


A 85230 GT
A 85310 GT
Gebrauchsanleitung
Εγχειρίδιο οδηγιών του χρήστη
User Manual Manuel d'utilisation
PERFEKT IN FORM UND FUNKTION

EN
|
|
|
|
|
Contents |
|
|
Technical Data . . . . . . . . . . . . |
. . . . . . . . . . . . |
. |
. . |
. . . . . . . . . . . . . . |
18. . . . . . . . . . . . . . . . . . . . . . . . . . . . . . . . . . . |
||
Safety Information . . . . . . . . . . |
. . . . . . . . . . . . . |
|
. . |
. . . . . . . . . . . . . . |
20. . . . . . . . . . . . . . . . . . . . . . . . . . . . . . . . . . . |
||
Product Description . . . . . . . . |
. . . . . . . . . . . . . |
|
. . |
. . . . . . . . . . . . . . |
20. . . . . . . . . . . . . . . . . . . . . . . . . . . . . . . . . . . |
||
Control panel . . . . . . . . . . . . . |
. . . . . . . . . . . . . |
|
. . |
. . . . . . . . . . . . . . |
20. . . . . . . . . . . . . . . . . . . . . . . . . . . . . . . . . . . |
||
Display . . . . . . . . . . . . . . . . . . |
. . . . . . . . . . . . . |
|
. . |
. . . . . . . . . . . . . . |
20. . . . . . . . . . . . . . . . . . . . . . . . . . . . . . . . . . . |
||
Installation . . . . . . . . . . . . . . . |
. . . . . . . . . . . . . |
|
. . |
. . . . . . . . . . . . . . |
20. . . . . . . . . . . . . . . . . . . . . . . . . . . . . . . . . . . |
||
First use . . . . . . . . . . . . . . . . . |
. . . . . . . . . . . . |
. |
. . |
. . . . . . . . . . . . . . |
21. . . . . . . . . . . . . . . . . . . . . . . . . . . . . . . . . . . |
||
Switch on-off . . . . . . . . . . . . . . |
. . . . . . . . . . . . |
. |
. . |
. . . . . . . . . . . . . . |
21. . . . . . . . . . . . . . . . . . . . . . . . . . . . . . . . . . . |
||
Switch on the freezer . . . . |
. . . . . . . . . . . . |
. |
. . |
. . . . . . . . . . . . . . |
21. . . . . . . . . . . . . . . . . . . . . . . . . . . . . . . . . . . |
||
Switch off the freezer . . . . |
. . . . . . . . . . . . |
. |
. . |
. . . . . . . . . . . . . . |
21. . . . . . . . . . . . . . . . . . . . . . . . . . . . . . . . . . . |
||
Daily use . . . . . . . . . . . . . . . . . |
. . . . . . . . . . . . |
. |
. . |
. . . . . . . . . . . . . . |
21. . . . . . . . . . . . . . . . . . . . . . . . . . . . . . . . . . . |
||
Temperature adjustment . . |
. . . . . . . . . . . . |
. |
. . |
. . . . . . . . . . . . . . |
21. . . . . . . . . . . . . . . . . . . . . . . . . . . . . . . . . . . |
||
Super Freeze function . . . . |
. . . . . . . . . . . . |
. |
. . |
. . . . . . . . . . . . . . |
21. . . . . . . . . . . . . . . . . . . . . . . . . . . . . . . . . . . |
||
Drinks Chill function . . . . . |
. . . . . . . . . . . . |
. |
. . |
. . . . . . . . . . . . . . |
21. . . . . . . . . . . . . . . . . . . . . . . . . . . . . . . . . . . |
||
Eco Mode function . . . . . . |
. . . . . . . . . . . . |
. |
. . |
. . . . . . . . . . . . . . |
21. . . . . . . . . . . . . . . . . . . . . . . . . . . . . . . . . . . |
||
Child Lock function . . . . . . |
. . . . . . . . . . . . . |
|
. . |
. . . . . . . . . . . . . . |
22. . . . . . . . . . . . . . . . . . . . . . . . . . . . . . . . . . . |
||
Alarm . . . . . . . . . . . . . . . . |
. . . . . . . . . . . . . |
|
. . |
. . . . . . . . . . . . . . |
22. . . . . . . . . . . . . . . . . . . . . . . . . . . . . . . . . . . |
||
Storage baskets . . . . . . . . |
. . . . . . . . . . . . . |
|
. . |
. . . . . . . . . . . . . . |
22. . . . . . . . . . . . . . . . . . . . . . . . . . . . . . . . . . . |
||
Fast freezing basket . . . . . |
. . . . . . . . . . . . . |
|
. . |
. . . . . . . . . . . . . . |
22. . . . . . . . . . . . . . . . . . . . . . . . . . . . . . . . . . . |
||
Security lock . . . . . . . . . . . |
. . . . . . . . . . . . . |
|
. . |
. . . . . . . . . . . . . . |
22. . . . . . . . . . . . . . . . . . . . . . . . . . . . . . . . . . . |
||
Making ice cubes . . . . . . . |
. . . . . . . . . . . . . |
|
. . |
. . . . . . . . . . . . . . |
22. . . . . . . . . . . . . . . . . . . . . . . . . . . . . . . . . . . |
||
Opening and closing the lid |
. . . . . . . . . . . . . |
|
. . |
. . . . . . . . . . . . . . |
22. . . . . . . . . . . . . . . . . . . . . . . . . . . . . . . . . . . |
||
Care and Cleaning . . . . . . . . . |
. . . . . . . . . . . . . |
|
. . |
. . . . . . . . . . . . . . |
23. . . . . . . . . . . . . . . . . . . . . . . . . . . . . . . . . . . |
||
Cleaning . . . . . . . . . . . . . . |
. . . . . . . . . . . . . |
|
. . |
. . . . . . . . . . . . . . |
23. . . . . . . . . . . . . . . . . . . . . . . . . . . . . . . . . . . |
||
When not in use . . . . . . . . |
. . . . . . . . . . . . . |
|
. . |
. . . . . . . . . . . . . . |
23. . . . . . . . . . . . . . . . . . . . . . . . . . . . . . . . . . . |
||
Changing the light bulb . . . |
. . . . . . . . . . . . . |
|
. . |
. . . . . . . . . . . . . . |
23. . . . . . . . . . . . . . . . . . . . . . . . . . . . . . . . . . . |
||
Helpful hints and tips . . . . . . . . |
. . . . . . . . . . . . . |
|
. . |
. . . . . . . . . . . . . . |
23. . . . . . . . . . . . . . . . . . . . . . . . . . . . . . . . . . . |
||
Freezing food . . . . . . . . . . |
. . . . . . . . . . . . . |
|
. . |
. . . . . . . . . . . . . . |
23. . . . . . . . . . . . . . . . . . . . . . . . . . . . . . . . . . . |
||
Food storage . . . . . . . . . . |
. . . . . . . . . . . . . |
|
. . |
. . . . . . . . . . . . . . |
23. . . . . . . . . . . . . . . . . . . . . . . . . . . . . . . . . . . |
||
In the case of a power failure or breakdown . |
|
. . |
. . . . . . . . . . . . . . |
23. . . . . . . . . . . . . . . . . . . . . . . . . . . . . . . . . . . |
|||
What to do if... . . . . . . . . . . . . |
. . . . . . . . . . . . . |
|
. . |
. . . . . . . . . . . . . . |
23. . . . . . . . . . . . . . . . . . . . . . . . . . . . . . . . . . . |
||
Service or repair . . . . . . . . . . . |
. . . . . . . . . . . . |
. |
. . |
. . . . . . . . . . . . . . |
24. . . . . . . . . . . . . . . . . . . . . . . . . . . . . . . . . . . |
||
|
|
|
|
|
|
|
|
Technical Data |
|
|
|
|
|
|
|
|
|
|
|
|
|
|
|
|
|
|
|
|
|
|
|
Model |
|
|
C 265 |
C335 |
|||
|
|
|
|
A 85230 GT |
A 85310 GT |
|
|
Volume (gross) |
|
Liter |
|
264 |
335 |
|
|
Volume (net) |
|
Liter |
|
257 |
327 |
|
|
Height without/with roller |
|
Cm |
|
87,6 |
87,5 |
|
|
Width |
|
Cm |
|
132,5 |
160 |
|
|
Depth |
|
Cm |
|
66,5 |
66,5 |
|
|
Weight |
|
Kg |
|
63 |
69 |
|
|
Energy consumption/24h |
|
kWh/24h |
|
0,484 |
0,553 |
|
|
Freezing capacity |
|
kg/24h |
|
30,5 |
31,5 |
|
|
Hold-over time |
|
Hours |
|
55 |
58 |
|
|
Rated power |
|
Watt |
|
120 |
140 |
|
|
Voltage |
|
Volts |
|
230 |
230 |
|
|
Climatic class |
|
|
|
SN-T |
SN-T |
|
|

EN
The following symbols are used in this user manual:
Important information concerning your personal safety and information on how to avoid damaging the appliance
General information and tips
Environmental information
Disposal
By ensuring this product is disposed of correctly, you will help prevent potential damaging consequences for the environment and human health.
The symbol on the product indicates that this product may not be treated as household waste, but must be taken instead to a suitable collection point for the recycling of electrical and electronic equipment. For more detailed information about recycling of this product, please contact your local city office, your household waste disposal service or the shop where you purchased the appliance.
EN
 Safety Information
Before installing and using the appliance read this user's instruction book carefully. It contains safety precautions, hints, information and ideas. If the freezer is used in compliance with the instructions written, it will operate properly and provide you with greatest satisfaction.
These warnings are provided in the interest of safety. You must read them carefully before installing or using the appliance.
Use the freezer only for storing frozen food, freezing fresh food and making ice cubes.
Do not eat ice cubes or ice lollies immediately after taking them out of the freezer, since they may cause frost burns.
Do not allow children to play or hide inside the freezer, since they may become trapped inside and suffocate.
Do not store glass containers with liguids in the freezer, since they may burst.
Ensure that the freezer is not resting on the power supply cable.
Before servicing or cleaning, always unplug the appliance or disconnect the power supply.
Do not use other electrical appliances (such as ice cream makers) inside the appliance.
friendly natural gas, isobuthane (R600a). Caution is required however, since isobuthane is flammable. Therefore it is essential to ensure that the refrigerant pipelines are not damaged.
is most important that this instruction book should be retained with the appliance for future reference.
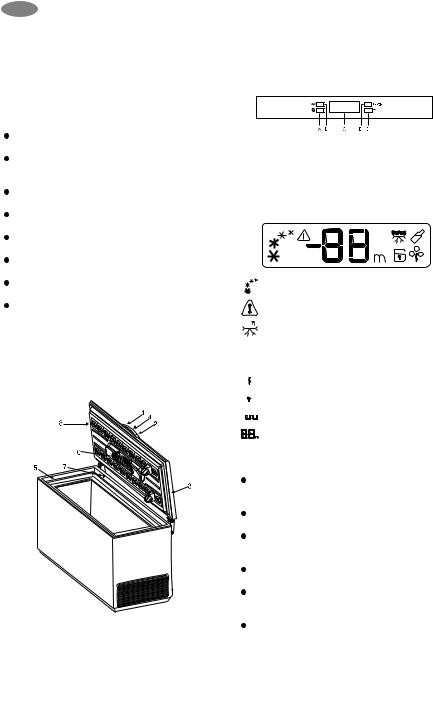
Product Description
1.Lid handle
2.Security lock
3.Seal
4.Control panel
5.Upper edge
6.Light
7.Valve: easy re-opening of lid
8.Frost Free system: totally eliminates ice-build-up in the chest freezer
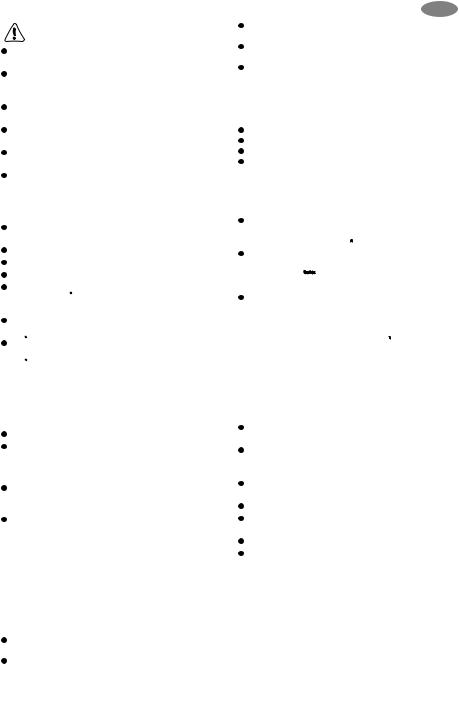
Control panel
A - Appliance ON/OFF button
B - Temperature regulation button
C - Display
D - Function button
E - Confirmation button
Display
Indicates the appliance is swiched on, speeds up when the Super Freeze function is activated.
Indicates that the freezer temperature is not sufficiently low or that the lid has been left open.


 Indicates the Super Freeze function is activated for large quantities for fresh food and switches off the beeping alarm.
 Indicates the Drinks Chill fuction is activated.
  Indicates the Eco Mode function is activated.
 Indicates the Child Lock function is activated.


 Indicates the temperature inside the freezer.
Indicates the number of minutes drinks are to be chilled for, when the Drinks Chill function in active.
Installation
Wait at least 2 hours before connecting the freezer to the power supply to ensure the refrigerant circuit is fully efficient.
Install the freezer in a dry, well ventilated room. Avoid locations near a source of heat or in direct sunlight.
The room temperature should correspond to the climatic classification for which the freezer was designed, see chapter "Technical data".
Place the freezer horizontally on a firm surface, resting on all four feet.
For optimum operation and in order to avoid damage when the lid is opened, leave a space of at least 5 cm from the rear wall and 5 cm at the sides.
power supply, ensure that the voltage corresponds to that indicated in chapter "Technical data" under "Voltage".
Danger!
Ensure that the freezer is not resting on the power supply cable.
Do not remove the power supply cable by pulling on its lead, particularly when the freezer is being pulled out of its niche.
The power supply cable may only be replaced by a qualified service personel.
Ensure that the power plug is not squashed or damaged by the back of the freezer.
There must be adequate ventilation around the appliance.
Any electrical work required to install this appliance should be carried out by a qualified electrician.
First use
Before first use, the freezer should be cleaned inside, see chapter "Care and cleaning".
Plug in the appliance.
Press button (A) to switch the appliance on.
The display will illuminate.
The symbol (  ) will flash on the display and the alarm will beep, since the temperature inside the freezer is not yet sufficiently low for food storage.
Press button (E) to switch the alarm off. The symbol (  ) will normally stop flashing after several hours. Only place food inside the freezer once the symbol (
  ) has gone. The temperature of the freezer is set to reach -18°C, which is the optimal storage temperature as set in the Eco Mode (
  )
)
Switch on-off
Switch on the freezer
Press button (A) to switch the appliance on.
The display comes on.
Switch off the freezer
Press button (A) for more than one second until the countdown "3-2-1" disappears and you hear a sequence of beeps.
The display goes off.
Warning! Do not place objects on the control panel, as they might accidentally switch off the freezer.
Daily use
Temperature adjustment
The temperature may be adjusted between -15°C and - 24°C. We suggest setting the freezer tem+G41perature to -18°C, which guarantees proper freezing and conservation of frozen food.
Press button (B) several times until the desired temperature is reached.
the display flashes and indicates
the temperature set.
EN
Press button (E) to confirm the desired temperature. You will hear a beep.
The temperature on the display stops flashing again and indicates the temperature inside the freezer.
The newly adjusted temperature is reached after several hours. During this time it is normal that the temperature displayed is different from the temperature set.
Attention! Differences between the temperature displayed and the temperature set are normal, especially when:
The temperature setting has recently been adjusted.
The lid has been left open for a long time.
Warm food has been placed in the freezer. The Super Freeze function is activated.
Super Freeze function
If more than 3-4 kg of fresh food is to be frozen, the freezer needs to be pre-cooled.
At least 24 hours before placing fresh food in the freezer, press button (D) several times until the corresponding symbol (  ) flashes on the display.
Press button (E) within
a few seconds to confirm the Super Freeze activation. The symbol (  ) stops flashing, you will hear a beep and the animation on the display speeds up.
Place the food in the freezer. After 52 hours this function will automatically stop and the freezer will return to normal storage temperature. This function can be de-activated at any time by pressing button (D) until the corresponding symbol (  ) flashes on the display again and then by pressing button (E) to confirm the de-activation.
Drinks Chill function
Use this function as a safety warning when placing bottles in the freezer, as they may burst when forgotten in the appliance.
Press button (D) several times until the corresponding symbol (  ) flashes on the display.
Press button (E) within a few seconds to confirm the Drinks Chill activation. The symbol (  ) stops flashing and you will hear a beep.
Press button (B) several times or continuously to set the desired number of minutes (from 1 to 90 minutes).
Place the drinks in the freezer.
At the end of the set time, the alarm will beep and the symbol (  ) and the time will flash on the display. Press button (E) to switch the alarm off.
Remove the drinks from the freezer. It is possible to deactivate this function at any time by pressing button (D) until the corresponding symbol (  ) flashes on the display again and then by pressing button (E) to confirm the de-activation.
Eco Mode function
Use this function to automatically set the freezer temperature to its best level (- 18°C), which guarantees proper conservation of frozen food at the lowest energy consumption.

EN
Press button (D) several times until the corresponding symbol (  ) flashes on the display.
Press button (E) within a few seconds to confirm the Eco Mode activation. The symbol (  ) stops flashing and you will hear a beep. It is
possible to de-activate this function at any time by pressing button (B) to change the selected temperature and then by pressing button (E) to confirm the selection.
Child Lock function
This function prevents children from playing with the buttons on the control panel. Any possible pressing of the buttons will have no effect.
Press button (D) several times until the corresponding symbol (  ) flashes on the display.
Press button (E) within a few seconds to confirm the Child Lock activation. The symbol (  ) stops flashing and you will hear a beep.
The buttons on the control panel are now locked. It is possible to de-activate this function at any time by pressing button (D) until the corresponding symbol (  ) flashes on the display again and then by pressing button (E) to confirm the de-activation.
Alarm
If the freezer temperature is not sufficiently low, the alarm will beep and the symbol (  ) and the temperature indication will flash on the display. When normal conditions are restored, only the freezer temperature continues to flash.The highest temperature the freezer reached is memorised.
Press button (E) to switch the alarm off. The highest temperature the freezer reached then appears on the display for some seconds. Then the display returns to showing the temperature of the freezer.
The symbol (  ) remains on as long as the temperature in the freezer is higher than the temperature set.
The alarm can be due to:
Insertion of a large amount of fresh food.
Opening the lid too long.
A defect in the system, see chapter "What to do if...".
Storage baskets
Hang the baskets on the upper edge (X) or place the stackable baskets inside the freezer (Y).
Turn and fix the handles for these two positions, as shown in the drawings.
Spare baskets can be obtained from your local Service Force Centre or from the Electrolux website (depending on country). The illustrations on this page show how many baskets can be placed in the various freezer models.
Fast freezing basket
The basket is designed for fast freezing.
Important! Never remove this special basket that protects the Frost Free system, keep it clicked into the hook underneath.
Security lock
Push the key in the lock while turning.
Spare keys can be obtained from your local Service Force Centre.
Important! Keep the keys out of reach of children. Before disposing of an old freezer remove the keys.
Making ice cubes
Hold the ice cube tray vertically and fill it with water upto the marked max. line (F).
Close the ice cube tray with the cap (G) and slide the tray in the lid of the freezer.
To loosen the ice cubes, either twist the tray or hold it under running water for a few seconds.
Important! Never use sharp or pointed instruments to remove the ice cube tray.
Opening and closing the lid
As the lid is fitted with a tightly closing seal, it will not reopen easily immediatedly after closing.
before re-opening the lid. A valve will allow the lid to be re-opened easily. Never pull the handle violently.
 Loading...