

Page 1

Chapter 1:
User Guide
Copyright
Page 2

© 2005 Adobe Systems Incorporated. All rights reserved.
Adobe® Photoshop® CS2 User Guide for Windows® and Macintosh
If this guide is distributed with software that includes an end user agreement, this guide, as well as the software described in it, is furnished under license and may be used or
copied only in accordance with the terms of such license. Except as permitted by any such license, no part of this guide may be reproduced, stored in a retrieval system, or transmitted, in any form or by any means, electronic, mechanical, recording, or other wise, without the prior written permission of Adobe Systems Incorporated.Pleasenotethatthe
content in this guide is protected under copyright law even if it is not distributed with software that includes an end user license agreement.
Thecontent of this guideisfurnished forinformational useonly, is subjecttochangewithout notice,and should notbeconstrued as acommitmentbyAdobe Systems Incorporated. Adobe Systems Incorporated assumes no responsibility or liability for any errors or inaccuracies that may appear in the informational content contained in this guide.
Please remember that existing artwork or images that you may want to include in your project may be protected under copyright law. The unauthorized incorporation of such
material into your new work could be a violation of the rights of the copyright owner. Please be sure to obtain any permission required from the copyright owner.
Any references to company names in sample templates are for demonstration purposes only and are not intended to refer to any actual organization.
Adobe, the Adobe logo, Acrobat, Acrobat Capture, Adobe Dimensions, Adobe Gamma, Adobe Premiere, After Effects, FrameMaker, GoLive, Illustrator, ImageReady, InDesign,
the OpenType logo, PageMaker, Photomerge, Photoshop, PostScript, Streamline, and Version Cue are either registered trademarks or trademarks of Adobe Systems Incorporated
in the United States and/or other countries.
Microsoft, OpenType, and Windows are either registered trademarks or trademarks of Microsoft Corporation in the United States and/or other countries. Apple, AppleTalk,
ColorSync, LaserWriter, Mac, and Macintosh are trademarks of Apple Computer, Inc. registered in the U.S. and other countries. Kodak is a registered trademark of Eastman
Kodak Company.
The Spelling portion of this product is based on Proximity Linguistic Technology. The Proximity Hyphenation System ©1989 All rights reserved Proximity Technology, Inc.
Proximity and Linguibase are registered trademarks of Proximity Technology Inc. This product includes software developed by the Apache Software Foundation
www.apache.org
(
(eay@cryptosoft.com). This software is based in part on the work of the Independent JPEG Group. © 1994 Hewlett Packard Company. Portions of this code are licensed from
Apple Computer, Inc. under the terms of the Apple Public Source License Version 2. The source code version of the licensed code and the license are available at
www.opensource.apple.com/apsl.
PANTONE® Colors displayed in the software application or in the user documentation may not match PANTONE-identified standards. Consult current PANTONE Color Publications for accurate color. PANTONE® and other Pantone, Inc. trademarks are the property of Pantone, Inc. © Pantone, Inc., 2001. Pantone, Inc. is the copyright owner of color
data and/or software which are licensed to Adobe Systems Incorporated to distribute for use only in combination with Adobe Photoshop. PANTONE Color Data and/or Software
shall not be copied onto another disk or into memory unless as part of the execution of Adobe Photoshop.
Notice to U.S. Government End Users: The Software and Documentation are “Commercial Items,” as that term is defined at 48 C.F.R. §2.101, consisting of “Commercial
Computer Software” and “Commercial Computer Software Documentation,” as such terms are used in 48 C.F.R. §12.212 or 48 C.F.R. §227.7202, as applicable. Consistent with
48 C.F.R. §12.212 or 48 C.F.R. §§227.7202-1 through 227.7202-4, as applicable, the Commercial Computer Software and Commercial Computer Software Documentation are
being licensed to U.S. Government end users (a) only as Commercial Items and (b) with only those rights as are granted to all other end users pursuant to the terms and conditions
herein. Unpublished-rights reserved under the copyright laws of the United States. Adobe agrees to comply with all applicable equal opportunity laws including, if appropriate,
the provisions of Executive Order 11246, as amended, Section 402 of the Vietnam Era Veterans Readjustment Assistance Act of 1974 (38 USC 4212), and Section 503 of the
Rehabilitation Act of 1973, as amended, and the regulations at 41 CFR Parts 60-1 through 60-60, 60-250, and 60-741. The affirmative action clause and regulations contained in
the preceding sentence shall be incorporated by reference.
Adobe Systems Incorporated, 345 Park Avenue, San Jose, California 95110, USA.
). This product contains either BISAFE and/or TIPEM software by RSA Data Security, Inc. This product includes cryptographic software written by Eric Young
Page 3

Contents
Chapter 1: Getting started
Installation and registration . . . . . . . . . . . . . . . . . . . . . . . . . . . . . . . . . . . . . . . . . 1
Adobe Help Center . . . . . . . . . . . . . . . . . . . . . . . . . . . . . . . . . . . . . . . . . . . . . . . . . 2
Using Help . . . . . . . . . . . . . . . . . . . . . . . . . . . . . . . . . . . . . . . . . . . . . . . . . . . . . . . . . 3
Tips and training . . . . . . . . . . . . . . . . . . . . . . . . . . . . . . . . . . . . . . . . . . . . . . . . . . . . 6
What’s new . . . . . . . . . . . . . . . . . . . . . . . . . . . . . . . . . . . . . . . . . . . . . . . . . . . . . . . . 10
Chapter 2: Tutorials
Tutorials . . . . . . . . . . . . . . . . . . . . . . . . . . . . . . . . . . . . . . . . . . . . . . . . . . . . . . . . . . . 13
Chapter 3: Work area
Work area basics . . . . . . . . . . . . . . . . . . . . . . . . . . . . . . . . . . . . . . . . . . . . . . . . . . . 31
Palettes and menus . . . . . . . . . . . . . . . . . . . . . . . . . . . . . . . . . . . . . . . . . . . . . . . . 35
Tools . . . . . . . . . . . . . . . . . . . . . . . . . . . . . . . . . . . . . . . . . . . . . . . . . . . . . . . . . . . . . .40
Working with files . . . . . . . . . . . . . . . . . . . . . . . . . . . . . . . . . . . . . . . . . . . . . . . . . 49
Viewing images . . . . . . . . . . . . . . . . . . . . . . . . . . . . . . . . . . . . . . . . . . . . . . . . . . . 50
Rulers, the grid, and guides . . . . . . . . . . . . . . . . . . . . . . . . . . . . . . . . . . . . . . . . 58
Customizing the work area . . . . . . . . . . . . . . . . . . . . . . . . . . . . . . . . . . . . . . . . . 64
Preferences . . . . . . . . . . . . . . . . . . . . . . . . . . . . . . . . . . . . . . . . . . . . . . . . . . . . . . . 68
Recovery and undo . . . . . . . . . . . . . . . . . . . . . . . . . . . . . . . . . . . . . . . . . . . . . . . . 71
Memory . . . . . . . . . . . . . . . . . . . . . . . . . . . . . . . . . . . . . . . . . . . . . . . . . . . . . . . . . . . 77
iii
Chapter 4: Adobe Bridge
The basics of Bridge . . . . . . . . . . . . . . . . . . . . . . . . . . . . . . . . . . . . . . . . . . . . . . . 79
Files and folders in Bridge . . . . . . . . . . . . . . . . . . . . . . . . . . . . . . . . . . . . . . . . . . 85
Bridge Center . . . . . . . . . . . . . . . . . . . . . . . . . . . . . . . . . . . . . . . . . . . . . . . . . . . . . . 92
Running automated tasks with Bridge . . . . . . . . . . . . . . . . . . . . . . . . . . . . . . 94
Metadata in Bridge . . . . . . . . . . . . . . . . . . . . . . . . . . . . . . . . . . . . . . . . . . . . . . . . 95
Using Version Cue with Bridge . . . . . . . . . . . . . . . . . . . . . . . . . . . . . . . . . . . . 101
Chapter 5: Adobe Stock Photos
Adobe Stock Photos . . . . . . . . . . . . . . . . . . . . . . . . . . . . . . . . . . . . . . . . . . . . . . 103
Comp images . . . . . . . . . . . . . . . . . . . . . . . . . . . . . . . . . . . . . . . . . . . . . . . . . . . . . 106
Buying stock photos . . . . . . . . . . . . . . . . . . . . . . . . . . . . . . . . . . . . . . . . . . . . . . 107
Stock Photos accounts . . . . . . . . . . . . . . . . . . . . . . . . . . . . . . . . . . . . . . . . . . . . 109
Chapter 6: Adobe Version Cue
Using Adobe Version Cue . . . . . . . . . . . . . . . . . . . . . . . . . . . . . . . . . . . . . . . . . 113
Working with Version Cue projects . . . . . . . . . . . . . . . . . . . . . . . . . . . . . . . . 118
Working with files in Version Cue . . . . . . . . . . . . . . . . . . . . . . . . . . . . . . . . . . 126
Disconnecting from projects . . . . . . . . . . . . . . . . . . . . . . . . . . . . . . . . . . . . . . 137
Deleting files, folders, and projects . . . . . . . . . . . . . . . . . . . . . . . . . . . . . . . . 139
Version Cue versions . . . . . . . . . . . . . . . . . . . . . . . . . . . . . . . . . . . . . . . . . . . . . . 143
Page 4

Version Cue alternates . . . . . . . . . . . . . . . . . . . . . . . . . . . . . . . . . . . . . . . . . . . . 148
Editing and synchronizing offline files . . . . . . . . . . . . . . . . . . . . . . . . . . . . . 152
The Version Cue Administration utility . . . . . . . . . . . . . . . . . . . . . . . . . . . . . 155
Creating and editing projects in Version Cue Administration . . . . . . . 160
Backing up and restoring from Version Cue Administration . . . . . . . . 165
Working with users and privileges . . . . . . . . . . . . . . . . . . . . . . . . . . . . . . . . 167
Viewing logs, reports, and workspace information . . . . . . . . . . . . . . . . . 171
Version Cue PDF reviews . . . . . . . . . . . . . . . . . . . . . . . . . . . . . . . . . . . . . . . . . . 172
Chapter 7: Getting images into Photoshop and ImageReady
Bitmap images and vector graphics . . . . . . . . . . . . . . . . . . . . . . . . . . . . . . . 177
Image size and resolution . . . . . . . . . . . . . . . . . . . . . . . . . . . . . . . . . . . . . . . . . 178
Changing image size and resolution . . . . . . . . . . . . . . . . . . . . . . . . . . . . . . . 182
Getting images from digital cameras . . . . . . . . . . . . . . . . . . . . . . . . . . . . . . 186
Scanning images . . . . . . . . . . . . . . . . . . . . . . . . . . . . . . . . . . . . . . . . . . . . . . . . . 188
Creating, opening, and importing images . . . . . . . . . . . . . . . . . . . . . . . . . 191
Placing files . . . . . . . . . . . . . . . . . . . . . . . . . . . . . . . . . . . . . . . . . . . . . . . . . . . . . . 196
High Dynamic Range images . . . . . . . . . . . . . . . . . . . . . . . . . . . . . . . . . . . . . . 201
iv
Chapter 8: Camera raw files
Camera raw files in Photoshop and Bridge . . . . . . . . . . . . . . . . . . . . . . . . . 207
Processing and opening camera raw files in Photoshop . . . . . . . . . . . . 210
Making tonal adjustments in Camera Raw . . . . . . . . . . . . . . . . . . . . . . . . . 214
Transforming images in Camera Raw . . . . . . . . . . . . . . . . . . . . . . . . . . . . . .217
Calibrating color in camera raw images . . . . . . . . . . . . . . . . . . . . . . . . . . . . 220
Saving camera raw images . . . . . . . . . . . . . . . . . . . . . . . . . . . . . . . . . . . . . . . . 221
Camera Raw settings . . . . . . . . . . . . . . . . . . . . . . . . . . . . . . . . . . . . . . . . . . . . . 222
Automating the Camera Raw workflow . . . . . . . . . . . . . . . . . . . . . . . . . . . . 226
Chapter 9: Color
Color modes . . . . . . . . . . . . . . . . . . . . . . . . . . . . . . . . . . . . . . . . . . . . . . . . . . . . . . 227
Adjusting the monitor display . . . . . . . . . . . . . . . . . . . . . . . . . . . . . . . . . . . . . 230
Channels and bit depth . . . . . . . . . . . . . . . . . . . . . . . . . . . . . . . . . . . . . . . . . . . 231
Converting between color modes . . . . . . . . . . . . . . . . . . . . . . . . . . . . . . . . . 234
Converting to indexed color . . . . . . . . . . . . . . . . . . . . . . . . . . . . . . . . . . . . . . 238
Choosing colors . . . . . . . . . . . . . . . . . . . . . . . . . . . . . . . . . . . . . . . . . . . . . . . . . . 241
Chapter 10: Color management
Understanding color management . . . . . . . . . . . . . . . . . . . . . . . . . . . . . . . . 250
Keeping colors consistent . . . . . . . . . . . . . . . . . . . . . . . . . . . . . . . . . . . . . . . . . 252
Color-managing imported images . . . . . . . . . . . . . . . . . . . . . . . . . . . . . . . . 256
Color-managing documents for online viewing . . . . . . . . . . . . . . . . . . . . 258
Proofing colors . . . . . . . . . . . . . . . . . . . . . . . . . . . . . . . . . . . . . . . . . . . . . . . . . . . 259
Color-managing documents when printing . . . . . . . . . . . . . . . . . . . . . . . . 261
Working with color profiles . . . . . . . . . . . . . . . . . . . . . . . . . . . . . . . . . . . . . . . 263
Color settings . . . . . . . . . . . . . . . . . . . . . . . . . . . . . . . . . . . . . . . . . . . . . . . . . . . . 268
Page 5

Chapter 11: Making color and tonal adjustments
Color and tonal corrections . . . . . . . . . . . . . . . . . . . . . . . . . . . . . . . . . . . . . . . 273
Viewing histograms and pixel values . . . . . . . . . . . . . . . . . . . . . . . . . . . . . . 275
Understanding color adjustments . . . . . . . . . . . . . . . . . . . . . . . . . . . . . . . . . 281
Adjusting images with Levels, Curves, and Exposure . . . . . . . . . . . . . . . 284
Targeting images for press . . . . . . . . . . . . . . . . . . . . . . . . . . . . . . . . . . . . . . . . 293
Making hue/saturation and color balance corrections . . . . . . . . . . . . . . 295
Improving shadow and highlight detail . . . . . . . . . . . . . . . . . . . . . . . . . . . . 299
Matching, replacing, and mixing colors . . . . . . . . . . . . . . . . . . . . . . . . . . . . 301
Making quick overall adjustments to images . . . . . . . . . . . . . . . . . . . . . . . 307
Applying special color effects to images . . . . . . . . . . . . . . . . . . . . . . . . . . . 312
Chapter 12: Selecting
Making selections . . . . . . . . . . . . . . . . . . . . . . . . . . . . . . . . . . . . . . . . . . . . . . . . 315
Adjusting pixel selections . . . . . . . . . . . . . . . . . . . . . . . . . . . . . . . . . . . . . . . . . 323
Softening and refining the edges of selections . . . . . . . . . . . . . . . . . . . . . 326
Moving, copying, and pasting selections and layers . . . . . . . . . . . . . . . . 328
Saving, loading, and deleting selections . . . . . . . . . . . . . . . . . . . . . . . . . . . 334
Extracting selections . . . . . . . . . . . . . . . . . . . . . . . . . . . . . . . . . . . . . . . . . . . . . . 336
Using masks . . . . . . . . . . . . . . . . . . . . . . . . . . . . . . . . . . . . . . . . . . . . . . . . . . . . . . 338
v
Chapter 13: Transforming and retouching
Changing the size of the work canvas . . . . . . . . . . . . . . . . . . . . . . . . . . . . . 346
Rotating and flipping entire images . . . . . . . . . . . . . . . . . . . . . . . . . . . . . . . 347
Cropping images . . . . . . . . . . . . . . . . . . . . . . . . . . . . . . . . . . . . . . . . . . . . . . . . . 348
Correcting image distortion . . . . . . . . . . . . . . . . . . . . . . . . . . . . . . . . . . . . . . . 351
Reducing image noise . . . . . . . . . . . . . . . . . . . . . . . . . . . . . . . . . . . . . . . . . . . .353
Sharpening images . . . . . . . . . . . . . . . . . . . . . . . . . . . . . . . . . . . . . . . . . . . . . . . 354
Transforming objects . . . . . . . . . . . . . . . . . . . . . . . . . . . . . . . . . . . . . . . . . . . . .359
Retouching and repairing images . . . . . . . . . . . . . . . . . . . . . . . . . . . . . . . . . 366
Vanishing Point . . . . . . . . . . . . . . . . . . . . . . . . . . . . . . . . . . . . . . . . . . . . . . . . . . . 374
Using the Liquify filter . . . . . . . . . . . . . . . . . . . . . . . . . . . . . . . . . . . . . . . . . . . . 383
Creating panoramic images using Photomerge . . . . . . . . . . . . . . . . . . . . 390
Chapter 14: Layers
Layer Basics . . . . . . . . . . . . . . . . . . . . . . . . . . . . . . . . . . . . . . . . . . . . . . . . . . . . . . 395
Selecting, grouping, and linking layers . . . . . . . . . . . . . . . . . . . . . . . . . . . . 399
Moving, copying, and locking layers . . . . . . . . . . . . . . . . . . . . . . . . . . . . . . . 401
Managing layers . . . . . . . . . . . . . . . . . . . . . . . . . . . . . . . . . . . . . . . . . . . . . . . . . . 406
Merging and stamping layers . . . . . . . . . . . . . . . . . . . . . . . . . . . . . . . . . . . . . 408
Setting opacity and blending options . . . . . . . . . . . . . . . . . . . . . . . . . . . . . 409
Layer effects and styles . . . . . . . . . . . . . . . . . . . . . . . . . . . . . . . . . . . . . . . . . . . 414
Adjustment and fill layers . . . . . . . . . . . . . . . . . . . . . . . . . . . . . . . . . . . . . . . . . 423
Smart Objects . . . . . . . . . . . . . . . . . . . . . . . . . . . . . . . . . . . . . . . . . . . . . . . . . . . . 427
Layer comps . . . . . . . . . . . . . . . . . . . . . . . . . . . . . . . . . . . . . . . . . . . . . . . . . . . . . . 430
Masking layers . . . . . . . . . . . . . . . . . . . . . . . . . . . . . . . . . . . . . . . . . . . . . . . . . . . . 432
Page 6

Chapter 15: Using channels and spot colors
Channels . . . . . . . . . . . . . . . . . . . . . . . . . . . . . . . . . . . . . . . . . . . . . . . . . . . . . . . . . 438
Adding spot colors . . . . . . . . . . . . . . . . . . . . . . . . . . . . . . . . . . . . . . . . . . . . . . . 442
Channel calculations . . . . . . . . . . . . . . . . . . . . . . . . . . . . . . . . . . . . . . . . . . . . . . 446
Chapter 16: Drawing
About vector graphics . . . . . . . . . . . . . . . . . . . . . . . . . . . . . . . . . . . . . . . . . . . . 449
Drawing shapes . . . . . . . . . . . . . . . . . . . . . . . . . . . . . . . . . . . . . . . . . . . . . . . . . . 450
Pen tools . . . . . . . . . . . . . . . . . . . . . . . . . . . . . . . . . . . . . . . . . . . . . . . . . . . . . . . . . 454
Paths . . . . . . . . . . . . . . . . . . . . . . . . . . . . . . . . . . . . . . . . . . . . . . . . . . . . . . . . . . . . 458
Editing paths . . . . . . . . . . . . . . . . . . . . . . . . . . . . . . . . . . . . . . . . . . . . . . . . . . . . . 460
Converting between paths and selection borders . . . . . . . . . . . . . . . . . 467
Adding color to paths . . . . . . . . . . . . . . . . . . . . . . . . . . . . . . . . . . . . . . . . . . . . 469
Chapter 17: Painting
Painting tools . . . . . . . . . . . . . . . . . . . . . . . . . . . . . . . . . . . . . . . . . . . . . . . . . . . . . 471
Selecting brush presets . . . . . . . . . . . . . . . . . . . . . . . . . . . . . . . . . . . . . . . . . . . 473
Creating brushes and setting options . . . . . . . . . . . . . . . . . . . . . . . . . . . . . 474
Creating and managing preset brushes . . . . . . . . . . . . . . . . . . . . . . . . . . . . 485
Blending modes . . . . . . . . . . . . . . . . . . . . . . . . . . . . . . . . . . . . . . . . . . . . . . . . . . 486
Erasing . . . . . . . . . . . . . . . . . . . . . . . . . . . . . . . . . . . . . . . . . . . . . . . . . . . . . . . . . . . 490
Gradients . . . . . . . . . . . . . . . . . . . . . . . . . . . . . . . . . . . . . . . . . . . . . . . . . . . . . . . . . 492
Filling and stroking selections and layers . . . . . . . . . . . . . . . . . . . . . . . . . . 497
Creating and managing patterns . . . . . . . . . . . . . . . . . . . . . . . . . . . . . . . . . 500
Choosing foreground and background colors . . . . . . . . . . . . . . . . . . . . . 503
vi
Chapter 18: Applying filters for special effects
Filters . . . . . . . . . . . . . . . . . . . . . . . . . . . . . . . . . . . . . . . . . . . . . . . . . . . . . . . . . . . . 509
Applying filters . . . . . . . . . . . . . . . . . . . . . . . . . . . . . . . . . . . . . . . . . . . . . . . . . . . 510
The Filter Gallery . . . . . . . . . . . . . . . . . . . . . . . . . . . . . . . . . . . . . . . . . . . . . . . . . . 510
Blending filter effects and setting options . . . . . . . . . . . . . . . . . . . . . . . . . 513
Tips for creating special effects . . . . . . . . . . . . . . . . . . . . . . . . . . . . . . . . . . . . 514
Filter effects . . . . . . . . . . . . . . . . . . . . . . . . . . . . . . . . . . . . . . . . . . . . . . . . . . . . . . 515
The Lighting Effects filter . . . . . . . . . . . . . . . . . . . . . . . . . . . . . . . . . . . . . . . . . . 527
Loading images and textures . . . . . . . . . . . . . . . . . . . . . . . . . . . . . . . . . . . . . 530
Improving filter performance . . . . . . . . . . . . . . . . . . . . . . . . . . . . . . . . . . . . . 530
Chapter 19: Type
Creating type . . . . . . . . . . . . . . . . . . . . . . . . . . . . . . . . . . . . . . . . . . . . . . . . . . . . . 532
Type layers . . . . . . . . . . . . . . . . . . . . . . . . . . . . . . . . . . . . . . . . . . . . . . . . . . . . . . . 535
Editing text . . . . . . . . . . . . . . . . . . . . . . . . . . . . . . . . . . . . . . . . . . . . . . . . . . . . . . . 537
Specifying a language for text . . . . . . . . . . . . . . . . . . . . . . . . . . . . . . . . . . . . . 539
Warping type . . . . . . . . . . . . . . . . . . . . . . . . . . . . . . . . . . . . . . . . . . . . . . . . . . . . . 540
Creating type on a path . . . . . . . . . . . . . . . . . . . . . . . . . . . . . . . . . . . . . . . . . . . 541
Creating paths, shapes, and selections from type . . . . . . . . . . . . . . . . . . 543
Formatting characters . . . . . . . . . . . . . . . . . . . . . . . . . . . . . . . . . . . . . . . . . . . . 544
Special characters . . . . . . . . . . . . . . . . . . . . . . . . . . . . . . . . . . . . . . . . . . . . . . . . 554
Page 7

OpenType character features . . . . . . . . . . . . . . . . . . . . . . . . . . . . . . . . . . . . . . 556
Formatting paragraphs . . . . . . . . . . . . . . . . . . . . . . . . . . . . . . . . . . . . . . . . . . . 558
Hyphenation and line breaks . . . . . . . . . . . . . . . . . . . . . . . . . . . . . . . . . . . . . . 562
Asian type . . . . . . . . . . . . . . . . . . . . . . . . . . . . . . . . . . . . . . . . . . . . . . . . . . . . . . . . 563
Chapter 20: Designing web pages
Designing for the web . . . . . . . . . . . . . . . . . . . . . . . . . . . . . . . . . . . . . . . . . . . . 571
Creating slices . . . . . . . . . . . . . . . . . . . . . . . . . . . . . . . . . . . . . . . . . . . . . . . . . . . . 573
Viewing slices . . . . . . . . . . . . . . . . . . . . . . . . . . . . . . . . . . . . . . . . . . . . . . . . . . . . 575
Selecting and organizing slices . . . . . . . . . . . . . . . . . . . . . . . . . . . . . . . . . . . . 577
Modifying slices . . . . . . . . . . . . . . . . . . . . . . . . . . . . . . . . . . . . . . . . . . . . . . . . . . 579
Converting slices to nested HTML tables . . . . . . . . . . . . . . . . . . . . . . . . . . . 585
Slice output options . . . . . . . . . . . . . . . . . . . . . . . . . . . . . . . . . . . . . . . . . . . . . . 587
Image maps . . . . . . . . . . . . . . . . . . . . . . . . . . . . . . . . . . . . . . . . . . . . . . . . . . . . . . 590
Previewing web graphics . . . . . . . . . . . . . . . . . . . . . . . . . . . . . . . . . . . . . . . . . 596
Creating web photo galleries . . . . . . . . . . . . . . . . . . . . . . . . . . . . . . . . . . . . . 597
Chapter 21: Rollovers and animations
Rollovers . . . . . . . . . . . . . . . . . . . . . . . . . . . . . . . . . . . . . . . . . . . . . . . . . . . . . . . . .604
Animations . . . . . . . . . . . . . . . . . . . . . . . . . . . . . . . . . . . . . . . . . . . . . . . . . . . . . . . 614
Opening and importing files as animations . . . . . . . . . . . . . . . . . . . . . . . . 623
vii
Chapter 22: Preparing Graphics for the Web
Optimizing images . . . . . . . . . . . . . . . . . . . . . . . . . . . . . . . . . . . . . . . . . . . . . . . 625
Web graphics formats and options . . . . . . . . . . . . . . . . . . . . . . . . . . . . . . . . 632
Using the color table . . . . . . . . . . . . . . . . . . . . . . . . . . . . . . . . . . . . . . . . . . . . . . 638
Using weighted optimization . . . . . . . . . . . . . . . . . . . . . . . . . . . . . . . . . . . . . 644
Output settings for web images . . . . . . . . . . . . . . . . . . . . . . . . . . . . . . . . . . . 647
Working with hexadecimal color values . . . . . . . . . . . . . . . . . . . . . . . . . . . 651
Chapter 23: Saving and exporting images
Saving images . . . . . . . . . . . . . . . . . . . . . . . . . . . . . . . . . . . . . . . . . . . . . . . . . . . . 653
Saving PDF files . . . . . . . . . . . . . . . . . . . . . . . . . . . . . . . . . . . . . . . . . . . . . . . . . . . 656
Saving GIF, JPEG, and PNG files . . . . . . . . . . . . . . . . . . . . . . . . . . . . . . . . . . . . 665
Saving files in other formats . . . . . . . . . . . . . . . . . . . . . . . . . . . . . . . . . . . . . . . 669
Exporting layers as files . . . . . . . . . . . . . . . . . . . . . . . . . . . . . . . . . . . . . . . . . . . 674
Exporting animation frames as files . . . . . . . . . . . . . . . . . . . . . . . . . . . . . . . 676
Exporting images in ZoomView format . . . . . . . . . . . . . . . . . . . . . . . . . . . . 677
File formats . . . . . . . . . . . . . . . . . . . . . . . . . . . . . . . . . . . . . . . . . . . . . . . . . . . . . . . 678
Displaying and adding file and image information . . . . . . . . . . . . . . . . . 686
Adding and viewing digital copyright information . . . . . . . . . . . . . . . . . 689
Preferences for saving files . . . . . . . . . . . . . . . . . . . . . . . . . . . . . . . . . . . . . . . . 692
Creating multiple-image layouts . . . . . . . . . . . . . . . . . . . . . . . . . . . . . . . . . . 693
Creating a PDF presentation . . . . . . . . . . . . . . . . . . . . . . . . . . . . . . . . . . . . . . 698
Placing Photoshop images in other applications . . . . . . . . . . . . . . . . . . . 700
Saving images for use in video and motion graphics . . . . . . . . . . . . . . . 704
Page 8

Chapter 24: Printing
Printing from Photoshop . . . . . . . . . . . . . . . . . . . . . . . . . . . . . . . . . . . . . . . . . . 710
Printing with color management . . . . . . . . . . . . . . . . . . . . . . . . . . . . . . . . . 714
Printing images to a commercial printing press . . . . . . . . . . . . . . . . . . . . 718
Printing duotones . . . . . . . . . . . . . . . . . . . . . . . . . . . . . . . . . . . . . . . . . . . . . . . . 725
Chapter 25: Automating Tasks
Actions . . . . . . . . . . . . . . . . . . . . . . . . . . . . . . . . . . . . . . . . . . . . . . . . . . . . . . . . . . . 729
Recording actions . . . . . . . . . . . . . . . . . . . . . . . . . . . . . . . . . . . . . . . . . . . . . . . . 731
Managing actions . . . . . . . . . . . . . . . . . . . . . . . . . . . . . . . . . . . . . . . . . . . . . . . . 737
Processing a batch of files . . . . . . . . . . . . . . . . . . . . . . . . . . . . . . . . . . . . . . . . . 739
Droplets . . . . . . . . . . . . . . . . . . . . . . . . . . . . . . . . . . . . . . . . . . . . . . . . . . . . . . . . . . 742
Scripting . . . . . . . . . . . . . . . . . . . . . . . . . . . . . . . . . . . . . . . . . . . . . . . . . . . . . . . . .746
Creating data-driven graphics . . . . . . . . . . . . . . . . . . . . . . . . . . . . . . . . . . . . . 747
Chapter 26: Keyboard Shortcuts
Customizing keyboard shortcuts . . . . . . . . . . . . . . . . . . . . . . . . . . . . . . . . . . 754
Default keyboard shortcuts . . . . . . . . . . . . . . . . . . . . . . . . . . . . . . . . . . . . . . . 755
Index . . . . . . . . . . . . . . . . . . . . . . . . . . . . . . . . . . . . . . . . . . . . . . . . . . . . . . . . . . . . 780
viii
Page 9

Chapter 1: Getting started
Installation and registration
To install
1 Close any Adobe® applications that are open.
2 Insert the product CD into your computer’s CD drive.
3 Double-click the CD icon, and then follow the on-screen instructions.
After the installation, you may be prompted to activate your copy of the product. (See “To activate” on page 1.)
For more detailed instructions about installing the product, see the How To Install file on the product CD. For
instructions about uninstalling the product, see the How To Uninstall file on the product CD.
To activate
Activation is a simple, anonymous process you must complete within 30 days of installing the product. Activation
allows you to continue using the product, and it helps prevent casual copying of the product onto more computers
than the license agreement allows. To learn more about activation, visit the Adobe website at
www.adobe.com/activation/main.html.
1
1 Start the product to access the Activation dialog box. (If you’ve just installed Adobe Creative Suite or Adobe
Photoshop®, the Activation dialog box appears automatically.)
2 Follow the on-screen instructions.
Important: If you intend to install the product on a different computer, you must first transfer the activation to that
computer. To transfer an activation, choose Help > Transfer Activation.
For more detailed instructions about activating the product and transferring an activation, see the How To Install file
on the product CD.
To register
Register your Adobe product to receive complimentary support on installation and product defects and notifications
about product updates. Registering your product also gives you access to the wealth of tips, tricks, and tutorials in
Adobe Studio® and access to Adobe Studio Exchange, an online community where users download and share
thousands of free actions, plug-ins, and other content for use with Adobe products. Adobe Studio is available in
English, French, German, and Japanese. Find it from the home page of the Adobe website.
❖ Do one of the following:
• Install and activate the software to access the Registration dialog box, and then follow the on-screen instructions.
An active Internet connection is required.
• Register at any time by choosing Help > Registration.
Page 10
ADOBE PHOTOSHOP CS2
User Guide
See also
“Adobe Studio” on page 7
“Extras” on page 9
Adobe Help Center
About Adobe Help Center
Adobe Help Center is a free, downloadable application that includes three primary features.
Product Help Provides Help topics for Adobe Photoshop Elements and Adobe CS2 products installed on your
system. (If none of these products are installed, Help topics for them aren’t available.) Help topics are updated periodically and can be downloaded through Adobe Help Center preferences.
Expert Support Provides information about Adobe Expert Support plans and lets you store details about plans
you’ve purchased. If you have an active support plan, you can also use the Expert Support section to submit web
cases—questions sent to Adobe support professionals over the web. To access links in the Expert Support section,
you must have an active Internet connection.
2
More Resources Provides easy access to the extensive resources on Adobe.com, including support pages, user
forums, tips and tutorials, and training. You can also use this area to store contact information for friends, colleagues,
or support professionals, or even websites you turn to for inspiration or troubleshooting information.
Product Help, Expert Support, and More Resources in Adobe Help Center
See also
“Using Help” on page 3
“To search Help topics” on page 5
“To navigate Help” on page 4
To check for updates
Adobe periodically provides updates to software and to topics in Adobe Help Center. You can easily obtain these
updates through Adobe Help Center. An active Internet connection is required.
1 Click the Preferences button .
2 In the Preferences dialog box, click Check For Updates. If updates are available, follow the on-screen directions to
download and save them.
Page 11

ADOBE PHOTOSHOP CS2
User Guide
To set Adobe Help Center preferences
1 Click the Preferences button . Set any of the following options:
Region Specifies your geographical location. Changing this option may affect which services are available to you.
Language Specifies the language in which Expert Support content is displayed.
Display Renewal Reminders For Expert Support Contracts Displays reminder screens when your Expert Support
plan has almost expired. Deselect this option if you’d like to turn off these reminders.
Enable Auto Login For Web Case Submission Allows youtosubmitsupport questionsoverthe web. This option is
available only if you have an active Expert Support plan.
User Interface Language Specifies the language in which Adobe Help Center interface text is displayed.
Check For Updates Searches for new updates to software and Help topics as they become available from Adobe.
Network Administrators Displays options for network administration.
2 Click OK.
To display More Resources
The More Resources section in Adobe Help Center provides easy access to some of the content and services available
from the Adobe website, including support, training, and tutorials.
3
❖ To display this section, click More Resources.
To add contact information in More Resources
1 Click More Resources, and then click Personal Contacts.
2 Do any of the following:
• To add a contact, click New, type the contact information you want to save, and click OK.
• To edit a contact, click a contact in the list, click Edit, make changes to the information, and click OK.
• To delete a contact, click a contact in the list, and then click Delete. To confirm the deletion, click Yes when
prompted, or click No to cancel.
Using Help
Using Help
The complete documentation for using your Adobe product is available in Help, a browser-based system you can
access through Adobe Help Center. Help topics are updated periodically, so you can always be sure to have the most
recent information available. For more information, see “To check for updates” on page 2.
Important: Adobe Help systems include all of the information in the printed user guides, plus additional information
not included in print. The Resources and Extras CD included with the software also includes a PDF version of the
complete Help content, optimized for printing.
Page 12

A B C D E
ADOBE PHOTOSHOP CS2
User Guide
4
Product Help section of Adobe Help Center
A. Returns you to Help home page B. Adds bookmark for current topic C. Prints contents of right pane D. Opens Preferences dialog
box E. Opens About Adobe Help Center window
See also
“To navigate Help” on page 4
“To search Help topics” on page 5
To navigate Help
❖ Do any of the following:
• To view Help for a product, choose the product name from the Help For menu. (To view only topics that apply
across all Creative Suite products, choose Adobe Creative Suite.)
• To expand or collapse a section, click the blue triangle to the left of the section name.
• To display a topic , click its title.
See also
“To use bookmarks” on page 6
Page 13

ADOBE PHOTOSHOP CS2
User Guide
To search Help topics
Search using words or phrases to quickly find topics. You can search Help for one product or for all Adobe products
you’ve installed. If you find a topic that you may want to view again, bookmark it for quick retrieval.
1 In Adobe Help Center, click Product Help.
2 Type one or more words in the Search box. To search across Help for all Adobe products you have installed, click
the black triangle to the left of the Search box and choose Search All Help.
Search Help for one product or for all products you’ve installed
3 Click Search. Topics matching the search words appear in the navigation pane.
4 To view a topic, click its title.
5 To return to the navigation pane, do one of the following:
• Click the Home button.
• Click the Back button.
• Click Next Topic or Previous Topic.
5
See also
“To print a topic from Help” on page 5
“To use bookmarks” on page 6
Search tips
Adobe Help search works by searching the entire Help text for topics that contain all of the words typed in the Search
box. These tips can help you improve your search results in Help:
• If you search using a phrase, such as “shape tool,” put quotation marks around the phrase. The search returns only
those topics containing all words in the phrase.
• Make sure that the search terms are spelled correctly.
• If a search term doesn’t yield results, try using a synonym, such as “web” instead of “Internet.”
To print a topic from Help
1 Select the topic you want to print, and click the Print button.
2 Choose the printer you’d like to use, and then click Print.
Page 14

ADOBE PHOTOSHOP CS2
User Guide
To change the view
By default, Adobe Help Center opens in Full view. Full view gives you access to the Product Help, Expert Support,
and More Resources sections. Switch to Compact view when you want to see only the selected Help topic and you
want to keep the Help window on top of your product workspace.
❖ Click the view icon to switch between Full and Compact views.
To use bookmarks
You can bookmark especially helpful topics for easy access, just as you bookmark pages in a web browser, and reread
them at another time.
1 Click the Bookmarks tab in the navigation pane to view the bookmarks.
2 Do any of the following in the Bookmarks pane:
• To create a bookmark, select the topic you want to mark, and click the Bookmark button . When the Bookmark
dialog box appears, type a new name in the text box if desired, and then click OK.
• To delete a bookmark, select it and click the Delete button. Click Yes to confirm the deletion.
• To rename abookmark, select it andthenclick theRenamebutton . In thedialogbox,typeanewnamefor the
bookmark and then click OK.
• To move a bookmark, select it and then click the Move Up button or the Move Down button .
6
Tips and training
Learning resources
Adobe provides a wide range of resources to help you learn and use Adobe products.
• “Tutorials in Help” on page 7: Short step-by-step lessons through Adobe Help Center.
• “Total Training Video Workshop CD” on page 7: Professional training videos from experts.
• “Adobe Studio” on page 7: Videos, tips and tricks, and other learning material on Adobe products.
• Adobe Creative Suite Design Guide (Adobe Creative Suite only): A full-color printed book about using Adobe
Creative Suite 2 as a complete design and publishing toolbox, including five guided projects on print, web, and
mobile workflows.
• “Technical information” on page 8: Reference material, scripting guides, and other in-depth information.
• “Other resources” on page 9: Training, books, user forums, product certification, and more.
• Support: Complimentary and paid technical support options from Adobe.
• “Extras” on page 9: Downloadable content and software.
See also
“About Adobe Help Center” on page 2
Page 15

ADOBE PHOTOSHOP CS2
User Guide
Tutorials in Help
The Help system for each Adobe CS2 product includes several step-by-step tutorials on key features and concepts.
These tutorials are also available in the complete, printable, PDF version of the Help contents, included on the
Resources and Extras CD.
To use these tutorials with the product, select the tutorial you want from the Contents pane in Adobe Help Center,
and click the View icon
cation windows, regardless of what window or application is selected. Drag an edge or a corner of the Help window
to resize it.
to switch to Compact view. Compact view keeps the Help window on top of the appli-
See also
“Adobe Studio” on page 7
“Total Training Video Workshop CD” on page 7
“Other resources” on page 9
Total Training Video Workshop CD
Presented by experts in their fields, Total Training videos provide overviews, demos of key new features, and many
useful tips and techniques for beginning and advanced users. Look for accompanying step-by-step instructions to
selected Total Training videos in monthly updates to Adobe Studio.
7
Short Total Training web videos on a variety of products and topics are also available in Adobe Studio, and complete
Total Training courseware can be purchased online from the Adobe Store.
See also
“Adobe Studio” on page 7
“Other resources” on page 9
Adobe Studio
AdobeStudioprovidesahuge wealth of tips andtricks, tutorials, andinstructional contentinvideo, AdobePDF,and
HTML, authored by experts from Adobe and its publishing partners. You can search the entire collection or sort by
product, topic, date, and type of content; new content is added monthly. Adobe Studio is available in English, French,
German, and Japanese. Find it from the home page of the Adobe website.
Page 16
ADOBE PHOTOSHOP CS2
User Guide
8
Tips and tutorials in Adobe Studio
See also
“Total Training Video Workshop CD” on page 7
“Other resources” on page 9
Technical information
The Technical information folder on the Resources and Extras CD included with your Adobe product includes
several useful documents in PDF, fully searchable and optimized for printing. These documents provide conceptual
and reference material on various in-depth topics, such as scripting, transparency, and high-end printing. For
complete developer documentation and resources, visit the Developers area of the Adobe website at
http://partners.adobe.com/public/developer/main.html. For additional backgrounders and instructional content,
visit Adobe Studio.
The Resources and Extras CD also includes the entire Help content optimized for printing. Note that the Help
content includes everything in the printed Adobe user guides, plus much more.
See also
“Adobe Studio” on page 7
“Other resources” on page 9
Page 17

ADOBE PHOTOSHOP CS2
User Guide
Other resources
Additional sources of information and help are available for Adobe products.
• Visit the Training area of the Adobe website for access to Adobe Press books; online, video, and instructor-led
training resources; Adobe software certification programs; and more.
• Visit the Adobe user forums, where users share tips, ask questions, and find out how others are getting the most
out of their software. User forums are available in English, French, German, and Japanese on the main Support
page of your local Adobe website.
• Visit the Support area of the Adobe website for additional information about free and paid technical support
options. Top issues are listed by product on the Adobe U.S. and Adobe Japan websites.
• Visit the Developers area of the Adobe website to find information for software and plug-in developers, including
SDKs, scripting guides, and technical resources.
• Click More Resources in Adobe Help Center to access many of the resources on the Adobe website and to create
your own list of frequently visited user groups and websites and valuable contacts.
• Look in Bridge Center for RSS feeds on the latest technical announcements, tutorials, and events. To access Bridge
Center, select it in the Favorites panel in Adobe Bridge. (Bridge Center is available with Adobe Creative Suite only.)
See also
“To display More Resources” on page 3
9
“Learning resources” on page 6
Extras
The Resources and Extras CD included with your CS2 product includes a Goodies folder that contains bonus content
and files for use with your Adobe product. For more free content and add-ons, visit Adobe Studio Exchange, an
online community where users download and share thousands of free actions, plug-ins, and other content for use
with Adobeproducts. To visitAdobe Studio Exchange,gotoAdobe Studio from thehomepageofthe Adobewebsite.
In addition, your CS2 product includes Adobe Stock Photos, an integrated service available within Adobe Bridge that
lets you search, view, try, and buy royalty-free stock photography from leading stock libraries. Because of the tight
integration between Stock Photos and CS2 products, you can download images directly into your Adobe Illustrator®,
Adobe InDesign®, and Adobe GoLive® projects. From Photoshop, you can open any downloaded image.
See also
“Adobe Studio” on page 7
“About Adobe Stock Photos” on page 103
“About Adobe Bridge” on page 79
Other downloads
The Downloads area of the Adobe website includes free updates, tryouts, and other useful software. In addition, the
Plug-ins section of the Adobe Store provides access to thousands of plug-ins from third-party developers, helping
you automate tasks, customize workflows, create specialized professional effects, and more.
Page 18

ADOBE PHOTOSHOP CS2
User Guide
See also
“About Adobe Stock Photos” on page 103
“Other resources” on page 9
What’s new
New features
Workflow improvements
Adobe Bridge
generation file browser. Efficiently browse, tag, search, and process your images. (See “About Adobe Bridge” on
page 79.)
Color management improvements Maintain common color settings throughout the Adobe Creative Suite compo-
nents. Print with the simplified printing interface for color management. (See “To synchronize color settings across
Adobe applications” on page 254.)
Version Cue® 2.0 Manage files and versions as a single user or in a small workgroup. Integrate with Adobe Bridge
to manage files for your Photoshop and Adobe Creative Suite projects. (See
page 113.)
Simplify file handling in Photoshop and within Adobe Creative Suite with Adobe Bridge, the next-
“Version Cue managed projects” on
10
Enhanced photo capabilities
Multi-image Camera Raw
Processanentirephoto shootinafraction of thetime. With supportfor acomprehensive
range of digital cameras, you can automatically adjust settings, convert to universal Digital Negative (DNG) format,
and apply nondestructive edits to batches of images. (See “The Camera Raw plug-in” on page 207.)
High Dynamic Range (HDR) Work with images in 32-bits-per-channel, extended dynamic range. Photographers
can capture the full dynamic range of a scene with multiple exposures and merge the files into a single image. (See
“About High Dynamic Range images” on page 201.)
Optical lens correction Correct for lens aberrations such as barrel and pincushion distortion, chromatic aberration,
and lens vignetting. Easily correct image perspective using the filter’s grid. (See “The Lens Correction filter” on
page 351.)
Noise reduction Reduce digital image noise, JPEG artifacts, and scanned film grain. (See “Reducing image noise”
on page 353.)
Smart Sharpen filter Sharpen images with new algorithms for better edge detection and reduced sharpening halos.
Control the amount of sharpening in the highlights and shadows. (See “To use the Smart Sharpen filter” on
page 355.)
Spot Healing tool Quickly heal spots and blemishes without selecting source content. (See “To use the Spot Healing
Brush tool” on page 369.)
One-click red-eye correction Fix red eyes with one click. Set options to adjust pupil size and darkening amount.
“To remove red eye” on page 371.)
(See
Blur filters Apply blur effects using new blur filters: Box Blur, Shape Blur, and Surface Blur. (See “Blur filters” on
page 515.)
Page 19

Productivity boosters
Customizable menus
ADOBE PHOTOSHOP CS2
Set up and save custom menus and workspaces, highlight new or commonly used menu
User Guide
items, and reduce on-screen clutter for easier access to the tools you need. (See “To define a set of menus” on
page 65.)
Image Processor Process a batch of files to multiple file formats. (See “About the Image Processor” on page 739.)
All new PDF engine Comprehensive, customizable presets and PDF 1.6/Acrobat 7.0 compatibility. (See “Saving files
in Photoshop PDF format” on page 656.)
Script and action event manager Set JavaScripts and Photoshop actions to run automatically when a specified
Photoshop event occurs. (See
UI font size customization Customize the size of text in the options bar, palettes, and the Layer Style dialog box.
“To change the font size in the work area” on page 64.)
(See
Update Manager Automatically search for Photoshop updates.
Variables Create data-driven graphics in Photoshop as you now do in ImageReady. (See “About data-driven
“To set scripts and actions to run automatically” on page 747.)
graphics” on page 747.)
Video preview Display your document on a video monitor using a Firewire (IEEE1394) link. (See “To preview your
document on a video monitor” on page 708.)
11
WYSIWYG Font menu Preview font families and font styles directly in the Font menu. (See “To choose a font family
and style” on page 546.)
Designer enhancements
Vanishing Point
Paste, clone, and paint image elements that automatically match the perspective planes in an
image. (See “About Vanishing Point” on page 374.)
Smart Objects Perform nondestructive transforms of embedded vector and of pixel data. Create multiple instances
of embedded data and easily update all instances at once. (See “Smart Objects” on page 427.)
Multiple layer control Work with layers as objects. Select multiple layers and move, group, align, and transform
them. (See “Selecting layers” on page 399 and “To group and ungroup layers” on page 400.)
Image Warp Easily create packaging mock-ups or other dimensional effects by wrapping an image around any
shape or stretching, curling, and bending an image using Image Warp. (See “The Warp command” on page 364.)
Animation Create animated GIF files in Photoshop much as you create animation in ImageReady. (See “Creating an
animation” on page 614.)
Japanese type features Format text with new character alignment (Mojisoroe) and more Kinsoku Shori types. (See
“About Asian type” on page 563.)
Smart Guides Align the content of layers as you move them using guidelines that appear only when you need them.
“About guides and the grid” on page 60.)
(See
Integrated Adobe Online Services Access and download professional Adobe Stock Photos and share and print
online with Adobe Photoshop Services. (See “About Adobe Stock Photos” on page 103.)
Page 20

ADOBE PHOTOSHOP CS2
User Guide
What’s changed
If you've worked with a previous version of Photoshop, you'll find that some things work a little differently in
Photoshop CS2.
Layer grouping You can group layers using the keyboard shortcut Control+G (Windows) or Command+G
(Mac OS). The shortcut for creating a clipping mask is now Control+Alt+G (Windows) or Command+Option+G
(Mac OS).
Layer linking and multiple layer selection Working with multiple layers is easier now because you can select
multiple layers in the Layers palette or in the document window using the Move tool. The layer linking column was
removed. To link layers, select multiple layers and click the link icon at the bottom of the Layers palette. Some menu
commands that work on linked layers have been changed to work on multiple layers.
To add or subtract layers from a selection in the Layers palette, Shift-click (or drag) in the document with the Move
tool, with the Auto Select Layer option selected. Previously, Shift-clicking linked and unlinked layers. For more information, see
Merging layers To merge all visible layers into a new layer, press Alt (Windows) or Option (Mac OS) and choose
Layer > Merge Visible. Previously you created a new layer and selected it before merging. To merge any two layers,
select them in the Layers palette and choose Layer > Merge Layers. You can still merge two adjacent layers in the
Layers palette by selecting the top layer and choosing Layer Merge Down.
“To select layers in the Layers palette” on page 399.
12
Loading a selection To load a layer as a selection, Control-click (Windows) Command-click (Mac OS) the layer's
thumbnail in the Layers palette. Previously you could click anywhere in the layer.
Clipping mask visibility To hide all layers except the clipping mask layer and the layer it is clipped to, Alt-click
(Windows) or Option-click (Mac OS) the layer’s visibility icon. Previously, Alt-clicking or Option-clicking hid all
layers.
File Browser AdobeBridgehandles allthe tasksthatyou previously didinthe File Browser. Flagging is nowhandled
by the star ratings. Files previously flagged are now marked with one star. In Bridge, Control+D (Windows) or
Command+D (Mac OS) now duplicates an image rather than deselecting it in the thumbnail view.
Placing a file Files that you place into Photoshop with the Place command now become Smart Objects.
Page 21

Chapter 2: Tutorials
Tutorials
Tutorials
Below you will find a list of tutorials that will help you get started using Adobe Photoshop quickly. Before going
through the tutorials, it’s helpful to know how to create and save documents. See “To create a new image” on page 191
and “To save changes to the current file” on page 654.
13
For more advanced tutorials, go to Adobe Studio at
See also
“Correct color and tone” on page 13
“Correct defects” on page 16
“Select areas in an image” on page 18
“Create an image using layers” on page 20
“Add shapes to an image” on page 24
“Print with color management” on page 28
http://studio.adobe.com. (A one-time registration is required.)
Correct color and tone
You can fix photos that are dull, lack contrast, or have a color cast by adjusting the shadows, midtones, and highlights.
In this tutorial, you’ll see how to adjust tonality and color.
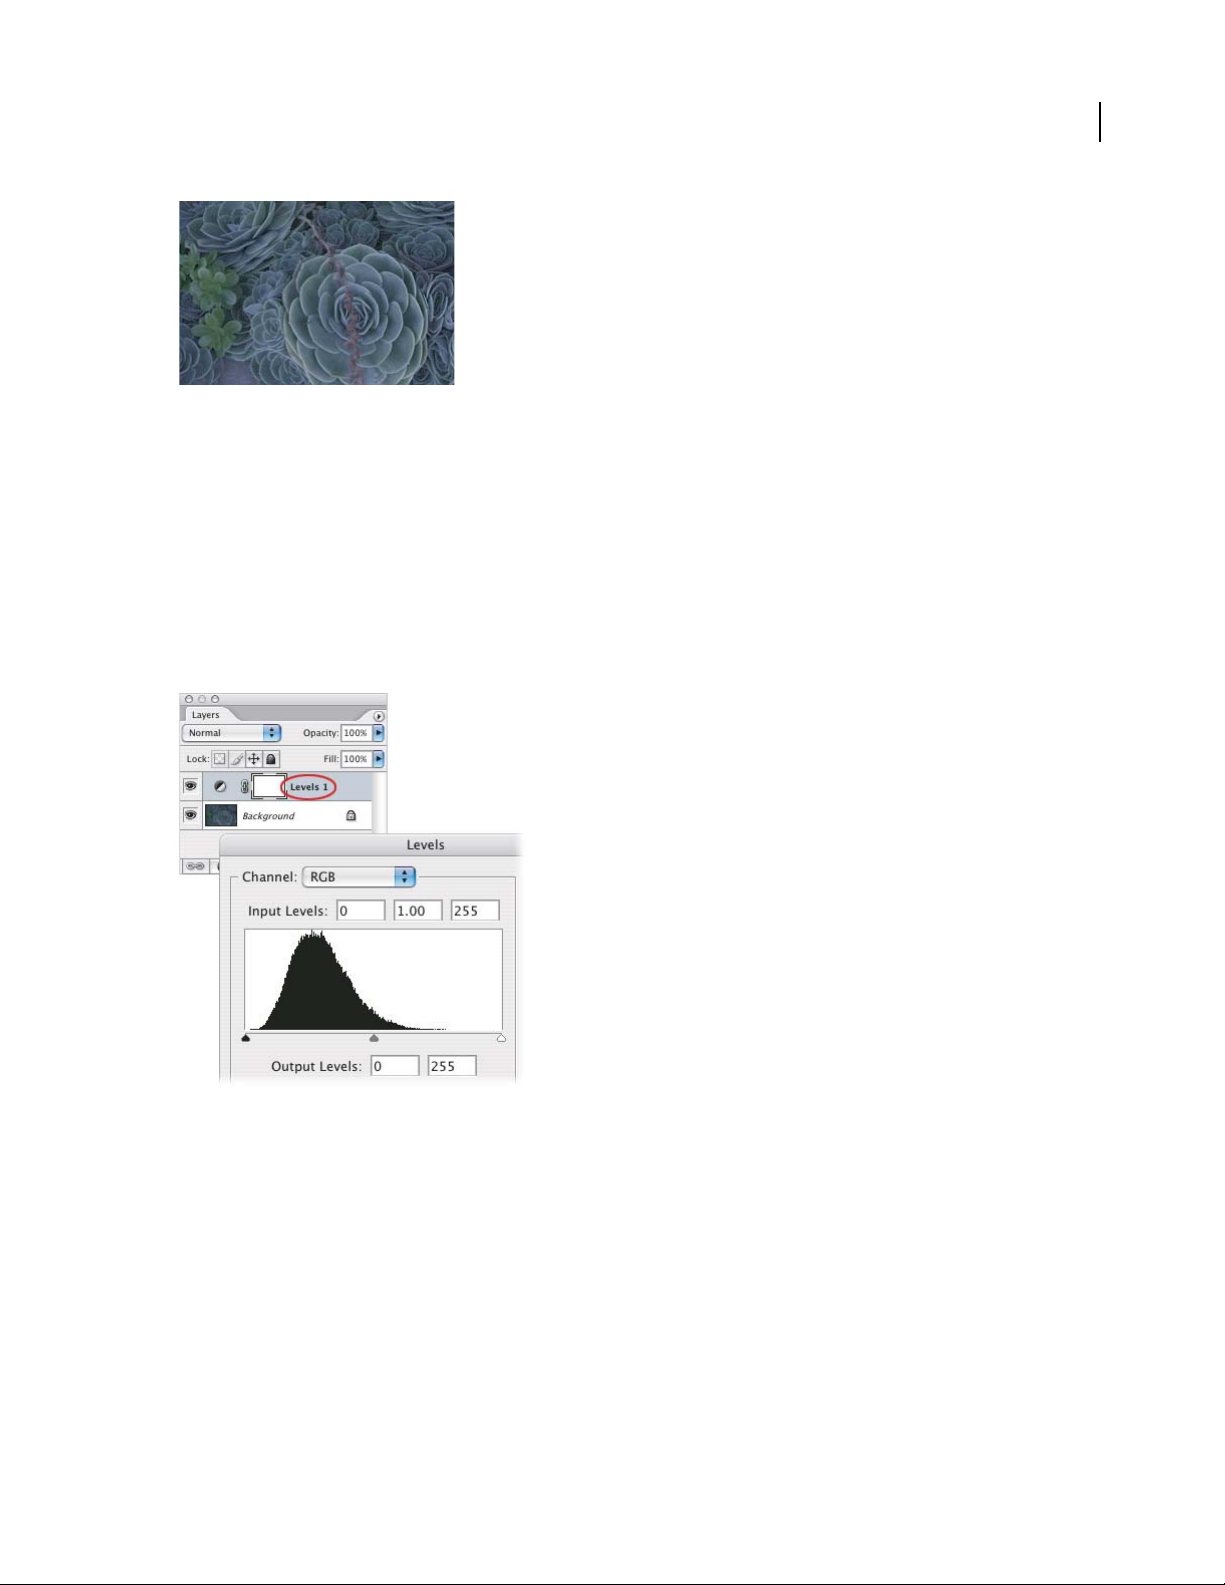
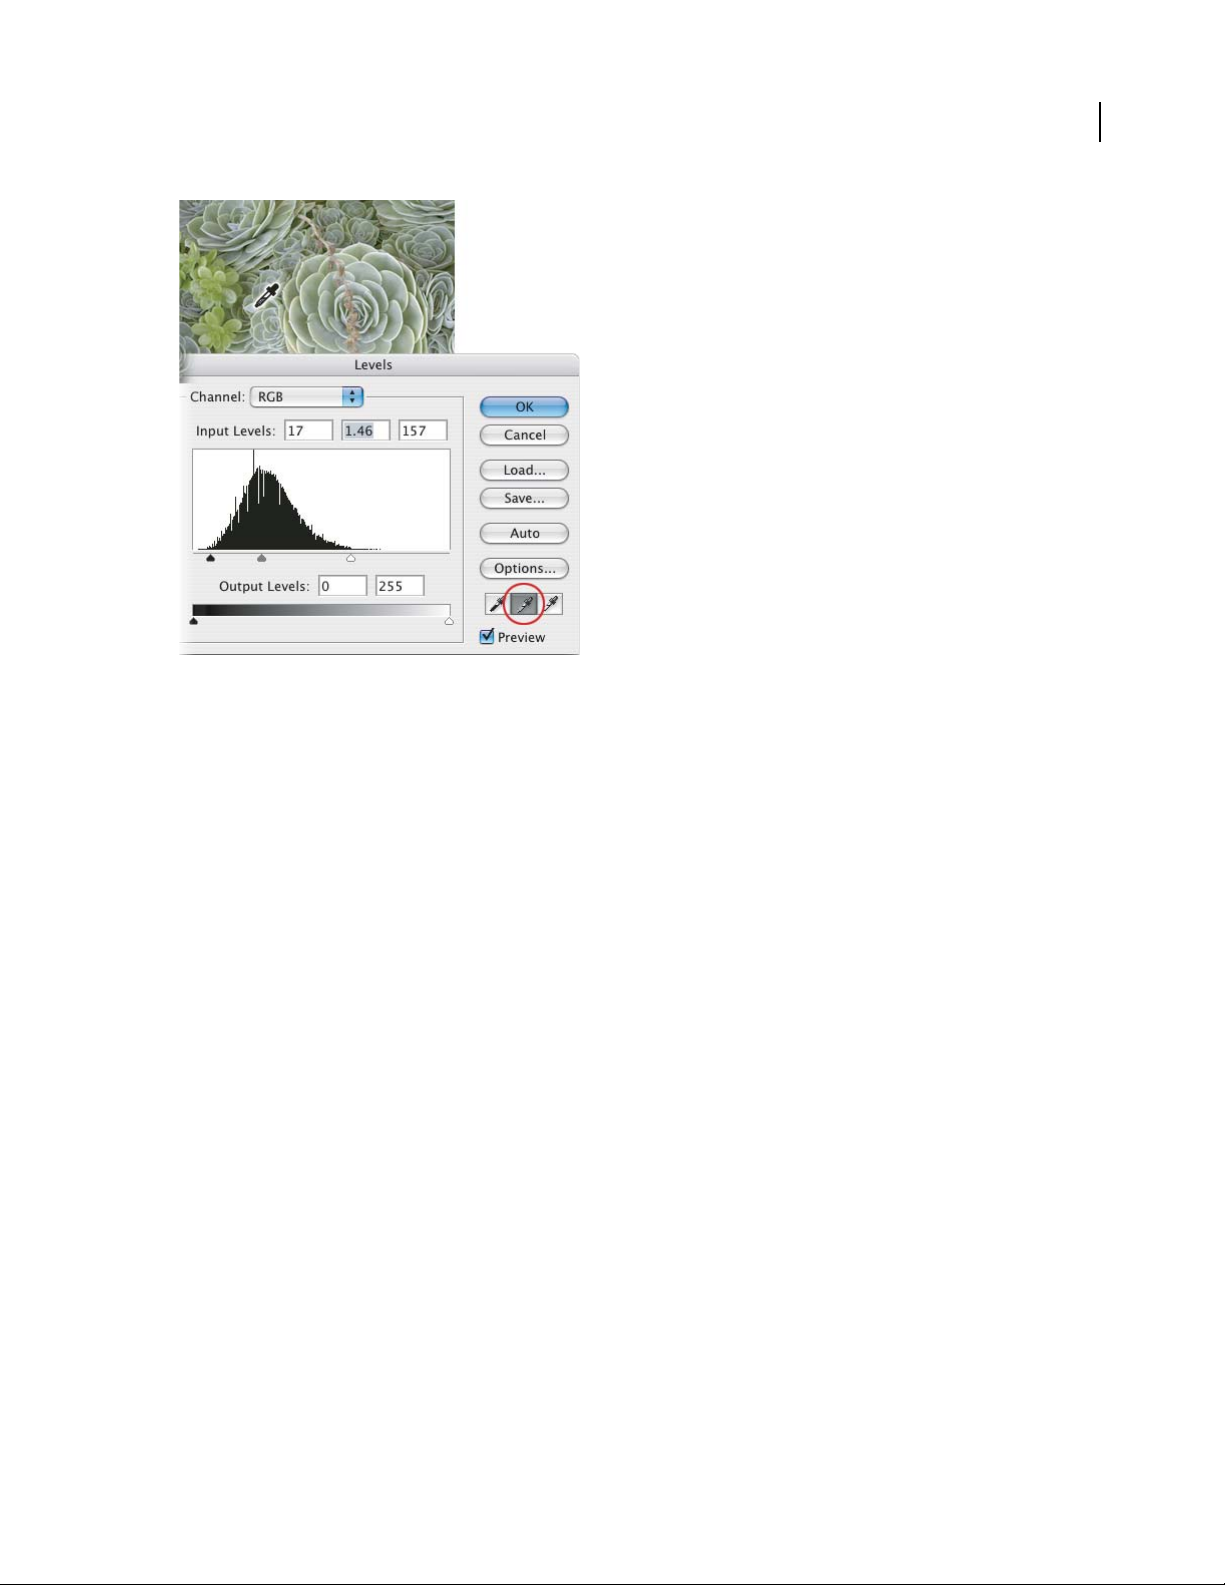
1. Evaluate your image.
Evaluate the image brightness, contrast, and color. This image is dark, has little contrast, and its overall color is shifted
toward blue. We can fix this image quickly using the Photoshop Levels dialog box.
Page 22
ADOBE PHOTOSHOP CS2
User Guide
2. Create a new Levels adjustment layer.
Choose Layer > New Adjustment Layer > Levels and click OK in the New Layer dialog box. Rather than working
directly on the image, we are going to make the tonal correction in an adjustment layer. Working in an adjustment
layer leaves the original image untouched so you can discard your changes and restore the original image at any time.
3. Evaluate the image histogram.
The histogram in the center of the Levels dialog box shows how pixels are distributed in an image by graphing the
number of pixels at each intensity level. It displays the relative number of pixels in the shadows (left part of the
histogram), midtones (middle), and highlights (right). You can see that this image is not using the entire tonal range.
Pixels don’t extend across the entire length of the histogram.
14
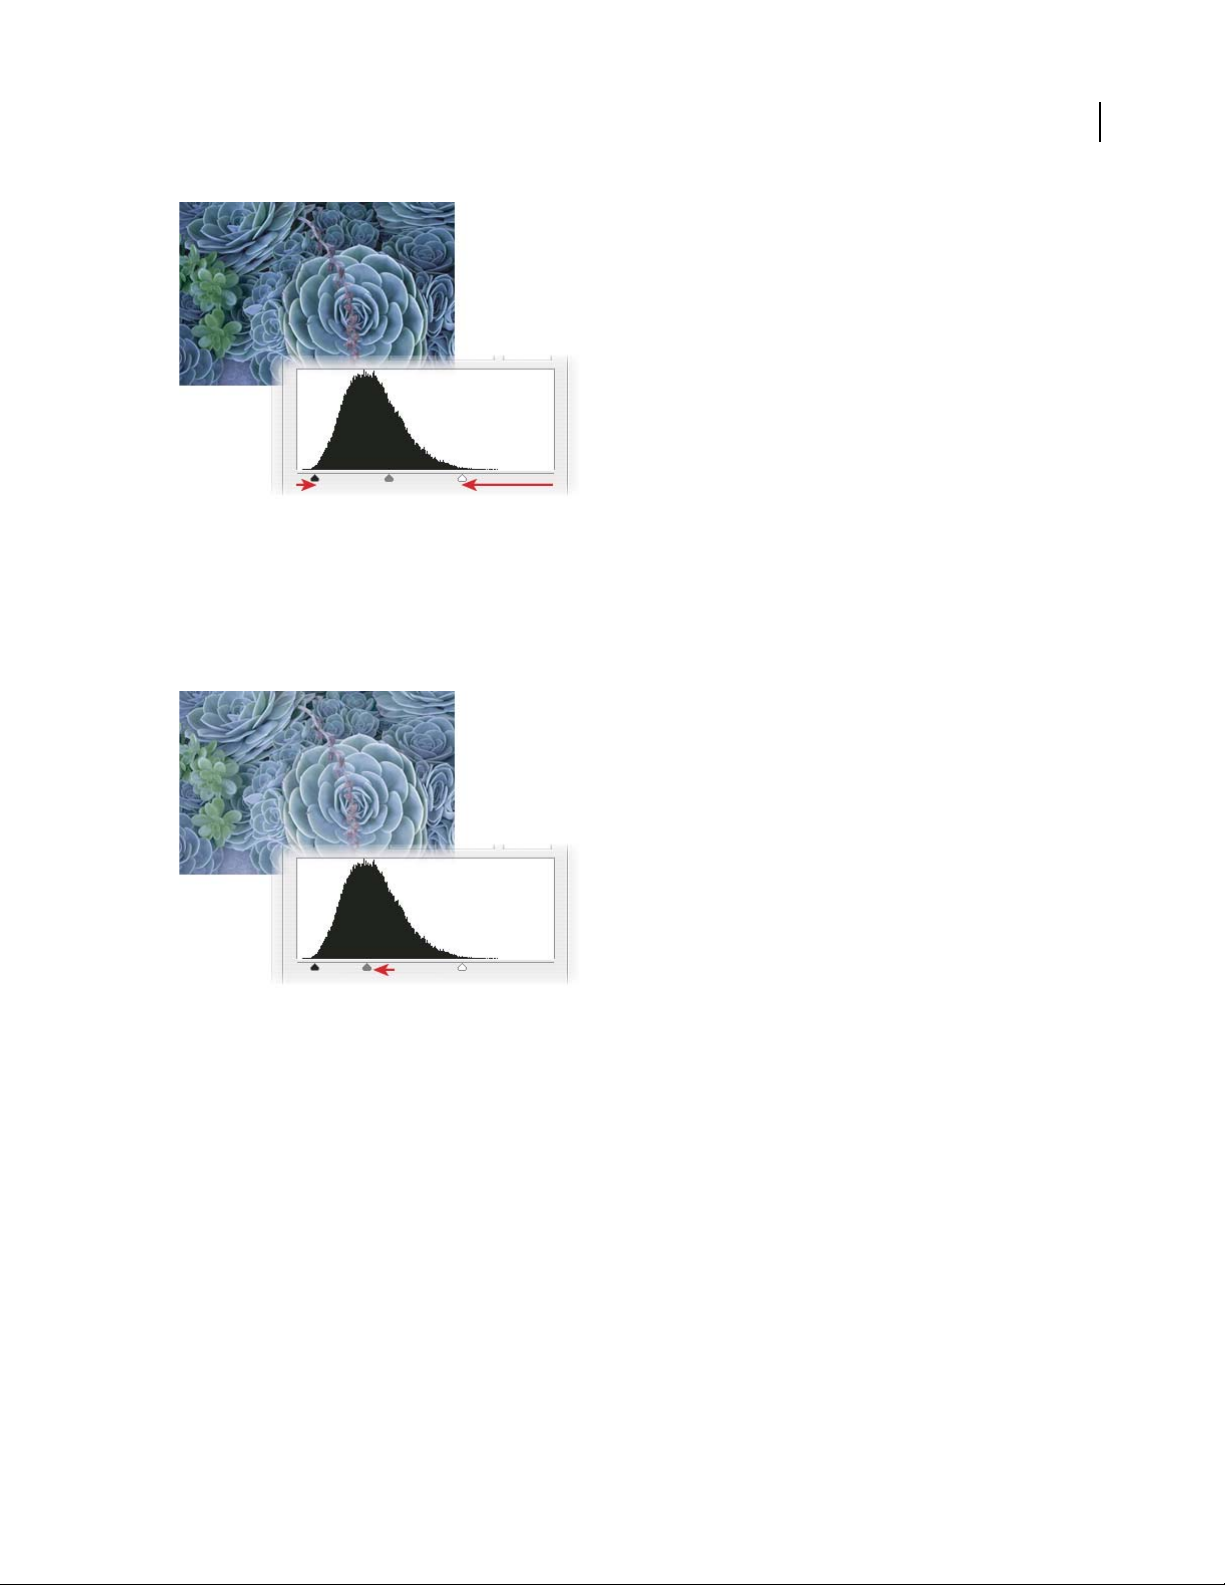
4. Set the shadows and highlights.
Move the black point input slider and the white point input slider (the black triangle and white triangle located
directly beneath the histogram) inward from the edges of the histogram. The black point input slider adjusts pixels
to value zero. All pixels at the level you set and any pixels below become black in the image. The white point input
slider maps values at its position or above to 255, or pure white. After you adjust the sliders, the image will have more
contrast.
Page 23
ADOBE PHOTOSHOP CS2
User Guide
5. Adjust the midtones.
The middle input slider (the gray triangle below the histogram) adjusts the gamma, or contrast, of the midtone
values. It moves the midtone (level 128) and changes the intensity values of the middle range of gray tones without
significantly altering the highlights and shadows.
Move the middle input slider to the left to lighten the image or to the right to darken the image.
15
6. Remove the color cast.
Select the Set Gray Point Eyedropper tool in the Levels dialog box (the middle eyedropper). Click an area in the
image that should be gray. That area becomes neutral gray, and the color cast is removed.
The Set Gray Point Eyedropper tool works best on images with easily identified neutral tones. Advanced users often
use the Levels command to adjust individual channels and remove a color cast.
Page 24
ADOBE PHOTOSHOP CS2
User Guide
16
7. Finish up.
When you’ve made all your adjustments, click OK to close the dialog box and accept your changes. Because you’ve
used an adjustment layer, you can reopen the dialog box and see the adjustments you made. You can readjust any of
the settings.
To reopen the Levels dialog box, in the Layers palette double-click the left thumbnail in the adjustment layer.
You’ve seen one way to adjust the color and tonal values in your image. Photoshop has many more tools to make these
ustments. For more information see “Correcting images in Photoshop” on page 274 and “Color adjustment
adj
commands” on page 274.
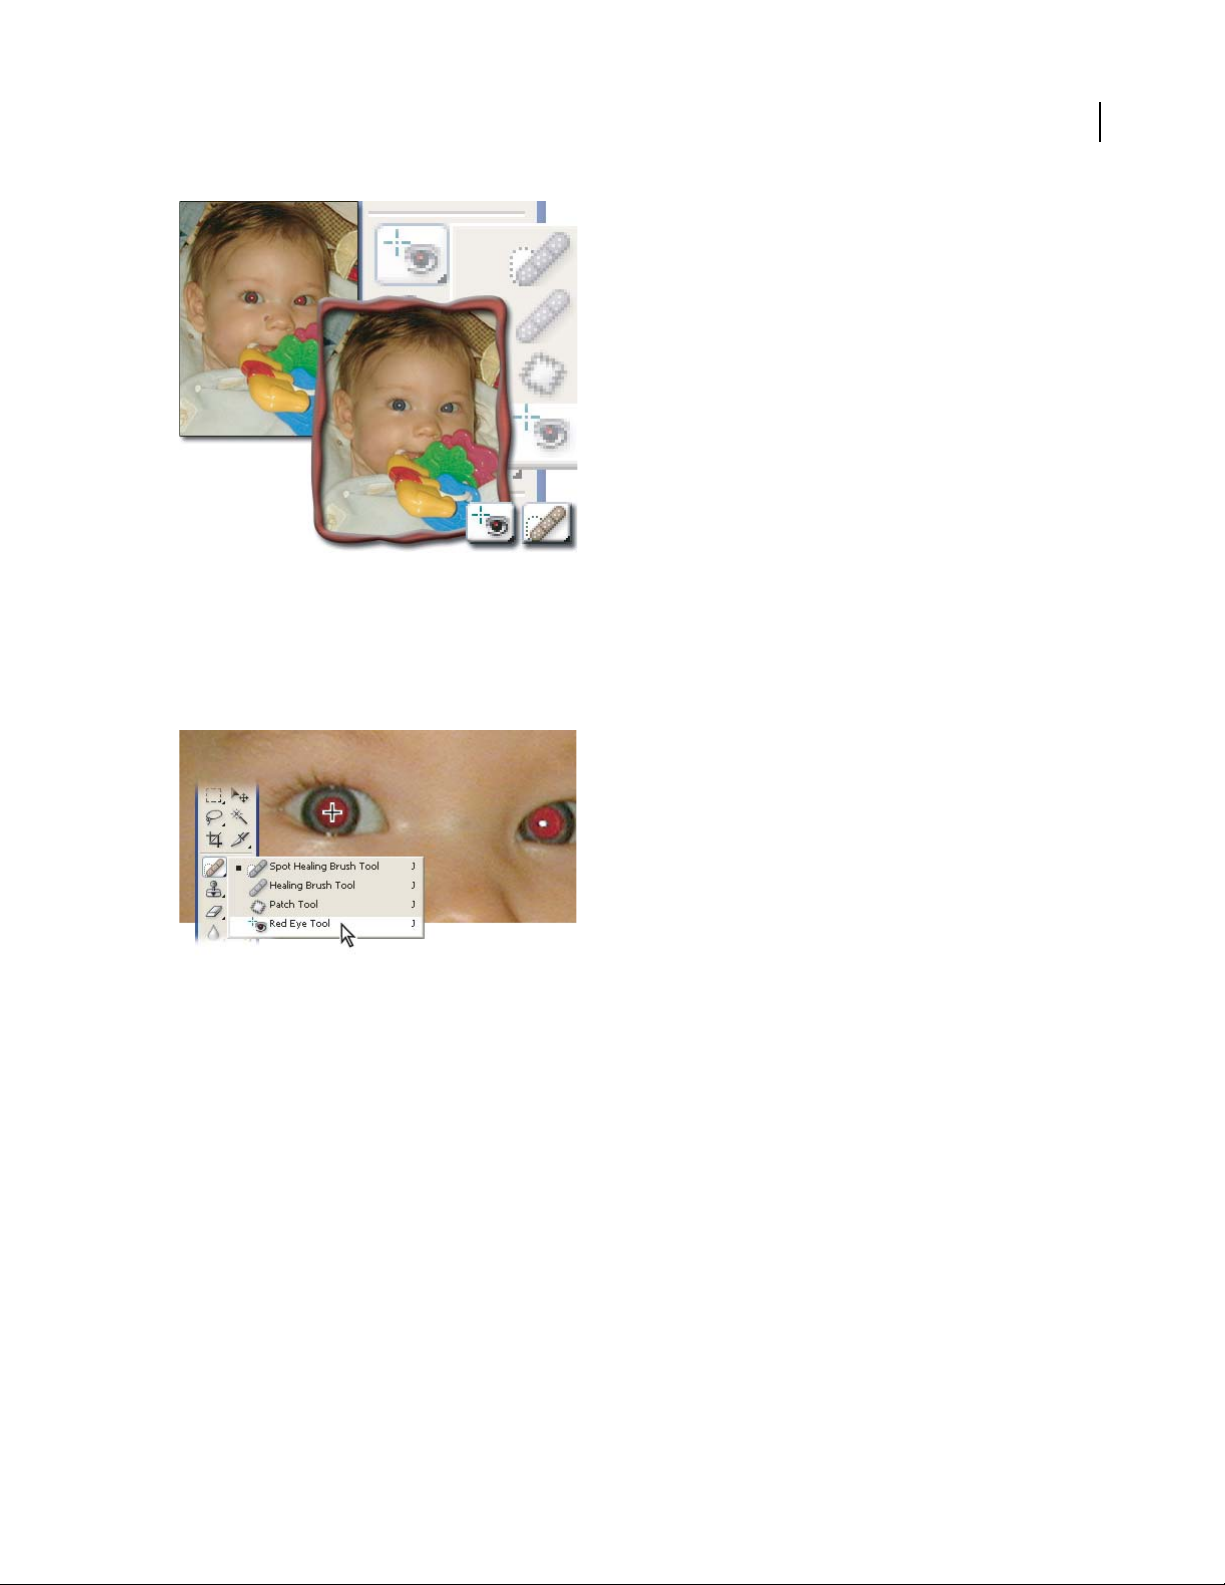
Correct defects
Some otherwise excellent photos are marred by blemishes or red eye (the reflection of the flash in the retina of the
subject). The Red Eye tool fixes red eye with a single click. The Spot Healing Brush easily removes blemishes,
unwanted objects from a uniform background, and other defects. In this tutorial, you’ll see how to correct red eye
and remove blemishes.
Page 25
ADOBE PHOTOSHOP CS2
User Guide
1. Fix the red eye.
Zoom in so that youcan easily seethe problemarea. Select theRed Eyetoolinthe toolboxand clickinthe redarea
of theeye to correctit. If youaren’tsatisfied with theresult, choose Edit >Undoand tryagain usingadifferent Pupil
Size and Darken Amount setting. You can change these settings in the option bar at the top of the application
window.
17
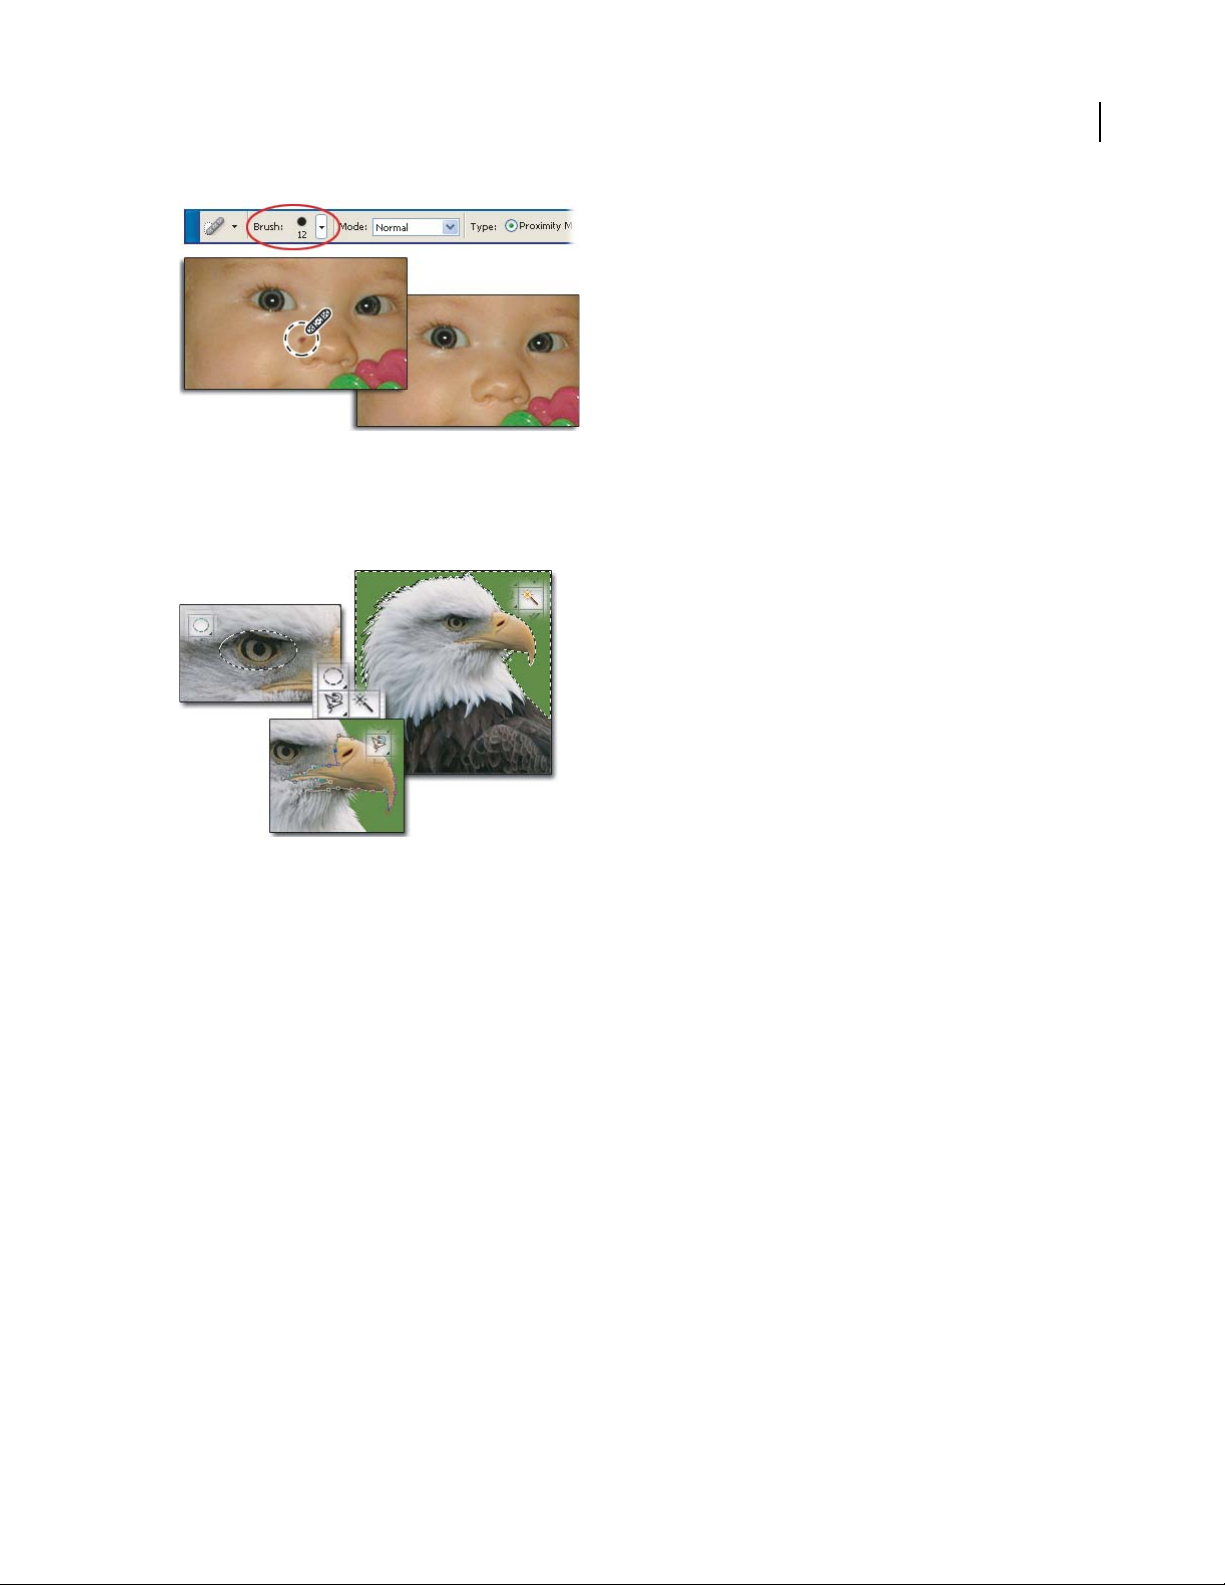
2. Fix spots and blemishes.
Select the Spot Healing Brush tool in the toolbox, and then set options for the tool. In the options bar at the top of
theapplication window,click thetrianglenexttoBrush to open theBrush picker.Dragthe Diameter slider to change
the brush size. Use a brush size that is about the size of the defect you want to fix.
To remove any unwanted spots, click on the spot or drag the pointer over it.
Page 26
ADOBE PHOTOSHOP CS2
User Guide
Select areas in an image
AdobePhotoshop hasselection toolstailoredfor different selectiontasks. In this tutorial,you’lllearn some good uses
for these tools.
18
1. Use the Magic Wand tool to select the background.
If the object has a well-defined shape against a background that’s primarily one color, you can select the background
using the Magic Wand tool.
Select theMagic Wand tool,and then clickanywhereinthe background.The marqueearoundthe background area
indicates that the background is now editable. Try dragging a paintbrush over the whole image to verify that only the
background, and not the object, is affected.
Page 27
ADOBE PHOTOSHOP CS2
User Guide
2. Invert your selection.
Because the background is easy to select, inverting the selection is a simple way to select the object. Choose Select >
Inverse. Notice that the selection border changes to outline the object.
This technique is useful for selecting objects that are sharply delineated against a background. Now you can make
edits on the object, leaving the background intact. Choose Select > Deselect to try another selection tool.
19
3. Use the Elliptical Marquee tool to select a detail.
Select the Elliptical Marquee tool, and then drag to draw a selection border around a detail in the object. To
reposition the selection border as you draw it, hold down the spacebar and drag the selection border to a new
position. To move the selection border after it’s created, click anywhere inside the border and drag.
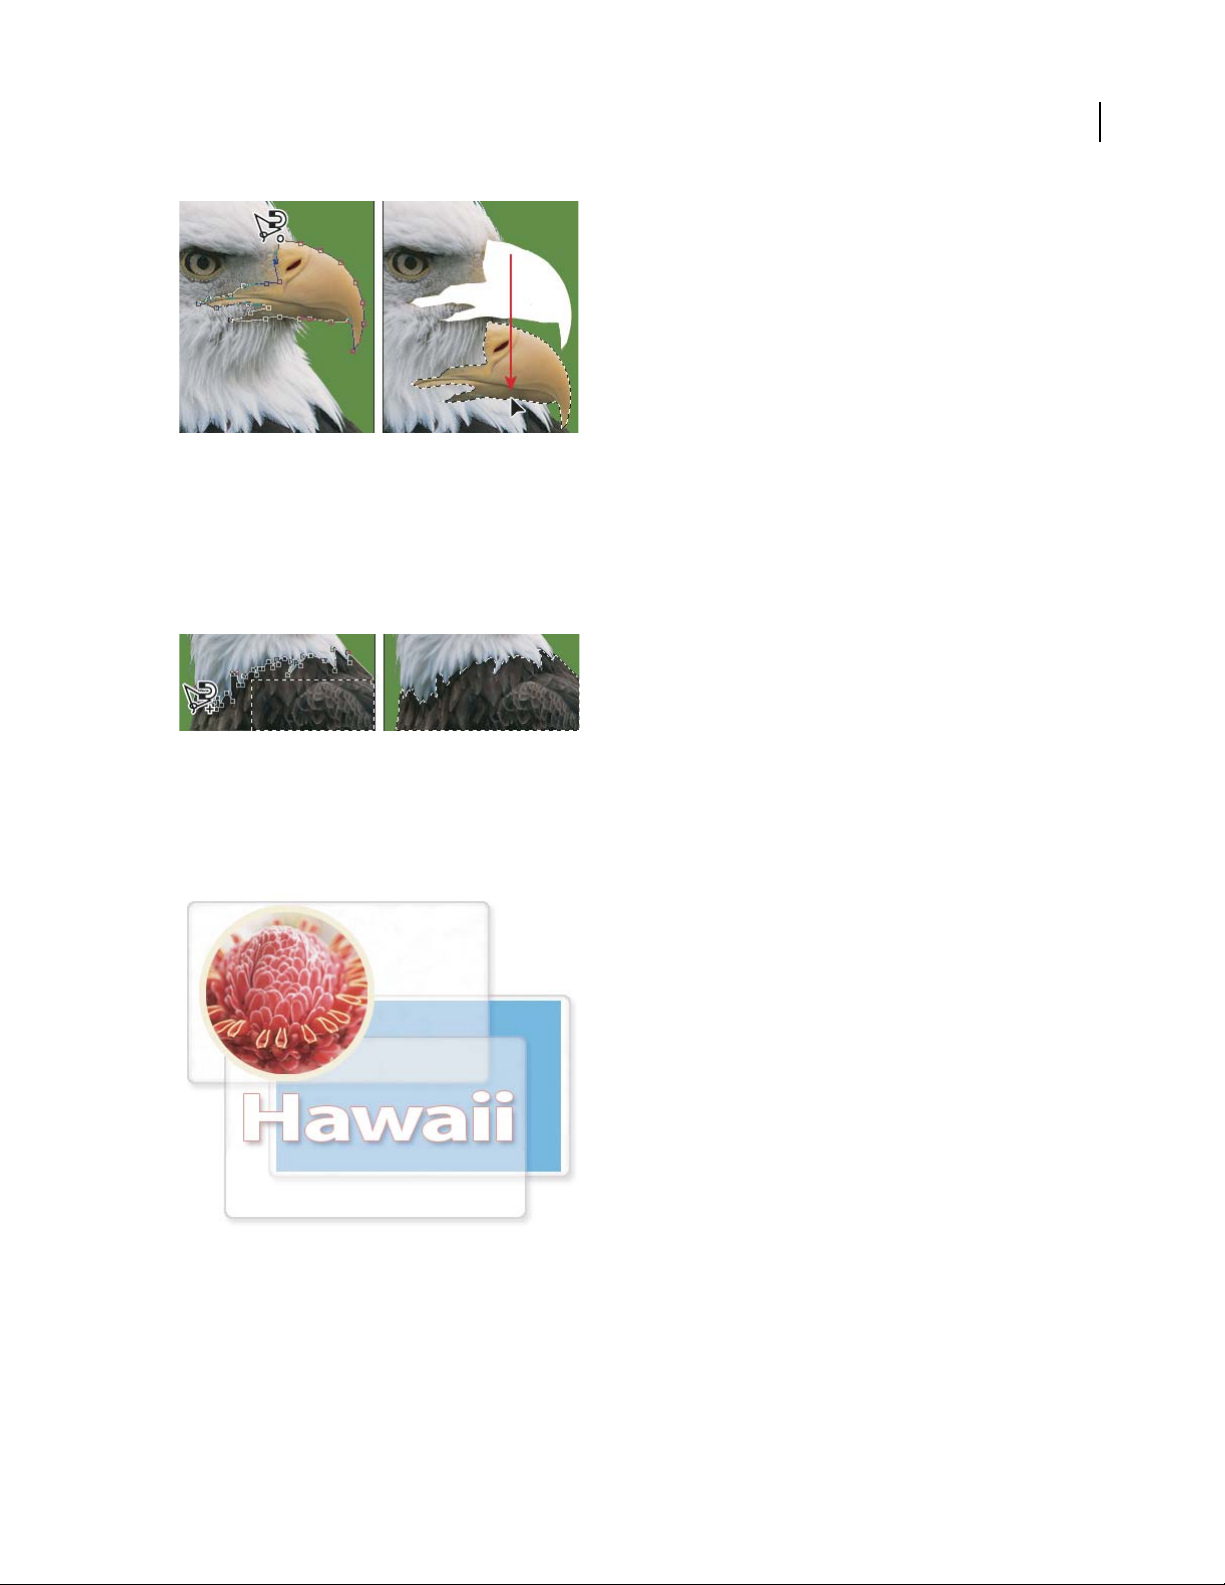
4. Use the Magnetic Lasso to select part of an object.
Select the Magnetic Lasso tool (hidden in the toolbox behind the Lasso tool), and then click and drag around part of
the object in your photo. As you drag, Photoshop “snaps” the selection to the edges of the object.
The Magnetic Lasso tool is especially suited for making freeform selections because it traces the edges of an object.
It works best on areas with clearly defined edges.
The tool places anchors as you drag (you can remove anchors by pressing the Delete key). To finish the selection
border, click the starting anchor point (or double-click). Try moving the selection using the Move tool. Choose Edit >
Undo to return the selection to its original position. Then choose Select > Deselect to deselect the object.
Page 28
ADOBE PHOTOSHOP CS2
User Guide
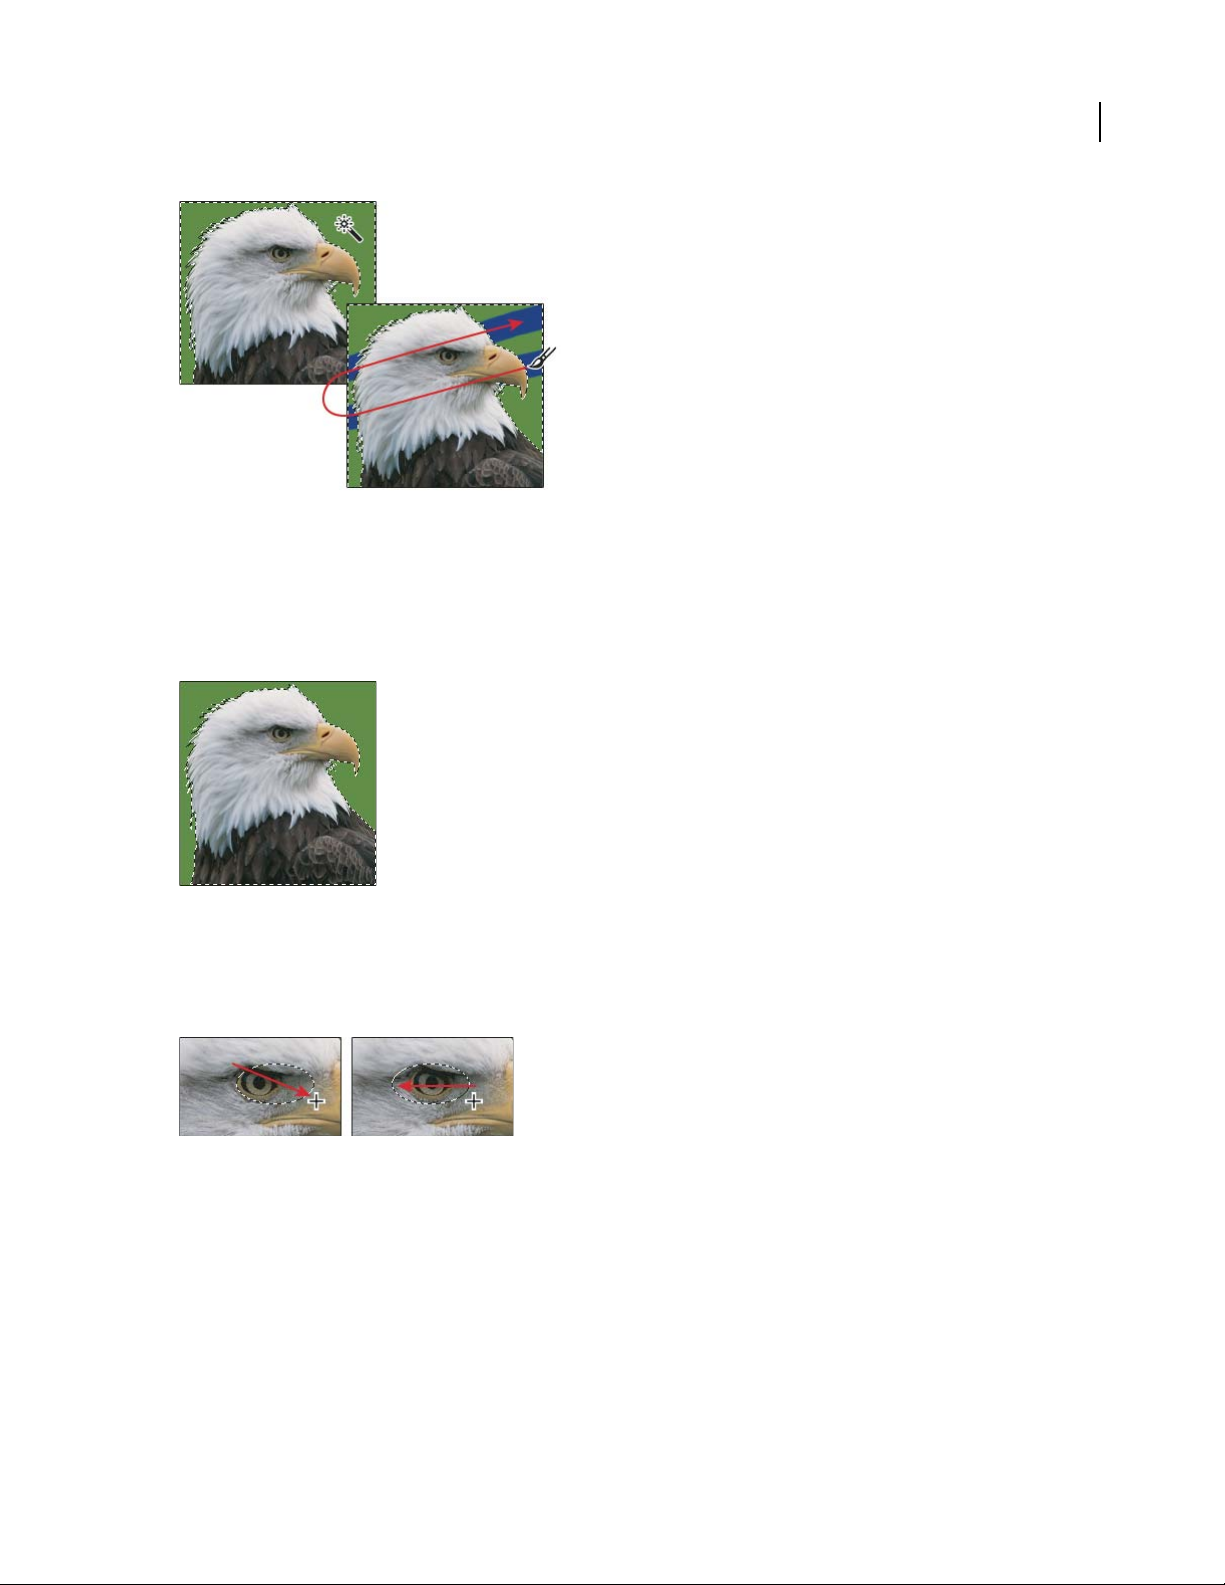
5. Add to a selection.
Select the Marquee tool, and make a rough selection of the object in your photo. After you make the selection, you
can add to the selection border without having to start over. Select the Magnetic Lasso tool, and select the Add To
Selection option in the options bar. Refine your selection by dragging around the outside of the object (notice the
small plus sign below the tool pointer). Release the mouse. The selection border now includes the area you selected
with the Magnetic Lasso tool.
20
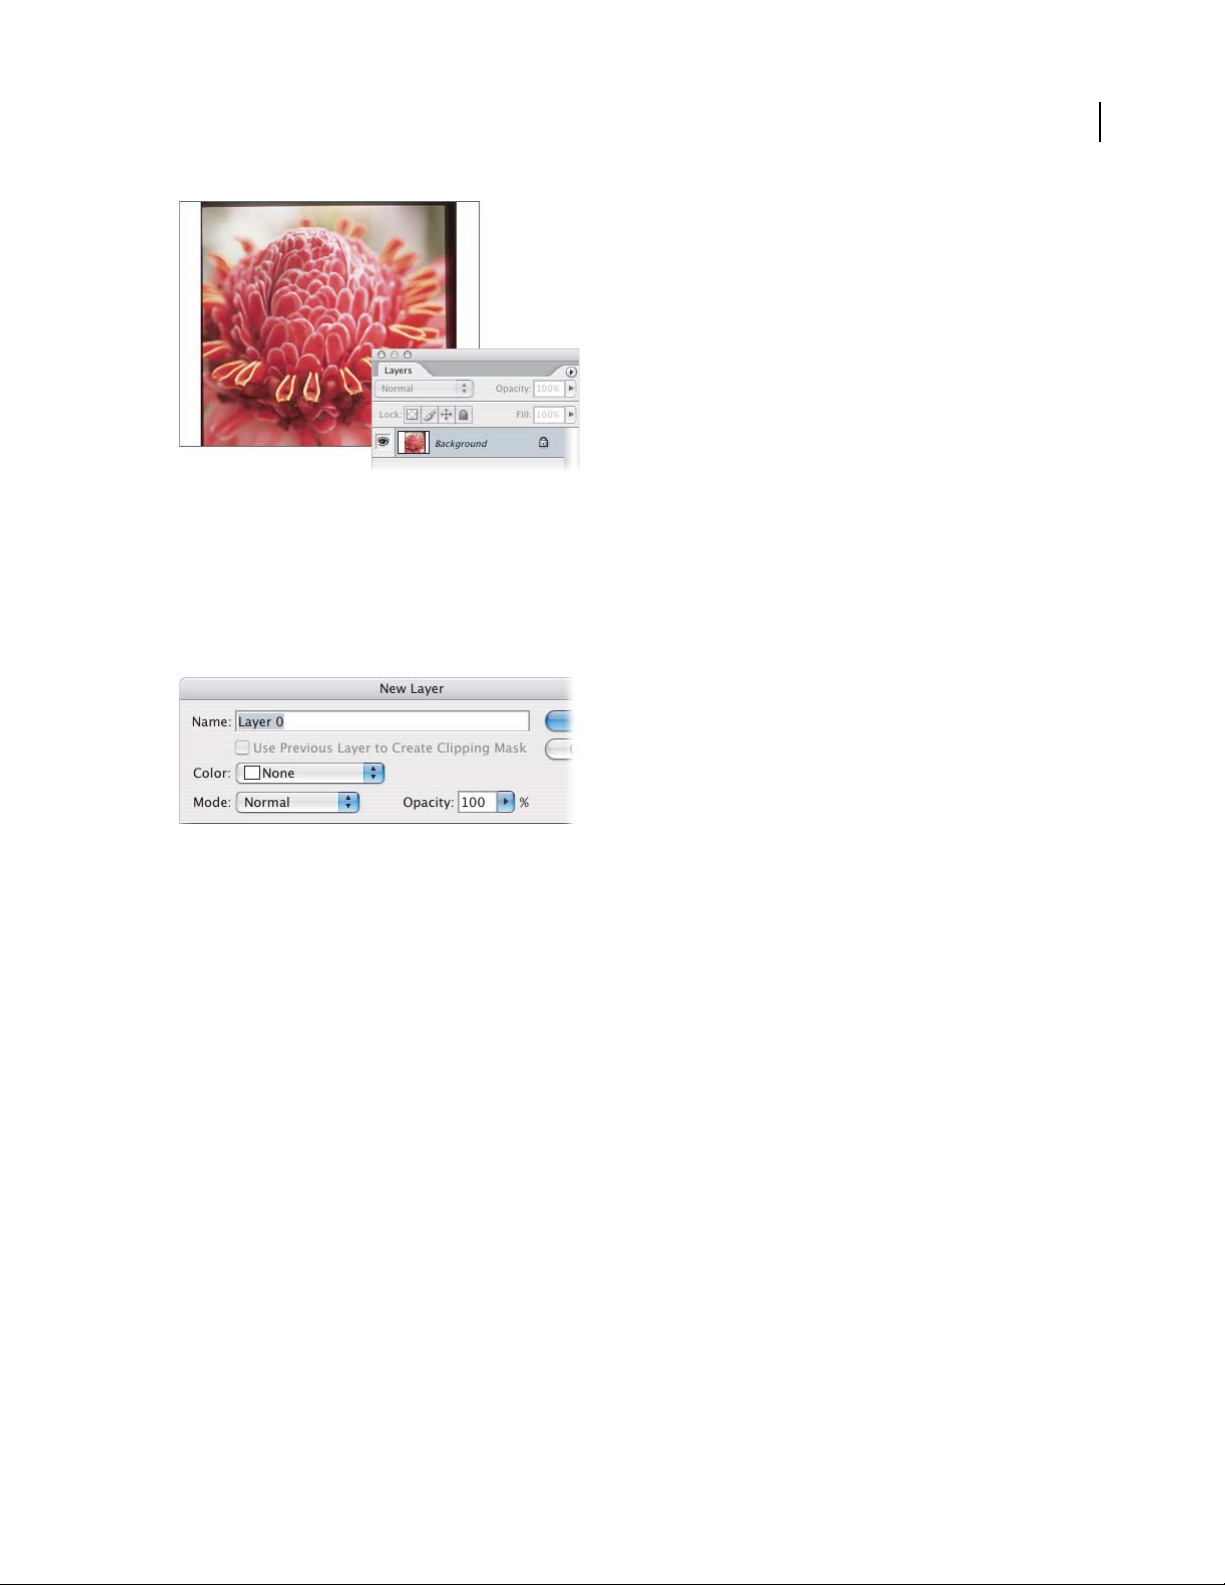
Create an image using layers
Layers give you complete creative control when you construct an image from different elements, such as a
background color, text, shapes, and selections from other photographs. In this tutorial, you’ll see how to create a
multilayered image, apply a layer mask, and then add a text layer.
1. Open an image in Photoshop.
Choose File > Open, or double-click a thumbnail in Adobe Bridge.
By default, the Layers palette should be visible. If not, choose Window > Layers. The Layers palette displays each layer
in the image, along with a thumbnail of the layer contents.
Page 29
ADOBE PHOTOSHOP CS2
User Guide
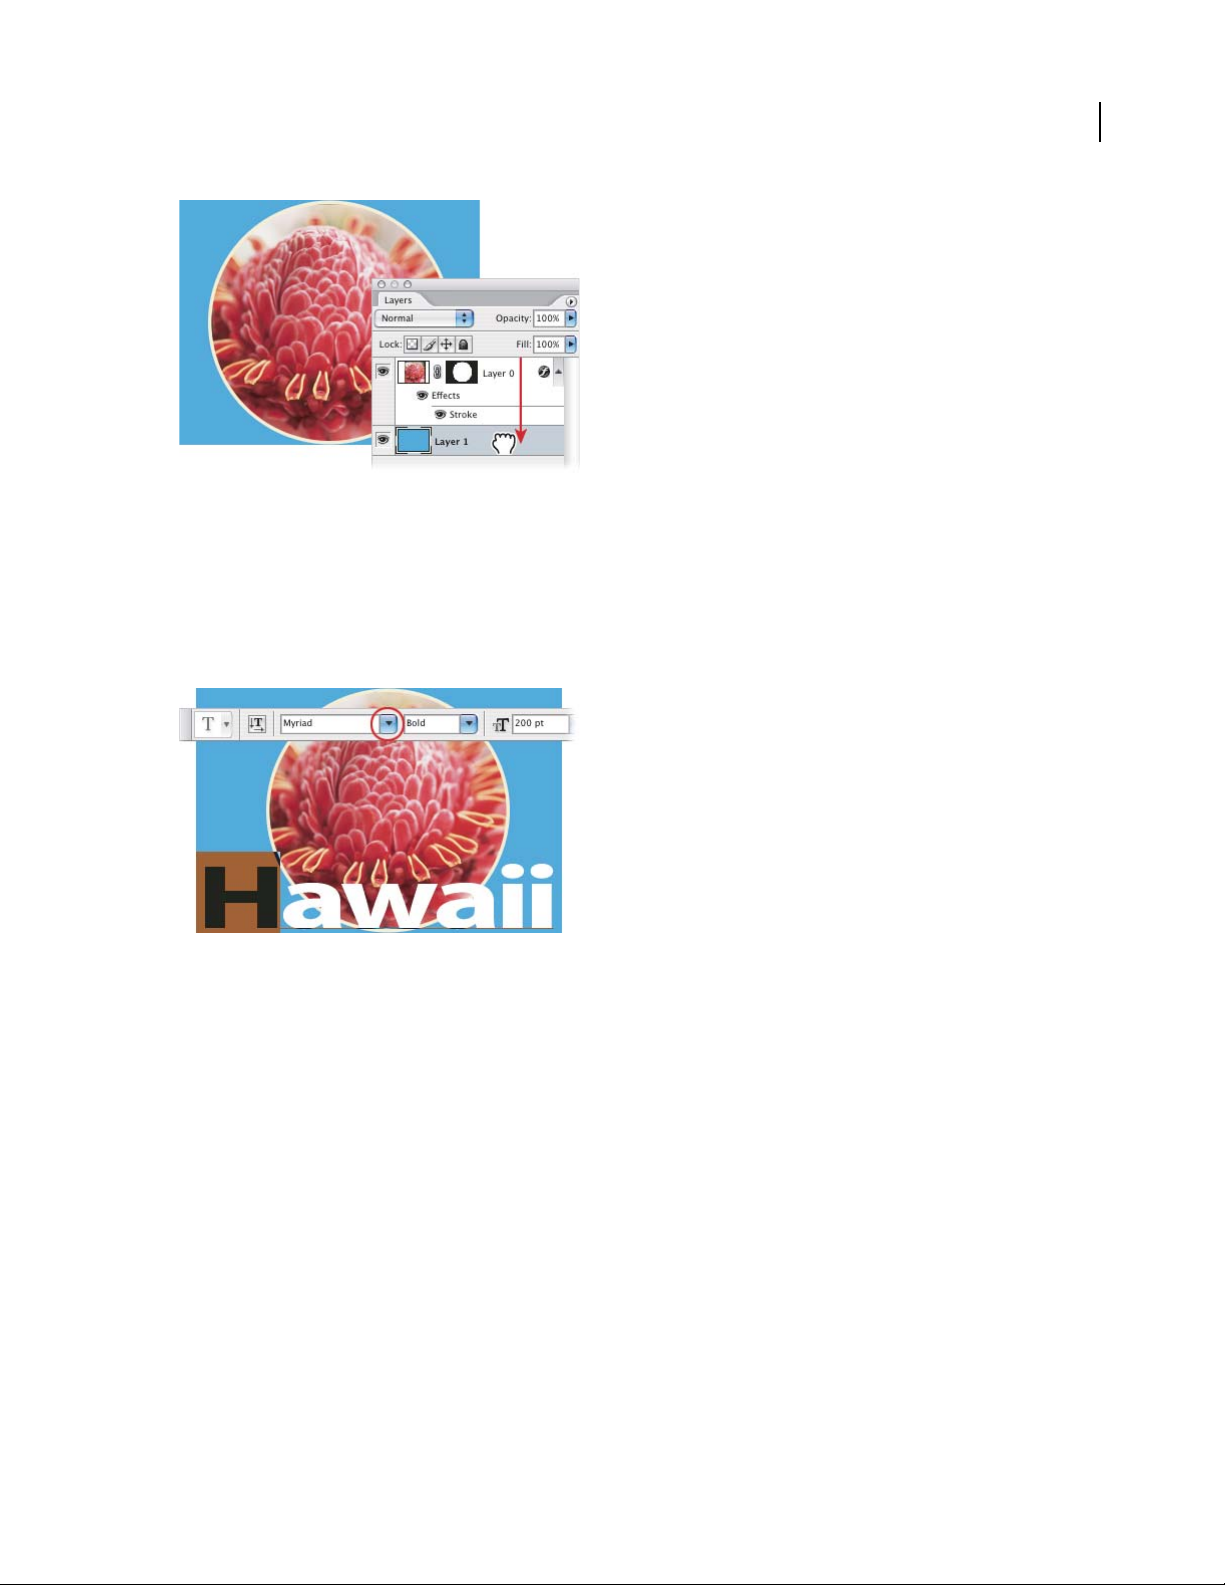
2. Convert the background layer.
You need to convert the background to a regular layer if you want to use transparency in the layer.
In the Layers palette, double-click the background layer. Click OK in the New Layer dialog box.
You can now show or hide the layer. Click the eye icon next to a layer. Notice that the icon disappears and the layer
is hidden. Click the empty icon box again. The eye icon and the layer contents reappear.
21
3. Apply a layer mask.
Youcan usealayermasktoselectand displayjustthe part of theimage youwanttouse,without altering theimage.
Here you’ll mask the entire image except for a circular area containing the flower.
Click and hold the Rectangular Marquee tool, and then select the Elliptical Marquee tool from the pop-up menu.
Hold down the Shift key to constrain the selection to a circle, and then drag an area of the image. In the Layers palette,
click Add Layer Mask.
Now only the area you selected is visible. You can change the visible area by moving the mask around the image. First
click the link icon to unlink the mask from the layer. Select the Move tool, click inside the mask, and drag to
reposition it. When the mask is correctly positioned, click the link icon to relink the mask and the layer. Where you
move the layer, the mask now moves with it.
Page 30

ADOBE PHOTOSHOP CS2
User Guide
4. Add a stroke effect.
Click Add A Layer Style at the bottom of the Layers palette, and select Stroke from the menu. Select Stroke on the
left side of the Layer Style dialog box, and make changes to the color, size, position, opacity, and blend mode of the
stroke.
22
5. Create a fill and add a new layer.
Click Create A New Layer to add a new layer to the image. The new layer appears above the selected layer and
becomes the selected layer. Click the Foreground color swatch and select a color from the Color Picker. Select the
Paint Bucket tool (it’s hidden under the Gradient tool; click the triangle to show the hidden tools). Then click
anywhere in the image to create the fill.
6. Reorder the layers.
Drag the new layer below the other layers. Changing the stacking order of your layers makes certain parts of the
image appear in front of or behind other layers.
Page 31
ADOBE PHOTOSHOP CS2
User Guide
7. Add a text layer.
In the Layers palette, click the top layer. Select the Text tool, and then click in the image. The I-beam cursor appears.
In the options bar, change text size, font, style, or color to your liking. When you add text, Photoshop automatically
places it on its own layer, where you can edit it separately from the rest of the image.
To edit thetext, select it with theTexttool, andthenchangeany of thesettingsinthe optionsbar.Tomovethe text,
select the Move tool and drag the text.
23
8. Add an effect to the text.
Click Add A Layer Style and select Drop Shadow from the menu. You can change the color or angle of the shadow
or make other adjustments in the Layer Style dialog box.
In theLayerspalette, youcan seewhich effectswereusedonany layerbyclickingthe blacktrianglenexttothe Layer
Style button. The eye icon next to each layer style acts like a toggle. Click it to apply that style or to remove it from
that layer.
Page 32

ADOBE PHOTOSHOP CS2
User Guide
Add shapes to an image
Adobe Photoshop makes it easy to add shapes to an image: you can draw them using a variety of shape tools or select
from a large assortment of predrawn shapes. You can arrange vector shapes on separate layers for easy modification
andoverlay effects. In this tutorial,you’lllearn howtoplace background andforegroundshapesinanimage andadd
some flair with gradient and layer effects.
24
1. Open an Image in Photoshop.
Choose File > Open or double-click a thumbnail in Adobe Bridge. You need to start with an image that has at least
two layers.
First you’ll add shapes to create a more interesting background.
Page 33

ADOBE PHOTOSHOP CS2
User Guide
2. Select the Rectangle tool.
Select the Rectangle tool from the toolbox and then click the Shape Layers icon in the options bar. Now, the Rectangle
tool creates a vector shape on a new layer. (Adjacent options let you create a path or a rasterized shape on the current
layer.)
3. Create a rectangle shape.
In the Layers palette, select the bottom layer in your image. Click and drag to create a rectangle covering the right
half of the image. The rectangle uses the foreground color by default. To change the color, double-click the layer
thumbnail to display the Color Picker and select a new color.
25
4. Add gradients to a shape.
Now add two more rectangle shapes, this time with gradient effects. Using the Rectangle Shape tool, drag a new
rectangle to cover the top left quarter of the image. Click the foreground color swatch and select a new color for this
rectangle. Choose Layer > Change Layer Content > Gradient. Leave Gradient at the default setting, and set Style to
Linear, angle to –50, and scale to 100%. Repeat these steps to create a second rectangle, this time with an angle of 20.
Page 34

ADOBE PHOTOSHOP CS2
User Guide
5. Load a complete set of custom shapes.
Select the Custom Shape tool in the tool options bar. Click the Shape pop-up menu to open the Custom Shapes
pop-up palette.
Before selecting a custom shape, let’s add more shapes to the Custom Shapes pop-up palette. Click the black triangle
andchoosePresetManager from thepalette menu.Inthe Preset Managerdialogbox,makesurethatCustomShapes
appears in the Preset Type pop-up menu, and then click Load. Navigate to the Custom Shapes folder (default path:
Adobe Photoshop CS2/Presets/Custom Shapes) and select All. Click Load to load the full set of custom shapes. This
loads all the predrawn shapes into the Custom Shapes palette.
26
Click Done to close the Preset Manager.
6. Draw a custom shape.
Now add a custom shape to the foreground for an overlay effect. Select the top layer of the image, and use the
foreground color swatch in the toolbox to select a color for the new shape. Select a custom shape from the Custom
Shapes pop-up palette in the options bar. (For our image, we chose the sunburst shape.) Hold down the Shift key to
constrain proportions, click and drag in the image to draw the shape.
Becausethe vector shapeisonits ownlayer,itiseasytomoveorresizewithout affectingother elements of theimage.
Select thelayer andthenuse theMovetooltomovethe shape, or choose Edit >FreeTransform to resize,rotate, flip,
or skew it.
Page 35

ADOBE PHOTOSHOP CS2
User Guide
7. Fill the custom shape with a pattern.
Next apply one of the Photoshop pattern effects to make the shape more interesting. Select the new shape in the
Layers palette, and then choose Layer > Change Layer Content > Pattern. In the Pattern Fill dialog box, click the tiny
inverted triangle next to the pattern swatch to open the Patterns pop-up palette.
Before selecting a pattern, let’s load more patterns into the Patterns pop-up palette. Click the black triangle in the
upper right corner of the Patterns pop-up palette and choose Preset Manager from the palette menu. In the Preset
Manager dialog box, make sure that Patterns appears in the Preset Type pop-up menu, and then click Load. Navigate
to the Patterns folder (default path: Adobe Photoshop CS2 /Presets/Patterns) and select the patterns you want. Click
Load to add the selected patterns to the list of patterns in the Preset Manager, and then click Done to close the Preset
Manager dialog box.
27
In the Pattern Fill dialog box, select a pattern and then click OK to apply it to the custom shape. To change your shape
back to a solid color or to a gradient, choose Layer > Change Layer Content and then choose either Solid Color or
Gradient.
8. Add a layer effect to the shape.
To enhance your shape, you can add layer effects and then apply blending mode. With the shape layer selected, click
theAdd ALayer Styleiconatthe bottom of theLayerspalette andchooseStrokefromthe menu.Inthe LayerStyle
dialog box, choose settings for the stroke style blending. You can also choose other options from the Styles menu on
the left. Click OK to apply the layer effect.
To blend the shape and layer effect with the other layers in the image, choose a blending mode from the Blending
Mode menu at theupper left of theLayerspalette. To remove alayer effect,selectthe LayerEffecticon(acirclewith
an “f ”) in the Layers palette and drag it to the Delete (trash can) icon at the bottom of the Layers palette.
Page 36

ADOBE PHOTOSHOP CS2
User Guide
Print with color management
The Photoshop Print With Preview feature helps you achieve predictable results when you print your photos. In this
tutorial, you’ll learn how to adjust color management settings for the best possible prints. To follow these steps, you
must have an ICC profile for your printer and paper type. For more information, see “To have Photoshop manage
colors when printing” on page 715.
Note: For best results, make sure that your monitor is calibrated and profiled correctly.
28
1. Open the Print With Preview dialog box.
Open your image in Photoshop and choose File > Print With Preview. The Print (Print With Preview) dialog box
appears. Expand the dialog box by clicking the More Options button on the right side. If it is already expanded, the
Fewer Options button is visible.
Page 37

ADOBE PHOTOSHOP CS2
User Guide
29
2. Set color management options.
Choose Color Management from the pop-up menu below the preview thumbnail.
Under Print, select the Document option. The image’s current profile is listed here.
YouwantPhotoshop to handle thecolor conversion to theprinter’s colorspace,sochooseLet PhotoshopDetermine
Colors from the Color Handling pop-up menu under Options.
Note: Later, when theprinter driver dialog boxappears,makesuretoturnoff theprinter’s colormanagementsothatthe
printer driver settings don’t conflict with the Photoshop color management settings.
3. Select the printer profile.
Choose theprofile foryouroutputdevicefromthe PrinterProfile pop-up menu.The profilemustbeinstalled in the
correct location to show up. See “To install a color profile” on page 266.
4. Choose a rendering intent from the menu.
The rendering intent specifies how Photoshop converts colors to the printers color space. Perceptual or Relative
Colormetric are good choices for most photographs.
5. Specify the printer driver settings and print the image.
Click Print. The Print dialog box for your printer driver appears. The options you see depend on the printer driver.
Make sure to turn offthe printerdriver’scolor management becauseyou chosetohavePhotoshop convertthe colors
to the printer profile. In some printer drivers, you need to select the No Color Management option. If you don’t turn
off color management in the printer driver, you’ll get unpredictable results.
Page 38

ADOBE PHOTOSHOP CS2
User Guide
In this tutorial you learned how to print your image using a printer profile. You’ll also want to learn how to preview
and adjust your image using softproofing to get the results you want from your printer. For more information, see
“Soft-proofing colors” on page 259.
30
Page 39
Chapter 3: Work area
Work area basics
About the Welcome window
When you launch Photoshop or ImageReady, the Welcome window automatically appears. Select the options in this
window to learn about Photoshop or ImageReady by reading tutorials or by viewing a movie about new features. In
Photoshop, you can also learn how to set up a color management system.
Choose Help > Welcome Screen to display the window if it’s not already open.
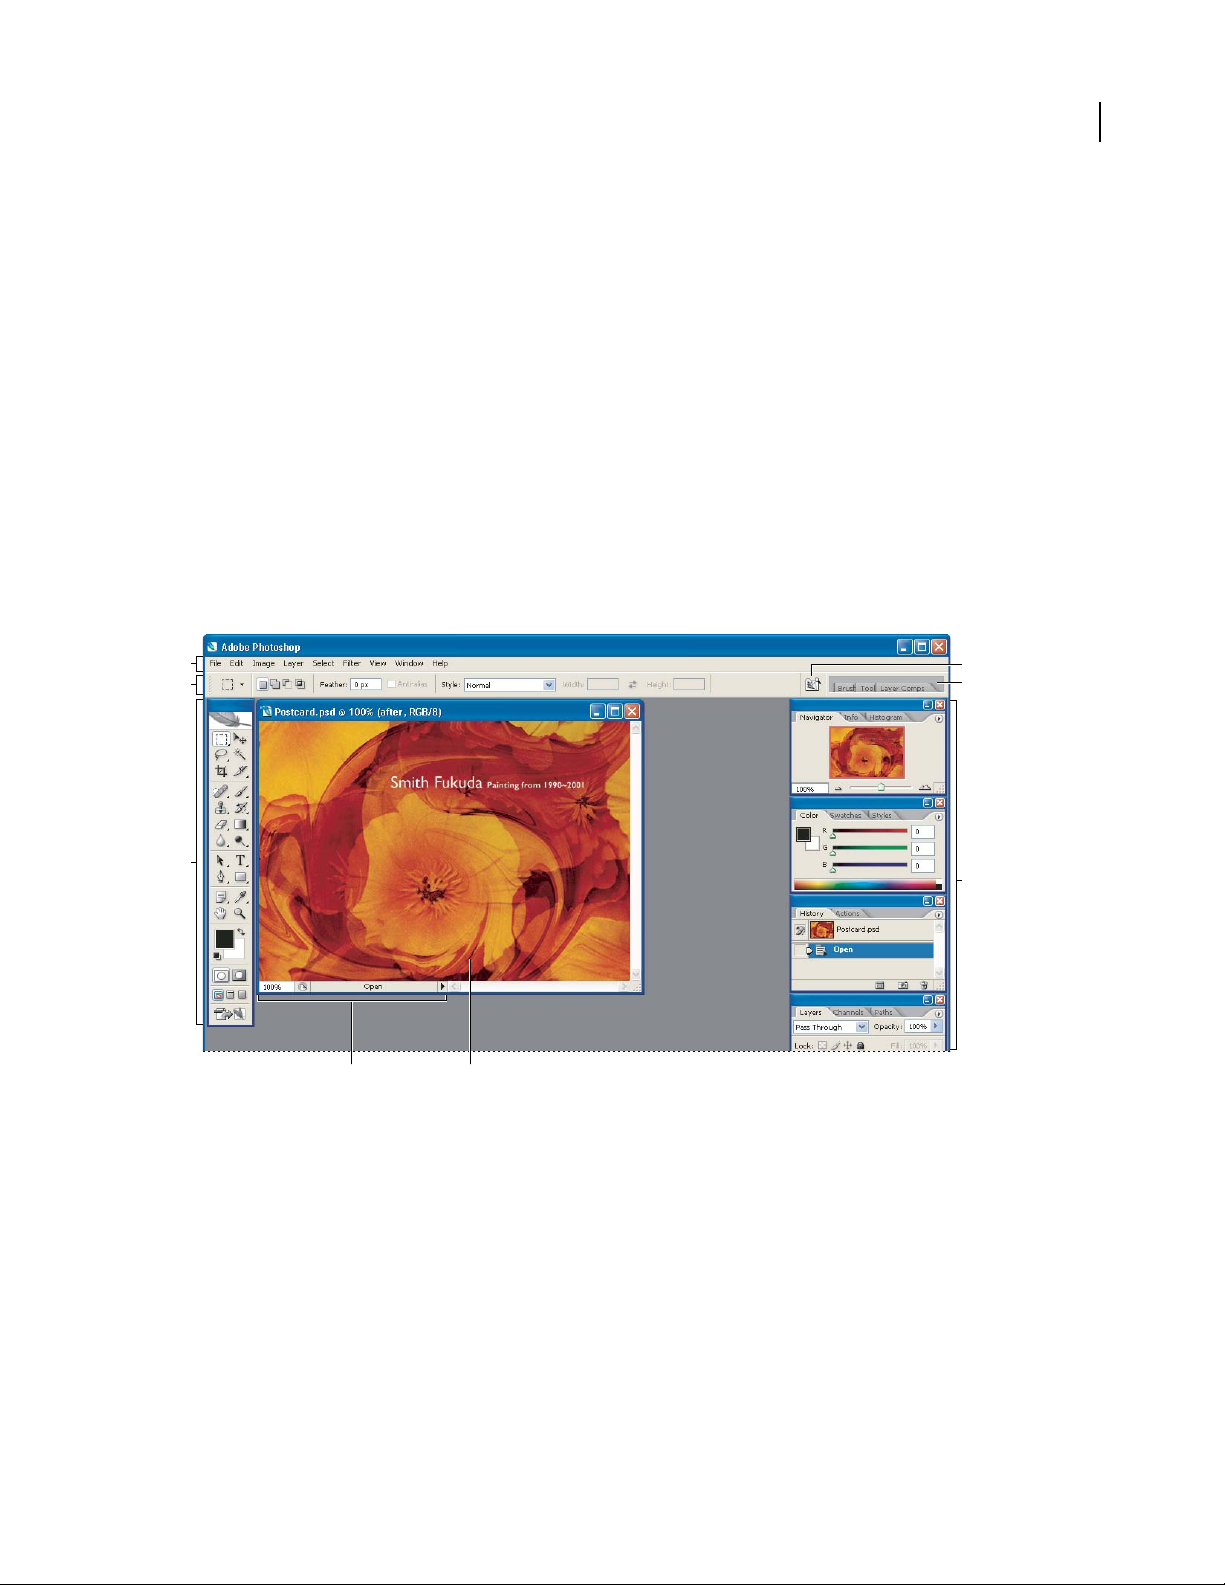
About the work area
The Photoshop and ImageReady work area is arranged to help you focus on creating and editing images.
31
A
B
C
G H
Photoshop work area
A. Menu bar B. Options bar C. To ol b ox D. Go to Bridge E. Palette well F. Palettes G. Status bar H. Active image area
D
E
F
The work area has these components:
Menu bar Contains menus organized by tasks. For example, the Layers menu contains commands for working with
layers. In Photoshop, you can customize the menu bar by showing, hiding, or adding color to menu items.
Options bar Provides options for using a tool.
Toolbox Contains tools for creating and editing images.
Active image area Displays the active open file. The window containing an open file is also called the document
window.
Page 40

ADOBE PHOTOSHOP CS2
User Guide
Palette well Helps you organize the palettes in your work area.
Palettes Help you monitor and modify images. You can customize the palette locations in the workspace. In
Photoshop, you can also show, hide, or add color to items in palette menus.
In Photoshop, you can change the font size of the text in the options bar, palettes, and tool tips.
About the status bar
The status bar is located at the bottom of every document window and displays useful information—such as the
currentmagnification andfilesizeofthe active image, andbrief instructions forusing theactivetool. Thestatusbar
also displays Version Cue information if you have Version Cue enabled.
Note: In ImageReady, if the document window is wide enough, two image information boxes appear, enabling you to
view two different information options for the image at the same time. You can also view copyright and authorship information that has been added to the file. This information includes standard file information and Digimarc watermarks.
Photoshop automatically scans opened images for watermarks using the Digimarc Detect Watermark plug-in. If a
watermark is detected, Photoshop displays a copyright symbol in the image window’s title bar and updates the Copyright
& URL area of the File Info dialog box.
To display file information in the document window
1 Click the triangle in the bottom border of the document window.
32
File information view options in Photoshop
2 Choose a view option from the pop-up menu:
Note: If you have Version Cue enabled, choose from the Show submenu.
Version Cue Displays the Version Cue workgroup status of your document, such as open, unmanaged, unsaved, and
so forth. This option is available only if you have Version Cue enabled.
Document Sizes Information on the amount of data in the image. The number on the left represents the printing
size of the image—approximately the size of the saved, flattened file in Adobe Photoshop format. The number on the
right indicates the file’s approximate size, including layers and channels.
Document Profile The name of the color profile used by the image.
Document Dimensions The dimensions of the image.
Scratch Sizes Informationonthe amount of RAMand thescratchdiskusedtoprocess theimage.The number on
the left represents the amount of memory currently being used by the program to display all open images. The
number on the right represents the total amount of RAM available for processing images.
Efficiency The percentage of time actually spent performing an operation instead of reading or writing to the
scratch disk. If the value is below 100%, Photoshop is using the scratch disk and is therefore operating more slowly.
Page 41
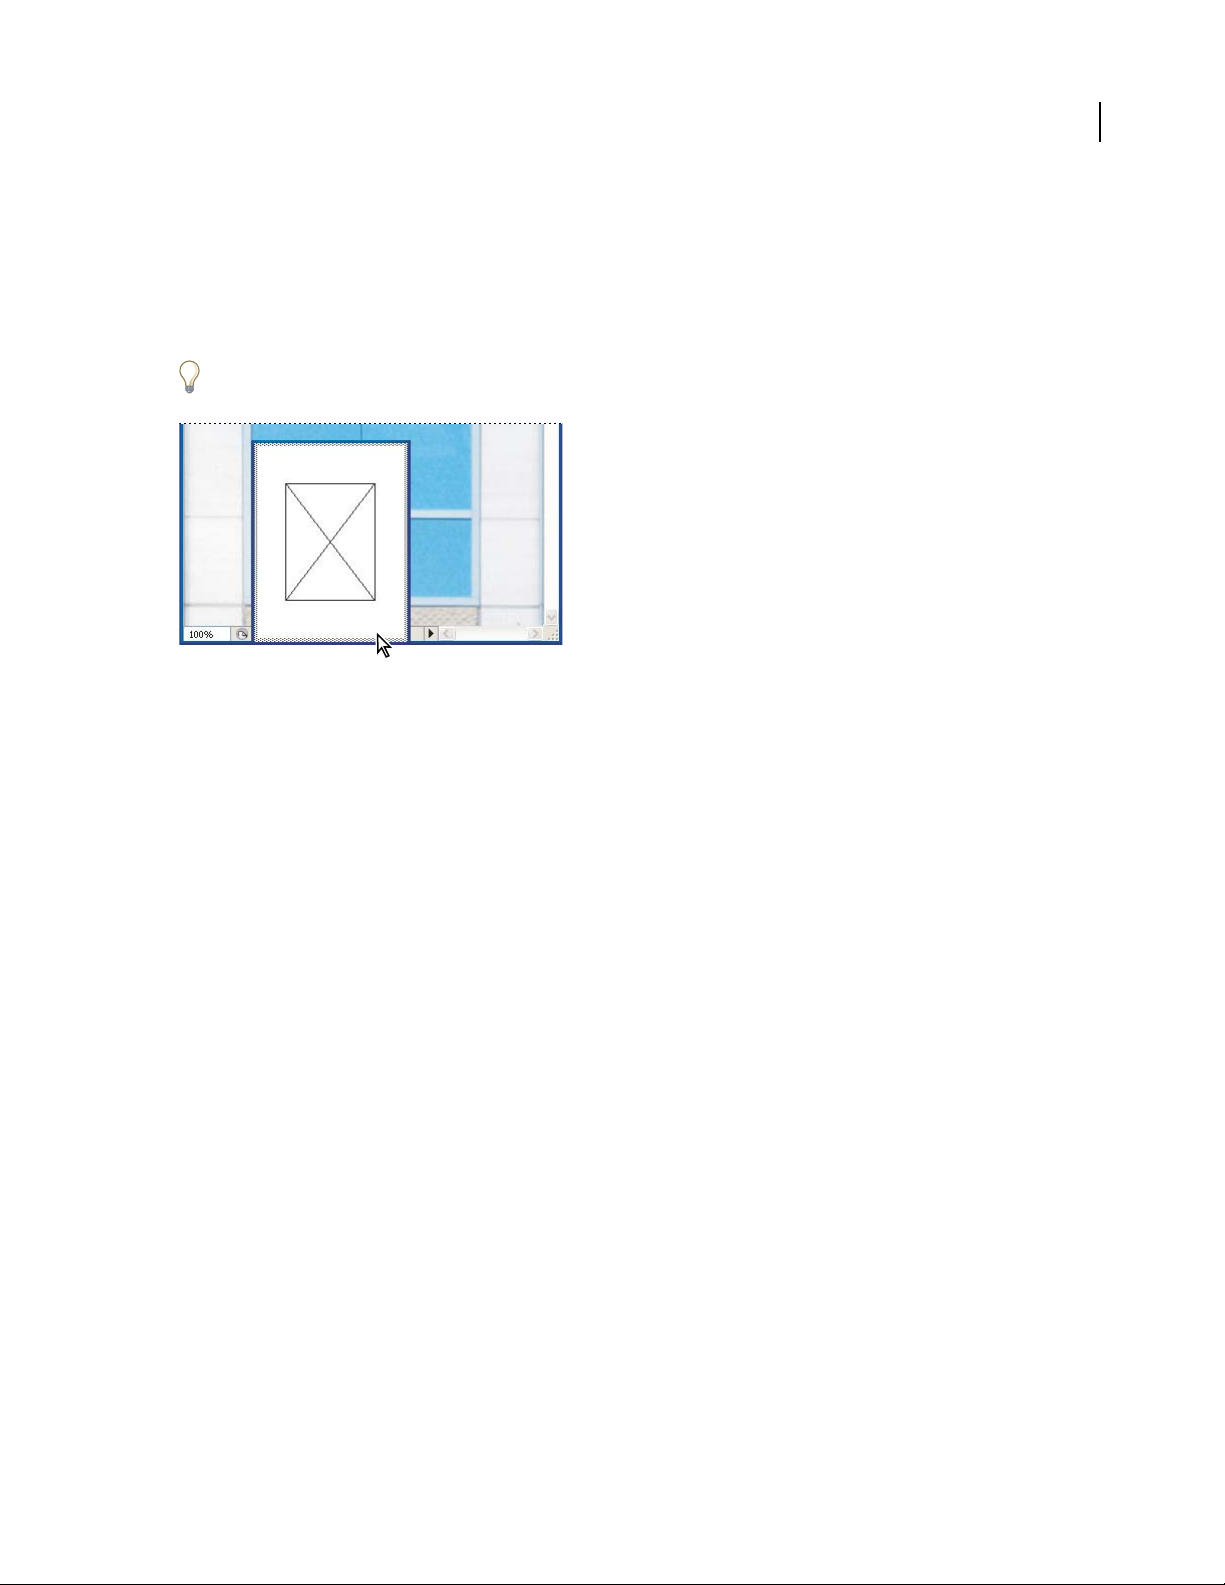
ADOBE PHOTOSHOP CS2
User Guide
Timing The time it took to complete the last operation.
Current Tool The name of the active tool.
32-bit Exposure Option for adjusting the preview image for viewing 32-bits-per-channel high dynamic range
(HDR) images on your computer monitor. The slider is available only when the document window displays an HDR
image.
Clickanywhereinthe file informationareaofthe status bartosee athumbnail previewshowing howyourdocument
(at its current image size) will be printed in the current page setup.
Click the file information area in the status bar to see a thumbnail preview of how the image will be printed.
33
See also
“Version Cue managed projects” on page 113
“To adjust HDR image viewing” on page 204
To display image information in ImageReady
1 Click an image information box at the bottom of the document window.
2 Select a view option:
Original/Optimized File Size The file size of the original and optimized images. The first value indicates the file size
of the original image. The second value (present if the original image has been optimized) indicates the file size and
file format of the optimized image based on the current settings in the Optimize palette.
Optimized Information The file format, file size, number of colors, and dither percentage of the optimized image.
Image Dimensions The pixel dimensions of the image.
Watermark Strength The strength of the Digimarc digital watermark, if present, in the optimized image.
Undo/Redo Status The number of undos and redos that are available for the image.
Original in Bytes The size, in bytes, of the original, flattened image.
Optimized in Bytes The size, in bytes, of the optimized image.
Optimized Savings The reduction percentage of the optimized image, followed by the difference in bytes between
the original and optimized sizes.
Output Settings Output settings that control how HTML files are formatted, how files and slices are named, and
how background images are handled when you save an optimized image.
Size/Download Time The file size of the optimized image and estimated download time using the selected modem
speed.
Page 42

ADOBE PHOTOSHOP CS2
User Guide
Note: Download timesmay vary basedonInternettraffic andmodem compression schemes. Thevalue displayedisan
approximation.
See also
“Adding digital copyright information” on page 689
“To set output options” on page 647
To jump between Photoshop and ImageReady
You can easily jump between Photoshop and ImageReady to use features in both applications when preparing
graphics for the web or other purposes. Jumping between the applications lets you use the full feature sets of both
applications while maintaining a streamlined workflow. Files and documents updated in one application can be
automatically updated in the other application. Jumping to an application eliminates the need to close the file in one
application and reopen it in another.
❖ Do one of the following:
• Click the Edit In Photoshop button at the bottom of the toolbox.
• Choose File > Edit In Photoshop or File > Edit in ImageReady.
When you jump between Photoshop and ImageReady, the applications use a temp file for transferring changes.
34
Jumping to other applications
In addition to jumping to current versions of Photoshop, you can jump to other graphics-editing applications and
HTML-editing applications from within Photoshop and ImageReady.
When you install Photoshop or ImageReady, Adobe graphics-editing and HTML-editing applications currently on
your system are added to the Jump To submenu. You can add more applications, including non-Adobe applications,
to the Jump To submenu.
When you jump to a graphics-editing application, the original file is opened in the destination application. When
you jump to an HTML editor, the optimized file and the HTML file are saved and opened in the destination application. If the image contains slices, all files for the full image are included. You can set a preference for automatically
updating files when you jump to Photoshop or ImageReady after editing files in another application.
To jump to another application from ImageReady
1 Do one of the following:
• Choose File > Jump To, and choose the desired application from the submenu.
• If the desired application doesn’t appear in the Jump To submenu, choose Other Graphics Editor or Other HTML
Editor to specify the application.
2 If the file has been modified since the last save, choose an option in ImageReady for saving the file:
• Click Save, and save the file with its current name and location.
• Click Save As, and save the file with a new name, in a new location, or both.
Page 43

ADOBE PHOTOSHOP CS2
User Guide
To add an application to the Jump To submenu
1 Create a shortcut (Windows) or an alias (Mac OS) for the application you want to add to the menu.
2 Drag the icon for the shortcut or alias into the Jump To Graphics Editor folder or the Jump To HTML Editor folder,
located in the Helpers folder inside the Photoshop program folder.
3 Restart ImageReady to view the application in the Jump To submenu.
To enable automatic file updates in ImageReady
You can set a preference to automatically update a file when returning to ImageReady from another application.
1 Do one of the following:
• (Windows) Choose Edit > Preferences > General.
• (Mac OS) ImageReady > Preferences > General.
2 Select Auto-Update Open Documents.
Palettes and menus
35
To use palettes
❖ Palettes help you monitor and modify your work. You can customize the default palette arrangement in the
following ways:
• To hide or show all palettes, including the toolbox and options bar, press Tab. To hide or show all palettes except
for the toolbox, press Shift+Tab.
• To display a palette menu, position the pointer on the triangle in the upper right corner of the palette, and press
the mouse button.
• To change the size of a palette, drag any corner of the palette (Windows) or drag the size box at its lower right
corner (Mac OS). Some palettes, such as the Color palette, cannot be resized by dragging.
• To collapse a group of palettes to their titles only, double-click the palette’s tab, or click the Minimize button
(Windows) or the Zoom box (Mac OS). You can open the palette menu even when the palette is collapsed.
Page 44

ADOBE PHOTOSHOP CS2
User Guide
A B
C
Using palettes
A. Click to collapse or expand a Mac OS palette B. Click to collapse or expand a Windows palette C. Click to display the palette menu
• To make a palette appear at the front of its group, click the palette’s tab.
• To move an entire palette group, drag its title bar.
• To rearrange or separate a palette group, drag a palette’s tab. Dragging a palette outside an existing group creates
a new palette window.
• To move a palette to another group, drag the palette’s tab to that group.
• To dock palettes so that they move together, drag a palette’s tab to the bottom of another palette.
• To move an entire docked palette group, drag its title bar.
36
Docking a palette in the palette well
• To return palettes to their default sizes and positions, choose Window > Workspace > Reset Palette Locations
(Photoshop) or Window > Workspace > Default Palette Locations (ImageReady).
• (ImageReady) To show or hide options for palettes that include hidden options (the Optimize, Layer Options, and
Slice palettes), click the double triangle icon in a palette tab to cycle through palette displays, or choose Show
Options or Hide Options from the palette menu.
A
B
ImageReady palette
A. Click to show options for the palette B. Click to show options for the option set
About the palette well
ThePhotoshop andImageReadyoptions bars includeapalettewellthathelps youorganizeand manage palettes.The
palette well stores, or docks, palettes that you use frequently, so that you don’t have to keep them open on the work
area.
The palette well is available only when the screen resolution is greater than 800 pixels x 600 pixels (a setting of at least
1024 x 768 is recommended).
Page 45

ADOBE PHOTOSHOP CS2
User Guide
Click a palette’s tab to use the palette in the palette well. The palette remains open until you click outside it or click
the palette’s tab again.
Docked palette in the palette well
To enter values in palettes, dialog boxes, and the tool options bar
❖ Do any of the following:
• Type a value in the text box, and press Enter or Return (Mac OS only).
• Drag the slider.
• (Photoshop) Move the pointer over the title of a slider or pop-up slider. When the pointer turns to a pointing
finger, drag the scrubby slider to the left or right. This feature is available only for selected sliders and pop-up
sliders.
• Drag the dial.
• Click the arrow buttons in the palette to increase or decrease the value.
• (Windows) Click the text box and then use the Up Arrow key and the Down Arrow key on the keyboard to
increase or decrease the value.
• Select a value from the menu associated with the text box.
37
A B C
D
Ways to enter values
A. Menu arrow B. Scrubby slider C. Text box D. Dial E. Slider
E
See also
“About scrubby sliders” on page 38
About pop-up sliders
Some palettes, dialog boxes, and options bars contain settings that use pop-up sliders (for example, the Opacity
option in the Layers palette). If there is a triangle next to the text box, you can activate the pop-up slider by clicking
the triangle. Position the pointer over the triangle next to the setting, hold down the mouse button, and drag the
slider or angle radius to the desired value. Click outside the slider box or press Enter to close the slider box. To cancel
changes, press the Esc key.
To increase or decrease values in 10% increments when the pop-up slider box is open, hold down Shift and press the
Up Arrow or Down Arrow key.
Page 46

ADOBE PHOTOSHOP CS2
User Guide
A
B
Using different kinds of pop-up sliders
A. Click to open pop-up slider box. B. Drag slider or angle radius.
(Photoshop) You can also “scrub” some pop-up sliders. For example, if you hold the pointer over the word “Fill” or
“Opacity” in the Layers palette, the pointer changes to the Hand icon. Then you can move the pointer left or right to
change the fill or opacity percentage.
About scrubby sliders
In some palettes, dialog boxes, and options bars, you can drag scrubby sliders to change option values. Scrubby
sliders are hidden until you position thepointer overthe title of slidersand pop-up sliders. When thepointer changes
to apointing finger, you drag to theleft or right.Holding down the Shift key while dragging accelerates the scrubbing
by a factor of 10.
Hovering over the title of a slider or pop-up slider shows the scrubby slider
38
About pop-up palettes
Pop-up palettes provide easy access to available options for brushes, swatches, gradients, styles, patterns, contours,
and shapes. You can customize pop-up palettes by renaming and deletingitems and by loading, saving, andreplacing
libraries. You can also change the display of a pop-up palette to view items by their names, as thumbnail icons, or
with both names and icons.
Click a tool thumbnail in the options bar to show its pop-up palette. Click an item in the pop-up palette to select it.
AB
Viewing the Brush pop-up palette in the options bar
A. Click to show the pop-up palette. B. Click to view the pop-up palette menu.
To rename or delete an item in a pop-up palette
❖ Select an item, click the triangle in the upper right corner of the pop-up palette, and choose one of the following:
Rename Lets you enter a new name for the item.
Delete Deletes an item in the pop-up palette.
Page 47

ADOBE PHOTOSHOP CS2
User Guide
Note: You can also delete an item in a pop-up palette by holding down Alt (Windows) or Option (Mac OS) and clicking
the item.
To customize the list of items in a pop-up palette
1 Click the triangle in the upper right corner of the pop-up palette to view the palette menu.
2 To return to the default library, choose the Reset command. You can either replace the current list or add the
default library to the current list.
3 To load a different library, do one of the following:
• Choose the Load command to add a library to the current list. Then select the library file you want to use, and
click Load.
• Choose the Replace command to replace the current list with a different library. Then select the library file you
want to use, and click Load.
• Choose a library file (displayed at the bottom of the palette menu). Then click OK to replace the current list, or
click Append to add the current list.
4 To save thecurrent list as alibrary forlater use, choose theSavecommand.Thenenter anamefor thelibrary file,
and click Save.
(Mac OS) Include the extension of the library file name so that you can easily share the libraries across operating
systems. Select Append File Extension Always in the File Handling Preferences to append extensions to file names.
39
To change the display of items in a pop-up palette
1 Click the triangle in the upper right corner of the pop-up palette to view the palette menu.
2 Select a view option: Text Only, Small Thumbnail, Large Thumbnail, Small List, or Large List.
To display context menus
Contextmenus displaycommandsrelevanttothe active tool,selection,orpalette. They aredistinctfromthe menus
across the top of the work area.
Viewing the context menu for the Eyedropper tool
1 Position the pointer over an image or palette item.
2 Right-click (Windows) or Control-click (Mac OS).
Page 48

ADOBE PHOTOSHOP CS2
User Guide
Tools
About tools and the toolbox
The first time you start the application, the toolbox appears at the left side of the screen. You can move the toolbox
by dragging its title bar. You can also show or hide the toolbox by choosing Window > Tools.
Some tools in the toolbox have options that appear in the context-sensitive tool options bar. These include the tools
that let you use type, select, paint, draw, sample, edit, move, annotate, and view images. Other tools in the toolbox
allow you to change foreground/background colors, go to Adobe Online, work in different modes, and jump between
Photoshop and ImageReady applications.
You can expand some tools to show hidden tools beneath them. A small triangle at the lower right of the tool icon
signals the presence of hidden tools.
You can view information about any tool by positioning the pointer over it. The name of the tool appears in a tool tip
below the pointer. Some tool tips contain links leading to additional information about the tool.
40
Page 49

Toolbox overview
A D F
A
B
C
E
F
D
B
C
G
Selection tools
Rectangular
Marquee
Elliptical Marquee
Single Column
Marquee
Single Row
Marquee
Move
Lasso (L)
Polygonal Lasso
Magnetic Lasso
Magic Wand W)
(M)
(M)
(M)
(M)
(V)
(L)
(L)
(
Crop and slice tools
(C)
Crop
Slice (K)
Slice Select
Retouching tools
Spot Healing Brush (
Healing Brush (J)
Patch
(J)
Red Eye
(J)
Clone Stamp (S)
Pattern Stamp
Eraser
Background Eraser
Magic Eraser
Blur (R)
Sharpen (R)
Smudge (R)
Dodge (
Burn (O)
Sponge (O)
(S)
(E)
(E)
(E)
O)
ADOBE PHOTOSHOP CS2
41
User Guide
Painting tools
Brush (B)
(B)
Pencil
Color
Replacement
History Brush
Art History Brush
Gradient
Paint Bucket
E
Drawing and type
(B)
(Y)
(Y)
(G)
(G)
tools
Path Selection
Direct Selection
(P)
Pen
Freeform Pen
Add Anchor
Point
Delete Anchor
Point
Convert Anchor
J)
Point
Horizontal Type (T
Vertical Type
Horizontal Type
Mask
Vertical Type
Mask
Rectangle
Rounded
Rectangle
Ellipse (U)
Polygon
Line (U)
Custom Shape
(A)
(A)
(P)
(P)
(P)
(P)
)
(T)
(T)
(T)
(U)
(U)
(U)
(U)
Annotation,
measuring, and
navigation tools
(N)
Notes
Audio Annotation
Eyedropper
Color Sampler
(I)
Measure
Hand (H)
(Z)
Zoom
G
ImageReady only
tools
Rectangle Image
Map (P)
Circle Image Map (P)
Polygon Image Map (P)
Image Map Select (J)
Tab Rectangle (R)
Pi
ll Rectangle (R)
Toggle Image Map
Visibility (A
Toggle Slices
Visibility (Q
Preview Document (Y)
Preview in Browser
(cmd+option+P)
(N)
(I)
(I)
)
)
ndicates default tool * Keyboard shortcuts appear in parenthesis
I
See also
“Selection tools gallery” on page 42
“Crop and slice tools gallery” on page 42
“Retouching tools gallery” on page 42
“Painting tools gallery” on page 44
“Drawing and type tools gallery” on page 44
“Annotation, measuring, and navigation tools gallery” on page 45
“ImageReady-only tools gallery” on page 45
Page 50

ADOBE PHOTOSHOP CS2
Selection tools gallery
Tools marked with an asterisk are available in Photoshop only.
The marquee tools make The Move tool moves selec- The lasso tools make free- The Magic Wand tool selects
rectangular, elliptical, single tions, layers, and guides. hand, polygonal (straight- similarly colored areas.
row, and single column selec- edged), and magnetic* (snaptions. to) selections.
Crop and slice tools gallery
User Guide
42
The Crop tool trims images. The Slice tool creates slices. The Slice Select tool selects
slices.
Retouching tools gallery
Tools marked with an asterisk are available in Photoshop only.
The Spot Healing Brush The Healing Brush tool* The Patch tool* repairs im- The Red Eye tool* removes
tool* removes blemishes and paints with a sample or pat- perfections in a selected area the red reflection caused by a
objects tern to repair imperfections of an imageusing asampleor flash.
in a image. pattern.
Page 51

ADOBE PHOTOSHOP CS2
The Clone Stamp tool paints The Pattern Stamp tool* The Eraser tool erases pixels The Background Eraser
with a sample of an image. paints with part of an image and restores parts of an im- tool* erases areas to trans-
as a pattern. age to a previously saved parency by dragging.
state.
The Magic Eraser tool eras- The Blur tool* blurs hard The Sharpen tool*sharpens The Smudge tool* smudges
es solid-colored areas to edges in an image. soft edges in an image. data in an image.
transparency with a single
click.
User Guide
43
The Dodge tool* lightens ar- The Burn tool* darkens ar- The Sponge tool* changes
eas in an image. eas in an image. the color saturation of an ar-
ea.
Page 52

ADOBE PHOTOSHOP CS2
Painting tools gallery
Tools marked with an asterisk are available in Photoshop only.
The Brush tool paints brush The Pencil tool paints hard- The Color Replacement The History Brush tool*
strokes. edged strokes. tool*replacesaselected color paints a copy of the selected
with a new color. state or snapshot into the cur-
rent image window.
The Art History brush tool* The gradient tools* create The Paint Bucket tool fills
paints with stylized strokes straight-line, radial, angle, similarly colored areas with
that simulate the look of dif- reflected, and diamond the foreground color.
ferent paint styles, using a se- blends between colors.
lected state or snapshot.
User Guide
44
Drawing and type tools gallery
Tools marked with an asterisk are available in Photoshop only.
The path selection tools* Thetypetools create type on The type mask tools* create The pen tools* let you draw
make shape or segment selec- an image. a selection in the shape of smooth-edged paths.
tions showing anchor points, type.
direction lines, and direction
points.
The shape tools and Line The Custom Shape tool*
tool draw shapes and lines in makes customized shapes se-
a normal layer or a shape lected from a custom shape
layer. list.
Page 53
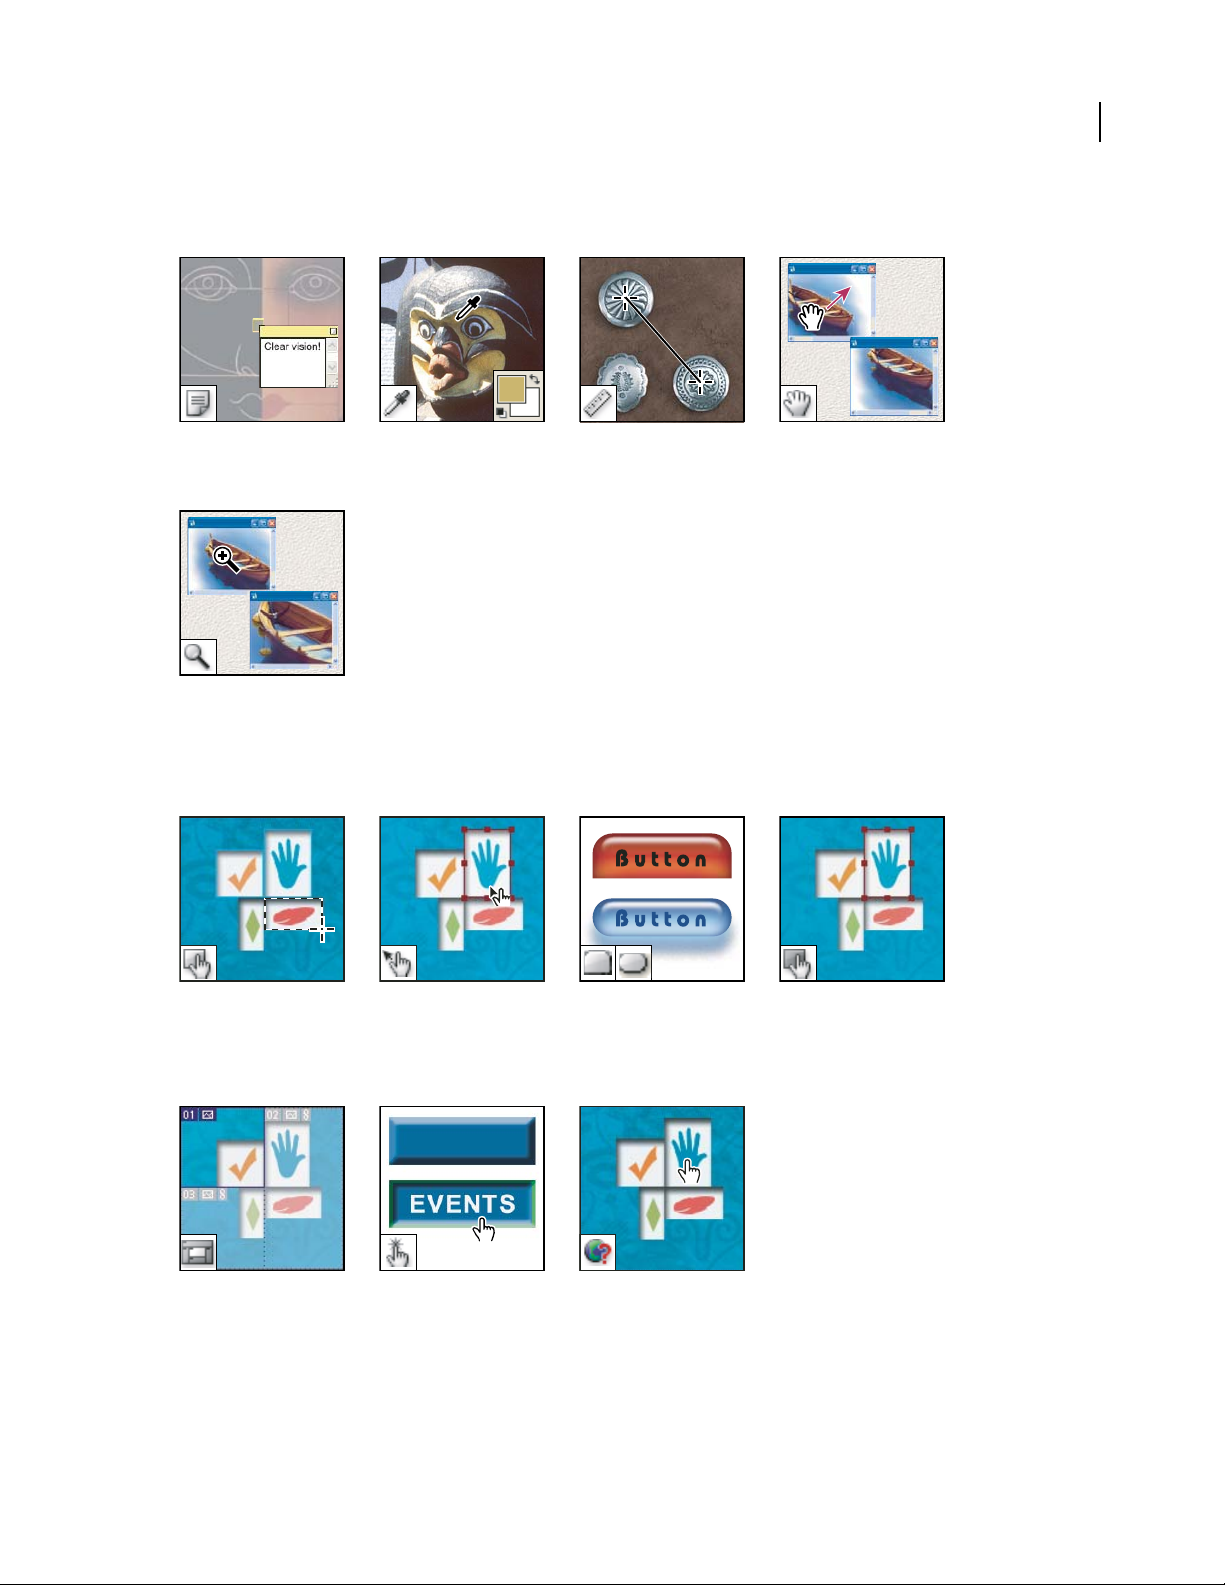
ADOBE PHOTOSHOP CS2
Annotation, measuring, and navigation tools gallery
Tools marked with an asterisk are available in Photoshop only.
The annotation tools*make The Eyedropper tool sam- The Measure tool*measures The Hand tool moves an im-
notes and audio annotations ples colors in an image. distances, locations, and an- age within its window.
that can be attached to an gles.
image.
The Zoom tool magnifies
and reduces the view of an
image.
User Guide
45
ImageReady-only tools gallery
Theimage maptools define The Image Map Select tool The Tab Rectangle tool TheToggleImage MapVisi-
image map areas in an im- selects image maps. draws a long rectangle with bility tool toggles between
age. the top corners rounded. showing and hiding image
The Toggle Slices Visibility The Preview Document tool The Preview in Default
tool toggles between showing previews rollover effects di- Browser tool previews ani-
andhidingslicesinanimage. rectly in ImageReady. mations in a web browser.
The Pill Rectangle tool maps.
draws a rectangle with
rounded corners.
Page 54

ADOBE PHOTOSHOP CS2
User Guide
To use a tool
❖ Do one of the following:
• Clickatool in thetoolbox.Ifthere is asmall triangle at atool’slower rightcorner, hold down themouse button to
view the hidden tools. Then click the tool you want to select.
• Press the tool’s keyboard shortcut. The keyboard shortcut is displayed in its tool tip. For example, you can select
the Move tool by pressing the V key.
46
A
B
C
Using the selecting tools
A. To ol b ox B. Active tool C. Hidden tools D. Tool name E. To o l s h o r tcut F. Hidden tool triangle
D
E
F
Note: In ImageReady, click the downward-pointing triangle at the bottom of the hidden tools list to tear off a floating
tool palette. Click the button at the top right (Windows) or top left (Mac OS) of the floating tool palette to close it.
Clicking the triangle to “tear off ” a floating tool palette
To cycle through hidden tools
Youcan select apreferencethatallowsyou to cyclethrough aset of hidden toolsbyholdingdownthe Shiftkey.When
this preference is not selected, you can cycle through a set of hidden tools by pressing the shortcut key (without
holding down Shift).
1 Choose Edit > Preferences > General (Windows) or Photoshop > Preferences > General (Mac OS).
2 Select Use Shift Key For Tool Switch.
To display or hide tool tips
1 Do one of the following:
• (Windows) Choose Edit > Preferences > General.
• (Mac OS) Choose Photoshop > Preferences > General or choose ImageReady > Preferences > General.
2 Select or deselect Show Tool Tips.
Note: Tool tips may not be available in some dialog boxes.
Page 55

ADOBE PHOTOSHOP CS2
User Guide
About tool pointers
In most cases, thepointer foratool is thesameasthe icon forthattool; yousee that pointerwhenyou select thetool.
The default pointer for the marquee tools is the cross-hair pointer
; and for the painting tools the default pointer is the Brush Size icon.
beam
; for the text tool, the default pointer is the I-
Each default pointer has a different hotspot,where an effect or action in theimage begins.Withmosttools,you can
switch to precise cursors, which appear as cross hairs centered around the hotspot.
To change tool pointers
1 Do one of the following:
• (Photoshop) Choose Edit > Preferences > Display & Cursors (Windows) or choose Photoshop > Preferences >
Display & Cursors (Mac OS).
• (ImageReady) Choose Edit > Preferences > Cursors (Windows) or choose ImageReady > Preferences > Cursors
(Mac OS).
2 Choose a tool pointer setting under Painting Cursors and/or Other Cursors:
Standard Displays pointers as tool icons.
Precise Displays pointers as cross hairs.
47
Brush Size (painting cursors only) Displays the painting tool cursors as brush shapes representing the size of the
current brush. Brush Size cursors may not appear for very large brushes.
3 (Photoshop) Select Brush Cursor options if you selected Brush Size as the tool pointer setting:
Normal The pointer outline corresponds to approximately 50% of the area that the tool will affect. This option
shows the pixels that would be most visibly affected.
Full Size The pointer outline corresponds to nearly 100% of the area that the tool will affect, or nearly all the pixels
that would be affected.
Always Show Crosshair Displays cross hairs in the center of the brush shape.
4 Click OK.
The Painting Cursors options control the pointers for the following tools:
• (Photoshop) Eraser, Pencil, Paintbrush, Healing Brush, Rubber Stamp, Pattern Stamp, Smudge, Blur, Sharpen,
Dodge, Burn, and Sponge tools
• (ImageReady) Paintbrush, Pencil, and Eraser tools
The Other Cursors options control the pointers for the following tools:
• (Photoshop) Marquee, Lasso, Polygonal Lasso, Magic Wand, Crop, Slice, Patch, Eyedropper, Pen, Gradient, Line,
Paint Bucket, Magnetic Lasso, Magnetic Pen, Freeform Pen, Measure, and Color Sampler tools
• (ImageReady) Marquee, Lasso, Magic Wand, Eyedropper, Paint Bucket, and Slice tools
To toggle between standard and precise cursors in some tool pointers, press Caps Lock.
Page 56

ADOBE PHOTOSHOP CS2
User Guide
Using the options bar
The options bar appears below the menu bar at the top of the work area. The options bar is context sensitive—it
changes as you select different tools. Some settings in the options bar (such as painting modes and opacity) are
common to several tools, and some (such as the Auto Erase setting for the Pencil tool) are specific to one tool.
You can move the options bar in the work area by using the gripper bar, and you can dock it at the top or bottom of
the screen. Tool tips appear when you position the pointer over a tool. To show or hide the options bar, choose
Window > Options.
A B
Lasso options bar
A. Gripper bar B. Tool tip
(Photoshop) To return tools to their default settings, right-click (Windows) or Control-click (Mac OS) the tool icon
in the options bar, and then choose Reset Tool or Reset All Tools from the context menu.
(ImageReady) To return tools to their default settings, choose Edit > Preferences > General (Windows), or choose
ImageReady > Preferences > General (Mac OS) and then click Reset All Tools.
48
For more information on setting options for a specific tool, search for the tool’s name in Photoshop Help.
Using tool presets
Tool presets let you save and reuse tool settings. You can load, edit, and create libraries of tool presets using the Tool
Preset picker in the options bar, the Tool Presets palette, and the Preset Manager.
To choose a tool preset, click the Tool Preset picker in the options bar, and select a preset from the pop-up palette.
You can also choose Window > Tool Presets and select a preset in the Tools Presets palette.
A
B
C
Viewing the Tool Preset picker
A. Click the Tool Preset picker in the options bar to show the Tool Preset pop-up palette. B. Select a preset to change the tool’s options to the
preset, which applies each time you select the tool until you choose Reset Tool from the palette menu. C. Deselect to show all tool presets; select
to show presets for only the tool selected in the toolbox.
To create a tool preset
1 Choose a tool, and set the options you want to save as a tool preset in the options bar.
2 Do one of the following:
• Click the Tool Preset button next to the tool at the left of the options bar.
• Choose Window > Tool Presets to display the Tool Presets palette.
Page 57

ADOBE PHOTOSHOP CS2
User Guide
3 Do one of the following:
• Click the Create New Tool Preset button .
• Choose New Tool Preset from the palette menu.
4 Enter a name for the tool preset, and click OK.
To change the list of tool presets
❖ Click the triangle to open the Tool Presets pop-up palette menu and choose one of the following:
Show All Tool Presets Shows all loaded presets.
Sort By Tool Sorts the presets by tool.
Show Current Tool Presets Shows only the loaded presets for the active tool. You can also select the Current Tool
Only option in the Tool Presets pop-up palette.
Text Only, Small Text, or Large Text Determines how presets are displayed in the pop-up palette.
Note: To create, load, and manage libraries of tool presets, see “About pop-up palettes” on page 38 and “About the Preset
Manager” on page 67.
49
Working with files
To close windows
❖ Do one of the following:
• Choose File > Close to close the active window.
• (Photoshop) Choose File > Close All to close all windows.
• (ImageReady and Windows) Choose Window > Arrange > Close All to close all windows.
To duplicate an image in Photoshop
You can duplicate an entire image (including all layers, layer masks, and channels) into available memory without
saving to disk.
1 Open the image you want to duplicate.
2 Choose Image > Duplicate.
3 Enter a name for the duplicated image.
4 If you want to duplicate the image and merge the layers, select Duplicate Merged Layers Only. To preserve the
layers, make sure this option is deselected.
5 Click OK.
To duplicate an image in Photoshop and automatically append the word “copy” to its file name, hold down Alt
(Windows) or Option (Mac OS) when you choose Image > Duplicate.
Page 58

ADOBE PHOTOSHOP CS2
User Guide
To duplicate an image in ImageReady
Using duplicates in ImageReady lets you experiment and then compare several versions of the optimized image to the
original.
1 Open the image you want to duplicate.
2 Do one of the following:
• Select the Original tab at the top of the image window.
• Select the Optimized tab at the top of the image window.
3 Do one of the following:
• Hold down Alt (Windows) or Option (Mac OS), and drag the Original or Optimized tab from the image window.
• Choose Image > Duplicate.
4 Name the duplicate, specify whether to flatten the layers, and click OK.
Note: When you duplicate an image in Optimized, 2-Up, or 4-Up view, the duplicate image appears in the Original view
in the duplicate image window. If you want a duplicate optimized image to appear in the Optimized, 2-Up, or 4-Up view,
duplicate the original image, and then select the Optimized, 2-Up, or 4-Up tab in the duplicate image window.
To close a file
1 Choose File > Close or File > Close All (Photoshop).
2 Choose whether or not to save the file:
• Click Yes (Windows) or Save (Mac OS) to save the file.
• Click No (Windows) or Don’t Save (Mac OS) to close the file without saving it.
50
To quit Photoshop or ImageReady
1 Do one of the following:
• (Windows) Choose File > Exit.
• (Mac OS) Choose Photoshop > Quit or ImageReady > Quit.
2 Choose whether or not to save any open files:
• Click Yes (Windows) or Save (Mac OS) to save a file.
• Click No (Windows) or Don’t Save (Mac OS) to close a file without saving it.
Viewing images
To change the screen mode
You can use the screen mode options to view your images on your entire screen. You can show or hide the menu bar,
title bar, and scroll bars. You can choose from the following:
• The Standard screen mode is the default view, with menu bars, scroll bars, and other screen elements visible.
• Full Screen With Menu Bar view enlarges your view of an image but keeps the menu bar visible.
• (Photoshop) Full Screen mode lets you move the image around the screen to view different areas.
Page 59
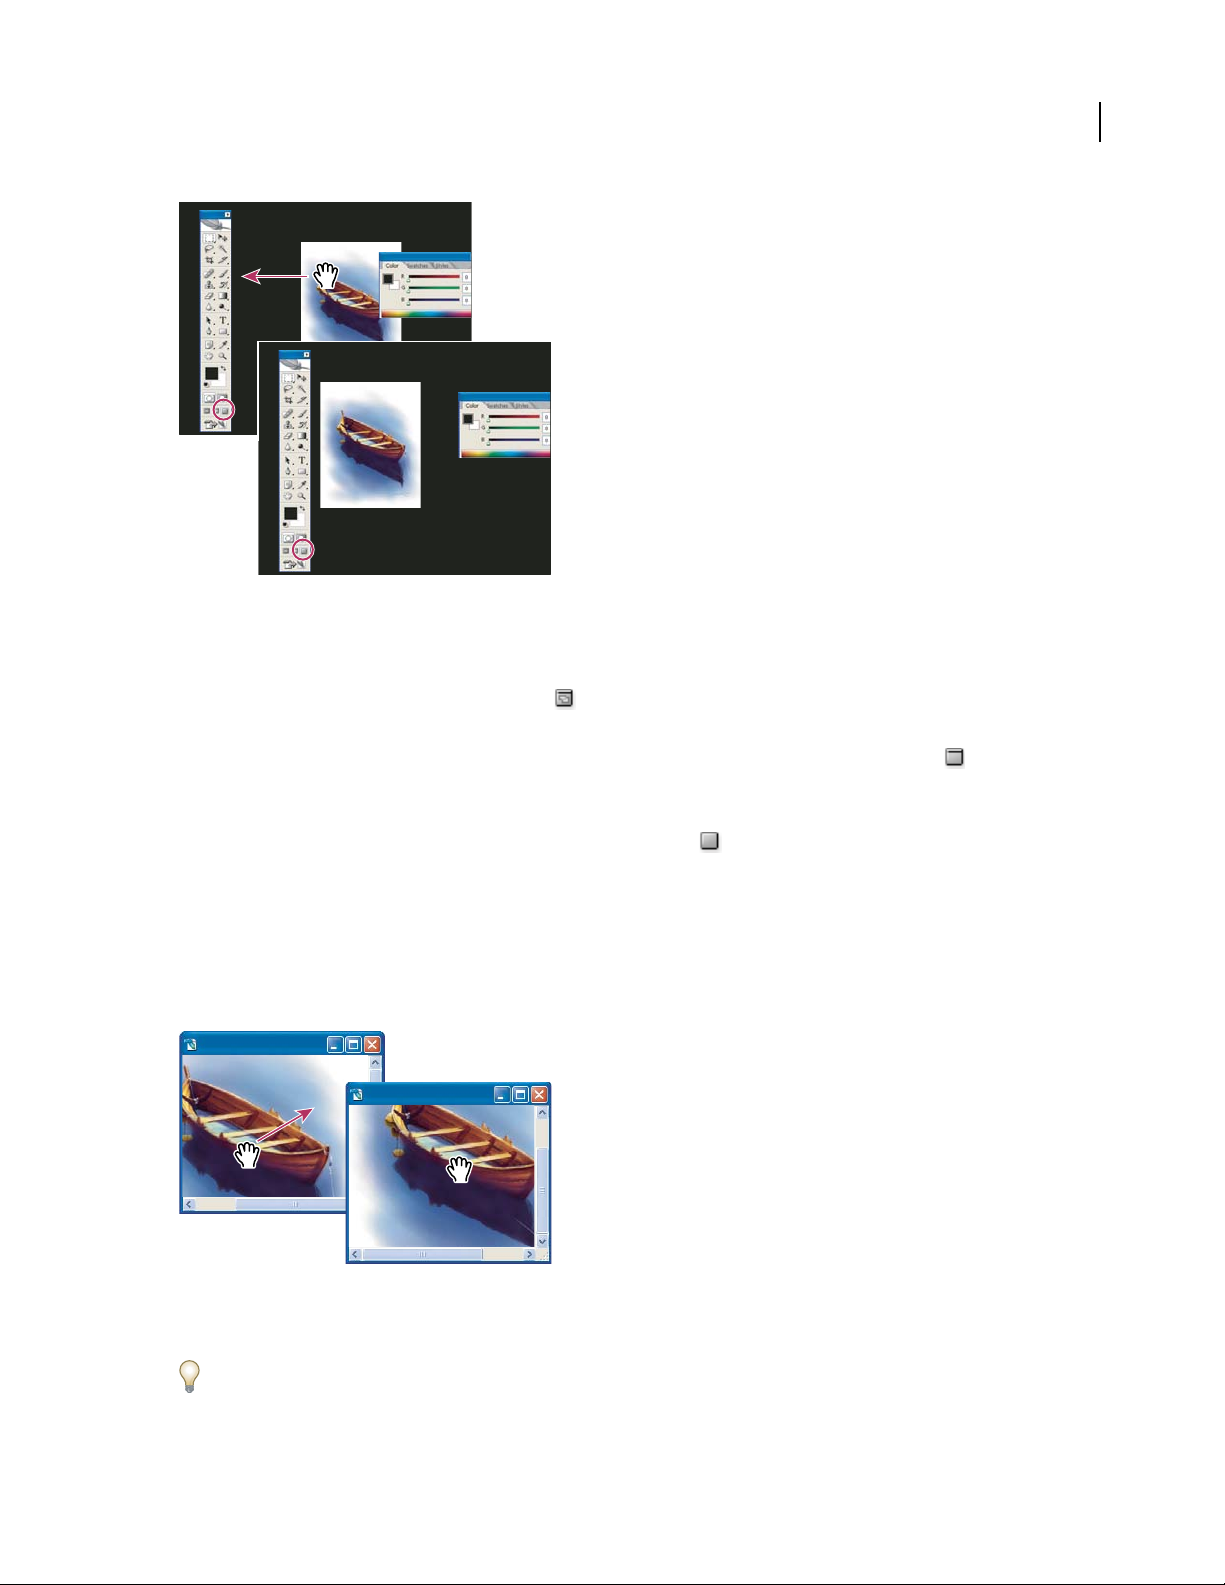
ADOBE PHOTOSHOP CS2
User Guide
(Photoshop) Dragging an image in Full Screen mode
❖ Do one of the following:
• To display the default window, with the menu bar at the top and scroll bars on the side, choose View > Screen
Mode > Standard, or click the Standard button in the toolbox.
• Todisplay a full-screen window with a menu bar and a 50% gray background, but no title bar orscroll bars, choose
View > Screen Mode > Full Screen With Menu Bar, or click the Full Screen With Menu Bar button in the
toolbox.
• To display a full-screen window with only a black background (no title bar, menu bar, or scroll bars), choose
View > Screen Mode > Full Screen, or click the Full Screen button in the toolbox.
51
To view another area of an image
❖ Do one of the following:
• Use the window scroll bars.
• Select the Hand tool and drag to pan over the image.
Dragging the Hand tool to view another area of an image
• Drag the colored box (proxy view area) in the Navigator palette.
To use the Hand tool while another tool is selected, hold down the spacebar as you drag in the image.
Page 60

ADOBE PHOTOSHOP CS2
User Guide
To use the Navigator palette
You use the Navigator palette to quickly change the view of your artwork using a thumbnail display. The colored box
in the Navigator (called the proxy view area) corresponds to the currently viewable area in the window.
❖ Do one or more of the following:
• To display the Navigator palette, select Window > Navigator.
• To change the magnification, type a value in the text box, click the Zoom Out or Zoom In button, or drag the zoom
slider.
• To move the view of an image, drag the proxy view area in the image thumbnail. You can also click the image
thumbnail to designate the viewable area.
• To change the color of the proxy view area, select Palette Options from the palette menu. Select a preset color from
the Color pop-up menu, or double-click the color box to choose a custom color.
A
B
C
D E F G
Navigator palette
A. Palette menu button B. Thumbnail display of artwork C. Proxy preview area D. Zoom text box E. Zoom Out button F. Zoom
slider G. Zoom In button
52
To zoom in or out
❖ Do any of the following:
• (Photoshop) Select the Zoom tool , and click either the Zoom In or Zoom Out button in the options
bar. Click the area you want to magnify.
• Select the Zoom tool. The pointer becomes a magnifying glass with a plus sign in its center. Click the center of the
area that you want to magnify, or hold down Alt (Windows) or Option (Mac OS) and click the center of the area
that you want to reduce. Each click magnifies or reduces the view to the previous preset percentage.
Note: When youuse theZoomorZoomOut tool,eachclick magnifiesorreduces theimage to thenext preset percentage
and centers the display around the point you click. When the image has reached its maximum magnification level of
1600% or minimum size of 1 pixel, the magnifying glass appears empty.
• Select the Zoom tool and drag a dotted rectangle, called a marquee,aroundthe area youwanttomagnify.Tomove
the marquee around the artwork, hold down the spacebar and continue dragging until the marquee is in the
desired location.
• Choose View > Zoom In or View > Zoom Out. When the image reaches its maximum or minimum magnification,
the command is dimmed.
• Set the zoom level at the lower left corner of the document window or in the Navigator palette (Photoshop).
• To display a file at 100%, choose View > Actual Pixels (Photoshop) or View > Actual Size (ImageReady).
• To change the view to fit the document window, choose View > Fit In Window.
(Photoshop) If your mouse has a scroll wheel, you can use it to zoom in or out after selecting the Zoom tool. Choose
Edit > Preferences > General (Windows) or Photoshop > Preferences > General (Mac OS) and select the Zoom With
Scroll Wheel option to enable this behavior.
Page 61

ADOBE PHOTOSHOP CS2
User Guide
To magnify by dragging
1 Select the Zoom tool.
2 Drag over the part of the image that you want to magnify.
Dragging the Zoom tool to magnify the view of an image
Theareainside thezoommarquee is displayedatthe highestpossiblemagnification.Tomovethe marqueearound
the artwork in Photoshop, begin dragging a marquee and then hold down the spacebar while dragging.
To display an image at 100%
❖ Do one of the following:
• Double-click the Zoom tool in the toolbox.
• Choose View > Actual Pixels (Photoshop) or View > Actual Size (ImageReady).
• Enter 100% in the Status Bar and press Enter (Windows) or Return (Mac OS).
53
Note: The 100% view of an image displays an image as it will appear in a browser (based on the monitor resolution and
the image resolution).
To fit an image to the screen
❖ Do one of the following:
• Double-click the Hand tool in the toolbox.
• Choose View > Fit On Screen.
• Select a zoom tool or the Hand tool, and click the Fit On Screen button in the options bar.
These options scale both the zoom level and the window size to fit the available screen space.
To automatically resize the window when zooming
❖ With the Zoom tool active, select Resize Windows To Fit in the options bar. The window is resized when you
magnify or reduce the view of the image.
When Resize Windows To Fit is deselected (the default), the window maintains a constant size regardless of the
image magnification. This can be helpful when using smaller monitors or working with tiled views.
Note: To automatically resize the window when using keyboard shortcuts to reduce or magnify an image view, choose
Edit > Preferences > General (Windows) or Photoshop > Preferences > General (Mac OS), then select the Zoom Resizes
Windows preference and click OK.
Page 62

ADOBE PHOTOSHOP CS2
User Guide
To view images in multiple windows
The document window is where your images appear. You can open multiple windows to display different images or
different views of the same one. A list of open windows appears in the Window menu. To bring an open image to the
front, choose the file name from the bottom of the Window menu. Available memory may limit the number of
windows per image.
(ImageReady) The document window lets you switch easily between original and optimized views of an image using
tabs, and to view the original image and multiple versions of an optimized image simultaneously.
1 Do one of the following:
• Choose Window > Arrange > New Window For [Image File Name].
• (ImageReady) Drag any tab away from the document window.
2 If you want to arrange the windows, choose Window > Arrange and then choose one of the following:
Cascade Displays windows stacked and cascading from the upper left to the lower right of the screen.
Tile Horizontally or Tile Vertically Displays windows edge to edge. As you close images, the open windows are
resized to fill the available space.
(Windows) Arrange Icons Aligns minimized image windows along the bottom of the screen.
(Photoshop) You can use the Hand tool’s Scroll All Windows option to scroll through all open images. Select it in the
options bar and drag in one image to scroll through all visible images.
54
To zoom into or out of multiple images
1 Open one or more images, or copies of a single image.
2 Choose Window > Arrange > Tile Horizontally/Tile Vertically to display the images edge to edge.
3 Select the Zoom tool, and then do one of the following:
• Select Zoom All Windows in the options bar, and then click one of the images. The other images zoom in or out
at the same time.
• Choose Window > Arrange > Match Zoom. Hold down the Shift key and click one of the images. The other images
zoom in or out at the same magnification.
To match locations in images
1 Open one or more images, or multiple copies of a single image.
2 Choose either Window > Arrange > Tile Horizontally/Tile Vertically to display the images edge to edge.
3 Select the Hand tool, and then do one of the following:
• Select Scroll All Windows in the options bar, and then drag to view another area in one of the images.
• Choose Window > Arrange > Match Location, hold down the Shift key, and click or drag an area in one of the
images. The other images snap to the corresponding area.
To match zoom and locations in images
1 Open one or more images, or multiple copies of a single image.
2 Choose Window > Arrange > Tile.
3 Choose Window > Arrange > Match Zoom And Location.
Page 63

ADOBE PHOTOSHOP CS2
User Guide
Without Match Zoom And Location (top), and with Match Zoom And Location (bottom) selected
4 Select the Zoom tool or the Hand tool.
5 Select one of the images, hold down the Shift key, and click in or drag an area of an image. The other images are
magnified to the same percentage and snap to the area you clicked.
55
About the Info palette
The Info palette shows the color values beneath the pointer and, depending on the tool in use, gives other useful
information. In Photoshop, the Info palette also displays a hint on using the selected tool, gives document status
information, and can display 8-bit, 16-bit, or 32-bit values.
(Photoshop) The Info palette displays the following information:
• Depending on the option you specify, the Info palette displays 8-bit, 16-bit, or 32-bit values.
• When displaying CMYK values, the Info palette displays an exclamation point next to the CMYK values if the
color beneath the pointer or color sampler is out of the printable CMYK color gamut.
• When a marquee tool is being used, the Info palette displays the x and y coordinates of the pointer position and
the width (W) and height (H) of the marquee as you drag.
• When the Crop tool or Zoom tool is being used, the Info palette displays the width (W) and height (H) of the
marquee as you drag. The palette also shows the angle of rotation of the crop marquee.
• When the Line tool, the Pen tool, or Gradient tool is being used, or when a selection is being moved, the Info
palette displays the x and y coordinates of your starting position, the change in X (DX), the change in Y (DY), the
angle (A), and the distance (D) as you drag.
• When a two-dimensional transformation command is being used, the Info palette displays the percentage change
in width (W) and height (H), the angle of rotation (A), and the angle of horizontal skew (H) or vertical skew (V).
• When any color adjustment dialog box (for example, Curves) is being used, the Info palette displays before-and-
after color values for the pixels beneath the pointer and beneath color samplers.
• If the Show Tool Hints option is enabled, you see hints for using the tool selected in the toolbox.
• Depending on the options selected, the Info palette displays status information, such as document size, document
profile, document dimensions, scratch sizes, efficiency, timing, and current tool.
(ImageReady) The Info palette displays the following information:
• The RGB numeric values of the color beneath the pointer
Page 64

ADOBE PHOTOSHOP CS2
User Guide
• The Opacity value of the pixels beneath the pointer
• The hexadecimal value of the color beneath the pointer
• The position, in the indexed color table, of the color beneath the pointer
• The x and y coordinates of the pointer
• The x and y coordinates of your starting position (before you click the image) and your ending position (as you
drag in the image) when you use the Marquee tool, the shape tools, the Crop tool, and the Slice tool
• The width (W) and height (H) of the selection as you drag when you use the Crop tool, the shape tools, the Slice
tool, or the Zoom tool
• The percentage change in width (W) and height (H), the angle of rotation (A), and the angle of horizontal skew
(H) or vertical skew (V) when you use a Transform or Free Transform command
See also
“Viewing the color values of pixels” on page 279
To use the Info palette
The Info palette displays file information about an image and also provides feedback about the color values as you
move a tool pointer over an image. Make sure the Info palette is visible in your work area if you want to view information while dragging in the image.
56
1 (Optional) Do one of the following if you need to display the Info palette:
• Click the Info palette tab if it’s docked with other palettes.
• Choose Window > Info. File information about the image is displayed at the bottom of the Info palette. You can
change the information displayed by clicking the triangle in the upper right corner of the palette and choosing
Palette Options from the palette menu.
2 (Optional, Photoshop) Set the options for the information you want displayed in the Info Palette by doing any of
the following:
• Choose Palette Options from the Info palette menu and specify options in the Info Palette Options dialog box.
• Click an eyedropper icon and choose display options from the pop-up menu. You can also use the pop-up menu
to specify whether the Info palette displays 8-bit, 16-bit, or 32-bit values.
• Click the cursor coordinates icon and choose a unit of measurement.
3 Select a tool.
4 Move the pointer in the image, or drag in the image to use the tool. The following information may appear,
depending on which tool you’re using:
Displays the numeric values for the color beneath the pointer.
Displays the x and y coordinates of the pointer.
Displays the width (W) and height (H) of a marquee or shape as you drag, or the width and height of an active
selection.
Page 65

ADOBE PHOTOSHOP CS2
User Guide
To change the Info palette options
1 Click the triangle in the upper right corner to open the Info palette menu and choose Palette Options.
2 In the Info Palette Options dialog box, for First Color Readout, choose one of the following display options:
Actual Color Displays values in the current color mode of the image.
Proof Color Displays values for the output color space of the image.
A color mode Displays the color values in that color mode.
Total Ink Displays the total percentage of all CMYK ink at the pointer’s current location, based on the values set in
the CMYK Setup dialog box.
Opacity Displays the opacity of the current layer. This option does not apply to the background.
Youcan also setthe readoutoptions by clicking theeyedroppericoninthe Info palette. In addition to theFirst Color
Readout options, you can also display 8-bit, 16-bit, or 32-bit values.
3 For Second Color Readout, choose a display option from the list in step 2. For the second readout, you can also
click the eyedropper icon in the Info palette and choose readout options from the pop-up menu.
57
Clicking an eyedropper icon and choosing a readout mode from the pop-up menu
4 For Ruler Units, choose a unit of measurement.
5 Under Status information, select from the following to display file information in the Info palette:
Document Sizes Displays information on the amount of data in the image. The number on the left represents the
printing size of the image—approximately the size of the saved, flattened file in Adobe Photoshop format. The
number on the right indicates the file’s approximate size including layers and channels.
Document Profile Displays the name of the color profile used by the image.
Document Dimensions Displays the dimensions of the image.
Scratch Sizes Displays information on the amount of RAM and the scratch disk used to process the image. The
number on the left represents the amount of memory that is currently being used by the program to display all open
images. The number on the right represents the total amount of RAM available for processing images.
Efficiency Displays the percentage of time spent performing an operation instead of reading or writing to the
scratch disk. If the value is below 100%, Photoshop is using the scratch disk and is therefore operating more slowly.
Timing Displays the amount of time it took to complete the last operation.
Current Tool Displays the name of the active tool.
6 (Optional) Select Show Tool Hints to display a hint for using a selected tool at the bottom of the Info palette.
7 Click OK.
Page 66

ADOBE PHOTOSHOP CS2
User Guide
To change measurement units, click the cross-hair icon in the Info palette and choose from the menu.
Rulers, the grid, and guides
About rulers
Rulers help youpositionimagesorelementsprecisely.When visible, rulers appear along the top and left side of the
active window. Markers in the ruler display the pointer’s position when you move it. Changing the ruler origin (the
(0, 0) mark on the top and left rulers) lets you measure from a specific point on the image. The ruler origin also determines the grid’s point of origin.
To show or hide rulers, choose View > Rulers.
To change a ruler’s zero origin
1 (Optional) Choose View > Snap To, then choose any combination of options from the submenu. This snaps the
ruler origin to guides, slices, or document bounds. In Photoshop, you can also snap to the grid.
2 Position the pointer over the intersection of the rulers in the upper left corner of the window, and drag diagonally
down onto the image. A set of cross hairs appears, marking the new origin on the rulers.
58
In Photoshop, you can hold down Shift as you drag to make the ruler origin snap to the ruler ticks.
To reset a ruler’s origin to its default value, double-click the upper left corner of the ruler.
Dragging to create new ruler origin
See also
“To use snapping” on page 62
Page 67

ADOBE PHOTOSHOP CS2
User Guide
To change the unit of measurement
1 Do one of the following:
• Double-click a ruler.
• (Windows) Choose Edit > Preferences > Units & Rulers, or right-click the ruler and then choose a new unit from
the context menu.
• (Mac OS) Choose Photoshop > Preferences > Units & Rulers, or Control-click the ruler and then choose a new
unit from the context menu.
2 For Rulers, choose a unit of measurement.
Note: Changing the units on the Info palette automatically changes the units on the rulers.
3 For Point/Pica Size, choose from the following options:
PostScript (72 points per inch) Sets a unit size compatible for printing to a PostScript device.
Traditional Uses 72.27 points per inch, as traditionally used in printing.
4 Click OK.
To specify columns for an image
Columns help you position images or elements precisely. The New, Image Size, and Canvas Size commands let you
specify image width in terms of columns. Using columns is convenient when you plan to import an image into a
page-layout program, such as Adobe InDesign®, and you want the image to fit exactly within a certain number of
columns.
59
1 Choose Edit > Preferences > Units & Rulers (Windows) or Photoshop > Preferences > Units & Rulers (Mac OS).
2 Enter values for Width and Gutter.
About the Measure tool
The Measure tool helps you position images or elements precisely. The Measure tool calculates the distance
between any two points in the work area. When you measure from one point to another, a nonprinting line is drawn,
and the options bar and Info palette show the following information:
• The starting location (X and Y)
• The horizontal (W) and vertical (H) distances traveled from the x and y axes
• The angle measured relative to the axis (A)
• The total distance traveled (D1)
• The two distances traveled (D1 and D2), when you use a protractor
All measurements except the angle are calculated in the unit of measure currently set in the Units & Rulers preference
dialog box.
If your document has an existing measuring line, selecting the Measure tool causes it to be displayed.
Page 68

ADOBE PHOTOSHOP CS2
User Guide
To measure between two points
1 Select the Measure tool
2 Drag from the starting point to the ending point. Hold down the Shift key to constrain the tool to 45˚ increments.
3 To create a protractor from an existing measuring line, Alt-drag (Windows) or Option-drag (Mac OS) at an angle
from one end of the measuring line, or double-click the line and drag. Hold down the Shift key to constrain the tool
to multiples of 45˚.
.
To edit a measuring line or protractor
1 Select the Measure tool
2 Do one of the following:
• To resize the line, drag one end of an existing measuring line.
• To move the line, place the pointer on the line away from either endpoint, and drag the line.
• To remove the line, place the pointer on the line away from either endpoint, and drag the line out of the image.
Note: You can drag out a measure line on an image feature that should be horizontal or vertical, and then choose
Image > Rotate Canvas > Arbitrary. The correct angle of rotation required to straighten the image is automatically
entered into the Rotate Canvas dialog box.
.
60
About guides and the grid
Guides andthe grid help youpositionimagesorelementsprecisely.Guidesappearasnonprinting lines that floatover
the image. You can move and remove guides.You can also lock them so that you don’t move them by accident.
Thegridisusefulfor laying outelementssymmetrically.The grid appearsbydefault as nonprintinglines butcan also
be displayed as dots.
Guides and grids behave in similar ways:
• Selections, selection borders, and tools snap to a guide or the grid when dragged within 8 screen (not image)
pixels. Guides also snap to the grid when moved. You can turn this feature on and off.
• Guide spacing, along with guide and grid visibility and snapping, is specific to an image.
• Grid spacing, along with guide and grid color and style, is the same for all images.
You can use Smart Guides to help align shapes, slices, and selections. They appear automatically when you draw a
shape, or create a selection or slide. You can hide Smart Guides if you need to.
Smart guides appear automatically to help you align shapes, slices, and selections.
Note: In ImageReady, you can create slices from guides.
Page 69

ADOBE PHOTOSHOP CS2
User Guide
See also
“To create slices from guides” on page 573
To show or hide a grid, guides, or smart guides
❖ Do one of the following:
• (Photoshop) Choose View > Show > Grid.
• Choose View > Show > Guides.
• View > Show > Smart Guides.
• Choose View > Extras. In Photoshop, this command also shows or hides layer edges, selection edges, target paths,
slices, and annotations, and, in ImageReady, selection edges, slices, auto slices, image maps, text bounds, and text
selections.
To place a guide
1 If the rulers are not visible, choose View > Rulers.
Note: For the most accurate readings, view the image at 100% magnification or use the Info palette.
2 Do one of the following to create a guide:
• (Photoshop) Choose View > New Guide. In the dialog box, select Horizontal or Vertical orientation, enter a
position, and click OK.
• (ImageReady) Choose View > Create Guides. In the dialog box, specify guide options and click OK.
• Drag from the horizontal ruler to create a horizontal guide.
61
Dragging to create a horizontal guide
• Hold down Alt (Windows) or Option (Mac OS), and drag from the vertical ruler to create a horizontal guide.
• Drag from the vertical ruler to create a vertical guide.
• Hold down Alt (Windows) or Option (Mac OS), and drag from the horizontal ruler to create a vertical guide.
• (Photoshop)HolddownShift anddragfromthe horizontal or vertical rulertocreateaguidethatsnaps to theruler
ticks. The pointer changes to a double-headed arrow when you drag a guide.
3 (Optional) If you want to lock all guides, choose View > Lock Guides.
Page 70

ADOBE PHOTOSHOP CS2
User Guide
To move a guide
1 Select the Move tool , or hold down Ctrl (Windows) or Command (Mac OS) to activate the Move tool. (This
option does not work with the Hand tool or the Slice tool
2 Position the pointer over the guide (the pointer turns into a double-headed arrow).
3 Move the guide in any of the following ways:
• Drag the guide to move it.
• Change the guide from horizontal to vertical, or vice versa, by holding down Alt (Windows) or Option (Mac OS)
.)
as you click or drag the guide.
• (Photoshop) Align the guide with the ruler ticks by holding down Shift as you drag the guide. The guide snaps to
the grid if the grid is visible and View > Snap To > Grid is selected.
To remove guides from the image
❖ Do one of the following:
• To remove a single guide, drag the guide outside the image window.
• To remove all guides, choose View > Clear Guides.
62
To set guide and grid preferences
1 Do one of the following:
• (Windows) Choose Edit > Preferences > Guides, Grid, & Slices.
• (Mac OS) Choose Photoshop > Preferences > Guides, Grid, & Slices.
2 For Color, choose a color for the guides, the grid, or both. If you choose Custom, click the color box, choose a
color, and click OK.
3 For Style, choose a display option for guides or the grid, or both.
4 For Gridline Every, enter a value for the grid spacing. For Subdivisions, enter a value by which to subdivide the
grid.
If desired, change the units for this option. The Percent option creates a grid that divides the image into even sections.
For example, choosing 25 for the Percent option creates an evenly divided 4-by-4 grid.
5 Click OK.
See also
“About the Color palette” on page 505
To use snapping
Snapping helps with precise placement of selection edges, cropping marquees, slices, shapes, and paths. However,
sometimes snapping prevents you from correctly placing elements. You can enable or disable snapping using the
Snap command. You can also specify different elements to which you want to snap when snapping is enabled.
❖ Choose View > Snap. A check mark indicates that snapping is enabled.
Page 71

ADOBE PHOTOSHOP CS2
User Guide
To specify what to snap to
❖ Choose View > Snap To, and choose one or more options from the submenu:
Guides Snaps to guides.
Grid Snaps to the grid. You cannot select this option when the grid is hidden.
Slices Snaps to slice boundaries. You cannot select this option when slices are hidden.
Document Bounds Snaps to the edges of the document.
All Selects all Snap To options.
None Deselects all Snap To options.
A check mark indicates that the option is selected and snapping is enabled.
If you want to enable snapping for only one option, make sure the Snap command is disabled, and then choose
View > Snap To and choose an option. This automatically enables snapping for the selected option, and deselects all
other Snap To options.
To show or hide Extras
Guides, grid, target paths, selection edges, slices, image maps, text bounds, text baselines, text selections, and annotations are nonprinting Extras that help you select, move, or edit images and objects. You can turn on or off an Extra
or any combination of Extras without affecting the image. You can also show or hide Extras by choosing the Extras
command in the View menu.
63
Hiding Extras only suppresses the display of Extras. It does not turn off these options.
❖ Do one of the following:
• To show or hide Extras, choose View > Extras. A check mark appears next to all shown Extras in the Show
submenu.
• To turn on and show an Extra from a group of hidden Extras, choose View > Show and choose an Extra from the
submenu.
• To turn on and show all available Extras, choose View > Show > All.
• To turn off and hide all Extras, choose View > Show > None.
Note: Showing Extras causes color samplers to be shown as well, even though color samplers are not an option in the
Show submenu.
Page 72

ADOBE PHOTOSHOP CS2
User Guide
Customizing the work area
To manage workspaces
You can customize the palette locations in a workspace. You can save custom workspaces and switch between them.
In Photoshop, you can also customize menu items and keyboard shortcuts. In ImageReady, preset workspaces are
available for certain tasks.
❖ Choose Window > Workspace, and do one of the following:
• To switch to a workspace, choose a workspace from the submenu.
(Photoshop) Assign keyboard shortcuts to each workspace to navigate among them quickly.
• (ImageReady) To switch to a factory-preset workspace for authoring interactive images or optimizing images for
the web, choose Interactivity Palette Locations or Optimization Palette Locations.
• To delete a custom workspace, choose Delete Workspace, select the workspace you want to delete, and click Delete.
• (Photoshop) To reset palettes, shortcuts, and menus to their default positions or states, choose Default Workspace.
• To reset palettes to their default positions, choose Reset Palette Locations (Photoshop) or Default Palette Locations
(ImageReady).
• (Photoshop) To reset menus to Photoshop defaults, choose Reset Menus.
• (Photoshop) To reset keyboard shortcuts to Photoshop defaults, choose Reset Keyboard Shortcuts.
64
See also
“About customizing keyboard shortcuts” on page 754
“To arrange palettes into a custom workspace” on page 64
“To define a set of menus” on page 65
“To use palettes” on page 35
To change the font size in the work area
You can change the size of the small font text that appears in the options bar, palettes, and tool tips.
1 Choose Edit > Preferences > General (Windows) or Photoshop > Preferences > General (Mac OS).
2 Choose a size from the UI Font Size menu and click OK. The change takes effect the next time you start
Photoshop.
To arrange palettes into a custom workspace
If you save the current palette locations, keyboard shortcut set, and menu set as a workspace, you can return to it
even if you move or close a palette, or change to a different set of keyboard shortcuts or menus. In ImageReady, you
can save the current palette locations.
1 With the workspace in the configuration you want to save, choose Window > Workspace > Save Workspace.
2 Enter a name for the workspace.
Page 73

ADOBE PHOTOSHOP CS2
User Guide
3 (Photoshop) Under Capture, select one or more options:
Palette Locations Saves the current palette locations.
Keyboard Shortcuts Saves the current set of keyboard shortcuts.
Menus Saves the current set of menus.
4 Click OK.
See also
“About customizing keyboard shortcuts” on page 754
“To define a set of menus” on page 65
“To use palettes” on page 35
To start with the last or default palette locations
Selecting the Save Palette Locations preference causes Photoshop or ImageReady to display palettes in their last
locationsuponstartup.Ifyou deselect this preference,Photoshop or ImageReady displays thepalettesintheir default
locations upon startup.
65
❖ Do one of the following:
• (Windows) Choose Edit > Preferences > General, and then select/deselect Save Palette Locations.
• (Mac OS) Choose Photoshop > Preferences > General or choose ImageReady > Preferences > General, and then
select/deselect Save Palette Locations.
The change takes effect the next time you start the application.
To define a set of menus
1 Do one of the following:
• Choose Edit > Menus.
• Choose Window > Workspace > Keyboard Shortcuts & Menus and click the Menus tab.
2 In the Keyboard Shortcuts and Menus dialog box, choose a set of menus from the Set menu (Photoshop Defaults
is the only option until you create a new set). For information on customizing keyboard shortcuts, see “About
customizing keyboard shortcuts” on page 754.
3 Choose a type from the Menu For menu:
Application Menus Lets you show, hide, or add color to items in the application menus.
Palette Menus Lets you show, hide, or add color to items in palette menus.
4 Click the triangle next to a menu or palette name.
5 Do one of the following:
• To hide a menu item, click the Visibility button .
• To show a menu item, click the empty Visibility button.
• To add color to a menu item, click the color swatch and choose a color.
Page 74

ADOBE PHOTOSHOP CS2
User Guide
6 When you finish changing the menus, do one of the following:
• To save allchangestothe currentset of menus, clickthe Save Setbutton . Changestoacustom setare saved. If
you’re saving changes to the Photoshop Defaults set, the Save dialog box opens. Enter a name for the new set and
click Save.
• To create a new set based on the current set of menus, click the Save Set As button .
Note: If you haven’t saved the current set of changes, you can click Cancel to discard all changes and close the dialog box.
7 In the Save dialog box, enter a name for the set and click Save.
66
Choosing a color for a menu item using the Keyboard Shortcuts & Menus dialog box
To delete a set of menus
1 Do one of the following:
• Choose Edit > Menus.
• Choose Window > Workspace > Keyboard Shortcuts & Menus and click the Menu tab.
2 In the Keyboard Shortcuts & Menus dialog box, choose a set of menus from the Set menu.
3 Click the Delete Set icon .
To temporarily show hidden menu items
It’s possible to temporarily show items that you’ve hidden in a menu. After the menu closes, the items return to their
hidden state.
❖ Do one of the following:
• From a menu with hidden items, choose Show All Menu Items.
• Shift-click a menu with hidden items.
To turn menu colors on or off
1 Choose Edit > Preferences > General (Windows) or Photoshop > Preferences > General (Mac OS).
2 Select or deselect Show Menu Colors.
Page 75

ADOBE PHOTOSHOP CS2
User Guide
About the Preset Manager
The Preset Manager lets you manage the libraries of preset brushes, swatches, gradients, styles, patterns, contours,
custom shapes, and preset tools that come with Photoshop. For example, you can use the Preset Manager to change
the current set of preset items or create new libraries. After you load a library in the Preset Manager, you can access
the library’s items in locations such as the options bar, palettes, dialog boxes, and so on.
In general, when you change a preset, Photoshop prompts you to save the changes as a new preset so that both the
original and changed preset remain available.
Each type of library has its own file extension and default folder. Preset files are installed on your computer inside
the Presets folder in the Adobe Photoshop CS2 application folder.
To open thePresetManager,chooseEdit > Preset Manager. Choose an option from thePresetTypemenutoswitch
to a specific preset type.
You can adjust the configuration of presets by clicking the palette menu button and choosing a display mode from
the top section of the menu:
Text Only Displays the name of each preset item.
Small Thumbnail or Large Thumbnail Displays a thumbnail of each preset item.
Small List or Large List Displays the name and thumbnail of each preset item.
67
Stroke Thumbnail Displays a sample brush stroke and brush thumbnail of each brush preset. (This option is
available for brush presets only.)
To rearrange the list of items, drag an item up or down in the list.
Rearranging tool presets in the Preset Manager
Note: To delete a preset in the Preset Manager, select the preset and click Delete. You can always use the Reset command
to restore the default items in a library.
To load a library of preset items
❖ Do one of the following:
• Click the triangle to the right of the Preset Type pop-up menu and then choose a library file from the bottom of
the palette menu. Click OK to replace the current list, or click Append to add the current list.
• To add a library to the current list, click Load, select the library file you want to add, and click Load.
• To replace the current list with a different library, choose Replace [Preset Type] from thepalette menu.Selectthe
library file you want to use, and click Load.
Note: Each type of library has its own file extension and default folder in the Presets folder in the Photoshop program
folder.
Page 76

ADOBE PHOTOSHOP CS2
User Guide
To rename preset items
1 Select a preset item. Shift-click to select multiple items.
2 Do one of the following:
• Click Rename, and then enter a new name for the brush, swatch, and so on.
• If the Preset Manager currently displays presets as thumbnails, double-click a preset, enter a new name, and
click OK.
• If the Preset Manager currently displays presets as a list or text only, double-click a preset, enter a new name inline,
and press Enter (Windows) or Return (Mac OS).
To delete preset items
❖ Do one of the following:
• Select a preset item, and click Delete.
• Alt-click (Windows) or Options-click (Mac OS) the items you want to delete.
To create a new library of presets
1 Do one of the following:
• To save all the presets in the list as a library, make sure that no items are selected.
• To save a subset of the current list as a library, hold down Shift, and select the items you want to save.
2 Click Save Set, choose a location for the library, enter a file name, and click Save.
68
You can save the library anywhere. However, if you place the library file in the appropriate Presets folder inside the
Photoshop program folder, the library name will appear at the bottom of the palette menu after you restart
Photoshop.
To restore the default library of preset items
❖ Choose Reset from the palette menu. You can either replace the current list or append the default library to the
current list.
Preferences
About preferences
Numerous program settings are stored in the Adobe Photoshop CS Prefs file, including general display options, filesaving options, cursor options, transparency options, and options for plug-ins and scratch disks. Most of these
options are set in the Preferences dialog box. Preference settings are saved each time you quit the application.
Unexpected behavior may indicate damaged preferences. If you suspect damage to preferences, restore preferences
to their default settings.
Page 77

ADOBE PHOTOSHOP CS2
User Guide
To open a preferences dialog box
1 Do one of the following:
• (Windows) Choose Edit > Preferences and choose the desired preference set from the submenu.
• (Mac OS) Choose Photoshop > Preferences or choose ImageReady > Preferences, and then choose the desired
preference set from the submenu.
2 To switch to a different preference set, do one of the following:
• Choose the preference set from the menu at the top of the dialog box.
• Click Next to display the next preference set in the menu list; click Prev to display the previous preference set.
For information on a specific preference option, see the index.
To restore all preferences to default settings
❖ Do one of the following:
• Press and hold Alt+Control+Shift (Windows) or Option+Command+Shift (Mac OS) as you start Photoshop or
ImageReady. You are prompted to delete the current settings.
• (Mac OS only) Open the Preferences folder in the Library folder, and drag the Adobe Photoshop CS Settings folder
to the Trash.
69
New Preferences files are created the next time you start Photoshop or ImageReady.
To disable and enable warning messages
Sometimes you will see messages containing warnings or prompts. You can suppress the display of these messages
by selectingthe Don’tShowAgain option in themessage.You canalsogloballyredisplay allmessagesthathavebeen
suppressed.
1 Do one of the following:
• (Windows) Choose Edit > Preferences > General.
• (Mac OS) Choose Photoshop > Preferences > General or choose ImageReady > Preferences > General.
2 Click Reset All Warning Dialogs, and click OK.
About plug-in modules
Plug-in modules are software programs developed by Adobe Systems and by other software developers in
conjunction with Adobe Systems to add features to Photoshop and ImageReady. A number of importing, exporting,
and special-effects plug-ins come with your program. They are automatically installed in folders inside the
Photoshop Plug-ins folder.
You can select an additional Plug-ins folder for compatible plug-ins stored with another application. You can also
create a shortcut (Windows) or an alias (Mac OS) for a plug-in stored in another folder on your system. You can then
add the shortcut or alias to the plug-ins folder and use that plug-in with Photoshop and ImageReady.
Once installed, plug-in modules appear as options in the Import or Export menu; as file formats in the Open, Save
As, and Export Original (ImageReady) dialog boxes; or as filters in the Filter submenus. Photoshop and ImageReady
can accommodate a large number of plug-ins. However, if the list of installed plug-in modules becomes too long,
Photoshop or ImageReady may not be able to display all the plug-ins in their appropriate menus. If so, newly installed
plug-ins appear in the Filter > Other submenu.
Page 78

ADOBE PHOTOSHOP CS2
User Guide
To install a plug-in module
In Mac OS, you cannot run Photoshop in the Classic environment. Plug-ins originally intended to work on Mac OS 9
won’t appear.
❖ Do one of the following:
• To install an Adobe Systems plug-in module, use the plug-in installer, if provided. You can also (Windows) install
copy the module into the appropriate Plug-ins folder in the Photoshop program folder, or (Mac OS) drag a copy
of the module to the appropriate Plug-ins folder in the Photoshop program folder. Make sure that the files are
uncompressed.
• To install a third-party plug-in module, follow the installation instructions that came with the plug-in module. If
you cannot run a third-party plug-in, it may require a legacy Photoshop serial number.
Note: If youwanttouse aplug-in only in PhotoshoporonlyinImageReady, or when aplug-in is compatible with only
one of the applications, you can install the plug-in inside the Plug-ins folder in either the Adobe Photoshop Only folder
or the Adobe ImageReady Only folder.
To specify a legacy serial number
1 Do one of the following:
• (Windows) Choose Edit > Preferences > Plug-ins & Scratch Disk.
• (Mac OS) Choose Photoshop > Preferences > Plug-ins & Scratch Disk.
2 Enter the serial number from Photoshop CS or earlier in the Legacy Photoshop Serial Number text box.
70
To select an additional plug-ins folder
1 Do one of the following:
• (Photoshop) Choose Edit > Preferences > Plug-ins & Scratch Disk (Windows) or choose Photoshop >
Preferences > Plug-ins & Scratch Disk (Mac OS).
• (ImageReady) Choose Edit > Preferences > Plug-ins (Windows) or choose ImageReady > Preferences > Plug-ins
(Mac OS).
2 Select Additional Plug-ins Folder.
3 Click Choose, and select a folder or directory from the list. Make sure that you do not select a location inside the
Plug-ins folder. To display the contents of a folder, double-click the directory (Windows) or click Open (Mac OS).
4 When you have highlighted the additional plug-ins folder, click OK (Windows) or Choose (Mac OS).
5 Restart Photoshop or ImageReady for the plug-ins to take effect.
To suppress the loading of plug-ins
❖ Add a tilde ~ character at the beginning of the plug-in name, folder, or directory. That file (or all files in the folder)
will be ignored by the application.
Page 79

ADOBE PHOTOSHOP CS2
User Guide
To view information about installed plug-ins
❖ Do one of the following:
• (Windows) Choose Help > About Plug-in and choose a plug-in from the submenu.
• (Mac OS) Choose Photoshop > About Plug-in or choose ImageReady > About Plug-in, and then choose a plug-in
from the submenu.
Recovery and undo
To use the Undo or Redo commands
TheUndoand Redo commands letyou undo or redo operations.You canalsouse theHistory palettetoundoorredo
operations.
❖ Choose Edit > Undo or Edit > Redo.
If an operation can’t be undone, the command is dimmed and changes to Can’t Undo.
You can set the Redo keystroke preference to be the same for Photoshop and ImageReady. In the General area of the
Preferences dialog box, select a preference for the Redo key. You can also set the key to toggle between Undo and Redo.
71
See also
“About the History palette” on page 72
To revert to the last saved version
❖ Choose File > Revert.
Note: Revert is added as a history state in the History palette and can be undone.
To restore part of an image to its previously saved version
❖ Do one of the following:
• Use the History Brush tool to paint with the selected state or snapshot on the History palette.
• Use the Eraser tool with the Erase To History option selected.
• Select the area you want to restore, and choose Edit > Fill. For Use, choose History, and click OK.
Note: To restorethe imagewithasnapshot of theinitial stateofthe document,chooseHistory Optionsfromthe Palette
menu and make sure that the Automatically Create First Snapshot option is selected.
See also
“To use the Eraser tool” on page 490
“The Art History Brush tool” on page 472
To cancel an operation
❖ Hold down Esc until the operation in progress has stopped. In Mac OS, you can also press Command+period.
Page 80

ADOBE PHOTOSHOP CS2
User Guide
To receive notification when an operation is completed
Aprogressbar indicatesthatanoperation is beingperformed.You caninterrupt theoperation or have theprogram
notify you when it has finished the operation.
1 Do one of the following:
• (Windows) choose Edit > Preferences > General.
• (Mac OS) choose Photoshop > Preferences > General or choose ImageReady > Preferences General.
2 Do one of the following:
• (Photoshop) Select Beep When Done.
• (ImageReady) Select Notify When Done. In Mac OS, you can then choose System Alert to be notified through
your system alert or Text To Speech to receive a spoken notification.
3 Click OK.
About the History palette
You can use the History palette to jump to any recent state of the image created during the current working session.
Each time you apply a change to an image, the new state of that image is added to the palette.
For example, if you select, paint, and rotate part of an image, each of those states is listed separately in the palette.
When you select one of the states, the image reverts to how it looked when that change was first applied. You can
then work from that state.
72
You can also use the History palette to delete image states and, in Photoshop, to create a document from a state or
snapshot.
To display the History palette, choose Window > History, or click the History palette tab.
A
B
C
D
Photoshop History palette
A. Sets the source for the history brush B. Thumbnail of a snapshot C. History state D. History state slider
Keep the following in mind when using the History palette:
• Program-wide changes, such as changes to palettes, color settings, actions, and preferences, are not reflected in the
History palette, because they are not changes to a particular image.
• By default, the History palette lists the previous 20 states (Photoshop), or 32 states (ImageReady). You can change
the number of remembered states by setting a preference. Older states are automatically deleted to free more
memory for Photoshop. To keep a particular state throughout your work session, make a snapshot of the state.
• Once youclose andreopenthe document,all states andsnapshots from thelastworking sessionare clearedfrom
the palette.
Page 81

ADOBE PHOTOSHOP CS2
User Guide
• By default, a snapshot of the initial state of the document is displayed at the top of the palette.
• States are added to the bottom of the list. That is, the oldest state is at the top of the list, the most recent one at the
bottom.
• Each state is listed with the name of the tool or command used to change the image.
• By default, when you select a state, the states below it are dimmed. This way you can easily see which changes will
be discarded if you continue working from the selected state.
• By default, selecting a state and then changing the image eliminates all states that come after it.
• If you select a state and then change the image, eliminating the states that came after, you can use the Undo
command to undo the last change and restore the eliminated states.
• By default, deleting a state deletes that state and those that came after it. If you choose the Allow Non-Linear
History option, deleting a state deletes only that state.
To revert to a previous image state
❖ Do any of the following:
• Click the name of the state.
• Drag the slider at the left of the state up or down to a different state.
• (Photoshop) Choose Step Forward or Step Backward from the History palette menu or the Edit menu to move to
the next or previous state.
73
To delete one or more image states in Photoshop
❖ Do one of the following:
• Clickthe name of thestate,and choose Delete from theHistory palettemenutodeletethatchangeand thosethat
came after it.
• Drag the state to the Delete icon to delete that change and those that came after it.
• Choose Clear History from the palette menu to delete the list of states from the History palette, without changing
the image. This option doesn’t reduce the amount of memory used by Photoshop.
• Hold down Alt (Windows) or Option (Mac OS), and choose Clear History from the palette menu to purge the list
of states without changing the image. If you get a message that Photoshop is low on memory, purging states is
useful, because the command deletes the states from the Undo buffer and frees up memory. You can’t undo the
Clear History command.
• Choose Edit > Purge > Histories to purge the list of states for all open documents. You can’t undo this action.
To delete all image states in ImageReady
❖ Choose Clear Undo/Redo History from the History palette menu.
Note: This action cannot be undone.
Page 82

ADOBE PHOTOSHOP CS2
User Guide
To create or replace a document with an image state
❖ Do one of the following:
• Drag a state or snapshot onto the New Document button . The history list for the newly created document will
be empty.
• Select a state or snapshot, and click the New Document button. The history list for the newly created document
will be empty.
• Select astate or snapshot,and choose NewDocumentfromthe Historypalette menu.The historylistfor thenewly
created document will be empty.
• Drag a state onto an existing document.
To save one or more snapshots or image states for use in a later editing session, create a new file for each state you
save, and save each in a separate file. When you reopen your original file, plan to open the other saved files also. You
can drag each file’s initial snapshot to the original image to access the snapshots again from the original image’s History
palette.
To set history options
You can specify the maximum number of items to include in the History palette and set other options to customize
the palette.
74
1 Choose History Options from the History palette menu.
2 Select an option:
Automatically Create First Snapshot Automatically creates a snapshot of the initial state of the image when the
document is opened.
Automatically Create New Snapshot When Saving Generates a snapshot every time you save.
Allow Non-Linear History Makes changes to a selected state without deleting the states that come after. Normally,
when you select a state and change the image, all states that come after the selected one are deleted. In this way, the
History palette can display a list of the editing steps in the order that they were made. By recording states in a
nonlinearway,you canselectastate, make achange to theimage,and delete just that state. Thechangeisappended
at the end of the list.
Show New Snapshot Dialog By Default Forces Photoshop to prompt you for snapshot names even when you use
the buttons on the palette.
Making a snapshot of an image
TheSnapshotcommand lets youmakeatemporarycopy(or snapshot)ofany stateofthe image. Thenew snapshot
is added to the list of snapshots at the top of the History palette. Selecting a snapshot lets you work from that version
of the image.
Snapshots are similar to the states listed in the History palette, but they offer additional advantages:
• You can name a snapshot to make it easy to identify.
• Snapshots can be stored for an entire work session.
Page 83

ADOBE PHOTOSHOP CS2
User Guide
• You can compare effects easily. For example, you can take a snapshot before and after applying a filter. Then select
the first snapshot, and try the same filter with different settings. Switch between the snapshots to find the settings
you like best.
• With snapshots, you can recover your work easily. When you experiment with a complex technique or apply an
action,takeasnapshot first. If you’re notsatisfied with theresults, youcan select thesnapshottoundoall thesteps.
Note: Snapshots are not saved with the image—closing an image deletes its snapshots. Also, unless you select the Allow
Non-Linear History option, selecting a snapshot and changing the image deletes all of the states currently listed in the
History palette.
To create a snapshot
1 Select a state and do one of the following:
• To automatically create a snapshot, click the New Snapshot button on the History palette, or if Automatically
Create New Snapshot When Saving is selected in the history options, choose New Snapshot from the History
palette menu.
• To set options when creating a snapshot, choose New Snapshot from the History palette menu, or Alt-click
(Windows) or Option-click (Mac OS) the New Snapshot button.
2 Enter the name of the Snapshot in the Name text box.
3 Choose the snapshot contents from the From menu:
Full Document Makes a snapshot of all layers in the image at that state
75
Merged Layers Makes a snapshot that merges all layers in the image at that state
Current Layer Makes a snapshot of only the currently selected layer at that state
To work with snapshots
❖ Do one of the following:
• To select a snapshot, click the name of the snapshot or drag the slider at the left of the snapshot up or down to a
different snapshot.
• To rename a snapshot, double-click the snapshot and enter a name.
• To delete asnapshot, select thesnapshotand either choose Delete from thepalette menu,click theDeleteicon
or drag the snapshot to the Delete icon.
Painting with a state or snapshot of an image
The History Brush tool lets you paint a copy of one image state or snapshot into the current image window. This
tool makes a copy, or sample, of the image and then paints with it.
Forexample,you mightmakeasnapshot of achange youmadewithapainting tool or filter (withthe Full Document
option selected when you create the snapshot). After undoing the change to the image, you could use the History
Brush tool to apply the change selectively to areas of the image. Unless you select a merged snapshot, the History
Brush tool paints from a layer in the selected state to the same layer in another state.
The History Brush tool copies from one state or snapshot to another, but only at the same location. In Photoshop,
you can also paint with the Art History Brush tool to create special effects.
,
Page 84

ADOBE PHOTOSHOP CS2
User Guide
See also
“To use the Art History Brush tool” on page 472
To paint with a state or snapshot of an image
1 Select the History Brush tool
2 Do one of the following in the options bar:
• Specify the opacity and blending mode.
• Choose a brush and set brush options.
3 In the History palette, click the left column of the state or snapshot to be used as the source for the History Brush
tool.
4 Drag to paint with the History Brush tool.
See also
“About blending modes” on page 486
“To create a brush and set painting options” on page 475
.
76
About the Edit History Log
You may need to keep careful track of what’s been done to a file in Photoshop, either for your own records, client
records, or legal purposes. The Edit History Log helps you keep a textual history of changes made to an image. You
can view the Edit History Log metadata using Adobe Bridge or the File Info dialog box.
You can choose to export the text to an external log file, or you can store the information in the metadata of edited
files. Storing many editing operations as file metadata increases file size; such files may take longer than usual to open
and save.
If you need to prove that the log file hasn’t been tampered with, keep the edit log in the file’s metadata, and then use
Adobe Acrobat to digitally sign the log file.
See also
“To add metadata using the File Info dialog box” on page 98
To set Edit History Log options
1 Choose Edit > Preferences > General (Windows) or Photoshop > Preferences > General (Mac OS).
2 Click the History Log preference to toggle from on to off or vice versa.
3 In the History Log Options pane, choose one of the following options:
Metadata Stores metadata for each image.
Text File Exports the text to an external file. You are prompted to name the log file and choose a location in which
to store it.
Both Stores metadata in the file and creates a text file.
Page 85

ADOBE PHOTOSHOP CS2
User Guide
Note: If you want to save the text file in a different location or save another text file, click the Choose button, specify
where to save the text file, name the file if necessary, and click Save.
4 From the Edit Log Items menu, choose one of the following options:
Sessions Keeps a record of each time your start or quit Photoshop and each time you open and close files (each
image’s file name is included).
Concise Includes the text that appears in the history palette in addition to the Sessions information.
Detailed Includes the text that appears in the Actions palette in addition to the Concise information. Choose
Detailed if you need a complete history of all changes made to files.
Memory
Assigning scratch disks
When your system does not have enough RAM to perform an operation, Photoshop and ImageReady use a proprietary virtual memory technology, also called scratch disks. A scratch disk is any drive or drive partition with free
memory.Bydefault,Photoshop andImageReadyuse theharddrive on whichthe operatingsystemisinstalled as the
primary scratch disk.
77
In the Plug-ins & Scratch Disks preferences in Photoshop, you can change the primary scratch disk and designate a
second, third, or fourth scratch disk to be used when the primary disk is full. Your primary scratch disk should be
your fastest hard disk; make sure it has plenty of defragmented space available.
The following guidelines can help you assign scratch disks:
• For best performance, scratch disks should be on a different drive than any large files you are editing.
• Scratch disks should be on a different drive than the one used for virtual memory.
• Scratch disks should be on a local drive. That is, they should not be accessed over a network.
• Scratch disks should be conventional (nonremovable) media.
• RAID disks/disk arrays are good choices for dedicated scratch disk volumes.
• Drives with scratch disks should be defragmented regularly.
To change the scratch disk assignment
1 Choose Edit > Preferences > Plug-ins & Scratch Disks (Windows) or Photoshop > Preferences > Plug-ins &
Scratch Disks (Mac OS).
2 Choose the desired disks from the menus. You can assign up to four scratch disks of any size that your file system
supports.
3 Click OK.
4 Restart Photoshop for the change to take effect.
Page 86

ADOBE PHOTOSHOP CS2
User Guide
To free memory
The Purge command lets you free memory used by the Undo command, the History palette, or the clipboard.
❖ Choose Edit > Purge, and choose the item type or buffer you want to clear. If it is already empty, the item type or
buffer is dimmed.
Note: The Purge command permanently clears from memory the operation stored by the command or buffer; Purge
cannot be undone. For example, choosing Edit > Purge > Histories deletes all history states from the History palette. Use
the Purge command when the amount of information in memory is so large that Photoshop’s performance is noticeably
affected.
78
Page 87

Chapter 4: Adobe Bridge
The basics of Bridge
About Adobe Bridge
Adobe Bridge is the control center for Adobe Creative Suite. You use it to organize, browse, and locate the assets you
need to create content for print, the web, and mobile devices. Adobe Bridge keeps native PSD, AI, INDD, and Adobe
PDF files as well as other Adobe and non-Adobe application files available for easy access.You can drag assets into
your layouts as needed, preview them, and even add metadata to them. Bridge is available independently, as well as
from within Adobe Photoshop, Adobe Illustrator, Adobe InDesign, and Adobe GoLive.
File browsing From Bridge you can view, search, sort, manage, and process image files. You can use Bridge to create
new folders; rename, move, and delete files; edit metadata; rotate images; and run batch commands. You can also
view information about files and data imported from your digital camera.
Version Cue If you have Adobe Creative Suite, you can use Bridge as a central location from which to use Adobe
Version Cue. From Bridge, you can browse all the files in a project in one place without having to start the native
application for each file, including non-Adobe application files. Also, you can create new Version Cue projects, delete
ects, create versions, save alternates, and set access privileges in Bridge. See “Working with Version Cue in
proj
Bridge” on page 101.
79
Bridge Center If you have Adobe Creative Suite, Adobe Bridge includes Bridge Center, the “dashboard” of Adobe
Creative Suite, whereyou canviewnewsreaders in your webbrowser,see your most recent activity,readabout tips
and tricks for using Adobe products, save groups of files, and more. Adobe Creative Suite users can also use Bridge
to specifycolor management settings andaccess scriptsthathelpautomateyourworkflow. See“AboutBridgeCenter”
on page 92.
Camera Raw If you have Adobe Photoshop installed, you can open and edit camera raw files from Bridge and save
them in a Photoshop-compatible format. You can edit the image settings directly in the Camera Raw dialog box
without starting Photoshop. If you don’t have Photoshop installed, you can still preview the camera raw files in
Bridge. See
Stock Photos Click Adobe Stock Photos from the Favorites pane in Bridge to search leading stock libraries for
royalty-free images. You can download low-resolution, complementary versions of the images and try them out in
your proj
Color management You can use Bridge to synchronize color settings across applications. This synchronization
ensures that colors look the same no matter which Creative Suite application you view them in. See “To synchronize
color settings across Adobe applications” on page 254.
“To open files in Bridge” on page 87.
ects before purchasing them. See “About Adobe Stock Photos” on page 103.
See also
“The Bridge work area” on page 79
The Bridge work area
These are the main components of the Adobe Bridge window:
Page 88

ADOBE PHOTOSHOP CS2
User Guide
80
A
B
Bridge window in filmstrip view
A. The Look In menu B. The Metadata panel C. The shortcuts buttons D. The content area
C
D
The menu bar Contains commands specific to Bridge. In Windows®, the menu bar is at the top of the Bridge
window. In Mac OS®, the menu bar is located at the top of the screen.
The Look In menu Lists the folder hierarchy, as well as favorite and recent folders. This menu gives you a quick way
to find folders containing the items you want to display. The menu is at the top of the Bridge window.
The shortcut buttons Help you work efficiently with your files. They are located to the right of the Look In menu,
at the top of the Bridge window.
The Favorites panel Gives you quick access to folders as well as to Version Cue, Adobe Stock Photos, collections,
and Bridge Center (Adobe Creative Suite only). Like all panels, it’s located on the left side of the Bridge window.
The Folders panel Shows the folder hierarchy. Use it to navigate to the correct folder.
The Preview panel Displays a preview of the selected file, separate from and typically larger than the thumbnail
image displayed in the content area. You can reduce or enlarge the preview.
The Metadata panel Contains metadata information for the selected file. If multiple files are selected, shared data
(such as keywords, date created, and exposure setting) is listed.
The Keywords panel Helps you organize your images by attaching keywords to them.
The content area Displays thumbnail previews of the items in the current folder, along with information about
those items.
The bottom of the Bridge window displays status information and contains buttons for toggling the display of the
panels, a slider for setting the size of thumbnails, and buttons for specifying the type of display in the content area.
Page 89

ADOBE PHOTOSHOP CS2
User Guide
See also
“To create and close Bridge windows” on page 81
“To use Bridge in Compact mode” on page 81
To start and quit Bridge, and to return to an application
Do any of the following:
• To open Bridge from an application, choose File > Browse from your application.
• (Windows) To open Bridge directly, choose Adobe Bridge from the Start menu.
• (Mac OS) To open Bridge directly, double-click the Adobe Bridge icon . By default, this is located in the Appli-
cations/Adobe Bridge folder.
• To quit Bridge, choose File > Exit (Windows) or Bridge > Quit Bridge (Mac OS).
• To return to the last open application that started Bridge, choose File > Return To [Application].
See also
“About Adobe Bridge” on page 79
81
“To manage files with Bridge” on page 88
To create and close Bridge windows
❖ Do one of the following:
• Choose File > New Window to create a full-size Bridge window.
• Choose File > Close Window. In Windows, this command quits Bridge as well.
See also
“The Bridge work area” on page 79
“To use Bridge in Compact mode” on page 81
To use Bridge in Compact mode
Switch to Compact mode when you want to shrink the Bridge window, hiding the panels and simplifying the content
area. A subset of common Bridge commands remains available from the pop-up menu at the top right of the window.
Page 90

ADOBE PHOTOSHOP CS2
User Guide
By default, the Compact mode Bridge window floats on top of all windows. (In Full mode, the Bridge window can
move behind application windows.) This floating window is useful because it is always visible and usable as you work
in different applications. For instance, you might use Compact mode after you select the files you plan to use, and
then drag them into the application as you need them.
82
1 Click the Switch To Compact Mode button
2 Do any of the following:
• Choose commands from the menu at the top right of the Bridge window.
• Click the Switch To Ultra Compact Mode button to hide the content area, further minimizing the Bridge
.
window. You can click the button again to return to Compact mode.
• Click the Switch To Full Mode button to return to Full mode, displaying the content area and the panels, and
letting Bridge move behind the current application window.
See also
“The Bridge work area” on page 79
To adjust the Bridge window
You can adjust the Bridge window by moving and resizing the panels. For example, you can enlarge the Preview panel
to display bigger thumbnails. You can’t, however, move panels outside the Bridge window.
❖ Do any of the following:
• Drag a panel by its tab up or down into another panel area.
• Drag the horizontal divider bar between panels to make them larger or smaller.
• Drag the vertical divider bar between the panels and the content area right or left to resize the panels or content
area.
• Click the Show/Hide Panes button at the lower left of the Bridge window to display or hide the panels.
• Choose View, followed by the name of the panel you want to display or hide.
See also
“The Bridge work area” on page 79
To select Bridge workspaces
A Bridge workspace is a certain configuration or layout of the work area. You can select either a premade one or a
custom one that you have previously saved. You can use a preset configuration or switch between different configurations best suited for specific tasks, such as sorting photos.
Note: A Bridge workspace is different from a Version Cue Workspace. Your work in Bridge workspaces has no effect on
the Version Cue Workspaces.
❖ Choose Window, followed by the name of the workspace you want, or choose Window > Workspace, followed by
one of the following commands:
Lightbox Displays just the content area of Bridge, so that you can concentrate on viewing the files.
File Navigator Displays the content area in Thumbnails view, along with the Favorites panel and Folder panel.
Page 91

ADOBE PHOTOSHOP CS2
User Guide
Metadata Focus Displays the content area in Thumbnails view, along with the Metadata panel prominently shown.
Filmstrip Focus Displays just the content area, in Filmstrip view.
See also
“To save and delete Bridge workspaces” on page 83
To save and delete Bridge workspaces
You can save the current Bridge layout (that is, the work area configuration) as a workspace and reuse it later. By
saving Bridge in various configurations, you can work in (and quickly switch between) different layouts of the work
area. For instance, you might use one workspace to sort new photos and another to work with Adobe InDesign files.
Note: A Bridge workspace is different from a Version Cue Workspace. Your work in Bridge workspaces has no effect on
Version Cue Workspaces.
❖ Choose Window > Workspace, followed by one of these commands:
Save Workspace Saves the current Bridge layout as a workspace so that you can reuse it later, even if you move a
panelorchange theviewinthe contentarea. If youchoosethiscommand, enteraname forthe workspaceand click
Save. You can also assign a keyboard shortcut to the workspace and specify whether to save the location of the Bridge
window as part of the workspace.
83
Delete Workspace Deletes the saved workspace. If you choose this command, choose the workspace from the
menu, and click Delete.
Reset To Default Workspace Restores the workspace to the default configuration.
See also
“To select Bridge workspaces” on page 82
To set Bridge preferences
1 Choose Edit > Preferences (Windows) or Bridge > Preferences (Mac OS).
2 Select any of the preferences categories on the left:
General Controls the general appearance settings. You can use this category to specify such preferences as how dark
to make the content area for thumbnails, what information to show with thumbnails, and what to include in the
Favorites panel. See “Bridge General preferences” on page 84.
Metadata Controls which sections and fields are displayed in the Metadata panel.
Labels Assigns names to each color label and specifies whether you need to press Control as part of the keyboard
shortcut combination to apply labels and ratings to files.
File Type Associations Specifies which application to use from Bridge to open files of the named type. For any file
type, you can click the name of the application (or None) and click Browse to locate an application to use. You can
also reset the file type associations to their default settings as well as hide any file types that don’t have an associated
application. This affects only those files that you open with Bridge, and overrides the Explorer (Windows) and Finder
(Mac OS) settings.
Page 92

ADOBE PHOTOSHOP CS2
User Guide
Adobe Stock Photos Specifies Adobe Stock Photos settings. See “To set Adobe Stock Photos preferences” on
page 112.
Advanced Specifies advanced settings, including cache options and language options. See “Bridge Advanced prefer-
ences” on page 84.
3 Click OK.
Bridge General preferences
Set any of the following General preferences and click OK:
Background Specifies the darkness of the content area in which thumbnails are shown.
Show Tooltips Specifies whether to display Bridge help information when you position the pointer over an item.
(This preference does not affect settings for Version Cue tool tips, which display metadata for items.)
Additional Lines Of Thumbnail Metadata Specifies whether to show additional metadata information with
thumbnails in the content area. If you select this option, you can choose the type of metadata to show from the
associated menu. You can display up to three extra lines of information.
Favorites Items Specifies what items to show in the Favorites panel. Certain options are dimmed if you do not have
those items.
84
Reveal Scripts In Finder Opens the folder that contains scripts (the commands available in the Tools menu).
Reset All Warning Dialogs Resets warning notices in Bridge to their default settings.
See also
“To set Bridge preferences” on page 83
Bridge Advanced preferences
Set any of the following Advanced preferences and click OK:
Do Not Process Files Larger Than Specifies the maximum file size of documents for which Bridge automatically
creates thumbnails. Displaying large files can slow performance.
Number Of Recently Visited Folders To Display In The Look In Popup Sets the number of most recently viewed
folders that appear in the Look In menu.
Language Sets the language used in the Bridge interface. Select Automatic to set the language to the one specified
for Bridge by the program that installed it.
Show Camera Raw Interface On Open Opens camera raw files in the Adobe Camera Raw dialog box in Adobe
Photoshop.
Use A Centralized Cache File Places the two cache files created for each folder you view in a centralized folder. A
centralized cache is generally easier to use than a distributed cache. For instance, when the cache is centralized, you
don’t have to search in multiple, distributed locations if you want to remove the cache. To specify a new name or
location for this centralized cache folder, click Choose.
Use Distributed Cache Files When Possible Places the two cache files created for each folder you view in the
viewed folder,ifpossible. Forinstance, it’s notpossibletoplace thecache filesinthe viewed folder if that folder is on
a burned CD. In that case, Bridge places the cache files in the centralized folder instead. However, if you are burning
a CD, using a distributed cache means that you don’t have to export the cache to the CD, because it is already in the
Page 93

ADOBE PHOTOSHOP CS2
folder you are burning to the CD. Also, using distributed cache files preserves the cache in a folder if you rename that
folder. See
Note: Cache files are hidden files. To view them in Bridge, choose View > Show Hidden Files.
“To work with the cache in Bridge” on page 85.
User Guide
See also
“To set Bridge preferences” on page 83
To work with the cache in Bridge
The cache stores thumbnail, metadata, and file information to shorten loading times when you return to a previously
viewed folder. However, storing the cache takes up disk space.
Note: Purging the cache deletes the metadata cache and thumbnail cache. If the metadata can’t be written to a file, label
and rating information is lost as well.
❖ Choose any of the following commands from the Tools > Cache submenu:
Build Cache For Subfolders Builds, as a background process, a cache for the selected folder and all the folders
within it (except aliases/shortcuts to other folders), shortening the time spent waiting for the cache to be displayed
as you look in subfolders.
85
Purge Cache For This Folder Clears the cache for the selected folder. This command is useful if you suspect that the
cache for a folder is old and needs to be regenerated.
Purge Central Cache Clears the entire centralized cache and any distributed cache in the currently viewed folder,
freeing room on the hard drive. The command does not otherwise clear local caches.
Export Cache Exports the cache, allowing you to burn a CD with the cache already generated. Because the folder
cache is written into the folder, the thumbnail cache and metadata cache are available after you burn the CD. This
option is active only if you chose Use A Centralized Cache File in the Preferences dialog box.
See also
“About Adobe Bridge” on page 79
Files and folders in Bridge
To view file and folder thumbnails in Bridge
The content area of Bridge displays thumbnails of the files and folders of the selected folder, along with information
about them (depending on your view).
You can specify how you want files and folders are displayed in the content area; for instance, you can decide how big
thumbnails should be, how they should appear, and whether file information should be displayed.
❖ Do any of the following:
• Drag the Thumbnail slider at the bottom of the Bridge window to adjust the size of thumbnails. You can also
click the buttons at either side of the Thumbnail slider to minimize or maximize the thumbnails.
• Clickthe ThumbnailViewbutton atthe bottom of theBridgewindoworchooseView > As Thumbnails to
display items in a grid.
Page 94

ADOBE PHOTOSHOP CS2
• Click the Filmstrip View button or choose View > As Filmstrip to display thumbnails in a scrolling list along
User Guide
with an extra-large thumbnail of the currently selected item. Click the Back button or Forward button directly
below the extra-large thumbnail to go to the previous or next thumbnail. Click the Switch Filmstrip Orientation
button
to change from a horizontal slide show to a vertical one. Note that you can page through a PDF preview
in Filmstrip view.
• Click the Details View button or choose View > As Details to display a scrollable list of thumbnails along
with information about the selected file, such as its creation date, file type, pixel size, and file size. For Version Cue
files, there is additional information about the number of versions or alternates as well as enhanced status information along with the current version comment.
• Click the Versions And Alternates View button or choose View > As Versions And Alternates to display a
scrollable list of thumbnails along with thumbnails of any Version Cue alternates and versions for each item. (Only
the current file appears unless you have created an alternates group containing the file or created previous versions
of the file.) Click Alternates View or Versions View at the top right of the content area to display thumbnails of
alternates or versions. In Alternates View, you can also create alternates groups containing files that are not in the
current folder.
• Choose View > Show Thumbnail Only to view thumbnails without any text information listed. However, Version
Cue tool tips still display Version Cue information when you position the pointer over the thumbnail.
• Choose View > Slideshow to view thumbnails as a slide show that takes over the entire screen. This is a quick and
easy way to display and work with large versions of all the graphics files in a folder. Instructions on how to use the
slide show are displayed on the screen when you choose this command.
86
Depending on the view you’re in, you can display extra file information by positioning the pointer over a thumbnail
in the content area. For files in Version Cue projects, you can also choose File > Versions or File Alternate. This
command opens a dialog box that lets you work with the file’s versions or alternates without having to select that view
in the Bridge content area.
To specify how files and folders are shown in Bridge
You can specify what type of files and folders you want to display as thumbnails in the content area, as well as the
order in which to display them.
❖ Choose any of the following commands from the View menu:
• Sort, followed by the order in which you want to sort files. Choose Ascending to sort in ascending rather than
descending order. Choose Manually to sort by the last order in which you dragged the files.
• Show Hidden Files to display hidden files, such as cache files and Version Cue files that have been provisionally
removed (not permanently deleted) from Version Cue projects.
• Show Folders to display folders as well as individual files.
• Show All Files to display all files regardless of type, even non-Adobe files that Bridge doesn’t normally display.
• Show Graphic Files Only to display only files in graphic file formats, such as EPS, JPEG, BMP, PS, TIFF, and GIF.
• Show Camera Raw Files Only to display only camera raw files.
• Show Vector Files Only to display only files created with drawing programs such as Adobe Illustrator, and EPS and
PS files.
• Refresh (or choose Refresh from the Folders panel menu) to update the content area. This is useful, for instance,
when you perform certain Version Cue actions that don’t automatically refresh the view in the content area.
Closing and reopening Bridge also refreshes the view.
Page 95

ADOBE PHOTOSHOP CS2
User Guide
You can also click Unfiltered at the top right of the Bridge window and choose the files you want to display based on
their rating or label. The Unfiltered menu operates independently of the View > Sort commands.
To navigate folders and files with Bridge
❖ Do any of the following:
• Select the Folders panel and click to select the folder you want. Click the plus sign (Windows) or triangle (Mac OS)
next to a folder or double-click the folder to open subfolders within it.
• Select the Favorites panel and click to select the folder you want.
• Choose afolderfromthe Look In menu.You canclick theGoBackbutton, Go Forwardbutton, or Go Up button
next to the menu to navigate within the current folder listed in the menu.
See also
“To specify how files and folders are shown in Bridge” on page 86
To select files in Bridge
Before you can work with a file, you need to select it. You can select more than one file at a time.
87
❖ Do one of the following in the current folder:
• Click the thumbnail of a file.
• To select contiguous files, Shift-click them.
• To select noncontiguous files, Ctrl-click (Windows) or Command-click (Mac OS) them.
• To select all the files, choose Edit > Select All.
• To select all labeled files, choose Edit > Select Labeled.
• To select all unlabeled files, choose Edit > Select Unlabeled.
• To select the opposite of the current selection, choose Edit > Invert Selection.
• To deselect all selected files, choose Edit > Deselect All.
See also
“To manage files with Bridge” on page 88
“To manage folders with Bridge” on page 89
To open files in Bridge
You can open files in Bridge, even files that were not made with Adobe Creative Suite applications.
1 Select the file in the current folder.
2 Do one of the following:
• Choose File > Open.
• Press Enter (Windows) or Return (Mac OS).
• Double-click the file in the content area or Preview panel.
• Choose File > Open With, followed by the name of the application with which to open the file.
Page 96

ADOBE PHOTOSHOP CS2
User Guide
• Drag the file into the working area of an application, such as an open Illustrator document.
• Drag the file onto the application icon.
• Choose File > Open With Camera Raw to edit the Adobe camera raw settings for the file.
See also
“To manage files with Bridge” on page 88
“To manage folders with Bridge” on page 89
To manage files with Bridge
Adobe Bridge makes it easy to drag and drop files, move them between folders, copy and duplicate them, and
otherwise manipulate them.
Note: From Bridge, you can also use Adobe Version Cue to manage files you author in Adobe Creative Suite applications.
You can create and manage revisions to files kept in Version Cue projects. Version Cue is also a convenient environment
for collaborative file management in workgroups. You can manage not only Adobe Creative Suite files but also nonAdobe files.
❖ Do any of the following:
To delete files Select the files and click the Delete button , click Delete on your keyboard, choose File > Send To
Recycle Bin (Windows), choose File > Move To Trash (Mac OS), drag the file to the Recycle Bin or Trash, or choose
Edit > Cut.
88
To copy files and folders Select the files or folders and choose Edit > Copy, or Ctrl-drag (Windows) or Option-drag
(Mac OS) the file or folders to a different folder.
To duplicate files Select the files and choose Edit > Duplicate.
To paste files Choose Edit > Paste.
To move files to another folder Select the files and drag them to a different folder. (When you search for Adobe
Stock Photos, you can’t drag images to other areas, because some images may be comp thumbnails. To drag a comp
image, first download it and then drag it from the downloaded comp’s folder.)
Page 97

ADOBE PHOTOSHOP CS2
User Guide
To quickly attach an image to an e-mail message, drag the image from Bridge and drop it into the e-mail message.
To rename files Click the file name, type a new name, and press Enter (Windows) or Return (Mac OS).
To manually reorder files in the content area Drag the file to a new location in the content area.
To display the location of a file in the operating system Select the file and choose File > Reveal In Explorer
(Windows) or File > Reveal In Finder (Mac OS).
To find the location of a file in a collection Select a file and choose File > Reveal In Bridge. By default, if you select
a file in a collection, it is listed as being located in the folder “File Results.” Selecting Reveal In Bridge moves you to
the folder in which the file is located.
To place files into an application Select the files and choose File > Place, followed by the name of the application.
For instance, you can use this command to place a JPEG image into Illustrator. You can also drag files from Bridge
into an application. Depending on the file, the document into which you want to place it may need to be open first.
To eject attached media such as CDs and DVDs Select the medium and choose File > Eject.
To drag files out of Bridge Select thefiles anddragthemontothe desktoporintoanother folder.Thisactioncopies
the file (Windows) or moves the file (Mac OS) onto the desktop or folder.
To drag files into Bridge Select oneormorefiles on thedesktop,inafolder,orinanother applicationthatsupports
drag and drop, and drag them into the content area in Bridge. The files are moved from their current folder into the
one displayed in Bridge. (If the file you are dragging is in a different mounted volume than Bridge, the file is copied
into Bridge.)
89
Drag a file or folder onto the Preview panel to display the contents of the folder in Bridge.
See also
“To search for files and folders with Bridge” on page 91
“To batch-rename files with Bridge” on page 95
“To run automated tasks with Bridge” on page 94
“Working with Version Cue in Bridge” on page 101
To manage folders with Bridge
❖ Do any of the following:
To create new folders Click the Create A New Folder button or Choose File > New Folder. Then, enter a name
when the folder appears in the content area.
To delete folders Select the folder and click the Delete button , press Delete on your keyboard, or choose File >
Move To Recycle Bin (Windows) or File > Move To Trash (Mac OS).
To add folders to Favorites Choose afolderfromthe Look In menu or Folderspanel or select it in thecontent area.
Then choose File > Add To Favorites. You can also drag the folder from the content area to the Favorites panel.
To remove folders from Favorites In theFavorites panel, select thefolderyou want to remove.ThenchooseFile >
Remove From Favorites.
Page 98

ADOBE PHOTOSHOP CS2
User Guide
To reorganize folders in the Favorites panel Drag the folder to the desired location in the panel.
To rename folders Click the folder name, type a new name, and press Enter (Windows) or Return (Mac OS).
See also
“About Adobe Bridge” on page 79
“To manage files with Bridge” on page 88
To rotate images with Bridge
You can rotate the view of JPEG, PSD, TIFF, and camera raw file images in Bridge. Rotating an image in Bridge may
rotate it in the application in which it was created as well. Rotating does not affect the data in the image file.
1 Select one or more images in the content area.
2 Do one of the following:
• To rotate the images 90˚ clockwise, click the Rotate 90˚ Clockwise button or choose Edit > Rotate 90˚
Clockwise.
• To rotate the images 90˚ counterclockwise, click the Rotate 90˚ Counterclockwise button or choose
Edit > Rotate 90˚ Counterclockwise.
• To rotate the image 180˚, choose Edit > Rotate 180˚.
90
See also
“About Adobe Bridge” on page 79
“To manage files with Bridge” on page 88
To label files with Bridge
Labeling files with a color is a flexible way to quickly mark a large number of files. Using the View > Sort menu or
Unfilter button, you can choose to view files according to their label.
For example, suppose you’ve just imported a large number of images and are viewing them in Bridge. As you review
each new image, you can label those you want to keep. After this initial pass, you can use the Unfilter button to display
and work on files you’ve labeled with a particular color.
You can assign names to labels through the Preferences dialog box. The name is then added to the file’s metadata
when you apply the label.
Note: When you view folders, Bridge shows both labeled and unlabeled files until you choose another option. Also,
purging the cache deletes labels from files that don’t support XMP write (such as BMP, DCS, Pict, PS6 PDF, and PSB
files), locked files, or read-only files (such as files on CDs).
1 Select one or more files.
2 Do one of the following:
• To label files, choose a color from the Label menu.
• To remove labels from files, choose Label > No Label.
Page 99

ADOBE PHOTOSHOP CS2
User Guide
See also
“About Adobe Bridge” on page 79
“To specify how files and folders are shown in Bridge” on page 86
To rate files with Bridge
You can assign ratings to files, awarding from zero to five stars. Using the View > Sort menu or Unfilter button, you
can choose to view files according to their rating.
For example, suppose you’ve just imported a large number of images and are viewing them in Bridge. As you review
each newimage,you canratethemfrombesttoworst.After this initialpass, youcan view only filesyou’verated with
four or five stars and work on those.
1 Select one or more files.
2 Do any of the following:
• In Thumbnail view, click the dot representing the number of stars you want to give the file. (Dots do not appear
in very small thumbnail views. If necessary, rescale the thumbnail view until the dots appear.)
• Choose a rating from the Label menu.
• To add one star, choose Label > Increase Rating.
• To remove one star, choose Label > Decrease Rating.
• To remove all stars, choose Label > No Rating or click the No Rating icon on the thumbnail of the file.
91
See also
“About Adobe Bridge” on page 79
“To specify how files and folders are shown in Bridge” on page 86
To search for files and folders with Bridge
You can perform searches with Bridge. You can narrow your search by adding multiple search criteria. You can even
save your search criteria as a collection, so that you can perform the same search again later.
Note: For information on searching for Adobe Stock Photos with Bridge, see Help.
1 Choose Edit > Find.
2 In the Find dialog box, choose a source folder from the Look In menu. By default, the menu displays the currently
active folder. Click the Browse button to navigate to another folder.
3 (Optional) Select Include All Subfolders to expand the search to any subfolders in the source folder.
4 (Optional) Select Search Past Versions Of Version Cue Files to include past versions of Adobe Version Cue files,
as well as current ones, in the search.
5 (Optional) Select Show Find In A New Browser Window to display the search results in a new Bridge window. If
left unselected, the search results appear in the content area of the current window.
6 Choose a criterion for your search by selecting an option from the leftmost Criteria menu.
7 Select a limiter from the center Criteria menu.
8 Enter the search text in the text box at the right, if needed. You can enter basic search terms such as AND, OR, and
* (for wild cards).
Page 100

ADOBE PHOTOSHOP CS2
User Guide
9 To add search criteria, click the plus sign button. To remove search criteria, click the minus sign button.
10 Click Find. Bridge displays the files that match the search criteria, and you can navigate through the files.
11 (Optional) To save the search criteria to perform the same search again, click Save As Collection. Enter a name
for the collection. Select Start Search From Current Folder to search from the same folder in the future. Then, click
Save. The search criteria are saved in the Collections folder listed in the Favorites panel.
See also
“To manage files with Bridge” on page 88
“To search with criteria saved as collections” on page 92
To search with criteria saved as collections
If you saved search criteria by using the Save As Collection option in the Find dialog box, you can run that search
again by using that collection.
1 Select Collections in the Favorites panel or Look In menu.
2 Double-click the collection you want.
A new Bridge window appears containing the results of the search.
92
See also
“To manage files with Bridge” on page 88
“To search for files and folders with Bridge” on page 91
Bridge Center
About Bridge Center
If you are working with the Adobe Creative Suite, Bridge Center gives you quick access to your most recent files and
folders, RSS newsreaders for the latest information, tips and tricks for using Adobe products, color management
features, and Help documentation. It even lets you start new Version Cue projects.
To display Bridge Center, select it in the Favorites panel.
Note: If you don’t see Bridge Center in the Favorites panel, make sure that Center is selected in the General preferences.
“To set Bridge preferences” on page 83.
See
Adobe Stock Photos Opens the Adobe Stock Photos home page in Bridge.
Saved File Groups Lists sets of files that you have saved as a group, even if they are being used in separate applica-
tions. When youcreateasavedfilegroup,you assemble andnameasetoffiles,which Bridge then closes.Whenyou
open a saved file group, Bridge reopens the current version of those files, launching the appropriate Adobe Creative
Suite applications as needed. See “To work with saved file groups in Bridge Center” on page 93.
Note: Saved file groups do not preserve versions of files; groups always contain the most current version of the files. For
instance,suppose youinclude thefilelogo.jpginasavedfilegroup.Ifyou open thesaved file grouplater,editthe logo.jpg
file, and save it in another group, both saved file groups will contain the same logo.jpg file.
 Loading...