

Page 1

1
.5
Adobe
®
™
Audition
1
.5
Us er Guide
Page 2

©
2004 Adobe Systems Incorporated. All rights reserved.
®
Adobe
Audition™ 1.5 User Guide for Windows®.
If this guide is distributed with software that includes an end-user agreement, this guide, as well as the software described in it, is furnished
under license and may be used or copied only in accordance with the terms of such license. Except as permitted by any such license, no part
of this guide may be reproduced, stored in a retrieval system, or transmitted, in any form or by any means, electronic, mechanical, recording,
or otherwise, without the prior written permission of Adobe Systems Incorporated. Please note that the content in this guide is protected
under copyright law even if it is not distributed with software that includes an end-user license agreement.
The content of this guide is furnished for informational use only, is subject to change without notice, and should not be construed as a commitment by Adobe Systems Incorporated. Adobe Systems Incorporated assumes no responsibility or liability for any errors or inaccuracies
that may appear in the informational content contained in this guide.
Please remember that existing artwork or images that you may want to include in your project may be protected under copyright law. The
unauthorized incorporation of such material into your new work could be a violation of the rights of the copyright owner. Please be sure to
obtain any permission required from the copyright owner.
Any references to company names in sample templates are for demonstration purposes only and are not intended to refer to any actual organization.
Adobe, the Adobe logo, Adobe Audition, Adobe Encore DVD, Adobe Premiere, and After Effects are either registered trademarks or trademarks of Adobe Systems Incorporated in the United States and/or other countries. Apple, Macintosh, and Mac OS are trademarks of Apple
Computer, Inc., registered in the U. S. and other countries. Microsoft, Windows, and Windows NT are registered trademarks of Microsoft
Corporation in the U.S. and/or other countries. mp3PRO audio coding technology licensed from Coding Technologies, Fraunhofer IIS and
Thomson Multimedia. VST is a trademark of Steinberg Media Technologies AG. ReWire is a product of Propellerhead Software. All other
trademarks are the property of their respective owners.
Supply of this product does not convey a license nor imply any right to distribute MP3-encoded or mp3PRO-encoded data created with this
product in revenue-generating broadcast systems (terrestrial, satellite, cable, and/or other distribution channels), streaming applications (via
Internet, intranets, and/or other networks), other content distribution systems (pay-audio or audio-on-demand applications and the like)
or on physical media (compact discs, digital versatile discs, semiconductor chips, hard drives, memory cards, and the like). An independent
license for such use is required. For details, please visit http://mp3licensing.com
Notice to U.S. government end users. The software and documentation are “Commercial Items,” as that term is defined at 48 C.F.R. §2.101,
consisting of “Commercial Computer Software” and “Commercial Computer Software Documentation,” as such terms are used in 48 C.F.R.
§12.212 or 48 C.F.R. §227.7202, as applicable. Consistent with 48 C.F.R. §12.212 or 48 C.F.R. §§227.7202-1 through 227.7202-4, as applicable, the Commercial Computer Software and Commercial Computer Software Documentation are being licensed to U.S. Government end
users (a) only as Commercial items and (b) with only those rights as are granted to all other end users pursuant to the terms and conditions
herein. Unpublished-rights reserved under the copyright laws of the United States. Adobe Systems Incorporated, 345 Park Avenue, San Jose,
CA 95110-2704, USA. For U.S. Government End Users, Adobe agrees to comply with all applicable equal opportunity laws including, if appropriate, the provisions of Executive Order 11246, as amended, Section 402 of the Vietnam Era Veterans Readjustment Assistance Act of
1974 (38 USC 4212), and Section 503 of the Rehabilitation Act of 1973, as amended, and the regulations at 41 C.F.R Parts 60-1 through 6060, 60-250, and 60-741. The affirmative action clause and regulations contained in the preceding sentence shall be incorporated by reference.
Part number: 90050796 (05/2004)
Page 3

Contents
iii
Learning about Adobe Audition
Getting help . . . . . . . . . . . . . . . . . . . . . . . . . . . . . . . . . . . . . . . . . . . . . . . . . . 1
Working with Adobe Audition . . . . . . . . . . . . . . . . . . . . . . . . . . . . . . . . . 3
What’s New in Adobe Audition 1.5
Use integrated tools . . . . . . . . . . . . . . . . . . . . . . . . . . . . . . . . . . . . . . . . . . . 5
Sound your best . . . . . . . . . . . . . . . . . . . . . . . . . . . . . . . . . . . . . . . . . . . . . . 6
Work efficiently . . . . . . . . . . . . . . . . . . . . . . . . . . . . . . . . . . . . . . . . . . . . . . . 7
Chapter 1
Chapter 2
Looking at the Work Area
About the work area . . . . . . . . . . . . . . . . . . . . . . . . . . . . . . . . . . . . . . . . . . 9
About using Edit View and Multitrack View . . . . . . . . . . . . . . . . . . . .10
Switching between views . . . . . . . . . . . . . . . . . . . . . . . . . . . . . . . . . . . . 11
Choosing commands . . . . . . . . . . . . . . . . . . . . . . . . . . . . . . . . . . . . . . . . .12
Using toolbars . . . . . . . . . . . . . . . . . . . . . . . . . . . . . . . . . . . . . . . . . . . . . . . 13
Using windows . . . . . . . . . . . . . . . . . . . . . . . . . . . . . . . . . . . . . . . . . . . . . . 14
Navigating in the display window . . . . . . . . . . . . . . . . . . . . . . . . . . . . . 17
Using the status bar . . . . . . . . . . . . . . . . . . . . . . . . . . . . . . . . . . . . . . . . . . 21
Undoing and redoing changes . . . . . . . . . . . . . . . . . . . . . . . . . . . . . . . 22
Organizing files and effects . . . . . . . . . . . . . . . . . . . . . . . . . . . . . . . . . . . 24
Working with effects . . . . . . . . . . . . . . . . . . . . . . . . . . . . . . . . . . . . . . . . . 28
Setting up Adobe Audition
About setting up Adobe Audition . . . . . . . . . . . . . . . . . . . . . . . . . . . . . 35
Setting up devices . . . . . . . . . . . . . . . . . . . . . . . . . . . . . . . . . . . . . . . . . . . 36
Setting Adobe Audition preferences . . . . . . . . . . . . . . . . . . . . . . . . . .43
Managing temporary files . . . . . . . . . . . . . . . . . . . . . . . . . . . . . . . . . . . . 57
Page 4

CONTENTS
iv
Chapter 3
Chapter 4
Importing, Recording, and Playing Audio
Opening audio files and multitrack sessions . . . . . . . . . . . . . . . . . . .61
Inserting audio files into multitrack sessions . . . . . . . . . . . . . . . . . . 63
Importing audio from CD . . . . . . . . . . . . . . . . . . . . . . . . . . . . . . . . . . . . . 64
Setting the current-time indicator . . . . . . . . . . . . . . . . . . . . . . . . . . . . 68
Monitoring time . . . . . . . . . . . . . . . . . . . . . . . . . . . . . . . . . . . . . . . . . . . . . 69
Using the transport controls . . . . . . . . . . . . . . . . . . . . . . . . . . . . . . . . . . 71
Recording audio . . . . . . . . . . . . . . . . . . . . . . . . . . . . . . . . . . . . . . . . . . . . . 72
Playing audio . . . . . . . . . . . . . . . . . . . . . . . . . . . . . . . . . . . . . . . . . . . . . . . . 75
Stopping, pausing, and adjusting the playback cursor . . . . . . . . . 78
Monitoring recording and playback levels . . . . . . . . . . . . . . . . . . . . . 79
Editing Audio
About editing audio . . . . . . . . . . . . . . . . . . . . . . . . . . . . . . . . . . . . . . . . . . 83
Creating new audio files . . . . . . . . . . . . . . . . . . . . . . . . . . . . . . . . . . . . . . 84
Viewing waveforms . . . . . . . . . . . . . . . . . . . . . . . . . . . . . . . . . . . . . . . . . . 85
Selecting audio data . . . . . . . . . . . . . . . . . . . . . . . . . . . . . . . . . . . . . . . . . 87
Copying, cutting, pasting, and deleting . . . . . . . . . . . . . . . . . . . . . . . . 92
Working with cues . . . . . . . . . . . . . . . . . . . . . . . . . . . . . . . . . . . . . . . . . . . 96
Creating play lists . . . . . . . . . . . . . . . . . . . . . . . . . . . . . . . . . . . . . . . . . . .102
Creating and deleting silence . . . . . . . . . . . . . . . . . . . . . . . . . . . . . . . .103
Inverting and reversing audio . . . . . . . . . . . . . . . . . . . . . . . . . . . . . . .106
Generating audio . . . . . . . . . . . . . . . . . . . . . . . . . . . . . . . . . . . . . . . . . . .106
Converting the sample type . . . . . . . . . . . . . . . . . . . . . . . . . . . . . . . . .110
Adding file properties . . . . . . . . . . . . . . . . . . . . . . . . . . . . . . . . . . . . . . .116
Chapter 5
Enhancing and Restoring Audio
About enhancing and restoring audio . . . . . . . . . . . . . . . . . . . . . . .117
About the mastering process . . . . . . . . . . . . . . . . . . . . . . . . . . . . . . . .117
Analyzing frequency, phase, and dynamic range . . . . . . . . . . . . . .118
Removing noise . . . . . . . . . . . . . . . . . . . . . . . . . . . . . . . . . . . . . . . . . . . . .125
Filtering audio . . . . . . . . . . . . . . . . . . . . . . . . . . . . . . . . . . . . . . . . . . . . . .129
Optimizing amplitude . . . . . . . . . . . . . . . . . . . . . . . . . . . . . . . . . . . . . . .134
Page 5

v
Chapter 6
Chapter 7
Applying Stereo, Pitch, and Delay Effects
About using stereo, pitch, and delay effects . . . . . . . . . . . . . . . . . .139
Changing stereo imagery . . . . . . . . . . . . . . . . . . . . . . . . . . . . . . . . . . . .139
Using chorus, flanger, and phaser effects . . . . . . . . . . . . . . . . . . . . .143
Changing pitch . . . . . . . . . . . . . . . . . . . . . . . . . . . . . . . . . . . . . . . . . . . . .145
Adding delays and echoes . . . . . . . . . . . . . . . . . . . . . . . . . . . . . . . . . . .147
Adding reverb . . . . . . . . . . . . . . . . . . . . . . . . . . . . . . . . . . . . . . . . . . . . . .150
Creating special effects . . . . . . . . . . . . . . . . . . . . . . . . . . . . . . . . . . . . . .153
Using multitrack-only effects . . . . . . . . . . . . . . . . . . . . . . . . . . . . . . . .156
Mixing Multitrack Sessions
About mixing multitrack sessions . . . . . . . . . . . . . . . . . . . . . . . . . . . .161
Working with sessions . . . . . . . . . . . . . . . . . . . . . . . . . . . . . . . . . . . . . . .162
Setting advanced session properties . . . . . . . . . . . . . . . . . . . . . . . . .167
Working with clips . . . . . . . . . . . . . . . . . . . . . . . . . . . . . . . . . . . . . . . . . .168
Working with audio tracks . . . . . . . . . . . . . . . . . . . . . . . . . . . . . . . . . . .179
Working with ReWire tracks . . . . . . . . . . . . . . . . . . . . . . . . . . . . . . . . .184
Working with MIDI tracks . . . . . . . . . . . . . . . . . . . . . . . . . . . . . . . . . . . .185
Using real-time effects . . . . . . . . . . . . . . . . . . . . . . . . . . . . . . . . . . . . . .185
Automating mixes with clip envelopes . . . . . . . . . . . . . . . . . . . . . . .188
Using the Mixers window . . . . . . . . . . . . . . . . . . . . . . . . . . . . . . . . . . . .190
Mixing down ReWire tracks and specific audio clips . . . . . . . . . .196
Chapter 8
Using Loops
About loops . . . . . . . . . . . . . . . . . . . . . . . . . . . . . . . . . . . . . . . . . . . . . . . .197
Defining loops . . . . . . . . . . . . . . . . . . . . . . . . . . . . . . . . . . . . . . . . . . . . . .198
Calculating the tempo of selected ranges . . . . . . . . . . . . . . . . . . . .199
Setting permanent loop properties in Edit View . . . . . . . . . . . . . .200
Setting impermanent loop properties in Multitrack View . . . . .202
Setting the tempo, time signature, and key for sessions . . . . . . .204
Working with loops in the track display . . . . . . . . . . . . . . . . . . . . . .205
Page 6

CONTENTS
vi
Chapter 9
Chapter 10
Chapter 11
Working with Video
About working with video . . . . . . . . . . . . . . . . . . . . . . . . . . . . . . . . . . .207
Working with Adobe Premiere Pro and After Effects . . . . . . . . . .207
Importing audio and video from video files . . . . . . . . . . . . . . . . . .208
Working with video clips . . . . . . . . . . . . . . . . . . . . . . . . . . . . . . . . . . . .209
Previewing video . . . . . . . . . . . . . . . . . . . . . . . . . . . . . . . . . . . . . . . . . . . .210
Preparing video mixdowns for export . . . . . . . . . . . . . . . . . . . . . . . .211
Creating Surround Sound
About surround sound . . . . . . . . . . . . . . . . . . . . . . . . . . . . . . . . . . . . . .213
Using the Multichannel Encoder . . . . . . . . . . . . . . . . . . . . . . . . . . . . .214
Panning tracks and buses for surround sound . . . . . . . . . . . . . . . .215
Adjusting volume levels . . . . . . . . . . . . . . . . . . . . . . . . . . . . . . . . . . . . .220
Zooming into and out of the waveform display . . . . . . . . . . . . . . .221
Previewing the multichannel project . . . . . . . . . . . . . . . . . . . . . . . . .221
Exporting surround-sound files . . . . . . . . . . . . . . . . . . . . . . . . . . . . . .223
Saving, Exporting, and Closing Files
Saving audio files . . . . . . . . . . . . . . . . . . . . . . . . . . . . . . . . . . . . . . . . . . .227
Saving and exporting sessions . . . . . . . . . . . . . . . . . . . . . . . . . . . . . . .228
Closing files . . . . . . . . . . . . . . . . . . . . . . . . . . . . . . . . . . . . . . . . . . . . . . . . .231
Choosing an audio file format . . . . . . . . . . . . . . . . . . . . . . . . . . . . . . .231
Chapter 12
Scripting and Batch Processing
About scripting and batch processing . . . . . . . . . . . . . . . . . . . . . . .243
Batch processing cue ranges . . . . . . . . . . . . . . . . . . . . . . . . . . . . . . . .243
Normalizing groups of files . . . . . . . . . . . . . . . . . . . . . . . . . . . . . . . . . .244
Batch processing files . . . . . . . . . . . . . . . . . . . . . . . . . . . . . . . . . . . . . . .247
Working with scripts . . . . . . . . . . . . . . . . . . . . . . . . . . . . . . . . . . . . . . . .249
Using favorites (Edit View only) . . . . . . . . . . . . . . . . . . . . . . . . . . . . . .253
Page 7

vii
Chapter 13
Appendix A
Appendix B
Burning Audio CDs
Using CD Project View . . . . . . . . . . . . . . . . . . . . . . . . . . . . . . . . . . . . . . .257
Assembling tracks . . . . . . . . . . . . . . . . . . . . . . . . . . . . . . . . . . . . . . . . . . .257
Editing the source audio for tracks . . . . . . . . . . . . . . . . . . . . . . . . . . .260
Setting track properties . . . . . . . . . . . . . . . . . . . . . . . . . . . . . . . . . . . . .260
Writing a CD . . . . . . . . . . . . . . . . . . . . . . . . . . . . . . . . . . . . . . . . . . . . . . . .261
Keyboard Shortcuts
About keyboard shortcuts . . . . . . . . . . . . . . . . . . . . . . . . . . . . . . . . . . .263
Keys for playing audio . . . . . . . . . . . . . . . . . . . . . . . . . . . . . . . . . . . . . . .263
Keys for selecting ranges, channels, and tracks . . . . . . . . . . . . . . .264
Keys for copying waveforms . . . . . . . . . . . . . . . . . . . . . . . . . . . . . . . . .264
Keys for editing clips . . . . . . . . . . . . . . . . . . . . . . . . . . . . . . . . . . . . . . . .265
Keys for repeating commands . . . . . . . . . . . . . . . . . . . . . . . . . . . . . . .265
Keys for using markers . . . . . . . . . . . . . . . . . . . . . . . . . . . . . . . . . . . . . .265
Keys for scrolling waveforms and sessions . . . . . . . . . . . . . . . . . . . .266
Keys for viewing windows . . . . . . . . . . . . . . . . . . . . . . . . . . . . . . . . . . .266
Digital Audio Primer
Sound fundamentals . . . . . . . . . . . . . . . . . . . . . . . . . . . . . . . . . . . . . . . .267
Waveforms . . . . . . . . . . . . . . . . . . . . . . . . . . . . . . . . . . . . . . . . . . . . . . . . . .268
Analog audio . . . . . . . . . . . . . . . . . . . . . . . . . . . . . . . . . . . . . . . . . . . . . . .270
Digital audio . . . . . . . . . . . . . . . . . . . . . . . . . . . . . . . . . . . . . . . . . . . . . . . .270
Sampling rate . . . . . . . . . . . . . . . . . . . . . . . . . . . . . . . . . . . . . . . . . . . . . . .270
Bit depth . . . . . . . . . . . . . . . . . . . . . . . . . . . . . . . . . . . . . . . . . . . . . . . . . . . .271
Where Adobe Audition fits into the process . . . . . . . . . . . . . . . . . .272
Introducing MIDI . . . . . . . . . . . . . . . . . . . . . . . . . . . . . . . . . . . . . . . . . . . .273
Conclusion . . . . . . . . . . . . . . . . . . . . . . . . . . . . . . . . . . . . . . . . . . . . . . . . . .273
Appendix C
Glossary
Index
. . . . . . . . . . . . . . . . . . . . . . . . . . . . . . . . . . . . . . . . . . . . . . . . . . . . . .275
. . . . . . . . . . . . . . . . . . . . . . . . . . . . . . . . . . . . . . . . . . . . . . . . . . . . . . .291
Page 8

Page 9
Learning about Adobe Audition
1
elcome to Adobe® Audition
TM
1.5, the ultimate software tool for audio editing,
mixing, and mastering.
W
Adobe provides a variety of options you can use to learn Adobe Audition, including online
Help and tool tips. You can also use the Adobe Web site to easily access a wide range of
continually updated Web resources, from tutorials to technical support information.
Many files on the Adobe Web site are in Adobe PDF format. To view these files, use
®
Adobe Reader
Getting help
There are a number of ways to get the help you need in Adobe Audition. The following
three tables can help you find specific resources related to Adobe Audition features,
training resources, and support.
Finding Help for Adobe Audition features
If you . . . Try this . . .
Want information about
installing Adobe Audition
, included on the Adobe Audition CD.
Insert the Adobe Audition application CD into your CD drive, and follow
•
the on-screen installation instructions. (You cannot run Adobe Audition
from the CD.)
•
See the ReadMe file on the application CD.
Are new to Adobe Audition
and want an overview of tools
and features
Are upgrading from a previous
version of Adobe Audition
•
For information about specific tasks, see “Working with Adobe Audition”
on page 3.
•
For information about the user interface, see “About the work area” on
page 9.
•
Move the pointer over tools and buttons to view tool and button names.
•
See the beginning tutorials in Help.
See “What’s New in Adobe Audition 1.5” on page 5 to get an overview of
new features. Or, for more detailed information, see the NewFeatures.pdf
file on the Adobe Audition application CD.
Page 10
2
Learning about Adobe Audition
Finding Help for Adobe Audition features
If you . . . Try this . . .
Are looking for detailed
information about a feature
Want a list of keyboard
shortcuts
Finding Adobe Audition training resources
If you . . . Try this . . .
Want to obtain in-depth
Adobe Audition training
Are looking for background
information on digital audio
Want information about
becoming an Adobe Certified
Expert
Want training from an Adobe
Certified Training Provider
In Help, use the Index or Search tabs.
•
In windows and dialog boxes, click the Help button or press F1.
•
See “Keyboard Shortcuts” on page 263.
•
See the tutorials on the Adobe Studio Web site at www.studio.adobe.com.
•
Browse the Adobe Press materials at www.adobepress.com (English only)
and the training resources at www.adobe.com/support/training.html.
•
For step-by-step lessons, consider the Adobe Classroom in a Book series.
See the “Glossary” on page 275 and “Digital Audio Primer” on page 267.
Visit the Partnering with Adobe Web site at http://partners.adobe.com.
Certification is available for several different geographical regions.
See the Training page of the Adobe Web site at
www.adobe.com/support/training.html.
Page 11

Finding support for Adobe Audition
If you . . . Try this . . .
ADOBE AUDITION 1.5
User Guide
3
Want customer or technical
support
Want answers to common
troubleshooting questions
Want to register your copy of
Adobe Audition
Want to access downloads or
links to user forums
Refer to the technical support card provided with your software.
•
•
See the Adobe Audition support page at
www.adobe.com/support/products/audition.html.
See the ReadMe file installed with Adobe Audition for information that
•
became available after this guide went to press.
Visit the Adobe Audition support page at
www.adobe.com/support/products/audition.html.
When you first start Adobe Audition, you’re prompted to register online.
•
Fill out the form, and then submit it directly or fax a printed copy.
Fill out and return the registration card included with your software package.
•
Visit the main Adobe Audition page at www.adobe.com/audition.
Working with Adobe Audition
You can work with Adobe Audition in many different ways. In this section, you’ll find directions to specific information to help you accomplish some common Adobe Audition tasks.
If you want to increase productivity
Use the Organizer window to quickly organize files, preview loops, and apply effects.
•
(See “Organizing files and effects” on page 24 and “Previewing audio by using the
Organizer window” on page 77.)
•
Automatically convert audio from a CD into an editable waveform. (See “Importing
audio from CD” on page 64.)
•
Store selections and start points in cues to speed up editing and navigation tasks. (See
“Working with cues” on page 96.)
Batch process files to quickly apply favorite processing or prepare audio for specific
•
mediums, such as audio CD or the Web. (See “Scripting and Batch Processing” on
page 243.)
Page 12

4
Learning about Adobe Audition
If you want to create video soundtracks
Easily create and remix soundtracks used in Adobe® Premiere® Pro and After Effects®
•
projects. (See “Working with Adobe Premiere Pro and After Effects” on page 207.)
Time stretch audio clips to match video. (See “Time stretching audio clips” on
•
page 177.)
•
Generate noises and tones for sound effects. (See “Generating audio” on page 106.)
•
Create surround-sound mixes. (See “About surround sound” on page 213.)
If you want to record and mix musical compositions
Nondestructively record and edit multitrack sessions of up to 128 tracks. (See “About
•
mixing multitrack sessions” on page 161.)
•
Automate mixes with clip envelopes. (See “Automating mixes with clip envelopes” on
page 188.)
•
Apply, edit, and rearrange real-time effects, without making any permanent changes.
(See “Using real-time effects” on page 185.)
•
Build compositions with musical loops. (See “About loops” on page 197.)
Synchronize with ReWire and SMPTE. (See “Setting up ReWire connections” on
•
page 42 and “Setting up for SMPTE synchronization” on page 40.)
Page 13

What’s New in Adobe
Audition 1.5
his overview introduces you to the key new features of Adobe Audition 1.5,
including streamlined workflow with other Adobe products, powerful new effects,
integrated CD burning, and more.
T
Use integrated tools
Adobe Audition tightly integrates with flexible audio technology like ReWire and VST, and
video applications like Adobe Premiere Pro and Adobe After Effects.
5
ReWire support
and other audio software such as Propellerhead Reason and Ableton Live. (See “Setting up
ReWire connections” on page 42.)
VST plug-in support
plug-ins, which can also be used in Adobe Premiere Pro. (See “Using plug-in effects” on
page 32.)
Enhanced video integration
track display, and import a wide range of video file formats, including AVI, MPEG, and
WMV. (See “About working with video” on page 207.)
Improved workflow with other Adobe products
Pro, Adobe After Effects, and Adobe
keyboard shortcuts. (See “Working with Adobe Premiere Pro and After Effects” on
page 207.)
Stream full-resolution audio data in real-time between Adobe Audition
Expand your options with integrated support for third-party VST
Edit video soundtracks with ease. View video frames in the
Wo rk smoothly with Adobe Premiere
®
EncoreTM DVD by using similar tools, menus, and
Page 14

6
What’s New in Adobe Audition 1.5
Sound your best
With high fidelity, 32-bit internal processing, Adobe Audition supports up to 32-bit files
and sample rates up to 10 MHz. Powerful effects, restoration, and pitch correction tools
let you create the exact sound you're after.
Pitch correction tool
Correct off-pitch performances and create pitch-based effects. Use
automatic mode for quick results, or manual mode for precise control. (See “Using the
Pitch Correction effect (Edit View only)” on page 146.)
Frequency space editing
Visually isolate, select, and modify sounds in frequency and
time using the Marquee Selection tool. (See “Selecting audio frequencies in Spectral View”
on page 88.)
Automatic elimination of clicks and pops
Quickly and easily restore digital recordings of
vinyl source material, wireless mics, DV cameras, and other production audio. (See “Using
the Auto Click/Pop Eliminator effect (Edit View only)” on page 125.)
Studio reverb
Apply high-quality reverb that conserves processing resources, while
offering extensive controls. (See “Using the Studio Reverb effect” on page 153.)
New sample sessions
Get up to speed quickly by using any of the 20 sample sessions
included with Adobe Audition. Modify the samples to create your own music. (See “About
mixing multitrack sessions” on page 161.)
New royalty-free loops
Use more than 500 new music loops—for a total of more than
5,000—in a variety of styles including 70’s disco, classic rhumba, and wedding and event.
(See “About loops” on page 197.)
Vocal extraction
Quickly and easily extract the vocal portions of a track to create either
a cappella or karaoke-ready tracks, while preserving the stereo image. (See “Using the
Center Channel Extractor effect” on page 141.)
Flexible envelope scaling
Rescale control points on pan, volume, and effects envelopes to
quickly modify a clip in a multitrack mix. Scale all points simultaneously while
maintaining relative or absolute relationships between points. (See “Automating mixes
with clip envelopes” on page 188.)
Page 15

ADOBE AUDITION 1.5
Work efficiently
Adobe Audition puts all the tools you need at your fingertips so you can get your work
done quickly and efficiently. An intuitive interface gets you up and running in no time,
and integrated editing, mixing, and CD burning streamline your audio workflow.
User Guide
7
Integrated CD burning
Create masters of your audio compositions by burning gapless
audio CDs directly from Adobe Audition. (See “Using CD Project View” on page 257.)
Time stretching
Visually drag the edge of any audio clip in a multitrack mix to fit a specific
length of time, with or without affecting the clip's pitch. Quickly fit sound effects and
dialog to video clips. (See “Time stretching audio clips” on page 177.)
Preroll and postroll playback
Speed the process of performing destructive edits and
applying effects by listening to the audio preceding and following a selection. (See
“Playing audio by using the transport controls” on page 75.)
Custom keyboard shortcut sets
Customize keyboard shortcut sets to configure Adobe
Audition for your working style. (See “Using shortcuts” on page 12.)
In-time loop previews
Use the Organizer window to preview loops in the tempo and pitch
of the current session before adding them to your mix. (See “Previewing audio by using
the Organizer window” on page 77.)
Task-based documentation
Quickly learn how to complete audio production tasks using
an updated Help system and user guide organized by subjects such as editing, looping, and
video.
Page 16

Page 17
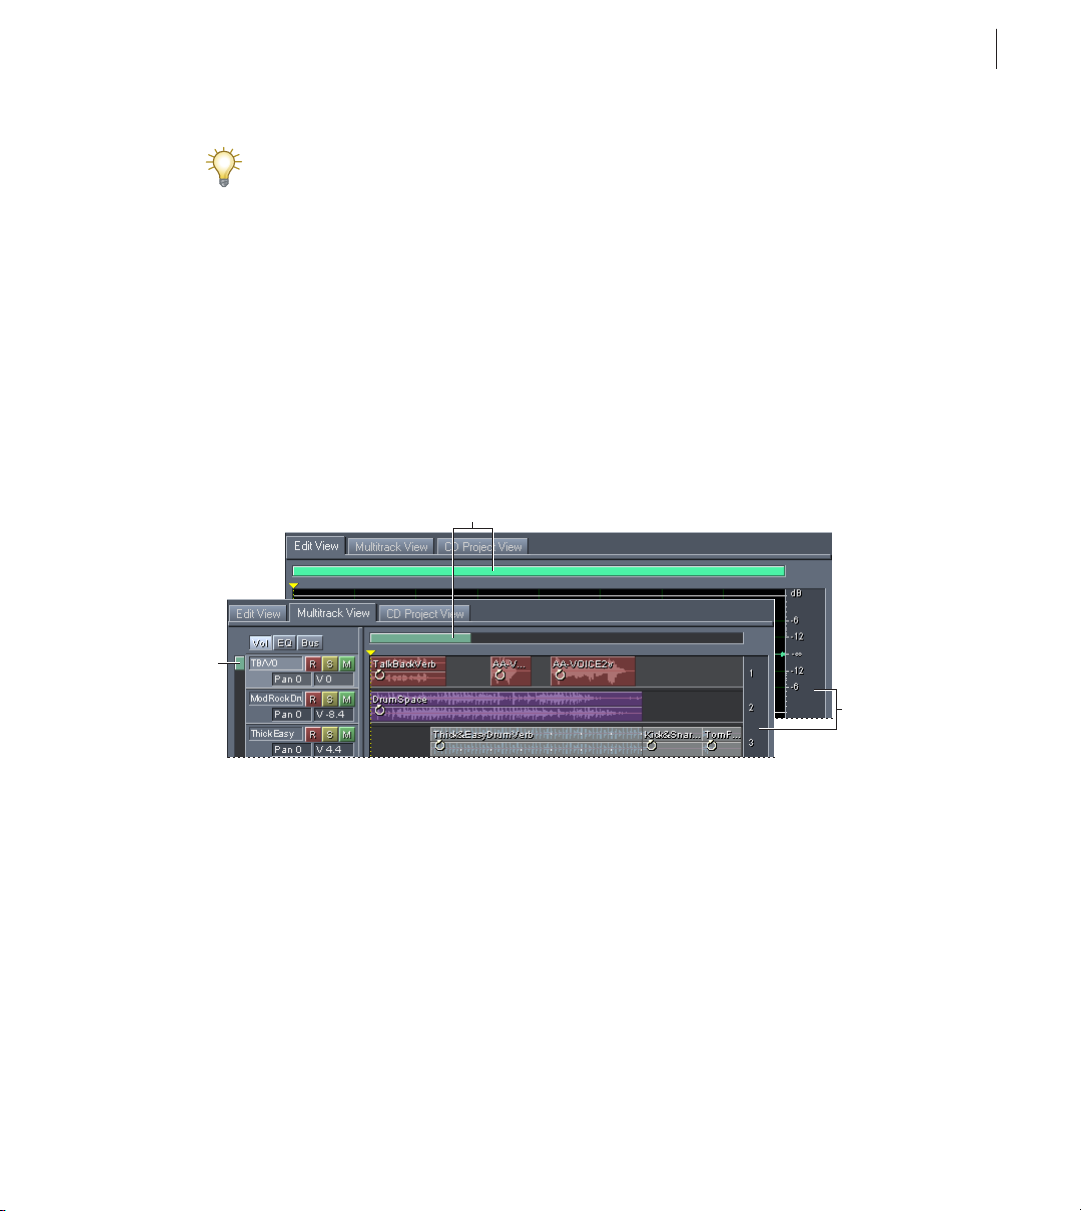
Chapter 1: Looking at the
Wo r k Area
elcome to Adobe Audition. Adobe Audition gives you an efficient work area and
user interface to edit and mix audio files.
W
About the work area
Adobe Audition is divided into three main work areas: Edit View, Multitrack View, and CD
Project View. This division is intended to help you focus on the major tasks of editing audio
files, mixing sessions, and burning CDs. For more information on the differences between Edit
View and Multitrack View, see “About using Edit View and Multitrack View” on page 10. For
more information on CD Project View, see “Using CD Project View” on page 257.
A B C
9
Adobe Audition work area
A.
Edit View tabB. Multitrack View tabC. CD Project View tabD. menusE. toolbars
F.
display windowG. various windows
D
E
F
G
Page 18

CHAPTER 1
10
Looking at the Work Area
All three views have a similar user interface, including the following components:
Menus
The menus in the menu bar contain commands for performing tasks. (See
“Choosing commands” on page 12.)
To olbars
The toolbars hold buttons for applying commonly used functions. (See “Using
toolbars” on page 13.)
Windows
Windows—including the Organizer, Transport Controls, Zoom Controls, Level
Meters, and Selection/View Controls—help you monitor and modify audio files. (See
“Using windows” on page 14.)
Display window
The display window shows you sound in an easy-to-manipulate form. In
Edit View, the display window is where you modify single waveforms. In Multitrack View,
the display window is where you mix multiple audio files in a session. (See “About editing
audio” on page 83 and “About mixing multitrack sessions” on page 161.)
Yo u can change many aspects of Adobe Audition’s appearance, including the color
scheme, the appearance of buttons, and the appearance of the waveform display, in the
Settings dialog box. (See “Setting Adobe Audition preferences” on page 43.)
About using Edit View and Multitrack View
Adobe Audition provides different work areas for editing single waveforms and creating
multitrack mixes. To edit single waveforms, you use Edit View. To mix multiple waveforms
with MIDI and video files, you use Multitrack View.
Edit View and Multitrack View use different editing methods, and each has unique advantages. Edit View uses a
destructive
saved files. Such permanent changes are preferable when converting sample rate and bit
depth, mastering, or batch processing. Multitrack View uses a
is impermanent and instantaneous, requiring more processing power, but increasing flexibility. This flexibility is preferable when gradually building and reevaluating a multilayered
musical composition or video soundtrack.
method, which changes audio data, permanently altering
nondestructive
method, which
Page 19
ADOBE AUDITION 1.5
You can combine destructive and nondestructive editing to suit the needs of a project. If a
multitrack clip requires destructive editing, for example, simply double-click it to access
Edit View. Likewise, if an edited waveform contains recent changes that you dislike, use the
Undo command to revert to previous states—destructive edits aren’t applied until you
save a file. For more information on using Edit View, see “About editing audio” on page 83;
for more information on using Multitrack View, see “About mixing multitrack sessions”
on page 161.
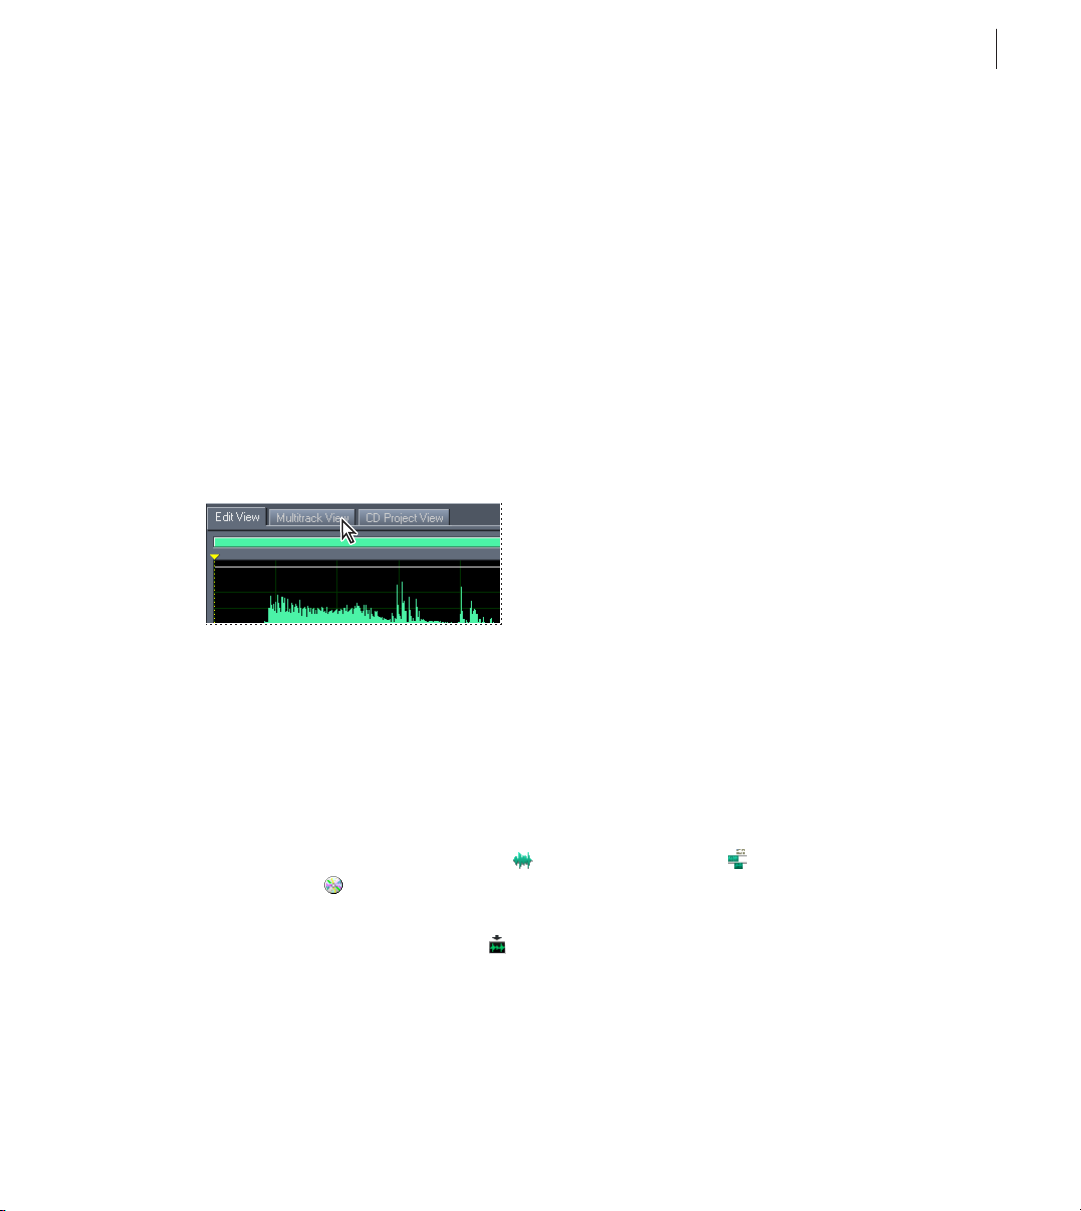
Switching between views
You can use the tabs above the display window or menu commands to switch between Edit
View, Multitrack View, and CD Project View. If you prefer not to use the tabs above the
display window, you can hide them.
User Guide
11
View tabs above the display window
To switch between views:
Do one of the following:
• Choose View > Edit Waveform View, View > Multitrack View, or View > CD Project View.
• Click the Edit View tab, the Multitrack View tab, or the CD Project View tab above the
display window.
• Click the Edit Waveform View button , Multitrack View button , or CD Project
View button in the View toolbar. (See “Using toolbars” on page 13.)
• In Multitrack View, double-click a file in the Files tab of the Organizer window or select
a file and click the Edit File button . Alternatively, double-click a waveform block in
the display window.
To show and hide view tabs above the display window:
Choose View > Show View Tabs. A check mark indicates that the tabs are showing.
Page 20

CHAPTER 1
12
Looking at the Work Area
Choosing commands
Commands let you perform a wide variety of tasks. You can choose commands from the
menus at the top of your screen or click buttons in a toolbar. You can also use contextsensitive (right-click) menus and keyboard shortcuts to quickly execute commands.
Using context-sensitive menus
Adobe Audition makes liberal use of context-sensitive menus. Whenever you see a simple
function button, control, window, or waveform action, try right-clicking it. Chances are
you’ll be surprised by a useful shortcut menu or a set of handy options that can make
Adobe Audition’s operation even easier.
Using shortcuts
Adobe Audition provides a set of standard keyboard shortcuts to help you speed up the
editing process. For example, instead of using your mouse to go to the Edit menu and
choose the Cut command, you can simply press Ctrl + X to cut the selected portion of a
waveform. When available, the keyboard shortcut appears to the right of the command
name in the menu or in the tool tip for a button or icon. Adobe Audition also provides
keyboard shortcuts for performing certain mouse actions. These shortcuts are listed in the
Keyboard Shortcuts appendix.
If a shortcut isn’t working, it’s likely that the window you’re trying to run the shortcut in
doesn’t have focus. For example, if you’re in Edit View and you push F11 to bring up the
Convert Sample Type dialog box and nothing happens, the waveform display probably isn’t the
active window. Click the waveform display to give it focus, and then try the shortcut again.
You can change nearly all of the default shortcuts and add shortcuts for other functions.
In addition, you can add shortcuts that let you execute commands using keys on a MIDI
keyboard, a sequencer, or any other device capable of issuing a MIDI command. This type
of shortcut is referred to as a MIDI Trigger. For example, you can assign the Play command
in Adobe Audition to the C4 note on your MIDI keyboard.
To enable MIDI triggering:
Choose Options > MIDI Trigger Enable. A check mark indicates the MIDI triggering is on.
Important: Before attempting to enable MIDI triggering, you must choose a device for MIDI
In that’s recognized by Windows. For more information, see “Designating which devices you
want to use” on page 36.
Page 21

ADOBE AUDITION 1.5
To customize a shortcut:
1 Choose Options > Keyboard Shortcuts And MIDI Trigger.
2 Select the function you want to assign the shortcut to.
Note: Yo u can filter the list of functions by choosing an option from the Category menu and
clicking the Multitrack View or Edit View button. To show all functions, choose (show all)
from the Category menu, and deselect the Multitrack View and Edit View buttons.
3 Do any of the following:
• To assign a keyboard shortcut to the function, click in the Keyboard Shortcut text box
and press the desired keyboard combination. Many Adobe Audition users find single
key shortcuts (such as n for Normalize) faster to use and easier to remember.
• To assign a MIDI trigger to the function, click in the MIDI Trigger text box and press
the desired key on the MIDI keyboard. You can also apply MIDI events other than
pressing keys (such as pressing the foot pedal).
• To remove a keyboard shortcut or MIDI trigger from the function, click Clear.
4 If you enter a key combination that’s already in use, Adobe Audition notifies you of the
conflict in the Conflicting Keys text box. Click Clear, and enter a different shortcut before
continuing.
5 Click OK.
User Guide
13
To restore the default keyboard shortcuts:
1 Choose Options > Keyboard Shortcuts And MIDI Trigger.
2 Choose Adobe Audition Default from the Set list, and click OK.
Using toolbars
Many of Adobe Audition’s most commonly used functions are represented as buttons within
toolbars, which appear near the top of the main interface. These buttons give you instant
access to effects, file handling functions, viewing options, and more, at the press of a button.
To see what a button does, hold your mouse pointer over it to display a tool tip that
describes the function in simple terms.
Page 22
CHAPTER 1
14
Looking at the Work Area
To show or hide a toolbar:
Choose View > Toolbars, and choose a toolbar name from the submenu. A check mark
indicates that the toolbar is showing.
To specify how many rows of buttons are displayed:
Choose View > Toolbars, and choose a number of rows from the submenu.
Using windows
Many windows in the Adobe Audition interface can be repositioned and resized to better
suit your requirements. You can also hide windows that you’re not currently using, and
then show them again when needed. For more information on specific windows, see the
index or search Help.
Repositioning and resizing windows
When you reposition a window, you can dock it in a specific location in the interface, or
you can undock the window so that it floats above the main window. To identify docked
windows, look for two thin vertical or horizontal lines. These lines are the handle (or grab
bar) of a docked window. Move your mouse over a handle, and the cursor looks like a plus
sign with arrows at each end .
Some docked windows can also be resized. If resizing is possible, the docked window will
have a single, thicker horizontal or vertical bar, called a resize bar. When you move your
mouse over a resize bar, the cursor takes on the appearance of two lines with two
arrows .
AB
Docked window
A. Handle B. Resize bar
Page 23

ADOBE AUDITION 1.5
To undock a window:
Drag the window’s handle to the middle of the work area until you see an outline of the
window.
The window is now a standard floating window. You can move the window by dragging its
title bar.
Press Ctrl while moving a floating window around to force it to not dock. That way you
can float the window over an area that it would normally try to dock to. To disable this
feature, select Ctrl Key Allows Dockable Windows to Dock in the General tab of the Settings
dialog box. (See “Setting Adobe Audition preferences” on page 43.)
To dock a window in a different location:
1 Drag the window’s handle around the work area to locate potential docking areas. The
resize bars of other docked windows will light up wherever docking is possible.
2 When you locate the desired docking area, release the mouse button. The window snaps
into its new location.
If a window is docked in the same row with other windows, you can force the window into
a new row by right-clicking the window’s handle and selecting Force New Row. Likewise,
deselecting Force New Row causes the window to dock in the previous row (if there’s room).
User Guide
15
To resize a docked window:
Drag the window’s resize bar.
Even if the resize bar is visible, resizing might not be possible due to the other windows
that are in the row with the window you’re trying to resize.
To reset windows to the default layout, select Restore Default Workspace in the General
tab of the Settings dialog box. (See “Setting Adobe Audition preferences” on page 43.)
Showing and hiding windows
You can free up space in the work area by closing windows when you aren’t using them,
and then redisplay the windows as needed. The Window menu lists all available windows;
a check mark indicates that a window is currently showing.
Page 24

CHAPTER 1
16
Looking at the Work Area
To hide a window:
Do one of the following:
• Choose the window name from the Window menu.
• Click the button that corresponds to the window name in the View toolbar. (See “Using
toolbars” on page 13.)
• For docked windows, right-click the window’s handle and choose Close.
• For undocked windows, click the X button on the window’s title bar.
To show a window:
Choose the window name from the Window menu, or click the window’s button in the
View toolbar.
Using placekeeper windows
Placekeeper windows let you define the aspect ratio of a docking area. For example, if you
try docking the Track EQ controls above the transport controls, they end up going underneath the whole session display, which creates a view that isn’t very useful (or aesthetically
pleasing). You can use a placekeeper, though, on either side of the Track EQ to force the
EQ into a certain aspect ratio. You can also use placekeepers just for appearance’s sake, just
because you like the way they let you customize the work area.
You can create up to four placekeeper windows, and insert them wherever docking is
allowed. You can also change the appearance of placekeeper windows by filling them with
a pattern.
To insert a placekeeper window:
1 Choose Window > Placekeeper.
2 Dock the placekeeper in the desired location. The window is automatically resized to fit
the docked area.
To change the appearance of a placekeeper window:
Right-click the window’s handle, and choose a fill option: Nothing, Cool Texture, or Squares.
To make future placekeeper windows adopt the current appearance, choose Make Default.
Page 25

ADOBE AUDITION 1.5
To delete a placekeeper window:
Right-click the window’s handle, and choose Close.
Navigating in the display window
The display window shows you the current waveform (in Edit View) or session (in Multitrack View). You can control how much of the waveform or session is displayed by
zooming and scrolling. You can also use the selection and view controls to determine the
beginning time, ending time, and length of audio data in the display window.
Zooming
Zooming lets you adjust the view in the display window to best meet your needs. For
example, you can zoom in to clearly see the samples in a waveform, or you can zoom out
to get a visual overview of a waveform or session.
The Zoom Controls window provides a variety of tools for zooming. You can also zoom
by dragging in the horizontal scroll bar, vertical scroll bar (Multitrack View only), or
vertical ruler.
User Guide
17
Zoom controls
To show or hide the zoom controls:
Do one of the following:
• Choose Window > Zoom Controls. A check mark indicates that the controls are visible.
• Click the Hide/Show Zoom Controls button in the View toolbar. (See “Using
toolbars” on page 13.)
If you don’t like the default location of the zoom controls, you can reposition them or
detach them so they float above the main window. (See “Using windows” on page 14.)
Page 26

CHAPTER 1
18
Looking at the Work Area
To zoom in or out by using the zoom controls:
Do any of the following:
• Click the Zoom In Horizontally button to zoom in on the center of the visible
waveform window or session.
• Click the Zoom In Vertically button to increase the vertical scale resolution of a
waveform’s amplitude display (in Edit View) or decrease the number of viewed tracks
in the session display (in Multitrack View).
• Click the Zoom To Selection button to zoom in on the actively selected waveform or
session range.
• Click the Zoom In To Right Edge Of Selection button to zoom in on the right
boundary of the actively selected waveform range or session.
• Click the Zoom In To Left Edge Of Selection button to zoom in on the left boundary
of the actively selected waveform range or session.
• Click the Zoom Out Horizontally button to zoom out from the center of the visible
waveform window or session.
• Click the Zoom Out Full Both Axis button to zoom out to display the entire
waveform or blocks that are contained within a session.
• Click the Zoom Out Vertically button to decrease the vertical scale resolution of a
waveform’s amplitude display (in Edit View) or to show more tracks in the session
display (in Multitrack View).
To zoom in or out by using a scroll bar or ruler:
Do either of the following:
• To change the viewable range of time, position the pointer in the timeline or over the
left or right edge of the horizontal scroll bar. Then drag to the left or right. A magnifying
glass with arrows icon appears as you drag.
• To change the viewable range of amplitude (in Edit View) or tracks (in Multitrack
View), hold down the right mouse button in the vertical ruler, and drag up or down.
The magnifying glass with arrows icon appears as you drag.
Page 27
ADOBE AUDITION 1.5
Yo u can also use the wheel on your mouse to zoom in and out. To do so, place the pointer
over the horizontal scroll bar, timeline, vertical scroll bar (Multitrack View only), or
vertical ruler, and roll the mouse wheel. To set a zoom percentage for the mouse wheel, enter
a value for Zoom Factor in the General tab of the Settings dialog box. (See “Setting Adobe
Audition preferences” on page 43.)
Scrolling
The display window provides several scrolling devices. The horizontal scroll bar—which,
by default, is at the top of the display window—lets you scroll forwards and backwards in
time throughout a waveform (in Edit View) or session (in Multitrack View). The vertical
ruler on the right side of the display window lets you scroll through amplitude ranges (in
Edit View) or tracks (in Multitrack View). In Multitrack View, there’s an additional vertical
scroll bar on the left side of the display window that lets you scroll through tracks.
B
User Guide
19
A
C
Scrolling devices
A. Vertical scroll bar B. Horizontal scroll bar C. Ve rtical ruler
To scroll in the display window:
Do either of the following:
• To scroll to the left or right, drag the horizontal scroll bar. Or, click to the left or right
of the scroll bar to page through the display one screen at a time.
• To scroll up or down, drag in the vertical ruler. In Multitrack View, you can also drag
the vertical scroll bar or click above or below the scroll bar to page through the display
one screen at a time.
Page 28
CHAPTER 1
20
Looking at the Work Area
Yo u can also use the wheel on your mouse to scroll in the display window. To do so, place
the pointer over the display window, and roll the mouse wheel.
To change the position of the horizontal scroll bar:
Right-click the horizontal scroll bar, and choose a display option: Above Display or Below
Display.
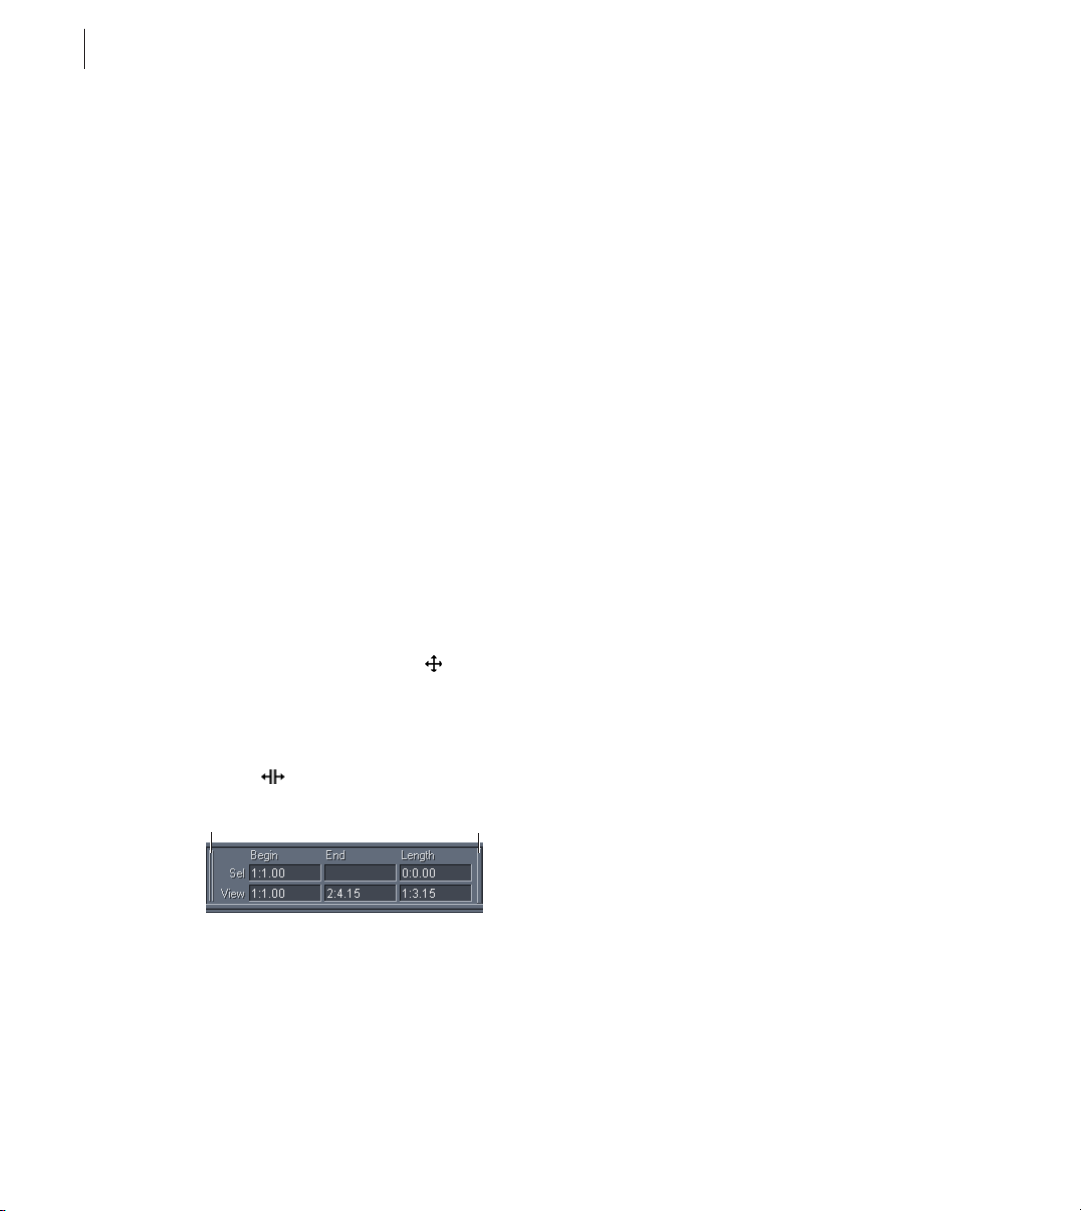
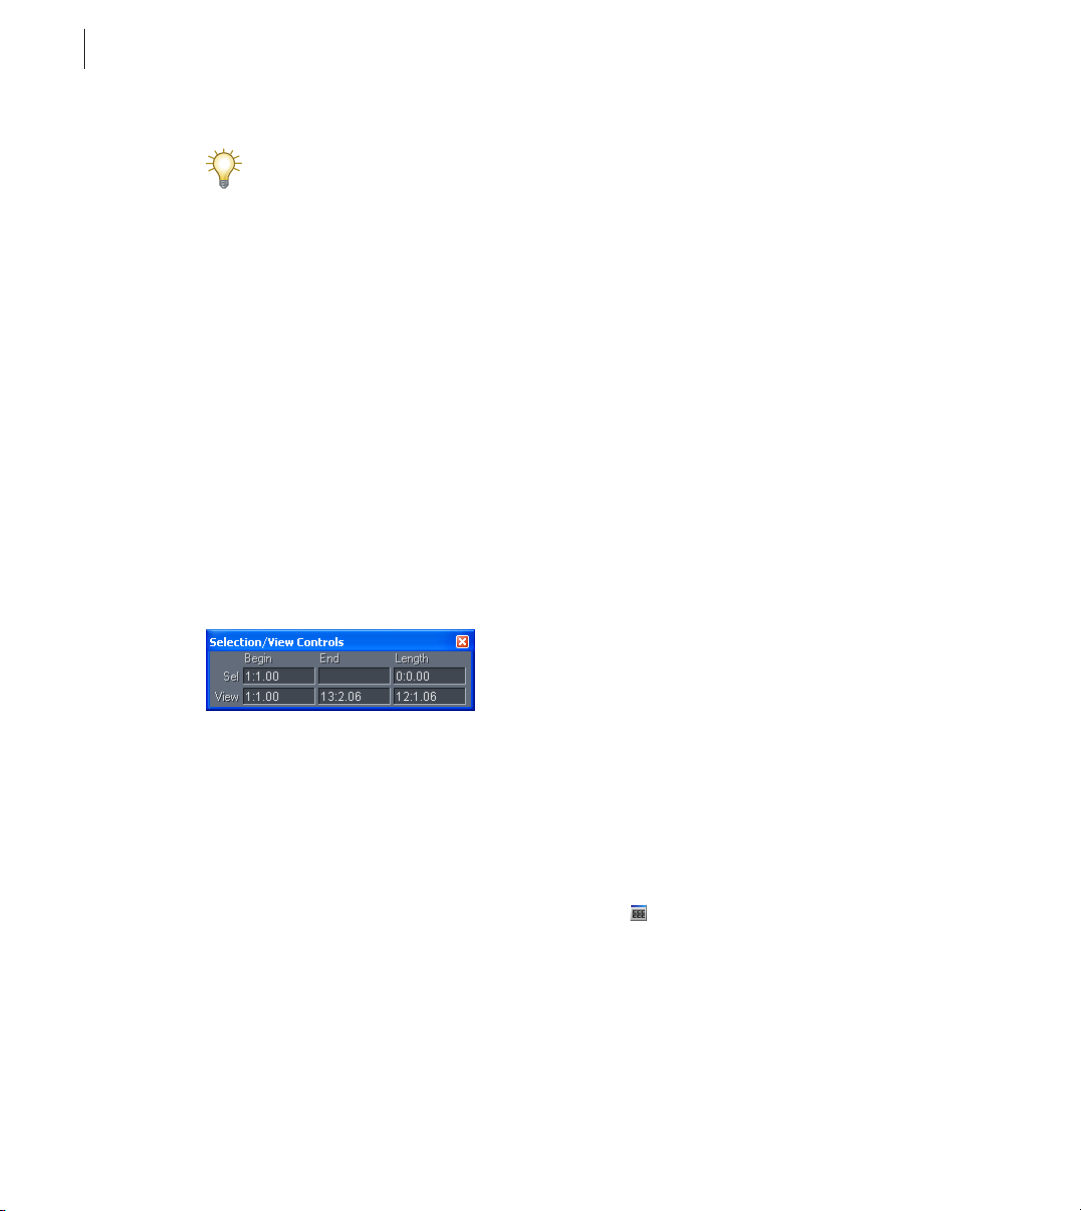
Using the selection and view controls
The Selection/View Controls window shows the beginning and ending points, as well as
the total length of both the selection and the section of the waveform or session that’s
currently visible. Both the selection and display range is shown in the current time-display
format. For information on changing the time-display format, see “Monitoring time” on
page 69.
In addition to viewing time information, you can also use the selection and view controls
to adjust selections and change the section of audio data that is visible in the display
window. Simply enter new values for Begin, End, and Length. After you click in a text box,
you can right-click to access additional context-menu commands.
Selection and view controls
To display the selection and view controls:
Do one of the following:
• Choose Window > Selection/View Controls. A check mark indicates that the window is
showing.
• Click the Hide/Show Selection/View Controls button in the View toolbar. (See
“Using toolbars” on page 13.)
If you don’t like the default location of the selection and view controls, you can reposition
them or detach them so they float above the main window. (See “Using windows” on
page 14.)
Page 29
ADOBE AUDITION 1.5
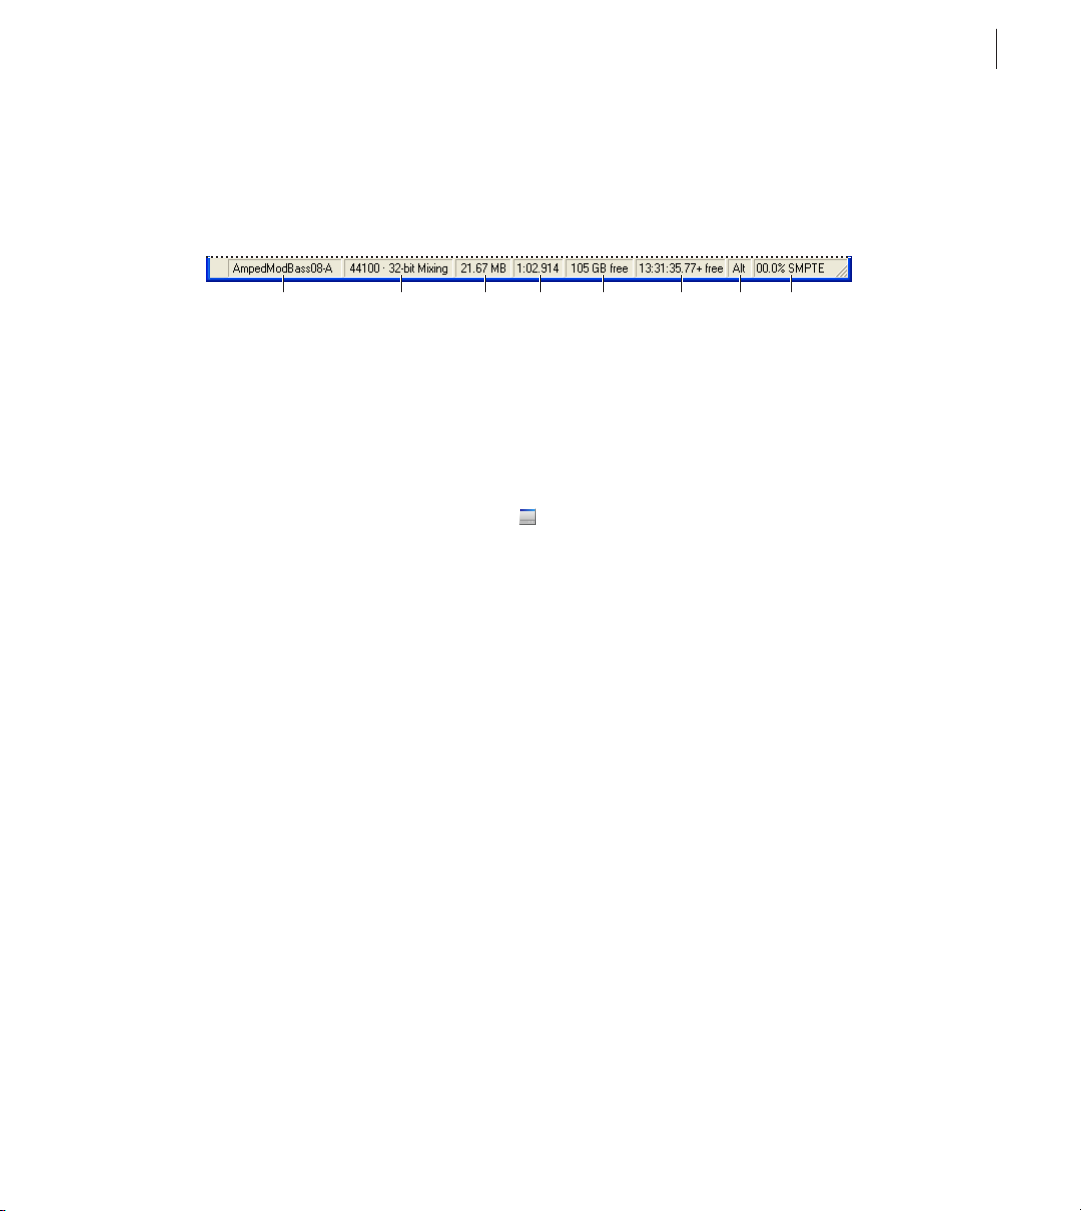
Using the status bar
The status bar runs along the very bottom of Adobe Audition’s main window. It can
display information such as sample format, file size, and free disk space.
A B C D E F HG
Status bar
A. Data Under Cursor B. Sample Format C. File Size D. File Size (time) E. Free Space
F. Free Space (time) G. Keyboard Modifiers H. SMPTE Slave Stability
To show or hide the status bar:
Do one of the following:
• Choose View > Status Bar > Show. A check mark indicates that the status bar is visible.
• Click the Hide/Show Status Bar button in the View toolbar. (See “Using toolbars” on
page 13.)
To change the type of information that is displayed in the Status Bar:
Choose View > Status Bar or right-click the Status Bar, and select the desired display
options. Selected items appear in the Status Bar; unselected items are hidden.
User Guide
21
You can choose from the following options:
Data Under Cursor Shows useful information such as the channel (if a current
waveform is stereo), the amplitude (measured in decibels), and the time
(hours:minutes:seconds:hundredths of seconds) from the beginning of the audio file.
This data is computed at the precise point where your mouse pointer is placed within the
wave display, and changes dynamically when you move the pointer. For example, if you see
R: –15.2 dB @ 0:00:242 in the Status Bar when in Edit View, this means that your pointer
is over the right channel at 0.242 seconds into the waveform, and the amplitude at that
precise point is –15.2 dB.
In the Multitrack View, you’ll see even more beneficial data such as Pan and Volume
envelope positions, envelope positions for effects envelopes, dynamic effect settings, and
the current position of the wave block as you drag it around.
Sample Format Displays sample information about the currently opened waveform. For
example, a 44,100 kHz 16-bit stereo file shows up as 44100 – 16-bit – stereo.
Page 30

CHAPTER 1
22
Looking at the Work Area
File Size) Represents how large the active audio file is, measured in kilobytes. If you see
308 K in the Status Bar, then the current waveform or session is 308 kilobytes (KB) in size.
File Size (time) Shows you the length (measured in time) of the current waveform or
session. For example, 0:01:247 means the waveform or session is 1.247 seconds long.
Free Space In Edit View and Multitrack View, shows how much space is available on your
hard drive. In CD Project View, shows how much space remains on a CD based on which
View menu item is selected: 74 min CD or 80 min CD.
Free Space (time) In Edit View and Multitrack View, displays the amount of available time
left for recording, based upon the currently selected sample rate. This value is shown as
minutes, seconds, and thousandths of seconds. For example, if Adobe Audition is set to
record an 8-bit mono waveform at 11,025 kHz, the time left might read something like
4399:15.527 free. Change the recording options to 16-bit stereo at 44,100 kHz, and the
remaining time value becomes 680:44.736 free.
In CD Project View, shows how much space remains on a CD based on which View menu
item is selected: 74 min CD or 80 min CD.
Keyboard Modifiers Displays the status of your keyboard’s Ctrl, Shift, and Alt keys.
SMPTE Slave Stability Indicates the stability of incoming SMPTE timecode compared to
Adobe Audition’s internal clock. For example, 95.0% SMPTE indicate a very strong
SMPTE signal. Percentages above 80% should be stable enough to maintain sync. For
more information on SMPTE synchronization, see “Setting up for SMPTE synchronization” on page 40 and “Using sessions as SMPTE masters or slaves” on page 166.
Undoing and redoing changes
Adobe Audition keeps track of the edits you perform during the course of an editing session.
These changes are stored in a temporary file on your hard drive. They aren’t permanently
applied to the file until you save and close it, giving you unlimited undo and redo capability.
When you work with very large audio files, you might not have enough free disk space to
save the Undo data before continuing with an edit. In addition, the time required to save
the Undo information might slow down your work. You can solve either problem by
disabling the Undo function.
Page 31

ADOBE AUDITION 1.5
To undo a change:
Choose Edit > Undo [name of change]. Or, click the Undo button in the toolbar.
The Undo command conveniently indicates which change you’re undoing. For example,
it may appear as Undo Delete or Undo Normalize. If you haven’t yet edited a waveform,
or if Undo is disabled, this command appears as Can’t Undo.
If you forgot which editing action you last performed on a waveform, look at the Undo
command to refresh your memory, whether you want to undo the action or not.
To discard edits made since you last saved the file:
In Edit View, choose File > Revert To Saved.
To redo a change:
In Edit View, choose Edit > Redo [name of change]. Or, click the Redo button in the
toolbar.
To repeat the last command:
In Edit View, choose Edit > Repeat Last Command. You can repeat most editing functions
in Adobe Audition by using this command; however, there are a few exceptions (such as
Delete).
User Guide
23
To disable or enable the Undo function:
Do one of the following:
• In Edit View, choose Edit > Enable Undo/Redo. A check mark indicates that the Undo
function is enabled.
• Choose Options > Settings, and click the System tab. Select or deselect Enable Undo,
and click OK. You can also specify the minimum number of undo levels, and you can
purge all undo files. (See “System options” on page 45.)
If you don’t have enough disk space to save the undo information, you can change the
Te mp folder to a different drive, if available.
Page 32

CHAPTER 1
24
Looking at the Work Area
Organizing files and effects
The Organizer window appears in Edit View, Multitrack View, and CD Project View. This
handy, tabbed window lets you easily open and close files, see a list of all open waveforms
and MIDI files, choose effects with ease, and more. By default, the Organizer window is
docked to the left of the waveform or session display; however, you can reposition it or
detach it so it floats above the main window. (See “Using windows” on page 14.)
Organizing files
The Files tab in the Organizer window displays a list of open waveforms, MIDI files, and
video files. You can use the Files tab to import files, select files for editing, insert clips into
sessions, insert tracks into CDs, and close files.
The Files tab also provides a variety of advanced options that let you show and hide cues,
change the listing and sort order of files, and play files. You can choose to hide advanced
options if you don’t use them.
Files tab in the Organizer window
Page 33

ADOBE AUDITION 1.5
To display the Files tab:
1 If the Organizer window isn’t showing, choose Window > Organizer to display it.
2 Click the Files tab in the Organizer window. The following buttons appear at the top of
the Files tab:
• The Import File button lets you import audio, MIDI, and video files into Adobe
Audition.
• The Close Files button lets you close all selected files in the Files tab.
• The Insert Into Multitrack button lets you insert all selected files, each into their
own track, in Multitrack View. (See “Inserting audio files into multitrack sessions” on
page 63.)
• The Insert Into CD Project button lets you insert all selected files into CD Project
View. (See “Inserting tracks” on page 258.)
• The Edit File button lets you open the selected file in Edit View. (See “Switching
between views” on page 11.)
To select files in the Files tab:
Do any of the following:
User Guide
25
• To select a single file, click it.
• To select adjacent (or contiguous) files, click the first file in the desired range, and then
Shift-click the last.
• To select nonadjacent (or noncontiguous) files, Ctrl-click them.
Note: If you select multiple files, only the last file you click appears in Edit View.
To show or hide advanced options in the Files tab:
Click the Advanced Options button at the top of the Files tab. When showing, the
advanced options appear at the bottom of the Files tab.
For information on the play controls in the Files tab, see “Previewing audio by using the
Organizer window” on page 77.
Page 34

CHAPTER 1
26
Looking at the Work Area
To change the listing and sort order of files in the Files tab:
Make sure that the advanced options are showing, and do any of the following:
• To show or hide files, select a Show File Types option. An X indicates that files of the
specified type are showing.
• To change the sort order of files, choose an option from the Sort By menu.
• To display the full path [drive, folder(s), filename] of the entries in the File tab, select the
Full Path button. To display only the filenames, deselect this button.
To show or hide cues in the Files tab:
Make sure that the advanced options are showing, and click Show Cues.
When Show Cues is selected, a plus icon appears next to files that contain cues. Click the
plus icon to display the cue names. For more information on cues, see “Working with
cues” on page 96.
Organizing effects
The Effects tab in the Organizer window lists all of the effects at your disposal. The listing
includes all of Adobe Audition’s effects as well as all installed DirectX and VST audio plugins. You can change the grouping of effects to best meet your needs.
Effects tab in the Organizer window
Page 35

ADOBE AUDITION 1.5
To display the Effects tab:
1 If the Organizer window isn’t showing, choose Window > Organizer to display it.
2 Click the Effects tab in the Organizer window.
To change how the effects are grouped:
Click the buttons at the bottom of the Effects tab:
• Select Group By Category to list effects in a hierarchy where categories and their entries
are shown in the same order as they appear in the Effects menu.
• Deselect Group By Category to display all effects in roughly the same order as they
appear in the Effects and Generate menus.
• Select Group Real-Time Effects to list effects in a hierarchy where all of the Real-Time
Effects are grouped together, the Off-Line Effects are grouped together, and the Multitrack Effects are grouped together.
• Deselect Group Real-Time Effects to return to the previous view.
Organizing favorites
Favorites are effects, scripts, and even third-party tools that you’ve saved for easy access.
The Favorites tab in the Organizer window lists all of the favorites you’ve created. (These
same items are listed in the Favorites menu.)
User Guide
27
Favorites tab in the Organizer window
Page 36

CHAPTER 1
28
Looking at the Work Area
To display the Favorites tab:
1 If the Organizer window isn’t showing, choose Window > Organizer to display it.
2 Click the Favorites tab in the Organizer window.
For more information on creating and editing favorites, see “Using favorites (Edit View
only)” on page 253.
Working with effects
Effects provide much of the functionality in Adobe Audition. For example, you use effects to
remove noise, optimize volume, change pitch, and add reverb. If Adobe Audition doesn’t
provide the effect you want, you may be able to purchase a plug-in effect to do the job.
As you apply effects, you’ll notice similarities between Adobe Audition’s effect dialog boxes.
For example, many effect dialog boxes provide presets for storing and recalling your favorite
settings. Some effect dialog boxes also provide graph controls for adjusting settings. As you
adjust settings, you can use the Preview option to preview effects in real time.
For information on using specific effects, search for the effect name in Help or look in
the index.
Using presets
Many of Adobe Audition’s effects and other functions have presets that are available for easily
storing and recalling your favorite settings. You can add and remove presets at any time.
Presets in the Amplify/Fade dialog box
Page 37

ADOBE AUDITION 1.5
To apply a preset:
Double-click the preset name. The settings defined by the preset are reflected in the dialog box.
To add a preset:
1 Adjust the effect settings as desired.
2 Click Add in the Presets area of the effect dialog box.
3 Enter a name for the preset, and click OK. Your new preset is added to the list of other
presets, which is automatically sorted alphabetically.
To modify a preset:
1 Double-click the preset name, and adjust the settings as desired.
2 Click Add, enter the name of the current preset, and click OK.
3 Click OK when prompted to replace the preset.
To remove a preset
Select the preset, and click Del.
User Guide
29
Using graph controls
Many of Adobe Audition’s effects use graph controls for adjusting parameters. By adding and
moving control points on the graph, you can tailor the effect to precisely meet your needs.
By default, graphs display straight lines between control points. However, some graphs
provide a Splines or Spline Curves option for generating a curve between control points.
Using spline curves lets you create smoother transitions between points.
Page 38

CHAPTER 1
30
Looking at the Work Area
Graph with straight lines between control points compared to graph with spline curves
When you use spline curves, the line won’t travel directly through the control points.
Instead, the points control the shape of the curve. To get the curve closer to a control
point, click to create more control points near the point in question. The more control points
there are clustered together, the closer the spline curve will be to those points.
To use graph controls:
Do any of the following:
• To add a control point to the graph, click in the grid at the location where you want to
place the point.
• To enter the values for a control point numerically, right-click the point to bring up the
edit box, or double-click the graph’s curve.
• To move a point on the graph, drag it to a new location.
• To remove a point from the graph, drag it off the graph.
Note: When the pointer is located over a control point, you’ll see it change from an arrow to
a hand.
Page 39

ADOBE AUDITION 1.5
Previewing effects in Edit View
Many dialog boxes provide a Preview button for previewing effects in real time. This means
that you can monitor the processed signal before applying the effect to the waveform. The
preview feature updates in real time, meaning that changes you make to effect settings while
in the dialog box for that effect become audible immediately, while the audio is playing.
Keep in mind that your system’s performance affects the preview feature. On slower systems,
some effects may tend to break up or skip during preview. In Multitrack View, the preview
is not necessary, as effects are used nondestructively. Basically, every effect in the Multitrack
View is in preview all the time. For more information on the differences between destructive
and nondestructive editing, see “About using Edit View and Multitrack View” on page 10.
In Edit View, you can add an optional preroll or postroll amount to the duration of the
preview. This is especially useful when previewing effects for small ranges and marquee
selections because it lets you hear how the in and out transitions are affected by the effects
settings.
To preview effects in real time:
1 Click the Preview button to start playing the audio.
2 Adjust the effect settings as desired.
3 To compare the original audio to the processed audio, select and deselect the Bypass
option. When the option is selected, you hear the original audio; when the option is
deselected, you hear the processed audio.
4 When you’re satisfied with the settings, click Stop.
User Guide
31
To add a preroll and postroll duration to a preview:
1 In Edit View, right-click the Play button or the Play To End button in the transport
controls, and choose Preroll And Postroll Options.
2 In the Effects Preview section of the Preroll And Postroll Options dialog box, enter
durations for the preroll and postroll, and click OK.
Page 40

CHAPTER 1
32
Looking at the Work Area
3 Do one of the following:
• Choose Effects > Enable Preroll And Postroll Preview.
• In an effects dialog box, select Enable Preroll And Postroll Preview. This option appears
below the Presets. If a dialog box does not have Preset, the Enable Preroll And Postroll
Preview option will not appear; however, you can still enable preroll and postroll
preview by choosing Effects > Enable Preroll And Postroll Preview.
4 Preview an effect as described in the previous procedure.
Using plug-in effects
DirectX and VST plug-ins let you extend the already powerful effects at your disposal in
Adobe Audition. Before you can start using plug-in effects, you must set them up in Adobe
Audition. For DirectX effects, this process involves enabling the effects and then refreshing
the effects list. For VST effects, you need to verify that Adobe Audition is scanning the
directories where the effects are installed; then, you must refresh the effects list.
After that, using plug-in effects is as easy as using any other Adobe Audition effect. Just
select an area to process, and choose the effect from the Effects > DirectX or Effects > VST
menu (or from the Effects tab of the Organizer Window). Of course, you'll need to consult
the documentation provided by the plug-in manufacturer for any help with its features.
Note: If Adobe Premiere Pro and Adobe Audition are installed on the same computer, Adobe
Audition automatically displays the VST plug-ins that come with Adobe Premiere Pro.
To enable DirectX effects:
Do one of the following:
• In Edit View, choose Effects > Enable DirectX Effects.
• In Multitrack View, click the FX button in the track controls. In the Track Effects Rack
dialog box, click Enable DirectX Effects, and then click OK.
This causes Adobe Audition to scan your system for DirectX plug-ins. After the plug-ins
are activated, the Enable DirectX Effects option is removed from the menu and dialog box.
Page 41

ADOBE AUDITION 1.5
To set up directories for VST effects:
1 In Edit View, choose Effects > Add/Remove VST Directory.
The Add/Remove VST Directory lists the directories that Adobe Audition will scan for VST
plug-ins when you choose Effects > Refresh Effects List.
2 Do either of the following:
• To add a new directory, click Add, locate or create the folder you want Adobe Audition
to scan for VST plug-ins, and click OK.
• To remove a directory, select the directory and click Remove.
To refresh the effects list after installing new effects:
In Edit View, choose Effects > Refresh Effects List.
User Guide
33
Page 42

Page 43

Chapter 2: Setting up Adobe
Audition
ou can customize the way Adobe Audition works by setting up devices and internal
preferences.
Y
About setting up Adobe Audition
Setup tasks fall into several categories. Perhaps the most important is setting up the devices
you want to use with Adobe Audition. If you have multiple sound cards, or a single card that
has multiple inputs and outputs, you need to specify which devices you want to use for
playback and recording. In addition, you can set up MIDI devices, external controllers, and
ReWire connections for use with Adobe Audition. For more information on these tasks, see
“Setting up devices” on page 36.
Another category of setup tasks is customizing internal Adobe Audition preferences to
best suit your needs. For example, you can change the appearance of the workspace, set
buffer sizes to optimize performance, change the locations of temporary folders to better
utilize disk space, and customize the wave and session displays. For more information on
these tasks, see “Setting Adobe Audition preferences” on page 43.
35
A final category of setup tasks is managing the size of temporary files. The size of
temporary files is limited only by the amount of disk space that is available; however, when
you’re working with very large files (or when you have many files open at the same time),
your disk space may run low. If this happens, you can delete temporary files you’re not
using, clear specific Undo items, and change the amount of reserve space. For more information on these tasks, see “Managing temporary files” on page 57.
Page 44

CHAPTER 2
36
Setting up Adobe Audition
Setting up devices
You can use a wide range of devices with Adobe Audition. Sound card inputs let you bring
audio signals into Adobe Audition through sources such as microphones, tape decks, and
digital effects units. Sound card outputs let you monitor audio signals through sources
such as speakers and headphones. MIDI ports let you connect Adobe Audition to MIDI
keyboards and synthesizers. You can also synchronize Adobe Audition with ReWire applications and hardware or software components that support SMPTE/MTC timecode.
Designating which devices you want to use
The Device Order dialog box lets you designate which devices you want to use with Adobe
Audition. When working in Edit View, you can designate one stereo output device to use
for playback and one stereo input device to use for recording. When working in Multitrack
View, you can assign different input and output devices to each audio track. However,
before you can do this, you must specify which devices you plan to use and the order in
which you want to view them.
If your audio system includes MIDI devices, you can also designate which MIDI input and
output devices you want to use. For example, you can designate a MIDI keyboard to use
for triggering commands and a MIDI synthesizer channel to use for playback. (See “About
using MIDI devices” on page 39.)
To designate the devices you want to use:
1 Choose Options > Device Order.
2 Click the tab for the type of device you want to designate: Playback, Recording, MIDI
Output, or MIDI Input.
3 Move the devices you want to use into the Multitrack Device Preference Order list by
selecting devices in the Unused list and clicking Use. Remove the devices you don’t want
to use by selecting devices in the Multitrack Device Preference Order list and clicking
Remove.
Note: Yo u can specify up to 16 stereo devices or 32 mono devices in the Multitrack Device
Preference Order list.
4 Designate the device you want to use in Edit View by selecting the device and clicking
Use in EV. [EV] appears after the device name.
Page 45

ADOBE AUDITION 1.5
5 Adjust the order of devices for use in Multitrack View by selecting a device and clicking
Move Up or Move Down.
The first device in the list is the default device. This means that, by default, the first playback
device is assigned as the output for all audio tracks in a session and the first recording device
is assigned as the input for all audio tracks. Likewise, the first MIDI Out device is assigned
as the output for all MIDI tracks. However, you can easily reassign the devices for a track.
(See “Using the Track Properties window” on page 180.)
6 If desired, click a different tab to set up ordering for another type of device. When you
are finished, click OK.
To quickly view or change the properties for a device, select the device and click
Properties.
Setting properties for audio output devices
The Device Properties dialog box lets you specify Adobe Audition’s parameters for playing
back waveforms. If you have multiple sound cards, or a single card that has multiple audio
outputs, you can customize the properties for each output.
User Guide
37
To set properties for audio output devices:
1 Choose Options > Device Properties, and click the Wave Out tab.
2 Select a device from the list at the top of the dialog box.
The capabilities of the selected output device are shown in the Supported Formats table.
A Yes or No indicates different combinations of sample rate and bit resolution. This table
also shows what (if any) 32-bit formats the output device can handle, and whether it can
accept the WDM driver extensible wave format.
3 Set any of the following properties. When you are finished, you can choose a different
device to set up, or you can click OK to close the dialog box:
Order Displays the order of the device for use in Multitrack View. Click Change to open
the Device Order dialog box and change the order of devices. (See “Designating which
devices you want to use” on page 36.)
Use This Device In Edit View Indicates that Adobe Audition will use the device to play
waveforms in Edit View.
Page 46

CHAPTER 2
38
Setting up Adobe Audition
Limit Playback To Downsamples audio data for playback. Use this option to compensate
for limitations imposed by your hardware. For example, if your sound card doesn’t handle
32-bit audio correctly, you can have Adobe Audition limit the playback of 32-bit files to
either 16-bit or 8-bit.
Send 32-bit Audio As Specifies how Adobe Audition sends 32-bit audio data to the output
device. This option is not available if you select a Limit Playback To option. If the output
device supports it, you can send 32-bit audio as 3-byte Packed PCM, 4-byte PCM, or 4-byte
IEEE float.
Enable Dithering Activates dithering when playing back audio at a limited bit depth. If
you deselect this option, Adobe Audition truncates the audio data instead. This means that
bits that aren’t used are simply chopped off and discarded. Enabling dithering is recommended when working with audio files that have a higher bit depth than your sound card
supports. You can set the following options when dithering is enabled:
• bits specifies the number of bits to dither to. If you have a 20-bit sound card, for
example, you will want to dither to 20 bits since any more bits will not be used by the
card. Even for 16-bit-only sound cards, choosing to dither to 16-bit will improve the
quality when playing back 32-bit audio.
• p.d.f. (probability distribution function) controls how the dithered noise is distributed
away from the original audio sample value. Usually one of the Triangular p.d.f.
functions is a wise choice, because it gives the best tradeoff between SNR, distortion,
and noise modulation.
• Shaping specifies a noise shaping curve for moving noise to different frequencies. You
can also specify that no noise shaping is used.
Setting properties for audio input devices
The Device Properties dialog box lets you specify Adobe Audition’s parameters for
recording waveforms. If you have multiple sound cards, or a single card that has multiple
inputs, you can customize the properties for each audio input device.
To set properties for audio input devices:
1 Choose Options > Device Properties, and click the Wave In tab.
2 Select a device from the list at the top of the dialog box.
Page 47

ADOBE AUDITION 1.5
The capabilities of the selected recording device are shown in the Supported Formats
table. A Yes or No indicates different combinations of sample rate and bit resolution.
3 Set any of the following properties. When you are finished, you can choose a different
device to set up, or you can click OK to close the dialog box:
Order Displays the order of the device for use in Multitrack View. Click Change to open
the Device Order dialog box and change the order of devices. (See “Designating which
devices you want to use” on page 36.)
Use This Device In Edit View Indicates that Adobe Audition will use the device to record
waveforms in Edit View.
Get 32-bit Audio Specifies how the input device sends 32-bit audio data to Adobe
Audition. If supported by the recording device, you can send 32-bit audio as 3-byte Packed
PCM, 4-byte PCM, or 4-byte IEEE float.
Multitrack Latency Specifies the delay time (or latency) that the device introduces during
recording. Many sound cards allow for monitoring input source signals with no latency.
However, if you notice that tracks are out of sync, it is probably because one of the devices
you used for recording introduced latency. Once you determine how out of sync a particular
device gets, you can enter the number of milliseconds to delay a track’s playback in
relationship to all other tracks' playback to achieve synchronization.
User Guide
39
Adjust To Zero-DC When Recording Removes any detected DC bias when recording.
About using MIDI devices
MIDI stands for Musical Instrument Digital Interface, and is a way of communicating
performance information from one piece of software or hardware to another. This performance information can take the simple shape of a note instruction, as in E4, or it can
transmit detailed information on things such as timing or sound patch data. Windows
provides a way of transmitting MIDI information internally between programs, plus you
can transmit MIDI information into and out of your computer to or from external devices
(such as a MIDI Keyboard) through the MIDI port of a sound card, or other MIDI
interface device.
Page 48

CHAPTER 2
40
Setting up Adobe Audition
You cannot record audio directly from a MIDI input device into Adobe Audition. In order
to work with MIDI data in Adobe Audition, you must save the MIDI data to a file using a
MIDI sequencing application, and then import the MIDI file into a session as a clip. Once
you have MIDI clips in a session, you can map them to a specific MIDI output device and
channel for playback. (See “Working with MIDI tracks” on page 185.)
If you have a MIDI input device connected to your system’s MIDI interface, you can use it
to execute commands in Adobe Audition. For example, you can assign the Play command
in Adobe Audition to the C4 note on your MIDI keyboard. This is called MIDI triggering.
(See “Using shortcuts” on page 12.)
You can also use your system’s MIDI Out and In ports to send and receive SMPTE/MTC
timecode. This process lets you synchronize Adobe Audition’s Multitrack playback and
recording with other hardware or software components that also support SMPTE/MTC.
(See “Using sessions as SMPTE masters or slaves” on page 166.)
Setting up for SMPTE synchronization
You can use SMPTE (Society of Motion Picture and Television Engineers) timecode to
synchronize Adobe Audition’s transport controls with a MIDI sequencing application or
an external hardware device, such as a videotape machine. (See “Using sessions as SMPTE
masters or slaves” on page 166.)
Adobe Audition sends and receives SMPTE timecode via MIDI timecode (MTC), which
Windows transmits through your system’s MIDI Out and MIDI In ports. MTC is a digital
signal; to convert analog SMPTE timecode from a video or audio tape deck to digital
MTC, you must use an appropriate MIDI interface.
To designate the devices with which you want to synchronize:
1 Choose Options > Device Properties.
2 Click the MIDI Out tab, and choose a device for SMPTE Output. This is the device to
which Adobe Audition will send the MIDI timecode.
3 Click the MIDI In tab, and choose the device for SMPTE Slave Device. This is the device
from which Adobe Audition will receive the MIDI timecode.
4 Click OK.
Page 49

ADOBE AUDITION 1.5
To set options for incoming SMPTE timecode:
1 If your MIDI interface supports sample-accurate synchronization, choose Options >
Sample Accurate Sync.
2 Choose Options > Settings, and click the SMPTE tab.
3 Set the following options:
Lead Time Specifies the amount of time (in milliseconds) in which Adobe Audition estab-
lishes synchronization with incoming timecode. Lower settings (200 and lower) result in
faster transport response but may prevent Adobe Audition from establishing synchronization. Settings of 500 to 1000 are sufficient on most systems.
Stopping Time Specifies the amount of time (in milliseconds) Adobe Audition will
continue playing if it encounters a dropout in timecode.
Lag Time Specifies the number of samples between incoming timecode and outgoing
audio data. This value accounts for discrepancies introduced by sound card buffers. The
default value is 10 samples.
Slack Specifies the number of frames Adobe Audition can fall out of sync with timecode
before either repositioning the current-time indicator to match the code or performing a
full resynchronization. A setting of up to 2.5 frames is recommended, as incorrect
timecode is usually corrected on the next frame sent. The default value is 1 frame.
User Guide
41
Clock Drift Correction Time Specifies the number of samples to crossfade when making
time corrections to chase audio to timecode. The default value is 200 samples.
Reposition Playback Cursor When Shuttling Readjusts the playback position if synchroni-
zation is off by the Slack value.
Full Re-Sync When Shuttling Performs a full re-synchronization if synchronization is off
by the Slack value.
Setting up external controllers
You can use external controllers, such as the Mackie Control, when recording and mixing
in Adobe Audition. These devices let you edit audio tracks using real knobs and automated
faders, instead of your mouse and computer keyboard. The Device Properties dialog box
lets you configure external controllers and specify a volume increment.
Page 50

CHAPTER 2
42
Setting up Adobe Audition
To set up external controllers:
1 Choose Options > Device Properties, and click the Ext. Controller tab.
2 Select the external controller you want to use, and specify a volume increment for the
device.
3 Click Configure to set additional options for the device. These options are provided by
the controller software. Refer to your controller documentation for more information.
4 Click OK.
Setting up ReWire connections
ReWire (a product of Propellerhead Software) is a technology for synchronizing audio
applications. You can configure Adobe Audition to accept audio input from any ReWirecompatible application. When Adobe Audition is configured to accept ReWire input, it is
referred to as a ReWire host. Applications that supply audio input are called ReWire slaves
and the output channels they expose to the host are called devices.
To establish a ReWire connection, you first enable ReWire support in Adobe Audition and
then activate a ReWire slave application and assign output from the slave to one or more
Audition tracks. Adobe Audition serves as a ReWire host until you close the application.
You can also manually disable ReWire support. For more information on using Adobe
Audition as a ReWire host, see “Working with ReWire tracks” on page 184.
Note: Before enabling ReWire in Adobe Audition you must close all other ReWire host and
slave applications. After activating a slave application from within Adobe Audition, you will
launch the application to establish the ReWire connection.
To establish a ReWire connection:
1 In Multitrack view, choose Options > Device Properties and select the ReWire tab.
2 Click Enable. The dialog box automatically populates with a list of installed ReWire
slave applications.
3 Select the check box next to the application you want to activate as a slave.
4 Choose one of the following track assignment options:
• Insert Summed Stereo Output Into First Available Track. All ReWire devices offer one
summed stereo output. This option routes the summed stereo output into the first
unoccupied track in the current session.
Page 51

ADOBE AUDITION 1.5
• Insert All Outputs To Individual Tracks. ReWire devices may offer multiple channel
outputs. This option routes each available ReWire output to its own track, starting with
the first unoccupied track and following contiguously to additional unoccupied tracks.
• Insert Outputs Manually Using Track Device Input Dialogs. Choose this option if you
want to assign outputs manually by using the Input Device dialog box. (See “Working
with ReWire tracks” on page 184.)
5 Click Launch to launch the ReWire slave application and establish the ReWire
connection. Adobe Audition assigns output from the ReWire slave to one or more tracks,
as specified by the track assignment option you selected.
6 Open the session you want to work with in the ReWire slave application to make the
audio available to Adobe Audition.
Note: Because only one ReWire host can be active at a time, you need to disable ReWire in
Adobe Audition before enabling any other ReWire host application.
To disable ReWire support:
1 In Multitrack view, choose Options > Device Properties and select the ReWire Devices tab.
2 Click Disable, and then click OK.
User Guide
43
Setting Adobe Audition preferences
The Settings dialog box lets you customize Adobe Audition’s workspace, use of memory and
hard disk space, spectral view, behavior when pasting, and other miscellaneous settings.
To use the Settings dialog box:
1 Choose Options > Settings.
2 Click a tab at the top of the dialog box to view the desired sets of options.
3 When you’re finished setting options, click OK. To close the Settings dialog box without
changing any options, click Cancel.
Once you click OK, most changes take effect immediately. If a change requires that you
close and reopen Adobe Audition, you'll be prompted to do so. For example, you need to
close and reopen Adobe Audition when you set up a different temporary folder.
Page 52

CHAPTER 2
44
Setting up Adobe Audition
General options
The General tab in the Settings dialog box provides options for adjusting mouse behavior
in Adobe Audition, as well as parameters for auto-play, live update, auto-scroll, and more.
Force Spacebar To Always Trigger Play Forces the spacebar to always trigger playback
regardless of which dockable window has focus.
Auto-Play On Command-Line Load Enables the ability to start Adobe Audition and play a
file from the command line. For example, if you go to the Run command in the Windows
Start menu and type
"c:\Program Files\Adobe\Audition 1.5\Audition Theme\TalkBackVerb.cel" at the
command line, Adobe Audition will start and begin playing TalkBackVerb.cel.
Live Update During Recording Enables live waveform drawing while recording. On faster
computers, you can have the waveform displayed in real time as audio is being recorded.
However, if you find the recorded audio becoming choppy, disable this option.
In Edit View’s Spectral View mode, and at lower spectral resolutions (around 256), you
can perform a nice scrolling spectral plot while recording with this option on.
Auto-Scroll During Playback And Recording Enables scrolling of the waveform display in
sync with playback. Auto-scrolling only takes affect when you are zoomed in on a portion
of a waveform and play past the viewed portion.
"c:\Program Files\Adobe\Audition 1.5\Audition.exe"
Note: The display refresh rate is directly related to the Total Buffer Size setting in the System
tab of the Settings dialog box. A low buffer size (such as 1) results in a smooth scrolling display,
where as a high buffer size (such as 8) results in a more choppy display. (See “System options”
on page 45.)
Upon A Manual Scroll/Zoom/Selection Change Determines auto-scrolling behavior when
a manual scroll, a zoom, or a selection change occurs in Adobe Audition. You can abort
auto-scrolling until the next time you play or record; resume auto-scrolling only when the
play cursor enters the view; or resume auto-scrolling immediately. Choose the one that
best suits your needs.
Custom Time Code Display Defines the number of frames per second (FPS) assigned to
the Custom time format in the View > Display Time Format menu.
Restore Default Workspace Resets all window sizes and positions to Adobe Audition’s
default arrangement.
Page 53

ADOBE AUDITION 1.5
Ctrl Key Allows Dockable Windows To Dock Disables the Ctrl key from preventing a
window to dock when moving the window around the work area.
Mouse Wheel Determines the amount to zoom in when rotating the mouse wheel found
on Intellipoint-compatible pointing devices. Values from 10% to 80% work well. The
higher the value, the further you’ll zoom in when you roll the mouse wheel.
Time Selection Mouse Cursor Determines whether you want your mouse pointer to
appear as an arrow or as an I-beam when it’s over the waveform display.
Edit View Right-Clicks Determines the behavior for a right-click in the waveform display.
• Popup Menu: When right-clicking in the waveform display, a menu pops up if this
option is selected. You can then Shift-click to extend a selection.
• Extend Selection: If you select this option, right-clicking in the Edit View’s waveform
display lets you extend the edge of a waveform selection instead of displaying the popup menu. To see the pop-up menu, hold down the Ctrl key as you right-click.
Default Selection Range Determines the amount of waveform data that automatically
gets selected (if nothing is already highlighted) when you apply an effect.
• View: If this option is selected, the area that’s automatically selected is limited to the area
you can currently see on-screen.
• Entire Wave: When you choose this option, the entire waveform is automatically
selected, even if you’re only viewing a portion of it.
User Guide
45
Double-clicking always selects the current view. Triple-clicking always selects the entire
waveform.
Highlight After Paste Highlights the inserted selection when performing a Paste
operation. Deselect this option to have the cursor placed at the end of the pasted selection
instead.
Deselect this option for easier multiple pastes, one after the other.
System options
The System tab in the Settings dialog box provides options for configuring how Adobe
Audition interacts with your system.
Page 54

CHAPTER 2
46
Setting up Adobe Audition
Edit View Play/Record Buffer Determines the buffer size (in seconds) to be used when
sending data to and from your sound card when playing back or recording in Edit View.
Different sound card devices may require different memory buffer settings. The default
settings should work fine for most sound cards, but if you hear choppiness (skips or
dropouts) in recording or playback, you may need to adjust the buffer size or number of
buffers used. For example, if you experience breakups in your audio, or you can’t stop a
recording in progress, increase the buffer size.
Use the two fields in the Edit View Play/Record Buffer area to reserve more memory for
recording and playback by entering a higher buffer size, both in seconds and a number
of buffers.
Keep in mind that while a greater buffer size will allow for increased multitasking when
audio is being played, it does so at the expense of taking more of your computer’s memory.
Wave Cache Determines the amount of memory that Adobe Audition reserves for
processing data. Recommended cache sizes are from 8192 to 32768 KB (8192 KB is the
default).
Select Use System’s Cache to let Windows handle all disk caching. Keep in mind that Adobe
Audition usually handles caching better than Windows can. However, this option reserves
the least amount of memory, so it may be desired for systems with low amounts of RAM.
EV Preview Buffer Determines the minimum buffer size used when sending data to your
sound card for the real-time Preview feature found in many effect dialog boxes. The
default value is 250 milliseconds.
Different sound card ports may require different memory buffer settings. If you hear
choppiness (skips or dropouts) when you use the Preview feature, try adjusting the buffer
size used. (Choppiness can be caused by insufficient processing power as well.) Keep in
mind that a larger Minimum Preview Buffer Size requires more computer memory.
Use Sound Card Positioning Info Allows Adobe Audition to query the sound card for the
actual location and sync up the cursor with audio. This option is useful if a sound card
doesn’t play or record at 44,100 Hz (some sound cards, for example, work at 44,050 Hz or
44,130 Hz). Leave this option unselected unless the cursor is out-of-sync with the audio.
CD Device Options Specifies the SCSI interface used by your CD device: ASPI (Advanced
SCSI Programming Interface) or SPTI (SCSI Pass Through Interface).
Page 55

ADOBE AUDITION 1.5
Temporary Folders Specifies the folders in which you want Adobe Audition to store
temporary files. Adobe Audition creates temporary files for use when performing edits on
your audio. All temporary files begin with CEP and have the .tmp extension. The rest of
the filename is chosen at random when the file is created. If there are no copies of Adobe
Audition running, none of these files should be present, since Adobe Audition normally
deletes temporary files when it exits. However, these files can be left behind in extreme
circumstances if Adobe Audition crashes, or if Windows unexpectedly quits while Adobe
Audition is active. As long as Adobe Audition isn’t running, you can safely delete these
files. You can also use the Manage Temporary Folder Reserve Space to delete temporary
files you aren’t using while Adobe Audition is running. (See “Managing temporary files”
on page 57.)
Important: You need to have enough space available in these folders to accommodate the total
size of all the audio files you wish to edit simultaneously.
Use the reserve free fields to specify an amount to leave available for headroom purposes
for both the primary and secondary temporary folders.
• Te mp Folder: Specifies Adobe Audition’s main temporary folder. Ideally it should be on
your fastest hard drive.
• Secondary Temp: Specifies Adobe Audition’s secondary temporary folder. For best
results, this should be on a different physical hard drive than the primary temp folder.
This is especially true when recording more than one track at a time in Multitrack View,
because odd track recordings go to one temp folder while the even tracks are recorded
to the other temp folder, dividing the workload.
User Guide
47
Note: Providing you have enough free space on the drive that holds the primary temporary
folder, Adobe Audition will work just fine if no Secondary Temp folder is specified.
Undo Specifies options for Adobe Audition’s Undo feature, which lets you revert back to
your last edit with a keyboard shortcut (Ctrl+Z), menu command, or toolbar button.
• Enable Undo: Activates the Undo function. Because Undo requires extra disk space for
its temporary files and time to save them before processing, you may sometimes want
to turn this feature off.
• Levels (minimum): Specifies the fewest number of Undo levels.
• Purge Undo: Deletes all of Adobe Audition’s Undo files. This frees up disk space, but
ends your ability to revert to previous edits.
Page 56

CHAPTER 2
48
Setting up Adobe Audition
Delete Clipboard Files On Exit Deletes Adobe Audition clipboard files when you exit. In
general, leave this option enabled: Usually, after you finish with an Adobe Audition session,
these clipboard files are no longer needed and just take up valuable hard disk space.
Deselect this option to retain Adobe Audition’s clipboard files on your hard drive after you
exit the program.
Force Complete Flush Before Saving Disables the quick save feature, in which Adobe
Audition quickly saves files that contain only minor modifications. If you enable this
option and force a flush before saving, Adobe Audition saves all files by making a backup
copy of the file internally and then writing the entire file back.
This option is disabled by default. When enabled, it considerably increases the save time
for large files. It is intended for use only if you have trouble saving back to the same
filename or you have a problem with Adobe Audition’s quick save feature.
Colors options
The Colors tab in the Settings dialog box provides options for changing Adobe Audition’s
color scheme.
Color Presets Lists color scheme presets that come with the program as well as those
you’ve created yourself. To choose one, select it from the list. The currently selected color
scheme is displayed in the Example window.
Save As Saves the currently selected color scheme as a preset.
Delete Deletes the currently highlighted color scheme preset.
Waveform Tab Lists all of Adobe Audition’s waveform elements to which you can assign
custom colors. Choose an item from the list and click the Change Color button to change
the color.
To adjust the appearance of the selected (highlighted) portions of waveforms and blocks,
select a Selection option:
• Tr ansparency: Drag the slider or enter a value to adjust the transparent value (in
percentage) of a selection; 0 is no transparency and 100 is maximum transparency.
• Invert: Select to set the selection colors to the inverse of the nonselected colors.
Page 57

ADOBE AUDITION 1.5
Spectral Tab Lists the display elements for Adobe Audition’s spectral display. Select an
item from the list and click the Change Color button to adjust the element’s color.
For Spectrum, choose one of these options:
• Reverse Direction: Inverts the normal colors of the spectrum display, similar to an
Invert or Negative command in a photo editor.
• Gamma: Adjusts the overall brightness of the Spectral View. Positive numbers make the
display brighter, while negative numbers darken the display. This setting works just like
the Gamma function in many image editors.
To adjust the appearance of the selected (highlighted) portions of waveforms in spectral
display, choose a Selection option.
• Tr ansparency: Drag the slider or enter a value to adjust the transparent value (in
percentage) of a selection; 0 is no transparency, and 100 is maximum transparency.
• Invert: Select to set the selection colors to the inverse of the nonselected colors.
Controls Tab Lists the Adobe Audition control elements for which you can change colors.
Select an item from the list and click the Change Color button to adjust the element’s color.
Select Segmented Progress Bar to make the progress bar segmented instead of solid. The
progress bar appears when you apply an effect, or open or save large waveforms.
User Guide
49
Select White Progress Background to make the background of the progress bar white.
For Dockable Windows, select one of the following options:
• Use System 3D Color: Select to make dockable windows use your system’s 3D color.
This is the color Windows uses to render most windows on your system.
• Use Darkened System 3D Color: Select to make dockable windows use the darkened
version of your system’s 3D color.
• Use Specified 3D Color: Select to make Adobe Audition’s dockable windows use the 3D
color you specify.
To change the 3D color, select Dockable Windows 3D Color in the controls list, and then
click the Change Color button to select a new color.
Page 58

CHAPTER 2
50
Setting up Adobe Audition
Display options
The Display tab in the Settings dialog box provides options for adjusting Adobe Audition’s
Spectral View and Waveform View modes.
Windowing Function Determines the method Adobe Audition uses to segment the
spectral data before it displays it. The segments (windows) are listed in order from the
narrowest frequency band/most noise to the widest frequency band/least noise.
Blackmann or Blackmann-Harris are good choices.
Resolution Specifies the number of vertical bands used in drawing frequencies. Keep in
mind that the larger this number, the longer it will take for Adobe Audition to render the
spectral display. Performance will vary based on the speed of your computer.
Window Width Specifies the width of the window (or frame size) used in plotting the
spectral data, where 100% is a frame size of the FFT (Fast Fourier Transform)
Window Width basically lets you increase time resolution at the expense of some
frequency resolution. So the display will become more accurate along the timeline (left
and right) and less accurate along the frequency scale (up and down) as the window width
decreases. The default setting is 75%, but you should lower the value (50 to 75% works
best) if you want to increase the resolution horizontally—for example, to find out exactly
where a certain frequency starts.
size.
Plot Style Specifies a style for plotting frequencies:
• Logarithmic Energy Plot: In this mode, colors change with the decibel value of the
energy at any particular time and frequency. In this mode, you can see more details in
the very quiet ranges, especially if the Range is quite high (above 150 dB). Use the Range
value to adjust the sensitivity in plotting frequencies.
• Linear Energy Plot: When selected, colors are chosen based on percentage of maximum
amplitude instead of decibel amplitude. Liner Energy Plot can be useful for viewing the
general overview of a signal without getting bogged down by detail at much quieter
levels. You can adjust the Scaling factor to highlight audio of different intensities.
Show Cue And Range Lines Displays cue marker and range lines in the waveform display.
Cue marker and range entries in the Cue List appear with vertical dotted lines overlaying
the audio, connecting the arrows from the top to the bottom of the display.
Show Grid Lines Displays grid lines in the waveform display. The grid lines mark off time
on the horizontal x-axis and amplitude on the vertical y-axis.
Page 59

ADOBE AUDITION 1.5
Show Center Lines Displays center lines in the waveform display. The center lines
represent zero amplitude of the waveform’s right and left channels.
Show Boundary Lines Displays boundary lines in the waveform display. Boundary lines
are the horizontal lines that visually indicate where the waveform’s amplitude approaches
or exceeds the clipping level. The value in the Display Boundary Lines At option specifies
the amplitude at which the boundary lines appear.
Peak Files Specifies options for peak (.pk) files, which Adobe Audition uses to store infor-
mation about how to display WAV files. Peak files make file opening almost instantaneous
by greatly reducing the time it takes to draw the waveform (especially with larger files).
• Peaks Cache: Determines the number of samples per block to be used when storing
peak files. Larger values reduce the RAM requirement for large files at the expense of
slightly slower drawing at some zoom levels. If RAM is an issue on your system, and
you’re working with very large files (several hundred megabytes or more in size),
consider increasing the Peaks Cache to 1024 or even 1536 or 2048.
• Save Peak Cache Files: Specifies that peak files are saved with all .wav files (in the same
folder) with the extension .pk following the original audio filename.
• Rebuild Wave Display Now: Click to rescan the current file for sample amplitudes and
redraw the waveform.
User Guide
51
Data options
The Data tab in the Settings dialog box provides options for controlling how Adobe
Audition handles audio data.
Embed Project Link Data For Edit Original Functionality Links session files with exported
mixdown files. Once these files are linked, you can select a mixdown file in Adobe
Premiere Pro or After Effects, and then open and remix the related session in Adobe
Audition’s Multitrack View.
Auto-Convert All Data To 32-Bit Upon Opening Converts all 8-bit and 16-bit data to
32-bit when a file is opened, and all subsequent operations will keep the data in the
32-bit realm.
Interpret 32-Bit PCM .wav Files As 16.8 Float Causes this version of Adobe Audition to be
compatible with previous versions when it comes to handling 32-bit PCM .wav files.
Page 60

CHAPTER 2
52
Setting up Adobe Audition
Dither Transform Results (increases dynamic range) Enables dithering when processing
effects such as FFT Filter or Amplify. Most processing done by Adobe Audition uses arithmetic greater than 16-bit, with the results converted back to 16-bit when complete. During
this conversion, dithering provides a higher dynamic range and cleaner results, with less
distortions and negative artifacts. With dithering, you get almost 24-bit sample performance in only 16 bits, as the dynamic range is increased by another 10 dB or so, allowing
signals as quiet as –105 dB.
If this option is disabled, the results are truncated to 16 bits when converting back, thus
losing the more subtle information.
When enabled, the addition of dither retains this subtle information. The drawback is that
with each operation a small amount of white noise is added at the quietest volume level.
However, the trade-off between using dither (thus adding noise) and truncating the data
(thus creating artifacts and correlated quantization noise) generally favor using dither, so
it’s best to leave this option enabled.
Use Symmetric Dithering Enables symmetric dithering. In most cases, it’s best to leave
this option selected. If unselected, a DC offset of one-half sample is added each time data
is dithered. Symmetric dithering has just as many samples added above zero as below zero.
By contrast, nonsymmetric dithering just toggles between 0 and 1. Sometimes in a final
dither, this may be desired to reduce the bit range of the dither. However, both methods
produce identical audible results in every respect.
Smooth Delete And Cut Boundaries Smooths Cut and Delete operations at the splicing
point, preventing audible clicks at these locations.
Smooth All Edit Boundaries By Crossfading Automatically applies a crossfade to the
starting and ending boundaries of the selection. This option smooths any abrupt transitions at these endpoints, thus preventing audible clicks when filtering small portions of
audio. You can enter a value (in milliseconds) in the crossfade time box to specify the
crossfade duration to be applied.
Page 61

ADOBE AUDITION 1.5
Auto-Convert Settings For Paste When pasting different sample formats, Adobe Audition
uses these settings when auto-converting the clipboard to the current sample format. Valid
settings range from 30 to 1000.
• Downsampling Quality Level: Enter a value (30 to 1000) for downsampling quality.
Higher values retain more high frequencies while still preventing the aliasing of higher
frequencies to lower ones. A lower quality setting requires less processing time, but
results in certain high frequencies being rolled off, leading to muffled-sounding audio.
Because the filter’s cutoff slope is much steeper at higher quality settings, the chance of
ringing at high frequencies is greater. Usually values between 80 and 400 do a great job
for most conversion needs. The default value is 80.
• Pre-Filter: To prevent any chance of aliasing, the pre-filter on downsampling removes
all frequencies above the Nyquist limit, thus keeping them from generating false
frequencies at the low end of the spectrum. In general, select this option for best results.
• Upsampling Quality Level: Enter a value (30 to 1000) for upsampling quality. Higher
values retain more high frequencies while still preventing the aliasing of higher
frequencies to lower ones. A lower quality setting requires less processing time but
results in certain high frequencies being rolled off, leading to muffled-sounding audio.
Because the filter’s cutoff slope is much steeper at higher quality settings, the chance of
ringing at high frequencies is greater. Usually values between 100 and 400 do a great job
for most conversion needs. The default value is 120.
User Guide
53
Yo u should use a higher value whenever you downsample from a high sample rate to a low
rate. For upsampling, a lower value produces quality almost identical to a higher value.
The difference lies in the larger phase shift that exists at higher frequencies, but since the phase
shift is completely linear, it’s very difficult to notice. Downsampling, at even the lowest values,
generally doesn't introduce any undesired noisy artifacts. Instead, the sound might be slightly
muffled because of the increased high-end filtering.
• Post-Filter: To prevent any chance of aliasing, the post-filter on upsampling removes all
frequencies above the Nyquist limit, thus keeping them from generating false
frequencies at the low end of the spectrum. In general, select this option for best results.
Dither Amount For Saving 32-Bit Data To 16-Bit Files Enables dithering when pasting
32-bit audio to 16-bit. The default value of 1 (bit) enables dithering, while a value of 0
disables dithering. For semi-dithering, choose a value of 0.5.
With dithering, you get almost 24-bit sample performance in only 16 bits, as the dynamic
range is increased by another 10 dB or so. This allows signals as quiet as –105 dB.
Page 62

CHAPTER 2
54
Setting up Adobe Audition
Allow For Partially Processed Data After Canceling Effect Determines what happens after
you click the Cancel button while in the middle of applying an effect to a waveform. When
selected, Adobe Audition leaves the effect applied to all data processed up until the point
you clicked Cancel. When deselected, Adobe Audition automatically removes the effect on
already processed data when you click Cancel.
Multitrack options
The Multitrack tab in the Settings dialog box provides options that let you optimize
performance during recording, playback, and mixdown.
Playback Buffer Size Determines the buffer size (in seconds) used when sending data to
your sound card when playing back a multitrack session. Different sound card drivers may
require different memory buffer size settings. Adobe Audition’s default settings should
work fine for most sound cards. If you hear choppiness (skips or dropouts) in multitrack
playback, adjust the buffer size. (Choppiness in multitrack playback can also be attributed
to the background mixing process not being far enough ahead). A larger buffer size
requires more computer memory. The default setting is 1.
Playback Buffers Specifies the number of buffers Adobe Audition uses for playback in
the multitrack environment. If you experience break-up in your audio, try reducing the
number of buffers. Increasing this number might also be helpful for some configurations.
The default setting is 10.
Recording Buffer Size Reserves memory for recording in a multitrack session by entering
a buffer size (in seconds). Different sound card drivers may require different memory
buffer size settings. Adobe Audition’s default settings should work fine for most sound
cards. If you experience dropouts while recording in multitrack (especially when playback
seems fine), try increasing this setting. (First, be sure the background mixing process is
sufficiently complete when you go to record as this may cause the same symptom.) A
larger buffer size requires more computer memory. The default setting is 2 seconds.
Recording Buffers Specifies the number of buffers used for recording in the multitrack
environment. If you experience break-ups in your audio, try reducing the number of buffers.
Increasing this number may also help for some configurations. The default setting is 10.
Background Mixing Priority Specifies the priority level of the background mixing process
in a multitrack session. Lower values indicate a higher level of priority above other system
events. You can use fractional numbers (such as 0.8). The default setting is 2.
Page 63

ADOBE AUDITION 1.5
Open Order Determines the order in which Adobe Audition opens a sound card’s playback
(in) and record (out) ports for use in the multitrack environment. This order is relevant
only for older sound cards that don’t support full-duplex capability.
Start Order Determines the order in which Adobe Audition starts a sound card’s playback
(in) and record (out) ports for use in the multitrack environment. This order is relevant
only for older sound cards that don’t support full-duplex capability.
Correct For Drift In Recordings Synchronizes the master audio playback device (generally,
the first Out device listed in the session—the one on Track 1) and the record device of the
waveform being recorded. If the true sample rates on the cards differ enough that the
recording would have drifted out of sync with the original if both were played back at
exactly the same sample rate, then the recording is corrected by resampling to make it the
proper length. This option only works with new record tracks, not with recording on top
of existing waveforms, or punch-ins.
Note: On sound cards that support sample accurate devices (that is, synchronized device
starting, and all devices keyed off of the same clock) you don’t need to select this option. This
option allows for some measure of near sample-accurate synchronization across different
sound cards, or when using with a single sound card that doesn’t use the same clock for
playback and recording (which is common in consumer and other low-end sound cards).
User Guide
55
Correct For Start Sync In Recordings Compares the exact true time that the record device
started with the time the master playback device started. If different, the recorded block’s
position is adjusted so the recording starts in perfect sync with the playback. This option
only works with new record tracks, not with recording on top of existing waveforms, or
punch-ins.
If this option is enabled, and you do a loopback test (by connecting the audio Out to the
audio In and recording some ticks) and each recording is still a fixed amount out of sync,
then you can adjust for this by entering this amount (in milliseconds) in the Latency field of
Options > Device Properties for the recording device being used. To compute milliseconds,
look at the difference in samples, multiply by 1000, and then divide by the sample rate. For
instance, if the recording consistently appears 27 samples ahead of the playback, the latency
would be 27 x 1000 / 44,100, or about 0.61 milliseconds. (The reason for the milliseconds
format and not samples is because at various sample rates this latency will be different in
terms of samples, but will be the same in terms of milliseconds.)
Page 64

CHAPTER 2
56
Setting up Adobe Audition
Note: On sound cards that support sample accurate devices (that is, synchronized device starting,
and all devices keyed off of the same clock) you don’t need to select this option. This option allows
for some measure of near sample-accurate synchronization across different sound cards or a
situation where a single sound card uses different clocks for playback and recording. (This
situation is common for consumer and other low-end sound cards.)
Delete Old Takes After Merging Automatically deletes any unused takes created during a
punch-in when you select a take. If you don’t select this option, unused takes remain
available to the Session (in the Insert menu) and occupy hard drive space.
Crossfade Time Determines the amount of time (in milliseconds) over which crossfading
occurs when a take created using punch-in is merged back into the surrounding waveform.
Mixdowns Determines the bit-resolution that is used when performing a mixdown.
Regardless of the session format (16-bit or 32-bit), you can generate mixdowns at either
16-bit or 32-bit quality with this option. The default is 16-bit. Click Dithering Option to
specify how to dither the 16-bit mixdown.
Track Record Specifies how waveforms are created when recording directly into the Multi-
track View: as mono or stereo, and as 16-bit or 32-bit.
Pre-Mixing Determines the bit size used for the background mixing process. Best quality
is achieved by leaving this at the default 32-bit setting. However, if you’re using multiple
sound cards, it may be advantageous and faster to choose 16-bit for pre-mixing, as less
data will be transferred across the hard drives. For single output device situations, or faster
hard drives, 32-bit is better as it provides optimization at mixdown.
Panning Mode Specifies the method used for panning waveforms in a multitrack session.
• L/R Cut (log): Pans left by reducing the volume of the right channel, and pans right by
reducing the left channel volume. The channel being panned to doesn’t increase in
volume as panning gets closer to 100%.
• Equal-power Sine: Pans left and right channels with equal power, so a hard pan left will
contain the same loudness as both channels together. This results in an increase of 3 dB
RMS on the channel being panned to when at 100%.
Note: Because panning can actually make one channel louder than the original waveform,
audible clipping can occur in 16-bit sessions. To avoid this, work in the 32-bit realm if you’re
using the Equal-power Sine panning method.
Page 65

ADOBE AUDITION 1.5
Auto Zero-Cross Edits Automatically adjusts the beginning and end points of all Cut,
Copy, and Paste-type edits to the nearest place where the waveform crosses the center line
(zero amplitude point).
If the amplitudes aren’t lined up on both sides of the selection, the endpoints are at
different amplitudes. This often results in an audible pop or click at that point.
Smooth Auto-Scrolling During Playback Enables smooth scrolling when playing back
audio in Multitrack View. By default Adobe Audition uses a paging method of scrolling in
Multitrack View instead of the smooth scrolling technique used in Edit View. This saves
on system resources.
Save Locked Track Files After Closing Sessions Saves the temporary files associated with
locked tracks. When you reopen the session, Adobe Audition uses the temporary file
instead of mixing down the locked tracks.
SMTPE options
The SMTPE tab in the Settings dialog box provides options for adjusting the settings for
incoming SMTPE timecode. For more information, see “Setting up for SMPTE synchronization” on page 40.
User Guide
57
Managing temporary files
When you edit a file, Adobe Audition converts the audio data into an internal, temporary
waveform. This process allows for quicker editing, better handling of large files, and the
ability to undo changes. You can specify the folders where you want Adobe Audition to
save temporary files and customize Undo options in the System tab of the Settings dialog
box. (See “Setting Adobe Audition preferences” on page 43.)
One advantage to using temporary files is virtually unlimited waveform sizes, since the
maximum waveform size depends only on the size of your hard drive. The drawback, of
course, is that the temporary file can get extremely large, potentially preventing you from
being able to save a masterpiece on the same drive. If you notice long delays between edits
or stuttering sounds on playback, you may be running out of free disk space in which to
save the temporary file. In this case, you can use the Manage Temporary Folder Reserve
Space dialog box to delete temporary files you’re not using, clear specific Undo items, and
change the amount of reserve space. This dialog box automatically appears when available
hard drive space nears zero kilobytes.
Page 66

CHAPTER 2
58
Setting up Adobe Audition
A B
C
Manage Temporary Folder Reserve Space dialog box
A. Open waveforms B. Undo items for the selected waveform C. Location of primary and
secondary temporary folders
Use the Status Bar to monitor the amount of free disk space. (See “Using the status bar”
on page 21).
Adobe Audition doesn’t create a temporary file for a waveform until you edit the waveform.
However, you can force Adobe Audition to create a temporary file by using the Flush
Virtual File command. This is useful when you need to use a waveform simultaneously in
Adobe Audition and another application.
Page 67

ADOBE AUDITION 1.5
To manage temporary folder reserve space:
1 Choose File > Manage Temporary Folder Reserve Space.
2 Do any of the following:
• To c lose a temporary file you’re no longer using, select the file in the Waveform list, and
click Close File. (The currently active waveform can’t be closed this way, however.)
• To c lear Undo items for a file, select the file in the Waveform list. The Undo History list
displays the actions that are currently being retained on your system and the amount of
hard drive space each instance consumes. Select an item and click Clear Undo(s). All
items at the selected level and below are removed.
• To c hange the amount of space you want to keep free on the drives where the temporary
files reside, enter a value in the Reserve text box, and click Set New Reserves.
• To stop any action in progress, such as the application of an effect or any other edit, click
Cancel Last Operation. This option is useful only if the dialog box automatically
appeared because you ran out of storage space.
If Adobe Audition crashes, there may be a temp file (CEPx*.tmp) in your temporary
folder that you should manually delete.
User Guide
59
To force Adobe Audition to create a temporary file for the current waveform:
In Edit View, choose File > Flush Virtual File.
Page 68

Page 69

Chapter 3: Importing,
Recording, and Playing Audio
ou can bring audio into Adobe Audition by importing it from an audio or video file
or by recording it from an external source, such as a microphone or a computer’s
CD player. When you play back the audio, Adobe Audition provides an assortment
of features for monitoring the sound.
Opening audio files and multitrack sessions
Both Edit View and Multitrack View provide a variety of methods for opening files. In Edit
View, you can open audio files; in Multitrack View, you can open session files.
Opening audio files in Edit View
In Edit View, you can open audio from a variety of audio file formats, including MP3,
WAV, and AIFF. For more information on supported file formats, see “Choosing an audio
file format” on page 231.
61
If desired, you can change the sample type of the audio when you import it or append the
audio to the end of the current waveform. Whichever method you choose for opening
files, Adobe Audition provides options that let you preview the contents of files before you
open them.
To open an audio file:
1 In Edit View, choose File > Open. Alternatively, click the Open button in the toolbar
or the Import button in the Files tab of the Organizer window.
2 Locate and select the file you want to open. To select multiple, adjacent files, click the
first file and Shift-click the last. To select multiple, nonadjacent files, Ctrl-click them.
Note: If you don’t see the name of the file you want, choose All Supported Media from the Files
Of Type menu. If you still don’t see the file, it might be stored in a format that Adobe Audition
can’t read.
3 Click Open.
Page 70

CHAPTER 3
62
Importing, Recording, and Playing Audio
To preview the contents of a selected file:
Do any of the following:
• Click Play to listen to the file once.
• Select Loop to repeat the file until you click Stop.
• Click Auto Play to play files automatically when you select them.
To append an audio file to the current waveform:
1 In Edit View, choose File > Open Append.
If the new audio has a different sample rate, resolution, or channel type than the current
waveform, Adobe Audition converts it to match the current waveform. For the best results,
append files that have the same sample rate as the waveform.
2 Locate and select the file you want to open. To select multiple, adjacent files, click the
first file and then Shift-click the last. To select multiple, nonadjacent files, Ctrl-click them.
3 Click Open.
To convert audio to a different sample rate, resolution, or channel type during import:
1 In Edit View, choose File > Open As.
2 Locate and select the file you want to open, and click Open.
3 Set the desired options in the Open File(s) As dialog box, and click OK:
Sample Rate Determines how many frequencies can be encoded in the audio signal.
(Higher sampling rates mean wider bandwidth.) For more information, see “About
sample rates” on page 110.
Channels Determines if the waveform is mono or stereo. Select Mono to create a
waveform with just one channel of audio information. This option works well for a voiceonly recording. Select Stereo to create a two-channel waveform with separate right and left
channels. This option is usually best for a music recording. Because they contain twice as
much data, stereo waveforms consume twice the storage space of mono waveforms.
Resolution Determines the number of unique amplitude levels Adobe Audition can use
to represent a sound. The 32-bit level is best while you work in Adobe Audition, and you
convert down for output if necessary.
Page 71

ADOBE AUDITION 1.5
Note: Older sound cards might not be able to play 32-bit files properly. To check the capabilities of your sound card, choose Options > Device Properties. If your sound card doesn’t
support 32-bit files, you can convert the files to a lower bit rate (such as 16-bit) for playback.
Opening session files in Multitrack View
Session files contain no audio data themselves. Instead, they are small files that point to
other audio files on the hard drive. A session file keeps track of what files are a part of the
session, where they go in the multitrack, what envelopes and effects are applied to the
tracks, and so on. For more information on creating session files, see “Creating new
sessions” on page 162.
In Multitrack View, you can open individual session files and you can append one session
to another to quickly build elaborate compositions with shared themes. When you append
sessions, appended tracks appear below current tracks. For example, if the current session
uses tracks 1-4, Adobe Audition appends tracks 5 and greater and places them at the
beginning of the timeline. If desired, you can then move clips in appended tracks to a new
position. (See “Selecting and moving clips” on page 168.)
Note: You can append a session only if it uses the same sample rate and bit depth as the current
session. The sample rate and bit depth of the current session is displayed in the status bar.
User Guide
63
To open a session file:
1 In Multitrack View, choose File > Open Session. Alternatively, click the Open button
in the toolbar.
2 Locate and select the file you want to open, and click Open.
To append a session file to the end of the current session:
1 In Multitrack View, choose File > Append To Session.
2 Locate and select the file you want to open, and click Open.
Inserting audio files into multitrack sessions
When you insert an audio file in Multitrack View, the file becomes an audio clip on the
selected track. For more information about audio clips, see “Working with clips” on
page 168.
Page 72

CHAPTER 3
64
Importing, Recording, and Playing Audio
To insert an audio file into a multitrack session:
1 In Multitrack View, position the current-time indicator at the desired insertion point.
2 Select the desired track.
3 Do one of the following:
• Choose Insert > Audio, select the audio file, and click Open. To preview the contents of
a selected file, click Play to listen to the file once, or click Auto Play to play the file
automatically when you select it. Select Loop to repeat the file until you click Stop.
• Choose Insert, and select the name of a recently opened waveform from the submenu.
• Choose Insert > File/Cue List. A window appears that lists all of the files that are
currently open in Edit View. If a file has cues in it, a plus sign (+) appears next to its
name to let you expand that file and see all the cue ranges in it. Click the file or cue you
want to insert. Alternatively, drag the file or cue into the track display.
• Select one or more files in the Files tab of the Organizer window, and click the Insert
Into Multitrack button . If you select multiple files, each is inserted into a separate
track. This method lets you insert a file into a session without leaving Edit View. (See
“Organizing files” on page 24.)
Note: If the audio file is longer than the space available on the selected track, Adobe Audition
inserts the new clip on the nearest empty track.
Importing audio from CD
If you want to import audio into Adobe Audition from a CD, you can digitally extract it
or record it internally. Digital extraction is the recommended method because it produces
higher-quality audio than internal recording. Only use internal recording if your CD-ROM
drive doesn’t support digital extraction.
Extracting tracks from CDs
If your computer’s CD-ROM drive supports audio digital extraction (also known as
ripping), you can extract tracks from audio CDs. Once the audio is in Adobe Audition, you
can edit it like any other waveform. Of course, if the CD is a typical read-only compact
disc, you won’t be able to save those changes back to CD. Instead, save modified CD tracks
to a hard disk or burn them onto a new CD.
Page 73

ADOBE AUDITION 1.5
Adobe Audition provides two methods for ripping tracks from CDs: using the Open
command and using the Extract Audio From CD command. Using the Open command is
the quickest method and is preferred for ripping entire tracks. Using the Extract Audio
From CD command gives you more control, such as the abilities to rip partial tracks and
specify the ripping process used.
To extract tracks from a CD by using the Open command:
1 Place an audio CD in the computer’s CD-ROM drive.
2 In Edit View, choose File > Open.
3 Choose CD Digital Audio (*.cda) as the file type, and navigate to the computer’s
CD-ROM drive.
4 Select the tracks you want to rip, and click Open.
To extract tracks from a CD by using the Extract Audio From CD command:
1 Place an audio CD in the computer’s CD-ROM drive.
2 In Edit View or CD Project View, choose File > Extract Audio From CD.
3 For Device, choose the drive that contains the audio CD.
4 For Source Selection, do one of the following:
• Select Track to extract one or more complete CD tracks. A list of all tracks on the CD
appears, along with their lengths stated in Min:Sec:Frame format. (Each second of CD
audio has 75 frames.)
• Select Time to extract part of a track or a segment of audio that spans multiple tracks.
Enter the beginning frame in the Start box, and the total number of frames you wish to
extract in the Length box. (Each second of CD audio has 75 frames.) The actual start
and length times appear in Min:Sec:Frame format above their respective boxes. The
Range bar provides a graphical representation of how much audio will be extracted and
where the audio appears within the CD. However, if you select only a short bit of audio
to extract, you might not see any change in the Range bar.
User Guide
65
The Time option is great for pulling hidden tracks from CDs, as well as for joining
tracks that have been broken up by track indexes (such as performance track CDs and
live albums).
Page 74

CHAPTER 3
66
Importing, Recording, and Playing Audio
5 For Interface Option, choose Generic Win32 or ASPI/SPTI. In most cases, ASPI/SPTI
is the best choice. Select Generic Win32 only if the ASPI/SPTI option doesn’t produce
satisfactory results. The Generic Win32 option causes the Extract Audio From CD feature
to use Input/Output control codes instead of SCSI commands.
For more information, see “Extract Audio From CD options” in Help.
6 For Error Correction, CDDA Accurate is automatically selected if the CD-ROM drive
has built-in ripping error correction. For these types of drives, no error correction is
needed, so you won’t be able to select any options from this part of the Extract Audio From
CD dialog box.
However, if your drive isn’t CDDA Accurate, you have access to No Correction and Jitter
Correction options. No Correction, as you’d expect, means that no error correction will
be performed. Jitter Correction compensates for data reading problems that older drives
might have.
7 To listen to the selected tracks before extracting them, click Preview.
8 To save the settings for future use, save a preset. (See “Using presets” on page 28.)
9 After you finish setting options, click OK.
Extract Audio From CD options
If you select ASPI/SPTI in the Extract Audio from CD dialog box, set the following options
as desired:
Read Method Lets you choose the way Adobe Audition
are provided, many of them developed before the SCSI 3 specifications were published.
(The SCSI 2 specs don’t accommodate CD ripping.)
• MMC – Read CD is a SCSI 3-specific setting, and it works with most all recent drives.
If you have a newer CD-ROM drive, try this setting first.
• SBC – Read10 is a standard SCSI read setting that uses a 10-byte SRB (SCSI Request
Block). All SCSI devices are required to support this setting.
• SBC – Read6 is a standard SCSI read setting that uses a 6-byte SRB (SCSI Request
Block). Many SCSI devices support this setting, but because it’s optional, not all do.
• Plextor (D8) sends the D8 SCSI Op Code to the CD-ROM drive. Use this setting with
older Plextor CD-ROM drives.
reads CD audio. Several methods
Page 75

ADOBE AUDITION 1.5
• D5 sends the D5 SCSI Op Code to the CD-ROM drive.
• NEC works with older NEC CD-ROM drives.
CD Speed Lists all extraction speeds that the selected CD-ROM drive supports and lets
you specify the speed you want to use. The Max (Maximum) Speed option usually
produces satisfactory results, but if it produces errors, specify a slower speed.
Buffer Size Specifies how much data Adobe Audition
calls into the CD Extraction module
to fetch, therefore determining how much data is pulled from the CD in each call to the
read command. The default is 16 KB, but you can experiment with other sizes (which
range all the way to the highest buffer size the CD-ROM drive supports). Although higher
sizes mean faster ripping, they could introduce errors into the ripped file.
Swap Byte Order Changes the byte order from Little Endian to Big Endian, or vice-versa.
Some CD-ROM drives designed to work only with other types of computers (like DEC
and Macintosh systems) report data by using the Little Endian byte order, while PCs use
the Big Endian method. Normally, you should leave this box unchecked; check it only if
the extraction process seems to work fine but the audio results are “garbage.”
Swap Channels Places the left channel of a CD’s audio in the right channel of the Wave
Display, and places the right channel of the audio in the Wave Display’s left channel.
User Guide
67
Spin Up Before Extraction Causes the CD-ROM drive to start spinning before Adobe
Audition extracts the data. Some CD-ROM drives have better accuracy if they first read
the CD after the drive is spinning. Selecting this option for other drives, however, doesn’t
provide any advantage.
Recording from CDs internally
If you have an older CD-ROM drive that doesn’t support digital extraction, or if you have
problems ripping a track into Adobe Audition, then you can record from a CD in real-time
through the sound card on your computer. This method is called internal recording. Keep
in mind that not all PC's have an analog cable from a CD drive, and not all computers react
the same way when recording from CD internally. As a result, this method is never
preferable to extracting from CD digitally.
Before you record from a CD internally, you should always preview the CD Audio input
level to make sure that clipping won’t occur.
Page 76

CHAPTER 3
68
Importing, Recording, and Playing Audio
To preview the CD Audio input level:
1 Open your favorite third-party CD player application (such as Windows Media Player).
2 Start playing the loudest part of the CD. Then, switch to Adobe Audition, and choose
Options > Monitor Record Level.
3 Use the Level Meters in Adobe Audition to monitor the amplitude of the incoming
signal. You want the input level to be as loud as possible without exceeding 0 dB. If the
input level exceeds 0 dB, clipping occurs.(See “Monitoring recording and playback levels”
on page 79.)
4 If you need to adjust the CD Audio input level, choose Options > Windows Recording
Mixer to open the Windows Recording Control panel. Adjust the CD Audio input level as
desired.
5 After you finish monitoring the input level, choose Options > Monitor Record Level.
To record from a CD internally:
1 In Edit View, create a new file.
2 Click the Record button .
3 Start the desired track in your CD player application.
4 When desired, stop recording in both Adobe Audition and the CD player application.
Setting the current-time indicator
The current-time indicator is a vertical, dotted line in the display window. You set the
current-time indicator in order to start playback or recording at a specific point in a
waveform.
When you work with multiple files in Edit View, you can use the Synchronize Cursor Across
Windows command to retain the position of the current-time indicator between files. This
command is useful if you switch between different versions of the same waveform during
editing. In Multitrack View, you can use the Synchronize Clips With Edit View command to
maintain the position of the current-time indicator when you switch between Multitrack
View and Edit View.
Page 77

ADOBE AUDITION 1.5
Current-time indicator
To set the current-time indicator:
Do one of the following in the display window:
• Click exactly where you want to set the current time.
• Position the pointer over the triangle above or below the current-time indicator. (This
triangle is the current-time indicator’s handle.) Drag the handle to the desired position
in the timeline.
After you set the current-time indicator, you can save it as a cue for later reference. For
more information, see “Working with cues” on page 96.
User Guide
69
To synchronize the current-time indicator between waveforms:
In Edit View, choose Options > Synchronize Cursor Across Windows.
To synchronize the current-time indicator between Multitrack View and Edit View:
In Multitrack View, choose Options > Synchronize Clips With Edit View.
Monitoring time
Adobe Audition provides several features to help you monitor time during recording and
playback. The playback cursor—a vertical, white line that appears in the display window—
shows you the current time in the waveform. The Time window shows the current time in
numerical format. The default display format is mm:ss:ddd (minutes:seconds:thousandths
of a second), but you can easily change it. The display format is also used by the timeline
along the bottom of the display window.
Page 78

CHAPTER 3
70
Importing, Recording, and Playing Audio
A
B
C
Features that help you monitor time
A. Playback cursor B. Timeline C. Time window
To display the Time window:
Do one of the following:
• Choose Window > Time. A check mark indicates that the window is visible.
• Click the Hide/Show Time Window button in the View toolbar. (See “Using
toolbars” on page 13.)
If you don’t like the default location of the Time window, you can reposition it or detach
it so it floats above the main window. (See “Using windows” on page 14.)
To change the time display format:
Choose View > Display Time Format, and choose the desired option:
• Decimal (mm:ss.ddd) displays time in minutes, seconds, and thousandths of a second.
• Compact Disc 75 fps displays time in the same format utilized by audio compact discs,
where each second equals 75 frames.
• SMPTE 30 fps displays time in the SMPTE format, where each second equals 30 frames.
• SMPTE Drop (29.97 fps) displays time in the SMPTE drop-frame format, where each
second equals 29.97 frames.
• SMPTE 29.97 fps displays time in the SMPTE non-drop-frame format, where each
second equals 29.97 frames.
• SMPTE 25 fps (EBU) displays time using the standard European frame rate, where each
second equals 25 frames.
Page 79

ADOBE AUDITION 1.5
• SMPTE 24 fps (Film) displays time in a format where each second equals 24 frames,
suitable for film.
• Samples displays time numerically, using as a reference the actual number of samples
that have passed since the beginning of the edited file.
• Bars and Beats displays time in a musical measures format of bars:beats:ticks. To adjust
the settings, choose Edit Tempo. For more information, see “Calculating the tempo of
selected ranges” on page 199.
• Custom (X frames/sec) displays time in a custom format. To modify a custom format,
choose Edit Custom Time Format, enter a number of frames per second for Custom
Time Code Display, and click OK.
Using the transport controls
Just like many hardware-based audio recording and playback devices, Adobe Audition
provides transport controls for playing, recording, stopping, pausing, fast forwarding, and
rewinding waveforms and sessions.
Right-click the transport control buttons to set options for playing, recording, fast
forwarding, and rewinding audio.
User Guide
71
Transport controls
To show or hide the transport controls:
Do one of the following:
• Choose Window > Transport Controls. A check mark indicates that the controls are
visible.
• Click the Hide/Show Transport Controls button in the View toolbar. (See “Using
toolbars” on page 13.)
If you don’t like the default location of the transport controls, you can reposition them or
detach them so they float above the main window. (See “Using windows” on page 14.)
Page 80

CHAPTER 3
72
Importing, Recording, and Playing Audio
Recording audio
You can record audio from a microphone or any signal you can plug into the Line In port
of a sound card.
Note: Yo u may need to adjust the input signal to obtain the optimum recording and signal-tonoise levels. (See “Adjusting a sound card’s levels” on page 82.)
By default, Adobe Audition displays waveforms in real time while recording. However, if
the recorded audio is choppy, deselect Live Update During Recording in the General tab
of the Settings dialog box. (See “Setting Adobe Audition preferences” on page 43.)
Recording audio in Edit View
In Edit View, you can record audio into a new file or over existing audio. You can also
disable the Record button so you don’t start recording accidentally.
To record in Edit View:
1 Do one of the following:
• Create a new file. (See “Creating new audio files” on page 84.)
• In an existing file, place the current-time indicator where you want to start recording.
(See “Setting the current-time indicator” on page 68.)
2 Click the Record button to begin recording.
3 Click the Stop button to stop recording.
To disable the Record button:
Right-click the Record button, and choose Disable Record Button. Repeat to reenable the
button.
Using timed record mode
Use timed record mode to set start and stop times for recording. You can specify a maximum
recording time and you can set a time for recording to start and stop automatically.
To enable or disable timed record mode:
Choose File > Timed Record Mode. Alternatively, right-click the Record button, and
choose Timed Record Mode. A check mark indicates that timed record mode is enabled.
Page 81

ADOBE AUDITION 1.5
To set start and stop times for recording:
1 Enable timed record mode.
2 Click the Record button .
3 Specify the maximum recording time:
• Select No Time Limit to record until you click the Stop button (or until disk space
runs out).
• Select Recording Length to record for the duration you specify in the Recording
Length box.
4 Specify when to start recording:
• Select Right Away to begin recording as soon as you click OK.
• Select Time/Date to begin recording at a time you specify (for example, to have Adobe
Audition capture a radio broadcast at a certain time). Enter the starting time and date
in the appropriate text boxes, and set the desired time and date options.
5 Click OK.
Recording audio in Multitrack View
In Multitrack View, you can record audio on multiple tracks by overdubbing. When you
overdub tracks, you can hear previously recorded tracks and play along with them to
create sophisticated, layered compositions.
User Guide
73
Each recording becomes a new audio clip on a track. If you are unsatisfied with a section
of a recorded clip, you can select that section and punch in a new recording—leaving the
remainder of the original clip intact. For particularly important or difficult sections, you
can punch in multiple takes (different versions), and then select the take with the best
performance.
A take created with the Punch In command
Page 82

CHAPTER 3
74
Importing, Recording, and Playing Audio
To record a new clip in a track:
1 In the track controls area for the track, click the In 1 button, select the desired input of
your sound card, and then click OK.
2 Click the Record-enable button for the track.
3 To simultaneously record on multiple tracks, repeat steps 1-2 for each track.
4 Position the current-time indicator at the desired starting point for recording, or select
the range where you want to record the clip.
5 Click the Record button to begin recording.
6 Click the Stop button to stop recording.
To r ecord in a loop:
1 Specify the input source, track, and starting point (or range) for recording, as described
in the previous procedure.
2 Right-click the Record button , and choose one of the following options:
• Loop While Recording (View or Sel) to loop when the cursor reaches the end of the
viewable range of track. If a range is selected, looping occurs when the cursor reaches
the end of the range.
• Loop While Recording (Entire or Sel) to loop when the cursor reaches the end of the
track. If a range is selected, looping occurs when the cursor reaches the end of the range.
3 Click the Record button to begin recording.
4 Click the Stop button to stop recording.
If you use either of the Loop While Recording options for punching in audio, a new take
is created with each loop.
To punch into a range of a clip:
1 In the track display, select the range of the clip.
2 Choose Edit > Punch In.
3 Position the current-time indicator a few seconds prior to the selected range.
4 In the Transport Controls window, click the Record button .
5 To punch in multiple takes, repeat step 4 for each take.
Page 83

ADOBE AUDITION 1.5
Note: Yo u can't punch into a loop-enabled clip. For information about disabling loops, see
“Setting impermanent loop properties in Multitrack View” on page 202.
To select from multiple takes in a clip:
1 Select the clip.
2 Choose Edit > Take History, and then select the desired take.
To merge a selected take into a clip:
Choose Edit > Take History > Merge This Take (Destructive).
Note: Merging destructively adds a 30 millisecond crossfade at take edges.
To delete a selected take:
Choose Edit > Take History > Delete This Take.
Playing audio
Adobe Audition provides several ways to play audio, including using the transport
controls to play the currently active file, using the Organizer window to preview files, and
using the Windows Run command to start Adobe Audition and begin playing a file.
User Guide
75
Playing audio by using the transport controls
The transport controls provide several options for playing the currently active file. For
example, you can play just the visible section of a waveform, the duration from the
current-time indicator to the end of the file, or the entire waveform. In addition, you can
set preroll and postroll options to play a selection with just a bit of audio preceding or
following it.
To start playback without using the transport controls, press the space bar. Press the
space bar again to stop playback.
To play a range of audio:
Select the range you want to play, and click the Play button in the Transport Controls
window.
Page 84

CHAPTER 3
76
Importing, Recording, and Playing Audio
To play from the current-time indicator to the end of the current view:
Set the current-time indicator where you want playback to start, and click the Play button
in the Transport Controls window.
To play from the current-time indicator to the end of the file:
Set the current-time indicator where you want playback to start, and click the Play To End
button in the Transport Controls window.
To play the visible portion of the file:
Right-click the Play button or Play To End button, and choose Play View. Then click the
button again to start playback.
To play an entire file:
Right-click the Play button or Play To End button, and choose Play Entire File. Then click
the button again to start playback.
To loop audio during playback:
Do one of the following:
• To play the currently-visible portion of the audio in a continuous loop, click the Play
Looped button in the Transport Controls window.
• To loop the entire waveform or session (or just the selected range), right-click the Play
Looped button and choose Play Entire (or Selection). Then click the button again to
start playback.
Note: By default, the display window scrolls in sync with playback that extends beyond the
visible section of a waveform. In the General tab of the Settings dialog box, you can set options
for auto-scrolling or you can disable this feature. (See “Setting Adobe Audition preferences”
on page 43.)
Using preroll and postroll during playback (Edit View only)
In Edit View, you can play back the audio just before and after a selected range. This audio
is known as preroll and postroll. Playing preroll and postroll is useful for fine-tuning selections and listening to transitions without destroying a selection. By default, the duration
of preroll and postroll is one second; however, you can adjust this duration to best meet
your needs.
Page 85

ADOBE AUDITION 1.5
To play a selected range of audio with preroll and postroll:
1 In Edit View, right-click the Play button or the Play To End button in the
Tr ansport Controls window, and choose one of the following options: Play Preroll and
Postroll, Play Preroll and Selection, Play Postroll, or Play Preroll, Postroll, and Selection
2 Click the button again to start playback.
Yo u can also use keyboard shortcuts to play preroll and postroll. For information on
specific keyboard shortcuts, “Keys for playing audio” on page 263.
To set a duration for preroll and postroll:
1 In Edit View, right-click the Play button or the Play To End button in the
Tr ansport Controls window.
2 Choose Preroll and Postroll Options.
3 In the Edit View–Play section of the Preroll and Postroll Options dialog box, specify a
duration for preroll and postroll.
4 Click OK.
User Guide
77
Previewing audio by using the Organizer window
The Files tab in the Organizer window provides several play options that make it easy to
preview loops and other files. These options are particularly handy when you work in
Multitrack View because they let you preview loops at the session tempo. For more information on using the Files tab in the Organizer window, see “Organizing files” on page 24.
To preview a file:
1 Make sure that the advanced options—including the preview and sorting controls—
appear in the Files tab of the Organizer window. If they don’t, click the Advanced Options
button at the top of the Files tab.
2 Select the file you want to preview, and then click the Play button . Click the Stop
button to stop the preview. Use the volume slider to adjust the volume of the preview.
To enable auto-play:
Click the Auto-play button on the Files tab. Adobe Audition automatically previews files
you select. To disable auto-play, click the Auto-play button again.
Page 86

CHAPTER 3
78
Importing, Recording, and Playing Audio
To preview a file at the session tempo (Multitrack View only):
In Multitrack View, select Follow Session on the Files tab, and then click the Play button
or enable auto-play, and select a file.
Note: Only files that are loop-enabled can be previewed at the session tempo. Loop-enabled
files are identified with a loop icon in the Files tab.
To enable continuous loop preview:
Click the Loop button on the Files tab, and then click the Play button or enable autoplay, and select a file. To disable continuous loop preview, click the Loop button again.
Playing audio by using the Windows Run command
You can start Adobe Audition and begin playing a file by using the Windows Run command.
Before using the command, make sure that Auto-Play On Command-Line Load in the
General tab of the Settings dialog box is selected. (See “Setting Adobe Audition preferences”
on page 43.)
To play audio from the command line:
In the Windows Run dialog box, type the following text, and click OK:
"[drive]:\Program Files\Adobe\Audition 1.5\Audition.exe" "[path to file]"
For example, type the following to play the TalkBackVerb loop file:
"c:\Program Files\Adobe\Audition 1.5\Audition.exe" "c:\Program
Files\Adobe\Audition 1.5\Audition Theme\TalkBackVerb.cel"
Stopping, pausing, and adjusting the playback cursor
The transport controls provide buttons for stop recording and playback, pausing
recording and playback, and adjusting the playback cursor.
To stop playback without using the transport controls, press the spacebar. Press the
spacebar again to start playback.
To stop playing or recording audio:
Click the Stop button in the Transport Controls window.
Page 87

ADOBE AUDITION 1.5
To pause playing or recording audio:
Click the Pause button in the Transport Controls window. Click the Pause button again
to resume playback or recording.
To adjust the playback cursor:
Click one of the following buttons in the Transport Controls window:
• The Go to Beginning button places the playback cursor at the beginning of the
waveform or session.
• The Rewind button shuttles the playback cursor backward in time. This function
supports scrubbing, meaning that on some sound cards, the audio file plays back at a
lower volume as the playback cursor shuttles over the waveform or session.
Right-click the Rewind button to set the rate at which the cursor moves.
• The Fast Forward button shuttles the playback cursor forward in time. This
function supports scrubbing, meaning that on some sound cards, the audio file plays
back at a lower volume as the playback cursor shuttles over the waveform or session.
Right-click the Fast Forward button to set the rate at which the cursor moves.
User Guide
79
• The Go to End button places the playback cursor at the end of a waveform (in Edit
View) or at the end of the list clip in a session (in Multitrack View).
Monitoring recording and playback levels
Adobe Audition provides the Level Meters to help you monitor the amplitude of the signal
during recording and playback. If the amplitude is too high, clipping occurs and results in
distortion; if the amplitude is too low, the sound quality is reduced.
If you find that the signal is too high or low during recording and playback, you can adjust
the input and output levels of your sound card.
Page 88

CHAPTER 3
80
Importing, Recording, and Playing Audio
Using the Level Meters
The Level Meters represent the incoming signal in dBFS (decibels below full scale), where
a level of 0 dB is the maximum amplitude possible before clipping occurs. Yellow peak
indicators remain for 1.5 seconds to allow for reading of the peak amplitude. If clipping
does occur, the clip indicator to the right of the meter lights up and stays on until you clear
it. When stereo audio is displayed, the top meter represents the left channel, and the
bottom represents the right.
You can customize the Level Meters in a variety of ways, such as changing the decibel
range, showing valley (minimum amplitude) indicators, and changing the mode of the
peak indicators.
Right-click the Level Meters to set metering options.
A
B
The Level Meters
A. Left channel B. Right channel C. Peak indicators D. Clip indicators
C D
To show or hide the Level Meters:
Do one of the following:
• Choose Window > Level Meters. A check mark indicates that the Level Meters are visible.
• Click the Hide/Show Level Meters button in the View toolbar. (See “Using toolbars”
on page 13.)
If you don’t like the default location of the Level Meters, you can reposition them or detach
them so they float above the main window. (See “Using windows” on page 14.)
To start or stop monitoring the levels of an input source:
Choose Options > Monitor Record Level, or double-click the Level Meters.
To disable or enable the Level Meters during recording or playback:
Choose Options > Show Levels On Play And Record. Disabling the Level Meters improves
performance on lower specification computers.
Page 89

ADOBE AUDITION 1.5
To clear a clip indicator:
Click the clip indicator, or right-click the Level Meters and choose Clear Clip Indicator.
Note: The clip indicators always light up if clipping occurs, but if Adjust For DC is enabled,
the indicators light up if audio has a DC offset.
To adjust for DC offset:
Right-click the Level Meters, and choose Adjust For DC.
Many sound cards record audio with a slight DC offset, meaning that the center of the
waveform being recorded is a little above or below the center of the waveform display. This
offset can dramatically throw off the level meters since the offset amount could be interpreted as a constant sound at that volume. You should have this option enabled when
recording.
To show or hide valley indicators:
Right-click the Level Meters, and choose Show Valleys.
If the valley indicators are close to the peak indicators, the dynamic range (the difference
between the quietest and loudest sounds) is low. If they’re spread far apart, the dynamic
range is high.
User Guide
81
To change the decibel range of the Level Meters:
Right-click the Level Meters, and choose a Range option.
To change the mode of peak indicators:
Right-click the Level Meters, and choose one of the following options:
• Dynamic Peaks causes the yellow peak level indicators to reset to a new peak level after
1.5 seconds, letting you easily see the peak amplitude “right now.” As the audio gets
quieter, the peak indicators start backing off.
• Static Peaks keeps the peak levels from being reset, letting you retain the maximum
amplitude of the signal since monitoring, playing, or recording began. The peak can still
be reset manually at any time by clearing the clip indicators (that is, by clicking the clip
indicator at the right).
Page 90

CHAPTER 3
82
Importing, Recording, and Playing Audio
Select Static Peaks as a great way to find out how loud a song will get before you record
it. Just start monitoring levels and then play the song. After the song ends, the peak
indicators show the volume of the loudest part.
Adjusting a sound card’s levels
Adobe Audition doesn’t directly control a sound card’s record levels (input gain) and
playback levels (output volume). Instead, you can adjust these levels with the mixer application that comes with the sound card or with the mixer built into Windows. You may
need to adjust levels if recordings are too quiet (causing unwanted noise), too loud
(leading to clipped, distorted sound), or not audible when played in Adobe Audition.
To get the best sounding results, you should record audio as loud as possible without
clipping. Try to keep the loudest point somewhere between –2 dB and 0 dB when setting
the recording levels.
To adjust a sound card’s record and playback levels by using Windows:
1 Open the Windows Volume Control program.
You can usually access this program in the Programs > Accessories > Entertainment (or
Multimedia) menu of the Windows Start menu. On many systems, you can also doubleclick the speaker icon in the system tray to access the Volume Control program, which
resembles a small mixing board with vertical sliders.
2 To adjust the sound card’s playback (output) level, turn up the sliders on the Windows
mixer to the desired volume. Make sure that Mute underneath both sliders isn’t selected.
3 To adjust the sound card’s record (input) level, choose Options > Properties in Volume
Control. Select Recording and click OK. Be sure that the input source you want to use is
selected, and adjust other sliders on the Windows mixer as needed.
To quickly access the Record section of the Windows mixer, choose Options > Windows
Recording Mixer in Adobe Audition.
Page 91

Chapter 4: Editing Audio
dobe Audition provides a powerful and easy-to-use interface for preforming a
variety of editing tasks, such as copying, pasting, and deleting; adding and
removing silence; generating noise and tones; changing the sample type; and
A
adding information to audio files.
About editing audio
When you open an audio file in Edit View, you see the waveform display, a visual represen-
tation of the sound wave, or waveform. If you open a stereo file, the waveform for the left
channel appears at the top and the waveform for the right channel appears at the bottom.
If you open a mono file, the waveform utilizes the total height of the waveform display. The
peaks and valleys in the waveform represent positive and negative air pressure. Quiet
audio has both lower peaks and lower valleys than loud audio.
For background information on working with digital audio, see “Sound fundamentals”
on page 267.
83
Stereo waveform in Edit View
Page 92

CHAPTER 4
84
Editing Audio
Many editing tasks require that you select a precise range of a waveform. When selecting
a range, you’ll probably want to zoom in to view the waveform in more detail. (See
“Zooming” on page 17.) Adobe Audition provides a variety of ways to select audio data
precisely, such as adjusting selections to zero-crossings, finding beats, and using snapping.
(See “Selecting audio data” on page 87.)
As you edit a waveform, keep in mind that you can undo your changes until you save the
file. (See “Undoing and redoing changes” on page 22.)
Creating new audio files
The File > New command lets you create an empty audio file. Doing so is useful when you
want to paste audio into an empty file before you edit it or when you want to record audio
into a new file.
Yo u can quickly create a new file from a selection by choosing Edit > Copy to New.
(See “Copying audio data” on page 92.)
To create a new audio file:
1 Choose File > New. Alternatively, click the New File button in the toolbar.
2 Select a sample rate in the list, or type a custom sample rate in the text box.
The sample rate determines how many frequencies can be encoded in the audio signal.
(Higher sampling rates mean a wider bandwidth.) For more information, see “About
sample rates” on page 110.
3 Select a number of channels:
• Mono creates a waveform with just one channel of audio information. This setting is
good for voice-only recordings.
• Stereo creates a waveform with separate right and left channels. This setting is usually
best for music recordings. Because stereo waveforms contain twice as much data as
mono waveforms, they consume twice as much storage space.
4 Select a resolution, and click OK:
• 8-bit creates a waveform where quality is not much of a concern, but small file size is.
8-bit waveforms are usually fine for telephony applications or for embedded sounds in Web
pages. Although they tend to be noisier than their 16-bit counterparts, they’re half the size.
Page 93

ADOBE AUDITION 1.5
• 16-bit produces a CD-quality waveform. This setting is suitable for most broadcast and
music recordings.
• 32-bit creates a waveform that supports the most precise audio processing, and 32-bit
is the recommended resolution for editing files in Adobe Audition. After you edit a file,
you can downsample it to 16- or 8-bit for output and achieve better results than if you
edit an 8- or a 16-bit file. (See “Changing the bit depth” on page 113.)
Note: Older sound cards might not be able to play 32-bit files properly. To check the capabilities of your sound card, choose Options > Device Properties. If your sound card doesn't
support 32-bit files, you can limit playback to 16-bits while retaining the 32-bit depth internally. (See “Setting properties for audio output devices” on page 37.)
Viewing waveforms
The waveform display in Edit View shows you a visual representation of a waveform. By
default, this representation shows the amplitude of a waveform over time. However, you
can view the frequency of a waveform over time by switching to Spectral View. You can also
control the scale with which Adobe Audition measures the amplitude or frequency of
waveforms.
User Guide
85
Switching between Waveform View and Spectral View
The waveform display offers two ways to represent audio data: Waveform View and
Spectral View.
Waveform View and Spectral View
Page 94

CHAPTER 4
86
Editing Audio
• Wa veform View (the default) displays a waveform as a series of positive and negative
peaks. The x-axis (horizontal ruler) represents time, and the y-axis (vertical ruler)
measures spikes, or increased amplitude, in a waveform.”
• Spectral View displays a waveform by its frequency components, where the x-axis repre-
sents time and the y-axis (vertical ruler) measures frequency. This view lets you analyze
audio data to see which frequencies are most prevalent. The greater a signal’s amplitude
component within a specific frequency range, the brighter the displayed color. Colors
range from dark blue (meaning that the frequencies are very low in amplitude) to bright
yellow (meaning that the frequencies are high in amplitude).
To switch between Waveform View and Spectral View:
Choose View > Waveform View or View > Spectral View. Alternatively, click the Toggle
Between Waveform And Spectral Views button in the toolbar.
Adobe Audition lets you customize certain features of Waveform View and Spectral View.
For example, you can show or hide grid lines in Waveform View and change the resolution
in Spectral View. For more information, see “Display options” on page 50.
Changing the vertical scale
In Wa veform View, the vertical ruler shows the decibel value of the audio data. However,
you can change the scale of the ruler to Sample Values, Normalized Values, or Percentage.
Note: In Spectral View, the vertical scale is always in hertz (Hz).
To change the scale of the vertical ruler:
Choose View > Vertical Scale Format, and choose the desired scale:
• Sample Values indicates amplitude as the data’s exact sample value of the data.
• Normalized Values indicates amplitude on a normalized scale value that ranges from
– 1 to 1.
• Percentage indicates amplitude on a percentage scale value that ranges from –100%
to 100%.
• Decibels indicates amplitude using a decibel scale value that ranges from –Infinity to Zero.
Double-click the vertical ruler to cycle through the scales.
Page 95

ADOBE AUDITION 1.5
Selecting audio data
To edit a waveform, you must first select the audio data that you want to modify. Adobe
Audition provides several methods for making and adjusting selections.
Using cues ranges can save you time when making selections. (See “Working with cues”
on page 96.)
Selecting with the mouse
You can select a range of audio data by dragging in the waveform display. When precision
is important, you may want to zoom in to view the waveform in more detail. (See “Zooming”
on page 17.)
User Guide
87
Dragging to select a range
To select a range of a waveform:
Drag to select the desired range of the waveform.
To extend or shorten a selection:
Shift-click the end of the selection that you wish to modify, and drag to extend or shorten it.
Note: If you prefer, you can right-click to extend or shorten a selection. To enable this feature,
select Extend Selection in the General tab of the Settings dialog box. (See “Setting Adobe
Audition preferences” on page 43.)
Page 96

CHAPTER 4
88
Editing Audio
To select a range in only one channel:
Do one of the following:
• Drag near the top of the left (upper) channel. The cursor displays an L icon to indicate
the left channel.
• Drag near the bottom of the right (lower) channel. The cursor displays an R icon to
indicate the right channel.
To select the visible range of a waveform:
Double-click in the waveform display.
Selecting all of a waveform
The Select Entire Wave command lets you select all of the audio data in a waveform. You
can use the mouse to do this as well.
To select all of a waveform:
Choose Edit > Select Entire Wave, or triple-click in the waveform display.
Selecting audio frequencies in Spectral View
When working in Spectral View, you can use the Marquee Selection tool to select audio
data within specific frequencies. This method allows for band-limited editing and
processing, as well as greater flexibility in audio restoration work. For example, if you
detect an audio anomaly or error, you can select and edit just the affected frequencies,
resulting in superior results and faster processing.
Making a marquee selection in Spectral View
Page 97

ADOBE AUDITION 1.5
To make a marquee selection:
1 In Spectral View, click the Marquee Selection button in the toolbar.
If this button isn’t visible, choose View > Toolbars > Spectral Selection.
2 Drag in the waveform display to select the desired audio data.
When making a marquee selection in a stereo waveform, the selection is applied to both
channels. To select audio data in just one channel, choose Edit > Edit Channel, and
then choose Edit Left Channel or Edit Right Channel.
To move a marquee selection:
Position the cursor in the selection, and drag it to the desired location.
To resize a marquee selection:
Position the cursor on the corner or edge of the selection, and drag it to the desired size.
Adjusting selections to zero-crossing points
For many editing tasks, such as deleting or inserting audio in the middle of a waveform,
the best places to make selections are the points where the amplitude is zero (called zero-
crossings). Selecting the zero-crossing points reduces the chance that an edit will create an
audible pop or click. You can easily adjust a selection to the closest zero-crossing points by
using a Zero Crossing command.
User Guide
89
To adjust a selection to zero-crossing points:
Choose Edit > Zero Crossing, and choose one of the following commands:
• Adjust Selection Inward adjusts both range boundaries inward to the next zero-crossing
point. Alternatively, click the Zero Crossing button in the toolbar.
• Adjust Selection Outward adjusts both range boundaries outward to the next zero-
crossing point.
• Adjust Left Side To Left adjusts the left range boundary leftward to the next zero-
crossing point.
• Adjust Left Side To Right adjusts the left range boundary rightward to the next zero
crossing point.
Page 98

CHAPTER 4
90
Editing Audio
• Adjust Right Side To Left adjusts the right range boundary leftward to the next zero
crossing point.
• Adjust Right Side to Right adjusts the right range boundary rightward to the next zero
crossing point.
Finding beats
For some editing tasks, such as constructing drum loops and similar musical phrases, you
need to select audio between beats. You can usually pick out where the beats are by looking
for the peaks in a waveform. You can also use a Find Beats command.
Once you find beats, you can save them as Beat Cues, making it easy to locate the beats
again. (See “Working with cues” on page 96.)
To find the beginning of a beat:
1 Click in the waveform display to the left of the first beat you want to find.
2 Choose Edit > Find Beats > Find Next Beat (Left). The cursor moves to the beginning
of the next beat.
To select audio between beats:
1 Find the beginning of a beat.
2 Choose Edit > Find Beats > Find Next Beat (Right) to select from the current cursor
position to the next beat.
3 If you want to select more than one beat, choose Edit > Find Beats > Find Next Beat
(Right) again. Each time you choose this command, Adobe Audition adds the next beat to
the selection.
When you select audio to construct a loop, click the Play Looped button in the transport
controls to preview the loop. After any necessary tweaking, you can then save, paste, or
add the loop to the Cue List.
To adjust the settings that Adobe Audition uses to find beats:
Choose Edit > Find Beats > Beat Settings. Enter new values for Decibel Rise and Rise
Time, and click OK.
Page 99

ADOBE AUDITION 1.5
For finding beats with material that has fast transient attacks, such as drums, specify a
quick Rise Time and a high Decibel Rise so as not to cut off the beginning of the attack.
For material with softer attacks, such as bass, the Rise Time can be slightly slower relative to
Decibel Rise.
Snapping
Snapping causes selection boundaries, as well as the current-time indicator, to move to items
such as cues, ruler ticks, zero-crossing points, and frames. Enabling snapping helps you
make accurate selections; however, if you prefer, you can disable snapping for specific items.
To enable or disable snapping:
Choose Edit > Snapping, and choose any of the following commands. A check mark
indicates that a command is enabled:
• Snap To Cues allows the cursor to snap to a cue point. For more information on
defining cues, see “Working with cues” on page 96.
• Snap To Ruler (Coarse) allows the cursor to snap only to the major numeric divisions
(decimal, SMPTE, samples, and so on) in the timeline.
User Guide
91
Note: Yo u can enable only one Snap To Ruler command at a time.
• Snap To Ruler (Fine) allows the cursor to snap to each of the subdivisions (decimal,
SMPTE, samples, and so on) within the timeline. Zooming in (by right-clicking as you
drag across the timeline) breaks the display down into more accurate subdivisions,
letting you place the cursor more accurately within the timeline.
• Snap To Zero Crossings allows the cursor to snap to the nearest place where the
waveform crosses the center line (in other words, the zero amplitude point).
• Snap To Frames (Always) allows the cursor to snap to a frame boundary, as long as the
time format is measured in frames (such as Compact Disc and SMPTE). This command
is especially handy for working on audio for CD.
Yo u can access snapping commands by right-clicking the timeline.
Page 100

CHAPTER 4
92
Editing Audio
Specifying which channel of a stereo waveform to edit
By default, Adobe Audition applies selections and edits to both channels of a stereo
waveform. However, you can easily select and edit just the left or right channel of a stereo
waveform.
To specify which channel you want to edit:
Do either of the following:
• Choose Edit > Edit Channel, and choose which channel you want to edit.
• Click the Edit Left Channel button , the Edit Right Channel button , or the Edit
Both Channels button in the View toolbar. (See “Using toolbars” on page 13.)
Copying, cutting, pasting, and deleting
Adobe Audition supports all of the basic editing functions, as well as several commands
designed specifically for audio editing.
Choosing a clipboard
Adobe Audition gives you access to five internal clipboards for temporary data storage.
Each works similarly to the Windows clipboard, except that they can handle more data at
a faster rate.
To choose a clipboard:
Choose Edit > Set Current Clipboard, and choose a clipboard.
Choose the Windows clipboard if you want to copy audio data to other Windows
applications.
Copying audio data
The Copy command lets you copy audio data to the active clipboard. The Copy To New
command lets you copy and paste the data to a new file in one step.
 Loading...