

Page 1

®
Adobe
™
Audition
User Guide
Page 2

Legal Notices
Copyright
©
2003 Adobe Systems Incorporated. All rights reserved.
®
Adobe
If this guide is distributed with software that includes an end-user agreement, this guide, as well as the software described in it, is furnished
under license and may be used or copied only in accordance with the terms of such license. Except as permitted by any such license, no part
of this guide may be reproduced, stored in a retrieval system, or transmitted, in any form or by any means, electronic, mechanical, recording,
or otherwise, without the prior written permission of Adobe Systems Incorporated. Please note that the content in this guide is protected
under copyright law even if it is not distributed with software that includes an end-user license agreement.
The content of this guide is furnished for informational use only, is subject to change without notice, and should not be construed as a commitment by Adobe Systems Incorporated. Adobe Systems Incorporated assumes no responsibility or liability for any errors or inaccuracies
that may appear in the informational content contained in this guide.
Please remember that existing artwork or images that you may want to include in your project may be protected under copyright law. The
unauthorized incorporation of such material into your new work could be a violation of the rights of the copyright owner. Please be sure to
obtain any permission required from the copyright owner.
Any references to company names in sample templates are for demonstration purposes only and are not intended to refer to any actual organization.
Adobe, the Adobe logo, Adobe Audition, Adobe Premiere, and After Effects are either registered trademarks or trademarks of Adobe Systems
Incorporated in the United States and/or other countries. Apple, Macintosh, and Mac OS are trademarks of Apple Computer, Inc., registered
in the U. S. and other countries. Microsoft, Windows, and Windows NT are registered trademarks of Microsoft Corporation in the U.S.
and/or other countries. MPEG Layer 3 audio compression technology is licensed by Fraunhofer IIS and Thompson. mp3PRO audio coding
technology licensed from Coding Technologies, Fraunhofer IIS and Thomson Multimedia. All other trademarks are the property of their
respective owners.
Supply of this product does not convey a license nor imply any right to distribute MP3-encoded or mp3PRO-encoded data created with this
product in revenue-generating broadcast systems (terrestrial, satellite, cable, and/or other distribution channels), streaming applications (via
Internet, intranets and/or other networks), other content distribution systems (pay-audio or audio-on-demand applications and the like) or
on physical media (compact discs, digital versatile discs, semiconductor chips, hard drives, memory cards and the like). An independent license for such use is required. For details, please visit http://mp3licensing.com
Contains an implementation of the LZW algorithm licensed under U.S. Patent 4,558,302.
Notice to U.S. government end users. The software and documentation are “Commercial Items,” as that term is defined at 48 C.F.R. §2.101,
consisting of “Commercial Computer Software” and “Commercial Computer Software Documentation,” as such terms are used in 48 C.F.R.
§12.212 or 48 C.F.R. §227.7202, as applicable. Consistent with 48 C.F.R. §12.212 or 48 C.F.R. §§227.7202-1 through 227.7202-4, as applicable, the Commercial Computer Software and Commercial Computer Software Documentation are being licensed to U.S. Government end
users (a) only as Commercial items and (b) with only those rights as are granted to all other end users pursuant to the terms and conditions
herein. Unpublished-rights reserved under the copyright laws of the United States. Adobe Systems Incorporated, 345 Park Avenue, San Jose,
CA 94110-2704, USA. For U.S. Government End Users, Adobe agrees to comply with all applicable equal opportunity laws including, if appropriate, the provisions of Executive Order 11246, as amended, Section 402 of the Vietnam Era Veterans Readjustment Assistance Act of
1974 (38 USC 4212), and Section 503 of the Rehabilitation Act of 1973, as amended, and the regulations at 41 CFR Parts 60-1 through 6060, 60-250, and 60-741. The affirmative action clause and regulations contained in the preceding sentence shall be incorporated by reference.
Part number: 90047223 (07/2003)
Audition
™
User Guide for Windows
®
.
Page 3

iii
Contents
Legal Notices
Copyright . . . . . . . . . . . . . . . . . . . . . . . . . . . . . . . . . . . . . . . . . . . . . . . . . . . . . ii
Introduction
Getting Help . . . . . . . . . . . . . . . . . . . . . . . . . . . . . . . . . . . . . . . . . . . . . . . . . . 1
Registration . . . . . . . . . . . . . . . . . . . . . . . . . . . . . . . . . . . . . . . . . . . . . . . . . . . 1
Customer support . . . . . . . . . . . . . . . . . . . . . . . . . . . . . . . . . . . . . . . . . . . . . 1
Chapter 1
Chapter 2
Adobe Audition at a Glance
Sound Your Best . . . . . . . . . . . . . . . . . . . . . . . . . . . . . . . . . . . . . . . . . . . . . . . 3
Work Efficiently . . . . . . . . . . . . . . . . . . . . . . . . . . . . . . . . . . . . . . . . . . . . . . . 4
Use Integrated Tools . . . . . . . . . . . . . . . . . . . . . . . . . . . . . . . . . . . . . . . . . . . 5
Key Concepts of Adobe Audition
Destructive and Non-Destructive Editing . . . . . . . . . . . . . . . . . . . . . . . 7
Real-Time Preview . . . . . . . . . . . . . . . . . . . . . . . . . . . . . . . . . . . . . . . . . . . . 8
Multitrack . . . . . . . . . . . . . . . . . . . . . . . . . . . . . . . . . . . . . . . . . . . . . . . . . . . . . 8
Session Files . . . . . . . . . . . . . . . . . . . . . . . . . . . . . . . . . . . . . . . . . . . . . . . . . . 9
Working with Premiere Pro and After Effects . . . . . . . . . . . . . . . . . . . 9
Looking at the Work Area
Edit View and Multitrack View . . . . . . . . . . . . . . . . . . . . . . . . . . . . . . . . 11
Switching from Edit View to Multitrack View . . . . . . . . . . . . . . . . . . 13
Switching from Multitrack View to Edit View . . . . . . . . . . . . . . . . . . 13
Dockable Windows . . . . . . . . . . . . . . . . . . . . . . . . . . . . . . . . . . . . . . . . . . . 14
Placekeepers . . . . . . . . . . . . . . . . . . . . . . . . . . . . . . . . . . . . . . . . . . . . . . . . . 15
Drop-down Menus . . . . . . . . . . . . . . . . . . . . . . . . . . . . . . . . . . . . . . . . . . . 16
Toolbars . . . . . . . . . . . . . . . . . . . . . . . . . . . . . . . . . . . . . . . . . . . . . . . . . . . . . 16
Organizer Window . . . . . . . . . . . . . . . . . . . . . . . . . . . . . . . . . . . . . . . . . . . 17
Files Pane . . . . . . . . . . . . . . . . . . . . . . . . . . . . . . . . . . . . . . . . . . . . . . . . . . . . 17
Effects Pane . . . . . . . . . . . . . . . . . . . . . . . . . . . . . . . . . . . . . . . . . . . . . . . . . .18
Favorites Pane . . . . . . . . . . . . . . . . . . . . . . . . . . . . . . . . . . . . . . . . . . . . . . . 19
Wave Display/Session Display . . . . . . . . . . . . . . . . . . . . . . . . . . . . . . . . 19
Page 4

iv
CONTENTS
Presets . . . . . . . . . . . . . . . . . . . . . . . . . . . . . . . . . . . . . . . . . . . . . . . . . . . . . . . 20
Graph Controls . . . . . . . . . . . . . . . . . . . . . . . . . . . . . . . . . . . . . . . . . . . . . . . 21
Transport Buttons . . . . . . . . . . . . . . . . . . . . . . . . . . . . . . . . . . . . . . . . . . . . 22
Level Meters . . . . . . . . . . . . . . . . . . . . . . . . . . . . . . . . . . . . . . . . . . . . . . . . . 23
Show Valleys . . . . . . . . . . . . . . . . . . . . . . . . . . . . . . . . . . . . . . . . . . . . . . . . . 24
Zoom Buttons . . . . . . . . . . . . . . . . . . . . . . . . . . . . . . . . . . . . . . . . . . . . . . . . 25
Time Window . . . . . . . . . . . . . . . . . . . . . . . . . . . . . . . . . . . . . . . . . . . . . . . .26
Sel/View Controls . . . . . . . . . . . . . . . . . . . . . . . . . . . . . . . . . . . . . . . . . . . . 26
Status Bar . . . . . . . . . . . . . . . . . . . . . . . . . . . . . . . . . . . . . . . . . . . . . . . . . . . . 27
Window Menu – Edit View . . . . . . . . . . . . . . . . . . . . . . . . . . . . . . . . . . . . 28
Chapter 3
Chapter 4
Wave File Formats Supported by Adobe Audition
64-bit doubles (RAW) (.dbl) . . . . . . . . . . . . . . . . . . . . . . . . . . . . . . . . . . . 29
8-bit signed (.sam) . . . . . . . . . . . . . . . . . . . . . . . . . . . . . . . . . . . . . . . . . . . 29
A/mu-Law Wave (.wav) . . . . . . . . . . . . . . . . . . . . . . . . . . . . . . . . . . . . . . . 29
ACM Waveform (.wav): . . . . . . . . . . . . . . . . . . . . . . . . . . . . . . . . . . . . . . . 30
Amiga IFF-8SVX (.iff, .svx) . . . . . . . . . . . . . . . . . . . . . . . . . . . . . . . . . . . . .30
Apple AIFF (.aif, .snd) . . . . . . . . . . . . . . . . . . . . . . . . . . . . . . . . . . . . . . . . . 30
ASCII Text Data (.txt) . . . . . . . . . . . . . . . . . . . . . . . . . . . . . . . . . . . . . . . . . . 31
Audition Loop (.cel) . . . . . . . . . . . . . . . . . . . . . . . . . . . . . . . . . . . . . . . . . . 31
Creative Sound Blaster (.voc) . . . . . . . . . . . . . . . . . . . . . . . . . . . . . . . . .32
Dialogic ADPCM (.vox) . . . . . . . . . . . . . . . . . . . . . . . . . . . . . . . . . . . . . . . . 32
DiamondWare Digitized (.dwd) . . . . . . . . . . . . . . . . . . . . . . . . . . . . . . . 32
DVI/IMA ADPCM (.wav) . . . . . . . . . . . . . . . . . . . . . . . . . . . . . . . . . . . . . . . 33
Microsoft ADPCM (.wav) . . . . . . . . . . . . . . . . . . . . . . . . . . . . . . . . . . . . . . 33
mp3Pro® (.mp3) . . . . . . . . . . . . . . . . . . . . . . . . . . . . . . . . . . . . . . . . . . . . . . 34
Next/Sun (.au, .snd) . . . . . . . . . . . . . . . . . . . . . . . . . . . . . . . . . . . . . . . . . . . 34
SampleVision (.smp) . . . . . . . . . . . . . . . . . . . . . . . . . . . . . . . . . . . . . . . . . . 34
Windows PCM (.wav) . . . . . . . . . . . . . . . . . . . . . . . . . . . . . . . . . . . . . . . . .35
Windows Media Audio(.wma) . . . . . . . . . . . . . . . . . . . . . . . . . . . . . . . . 35
PCM Raw Data (.pcm) (.raw) . . . . . . . . . . . . . . . . . . . . . . . . . . . . . . . . . .36
Navigating the Edit View
About Edit View . . . . . . . . . . . . . . . . . . . . . . . . . . . . . . . . . . . . . . . . . . . . . . 37
Navigating the Wave Display . . . . . . . . . . . . . . . . . . . . . . . . . . . . . . . . . 38
Waveform View/Spectral View . . . . . . . . . . . . . . . . . . . . . . . . . . . . . . . . 38
Horizontal Ruler . . . . . . . . . . . . . . . . . . . . . . . . . . . . . . . . . . . . . . . . . . . . .40
Page 5

v
Vertical Ruler . . . . . . . . . . . . . . . . . . . . . . . . . . . . . . . . . . . . . . . . . . . . . . . . . 40
Recording in Edit View . . . . . . . . . . . . . . . . . . . . . . . . . . . . . . . . . . . . . . . 41
Wave Display Right-Click Menu . . . . . . . . . . . . . . . . . . . . . . . . . . . . . . .42
Chapter 5
Chapter 6
File Menu – Edit View
New . . . . . . . . . . . . . . . . . . . . . . . . . . . . . . . . . . . . . . . . . . . . . . . . . . . . . . . . . 45
Open . . . . . . . . . . . . . . . . . . . . . . . . . . . . . . . . . . . . . . . . . . . . . . . . . . . . . . . . 46
Open As . . . . . . . . . . . . . . . . . . . . . . . . . . . . . . . . . . . . . . . . . . . . . . . . . . . . . 47
Open Append . . . . . . . . . . . . . . . . . . . . . . . . . . . . . . . . . . . . . . . . . . . . . . . . 47
Extract Audio from Video . . . . . . . . . . . . . . . . . . . . . . . . . . . . . . . . . . . . . 48
Extract Audio From CD . . . . . . . . . . . . . . . . . . . . . . . . . . . . . . . . . . . . . . . 48
Revert to Saved . . . . . . . . . . . . . . . . . . . . . . . . . . . . . . . . . . . . . . . . . . . . . .51
Close . . . . . . . . . . . . . . . . . . . . . . . . . . . . . . . . . . . . . . . . . . . . . . . . . . . . . . . . 51
Close All Waves and Session . . . . . . . . . . . . . . . . . . . . . . . . . . . . . . . . . .51
Close Only Non-Session Waveforms . . . . . . . . . . . . . . . . . . . . . . . . . . . 51
Save . . . . . . . . . . . . . . . . . . . . . . . . . . . . . . . . . . . . . . . . . . . . . . . . . . . . . . . . . 52
Save As . . . . . . . . . . . . . . . . . . . . . . . . . . . . . . . . . . . . . . . . . . . . . . . . . . . . . . 52
Save Selection . . . . . . . . . . . . . . . . . . . . . . . . . . . . . . . . . . . . . . . . . . . . . . . 53
Save All . . . . . . . . . . . . . . . . . . . . . . . . . . . . . . . . . . . . . . . . . . . . . . . . . . . . . .53
Batch File Convert . . . . . . . . . . . . . . . . . . . . . . . . . . . . . . . . . . . . . . . . . . . . 53
Flush Virtual File . . . . . . . . . . . . . . . . . . . . . . . . . . . . . . . . . . . . . . . . . . . . . 57
Free Up Space in Temp Files . . . . . . . . . . . . . . . . . . . . . . . . . . . . . . . . . . 57
MRU List . . . . . . . . . . . . . . . . . . . . . . . . . . . . . . . . . . . . . . . . . . . . . . . . . . . . . 59
Exit . . . . . . . . . . . . . . . . . . . . . . . . . . . . . . . . . . . . . . . . . . . . . . . . . . . . . . . . . . 59
Edit Menu – Edit View
Undo . . . . . . . . . . . . . . . . . . . . . . . . . . . . . . . . . . . . . . . . . . . . . . . . . . . . . . . . 61
Enable Undo/Redo . . . . . . . . . . . . . . . . . . . . . . . . . . . . . . . . . . . . . . . . . . . 61
Repeat Last Command . . . . . . . . . . . . . . . . . . . . . . . . . . . . . . . . . . . . . . .62
Set Current Clipboard . . . . . . . . . . . . . . . . . . . . . . . . . . . . . . . . . . . . . . . . 62
Copy . . . . . . . . . . . . . . . . . . . . . . . . . . . . . . . . . . . . . . . . . . . . . . . . . . . . . . . . 62
Cut . . . . . . . . . . . . . . . . . . . . . . . . . . . . . . . . . . . . . . . . . . . . . . . . . . . . . . . . . . 62
Paste . . . . . . . . . . . . . . . . . . . . . . . . . . . . . . . . . . . . . . . . . . . . . . . . . . . . . . . . 62
Paste to New . . . . . . . . . . . . . . . . . . . . . . . . . . . . . . . . . . . . . . . . . . . . . . . . 62
Mix Paste . . . . . . . . . . . . . . . . . . . . . . . . . . . . . . . . . . . . . . . . . . . . . . . . . . . . 63
Copy to New . . . . . . . . . . . . . . . . . . . . . . . . . . . . . . . . . . . . . . . . . . . . . . . . . 64
Insert in Multitrack . . . . . . . . . . . . . . . . . . . . . . . . . . . . . . . . . . . . . . . . . . . 64
Page 6

CONTENTS
vi
Insert Play List in Multitrack . . . . . . . . . . . . . . . . . . . . . . . . . . . . . . . . . . . 64
Select Entire Wave . . . . . . . . . . . . . . . . . . . . . . . . . . . . . . . . . . . . . . . . . . .65
Delete Selection . . . . . . . . . . . . . . . . . . . . . . . . . . . . . . . . . . . . . . . . . . . . . 65
Delete Silence . . . . . . . . . . . . . . . . . . . . . . . . . . . . . . . . . . . . . . . . . . . . . . . . 65
Trim . . . . . . . . . . . . . . . . . . . . . . . . . . . . . . . . . . . . . . . . . . . . . . . . . . . . . . . . . 66
Zero Crossings . . . . . . . . . . . . . . . . . . . . . . . . . . . . . . . . . . . . . . . . . . . . . . . 66
Find Beats . . . . . . . . . . . . . . . . . . . . . . . . . . . . . . . . . . . . . . . . . . . . . . . . . . . 67
Auto-Cue . . . . . . . . . . . . . . . . . . . . . . . . . . . . . . . . . . . . . . . . . . . . . . . . . . . . 68
Snapping . . . . . . . . . . . . . . . . . . . . . . . . . . . . . . . . . . . . . . . . . . . . . . . . . . . . 69
Group Waveform Normalize . . . . . . . . . . . . . . . . . . . . . . . . . . . . . . . . . . 69
Out of Band Peaks . . . . . . . . . . . . . . . . . . . . . . . . . . . . . . . . . . . . . . . . . . . . 73
Adjust Sample Rate . . . . . . . . . . . . . . . . . . . . . . . . . . . . . . . . . . . . . . . . . . 73
Convert Sample Type . . . . . . . . . . . . . . . . . . . . . . . . . . . . . . . . . . . . . . . . . 75
Chapter 7
Chapter 8
View Menu – Edit View
Multitrack View . . . . . . . . . . . . . . . . . . . . . . . . . . . . . . . . . . . . . . . . . . . . . . 79
Waveform View . . . . . . . . . . . . . . . . . . . . . . . . . . . . . . . . . . . . . . . . . . . . . . 79
Spectral View . . . . . . . . . . . . . . . . . . . . . . . . . . . . . . . . . . . . . . . . . . . . . . . . 79
Show Organizer Window . . . . . . . . . . . . . . . . . . . . . . . . . . . . . . . . . . . . . 79
Show Cue List . . . . . . . . . . . . . . . . . . . . . . . . . . . . . . . . . . . . . . . . . . . . . . . . 80
Creating Cues and Ranges . . . . . . . . . . . . . . . . . . . . . . . . . . . . . . . . . . . . 81
Show Play List . . . . . . . . . . . . . . . . . . . . . . . . . . . . . . . . . . . . . . . . . . . . . . . . 84
Show Transport Buttons . . . . . . . . . . . . . . . . . . . . . . . . . . . . . . . . . . . . . . 85
Show Zoom Buttons . . . . . . . . . . . . . . . . . . . . . . . . . . . . . . . . . . . . . . . . .85
Show Time Window . . . . . . . . . . . . . . . . . . . . . . . . . . . . . . . . . . . . . . . . . .85
Show Sel/View Controls . . . . . . . . . . . . . . . . . . . . . . . . . . . . . . . . . . . . . . 85
Show Level Meters . . . . . . . . . . . . . . . . . . . . . . . . . . . . . . . . . . . . . . . . . . . 85
Show a Placekeeper . . . . . . . . . . . . . . . . . . . . . . . . . . . . . . . . . . . . . . . . . . 86
Display Time Format . . . . . . . . . . . . . . . . . . . . . . . . . . . . . . . . . . . . . . . . . 86
Vertical Scale Format . . . . . . . . . . . . . . . . . . . . . . . . . . . . . . . . . . . . . . . . . 88
Toolbars . . . . . . . . . . . . . . . . . . . . . . . . . . . . . . . . . . . . . . . . . . . . . . . . . . . . . 88
Status Bar . . . . . . . . . . . . . . . . . . . . . . . . . . . . . . . . . . . . . . . . . . . . . . . . . . . . 89
Wave Properties . . . . . . . . . . . . . . . . . . . . . . . . . . . . . . . . . . . . . . . . . . . . . . 89
Effects Menu – Edit View
Invert . . . . . . . . . . . . . . . . . . . . . . . . . . . . . . . . . . . . . . . . . . . . . . . . . . . . . . . . 97
Reverse . . . . . . . . . . . . . . . . . . . . . . . . . . . . . . . . . . . . . . . . . . . . . . . . . . . . . . 97
Page 7

vii
Silence . . . . . . . . . . . . . . . . . . . . . . . . . . . . . . . . . . . . . . . . . . . . . . . . . . . . . . . 97
Amplitude . . . . . . . . . . . . . . . . . . . . . . . . . . . . . . . . . . . . . . . . . . . . . . . . . . . 97
Amplify . . . . . . . . . . . . . . . . . . . . . . . . . . . . . . . . . . . . . . . . . . . . . . . . . . . . . . 97
Binaural Auto-Panner . . . . . . . . . . . . . . . . . . . . . . . . . . . . . . . . . . . . . . .100
Channel Mixer . . . . . . . . . . . . . . . . . . . . . . . . . . . . . . . . . . . . . . . . . . . . . .102
Dynamics Processing . . . . . . . . . . . . . . . . . . . . . . . . . . . . . . . . . . . . . . . .103
Envelope . . . . . . . . . . . . . . . . . . . . . . . . . . . . . . . . . . . . . . . . . . . . . . . . . . .109
Hard Limiting . . . . . . . . . . . . . . . . . . . . . . . . . . . . . . . . . . . . . . . . . . . . . . .110
Normalize . . . . . . . . . . . . . . . . . . . . . . . . . . . . . . . . . . . . . . . . . . . . . . . . . . .112
Pan/Expand . . . . . . . . . . . . . . . . . . . . . . . . . . . . . . . . . . . . . . . . . . . . . . . . .113
Stereo Field Rotate . . . . . . . . . . . . . . . . . . . . . . . . . . . . . . . . . . . . . . . . . .114
Delay Effects . . . . . . . . . . . . . . . . . . . . . . . . . . . . . . . . . . . . . . . . . . . . . . . .116
Chorus . . . . . . . . . . . . . . . . . . . . . . . . . . . . . . . . . . . . . . . . . . . . . . . . . . . . . .116
Delay . . . . . . . . . . . . . . . . . . . . . . . . . . . . . . . . . . . . . . . . . . . . . . . . . . . . . . .120
Dynamic Delay . . . . . . . . . . . . . . . . . . . . . . . . . . . . . . . . . . . . . . . . . . . . . .121
Echo . . . . . . . . . . . . . . . . . . . . . . . . . . . . . . . . . . . . . . . . . . . . . . . . . . . . . . . .123
Echo Chamber . . . . . . . . . . . . . . . . . . . . . . . . . . . . . . . . . . . . . . . . . . . . . .125
Flanger . . . . . . . . . . . . . . . . . . . . . . . . . . . . . . . . . . . . . . . . . . . . . . . . . . . . .128
Full Reverb . . . . . . . . . . . . . . . . . . . . . . . . . . . . . . . . . . . . . . . . . . . . . . . . . .130
Multitap Delay . . . . . . . . . . . . . . . . . . . . . . . . . . . . . . . . . . . . . . . . . . . . . .135
QuickVerb . . . . . . . . . . . . . . . . . . . . . . . . . . . . . . . . . . . . . . . . . . . . . . . . . .138
Reverb . . . . . . . . . . . . . . . . . . . . . . . . . . . . . . . . . . . . . . . . . . . . . . . . . . . . . .139
Sweeping Phaser . . . . . . . . . . . . . . . . . . . . . . . . . . . . . . . . . . . . . . . . . . . .141
DirectX . . . . . . . . . . . . . . . . . . . . . . . . . . . . . . . . . . . . . . . . . . . . . . . . . . . . .143
Filters . . . . . . . . . . . . . . . . . . . . . . . . . . . . . . . . . . . . . . . . . . . . . . . . . . . . . . .144
Dynamic EQ . . . . . . . . . . . . . . . . . . . . . . . . . . . . . . . . . . . . . . . . . . . . . . . .144
FFT Filter . . . . . . . . . . . . . . . . . . . . . . . . . . . . . . . . . . . . . . . . . . . . . . . . . . . .146
Graphic Equalizer . . . . . . . . . . . . . . . . . . . . . . . . . . . . . . . . . . . . . . . . . . .150
Graphic Phase Shifter . . . . . . . . . . . . . . . . . . . . . . . . . . . . . . . . . . . . . . .151
Notch Filter . . . . . . . . . . . . . . . . . . . . . . . . . . . . . . . . . . . . . . . . . . . . . . . . .153
Parametric Equalizer . . . . . . . . . . . . . . . . . . . . . . . . . . . . . . . . . . . . . . . .155
Quick Filter . . . . . . . . . . . . . . . . . . . . . . . . . . . . . . . . . . . . . . . . . . . . . . . . .157
Scientific Filters . . . . . . . . . . . . . . . . . . . . . . . . . . . . . . . . . . . . . . . . . . . . .158
Noise Reduction . . . . . . . . . . . . . . . . . . . . . . . . . . . . . . . . . . . . . . . . . . . .160
Click/Pop Eliminator . . . . . . . . . . . . . . . . . . . . . . . . . . . . . . . . . . . . . . . . .161
Clip Restoration . . . . . . . . . . . . . . . . . . . . . . . . . . . . . . . . . . . . . . . . . . . . .166
Hiss Reduction . . . . . . . . . . . . . . . . . . . . . . . . . . . . . . . . . . . . . . . . . . . . . .167
Page 8

viii
CONTENTS
Noise Reduction . . . . . . . . . . . . . . . . . . . . . . . . . . . . . . . . . . . . . . . . . . . .170
Special . . . . . . . . . . . . . . . . . . . . . . . . . . . . . . . . . . . . . . . . . . . . . . . . . . . . .175
Convolution . . . . . . . . . . . . . . . . . . . . . . . . . . . . . . . . . . . . . . . . . . . . . . . .175
Distortion . . . . . . . . . . . . . . . . . . . . . . . . . . . . . . . . . . . . . . . . . . . . . . . . . . .178
Music . . . . . . . . . . . . . . . . . . . . . . . . . . . . . . . . . . . . . . . . . . . . . . . . . . . . . . .179
Doppler Shifter . . . . . . . . . . . . . . . . . . . . . . . . . . . . . . . . . . . . . . . . . . . . .181
Pitch Bender . . . . . . . . . . . . . . . . . . . . . . . . . . . . . . . . . . . . . . . . . . . . . . . .183
Stretch . . . . . . . . . . . . . . . . . . . . . . . . . . . . . . . . . . . . . . . . . . . . . . . . . . . . . .185
Refresh Effects List . . . . . . . . . . . . . . . . . . . . . . . . . . . . . . . . . . . . . . . . . .187
Chapter 9
Chapter 10
Chapter 11
Chapter 12
Generate Menu – Edit View
Silence . . . . . . . . . . . . . . . . . . . . . . . . . . . . . . . . . . . . . . . . . . . . . . . . . . . . . .189
DTMF Signals . . . . . . . . . . . . . . . . . . . . . . . . . . . . . . . . . . . . . . . . . . . . . . .189
Noise . . . . . . . . . . . . . . . . . . . . . . . . . . . . . . . . . . . . . . . . . . . . . . . . . . . . . . .190
Generate Tones . . . . . . . . . . . . . . . . . . . . . . . . . . . . . . . . . . . . . . . . . . . . .192
Analyze Menu – Edit View
Show Frequency Analysis . . . . . . . . . . . . . . . . . . . . . . . . . . . . . . . . . . . .195
Show Phase Analysis . . . . . . . . . . . . . . . . . . . . . . . . . . . . . . . . . . . . . . . .197
Statistics . . . . . . . . . . . . . . . . . . . . . . . . . . . . . . . . . . . . . . . . . . . . . . . . . . . .199
General Tab . . . . . . . . . . . . . . . . . . . . . . . . . . . . . . . . . . . . . . . . . . . . . . . . .200
Histogram Tab . . . . . . . . . . . . . . . . . . . . . . . . . . . . . . . . . . . . . . . . . . . . . .201
Favorites Menu – Edit View
Edit Favorites . . . . . . . . . . . . . . . . . . . . . . . . . . . . . . . . . . . . . . . . . . . . . . .203
Function Tab . . . . . . . . . . . . . . . . . . . . . . . . . . . . . . . . . . . . . . . . . . . . . . . .204
Script Tab . . . . . . . . . . . . . . . . . . . . . . . . . . . . . . . . . . . . . . . . . . . . . . . . . . .205
Tool Tab . . . . . . . . . . . . . . . . . . . . . . . . . . . . . . . . . . . . . . . . . . . . . . . . . . . .205
Help Tab . . . . . . . . . . . . . . . . . . . . . . . . . . . . . . . . . . . . . . . . . . . . . . . . . . . .205
Options Menu – Edit View
Loop Mode . . . . . . . . . . . . . . . . . . . . . . . . . . . . . . . . . . . . . . . . . . . . . . . . .207
Timed Record . . . . . . . . . . . . . . . . . . . . . . . . . . . . . . . . . . . . . . . . . . . . . . .207
Monitor Record Level . . . . . . . . . . . . . . . . . . . . . . . . . . . . . . . . . . . . . . . .208
Show Levels on Play and Record . . . . . . . . . . . . . . . . . . . . . . . . . . . . .208
MIDI Trigger Enable . . . . . . . . . . . . . . . . . . . . . . . . . . . . . . . . . . . . . . . . .208
Page 9

ix
Synchronize Cursor Across Windows . . . . . . . . . . . . . . . . . . . . . . . . .208
Windows Recording Mixer . . . . . . . . . . . . . . . . . . . . . . . . . . . . . . . . . . .209
Scripts & Batch Processing . . . . . . . . . . . . . . . . . . . . . . . . . . . . . . . . . . .209
Batch Process . . . . . . . . . . . . . . . . . . . . . . . . . . . . . . . . . . . . . . . . . . . . . . .212
Settings . . . . . . . . . . . . . . . . . . . . . . . . . . . . . . . . . . . . . . . . . . . . . . . . . . . . .214
Mouse Wheel . . . . . . . . . . . . . . . . . . . . . . . . . . . . . . . . . . . . . . . . . . . . . . .215
System Tab . . . . . . . . . . . . . . . . . . . . . . . . . . . . . . . . . . . . . . . . . . . . . . . . . .216
Colors Tab . . . . . . . . . . . . . . . . . . . . . . . . . . . . . . . . . . . . . . . . . . . . . . . . . .218
Spectral Tab . . . . . . . . . . . . . . . . . . . . . . . . . . . . . . . . . . . . . . . . . . . . . . . . .219
Controls Tab . . . . . . . . . . . . . . . . . . . . . . . . . . . . . . . . . . . . . . . . . . . . . . . .220
Display Tab . . . . . . . . . . . . . . . . . . . . . . . . . . . . . . . . . . . . . . . . . . . . . . . . .220
Data Tab . . . . . . . . . . . . . . . . . . . . . . . . . . . . . . . . . . . . . . . . . . . . . . . . . . . .222
Multitrack Tab . . . . . . . . . . . . . . . . . . . . . . . . . . . . . . . . . . . . . . . . . . . . . . .224
SMPTE Tab . . . . . . . . . . . . . . . . . . . . . . . . . . . . . . . . . . . . . . . . . . . . . . . . . .228
Device Properties . . . . . . . . . . . . . . . . . . . . . . . . . . . . . . . . . . . . . . . . . . .229
Wave Out Tab . . . . . . . . . . . . . . . . . . . . . . . . . . . . . . . . . . . . . . . . . . . . . . .229
Wave In Tab . . . . . . . . . . . . . . . . . . . . . . . . . . . . . . . . . . . . . . . . . . . . . . . . .230
MIDI Out Tab . . . . . . . . . . . . . . . . . . . . . . . . . . . . . . . . . . . . . . . . . . . . . . . .231
MIDI In Tab . . . . . . . . . . . . . . . . . . . . . . . . . . . . . . . . . . . . . . . . . . . . . . . . . .232
Device Order . . . . . . . . . . . . . . . . . . . . . . . . . . . . . . . . . . . . . . . . . . . . . . . .232
Shortcuts (Keyboard & MIDI Triggers) . . . . . . . . . . . . . . . . . . . . . . . .236
Chapter 13
Navigating the Multitrack View
About Images . . . . . . . . . . . . . . . . . . . . . . . . . . . . . . . . . . . . . . . . . . . . . . .240
About Blocks . . . . . . . . . . . . . . . . . . . . . . . . . . . . . . . . . . . . . . . . . . . . . . . .241
About Session Files . . . . . . . . . . . . . . . . . . . . . . . . . . . . . . . . . . . . . . . . . .241
Navigating the Session Display . . . . . . . . . . . . . . . . . . . . . . . . . . . . . .241
Inserting Existing Audio Into Your Session . . . . . . . . . . . . . . . . . . . .242
Recording New Audio Into Your Session . . . . . . . . . . . . . . . . . . . . . .242
Track Controls . . . . . . . . . . . . . . . . . . . . . . . . . . . . . . . . . . . . . . . . . . . . . . .243
Session Display . . . . . . . . . . . . . . . . . . . . . . . . . . . . . . . . . . . . . . . . . . . . .248
Track Context Menu . . . . . . . . . . . . . . . . . . . . . . . . . . . . . . . . . . . . . . . . .249
Block Context Menu . . . . . . . . . . . . . . . . . . . . . . . . . . . . . . . . . . . . . . . . .258
About Busses . . . . . . . . . . . . . . . . . . . . . . . . . . . . . . . . . . . . . . . . . . . . . . .269
About Real-Time Effects . . . . . . . . . . . . . . . . . . . . . . . . . . . . . . . . . . . . .269
Page 10

CONTENTS
x
Chapter 14
Chapter 15
File Menu – Multitrack View
About Sessions . . . . . . . . . . . . . . . . . . . . . . . . . . . . . . . . . . . . . . . . . . . . . .273
New Session . . . . . . . . . . . . . . . . . . . . . . . . . . . . . . . . . . . . . . . . . . . . . . . .273
Open Session . . . . . . . . . . . . . . . . . . . . . . . . . . . . . . . . . . . . . . . . . . . . . . .274
Append to Session . . . . . . . . . . . . . . . . . . . . . . . . . . . . . . . . . . . . . . . . . .274
Close Session . . . . . . . . . . . . . . . . . . . . . . . . . . . . . . . . . . . . . . . . . . . . . . .275
Close Session and Waveforms . . . . . . . . . . . . . . . . . . . . . . . . . . . . . . .275
Close Only Non-Session Waveforms . . . . . . . . . . . . . . . . . . . . . . . . . .275
Open Waveform . . . . . . . . . . . . . . . . . . . . . . . . . . . . . . . . . . . . . . . . . . . .275
Save Session . . . . . . . . . . . . . . . . . . . . . . . . . . . . . . . . . . . . . . . . . . . . . . . .275
Save Session As . . . . . . . . . . . . . . . . . . . . . . . . . . . . . . . . . . . . . . . . . . . . .276
Save Mixdown As . . . . . . . . . . . . . . . . . . . . . . . . . . . . . . . . . . . . . . . . . . .277
Save Mixdown To Video As . . . . . . . . . . . . . . . . . . . . . . . . . . . . . . . . . .279
Save All . . . . . . . . . . . . . . . . . . . . . . . . . . . . . . . . . . . . . . . . . . . . . . . . . . . . .279
Default Session . . . . . . . . . . . . . . . . . . . . . . . . . . . . . . . . . . . . . . . . . . . . .279
Free Up Space in Temp Files . . . . . . . . . . . . . . . . . . . . . . . . . . . . . . . . .279
MRU List . . . . . . . . . . . . . . . . . . . . . . . . . . . . . . . . . . . . . . . . . . . . . . . . . . . .280
Exit . . . . . . . . . . . . . . . . . . . . . . . . . . . . . . . . . . . . . . . . . . . . . . . . . . . . . . . . .280
View Menu – Multitrack View
Edit Waveform View . . . . . . . . . . . . . . . . . . . . . . . . . . . . . . . . . . . . . . . .281
Show Pan Envelopes . . . . . . . . . . . . . . . . . . . . . . . . . . . . . . . . . . . . . . . .281
Show Volume Envelopes . . . . . . . . . . . . . . . . . . . . . . . . . . . . . . . . . . . .281
Show Wet/Dry Mix Envelopes . . . . . . . . . . . . . . . . . . . . . . . . . . . . . . . .282
Show FX Parameter Envelopes . . . . . . . . . . . . . . . . . . . . . . . . . . . . . . .282
Show Tempo Envelopes . . . . . . . . . . . . . . . . . . . . . . . . . . . . . . . . . . . . .283
Enable Envelope Editing . . . . . . . . . . . . . . . . . . . . . . . . . . . . . . . . . . . .283
Enable Block Edge Dragging . . . . . . . . . . . . . . . . . . . . . . . . . . . . . . . . .283
Session Properties . . . . . . . . . . . . . . . . . . . . . . . . . . . . . . . . . . . . . . . . . .284
Show Mixers Window . . . . . . . . . . . . . . . . . . . . . . . . . . . . . . . . . . . . . . .284
Tracks Mixer Tab . . . . . . . . . . . . . . . . . . . . . . . . . . . . . . . . . . . . . . . . . . . . .286
Bus Mixer Tab . . . . . . . . . . . . . . . . . . . . . . . . . . . . . . . . . . . . . . . . . . . . . . .289
Show Track EQ Window . . . . . . . . . . . . . . . . . . . . . . . . . . . . . . . . . . . . .290
Show Track Properties . . . . . . . . . . . . . . . . . . . . . . . . . . . . . . . . . . . . . . .291
Show Organizer Window . . . . . . . . . . . . . . . . . . . . . . . . . . . . . . . . . . . .293
Show Cue List . . . . . . . . . . . . . . . . . . . . . . . . . . . . . . . . . . . . . . . . . . . . . . .293
Show Transport Buttons . . . . . . . . . . . . . . . . . . . . . . . . . . . . . . . . . . . . .294
Page 11

xi
Show Zoom Buttons . . . . . . . . . . . . . . . . . . . . . . . . . . . . . . . . . . . . . . . .294
Show Time Window . . . . . . . . . . . . . . . . . . . . . . . . . . . . . . . . . . . . . . . . .294
Show Sel/View Controls . . . . . . . . . . . . . . . . . . . . . . . . . . . . . . . . . . . . .294
Show Level Meters . . . . . . . . . . . . . . . . . . . . . . . . . . . . . . . . . . . . . . . . . .294
Show Load Meter . . . . . . . . . . . . . . . . . . . . . . . . . . . . . . . . . . . . . . . . . . .294
Show Video Window . . . . . . . . . . . . . . . . . . . . . . . . . . . . . . . . . . . . . . . .295
Show a Placekeeper . . . . . . . . . . . . . . . . . . . . . . . . . . . . . . . . . . . . . . . . .295
Display Time Format . . . . . . . . . . . . . . . . . . . . . . . . . . . . . . . . . . . . . . . .295
Toolbars . . . . . . . . . . . . . . . . . . . . . . . . . . . . . . . . . . . . . . . . . . . . . . . . . . . .295
Status Bar . . . . . . . . . . . . . . . . . . . . . . . . . . . . . . . . . . . . . . . . . . . . . . . . . . .295
Advanced Session Properties . . . . . . . . . . . . . . . . . . . . . . . . . . . . . . . .296
Chapter 16
Edit Menu – Multitrack View
Undo . . . . . . . . . . . . . . . . . . . . . . . . . . . . . . . . . . . . . . . . . . . . . . . . . . . . . . .301
Edit Waveform (Wave Block Only) . . . . . . . . . . . . . . . . . . . . . . . . . . . .301
Loop Properties (Wave Block Only) . . . . . . . . . . . . . . . . . . . . . . . . . .301
Allow Multiple Takes (Wave Block Only) . . . . . . . . . . . . . . . . . . . . . .301
Take History (Wave Block Only) . . . . . . . . . . . . . . . . . . . . . . . . . . . . . .302
Adjust Wave Volume (Wave Block Only) . . . . . . . . . . . . . . . . . . . . . .302
Adjust Wave Pan (Wave Block Only) . . . . . . . . . . . . . . . . . . . . . . . . . .302
Wave Block Properties (Wave Block Only) . . . . . . . . . . . . . . . . . . . .303
Transpose (MIDI Block Only) . . . . . . . . . . . . . . . . . . . . . . . . . . . . . . . . .304
Set Tempo (MIDI Block Only) . . . . . . . . . . . . . . . . . . . . . . . . . . . . . . . . .304
Zoom in/Zoom out (MIDI Block Only) . . . . . . . . . . . . . . . . . . . . . . . .304
Active Track (MIDI Block Only) . . . . . . . . . . . . . . . . . . . . . . . . . . . . . . .304
Set Controller 7 (MIDI Block Only) . . . . . . . . . . . . . . . . . . . . . . . . . . . .305
Mix Down to File . . . . . . . . . . . . . . . . . . . . . . . . . . . . . . . . . . . . . . . . . . . .305
Mix Down to Empty Track N (Bounce) . . . . . . . . . . . . . . . . . . . . . . . .305
Group Blocks . . . . . . . . . . . . . . . . . . . . . . . . . . . . . . . . . . . . . . . . . . . . . . .306
Group Color . . . . . . . . . . . . . . . . . . . . . . . . . . . . . . . . . . . . . . . . . . . . . . . . .306
Block Color . . . . . . . . . . . . . . . . . . . . . . . . . . . . . . . . . . . . . . . . . . . . . . . . .306
Punch In . . . . . . . . . . . . . . . . . . . . . . . . . . . . . . . . . . . . . . . . . . . . . . . . . . . .306
Crossfade . . . . . . . . . . . . . . . . . . . . . . . . . . . . . . . . . . . . . . . . . . . . . . . . . . .307
Loop Duplicate . . . . . . . . . . . . . . . . . . . . . . . . . . . . . . . . . . . . . . . . . . . . . .308
Convert to Unique Copy . . . . . . . . . . . . . . . . . . . . . . . . . . . . . . . . . . . . .309
Mute Blocks . . . . . . . . . . . . . . . . . . . . . . . . . . . . . . . . . . . . . . . . . . . . . . . .310
Lock in Time . . . . . . . . . . . . . . . . . . . . . . . . . . . . . . . . . . . . . . . . . . . . . . . .310
Page 12

xii
CONTENTS
Lock for Play Only . . . . . . . . . . . . . . . . . . . . . . . . . . . . . . . . . . . . . . . . . . .310
Split . . . . . . . . . . . . . . . . . . . . . . . . . . . . . . . . . . . . . . . . . . . . . . . . . . . . . . . .310
Merge/Rejoin Split . . . . . . . . . . . . . . . . . . . . . . . . . . . . . . . . . . . . . . . . . .310
Align Left . . . . . . . . . . . . . . . . . . . . . . . . . . . . . . . . . . . . . . . . . . . . . . . . . . .311
Align Right . . . . . . . . . . . . . . . . . . . . . . . . . . . . . . . . . . . . . . . . . . . . . . . . . . 311
Adjust Boundaries . . . . . . . . . . . . . . . . . . . . . . . . . . . . . . . . . . . . . . . . . . .311
Trim . . . . . . . . . . . . . . . . . . . . . . . . . . . . . . . . . . . . . . . . . . . . . . . . . . . . . . . . 311
Cut . . . . . . . . . . . . . . . . . . . . . . . . . . . . . . . . . . . . . . . . . . . . . . . . . . . . . . . . .312
Full . . . . . . . . . . . . . . . . . . . . . . . . . . . . . . . . . . . . . . . . . . . . . . . . . . . . . . . . .312
Remove Blocks . . . . . . . . . . . . . . . . . . . . . . . . . . . . . . . . . . . . . . . . . . . . .312
Destroy Blocks (remove & close) . . . . . . . . . . . . . . . . . . . . . . . . . . . . .312
Select All Blocks . . . . . . . . . . . . . . . . . . . . . . . . . . . . . . . . . . . . . . . . . . . .312
Select All Blocks in Track N . . . . . . . . . . . . . . . . . . . . . . . . . . . . . . . . . . .312
Insert/Delete Time . . . . . . . . . . . . . . . . . . . . . . . . . . . . . . . . . . . . . . . . . .313
Group Waveform Normalize . . . . . . . . . . . . . . . . . . . . . . . . . . . . . . . . .313
Snapping . . . . . . . . . . . . . . . . . . . . . . . . . . . . . . . . . . . . . . . . . . . . . . . . . . .313
Refresh Now . . . . . . . . . . . . . . . . . . . . . . . . . . . . . . . . . . . . . . . . . . . . . . . .314
Check For Hidden Blocks . . . . . . . . . . . . . . . . . . . . . . . . . . . . . . . . . . . .314
Chapter 17
Chapter 18
Chapter 19
Insert Menu – Multitrack View
Wave from File . . . . . . . . . . . . . . . . . . . . . . . . . . . . . . . . . . . . . . . . . . . . . .315
MIDI from File . . . . . . . . . . . . . . . . . . . . . . . . . . . . . . . . . . . . . . . . . . . . . . .315
Video from File . . . . . . . . . . . . . . . . . . . . . . . . . . . . . . . . . . . . . . . . . . . . . .315
Audio from Video File . . . . . . . . . . . . . . . . . . . . . . . . . . . . . . . . . . . . . . .316
Currently Open Waveform List . . . . . . . . . . . . . . . . . . . . . . . . . . . . . . .316
File/Cue List . . . . . . . . . . . . . . . . . . . . . . . . . . . . . . . . . . . . . . . . . . . . . . . . .316
Effects Menu – Multitrack View
Envelope Follower . . . . . . . . . . . . . . . . . . . . . . . . . . . . . . . . . . . . . . . . . .317
Frequency Band Splitter . . . . . . . . . . . . . . . . . . . . . . . . . . . . . . . . . . . . .320
Vocoder . . . . . . . . . . . . . . . . . . . . . . . . . . . . . . . . . . . . . . . . . . . . . . . . . . . .322
Options Menu – Multitrack View
Loop Mode . . . . . . . . . . . . . . . . . . . . . . . . . . . . . . . . . . . . . . . . . . . . . . . . .325
Monitor Record Level(s) . . . . . . . . . . . . . . . . . . . . . . . . . . . . . . . . . . . . .325
Show Levels on Play and Record . . . . . . . . . . . . . . . . . . . . . . . . . . . . .325
Page 13

MIDI Trigger Enable . . . . . . . . . . . . . . . . . . . . . . . . . . . . . . . . . . . . . . . . .325
MIDI Panic Button . . . . . . . . . . . . . . . . . . . . . . . . . . . . . . . . . . . . . . . . . .325
Synchronize Blocks with Edit View . . . . . . . . . . . . . . . . . . . . . . . . . . .326
SMPTE Slave Enable . . . . . . . . . . . . . . . . . . . . . . . . . . . . . . . . . . . . . . . . .326
SMPTE Master Enable . . . . . . . . . . . . . . . . . . . . . . . . . . . . . . . . . . . . . . .326
SMPTE Start Offset . . . . . . . . . . . . . . . . . . . . . . . . . . . . . . . . . . . . . . . . . .326
Sample Accurate Sync . . . . . . . . . . . . . . . . . . . . . . . . . . . . . . . . . . . . . . .327
Pause Background Mixing . . . . . . . . . . . . . . . . . . . . . . . . . . . . . . . . . .327
Metronome . . . . . . . . . . . . . . . . . . . . . . . . . . . . . . . . . . . . . . . . . . . . . . . .327
Windows Recording Mixer . . . . . . . . . . . . . . . . . . . . . . . . . . . . . . . . . . .327
Settings . . . . . . . . . . . . . . . . . . . . . . . . . . . . . . . . . . . . . . . . . . . . . . . . . . . . .327
Device Properties . . . . . . . . . . . . . . . . . . . . . . . . . . . . . . . . . . . . . . . . . . .328
Device Order . . . . . . . . . . . . . . . . . . . . . . . . . . . . . . . . . . . . . . . . . . . . . . . .328
Shortcuts (Keyboard & MIDI Triggers) . . . . . . . . . . . . . . . . . . . . . . . .328
xiii
Chapter 20
Appendix A
Appendix B
Multichannel Encoder
Multichannel Encoder Requirements . . . . . . . . . . . . . . . . . . . . . . . .329
Elements of the Multichannel Encoder . . . . . . . . . . . . . . . . . . . . . . .329
Opening Encoded and Exported files back in Adobe Audition 343
Keyboard Shortcuts
File Menu Shortcuts . . . . . . . . . . . . . . . . . . . . . . . . . . . . . . . . . . . . . . . . .346
Edit Menu Shortcuts . . . . . . . . . . . . . . . . . . . . . . . . . . . . . . . . . . . . . . . .346
Scroll/Select Shortcuts . . . . . . . . . . . . . . . . . . . . . . . . . . . . . . . . . . . . . .348
View Menu Shortcuts . . . . . . . . . . . . . . . . . . . . . . . . . . . . . . . . . . . . . . .349
Analyze Menu Shortcuts . . . . . . . . . . . . . . . . . . . . . . . . . . . . . . . . . . . . .350
Options Menu Shortcuts . . . . . . . . . . . . . . . . . . . . . . . . . . . . . . . . . . . .350
Transport Shortcuts . . . . . . . . . . . . . . . . . . . . . . . . . . . . . . . . . . . . . . . . .350
Help Menu Shortcuts . . . . . . . . . . . . . . . . . . . . . . . . . . . . . . . . . . . . . . . .351
Keyboard Shortcuts Dialog . . . . . . . . . . . . . . . . . . . . . . . . . . . . . . . . . .351
Glossary . . . . . . . . . . . . . . . . . . . . . . . . . . . . . . . . . . . . . . . . . . . . . . . . . . .353
Index . . . . . . . . . . . . . . . . . . . . . . . . . . . . . . . . . . . . . . . . . . . . . . . . . . . . . . .367
Page 14

xiv
CONTENTS
Page 15

Introduction
elcome to Adobe Audition, the complete multitrack digital audio recorder, editor, and mixer for Windows
98, ME, 2000, and XP. The combination of Adobe Audition and any Windows sound card puts the power of
W
Adobe Audition.
Getting Help
Adobe provides a variety of options you can use to learn Adobe Audition, including printed guides, online Help, and tool
tips. You can also access a host of continually updated Web resources for learning Adobe Audition, from tips and tutorials
to tech support information.
an entire digital recording studio at your fingertips. So start making some great sounds, and thanks for using
1
If you . . . Try this . . .
Want information about installing Adobe Audition
Are new to digital audio editors
Are looking for a detailed information about a feature
Want a complete list of keyboard
shortcuts
Want answers to common troubleshooting questions
Follow the on-screen installation instructions. For more detailed information, see
the HowToInstall file on the CD.
See the “Looking at the Work Area” chapter to get familiar with the work area
•
and tools.
Use the Adobe Audition tool tips feature to help identify tools, buttons, and
•
palette controls as you work in Adobe Audition.
Search for the feature in Help or look it up in the index.
See the Keyboard Shortcuts chapter.
Search the Adobe Support Knowledgebase and Adobe Audition Top Issues,
which you can access from Adobe’s Web site at www.adobe.com/support/products/audition.html.
Registration
In order for Adobe to provide you with the highest quality software, offer technical support, and inform you about new
Adobe Audition software developments, please register your application. When you first start the Adobe Audition application, you’re prompted to register online. You can choose to submit the form directly or fax a printed copy. You can also
register by filling out and returning the registration card included with your software package.
Customer support
When you register your product, you may be entitled to technical support. Terms may vary depending on your country
of residence. For more information, refer to the technical support card provided with the Adobe Audition documentation.
Page 16

Adobe also provides several forms of automated technical support:
See the ReadMe file installed with the program for information that became available after
•
this guide went to press.
See the Adobe Audition support page for information on top support issues and trouble-
•
shooting information for common problems.
Page 17

Adobe Audition at a Glance
dobe Audition software is a professional audio editing and mixing environment. Designed for audio and video
professionals in studios, broadcast facilities, and post-production facilities, Adobe Audition delivers advanced
A
audio files, create loops, and use more than 45 DSP (digital signal processing) effects. Adobe Audition is a complete
multitrack recording studio that offers a flexible workflow coupled with exceptional ease of use. Whether you’re
producing music, radio broadcasts, or audio for video, the precise tools in Adobe Audition give you the power to create
rich, nuanced audio of the highest possible quality. A complete solution for digital audio, Adobe Audition lets you:
audio mixing, editing, mastering, and effects-processing capabilities. Mix up to 128 tracks, edit individual
3
Sound your best
whether your destination is tape, CD, DVD, or DVD-Audio, Adobe Audition is up to the task. All processing is done at
32-bit resolution for the highest quality sound.
Work efficiently
and efficiently. An accessible interface helps you to get up and running in no time, and dockable pallets enable you to
arrange your workspace to match a project’s needs.
Use integrated tools
and edit views, real-time effects, looping support, analysis tools, restoration features, and video support provide the
power you need in a fully integrated audio toolset.
Adobe Audition supports files with bit depths of up to 32-bit and sample rates in excess of 192 kHz, so
Adobe Audition puts all the tools you need at your fingertips so that you can get your work done quickly
Adobe Audition provides an all-in-one audio editing and mixing solution. Integrated multitrack
Sound Your Best
Adobe Audition enhances your sound with the following advanced audio features:
Highest-quality audio
standard rates such as 44.1kHz, 88.2kHz, 96kHz, and 192kHz. Support for 24-bit/96kHz recording ensures DVD-ready
sound.
Sample-accurate editing
be automatically snapped to zero crossings; short crossfades can be added for smooth, pop-free cuts every time and quick
fades can be added using keyboard shortcuts. Check for in-phase material and mono compatibility in the Phase Analysis
window, and use the Frequency Analysis window to take snapshots of frequency (FFT) data and export that information
to the clipboard.
Powerful DSP tools and effects
restoration features. Adobe Audition includes standard effects such as Reverb, Delay, Dynamics Processing, and Flange,
as well as advanced processing such as Parametric Equalizer, Scientific Filters, Doppler Shifter, Hard Limiting, Noise
Reduction (including click and pop elimination), and Time/Pitch stretch. Adobe Audition also supports third-party
DirectX plug-ins.
Record, edit, and mix high-resolution 32-bit files using any sample rate up to 10 MHz, including
Be as precise in your cuts as you like. Edits can be accurate down to the sample level and can
Work with more than 45 DSP tools and effects, mastering and analysis tools, and audio
Page 18

4
Adobe Audition at a Glance
Precise sample rate conversion
Convert audio sample rates with confidence: transparent sample-rate conversion
guarantees that if you need to change the sample rate of audio, it will sound its best. Ideal for taking CD material at
44.1kHz and upsampling it to 48kHz for video or 96kHz for DVD.
Automation envelopes
Create smooth volume, pan, effects parameter, and wet/dry transitions for clips in a multitrack
mix using sample-accurate automation envelopes or “rubber bands.” Envelope curves can be adjusted using splines to
produce gradual, non-linear transitions.
Customizable dithering
Convert high-bit-rate material to lower resolution formats without introducing audible
artifacts. User-definable dither depth and a wide array of Noise Shaping curves assure that your audio will retain its
character and definition.
High-quality stretching
Change tempo without shifting pitch or shift pitch without changing tempo thanks to highquality stretch support.
Work Efficiently
Adobe Audition increases your productivity with extensive customization and performance options:
Customizable workspace
configured to meet your production needs. For example, create default sessions that can be called up as templates for
projects that share similar configurations.
Real-time effects
CPU usage, lock a track to cache the rendered effect; unlock it instantly to make adjustments.
Integration with Adobe Premiere
Effects into Audition with the Edit Original command. WAV files are stamped with session data, so Audition can
automatically open the session that created the WAV file you are using in the other software.
Get up and running quickly using an interface that is dockable, resizable, and can be
Process effects in real-time instead of waiting for each effect to render before moving on. To reduce
®
Pro and Adobe After Effects
®
Send your audio from Adobe Premiere Pro or After
Organizer window
Keep your project resources at your fingertips using the Organizer window, where you can quickly
access currently open audio, MIDI, and video files; available effects; and favorites.
Batch file processing
Use the dedicated batch-processing wizard to easily convert large numbers of files among different
sample rates, bit depths, and file formats. Also, automate repetitive tasks with scripts.
Surround sound support
Use the multichannel encoder to create a surround mix from any session in the multitrack
view, then export the mix as a 6-channel wave, six mono waves, or a multichannel WMA 9 file.
Favorites
Use Favorites to build a customized collection of commands, scripts, effects, and external software tools.
Favorites appear in the Organizer window and the Favorites menu, and can be assigned keyboard shortcuts for quick
access.
Precise analysis tools
Work with built-in analysis tools (frequency analysis, phase analysis, statistics, and spectral view)
in real-time while editing to save time and see your audio characteristics from edit to edit.
Page 19

Use Integrated Tools
Adobe Audition integrates many powerful digital audio tools:
5
ADOBE AUDITION
User Guide
Complete toolkit for digital audio
Handle all of your digital audio editing tasks within a single application: Audition
includes an integrated multitrack mixing view, a mono and stereo waveform editing view, effects support, and looping
capabilities.
Powerful multitrack editing
Use the multitrack view for recording, mixing, and editing sessions with up to 128 stereo
tracks. Apply volume, pan, and effects automation envelopes, use real-time effects and EQ on every track, play back AVI
and MIDI files, and more.
Audio for video
Open AVI files in the multitrack view and use all of the audio tools available in Adobe Audition on the
soundtrack. This means you can do anything from creating a totally new soundtrack, to sweetening the recording you
already have, to reducing noise on the current soundtrack.
Loop-based soundtrack creation
Use flexible looping tools to quickly construct high-quality music for songs or movie
soundtracks. Loops automatically match global session tempo and key to produce dynamic musical performances.
Thousands of royalty-free production music loops
Adobe Audition includes thousands of original, performance-based
loops in a wide range of musical genres that you can combine to create your own music beds, songs, soundtracks, and
more. Styles include Classical and Orchestral, Blues, Cocktail Jazz, Bossa Nova, Rockabilly, 70s Funk, Lounge, Dub
Reggae, Ska, Alternative Rock, Techno, Ambient, and World Music.
Broad file-format support
Work with files that arrive from a wide array of sources and deliver files in the audio format
you need: Audition supports more than twenty file formats and variations, including Windows PCM (wav), AIFF, MP3,
mp3PRO, and WMA 9.
Page 20

6
Adobe Audition at a Glance
Page 21

Chapter 1: Key Concepts of Adobe
Audition
o get the most out of Adobe Audition, you should be familiar with some of its general operating concepts. The
following information should help you to understand Adobe Audition’s working model in a few key areas.
T
Destructive and Non-Destructive Editing
Being a software-based audio system, Adobe Audition deals with audio in a digital form, meaning that an analog
waveform (such as your voice saying “hello”) is converted, or sampled, into a binary representation. This sampled
waveform then exists as a waveform on your computer’s hard drive. When you put together a song or audio presentation
in Adobe Audition, waveforms are your building blocks, much as text files are your building blocks when you use a word
processor to compose a book.
7
One key point is the way in which an audio program operates on a waveform. There are two kinds of computer-based
audio editing: destructive and non-destructive.
•
Destructive editing simply means that edits (cutting, pasting, adding reverb, etc.) are applied directly to the waveform,
so that the original audio data changes.
•
Non-destructive editing implies that the file on disk is not actually altered; instead, each “edit” is stored as an
instruction to be applied to the file. For example, in destructive editing, a change in audio volume would actually alter
the amplitude of a waveform, whereas in non-destructive editing, the volume change would consist of commands that
essentially instruct the program to “get louder at this point”.
Adobe Audition employs both destructive and non-destructive editing methods. However, in Adobe Audition, even
“destructive” edits aren’t applied directly to the waveform in use until you save the file. In essence, Adobe Audition uses
“delayed destructive editing”.
When you open a waveform in Adobe Audition, it places a copy of the file in a temporary folder, and it uses that copy for
editing. The original file remains unaltered until you choose to save any changes you’ve made (by choosing Save from
the File menu, for example). When you save your changes, Adobe Audition overwrites the original file with what you’ve
done to the copy. Therefore, destructive edits in Adobe Audition don’t directly affect your original waveform when you
perform them.
•
Edits performed in Adobe Audition’s Edit View like cutting, pasting, and applying effects (such as Reverb or Limiting)
are destructive in nature, so when you save your file again, those edits are applied to the waveform itself.
•
Edits made in the Multitrack View, such as a cut, split, or volume change, are non-destructive. The use of real-time
effects in Multitrack View is non-destructive as well.
Page 22

CHAPTER 1
8
Key Concepts of Adobe Audition
This same model of delayed destructive editing also enables Adobe Audition to offer multiple levels of Undo. When you
apply destructive edits to a waveform, Adobe Audition retains a copy of the file as it exists before the edit. It does this for
each edit you perform, enabling you to travel back through your edits to previous states of the waveform.
Multiple Undo gives you tremendous freedom in working on waveforms without having to worry about destructiveness
in the least. However, it also requires additional hard drive space to store these copies. (Copies are automatically deleted
from your hard drive when you close a file or exit the program.) You can disable the Undo feature if your disk space runs
too low.
Real-Time Preview
In the Edit View, Adobe Audition offers real-time preview for many of its effects. This means that you can monitor the
processed signal before applying the effect to the waveform. (Remember: the effect is actually applied to a copy of the
waveform, and can be freely undone.) The preview feature updates in real time, meaning that changes you make to effect
parameters while in the dialog for that effect become audible immediately, while the audio is playing. Keep in mind,
however, that your system’s performance affects the preview feature. On slower systems, some effects may tend to break
up or skip during preview. In multitrack the preview is not necessary, as effects are used non-destructively. Basically,
every effect in the Multitrack View is in preview all the time.
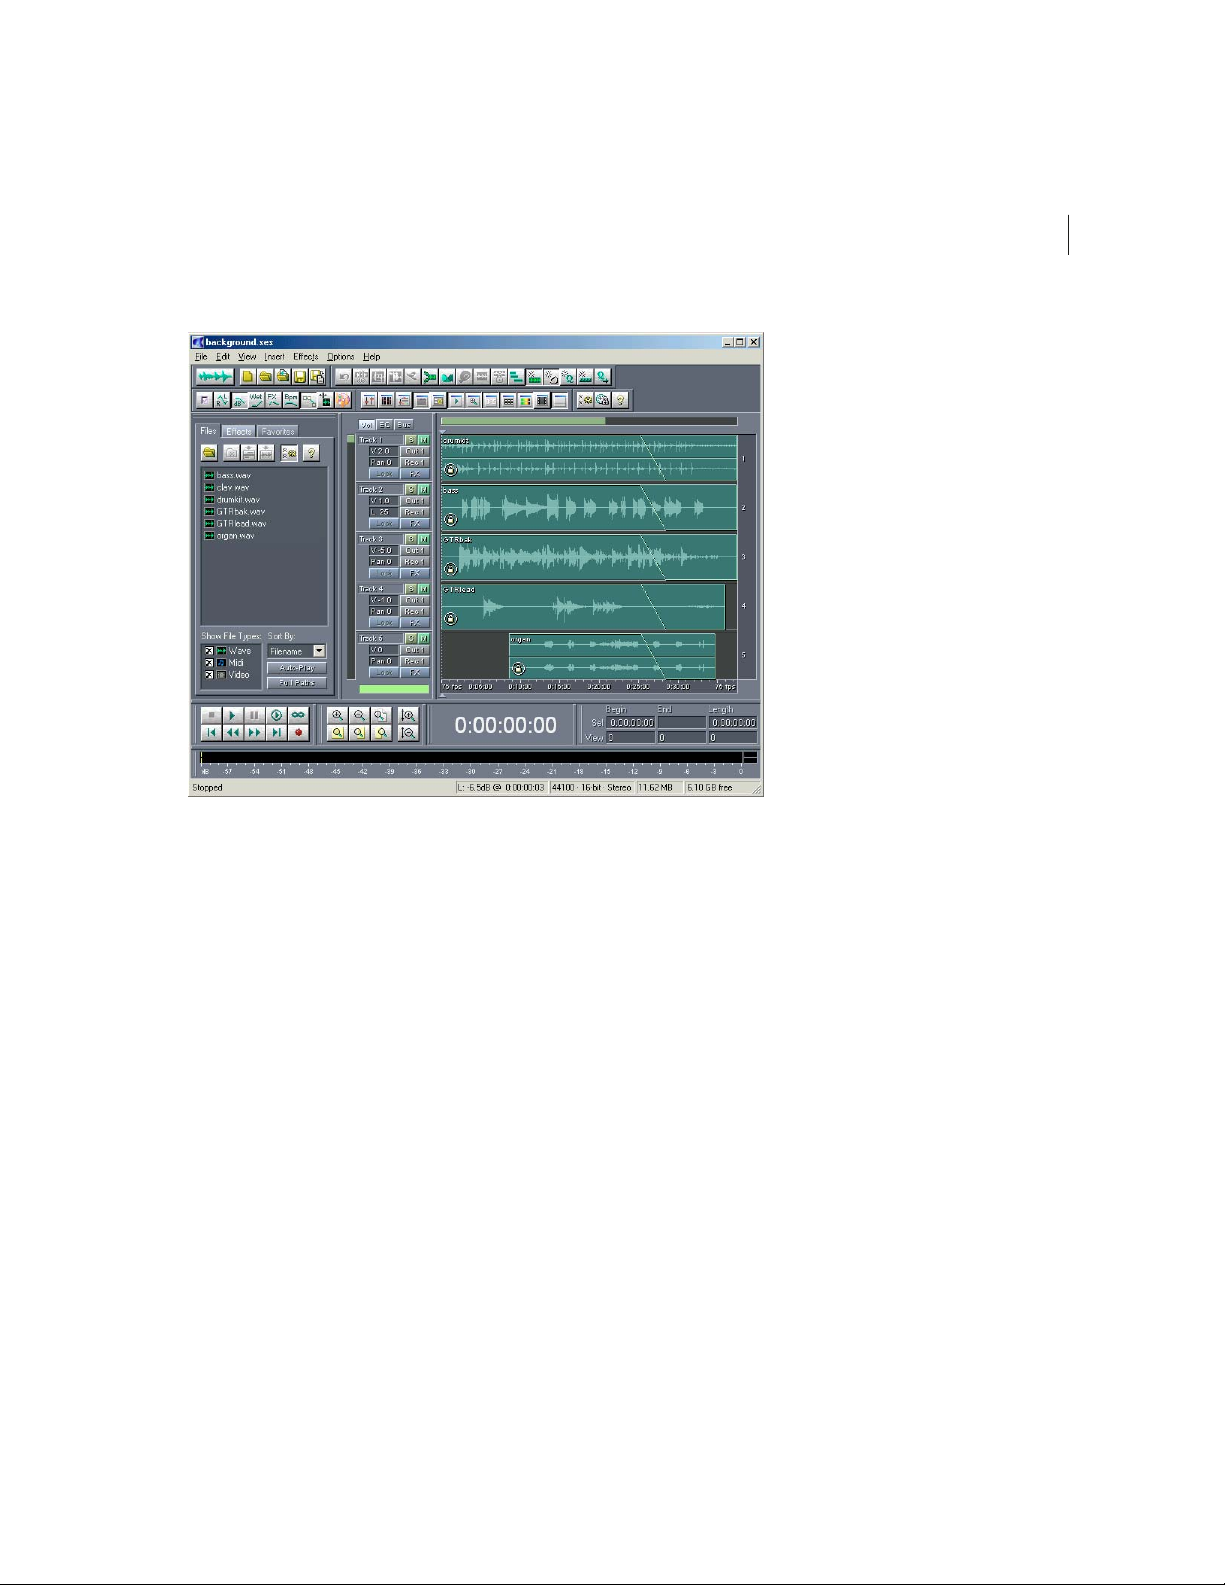
Multitrack
Adobe Audition’s multitrack environment enables you to place multiple waveforms, MIDI files, and video soundtracks
into different tracks for simultaneous playback and mixdown. No matter which type of audio you use, each sound
instance in Adobe Audition’s Multitrack View is referred to as a “block.”
The mixing process involves combining the audio of all of the placed blocks into two or more channels for output.
Because you can edit, add, and subtract blocks in the multitrack environment, Adobe Audition must constantly watch
for changes to the multitrack session, such as a moved or deleted sound file, a volume change, or new material recorded
into a track. When something is altered, Adobe Audition must immediately work that change into the mixed output, and
it does so through background mixing. Background mixing occurs behind the scenes and is generally very fast. The faster
your system – especially your CPU and hard drive(s) – the faster Adobe Audition can mix in the background.
The Mix Gauge at the bottom of the Track Controls in the Multitrack View shows how far along Adobe Audition is in
the process of mixing your session. The meter goes from “empty” to “full” as it mixes the session, and it turns a bright
color when the entire session is fully mixed. You can think of this meter as a “ready” indicator. However, you need not
wait for the meter to reach completion entirely before beginning playback. As stated above, Adobe Audition continuously
mixes, and will continue to do so while playing, so you can safely begin playback when the Mix Gauge meter is about
halfway up.
Page 23

9
ADOBE AUDITION
User Guide
In general, if the background mix is not sufficiently complete, you’ll hear a break-up or skipping when playing back the
mix. If that happens, just wait a few seconds – Adobe Audition will usually catch up very quickly, and you can begin
playing again. Your audio might also start to break up if you are using real-time effects in multitrack view and your
system cannot keep up with the processing. If this happens, try using the Lock feature on some of your effected tracks to
mix the effects into the background mix and take some load off of your CPU.
Playback can be directed to a pair of outputs (as in a single stereo sound card) or to multiple outputs (as in multiple
stereo sound cards, or a single card with multiple outputs). Adobe Audition produces a mix for each set of outputs used.
If you’re using one stereo sound card, Adobe Audition generates just one mix, but if you have multiple outputs, it must
create a separate mix for each output device (typically a stereo pair). The additional mixing required for multiple outputs
demands more processing power and therefore tends to slow down the mixing process.
Session Files
In addition to waveforms, MIDI files, and video soundtracks, Adobe Audition also makes use of a type of file called a
session file. Session files (.ses) are very small in size and simply contain the details of your Adobe Audition multitrack
session, as in what audio and video files are used and where, the volume and pan levels, the names of the tracks, what
real-time effects are used, etc. With this in mind, you cannot simply copy a session file to a floppy disk and have a friend
open it up and play it.
For example, if you create a session with a file called C:\Music\hihat.wav, and later use another program (like Explorer)
to move hihat.wav to a new folder called C:\Music\Drums, Adobe Audition won’t know that you moved the file the next
time you load the session. Try to keep this in mind as you manage your audio elements and session files so that you don’t
end up losing tracks or objects inside your sessions.
If you want to move an entire session file and all of its embedded audio elements to a new directory, choose File > Save
Session As, and select Save Copies of All Associated Files.
Working with Premiere Pro and After Effects
You can easily move projects between Adobe Audition and Adobe’s video applications by using the Edit Original
command in Premiere Pro and After Effects. To enhance the functionality of this command, you can configure Adobe
Audition to link mixdown files with related session files so you can quickly edit and remix soundtracks. To link mixdown
and session files, choose Options > Settings, click the Data tab, and select Embed Project Link Data for Edit Original
Functionality.
Page 24

CHAPTER 1
10
Key Concepts of Adobe Audition
Page 25

Y
Chapter 2: Looking at the Work Area
ou might think of Adobe Audition as two major audio programs in one. It’s a powerful single-waveform editor
that can be used to play, record, modify, and process mono and stereo waveforms. And Adobe Audition can also
digitally record and mix numerous audio files (using up to 128 tracks) to either a single sound card or multiple
sound cards, while providing for real-time effects and level/pan mix adjustments in a non-destructive editing
environment.
This chapter is meant to be a brief introduction to the various navigation and functional controls of this deceptively
simple – yet powerful – program. Here we’ll concentrate on the major interface elements that are common between
Adobe Audition’s two major work areas: Edit View and Multitrack View. Parts of the program that are more specific to
either area will be covered in subsequent chapters.
11
Adobe Audition makes liberal use of your mouse’s right button. Whenever you see a simple function button, control,
window, or waveform action, try right-clicking it. Chances are you’ll be surprised by a useful shortcut menu or a set of
handy options that can make Adobe Audition’s operation even easier.
Edit View and Multitrack View
Adobe Audition offers two major workspaces: Edit View and Multitrack View. While in Edit View, Adobe Audition can
be thought of as being a single-waveform editor that can be used to record, edit, and process mono and stereo waveforms.
Audio files can be saved to disk (including CDs), or played back through any sound card that has been installed within
your computer.
Page 26
CHAPTER 2
12
Looking at the Work Area
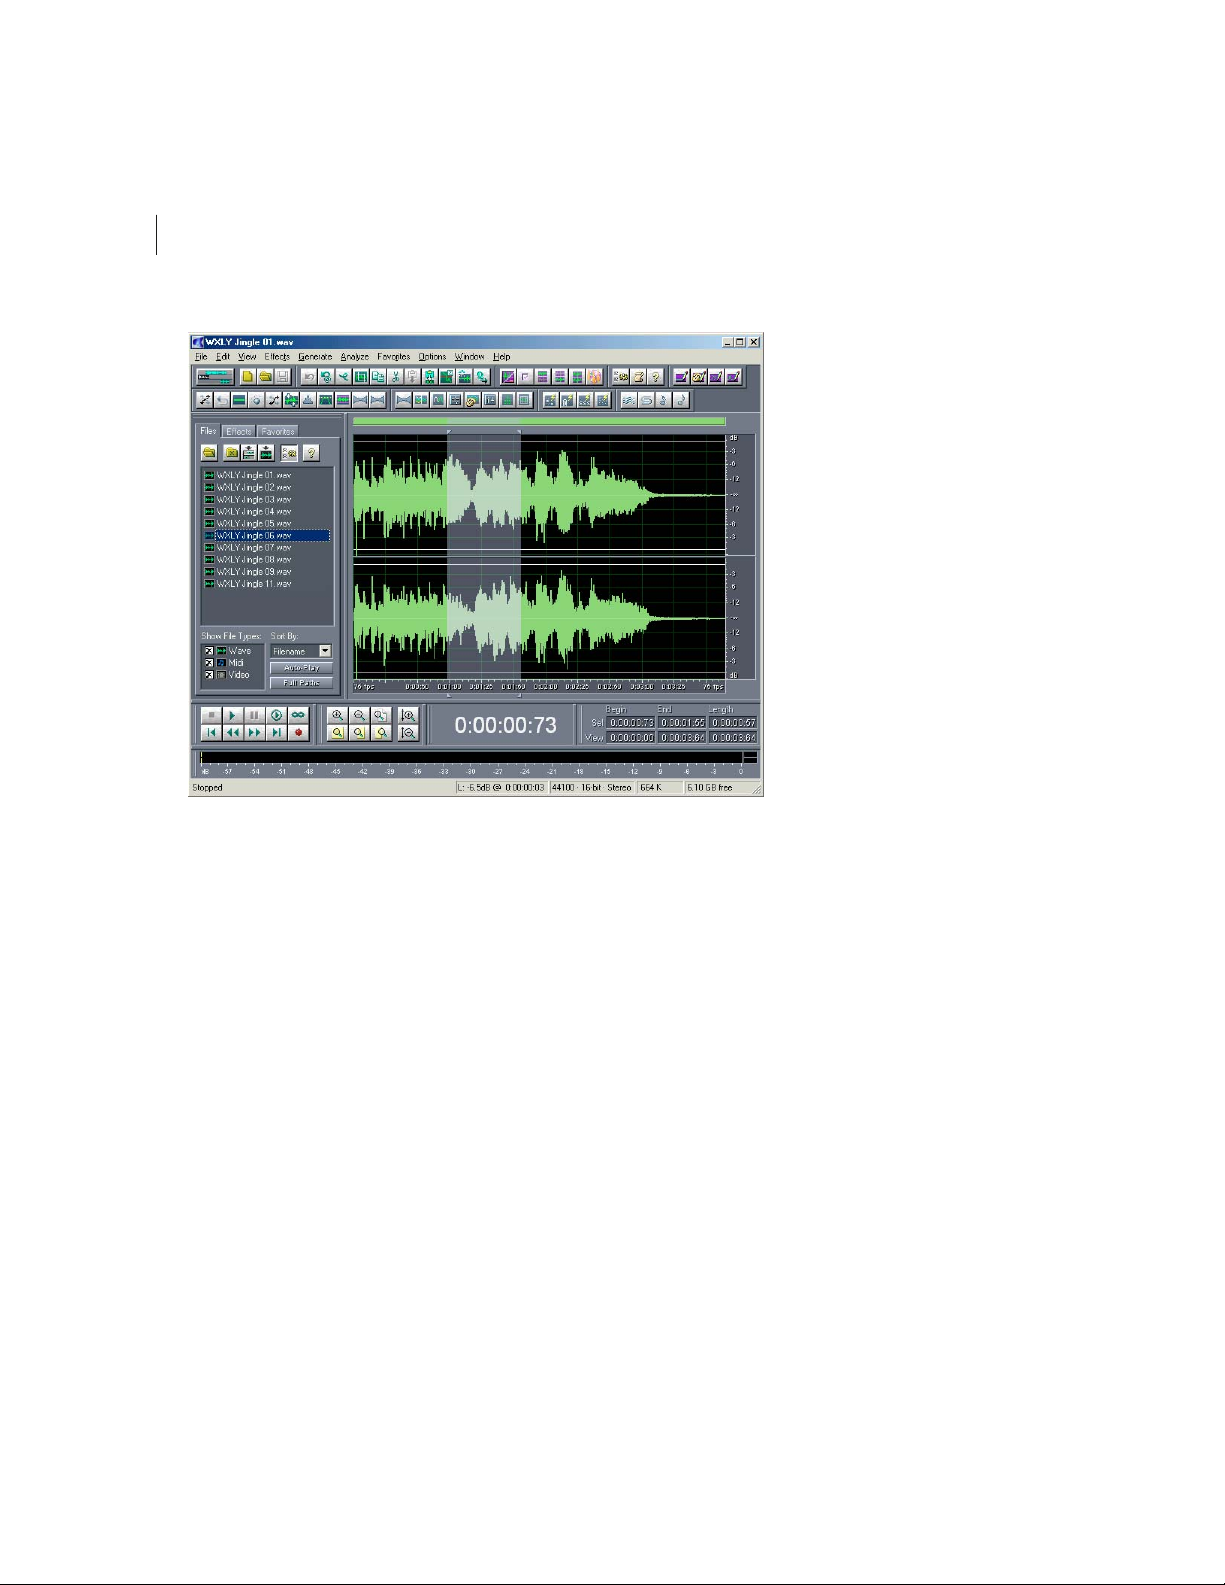
Edit View with Organizer Window Active
On the other hand, Multitrack View is where Adobe Audition allows you to record, play, and mix multiple tracks of audio
in a virtual 128-track recording studio. Real-time effects can be applied, relative track volume and stereo placement may
be adjusted, and audio can be played back through single or multiple sound cards.
Page 27
13
ADOBE AUDITION
User Guide
Multitrack View with Organizer Window Active
Switching from Edit View to Multitrack View
There are several ways to switch from Edit View to Multitrack View. Here are the most popular:
Select Multitrack View from Adobe Audition’s View menu.
•
Click on the left-most icon on the Adobe Audition File toolbar.
•
•
Press F12.
Switching from Multitrack View to Edit View
Several methods are provided to switch from Multitrack View to Edit View. These include:
•
Double-click on a waveform’s entry in the File tab of the Organizer Window.
Double-click on a wave block.
•
Select Edit Waveform… from a wave block’s right-click menu.
•
Select Edit Waveform View from Adobe Audition’s View menu.
•
•
Click on the left-most icon on the Adobe Audition File toolbar.
•
Press F12.
Page 28

CHAPTER 2
14
Looking at the Work Area
Dockable Windows
If Adobe Audition’s default interface layout doesn’t quite meet the current needs of your project or screen resolution,
you’ll be happy to know that many individual parts of the interface are dockable. This means that interface components
like the Transport Buttons, the Time Display window, the Level Meters, and Rulers may be detached from their current
location to float above Adobe Audition’s main window, or they may be repositioned and resized within the main window
so they better suit your requirements.
How can you tell if a part of the Adobe Audition interface is indeed a dockable window? Look for two thin vertical or
horizontal lines – these lines are the “handle” (or grab bar) of a dockable window. Move your mouse over a handle, and
your mouse cursor looks like a plus sign with arrows at each end.
For quick reference, here’s a list of all Adobe Audition dockable windows:
•
Organizer Window
•
Cue List
Play List *
•
•
Transport Buttons
•
Zoom Buttons
•
Time Window
•
Sel/View Controls
Level Meters
•
•
Placekeeper
•
Session Properties **
•
Mixers Window **
•
Track EQ Window **
• Track Properties **
• Load Meter **
• Video Window **
* (Available in Edit View only)
** (Available in Multitrack View only)
Some docked windows may be resized. If resizing is possible, the docked window will have a single, thicker horizontal or
vertical bar, known as a resize control. If your mouse moves over a resize control, your mouse cursor takes on the
appearance of two lines with two arrows.
Note: Even if the resize control is visible, resizing might not be possible due to the other windows that are in the row with the
window you’re trying to resize.
Page 29

ADOBE AUDITION
User Guide
To select a docked window, left-click when you’re over a handle. (Notice how the window becomes outlined when
selected.)
To move a docked window, select it and drag its hollow shape while holding down the left mouse button. As you move
it around the Adobe Audition interface, two things will happen. If the outline of a dockable window retains its original
dimension, releasing the left-mouse button will cause the window to “materialize” as its own standard floating window.
However, if you notice the resize bar of another docked window “light up”, this designates a docking location. If this is
where you’d like the dragged window to appear, release the left-mouse button and the window will snap into its new
location.
To close a docked window, right-click on its handle to see a pop-up menu with a Close option. Check this option and
the window will disappear. Don’t worry if you change your mind, since you can bring back any closed dockable window
by checking its name on Adobe Audition’s View menu.
A docked window’s right-click menu also contains an option called Force New Row. If this item is checked, a new, empty
row to dock windows is created.
To move a floating window, left-click on its title bar and, while holding down the left mouse button, drag the window to
the desired location. Close a floating window by left-clicking on the “X” control in its title bar.
To dock a floating window, left-click and drag it while holding down the left mouse button. As you move it around the
Adobe Audition interface, potential docking locations will appear; you’ll see the resize bar of dockable windows “light
up” wherever docking is possible. If this is where you’d like the floating window to dock, release the left-mouse button
and the window will snap into its new home.
15
Press the Ctrl key while moving a floating window around to force it to not dock. That way you can float it over an area
that it would normally try to dock to.
Placekeepers
Select Show a Placekeeper from Adobe Audition’s View menu to create a blank, dockable window called a “placekeeper”.
Use it to more accurately define where you want a dockable window to be, especially for windows that are only useful
when viewed in a certain aspect ratio.
For instance, if you try docking the Track EQ controls above the Transport Buttons, they end up going underneath the
whole session display, which creates a view that isn’t very useful (or aesthetically pleasing). You can use a placekeeper,
though, on either side of the Track EQ window in order to force the EQ into a certain aspect ratio. Placekeepers can also
be used just for appearance’s sake, just because you like the way they let you customize Adobe Audition’s look.
Placekeepers may be inserted at any point in the Adobe Audition interface where docking is possible, and they automatically resize to fit their docked area. You can right-click within a placeholder window to select Squares to fill the placekeeper’s appearance. Check the Make Default item to make future placekeepers automatically adopt the current
appearance.
Page 30

CHAPTER 2
16
Looking at the Work Area
You can have up to four placekeeper windows, each created with a click of the Show a Placekeeper command. To delete
a docked placekeeper, right-click on its grab bar and select Close from the pop-up menu.
Drop-down Menus
The Multitrack View’s Options drop-down Menu
Adobe Audition’s drop-down menus offer quick and easy access to all session and audio file handling, editing, and signal
processing functions, as well as options, viewing properties, and help. Complete details about the commands found in
both the Edit View and Multitrack View’s drop-down menus can be found later in this manual.
Toolbars
Many of Adobe Audition’s most commonly used functions are represented as icons within toolbars, which appear near
the top of the main interface. These icons give you instant access to effects, file handling functions, viewing options, and
more, at the press of a button.
The Edit View’s Edit Toolbar
You can decide which sets of toolbar icons to display by going to View > Toolbars (or right-click on the toolbar area) and
checking or unchecking the desired toolbar group(s). Another option is to limit how many rows of toolbar icons Adobe
Audition displays at any one time: one row, two rows, or three rows.
Note: To see what a toolbar button does, hold your mouse pointer over it to display a small “tool tip” that describes the function
in simple terms.
Page 31

ADOBE AUDITION
User Guide
Organizer Window
Adobe Audition’s Organizer Window is a handy, tabbed window that allows you to easily open and close files, see a list
of all open waveforms and MIDI files, choose effects with ease, and more. The Organizer Window is hidden by default.
To display it, check Show Organizer Window from Adobe Audition’s View menu, or press the Alt+9 keyboard shortcut.
The Organizer Window initially appears to the left of the Wave Display in Edit View or to the left of the Session Display
in Multitrack View. However, it’s dockable so you can reposition it at one of several places in the Adobe Audition
interface. Or, you may detach it and have it float above Adobe Audition’s main window.
To close the Organizer Window when it’s floating, click on the “X” control in its title bar. To get rid of the Organizer
Window when it’s docked, right-click on its grab bar and select Close from the pop-up menu. Or, you can simply
uncheck the Show Organizer Window item on the View menu to close it in either docking or floating mode, or press the
Alt+9 hotkey.
Files Pane
17
The Files Pane of the Organizer Window with Advanced Options displayed
The Files Pane of the Organizer Window displays a list of open waveforms and MIDI files. Here are its components:
Open File Click on the Open File button to access Adobe Audition’s Open a Waveform dialog. Double-clicking on a
waveform in the Organizer opens it for editing in the Edit View. Dragging and dropping a Wave or MIDI file into a track
in the Multitrack View drops it in that track.
Close File Pressing this button closes all of the files that are highlighted in the Files pane.
Insert Into Multitrack Push this button to insert all highlighted files, each into their own track, in Adobe Audition’s
Multitrack View.
Page 32

CHAPTER 2
18
Looking at the Work Area
Note: If you highlight a file and press the Insert Into Multitrack button multiple times, that file is inserted the same number
of times, each time into a separate track. For instance, if no other waveforms are in the Multitrack View, highlighting a file
and pressing the Insert Into Multitrack button five times places the same file into tracks 1, 2, 3, 4, and 5.
Display In Edit View Push this button to show a highlighted file in Adobe Audition’s Edit View.
Note: Should multiple files be highlighted, only the last file you clicked on will appear in Edit View.
Advanced Options Depressing this button causes additional options to appear near the bottom of the Files pane.
Show File Types You’re given the option to show or hide the display of Wave and/or MIDI files in the Files pane. Click
on the appropriate box to toggle its view status.
Sort By This control lets you decide how you want to sort the entries in the Files pane: Recent Access, Filename, Recent
Type, or Recent Filename.
Auto-Play When this button is pushed down, clicking a file’s name causes the file to begin playing.
Full Paths Push this button to display the full path [drive, folder(s), filename] of the entries in the File pane. Push it again
to show just the filenames.
Note: Hold down the Shift key to select multiple contiguous files in the Files pane; holding down the Ctrl key allows you to
highlight multiple non-contiguous entries.
Effects Pane
The Effects Pane lists all of the effects at your disposal. The listing includes all of Adobe Audition’s effects as well as all
installed DirectX audio plug-ins. Double-clicking on an Effect in the Organizer brings up the dialog to run that effect on
the open waveform in the Edit View. Dragging and dropping an Effect onto a track in the Multitrack View adds that effect
to the track.
The Effects Pane of the Organizer Window with Group By Category active
Page 33

ADOBE AUDITION
User Guide
Group By Category With this control pushed down, the list is shown as an Explorer-like hierarchical tree-type display.
Categories and their entries are shown in the same order as they appear on Adobe Audition’s Effects menu. With the
Group By Category button in the up position, all effects are displayed in roughly the same order they appear on the
Effects and Generate menus.
Group Real-Time Effects When this control is pushed down, the list is shown as an Explorer-like hierarchical tree-type
display, where all of the Real Time Effects are grouped together, the Off-Line Effects are grouped together, and the Multitrack Effects are grouped together. Another push of the Group Real-Time Effects button returns the File Pane to its
previous view.
Favorites Pane
The Favorites Pane lists all of the favorites you’ve created. (These are the same items that appear on Adobe Audition’s
Favorites menu.)
19
The Favorites Pane of the Organizer Window
Edit Favorites Press this button to call up the Favorites dialog, where you can create new favorites, or edit or delete
existing Favorites.
Wave Display/Session Display
The Wave Display window (in Edit View) and the Session Display window (in Multitrack View) are the heart and soul
of Adobe Audition. These are the areas where you’ll see sound visualized in an easy-to-manipulate form, whether you’re
modifying one waveform in Edit View or mixing dozens of discrete audio elements in Multitrack View. More details
about the Wave Display and Session Display windows can be found in the “Navigating the Edit View” and “Navigating
the Multitrack View” chapters, respectively.
Page 34
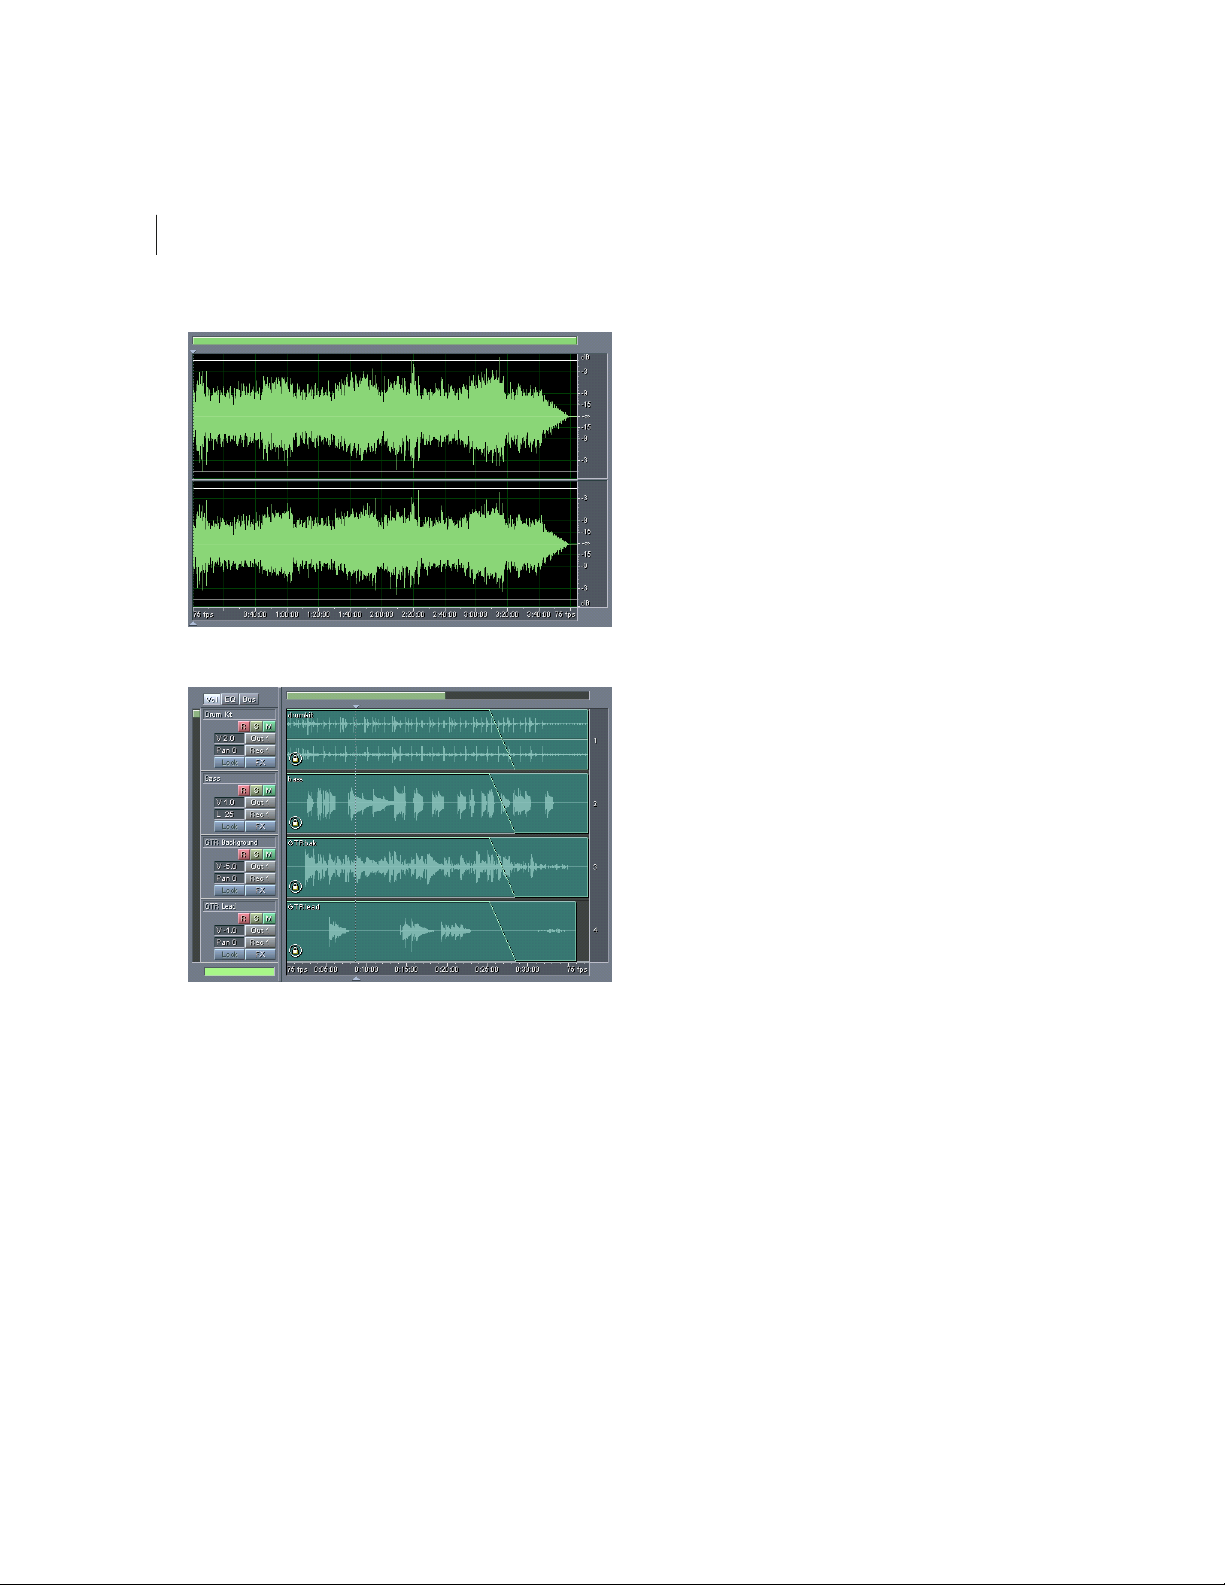
CHAPTER 2
20
Looking at the Work Area
The Edit View’s Wave Display
The Multitrack View’s Session Display
Presets
Many of Adobe Audition’s effects and other functions have presets that are available for easily storing and recalling your
favorite settings. New presets can be added at any time.
Page 35

ADOBE AUDITION
User Guide
The Presets portion of the Amplify Effect’s Dialog
Double-clicking on any preset will instantly set all controls in the dialog box to that preset.
Whenever you have settings you would like to keep, you may enter a name for your settings, and press the Add button.
A dialog pops up, prompting you to name your new preset. Your new preset is added to the list of other presets, which
is automatically sorted alphabetically.
Note: Adobe Audition allows you to add two or more presets with the same name. Normally you wouldn’t want to do this as
this can be confusing if the presets are different.
To remove a preset from the list, choose the preset, and press Del.
To modify an existing preset, double-click on the preset name, make your modifications, then press Del immediately
followed by Add. This will delete the old preset and add your current settings in under the same name.
21
Graph Controls
Many of Adobe Audition’s effects use graph controls for adjusting parameters. By adding and moving control points on
the graph, you can tailor the effect to precisely meet your needs.
The Graph Control portion of the Dynamics Processing Dialog
To work with an Adobe Audition graph control:
• To add a control point to the graph, click in the grid at the location where you want to place the point.
• To enter the values for a control point numerically, right click on the point to bring up the edit box, or double-click
on the graph’s curve.
Page 36

CHAPTER 2
22
Looking at the Work Area
• To move a point on the graph, click and hold on the point and drag to a new location.
• To remove a point from the graph, click and hold on the point and drag it off the graph.
Note: When the mouse cursor is located over a control point, you’ll see it change from an arrow to a hand.
Transport Buttons
Just like many hardware-based audio recording and playback devices, Adobe Audition provides VCR-like transport
buttons for playing, recording, stopping, pausing, fast forwarding, and rewinding your waveforms and sessions. The
Transport Buttons are in a dockable window, allowing you to reposition them at several places in the Adobe Audition
interface. Or, you can even detach the Transport Buttons window and have it float above Adobe Audition’s main window.
<<CAPTION TO BE WRITTEN>>
To close the Transport Buttons window when it’s floating, click on the “X” control in its title bar. To get rid of the
Transport Buttons window when it’s docked, right-click on its grab bar and select Close from the pop-up menu. Or,
simply uncheck the Show Transport Buttons item from the Edit menu to close it in either docking or floating mode.
Here’s what each transport button does:
Stop Click on this button to stop the playback of a waveform or session.
Play This button plays the portion of the wave or session that is currently being viewed (or that’s highlighted) from the
current cursor position. Right-click on the Play button to select from four behavior options:
• Play View: Adobe Audition will play just the portion of audio you’re currently viewing from beginning to end.
• Play from Cursor to End of View: Adobe Audition plays from the current cursor position to the end of the view. (This
is the default behavior for this button.)
• Play from Cursor to End of File: Audio is played from the current cursor position until the end point of the file or
session.
• Play Entire File: When this option is checkmarked, Adobe Audition will play the entire file or session from beginning
to end, regardless of the cursor position or view.
Pause Press this button to temporarily pause the playback or recording of audio. The control turns into a Continue
button when audio is paused.
You may also enable pause in Multitrack View by first holding down the Ctrl key and then pressing the spacebar to start
playback. Hitting the spacebar again will pause the playback of the multitrack session.
Play to End Clicking on this button plays the contents of the currently-visible waveform or session window, and then
stops playback. Right-click on the Play to End control to select from four behavior options:
• Play View: Adobe Audition will play just the portion of audio you’re currently viewing from beginning to end.
Page 37

ADOBE AUDITION
User Guide
• Play from Cursor to End of View: Adobe Audition plays from the current cursor position to the end of the view.
• Play from Cursor to End of File: Audio is played from the current cursor position until the end point of the file or
session. (This is the default behavior for this button.)
• Play Entire File: When this option is checkmarked, Adobe Audition will play the entire file or session from beginning
to end, regardless of the cursor position or view.
Play Looped This button plays the contents of the currently-visible waveform or session window in a continuous,
looping fashion.
Right-click on this button to change its behavior. Loop View (or Selection) is the default option; it will loop just the area
of the waveform or session that’s currently viewed or highlighted. Checkmark Loop Entire (or Selection) to have Adobe
Audition loop the entire waveform or session (or just the highlighted portion), regardless of how much is being viewed.
Go to Beginning Press this button to place the playback cursor at the beginning of the waveform or session.
Rewind Click on this button to shuttle the playbar cursor backwards in time. This function supports scrubbing. This
means that on some sound cards, the audio file will be played back at a lower volume as it shuttles over the waveform or
session.
Right-clicking on the Rewind button allows you to set the rate at which the cursor will move.
Fast Forward Pressing this button shuttles the playbar cursor forward in time. This function supports scrubbing.
This means that on some sound cards, the audio file will be played back at a lower volume as it shuttles over the waveform
or session.
23
Right-clicking on the Fast Forward button allows you to set the rate at which the cursor will move.
Go to End Click this button to place the playback cursor at the end of the waveform or session.
Record This button starts recording from the current playbar cursor position. Any waveform data after this point will
be recorded over.
Right-click on the Record button to select from different behavior options, which vary depending on whether you’re in
Edit View or Multitrack View: In Edit View, you can switch between Instant Record (the default) and Timed Record
modes. (Timed Record lets you use Adobe Audition as an automated, time-shifting recording device.) In Multitrack View, you
have three options: Continuous Linear Record (the default), Loop While Recording (View), and Loop While Recording
(Entire). Since the Play Looped button itself only applies to playback, the last two options allow for looping while recording.
If areas are marked for Punch In (i.e., the Allow Multiple Takes option is checked on a Wave Block’s right-click menu), a new
take is created on each looping.
Level Meters
The Level Meters (which by default are near the bottom of both Adobe Audition’s Edit View and Multitrack View
windows) display both record and playback levels. The Level Meters are in a dockable window, allowing you to reposition
it at one of several places in the Adobe Audition interface. Or, you can even detach the Level Meters window and have it
float above Adobe Audition’s main window.
Page 38

CHAPTER 2
24
Looking at the Work Area
Level Meters
The incoming signal from your selected sound card(s) is represented as the peak amplitude in decibels, where a level of
0dB is the absolute maximum before clipping occurs. If clipping does occur, the clip indicator to the right of the meter
will light up, and remain lit. Clicking on the clipping indicator at any time resets it. Yellow peak indicators will “stick”
for 1.5 seconds before resetting to allow for reading of the peak amplitude.
When displaying stereo audio, the top meter represents the left channel, and the bottom, the right.
To close the Level Meters window when it’s floating, click on the “X” control in its title bar. To get rid of the Level Meters
window when it’s docked, right-click on its grab bar and select Close from the pop-up menu. Or, you can simply uncheck
the Show Level Meters item on the View menu to close it in either docking or floating mode.
Right-click on the Level Meters window to call up a menu with metering options:
Monitor Record Level This option activates the Level Meters and starts monitoring the recording source. This is useful
for setting input levels before recording. To stop monitoring, press the Stop control or tap your spacebar. You can also
start and stop monitoring by double-clicking on the Level Meters.
Show on Play and Record Selecting this option causes the Level Meters to operate during the playback or recording of
audio.
Clear Clip Indicators If clipping occurs (i.e., incoming audio is greater than 0dB), then the Level Meter’s red lights come
on and stay on until cleared. Choose this option to reset the red lights. You may also click on the Clip Indicators (at the
right edge of the Level Meters) to clear them.
Note: The clip indicators will always light if clipping occurs, but if Adjust for DC is enabled, the indicators may light up when
the audio has a DC offset.
Adjust for DC Many sound cards record audio with a slight DC offset, which means that the center of the waveform being
recorded is not at the exact center of the waveform display, but a little above or below it. This can dramatically throw the
level meters off since the amount the waveform is displaced could be interpreted as a constant sound that loud. To
compensate, make sure this menu item is checked. The recording meters will dynamically adjust to the DC offset, and
display the true amplitude of the signal in decibels.
Show Valleys
Just as the yellow indicators show peak levels, if Show Valleys is chosen, valley levels (minimum amplitudes) will be
marked as well. This gives a good indication of the dynamic range of the audio. If the valley indicators are close to the
peak indicators, the dynamic range – the difference between the quietest and loudest sounds – is low. If they’re spread
far apart, the dynamic range is high.
120dB Range With this option checked, the range of the Level Meters is 120 decibels.
Page 39

ADOBE AUDITION
User Guide
90dB Range Select this option to have the Level Meters display a range of 90 decibels.
75dB Range Click on this entry to display a range of 75 decibels in the Level Meters.
60dB Range This option causes the Level Meters to have a range of 60 decibels.
45dB Range When you choose this option, the Level Meters have a range of 45 decibels.
30dB Range Checking this item gives the Level Meters a range of 30 decibels.
Dynamic Peaks Choosing Dynamic Peaks causes the yellow peak level indicators to reset to a new peak level after 1.5
seconds. This lets you easily see the peak amplitude “right now”. As the audio gets quieter, the peak indicators start
backing off.
Static Peaks With this option selected, the peak levels never reset. This lets you retain the maximum amplitude of the
signal since monitoring, playing, or recording began. The peak can still be reset manually at any time by clearing the clip
indicators (clicking on the clip indicator at the right).
Having Static Peaks selected is great for finding out how loud a song will get before recording it. Just start the meters and
start playing the song. When the song is over, the peak indicators will show the volume of the loudest part of the song.
Zoom Buttons
Adobe Audition’s Zoom Buttons allow you to zoom in or out of the Wave Display or Session Display. You can zoom in
down to the point where the sample of each waveform can be clearly seen, or zoom out to get a complete visual overview
of the entire waveform or session.
25
Zoom Buttons
The Zoom Buttons window is a dockable window, allowing you to reposition it at one of several places in the Adobe
Audition interface. Or, you can even detach the Zoom Buttons window and have it float above Adobe Audition’s main
window.
To close the Zoom Buttons window when it’s floating, click on the “X” control in its title bar. To get rid of the Zoom
Buttons window when it’s docked, right-click on its grab bar and select Hide from the pop-up menu. Or, you can simply
uncheck the Show Zoom Buttons item on the Edit menu to close it in either docking or floating mode.
The following items are included within Adobe Audition’s Zoom Buttons:
Zoom in to Center Click this button to zoom in on the center of the visible waveform window or session.
Zoom Out Click this button to zoom out from the center of the visible waveform window or session.
Zoom Out Full Click this button to zoom out to display the entire waveform or blocks that are contained within a session.
Zoom to Selection Click this button to zoom in on the actively selected waveform or session range.
Page 40

CHAPTER 2
26
Looking at the Work Area
Zoom to Left Selection Click this button to zoom in on the left-hand boundary of the actively selected waveform range
or session.
Zoom to Right Selection Click this button to zoom in on the right-hand boundary of the actively selected waveform
range or session.
Vertical Zoom Out In Edit View, clicking this button decreases the vertical scale resolution of a waveform’s amplitude
display; in Multitrack View, clicking this button shows more tracks.
Vertical Zoom In In Edit View, clicking this button increases the vertical scale resolution of a waveform’s amplitude
display; in Multitrack View, clicking this button decreases the number of viewed tracks in the Session Display.
Time Window
Adobe Audition’s Time Window displays the current position of the playback cursor. The default display value is
mm:ss:ddd (minutes:seconds:thousandths of a second), but this can easily be changed by right-clicking on the Time
Window and choosing another option, such as Compact Disc, Samples, Bars and Beats, or one of several SMPTE values.
Time Window
The Time Window is dockable, so you can reposition it at one of several places in the Adobe Audition interface. You may
also detach the Time Window and have it float above Adobe Audition’s main window. To close the Time Window when
it’s floating, click on the “X” control in its title bar. To get rid of the Time Window when it’s docked, right-click on its
grab bar and select Close from the pop-up menu. Or, just uncheck the Show Time Window item on the View menu to
close it in either docking or floating mode.
Sel/View Controls
The Sel/View Controls window (Sel is an abbreviation for Selection) shows the beginning and ending points, as well as
the total length of both the selection and the section of the waveform or session that’s currently viewed. Both the selection
and display range is shown using the current time display format (which is selected in View > Display Time Format).
Left-click on any one of the individual value windows to directly enter numeric time display data. A subsequent rightclick calls up a copy/paste and options selection box.
Sel/View Controls
Page 41

ADOBE AUDITION
User Guide
Since Sel/View Controls is a dockable window, you can reposition it at one of several places in the Adobe Audition
interface. You may also detach the Show Sel/View Controls window and have it float above Adobe Audition’s main
window. To close the Sel/View Controls window when it’s floating, click on the “X” control in its title bar. To get rid of
the Sel/View Controls window when it’s docked, right-click on its grab bar and select Close from the pop-up menu. Or,
you can simply uncheck the Show Sel/View Controls item on the View menu to close it in either docking or floating
mode.
Status Bar
The Status Bar window runs along the very bottom of Adobe Audition’s main window. It can display information such
as sample format, file size, and free disk space.
Status Bar
Right-click on the Status Bar to show a menu of display options (which are described below). Check the items you wish
to display; uncheck the items you don’t want to see. You may also access Status Bar options from Adobe Audition’s View
menu.
Data Under Cursor This shows useful information such as the channel (if a current waveform is stereo), the amplitude
(measured in dB), and the time (hours:minutes:seconds:hundredths of seconds) from the beginning of the audio file.
This data is computed at the precise point where your mouse cursor is placed within the wave display, and changes
dynamically when the mouse cursor is moved. Example: If you see “R: -15.2dB @ 0:00:242” in the status bar when in Edit
View, this means that your cursor is over the right channel at 0.242 seconds into the waveform, and the amplitude at that
precise point is –15.2 decibels.
27
In the Multitrack View, you’ll see even more beneficial data such as Pan and Volume envelope positions, envelope
positions for effects envelopes, dynamic effect settings, and the current position of the wave block as you drag it around.
Sample Format When this item is checked, sample information about the currently loaded waveform is displayed. For
instance, a 44,100 kHz 16-bit stereo file shows up as “44100 – 16-bit – stereo”.
File Size (K) This value represents how large the active audio file is, measured in kilobytes. If you see “308 K” in the status
bar, then the current waveform is 308 kilobytes (KB) in size.
File size (time) This figure tells you the length (measured in time) of the current waveform. For instance, “0:01:247”
means the sound file is 1.247 seconds long.
Free Space (K) This option lets you see how much space is available on your hard drive. A typical display might be
“7028.32 MB free”.
Page 42

CHAPTER 2
28
Looking at the Work Area
Free Space (time) Check this item to have Adobe Audition display the amount of available time left for recording, based
upon the currently selected sample rate. This value is shown as minutes, seconds, and thousandths of seconds. For
instance, if Adobe Audition is set to record an 8-bit mono waveform at 11,025 kHz, the time left might read something
like “4399:15.527 free”. Change the recording options to 16-bit stereo at 44,100 kHz, and the remaining time value
becomes “680:44.736 free”.
Keyboard Modifiers Select this option if you wish to have the status of your keyboard’s Ctrl, Shift, and Alt keys shown in
the status bar.
Window Menu – Edit View
When you’re working in Edit View mode, the Window menu gives you a simple way to switch between open files.
Currently Open Waveform List Entries for up to 10 open waveforms are listed.
Note: If you have more than 10 waveforms active, only the last 10 opened will appear on the Windows menu. Think of this
section of the Windows menu as a MRU (“Most Recently Used”) list of open waveforms. If you need to access another open
waveform whose name isn’t listed, use the Switch To… command or Adobe Audition’s Organizer window.
Switch To Access the Switch To… command to show a list of all open files. Click on a file’s name to make it the active file
in the Wave Display.
Switch To Window
Note: If you have a waveform open that has a cue range in it, there will be a + sign next to its name. Click on the + sign to
expand the entry so you can jump directly to any of the cue ranges it includes.
Instead of using the Window menu, try using the Files tab of Adobe Audition’s Organizer window. To activate the
Organizer window, go to the View Menu and click on Show Organizer Window, or press the Alt+9 keyboard shortcut.
Page 43

Chapter 3: Wave File Formats Supported
by Adobe Audition
he following is a list of the various wave file formats that Adobe Audition currently supports, arranged in the
order they appear in Adobe Audition’s Save Waveform As dialog. Some of these formats will have options, so look
for the Options… button to be enabled in Adobe Audition’s Save Waveform As dialog.
T
Note: If you want to load from or save to a format that’s not listed here, you may be able to use an ACM Waveform codec to
do so. To do this, use File > Open As or File > Save As, click on Options…, and try to find the format you want to use. When
exporting to an ACM format, you may first need to use Edit > Convert Sample Type to convert the file to a format supported
by the ACM codec.
64-bit doubles (RAW) (.dbl)
This format is 8-byte doubles in binary form – 8 bytes per sample mono, or 16 bytes per sample stereo interleaved. Just
as raw PCM has no header and is just audio data, so does the 64-bit doubles format.
29
8-bit signed (.sam)
This format is popular for building MOD files, since audio in MOD files is 8-bit signed. Many MOD editors allow
samples to be inserted from files, or exported to files in this format. 8-bit signed raw format data with the .sam extension
is assumed to be 8-bit signed raw data with no header. The sample rate is assumed to be 22050Hz, but the actual sample
rate can be changed once the file is loaded using Edit > Adjust Sample Rate.
A/mu-Law Wave (.wav)
The A-Law and mu-Law formats (CCITT standard G.711) are common in telephony applications. These encoding
formats compress the original 16-bit audio down to 8 bits (for a 2:1 compression ratio) with a dynamic range of about
13-bits (78 dB). While A-law and mu-Law encoded waveforms have a higher signal-to-noise ratio than 8-bit PCM, it’s
at the price of a bit more distortion than the original 16-bit audio. Still, the quality is higher than you would get with
some 4-bit ADPCM formats.
Note: Files saved in this format will automatically be expanded to 16-bits when loaded, so you should not save to this format
from 8-bit.
Options Choose from the following:
• A-Law 8-bit is a slight variation of the standard mu-Law format, and is found in European systems.
• mu-Law 8-bit is the international standard telecommunications encoding format, and is the default option.
Page 44

CHAPTER 3
30
Wave File Formats Supported by Adobe Audition
ACM Waveform (.wav):
Nearly any file format supported by the Microsoft Audio Compression Manager (ACM) can be loaded or saved in Adobe
Audition. The available ACM formats are displayed in the Choose ACM Format dialog that appears when you press the
Options… button on the Save Waveform As dialog.
Note: The ACM driver you want to use may require that the file be in a specific format before saving. For example, if you want
to save a file in the DSP Group TrueSpeech format, you should first use Edit > Convert Sample Type to convert the file to
8KHz/mono/16-bit, because that’s the only format supported by the TrueSpeech ACM driver. For more information on any
particular ACM driver, contact the creator of the format (such as DSP Group for TrueSpeech, or CCITT for the various
CCITT formats) or the manufacturer of the hardware that uses the format in question.
Options Set the following:
• Name displays the name of any saved format presets. Three are provided initially: CD, Radio, and Telephone Quality.
• Save As: Click this button to save additional preset format/attribute combinations.
• Filter is the ACM format you wish to save in. Note that this list will display only those formats that are compatible with
the current waveform’s properties (stereo/mono, resolution, etc.).
• Attributes: The available attributes will depend on the original attributes of the file (sample rate, etc.) and the Filter
chosen.
• Write as RAW Data: Check this box to save the waveform as RAW data.
Amiga IFF-8SVX (.iff, .svx)
The Amiga 8SVX format is an 8-bit mono format from the Commodore Amiga computer. A variety of sample rates are
supported.
Options Choose from the following:
• Data Formatted As 8-bit Signed: Check this option to save the audio file in uncompressed 8-bit Signed format, which
is the default.
• Data Formatted As 4-bit Fibonacci Delta Encoded: With this selection made, the file will be saved using the
compressed 4-bit Fibonacci Delta encoded format.
• Dithering from 16-bit: If you’re saving from a 16-bit file, choose the type of dithering you wish: Triangular Dither,
Shaped Gaussian Dither, Noise Shaping A, or Noise Shaping B. No Dithering is the default.
Apple AIFF (.aif, .snd)
This is Apple’s standard wave file format. Like Windows WAV, AIFF files support mono or stereo, 16-bit or 8-bit, and a
wide range of sample rates. Adobe Audition only supports the PCM encoded portion of the data, even though this format
(like Windows WAV) can contain any one of a number of data formats.
Page 45

ADOBE AUDITION
User Guide
The AIFF format is a good choice for PC/Macintosh cross-platform compatibility. Before you open AIFF files in Adobe
Audition, add the .aif or .snd extension to the file and load it using the Apple AIFF file filter. When transferred to a Mac,
you can add the four character code “AIFF” in the file’s resource fork to have it recognized (The Macintosh identifies a
file through its “resource”, which is stripped away when a file is opened on a PC. However, many Mac applications that
support AIFF can recognize the PCM data without this identifier.)
ASCII Text Data (.txt)
Audio data can be read to or written from files in a standard text format, with each sample separated by a carriage return,
and channels separated by a tab character. An optional header can be placed before the data. If there is no header text,
then the data is assumed to be 16-bit signed decimal integers. The header is formatted as KEYWORD: value with the
keywords being: SAMPLES, BITSPERSAMPLE, CHANNELS, SAMPLERATE, and NORMALIZED. The values for
NORMALIZED are either TRUE or FALSE. For example,
SAMPLES: 1582
BITSPERSAMPLE: 16
CHANNELS: 2
SAMPLERATE: 22050
31
NORMALIZED: FALSE
164 <tab> -1372
492 <tab> -876
etc...
Options Choose any of the following:
• Include Format Header places a header before the data.
• Normalized Data normalizes the data between -1.0 and 1.0.
Audition Loop (.cel)
Audition Loop files are essentially MP3 files with a .cel extension, but with a header that contains two important items.
The first is the loop info, just as it’s saved with a .wav file and is set under View > Wave Properties > Loop Info. This
includes number of beats, tempo, key, and stretch method.
The .cel file also works to avoid a problem with MP3 files. It’s in the nature of MP3 files that a very small amount of
silence is added to the beginning and/or end of an MP3 file when it’s encoded. This is very short, and often only a few
samples long. When working with a loop, though, it’s enough to throw the entire loop off.
Page 46

CHAPTER 3
32
Wave File Formats Supported by Adobe Audition
As it saves a .cel file, Adobe Audition calculates how much silence is going to be added to the MP3 file and writes this
information into the .cel header. Then, when Adobe Audition loads a .cel file, it reads this silence information and
automatically removes the silence from the file so that it’ll loop smoothly.
Options The file saving options are identical to the ones for mp3PRO® (.mp3) files, which are documented later in this
chapter.
Creative Sound Blaster (.voc)
This is the Sound Blaster and Sound Blaster Pro voice file format. Adobe Audition supports both old and new style .voc
files. The older .voc format only supports 8-bit audio; mono to 44.1 kHz, and stereo to 22 kHz. The newer type of .voc
file supports both 8-bit and 16-bit audio.
VOC files can contain information for looping and silence. If the file you’re loading contains loops and silence blocks,
they’ll be expanded while loading.
Options Choose one of the following:
• Old Style saves your audio as an 8-bit .voc file that can be played on any Sound Blaster card.
• New Style allows you to save to the newer .voc format that supports both 8-bit and 16-bit audio.
Dialogic ADPCM (.vox)
The Dialogic ADPCM format is commonly found in telephony applications, and has been optimized for low sample rate
voice. It will only save mono 16-bit audio, and like other ADPCM formats, it compresses to 4-bits/sample (for a 4:1
ratio). This format has no header, so any file format with the extension .vox will be assumed to be in this format. When
opening VOX files, you’ll be prompted for a sample rate unless Don’t ask for further details is checked in the Open a
Waveform dialog.
Note: Take note of the sample rate of your audio before saving as Dialogic VOX, as you’ll need to enter it upon reopening the
file.
DiamondWare Digitized (.dwd)
This is the audio format used by DiamondWare’s Sound Toolkit, a programmer's library that lets you quickly and easily
add high quality interactive audio to games and multimedia applications. It supports both mono and stereo files at a
variety of resolutions and sample rates. See http://www.dw.com for more information.
Page 47

ADOBE AUDITION
User Guide
DVI/IMA ADPCM (.wav)
The International Multimedia Association (IMA) flavor of ADPCM compresses 16-bit data to 4 bits/sample (4:1) using
a different (faster) method than Microsoft ADPCM, and has different distortion characteristics, which can produce
either better or worse results depending on the sample being compressed. As with Microsoft ADPCM, it’s best to save to
this format from 16-bit rather than from 8-bit. This compression scheme can be a good alternative to MPEG; it provides
reasonably fast decoding of 4:1 compression, and it degrades sample quality only slightly.
Options Choose from the following:
• 2 bits/sample, 8:1
• This option creates ADPCM .wav files with the highest compression ratio (8:1), but with the lowest number of bits.
Select this option when smaller file size is more important than audio quality. Keep in mind that this compression rate
is less compatible than the standard 4-bit, and may not be able to be played back on all systems.
• 3 bits/sample, 5.3:1 -- The 3-bit ADPCM files produced with this option use a compression ratio of 5.3:1. Quality is
better than with the 2 bits option, but not quite as good as the 4 and 5 bits choices. Some systems might have problems
playing back files compressed with this option, especially stereo files.
• 4 bits/sample, 4:1 -- This is the default option, which produces 4-bit files at a compression ratio of 4:1.
• 5 bits/sample, 3.2:1 -- Use this option for the best quality, since more bits and a lower compression ratio are used.
However, this compression rate is less compatible than the standard 4-bit, and may not work on all systems.
33
Microsoft ADPCM (.wav)
The Microsoft ADPCM format consists of 4-bit per channel compressed data, which provides 4:1 compression. Files
saved in this format will automatically be expanded to 16-bits when loaded, regardless of their original resolution. For
this reason, it’s best to save to this format from a 16-bit waveform rather than 8-bit, as the quality will be much greater.
Options Choose from the following:
• Single Pass compresses files in a single pass. Use this option if you’re in a hurry. However, the quality will be lower than
if you use the Multiple Pass option. The time taken to read an ADPCM compressed file is the same no matter which
option you choose.
• Multiple Pass compresses files using multiple passes, which provides better quality. This is the default setting.
• Block Size offers three size options, each with a different compression ratio and quality level.
• Large (Default Quality), with a compression ratio of 3.98:1.
• Medium (Good Quality), with an increased quality level, but because the compression ratio is a bit smaller (3.81:1),
your files will be slightly larger than with the Large option.
• Small (High Quality) offers the best quality ADPCM sound at a trade-off of larger files due to the smaller
compression ratio (3.25:1).
Page 48

CHAPTER 3
34
Wave File Formats Supported by Adobe Audition
mp3Pro® (.mp3)
The mp3Pro filter enables Adobe Audition to directly encode (save) and decode (open) .mp3 files. When a file is saved
as MP3, it’s encoded and compressed as specified by the MP3 settings. As an .mp3 file is opened, it’s decompressed into
Adobe Audition’s uncompressed internal format. This allows you to save the .mp3 file back to disk as any file format
(including as a standard .wav file).
Check your online documentation and help for details on the options for saving mp3PRO.
Note: The mp3PRO filter encapsulates standard mp3 file support, which means that you can save standard, non-pro mp3s
by unselecting the “pro” setting in the mp3 options.
Supply of this product does not convey a license nor imply any right to distribute content created with this product in revenue-generating
broadcast systems (terrestrial, satellite, cable and/or other distribution channels), streaming applications (via Internet, intranets and/or other
networks), other content distribution systems (pay-audio or audio-on-demand applications and the like) or on physical media (compact discs,
digital versatile discs, semiconductor chips, hard drives, memory cards and the like). An independent license for such use is required. For details,
please visit http://mp3licensing.com.
Next/Sun (.au, .snd)
This format is the standard found on NeXT and Sun computers, and has many data types. Adobe Audition supports the
CCITT mu-Law, A-Law, G.721 ADPCM, and linear PCM data variants. Like Windows WAV and AIFF files, this format
can support mono or stereo, 16-bit or 8-bit, and a wide range of sample rates when saved as linear PCM.
The most common use for the AU file format is for compressing 16-bit data to 8-bit mu-law data. AU is used quite extensively for distribution on the Internet, and for inclusion in Java applications and applets.
Options Choose from the following:
• mu-Law 8-bit compresses the file using the mu-Law 8-bit format. (This is the default.)
• A-Law 8-bit uses the A-Law 8-bit format to compress the file.
• G.721 ADPCM 4-bit uses the CCITT G.721 (ADPCM at 32 kbits/second) to compress the file.
• Linear PCM saves the file as uncompressed linear PCM.
SampleVision (.smp)
The SampleVision format is used by Turtle Beach’s SampleVision program. It supports only mono 16-bit audio. If your
data is in a different format, you’ll be asked to convert it before saving. This format also supports loop points, which can
be edited using Adobe Audition’s Cue List.
The Label of the cue must be in the format Loop n, m where n is the loop number from 1 to 8, and m is the mode: 0 =
no looping, 1 = forward loop, 2 = forward/back loop. Adobe Audition’s Play List is used to enter the number of times to
loop the cue range. Add the cue range to the Play List, and then enter the number of times to loop.
Page 49

ADOBE AUDITION
User Guide
Windows PCM (.wav)
The Microsoft Windows WAV format supports both mono and stereo files at a variety of resolutions and sample rates.
It follows the RIFF (Resource Information File Format) specification, and allows for extra user information to be
embedded and saved with the wave file. WAV files contain PCM coded audio – which is pure, uncompressed Pulse Code
Modulation formatted data.
Options These formatting options are available only to 32-bit files; they’ll be disabled (“grayed-out”) at other times:
• 32-bit 24.0 float (type 1 – 24-bit) saves full 32-bit floats (in the range of +/-8million), but the .wav BitsPerSample field
is set to 24 while BlockAlign is still set to 4 bytes per channel.
• 32-bit 16.8 float (type 1 – 32-bit) is Adobe Audition’s internal format. Floating point values are in the range of +/-
32768.0, but larger and smaller values are valid and not clipped since the floating point exponent is saved as well. The
.wav BitsPerSample field is set to 32 and BlockAlign is set to 4 bytes per channel.
• 32-bit 0.24 normalized float (type 3 – 32-bit) is the standard floating point format for type 3 .wav files. Values are
normalized to the range +/-1.0 and although values above and below this range are saved, some programs may clip
when reading them back in. (Adobe Audition will not clip, but read the same value back if it’s beyond this range.)
• 24-bit pack int (type 1 – 24-bit) saves straight 24-bit integers so any data beyond the bounds are clipped. The .wav
BitsPerSample field is set to 24 and BlockAlign is set to 3 bytes per channel.
• 24-bit packed int (type 1 – 20-bit) saves straight 24-bit integers (so any data beyond the bounds is clipped). The .wav
BitsPerSample field is set to 20 and BlockAlign is set to 3 bytes per channel. The extra 4 bits that are saved are actually
the remaining valid bits when saving, and are used when reading (thus still giving 24-bit accuracy if those bits were
actually present when writing). Applications should either fill those last 4 bits with zeros, or with actual data, but
generally analog/digital converters that generate 20 bits of valid data automatically set the remaining 4 bits to zero.
Any type 1 format with BlockAlign set to 3 bytes per channel is assumed to be packed integers, and a BitsPerSample
field between 17 and 24 inclusively will read in all 24 bits and assume the remaining bits are either accurate or set to
zero.
• 32-bit int (type 1 – 32-bit) saves 32-bit audio as 32-bit integers.
• Enable Dithering will dither 32-bit files when saving to a PCM format (20-bit, 24-bit, or 32-bit). This option is only
available if you have a 32-bit file and you select to save it as a nonfloating-point type format. The dither used is a Triangular dither, depth 1.0, with no noise shaping. If you wish to apply a noise shaped dither, use Edit > Convert Sample
Type… to dither the audio first, then save without dither enabled in the file format options.
35
Windows Media Audio(.wma)
The Windows Media Audio filter enables Adobe Audition to directly encode (save) and decode (open) .wma files. When
a file is saved as a .wma file, it’s encoded and compressed as specified by the .wma settings. As a .wma file is opened, it’s
decompressed into Adobe Audition’s uncompressed internal format. This allows you to save the .wma file back to disk
as any file format (including as a standard .wav file).
Check your online documentation and help for details on the options for saving Windows Media Audio files.
Page 50

CHAPTER 3
36
Wave File Formats Supported by Adobe Audition
PCM Raw Data (.pcm) (.raw)
This format is simply the PCM dump of all data for the wave. No header information is contained in the file. For this
reason, you’re asked to select the sample rate, resolution, and number of channels upon opening.
By opening audio data as PCM, you can interpret almost any audio file format – but make sure you have some idea about
the sample rate, number of channels, etc. You can also interpret the data as A-Law or mu-Law compressed. When
guessing at these parameters upon opening, the waveform may sound incorrect (in different ways, depending on which
parameters you have mixed up). Once the waveform is loaded and sounds fine, you may hear clicks at the start, end, or
sometimes throughout. These clicks are various header information being interpreted as waveform material. Just cut
these out, and Voilà! – you’ve read in a wave in an unknown format.
Options Choose from the following:
• Data Formatted As 16-bit PCM (LSB, MSB) saves data formatted as an uncompressed 16-bit PCM file with the Least
Significant Bit first and the Most Significant Bit last. With this option you’ll be able to offset the input data by +1 byte
if desired. (The input data of 32-bit files may be offset by +2 or +3 bytes as well.)
• Data Formatted As 16-bit PCM (MSB, LSB) saves as an uncompressed 16-bit PCM file with the Most Significant Bit
first and the Least Significant Bit last. With this option you’ll be able to offset the input data by +1 byte if desired. (32bit files can have input data offset by +2 or +3 bytes as well.)
• Data Formatted As 8-bit mu-Law Compressed saves PCM data in 8-bit mu-Law compressed format.
• Data Formatted As 8-bit A-Law Compressed saves data in 8-bit A-Law compressed format.
• Create .DAT header on save writes a header to a separate .dat file to make reloading the file easier.
Page 51

Chapter 4: Navigating the Edit View
dit View is one of Adobe Audition’s two major workspaces (Multitrack View is the other). Use Edit View to
record, play, convert, and edit single waveforms…and lots more. A wealth of effects are at your disposal, from
delay effects like echoes and reverbs, to advanced functions such as noise reduction and dynamics processing.
E
Most of this chapter will concentrate on the largest portion of the Edit View: the Wave Display. The Wave Display is the
area where waveforms are visualized and modified.
Note: Interface components that are common to both Edit View and Multitrack View (such as the Level Meters and the
Transport Buttons) are documented in the “Looking at the Work Area” chapter, while all of the items referenced on the Edit
View’s drop-down menus are explained in the Edit View menu chapters.
About Edit View
The following is a typical layout for Adobe Audition’s Edit View Screen:
37
A typical Edit View screen with the Organizer Window open
Page 52

CHAPTER 4
38
Navigating the Edit View
Stereo vs. Mono If a stereo waveform is loaded, the Wave Display is split horizontally. The waveform’s left channel
appears at the top of the window while the right channel is at the bottom.
A stereo waveform
The total height of the Wave Display window is utilized for mono waveforms.
A mono waveform
Navigating the Wave Display
The following movements are crucial to navigating the Wave Display window:
Defining a Range Left-click on one side of the range portion you want to select and drag left or right.
Changing Range Boundaries Hold down the Shift key and left-click on the range boundary you want to move, and drag
the boundary to its new location.
Select All Double-click in the Wave Display to select all of the waveform you currently see. Triple-click in the Wave
Display to select the entire waveform, whether you can see it all or not.
Selecting Only the Left Channel Click near the top of the left (upper) channel to select the left channel only. The mouse
cursor will acquire a boxed “L” when you do this.
Selecting Only the Right Channel Click near the bottom of the right (lower) channel to select the right channel only. The
mouse cursor will acquire a boxed “R” when you do this.
Waveform View/Spectral View
The Wave Display offers two ways to represent audio data: Waveform View and Spectral View. Switch between the two
methods using Adobe Audition’s View menu.
Page 53

ADOBE AUDITION
User Guide
• Waveform View – which is Adobe Audition’s default – displays audio data drawn as a series of positive and negative
peaks. Spikes in the x-axis (vertical) indicate increased amplitude, and the y-axis (horizontal) represents time.
A 15-second stereo .wav file displayed using Waveform View
•
Spectral View displays a waveform by its frequency components, where the x-axis is frequency, and the y-axis is time.
This allows you to analyze your audio data to see which frequencies are most prevalent. The greater a signal’s
amplitude component within a specific frequency range, the brighter the displayed color will be. Colors range from
dark blue (which means that next to no amplitude components exist in this frequency range) to bright yellow
(meaning that frequencies in this range are high in amplitude).
39
The same 15-second stereo .wav file displayed using Spectral View
Horizontal Portion Bar Use the Horizontal Portion Bar – which, by default, is at the top of the Wave Display – to scroll
forwards and backwards in time throughout a waveform. It can also be used to zoom in and out horizontally in the Wave
Display.
Horizontal Portion Bar
Left-click and drag the little hand over the Horizontal Portion Bar’s “handle” to scroll time-wise through the
•
waveform.
Page 54

CHAPTER 4
40
Navigating the Edit View
• Left-click and drag the magnifying glass (which appears when your mouse passes over the edge of the Horizontal
Portion Bar’s “handle”) to change the viewable range of the Wave Display. Moving the magnifying glass to the left
zooms in, while moving it to the right zooms out.
• Right-click anywhere on the Horizontal Portion Bar to call up a menu with three zooming options: Zoom In, Zoom
Out, and Zoom Full. The menu also has options for moving the Horizontal Portion Bar to the bottom of the Wave
Display, as well as returning it to its default position at the top of the Wave Display.
Horizontal Ruler
The Horizontal Ruler runs along the bottom of the Wave Display and acts as a timeline. It measures time in the same
format specified in the View > Display Time Format menu (which is hours, minutes, and seconds by default).
Horizontal Ruler
Left-click on the Horizontal Ruler and drag the little hand over the ruler to scroll time-wise through the session.
•
• Right-click on the Horizontal Ruler and drag to select an area to zoom in on. The zoom in occurs when the right
mouse button is released.
• Right-click anywhere on the Horizontal Ruler to call up a menu with several options.
Display Time Format This submenu allows you to choose the time format the Horizontal Ruler uses.
Snapping Snapping allows the edges of any block to “snap” to certain time locations when being dragged. Check the
snapping behavior(s) desired.
Zooming Six zoom commands are provided here: Zoom In, Zoom Out, Zoom Full, Zoom to Selection, Zoom In to Left
Edge of Selection, and Zoom In to Right Edge of Selection.
Vertical Ruler
The Vertical Ruler – at the right edge of the Wave Display – shows the relative amplitude of a waveform over time.
Vertical Ruler
Page 55

ADOBE AUDITION
User Guide
By default its display format is set to Sample Values (the exact sample value of the audio data), but it can easily be
switched to three other types – Normalized Values, Percentage, and Decibels – by doing one of the following:
• Right-click on the Vertical Ruler to switch display formats from a pop-up menu.
• Go to Adobe Audition’s View > Vertical Scale Format menu and make a selection.
• Double-click on the Vertical Ruler to cycle through all of the display formats.
Note: When the wave display is set to Spectral View, the vertical scale is always in Hertz (Hz).
The Vertical Ruler also provides access to the following display options:
• Left-clicking and dragging the little hand vertically over the Vertical Ruler allows you to scroll through Adobe
Audition’s visible amplitude ranges that might extend beyond the traditional amplitude scale values.
• Right-clicking and dragging over the Vertical Ruler automatically zooms the waveform window to show only the
specified amplitude scale.
• Right-clicking on the Vertical Ruler calls up a menu that not only lets you choose one of the aforementioned display
formats, but provides three Zoom options:
• Zoom In: Decreases the vertical scale resolution of a waveform’s amplitude display incrementally.
• Zoom Out: Increases the vertical scale resolution of a waveform’s amplitude display incrementally.
• Zoom Full: Zooms out the vertical scale resolution of a waveform’s amplitude display completely.
41
Recording in Edit View
Recording with Adobe Audition in Edit View is easy. You can record from a microphone, your computer’s CD player, a
MIDI source, or any signal you can plug into the “Line in” port of your sound card.
Note: You may need to adjust your input signal to obtain the optimum recording and signal-to-noise levels. (For most folks
this is done using the Windows Mixer.)
To record in Edit View.
1 Use File > New to create a new file.
2 Select the sample rate, bit resolution, and number of channels (stereo or mono) that you want to use and press OK.
3 Click on the Record button in the Track Controls window to begin recording.
4 When you’re done recording, click on the Stop button in the Track Controls window.
5 Edit as needed, and then save your recording to disk using File > Save As.
Page 56

CHAPTER 4
42
Navigating the Edit View
Wave Display Right-Click Menu
Right-click in the Wave Display window to bring up a menu with several useful commands. Notice that most have
keyboard shortcuts listed next to their name. You’ll find that using these shortcuts for frequently used commands will
speed up the editing process considerably.
Wave Display Right-Click Menu
Note: By going to Options > Settings, you can change the behavior of your mouse’s right-click button in the Wave Display. By
default, a Wave Display right-click brings up a menu. However, you can push the Extend Selection radio button in the Settings
window’s General tab to have a right-click extend a selection in the Wave Display; this means you’ll then need to hold down
the Ctrl key as you right-click to display the menu.
Select View This command selects the contents of just the Wave Display area that you’re viewing.
Select Entire Wave The entire waveform is selected (highlighted) with this command.
Insert Into Multitrack This command takes the currently highlighted portion of a waveform and inserts it as a waveform
block in the Multitrack View window. If there isn’t a highlighted segment, the entire current waveform is inserted. Either
way, the inserted audio is placed in the next available track at the beginning of the window’s timeline.
Cut Use Cut to remove the current waveform, or highlighted part of the waveform, to the active clipboard.
Note: While Adobe Audition can use the Windows clipboard for cut and paste operations, by default it uses its own internal
clipboard which is faster and more suitable for working with large waveforms. (As a matter of fact, it puts five such “super
clipboards” at your disposal.)
Copy This command copies the current waveform, or highlighted part of the waveform, to the active clipboard. Keep in
mind that if you want to copy audio to another Windows application, the current clipboard must be set to Windows.
Otherwise, use one of Adobe Audition’s internal clipboards, which are faster and can handle more data.
Copy to New When this command is run, the current waveform, or highlighted part of the waveform, is copied to the
active clipboard and then automatically pasted into a new Wave Display window.
Paste Paste inserts data from the active clipboard at the insertion point, or it replaces the currently highlighted data. If
the format of the waveform data on the clipboard is different from the format of the file it’s being pasted into, Adobe
Audition automatically converts it before pasting.
Page 57

ADOBE AUDITION
User Guide
Mix Paste Use Mix Paste to mix any audio data from the active clipboard with the currently shown waveform. (You
might think of it as a “quick and dirty” alternative to Adobe Audition’s more powerful and flexible multitrack functions.)
Clipboard data is inserted or overlapped beginning at the current insertion point or selection. Should the format of the
waveform data on the clipboard differ from the format of the file it’s being pasted into, Adobe Audition automatically
converts it before pasting.
Tri m Trim is used to get rid of unwanted audio (like silence) on one or both sides of the selected audio. Everything in
the waveform is removed except for the highlighted selection.
Note: The deleted portion(s) aren’t copied to the clipboard and can only be retrieved using the Edit > Undo command, or by
File > Revert to Saved if you haven’t saved the file since trimming.
Silence This function silences out the selected range of the waveform. Unlike deleting or cutting a selection – which
splices the surrounding material together – Silence leaves the duration of the selection intact, and simply zeroes the
amplitude within it.
Note: You must select part or all of your waveform first in order for Silence to work.
Add to Cue List This command adds the current cursor position to Adobe Audition’s Cue List.
Wave Properties Access this command to bring up a tabbed window that lets you embed text and graphics, specify
certain parameters, and get information about the active waveform.
Edit Sample Directly If you Zoom In far enough in Edit View, you can modify each sample of a waveform directly. To do
this, select a small portion of the waveform and use the Zoom to Selection button (one of Adobe Audition’s Zoom
Buttons) to zoom in as far as you can go.
43
The Wave Display zoomed in to the sample level
Instead of looking “wavy,” the waveform is displayed as a sequence of squares strung together by a line. Those squares
are samples. Move your mouse cursor over one. You’ll notice the cursor turns into a hand pointer. Left-click on a sample
and drag it up or down as desired. Right-click on a sample to display the Edit Sample Directly dialog.
Page 58

CHAPTER 4
44
Navigating the Edit View
The Edit Sample Directly dialog.
Here are the major components of the Edit Sample Directly dialog:
• Sample is the number of the sample as measured from the beginning of the waveform.
• Sample Value is the value of the sample as measured using one of the four Interpret As options below. Negative
numbers mean that the sample is below the horizontal center of the waveform, while positive numbers mean that the
sample is above the waveform’s center.
• Interpret As is four options that determine how the Sample Value is measured. Choose from 8-bit range, 16-bit range,
24-bit range, or Normalize +/- 1.0.
Page 59

Chapter 5: File Menu – Edit View
se the commands on the File Menu to open, save, and close wave files; import audio from video files; perform
batch conversions; access recently used waveforms; and more.
U
New
Select File > New to create a new, empty waveform. The New Waveform window appears so that you can choose the new
file’s properties. Options are provided for Sample Rate, Channels, and Resolution.
45
New Waveform Dialog
You’ll get better-quality sound when you use a higher sample rate and resolution, but you’ll use more hard disk space.
Audio CDs use a sample rate of 41000 and a resolution of 16 bits per sample.
Sample Rate This value determines how many frequencies can be encoded in the audio signal. Higher sampling rates
mean a wider bandwidth. Popular sample rates are already listed; just click on one to select it. Or, enter a custom number
in the Sample Rate box to specify a different rate from those provided. However, keep in mind that most sound cards
only support certain sample rates.
Channels Select Mono if you want to record a waveform with just one channel of audio information (such as a voice-
only recording).
The Stereo option allows you to create a two-channel waveform with separate right and left channels. This is usually the
best option for a music recording. Because they contain twice as much data, stereo waveforms consume double the
storage space of mono waveforms.
Resolution Three options are provided:
• 8-bit creates waveforms where quality is not much of a concern, but small file size is. 8-bit waveforms are usually fine
for telephony applications, or for use as embedded sounds in Web pages. While they tend to be noisier than their 16bit counterparts, they’re half the size.
Page 60

CHAPTER 5
46
File Menu – Edit View
• 16-bit produces CD-quality waveforms. This setting is suitable for most broadcast and music recording.
• 32-bit creates a waveform that lets you work at the 32-bit level. One benefit of 32-bit audio is more precise audio
processing, plus the ability to take advantage of the power in sound cards that go beyond the 16-bit standard (such as
a 24-bit card). Press the Options button in the Edit View’s File > Save As dialog to access 32-bit options.
Note: Although Adobe Audition can create and edit 32-bit files, your sound card may not be able to play them properly. If
that’s the case, you’ll need to convert waveforms stored and processed at this rate to a lower bit rate (such as 16-bit) for
playback. To see the capabilities of your system, go to Options > Device Properties.
Open
Use this command to load an existing waveform or CD track into an Adobe Audition editing window. The Open a
Waveform dialog appears, allowing you to select one or more audio files for listening or modification. This dialog looks
and works similarly to a standard Windows Explorer Open window (including allowing you to use the Ctrl and Shift keys
to select multiple non-contiguous and contiguous files respectively), but adds useful Adobe Audition-specific features.
No matter which of the wide variety of supported waveform types you load, Adobe Audition automatically converts the
audio file into an internal temporary waveform for quicker editing and better handling of large files.
Open a Waveform Dialog
Here are the components of the Open a Waveform dialog:
Recent Folders This shows the folders you’ve most recently opened with Adobe Audition. Select a folder name from the
drop-down box to quickly navigate to it.
Page 61

ADOBE AUDITION
User Guide
Look in Use this control to navigate through all available drives and folders.
File Name Here’s where you may specify the name of the file you desire to open, if it resides in the current folder. Entering
*.extension (such as *.wav or *.mp3) displays all files with that extension in the open folder.
Files of type Use this control to filter the display of files in the current folder to a specific type of supported waveform,
such as Windows PCM (*.wav) or Next/Sun (*.au;*.snd). As you’d expect, selecting the All files (*.*) listing displays all
files in the current folder.
Don’t ask for further details If you check this box, you won’t be prompted for more information about the waveform
format after you choose a file to open. For instance, if you double-click on a raw, headerless PCM file, Adobe Audition
won’t ask you for the sample rate, bit resolution, A-law/mu-law compression, or any other details. Instead, the program
uses the last settings specified when you opened a headerless file.
Show File Information With this box checked, Adobe Audition displays useful details about the selected waveform such
as format type, full size, sample rate, and running time.
Auto Play Check this box to have Adobe Audition automatically play a sound file when you highlight it in the Open a
Waveform window. This handy feature lets you quickly audition files before you load them into an editing window.
(Keep in mind that you can only play file types that are supported by your system.)
You can also play individual files when Auto Play is unchecked. Just select a waveform and click on the Play button in the
Open a Waveform window. Terminate playback by clicking on the Stop button, which replaces the Play button when a
sound is playing.
47
Note: When multiple files are open in the Edit View, you can easily select between them holding down the Ctrl+Tab keys
simultaneously, which shifts between open files in the forward direction. Use the Ctrl+Shift+Tab key combination to move
between open waveforms in the reverse direction.
Open As
The File > Open As command is similar to File > Open, except that it lets you specify the sample format before opening
a file. Think of it as a quick way to make changes to one or more existing waveforms’ sample rate, bit rate, and/or channel
type.
Since this function doesn’t pre-filter or post-filter the samples, you’ll get better-sounding results when changing sample
rates by opening the file(s) normally and using the Edit > Convert Sample Type function.
Open Append
Use this command to add one or more waveforms to the end of the currently shown waveform in the editing window. If
the waveform being added is of a different type, Adobe Audition automatically converts it as it’s opened. However, better
results are achieved if you only append files of the same sample rate, since no number-crunching is required to change
between rates.
Page 62

CHAPTER 5
48
File Menu – Edit View
Note: Appended cue points are automatically placed within Adobe Audition’s Cue List, making it simple to locate the edit
boundaries later.
Extract Audio from Video
The command lets you extract the soundtrack from any type of video file that Adobe Audition supports. The Choose a
Video File window (similar to a standard Windows File > Open window) appears, allowing you to select one or more
video files. The video’s audio is placed in an editing window, where it can be modified just like any supported sound file.
Choose a Video File Dialog
Extract Audio From CD
Use Adobe Audition’s Extract Audio From CD feature to digitally pull out sound from audio compact discs and place it
into the Wave Display for editing. This extraction process is commonly known as “ripping”. (Keep in mind that you must
have a CD-ROM drive that supports audio extraction in order to use this feature. Luckily, most newer CD-ROM drives
do.)
While CD tracks may be ripped using Adobe Audition’s File > Open dialog, The Extract Audio From CD function gives
you more control over the extraction procedure, such as the abilities to rip partial tracks and specify the ripping process
used.
Page 63

The Extract Audio From CD dialog
ADOBE AUDITION
User Guide
49
Here are the major components of the Extract Audio From CD dialog:
Device If your system has more than one CD-ROM drive, use this drop-down list to select the drive you want to use for
extraction.
Source Selection Two methods of choosing the exact audio you wish to extract are provided: Track and Time.
• Track: If you want to extract one or more complete CD tracks, push the Track button. A list of all tracks on the
compact disc is shown, along with their lengths stated in Min:Sec:Frame format. (There are 75 frames in each second
of compact disc audio.) Click on the desired track names to select them for extraction, simultaneously holding down
the Ctrl key to choose non-contiguous tracks or the Shift key for contiguous selection.
• Time: To extract part of a track or a segment of audio that spans multiple tracks, push the Time button. Enter the
beginning frame in the Start box, and the total number of frames you wish to extract in the Length box. (There are 75
frames in one second of CD audio.) The actual start and length times are displayed in Min:Sec:Frame format above
their respective boxes. The Range bar provides a graphical representation of not only the amount of audio that will be
extracted, but where the audio appears within the CD. However, if only a short bit of audio is selected for extraction,
you might not see any change in the appearance of the Range bar.
The Time option is great for pulling “hidden” tracks from CDs, as well as to join tracks that have been broken up by track
indices (such as performance track CDs and live albums).
Page 64

CHAPTER 5
50
File Menu – Edit View
Interface Options Two main options are provided: Generic Win32 and ASPI/SPTI. Under normal circumstances,
ASPI/SPTI should be selected. (ASPI, developed by Adaptec, stands for Advance SCSI Programming Interface. SPTI is
an acronym for SCSI Pass Through Interface, and was implemented by Microsoft as an Operating System-supported way
of sending SCSI commands; at this writing it’s only available on Windows NT, Windows 2000, and Windows XP.)
Generic Win32 should only be used if the ASPI/SPTI setting doesn’t produce satisfactory results. (The Generic Win32
option causes the Extract Audio From CD feature to use Input/Output control codes instead of SCSI commands.)
When the ASPI/SPTI button is pushed, several additional options are available:
• Read Method is a drop-down menu that lets you choose the way Adobe Audition reads CD audio. Several methods
are provided, many of them developed before the SCSI 3 specifications were published. (The SCSI 2 specs made no
accommodations for CD ripping.)
• MMC – Read CD: This is the SCSI 3 specific command, and it’s the command that most all recent drives will work
with. If you have a newer CD-ROM drive, try this setting first.
• SBC – Read10: This is a standard SCSI read command that uses a 10-byte SRB (SCSI Request Block). All SCSI
devices are required to support this command.
• SBC – Read6: This is a standard SCSI read command that uses a 6-byte SRB (SCSI Request Block). Many SCSI
devices support this command, but since it’s optional, not all do.
• Plextor (D8): Use this setting with older Plextor CD-ROM drives. It sends the D8 SCSI Op Code to the CD-ROM
drive.
• D5: This command sends the D5 SCSI Op Code to the CD-ROM drive.
• NEC (D4): Use this setting with older NEC CD-ROM drives.
• CD Speed: This drop-down control lists all extraction speeds that your selected CD-ROM drive supports, and lets you
choose the speed you want to use. Many people will find satisfactory results with the Max (Maximum) Speed option.
However, if extraction at maximum speed produces errors, try choosing a slower speed.
• Buffer Size: The figure in the Buffer Size box specifies the amount of data Adobe Audition calls into the CD Extraction
module to fetch, which therefore determines how much data is pulled from the CD in each call to the read command.
The default is 16 KB, but you’re welcome to experiment with the other sizes (which range all the way to the highest
buffer size your CD-ROM drive supports). While higher sizes mean faster ripping, they could introduce errors into
the ripped file.
• Swap Byte Order: Some CD-ROM drives designed to work only with other types of computers (like DEC and
Macintosh systems) report data using the Little Endian byte order, while PCs need data reported using the Big Endian
method. Checking this box changes the byte order from Little Endian to Big Endian or vice-versa. You would normally
leave this box unchecked; check it only if the extraction process seems to work fine but the audio results are “garbage”.
• Swap Channels: When this box is checked, the left channel of the CD’s audio is placed in the right channel of Adobe
Audition’s Wave Display, while the CD’s right channel audio is placed in the Wave Display’s left channel.
Page 65

ADOBE AUDITION
User Guide
• Spin Up Before Extraction: Some CD-ROM drives have better accuracy when they first read the CD if the drive is
already spinning. If your drive is like this, check the Spin Up Before Extraction box. Otherwise, having this box
checked doesn’t really provide any advantages.
Error Correction If a CD-ROM drive supports SCSI3 and ReadCD, it’s automatically “CDDA Accurate”. This means that
the drive has ripping error correction built in. For those types of drives, no error correction is needed, so you won’t be
able to select any options from this part of the Extract Audio From CD dialog. However, if your drive isn’t CDDA
Accurate, you have access to No Correction and Jitter Correction options.
• No Correction, as you’d expect, means that no error correction will be performed.
• The Jitter Correction option compensates for data reading problems that older drives might have.
Presets The Extract Audio From CD dialog supports Presets, which allow you to save and recall favorite settings. To add
the current settings as a preset, press the Add button. A box will pop up to allow you to name the preset. To remove a
stored preset, select it and press the Del button.
Preview Press the Preview button to audition the CD audio that will be extracted. (Your CD-ROM drive doesn’t need
to be physically hooked up to your sound card in order to hear the preview, since Adobe Audition actually rips the
preview audio.) When the audio begins to play, the Preview button turns into a Stop button. Click it to discontinue the
preview.
51
Revert to Saved
Use Revert to Saved to reload the currently visible waveform from disk. This discards any edits that were made since the
last time the file was saved.
Close
This closes the currently displayed editing window. If any changes have been made to the waveform since the last time
the file was saved to disk, Adobe Audition asks you if you wish to save them. When a waveform is closed, its associated
temporary file is automatically deleted as well.
Close All Waves and Session
Use this command to close all editing windows and the current multitrack session (if any) simultaneously. You’re
prompted to save, if necessary.
Close Only Non-Session Waveforms
All waveforms not currently inserted in a multitrack session are closed when this command is used. You’re given the
option to save any modified, unsaved files.
Page 66

CHAPTER 5
52
File Menu – Edit View
Save
This saves a modified waveform to disk using the waveform’s existing name and format. No options are provided.
Note: To save newly recorded waveforms, use the File > Save As command.
Save As
This command brings up the Save Waveform As window, which allows you to save the current waveform to a new name,
location, or format.
The File > Save As function is also used to save newly recorded waveforms to disk.
Free space on all available drives is displayed in the right section of the window.
Save Waveform As Dialog
Recent Folders This shows the most recent folders that Adobe Audition has saved files in. Select a folder name from the
drop-down box to quickly navigate to it.
Save in Use this control to navigate through all available drives and folders.
File Name Here’s where you specify the name of the file.
Save as type Use this control to choose the format you wish to save from the drop-down list of supported file types, such
as Windows PCM (*.wav) or MPEG 3 (*.mp3).
Page 67

ADOBE AUDITION
User Guide
Note: Some formats can’t be written to using waveforms of certain sample types. In this case, Adobe Audition asks you if you
want to convert before saving.
Adobe Audition also warns you if you’re trying to save a waveform to a compressed (lossy) format, and suggests that you
keep a backup of your original file if you wish to preserve full audio fidelity. If you don’t want to see this dialog box again,
check the Don’t display this message in the future box.
Save extra non-audio information Uncheck this box if you don’t want to save header fields such as copyright/author
information and cue marks. If you plan to burn the waveform to compact disc using another program, unchecking the
box is highly recommended. Some CD recording applications interpret non-audio information incorrectly and will
place an unpleasant burst of noise as the beginning of each CD track.
Options Most audio file formats support various options. (See the Waveform File Formats chapter for more infor-
mation.) Press the Options button to bring up a window to select the desired settings.
If the format doesn’t have any options, the Options button is disabled (“grayed out”).
Save Selection
File > Save Selection works similarly to the File > Save As command, except it allows you to save just the highlighted
selection of a waveform to its own file.
This feature is very useful for saving small segments of a larger file. For instance, should you wish to record a number of
samples from a friend’s sampler, you could record them as a single, continuous file and then split them into their own
waveforms. Or, you can break up a long music recording into smaller, more manageable tracks.
53
Save All
Run the File > Save All command to automatically save all open, modified waveforms to disk.
Batch File Convert
Adobe Audition’s handy Batch File Convert tool allows you to easily change multiple waveforms from one audio format
to another (such as from .wav to .mp3) using a four-window process.
1 Files
This window is where you add files to the list of waveforms to be converted.
Press the Add Files button to bring up the Please Choose the Source Files dialog (similar to Adobe Audition’s File > Open
dialog) to select one or more waveforms.
Hold down your Ctrl or Shift keys to select non-contiguous or contiguous files respectively. You can even select an entire
folder with the Add Folder button.
Page 68

CHAPTER 5
54
File Menu – Edit View
The Files Screen of the Batch File Convert Dialog
Press the Remove button to delete highlighted files from the list, or click on the Remove All button to delete all files from
the list.
Check the Hide Path box if you don’t want to see the full path of each file.
If you’re converting Raw PCM files, press the Open Raw PCM As button to pick the desired Sample Rate, Channels,
Resolution, and other properties.
2 Resample
Check the Convert Sample Type box if you wish to change each waveform’s sample properties to a common set of values.
This enables the Change Destination Format button.
If the box is unchecked, the destination sample format is the same as the source and the Change Destination Format
button is disabled.
Page 69

ADOBE AUDITION
User Guide
The Resample Screen of the Batch File Convert Dialog
Pressing the Change Destination Format button brings up Adobe Audition’s Convert Sample Type window, where you
can select the destination files’ sample properties.
55
3New Format
Here’s where you choose the format of the destination files. Use the Output Format drop-down control to pick the
desired format from all of Adobe Audition’s supported file types.
Page 70

CHAPTER 5
56
File Menu – Edit View
The New Format Screen of the Batch File Convert Dialog
Click on the Format Properties button to bring up the Options screen for the destination format. For example, if you’re
converting waveforms to .mp3 format, you’ll see the MPEG-1 Layer 3 Encoder Options screen, where you can adjust the
properties for the .mp3 files you’re creating.
The Sample Format Types box lists the sample properties of the waveforms that are to be converted. If you see more than
one entry in this list, you may have to select different file format properties for each entry, depending on the destination
format. For instance, a 22 kHz mono waveform might need different encoding options than a 44 kHz stereo file.
Highlight the desired Sample Format Type entry and press the Format Properties button to make the necessary adjustments.
4 Destination
This screen allows you to select the destination folder and the way files are renamed. By selecting the desired radio
buttons and check boxes, you can:
• save modified files in the same folder as the file’s source file or another folder.
• save existing files with the same name overwritten.
• delete the source file(s) if the conversion process was successful.
• remove filenames from the source list once their waveforms have been successfully converted.
Page 71

ADOBE AUDITION
User Guide
The Destination Screen of the Batch File Convert Dialog
Decide how you want the files renamed by modifying the text in the Output Filename Template field. In most cases, the
default renaming method is fine (the first part of the filename remains the same but the extension is changed). However,
several example templates are shown as guides in case you wish to be more creative in your renaming. After the desired
parameters have been set in Batch File Convert’s four tabbed screens, press the Run Batch button and Adobe Audition
automatically processes each file.
57
Flush Virtual File
Adobe Audition opens waveforms and uses them directly without making a backup in the temp folder.
If a waveform needs to be closed for deleting or for opening in another program, running the Flush Virtual File
command copies the waveform’s contents to the temp folder and closes the file. Files are automatically flushed if the
entire waveform is modified by Adobe Audition, since all changes are written to the temp folder.
In other words, this command lets an audio file that’s currently being used by Adobe Audition to be simultaneously used
by another program or resource application.
Free Up Space in Temp Files
Use this command to bring up the Free Up Space in Temp Files window for managing Adobe Audition’s use of the space
on your hard drive(s), including the instances of Undo for each waveform.
The window also automatically appears when available hard drive space nears zero kilobytes. If your system has lots of
available free hard drive space, Adobe Audition’s undo levels are cleared regularly, so you may not see this window unless
you manually call it from the File menu.
Page 72

CHAPTER 5
58
File Menu – Edit View
The Free Up Space In Temp Files Dialog
Waveform The Waveform list displays the names of the currently open waveforms. Select the name of the file for which
you’d like to remove Undo instances.
Press the Close File button to close the highlighted file if you no longer need it opened in Adobe Audition. This frees up
hard drive space as well. (The waveform in the currently active editing window can’t be closed this way, however.)
Undo History This part of the window lists the “undone actions” that are currently being retained on your system. The
amount of hard drive space each instance consumes is shown.
To remove items from the Undo History list, highlight an item from the list and press the Clear Undo(s) button. All Undo
actions at the selected level and below are removed.
Lower Hard Drive Reserves Adobe Audition creates temporary files for use when performing audio edits. The Primary
and Secondary drives listed are those that have been set in the System tab of the Options > Settings window, and are used
to store these temporary files.
You can temporarily change that reserved space by entering a different amount in MB that you wish to keep free on those
drives. In case that free space gets low, Adobe Audition won’t make use of it. Press the Set New Reserves button to save
the new values you’ve entered as the program’s defaults.
Total Available Space This field displays the total amount of hard drive space available to Adobe Audition. (It’s the sum
of the free space on your Primary and Secondary drives.) This value should increase as you free up space.
Cancel Last Operation Press this button to stop any action in progress, such as the application of an Effect or any other
edit. The becomes useful only if the Free Some Hard Drive Space window has been automatically invoked by Adobe
Audition, indicating that you have run out of storage space.
Page 73

ADOBE AUDITION
User Guide
MRU List
The Most Recently Used list displays the last nine audio files opened in Adobe Audition. You can quickly open any of
these files (providing they haven’t been deleted or moved) by selecting it from the list with your mouse. Or, type the
number that’s associated with the desired file.
Exit
As you’d expect, this command closes Adobe Audition. If there are any modified waveforms that are open that haven’t
been saved to disk, you’ll be asked if you want to save them. All temporary files that Adobe Audition has created are
deleted as well.
59
Page 74

CHAPTER 5
60
File Menu – Edit View
Page 75

Chapter 6: Edit Menu – Edit View
he Edit Menu displays all of the options that have to do with basic waveform editing in the Edit View mode.
T
Undo
This command reverses the last action, as long as the Undo function is turned on (see Enable Undo/Redo below).
Adobe Audition conveniently tells you which action you’re undoing. For instance, this menu item might say, Undo
Delete or Undo Normalize. If you haven’t yet edited a waveform, or Undo has been disabled, this menu item says Can’t
Undo or Undo Disabled instead.
If you forget which editing action you last performed on a waveform, check out the Undo item on the Edit menu to jog
your memory, whether you want to undo the action or not.
About Undo
Adobe Audition’s Undo information is stored as a temporary file on your hard drive. If the Undo function is enabled in
the Systems tab of Options > Settings, an unlimited number of undos can be retained. (Actually, the number is only
limited by the amount of free hard disk space).
61
All changes are automatically saved as one or more files in your temporary folder as long as the waveform is open in
Adobe Audition – even after it’s been saved to disk. This gives you the freedom to “experiment” or make mistakes,
knowing that Adobe Audition’s Undo function is there to cover your backside when you want to revert back to the last
edit you performed.
When working with very large audio files, it’s possible that you might not have enough free disk space to save the Undo
information before continuing on with an edit. It’s also possible that the time required to save the Undo information of
very large audio files can slow your work down. In either case, the problem can be solved by turning off the Undo
function – if you don’t mind working without a “safety net”. Undo can be turned off three ways:
1 On the System tab of Adobe Audition’s Settings window (Options > Settings)
2 By removing the check mark from the Edit > Enable Undo/Redo menu item
3 By pressing the Skip button in the Saving Undo Data dialog while Undo information is being saved.
If you find that you don’t have enough disk space to save the Undo information, you can change the Temp folder to a
different drive, if available. To do this, go to Options > Settings and click on the System tab. Change the path in the
Temp Folder field so that it points to another drive and folder.
Enable Undo/Redo
Highlight and click Enable Undo/Redo to toggle its status. If a checkmark appears next to this menu item, Adobe
Audition’s Undo and Redo functions are turned on. If you don’t see a checkmark, Undo and Redo have been disabled.
Page 76

CHAPTER 6
62
Edit Menu – Edit View
Repeat Last Command
Just as you’d expect, this item repeats the last command. Most editing functions in Adobe Audition can be repeated using
this command, but there are a few exceptions (such as Delete).
Set Current Clipboard
Adobe Audition gives you access to five internal clipboards for temporary data storage. Each works similarly to the
Windows clipboard, except without the memory limitations.
Use this command to decide which of Adobe Audition’s five available internal clipboards is active – just check the one
you wish to use. Or, choose Windows to have Adobe Audition use the Windows clipboard. (You’ll want to use the latter
option if you want to copy audio data to other Windows applications.)
Set Current Clipboard Menu
Copy
This command copies the current waveform, or highlighted part of the waveform, to the active clipboard (see Set
Current Clipboard).
Note: Keep in mind that if you want to copy audio to another Windows application, the current clipboard must be set to
Windows. Otherwise, use one of Adobe Audition’s internal clipboards, which are faster and can handle more data.
Cut
Use Cut to remove the current waveform, or highlighted part of the waveform, to the active clipboard.
Paste
Paste inserts data from the active clipboard at the insertion point, or it replaces the currently highlighted data. If the
format of the waveform data on the clipboard is different from the format of the file it’s being pasted into, Adobe
Audition automatically converts it before pasting.
Paste to New
This command creates a new file and inserts waveform data from the active clipboard. The new file automatically inherits
the properties (sample rate, sample frequency, etc.) from the original clipboard material.
Page 77

ADOBE AUDITION
User Guide
Mix Paste
Use Mix Paste to mix any audio data from the active clipboard with the currently shown waveform. (You might think of
it as a “quick and dirty” alternative to Adobe Audition’s more powerful and flexible multitrack functions.)
Mix Paste Dialog
Clipboard data is inserted or overlapped beginning at the current insertion point or selection. Should the format of the
waveform data on the clipboard differ from the format of the file it’s being pasted into, Adobe Audition automatically
converts it before pasting. The major components of the Mix Paste window are as follows:
63
Volume Move the volume sliders to adjust the sound level of the left and right channels of the audio in the clipboard
before pasting. Or, you can type in a value (represented in percentage) in the fields to the right of the volume sliders.
Paste in single channels (either left or right) by adjusting the level of the opposite channel to zero.
Invert Check the desired Invert box to physically turn that channel of the waveform upside-down. (Any samples
above the center line will be placed below the line, and those below will come out above the line.)
This function comes in handy when you want to take the difference (or subtract one signal from another) between two
samples.
Lock Left/Right When this box is checked, both volume sliders are locked so that when one is moved to a certain level,
the other moves simultaneously to that same level.
Insert Choose this radio button if you wish to insert waveform data from the active clipboard at the current location or
selection, replacing any selected data. If no selection has been made, Adobe Audition inserts clipboard audio at the cursor
location, moving any existing data to the end of the inserted material.
Overlap When Overlap is selected, the clipboard audio is mixed at the selected volume level with the current waveform.
If the clipboard audio is longer than the current waveform, the current waveform is automatically lengthened to accommodate the pasted audio.
Page 78

CHAPTER 6
64
Edit Menu – Edit View
Replace This option pastes the contents of the active clipboard beginning at the cursor location, and replaces the existing
material thereafter for the duration of clipboard data. For instance, pasting 5 seconds of material replaces the first 5
seconds after the cursor with the clipboard’s contents.
Modulate Select this option to modulate the clipboard audio with the current waveform for an interesting effect. This
is similar to overlapping, except that the values of the two waveforms are multiplied by each other, sample by sample,
instead of added.
Crossfade Check the Crossfade box and enter a value (in milliseconds) to apply a fade to the beginning and end of the
clipboard data. Adobe Audition fades in the first n milliseconds and fades out the last n milliseconds of pasted data.
Use this option for smoother transitions to and from pasted audio.
From Clipboard n Select From Clipboard n to paste audio directly from the active internal clipboard.
From Windows Clipboard Choose this option if you want to paste audio from the Windows clipboard. If there’s no audio
data in the Windows clipboard, this selection is disabled.
From File Select this option and press the Select File… button to browse for an audio file to paste into the active
waveform. The Please Choose a Wave File window appears, which is similar to Adobe Audition’s Open dialog.
Loop Paste When this box is checked, the audio data in the clipboard is pasted the number of times entered. Should the
clipboard audio be longer than the current selection, the current selection is automatically lengthened accordingly.
Copy to New
When this command is run, the current waveform, or highlighted part of the waveform, is copied to the active clipboard
and then automatically pasted into a new Wave Display window.
Insert in Multitrack
This command takes the currently highlighted portion of a waveform and inserts it as a waveform block in Adobe
Audition’s Multitrack View. If there isn’t a highlighted segment, the entire current waveform is inserted. Either way, the
inserted audio is placed in the next available track at the beginning of the window’s timeline.
Insert Play List in Multitrack
Use this command to take all the entries in the Adobe Audition Play List and insert them into the Multitrack View as its
own item.
Use this command if you use the Play List to assemble long montages that come out of a single file. Once you’re done,
you can insert the montage into the Multitrack View, make desired changes, and then render the montage to a new single
file.
Page 79

ADOBE AUDITION
User Guide
Select Entire Wave
Choose this command to select the current waveform. It doesn’t make any difference if you can’t see the entire waveform
on screen – the whole thing is highlighted.
You may also select the entire wave by double left-clicking within the Wave Display window.
Delete Selection
This command removes the highlighted portion of the waveform.
Note: Deleted data doesn’t go to the clipboard and can only be retrieved using the Edit > Undo command, or by File > Revert
to Saved if you haven’t saved the file since deleting.
Delete Silence
Use this feature to have Adobe Audition automatically detect and remove silence between words or other audio. It’s ideal
for cleaning up voice prompts and speeding up narratives without affecting the foreground audio.
65
Delete Silence Dialog
Here are the major components of the Delete Silence window:
“Silence” is defined as Enter the amplitude value (in decibels) you wish Adobe Audition to consider as the maximum
level for Silence in the Signal is below box. The duration (in milliseconds) of this maximum amplitude value should be
entered in the For more than box.
Note: For very quiet, high-quality audio, the dB value will be lower (like –60 dB). For noisier audio, the value may be much
higher (such as –30 dB). Use higher values in the second box to keep groups of words together, for example.
“Audio” is defined as Enter the amplitude value (in decibels) you wish Adobe Audition to consider as the minimum level
for Audio in the Signal is above box. The duration (in milliseconds) of this minimum amplitude value should be entered
in the For more than box.
Use higher values for the second box to ignore short periods of undesired audio (like clicks, static, or other noise).
However, if the value is too high (above 200 ms), short words may be skipped.
Page 80

CHAPTER 6
66
Edit Menu – Edit View
Find Levels Press this button to scan the waveform (or a highlighted section) to have Adobe Audition automatically
determine a good starting point for signal levels. After completing the scan, suggested values are automatically placed in
the appropriate boxes.
If these values aren’t doing the job – say, words or phrases are being chopped off – try lowering the signal level values.
Increase the signal level values if not enough silence is being removed.
Mark Deletions in Cue List Check this box to have each location where silence is removed added to Adobe Audition’s Cue
List.
Limit Continuous Silence to Enter a value (in milliseconds) in this box to set a minimum amount of silence to keep at all
times.
• If a silent region of less than this length is found, it’s not removed.
• If a silent region of more than this length is detected, enough silence is removed so that there’s exactly this length of
silence left.
Setting this value to zero will remove as much silence as possible.
When shortening speech segments, a setting of 150 ms or so will leave a more realistic, natural-sounding pause where
the larger region of silence was found. Removal of too much silence leads to an artificial sound.
Scan for Silence Now Press this button to pre-perform the silence deletion. Instead of actually deleting, it reports how
much silence will be removed, as well as how many sections of silence were found. This gives you an idea of what to
expect using the current settings when you actually commit to the Delete Silence command.
If you have an audio presentation that consists of many cuts separated by silence (such as a reel of several jingles), use
Edit > Delete Silence to make sure the duration of silence between each cut is the same. For instance, if the difference
between cuts 1 and 2 is 3.2 seconds, the difference between cuts 2 and 3 is 4.1 seconds, and the difference between cuts 3 and
4 is 3.7 seconds, you can use Delete Silence to make the silence duration between all four cuts exactly 3 seconds.
Tri m
Use Trim to get rid of unwanted audio (like silence) on one or both sides of the selected audio.
Essentially, Trim is the exact opposite of the Delete Selection command. Everything in the waveform is removed except
for the highlighted selection.
Note: Remember that the deleted portion(s) aren’t copied to the clipboard and can only be retrieved using the Edit > Undo
command, or by File > Revert to Saved if you haven’t saved the file since trimming.
Zero Crossings
This command adjusts the starting and ending points of the current selection to the nearest place where the waveform
crosses the center line (zero amplitude point).
Page 81

ADOBE AUDITION
User Guide
Having a selection start and end on a Zero Crossing is useful in deleting or inserting a selection in the middle of a
waveform. If you don’t line up the amplitudes (at zero, in this case) on both sides of the selection, the end points drawn
together when the highlighted selection is removed are at different amplitudes, which often results in an audible pop or
click.
You might want to use this feature when you wish to delete a portion of a waveform, or insert a portion from the middle
of the waveform.
To use Zero Crossings:
1 Select the portion you want to delete (or position the cursor where you want to insert).
2 Choose Edit > Zero Crossings and the appropriate submenu entry:
• Adjust Selection Inward: Adjusts both region boundaries inward to the next available zero crossing
• Adjust Selection Outward: Adjusts both region boundaries outward to the next available zero crossing
• Adjust Left Side to Left: Adjusts the left region boundary leftward to the next available zero crossing
• Adjust Left Side to Right: Adjusts the left region boundary rightward to the next available zero crossing
• Adjust Right Side to Left: Adjusts the right region boundary leftward to the next available zero crossing
• Adjust Right Side to Right: Adjusts the right region boundary rightward to the next available zero crossing
67
Find Beats
Use this function to have Adobe Audition locate the boundaries that make up musical beats in an existing music audio
file. This lets you easily find the starting and ending loop points when you want to construct drum loops and similar
musical phrases.
To use Find Beats:
1 Place the play cursor in the Wave Display to the left of your targeted loop starting point.
2 Select Edit > Find Beats > Find Next Beat (Left) to locate the beginning of the current beat.
3 Press Shift+[ until you arrive at the desired loop starting point.
4 Choose Edit > Find Beats > Find Next Beat (Right) to select from the current cursor position (now the loop start) to
the next beat.
5 Press Shift+] until you arrive at the desired ending for your loop.
6 Press the Play Looped button in the Transport Controls to audition your loop.
7 After any necessary tweaking, you can then save, paste, or add the loop to the Cue List.
Note: If the waveform levels don’t match up at the loop point, you may hear audible clicking as the loop repeats. To adjust for
this, you can revert to the original source file and use the Zero Crossings feature to match initial and ending levels.
Page 82

CHAPTER 6
68
Edit Menu – Edit View
Auto-Cue
The Auto-Cue feature is used to define spoken/music phrases or beats, and automatically add them to the Cue List.
To use Auto-Cue, first highlight the general region in which you wish to find phrases or beats. Then, select Edit > AutoCue and the appropriate submenu choice from the following options:
• Adjust Selection to Phrase: Selects a phrase within the highlighted region by adjusting the highlight inward, ignoring
any silence before and after the audio. Nothing is added to the Cue List.
• Find Phrases and Mark: Scans the highlighted area, marking non-silent regions as Basic cues in the Cue List.
• Find Beats and Mark: Scans the highlighted area, marking beats as Beat cues in the Cue List.
Auto-Cue Settings Dialog
•
Auto-Cue Settings: Choose this option to customize the way the Auto-Cue function works. Here are the major components of the Auto-Cue Settings window:
• Audio will be considered “silence” when: Enter the amplitude value (in decibels) you wish Adobe Audition to
consider as the maximum level for Silence in the Signal is below box. The duration (in milliseconds) of this
maximum amplitude value should be entered in the For more than box.
Note: For very quiet, high-quality audio, the dB value will be lower (like –60 dB). For noisier audio, the value may be much
higher (such as –30 dB). Use higher values in the seconds box to keep groups of words together, for example.
• Audio will be considered as valid when: Enter the amplitude value (in decibels) you wish Adobe Audition to
consider as the minimum level for Audio in the Signal is above box. The duration (in milliseconds) of this
minimum amplitude value should be entered in the For more than box.
Use higher values for the second box to ignore short periods of undesired audio (like clicks, static, or other noise).
However, if the value is too high (above 200 ms), short words may be skipped.
• Find Levels: Press this button to scan the waveform (or a highlighted section) to have Adobe Audition automatically
determine a good starting point for signal levels. After completing the scan, suggested values are automatically placed
in the appropriate boxes.
If these values aren’t doing the job – say, words or phrases are being chopped off – try lowering the signal level values.
Increase the signal level values if not enough silence is being removed.
Page 83

ADOBE AUDITION
User Guide
• Trim Digital Silence: This command removes pure digital silence from the beginning and ending of a file. However, if
you highlight the middle of a waveform, Trim Digital Silence will act as a normal Trim command, trimming out everything else, in addition to any digital silence in the highlighted region at the endpoints.
Snapping
In this case, the term “snapping” means that whenever a waveform cursor is placed within a certain distance of a defined
location point timeline or cue location point, that cursor automatically “jumps” or “snaps” to that precise boundary
point. Keep in mind that snapping only occurs if you’re close to the ruler tick.
Four options are available, all accessed from the Edit > Snapping submenu. Highlight and check one to select it. (Only
one of the Snap to Ruler commands can be checked at a time.)
Snap to Cues Use this option to allow a selected waveform to snap to a defined Cue point. (See the View > Cue List
section of this guide for information on how to define Cue points.)
Snap to Ruler (Coarse) This option allows the selected waveform to only snap to the major numeric divisions (decimal,
SMPTE, samples, etc.) in the timeline window. If you need more precise snapping, check Snap to Ruler (Fine), which is
described below.
Snap to Ruler (Fine) Select this option to allow the selected waveform to snap to each of the subdivisions (decimal,
SMPTE, samples, etc.) within the timeline window. Zooming in on the timeline – which is done by right-clicking and
dragging within the timeline across the desired waveform area – will generally break the display down into more accurate
subdivisions. This lets you place a waveform more accurately within the timeline.
69
Snap to Zero Crossings Choose this option to have the waveform snap to the nearest place where the waveform crosses
the center line (in other words, the zero amplitude point).
Snap to Frames (Always) When Snap to Frames (Always) is chosen, the selection or your cursor is always right on a frame
boundary in whatever time format you’re in – as long as the time format selected is measured in frames (such as Compact
Disc and SMPTE). This option is especially handy for working on audio for CD.
Snapping settings may be easily accessed by right-clicking on the timeline.
Group Waveform Normalize
Group Waveform Normalize allows you to normalize the volume of multiple open waveforms using a three-screen batch
process. (When you normalize a waveform, the loudest part of the waveform is set to a specified amplitude, thereby
raising or lowering all other parts of the same waveform by the same amount.) If the volume is raised as part of the
normalization process, Adobe Audition can apply limiting to prevent clipping.
If you’re getting ready to master an audio CD, using Group Waveform Normalize is a great way to make sure that all
tracks on the CD have a consistent volume.
Page 84

CHAPTER 6
70
Edit Menu – Edit View
1 Choose Files Tab
A list of all the currently open waveforms is shown. Choose the ones you wish to normalize by using the Ctrl and Shift
keys to select multiple non-contiguous and contiguous files respectively. (This is similar to the way you pick multiple
files in Windows Explorer.) You can also just click and drag to highlight a group of waves.
The Choose Files Tab of the Group Waveform Normalization Dialog
2 Analyze Loudness Tab
The waveforms you’ve chosen to normalize appear in this list. Press the Scan for Statistical Information button to have
Adobe Audition analyze the current amplitude statistics for each listed waveform.
Page 85

The Analyze Loudness Tab of the Group Waveform Normalization Dialog
These statistics are shown:
ADOBE AUDITION
User Guide
71
EQ-Loud This is the final loudness value with an equal-loudness equalization curve that takes into account frequencies
the human ear is more or less sensitive to. If Use Equal Loudness Curve is chosen in the final Normalize step, then this
is the value that will be used to determine how much to amplify the audio to normalize it.
Loud This is the final loudness value without equal-loudness equalization. This value will be used to determine how
much to amplify the audio to normalize it if the Use Equal Loudness Curve is not checked in the final step.
Max This is the maximum RMS amplitude found. This value is based on a full-scale sine-wave being 0dB, and uses the
window width given in the Advanced section of the Normalize tab.
Avg This is the total average RMS of the entire file. This value isn’t used to normalize with because files can have more
interesting dynamics that need to be accounted for.
% Clip This is the percentage of the waveform that would be clipped when normalizing. The value used to determine the
amount of normalization is either the Loud or Eq-Loud value, depending on if the Use Equal Loudness Curve box is
checked in the Normalize tab. If limiting is used, then actual clipping won’t occur, but instead the louder portions of
audio will be limited to prevent actual clipping.
Generally, you don’t want this value to be more than 5%. Anything higher than this may result in audible artifacts in the
louder portions of audio.
Reset Press this button to clear all of the normalization statistics for the files in the list. You can select any subset of files
and clear just those.
Page 86

CHAPTER 6
72
Edit Menu – Edit View
Double-click on any of the files in this list to see a more detailed account of statistics including: a complete RMS
Histogram, which shows the relative amounts of audio at each loudness level, and a Clipping Profile, which shows how
much clipping will occur for each decibel of amplification.
3 Normalize Tab
This is the area where you specify how you’d like to have Adobe Audition normalize the listed waveforms.
The Normalize Tab of the Group Waveform Normalization Dialog
Normalization You can normalize to an average level, or to a specific level.
• Normalize to Average Level of Source Files normalizes each file using the average level of all of them.
• Normalize to a Level of lets you specify the normalization level (entered in decibels) for the whole batch of waveforms.
Note: Unlike Effects > Amplitude > Normalize, percentages aren’t used with the Group Waveform Normalization function
because it’s not peak-based, but RMS-based. The peaks may not go above 25%, or may go over 150% and be the same
loudness.
Use Equal Loudness Contour Check this box to have Adobe Audition use an equal loudness contour, where the middle
frequencies are most important. You’d normally want to have this box checked. Since the ear is less sensitive to very high
and very low frequencies, and much more sensitive to those frequencies between 2 kHz and 4 kHz, two different pieces
of audio with the same RMS amplitude, but that contain different frequencies, will sound like they have differing
volumes. Checking the Equal Loudness Contour box will ensure that the audio has the same perceived loudness
regardless of what frequencies are actually present in the sound file.
Page 87

ADOBE AUDITION
User Guide
Out of Band Peaks
These settings determine how Adobe Audition handles out of band peaks. When amplifying audio, the audio samples
may go beyond clipping. If this happens, you can choose to just let it clip (and cause distortion) – or you can apply
limiting to those areas so the audio doesn't actually clip (which is what’s commonly done for the audio of TV commercials so they sound louder).
No Limiting (Clip) If this option is chosen, no limiting will be performed, which means you could end up with clipped
(distorted) audio.
Use Limiting Choose this option to have Adobe Audition’s Hard Limiter spring into action, if needed, to keep out of
band peaks from clipping.
• Look Ahead Time: This is the amount of time (measured in milliseconds) that it will generally take to attenuate the
audio before the loudest peak will be hit.
Note: If this value is too small, audible distortion effects may be heard. Make sure the value is at least 5 ms. (The default is 12
ms.)
• Release Time: This is the time (measured in milliseconds) that it takes for the attenuation to rebound back 12dB (or
roughly the time it would take audio to resume normal volume if an extremely loud peak was encountered). Generally
around 100 ms (the default) works very well, and will preserve very low bass frequencies.
Note: If this value is too long, audio may just stay very quiet, and not resume normal levels for a while. (The default is 200 ms.)
73
Advanced Here’s where you can modify the Statistics RMS Width, which is measured in milliseconds. The default is 50
ms.
Run Normalize After adjusting the parameters to your preferences, press the Run Normalize button to close the Group
Waveform Normalization dialog and perform normalization on all selected waveforms.
Adjust Sample Rate
Use this command to bring up the Adjust Sample Rate window. It lets you play an audio file at any sample rate that is
supported by your sound card. Keep in mind that this command doesn’t let you actually convert the audio file – you’ll
need to go to Edit > Convert Sample Type for that. However, it does let you hear what the current waveform would sound
like at a different sample rate.
Page 88

CHAPTER 6
74
Edit Menu – Edit View
Adjust Sample Rate Dialog
Choosing a higher sample rate results in Adobe Audition playing back the file at higher pitch (think “chipmunks”), while
selecting a lower sample rate results in a lower-pitched sound (think “drunk Darth Vader”).
Sample Rate The sampling rate you choose determines the overall bandwidth (how many frequencies can be encoded
within the audio signal). Higher sampling rates yield a wider bandwidth. You may enter any sample rate directly, or
choose a common sample rate from the list.
Note that most sound cards support only certain sample rates. Certain combinations of sample rate, channels, and
resolution may not be available on your system. To see the capabilities of your system, check Options > Settings > Device
Properties. Although you can create and edit any sample type with Adobe Audition, your sound card may not be capable
of playing it properly.
About Sample Rates
During the sampling process, an incoming analog signal is sampled at discrete time intervals. At each interval, this analog
signal is momentarily “held” for observation and thus represents a specific, measurable voltage level. A mathematical
conversion is used to generate a digital series of numbers that represent the signal level at that particular instant in time.
Once the conversion has been made, it can be digitally stored or processed.
The sampling rate is defined as the number of samples (or snapshots) that are taken of an audio signal per second. Since
sampling is tied directly to the component of time, a system’s sampling rate determines a system’s overall bandwidth –
in other words, how many frequencies can be encoded within the audio signal. Higher sampling rates generally yield a
better-quality waveform.
The most commonly encountered sample rates used for digital audio editing are:
• 11,025 Hz Poor AM Radio Quality/Speech (low-end multimedia)
• 22,050 Hz Near FM Radio Quality (high-end multimedia)
• 32,000 Hz Better than FM Radio Quality (standard broadcast rate)
Page 89

ADOBE AUDITION
User Guide
• 44,100 Hz CD Quality
• 48,000 Hz DAT Quality
• 96,000 Hz DVD Quality
Non-standard sample rates can be entered directly into the numeric sample rate window.
Channels This setting is disabled in Adjust Sample Rate.
Resolution This setting is disabled in Adjust Sample Rate
Convert Sample Type
This function converts the sample rate, bit rate, and channel format of an audio file that’s currently loaded in Adobe
Audition into a new format type (such as 44 kHz/16-bit/stereo to 22 kHz/8-bit/mono). Unlike Edit > Adjust Sample
Rate, Convert Sample Type directly processes the samples within the file, or re-samples the data, so that the audio retains
the same pitch and duration as the original file.
75
Convert Sample Type Dialog
You can choose various levels of conversion quality. Changes in overall and relative L/R volume levels may be easily made
when converting between mono and stereo formats. The Dither option allows you to reduce granulation noise when
converting to lower bit rates. Various other options are available, letting you adjust the conversion process to suit your
own particular needs. The following are the major components of the Convert Sample Type:
Sample Rate Conversion Presets Choose any saved presets that you’ve created from this drop-down list. Have a sample
type that you convert to often? Use the Save As… button to add those settings to the Sample Rate Conversion Presets list.
Press the Delete button to remove highlighted entries from the list.
Page 90

CHAPTER 6
76
Edit Menu – Edit View
Sample Rate The sampling rate you choose determines the overall bandwidth (how many frequencies can be encoded
within the audio signal). Higher sampling rates generally yield better-quality waveforms. Enter any sample rate directly,
or choose a common sample rate from the list. Keep in mind that most sound cards support only certain sample rates.
Low/High Quality Use this slider to adjust the quality of the sampling conversion.
Higher values retain more high frequencies while still preventing aliasing of higher frequencies to lower ones, but the
conversion process takes longer. A lower quality setting requires less processing time, but results in certain high
frequencies being “rolled-off”, leading to muffled-sounding audio. Usually values between 100 and 400 do a fine job for
most conversion needs.
You should use high-quality settings whenever you downsample from a high sample rate to a low rate. When upsampling, a low-quality setting will sound almost identical to a high-quality setting.
Pre/Post Filter In general, you should enable this option for best results. During downsampling and upsampling, the
appropriate filter will help keep false frequencies from being generated at the low end of the audio spectrum.
Channels Choose whether the new sample type will be Mono or Stereo by pushing the desired button. When you convert
to Stereo from Mono or vice-versa, you’re given the option to adjust the mix of the left and right channels.
When converting from Mono to Stereo, you can choose the relative amplitude (measured in percentage) with which the
original mono signal will be placed into each side of the new stereo signal. This way, you can place the mono source on
the left channel only, the right channel only, or any balance point in between.
If you’re converting from Stereo to Mono, this percentage controls the amount of signal from the respective channel that
will be mixed into the final mono waveform. The most common mixing methods are to use 50% of both left and right
channels when converting to Mono, and 100% for both values when converting to Stereo.
To remove all or most of the lead vocals from many stereo music recordings, you can convert a stereo waveform to mono
with a Left Mix of 100% and a Right Mix of -100%. Most vocal tracks are positioned in the middle of the stereo field in-
phase, so converting the signal so that it’s out-of-phase will often greatly reduce or eliminate the vocal track’s level.
When converting a stereo recording of monaural material (that is, the exact same contents are on both channels) to a
Mono waveform, try setting either the Left Mix or Right Mix to 100% and the opposite channel to 0%. This often results
in a cleaner sounding mono recording, especially if the original recording was made or played back on a tape recorder with
improperly aligned heads.
Resolution Use this control to choose the bit resolution to convert to. When converting to a lower resolution, the Dither
options are enabled.
Dither Use Dither to reduce noise and distortion to figures below their current levels through the addition of small
amounts of white noise. Although a small amount of noise is introduced into the “circuit”, the result is far preferable to
the increased distortion that you would otherwise be listening to at low signal levels.
Note: When converting to lower resolutions, dithering allows you to hear sounds that would otherwise be masked by the noise
and distortion limits of 8-bit audio (or quieter than the 16-bit limit provides when converting from 32-bit.)
Page 91

ADOBE AUDITION
User Guide
If Dither isn’t checked, quiet audio passages will just fade in and out of a disruptive, “choppy” sound that resembles
falling rain or static. Whether or not dithering is used depends on the audio that’s being converted and, of course, your
preferences.
Enable Dithering Check this box to activate Dithering; uncheck the box to turn Dithering off.
Note: If Dithering isn’t enabled, Adobe Audition truncates instead. This means that bits that aren’t used are simply chopped
off and discarded. This gives a “crackly” effect that fades in and out on very quiet audio passages.
Dither Depth (bits) This sets the bit amount of Dither to be applied. Generally, values of 0.2 to 0.7 give the best results
without adding too much noise. Note, however, that as this value is lowered, other unwanted harmonic distortion noise
will appear. (You can usually get away with lower values for the Dither Depth when you use Noise Shaping.)
p.d. f.: The “probability distribution function” controls how the dithered noise is distributed away from the original
audio sample value. Five p.d.f. types are available from the drop-down list: Rectangular, Triangular, Gaussian, Shaped
Triangular, and Shaped Gaussian.
The Rectangular function means there’s an equal chance that the noise value added will lie anywhere between +1 and 1 (i.e., the likelihood of a value of -0.8 being chosen is the same as that of 0.2, or 0.3, or any value between -1 and +1).
The Triangular function chooses random numbers that are generally closer to 0 than to the edges -1 or +1 (i.e., the
chance of 0 being chosen is twice as great as the chance of choosing 0.5 or -0.5). All dithering distribution functions can
linearize the quantization noise, meaning that the noise that’s heard doesn’t depend on the frequency of the dithered
audio, thus no harmonic distortion appears. The SNR Loss is measured against the undithered case. If modulation is
present, the audible noise floor rises and falls depending on the amplitude of the signal, so generally one doesn’t want
this either.
77
p.d.f. SNR Loss Modulation
Rectangular 3dB Yes
Triangular 4.8dB No
Gaussian 6dB Negligible
Shaped Triangular 4.8dB No
Shaped Gaussian 6dB Negligible
Usually a Triangular p.d.f. function is a wise choice, because it gives the best tradeoff between SNR, distortion, and noise
modulation.
Noise Shaping Select one of the several noise shaping presets (known as “noise shaping curves”) to have Adobe Audition
determine the placement when moving noise to different frequencies. The same amount of noise overall is present, but
you can choose less noise to be placed at one frequency at the expense of placing more noise at another. You may also
specify that no noise shaping is used.
Page 92

CHAPTER 6
78
Edit Menu – Edit View
Note: Different curves result in different types of background noise. The type of curve to use depends on the source audio, final
sample rate, and bit resolution. By introducing noise shaping, you may be able to get away with lower Dither depths to reduce
the overall background noise level, without introducing a lot of unwanted harmonic noise.
Curve Sample Rate
Noise Shaping A 44.1 kHz or 48 kHz
Noise Shaping B 44.1 kHz or 48 kHz
Noise Shaping C1 44.1 kHz or 48 kHz
Noise Shaping C2 44.1 kHz or 48 kHz
Noise Shaping C3 44.1 kHz or 48 kHz
Noise Shaping D 44.1 kHz or 48 kHz
Noise Shaping E 44.1 kHz or 48 kHz
Noise Shaping E2 44.1 kHz or 48 kHz
44.1KHZ 44.1 kHz
48KHZ 48 kHz
96KHZ 96 kHz
Note: In general, there are no really good noise shaping curves for audio at 32kHz or lower. With audio at those sampling
frequencies, feel free to try the different curves to see if they help at all, and just choose the one that sounds the best.
Page 93

Chapter 7: View Menu – Edit View
he View Menu displays options that relate to changing the display or viewable area when you’re in the Edit View
Mode. For many of the items, a checkmark is shown next to their menu entries to designate that they’re active.
T
Multitrack View
Access this command to go to Adobe Audition’s Multitrack View, where you can digitally mix up to 128 tracks to one or
more sound cards.
Pressing the leftmost button in the Edit View’s File toolbar takes you to Multitrack View mode. The face of the View
button represents the target View that the system will “jump to” when pressed. For example, when you’re working in Edit
View, this button’s appearance changes to let you know that if you push the button, you’ll go to the Multitrack View.
You can also use the F12 key to quickly switch between Multitrack and Edit View.
Waveform View
Adobe Audition offers two ways to visualize waveform data. Waveform View is the default. Data is shown as vertical
spikes that represent relative volume, while time is visualized horizontally.
79
Spectral View
Spectral View is the other method Adobe Audition utilizes to represent waveform data. Spectral View makes it easy to
view the frequency components to an audio file over time. This mode is handy for spotting which frequencies are most
prevalent throughout the waveform. The greater a signal’s amplitude component within a specific frequency range, the
brighter the displayed color will be.
Colors range from dark blue (which means that next to no amplitude components exist in this frequency range) to bright
yellow (frequencies in this range are high in amplitude.) Lower frequencies are displayed near the bottom of the display,
while higher frequencies are visualized from the middle-to-top part of the scale.
Show Organizer Window
This command lets you see Adobe Audition’s Organizer Window. This handy, tabbed window allows you to easily open
and close files, quickly send waveforms to the Multitrack Display, choose effects with ease, and more.
Note: More information about the Organizer Window can be found in the “Looking at the Work Area” chapter.
Page 94

CHAPTER 7
80
View Menu – Edit View
Show Cue List
The command opens the Cue List window, which is a dockable window. This means you can reposition it at one of
several places in the Adobe Audition interface. Or, you can even detach the Play List window and have it float above
Adobe Audition’s main window.
Cue List Dialog with Edit Cue Info Mode Active
An unlimited number of cues may be defined and saved in the Cue List for later recall, or for assembling in Adobe
Audition’s Play List.
To close the Cue List window when it’s floating, click on the “X” control in its title bar. To get rid of the Cue List window
when it’s docked, right-click on its grab bar and select Close from the pop-up menu. Or, you can simply uncheck the Cue
Play List item on the Edit menu to close it in either docking or floating mode.
About Cues Cues are time offsets or locations defined within a waveform. They may be thought of as virtual markers.
Adobe Audition has four types of Cues. Each type can be a point or a range.
• A point refers to an exact cursor position within a waveform (for instance, 1:08.566 from the start of the wave).
• A range has both a start time and an end time (for example, all of the waveform from 1:08.566 to 3:07.379). If a Cue
is a range, you can drag its beginning and end points to different times.
The upper part of the Wave Display showing the Cursor Handle and three Cue Handles
Page 95

ADOBE AUDITION
User Guide
Here are the four cue types:
• Basic: Basic Cues are used to mark important sections of the waveform for later reference (for example, to remind
yourself of an editing point). They’re also used to specify stop and start positions for the Adobe Audition’s Play List.
• Beat: Beat Cues are just like Basic Cues, but they’re specifically for marking musical beats. If you use the Find Beats
and Mark part of the Auto-Cue feature (Edit > Auto-Cue), Adobe Audition will mark each beat with a Beat Cue.
• Track: Track Cues are only used for burning CDs. They indicate a split in tracks for an audio compact disc.
• Index: Index Cues are also just used for CD burning. Indexes are markers within a CD track. (Some CD players offer
controls for cueing indexes.) Also, the time between the track marker that begins a track and the first index in that
track will show up on the player as “negative time”.
All four Cue types can be ranges as well as points, although it doesn’t really make sense for indexes to be ranges.
Note: Cues are preserved in the waveform when the file is saved, but only if the Save extra non-audio information box is
checked in Adobe Audition’s Save Waveform As dialog.
Creating Cues and Ranges
To add a specific point in a waveform (say, three seconds from the beginning of the waveform) to the Cue List, left-click
on the waveform at the exact place where you wish the cue to be. Then, do one of the following:
81
• Click on the Add button in the Cue List window.
• Press F8 to add a Basic cue, Shift+F8 to add a Track cue, or Ctrl+F8 to add an Index cue.
• Right-click on the Wave Display and choose Add to Cue List.
• Right-click on the Cursor Handle (the triangle at the top and bottom of the Wave Display directly over and under the
play cursor) and choose Insert in Cue List, Insert CD Track Marker, or Insert CD Index Marker.
To add a specified range (for instance, all the audio from two seconds to five seconds, as measured from the first part of
the waveform), just highlight the range in the Wave Display and do one of the following:
• Click on the Add button in the Cue List window.
• Press F8 to add a Basic cue, Shift+F8 to add a Track cue, or Ctrl+F8 to add an Index cue.
• Right-click on the Wave Display and choose Add to Cue List.
• Right-click on the Cursor Handle (the triangle at the top and bottom of the Wave Display directly over and under the
play cursor) and choose Insert in Cue List, Insert CD Track Marker, or Insert CD Index Marker.
The easiest way to make a range is to highlight a selection in the waveform. Then add a cue, either through the Cue List
or by pushing F8 (for a Basic Cue), Shift+F8 (for a Track Cue), or Ctrl+F8 (for an Index Cue).
Cue Handle Context Menu Right-click on a Cue Handle (a Cue-named triangle at the top and bottom of the Wave
Display) to display the Cue Handle context menu.
Page 96

CHAPTER 7
82
View Menu – Edit View
The Cue Handle context menu
The Cue Handle context menu has these commands:
• Go To Cue List: Accessing this command displays the Cue List, or if the Cue List is already displayed, makes it the active
window.
• Change Cue Type: Use this entry and its submenu to change a Cue from one type to another. A checkmark designates
the current Cue type.
• Make Range: If the Cue is already a point cue, this command turns it into a range cue. The Cue Handle is split into
two handles, one yellow and one blue. Drag either or both to set the beginning and ending times of the range.
Note: Adobe Audition automatically makes the second point of a cue range the end, even if you move the ranges around.
• Make Point: If the Cue is a range cue, this command turns it into a point Cue. The two parts of the range Cue Handles
are merged into a point Cue Handle, with the start time of the range becoming the time for the point Cue.
• Delete: This command deletes the Cue, removing it from both the Cue List and the Wave Display.
Here are the major components of the Cue List window:
Column Bar The column bar runs along the top of the Cue List window. It behaves similarly to the column bar in a
Windows Explorer window. Along with telling you the type of data in each column (Label, End, Begin, etc.), you can
click on a column header to sort the data in that column. For instance, a left-click on the Length column header will place
all of the items in the Cue List from shortest to longest. You may also select and slide a column header horizontally to
rearrange the sequence of column headers.
Edit Cue Info Button When you press this button, fields used to modify the information in the highlighted cue appear:
Begin (the cue’s starting time), End (the cue’s ending time), Length (the cue's length), Label (the cue's name), and Desc
(the cue’s description).
Left-click on the desired field to make it active, and then type in the new time or name. You can also use the drop-down
list to pick the type of cue: Basic, Beat, Track, or Index.
To hide the cue info fields, press the Edit Cue Info button once more.
Auto-Play If the Auto-Play button is depressed, the cue will automatically play whenever the cue is selected in the Cue
List. To deactivate the automatic play mode, click on the Auto-Play button to release it.
Add Press this button to add a Basic cue – either an exact point or a specified range – to the Cue List. You can also press
F8 to add a Basic cue, Shift+F8 to add a Track cue, or Ctrl+F8 to add an Index cue to the Cue List.
Page 97

ADOBE AUDITION
User Guide
Del This button deletes all of the highlighted items in the Cue List. Just as in a Windows Explorer window, you can
depress your Shift key as you click to select and highlight multiple contiguous files, or hold down the Ctrl key as you click
to select and highlight multiple non-contiguous files.
Merge Click on the Merge button to combine highlighted entries in the Cue List into a single, combined cue that spans
the earliest and latest locations in the two cues. Keep in mind that you’re limited to merging just two ranges, but there
are no limitations on the number of cue points you can measure.
Hold down your Shift key as you click to select and highlight multiple contiguous files, or depress the Ctrl key as you
click to select and highlight multiple non-contiguous files.
Note: The new merged item inherits the name from the earliest item chosen. You lose the information entered in the Label
and Desc fields for the subsequent merged items.
Batch If one or more Cue List range entries are highlighted, pressing this button brings up the Batch Process Phrases
dialog.
83
The Cue List’s Batch Process Phrases Dialog
Note: At least one of the cues must be a cue range in order for the Batch button to be active.
Here are the components of the Batch Process Phrases dialog:
Set Amount Of Silence Select this item to add silence between cue points in the currently shown waveform. Fill in the
desired values (measured in seconds) in the Add silence before: and Add silence after: fields. Press the OK button to
initiate the silence-adding process.
Save to Files Use this option if you’d like to split the audio between cue points in the active waveform to new files.
Filename Prefix Enter the desired Filename Prefix (such as “phrase”) in the field provided. Adobe Audition automatically
adds numbers after the prefix (phrase02, phrase03, etc.) as well as the correct extension based upon the output format
you’ve chosen.
Page 98

CHAPTER 7
84
View Menu – Edit View
Destination Folder This is the folder where Adobe Audition will place your new “split” files. Press the Browse… button
to open the Choose Destination Folder window.
Output Format Use this drop-down control to select the desired output format. If the selected format has options, the
Options… button will be enabled, allowing you to select them.
Show Play List
Select this item to display Adobe Audition’s Play List window. The Play List is an arrangement of Cue List entries that
you can play back in any order and loop a specified number of times. The Play List can include an unlimited number of
entries.
Play List Dialog
The Play List window is a dockable window, allowing you to reposition it at one of several places in the Adobe Audition
interface. Or, you can detach the Play List window and have it float above Adobe Audition’s main window.
To close the Play List window when it’s floating, click on the “X” control in its title bar. To get rid of the Play List window
when it’s docked, right-click on its grab bar and select Close from the pop-up menu. Or, you can simply uncheck the
Show Play List item on the Edit menu to close it in either docking or floating mode.
Here are the major components of the Play List window:
Show Cue List Click on this button to display Adobe Audition’s Cue List window. The Show Cue List button is then
replaced by the Insert Cue(s) button.
Insert Cue(s) Press this button to add the currently highlighted selection(s) from the Cue List to the Play List. The
selection is inserted before the currently highlighted Play List item, or at the end, if nothing is selected.
Note: The cues must be cue ranges, not just cue points, for this to work.
Remove Click on this button to remove the selected Play List item.
Loops In this field, enter the number of times you wish the selected Play List item to loop (play again). Each item in the
Play List can loop a different number of times.
Play Pressing this button plays the cue ranges in the order listed, looping selections if specified. Play begins at the
currently highlighted item in the Play List and goes to [End].
During playback the Play button turns into a Stop button.
Page 99

ADOBE AUDITION
User Guide
Autocue This control plays the currently highlighted item in the Play List (or the first item if nothing is highlighted),
and stops on the next item in the Play List. Thus, the next item in the Play List will be played every time Autocue is
pressed.
Move Up Push this button to move the highlighted item in the Play List up one position.
Move Down Click on this button to move the highlighted item in the Play List down one position.
Show Transport Buttons
Check this item to display Adobe Audition’s Transport Buttons, which are used to play, stop, pause, rewind, and fast
forward the active waveform or session. The Transport Buttons window is dockable.
Note: More information on the Transport Buttons can be found in the “Looking at the Work Area” chapter.
Show Zoom Buttons
Select this item to display Adobe Audition’s Zoom Buttons. The Zoom Buttons window is a dockable window, allowing
you to reposition it at one of several places in the Adobe Audition interface.
Note: More information on the Zoom Buttons can be found in the “Looking at the Work Area” chapter.
85
Show Time Window
Select this item to show Adobe Audition’s Time Window. This dockable window displays the current position of the
playback cursor. The default display value is mm:ss:ddd (minutes:seconds:thousandths of a second), but this can easily
be changed by right-clicking on the Time Window and choosing another option, such as Compact Disc, Samples, Bars
and Beats, or one of several SMPTE values.
Note: More information on the Time Window can be found in the “Looking at the Work Area” chapter.
Show Sel/View Controls
When checked, the Sel/View Controls window is displayed. (“Sel” is an abbreviation for Selection.) This window shows
the beginning and ending points, as well as the total length of both the selection and the section of the waveform that’s
currently viewed. The selection and display range are each shown using the current time display format.
Note: More information on the Sel/View Controls window (which is dockable) is in the “Looking at the Work Area” chapter.
Show Level Meters
Click on this option to display Adobe Audition’s Level Meters, which appear by default near the bottom of both Adobe
Audition’s Edit View and Multitrack View windows. These meters display both record and playback levels. The Level
Meters window is dockable.
Page 100

CHAPTER 7
86
View Menu – Edit View
Note: More information on the Level Meters can be found in the “Looking at the Work Area” chapter.
Show a Placekeeper
Select Show a Placekeeper to create a blank, dockable window called a “placekeeper”. Use it to more accurately define
where you want a dockable window to be, especially for windows that are only useful when viewed in a certain aspect
ratio.
Note: More information on Placekeepers can be found in the “Looking at the Work Area” chapter.
Display Time Format
The Display Time Format menu lets you choose between several time display readouts, including Decimal, Compact
Disc, different versions of SMPTE, Samples, Bars and Beats, and Custom time code frame rates. Adobe Audition will then
use the format chosen here when referencing time: the Time Window, the x-axis (time) ruler, time status boxes, Status
Bar, etc.
Selectively cycle through the available time formats by double-clicking on the waveform ruler. In addition, right-clicking
on the horizontal time waveform ruler or the main time display will pop-up a window that allows you to select between
formats.
Decimal (mm:ss:ddd) This display type numerically indicates time in an mm:ss:ddd (minutes, seconds, decimal) format.
Compact Disc 75 fps This time format used is the same one utilized by audio compact discs, where each second equals
75 frames.
SMPTE 30 fps Time is displayed in the SMPTE format where 30 frames equal one second.
SMPTE Drop (29.97 fps) This display type numerically indicates time in the SMPTE Drop format of 29.97 frames-per-
second.
SMPTE 29.97 Use this option to display time in the SMPTE Non-Drop format of 29.97 frames-per-second.
SMPTE 25 fps (EBU) Time is displayed using the standard European frame rate standard of 25 frames per second.
SMPTE 24 fps (Film) Use this SMPTE time format when working with film, where 24 frames equal one second.
Samples This display type indicates time numerically using the actual number of samples that have passed since the
beginning of the edited file as a reference.
Bars and Beats This displays time in a musical measures format of bar:beat:ticks per beat. You can adjust the number of
ticks per beat, tempo, and other properties in the Edit Tempo… dialog, which is described below.
Custom (XX frames/sec) This option will default to the time code setting that was last selected in View > Display Time
> Define Custom Frames… For example, if a custom time code setting of 15 frames-per-second was chosen in a previous
session, this option would show as “Custom (15 frames/sec)”.
 Loading...