

Page 1

Online Help
version
®
Adobe Atmosphere
1.0
Page 2

2001 Adobe Systems Incorporated. All rights reserved.
Adobe® Atmosphere™ Builder
This manual, as well as the software described in it, is furnished under license and may be used or copied only in accordance
with the terms of such license. The content of this manual is furnished for informational use only, is subject to change without notice, and should not be construed as a commitment by Adobe Systems Incorporated. Adobe Systems Incorporated
assumes no responsibility or liability for any errors or inaccuracies that may appear in this book.
Except as permitted by such license, no part of this publication may be reproduced, stored in a retrieval system, or transmitted, in any form or by any means, electronic, mechanical, recording, or otherwise, without the prior written permission of
Adobe Systems Incorporated.
Please remember that existing artwork or images that you may want to include in your project may be protected under
copyright law. The unauthorized incorporation of such material into your new work could be a violation of the rights of the
copyright owner. Please be sure to obtain any permission required from the copyright owner.
Any references to company names in sample templates are for demonstration purposes only and are not intended to refer to
any actual organization.
Adobe and the Adobe logo are trademarks of Adobe Systems Incorporated. Microsoft and Windows are registered trademarks of Microsoft Corporation in the U.S and/or other countries. All other trademarks are the property of their respective
owners.
Notice to U.S. government end users. The software and documentation are “commercial items,” as that term is defined at 48
C.F.R. §2.101, consisting of “commercial computer software” and “commercial computer software documentation,” as such
terms are used in 48 C.F.R. §12.212 or 48 C.F.R. §227.7202, as applicable. Consistent with 48 C.F.R. §12.212 or 48 C.F.R.
§§227.7202-1 through 227.7202-4, as applicable, the commercial computer software and commercial computer software
documentation are being licensed to U.S. government end users (A) only as commercial items and (B) with only those rights
as are granted to all other end users pursuant to the terms and conditions set forth in the Adobe standard commercial
agreement for this software. Unpublished rights reserved under the copyright laws of the United States.
Page 3

Contents
iii
Atmosphere Builder Basics
Building Worlds
About Atmosphere Builder . . . . . . . . . . . . . . . . . . . . . . . . . . . . . 1
Creating and opening worlds . . . . . . . . . . . . . . . . . . . . . . . . . . . 1
Working with views . . . . . . . . . . . . . . . . . . . . . . . . . . . . . . . . . . . . 2
Navigating in wireframe views . . . . . . . . . . . . . . . . . . . . . . . . . . 3
Navigating in Browser view . . . . . . . . . . . . . . . . . . . . . . . . . . . . . 5
Using the Actor object . . . . . . . . . . . . . . . . . . . . . . . . . . . . . . . . . . 6
Using palettes . . . . . . . . . . . . . . . . . . . . . . . . . . . . . . . . . . . . . . . . . . 7
Saving and publishing worlds . . . . . . . . . . . . . . . . . . . . . . . . . . 8
Closing and quitting . . . . . . . . . . . . . . . . . . . . . . . . . . . . . . . . . . . . 9
About building worlds . . . . . . . . . . . . . . . . . . . . . . . . . . . . . . . . . 11
Adding objects to a world . . . . . . . . . . . . . . . . . . . . . . . . . . . . . 13
Specifying where to add objects . . . . . . . . . . . . . . . . . . . . . . . 15
Using the Object Inspector palette . . . . . . . . . . . . . . . . . . . . . 16
Creating floors . . . . . . . . . . . . . . . . . . . . . . . . . . . . . . . . . . . . . . . . 17
Creating walls . . . . . . . . . . . . . . . . . . . . . . . . . . . . . . . . . . . . . . . . . 18
Creating slabs and trislabs . . . . . . . . . . . . . . . . . . . . . . . . . . . . . 19
Creating boxes . . . . . . . . . . . . . . . . . . . . . . . . . . . . . . . . . . . . . . . . 21
Creating cones and columns . . . . . . . . . . . . . . . . . . . . . . . . . . . 21
Creating stairs . . . . . . . . . . . . . . . . . . . . . . . . . . . . . . . . . . . . . . . . . 23
Combining objects . . . . . . . . . . . . . . . . . . . . . . . . . . . . . . . . . . . . 25
Exporting and publishing objects . . . . . . . . . . . . . . . . . . . . . . 27
Working with Objects
About working with objects . . . . . . . . . . . . . . . . . . . . . . . . . . . 29
Using the Objects palette . . . . . . . . . . . . . . . . . . . . . . . . . . . . . . 29
Using the Tool Inspector palette . . . . . . . . . . . . . . . . . . . . . . . 30
Selecting objects . . . . . . . . . . . . . . . . . . . . . . . . . . . . . . . . . . . . . . 30
Viewing selected objects . . . . . . . . . . . . . . . . . . . . . . . . . . . . . . 32
Moving objects . . . . . . . . . . . . . . . . . . . . . . . . . . . . . . . . . . . . . . . 33
Deleting objects . . . . . . . . . . . . . . . . . . . . . . . . . . . . . . . . . . . . . . 33
Duplicating objects . . . . . . . . . . . . . . . . . . . . . . . . . . . . . . . . . . . 33
Aligning and connecting objects . . . . . . . . . . . . . . . . . . . . . . 34
Grouping objects . . . . . . . . . . . . . . . . . . . . . . . . . . . . . . . . . . . . . . 36
Page 4

CONTENTS
iv
Locking objects . . . . . . . . . . . . . . . . . . . . . . . . . . . . . . . . . . . . . . . 37
Showing and hiding objects . . . . . . . . . . . . . . . . . . . . . . . . . . . 38
Resizing objects . . . . . . . . . . . . . . . . . . . . . . . . . . . . . . . . . . . . . . . 38
Transforming objects . . . . . . . . . . . . . . . . . . . . . . . . . . . . . . . . . . 39
Adding Textures and Colors
Adding Lighting
Creating effects with
JavaScript
Connecting Worlds, Users,
and the Web
About surface textures and colors . . . . . . . . . . . . . . . . . . . . . 43
Importing textures . . . . . . . . . . . . . . . . . . . . . . . . . . . . . . . . . . . . 44
Applying textures . . . . . . . . . . . . . . . . . . . . . . . . . . . . . . . . . . . . . 45
Applying colors . . . . . . . . . . . . . . . . . . . . . . . . . . . . . . . . . . . . . . . 46
Editing textures . . . . . . . . . . . . . . . . . . . . . . . . . . . . . . . . . . . . . . . 46
Rendering surface textures and colors . . . . . . . . . . . . . . . . . 51
Deleting surface textures . . . . . . . . . . . . . . . . . . . . . . . . . . . . . . 52
About lighting . . . . . . . . . . . . . . . . . . . . . . . . . . . . . . . . . . . . . . . . 53
Creating luminous surfaces . . . . . . . . . . . . . . . . . . . . . . . . . . . . 53
Editing luminous surfaces . . . . . . . . . . . . . . . . . . . . . . . . . . . . . 55
Lighting a world . . . . . . . . . . . . . . . . . . . . . . . . . . . . . . . . . . . . . . . 56
About working with JavaScript . . . . . . . . . . . . . . . . . . . . . . . . 61
Attaching a script to a world . . . . . . . . . . . . . . . . . . . . . . . . . . . 61
Using the Atmosphere JavaScript API . . . . . . . . . . . . . . . . . . 62
Creating gateways . . . . . . . . . . . . . . . . . . . . . . . . . . . . . . . . . . . . 67
Creating links to Web sites . . . . . . . . . . . . . . . . . . . . . . . . . . . . . 70
Administering worlds . . . . . . . . . . . . . . . . . . . . . . . . . . . . . . . . . 70
Embedding the Atmosphere Browser plug-in in a Web
page . . . . . . . . . . . . . . . . . . . . . . . . . . . . . . . . . . . . . . . . . . . . . . . . . . 72
Building Avatars
Index
About avatars . . . . . . . . . . . . . . . . . . . . . . . . . . . . . . . . . . . . . . . . . 73
Creating avatars . . . . . . . . . . . . . . . . . . . . . . . . . . . . . . . . . . . . . . . 74
Making avatars available to users . . . . . . . . . . . . . . . . . . . . . . 75
Page 5

Atmosphere Builder Basics
About Atmosphere Builder
The Atmosphere Builder application provides tools for building virtual three-dimensional
worlds and publishing them on the Web. Users can explore published worlds on the Web
using the Atmosphere Browser. The experience of exploring a world is much like a video
game, except that Atmosphere Builder worlds can be linked together and explored over the
Internet at realistic speeds, with high resolution, realistic lighting effects, and in full color.
Users that are exploring the same world can see representations of each other called
avatars
, and converse with one another by typing messages in a chat window.
Creating and opening worlds
When you start Atmosphere Builder for the first time, you will see a variety of palettes and
a menu bar. The menus at the top of your screen provide access to commands, and the
palettes contain tools and options for building a 3D world. When you create a new world
or open an existing world, a document window appears on your screen. You can have only
one document window open at a time.
1
To create a new world:
Choose File > New.
To open a world:
1
Choose File > Open.
2
Select the name of the file you want to open, and click Open.
Note:
You can only open Atmosphere files using the Open command. For information on
importing Viewpoint files, see “Importing objects” on page 14.
Page 6

2
Atmosphere Builder Basics
Working with views
The document window displays a
three wireframe views to see a blueprint representation of your world called a
or you can choose Browser view to see your world with its surface textures, colors, and
lighting. Browser view shows you how your world will appear when viewed on the Web in
the Atmosphere Browser.
About views
Building a world is easier when you understand how to use the different views. If you’ve
ever worked in a 3D modeling application or sketched out plans for a building project,
you’re already familiar with the concept of using views. Atmosphere Builder provides four
ways to view a world. The three wireframe views show you the structure of the world and
how the objects are connected to each other; the fourth view shows a preview of the world
as it will appear in the Atmosphere Browser with surface textures, colors, and lighting
applied to objects.
view
of the objects in a world. You can choose one of
wireframe
;
Top view
Shows the top of the wireframe from a position directly above it. When you first
create or open a world, this is the initial view in the document window.
Side view
Shows the side of the wireframe. You’ll frequently switch between the Top view
and Side view when placing and aligning objects in Atmosphere Builder.
Isometric view
Shows the wireframe from an oblique angle that is above and to the side
of it. Isometric view is useful for getting an overview of where objects are in the world.
Page 7
ADOBE ATMOSPHERE
User Guide
3
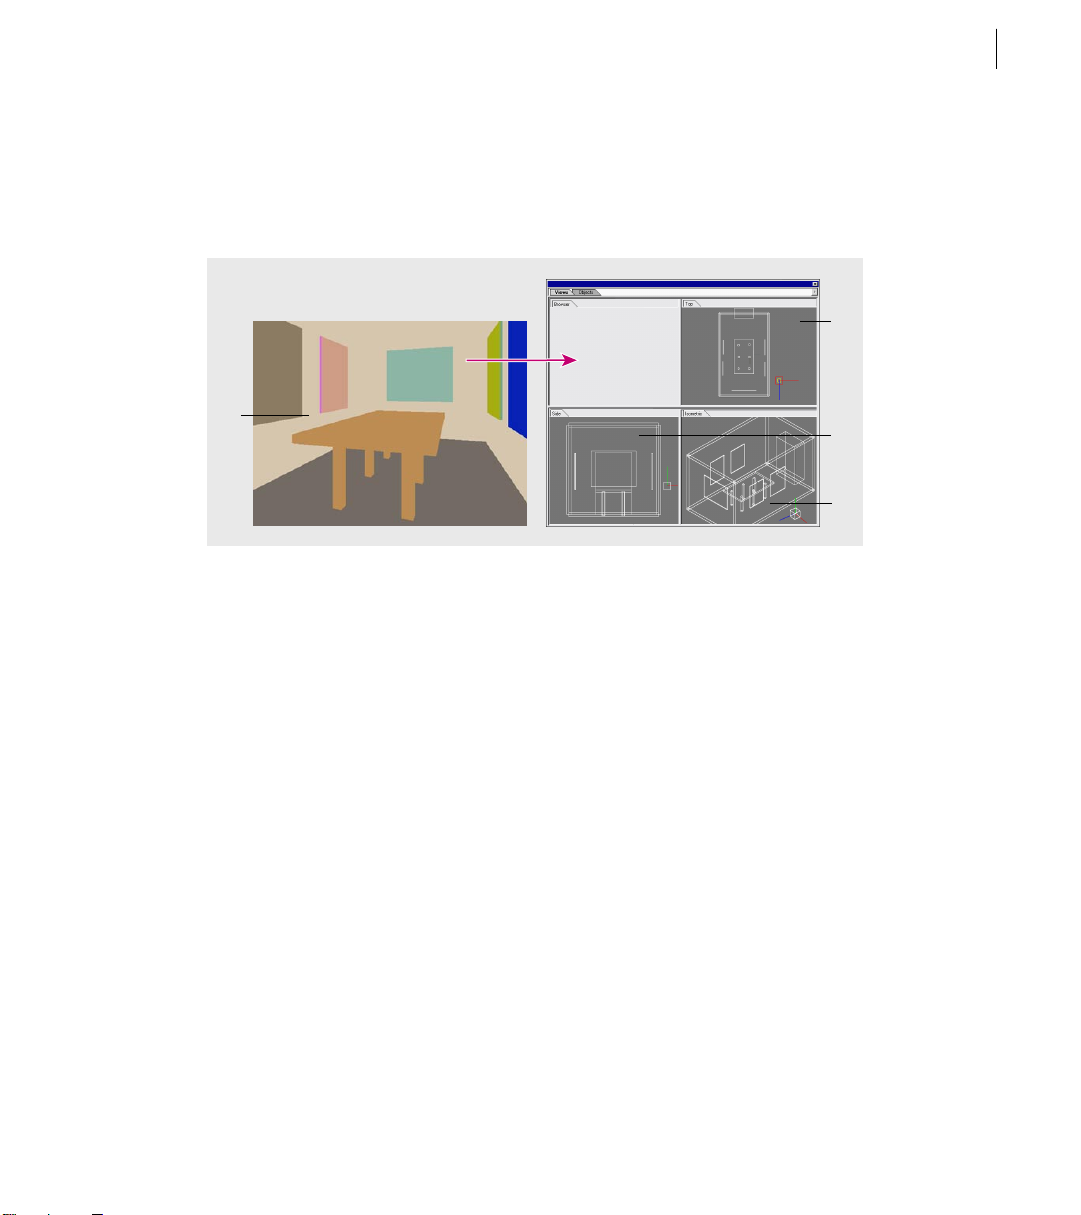
Browser view
Shows a rendered, three-dimensional view of your world that you can move
through and explore. You use Browser view to apply surface textures and colors to the
objects you created in wireframe view, and to adjust the lighting in the world. Keep in
mind that what you see in Browser view is what users will see on the Web.
B
A
A
. Browser view B. Top view C. Side view D. Isometric view
C
D
Selecting a view
You can use the Views palette or the Views menu to select a view.
To display the Views palette:
Choose Window > Views.
To select a view:
Do one of the following:
•
Click a view in the Views palette.
Choose a view from the View menu.
•
Navigating in wireframe views
Navigating is essential to building a world. You can scroll, rotate, magnify, and reduce a
view to better see the portion of the wireframe you want to work on.
Page 8
4
Atmosphere Builder Basics
Scrolling wireframe views
If the area of the wireframe you want to work on is not visible in the document window,
you can scroll to bring that area into view.
To scroll a view:
Select the pan tool
Rotating wireframe views
You can rotate a wireframe view in the document window to see the objects from a
different perspective. Keep in mind that rotating the view does not change the orientation
of individual objects, only the angle at which you see the wireframe as whole. For information on rotating individual objects, see “Rotating objects” on page 40.
To rotate a view:
1
2
to rotate the view counter-clockwise.
()
, and drag in the document window.
Select the rotate objects tool
.
()
Drag to the left in the document window to rotate the view clockwise; drag to the right
Magnifying and reducing wireframe views
You can magnify your view to see the wireframe in greater detail, or you can reduce your
view to see a larger portion of the wireframe. Keep in mind that zooming in and out does
not change the actual size of the objects, only the magnification at which you see them.
For information on changing the scale of objects, see “Scaling and distorting objects” on
page 41.
To zoom in and out by dragging:
Select the zoom tool
1
2
Drag to the right in the document window to zoom in, or to the left to zoom out. Your
view zooms in and out on a continuous range of percentages based on how much you drag.
To zoom in by clicking:
Select the zoom in tool
to magnify.
.
()
()
, and click a point in the wireframe around which you want
Page 9

ADOBE ATMOSPHERE
To zoom out by clicking:
Select the zoom out tool
()
, and click a point in the wireframe around which you want
to reduce magnification.
Centering wireframes in the document window
After navigating in the wireframe views, you can quickly display all of the objects in the
wireframe and center the view in the document window.
To center a wireframe in the document window:
Choose View > Fit All.
Navigating in Browser view
Browser view presents a shaded, perspective view of a world. You can navigate around this
world using your mouse and keyboard commands. You can move forward and backward
through doorways, climb up and down stairs, and look side to side. You can also set
options that determine the quality of your movement.
User Guide
5
To navigate in Browser view:
Select the move tool
1
Do one or more of the following:
2
•
Drag in a world to change your point of view: drag to the left to turn left, drag to the
.
()
right to turn right, drag up to move forward, and drag down to move backward.
•
Press an arrow key to change your point of view: press the left arrow key to turn left, the
right arrow key to turn right, the up arrow key to move forward, and the down arrow key
to move backward.
Shift-drag up or down, or hold down Shift+up arrow key or Shift+down arrow key, to
•
move vertically in the world. Shift-drag right or left, or hold down Shift+right arrow key
or Shift+left arrow key, to move horizontally (side to side) in the world.
•
Ctrl-drag to rotate around your current position (as if you are turning your head and
looking). When you Ctrl-drag to the side, your subsequent movement is determined by
the direction in which you are looking. For example, if you Ctrl-drag to the right, release
the Ctrl key, and then drag forward, you will move along a forward trajectory to the right.
Page 10
6
Atmosphere Builder Basics
To set move tool options:
1
2
page 16.)
3
•
objects in the world, like walls, floors, and so on, will block your passage. If you deselect
Collide, you will be able to move through objects in the world without resistance.
•
drawn to the floor or ground plane of the world. If you deselect Gravity, you can change
your vertical position and hover above or below the ground plane of the world.
Note:
checkbox does not change). When you reselect Collide, Gravity is reenabled.
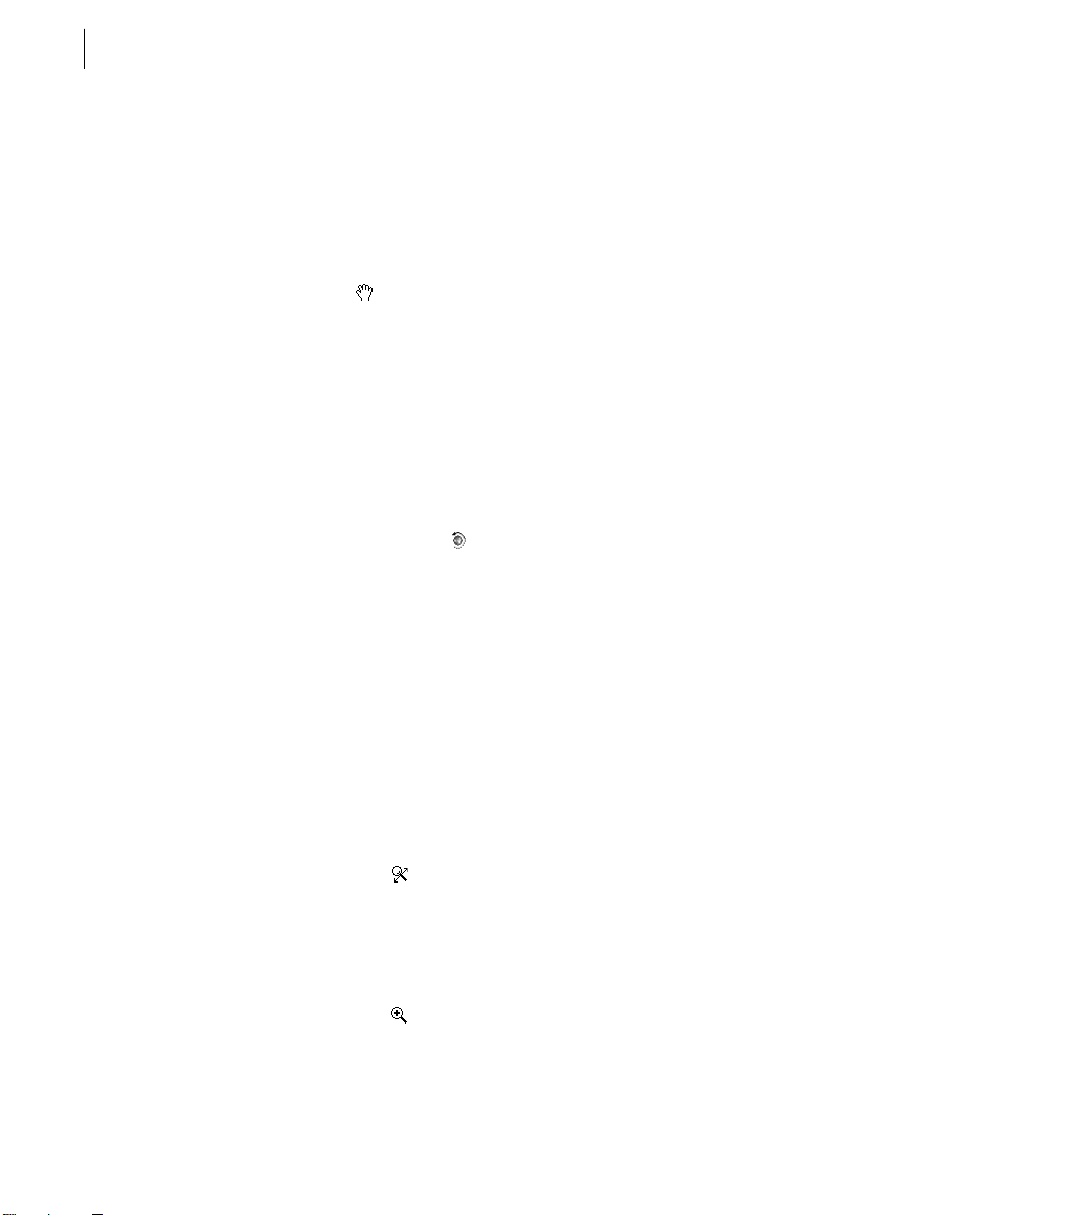
Using the Actor object
The Actor is a special object that appears in each wireframe view and reflects your current
location and orientation in the Browser view.
Select the move tool
()
.
Display the Tool Inspector palette. (See “Using the Object Inspector palette” on
Select or deselect the following options:
Collide to specify whether or not you can move through objects. If you select Collide,
Gravity to specify the effects of gravity on your movement. If you select Gravity, you are
When you deselect Collide, Gravity is implicitly disabled (although the Gravity
Moving the Actor object in a wireframe view changes your position in Browser view.
To change your position and orientation in Browser view using the Actor object:
Select a wireframe view: Top, Side, or Isometric.
1
Select the Actor object
2
Drag the Actor object to the desired position in the wireframe.
3
or ). (See “Selecting objects” on page 30.)
(
Page 11

ADOBE ATMOSPHERE
4
If necessary, rotate the Actor object until it is pointing in the direction you want to face
in Browser view. (See “Rotating objects” on page 40.)
Switch to Browser view.
5
Using palettes
Atmosphere Builder features a variety of palettes that you use to perform different tasks,
including selecting tools and views, adding objects to a world, and setting the properties
of those objects. When you first start Atmosphere Builder, several palettes are displayed by
default. You can choose to show and hide palettes as you work.
group
is a window that lets you organize palettes. You can move all palettes into a single
A
group or move each palette into its own group window. You can also close and resize
groups to make better use of your work area.
To show a palette and any palettes in its group:
Choose the palette’s name in the Window menu.
To hide a palette and any palettes in its group:
Click the close box in the upper right corner of the group window.
User Guide
7
To bring a palette to the front of its group:
Click the palette’s tab, or choose the palette’s name in the Window menu. A check mark
next to the palette’s name in the Window menu indicates that the palette is visible and at
the front of its group.
To move a palette between groups:
Drag the palette’s tab to another group.
To move a palette so that it appears in its own window:
Drag the palette’s tab to the desktop.
To move a group of palettes:
Drag the group’s title bar.
Page 12

8
Atmosphere Builder Basics
To resize a group window:
Drag the lower right corner of the window.
To collapse a group of palettes to a tab at the right edge of the screen:
Ctrl-click the title bar of the group window. To expand the group window, click the tab at
the right edge of the screen.
Saving and publishing worlds
When you save a world, Atmosphere Builder creates a single file; when you publish a
world, Atmosphere Builder collects all files required to open a world into one folder.
Important:
Be sure to use the Publish command, rather than the Save or Save As command,
when you are ready to post your world on a Web server.
Saving a world
When you save a world, its geometry, lighting, and colors are preserved in the world file.
However, all textures and Viewpoint objects are maintained as separate files and loaded by
reference. This means that you must keep texture and Viewpoint files in the same relative
location to the world file. If Atmosphere Builder can’t locate a texture file, a solid color will
be substituted for the missing texture.
To save a world:
Choose File > Save.
To save a world with a different name:
Choose File > Save As.
1
2
Locate and open the folder where you want to save the world.
3
Enter a name, and click Save.
Page 13

ADOBE ATMOSPHERE
Publishing a world
Publishing accomplishes several tasks to ensure that your world will function correctly
when you post it on the Web. First, the Publish command copies all of the files required to
open a world, including its referenced texture files and Viewpoint objects, into one folder.
The URL of each texture file is updated to its new location. If you don’t want the texture
to be copied and its URL to be updated, you can select the Absolute Path option in the
Object Inspector palette. (See “Viewing and updating the location of textures” on
page 50.)
Second, the Publish command generates a snapshot for every entry point in your world.
This snapshot is what users see when they create a bookmark for your world. If your world
does not include an entry point when you publish it, Atmosphere generates a default entry
point based on your location in the world. (See “Creating an entry point” on page 67.)
To publish a world:
Choose File > Publish.
1
Locate and open the folder where you want to store all of the files for the world.
2
3
Enter a name, and click OK.
User Guide
9
To place the world on a Web site, use any standard FTP software application to upload the
contents of the folder to a Web server.
Closing and quitting
When you’re done working in Atmosphere Builder, you can close the current world file
and exit the application.
To close a world file:
Choose File > Close
To quit Atmosphere Builder:
Choose File > Exit.
If you did not save the file before choosing the Exit command, the Save dialog box appears.
Enter a name for the file (if necessary), and click Save.
Page 14

Page 15

Building Worlds
About building worlds
There are two main aspects to building the structure of a world. The first is creating
objects; the second is laying out objects in relation to each other.
Creating objects
Objects are the building blocks of a three-dimensional world—you use objects to define
space and give form to your vision. Atmosphere Builder provides tools for creating basic
geometric forms called
slabs, stairs, columns, and cones—let you quickly lay out the framework of a world.
When you build with structure in Atmosphere Builder, you are working with the
principles of constructive solid geometry. Because primitives are solid objects, they are
easy to combine and form a solid structure. (You don’t have to worry about wrapping
polygons around a structure as you do in some 3D applications.) You can use primitives
to create more complex objects by adding them together or subtracting them one from the
another. Take, for example, a box object and wall object that intersect each other. By
selecting the Connect Objects option in the Tool Inspector palette, Atmosphere Builder
combines the objects to create a solid that represents a wall with a protruding box.
However, you can choose to subtract the volume of the box from that of the wall, in which
case you create a solid that represents a wall with a hole in it. You can also choose to
intersect the volumes of the box and the wall, in which case you create a solid that has the
depth of the wall and the height and width of the box.
primitives
. Primitives—such as boxes, floors, polygons, walls,
11
Page 16
12
Building Worlds
Although you can create an infinite variety of objects using constructive solid geometry,
there are some objects that you cannot create in Atmosphere Builder. Organic shapes,
such as the human form, and spheres may only be approximated using the available primitives. This is where 3D objects saved in the Viewpoint file format come into play.
Importing Viewpoint objects provides a way to add additional detail to a world. For
example, you can create a model of a fish in another 3D modeling application and import
it into Atmosphere Builder as a Viewpoint object.
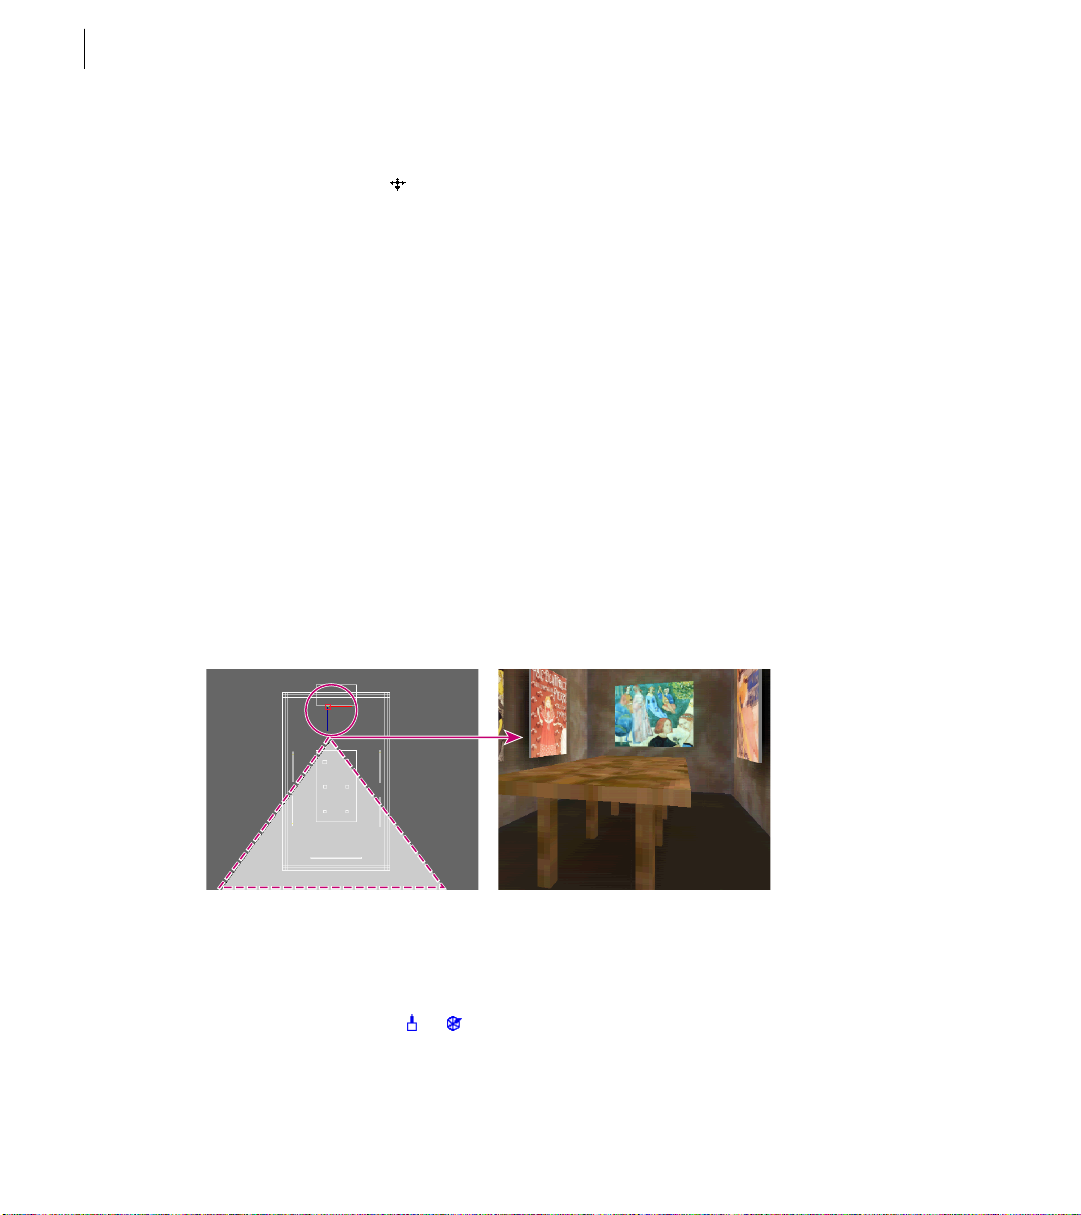
D
A
B
C
A.
Box object B. Floor object C. Cone object
G
. Slab object H. Viewpoint object
D.
E
F
G
H
Wal l ob jec t E. Stairs object F. Column object
Laying out objects
When building a world, the space between objects is as important as the objects
themselves. For example, if you build a room using two floor objects and four wall objects,
the amount of the space inside the room is defined by the relationship between objects.
You can create a tall, narrow space by creating a narrow floor and tall walls, or you can
create an expansive space by creating a wide floor and short walls.
Page 17

ADOBE ATMOSPHERE
As you add objects to a world, the relationship between objects becomes more complex.
For example, if you want to increase the length of a room, all of the room’s components
(the floor, walls, and ceiling) must change.
Connectors
let you link objects to each other
and maintain their spatial relationships. Think of connectors as the bolts of your world.
When objects are linked, you can move one connector to adjust an entire structure.
User Guide
13
Atmosphere manages the connections between objects in a world using
constraints
.
Constraints determine how an object can be moved. For example, when you move a wall
object that is connected to a floor object, Atmosphere Builder constrains the movement
so that the wall remains vertical, the floor remains horizontal, and the wall and floor
remain connected. This system of constraints adds stability to your world.
Adding objects to a world
You can add objects to a world using the object tools that appear in the Variable Tools
palette.
Creating new objects
The Variable Tools palette contains specialized tools for creating boxes, walls, floors, cones,
columns, and stairs, as well as portals and entry points that let users travel between worlds.
To create a new object:
1 Select a wireframe view: Top, Side, or Isometric.
2 Select a tool in the Variable Tools palette.
3 If desired, set object properties in the Object Inspector palette. (See “Using the Object
Inspector palette” on page 16.)
4 Do one of the following:
• Click in the document window to place the object.
• Hold the mouse button in the down position and drag in the document window to
position the object. Note that dragging does not allow you to resize the object; it simply
allows you to reposition the object.
After creating an object, you can change its properties in the Object Inspector palette.
Page 18

14
Building Worlds
Importing objects
Importing lets you bring additional 3D content into the Variable Tools palette. You can
import two types of content: Atmosphere content and content saved in Viewpoint file
format.
• Atmosphere content comprises any world (or portion of a world) that you create and
save in Atmosphere Builder. Creating Atmosphere content makes it easy to reuse objects
between worlds. For example, you can create furniture, landscaping, and other libraries of
objects that you want to use repeatedly.
• You can create 3D content in a third-party application and import it into Atmosphere as
a Viewpoint object. Some 3D applications let you directly export scenes to Viewpoint
(MTX) format. If this is not the case with your 3D application, you can save the scene in
MTS, OBJ, or ASE file and using the Viewpoint Scene Builder application to output an
MTX file. An MTX file is an XML file that contains parameters describing the scene’s 3D
objects and the 3D scene itself. For more information about Viewpoint format, see the
Viewpoint Web site at www.viewpoint.com.
To import Atmosphere content:
1 Choose File > Import Objects.
2 Select the name of the file you want to open, and click Open. The content appears as a
tool in the Variable Tools palette.
To import Viewpoint content:
1 Choose File > Import Viewpoint Objects.
2 Select the name of the file you want to open, and click Open. The content appears as a
tool in the Variable Tools palette.
For more information on using object tools, see “Creating new objects” on page 13.
Page 19

ADOBE ATMOSPHERE
Specifying where to add objects
When you work in Top view or Side view, objects are represented in two dimensions. For
example, if you place a box in Top view, you can see the object’s width and depth but not
its height. Similarly, if you place the same box in Side view, you can see the object’s width
and height but not its depth. How, then, can you determine the exact location of an object
in the world? The Axis Reference object fulfills this role.
You use the Axis Reference object to specify the exact location for the object before you
place it. For example, before placing a box in Top view, you can move the Axis Reference
object in Side view to where you want to bottom of the box to be. Using the Axis Reference
object is especially useful when you want to add multiple objects and align them at the
same time, such as four columns in a line in front of a floor.
To select the Axis Reference object:
Do one of the following:
• Select the select tool (), and click the Axis Reference object ( or ) in the
document window.
• Select the object in the Objects palette.
User Guide
15
Note: If you can’t find the Axis Reference object in the document window, an EntryPoint
object may be obscuring it. Use the select tool to move the EntryPoint object
( or ) to a
different position.
To specify where to add an object:
1 Determine the view in which you want to add the new object.
2 Do one of the following:
• If you want to place the object in Top view, select the Axis Reference object in Side view
or Isometric view.
• If you want to place the object in Side view, select the Axis Reference object in Top view
or Isometric view.
•
If you want to place the object in Isometric view, select the Axis Reference object in any view.
Page 20

16
Building Worlds
3 Select the select tool and drag the yellow square on the Axis Reference object to the
desired location. The location that is specified by the Axis Reference object depends on
two factors: the type of object you add and the view in which you position the Axis
Reference object.
Object: Specifies the following location in
Side view:
wall bottom edge of wall midpoint of wall thickness
floor midpoint of floor thickness center of floor
slab midpoint of slab thickness edge of slab
stair, column, or cone bottom edge of stair, column, or cone center of stair, column, or cone
box, entry point, or portal center of box, entry point, or portal center of box, entry point, or portal
Specifies the following location in
Top view or Isometric View:
4 Select the view in which you want to add the new object, and use an object in the
Variable Tools palette to create the object. (See “Creating new objects” on page 13.)
Using the Object Inspector palette
The Object Inspector palette is context sensitive and changes as different objects are
selected. Some settings in the Object Inspector palette are common to several objects
(such as the Visible in Wireframe Views, Hide in Browser View, Locked, and Subtractive
options), and some are specific to one object (such as the Entry Point Title option for the
entry point tool).
To set options in the Object Inspector palette:
1
If the Object Inspector palette is hidden, choose Window > Object Inspector to display it.
2 Select a tool in the Variable Tools palette.
3 Select options in the Object Inspector palette. For more information on specific
options, see the related topic. For example, for information on the Faces and Radius
options for the column tool, see “Creating cones and columns” on page 21.
Page 21

ADOBE ATMOSPHERE
Creating floors
A floor object is any flat, horizontal surface in an Atmosphere world. In the real world, we
define a floor as something we walk on; in Atmosphere, you can also use a floor object as
a ceiling or as any other flat horizontal surface such as a patio or deck. The floor tool lets
you create a floor object that is initially square; however, you can adjust the length of each
side by dragging the floor’s connectors. Floor objects always remain horizontal in a world,
no matter how you adjust their connectors. For example, if you’re working in Side view
and move one of the floor’s connectors up, the whole floor (and any floor sections
connected to it) moves up to keep the floor horizontal.
To add a floor object:
1 Select the floor tool () in the Variable Tools palette.
2 If desired, set one or more options in the Object Inspector palette:
• Object Name to enter a name for the object that will appear in the Object Inspector
palette and the Objects palette.
• JavaScript URL to attach a script to the object. (See “Attaching a script to a world” on
page 61.)
• Visible in Wireframe Views to show the object after you create it. (See “Showing and
hiding objects” on page 38.)
• Hide in Browser View to create a hidden object, such as a hidden luminous object. (See
“Creating hidden luminous objects” on page 54.)
• Locked to lock the object. (See “Locking objects” on page 37.)
• Subtractive to use the object to cut through another object. (See “Creating openings in
objects” on page 26.)
• Thickness to specify the thickness of the horizontal surface in feet.
User Guide
17
3 Click in the document window. If you’re working in Top view or Isometric view, click
where you want to locate the center of the floor. If you’re working in Side view, click where
you want to locate the midpoint of the floor thickness. Hold down the mouse button and
drag to reposition the object.
Page 22

18
Building Worlds
Creating walls
A wall object is any flat, vertical surface in an Atmosphere Builder world. You can connect
wall objects with floor objects to build rooms. You can also use a wall object by itself as any
other flat vertical surface, such as a door, a picture frame, or a fence. Wall objects always
remain vertical in a world, no matter how you adjust their connectors. For example, if
you’re working in Top view and move one of the wall’s top connectors, the corresponding
bottom connector moves up to keep the wall vertical.
You can quickly add and connect walls to a floor using the Extrude Walls from Floor
command. Atmosphere Builder adds and connects a wall object to each side of the selected
floor. This command works only with a floor.
To add a wall:
1 Select the wall tool () in the Variable Tools palette.
2 If desired, set one or more options in the Object Inspector palette:
• Object Name to enter a name for the object that will appear in the Object Inspector
palette and the Objects palette.
• JavaScript URL to attach a script to the object. (See “Attaching a script to a world” on
page 61.)
• Visible in Wireframe Views to show the object after you create it. (See “Showing and
hiding objects” on page 38.)
• Hide in Browser View to create a hidden object, such as a hidden luminous object. (See
“Creating hidden luminous objects” on page 54.)
• Locked to lock the object. (See “Locking objects” on page 37.)
• Subtractive to use the object to cut through another object. (See “Creating openings in
objects” on page 26.)
• Thickness to specify the thickness of the vertical surface in feet.
3 Click in the document window. If you’re working in Top view, click where you want to
locate the midpoint of the wall thickness. If you’re working in Side view or Isometric view,
click where you want to locate the center of the bottom edge of the wall. Hold down the
mouse button and drag to reposition the object.
Page 23
ADOBE ATMOSPHERE
To add and connect walls using the Extrude Walls from Floor command:
1 Select a floor object.
2 Choose Edit > Extrude Walls from Floor. A wall object is automatically connected to
each edge of the floor.
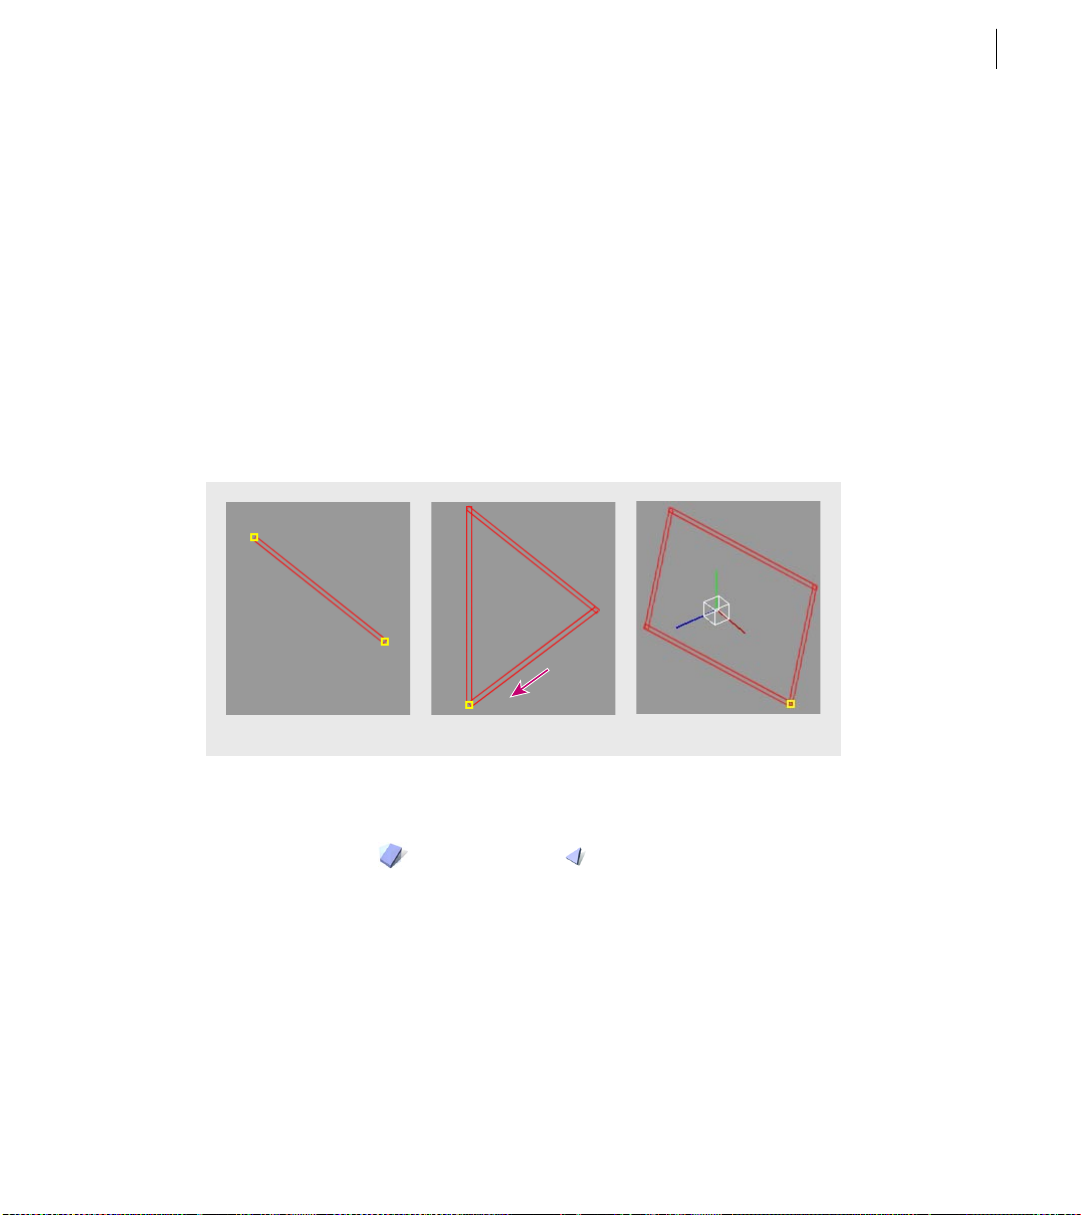
Creating slabs and trislabs
A slab is a four-sided object that can be slanted at any angle from 0 to 90 degrees, relative
to the ground in your world. For example, you can use a slab as a ramp leading up to a
floor. The slab tool lets you create an object that is initially flat, horizontal, and has four
equal sides. After you add a slab, you can change the sides of the slab to be unequal lengths,
or change the slope of the slab.
User Guide
19
A
A. The initial slab in Side view. B. Changing the sides of the slab. C. Changing the slope of the slab.
To add a slab:
B
C
1 Select the slab tool () or the trislab tool () in the Variable Tools palette.
2 If desired, set one or more options in the Object Inspector palette:
• Object Name to enter a name for the object that will appear in the Object Inspector
palette and the Objects palette.
• JavaScript URL to attach a script to the object. (See “Attaching a script to a world” on
page 61.)
Page 24

20
Building Worlds
• Visible in Wireframe Views to show the object after you create it. (See “Showing and
hiding objects” on page 38.)
• Hide in Browser View to create a hidden object, such as a hidden luminous object. (See
“Creating hidden luminous objects” on page 54.)
• Locked to lock the object. (See “Locking objects” on page 37.)
• Subtractive to use the object to cut through another object. (See “Creating openings in
objects” on page 26.)
• Thickness to specify the thickness of the slab in feet.
3 Click in the document window. If you’re working in Top view or Isometric view, click
where you want to locate the center of the slab edge. If you’re working in Side view, click
where you want to locate the midpoint of the slab thickness (or height). Hold down the
mouse button and drag to reposition the object.
To change the slope of a slab:
1 Select Side view. Although you can change the slope in Isometric view, the slope of the
slab is easier to see if you work in Side view.
2 Select the select tool ().
3 Do one of the following:
• Select the connectors on the side of the slab that you want to adjust. Drag the connectors
up or down to the desired elevation. For information on selecting multiple connectors, see
“Using the select tools” on page 30.
• If the slab is connected to another object, such as a wall, drag that object up or down.
Note: Depending on the position of its connectors, a slab can become non-planar. (A nonplanar slab is one in which no single plane can be positioned through all of its connectors.) In
this case, Atmosphere automatically breaks the slab into two triangular slabs. If the slab
becomes planar again, the break is automatically removed and a single planar slab is restored.
Page 25

ADOBE ATMOSPHERE
Creating boxes
A box is an object that has six faces: a bottom, four sides, and a top. You can use box objects
to represent solid objects such as cabinets, refrigerators, or other appliances. The box tool
lets you create an object that is a cube with six equal sides. After you add a box, you can
change its sides to be unequal lengths by dragging the box’s connectors.
To add a box:
1 Select the box tool () in the Variable Tools palette.
2 If desired, set one or more options in the Object Inspector palette:
• Object Name to enter a name for the object that will appear in the Object Inspector
palette and the Objects palette.
• JavaScript URL to attach a script to the object. (See “Attaching a script to a world” on
page 61.)
• Visible in Wireframe Views to show the object after you create it. (See “Showing and
hiding objects” on page 38.)
• Hide in Browser View to create a hidden object, such as a hidden luminous object. (See
“Creating hidden luminous objects” on page 54.)
• Locked to lock the object. (See “Locking objects” on page 37.)
• Subtractive to use the object to cut through another object. (See “Creating openings in
objects” on page 26.)
3 Click in the document window to locate the center of the box. Hold down the mouse
button and drag to reposition the object.
User Guide
21
Creating cones and columns
A column is an object that is the same diameter at all points between its top and bottom
edge. A cone is an object that can have a larger diameter at its bottom than at its top. For
example, you can use a column to hold up the roof of a building, and you can use a cone
to represent the nose cone on an airplane. You can slant a cone or column at any angle
from 0 to 90 degrees, relative to the point of view of visitors to your world.
Page 26

22
Building Worlds
Before you create a cone or column, you can specify how many sides (called faces) you
want it to have. If you increase the number of faces, the column or cone becomes increasingly circular and the surface becomes smoother. If you decrease the number of faces, the
column or cone becomes increasingly angular and the surface becomes rougher.
To add a cone or column object:
1 Select the cone tool () or the column tool () in the Variable Tools palette.
2 If desired, set one or more options in the Object Inspector palette:
• Object Name to enter a name for the object that will appear in the Object Inspector
palette and the Objects palette.
• JavaScript URL to attach a script to the object. (See “Attaching a script to a world” on
page 61.)
• Visible in Wireframe Views to show the object after you create it. (See “Showing and
hiding objects” on page 38.)
• Hide in Browser View to create a hidden object, such as a hidden luminous object. (See
“Creating hidden luminous objects” on page 54.)
• Locked to lock the object. (See “Locking objects” on page 37.)
• Subtractive to use the object to cut through another object. (See “Creating openings in
objects” on page 26.)
• Faces to specify the number of sides of a cone or column. To make the column or cone
more circular and its surface smoother, specify a larger number of faces. To make the
column or cone more angular and its surface rougher, specify a smaller number of faces.
• Radius (column tool only) to specify the width of the column.
• Top Radius and Bottom Radius (cone tool only) to specify the width at the top and
bottom of a cone.
3 Click in the document window. If you’re working in Top view, click where you want to
locate the center of the cone or column. If you’re working in Side view or Isometric view,
click where you want to locate the bottom of the cone or column. Press the mouse button
and drag to reposition the object.
Page 27

ADOBE ATMOSPHERE
Creating stairs
Stairs are an object that contain one or more steps. The shape and size of a stairs object is
determined by the location of its two top and two bottom connectors. Atmosphere Builder
uses the distance, slope, and width between the top and bottom connectors to automatically determine the number, size, and shape of the steps.
After you add a stairs object, you can drag one or more of its connectors to reshape it. For
example, you can create a spiral staircase by dragging one of the top or bottom connectors
to form a twist in the stairs object. When you change the vertical or horizontal dimensions
of a stairs object, Atmosphere Builder automatically adjusts the number and size of the
steps. For example, if you reduce the vertical height, Atmosphere Builder automatically
reduces the number of steps and increases the size of each step.
User Guide
23
A
A. Adjusting the vertical height of a stairs object in Side view. B. Adjusting the horizontal span of a stairs object
in Side view. C. Adjusting the width of the steps in Top view.
To add stairs:
B
C
1 Select the stairs tool () in the Variable Tools palette.
2 If desired, set one or more options in the Object Inspector palette:
• Object Name to enter a name for the object that will appear in the Object Inspector
palette and the Objects palette.
• JavaScript URL to attach a script to the object. (See “Attaching a script to a world” on
page 61.)
• Visible in Wireframe Views to show the object after you create it. (See “Showing and
hiding objects” on page 38.)
Page 28

24
Building Worlds
• Hide in Browser View to create a hidden object, such as a hidden luminous object. (See
“Creating hidden luminous objects” on page 54.)
• Locked to lock the object. (See “Locking objects” on page 37.)
• Subtractive to use the object to cut through another object. (See “Creating openings in
objects” on page 26.)
3 Click in the document window. If you’re working in Top view, click where you want to
locate the center of the stairs object. If you’re working in Side view, click where you want
to locate the third step from the bottom of the stairs object. If you’re working in Isometric
view, click where you want to locate the third step from the bottom of the stairs object.
Hold down the mouse button and drag to reposition the object.
To change the vertical height or horizontal span of stairs:
1 Select Top view.
2 In the Tool Inspector palette, choose Connectors for the Select option.
3 Select the select tool (), and click away from the stairs object if it’s currently selected.
4 Press Shift and select the two connectors at the end of the stairs object you want to
change.
5 Select Side view. Although you can change the size in any view, the vertical height and
horizontal span are easier to see if you work in Side view with the connectors already
selected from Top view.
6 Do one of the following:
• To change the vertical height, Shift-drag the selected connectors up or down.
• To change the horizontal span, Shift-drag the selected connectors to the right or left.
To change the width of stairs:
1 Select Top view.
2 In the Tool Inspector palette, choose Connectors for the Select option.
3 Select the select tool ().
4 Do one of the following:
• To make each step the same width, Shift-drag the two connectors at the side of the
stairs object.
Page 29

ADOBE ATMOSPHERE
• To make the top and bottom steps a different width, drag each of the connectors at the
top or bottom step. Atmosphere Builder automatically adjusts the width of each step
between the top and bottom step.
To change the shape of a stairs object:
1 Select Top view or Isometric view. Although you can change the shape of a stairs object
in any view, a twisted shape is easier to see if you work in Top view or Isometric view.
2 Select the select tool ().
3 Select one connector at the end of the stairs object you want to twist.
4 Drag the selected connector in the direction you want to move it.
Combining objects
With the constructive solid geometry features in Atmosphere Builder, you can combine
two or more objects to create a new object. There are three modes for combining objects:
Union Creates a composite object. This is the default mode for combining objects.
Intersection Creates an object from the junction of two or more objects.
User Guide
25
Subtraction Creates openings in objects.
Creating an object from a union
By selecting the Connect Objects option in the Tool Inspector palette, overlapping objects
can be combined to create a composite object. For example, you can combine a column,
cone, and floor object to create an airplane. The resulting object has a smooth surface, as
if a skin has been stretched over it.
Creating an object from an intersection
You can create a new object based on the intersecting area of two or more objects in a
group. You start by creating a composite object and grouping it together. Then, you select
the Junction option for the group. For example, you can create an elliptical-shaped object
by intersecting two columns.
Page 30

26
Building Worlds
To create an object from an intersection:
1 Create and place individual objects to form an intersection.
2 Select all of the objects, and choose Object > Group.
3 Select the group.
4 In the Object Inspector palette, select the Junction option.
5 Select the Browser view to see the resulting object.
Creating openings in objects
You can create openings in objects, such as doors or windows, using subtractive objects.
You first define the volume of the opening by creating an object or a group of objects. Then
in the Tool Inspector, select the Subtractive option for the object or group. When an object
or group has the Subtractive option selected, its volume is subtracted or cut out of the
object or group it intersects.
To avoid cutting out other objects, group the subtractive object with the objects that you
want it to cut out. If you don’t group a subtractive object, it affects all other objects in the
world. For example, if you want to place a flower vase in a window opening, group the
subtractive box object with a wall object. Then, when you position the flower vase object
within the window opening defined by subtractive box, the vase is not affected because it
isn’t in the same group as the subtractive box.
To create an opening in objects:
1 Create an object to use as an opening. You can also create a group of objects to use as
an opening.
2 Select the object or group of objects.
3 In the Object Inspector palette, select the Subtractive option.
4 Select the subtractive object, along with the objects from which you want to subtract it,
and choose Object > Group.
5 Select Browser view to see the resulting object.
Note: You can’t set the Subtractive option on entry point objects and portal objects.
Page 31

ADOBE ATMOSPHERE
Exporting and publishing objects
You can export any object or group of objects and use them in other worlds. By exporting
the objects you frequently use, you can create object libraries that save you time when
building new worlds. For example, you can create a library of objects that you use for
building a room.
The Export Objects command doesn’t change the location of any related texture files that
have been applied to the exported object. If you want to save the exported object to
another folder or location, use the Publish Objects command to move it and its related
textures together. Otherwise, you might lose track of the textures used by the exported
object.
Note: You can only export objects in the native Atmosphere format, which means that you can
only import them into other Atmosphere worlds.
To export an object:
1 Select the object or group of objects you want to export.
2 Choose File > Export Objects.
3 Enter a name, and click Save.
User Guide
27
To publish an object:
1 Select the object or group of objects you want to publish.
2 Choose File > Publish Objects.
3 Locate and open the folder where you want to publish the object and textures.
4 Enter a name, and click Save.
Page 32

Page 33

Working with Objects
About working with objects
Once you get the hang of working with objects, building a world is easy. Even in a complex
world, you can use different techniques to simplify the workflow. For example, you can use
the Objects palette to view all the objects in a world (see “Using the Objects palette” on
page 29). You can connect objects to each other to make resizing a structure easier (see
“Aligning and connecting objects” on page 34). You can lock objects, hide objects, create
hierarchies, and apply transformations.
Some people prefer to build a world methodically, others dynamically. Atmosphere
Builder facilitates many work styles, so experiment and find the techniques that work best
for you.
Using the Objects palette
Working in a world becomes more complex as you add objects to it. Objects may overlap
each other, making them difficult to select. In addition, identifying objects becomes a
challenge. For example, if you have ten box objects in a world, how do you tell which one
is a table and which one is a chair? This is where the Objects palette comes into play.
29
The Objects palette lists all of the objects in a world and provides an easy way to select and
name objects. For example, you might create a group called “Dining Room” that contains
all of the objects you want to add to a dining room, such as a table, chairs, paintings, and
so on. The relationship between objects and groups is called a hierarchy. A hierarchy adds
structure to the objects in a world and makes arranging and manipulating objects much
easier. For more information on creating groups, see “Grouping objects” on page 36.
To display the Objects palette:
Choose Window > Objects.
To expand or collapse a group in the Objects palette:
Click the plus icon () to the left of the group name.
Page 34

30
Working with Objects
Using the Tool Inspector palette
The Tool Inspector is a context-sensitive palette that displays options for the currently
selected tool in the Tools palette. Some tools do not have options, in which case the Tool
Inspector palette is empty.
To display the Tool Inspector palette:
Choose Window > Tool Inspector.
Selecting objects
Before you can work with an object, you must select it. Selecting allows you to make
changes to an object without affecting the other objects in the world. When an object is
selected, you can move it, rotate, it, edit its properties, and so on.
There are two methods for selecting objects and groups of objects. You can use the select
tools to select objects directly in the document window by clicking or dragging. Or you
can use the Objects palette to select an object or group based on its name and position in
the world hierarchy.
Object selected in Objects palette, and corresponding object in Top view.
Using the select tools
You can select objects, groups, and connectors with the following tools:
• The select tool lets you select entire objects or groups.
• The group select tool lets you select an individual object within a group, a single group
within multiple groups, or a set of groups within the framework.
Page 35

ADOBE ATMOSPHERE
To select a single object or connector:
1 Select the select tool () or the group select tool ().
2 In the Tool Inspector palette, specify the selection type:
• Objects to allow the selection of objects or groups only. This option prevents the
selection of connectors.
• Connectors to allow the selection of connectors only. This option prevents the selection
of objects and groups.
3 Do one of the following:
• Click the object or connector you want to select.
• Drag a marquee border around the object or connector you want to select.
Note: When you click to select an object, either the object or its connectors are selected, but not
both at the same time. When you drag a marquee to select an object, both the object and its
connectors are selected at the same time.
To select grouped objects:
1 Select the select tool ().
2 In the Tool Inspector palette, make sure that the Objects mode is chosen from the Select
menu.
3 Click or drag a marquee border around the grouped object you want to select.
User Guide
31
To select multiple objects, groups, or connectors:
Do one of the following:
• Shift-click additional objects, groups, or connectors.
• Drag a marquee border around the objects, groups, or connectors you want to select. If
there are undesired objects overlapping the objects you want to select, hold down Ctrl and
drag a marquee around the desired objects. The Ctrl key prevents you from selecting
objects that are located where you first click to begin dragging the marquee.
Page 36

32
Working with Objects
To select objects based on their hierarchy:
1 Use the group select tool () to select any object.
2 Ctrl-click to select all remaining objects in the current group. Each additional Ctrl-click
selects all objects in the next group in the hierarchy.
Selecting objects in the Objects palette
The Objects palette lists all the objects in an Atmosphere world. Using the Objects palette
to select objects is very convenient when you have overlapping objects, because underlying
objects can be difficult to access with select tools. For more information on using the
Objects palette, see “Using the Objects palette” on page 29.
To select an object or group in the Objects palette:
Click the name of the object or group in the Objects palette. If necessary, click the plus icon
() to the left of the group name to view its contents.
Deselecting objects
You can deselect one object or connector at a time, or all selected objects and connectors
at once.
To deselect objects or connectors:
Do one of the following:
• To deselect part of a selection, Shift-click the object or connector you want to deselect.
• To deselect everything in the world, click or drag away from any object.
Viewing selected objects
When working with objects, it can be very useful to view a specific area of the wireframe.
You can maximize your view of the selected objects in a world using the Fit Selected
command.
To maximize your view of selected objects:
Choose View > Fit Selected.
Page 37

ADOBE ATMOSPHERE
Moving objects
The composition of a world depends on the position of objects relative to other objects.
You can reposition objects by dragging them to a different location in the document
window.
To move an object or group:
1 Select a wireframe view: Top, Side, or Isometric.
2 Select the object or group you want to move. (See “Selecting objects” on page 30.)
3 With the select tool () or the group select tool (), drag the object to the desired
location. Be sure not to drag the object by one of its connectors, because you will resize the
object rather than moving it.
Use the Snap to Grid option to align an object with a grid when you drag it. (See
“Working with the grid” on page 35.)
Deleting objects
You can delete an object to remove it permanently from the world.
User Guide
33
To delete an object or group:
1 Select a wireframe view: Top, Side, or Isometric.
2 Select the object or group you want to delete. (See “Selecting objects” on page 30.)
3 Choose Edit > Clear.
Duplicating objects
Duplicating an object adds an exact copy of the object, or group of objects, to the world a
short distance below the original object.
To duplicate an object or group:
1 Select a wireframe view: Top, Side, or Isometric.
2 Select the object or group you want to duplicate. (See “Selecting objects” on page 30.)
3 Choose Edit > Duplicate.
Page 38

34
Working with Objects
Aligning and connecting objects
After adding objects to a world, you can connect the objects. Connected objects are bound
together as if nailed or bolted. When you drag an object that is connected to another
object, the objects move together as a unit or change their shape as necessary. If you drag
one of their common connectors where the objects are joined, the shapes of both objects
will change. (See “About building worlds” on page 11.)
Connecting and disconnecting objects
You can connect two objects by moving a connector on one object to a connector on the
other object, or by moving one object close to the other object until their connectors are
aligned.
To connect two objects:
1 Select a wireframe view: Top, Side, or Isometric.
2 Select the select tool () or the group select tool (). In the Tool Inspector palette, make
sure that the Connect Objects option is selected. This option controls Atmosphere
Builder’s ability to connect objects to each other.
The Closeness setting determines the snapping properties of the connectors.
3 Do one of the following:
• Drag a connector on one object to a connector on the object that you want to connect
to. Drag the remaining connectors as necessary to fully connect the two objects.
• Drag one object to another object until their connectors are aligned when viewed from
all angles.
As you drag the object, each connector displays a faint yellow halo. The yellow halo
indicates the area where a connector will snap to another connector. The size of the yellow
halo can be adjusted in the Tool Inspector palette by entering a radius value in the
Closeness text box. See“Adjusting the minimum distance required to connect objects” on
page 35.
If you align two connectors but can’t get them to snap together, the connectors may not
be at the same depth in your world. Switch to a different view to make sure that the
connectors line up in all three dimensions.
Page 39

ADOBE ATMOSPHERE
To disconnect objects:
1 Select the object you want to disconnect in a wireframe view.
2 Select either the select tool () or the group select tool ().
3 In the Tool Inspector palette, deselect Connect Objects. When this option is deselected,
you can disconnect objects that were previously connected.
4 Drag one of the objects away from the other object.
Working with the grid
You can use an invisible background grid to help you position and align objects in a world.
To snap objects to the grid:
1 Select the select tool () or the group select tool ().
2 In the Tool Inspector palette, select Snap to Grid.
To adjust the grid size:
1 Select the select tool or group select tool.
2 In the Tool Inspector palette, specify a value for Spacing. The lower the Spacing value,
the smaller the grid.
User Guide
35
Adjusting the minimum distance required to connect objects
The Closeness option in the Tool Inspector palette lets you specify how close you must
move a connector to another connector before it connects the two objects.
To adjust the minimum distance required to connect objects:
1 Select the select tool () or the group select tool ().
2 Make sure the Connect Objects option is selected in the Tool Inspector.
Selecting the Connect Objects option causes a faint yellow halo to appear at the connectors
when you move an object. This yellow halo indicates the area of the minimum distance
required to connect objects.
Page 40

36
Working with Objects
3 In the Tool Inspector palette, enter a value for Closeness. This value specifies the radius
of connectivity (the minimum distance required for one connector to snap to another).
The lower the closeness value, the smaller the yellow halos are around the connectors of
the object you’re moving. You must move a connector closer to another connector in order
to connect the objects.
Grouping objects
Grouping lets you control a set of objects as a single unit. When you manipulate a group,
all of the objects are equally affected. For example, if you resize a group, all of the objects
change in size. In addition, grouping lets you maintain the spatial relationships between
objects. For example, if you rotate a group, all of the objects are rotated around the same
axis.
To group objects:
1 Select the objects you want to group. Be sure you select the object and not the object’s
connectors. (See “Selecting objects” on page 30.)
2 Choose Object > Group.
If you’re not sure if an object is part of a group, view the hierarchy in the Objects palette.
(See “Using the Objects palette” on page 29.)
To ungroup objects:
Select the objects you want to ungroup, and choose Object > Ungroup.
To create a new group:
Choose Object > New Group. The new group appears in the Objects palette.
To add objects to an existing group:
1 Select the group to which you want to add objects.
2 Choose Object > Activate Group.
3 Create new objects as desired. The objects are added to the active group.
Page 41

ADOBE ATMOSPHERE
Locking objects
You can prevent accidental changes to objects or groups by locking them. You might want
to lock finished objects in a complex wireframe that are near or above other unfinished
objects. After you lock an object or group, you can’t select it with the select tools or make
any direct changes to it in the wireframe views. You can, however, select Browser view and
change the texture of a locked object or group.
Although you can’t select an entire locked object with the select tools, you can select the
connectors for locked object and resize it. Or if you change other objects connected to a
locked object or group, the locked object or group can change its size, shape, and location.
To lock an object or group:
1 Select a wireframe view: Top, Side, or Isometric.
2 Select the object or group you want to lock. (See “Selecting objects” on page 30.)
3 Do one of the following:
• In the Object Inspector palette, select Locked.
• In the Objects palette, click the button to the left of the object name or group name.
When a group or object is locked, a lock icon
subgroups and objects within it.
() appears. Locking a group locks all of the
User Guide
37
To unlock an object or group:
Select the object or group you want to unlock, and do one of the following:
• In the Object Inspector palette, deselect Lock.
• In the Objects palette, click the lock icon () to the left of the object name or group
name.
To lock all unselected groups or objects:
Choose Object > Lock Others.
To unlock all groups and objects:
Choose Object > Unlock All Objects.
Page 42

38
Working with Objects
Showing and hiding objects
You can hide an object or group to make it easier to work in a crowded area.
To hide an object or group:
1 Select a wireframe view: Top, Side, or Isometric.
2 Select the object or group you want to hide. (See “Selecting objects” on page 30.)
3 Do one of the following:
• In the Object Inspector palette, deselect Visible in Wireframe Views.
• In the Objects palette, click the eye icon () to the left of the object name or group
name.
To hide all unselected groups and objects:
Choose Object > Hide Others.
To show all hidden objects:
Choose Object > Show All Objects.
To show a hidden object or group:
In the Objects palette, click the visibility column button to the left of the object name or
group name. When a group or object is showing, an eye icon
() appears in the visibility
column.
Resizing objects
You can change the shape and size of an object by dragging its connectors. In addition, you
can set the thickness of some objects—such as floors, polygonal floors, slabs, and walls—
in the Object Inspector palette.
To resize an object:
1 Select a wireframe view: Top, Side, or Isometric.
2 Select the select tool () or the group select tool ().
Page 43

ADOBE ATMOSPHERE
3 Drag a connector on the object to change the size or shape of the object. If you select
more than one connector on an object, the orientation and length of the lines between the
selected connectors become fixed. Shift-drag the selected connectors to move them
together as a unit.
To change the thickness of an object:
1 Select the floor, polygonal floor, slab, or wall object you want to change.
2 In the Object Inspector palette, enter a value in the Thickness text box, or use the
Thickness slider to adjust the current value.
Transforming objects
If an object is the wrong size or in the wrong position, it won’t look right in your world.
To get the right look, you may need to scale, rotate, or distort objects. These kinds of
operations are called transformations.
About transformations
The transformation tools let you change the orientation, scale, or shape of objects. As you
transform objects, keep the following in mind:
User Guide
39
Page 44

40
Working with Objects
• The transform object tool and the rotate object tool perform their transformations in
relation to a fixed point on or around the object. This fixed point is called the point of
origin. The point of origin is wherever you click in the wireframe after selecting the
transform object tool or the rotate object tool.
A
B
Object rotated from a point of origin inside the object, and object rotated from a point
of origin outside the object
• You can undo all of the transformations that you applied to an object or group with the
transform object tool or rotate object tool. (You can only undo the transformations you
did with these two tools.)
Rotating objects
Rotating an object turns it around a fixed point that you specify with the rotate object tool.
To rotate an object or group:
1 Select a wireframe view: Top, Side, or Isometric.
2 Select the object or group you want to rotate. (See “Selecting objects” on page 30.)
3 Select the rotate object tool ().
4 Click once to set the point of origin around which you want to rotate the object. For
finer control, click inside or close to the object. A yellow circle appears around the point
of origin.
5 Drag the pointer towards the outside of the circle until a red line and a green line
appear.
Page 45

ADOBE ATMOSPHERE
6 Drag in the direction you want to rotate the object. As you drag, the green line moves
around the circle to indicate the amount of rotation. The red line remains fixed and
indicates the original orientation of the object. You can cancel the rotation by dragging the
pointer back inside the yellow circle.
7 When the object is rotated to the desired position, release the mouse button. Or, you
can undo the rotation by dragging the pointer within the circle before releasing the mouse
button.
Scaling and distorting objects
Scaling an object enlarges or reduces it horizontally (along the x axis), vertically (along the
y axis), or both horizontally and vertically relative to the point of origin. The point of
origin is wherever you click in the wireframe after selecting the transform object tool. You
can also distort the object by changing its shape and size in any direction.
To scale or distort an object or group:
1 Select a wireframe view: Top, Side, or Isometric.
2 Select the object or group you want to scale or distort. (See “Selecting objects” on
page 30.)
3 Select the scale objects tool ().
4 Do one of the following:
• To scale or distort the object without moving it, click in the center of the object. A yellow
circle appears where you clicked.
• To scale or distort the object and move it away from a specific location at the same time,
click that location.
5 Drag the pointer toward the outside of the circle until a green line appears.
User Guide
41
6 Do one of the following:
• To enlarge the object both vertically and horizontally, drag away from the center of the
circle. To reduce the object both vertically and horizontally, drag toward the center of the
circle.
• To enlarge the object along one axis only, Shift-drag away from the center of the circle
along that axis. To reduce the object along one axis only, Shift-drag toward the center of
the circle along that axis.
Page 46

42
Working with Objects
• To enlarge and distort the object both vertically and horizontally, Ctrl-drag in any
direction away from the center of the circle. To reduce and distort the object both vertically
and horizontally, Ctrl-drag in any direction toward the center of the circle.
7 When the object is scaled or distorted as desired, release the mouse button.
Undoing transformations
Atmosphere Builder saves the original size, shape, orientation, and location of the objects
before the transformations. When you clear transformations, Atmosphere Builder restores
the object or group to its original dimensions and position.
To undo transformations to an object or group:
1 Select an object or group.
2 Choose Edit > Clear Transform.
Page 47

Adding Textures and Colors
About surface textures and colors
In an Atmosphere world, you can add textures and colors to the objects you create to make
them look as real (or unreal) as you want. Applying a texture adds a 2D image to the
surface of a 3D object, giving the appearance that the object is composed of the material
in the texture image. Applying an RGB value creates a solid-colored object.
Before and after applying a surface textures in Browser view.
43
Creating surface textures
A surface texture can be any image that is saved in a GIF, JPEG, or PNG file. It can be a
scanned photograph or a bitmap image created inside a graphics application such as
Adobe Photoshop. When you apply a texture to a surface, Atmosphere Builder tiles the
texture using the scale and rotation values that you specify. Tiling is the process of
repeating a texture to fill up a surface area. Tiling in Atmosphere Builder uses the same
concept of tiling in the real world, where tiles are placed edge-to-edge until they fill the
desired area.
How you plan to use a surface texture will determine the characteristics of the source image:
• If you’re creating a texture that will be tiled, keep the image size and file size small, and
try to create a seamless texture. A seamless texture is an image whose top edge precisely
matches its bottom edge, and whose left edge matches its right edge. When the texture is
tiled on a surface, no seam is visible between tiles. There are different techniques for
creating seamless textures. For example, you can use the cloning brush in Photoshop to
create a seamless texture. Refer to your image editing application’s documentation for
more information.
Page 48

44
Adding Textures and Colors
• If you’re creating a texture that will not be tiled, image size and resolution are more
important. Make sure the source file has enough resolution to display the texture image
on the surfaces at the desired size—the more pixels, the bigger the image. For example, if
you’re creating an image that you plan to use as a painting, you may want to create several
versions of the image at different resolutions to see which works best in your world.
Importing textures
Before you can apply a texture to an object, you must either import it from a GIF, JPEG,
or PNG file, or copy a texture that has already been applied to an object. Imported and
copied textures appear in the Variable Tools palette when you are in Browser view.
Imported textures remain in the Variable Tools palette until you exit Atmosphere Builder.
Atmosphere Builder provides two modes for applying textures. The mode of a texture is
determined be the import command you choose—Import Textures or Import Anchored
Textures:
• When you import a texture using the Import Textures command, you can adjust the
scale and rotation of an applied texture without changing other applications of the texture.
For example, if you apply the same texture to three cubes in a world, you can reduce the
scale of the texture on the first cube without affecting the scale of the texture on the other
cubes.
• When you import a texture using the Import Anchored Textures command, you can
adjust the scale and rotation of all applied textures by changing one application of the
texture. In addition, anchored textures produce a continuous pattern on the surfaces to
which they are applied. Choose Import Anchored Textures if a texture has a strong pattern
and you want to create a seamless texture over multiple surfaces. For more information,
see “Working with anchored texture objects” on page 50.
To import a texture:
1 Select Browser view.
2 Do one of the following:
• Choose File > Import Textures.
• Choose File > Import Anchored Textures.
Page 49

ADOBE ATMOSPHERE
3
Select one or more textures you want to import. A texture must be a GIF, JPEG, or PNG file.
4 Click Open.
To copy a texture from a surface:
1 Select Browser view, and use the move tool () to navigate to the surface you want to
work with.
2 Select the get texture tool (), and click the surface.
You can create multiple variations of a texture in the Variable Tools palette by
importing or copying a texture multiple times, and then setting different properties for
each texture. (See “Editing textures” on page 46.)
Applying textures
You can apply a texture to an entire object or a single face of an object. Textures are
cumulative—they overlay, rather than replace, the previous surface.
To apply a texture:
1 Select Browser view, and use the move tool () to navigate to the object you want to
work with.
2 Select a texture in the Variable Tools palette.
3 In the Object Inspector palette, choose an option from the Apply To menu:
• Face to apply the texture to just one side or face of an object.
• Object to apply the texture to the entire object.
4 If desired, set additional texture options in the Object Inspector palette. (See “Editing
textures” on page 46.)
5 Click the object or face that you want to apply the texture to in the document window.
User Guide
45
Page 50

46
Adding Textures and Colors
Applying colors
You can apply an RGB color to the surface of an entire object or a single face of an object.
To apply a solid color:
1 Select Browser view, and use the move tool () to navigate to the object you want to
work with.
2 Select the paint bucket () in the Variable Tools palette.
3 In the Object Inspector palette, choose an option from the Apply To menu:
• Face to apply the color to just one side or face of an object.
• Object to apply the color to the entire object.
4 In the Object Inspector palette, specify values for Red, Green, and Blue by dragging the
color sliders or by entering numbers.
5 Click the object or face that you want to apply the color to in the document window.
To edit the color of an object or face:
1 Select Browser view, and use the move tool () to navigate to the object you want to
edit.
2 Select the edit texture tool ().
3 Click the object or face whose color you want to edit.
4 In the Object Inspector palette, specify values for Red, Green, and Blue by dragging the
color sliders or by entering values in the text boxes.
Editing textures
The Object Inspector palette provides options for adjusting the scale and rotation at which
Atmosphere applies a texture to an object. These options are important because they let
you change a texture’s characteristics without editing the texture file. You can set the
characteristics of the texture in the Variable Tools palette or change the texture’s characteristics for the selected object or face only.
Page 51

ADOBE ATMOSPHERE
Scaling modes
When editing textures in the Object Inspector, you have a choice of two modes for the
Scaling Type—Pixel mode and Tile mode.
In Pixel mode, the physical size of an image is determined by the number of pixels—the
more pixels, the bigger the image. In the Objects Inspector, the Scale values are the size of
a single pixel, expressed in length units. The Offset values are specified in numbers of
pixels.
In Tile mode, the physical size is independent of the number of pixels in the image. In the
Objects Inspector, the Scale values are the size of the image, in length units. The Offset
values are also measured in length units.
If you find that you’re using different variations of a texture, you can add multiple
versions of the texture to the Variable Tools palette, and then adjust the settings for each
texture.
Scaling textures
A texture’s scale is an important factor in creating realistic objects. For example, if you
apply a brick texture to a wall, the size of the bricks should be proportional to the size of
the wall. Or if you use a forest texture to create a natural environment, the trees should be
proportional to the other objects in the world.
User Guide
47
To specify texture scale in the Variable Tools palette:
1 Select Browser view.
2 Select the texture you want to scale in the Variable Tools palette.
3 In the Object Inspector palette, make sure the Scaling Type is set to the mode you wish
to edit in. See “Scaling modes” on page 47.
4 Specify your scaling options by selecting:
• Scale with Object to have the texture scale proportionately when an object is scaled.
• Constrain Proportions to uniformly scale the U (horizontal) and V (vertical) texture
coordinates together.
Page 52

48
Adding Textures and Colors
5 Specify a scale value by dragging the Scale U and Scale V sliders, or entering values in
the Scale U and Scale V text boxes.
Note: Changing the scale of a texture in the Variable Tools palette does not affect the scale of
existing textures in a world.
To scale a surface texture on an object or face:
1 Select Browser view, and use the move tool () to navigate to the object you want to
edit.
2 Select the edit texture tool ().
3 Click the object or face whose surface texture you want to edit.
4 In the Object Inspector palette, make sure the Scaling Type is set to the mode you wish
to edit in. See “Scaling modes” on page 47.
5 Specify your scaling options by selecting:
• Scale with Object to have the texture scale proportionately when an object is scaled.
• Constrain Proportions to uniformly scale the U (horizontal) and V (vertical) texture
coordinates together.
6 Specify a scale value by dragging the Scale U and Scale V sliders, or entering values in
the Scale U and Scale V text boxes.
Rotating textures
Along with scale, a texture’s orientation is an important factor in creating realistic objects.
For example, when applying a brick texture to a wall, you probably want the bricks to run
horizontally, rather than diagonally, along the wall. Or when applying a forest texture, the
trees should be pointing up rather than down. Of course, you can also apply surface
textures in different directions to create unexpected effects.
To specify texture rotation in the Variable Tools palette:
1 Select Browser view.
2 Select the texture you want to rotate in the Variable Tools palette.
3 In the Object Inspector palette, make sure the Scaling Type is set to the mode you wish
to edit in. See “Scaling modes” on page 47.
Page 53

ADOBE ATMOSPHERE
4 Specify a value for Rotation by dragging the slider or by entering the value in the text
box. The value you specify is the decimal representation of the degrees of rotation, where
90.00 is 90 degrees of rotation, and 180.00 is 180 degrees of rotation.
To rotate a surface texture on an object or face:
1 Select Browser view, and use the move tool () to navigate to the object you want to
edit.
2 Select the edit texture tool ().
3 Click the object or face whose surface texture you want to edit.
4 In the Object Inspector palette, make sure the Scaling Type is set to the mode you wish
to edit in.
5 Specify a value for Rotation by dragging the slider or by entering the value in the text
box. The value you specify is the decimal representation of the degrees of rotation, where
90.00 is 90 degrees of rotation, and 180.00 is 180 degrees of rotation.
Adjusting offset
A texture can be moved so its pattern wraps around an object or surface to produce the
appearance you wish. For example, you may want to move the texture on a slab surface so
a specific portion of the texture pattern is on the main horizontal surface, while the less
aesthetic portion of the pattern wraps onto the side edge.
User Guide
49
To specify texture offset in the Variable Tools palette:
1 Select Browser view.
2 Select the texture you want to scale in the Variable Tools palette.
3 In the Object Inspector palette, make sure the Scaling Type is set to the mode you wish
to edit in. See “Scaling modes” on page 47.
4 Specify an offset value by dragging the Offset U (horizontal) and Offset V (vertical)
sliders, or entering values in the Offset U and Offset V text boxes.
To offset a surface texture on an object or face:
1 Select Browser view, and use the move tool () to navigate to the object you want to
edit.
2 Select the edit texture tool ().
Page 54

50
Adding Textures and Colors
3 Click the object or face whose surface texture you want to edit.
4 In the Object Inspector palette, make sure the Scaling Type is set to the mode you wish
to edit in. See “Scaling modes” on page 47.
5 Specify an offset value by dragging the Offset U (horizontal) and Offset V (vertical)
sliders, or entering values in the Offset U and Offset V text boxes.
Working with anchored texture objects
An anchored texture is projected onto the surfaces to which it is applied from a stationary
position, or anchor. The first time you apply an anchored texture in a world, Atmosphere
Builder creates an anchored texture object. You can change the position and orientation
of this object to change the appearance of the texture in the world.
To change the position and orientation of an anchored texture object:
1 Select a wireframe view: Top, Side, or Isometric.
2 Select the anchored texture object (). (See “Selecting objects” on page 30.)
3 Drag the anchored texture object to the desired position in the wireframe. Rotate the
anchored texture object until it is pointing in the desired direction. (See “Moving objects”
on page 33 and “Rotating objects” on page 40.)
4 Switch to Browser view to see how the texture is applied to surfaces in the world.
Viewing and updating the location of textures
Atmosphere Builder tracks each texture you import into a world as an independent file.
This keeps the world file very small and improves performance in the Atmosphere
Browser. However, it also means that texture files must stay in the same location relative
to the world file. If you move the world file without moving its texture files, Atmosphere
Builder can’t display the objects in the world with surface textures. Instead, Atmosphere
Builder approximates the hue of the missing surface texture with a solid color.
The URL text box in the Object Inspector palette indicates where Atmosphere looks for
the texture file. If a surface texture for an object is missing, you can use the Browse feature
to locate the texture file and update the path to it. You can also replace one texture with
another texture by changing the specified path.
Page 55

ADOBE ATMOSPHERE
When you publish a world, Atmosphere Builder makes a copy of each texture file, places
the texture files in the same folder as the world file, and updates the URL of each texture
file to its new location. If you don’t want the URL for a texture to be updated, you can
select the Absolute Path option in the Object Inspector palette. This option is particularly
useful if you want to include dynamic textures in a world. Because textures are fetched at
runtime, if you update or replace a texture file on the Web server, users will see the new
texture the next time the world is loaded. For more information on publishing worlds, see
“Saving and publishing worlds” on page 8.
To view or update the location of an object’s surface texture file:
1 Select Browser view, and use the move tool () to navigate to the object you want to
work with.
2 Select the edit texture tool ().
3 Click the object or face whose surface texture you want to view or update.
4 In the Object Inspector palette, update the referenced file by entering a new path in the
URL text box or by clicking Browse and selecting a new file.
5 If you don’t want Atmosphere Builder to update the path to the texture file when you
publish your world, select Absolute Path. An absolute path must be the URL of a texture
file on a Web server.
User Guide
51
Rendering surface textures and colors
Rendering is the process of translating 3D data into pixels on your computer screen. The
texture options in the Tool Inspector palette let you control how surface textures and
colors are rendered in Atmosphere Builder. The Use Textures option determines whether
surface textures and colors are displayed in Browser view. (Hiding textures and colors can
help you see how lighting contributes to the world.) The Smooth Textures option determines whether texture quality is enhanced during rendering. Enabling the Smooth
Textures option enhances the appearance of textures and reduces blockiness; however, it
also increases rendering time.
Note: These options do not affect how a world appears when viewed in the Atmosphere
Browser—they apply only to the current Atmosphere Builder session. Selecting these options
can also slow down rendering in Atmosphere Builder.
Page 56

52
Adding Textures and Colors
To hide textures and colors in a world:
1 Select Browser view, and select the move tool ().
2 Deselect Use Textures in the Tool Inspector palette. Only the luminous surfaces in the
world are displayed with textures.
To enhance texture quality:
1 Select Browser view, and select the move tool ().
2 Select Smooth Textures in the Tool Inspector palette.
Deleting surface textures
If you want to change an object’s surface texture, you can simply apply a new texture over
the existing one. Atmosphere Builder keeps track of all the textures for an object, but only
displays the top-most texture. If you delete the top-most texture, you expose the one
beneath it.
To delete a surface texture:
1 Select Browser view, and use the move tool () to navigate to the object you want to
work with.
2 Select the delete texture tool ().
3 Click the object or face whose surface texture you want to delete.
4 Continue clicking to delete underlying surface textures. When you delete all the surface
textures, each face of the object is assigned a random color.
Page 57

Adding Lighting
About lighting
When light rays strike an object in the real world, the object’s surface reflects them. This
reflected light is what enables us to see objects. The light an object reflects goes on to
illuminate other objects. This effect is known as radiosity.
Atmosphere Builder’s lighting environment is based on the real-world principle of
radiosity. All surfaces in an Atmosphere world are either luminous (giving off light) or lit
(receiving light). How much light a surface receives is based on all of the distributed light
in the environment. With each lighting pass, the light reflected by surfaces is added to the
lighting environment. As a result, lighting gets more subtle every time you apply it to a
world.
53
Without realistic lighting your world will look flat and dull; with lighting your world gains
depth and dimension.
Creating luminous surfaces
The first step in lighting a world is to create luminous surfaces. A luminous surface casts
light onto the non-luminous surfaces around it.
Page 58

54
Adding Lighting
About luminous surfaces
There are three types of luminous surfaces in Atmosphere Builder:
• The sky is the default luminous surface in a world. If you’re building an enclosed
structure, the sky becomes a visible light source when you create openings, such as doors
and windows. The default color of the sky is light blue; however, you can change the color
of the sky to any RGB value. (See “Applying colors” on page 46.)
• A visible luminous surface is a texture or RGB value that emits light and is visible in the
world. For example, you can create a lamp that emits light.
• A hidden luminous object is an object that emits light but is not visible in the world.
Hidden luminous objects give you more control over lighting in a world.
Creating visible luminous surfaces
A visible luminous surface can be a solid color or have a surface texture. Luminous
surfaces (both colored and textured) remain visible when the lighting in a world is cleared.
(See “Resetting lighting” on page 59.)
To create a visible luminous surface:
1 In Browser view, select the edit texture tool ().
2 Click the surface you want to make luminous.
3 In the Object Inspector palette, select Luminous.
Creating hidden luminous objects
A hidden luminous object is an object that emits light but is not visible in the world. When
placing hidden luminous object, think of yourself as a lighting designer. In the real world,
lighting designers use recessed lighting to provide light without drawing attention to the
light fixture itself. Hidden luminous objects give you similar control over the lighting in a
Atmosphere world.
For purposes of designing a world, you can choose to show hidden luminous objects in
Browser view. This allows you to see exactly where the light sources are. However, hidden
luminous objects are always invisible when viewing a world on the Web in the Atmosphere
Browser. In addition, users never collide with hidden objects when navigating in a world.
Page 59

ADOBE ATMOSPHERE
To create a hidden luminous object:
1 In a wireframe view, create the object you want to make luminous. (See “Creating new
objects” on page 13.)
2 Switch to Browser view, and apply the desired texture or color to the object you created
in Step 1. (See “Applying textures” on page 45 and “Applying colors” on page 46)
3 Select the edit texture tool (), click the surface of the object to which you just applied
the texture or color, and select Luminous in the Object Inspector palette.
4 Switch back to a wireframe view, and select the object you created in Step 1. Select Hide
in Browser view in the Object Inspector palette.
To show or hide hidden luminous surfaces in Browser view:
1 In Browser view, select the move tool.
2 In the Tool Inspector palette, do one of the following:
• To show hidden objects, select Show Hidden Objects.
• To hide hidden objects, deselect Show Hidden Objects.
User Guide
55
Editing luminous surfaces
You can change the quality of light that a luminous surface emits by editing its color and
by amplifying its brightness.
Changing the color of luminous surfaces
The color of a luminous surface determines the color of the light that it emits. The sky,
which is the largest luminous surface in a world, is blue by default; however, you can
change the color of the sky to any RGB color. Likewise, you can apply a color or texture to
hidden luminous surfaces using the edit texture tool.
To change the color of the sky:
1 In Browser view, use the move tool () to navigate until you can see the sky. If you’re
building an enclosed structure, this means that you must navigate to the outside of the
structure.
2 Select the paint bucket () in the Variable Tools palette.
Page 60

56
Adding Lighting
3 In the Object Inspector palette, specify values for Red, Green, and Blue by dragging the
color sliders or by entering numbers.
4 Click the sky to apply the color.
To apply a color or texture to a hidden luminous surface:
1 In Browser view, select the move tool (), and select Show Hidden Objects in the Tool
Inspector palette.
2 Navigate until you can see the hidden luminous surface, and apply a color or texture to
it. (See “Applying colors” on page 46 and “Applying textures” on page 45.)
Lighting a world
When you light a world for the first time, Atmosphere Builder calculates all of the
distributed light in the world. How much light each non-luminous surface receives is
based on its spacial relationship to luminous surfaces in the world. Non-luminous
surfaces that are close to a luminous surface receive more light than those that are far away
from a luminous surface. Lighting is assigned to surfaces using a light map. A light map is
an RGB image of the lighting value for each unit of surface area in a world. This light map
is imposed over the world’s surface textures to create the appearance of light and shadows.
With each subsequent lighting pass, Atmosphere Builder recalculates the distributed light
in the world. Surfaces that were previously unlit now reflect light—this reflected light, in
turn, goes on to illuminate other surfaces in the world. To understand how Atmosphere
Builder uses the principle of reflected light, imagine a room with one red wall, one green
wall, and a white light in the center of the ceiling. During the first lighting pass, the red
wall and the green wall are illuminated by the white light. During the second lighting pass,
the light that is reflected by both walls is added to the distributed light in the world. The
red wall receives green light and vice versa. Because of this, the lighting in the world
becomes more subtle with each lighting pass.
Using the Lighting Control palette
The Lighting Control palette contains options for lighting a world. It also displays the
number of faces that remain to be processed during a lighting pass and the percentage of
pixels left to light in the currently-processing face.
Page 61

ADOBE ATMOSPHERE
To display the Lighting Control palette:
Choose Window > Lighting Control.
Applying lighting
Each time you apply lighting, Atmosphere Builder recalculates how much light nonluminous surfaces receive. You can apply lighting to a face of an object, an object, or every
surface in the world. In addition, you can stop the lighting process at any time. These
controls allows you to fine-tune the lighting in a world with precision. For example, you
can queue up five lighting passes, and stop the lighting process when you are satisfied with
the results.
To apply lighting to every surface in a world:
1 Select Browser view.
2 In the Lighting Control palette, click Add Lighting to Scene.
3
If desired, click Add Lighting to Scene multiple times to execute multiple lighting passes.
Atmosphere Builder creates a queue that lists each surface in a world, and adds additional
lighting passes to the end of the queue. The Faces field in the Lighting Control palette
displays the number of faces that remain to be processed at any time. The Pixels field in
the Lighting Control palette displays the percentage of completed pixels in the currentlyprocessing face.
User Guide
57
To apply lighting to an object:
1 Select Browser view, and use the move tool () to navigate until you can see the object
you want to apply lighting to.
2 Select the light object tool ().
3 Click the object.
To apply lighting to a face:
1 Select Browser view, and use the move tool () to navigate until you can see the face
you want to apply lighting to.
2 Select the light face tool ().
Page 62

58
Adding Lighting
3 Click the face.
If you use the light object tool or the light face tool while a lighting pass is in process, the
object or face is processed first. This makes it possible apply lighting to key surfaces of a
world at any point during a lighting pass.
To stop a lighting pass:
1 Select Browser view.
2 Click Stop Lighting in the Lighting Control palette.
Improving lighting quality in Browser view
A light map is an RGB image that is imposed over the world’s surface textures to create the
appearance of light and shadows. The Smooth Lighting Maps option in the Tool Inspector
palette lets you control how light maps are rendered in Atmosphere Builder. Enabling the
Smooth Lighting Maps option enhances the appearance and accuracy of light maps;
however, it also increases rendering time.
Note: This option does not affect how a world appears when viewed in the Atmosphere
Browser—it applies only to the current Atmosphere Builder session. Selecting this option can
also slow down rendering in Atmosphere Builder.
To enhance lighting quality:
1 Select Browser view, and select the move tool ().
2 Select Smooth Lighting Maps in the Tool Inspector palette.
Turning lighting on and off
You can view a world with and without lighting. With lighting, the surfaces in a world
display highlights and shadows; without lighting, the surfaces in a world appear exactly as
they do in the texture file—flat and unlit. Turning lighting off can help you work with
surfaces in dimly lit areas of a world.
Note: You must apply lighting at least once before turning the lighting on and off has any
effect.
To turn lighting on and off:
1 Select Browser view, and select the move tool ().
Page 63

ADOBE ATMOSPHERE
2 In the Tool Inspector palette, do one of the following:
• To turn lighting on, select Use Lighting.
• To turn lighting off, deselect Use Lighting.
Resetting lighting
When you reset lighting, only the luminous surfaces in the world are visible. Keep in mind
that resetting lighting is different than turning lighting off. Resetting lighting causes all the
non-luminous surfaces in the world to become black; turning lighting off simply displays
all surface textures without highlights and shadows. You can also think of resetting lighting
in terms of applying black light to a world.
To clear lighting in a world:
1 Select Browser view.
2 Click Reset Lighting in the Lighting Control palette.
Removing light maps
You can return a world to its unlit state by removing its light maps.
User Guide
59
To remove light maps:
1 Select Browser view.
2 Click Remove All Light Maps in the Lighting Control palette.
Page 64

Page 65

Creating effects with JavaScript
About working with JavaScript
If you know how to write JavaScript, you can add effects to your world using the
Atmosphere JavaScript API (Application Program Interface). These effects can be simple
or complex—ranging from adding a sound effect to creating an interactive animation.
The possibilities are limited only by your ability to implement your ideas in JavaScript.
Keep in mind that this documentation doesn’t explain how to write JavaScript code—you
can find a wealth JavaScript resources on the Web and in print. This documentation does
provide information about how to incorporate scripts into a world and gives you some
ideas for what you can do with the Atmosphere JavaScript API. For more information, see
the Atmosphere JavaScript API documentation. This documentation is installed with
Atmosphere Builder and is accessible from the Atmosphere folder in the Windows Start
menu.
Attaching a script to a world
You can attach a script to an object, a group of objects, or a whole world. If you attach a
script to an object or group, you can use the keyword this to refer to the current object.
Alternately, you can attach a script to the world and refer to objects by name. The world
script is always run before any of the other scripts; therefore, you can use the world script
to do initializations and provide methods that are required by other scripts.
61
To attach a script to an object or group:
1 Select a wireframe view: Top, Side, or Isometric.
2 Select the object or group to which you want to attach the script.
3 In the Object Inspector palette, enter the location of the JavaScript source file in the
JavaScript URL text box.
To attach a script to a world:
In the World Settings palette, enter the location of the JavaScript source file in the JavaScript URL text box.
Page 66

62
Creating effects with JavaScript
Using the Atmosphere JavaScript API
The Atmosphere JavaScript API comprises a set of modules that cover a broad range of
functionality—from adding buttons to the Atmosphere Browser to applying transformations to an object. The following topics describe some of the things you can do with the
Atmosphere JavaScript API.
Note: The Atmosphere JavaScript API is under continual development. For the most up-todate information, see Atmosphere JavaScript API documentation. This documentation is
installed with Atmosphere Builder and is accessible from the Atmosphere folder in the
Windows Start menu.
Adding sound
The Sound module provides methods and properties for implementing sound effects in a
world. You can add both ambient and positional sounds to a world. An ambient sound is
one that emanates from the entire world; while a positional sound is tied to a static or
dynamic position in the world. For example, you can write a script that plays a creaking
sound when a user navigates into a given position in the world.
Atmosphere supports WAV format and MP3 format for sound effects. For example, the
following code adds a sound and defines its parameters:
sound = Sound("soundName.wave");
sound.volume = .5 // volume
sound.repeats=0 // loop sound
sound.active=true // turn sound on
For more information on the Sound module, see the Atmosphere JavaScript API
documentation.
Adding fog
The FogModel module provides methods and properties for implementing fog effects in
a world. Fog is an atmospheric effect that obscures objects in relation to the position of the
user. For example, you can write a script that creates a greenish-gray fog that falls within
10 feet of the user’s position.
Note: In many cases, adding fog to a world slows down the rendering. However, in the case of
highly complex worlds, it can speed up rendering if the far point of the fog (beyond which
things are completely obscured) is close enough to cull out substantial portions of the world.
Page 67

ADOBE ATMOSPHERE
For example, the following code defines the parameters for rendering with fog:
// Set the fog color to bluish white
fog.color =[0.5, 0.6, 0.8];
// Specify quadratic drop-off with distance
// This is softer than linear fog (1)
fog.dropOff =2;
// Set the distance away that fog starts
fog.near = 1.0
// Set the distance away that the fog becomes completely opaque
fog.far = 400.0
// Now make the fog appear
fog.active = true;
For more information on the FogModel module, see the Atmosphere JavaScript API
documentation.
Adding buttons and sliders to the Atmosphere Browser
The Button and Slider modules provide methods and properties for adding controls to the
Atmosphere Browser. These controls appear in the Controls panel of the Browser.
Creating buttons and sliders allows you to add user-controlled interactivity to a world.
For example, the following code adds a toggle switch to control whether the scene uses fog
and adds a slider to control the drop-off parameter of the fog:
User Guide
63
if (hasModule("Button")) {
// Make a toggle to activate the fog
fogToggle = Toggle("Fog").add();
fogToggle.onClick = function(state) {
fog.active = state;
}
fogToggle.state = true;
// Now make a slider to control the drop-off parameter
fogDropOff = Slider("Fog DropOff").add();
fogDropOff.integersOnly = true;
fogDropOff.range = [0,2];
fogDropOff.onChange = function(val) { fog.dropOff = val; }
fogDropOff.value = fog.dropOff;
}
For more information on the Button module and the Slider module, see the Atmosphere
JavaScript API documentation.
Page 68

64
Creating effects with JavaScript
Getting feedback about user position and orientation
The Actor module provides methods and properties for getting feedback about user
position and orientation. For example, you can write a script that executes an animation
when a user navigates to a given position in the world.
For example, the following code tests the player to see if it is within 10 world units of a
target vector. If so, it prints a message:
if (player.position.subtract(target.position).length < 10) {
chat.print("You are within ten feet of the target!");
}
For more information on the Actor module, see the Atmosphere JavaScript API documentation.
Printing in the chat window
The PrintDevice module provides methods and properties for printing text in the chat
area of the Atmosphere Browser. For example, you can write a script that prints “Hello”
when a user enters the world.
For more information on the PrintDevice module, see the Atmosphere JavaScript API
documentation.
Working with objects
The WorldObject module provides methods and properties for getting information about
objects in a world. The primary use of this module is to determine the location of objects
in a world. For example, if you want the computer to play a sound when the user enters a
room, you need to determine the location of the doorway. You can use the WorldObject
module to find the location of the doorway and then compare it to the user’s position.
To receive notification when a user control-shift-clicks or mouses over a particular
object, use the onClick, onMouseOver, or onMouseOut callback in the
WorldObject module..
For example, the following code fills the vector position with the position of the world
object:
position = spiderWorldObject.position;
For more information on the WorldObject module, see the Atmosphere JavaScript API
documentation.
Page 69

ADOBE ATMOSPHERE
Working with subworlds
A subworld is a world that is loaded into the parent world. For example, an avatar is
considered a subworld. A subworld has the same functionality of a parent world, with the
exception of users being able to navigate inside of it. In addition, subworlds can be moved
around (or move themselves around) dynamically, whereas the parent world is static.
Subworlds have their own scripting engine, which is in a separate name space from the
scripting engine of the parent world.
The SubWorld module provides methods and properties for working with subworlds. For
example, the following code adds a subworld that is set to be invisible but made active for
collisions:
ghost = SubWorld("ghost.3da").add();
ghost.visible = false;
ghost.collide = 2; // Other objects collide with the ghost
For more information on the SubWorld module, see the Atmosphere JavaScript API
documentation.
Working with Viewpoint content
Viewpoint content is a 3D scene saved in MTX format. An MTX file contains parameters
describing the scene’s 3D objects and the 3D scene itself. You can use MTX format to
import objects (including animations) that you created in a third-party application into
Atmosphere.
User Guide
65
The ViewpointScene module provides methods and properties for interacting with
Viewpoint content in a world. You can use this module to play a named animation (called
a time element), to enumerate animations and instances (geometric components with
associated transforms), and to get and set Viewpoint properties. For example, the
following code attaches a script to the MetaObj in Atmosphere Builder, scales down the
model by a factor of two, and starts the time element that controls walking:
// Scale down the model (i.e. geometric instance) called "BodyModel" by a factor of 2
this.scene.getInstance("BodyModel" ).scale = [0.5, 0.5, 0.5];
// Activate the animation called "Walking"
timeElem = this.scene.getTimeElem("Walking");
timeElem.start();
For more information on the ViewpointScene module, see the Atmosphere JavaScript API
documentation. For more information about MTX format and the Viewpoint API, see the
Viewpoint Web site at www.viewpoint.com.
Page 70

66
Creating effects with JavaScript
Transforming objects
The Vector, Rotation, and Transform modules provide methods and properties for transforming subworlds and imported Viewpoint objects. You can use the Vector module to
move (translate) objects, the Rotation module to rotate objects, and the Transform
module to translate and rotate objects at the same time. For example, you can write a
script that rotates a subworld around its y axis while moving the subworld to a different
position in the world. Vector, Rotation, and Transform objects are values which you can
query as well as apply, so they are useful for finding the current position or orientation of
a subworld or Viewpoint object.
There is an important distinction between setting a position and orientation directly and
using the moveTo() and rotateTo() functions. When setting the position variables the
change happens at that time, and discontinuously. This is good for setting up the initial
position of an object in a scene when it is loaded.
It is important to provide smooth motions between frames for the collisions to be
computed correctly. This is achieved in the system using moveTo() and rotateTo() which
smoothly transform the object between frames allowing for correct collisions with other
objects in the scene. A moveTo() function schedules an update of the position but does not
do the change at that time. For this reason the updated position can only be read-back
during the next time step.
For example, the following code changes the position and orientation of a subworld
named “table”:
// Set the position the first time
// Same as table.setPosition(30.0, 2.0, 0.0);
table.position = Vector (30.0, 2.0, 0.0);
table.orientation =Rotation('Y', firstAngle); // Rotate about the y axis
// From now on any position changes for table will collide with
// other objects and other objects will collide with it
table.collide = 3;
// Now schedule the smooth transition during the next time step
table.moveTo(Vector(31.0, 2.0, 0.0));
table.rotateTo(Rotation('Y', secondAngle));
For more information on the Transform, Vector, and Rotation modules, see the
Atmosphere JavaScript API documentation.
Page 71

Connecting Worlds, Users, and the Web
Creating gateways
Gateways let users move from one 3D world to another. A gateway consists of an entry
point object and a portal object. An entry point specifies the point where users enter a
world; a portal specifies where users exit a world.
Creating an entry point
When you publish a world, Atmosphere Builder establishes a default entry point based on
your position and orientation in Browser view. For example, if you’re standing in the
middle of a room in Browser view, users will enter your world at the middle of that room.
If you’re facing to the right, users will enter your world facing to the right; if you’re facing
the left, users will enter your world facing to the left.
You can create additional entry points in a world using the entry point tool. An entry point
object consists of a square, which determines the location of the entry point in a world,
and a red line, which determines the initial point of view when users enter a world.
Creating multiple entry points provides the potential for users to enter your world
through different gateways.
67
AB
A. Actor object B. Point of view from an entry point
Page 72

68
Connecting Worlds, Users, and the Web
To create an entry point:
1 In Browser view, navigate to the position and orientation in which you want users to
enter your world.
2 Select a wireframe view: Top, Side, or Isometric.
3 Select the entry point tool () in the Variable Tools palette.
4 In the Object Inspector palette, do the following:
• Enter text in the Entry Point Title text box to assign a name to the entry point. A portal
references the entry point name in order to create a gateway between worlds.
• Click the Move to Viewer Location button. This establishes the location and orientation
of the entry point object based on your current location and orientation in Browser view.
5 Click in the document window to create the entry point object. After you create an
entry point, you can move it around like any other object. (See “Moving objects” on
page 33.)
To edit entry point options:
1 In a wireframe view, select the entry point object. (See “Selecting objects” on page 30.)
2 Edit the options as desired in the Object Inspector palette.
To change the position and orientation of an entry point, first change your position and
orientation in Browser view, and then click Move to Viewer Location in the Object
Inspector palette.
Creating a portal
When you create a portal, you create a gateway for users to travel to another world. In
order for the gateway to function, you must specify the URL of the world you want your
portal to connect to. You can also specify the name of the entry point where you want users
to enter the destination world. If you don’t specify an entry point name, the portal
connects to the default entry point in the destination world.
Page 73

ADOBE ATMOSPHERE
Creating portals is easy if you know the world URL and name of the entry point you want
to connect to. But what if you don’t know this information? Atmosphere Builder provides
an easy way to deal with this situation. First, explore different worlds on the Web using
Atmosphere Browser. When you find a world you want to create a portal to, create a
bookmark. Then, import the bookmarks into Atmosphere Builder. A tool for creating a
portal to each bookmarked entry point appears in the Variable Tools palette.
To create a portal using the portal tool:
1 Select a wireframe view: Top, Side, or Isometric.
2 Select the portal tool () in the Variable Tools palette.
3 In the Object Inspector palette, specify the entry point you want to link to in the Target
World URL text box using the following format:
http://server/world/world.3da#entry_point_name
Important: Use a pound character (#) to separate the URL and the entry point name. The
entry point name must correspond to the Entry Point Title option for the entry point in order
for the gateway to function. If no entry point name is specified, the portal connects to a default
entry point in the destination world.
User Guide
69
4 Click in the document window to place the portal.
To create a portal by importing bookmarks:
1 Use Atmosphere Browser to explore different worlds on the Web. When you enter a
world to which you want to add a portal, create a bookmark. A bookmark records the URL
of the world and the name of the entry point you entered through.
2 In Atmosphere Builder, choose File > Import Bookmarks. A tool for creating a portal
to each bookmarked entry point appears in the Variable Tools palette.
3 Select a portal tool in the Variable Tools palette, and click in the document window to
place the portal.
To edit portal options:
1 In a wireframe view, select the portal object. (See “Selecting objects” on page 30.)
2 Edit the options as desired in the Object Inspector palette.
Page 74

70
Connecting Worlds, Users, and the Web
Creating links to Web sites
You can add hypertext links to a world using JavaScript.
To add a hypertext link to a world:
1 Create a text file that contains JavaScript code for creating a hypertext link. For
example, the following script launches the Adobe Web site when a user clicks the object
that it is attached to:
this.onClick=function(){
launchURL(“http://www.adobe.com”);
}
2 In Atmosphere Builder, do one of the following:
• Select a wireframe view, and select an object to attach the script to. In the Object
Inspector palette, enter the path to the JavaScript file you created in Step 1 in the Javascript
URL text box.
• In the World Settings palette, enter the path to the JavaScript file you created in Step 1 in
the Javascript URL text box. For more information on the World Settings palette, see
“Administering worlds” on page 70.
Administering worlds
The World Settings palette contains options for administering a world. You can specify a
name for your world, specify the occupancy limit, and set up chatting.
To display the World Settings palette:
Choose Window > World Settings.
Specifying a world’s name and topic
Specifying a world’s name and topic makes it easier for users to find and identify your
world on the Web.
To specify a world’s name and topic:
In the World Settings palette, specify values for the following options:
Page 75

ADOBE ATMOSPHERE
• World Name to specify a name for your world as you want it to appear in the title bar of
a Web browser.
• Reference URL to allow all people to access to your world concurrently even if your
world is mirrored on different servers.
Specifying the user count
The user count determines the occupancy limit for a world. When a world reaches the
specified limit, a new instance of the world is created. To determine a reasonable user
count, consider how much space your world encompasses. For example, if you created a
large, expansive world, it’s acceptable to allow 100 users to explore it at one time. However,
if you created a small, intimate world, you probably want to limit the user count to a low
number.
Important: In the Beta version of Atmosphere Builder, User Count is hard-coded to 20 and
cannot be changed.
To specify the occupancy limit for a world:
In the World Settings palette, enter the maximum number of users in the User Count text
box. A setting of 0 indicates no limit on the number of users.
User Guide
71
Setting up chatting and community
As a Web site designer, you can use Adobe’s community server to facilitate chatting. The
community server also enables the display of avatars in a world. (See “About avatars” on
page 73.)
To specify the community server for a world:
1 In the World Settings palette, enter the URL of the community server in the Server text
box. The community server URL includes the following elements:
Protocol The protocol for the Adobe community server is YACP. As with the HTTP
protocol, the YACP string is followed by :// (yacp://).
Server address The address for the Adobe community server is
yacp://atmosphere.adobe.com. Use a forward slash (/) to separate the server address and
the channel name.
Page 76

72
Connecting Worlds, Users, and the Web
2 If necessary, enter the primary location of your world in the Reference URL text box.
The Reference URL is only entered for worlds that are mirrored on multiple servers and
enables users to be in the same community space regardless of the server they used to
access the world.
Embedding the Atmosphere Browser plug-in in a Web page
Atmosphere Browser is a plug-in viewer that enables users to view and navigate
Atmosphere worlds in a Web browser. You can embed one or multiple plug-ins in a Web
page by adding a few lines of code to an HTML file.
For complete information on how to embed the Atmosphere Browser plug-in in a Web
page, see the README file in your Atmosphere installation folder.
Page 77

Building Avatars
About avatars
When users enter a world that is connected to the Adobe community server, they are
visible to each other in the form of avatars. Users can choose a standard avatar provided
by Adobe or create their own avatar. You can also provide avatars to users by making them
available on a Web server. To use an avatar, users specify the URL of the avatar in their
Atmosphere Browser preferences.
An avatar can take any form you want it to. It can be a realistic human form or a simple
shape—the only limit is your imagination. For example, you can create a simple avatar by
creating a box object in Atmosphere Builder and applying a surface texture to it. Or you
can create a complex avatar in a 3D modeling application.
73
A
An avatar represents a user in an Atmosphere world. A. Avatar created in Atmosphere Builder.
B. Avatar created in a third-party application and exported in Viewpoint format.
B
Page 78

74
Building Avatars
Creating avatars
You can model avatars in Atmosphere Builder or another 3D application; however, you
must save avatars in Atmosphere format in order to use them in Atmosphere Browser.
To create an avatar:
1 Do one of the following:
• Create the avatar in Atmosphere Builder using basic primitives. Apply surface textures,
colors, and lighting as desired.
• Create the avatar in a third-party 3D application, and save it in Viewpoint (MTX)
format. Then import the Viewpoint object into Atmosphere Builder, and place it in a
world. (See “Importing objects” on page 14.)
Note: Some 3D applications let you directly export scenes to MTX format. If this is not the case
with your 3D application, you can still create Viewpoint content by saving the avatar in MTS,
OBJ, or ASE file and using the Viewpoint Scene Builder application to output an MTX file.
For more information about creating Viewpoint content, see the Viewpoint Web site at
www.viewpoint.com.
2 Create an entry point object at the eye location for the avatar. (See “Creating an entry
point” on page 67.)
The eye location determines the direction in which the avatar faces, as well as the vertical
level at which users of the avatar view a world. If you don’t establish an eye location using
an entry point object, Atmosphere Builder establishes the eye location at the center of the
avatar’s volume and facing your current position in Browser view.
3 In Browser view, navigate until you are looking at the front of the avatar. If you switch
back to a wireframe view, the Actor object should be pointing at the front of the avatar.
The orientation of the Actor object indicator determines the direction that the avatar faces
in a world. (See “Using the Actor object” on page 6.)
4 Choose File > Publish Objects. Enter a filename that includes the Atmosphere format
extension, and click Save. Then place the avatar file on any Web server.
Page 79

ADOBE ATMOSPHERE
Making avatars available to users
You can make avatars available to users by placing them on any Web server. Keep in mind
that you need to let users know the URL of the avatar file. One way to do this is to prepare
a pre-entry Web page for your world that provides the information. Or you can add a link
to such a Web page from inside the world. (See “Creating links to Web sites” on page 70.)
User Guide
75
Page 80

Page 81

Index
77
A
Absolute Path option
Activate Group command 36
aligning objects 34
anchored textures 44, 50
ASE format 14
avatars
about 73
creating 74
posting 75
Axis Reference object 15
B
box tool 21
Browser view 3
buttons, adding 63
C
chatting 71
Clear command 33
Clear Transform command 42
Close command 9
Closeness option 36
collide option 6
colors
about 43
51
applying 46
column tool 21
community server 71
cone tool 21
connecting objects 34
connectors 12
resizing objects 39
selecting 31
constraints 12
constructive solid geometry 11
creating worlds 1
D
delete texture tool 52
deleting objects 33
distorting objects 41
Duplicate command 33
duplicating objects 33
E
Entry Point Title option 68
entry point tool 68
Exit command 9
Export Objects command 27
Extrude command 19
F
Faces option 22
Fit All command 5
Fit Selected command 32
floor tool 17
fog, adding 62
G
gateways 67
gravity option 6
grid, snapping to 35
Group command 36
group selection tool 31
groups
selecting 31
H
hidden luminous objects 54
Hide Others command 38
hiding objects 38
hypertext links, creating 70
I
Import Anchored Textures
command 44
Import Bookmarks command 69
Import Objects command 14
Page 82

78
Import Textures command 44
Import Viewpoint Objects
command 14
intersection of objects 25
Isometric view 2
J
JavaScript
about 61
Actor module 64
Atmosphere API 62
attaching 61
Button module 63
FogModel module 62
hypertext links 70
Rotation module 66
Slider module 63
Sound module 62
SubWorld module 65
Transform module 66
Vector module 66
ViewpointScene module 65
WorldObject module 64
Junction option 26
L
light maps 56, 59
Lighting
turning off 58
lighting
about 53
applying 56
luminous surfaces 53, 55
removing 59
resetting 59
Lighting Control palette 56
Lock Others command 37
locking objects 37
luminous surfaces
creating 53
editing 55
M
move tool 5
moving objects 33
MP3 format 62
MTX format 14
N
New command 1
New Group command 36
O
OBJ format 14
Object Inspector palette
about 16
Absolute Path option 51
Entry Point Title option 68
Faces option 22
JavaScript URL option 61
Junction option 26
Lock option 37
Move to Viewer Location option
68
Rotation option
Scale option 48, 50
Show in Wireframe Views
option 38
Subtractive option 26
Target World option 69
Thickness option 17, 18, 20,
39
URL text box
objects
about 11
connecting 34
creating 13
deleting 33
duplicating 33
exporting 27
grouping 36
importing 14
laying out 12
locking 37
moving 33
publishing 27
resizing 38
rotating 40
scaling and distorting 41
48
51
Page 83

79
selecting 30
showing and hiding 38
Objects Inspector palette
Top Width option 22
Objects option 31
Objects palette 29
eye icon 38
lock icon 37
Open command 1
opening worlds 1
P
palettes, about 7
pan tool 4
plug-in. See Atmosphere Browser
plug-in
portal tool 69
primitives, about 11
Publish command 9
Publish Objects command 27
R
Reference URL option 71
resizing objects 38
rotate object tool 40
rotate view tool 4
rotating objects 40
rotating views 4
Rotation option 48
S
Save As command 8
Save command 8
scaling objects 41
scaling textures 48, 50
scrolling views 4
selection tool 31
Server option 71
Show All Objects command 38
Show in Wireframe Views option
38
showing objects
Side view 2
slab tool 19
sliders, adding 63
Smooth Light Maps option 58
Smooth Textures option 52
Snap to Grid option 35
sound, adding 62
stairs tool 23
subtraction of objects 26
Subtractive option 26
surface textures
about 43
applying 45
copying 44
creating 43
deleting 52
importing 44
38
URL for 50
T
Target World option 69
textures
rotating 48
scaling 47
textures. See surface textures
Thickness option 17, 18, 20
Tool Inspector palette
about 30
Closeness option 36
Objects option 31
Smooth Light Maps option 58
Smooth Textures option 52
Snap to Grid option 35
Use Textures option 52
Top view 2
Top Width option 22
transforming objects 39
U
Ungroup command 36
union of objects 25
Unlock All Objects command 37
Use Textures option 52
User Count option 71
V
Variable Tools palette 13
Page 84

80
Viewpoint format 74
Viewpoint objects
about 12
importing 14
scripting 65
views
about 2
centering 5
magnifying and reducing 4
navigating in Browser view 5
rotating 4
scrolling 4
selecting 3
Views palette 3
visibility, of objects 38
W
wall tool 18
WAV format 62
wireframe view. See views
World Name option 71
World Settings palette 70
JavaScript URL option 61
Reference URL option 71
Server option 71
User Count option 71
World Name option 71
worlds
about 1
creating 1
opening 1
publishing 9
Y
YACP protocol 71
Z
zooming 4
 Loading...