


Manual for
Acer Projector
PD523/PD525/PD527/PD528 Series

Disposal instructions
Do not throw this electronic device into the trash when discarding. To minimize pollution and ensure utmost protection of the global environment, please recycle it.
USA
For electronic products containing an LCD/CRT monitor or display, or a super high pressure mercury lamp:
Lamp(s) inside this product contain mercury and must be recycled or disposed of according to local, state or federal laws. For more information, contact the
Electronic Industries Alliance at www.eiae.org. For lamp-specific disposal information, check www.lamprecycle.org.

Table of Contents |
|
Table of Contents.......................................................................................... |
1 |
Usage Notice................................................................................................ |
3 |
Precautions........................................................................................................... |
3 |
Introduction................................................................................................... |
5 |
Product Features........................................................................................................ |
5 |
Package Overview................................................................................................ |
6 |
Product Overview ................................................................................................. |
7 |
Main Unit........................................................................................................................ |
7 |
Control Panel.................................................................................................................. |
8 |
Connection Ports............................................................................................................ |
9 |
Remote Control with Laser Pointer............................................................................... |
10 |
Installation................................................................................................... |
11 |
Connecting the Projector..................................................................................... |
11 |
Powering On/Off the Projector............................................................................ |
13 |
Powering On the Projector........................................................................................... |
13 |
Powering Off the projector............................................................................................ |
14 |
Warning Indicator.......................................................................................................... |
14 |
Adjusting the Projected Image............................................................................ |
15 |
Adjusting the Projector Image Height........................................................................... |
15 |
Adjusting the Projector Zoom / Focus.......................................................................... |
16 |
Adjusting Projected Image Size.................................................................................... |
16 |
User Controls.............................................................................................. |
17 |
Control Panel & Remote Control......................................................................... |
17 |
On-Screen Display Menus.................................................................................. |
21 |
How to operate ............................................................................................................ |
21 |
Color (Computer/Video Mode) ..................................................................................... |
22 |
Image (Computer/Video Mode).................................................................................... |
24 |
Management (Computer/Video Mode) ........................................................................ |
26 |
Audio (Computer/Video Mode) .................................................................................... |
32 |
Timer (Computer/Video Mode) .................................................................................... |
33 |
Language(Computer/Video Mode) .............................................................................. |
34 |
Wireless Projection..................................................................................... |
35 |
Introduction......................................................................................................... |
35 |
System Requirements ................................................................................................. |
35 |
I/O Interface ................................................................................................................. |
35 |
Setting up your WPG.......................................................................................... |
36 |
... English

Table of Contents |
|
Connecting to the WPG for the first time............................................................. |
36 |
Downloading the software .......................................................................................... |
37 |
Connecting to a projector.................................................................................... |
39 |
Using the audio function...................................................................................... |
40 |
Configuring your Acer WPG................................................................................ |
42 |
Projector ID .................................................................................................................. |
42 |
Confiiguration password setup ..................................................................................... |
42 |
Upgrade fiirmware ........................................................................................................ |
44 |
Network settings ......................................................................................................... |
44 |
Projection controls............................................................................................... |
45 |
Hide ............................................................................................................................. |
45 |
Freeze ........................................................................................................................ |
45 |
Projector remote control............................................................................................... |
45 |
Hotkey explanation....................................................................................................... |
45 |
Appendices................................................................................................. |
46 |
Troubleshooting.................................................................................................. |
46 |
Replacing the lamp............................................................................................. |
49 |
Specifications...................................................................................................... |
51 |
Compatibility Modes............................................................................................ |
52 |
Regulation & safety notices......................................................................... |
53 |
English ...

Usage Notice
Precautions
Follow all warnings, precautions and maintenance as recommended in this user’s guide to maximize the life of your unit.
Warning- Do not look into the projector’s lens when the lamp is on. The bright light may hurt your eyes.
Warning- To reduce the risk of fire or electric shock, do not expose this product to rain or moisture.
Warning- Please do not open or disassemble the product as this may cause electric shock.
Warning- When changing the lamp, please allow unit to cool down, and follow all changing instructions.
Warning- This product will detect the life of the lamp itself. Please be sure to change the lamp when it shows
warning messages.
Warning- Reset the “Lamp Hour Reset” function from the On Screen Display “Management” menu after replacing
the lamp module (refer to page 28)
Warning- When switching the projector off, please ensure the projector completes its cooling cycle before
disconnecting power.
Warning- Turn on the projector first and then the signal sources.
 Warning- Do not use lens cap when projector is in operation.
Warning- When the lamp reaches the end of its life, it will burn out and may make a loud popping sound. If this
happens, the projector will not turn back on until the lamp module has been replaced. To replace the lamp, follow the procedures listed under “Replacing the Lamp”.
... English

Usage Notice
Do:
Turn off the product before cleaning.
Use a soft cloth moistened with mild detergent to clean the display housing.
Disconnect the power plug from AC outlet if the product is not being used for a long period of time.
Don’t:
Block the slots and openings on the unit provided for ventilation.
Use abrasive cleaners, waxes or solvents to clean the unit.
Use under the following conditions:
-In extremely hot, cold or humid environments.
-In areas susceptible to excessive dust and dirt.
-Near any appliance that generates a strong magnetic field.
-Place in direct sunlight.
English ...

Introduction
Product Features
This product is an XGA single chip DLP® projector. Outstanding features include:
uTrue XGA, 1024 x 768 addressable pixels
uSingle chip DLP® technology
uNTSC3.58/NTSC4.43/PAL/SECAM and HDTV compatible (480i/p, 576i/p, 720p, 1080i)
uHigh-tech DVI connection for digital signal with HDCP function and supports 480p, 576p, 720p and 1080i
uFull function remote control with laser pointer
uUser friendly multilingual on screen display menu
uAdvanced digital keystone correction and high quality full screen image re-scaling
uUser friendly control panel
uSXGA+, SXGA compression and VGA, SVGA re-sizing
uMac compatible
... English
Introduction
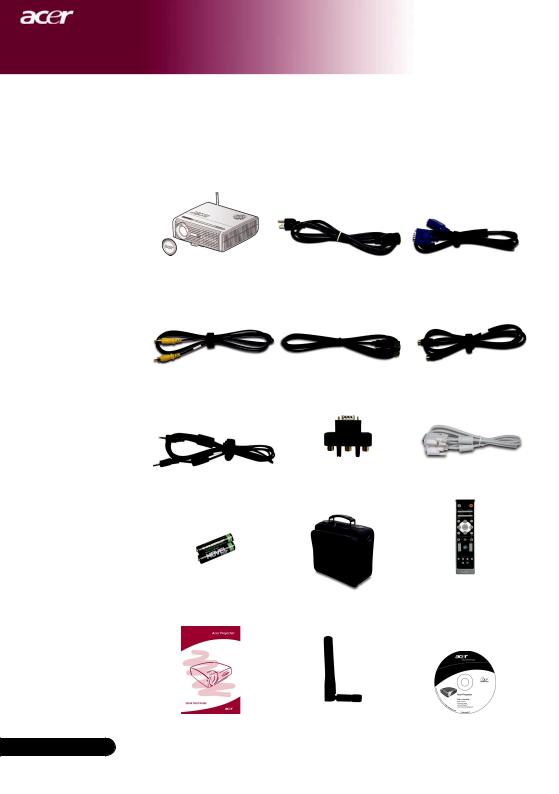
Package Overview
This projector comes with all the items shown below. Check to make sure your unit is complete. Contact your dealer immediately if anything is missing.
Projector with lens cap |
Power Cord 1.8m |
VGA Cable 1.8m |
Composite Video Cable |
USB Cable 1.8m |
S-Video Cable 1.8m |
2.0m |
|
|
Audio Cable Jack /Jack |
VGA to Component/ |
DVI Cable 1.8m |
HDTV Adapter |
|
|
1.8m |
|
|
|
|
2 x Battery |
Carrying Case |
Remote Control with |
Laser Pointer |
English ...
Quick Start Card |
Antenna (for PD525PW/ |
User’s Guide |
|
PD527W/PD528W only) |
|
Introduction
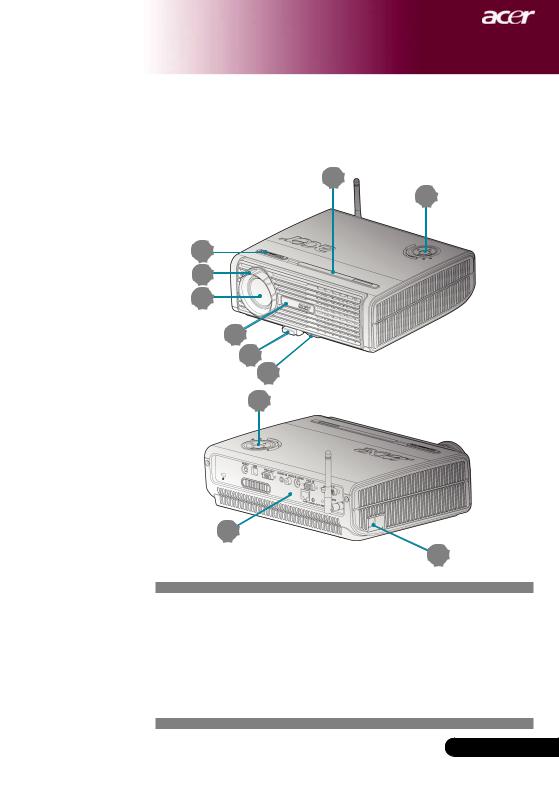
Product Overview
Main Unit
4
9
1
2
3
4 |
5
6
9
7
8
1.Zoom Ring
2.Focus Ring
3.Zoom Lens
4.Remote Control Receiver
5.Elevator Button
6.Elevator Foot
7.Connection Ports
8.Power Socket
9.Control Panel
... English

Introduction
Control Panel
2
1
7 |
3 |
4 |
5
6 |
1.Temp Indicator LED
2.Lamp Indicator LED
3.Power and Indicator LED (Power LED)
4.Source
5.Resync
6.Four Directional Select Keys
7.Menu
English ...
Introduction
Connection Ports
1 |
3 |
5 |
7 |
8 |
2 |
4 |
6 |
14 |
For PD525PW/ |
PD527W/ |
PD528W only |
9 |
10 |
13 |
1.RS232 Connector
2.USB Connector
3.Monitor Loop-through Output Connector (VGA-OUT)
4.Audio Input Connector
5.Composite Video Input Connector
6.S-Video Input Connector
7.PC Analog Signal/HDTV/Component Video Input Connector
8.DVI Input Connector (for Digital signal with HDCP function)
9.KensingtonTM Lock Port
Below items are for PD525PW/PD527W/PD528W only:
10.Lan (RJ45 Port for 10/100M Ethernet)
11.Audio Output Connector
12.Reset Button
13.Status Indicator
14.Antenna
9 ... English

Introduction
Remote Control with Laser Pointer
28 |
1
2 |
3 |
6 |
7 |
10 |
14 |
|
17 |
16 |
18 |
|
19 |
|
23
26
|
|
|
|
|
|
|
1. |
Laser Pointer |
15. |
Mouse Right Click |
|
|
2. |
Power |
16. |
Mouse |
|
|
3. |
Laser Button |
17. |
Empowering Key |
|
|
4. |
Source |
18. |
Volume + |
|
|
5. |
Resync |
19. |
Volume - |
|
|
6. |
Freeze |
20. |
Page Up |
|
|
7. |
Hide |
21. |
Page Down |
|
|
8. |
Mute |
22. |
VGA |
|
|
9. |
Aspect Ratio |
23. |
S-Video |
|
|
10. |
Keystone/Four Directional |
24. |
Video |
|
|
|
|
Select Keys |
25. |
Component |
|
11. |
Back |
26. |
DVI |
|
|
12. |
Digital Zoom |
27. |
Wireless or Language |
|
|
13. |
Menu |
28. |
Transmit Indicator Light |
|
English ... 10 |
14. |
Mouse Left Click |
|
|
|
|
|
|
|
|
|
Introduction
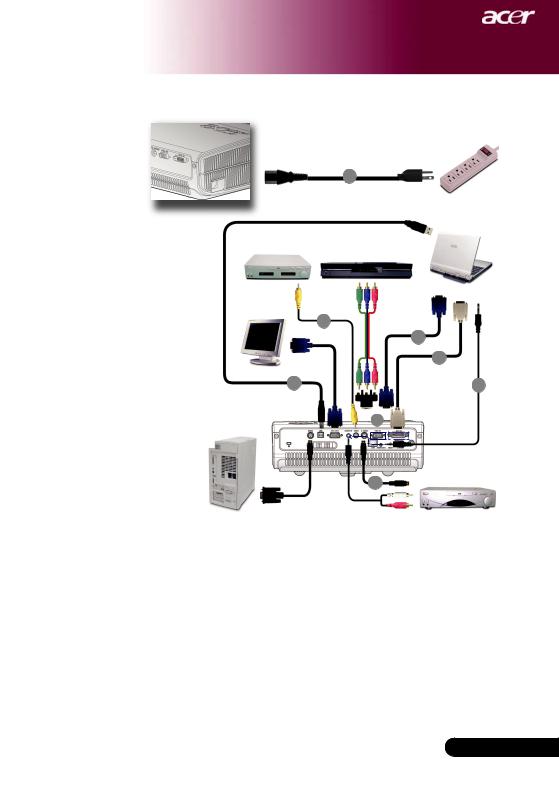
Connecting the Projector
|
|
1 |
|
|
USB |
|
|
|
Video Output |
DVD Player, Settop Box, |
|
|
|
HDTV receiver |
VGA DVI
3
2
8
4 |
7 |
 5
5 
RS232 |
6 |
S-Video Output |
|
|
|
|
|
|
|
|
|
1...................................................................................................................... |
|
Power Cord |
|
2....................................................................................................................... |
|
VGA Cable |
|
3................................................................................................. |
|
Composite Video Cable |
|
4........................................................................................................................ |
|
USB Cable |
|
5.......................................................................... |
VGA to Component/HDTV Adapter |
||
6.................................................................................................................. |
|
S-Video Cable |
|
7................................................................................................... |
|
Audio Cable Jack/Jack |
|
8......................................................................................................................... |
|
DVI Cable |
|
|
|
|
|
|
|
|
|
To ensure the projector works well with your computer, please make sure the timing of the display mode is compatible with the projector. Refer to the “Compatibility Modes” section on page 52.
... English
Introduction
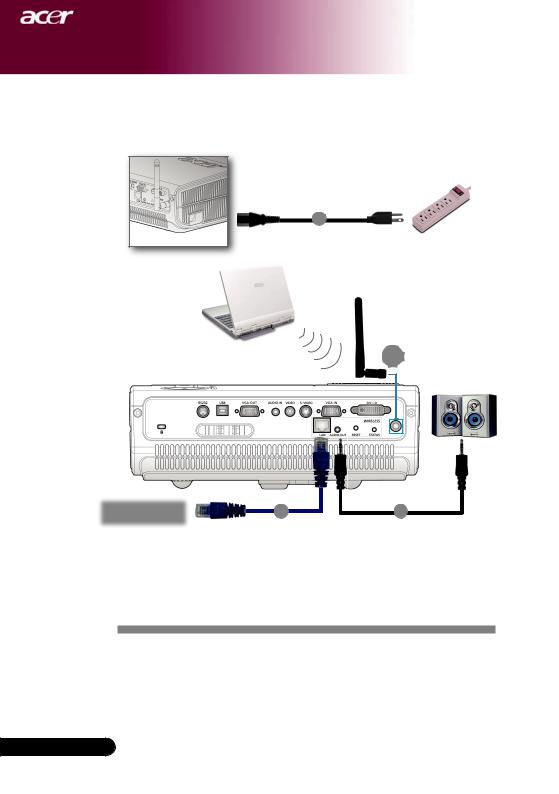
Connecting the Projector
For Wireless function
1
4
Internet |
2 |
3 |
|
|
|
|
|
|
|
|
|
|
|
|
1...................................................................................................................... |
|
Power Cord |
||
2......................................................................................................................... |
|
Lan Cable |
||
3................................................................................................... |
|
Audio Cable Jack/Jack |
||
4............................................................................................................................ |
|
Antenna |
||
(for PD525PW/PD527W/PD528W only, need to attach the antenna by user)
English ...

Introduction
Powering On/Off the Projector
Powering On the Projector
1.Remove the lens cap.
2.Ensure that the power cord and signal cable are securely connected. The Power LED will flash red.
3.Turn on the lamp by pressing “Power” button on the control panel, and the Power LED will turn blue.
4.Turn on your source (computer, notebook, video player, etc.). The projector will detect your source automatically.
If the screen displays “Lock” & “Source” icons, it means the pro-
jector locks on this source type and there is no such type of input signal found
If the screen displays “No Signal”, please make sure the signal cables are securely connected.
If you connect multiple sources at the same time, using the “Source” button on the remote control or control panel to
switch.
1 Power
Turn on the projector fi rst and then the signal sources.
... English

Introduction
Powering off the projector
1.Press the “Power” button to turn off the projector lamp, you will see a message “Please press power button again to complete the shutdown process. Warning: DO NOT unplug while the projector fan is still running.” displayed on the projector’s screen. Press the “Power” button again to confirm, otherwise the message will disappear after 5 seconds.
2.The cooling fans continue to operate for about 30 seconds for
cooling cycle and the Power LED will be quick red flash. When the Power LED becomes slow flashing, the projector has entered standby mode. If you wish to turn the projector back on, you must wait until the projector has completed the cooling cycle and has entered standby mode. Once in standby mode, simply press
“Power” button to restart the projector.
3.Disconnect the power cord from the electrical outlet and the projector.
4.Do not turn on the projector immediately following a power off procedure.
Warning Indicator
When the “LAMP” indicator lights solid red, the projector will
automatically shut itself down. Please contact your local reseller or service center.
When the “TEMP” indicator lights solid red for about 20 sec-
onds, it indicates the projector has been overheated. You will see a message “Projector Overheated. Lamp will automatically turn off soon.” on the on-screen display. The projector will automatically shut itself down.
Under normal conditions, the projector can be switched on again after it has cooled down. If the problem persists, you should contact your local dealer or our service center.
When the “TEMP” indicator flashs red for about 30 seconds, you
will see a message “Fan fail. Lamp will automatically turn off soon.” on the on-screen display. Please contact your local dealer or our service center.
English ... 14
Introduction
Adjusting the Projected Image
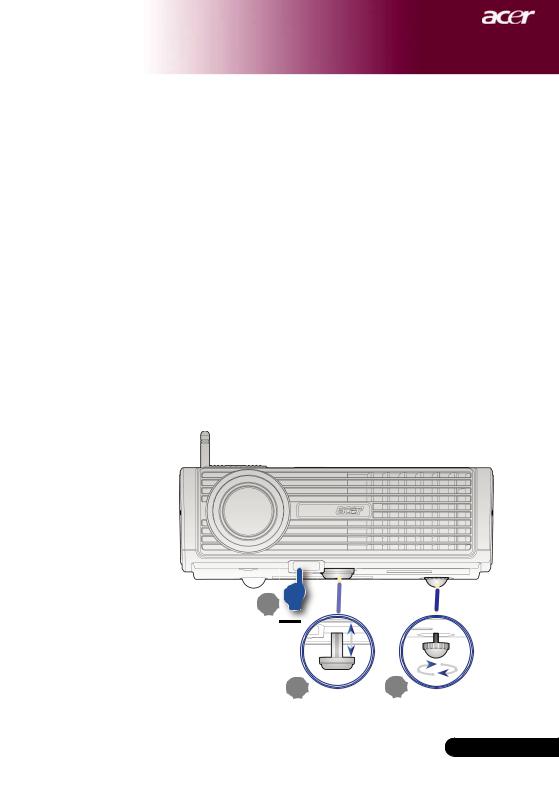
Adjusting the Projector Image Height
The projector is equipped with an elevator foot for adjusting the image height.
To raise the image:
1.Press the elevator button .
2.Raise the image to the desired height angle , then release the button to lock the elevator foot into position.
3.Use to fi ne-tune the display angle.
To lower the image:
1.Press the elevator button.
2.Lower the image, then release the button to lock the elevator foot into position.
3.Use to fi ne-tune the display angle.
1
Elevator Bu
2 |
3 |
Elevator Foot Tilt Adjusting Wheel
... English
Introduction
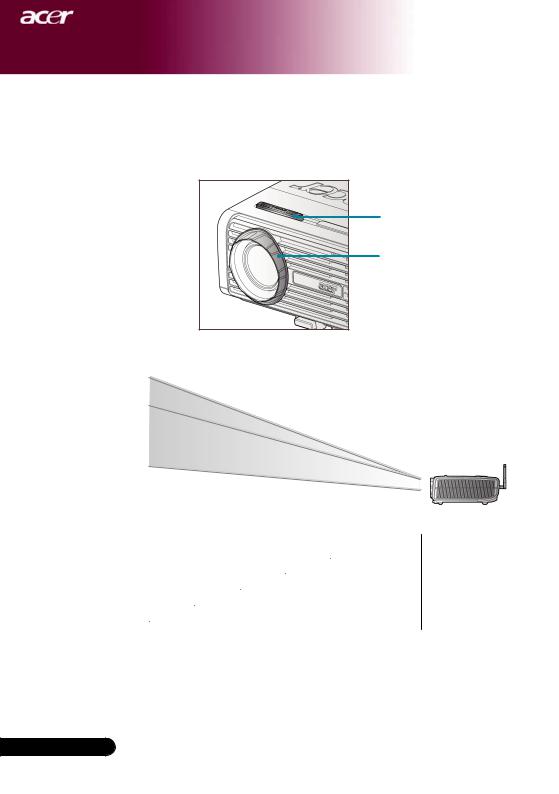
Adjusting the Projector Zoom / Focus
You may turn the zoom ring to zoom in or out. To focus the image, rotate the focus ring until the image is clear. The projector will focus at distances from 3.94 to 40 feet (1.2 to12.02 meters).
Zoom Ring
Focus Ring
Adjusting Projection Image Size
|
|
300"(762.5cm) |
|
|
|
|
|
|
|
|
|
|
|
|
|
|
||||
|
|
|
|
|
246.0"(625.0cm) |
|
|
|
|
|
|
|
|
|
|
|
||||
|
|
261.04" |
|
|
|
|
|
172.2"(437.5cm) |
|
|
|
|
|
|
|
|
||||
|
|
|
|
|
|
|
|
|
|
|
123.0"(312.5cm) |
|
|
|
|
|
||||
|
|
(663.0cm) |
|
213.97" |
|
|
|
|
|
|
|
|
|
|
||||||
|
|
|
|
|
(543.5cm) |
149.78" |
|
|
|
|
74.0"(187.5cm) |
|
|
|
||||||
|
|
|
|
|
|
|
|
(380.4cm) |
|
106.98" |
|
|
|
|
37.0" (93.8cm) |
|
||||
|
|
|
|
|
|
|
|
|
|
|
|
(271.7cm) |
64.1" |
|
|
|
||||
|
|
|
|
|
|
|
|
|
|
|
|
|
|
|
|
|
|
|||
|
|
|
|
|
|
|
|
|
|
|
|
|
|
(163.0cm) |
|
32.1" |
|
|
|
|
|
|
|
|
|
|
|
|
|
|
|
|
|
|
|
|
|
(64.1cm) |
|
4.99'(1.5m) |
|
|
|
|
|
|
|
|
|
|
|
|
|
|
|
|
|
|
|
|
||
|
|
|
|
|
|
|
|
|
|
|
|
|
|
|
|
|
|
|
||
|
|
|
|
|
|
|
|
|
|
|
|
|
|
|
|
|
|
|
||
|
|
|
|
|
|
|
|
|
|
|
|
|
|
|
|
|
|
|
9.84'(3.0m) |
|
|
|
|
|
|
|
|
|
|
|
|
|
|
|
|
|
|
|
|
||
|
|
|
|
|
|
|
|
|
|
|
|
|
|
|
|
|
|
|
16.40'(5.0m) |
|
|
|
|
|
|
|
|
|
|
|
|
|
|
|
|
|
|
|
|
||
|
|
|
|
|
|
|
|
|
|
|
|
|
|
|
|
|
|
|
22.97'(7.0m) |
|
|
|
|
|
|
|
|
|
|
|
|
|
|
|
|
|
|
|
|
||
|
|
|
|
|
|
|
|
|
|
|
|
|
|
|
|
|
|
|
32.81'(10.0m) |
|
|
|
|
|
|
|
|
|
|
|
|
|
|
|
|
|
|
|
|
||
|
|
|
|
|
|
|
|
|
|
|
|
|
|
|
|
|
|
|
40.03'(12.2m) |
|
|
|
|
|
|
|
|
|
|
|
|
|
|
|
|
|
|
|
|
||
|
|
|
|
|
|
|
|
|
|
|
|
|
|
|
|
|
|
|
|
|
|
Screen |
|
|
Max. |
|
37.0"(93.8cm) |
|
74.0"(187.5cm) |
123.0"(312.5cm) |
|
172.2"(437.5cm) |
246.0"(625.0cm) |
300.0"(762.5cm) |
|||||||
(Diagonal) |
|
|
Min. |
|
32.10"(81.5cm) |
|
64.19"(163.0cm) |
106.98"(271.7cm) |
|
149.78"(380.4cm) |
213.97"(543.5cm) |
261.04"(663.0cm) |
||||||||
|
Screen |
|
Max.(WxH) |
|
29.50" x 25.60" |
|
59.06" x 44.29" |
98.43" x 73.82" |
|
137.80" x 103.35" |
196.85" x 147.64" |
240.16" x 180.12" |
||||||||
|
|
|
(75.0 x 62.5cm) |
|
(150.0 x 112.5cm) |
(250.0 x 187.5cm) |
|
(350.0 x 262.5cm) |
(500.0 x 375.0cm) |
(610.0 x 457.5cm) |
||||||||||
|
|
|
|
|
|
|
||||||||||||||
|
|
Size |
|
Min.(WxH) |
|
25.68" x 19.26" |
|
51.35" x 38.51" |
85.59" x 64.19" |
|
119.82" x 89.87" |
171.17" x 128.38" |
208.83" x 156.62" |
|||||||
|
|
|
|
|
(65.2 x 48.9cm) |
|
(130.4 x 97.8cm) |
(217.4 x 163.0cm) |
|
(304.3 x 228.3cm) |
(434.8 x 326.1cm) |
(530.4 x 397.8cm) |
||||||||
|
|
|
|
|
|
|
|
|
||||||||||||
|
|
Distance |
|
4.99'(1.5m) |
|
|
9.84'(3.0m) |
|
16.40'(5.0m) |
|
|
22.97'(7.0m) |
|
32.81'(10.0m) |
40.03'(12.2m) |
|||||
This graph is for user’s reference only.
English ... 16
 Loading...