

Page 1

Wireless LAN Mobility System
Wireless LAN Switch Manager
User’s Guide
WX4400 3CRWX440095A
WX1200 3CRWX120695A
WXR100 3CRWXR10095A
WX2200 3CRWX220095A
http://www.3Com.com/
Part No. 10015403 Rev. AA
Published August 2006
Page 2

3Com Corporation
350 Campus Drive
Marlborough, MA USA
01752-3064
Copyright © 2006, 3Com Corporation. All rights reserved. No part of this documentation may be reproduced
in any form or by any means or used to make any derivative work (such as translation, transformation, or
adaptation) without written permission from 3Com Corporation.
3Com Corporation reserves the right to revise this documentation and to make changes in content from time
to time without obligation on the part of 3Com Corporation to provide notification of such revision or change.
3Com Corporation provides this documentation without warranty, term, or condition of any kind, either
implied or expressed, including, but not limited to, the implied warranties, terms or conditions of
merchantability, satisfactory quality, and fitness for a particular purpose. 3Com may make improvements or
changes in the product(s) and/or the program(s) described in this documentation at any time.
If there is any software on removable media described in this documentation, it is furnished under a license
agreement included with the product as a separate document, in the hard copy documentation, or on the
removable media in a directory file named LICENSE.TXT or !LICENSE.TXT. If you are unable to locate a copy,
please contact 3Com and a copy will be provided to you.
UNITED STATES GOVERNMENT LEGEND
If you are a United States government agency, then this documentation and the software described herein are
provided to you subject to the following:
All technical data and computer software are commercial in nature and developed solely at private expense.
Software is delivered as “Commercial Computer Software” as defined in DFARS 252.227-7014 (June 1995) or
as a “commercial item” as defined in FAR 2.101(a) and as such is provided with only such rights as are
provided in 3Com’s standard commercial license for the Software. Technical data is provided with limited rights
only as provided in DFAR 252.227-7015 (Nov 1995) or FAR 52.227-14 (June 1987), whichever is applicable.
You agree not to remove or deface any portion of any legend provided on any licensed program or
documentation contained in, or delivered to you in conjunction with, this User Guide.
Unless otherwise indicated, 3Com registered trademarks are registered in the United States and may or may
not be registered in other countries.
3Com is a registered trademark of 3Com Corporation. The 3Com logo is a trademark of 3Com Corporation.
Mobility Domain, Mobility Point, Mobility Profile, Mobility System, Mobility System Software, MP, MSS, and
SentrySweep are trademarks of Trapeze Networks, Inc.
Intel and Pentium are registered trademarks of Intel Corporation. Microsoft, MS-DOS, Windows, Windows XP,
and Windows NT are registered trademarks of Microsoft Corporation.
All other company and product names may be trademarks of the respective companies with which they are
associated.
ENVIRONMENTAL STATEMENT
It is the policy of 3Com Corporation to be environmentally-friendly in all operations. To uphold our policy, we
are committed to:
Establishing environmental performance standards that comply with national legislation and regulations.
Conserving energy, materials and natural resources in all operations.
Reducing the waste generated by all operations. Ensuring that all waste conforms to recognized environmental
standards. Maximizing the recyclable and reusable content of all products.
Ensuring that all products can be recycled, reused and disposed of safely.
Ensuring that all products are labelled according to recognized environmental standards.
Improving our environmental record on a continual basis.
End of Life Statement
3Com processes allow for the recovery, reclamation and safe disposal of all end-of-life electronic components.
Regulated Materials Statement
3Com products do not contain any hazardous or ozone-depleting material.
Environmental Statement about the Documentation
The documentation for this product is printed on paper that comes from sustainable, managed forests; it is
fully biodegradable and recyclable, and is completely chlorine-free. The varnish is environmentally-friendly, and
the inks are vegetable-based with a low heavy-metal content.
Page 3

CONTENTS
ABOUT THIS GUIDE
Conventions 9
Documentation 10
Documentation Comments 11
1 GETTING STARTED
Hardware Requirements for 3WXM Client 13
Hardware Requirements for 3WXM Services 14
Software Requirements 14
Preparing for Installation 15
User Privileges 15
Serial Number and License Key 15
HP OpenView Network Node Manager 15
Resource Allocation 16
Installing 3WXM 17
Installing 3WXM on Windows Systems 17
Installing 3WXM on Linux Systems 18
Start 3WXM Services 20
Connect 3WXM Clients to 3WXM Services 20
Configure 3WXM Services 21
3WXM Access Control 23
3WXM Interface 23
Display the Main Window 24
Using the Toolbar and Menu Bar 25
Setting Preferences 26
Easy Configuration Using Wizards 26
View Topology 26
Getting Help 27
Page 4

2 PLANNING AND MANAGING YOUR WIRELESS NETWORK WITH
3WXM
Which Services To Provide? 30
Network Plan 31
RF Coverage Area 31
RF Auto-Tuning 32
RF Auto-Tuning with Modelling 32
RF Planning 33
Which Planning Method Should I Use? 33
Configuration 35
Wireless Configuration 36
AAA Security Configuration 38
System and Administration Configuration 40
Equipment Installation 42
Deployment 43
Management and Monitoring 43
Network Status 44
RF Monitoring 44
Client Monitoring 45
Rogue Detection 46
Event Logging 46
Verification 47
Reporting 47
RF Plan Optimization 48
3 CONFIGURING WIRELESS SERVICES
What are Services? 51
Configure Employee Access Services 52
Tas k Ta bl e 52
Step Summary 54
Example: Configure Employee Access 55
What’s Next? 68
Configure Guest Access Services 69
Tas k Ta bl e 69
Step Summary 71
Optional: Configure Mobility Profiles 81
What’s Next? 82
Page 5

Configure Voice over Wireless IP Service 83
Tas k Ta bl e 83
Step Summary 85
Create a Radio Profile for Voice 86
Create a Service Profile for Voice 86
What’s Next? 95
4 USING RF AUTO-TUNING
What Is RF Auto-Tuning? 97
Place Your Equipment 98
Configure Initial WX Switch Connectivity 98
Upload the WX Switch Configuration into a 3WXM Network Plan 98
Create a Service Profile 99
Create a Radio Profile and Map the Service Profile to It 100
Create Your MAPs 101
Apply a Radio Profile to Each Radio 104
What’s Next? 104
5 USING RF AUTO-TUNING WITH MODELLING
What Is RF Auto-Tuning with Modelling? 105
Add Site Information 106
Insert RF Obstacles 108
Create Your RF Coverage Area 110
Create a Wiring Closet 110
Create Your RF Coverage Area 111
Add MAPs 118
Associate MAPs to the Coverage Area 118
What’s Next? 120
6 USING RF PLANNING
What is RF Planning? 121
Prepare the Floor Drawings 122
Define Site Information 123
Import a Floor Plan 128
Set the Scale 129
Clean Layout 130
Page 6

Model RF Obstacles 133
Import a Site Survey 134
Plan RF Coverage 135
Add Wiring Closets 135
Create Coverage Areas 136
Compute and Place MAPs 144
Assign Channel Settings 146
Calculate Optimal Power 148
Display Coverage 150
Generate a Work Order 151
Install the Equipment 153
What’s Next? 153
7 MANAGING AND MONITORING YOUR NETWORK
Deploy Your Configuration 155
Perform Basic Administrative Tasks 157
Configuring WX Management Services 157
Distributing System Images 159
Using the Image Repository 159
Distributing System Images 159
Saving Versions of Network Plans 160
Importing and Exporting Switch Configuration Files 161
Monitoring Examples 163
Monitor an Individual User 163
Monitor a Group of Users 169
Monitor a Rogue 171
8 OPTIMIZING A NETWORK PLAN
Using RF Measurements from MAPs 180
Using RF Measurements from an Ekahau Site Survey 181
Generating an Ekahau Site Survey Work Order 182
Importing RF Measurements from the Ekahau Site Survey 185
Optimizing the RF Coverage Model 187
Locating and Fixing Coverage Holes 189
Displaying the RF Coverage Area 189
Locking Down MAPs 190
Fixing a Coverage Hole 191
Page 7

Computing and Placing New MAPs 191
Replanning Your Network 191
What’s Next? 192
A OBTAINING SUPPORT FOR YOUR 3COM PRODUCTS
Register Your Product to Gain Service Benefits 193
Solve Problems Online 193
Purchase Extended Warranty and Professional Services 194
Access Software Downloads 194
Contact Us 194
Telephone Technical Support and Repair 195
INDEX
Page 8

Page 9
ABOUT THIS GUIDE
This manual shows you how to plan, configure, deploy, and manage a
Mobility System wireless LAN (WLAN) using the 3Com Wireless LAN
Switch Manager (3WXM) tool suite.
Read this manual if you are a network administrator or a person
responsible for managing a WLAN.
If release notes are shipped with your product and the information there
differs from the information in this guide, follow the instructions in the
release notes.
Most user guides and release notes are available in Adobe Acrobat
Reader Portable Document Format (PDF) or HTML on the 3Com
World Wide Web site:
http://www.3com.com/
Conventions Table 1 and Table 2 list conventions that are used throughout this guide.
Tab le 1 Notice Icons
Icon Notice Type Description
Information note Information that describes important features or
instructions
Caution Information that alerts you to potential loss of data or
potential damage to an application, system, or device
Page 10

10 ABOUT THIS GUIDE
This manual uses the following text and syntax conventions:
Tab le 2 Text Conventions
Convention Description
Menu Name >
Command
Monospace text Sets off command syntax or sample commands and system
Bold text Highlights commands that you enter or items you select.
Italic text Designates command variables that you replace with
[ ] (square brackets) Enclose optional parameters in command syntax.
{ } (curly brackets) Enclose mandatory parameters in command syntax.
| (vertical bar) Separates mutually exclusive options in command syntax.
Keyboard key names If you must press two or more keys simultaneously, the key
Words in italics Italics are used to:
Indicates a menu item that you select. For example,
File > New indicates that you select New from the File
menu.
responses.
appropriate values, or highlights publication titles or words
requiring special emphasis.
names are linked with a plus sign (+). Example:
Press Ctrl+Alt+Del
Emphasize a point.
Denote a new term at the place where it is defined in the
text.
Highlight an example string, such as a username or SSID.
Documentation The 3WXM documentation set includes the following documents.
Wireless LAN Switch Manager (3WXM) Release Notes
These notes provide information about the 3WXM software release,
including new features and bug fixes.
Wireless LAN Switch and Controller Release Notes
These notes provide information about the MSS software release,
including new features and bug fixes.
Wireless LAN Switch and Controller Quick Start Guide
This guide provides instructions for performing basic setup of secure
(802.1X) and guest (WebAAA™) access, for configuring a Mobility
Domain for roaming, and for accessing a sample network plan in
3WXM for advanced configuration and management.
Page 11

Documentation Comments 11
Wireless LAN Switch Manager Reference Manual
This manual shows you how to plan, configure, deploy, and manage a
Mobility System wireless LAN (WLAN) using the 3Com Wireless LAN
Switch Manager (3WXM).
Wireless LAN Switch Manager User’s Guide (this document)
This guide shows you how to plan, configure, deploy, and manage a
Mobility System wireless LAN (WLAN) using the 3Com Wireless LAN
Switch Manager (3WXM). It contains information about
recommended system requirements you should meet for optimum
3WXM performance, installing 3WXM client and 3WXM Services
software, and an introduction to using the 3WXM interface.
Wireless LAN Switch and Controller Hardware Installation Guide
This guide provides instructions and specifications for installing a WX
wireless switch in a Mobility System WLAN.
Wireless LAN Switch and Controller Configuration Guide
This guide provides instructions for configuring and managing the
system through the Mobility System Software (MSS) CLI.
Documentation Comments
Wireless LAN Switch and Controller Command Reference
This reference provides syntax information for all MSS commands
supported on WX switches.
Your suggestions are very important to us. They will help make our
documentation more useful to you. Please e-mail comments about this
document to 3Com at:
pddtechpubs_comments@3com.com
Please include the following information when contacting us:
Document title
Document part number and revision (on the title page)
Page number (if appropriate)
Page 12

12 ABOUT THIS GUIDE
Example:
Wireless LAN Switch and Controller Configuration Guide
Part number 730-9502-0071, Revision B
Page 25
Please note that we can only respond to comments and questions about
3Com product documentation at this e-mail address. Questions related to
Technical Support or sales should be directed in the first instance to your
network supplier.
Page 13

1
GETTING STARTED
This chapter contains information about recommended system
requirements you should meet for optimum 3WXM performance,
installing 3WXM client and 3WXM Services software, and an introduction
to using the 3WXM interface.
Hardware Requirements for 3WXM Client
Table 3 shows the minimum and recommended requirements to run the
3WXM client on Windows and Linux platforms.
Tab le 3 Hardware Requirements for Running 3WXM Client on Windows and
Linux
Minimum Recommended
Processor Intel Pentium 4, 2 GHz or
RAM 512 MB 1GB
Hard drive space
available
Monitor resolution 1024x768 pixels, 24-bit
CD-ROM drive CD-ROM or equivalent CD-ROM
equivalent
100 MB 200 MB
color
Intel Pentium 4, 3 GHz or
equivalent
1600x1200 pixels, 32-bit
color
Page 14

14 CHAPTER 1: GETTING STARTED
Hardware Requirements for 3WXM Services
Software Requirements
Table 4 shows the minimum and recommended requirements to run the
3WXM Services on Windows and Linux platforms.
Tab le 4 Hardware Requirements for Running 3WXM Services on Windows and
Linux
Minimum Recommended
Processor Intel Pentium 4, 2.4 GHz or
equivalent
RAM 1GB 2GB
Hard drive space
available
Monitor resolution 1024x768 pixels, 24-bit
CD-ROM drive CD-ROM or equivalent CD-ROM
1GB 2GB
color
Intel Pentium 4, 3.6 GHz or
equivalent
1600x1200 pixels, 32-bit
color
3WXM client and 3WXM Services are each supported on the following
operating systems:
Microsoft Windows Server 2003
Microsoft Windows XP with Service Pack 1 or higher
Microsoft Windows 2000 with Service Pack 4
SUSE Linux 9.1 and Red Hat WS 3
You must use the English version of the operating system you select.
Operating system versions in other languages are not supported with
3WXM.
The following additional software is required for certain 3WXM features:
Web browser (for example, Microsoft Internet Explorer 5.x or 6.x or
Netscape Navigator 6.x or 7.x)—For displaying 3WXM online help,
work orders, and reports
Adobe Acrobat Reader 5.x or later (or plug-in)—For reading the
manuals and release notes
HP OpenView Network Node Manager 6.4 or later—Must be installed
prior to 3WXM if you plan to use 3WXM in your HP OpenView
environment
Page 15

Preparing for Installation 15
Preparing for Installation
User Privileges Before you install 3WXM, make sure that you are logged in as a user who
Serial Number and
License Key
A licensed copy of 3WXM comes with a base license key. Before you
install 3WXM, make sure you have the appropriate administrative
privileges on the system.
After you have installed 3WXM, you will need to register your license and
the serial number with 3Com in order to obtain an activation key.
The base key along with its activation key enables you to manage up to
10 wireless LAN switches. To manage more than 10 wireless LAN
switches, you also need an upgrade key and an additional activation key,
which you obtain from 3Com. See “Serial Number and License Key”
below for more information.
has permission to install software, or as an administrator.
After you install 3WXM, you can configure 3WXM access privileges for
the user accounts on the machine. Likewise, you can configure access
privileges for the monitoring service, if installed. Access privileges for the
3WXM client are completely independent of access privileges for the
monitoring service, and are configured separately.
3WXM comes with a base license key, which is provided on the CD cover.
To use 3WXM Services, you need to enter the base key and an activation
key, which you obtain from 3Com. The base key and activation key
enable you to manage up to 10 wireless LAN switches. To manage more
than 10 wireless LAN switches, you also need an upgrade key and
additional activation key, which you obtain from 3Com.
HP OpenView
Network Node
Manager
Each time you connect the 3WXM client to the 3WXM Services, it checks
the license information. If the product is not licensed, the License wizard
is displayed.
If you do not have a license key, you can run 3WXM for 30 days. Once
this trial period is over, you will need to purchase a license to continue
running the 3WXM software.
If you want to integrate 3WXM into your HP OpenView environment, you
have the option of installing the HP OpenView plug-in required to use
Network Node Manager with 3Com products. Make sure that HP
OpenView is already installed before installing 3WXM with the plug-in.
Page 16
16 CHAPTER 1: GETTING STARTED
Resource Allocation Table 5 contains general recommended guidelines for hardware
requirements and memory allocation based on the number of radios and
WX switches your server will support. A larger number of WX switches
implies more connections and data processing, and consequently, more
CPU is required. A larger number of radios implies more data (including
client sessions) which requires more RAM and storage.
Tab le 5 Recommended Server Hardware Allocation
Number of Radios 1-25 WX Switches 25-50 WX Switches 50+ WX Switches
1 – 1000 2.4 GHz P4
500 MB RAM
1 GB HD
1000 – 2000 2.4 GHz P4
1 GB RAM
2 GB HD
2.8 GHz P4
500 MB RAM
1 GB HD
3.0 GHz P4
1 GB RAM
2 GB HD
3.2 GHz Xeon
1 GB RAM
1 GB HD
3.6 GHz Xeon
2 GB RAM
2 GB HD
3WXM Services Options
3WXM Services can be installed either in standalone mode or shared
mode. Standalone mode is when 3WXM client and 3WXM Services are
installed on one machine. Standalone mode is primarily used for trying
out 3WXM, while shared mode is used in a working environment. In
shared mode, the administrator sets up 3WXM Services on a single host
(typically with more resources) and other hosts with the client 3WXM
application share 3WXM Services to access network plans and monitoring
information. See Figure 1.
Figure 1 3WXM Services in Shared Mode
Page 17
Installing 3WXM 17
Installing 3WXM To install the 3Com Wireless Switch Manager, follow the instructions
below for your operating system.
Installing 3WXM on
Windows Systems
To install 3WXM on a Windows system:
The 3WXM install program installs either just the 3WXM client, or both
the 3WXM client and Services. There is no option to install the
3WXM Services only.
1 Insert the 3WXM CD in the CD-ROM drive.
If Autorun is enabled, wait briefly for the install program to start.
If Autorun is disabled, follow these steps:
a In Windows Explorer, navigate to your CD-ROM drive.
b In the Software\3WXM directory, double-click install.exe.
The Introduction page of the 3Com Wireless Switch Manager installation
wizard appears, and then the Contents screen appears, as shown in the
following figure.
2 Open the 3Com Wireless Switch Management folder.
3 Select 3Com Wireless Switch Manager.
Page 18
18 CHAPTER 1: GETTING STARTED
4 Click the View button.
The 3Com Wireless LAN Switch Manager (3WXM) information screen appears.
5 Click the Install button.
The installation begins. During the installation, the 3Com Wireless Switch
Manager installation wizard minimizes.
Installing 3WXM on
Linux Systems
6 When the installation is complete, maximize the 3Com Wireless Switch
Manager installation wizard screen, and then press the Contents button.
7 Press the Exit button to close the wizard, or navigate to the other items
on the CD.
The same 3WXM install program installs either 3WXM client, 3WXM
Services, or both.
To install 3WXM on a Linux system:
Unpack files
Use the Installation Wizard
Unpacking Files
To unpack files on Linux systems:
1 Log in as superuser.
2 Insert the 3WXM CD in the CD-ROM drive.
3 For the platform on which you are installing 3WXM, click the appropriate
Installer link.
4 Save the installation binary to a directory.
Page 19
Installing 3WXM 19
5 Open a shell window.
6 Use the cd command to go to the directory in which you saved the
installation binary.
7 In the shell window, type sh ./install.bin. The Introduction page of the
3WXM installation wizard appears.
8 Click Next to display the Choose Installation Type page of the installation
wizard, and go to “Using the Installation Wizard”.
The installer does not make any path changes during installation. You
might want to configure path information, to make 3WXM easy to start
on your system. 3WXM must be run at the root level.
Using the Installation Wizard
To use the installation wizard on a Linux system:
1 On the Choose Installation Type page, choose one of the following:
To install both the 3WXM server and the client, click the 3WXM
Services icon.
To install only the 3WXM client, click the 3WXM client icon.
For detailed installation instructions, see “Installing 3WXM” in the
Wireless LAN Switch Manager Reference Manual.
Near the end of the installation process, the installer displays the service
ports 3WXM Services will use:
443—HTTPS server port
162—SNMP trap receiver port
You can change one or both port numbers to prevent conflicts with other
applications on the same host.
Multiple applications cannot use the same UDP or TCP port on the same
host. For example, port 443 is defined by the Internet Assigned Numbers
Authority (IANA) as the well-known HTTPS port. If the host on which you
install 3WXM Services uses its default HTTPS port (443), and the same
host also runs Microsoft Internet Information Services (IIS) on its default
HTTPS port (443), there will be a conflict over the port. 3WXM clients will
not be able to communicate with 3WXM Services.
If you plan to use the remote configuration option to configure new
switches, you must use port 443 for 3WXM Services. When a switch
requests its configuration from 3WXM Services, it sends the request to
port 443.
Page 20

20 CHAPTER 1: GETTING STARTED
Start 3WXM Services
Connect 3WXM Clients to 3WXM Services
3WXM Services are automatically started when you install them on a
Windows system.
To start the 3WXM Services on a Unix or Linux System:
To start 3WXM Services manually, type a command such as the
following:
solaris# rm-services start
To stop 3WXM Services manually, type a command such as the following:
solaris# rm-services stop
These examples assume that 3WXM Services is installed in the default
location.
To connect the client to Services:
1 Select Start > Programs > 3Com > 3WXM > 3WXM. The 3WXM
Services Connection wizard is displayed.
2 Enter the IP address or fully-qualified hostname of the machine on which
the service is installed.
If 3WXM Services is installed on the same machine as the one you are
using to run 3WXM client, enter 127.0.0.1 as the IP address. This is a
standard IP loopback address.
3 Specify the service port, if different from the port number in the Service
Port listbox.
The port number used by the monitoring service must not be used by
another application on the machine where the monitoring service is
installed. If the port number is used by another application, change the
port number on the monitoring service. (See “Configure 3WXM Services”.)
4 Click Next to connect to the server.
5 If the Certificate Check dialog is displayed, click Accept.
If you left the Open Network Plan option on the 3WXM Services
Connection dialog selected, the server opens the last network plan.
Page 21
Connect 3WXM Clients to 3WXM Services 21
Configure 3WXM
Services
You can change the properties of 3WXM Services.
If a firewall is enabled on the host where you install 3WXM Services,
3WXM Services will not be able to communicate with 3WXM client or
with WX switches unless the firewall is configured to allow through
traffic for the SSL and SNMP ports (443 and 162 by default).
To configure 3WXM Services:
1 Select To ol s > 3WXM Services Setup dialog box from the 3WXM main
tool bar. The 3WXM Services Setup wizard is displayed.
By default, a username and password are not required to access 3WXM
Services from 3WXM client. You can configure user accounts for
administrative, provisioning, and monitoring access. (See “3WXM Access
Control” on page 23.)
2 You can optionally configure the following:
Select the arrow buttons to change the HTTPS Server Port, which is
the port on which 3WXM Services listens for requests from 3WXM
client.
Page 22

22 CHAPTER 1: GETTING STARTED
Select the arrow buttons to change the SNMP Trap Receiver Port,
On each switch in the network plan, you must enable notifications and
configure 3WXM Services as a notification target (trap receiver).
3WXM Services does not start listening for SNMP notifications from
switches until you save the network plan.
From the Key Store area of the window, specify security settings.
From the Access Control area, define user accounts. For more
(The Auto-Config IP Subnet Matching option is used for field replacement
of WX switches. For information, see the “Configuring WX Switches
Remotely” chapter in the Wireless LAN Switch Manager Reference
Manual.)
To change these settings, use the Service Settings tab of the 3WXM
Services Setup dialog.
which is the port on which SNMP traps are received. Also select the
trap type (SNMPv1 or SNMPv3) you want 3WXM Services to receive
from WX switches.
information about access control, see “3WXM Access Control” on
page 23.
To select monitoring settings
All monitoring options are enabled by default. You do not need to enable
them and you do not need to specify the switches you want to monitor.
However, for 3WXM Services to receive trap data from WX switches,
SNMP notifications must be enabled and 3WXM Services must be
configured as a notification target on each of the switches.
To start gathering data for monitoring, deploy your configuration to the
network. For information about deploying your configuration, see
“Deploy Your Configuration” on page 155.
Page 23

3WXM Interface 23
3WXM Access Control You can create a user account with administrator, provision, or monitor
privileges. See Table 6 for basic privilege definitions. For a details, see the
“Restricting Access to 3WXM” section in the “Getting Started” chapter
of the Wireless LAN Switch Manager Reference Manual
Tab le 6 User Privilege Levels
Privilege Level Access Control Configuration Monitoring
Administrator yes yes yes
Provision no yes yes
Monitor no no yes
To configure access control
1 Select To ol s > 3WXM Services Setup from the 3WXM main tool bar.
The 3WXM Services Setup window is displayed.
2 In the Access Control area of the window, deselect Allow All Users.
3 Enter a username and password for administrative access, then click OK.
(You must configure an admin account before you can configure
provision or monitor accounts.)
4 Select Add Admin Account, Add Provision Account, or Add Monitor
Account. A dialog box is displayed.
5 Enter the account name and the password and click OK.
6 To remove an account, select the account and click Remove Account.
3WXM Interface This section contains the following topics:
“Display the Main Window” on page 24
“Using the Toolbar and Menu Bar” on page 25
“Setting Preferences” on page 26
“Easy Configuration Using Wizards” on page 26
“View Topology” on page 26
“Getting Help” on page 27
Page 24

24 CHAPTER 1: GETTING STARTED
Display the Main
Window
When you start 3WXM client and log onto 3WXM Services, a network
plan is displayed by the 3WXM client. (See Figure 2 on page 25.)
Organizer panel displays a network tree representing your WLAN’s
devices and configurations on those devices. You can use it to
navigate to Policy configurations, Equipment within your network,
and network Sites.
When you select a device or configuration in the tree, the
context-sensitive information about the device or configuration is
displayed to the right in the Content and Information panels.
Content panel displays context-sensitive information about the device
or configuration selected from the tree in the Organizer panel. From
the Content panel, you can view 3Com devices and their status, verify
3Com device configurations in the network plan and in the network,
and display event logs and Rogue detection results.
Alerts panel displays a summary of alerts, including network and
configuration verification, Rogue detection, and local and network
changes. Click on a summary to display details.
The Lock icon indicates whether the network plan has been locked.
When you make changes to a network plan, 3WXM locks it on the
server. The lock prevents other clients who open the network plan
from modifying it while you are making changes. The network plan
remains locked until you save your changes, after which the lock is
released.
Page 25
Figure 2 Main 3WXM Window with Open Network Plan
3WXM Interface 25
Organizer panel
Content panel
Toolbar
Using the Toolbar
and Menu Bar
Alerts panel
The main 3WXM window has a toolbar that provides quick access to
features. You can use the Back and Forward buttons to cycle through
your display selections.
The menu bar (located above the toolbar) provides access to administrative
options such as plan management and access to online help. For example,
to open another network plan, select File > Switch Network Plan.
Lock
icon
Page 26
26 CHAPTER 1: GETTING STARTED
Setting Preferences You can set network and user interface preferences, as well as
preferences for save interval and autosave, certificate handling,
RF monitoring, and logging.
1 Select To ol s > Preferences from the 3WXM main tool bar.
The Preferences wizard is displayed.
2 Select any of the tabs, make modifications in the fields, and select Reset
All to reset preferences.
Easy Configuration
Using Wizards
Wizards help walk administrators through configuration steps. There are
many wizards in the 3WXM application.
Enter the required fields and click Next at the bottom of the wizard to
display the next step. Click Cancel to discard any changes made with the
wizard. When you are done, click Finish or OK to save changes.
You can right-click on many objects to display the Insert option. Select
Insert to create a new object that is a “child” of the selected object.
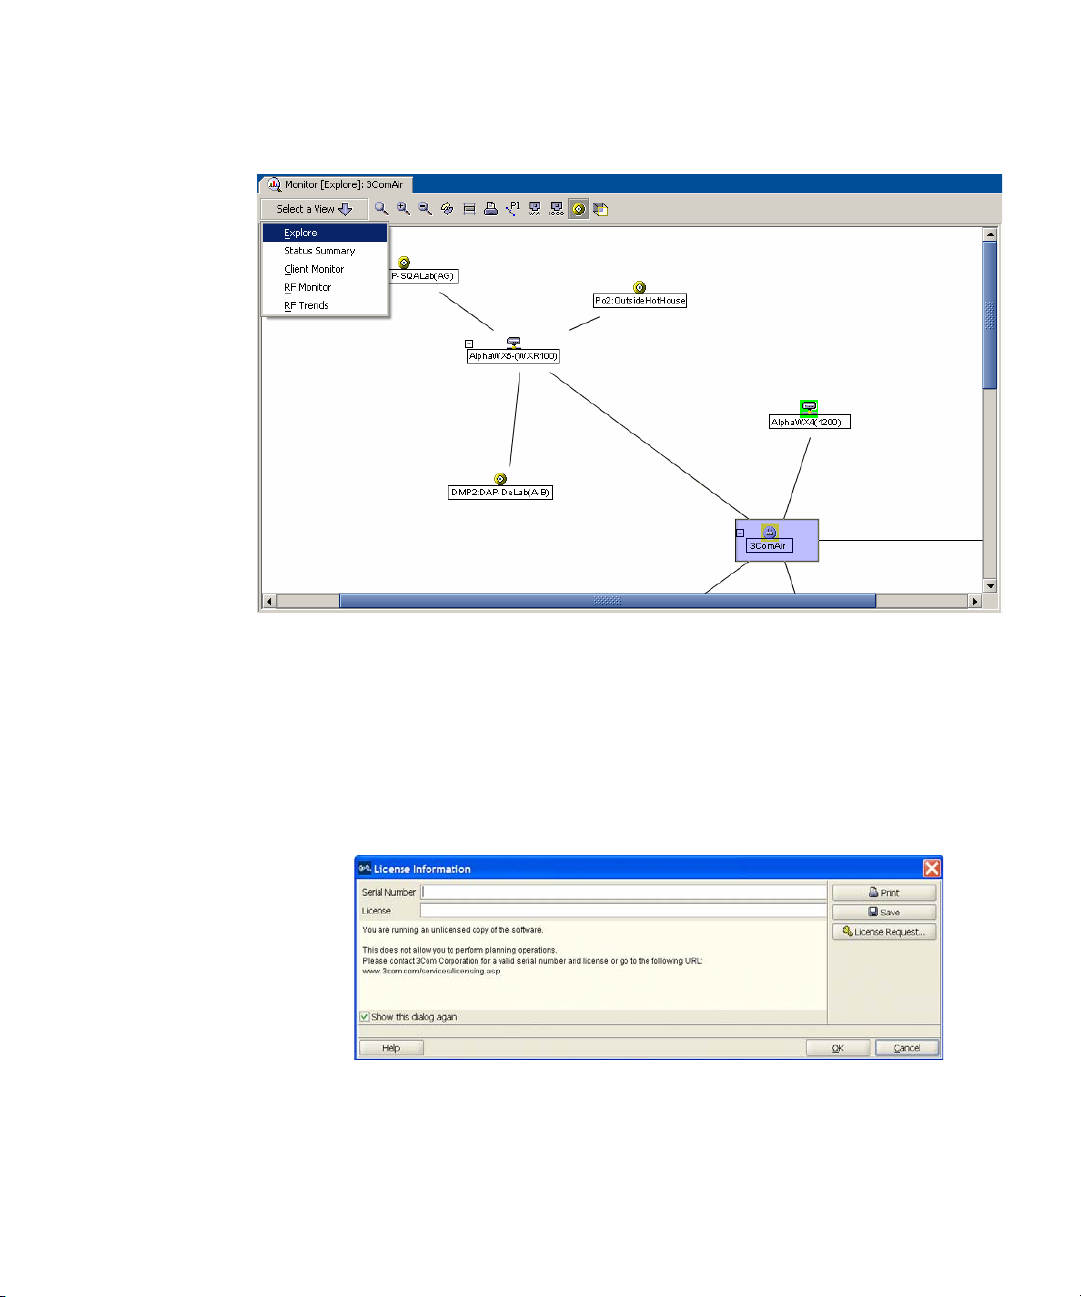
View Topology You can display a topology view of managed devices in your WLAN and
their relationships to each other. You can also click on the devices in the
topology view to display summary monitoring information about each
one.
To display a topology view of your network
1 Select the Monitor toolbar option.
2 In the Equipment section of the Organizer panel, select a Mobility
Domain or a WX switch.
3 If not already selected, select Explore from the drop-down list in the
Monitor tab. The topology view of the selected object is displayed.
Page 27
3WXM Interface 27
You also can select a radio, in which case the floor plan where the radio is
located is displayed, with status for all MAPs on that floor.
Getting Help Click Help from the Main menu bar to access different types of help:
1 Select Help > Help to display HTML help about configuring and using
3WXM.
2 Select Help > Licensing to view product licensing information.
3 Select Help > Report Problem to report a problem to 3Com Technical
Support.
4 Select Help > About 3WXM to display information about 3WXM and to
display the Release Notes. You also can click Force GC (garbage
collection) to free resources.
Page 28

28 CHAPTER 1: GETTING STARTED
Page 29
2
PLANNING AND MANAGING YOUR WIRELESS NETWORK WITH 3WXM
This chapter contains information about planning and managing your
wireless network with 3WXM. Planning your wireless network is highly
recommended because it not only helps you configure and deploy it, but
also aids in scaling and monitoring your network. 3Com provides you
with flexible tools to assist with network planning.
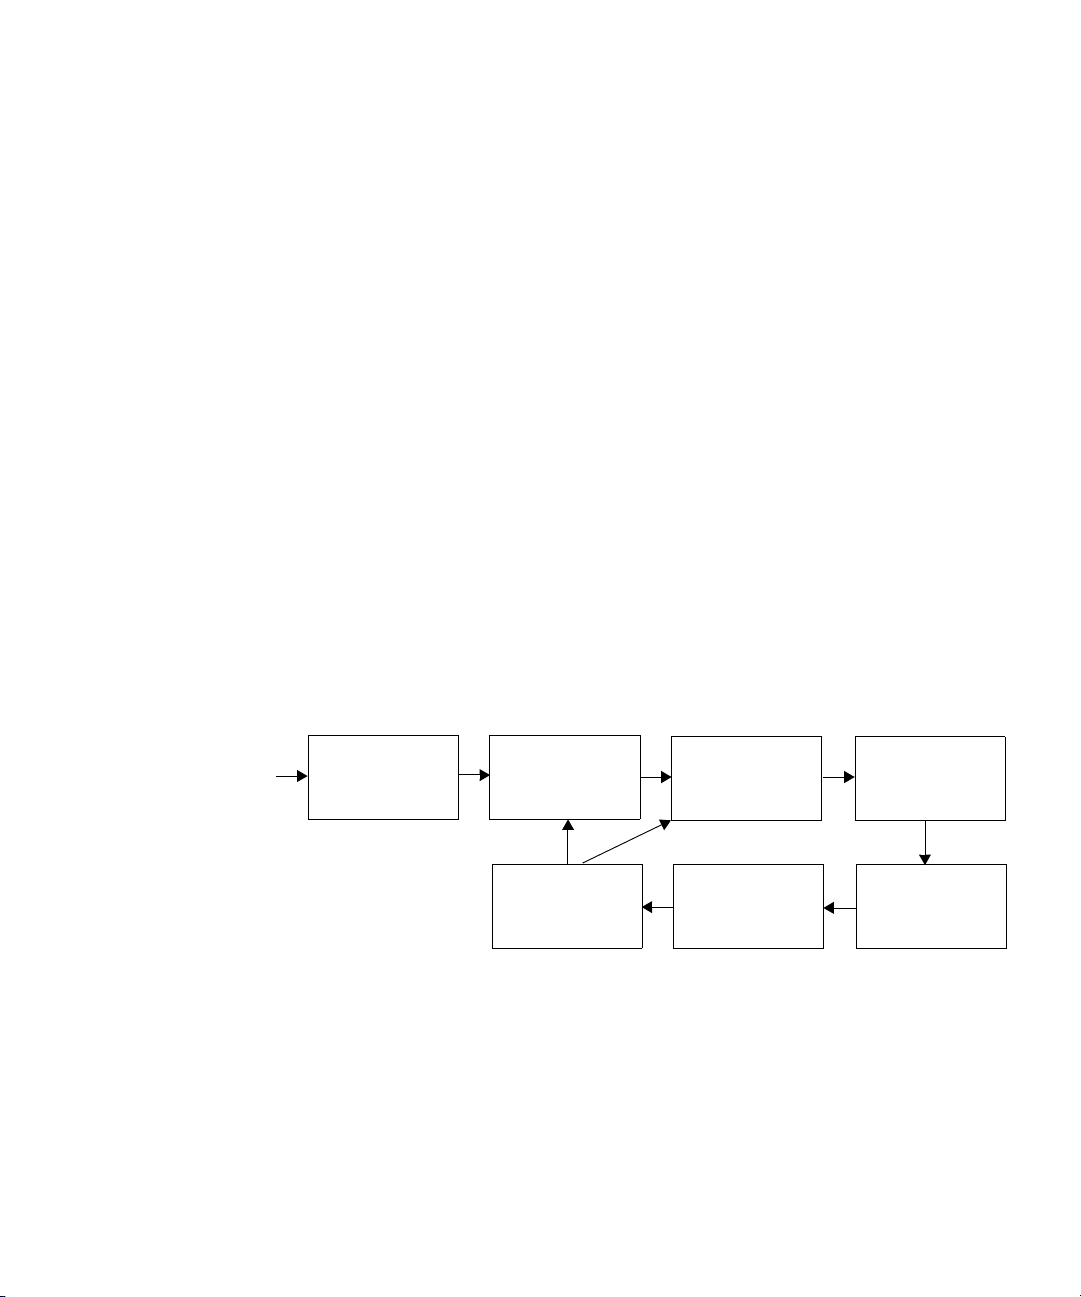
You plan your wireless network to support the services you want to offer
your employees, guests, or customers. Figure 3 describes the process you
will follow to establish services in your company or organization,
beginning with determining the services you want to offer. Each step in
the process is described in this chapter.
Figure 3 Process to Establish Wireless Services
START
Determine which
services to
provide
Configure
services
Optimize
services
Plan for network
equipment and
coverage
Monitor
services
Generate work
order and install
equipment
Deploy
services
Page 30

30 CHAPTER 2: PLANNING AND MANAGING YOUR WIRELESS NETWORK WITH 3WXM
Which Services To Provide?
What is a service?: A service is a concept (not a selectable item in the 3WXM
interface) that represents a set of options you configure and deploy on your
wireless network. You configure services to support the different levels of
network access you need to provide. For example, a service configured to
support employee access will have different options configured to provide
greater access to the network. In contrast, a service configured for guest
access typically restricts users to limited or no internal network access, but
easily provides a gateway connection to the Internet.
A service can be fully isolated and independent of other services on the
network (multi-hosted access is typically isolated), or you can reuse part
of a service configuration for another service you want to provide. Each
service has potential authentications (802.1X, web page, MAC address,
or “last resort”) and potential encryptions (802.11i, WPA, WEP, or
unencrypted).
Purpose of this section: To provide information about services that you can
configure using 3WXM.
Why is this important?: Understanding the services you can configure with
3WXM is the first step in planning and configuring your network.
The first step you need to do when planning your wireless network is to
determine which services your organization requires. The three common
types of services are:
Employee access
Guest access
Voice over Wireless IP (VoWIP)
Employee access is typically secure, encrypted access to the wireless
network. Guest access is access (possibly unencrypted) for visitors at your
location. If you intend to resell services to other providers, you will need
to provide multi-hosted access.
Determining the services you will need at the beginning of the planning
process results in configuration data. The configuration data is used to
create service profiles and AAA rules for each service. A service profile is a
subset of a radio profile. A radio profile is a common set of configuration
parameters that can be applied to many MAP radios.
See “Create a Service Profile” on page 99 for information about
configuring services.
Page 31

Network Plan 31
Network Plan What is a network plan?: A network plan is the workspace in 3WXM you
use to design a wireless network.
Why is this important?: You can better manage and visualize your network
topology by creating a detailed and accurate network plan.
You can start by creating a device-oriented (WX switches and MAPs) view
of your network without any geographic information about your site—no
floor dimensions, building material information, or RF obstacle
information. You can go a step further and provide some geographic
information by adding floor dimensions, your RF coverage area, and
some attenuation information, such as elevator shafts or internal
concrete walls. If you want to enjoy the full benefits of network
monitoring and visualization, you can create a detailed network plan. This
is done by importing detailed building and floor plans into 3WXM,
defining RF obstacles, and defining the quality of coverage (traffic
engineering parameters) you want for specific RF coverage areas.
RF Coverage Area What is an RF coverage area?: An RF coverage area is the geographical area
in which IEEE 802.11 radios provide wireless services.
Purpose of this section: To describe the three techniques you can use for
RF coverage.
Why is this important?: By understanding available RF coverage planning
techniques, you can use the technique that meets your organization’s
requirements.
There are three techniques you can use to get your wireless network
started:
RF Auto-Tuning lets you use the default auto tuning feature to select
power and channel settings for RF signals in your RF coverage area.
You upload the WX switches into 3WXM, configure the MAPs, enable
RF Auto-Tuning, and deploy.
Page 32

32 CHAPTER 2: PLANNING AND MANAGING YOUR WIRELESS NETWORK WITH 3WXM
RF Auto-Tuning with Modelling, as with the RF Auto-Tuning
technique, lets you set the auto tuning feature to adjust power and
channel settings to provide RF signals to the coverage area for your
users. Enhance the auto tuning feature by providing modelling
information about your geographic location. By providing some
information about your buildings and floors, you add enough details
into 3WXM so that your can better visualize your network topology
and support improved monitoring at your site.
RF Planning is a technique you can use to create a detailed network
plan that provides powerful monitoring and visualization benefits.
Unlike RF Auto-Tuning or RF Auto-Tuning with Modelling, you do not
rely on the auto tuning feature. Instead, you fully model your
geographic location with detailed information about your floors, and
specify your RF coverage areas and your RF obstacles.
Each of these methods is described in the sections that follow.
RF Auto-Tuning To use the RF Auto-Tuning technique:
Physically place WX switches and the MAPs in their desired locations.
RF Auto-Tuning with
Modelling
Upload a WX switch configuration and deploy it.
Enable the RF Auto-Tuning feature.
This is a great way to install a WX switch and some MAPs, and
observe how the network operates. The RF Auto-Tuning plan is best
suited to networks containing fewer MAPs.
To use the RF Auto-Tuning with Modelling technique, you add to the RF
Auto-Tuning technique by providing some geographical modelling about
your building, floors, and RF coverage area. You also add RF obstacle
information for major obstacles (like concrete walls, windows, and
elevator shafts) that affect attenuation—the quality of RF signals emitted
from and received by the MAPs. By adding geographical modelling, you
will be able to manage your network in the context of that geographical
information. For example, you will be able to manage your network
overlaid on a floor plan, versus managing an abstract logical group of
switches and MAPs.
Page 33

RF Coverage Area 33
RF Planning To do RF Planning, you provide detailed information about your site and
buildings by importing AutoCAD DXF™, AutoCAD DWG, JPEG, or GIF
floor plan files of the buildings into 3WXM. As you import the floor plans,
you can modify them to add or remove RF obstacles. You define RF
obstacles by specifying the attenuation factor in decibels for the obstacle.
In addition, 3WXM includes a library of attenuators for building
obstacles. The library includes doors, walls, ceilings, and other physical
obstructions that you can select. 3WXM factors in the impact these
objects have on how the radio frequency (RF) signals flow through a
given site.
If the network contains third-party or pre-installed APs, you can enter
information for these APs so that 3WXM takes the APs into account
when calculating the placement (and optionally, the channel and power
settings) of the 3Com MAPs.
By using this technique, you receive these substantial benefits:
Instead of you making a “best guess” as to how many MAPs you
require for the desired coverage and where MAPs should be placed,
3WXM automatically calculates how many MAPs you need and where
to place MAPs for optimal positioning.
Which Planning
Method Should I Use?
You can generate a deployable work order to help installers place WX
switches and MAPs.
You automatically receive a deployable configuration that includes
optimum power and channel settings.
You enjoy more accurate monitoring options and network
visualization based on the additional geographic modelling
information loaded into 3WXM.
The more detailed your network plan, the better you will be able to
manage and monitor the network. However, there are other
requirements organizations should consider.
3Com recommends using the RF Auto-Tuning technique if you are
installing MAPs without consideration to blanket coverage, throughput
concerns, or the number of users for whom service will be provided. RF
Auto-Tuning is ideal for small areas; for example, coverage that only
requires a few MAPs, or widely dispersed areas in a building, such as
conference rooms.
Page 34

34 CHAPTER 2: PLANNING AND MANAGING YOUR WIRELESS NETWORK WITH 3WXM
Use the RF Auto-Tuning with Modelling technique if you want to better
monitor your wireless network in terms of buildings, floors, or coverage
areas. You may only be able to locate inaccurate or incomplete building
and floor plans (perhaps only a JPEG file), but with even a bit more
geographic modelling of your site, you boost your ability to manage and
visualize your network.
Use RF Planning when you want to use all the tools provided in 3WXM to
deploy, manage, and monitor your network. You likely have multiple
constituencies of users you need to consider; for example, sets of users
that are mobile and wireless that have specific throughput and
bandwidth needs. One group of users may be mobile and require high
throughput performance (a higher bandwidth), while another group of
users are more stationary and require less throughput. Additionally, you
may be planning for future capacity, and need to add as much detailed
information as you can about your site in order to plan for the future.
See Table 7 for some guidelines to help you determine what planning
technique is right for your organization.
Tab le 7 Planning Techniques to Use
Concern If yes, use If No, use
Do I have adequate time to add
geographic modelling and RF
obstacle information?
Can I locate accurate building
and floor plans?
Do I need to plan for capacity of
users or quality of coverage
(traffic engineering concerns) for
certain users?
Do I need to visualize coverage
accurately?
Do I need to locate users? RF Planning or RF
Do I need to locate rogue APs? RF Planning or RF
RF Auto-Tuning with
Modelling
RF Planning or
RF Auto-Tuning with
Modelling
RF Planning RF Auto-Tuning or RF
RF Planning RF Auto-Tuning or RF
Auto-Tuning with
Modelling
Auto-Tuning with
Modelling
RF Auto-Tuning
RF Auto-Tuning with
Modelling
Auto-Tuning with
Modelling
Auto-Tuning with
Modelling
RF Auto-Tuning
RF Auto-Tuning
Page 35

Configuration 35
Tab le 7 Planning Techniques to Use
Concern If yes, use If No, use
Do I want to better monitor my
wireless network in terms of
buildings, floors, or coverage
areas?
RF Planning or RF
Auto-Tuning with
Modelling
RF Auto-Tuning
If RF Planning does not fit your requirements now, you can always use the
RF Planning technique in the future when you have the need, the time,
and the necessary floor plans available. You also can leverage the data in
RF Auto-Tuning and convert these RF measurements to configured
baseline values for planning.
Configuration Purpose of this section: To describe the main areas of the 3Com Network
(WX switch and MAPs) you will configure in 3WXM.
Why is this important?: To provide you with overview information about
the software so that you can plan a configuration to support the services
you require.
You will configure the wireless configuration and AAA security
configuration for each service you provide on your wireless network. You
also create a basic configuration for the WX switch.
Figure 4 Configuration Required for Each Service
Wireless Service
Wireless Configuration
- Radio Profile
- Service Profile
- Encryption Choices
AAA Security Configuration
- AAA methods
- Rules
- Authentication choices
Page 36

36 CHAPTER 2: PLANNING AND MANAGING YOUR WIRELESS NETWORK WITH 3WXM
This section contains information about:
“Wireless Configuration” on page 36
“AAA Security Configuration” on page 38
“System and Administration Configuration” on page 40
Wireless
Configuration
MAP1
Wireless configuration focuses on the configuration tasks (radio
configuration and AAA configuration) you do to deliver the virtual
wireless services you want to provide on your network. You enable the
MAPs to operate according to your planned RF coverage requirements.
Most of the wireless configuration is done as you plan your RF coverage
and create your radio profiles and service profiles.
A radio profile is used to apply common settings to multiple radios, and
each radio profile can support up to 32 service profiles, one for each
service you want to support. You specify in the service profile an SSID for
each service and the type of encryption mechanisms to be used by the
MAP radios. This gives the radio the potential to look like 32 different and
independent MAPs. (See Figure 5.)
Figure 5 Radio and Service Profiles
Radio 1
Radio 2
Radio 1
Radio Profile “default” applied to MAP1, Radio 1
and Radio 2 and MAP2, Radio 1
Service Profiles 1-32
SSID
MAP2
Radio 2
Radio Profile “EBC” applied to MAP2, Radio 2
Service Profile, 1-32
SSID
Page 37

Configuration 37
You must configure a radio profile to set attributes that you can apply to
multiple radios. Rather than configuring each radio individually, you
create a radio profile and apply it to multiple radios that you select. You
can also create a radio profile as part of a policy and apply it to MAP
access points on different WX switches.
The radio profile can contain RF Auto-Tuning settings and IEEE 802.11
settings that control how the data is received and transmitted. You can
select RF Auto-Tuning in the radio profile to apply AutoRF settings
(enable or disable auto tuning of power and channels) to radios en masse
via the radio profile. AutoRF enabled through the radio profile to multiple
radios can be easily disabled, too, should you want to go to full RF
planning. You can set specific IEEE 802.11 settings, such as beacon, DTIM
intervals, and the fragment threshold to control how packets are
transmitted.
A default radio profile named default is provided and cannot be deleted.
For each service you want to provide, you configure the following items
in a service profile:
The SSID name
SSID advertisement (whether the SSID name is beaconed)
Whether the SSID name is encrypted or clear (not encrypted)
Web page (if using WebAAA)
Multiple encryption choices (Dynamic/static WEP, WPA, WEP + WPA,
802.11i)
You also must configure AAA security configuration items for each
service. For more information, see “AAA Security Configuration” on
page 38.
The encryption type you use depends on the type of services you’re
offering. Employee access is typically encrypted, guest access is typically
clear (no encryption), and multi-host or “multiple virtualized services”
service can be encrypted, with each SSID being matched with its own
service profile.
If services are being used for customer corporate entities (e.g. different
airlines on an airport wireless net), then they would probably use 802.1X
and strong encryption with web guest access for their airport club guests.
Page 38

38 CHAPTER 2: PLANNING AND MANAGING YOUR WIRELESS NETWORK WITH 3WXM
If the services are being used to advertise multiple wireless service
TM
providers (WISP), such as T-Mobile
, Wayport ®, and Boingo WirelessTM,
then these services would probably be completely open. However, they
would likely be assigned to their own dedicated subnet containing their
proxy server/billing gateway.
AAA Security
Configuration
An administrator can control the way in which users access the network.
For each service you provide, you can configure unique authentication,
authorization, and accounting (AAA) security features, creating an
entirely virtualized wireless service. For each service, you configure:
Multiple authentication choices (802.1X, Web, AAA, MAC
authentication, Bonded Auth, open)
AAA methods (up to four RADIUS server groups, or a local database
on the WX switch)
Authentication
Authentication is the method of determining whether a user is allowed
access to your network. Users can be authenticated by a RADIUS server
(pass-through) or by the WX switch local database (local). The WX switch
can also assist the RADIUS server by performing the Extensible
Authentication Protocol (EAP) processing for the server (offload).
To authenticate users, you will need to configure users either in the local
database or on RADIUS servers. Each user will have a username,
password, and RADIUS and/or vendor-specific attributes (VSAs). You will
also need to configure authentication rules (802.1X, MAC, last-resort, or
web authentication).
See Figure 6 on page 39 to see a flowchart representing the
authentication process. Generally, 802.1X authentication is attempted
first. If the user fails, then MAC authentication is attempted. If this fails,
then last resort and web authentication is used. For a service profile, you
specify either web authentication, last-resort, or none in the
auth-fall-thru box. You can only select one.
Page 39

Figure 6 Authentication Flowchart for Network Users
Client associates with 3Com radio
or requests access from wired authentication port
Configuration 39
Client requests
encrypted SSID?
No
last-resort?
802.1X rule that
Yes
matches SSID?
MAC rule that
matches SSID?
Use fallthru authentication
Yes
No
No
No
Client
Yes
Last-resort rule that
matches SSID?
responds
to 802.1X?
No
Refuse
Client
No
Yes
Yes
Authent.
succeeds?
No
Refuse
Client
Authent.
succeeds?
No
Authent.
succeeds?
No
Refuse
Client
Yes
Yes
Yes
Allow
Client
Allow
Client
Allow
Client
web?
none?
No
Yes
Yes
Refuse
Client
Web Auth rule that
matches SSID?
No
Refuse
Client
Yes
Authent.
succeeds?
No
Refuse
Client
Yes
Allow
Client
Page 40

40 CHAPTER 2: PLANNING AND MANAGING YOUR WIRELESS NETWORK WITH 3WXM
Authorization
Authorization is the method for providing users with specific rights to the
network by associating attribute-value (AV) pairs to the user. AAA
authorization works by assembling a set of attributes that describe what
the user is authorized to perform. These attributes are compared to the
information contained in a local database or on a RADIUS server for a
given user and the result is returned to the WX switch to determine the
user’s actual capabilities and restrictions.
You can configure attributes, such as the time of day or specific VLAN
access. You can also control access using security access control lists
TM
(ACLs), Mobility Profiles
, and Location Policies. Security ACLs permit or
deny traffic based on IP protocol, IP addresses and, optionally, TCP or
UDP port. They also can be used to set class-of-service (CoS) values in a
packet. Mobility Profiles contain attributes to allow or deny access to
specific parts of the network for a specific user or group of users.
Location Policies are an ordered list of location policy rules based on a
user glob, VLAN, and/or ports. A Location Policy can be configured if you
need to override the configured AAA user authorization attributes locally
for a specific WX.
System and
Administration
Configuration
Accounting
Accounting collects and sends information used for billing, auditing, and
reporting—for example, user identities, connection start and stop times,
the number of packets received and sent, and the number of bytes
transferred. You can track sessions through accounting information
stored locally or on a remote RADIUS server. As network users roam
throughout the network, accounting records track them and their
network usage.
A Mobility Domain is a collection of WX switches that work together to
support roaming users. One of the WX switches is defined as a seed
device, which distributes information to the other WX switches defined in
the Mobility Domain.
A Mobility Domain allows users to roam geographically from one WX
switch to another without losing network connectivity. Users connect as
a member of a VLAN through their authorized identities.
You can add switches to a network plan as members of a Mobility
Domain or as standalone switches. After a switch is added, you can move
it into or out of a Mobility Domain.
Page 41

Configuration 41
You can create the following types of WX switches:
WX4400—Provides four dual-interface gigabit Ethernet ports. Each
port has a 1000BASE-TX copper interface and a Gigabit interface
converter (GBIC) slot for insertion of a 1000BASE-SX or 1000BASE-LX
fiber-optic interface.
WX1200—Provides eight 10/100 Ethernet ports, six of which support PoE.
WXR100—Provides two 10/100 Ethernet ports, one of which supports PoE.
WX2200—Provides twenty 10/100BASE-TX Ethernet ports, all of
which support Power over Ethernet (PoE). WX2200 switches also
provide two slots for 1000BASE-SX or 1000BASE-LX fiber-optic
gigabit Ethernet ports.
You perform the following tasks to create and initially configure a WX
switch:
Configure basic WX switch properties.
Configure WX switch connection information.
Configure boot information.
Configure Basic WX Switch Properties
To configure basic WX switch properties, you specify a name, select a
model, select its location by wiring closet, and select the Mobility System
Software (MSS) you want to run on the switch. Optionally, you can select
an MSS image to download when you deploy changes to the WX.
You also can specify if the switch is managed. A WX switch that is
physically installed as well as configured can be managed. You can
deploy configuration changes only to managed devices, and 3WXM
periodically checks the managed WX switches in the network for
changes. You also can fully configure a switch without it being physically
installed (unmanaged). Having an unmanaged device in your network
plan may be useful for predeployment purposes.
Basic configuration also includes specifying how you will manage the
switch. You can manage it through HTTPS, Telnet, and Secure Shell (SSH).
You also can enable monitoring using the Simple Network Management
Protocol (SNMP) to exchange information about network activity
between your network devices.
For more information about configuring basic WX switch properties, see
“Perform Basic Administrative Tasks” on page 157.
Page 42

42 CHAPTER 2: PLANNING AND MANAGING YOUR WIRELESS NETWORK WITH 3WXM
For detailed information about configuring basic WX switch properties,
see the Wireless LAN Switch and Controller Quick Start Guide.
Configure WX Switch Connection Information
You need to supply connection information for the WX switch on both
the WX switch and in 3WXM when you make the WX a managed device.
Connection information includes the IP address of the switch and how it
will connect to the backbone; for example, by means of a VLAN or a port.
Configure Boot Information
You select the software image that the WX will use when reset, or
optionally, the configuration file the WX will use when reset.
Equipment Installation
To physically install a WX switch:
1 Unpack and rack the WX switch in the wiring closet or data center location.
2 Plug the WX switch electrical cord into a power outlet.
3 Connect a network access cable from your existing network to one of the
Ethernet ports on the switch (10/100 or Gigabit Ethernet, depending on
the WX model and available interfaces on the network).
Remember the port number you used. You will need to know this when
performing the initial setup of the switch.
4 Connect a serial interface to the console port of the WX switch to access
the console’s CLI for initial setup.
To physically install MAPs:
1 Instruct the cabling installer to run the Cat. 5 Ethernet cable from the
closest wiring closet to intended location of the MAP.
2 Unpack the MAP, and select the appropriate mounting kit for your
installation location.
3 Install the MAP at the indicated location on the floor.
4 Connect the Cat 5. Ethernet cable(s) to the MAP.
5 At the wiring closet, connect the MAP to the infrastructure equipment:
a If you are directly connecting the MAP to a WX switch, plug the other
cable end(s) to the indicated port(s).
Page 43

Deployment 43
b If you are indirectly connecting the WX to the switch, plug the other
cable end(s) to an available network port on the wiring closet switch.
If the switch does not supply PoE, then ensure that a mid-span PoE
device is inserted in-line with the connection.
Deployment What is deployment?: Sending the WX configuration information in the
3WXM network plan to your WX switch.
Purpose of this section: To describe how changes are made to 3WXM and
deployed to your network.
Why is this important?: To understand best practices for sending and
deploying configurations to your WX.
Configuration changes are collected in 3WXM when you save them, but
are not applied to WX switches until you send the changes to your
network. Any changes you make to your network in 3WXM are saved,
but not applied to your network until they are deployed. This method
makes it easy to apply configurations simultaneously to multiple WX
switches, or you can deploy changes to a single WX switch.
Management and Monitoring
Purpose of this section: To provide an overview of the management and
monitoring capabilities offered in 3WXM.
Why is this important?: Understanding the management and monitoring tools
available in 3WXM can help you to quickly identify and correct problems in
your wireless network, as well as to provide you with the statistics and
reporting information you need to optimize your network.
This section talks about the following management and monitoring
features:
Network Status
RF monitoring
Client monitoring
Rogue detection
Event logging
Verification
Reporting
Page 44

44 CHAPTER 2: PLANNING AND MANAGING YOUR WIRELESS NETWORK WITH 3WXM
Network Status 3WXM provides summary status on devices in the network at the
Mobility Domain, switch or MAP level. View the summary status as the
initial step in monitoring. Summary status displays the operational status
of WX switches, MAPs, and their radios (whether they are up or down).
In addition, 3WXM collects network statistics for devices, including
system-level events and statistics for the wired network.
The Alerts section in the bottom, left panel in 3WXM displays top-level
status information. The Alerts panel provides you with summary error and
warning information for the following areas:
Configuration—indicates network plan configuration issues
Network—indicates managed network issues
Rogue detection—identifies the number of rogue APs detected
Local changes—indicates changes in 3WXM that can be deployed to
the network
Network changes—indicates configuration changes in the network
You can display a topology view of your network, including the state and
relationship of devices. You can right-mouse click on a device in the
topology to display the status of that device. The display can include the
wired network, third-party APs, and rogue access points (access points
that are not authorized to operate in your network).
You also can set thresholds for events. If the threshold is crossed, the
affected device is flagged, and a star is placed beside the parameter that
triggered the threshold.
RF Monitoring RF monitoring provides you with current and historical information about
your radio health and activity. Data collected for the RF environment and
the RF neighborhood includes the following items:
RF environment
Channel
Noise
CRC errors
PHY errors
Packet retransmissions
Percent utilization
Page 45

Management and Monitoring 45
RF neighborhood
Transmitters (heard by this radio)
Listeners (who heard this radio)
Neighbors
BSSID to SSID mapping
Channel
RSSI
Statistics collected for the RF environment provides data on a per-channel
basis. You can view noise levels, cyclic redundancy check (CRC) and PHY
errors, packet retransmissions and percent utilization.
Data collected for the RF neighborhood displays the neighboring radios.
This information can be viewed as a list of radios heard by a particular
radio, as well as a list of radios who can hear a particular radio.
You also can display trending information on a per-radio basis. Trending
collects radio statistics and charts them on a time basis. For example, you could
display average throughput rates for the previous 30 days, week, or day. You
can display and print the charts from 3WXM, as well as generate a report.
Client Monitoring Client monitoring provides current and historical information about the
clients using your network, including client activity, watch list clients,
current client sessions, and the ability to locate clients at your site. 3WXM
displays the data that WX switches collect on user sessions—either for a
single user, users associated with a MAP, users associated with a specific
radio, or users added to a watch list.
By viewing monitoring information for a user or a group of users, you can
troubleshoot problems originating from bandwidth constraints or
roaming patterns. You can collect statistics and view reports on:
Client associations, authentication, and authorization failures
Client activity, such as roaming and successful authorization
Current session status, location history, and statistics
Specifics on users over a period of time; information can be gathered
up to 30 days for session status, location history, client errors, and
client activity on users you place on the watch list
If you use 3WXM RF Planning, you also can display the approximate
geographic locations of clients.
Page 46

46 CHAPTER 2: PLANNING AND MANAGING YOUR WIRELESS NETWORK WITH 3WXM
Rogue Detection A rogue AP is an access point that is not authorized to operate in or near
your network. You can use RF countermeasures to deny service to or
from a targeted rogue AP, and render them ineffective. Once a rogue AP
is detected and reported, the closest 3Com MAP is assigned to perform
RF countermeasures. By spoofing various 802.11 control messages, the
MAP’s countermeasures disrupt association and authentication attempts
to the rogue AP by any new clients. This also disrupts any active
communications between any existing client and rogue AP.
You can collect statistics and view reports on:
Current rogue list, aggregated for the whole network
Current hour rogue list
Current day rogue list
30 days of rogue history, using best listener data
Rogue lifecycle events (when the rogue was first seen, by whom, and
when it went away)
Counter-measure activity
The number of currently detected rogues is conveniently displayed in the
Alerts panel.
If you use 3WXM RF Planning, you also can display the approximate
geographic locations of rogue devices and their clients.
Event Logging 3WXM incorporates a powerful and flexible display interface for all
events collected by the system. Events are stored on a per-WX basis and
are collected continuously. Customizable filters can be created to easily
drill down to specific information the event log database. You can filter
events based on:
Category
Severity
Date and time ranges
WX switch
3WXM client and services log
Specific text string matches
Page 47

Management and Monitoring 47
Verification Both configuration verification and network verification rules are checked
for any inconsistencies or problems. Verification rules include “instant
fix” resolutions. Instant fix resolutions are errors that can be automatically
fixed, or alternatively providing a hot link to the object containing the
error.
You can selectively disable any rule. Disabling a rule is useful if you wish
to ignore a warning and do not want to see it displayed anymore. The
number of configuration and network errors or warnings are
conveniently displayed in the Alerts panel.
Reporting 3WXM uses a database to collect and store client, RF, and other system
dynamic data, such as statistics, status, events, and traps. You can
generate reports from the monitoring and configuration data collected in
the database. A report can have a selectable scope and a selectable time
period and in some cases, query filter parameters. See Table 8 for a listing
and description of the reports you can generate in 3WXM.
Tab le 8 3WXM Reports
Report Description
Configuration Reports
Inventory Report Provides information about the WX switches
and MAPs in your network.
Mobility domain configuration Provides a configuration overview, providing
Wireless Switch (WX) Configuration Provides details on a WX configuration.
Site Survey Order Provides a map of your site that can be used
Work Order Provides information installers use to
Monitoring Reports
Client Session Summary Displays summary data for sessions in the
Client Session Details Displays detailed session information.
data that spans multiple WX switches. For
example, it contains information about the
AAA/RADIUS setup, SSIDs, and where they
are configured.
to guide a site survey.
physically install WX switches and MAPs.
selected scope.
Page 48

48 CHAPTER 2: PLANNING AND MANAGING YOUR WIRELESS NETWORK WITH 3WXM
Tab le 8 3WXM Reports (continued)
Report Description
Client Errors Provides data on client-related health in the
network over time; for example, if there is a
large number of association failures in some
area of the network.
Watch List Clients Contains detailed information for the clients
on the Watch List.
Network Usage Provides information about network resource
usage and client activity.
RF Summary Provides information about overall network
Radio Details Provides a detailed set of statistical
Rogue Details Provides current and historical information
Rogue Summary Provides information for all visible rogues for
health using selected radio statistics. It can be
used to compare RF environments across the
network and isolate potential problem areas.
information for each radio in the selected
MAP.
for a selected rogue.
a selected time.
RF Plan Optimization
What is optimization?: Importing RF measurement data into an RF model
to improve the accuracy of the model.
Purpose of this section: Provides an overview of optimization methods.
Why is this important?: A network plan contains the configuration settings
that determine the performance of your wireless network. Optimization
of the RF model leads to a more successful RF plan. The ultimate result is
an accurate visualization of your RF coverage, better-defined statistics for
monitoring, and the ability to more accurately plan for and improve
network performance.
You can optimize your network based on user and network statistics
gathered from:
The monitoring data in 3WXM
A site survey
Page 49

RF Plan Optimization 49
Based on RF measurement data you gather in 3WXM to optimize the RF
model of a floor, you can make configuration changes in the software to
improve signal strength and coverage for groups or individuals, modify
MAP locations, or add additional equipment to your wireless network if
statistics indicate your network has outgrown the support provided by its
current deployment of WX switches and MAPs.
You also can import RF measurement data based on a site survey done
outside of 3WXM. See the “Using RF Measurements from MAPs” on
page 180 for general guidelines about performing a site survey.
Page 50

50 CHAPTER 2: PLANNING AND MANAGING YOUR WIRELESS NETWORK WITH 3WXM
Page 51

CONFIGURING WIRELESS SERVICES
3
What are Services? A service is a concept (not a selectable item in the 3WXM interface) that
represents a set of options you configure and deploy on your wireless
network. Services are configured to provide various levels of wireless
network access to users, such as secure employee access, guest access,
multi-hosted access, or Voice over Wireless IP (VoWIP) access.
You can configure a service to be independent of other services on your
wireless network, or you may be able to share configuration components
among services. For example, multi-hosted access is typically fully isolated
from other services (no shared configuration), while services that provide
for guest and employee access in a single corporation may share a
common radio profile. In this way, you can reuse part of the service
configuration for other services you want to provide. You could configure
a service for employee access; then reuse part of the configuration to
provide services for guest access.
Each service has potential authentication types (802.1X, web page, MAC
address, or open access) and potential encryption types (802.11i, WPA,
WEP, or unencrypted). (Open Access is sometimes called last resort.)
This chapter contains examples to help you configure the following types
of service sets:
Employee access (802.1X)
Guest access (Web Portal)
Voice over IP (MAC AAA)
The configuration examples in this chapter take place on a WX switch
already in the network plan. However, you also can preconfigure services
in a policy and apply the policy to WX switches later.
Page 52

52 CHAPTER 3: CONFIGURING WIRELESS SERVICES
Configure Employee Access Services
Tas k Ta b l e Table 9 contains the tasks you need to perform to create a service for
Services for Employee access are typically configured to provide secure,
encrypted access to the wireless network.
The following sections provide information about how to configure
Employee access:
“Task Table” on page 52
“Step Summary” on page 54
“Example: Configure Employee Access” on page 55
Table 9 on page 52 contains the tasks you need to perform to configure
Employee access services. The summary provides the configurable options
you should set. The section “Example: Configure Employee Access” on
page 55 guides you through the primary wizards and pages in 3WXM to
configure Employee access services.
employee access. For a summary of configurable items, see “Step
Summary” on page 54. For detailed steps about how to perform each of
these tasks, see “Example: Configure Employee Access” on page 55.
Tab le 9 Creating a Service for Employee Access
Primary Parameters to
Task Path
“Create a
Radio Profile”
on page 56
1 Tool bar option: select
2 Organizer panel: expand
3 Expand Wireless.
4 Click on Radio Profiles.
5 Select Radio Profile in the
Configuration.
the WX switch.
task list.
Configure
From the Create Radio Profile
wizard:
Radio profile name: enter a
name
After you create the service profile,
you can map it to the radio profile.
After you install the MAPs, you can
map their radios to the radio
profile.
Note: The examples in this chapter
configure the radio profile first.
However, you also can configure
the radio profile later as part of
service profile configuration.
Page 53

Configure Employee Access Services 53
Tab le 9 Creating a Service for Employee Access (continued)
Primary Parameters to
Task Path
“Configure
1 Tool bar option: select
RADIUS
Servers” on
page 58
2 Organizer panel: expand
3 Expand AAA.
4 Click RADIUS.
5 Select RADIUS Server in the
Configuration.
the WX switch.
Task List.
Configure
From the Create RADIUS Server
wizard:
Name: enter server name
IP Address: enter server IP
address
Key: enter key
Server group: allow the wizard
to create it
On the RADIUS servers themselves,
configure the AAA backed (not in
3WXM):
Set up each WX switch as a
RADIUS client.
Define the 3Com vendor-specific
attributes (VSAs) in the RADIUS
server’s dictionary.
Configure each user record with
authorization rules (username
and password).
Configure each user with either
the Vlan-Name attribute (3Com
VSA) or the RADIUS
Tunnel-Private-Group-ID to
assign users to VLANs.
Configure authentication rules
(802.1X, MAC, Open Access, or
Web Portal).
Page 54

54 CHAPTER 3: CONFIGURING WIRELESS SERVICES
Tab le 9 Creating a Service for Employee Access (continued)
Task Path
“Create a
Service Profile
for 802.1X
Access” on
page 61
“Set Up
VLANs on WX
Switches” on
page 66
1 Tool bar option: select
Configuration.
2 Organizer panel: expand
the WX switch.
3 Expand Wireless.
4 Click Wireless Services.
5 Select 802.1X Service
Profile in the Task List.
1 Tool bar option: select
Configuration.
2 Organizer panel: expand
the WX switch.
3 Expand System.
4 Click VLANs.
5 Select VLAN in the Task
List.
Primary Parameters to
Configure
From the Create Service Profile
wizard:
Service profile name: edit name
SSID name: enter name
Security mode: select WPA (and
deselect Dynamic WEP)
Encryption type: use TKIP
(already selected)
EAP Type: use External RADIUS
Server (already selected)
RADIUS server group: select one
SSID default VLAN: enter name
Radio profile: select one
From the Create VLAN wizard:
VLAN Name: enter name
VLAN ID: select number
IP Address: enter IP Address
Ports: select them and either
move them (use them only in
the new VLAN) or add them
(share them with other VLANs)
If you add them, select Tag
Step Summary The following list summarizes the fields selected or configuration items
entered in the example that follows to configure Employee access:
1 Create a radio profile.
From the Radio Profile wizard, enter RadioProfile1 as the name of the
radio profile.
Click Finish.
2 Configure the RADIUS back end:
Configure the RADIUS server for 802.1X. Use the recommended EAP
method, PEAP + MS-CHAPv2.
Set up each WX switch as a RADIUS client.
Define any desired 3Com vendor-specific attributes (VSAs).
Page 55

Configure Employee Access Services 55
Configure each user record with either the VLAN-Name attribute or
the RADIUS Tunnel-Private-Group-ID.
Configure 802.1X authentication rules.
3 Configure the RADIUS server in 3WXM:
From the Create RADIUS wizard, enter sg1 as the Name of the server,
the server’s IP address, and the Key. Allow the wizard to create the
server group and place the server in it for you. Click Finish.
4 Create a service profile for 802.1X service.
From the 802.1x Service Profile wizard, click Next and enter
Secure-802.1X-Employees as the Name of the service profile and
Employees as the SSID.
Click Next. Select WPA and deselect Dynamic WEP.
Click Next. Leave TKIP enabled.
Click Next. Leave External RADIUS Server enabled. Select the RADIUS
server group and click Add.
Click Next. Enter vlan-mkt as the default VLAN to use if the VLAN is
not assigned by RADIUS authorization.
Example: Configure
Employee Access
Click Next. Select RadioProfile1 and click Add. Select default and click
Remove.
Click Finish.
5 Set up a VLAN on the WX switches.
From the Create VLAN wizard, enter vlan-mkt as the VLAN name.
Click Next. Select the VLAN ports. Click Add to share them with
other VLANs or Move to use them exclusively in this VLAN. If you click
Add, then select Tag.
Click Finish.
The following detailed steps provide an example of how to configure
Employee services. You will:
“Create a Radio Profile” on page 56
“Configure RADIUS Servers” on page 58
“Create a Service Profile for 802.1X Access” on page 61
“Set Up VLANs on WX Switches” on page 66
Page 56

56 CHAPTER 3: CONFIGURING WIRELESS SERVICES
In general, these same steps are required to configure other services, too.
You can refer back to this section, using the summary list or the task
table, with configuration options for “Configure Guest Access Services”
on page 69 or “Configure Voice over Wireless IP Service” on page 83.
Create a Radio Profile
You configure a radio profile to set attributes that you can apply to
multiple radios. Rather than configuring each radio individually, the radio
profile is applied to multiple radios that you select. Service profiles are
mapped to radio profiles.
The radio profile can contain RF Auto-Tuning settings and IEEE 802.11
settings that control how the data is received and transmitted.
MAPs (and consequently, radios) need to be added to 3WXM after
creating a radio profile. For more information about adding radios, refer
to one of the following:
“Using RF Auto-Tuning” on page 97
“Using RF Auto-Tuning with Modelling” on page 105
“Using RF Planning” on page 121
To create a radio profile
1 Select Configuration on the toolbar.
2 In the Organizer panel, expand the WX switch.
3 Expand Wireless, then select Radio Profiles.
4 In the Task List panel, select Radio Profile.
The Create Radio Profile wizard is displayed.
Page 57

Configure Employee Access Services 57
5 Enter the name of the radio profile, then click Next at the bottom of the
wizard.
6 If MAPs are already configured, select the radios to map to the radio
profile, then click Move.
3WXM removes the radios from the radio profile they are in and places
them in the new profile.
If you have not configured the MAPs in 3WXM yet, no radios are listed.
You can map the radios to the radio profile later.
7 Click Finish to save the changes and close the wizard.
The new radio profile appears in the Content panel.
Page 58

58 CHAPTER 3: CONFIGURING WIRELESS SERVICES
Configure RADIUS Servers
Remote Authentication Dial-In User Service (RADIUS) is a client-server
security protocol that provides authentication, authorization, and
accounting for network users and devices. A RADIUS server stores user
profiles, which include usernames, passwords, and other user attributes.
To configure RADIUS servers, you must:
Configure RADIUS server attributes in 3WXM
Configure attributes on the RADIUS server
Configure RADIUS Server in 3WXM To configure RADIUS in 3WXM,
you define RADIUS server groups (named sets of RADIUS servers). You
must create at least one server group. RADIUS server groups can
authenticate administrators and network users.
To configure the RADIUS server in 3WXM
1 Select Configuration on the toolbar.
2 In the Organizer panel, expand the WX switch on which you are
configuring the service.
3 Expand AAA, then select RADIUS.
4 In the Task List panel, select RADIUS Server.
The Create RADIUS Server wizard is displayed.
Page 59

Configure Employee Access Services 59
5 Type the name, IP address, and key, then click Next.
3WXM suggests the name of a server group to place the server in. The
server group is required because AAA rules refer to server groups, not to
individual servers.
6 Click Finish to save the server and create the server group.
The new server and group appear in the Content panel.
Page 60

60 CHAPTER 3: CONFIGURING WIRELESS SERVICES
Configure Attributes on the RADIUS Server To authenticate users,
you will need to configure users either in the local database or on RADIUS
servers. To configure services for Employee access, the following items
should be configured on the RADIUS server.
To configure the RADIUS server
1 Configure RADIUS server to perform 802.1X using the recommended
EAP method PEAP + MSCHAPV2.
2 Setup each WX switch as a RADIUS client.
3 Define any desired 3Com vendor-specific attributes (VSAs) in the RADIUS
server’s dictionary.
The vendor-specific attributes (VSAs) created by 3Com are embedded
according to the procedure recommended in RFC 2865, with Vendor-ID
set to 14525. Table 10 describes the 3Com VSAs, listed in order by
vendor type number.
Table 10 3Com VSAs
Rcv in
Attribute Type
VLAN-Name 26, 43, 2 Yes No Yes Name of the VLAN to
MobilityProfile
EncryptionType
Time-Of-Day 26, 43, 5 Yes No No Day(s) and time(s) during
SSID 26, 43, 6 Yes No Yes Name of the SSID you
26, 43, 3 Yes No No Name of the Mobility
26, 43, 4 Yes No No Type of encryption used
Access
Resp?
Sent in
Access
Reqst?
Sent in
Acct
Reqst? Description
which the client belongs.
Profile used by the
authorized client.
to authenticate the client.
which a user can log into
the network.
want the user to use. The
SSID must be configured
in a service profile, and
the service profile must be
used by a radio profile
assigned to 3Com radios
in the Mobility Domain.
Page 61

Table 10 3Com VSAs (continued)
Configure Employee Access Services 61
Rcv in
Attribute Type
End-Date 26, 43, 7 Yes No No Date and time after which
Start-Date 26, 43, 7 Yes No No Date and time at which
URL 26, 43, 8 Yes No No URL to which the user is
Access
Resp?
Sent in
Access
Reqst?
Sent in
Acct
Reqst? Description
the user is no longer
allowed to be on the
network. Use the
following format:
YY/MM/DD-HH:MM
the user becomes eligible
to access the network.
Use the following format:
YY/MM/DD-HH:MM
redirected after successful
WebAAA. Use the
following format:
http://www.example.com
4 Configure each user record with authorization rules (username and
password) and with either the Vlan-Name attribute (3Com VSA) or the
RADIUS Tunnel-Private-Group-ID to assign users to VLANs.
Other attributes are optional.
Create a Service Profile for 802.1X Access
A service profile contains the configuration for the service you want to
offer, such as employee access, guest access, or VoWIP.
For more information about service profiles, see “Wireless
Configuration” on page 36. For more information about service sets, see
“Which Services To Provide?” on page 30.
To create an 802.1X service profile
1 Select Configuration on the toolbar.
2 In the Organizer panel, expand the WX switch.
3 Expand Wireless, then select Wireless Services.
4 In the Task List panel, select 802.1X Service Profile.
The 802.1X Service Profile wizard is displayed.
Page 62

62 CHAPTER 3: CONFIGURING WIRELESS SERVICES
5 Click Next.
6 Change the service profile name to Secure-802.1X-Employees, and use
Employees as the SSID, as shown in the figure on the next page.
7 Click Next. Select WPA and deselect Dynamic WEP.
Page 63

Configure Employee Access Services 63
8 Click Next. TKIP is already selected.
9 Click Next. Leave External RADIUS Server selected as the EAP Type.
10 Select the RADIUS server group in the Available RADIUS Server Groups list
and click Add.
11 Click Next. Type vlan-mkt in the VLAN Name box.
12 Click Next. Select RadioProfile1 in the Available Radio Profiles list and
click Add. Select default in the Current Radio Profiles list and click
Remove.
Page 64

64 CHAPTER 3: CONFIGURING WIRELESS SERVICES
13 Click Finish.
The new service profile appears in the Content panel.
View the Service Profile’s Access Rules
Every service profile requires access rules. The access rules specify the
usernames or MAC addresses that are allowed to access the SSID. The
service profile wizards automatically create access rules that match on all
usernames (or that match on all MAC addresses, for VoWIP services).
Page 65

Configure Employee Access Services 65
To view an 802.1X service profile’s access rules
1 Select the service profile in the Wireless Service Profiles table (located in
the Content panel).
A Setup group appears in the Task List panel.
2 In the Task List panel, select 802.1X Access.
The Configure 802.1X Access wizard appears. The wizard displays the
encryption settings, access rules, and AAA settings for the service profile
and allows you to change them. You also can configure new access rules
using the wizard.
3 Click Next to page through the wizard until the 802.1X Access Rules
page appears.
This page lists the access rules configured for the service profile. The
userglob and SSID name are shown. The userglob is the value that
matches on username. The userglob can be a specific username, part of a
username with a wildcard character (*), or two wildcard characters (**)
to match on all usernames.
Page 66

66 CHAPTER 3: CONFIGURING WIRELESS SERVICES
The 802.1X Service Profile wizards uses the ** userglob in the access
rule. You can use this rule, modify it, or delete it and create a new one.
You also can create additional rules. For syntax information, see the
“Wireless Service Parameters” section in the “Configuring Wireless
Parameters” chapter of the Wireless LAN Switch Manager Reference
Manual.
To modify or create access rules
See the “Modifying SSID Encryption Settings and Access Rules” section in
the “Configuring Wireless Parameters” chapter of the Wireless LAN
Switch Manager Reference Manual.
Set Up VLANs on WX Switches
WX switches in a Mobility Domain contain a user’s traffic within the
VLAN the user is assigned to. For example, if you assign a user to VLAN
red, the WX switches in the Mobility Domain contain the user’s traffic
within VLAN red configured on the switches. The VLANs you set up for
service sets support wireless users—they don’t serve as management
VLANs.
If a WX is connected to the network by only one IP subnet, the WX must
have at least one VLAN configured. Optionally, each VLAN can have its
own IP address. However, no two IP addresses on the switch can belong
to the same IP subnet. User VLANs must be defined on at least one WX
switch within the Mobility Domain.
You can configure the Spanning Tree Protocol (STP) on a VLAN. STP is
used to maintain a loop-free network; meaning, devices will recognize a
loop in the topology and block one or more redundant paths, creating a
loop-free path.
The Mobility System Software (MSS) supports Per-VLAN Spanning Tree
protocol (PVST). PVST allows a separate spanning tree in each VLAN. STP,
disabled by default on all VLANS, is configurable for individual VLANs.
STP does not run on MAP ports or wired authentication ports and does
not affect traffic flow on these port types.
To set up a VLAN on a WX switch
1 Select Configuration on the toolbar.
2 In the Organizer panel, expand the WX switch.
3 Expand System, then select VLANs.
Page 67

4 In the Task List panel, select VLAN.
The Create VLAN wizard is displayed.
Configure Employee Access Services 67
5 Enter vlan-mkt as the VLAN name and use the VLAN ID suggested by the
wizard.
6 Click Next. Select the ports you want to use in the VLAN and click Add
or Move.
The Add button adds the ports to the new VLAN without removing
them from any other VLANs.
The Move button removes the ports from all other VLANs, and places
them in the new VLAN.
The ports appear in the Current Members list.
To tag ports in the VLAN, select Tag and edit the tag value. (Tagging is
required if you click Add, because the ports are then members of
multiple VLANs.)
7 Click Next. (Optional) To assign an IP interface to the VLAN, edit the IP
address or select DHCP Client. To enable the IP interface, select Interface
Enabled.
8 Click Finish.
The new VLAN appears in the Content panel.
Page 68

68 CHAPTER 3: CONFIGURING WIRELESS SERVICES
What’s Next? After you create Employee services, you can create additional services.
For information about configuring additional services, refer to:
“Configure Guest Access Services” on page 69
“Configure Voice over Wireless IP Service” on page 83
After you have created additional services, you can create your RF
environment, and deploy your configuration and enable monitoring.
For information about creating your RF environment, refer to:
“Using RF Auto-Tuning” on page 97
“Using RF Auto-Tuning with Modelling” on page 105
“Using RF Planning” on page 121
For information about deploying your configuration and enabling
monitoring of your network, see “Managing and Monitoring Your
Network” on page 155.
Page 69

Configure Guest Access Services 69
Configure Guest Access Services
Tas k Ta b l e Table 11 contains the tasks you need to perform to create Guest access services.
Guest access is access for visitors at your location and is typically clear (no
encryption).
This section contains the following information about how to configure
Guest access services:
“Task Table” on page 69
“Step Summary” on page 71
“Optional: Configure Mobility Profiles” on page 81
Table 11 contains the tasks you must perform to configure Guest access
services. The “Step Summary” provides the configurable options you
should set. The table contains references to the section “Example:
Configure Employee Access” on page 55. The references are provided in
case you want to refer back to detailed steps. However, be sure to use
the configurable options for Guest access services set forth in the “Step
Summary” on page 71. Also, you can optionally configure mobility
profiles for your Guest access services to limit access based on criteria,
such as RF coverage area or time of day.
For a summary of configurable items, see “Step Summary” on page 71.
Table 11 Creating a Service for Guest Access
Task Path
“Create a
Radio Profile”
on page 56
1 Tool bar option: select
2 Organizer panel: expand
3 Expand Wireless.
4 Click Radio Profiles.
5 Select Radio Profile in the
Configuration.
the WX switch.
Task List.
Primary Parameters to
Configure
From the Create Radio Profile
wizard:
Radio profile name: enter a name
After you create the service
profile, you can map it to the
radio profile.
After you install the MAPs, you
can map their radios to the radio
profile.
Note: The examples in this chapter
configure the radio profile first.
However, you also can configure
the radio profile later as part of
service profile configuration.
Page 70

70 CHAPTER 3: CONFIGURING WIRELESS SERVICES
Table 11 Creating a Service for Guest Access
Task Path
“Create a User
Group and
Guest Users”
on page 72
“Create a
Service Profile
for Guest
Access with
Web Login” on
page 75
“Set Up VLANs
on WX
Switches” on
page 66
“Optional:
Configure
Mobility
Profiles” on
page 81
1 Tool bar option: select
Configuration.
2 Organizer panel: expand
the WX switch.
3 Expand AAA.
4 Click Local User Database.
5 Select User in the Task List.
1 Tool bar option: select
Configuration.
2 Organizer panel: expand
the WX switch.
3 Expand Wireless.
4 Click Wireless Services.
5 Select Web Portal Service
Profile in the Task List.
1 Tool bar option: select
Configuration.
2 Organizer panel: expand
the WX switch.
3 Expand System.
4 Click VLANs.
5 Select VLAN in the Task List.
1 Tool bar option: select
Configuration.
2 Organizer panel: expand
the WX switch.
3 Expand AAA.
4 Click Mobility Profiles.
5 Select Mobility Profile in the
Task List.
Primary Parameters to
Configure
From the Create Named User
wizard:
Username: enter name
Password: enter password
Authorization attributes:
configure the end-date, to
specify when the account
expires
From the Create Service Profile
wizard:
Service profile name: edit
name
SSID name: enter name
SSID Type: use Clear
(unencrypted)
VLAN Name: enter name
Authentication server: select
LOCAL or a RADIUS server
group
Radio profile: select one
From the Create VLAN wizard:
VLAN Name: enter name
VLAN ID: select number
IP Address: enter IP Address
Ports: select them and either
move them (use them only in
the new VLAN) or add them
(share them with other VLANs)
If you add them, select Tag
From the Create Mobility Profile
wizard:
Profile Name: enter one
Ports: use Selected
Select the ports or Distributed
MAPs
Page 71

Configure Guest Access Services 71
Step Summary The following list summarizes the fields selected or configuration items
entered configure Guest access.
1 Create a radio profile.
From the Radio Profile wizard, enter RadioProfile1 as the Name of the
radio profile.
Click Finish.
2 Configure users in the local database:
From the Create Named User wizard, enter guest1 as username and
guest1pass as the password.
Configure the end-date authorization attribute to specify when the
account expires.
Allow the wizard to create a server group or select a configured server
group.
Click Finish.
3 Create a Web-Portal service profile.
From the Web-Portal Service Profile wizard, click Next and enter
Web-Portal-Guests as the Name of the service profile and Guests as
the SSID.
Click Next. Enter guest_vlan.
Click Next. Click Next again. Select LOCAL and click Add.
Click Next. Click Next again. Select RadioProfile1 and click Add.
Select default and click Remove.
Click Finish.
4 Set up a VLAN on the WX switches.
From the Create VLAN wizard, enter guest-vlan as the VLAN name.
Click Next. Select the VLAN ports. Click Add to share them with
other VLANs or Move to use them exclusively in this VLAN. If you click
Add, then select Tag.
Click Finish.
5 Optional: Configure a Mobility Profile.
From the Create Mobility Profile wizard, enter the Profile Name.
Select Selected.
Page 72

72 CHAPTER 3: CONFIGURING WIRELESS SERVICES
Choose the Ports or Distributed MAPs to which you’ll restrict guest
users to certain geographic areas of your network.
Click Finish.
For detailed information about the steps, see the cross-references in the
“Task Table” on page 69. New configuration items that were not part of
the example “Configure Employee Access Services” on page 52 are
included in the following sections.
Create a User Group and Guest Users
A simple way to administer guest user accounts is to configure a guest
user group and add users to the group.
To create users
1 Select Configuration on the toolbar.
2 In the Organizer panel, expand the WX switch.
3 Expand AAA, then select Local User Database.
4 In the Task List panel, select User.
5 Type the username and password.
Leave the User Group unassigned. (You can add the user to the group
when you create the group.)
Page 73

Configure Guest Access Services 73
Leave the VLAN name unassigned.
For Web Portal access, you specify the VLAN name when you configure
the guest service profile. (See step 8 on page 77.)
6 Click Next.
The wizard lists the authorization attributes you can configure for the
user. A very useful authorization attribute for guest users is the end-date,
which specifies the date and time when the user’s network access
expires.
7 Click in the Value column next to end-date and specify the ending date
and time for this user’s guest access. Use the following format:
YY/MM/DD-HH:MM
8 Click Finish.
The new user appears in the Content panel.
Page 74

74 CHAPTER 3: CONFIGURING WIRELESS SERVICES
To create a user group and add users to it
1 In the Task List panel, select User Group.
2 Type a name for the group in the name box and click Next.
The wizard lists the authorization attributes you can configure for the
group. For this example, leave the attributes unconfigured.
If attributes are configured for a user and also for the group the user is in,
the attributes assigned to the individual user take precedence for that
user.
3 Click Next. The users configured in the local database are listed. Select
the guest users in the Available Users list and click Add.
Page 75

4 Click Finish.
Configure Guest Access Services 75
The new group appears in the Content panel.
Create a Service Profile for Guest Access with Web Login
To create a Web-Portal service profile
1 Select Configuration on the toolbar.
2 In the Organizer panel, expand the WX switch.
3 Expand Wireless, then select Wireless Services.
4 In the Task List panel, select Web-Portal Service Profile.
The Web-Portal Service Profile wizard is displayed.
Page 76

76 CHAPTER 3: CONFIGURING WIRELESS SERVICES
5 Click Next.
6 Change the service profile name to Web-Portal-Guests, and use the name
Guests for the SSID.
Page 77

Configure Guest Access Services 77
7 Select the SSID Type:
Clear —Data is not encrypted
Encrypted—Data is encrypted
For this example, Clear is selected.
8 Click Next. Type or select the name of the VLAN you want to place your
guests users in. For this example, use guest-vlan.
Typing the VLAN name here does not actually configure the VLAN. To
configure a VLAN, see “Set Up VLANs on WX Switches” on page 66.
9 Click Next. The wizard displays the ACL that will automatically be added
to the configuration by the wizard. The ACL restricts users to DHCP traffic
only, while they are in the portal and are being authenticated. After
successful authentication, the user is allowed through the portal and the
ACL no longer applies to the user session.
Page 78

78 CHAPTER 3: CONFIGURING WIRELESS SERVICES
10 Click Next. Select the location of the user information and click Add:
LOCAL—The switch’s local database
RADIUS server group—group of external RADIUS servers
(For a server group to be available in the wizard, the group must already
be configured. See “Configure RADIUS Servers” on page 58.)
For this example, LOCAL is selected.
Page 79

Configure Guest Access Services 79
11 Click Next. The wizard shows the user names configured in the local
database.
The users created in “To create users” on page 72 are listed.
Page 80

80 CHAPTER 3: CONFIGURING WIRELESS SERVICES
Also listed is a user named web-portal-ssid, where ssid is the Web-Portal
SSID name. This user is automatically created. The switch uses the
web-portal-ssid username for users while they are in the portal and are
being authenticated. After a user is authenticated, the username of the
session changes to the user’s login name.
If you need to add users, you can do so from within the wizard by clicking
Create.
12 Click Next. Select RadioProfile1 in the Available Radio Profiles list and
click Add. Select the default radio profile and click Remove.
13 Click Finish.
The new service profile appears in the Content panel.
Page 81

Configure Guest Access Services 81
View the Service Profile’s Access Rules
To view a Web-Portal service profile’s access rules
1 Select the service profile in the Wireless Service Profiles table (located in
the Content panel).
A Setup group appears in the Task List panel.
2 In the Task List panel, select Web Portal Access.
The Configure 802.1X Access wizard appears. The wizard displays the
encryption settings, access rules, and AAA settings for the service profile
and allows you to change them. You also can configure new access rules
using the wizard.
The wizard is similar to the 802.1X Access wizard, but shows access
information for the Web-Portal service profile. (See “View the Service
Profile’s Access Rules” on page 64.)
Optional: Configure
Mobility Profiles
Mobility Profile™ attributes allow or deny access to the network for a
specific user or group of users. When you create a Mobility Profile, you
specify which MAP ports, Distributed MAPs, or wired authentication ports
are to be included. Typically, you include ports that are defined as MAP
ports or Distributed MAPs. You can specify that all or no ports are
included, or you can specify a list of ports to be included.
When you apply the Mobility Profile, it guests have access only through
specific areas of your WLAN—if they roam outside of a designated area
supported by a WX switch or certain MAPs, they no longer have access to
the Internet.
After creating a Mobility Profile, you can assign it to users created in the
local WX user database, or users who are authenticated and authorized
by a RADIUS server. To assign it to users in the WX user database, you
add the Mobility Profile name when you create or modify a user or user
group. To add this on a RADIUS server, you assign the name of the
Mobility Profile by using the Mobility-Profile RADIUS attribute, which is a
3Com vendor-specific attribute (VSA).
To create a Mobility Profile
1 Select Configuration on the toolbar.
2 In the Organizer panel, expand the WX switch.
3 Expand AAA, then select Mobility Profiles.
Page 82

82 CHAPTER 3: CONFIGURING WIRELESS SERVICES
4 In the Task List panel, select Mobility Profile.
The Create Mobility Profiles wizard appears.
5 In the Profile Name box, type the name of the Mobility Profile.
The name can be up to 16 alphanumeric characters, and it cannot
contain tabs.
The Mobility Profile Name has to be defined as an authorization attribute
in the defined users or user groups in the local database.
6 In the Ports list, specify ports to include in the Mobility Profile:
All—Include all MAP or wired authentication ports. Go to step 10.
Selected—Include a selected list of ports. Go to the next step.
None—Include no ports. Go to step 10.
7 Select the ports to be included in the Mobility Profile and click Add.
8 Click Next. In the Distributed MAPs list, specify the Distributed MAPs to
include in the Mobility Profile:
All—Include all Distributed MAPs. Go to step 10.
Selected—Include a selected list of Distributed MAPs. Go to the next
step.
None—Include no Distributed MAPs. Go to step 10.
9 Select the Distributed MAPs to be included in the Mobility Profile and
click Add.
10 Click Finish to save the changes and close the wizard.
What’s Next? After you create Guest services, you can create another service.
For information about configuring an additional service, refer to:
“Configure Voice over Wireless IP Service” on page 83
You can create your RF environment, and deploy your configuration and
enable monitoring.
For information about creating your RF environment, refer to:
“Using RF Auto-Tuning” on page 97
“Using RF Auto-Tuning with Modelling” on page 105
“Using RF Planning” on page 121
Page 83

Configure Voice over Wireless IP Service 83
For information about deploying your configuration and enabling
monitoring your network, refer to:
“Managing and Monitoring Your Network” on page 155.
Configure Voice over Wireless IP Service
Voice over Wireless IP (VoWIP) is a new technology, merging VoIP (Voice
over IP) with 802.11 wireless LANs to create a wireless telephone system.
Organizations that add VoWIP to their wireless LANs can deploy and
manage voice and data over a single wireless backbone, reserving some
portion of network bandwidth to support real-time voice
communications.
For a VoWIP service (sometimes also referred to simply as VoIP, or Voice
over IP), you can configure either local or RADIUS server authentication,
and add Access Lists (ACLs) to restrict user access.
This section contains the following information about how to configure
VoWIP services:
“Task Table” on page 83
“Step Summary” on page 85
“Create a Service Profile for WMM VoWIP Devices” on page 87
“Create a Service Profile for SVP VoWIP Devices” on page 90
“Create a Service Profile for Avaya VoWIP Devices” on page 92
Table 12 contains the tasks you must perform to configure Guest access
services. The table contains references to the section “Example:
Configure Employee Access” on page 55. The references are provided in
case you want to refer back to detailed steps. However, be sure to use
the configurable options for VoWIP access services set forth in the “Step
Summary” on page 85. The “Step Summary” provides the configurable
options you should set.
Tas k Ta b l e Table 12 contains the tasks you need to perform to create VoWIP access
services. For a summary of configurable items, see “Step Summary” on
page 85.
Page 84

84 CHAPTER 3: CONFIGURING WIRELESS SERVICES
Table 12 Creating a Service for VoWIP Access
Ta sk Path Primary Parameters to Configure
“Create a Radio Profile”
on page 56
1 Tool bar option: select
Configuration.
2 Organizer panel: expand the
WX switch.
3 Expand Wireless.
4 Click Radio Profiles.
5 Select Radio Profile in the Task
List.
From the Create Radio Profile wizard:
Radio profile name: enter a name
For SpectraLink, from the Radio Profile Properties
dialog:
802.11 attributes: change DTIM to 3
After you create the service profile, you can map it
to the radio profile.
After you install the MAPs, you can map their radios
to the radio profile.
Note: The examples in this chapter configure the
radio profile first. However, you also can configure
the radio profile later as part of service profile
configuration.
“Create a Service Profile
for Voice” on page 86
“Set Up a VLAN for
VoWIP on WX Switches”
on page 94
1 Tool bar option: select
Configuration.
2 Organizer panel: expand the
WX switch.
3 Expand Wireless.
4 Click Wireless Services.
5 Select Voice Service Profile in
the Task List.
1 Tool bar option: select
Configuration.
2 Organizer panel: expand the
WX switch.
3 Expand System.
4 Click VLANs.
5 Select VLAN in the Task List.
From the Create Service Profile wizard:
Service profile name: edit name
SSID name: enter name
SSID Type: use Clear (unencrypted)
VLAN Name: enter name
Authentication server: select LOCAL
Radio profile: select one
From the Create VLAN wizard:
VLAN Name: enter name
VLAN ID: select number
IP Address: enter IP Address
Ports: select them and move them to the voice
VLAN
For SpectraLink, from the VLAN Properties dialog:
IGMP: disable
SVP requires IGMP snooping to be disabled.
Page 85

Configure Voice over Wireless IP Service 85
Step Summary The following list summarizes the fields selected or configuration items
entered in the example that follows to configure VoWIP access:
1 Create a radio profile.
From the Radio Profile wizard, enter RadioProfileVoic as the Name of
the radio profile.
Click Finish.
Select the radio profile and click Properties.
Select the 802.11 Attributes and change the DTIM Period to 3.
Click OK.
2 Create a Voice service profile.
From the Voice Service Profile wizard, click Next and enter
Voice-WMM, Voice-SVP, Voice-Avaya, or Voice-Vocera
as the Name
of the service profile and WMM, SVP, Avaya, or Vocera as the SSID.
Select the Vendor (SpectraLink, Avaya, Vocera, or Other).
Click Next. Select the access type. (The examples in this section use
Open Access.)
Click Next. Select the data encryption method. (The examples in this
section use WPA and disable Static WEP.)
Click Next. Leave TKIP enabled and click Next.
Click Next. Type a passphrase from 8 to 63 characters long in the
Pre-shared Key box and click Generate.
Click Next. Type voice-vlan as the VLAN name to place voice users in.
Click Next. (If the device supports WMM, select WMM.)
Click Next. Select RadioProfileVoic in the Radio Profiles list.
Click Finish.
3 Set up a VLAN on the WX switches.
From the Create VLAN wizard, enter voice-vlan as the VLAN name.
Click Next. Select the VLAN ports. Click Move to use them exclusively
in this VLAN.
Click Finish.
Select the VLAN and click Properties.
Select IGMP and deselect Enabled to disable IGMP snooping.
Page 86

86 CHAPTER 3: CONFIGURING WIRELESS SERVICES
Create a Radio Profile
for Voice
This procedure is similar to the procedure in “Create a Radio Profile” on
page 56, but has additional steps to change the delivery traffic indication
map (DTIM) interval to 3.
To create a radio profile for voice service
1 Select Configuration on the toolbar.
2 In the Organizer panel, expand the WX switch.
3 Expand Wireless, then select Radio Profiles.
4 In the Task List panel, select Radio Profile.
5 The Create Radio Profiles wizard is displayed.
6 Enter the name of the radio profile (for example, RadioProfileVoic), then
click Next at the bottom of the wizard.
7 If MAPs are already configured, select the radios to map to the radio
profile, then click Move.
3WXM removes the radios from the radio profile they are in and places
them in the new profile.
If you have not configured the MAPs in 3WXM yet, no radios are listed.
You can map the radios to the radio profile later.
8 Click Finish to save the changes and close the wizard.
The new radio profile appears in the Content panel.
Create a Service Profile for Voice
9 If you are configuring voice service for SpectraLink devices, do the
following:
a Select the radio profile in the Radio Profiles table and click Properties.
b Click the 802.11 Attributes tab.
c In the DTIM Period box, change the value to 3.
d Click OK.
The Voice Service Profile wizard tailors its options based on the vendor
you select. The wizard has the following vendor options:
SpectraLink
Avaya
Vocera
Other
Page 87

Configure Voice over Wireless IP Service 87
The SpectraLink, Avaya, and Vocera options configure service for
proprietary VoWIP solutions from these vendors. If you are configuring
VoWIP for devices that use the Wi-Fi Multimedia (WMM) standard, or a
proprietary solution other than one of the listed vendors’, use the Other
option.
Create a Service Profile for WMM VoWIP Devices
1 Select Configuration on the toolbar.
2 In the Organizer panel, expand the WX switch.
3 Expand Wireless, then select Wireless Services.
4 In the Task List panel, select Voice Service Profile.
The Voice Service Profile wizard is displayed.
5 Click Next.
6 Change the service profile name to Voice-WMM, and use the name
WMM for the SSID.
7 Select Other from the Vendor drop-down list.
8 Click Next. Select Open Access and deselect MAC Access.
Page 88

88 CHAPTER 3: CONFIGURING WIRELESS SERVICES
9 Click Next. Select WPA and deselect Static WEP.
Page 89

Configure Voice over Wireless IP Service 89
10 Click Next. Leave TKIP enabled and click Next.
11 Click Next. Type a passphrase from 8 to 63 characters long in the
Pre-shared Key box and click Generate.
Page 90

90 CHAPTER 3: CONFIGURING WIRELESS SERVICES
12 Click Next. Type or select the name of the VLAN you want to place voice
users in. For this example, use voice-vlan.
Typing the VLAN name here does not actually configure the VLAN. To
configure a VLAN, see “Set Up VLANs on WX Switches” on page 66.
13 Click Next. Select Enable WMM.
14 Click Next. Select RadioProfileVoic in the Radio Profiles list.
15 Click Finish.
Create a Service Profile for SVP VoWIP Devices
1 Select Configuration on the toolbar.
2 In the Organizer panel, expand the WX switch.
3 Expand Wireless, then select Wireless Services.
4 In the Task List panel, select Voice Service Profile.
The Voice Service Profile wizard is displayed.
5 Click Next.
6 Change the service profile name to Voice-SVP, and use the name SVP for
the SSID.
Page 91

Configure Voice over Wireless IP Service 91
7 Leave SpectraLink selected in the Vendor drop-down list.
8 Click Next. Select Open Access and deselect MAC Access.
9 Click Next. Select WPA and deselect Static WEP.
10 Click Next. Leave TKIP enabled and click Next.
11 Click Next. Type a passphrase from 8 to 63 characters long in the
Pre-shared Key box and click Generate.
12 Click Next. Type or select the name of the VLAN you want to place SVP
users in. For this example, use voice-vlan.
Typing the VLAN name here does not actually configure the VLAN. To
configure a VLAN, see “Set Up VLANs on WX Switches” on page 66.
13 Click Next.
14 Click Next. The wizard displays the ACL that will automatically be added
to the configuration by the wizard. The first rule in the ACL provides high
-priority treatment of SVP traffic by marking IP protocol 119 (SVP) packets
with CoS 7. The second rule permits all other traffic in the VLAN.
15 Click Next. Select RadioProfileVoic in the Radio Profiles list.
16 Click Finish.
Page 92

92 CHAPTER 3: CONFIGURING WIRELESS SERVICES
Create a Service Profile for Avaya VoWIP Devices
1 Select Configuration on the toolbar.
2 In the Organizer panel, expand the WX switch.
3 Expand Wireless, then select Wireless Services.
4 In the Task List panel, select Voice Service Profile.
The Voice Service Profile wizard is displayed.
5 Click Next.
6 Change the service profile name to Voice-Avaya, and use the name Avaya
for the SSID.
7 Select Avaya in the Vendor drop-down list.
8 Click Next. Select Open Access and deselect MAC Access.
9 Click Next. Select WPA and deselect Static WEP.
10 Click Next. Leave TKIP enabled and click Next.
11 Click Next. Type a passphrase from 8 to 63 characters long in the
Pre-shared Key box and click Generate.
12 Click Next. Type or select the name of the VLAN you want to place Avaya
users in. For this example, use voice-vlan.
Typing the VLAN name here does not actually configure the VLAN. To
configure a VLAN, see “Set Up VLANs on WX Switches” on page 66.
13 Click Next.
14 Click Next. The wizard displays the ACL that will automatically be added
to the configuration by the wizard.
Page 93

Configure Voice over Wireless IP Service 93
15 Click Next. Select RadioProfileVoic in the Radio Profiles list.
16 Click Finish.
Create a Service Profile for Vocera VoWIP Devices
1 Select Configuration on the toolbar.
2 In the Organizer panel, expand the WX switch.
3 Expand Wireless, then select Wireless Services.
4 In the Task List panel, select Voice Service Profile.
The Voice Service Profile wizard is displayed.
5 Click Next.
6 Change the service profile name to Voice-Vocera, and use the name
VoceraBadges for the SSID.
7 Select Vocera in the Vendor drop-down list.
8 Click Next. Leave MAC Access selected.
9 Click Next. Leave Static WEP selected.
10 Specify the WEP keys.
For each key (up to four), type the key value in the corresponding key box.
By default, data in unicast and multicast packets are encrypted using
WEP key 1. To use another key for either type of packet, select the key
number in the WEP Unicast Key Index or WEP Multicast Key Index box.
Page 94

94 CHAPTER 3: CONFIGURING WIRELESS SERVICES
11 Click Next. Type or select the name of the VLAN you want to place SVP
users in. For this example, use voice-vlan.
Typing the VLAN name here does not actually configure the VLAN. To
configure a VLAN, see “Set Up VLANs on WX Switches” on page 66.
12 Click Create to add MAC users to the switch’s local database.
a In the User MAC Address box, type the MAC address for the user
device, using colons (:) as delimiters. You must specify all 6 bytes of
the MAC address.
b In the MAC User Group list, select the MAC user group that the user
device belongs to if the group is already configured.
c In the VLAN Name box, select or type the name of the VLAN that the
user device belongs to (1 to 16 alphanumeric characters, with no
spaces or tabs). The WX switch will authorize the user for that VLAN.
For more information on VLANs, see “Viewing and Configuring
VLANs” in the Wireless LAN Switch Manager Reference Manual.
d Click Next. In the attribute row you want to configure, click the
Attribute Value column. (See the “Authorization Attributes” section in
the “Configuring Authentication, Authorization, and Accounting
Parameters” chapter of the Wireless LAN Switch Manager Reference
Manual.)
e Click Finish.
13 Click Next. Select RadioProfileVoic in the Radio Profiles list.
14 Click Finish.
Set Up a VLAN for VoWIP on WX Switches
This procedure is similar to the procedure in “Set Up VLANs on WX
Switches” on page 66, except IGMP snooping is disabled on the VLAN.
To set up a VLAN for VoWIP on a WX switch
1 Select Configuration on the toolbar.
2 In the Organizer panel, expand the WX switch.
3 Expand System, then select VLANs.
4 In the Task List panel, select VLAN.
The Create VLAN wizard is displayed.
5 Enter a name such as vlan-voice and use the VLAN ID suggested by the
wizard.
Page 95

What’s Next? 95
6 Click Next. Select the ports you want to use in the VLAN and click Add
or Move.
The Add button adds the ports to the new VLAN without removing
them from any other VLANs.
The Move button removes the ports from all other VLANs, and places
them in the new VLAN.
The ports appear in the Current Members list.
To tag ports in the VLAN, select Tag and edit the tag value. (Tagging is
required if you click Add, because the ports are then members of
multiple VLANs.)
7 Click Next. (Optional) To assign an IP interface to the VLAN, edit the IP
address or select DHCP Client. To enable the IP interface, select Interface
Enabled.
8 Click Finish.
The new VLAN appears in the Content panel.
For SVP, continue with the following steps, to disable IGMP snooping. For
VoWIP types that do not require IGMP to be disabled, you can stop here.
9 Select the VLAN in the VLANs table and click Properties.
10 Click the IGMP tab.
11 Deselect Enabled, to disable IGMP snooping on the VLAN.
12 Click OK.
What’s Next? After you create VoWIP access services, you can create another service.
For information about configuring an additional service, refer to:
“Configure Guest Access Services” on page 69
You can create your RF environment, and deploy your configuration and
enable monitoring.
For information about creating your RF environment, refer to:
“Using RF Auto-Tuning” on page 97
“Using RF Auto-Tuning with Modelling” on page 105
“Using RF Planning” on page 121
Page 96

96 CHAPTER 3: CONFIGURING WIRELESS SERVICES
For information about deploying your configuration and enabling
monitoring your network, refer to:
“Managing and Monitoring Your Network” on page 155.
Page 97

4
USING RF AUTO-TUNING
What Is RF Auto-Tuning?
RF Auto-Tuning is a technique you can use to configure your RF (radio)
network. RF Auto-Tuning is a quick method that requires minimal
configuration and no RF planning or site surveys, and instead, relies on
the AutoTune feature to set MAP channels and power settings.
This is a great way to quickly install a WX switch and MAPs, and observe
how the network operates. The RF Auto-Tuning technique is best suited
to networks containing fewer MAPs.
To learn more about the benefits of RF Auto-Tuning, see “RF
Auto-Tuning” on page 32.
To use this technique:
1 Physically place your equipment (WX switches and MAPs) in their desired
locations.
2 Configure initial WX switch connectivity (configure IP addresses).
3 Upload the WX switch configuration into a 3WXM network plan.
4 Create a service profile.
5 Create a radio profile (or use the default radio profile).
6 Map your service profile to your radio profile.
7 Create your MAPs.
8 Apply a radio profile to each radio on a MAP.
9 Deploy your configuration.
Page 98

98 CHAPTER 4: USING RF AUTO-TUNING
Place Your Equipment
Configure Initial WX Switch Connectivity
Upload the WX Switch Configuration into a 3WXM Network Plan
You will need to unpack and physically install your WX switches and
MAPs. For information about installing your equipment, see “Equipment
Installation” on page 42.
After installing a WX switch, you must prepare it for configuration and
management by 3WXM, by configuring IP connectivity between the WX
and 3WXM. Use the Web Quick Start (if available), or enter the
quickstart command at the CLI prompt.
For more information about configuring initial WX switch connectivity,
see the Wireless LAN Switch and Controller Quick Start Guide.
An administrative certificate is also required on the WX switch to enable
management access by 3WXM. If the switch does not already have
certificates, MSS automatically generates them the first time you boot
using MSS Version 4.2 or later. You do not need to install certificates
unless you want to replace the ones automatically generated by MSS. (For
more information, see the “Certificates Automatically Generated by
MSS” section in the “Managing Keys and Certificates” chapter of the
Wireless LAN Switch and Controller Configuration Guide.)
Retrieve the basic configuration information you added to the WX switch
and upload it into 3WXM.
To upload the WX switch configuration into a 3WXM network
plan
1 Select the Configuration tool bar option.
2 In the Task List panel, select Upload Wireless Switch.
3 In the IP Address box, type the IP address for the WX switch.
4 In the Enable Password box, type the enable password for the WX switch.
This password must match the enable password that was defined using
the CLI command set enablepass. For more information, see the
Wireless LAN Switch and Controller Configuration Guide.
5 Click Next. The uploading progress is shown.
6 After the Successfully uploaded device message is displayed, click Next.
Page 99

Create a Service Profile 99
3WXM uses its verification rules to check the switch’s configuration. If an
item in the configuration generates an error or warning, 3WXM displays
the error or warning message.
7 Review the verification messages to determine whether you will need to
make changes to the switch’s configuration after uploading it into
3WXM.
8 Click Next.
9 Click Finish.
10 If 3WXM displayed error or warning messages, select the Verification tool
bar option. (See the “Verifying Configuration Changes” chapter in the
Wireless LAN Switch Manager Reference Manual.)
Create a Service Profile
A service profile contains the configuration for the service you want to
offer, such as employee access, guest access, or multi-hosted access.
For more information about service profiles, see “Wireless
Configuration” on page 36. For more information about wireless
services, see “Which Services To Provide?” on page 30.
To create a service profile
1 Select the Configuration tool bar option.
2 In the Organizer panel, click the plus sign next to the WX switch.
3 Click the plus sign next to Wireless.
4 Select Wireless Services.
5 In the Task List panel, select one of the following:
802.1X Service Profile—Provides wireless access to 802.1X clients.
Voice Service Profile—Provides wireless access to Voice over IP (VoIP)
devices.
Web-Portal Service Profile—Provides wireless access to clients who log
in using a web page.
Open Access Service Profile—Provides wireless access to clients
without requiring them to log in.
Custom Service Profile—Provides wireless access based on the
combination of option you choose. (Use this option only if none of the
other options applies to the type of service you want to offer.)
Page 100

100 CHAPTER 4: USING RF AUTO-TUNING
A wizard for configuring the service profile appears.
6 Read the first page of the wizard and click Next.
7 Edit the service profile and type an SSID name.
8 Edit additional settings as applicable to the type of service profile you are
creating.
For information, see the following:
“Configuring Wireless Services” on page 51
“Viewing and Configuring Wireless Services” section in the
“Configuring Wireless Parameters” chapter of the Wireless LAN
Switch Manager Reference Manual
9 Click Finish.
Create a Radio Profile and Map the Service Profile to It
To create a radio profile and map a service profile to it
1 Select the Configuration tool bar option.
2 In the Organizer panel, click the plus sign next to the WX switch.
3 Click the plus sign next to Wireless.
4 Select Radio Profiles.
5 In the Task List panel, select Radio Profile.
6 In the Name box, type the name of the radio profile (1 to 16 characters,
with no spaces or tabs).
7 Click Next. Click Next again.
8 To map the radio profile to a service profile, select the service profile in
the Available Service Profiles list and click Add.
9 Click Finish.
 Loading...