

Page 1
www.3com.com
M/N: WL-601
10016657 Rev AA
March 2008
3Com Wireless 11n PCI Adapter
Quick Installation Guide
3CRPCIN175
Antes de usar este equipo por primera vez,
lo invitamos a leer detenidamente las
siguientes instrucciones. Guarde este
manual para consultas futuras.
Page 2

3Com Corporation, 350 Campus Drive, Marlborough, MA USA 01752-3064
Copyright © 2005-2008, 3Com Corporation. All rights reserved. No part of this documentation may be
reproduced in any form or by any means or used to make any derivative work (such as translation,
transformation, or adaptation) without written permission from 3Com Corporation.
3Com Corporation reserves the right to revise this documentation and to make changes in content from time
to time without obligation on the part of 3Com Corporation to provide notification of such revision or
change.
3Com Corporation provides this documentation without warranty, term, or condition of any kind, either
implied or expressed, including, but not limited to, the implied warranties, terms or conditions of
merchantability, satisfactory quality, and fitness for a particular purpose. 3Com may make improvements or
changes in the product(s) and/or the program(s) described in this documentation at any time.
If there is any software on removable media described in this documentation, it is furnished under a license
agreement included with the product as a separate document, in the hard copy documentation, or on the
removable media in a directory file named LICENSE.TXT or !LICENSE.TXT. If you are unable to locate a copy,
please contact 3Com and a copy will be provided to you.
UNITED STATES GOVERNMENT LEGEND
If you are a United States government agency, then this documentation and the software described herein are
provided to you subject to the following:
All technical data and computer software are commercial in nature and developed solely at private expense.
Software is delivered as “Commercial Computer Software” as defined in DFARS 252.227-7014 (June 1995) or
as a “commercial item” as defined in FAR 2.101(a) and as such is provided with only such rights as are
provided in 3Com’s standard commercial license for the Software. Technical data is provided with limited
rights only as provided in DFAR 252.227-7015 (Nov 1995) or FAR 52.227-14 (June 1987), whichever is
applicable. You agree not to remove or deface any portion of any legend provided on any licensed program or
documentation contained in, or delivered to you in conjunction with, this User Guide.
Unless otherwise indicated, 3Com registered trademarks are registered in the United States and may or may
not be registered in other countries.
3Com and the 3Com logo are registered trademarks of 3Com Corporation.
Intel, Pentium, and Celeron are registered trademarks of Intel Corporation. Microsoft and Windows are
registered trademarks of Microsoft Corporation.
All other company and product names may be trademarks of the respective companies with which they are
associated.
Page 3

Check the Package Contents
Before you start with the installation, verify that your PCI Adapter
package includes the following items:
■ One 3Com Wireless 11n PCI Adapter with standard PCI
bracket
■ Three remote antennas
■ One low-profile PCI bracket
■ One 3Com Installation CD-ROM, which contains the driver
for the PCI Adapter
■ This 3Com Wireless 11n PCI Adapter Quick Installation Guide
■ One warranty flyer
If any of these items are damaged or missing, please contact your
3Com network supplier immediately.
Check the Minimum System Requirements
You can install the PCI Adapter on any desktop computer with
Microsoft
If using Windows 2000, please download the driver and utility
from the 3Com web site.
Your computer must also have, at least, the following:
■ Available PCI slot
■ 733 MHz Intel
■ 256 MB of RAM
®
Windows® XP, Windows 2000, or Windows Vista.
™
Pentium™ III or Celeron processor (or
equivalent)
Page 4
4 Check the Package Contents
■ 7 MB of free disk space
■ CD-ROM drive
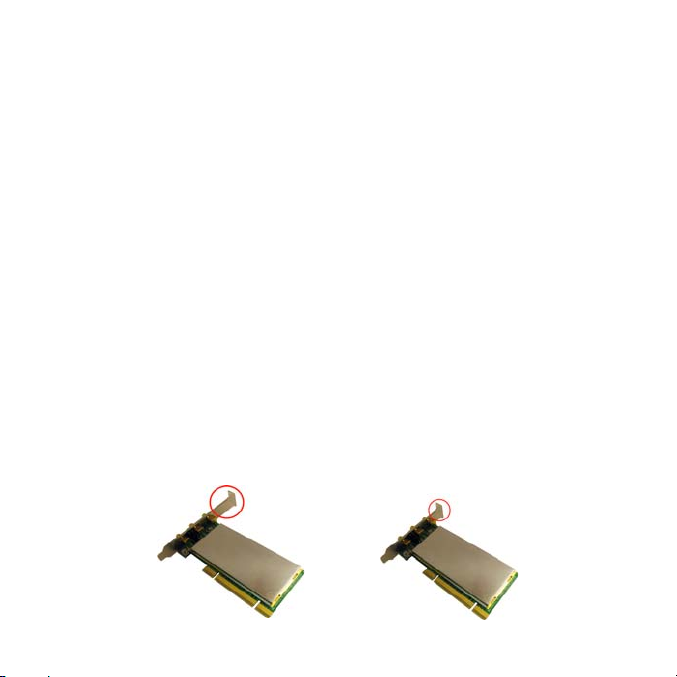
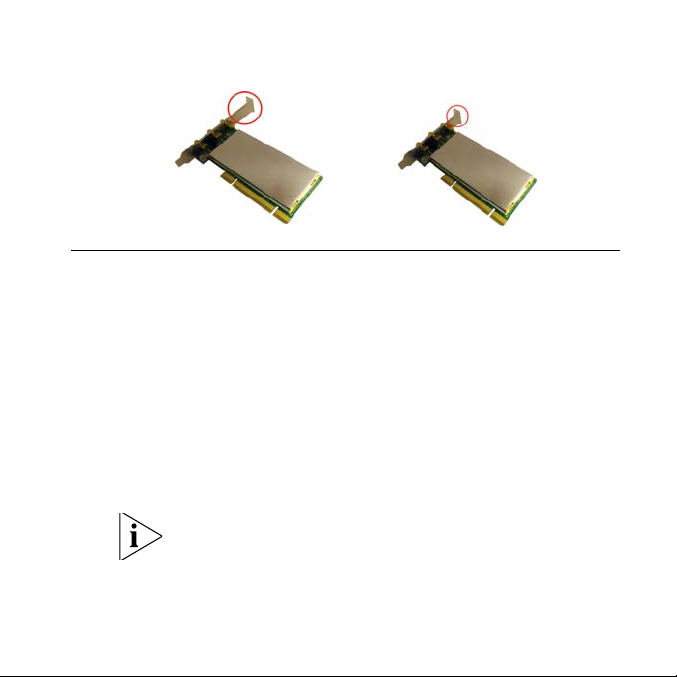
Check the PCI Bracket
The standard PCI bracket to which the PCI Adapter is attached by
default is for standard, full-height desktops. If you are using a
low-profile desktop, you need to replace the standard bracket
with the low-profile bracket for the PCI Adapter to fit.
To replace the PCI bracket:
1 Remove the three nuts and washers attached to the three
threaded antenna connectors.
2 Remove the two screws that secure the PCI Adapter to the
bracket. (Be careful not to let the shielding cover fall off, as these
screws also hold that in place.) Save the screws.
3 Replace the standard bracket with the low-profile bracket.
4 Fasten the PCI Adapter to the low-profile bracket with the screws.
5 Replace the three nuts and washers that you removed in step 1.
Page 5

Installing the Wireless PCI Adapter 5
Installing the Wireless PCI Adapter
Installing the PCI Adapter is a two-step process:
1 Install the PCI Adapter hardware
2 Install the 3Com PCI Adapter driver
Install the PCI Adapter Hardware
You will need:
■ A Phillips screwdriver to remove the computer case and slot
cover and to secure the PCI Adapter into the slot.
■ Antistatic protection
Attach the antennas to the antenna connectors only after you
secure the PCI Adapter into the slot.
To install the PCI Adapter into a PCI slot:
1 Shut down your computer, and unplug the power cord from the
power source.
2 Using antistatic protection, remove the computer cover.
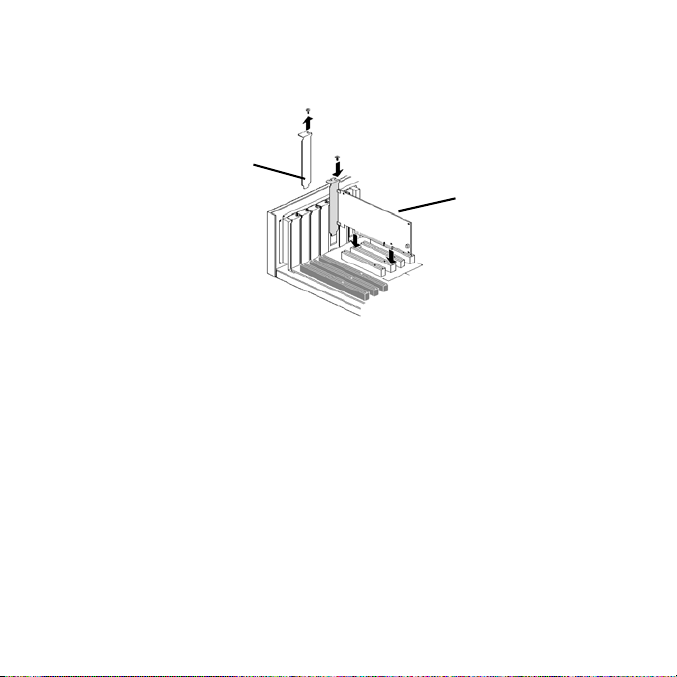
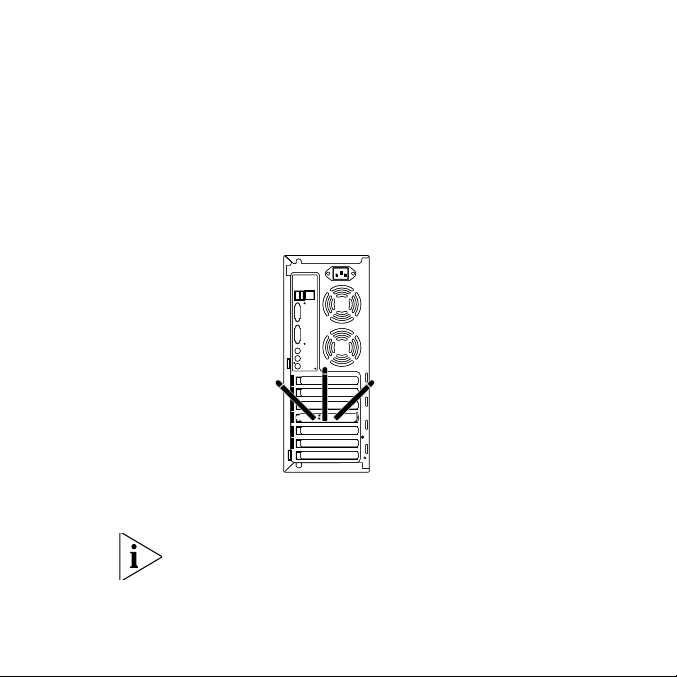
3 Locate an empty PCI slot and remove the slot cover. See 1 in
Figure 1. Save the screw.
Page 6
6 Installing the Wireless PCI Adapter
Figure 1 Inserting the PCI Adapter into a PCI Slot
1
4 Insert the PCI Adapter into the slot, and then press it down gently
until it seats snugly in the slot. See 2 in Figure 1.
5 Secure the PCI Adapter into the slot using the screw that you
removed earlier.
6 Replace the computer cover.
7 Attach the 3 antennas to the PCI Adapter’s antenna connectors,
and then turn the threaded parts clockwise to secure them. Do
not overtighten.
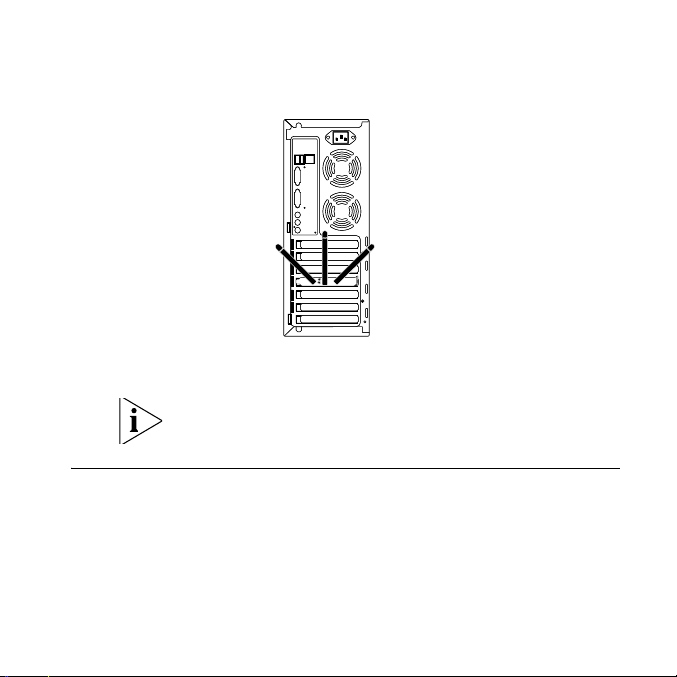
For optimal reception, position the antennas so that the center
one is straight up and the two either side are at a 45 degree
angle, as shown in Figure 2.
2
Page 7
Install the 3Com Wireless PCI Adapter Driver 7
Figure 2 Adjusting the Antennas for Best Reception
8 Reconnect the power cord to the power source, and then turn
on your computer.
9 If the Found New Hardware Wizard appears when Windows
starts, click Cancel.
Install the 3Com Wireless PCI Adapter Driver
Your PCI Adapter includes a CD that contains the 3Com Wireless
Driver. Running the PCI Adapter setup program installs the driver.
To install the 3Com PCI Adapter driver, follow the instructions in
the next sections based on your operating system.
Page 8
8 Install the 3Com Wireless PCI Adapter Driver
Windows XP Installation
1 With the computer on and Windows running, insert the 3Com
Installation CD into the CD-ROM drive.
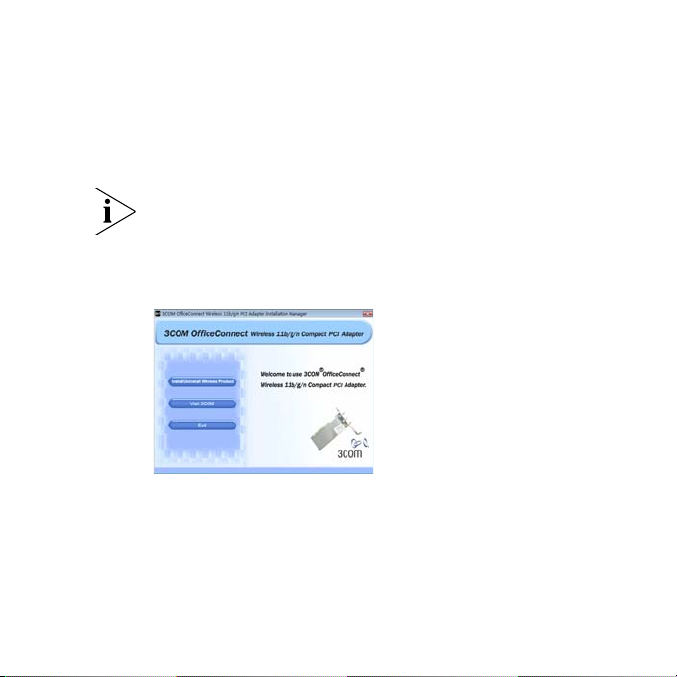
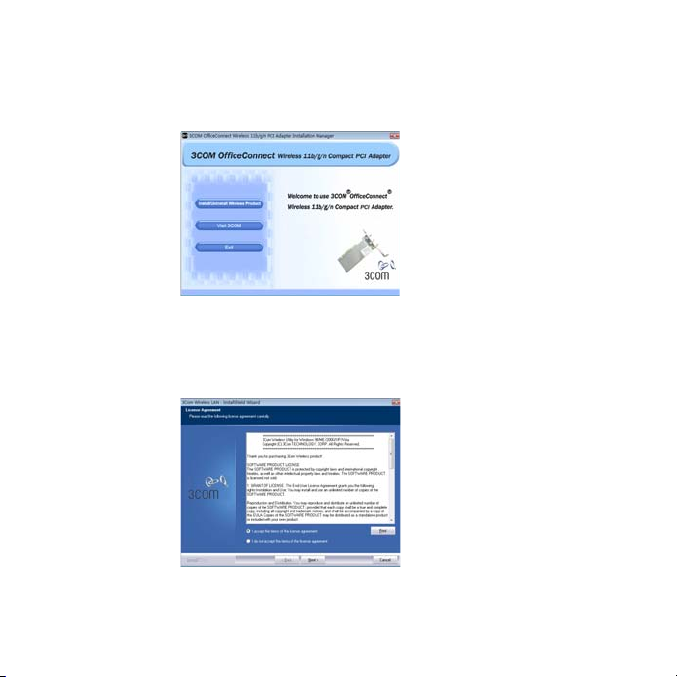
The 3Com Wireless 11n PCI Adapter Installation Manager setup
menu appears.
If the setup menu does not appear, click Start > Run, and then
type
d:\AutoRun.exe (where d: is the drive letter assigned to
your CD-ROM drive).
2 On the setup menu, click Install/Uninstall Wireless Product. The
wizard prepares for installation.
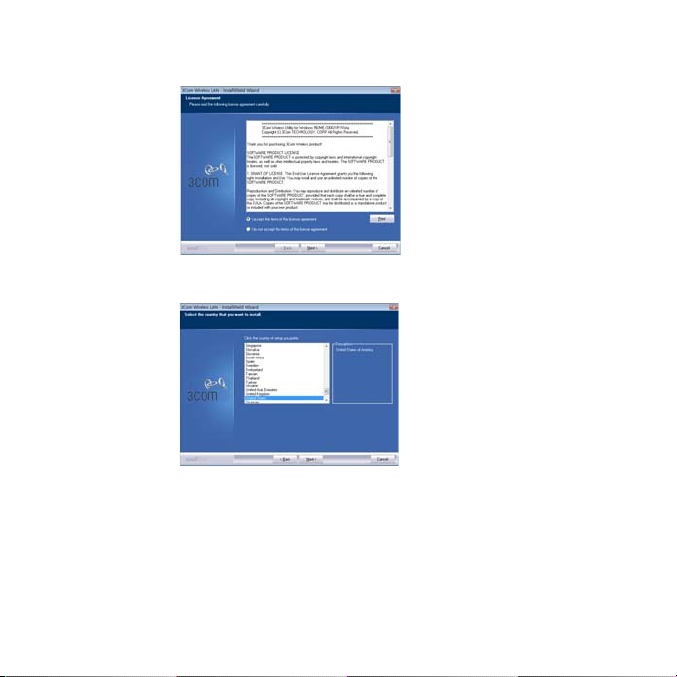
3 The 3Com End User Software License Agreement appears. Read
the agreement carefully, click I accept the terms of the license
agreement to agree to all the terms and conditions, and click
Next.
Page 9
Install the 3Com Wireless PCI Adapter Driver 9
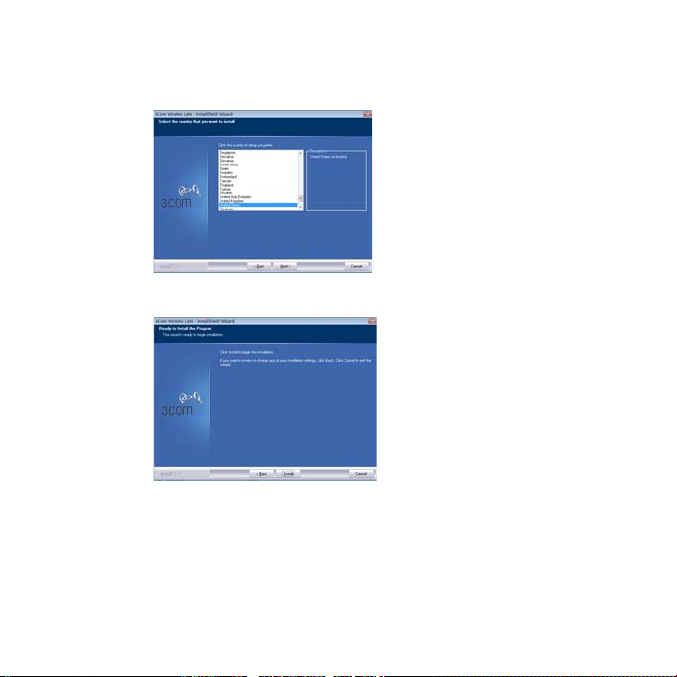
4 Choose your country and then click Next.
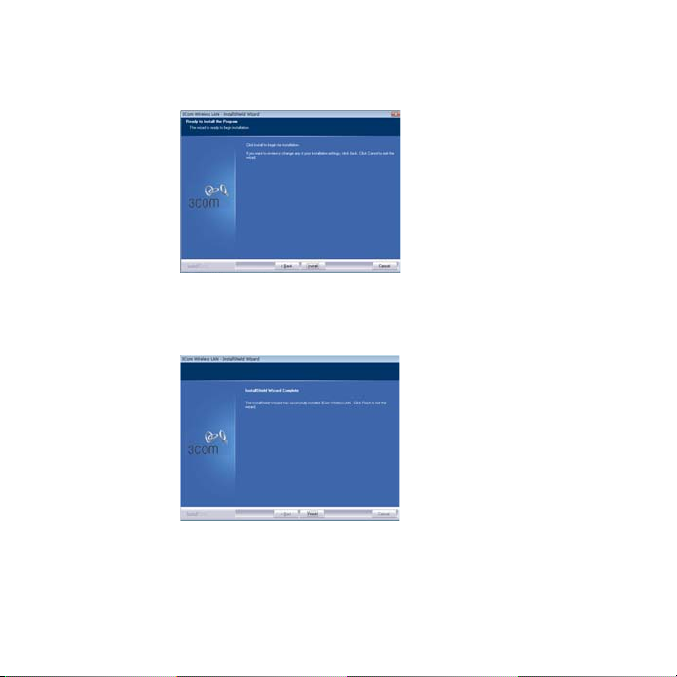
5 Click Install.
Page 10

10 Install the 3Com Wireless PCI Adapter Driver
6 When the message InstallShield Wizard Complete appears,
click Finish. You have completed installing the 3Com Wireless PCI
Adapter driver.
7 On the setup menu, click Exit.
Page 11
Windows Vista Installation
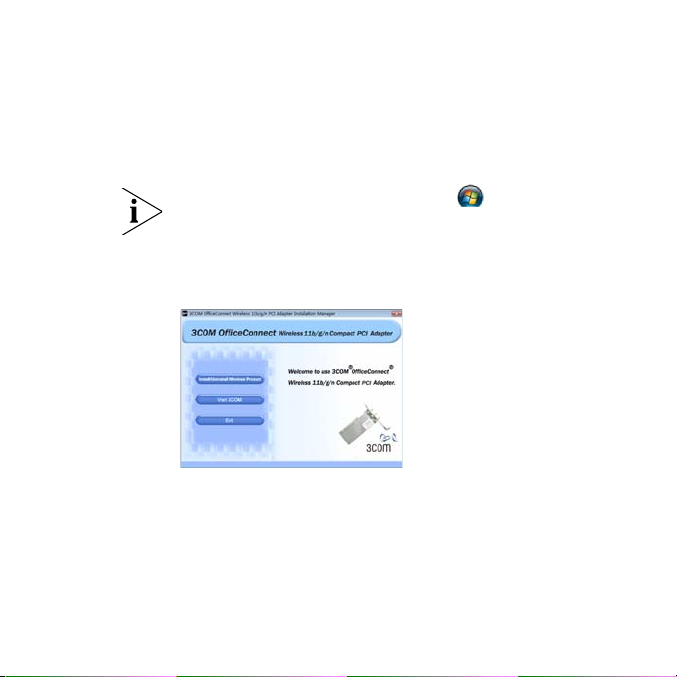
1 With the computer on and Windows running, insert the 3Com
Installation CD into the CD-ROM drive.
The 3Com Wireless 11n PCI Adapter Installation Manager setup
menu appears.
If the setup menu does not appear, click > All Programs >
Accessories > Run, and then type
the drive letter assigned to your CD-ROM drive).
2 On the setup menu, click Install/Uninstall Wireless Product. The
wizard prepares for installation.
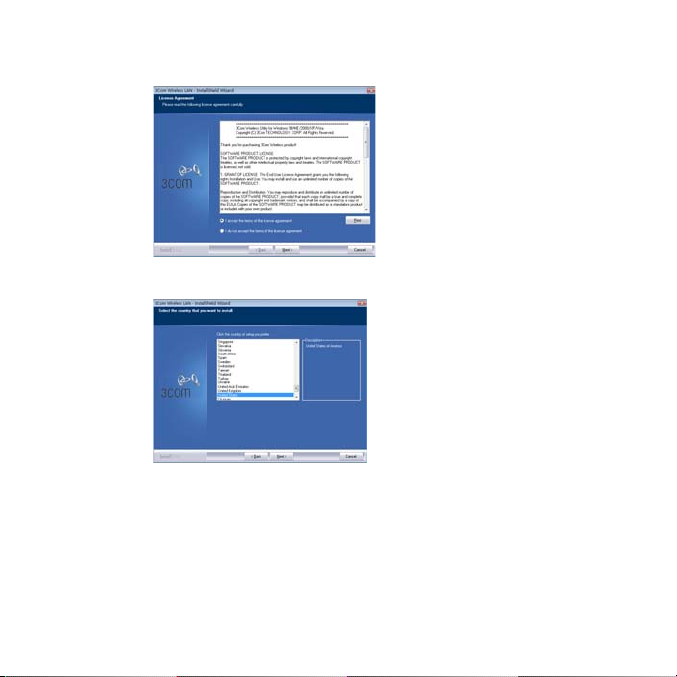
3 The 3Com End User Software License Agreement appears. Read
the agreement carefully, and then click I accept the terms of the
license agreement to agree to all the terms and conditions. Now
click Next.
Install the 3Com Wireless PCI Adapter Driver 11
d:\AutoRun.exe (where d: is
Page 12
12 Install the 3Com Wireless PCI Adapter Driver
4 Choose your country and then click Next.
Page 13
5 Click Install.
Install the 3Com Wireless PCI Adapter Driver 13
6 When the message
InstallShield Wizard Complete appears,
click Finish. You have completed installing the 3Com Wireless PCI
Adapter driver.
7 On the setup menu, click Exit.
Page 14
14 What to Do Next
What to Do Next
This section first covers connecting on Windows XP and then
connecting on the Windows Vista operating system.
Connecting on Windows XP
By default, the PCI Adapter now scans for access points in range.
To connect to a specific access point, you must configure your
wireless connection using the Windows Zero Configuration (WZC)
tool.
Ensure that you have Windows XP Service Pack 2 installed on your
computer.
Ensure that the Use Windows to configure my wireless network
settings check box is selected in the Wireless Network Connection
Properties tab.
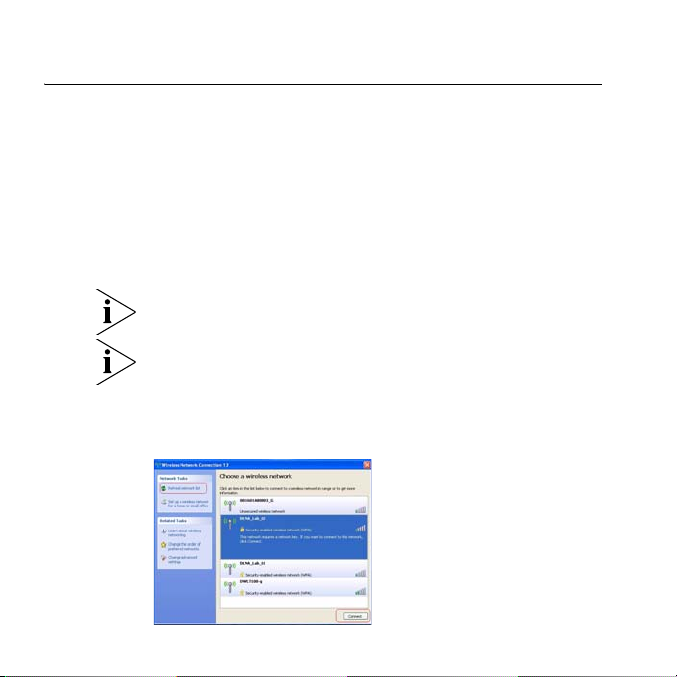
8 Click the network icon in the system tray to view Wireless
Networks.
Page 15
What to Do Next 15
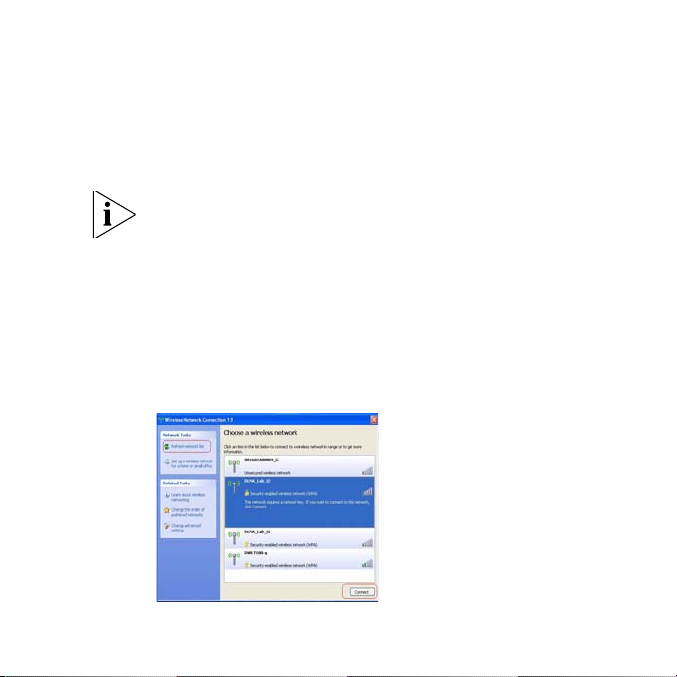
9 Click Refresh network list to reload and search for available
wireless devices. Select a wireless network in the list and click
Connect to join the selected wireless network.
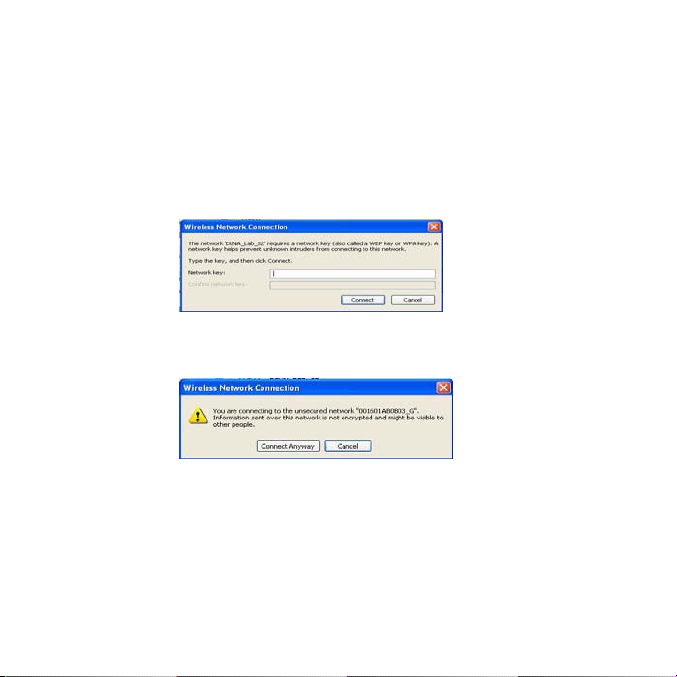
10 If wireless security is activated for the selected wireless network,
the Wireless Network Connection Window appears. Input the
Network key and click Connect.
11 If there is no security activated for the selected wireless network,
a warning window appears. Click Connect Anyway.
.
12 Close the Wireless Network Connection list window.
Page 16
16 What to Do Next
Connecting on Windows Vista
Windows Vista WLAN AutoConfig
The PC will begin functioning in Station Mode (as a Client) with
your Wireless LAN network as soon as the Network Key is set up.
If you do not have an existing wireless network, first set up your
wireless router before you use your PC in Station Mode.
1 Start your PC and connect with an existing WLAN AP.
2 Have the Network Key (WEP Key or WPA Key) ready if your
Wireless Network requires a security code.
3 Right click on the Wireless Network icon in the system tray.
4 Select Connect to a network from the Wireless Network icon
menu. The Wireless Network Connection dialog box appears, as
shown here:
Page 17
What to Do Next 17
5 Select the Wireless Network of your choice by clicking on its
name. The entire block is highlighted.
6 Select Connect in the lower right corner.
The next Wireless Network Connection dialog box appears, as
shown here:
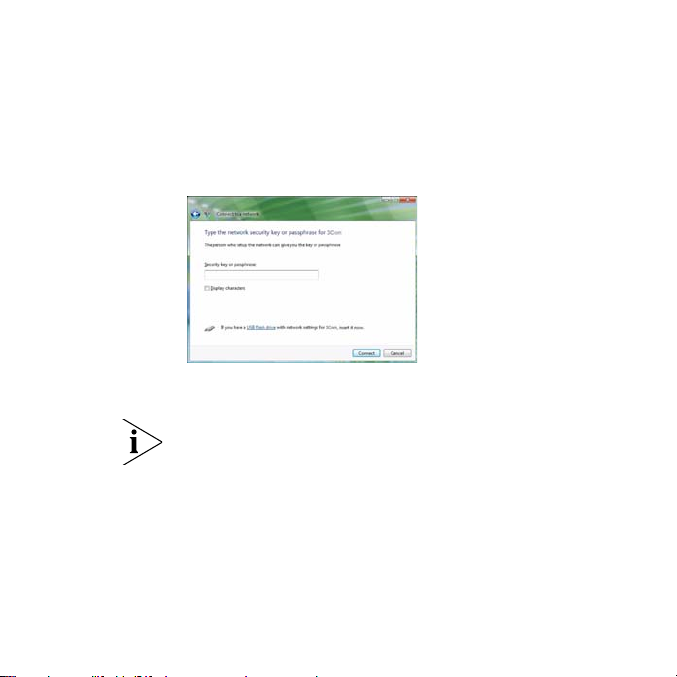
7 Enter the Network Key (WEP Key or WPA Key) for your Wireless
Network.
If your network is using WEP encryption, then a HEX or an ASCII
format is necessary when entering your Network key:
■ HEX — 10 Characters in HEX notation for 40 bit or 26
characters for 128 bit encryption.
■ ASCII — 5 Characters for 40 bit or 13 characters for 128 bit
encryption.
If your network is using WPA or WPA2 encryption, you must
enter an 8 – 63 character alphanumeric key-phrase.
8 Select Connect.
Page 18
18 What to Do Next
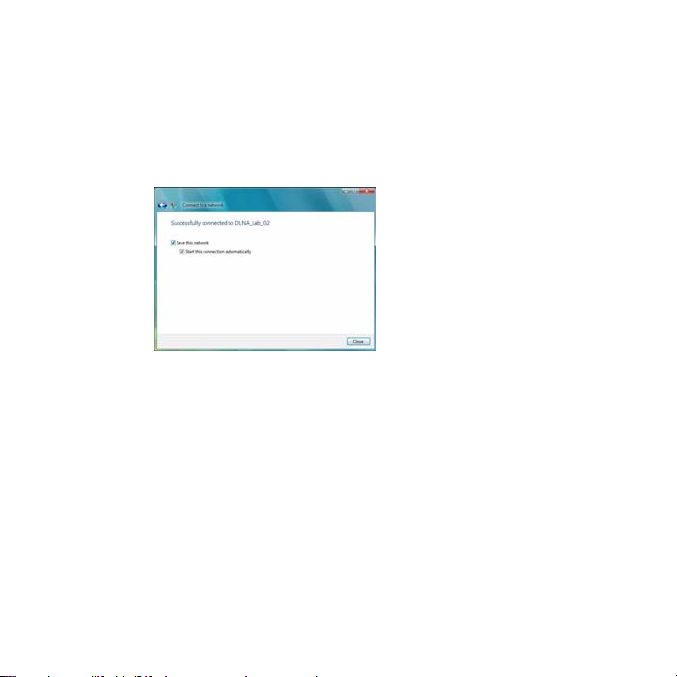
The Wireless Network Connection dialog box appears again as
you are being connected.
Once successfully connected to Generic1, as shown next, click the
check box to Save this network. Verify that Start this connection
automatically is also enabled.
9 Click Close.
Page 19

Troubleshooting Installation
Refer to Table 1 for a list of issues that you may encounter during
installation and some suggested solutions.
Table 1 Installation Issues and Possible Solutions
Problem Possible Solution
Installation program
does not finish or the
driver fails to load
Windows shows the
PCI Adapter as an
unknown device
Power/Activity LED is
off
Use the Device Manager to resolve resource
conflicts that may exist. To start the Device
Manager, go to the Control Panel, double-click
System, and then click the Device Manager tab.
■ If the hardware item for the PCI Adapter under
■ If the hardware item for the PCI Adapter does
■ Verify that the PCI Adapter is inserted properly
■ If the PCI Adapter is inserted properly into the
■ Verify that the PCI Adapter is inserted properly
■ Verify that the driver was installed successfully
Troubleshooting Installation 19
Network adapters has a yellow exclamation
point, right-click the item, and then click
Update Driver. Follow the instructions on the
Hardware Update Wizard to update the PCI
Adapter driver.
not appear under Network adapters, repeat
the setup procedure.
into the PCI slot.
slot and Windows still does not recognize it,
use the Device Manager to remove the
unknown device, and then repeat the setup
procedure.
into the PCI slot.
by checking the status of the device on the
Device Manager. See “What to Do Next” on
page 14.
Page 20

20 Register Your Product for Services and Repair
Register Your Product for Services and Repair
To obtain telephone support as part of your warranty and other
service benefits, you must first register your product at:
http://eSupport.3com.com/
Telephone Technical Support and Repair
3Com offers telephone, e-mail, and Internet access to technical
support and repair services. To access these services for your
region, use the appropriate telephone number, URL, or e-mail
address from the following URL:
http://csoweb4.3com.com/contactus/
Page 21

www.3com.fr
M/N : WL-601
10016657 Rev AA
Mars 2008
Adaptateur PCI 11n sans fil de 3Com
Guide d'installation rapide
3CRPCIN175
Page 22

3Com Corporation, 350 Campus Drive, Marlborough, MA USA 01752-3064
Copyright © 2005 -2008, 3Com Corporation. Tous droits réservés. Toute reproduction partielle ou totale de
cette documentation est interdite, quel que soit le procédé utilisé. Tout travail dérivé (tel que traduction,
transformation ou adaptation) est prohibé en l'absence d'une autorisation écrite de 3Com Corporation.
3Com Corporation se réserve le droit de revoir cette documentation et d'en modifier le contenu de temps à
autre sans préavis.
3Com Corporation fournit cette documentation sans garantie, modalité ou condition quelconque implicite ou
explicite, y compris, mais de manière non exhaustive, les garanties, modalités ou conditions implicites de
qualité marchande et d'adéquation à un usage donné. 3Com peut améliorer ou modifier le ou les produits
et/ou le ou les programmes décrits dans cette documentation.
Si un logiciel sur support amovible est décrit dans cette documentation, il est fourni aux termes d'un contrat
de licence, inclus avec le produit sous forme d'un document séparé, dans la version sur papier de la
documentation ou sur le support amovible dans un fichier nommé LICENSE.TXT ou !LICENSE.TXT. Si vous ne
trouvez pas ce document, contactez 3Com qui vous en enverra une copie.
LÉGENDE DU GOUVERNEMENT DES ÉTATS-UNIS
Si vous êtes un service officiel du gouvernement des États-Unis, cette documentation et le logiciel qu'elle
décrit sont fournis aux termes des conditions ci-dessous.
Toutes les données techniques et tous les logiciels informatiques sont de nature commerciale et développés
uniquement avec des fonds privés. Le logiciel est livré en tant que « Logiciel informatique commercial »,
conformément aux dispositions DFARS 252.227-7014 (juin 1995), ou en tant qu'« article commercial »
comme défini dans les dispositions FAR 2.101(a) et n'est fourni en tant que tel qu'avec les droits que procure
la licence commerciale standard de 3Com pour le logiciel. Les données techniques sont fournies avec des
droits limités uniquement, conformément aux dispositions DFAR 252.227-7015 (nov 1995) ou FAR 52.227-14
(juin 1987), suivant la loi applicable. Vous acceptez de ne pas enlever ni de dégrader toute ou partie de la
légende figurant sur tout programme sous licence ou sur la documentation contenue dans ce guide
d'utilisation, ou fournie avec celui-ci.
Sauf mention contraire, les marques 3Com sont déposées aux États-Unis et peuvent ou non être déposées
dans d'autres pays.
3Com et le logo 3Com sont des marques déposées de 3Com Corporation.
Intel, Pentium et Celeron sont des marques déposées de Intel Corporation. Microsoft et Windows sont des
marques déposées de Microsoft Corporation.
Tous les autres noms de produits ou de sociétés sont susceptibles de représenter les marques commerciales
des sociétés respectives auxquelles ils sont associés.
Page 23

Contenu du paquet
Avant de démarrer l'installation, veuillez vérifier que le paquet de
l'adaptateur PCI contient bien ce qui suit:
■ un adaptateur PCI 11n sans fil de 3Com avec bracket PCI
standard
■ trois antennes à distance
■ un bracket PCI profil bas
■ un CD-ROM d'installation de 3Com contenant le pilote de
l'adaptateur PCI
■ ce Guide d'installation rapide de l'adaptateur PCI 11n sans fil
de 3Com
■ un certificat de garantie
Si un élément manque ou est endommagé, prenez
immédiatement contact avec votre fournisseur 3Com.
Configuration système minimale
Vous pouvez installer l'adaptateur PCI sur un ordinateur de
bureau doté de Microsoft
Windows Vista.
Pour Windows 2000, veuillez télécharger le pilote et l'utilitaire se
trouvant sur le site Web de 3Com.
Votre ordinateur doit être muni, au minimum, de ce qui suit :
■ un emplacement PCI disponible
®
Windows® XP, Windows 2000 ou
Page 24

24 Contenu du paquet
■ un processeur Intel
équivalent)
■ 256 Mo de RAM
■ 7 Mo d'espace libre sur le disque
■ un lecteur CD-ROM
Vérification du bracket PCI
Le bracket PCI standard auquel est rattaché par défaut
l'adaptateur PCI est destiné aux ordinateurs de bureau standard
de hauteur normale. Si vous disposez d'un ordinateur de bureau
profil bas, vous devez remplacer le bracket standard par un
bracket profil bas pour pouvoir y monter l'adaptateur PC.
Pour remplacer le bracket :
1 Retirez les trois écrous et rondelles se trouvant sur les trois
connecteurs d'antenne filetés.
2 Retirez les deux vis fixant l'adaptateur PCI au bracket. (Veillez à ce
que le cache de protection ne tombe pas puisque les vis fixent
également cet élément). Mettez les vis de côté.
3 Remplacez le bracket standard par le bracket profil bas.
4 Attachez l'adaptateur PCI au braquet profil bas au moyen des vis.
5 Remplacez les trois écrous et rondelles que vous aviez enlevés à
l'étape 1
™
Pentium™ III ou Celeron 733 MHz (ou
Page 25
Installation de l'adaptateur PSI sans fil 25
Installation de l'adaptateur PSI sans fil
L'installation de l'adaptateur PCI se fait en deux étapes:
1 Installation du matériel de l'adaptateur PCI
2 Installation du pilote de l'adaptateur PCI de 3Com
Installation du matériel de l'adaptateur PCI
Vous aurez besoin :
■ d'un tournevis cruciforme pour enlever le boîtier et le cache
d'emplacement ainsi que pour fixer l'adaptateur PCI dans
l'emplacement.
■ une protection antistatique
N'attachez les antennes aux connecteurs qu'après avoir
immobilisé l'adaptateur PCI dans l'emplacement.
Page 26

26 Installation de l'adaptateur PSI sans fil
Pour installer l'adaptateur PCI dans un emplacement PCI :
1 Éteignez l'ordinateur et débranchez le cordon de la prise de
courant.
2 Au moyen de la protection antistatique, retirez le boîtier.
3 Repérez un emplacement PCI vide et enlevez le cache.
Reportez-vous à 1 dans la Figure 1. Mettez la vis de côté.
Figure 1Insertion de l'adaptateur PCI dans un emplacement PCI
1
4 Insérez l'adaptateur PCI dans l'emplacement. Appuyez légèrement
dessus pour s'assurer qu'il est bien emboîté. Reportez-vous à 2
dans la Figure 1.
5 Immobilisez l'adaptateur PCI dans l'emplacement au moyen de la
vis retirée antérieurement.
6 Replacez le boîtier.
2
Page 27
Installation de l'adaptateur PSI sans fil 27
7 Attachez les 3 antennes aux connecteurs de l'adaptateur PCI
puis faites tourner les portions filetées dans le sens des aiguilles
d'une montre pour les fixer. Ne serrez pas trop.
Pour une réception optimale, positionnez les antennes de sorte à
ce que celle du milieu soit à la verticale et que les deux autres
soient à un angle de 45 degrés, comme illustré dans la Figure 2.
Figure 2Ajustement des antennes
8 Rebranchez le cordon à la prise de courant puis allumez
l'ordinateur.
9 Si l' Assistant de matériel détecté apparaît au démarrage de
Windows, cliquez sur Annuler.
Page 28

28 Installation du pilote de l'adaptateur PCI sans fil de 3Com
Installation du pilote de l'adaptateur PCI sans fil de 3Com
Votre adaptateur PCI comprend un CD sur lequel se trouve le
pilote sans fil de 3Com. L'exécution du programme de
configuration permet d'installer l'adaptateur PCI.
Pour installer le pilote de l'adaptateur PCI de 3Com, suivez les
consignes figurant dans la section suivante en fonction du
système d'exploitation dont vous vous servez.
Installation sur Windows XP
1 Insérez le CD-ROM d'installation de 3Com dans le lecteur
CD-ROM de votre ordinateur (l'ordinateur et Windows doivent
être en route).
Le menu de configuration du gestionnaire d'installation de
l'adaptateur PCI 11n sans fil de 3Com apparaît.
Si le menu n'apparaît pas, cliquez sur Démarrer > Exécuter, puis
tapez
d:\AutoRun.exe (d: désignant la lettre attribuée au lecteur
de CD-ROM).
Page 29
Installation du pilote de l'adaptateur PCI sans fil de 3Com 29
2 Dans le menu de configuration, cliquez sur Install/Uninstall
Wireless Product. L'assistant se prépare à l'installation.
3 Le contrat de licence logicielle 3Com pour utilisateur final
apparaît. Lisez le contrat attentivement, cliquez sur I accept the
terms of the license agreement pour accepter les termes et les
conditions puis cliquez sur Next.
Page 30
30 Installation du pilote de l'adaptateur PCI sans fil de 3Com
4 Choisissez votre pays puis cliquez sur Next.
5 Cliquez sur Install.
Page 31

Installation du pilote de l'adaptateur PCI sans fil de 3Com 31
6 Lorsque le message InstallShield Wizard Complete
apparaît, cliquez sur Finish. Vous avez terminé l'installation du
pilote de l'adaptateur PCI sans fil de 3Com.
7 Sur le menu de configuration, cliquez sur Exit.
Page 32

32 Installation du pilote de l'adaptateur PCI sans fil de 3Com
Installation sur Windows Vista
1 Insérez le CD-ROM d'installation de 3Com dans le lecteur
CD-ROM de votre ordinateur (l'ordinateur et Windows doivent
être en route).
Le menu de configuration du gestionnaire d'installation de
l'adaptateur PCI 11n sans fil de 3Com apparaît.
Si le menu n'apparaît pas, cliquez sur > Tous les programmes
> Accessoires > Exécuter, puis tapez
désignant la lettre attribuée au lecteur de CD-ROM).
2 Dans le menu de configuration, cliquez sur Install/Uninstall
Wireless Product. L'assistant se prépare à l'installation.
d:\AutoRun.exe (d:w=
Page 33

Installation du pilote de l'adaptateur PCI sans fil de 3Com 33
3 Le contrat de licence logicielle 3Com pour utilisateur final
apparaît. Lisez le contrat attentivement puis cliquez sur I accept
the terms of the license agreement pour accepter les termes et
les conditions. Ensuite, cliquez sur Next.
4 Choisissez votre pays puis cliquez sur Next.
Page 34

34 Installation du pilote de l'adaptateur PCI sans fil de 3Com
5 Cliquez sur Install.
6 Lorsque le message
InstallShield Wizard Complete apparaît,
cliquez sur Finish. Vous avez terminé l'installation du pilote de
l'adaptateur PCI sans fil de 3Com.
7 Sur le menu de configuration, cliquez sur Exit.
Page 35

Que faire ensuite
Cette section présente tout d'abord la connexion sur le système
d'exploitation Windows XP puis celle sur Windows Vista.
Connexion sur Windows XP
Par défaut, l'adaptateur PCI recherche les points d'accès à
proximité.
Pour vous connecter à un point d'accès spécifique, vous devez
configurer votre connexion sans fil au moyen de l'outil Windows
Zero Configuration (WZC).
Veillez à ce que le Service Pack 2 de Windows XP soit installé sur
l'ordinateur.
Veillez à ce que la case Utiliser Windows pour configurer mon
réseau sans fil soit cochée dans l'onglet Propriétés des
connexions réseau sans fil.
8 Cliquez sur l'icône de réseau dans la barre d'état du système
pour consulter les Réseaux sans fil.
Que faire ensuite 35
Page 36

36 Que faire ensuite
9 Cliquez sur Actualiser la liste des réseaux pour recharger et
rechercher les périphériques sans fil disponibles. Sélectionnez un
réseau sans fil dans la liste puis cliquez sur Connexion pour
rejoindre le réseau sélectionné.
10 Si la sécurité sans fil est activée pour le réseau sélectionné, la
fenêtre Connexion réseau sans fil apparaît. Saisissez la Clé réseau
puis cliquez sur Connexion.
Page 37

Que faire ensuite 37
11 Si aucune sécurité n'est activée pour le réseau sans fil
sélectionné, une fenêtre d'avertissement apparaît. Cliquez sur
Connecter (quand même).
.
12 Fermez la fenêtre Liste des connexions réseau sans fil.
Page 38

38 Que faire ensuite
Connexion sur Windows Vista
Configuration automatique WLAN dans Windows Vista
L'ordinateur commence à fonctionner en mode station (comme
un client) avec le réseau local sans fil (WLAN) dès que la clé réseau
est configurée.
Si vous ne disposez pas d'un réseau sans fil, vos devez tout
d'abord configurer votre routeur sans fil avant d'utiliser
l'ordinateur en mode station.
1 Démarrez l'ordinateur et connectez-vous par le biais d'un point
d'accès WLAN existant.
2 Assurez-vous d'avoir la clé réseau (clé WEP ou clé WPA) à portée
de main au cas où le réseau sans fil vous demande un code de
sécurité.
3 Cliquez avec le bouton droit sur l'icône de réseau sans fil se
trouvant dans la barre d'état du système.
4 Sélectionnez Se connecter à un réseau dans le menu de l'icône de
réseau sans fil. La boîte de dialogue Connexion réseau sans fil
apparaît, comme illustré ci-dessous :
Page 39

Que faire ensuite 39
5 Sélectionnez le réseau sans fil de votre choix en cliquant sur son
nom. Le bloc tout entier se met en surbrillance.
6 Sélectionnez Connexion dans l'angle inférieur droit.
La boîte de dialogue Connexion réseau sans fil suivante apparaît,
comme illustré ci-dessous :
7 Saisissez la clé réseau (clé WEP ou clé WPA) correspondant au
réseau sans fil.
Page 40

40 Que faire ensuite
Si le réseau utilise un cryptage WEP, un format hexadécimal ou
ASCII est alors nécessaire pour saisir la clé réseau :
■ Hexadécimal — 10 caractères en notation hexadécimale
pour le cryptage 40 bits ou 26 caractères pour le cryptage
128 bits.
■ ASCII — 5 caractères pour le cryptage 40 bits ou 13
caractères pour le cryptage 128 bits.
Si le réseau utilise un cryptage WPA ou WPA2, vous devez entrer
une phrase-clé de 8 à 63 caractères alphanumériques.
8 Sélectionnez Connecter.
La boîte de dialogue Connexion réseau sans fil apparaît de
nouveau pendant que vous vous connectez.
Une fois connecté à Generic1, comme illustré ci-dessous, cochez
la case Enregistrer ce réseau. Vérifiez que Démarrer cette
connexion automatiquement est bien coché.
9 Cliquez sur Fermer.
Page 41

Résolution des problèmes d'installation 41
Résolution des problèmes d'installation
Reportez-vous au Tableau 1 pour une liste des problèmes que
vous pourrez être amené à rencontrer au cours de l'installation
ainsi que leurs solutions possibles.
Tableau 1 Problèmes d'installation et solutions possibles
Problème Solution possible
Le programme
d'installation ne se
termine pas ou le
pilote ne se charge
pas
Utilisez le Gestionnaire des périphériques pour
résoudre les conflits de ressources éventuels. Pour
démarrer le Gestionnaire de périphériques,
accédez à Panneau de configuration,
double-cliquez sur Système, puis cliquez sur
l'ongletGestionnaire de périphériques.
■ Si l'élément matériel de l'adaptateur PCI sous
Cartes réseau est doté d'un point
d'exclamation jaune, cliquez dessus avec le
bouton droit puis cliquez surMettre à jour le
pilote. Suivez les consignes de l'assistant de
mise à jour du matériel pour mettre à jour le
pilote de l'adaptateur PCI.
■ Si l'élément matériel de l'adaptateur PCI
n'apparaît pas sous Cartes réseau, effectuez de
nouveau la procédure de configuration.
Page 42

42 Enregistrement du produit pour le service après vente
Tab l e au 1 Problèmes d'installation et solutions possibles
Problème Solution possible
Windows indique
que l'adaptateur PCI
est un périphérique
inconnu.
Le voyant
d'alimentation/d'acti
vité est éteint.
■
Vérifiez que l'adaptateur PCI est correctement
inséré dans l'emplacement PCI.
■
Si l'adaptateur est bien inséré mais que
Windows ne le reconnaît toujours pas, utilisez le
Gestionnaire de périphériques pour supprimer le
périphérique inconnu puis effectuez de nouveau
la procédure de configuration.
■
Vérifiez que l'adaptateur PCI est correctement
inséré dans l'emplacement PCI.
■
Veillez à ce que le pilote ait bien été installé en
vérifiant le statut du périphérique dans le
Gestionnaire de périphériques. Reportez-vous à
la rubrique “Que faire ensuite” à la page 35.
Enregistrement du produit pour le service après vente
Pour obtenir l'aide par téléphone dans le cadre de la garantie ainsi
que d'autres avantages, vous devez enregistrer votre produit à :
http://eSupport.3com.com/
Soutien technique et réparation par téléphone
3Com offre un accès aux services d'aide technique et de
réparation par téléphone, courriel et Internet. Pour accéder à ces
services dans votre région, utilisez le numéro de téléphone, l'URL
ou l'adresse électronique corrects depuis l'URL suivante :
http://csoweb4.3com.com/contactus/
Page 43

www.3com.it
Numero parte: WL-601
10016657 Rev AA
Marzo 2008
Scheda PCI 3Com Wireless 11n
Guida rapida di
installazione
3CRPCIN175
Page 44

3Com Corporation, 350 Campus Drive, Marlborough, MA 01752-3064 Stati Uniti
Copyright © 2005-2008, 3Com Corporation. Tutti i diritti riservati. Nessuna parte della presente documentazione
può essere riprodotta in qualsiasi forma o tramite qualsiasi mezzo né può essere utilizzata per produrre lavori
derivativi (come traduzioni, modifiche o adattamenti) senza previa autorizzazione scritta di 3Com Corporation.
3Com Corporation si riserva il diritto di riesaminare la presente documentazione e di apportare modifiche al
contenuto di tanto in tanto senza l'obbligo da parte di 3Com Corporation di fornire alcun preavviso per tali
revisioni o modifiche.
3Com Corporation mette a disposizione la presente documentazione senza garanzie, termini né condizioni di
alcun genere, siano esse implicite o esplicite, compresi, a titolo esemplificativo, garanzie, termini o condizioni
implicite di commerciabilità, qualità soddisfacente e idoneità ad uno scopo specifico. 3Com potrà apportare in
qualsiasi momento miglioramenti o modifiche ai prodotti e/o ai programmi descritti all'interno della presente
documentazione.
Se in questa documentazione è descritto un software su un supporto rimovibile, tale prodotto viene fornito nei
termini di un contratto di licenza incluso in un documento separato con il relativo prodotto, in forma cartacea
oppure nel supporto rimovibile in un file denominato LICENSE.TXT o !LICENSE.TXT. Se il documento non fosse
presente, contattare 3Com che provvederà all'invio di una copia.
DISPOSIZIONI DEL GOVERNO DEGLI STATI UNITI
Se l'utente è un ente del governo degli Stati Uniti, questa documentazione e il software in essa descritto sono
forniti alle seguenti condizioni:
Tutti i dati tecnici ed il software informatico sono di natura commerciale e sono sviluppati unicamente a spese
private. Il Software è fornito come "Software Informatico Commerciale", come definito in DFARS 252.227-7014
(giugno 1995) o come "articolo commerciale", come definito in FAR 2.101(a) e, in quanto tale, viene fornito
solamente in base ai diritti previsti dalla licenza commerciale standard di 3Com relativa al Software in questione. I
dati tecnici sono forniti con diritti limitati solo secondo quanto previsto dal DFAR 252.227-7015 (novembre
1995) o FAR 52.227-14 (giugno 1987). L'utente si impegna a non rimuovere o rovinare alcuna porzione di
alcuna legenda fornita su qualsiasi programma o documentazione autorizzati contenuti in, o forniti all'utente
unitamente alla presente Guida.
Eccetto laddove diversamente indicato, i marchi registrati 3Com sono depositati negli Stati Uniti e possono essere
depositati o meno in altri paesi.
3Com e il logo 3Com sono marchi registrati di 3Com Corporation.
Intel, Pentium e Celeron sono marchi registrati di Intel Corporation. Microsoft e Windows sono marchi registrati
di Microsoft Corporation.
Tutti gli altri nomi di prodotto e di società possono essere marchi registrati delle rispettive società ai quali sono
associati.
Page 45

Contenuto della confezione
Prima di avviare l'installazione, verificare che la confezione della
scheda PCI contenga i seguenti componenti:
■ Una scheda PCI 3Com Wireless 11n con supporto standard
■ Tre antenne remote
■ Un supporto PCI a basso profilo
■ Un CD-ROM di installazione 3COM contenente il driver per
la scheda PCI
■ La presente Guida rapida di installazione per la scheda PCI
3Com Wireless 11n
■ Un volantino di sicurezza
Contattare immediatamente il fornitore della rete 3Com se uno
dei componenti sopra elencati manca o è danneggiato.
Requisiti minimi di sistema
È possibile installare la scheda PCI su un computer desktop con
Microsoft
Per Windows 2000, scaricare il driver e l'utility dal sito web di
3Com.
Il computer deve inoltre disporre dei seguenti componenti:
■ Slot PCI disponibile
■ Processore 733 MHz Intel
■ 256 MB di RAM
®
Windows® XP, Windows 2000 o Windows Vista.
equivalente)
™
Pentium™ III o Celeron (oppure
Page 46

46 Contenuto della confezione
■ 7 MB di spazio libero su disco
■ Unità CD-ROM
Supporto PCI
La scheda PCI è fissata per impostazione predefinita a un supporto
PCI standard per desktop ad altezza totale standard. Se si adopera
un desktop a basso profilo, è necessario sostituire il supporto
standard con il supporto a basso profilo per la scheda PCI.
Per sostituire il supporto PCI:
1 Rimuovere i tre dadi e rondelle fissati ai tre connettori di antenna.
2 Rimuovere le due viti con cui la scheda PCI è fissata al supporto.
Attenzione a non far cadere il coperchio di protezione fissato
mediante le stesse viti. Conservare le viti.
3 Sostituire il supporto standard con quello a basso profilo.
4 Fissare con le viti la scheda PCI al supporto a basso profilo.
5 Rimettere a posto i tre dadi e rondelle rimossi nel passaggio 1.
Page 47

Installazione della scheda PCI wireless 47
Installazione della scheda PCI wireless
L'installazione della scheda PCI viene effettuata in due passaggi:
1 Installazione dell'hardware della scheda PCI
2 Installazione del driver della scheda PCI 3Com
Installazione dell'hardware della scheda PCI
Per effettuare l'operazione, è necessario quanto segue:
■ Cacciavite Phillips per rimuovere l'involucro del computer e il
coperchio dello slot e per fissare la scheda PCI nello slot.
■ Protezione antistatica
Collegare le antenne ai rispettivi connettori solo dopo aver
fissato la scheda PCI nello slot.
Per installare la scheda PCI nello slot:
1 Arrestare il computer e scollegare il cavo di alimentazione dalla
presa.
2 Utilizzando la protezione antistatica, rimuovere il coperchio del
computer.
3 Individuare uno slot PCI vuoto e rimuovere il coperchio dello
stesso. Vedere 1 nella Figura 1. Conservare la vite.
Page 48

48 Installazione della scheda PCI wireless
Figura 1 Inserimento della scheda PCI in uno slot PCI
1
4 Inserire la scheda PCI nello slot e spingerla con delicatezza verso il
basso fino al suo completo alloggiamento nello slot. Vedere 2
nella Figura 1.
5 Fissare la scheda PCI nello slot tramite la vite rimossa in
precedenza.
6 Rimettere il coperchio del computer.
7 Collegare le tre antenne ai rispettivi connettori della scheda PCI,
quindi fissarle avvitando le parti filettate in senso orario. Non
stringere troppo.
Per una ricezione ottimale, collocare le antenne in modo che
quella centrale sia in posizione eretta e le due laterali abbiano un
angolo di 45 gradi come mostrato nella Figura 2.
2
Page 49

Installazione del driver della scheda PCI wireless 3Com 49
Figura 2 Regolazione delle antenne per una ricezione ottimale
8 Collegare nuovamente il cavo di alimentazione e accendere il
computer.
9 Se all'avvio di Windows viene visualizzato il messaggio
Installazione guidata nuovo hardware, fare clic su Annulla.
Installazione del driver della scheda PCI wireless 3Com
La scheda PCI include un CD con il driver wireless 3Com. Il driver
viene installato eseguendo il programma di installazione della
scheda PCI.
Per installare il driver della scheda PCI 3Com, seguire le istruzioni
riportate nelle prossime sezioni in base al sistema operativo
utilizzato.
Page 50

50 Installazione del driver della scheda PCI wireless 3Com
Installazione in Windows XP
1 Con il computer acceso e Windows in esecuzione, inserire il CD di
installazione 3Com nell'unità CD-ROM.
Verrà visualizzato il menu di installazione 3Com Wireless 11n PCI
Adapter Installation Manager (Gestore installazione per la scheda
PCI 3Com Wireless 11n).
Se il menu non viene visualizzato, fare clic su Start > Esegui,
quindi digitare
assegnata all'unità CD-ROM).
2 Nel menu di installazione, fare clic su Install/Uninstall Wireless
Product (Installa/Disinstalla dispositivo wireless). Verrà avviata
l'installazione guidata.
d:\AutoRun.exe (doved: è la lettera di unità
Page 51

Installazione del driver della scheda PCI wireless 3Com 51
3 Verrà visualizzato il contratto di licenza software con l'utente
finale di 3Com. Leggere il contratto attentamente e fare clic su I
accept the terms of the license agreement (Accetto i termini del
Contratto di licenza) per accettare tutti i termini e le condizioni
del contratto, quindi fare clic su Next (Avanti).
4 Scegliere il proprio paese e fare clic su Next.
Page 52

52 Installazione del driver della scheda PCI wireless 3Com
5 Fare clic su Install (Installa).
6 Quando viene visualizzato il messaggio
Complete
(Installazione guidata InstallShield completata),
InstallShield Wizard
scegliere Finish (Fine). L'installazione del driver della scheda PCI
wireless 3Com è completata.
7 Nel menu di installazione fare clic su Exit (Esci).
Page 53

Installazione del driver della scheda PCI wireless 3Com 53
Installazione in Windows Vista
1 Con il computer acceso e Windows in esecuzione, inserire il CD
di installazione 3Com nell'unità CD-ROM.
Verrà visualizzato il menu di installazione 3Com Wireless 11n PCI
Adapter Installation Manager (Gestore installazione per la scheda
PCI 3Com Wireless 11n).
Se il menu di installazione non viene visualizzato, fare clic su
> Tutti i programmi > Accessori > Esegui, quindi digitare
d:\AutoRun.exe (dove d: è la lettera di unità assegnata all'unità
CD-ROM).
2 Nel menu di installazione, fare clic su Install/Uninstall Wireless
Product (Installa/Disinstalla dispositivo wireless). Verrà avviata
l'installazione guidata.
3 Verrà visualizzato il contratto di licenza software con l'utente
finale di 3Com. Leggere il contratto attentamente e fare clic su I
accept the terms of the license agreement (Accetto i termini del
Page 54

54 Installazione del driver della scheda PCI wireless 3Com
Contratto di licenza) per accettare tutti i termini e le condizioni del
contratto. Fare clic su Next (Avanti).
4 Scegliere il proprio paese e fare clic su Next.
Page 55

Installazione del driver della scheda PCI wireless 3Com 55
5 Fare clic su Install (Installa).
6 Quando viene visualizzato il messaggio
Complete
(Installazione guidata InstallShield completata),
InstallShield Wizard
scegliere Finish (Fine). L'installazione del driver della scheda PCI
wireless 3Com è completata.
7 Nel menu di installazione fare clic su Exit (Esci).
Page 56

56 Successivi operazioni
Successivi operazioni
In questa sezione viene illustrato come eseguire la connessione
prima nel sistema operativo Windows XP, quindi in Windows
Vista.
Connessione in Windows XP
Per impostazione predefinita la scheda PCI cerca i punti di accesso
disponibili nell'intervallo.
Per connettere uno specifico punto di accesso, è necessario
configurare la connessione wireless mediante lo strumento di
gestione Windows Zero Configuration (WZC).
Accertarsi che sul computer sia installato Windows XP Service
Pack 2.
Verificare che la casella di controllo Usa Windows per configurare
le impostazioni della rete senza fili sia selezionata nella scheda
Proprietà connessione rete senza fili.
Page 57

Successivi operazioni 57
8 Fare clic sull'icona della rete nell'area di notifica per visualizzare
Reti senza fili.
9 Fare clic su Aggiorna elenco reti per ricaricare e cercare i
dispositivi wireless disponibili. Selezionare una rete wireless
elencata e fare clic su Connetti per accedere alla stessa.
10 Se per la rete selezionata è attiva la protezione wireless, viene
visualizzata la finestra Connessione rete senza fili. Immettere la
Chiave di rete e fare clic su Connetti.
Page 58

58 Successivi operazioni
11 Se non è attiva alcuna protezione per la rete wireless selezionata,
viene visualizzato un messaggio di avviso. Fare clic su Connetti
comunque.
.
12 Chiudere la finestra Connessione rete senza fili.
Connessione in Windows Vista
Configurazione automatica WLAN di Windows Vista
Il PC verrà avviato in modalità stazione singola (come client) con la
rete LAN wireless non appena viene impostata la chiave di rete.
Se una rete wireless non è disponibile, configurare il router
wireless prima di utilizzare il PC in modalità stazione singola.
1 Avviare il PC e connettersi a un punto di accesso WLAN esistente.
2 Se viene richiesto un codice di sicurezza, inserire la chiave di rete
WEP o WPA.
3 Fare clic con il pulsante destro del mouse sull'icona della rete
wireless nell'area di notifica.
Page 59

Successivi operazioni 59
4 Selezionare l'opzione Connessione a una rete dal menu della rete
wireless. Verrà visualizzata la finestra di dialogo Connessione rete
wireless, come mostrato nell'immagine:
5 Selezionare la rete wireless desiderata facendo clic sul nome della
stessa. L'intero blocco verrà evidenziato.
6 Selezionare Connetti nell'angolo inferiore destro.
Page 60

60 Successivi operazioni
Verrà aperta la successiva finestra di dialogo di connessione della
rete wireless, come mostrato nell'immagine:
7 Inserire la chiave di rete WEP o WPA per la rete wireless.
In caso di reti con crittografia WEP, è necessario immettere la
chiave di rete nel formato HEX o ASCII:
■ HEX — 10 caratteri in notazione HEX in caso di crittografia a
40 bit oppure 26 caratteri in caso di crittografia a 128 bit.
■ ASCII — 5 caratteri in caso di crittografia a 40 bit oppure 13
caratteri in caso di crittografia a 128 bit.
Per reti con crittografia WPA o WPA2 è necessario inserire una
frase chiave alfanumerica di 8 – 63 caratteri.
8 Selezionare Connetti.
Durante la connessione viene nuovamente visualizzata la finestra
di dialogo Connessione rete wireless.
Page 61

Successivi operazioni 61
Eseguita la connessione, selezionare la casella di controllo Salva
questa rete come mostrato sotto. Verificare che sia abilitata
anche l'opzione Avvia questa connessione automaticamente.
9 Scegliere Chiudi.
Page 62

62 Risoluzione dei problemi di installazione
Risoluzione dei problemi di installazione
Per un elenco dei possibili problemi di installazione e dei
suggerimenti per risolverli, consultare la Tabella 1.
Tabella 1 Problemi di installazione e possibili soluzioni
Problema Possibile soluzione
Il programma di
installazione non
viene completato
o non si riesce a
caricare il driver
Utilizzare Gestione periferiche (Gestione dispositivi
in Windows Vista) per risolvere eventuali conflitti
di risorse. Per avviare Gestione periferiche,
accedere al Pannello di controllo, fare doppio clic
su Sistema, quindi selezionare la scheda Gestione
periferiche.
■ Se in Schede di rete accanto alla voce hardware
relativa alla scheda PCI è presente un punto
esclamativo giallo, fare clic con il pulsante
destro del mouse sulla voce e selezionare
l'opzione Aggiorna driver. Aggiornare il driver
della scheda PCI seguendo le istruzioni
visualizzate in Aggiornamento guidato
hardware.
■ Se la voce hardware relativa alla scheda PCI
non è visualizzata in Schede di rete, rieseguire
la procedura di installazione.
Page 63

Registrazione del prodotto per servizi di assistenza e riparazione 63
Tabella 1 Problemi di installazione e possibili soluzioni
Problema Possibile soluzione
La scheda PCI non
viene riconosciuta
da Windows
Il LED di
alimentazione/atti
vità è spento
■ Verificare che la scheda PCI sia inserita
correttamente nello slot PCI.
■ Se la scheda PCI, pur essendo inserita
correttamente nello slot, non viene ancora
riconosciuta da Windows, utilizzare Gestione
periferiche (Gestione dispositivi in Windows
Vista) per rimuovere il dispositivo sconosciuto,
quindi ripetere la procedura di installazione.
■ Verificare che la scheda PCI sia inserita
correttamente nello slot PCI.
■ Verificare che il driver sia stato installato
correttamente controllando lo stato del
dispositivo in Gestione periferiche (Gestione
dispositivi in Windows Vista). Vedere
“Successivi operazioni” a pagina 56.
Registrazione del prodotto per servizi di assistenza e riparazione
Per avere diritto al supporto telefonico previsto dalla garanzia e agli
altri benefici di assistenza, è necessario registrare il prodotto
acquistato all'indirizzo:
http://eSupport.3com.com/
Assistenza tecnica e riparazione telefonica
3Com offre servizi di riparazione e assistenza tecnica per telefono,
e-mail e Internet. Per accedere a questi servizi nel proprio paese,
reperire il numero di telefono, l'URL o l'indirizzo e-mail appropriato
presso:
http://csoweb4.3com.com/contactus/
Page 64

64 Registrazione del prodotto per servizi di assistenza e riparazione
Page 65

www.3com.de
M/N: WL-601
10016657 Rev AA
März 2008
3Com Wireless 11n PCI-Adapter
Kurzanleitung zur
Installation
3CRPCIN175
Page 66

3Com Corporation, 350 Campus Drive, Marlborough, MA USA 01752-3064
Copyright © 2005-2008, 3Com Corporation. Alle Rechte vorbehalten. Ohne die schriftliche Genehmigung von
3Com Corporation ist es untersagt, dieses Dokumentation, sei es auch nur teilweise, in welcher Form und mit
welchem Verfahren auch immer, zu vervielfältigen oder davon abgeleitete Produkte (wie Übersetzung,
Umformung oder Anpassung) anzufertigen.
3Com Corporation behält sich das Recht vor, diese Dokumentation von Zeit zu Zeit zu überarbeiten und
inhaltliche Änderungen vorzunehmen. Dabei ist 3Com Corporation nicht dazu verpflichtet, derartige
Änderungen oder Überarbeitungen anzukündigen.
3Com Corporation stellt die Dokumentation ohne jede ausdrückliche oder stillschweigende Gewähr bereit,
einschließlich u. a. der stillschweigenden Garantien der Marktgängigkeit, zufriedenstellender Qualität oder
Eignung für einen bestimmten Zweck. 3Com behält sich das Recht vor, jederzeit Verbesserungen oder
Änderungen an den in dieser Dokumentation beschriebenen Produkten und/oder Programmen vorzunehmen.
Falls in dieser Dokumentation auf Wechseldatenträgern bereitgestellte Software beschrieben wird, unterliegt
diese Software einer Lizenzvereinbarung, die dem Produkt als eigenständiges Dokument in Papierform oder
auf dem Wechseldatenträger in einer Verzeichnisdatei namens LICENSE.TXT oder !LICENSE.TXT beigefügt ist.
Sollten Sie keine solche Lizenzvereinbarung finden, fordern Sie bitte eine Kopie von 3Com an.
REGIERUNGSBEHÖRDEN DER VEREINIGTEN STAATEN – VERMERK
Diese Dokumentation und die in ihr beschriebene Software wird Regierungsbehörden der Vereinigten Staaten
von Amerika unter den folgenden Bedingungen bereitgestellt:
Alle technischen Daten und Computer-Software sind rein kommerzieller Natur. Entwicklungs- und
Investitionskosten wurden ausschließlich von privater Seite getragen. Die Software wird gemäß der Definition
in DFARS 252.227-7014 (Juni 1995) als „kommerzielle Computer-Software“ bzw. gemäß der Definition in
FAR 2.101(a) als „kommerzielle Ware“ bereitgestellt und wird daher nur mit den Rechten bereitgestellt, die in
der kommerziellen 3Com-Standardlizenz für die Software vorgesehen sind. Technische Daten werden gemäß
in DFAR 252.227-7015 (Nov. 1995) bzw. FAR 52.227-14 (Juni 1987) mit beschränkten Rechten bereitgestellt.
Sie verpflichten sich, Lizenzvermerke oder Teile davon auf Programmen oder in Dokumentation, die
Bestandteile dieses Benutzerhandbuchs sind oder die Ihnen in Verbindung mit diesem Benutzerhandbuch
geliefert wurden, weder zu entfernen noch in irgendeiner Form zu verunstalten.
Sofern nicht anders angegeben, sind eingetragene 3Com-Marken in den USA sowie möglicherweise in
anderen Ländern eingetragen.
3Com und das 3Com-Logo sind eingetragene Marken der 3Com Corporation.
Intel, Pentium und Celeron sind eingetragene Marken der Intel Corporation. Microsoft und Windows sind
eingetragene Marken der Microsoft Corporation.
Alle anderen Namen von Unternehmen und Produkten sind Marken der jeweiligen Eigentümer.
Page 67

Überprüfen des Verpackungsinhaltes
Stellen Sie vor der Installation sicher, dass die Verpackung des
PCI-Adapters die folgenden Dinge enthält:
■ einen 3Com Wireless 11n PCI-Adapter mit
PCI-Standardhalterung
■ drei Remote-Antennen
■ eine PCI-Halterung (niedrige Bauhöhe)
■ eine 3Com-Installations-CD-ROM mit dem Treiber für den
PCI-Adapter
■ diese 3Com Wireless 11n PCI-Adapter – Kurzanleitung zur
Installation
■ einen Garantieschein
Sollte davon etwas fehlen oder beschädigt sein, wenden Sie sich
bitte umgehend an Ihren 3Com-Netzwerkanbieter.
Überprüfen der Mindestsystemanforderungen
Der PCI-Adapter kann auf allen Desktop-Computern mit
Microsoft
installiert werden.
Bei einer Installation unter Windows 2000 müssen der Treiber
und das Dienstprogramm von der 3Com-Website
heruntergeladen werden.
Der Computer muss die folgenden Mindestvoraussetzungen
erfüllen:
®
Windows® XP, Windows 2000 oder Windows Vista
Page 68

68 Überprüfen des Verpackungsinhaltes
■ verfügbarer PCI-Steckplatz
■ 733 MHz Intel
™
gleichwertiger) Prozessor
■ 256 MB RAM
■ 7 MB freier Festplattenspeicherplatz
■ CD-ROM-Laufwerk
Überprüfen der PCI-Halterung
Die PCI-Standardhalterung, an der der PCI-Adapter bei Lieferung
befestigt ist, ist für normalgroße Standarddesktop-Computer
gedacht. Wenn Sie einen Desktop-Computer mit niedriger
Bauhöhe verwenden, sollten Sie die Standardhalterung des
PCI-Adapters gegen die flache Halterung austauschen, damit der
PCI-Adapter in den Steckplatz passt.
So tauschen Sie die PCI-Halterung aus:
1 Entfernen Sie die drei Muttern und Unterlegscheiben an den drei
Antennenanschlüssen.
2 Entfernen Sie die beiden Schrauben, mit denen der PCI-Adapter
an der Halterung befestigt ist. (Achten Sie dabei darauf, dass die
Abdeckung nicht herunterfällt, die ebenfalls von diesen
Schrauben befestigt wird.) Bewahren Sie die Schrauben für einen
späteren Gebrauch auf.
3 Tauschen Sie die Standardhalterung gegen die flache Halterung
aus.
Pentium™ III oder Celeron (oder
Page 69

Installieren des Wireless PCI-Adapters 69
4 Befestigen Sie den PCI-Adapter mit den Schrauben an der
flachen Halterung.
5 Bringen Sie die drei in step 1 entfernten Muttern und
Unterlegscheiben wieder an.
Installieren des Wireless PCI-Adapters
Die Installation des PCI-Adapters erfolgt in zwei Schritten:
1 Installation der PCI-Adapter-Hardware
2 Installation des 3Com PCI-Adapter-Treibers
Installieren der PCI-Adapter-Hardware
Folgendes wird dazu benötigt:
■ ein Kreuzschlitzschraubendreher, um das Computergehäuse
und die Steckplatzabdeckung zu entfernen und den
PCI-Adapter im Steckplatz zu befestigen
■ ESD-Schutz
Page 70

70 Installieren des Wireless PCI-Adapters
Befestigen Sie die Antennen erst dann an den
Antennenanschlüssen, nachdem Sie den PCI-Adapter im
Steckplatz befestigt haben.
So installieren Sie den PCI-Adapter in einem PCI-Steckplatz:
1 Fahren Sie den Computer herunter und ziehen Sie das Netzkabel
aus der Steckdose.
2 Entfernen Sie unter Verwendung des ESD-Schutzes die
Computerabdeckung.
3
Entfernen Sie die Steckplatzabdeckung von einem unbenutzten
PCI-Steckplatz. Siehe
Figure 1 Einschieben des PCI-Adapters in einen PCI-Steckplatz
1
4 Schieben Sie den PCI-Adapter in den Steckplatz und drücken Sie
ihn leicht herunter, bis er fest im Steckplatz sitzt. Siehe 2 in
Figure 1.
1
in Figure 1. Bewahren Sie die Schraube auf.
2
Page 71

Installieren des Wireless PCI-Adapters 71
5 Befestigen Sie den PCI-Adapter mit der zuvor entfernten
Schraube im Steckplatz.
6 Bringen Sie die Computerabdeckung wieder an.
7 Verbinden Sie die 3 Antennen mit den Antennenanschlüssen des
PCI-Adapters und drehen Sie ihre Gewindeteile zur Befestigung
im Uhrzeigersinn. Ziehen Sie die Anschlüsse nicht zu fest an.
Richten Sie die Antennen für den besten Empfang so aus, dass
die mittlere Antenne senkrecht nach oben zeigt und die beiden
seitlichen Antennen in einem 45-Grad-Winkel abstehen (siehe
Figure 2).
Figure 2 Ausrichten der Antennen für den besten Empfang
Page 72

72 Installieren des 3Com PCI-Adapter-Treibers
8 Schließen Sie das Netzkabel wieder an die Steckdose an und
schalten Sie den Computer an.
9 Wenn beim Windows-Start die Meldung Neue Hardware
gefunden erscheint, klicken Sie auf Abbrechen.
Installieren des 3Com PCI-Adapter-Treibers
Der PCI-Adapter wird mit einer CD geliefert, auf der sich der
3Com Wireless-Treiber befindet. Führen Sie das
PCI-Adapter-Setupprogramm aus, um den Treiber zu installieren.
Befolgen Sie die für Ihr Betriebssystem geltenden Anweisungen
zur Installation des 3Com PCI-Adaptertreibers im nächsten
Abschnitt.
Installation unter Windows XP
1 Starten Sie den Computer und das Windows-Betriebssystem und
legen Sie die 3COM-Installations-CD in das CD-ROM-Laufwerk
ein.
Das Setup-Menü mit dem Installationsmanager für den 3Com
Wireless 11n PCI-Adapter wird angezeigt.
Wird dieses Setup-Menü nicht automatisch angezeigt, klicken Sie
auf Start > Ausführen und geben Sie dann
(
d: entspricht dabei dem Laufwerksbuchstaben Ihres
CD-ROM-Laufwerks.)
d:\AutoRun.exe ein.
Page 73

Installieren des 3Com PCI-Adapter-Treibers 73
2 Klicken Sie im Setup-Menü auf Wireless-Produkt
installieren/deinstallieren. Der Assistent bereitet die Installation
vor.
3 Die 3Com Endbenutzer-Softwarelizenzvereinbarung wird
angezeigt. Lesen Sie die Vereinbarung sorgfältig durch, klicken
Sie auf Ich akzeptiere die Bedingungen der Lizenzvereinbarung
und klicken Sie anschließend auf Weiter.
Page 74

74 Installieren des 3Com PCI-Adapter-Treibers
4 Wählen Sie Ihr Land aus und klicken Sie anschließend auf Weiter.
5 Klicken Sie auf Installieren.
Page 75

Installieren des 3Com PCI-Adapter-Treibers 75
6 Wenn die Meldung InstallShield-Assistent
abgeschlossen
angezeigt wird, klicken Sie auf Fertig stellen.
Dies schließt die Installation des 3Com Wireless
PCI-Adapter-Treibers ab.
7 Klicken Sie im Setup-Menü auf Beenden.
Page 76

76 Installieren des 3Com PCI-Adapter-Treibers
Installation unter Windows Vista
1 Starten Sie den Computer und das Windows-Betriebssystem und
legen Sie die 3COM-Installations-CD in das CD-ROM-Laufwerk
ein.
Das Setup-Menü mit dem Installationsmanager für den 3Com
Wireless 11n PCI-Adapter wird angezeigt.
Wird dieses Setup-Menü nicht automatisch angezeigt, klicken Sie
auf > Alle Programme > Zubehör > Ausführen und geben Sie
dann
d:\AutoRun.exe ein. (d: entspricht dabei dem
Laufwerksbuchstaben Ihres CD-ROM-Laufwerks.)
2 Klicken Sie im Setup-Menü auf Wireless-Produkt
installieren/deinstallieren. Der Assistent bereitet die Installation
vor.
Page 77

Installieren des 3Com PCI-Adapter-Treibers 77
3 Die 3Com Endbenutzer-Softwarelizenzvereinbarung wird
angezeigt. Lesen Sie die Vereinbarung sorgfältig durch und
klicken Sie auf Ich akzeptiere die Bedingungen der
Lizenzvereinbarung. und klicken Sie anschließend auf Weiter.
4 Wählen Sie Ihr Land aus und klicken Sie anschließend auf Weiter.
Page 78

78 Installieren des 3Com PCI-Adapter-Treibers
5 Klicken Sie auf Installieren.
6 Wenn die Meldung
InstallShield-Assistent abgeschlossen
angezeigt wird, klicken Sie auf Fertig stellen. Dies schließt die
Installation des 3Com Wireless PCI-Adapter-Treibers ab.
7 Klicken Sie im Setup-Menü auf Beenden.
Page 79

Nächste Schritte
Dieser Abschnitt beschreibt die Verbindungsherstellung unter
Windows XP und Windows Vista.
Verbindungsherstellung unter Windows XP
Der PCI-Adapter sucht standardmäßig nach verfügbaren
Zugriffspunkten im Sendebereich des Adapters.
Um sich mit einem bestimmten Zugriffspunkt zu verbinden,
müssen Sie die WLAN-Verbindung unter Verwendung des
Windows-Dienstes Konfigurationsfreie drahtlose Verbindung
einrichten.
Vergewissern Sie sich, dass auf Ihrem Computer Windows XP
Service Pack 2 installiert ist.
Stellen Sie sicher, dass auf der Registerkarte Drahtlose
Netzwerkverbindung das Kontrollkästchen Windows zum
Konfigurieren der Einstellungen verwenden markiert ist.
Nächste Schritte 79
Page 80

80 Nächste Schritte
8 Klicken Sie auf das Netzwerksymbol in der Taskleiste, um die
Drahtlosen Netzwerke anzuzeigen.
9 Klicken Sie auf Netzwerkliste aktualisieren, um die Suche nach
Zugriffspunkten durchzuführen und alle verfügbaren Geräte
anzuzeigen. Wählen Sie ein auf der Liste angezeigtes drahtloses
Netzwerk und klicken Sie auf Verbinden, um mit dem gewählten
WLAN eine Verbindung herzustellen.
10 Sind für das gewählte WLAN Sicherheitsfunktionen aktiviert, wird
das Fester Drahtlose Netzwerkverbindung angezeigt. Geben Sie
den Netzwerkschlüssel ein und klicken Sie auf Verbinden.
Page 81

Nächste Schritte 81
11 Sind für das gewählte WLAN keine Sicherheitsfunktionen
aktiviert, wird ein Fenster mit einer Warnung angezeigt. Klicken
Sie auf Trotzdem verbinden.
.
12 Schließen Sie das Fenster Drahtlose Netzwerkverbindung.
Page 82

82 Nächste Schritte
Verbindungsherstellung unter Windows Vista
Windows Vista WLAN AutoConfig
Sobald der Netzwerkschlüssel eingerichtet ist, beginnt der PC mit
Ihrem WLAN im Stationsmodus (d. h. als Client) zu arbeiten.
Falls Sie noch nicht über ein vorhandenes drahtloses Netzwerk
verfügen, müssen Sie zuerst den drahtlosen Router einrichten,
bevor Sie den Computer im Stationsmodus verwenden können.
1 Starten Sie den Computer und stellen Sie eine Verbindung mit
einem vorhandenen WLAN-Zugriffspunkt her.
2 Halten Sie den Netzwerkschlüssel (WEP- oder WPA-Schlüssel)
bereit, falls Ihr drahtloses Netzwerk die Eingabe eines
Sicherheitscodes erfordert.
3 Klicken Sie mit der rechten Maustaste auf das Netzwerksymbol in
der Taskleiste.
Page 83

Nächste Schritte 83
4 Wählen Sie im daraufhin angezeigten Menü die Option
Verbindung mit einem Netzwerk herstellen. Das Dialogfeld
Drahtlosverbindung wird angezeigt:
5 Klicken Sie auf den Namen des WLANs, mit dem Sie eine
Verbindung herstellen möchten. Der gesamte Block wird
hervorgehoben.
Page 84

84 Nächste Schritte
6 Klicken Sie auf Verbinden in der rechten unteren Ecke.
Das nächste Dialogfeld für die Drahtlosverbindung wird
angezeigt:
7 Geben Sie den Netzwerkschlüssel (WEP- oder WPA-Schlüssel) für
Ihr drahtloses Netzwerk ein.
Wenn Ihr Netzwerk WEP-Verschlüsselung verwendet, müssen Sie
den Netzwerkschlüssel im HEX- oder ASCII-Format eingeben:
■ HEX: 10 Hexadezimalzeichen für 40-Bit- oder 26
Hexadezimalzeichen für 128-Bit-Verschlüsselung.
■ ASCII: 5 ASCII-Zeichen für 40-Bit- oder 13 ASCII-Zeichen für
128-Bit-Verschlüsselung.
Wenn Ihr Netzwerk WPA- oder WPA2-Verschlüsselung verwendet,
müssen Sie einen alphanumerischen Kennsatz bestehend aus 8 bis
63 Zeichen eingeben.
Page 85

Nächste Schritte 85
8 Klicken Sie auf Verbinden.
Das Dialogfeld Drahtlosverbindung wird bei der
Verbindungsherstellung erneut angezeigt.
Klicken Sie nach erfolgreicher Verbindungsherstellung (siehe
unten) auf das Kontrollkästchen Dieses Netzwerk speichern.
Achten Sie darauf, dass das Kontrollkästchen Diese Verbindung
automatisch starten aktiviert ist.
9 Klicken Sie auf Schließen.
Page 86

86 Beheben von Installationsproblemen
Beheben von Installationsproblemen
In Table 1 finden Sie eine Liste mit Problemen, die bei der
Installation auftreten können, und entsprechende
Lösungsvorschläge.
Tab l e 1 Probleme bei der Installation und mögliche Lösungen
Problem Mögliche Lösung
Installationsprogra
mm wird nicht
fertiggestellt, oder
der Treiber wird
nicht geladen.
Stellen Sie unter Verwendung des Geräte-Managers
fest, ob möglicherweise Ressourcenkonflikte
vorliegen. Um den Geräte-Manager zu starten,
doppelklicken Sie in der
und klicken Sie anschließend auf die Registerkarte
Geräte-Manager
■
Wird neben dem Eintrag für den PCI-Adapter
unter
angezeigt, klicken Sie auf den Eintrag und
anschließend auf
Sie die Anweisungen des Assistenten für die
Hardware-Aktualisierung, um den
PCI-Adapter-Treiber zu aktualisieren.
■
Wird für den PCI-Adapter unter
kein Eintrag angezeigt, wiederholen Sie das
Setup-Verfahren.
.
Netzwerkadapter
Systemsteuerung
ein gelbes Ausrufezeichen
Treiber aktualisieren
Netzwerkadapter
auf
System
. Befolgen
Page 87

Produktregistrierung für Wartung und Reparatur 87
Table 1 Probleme bei der Installation und mögliche Lösungen
Problem Mögliche Lösung
■
Windows zeigt den
PCI-Adapter als
unbekanntes Gerät
an
LED-Anzeige für
Power/Aktivität
leuchtet nicht
Überprüfen Sie, ob der PCI-Adapter
ordnungsgemäß an den USB-Anschluss
angeschlossen ist.
■
Erkennt Windows den PCI-Adapter weiterhin
nicht, entfernen Sie das unbekannte Gerät mit
dem Geräte-Manager und wiederholen Sie das
Setup-Verfahren.
■
Überprüfen Sie, ob der PCI-Adapter
ordnungsgemäß an den USB-Anschluss
angeschlossen ist.
■
Stellen Sie sicher, dass der Treiber erfolgreich
installiert worden ist, indem Sie den Gerätestatus
im Geräte-Manager überprüfen. Nähere
Informationen finden Sie unter “Nächste Schritte”
in page 79.
Produktregistrierung für Wartung und Reparatur
Um im Rahmen Ihrer Garantie telefonischen Support und andere
Wartungsleistungen zu erhalten, müssen Sie Ihr Produkt zuerst
online registrieren:
http://eSupport.3com.com/
Technischem Support und Reparatur
Sie können den technischen Support und den Reparaturdienst
von 3Com per Telefon, E-Mail und über das Internet erreichen.
Die für Ihre Region geltende Telefonnummer, URL oder
E-Mail-Adresse finden Sie unter:
http://csoweb4.3com.com/contactus/
Page 88

88 Produktregistrierung für Wartung und Reparatur
Page 89

www.3com.com.br
M/N: WL-601
10016657 Rev AA
Março de 2008
Adaptador PCI Wireless 11g 3Com
Guia de Instalação Rápida
3CRPCIN175
Page 90

3Com Corporation, 350 Campus Drive, Marlborough, MA EUA 01752-3064
Copyright © 2005-2008, 3Com Corporation. Todos os direitos reservados. Nenhuma parte desta
documentação pode ser reproduzida de qualquer forma ou por qualquer meio ou usada para gerar qualquer
trabalho derivativo (como tradução, transformação ou adaptação) sem permissão por escrito da 3Com
Corporation.
A 3Com Corporation se reserva o direito de revisar esta documentação e de fazer alterações no conteúdo a
qualquer momento e sem prévio aviso.
A 3Com Corporation fornece esta documentação sem garantias, termos ou condições de qualquer tipo,
expressas ou implícitas, incluindo mas não se limitando a garantias, termos ou condições implícitas de
comercialização e de adequação a um propósito específico. A 3Com pode fazer melhorias ou alterações nos
produtos e/ou programas descritos nesta documentação a qualquer momento.
Se houver qualquer software em mídia removível descrito nesta documentação, ele será fornecido sob um
contrato de licença incluído no produto como um documento separado, em documentação impressa ou na
mídia removível em um arquivo de diretório chamado LICENSE.TXT ou !LICENSE.TXT. Caso não consiga
localizar uma cópia, entre em contato com a 3Com e uma cópia lhe será fornecida
LEGENDA DO GOVERNO DOS ESTADOS UNIDOS
Se você é uma agência do governo dos Estados Unidos, então esta documentação e o software descrito neste
documento são fornecidos sujeitos ao seguinte:
Todos os dados técnicos e software de computador são de natureza comercial e desenvolvidos exclusivamente
com recursos próprios. O Software é fornecido na forma de "Commercial Computer Software" (software
comercial de computador) conforme definição do DFARS 252.227-7014 (junho de 1995) ou como "item
comercial" conforme definição da FAR 2.101(a) e, dessa forma, é fornecido de acordo apenas com os direitos
autorais estabelecidos na licença comercial padrão da 3Com para a utilização de Software. Os dados técnicos
são fornecidos com direitos limitados de acordo com o DFAR 252.227-7015 (novembro de 1995) ou a FAR
52.227-14 (junho de 1987), o que for válido. Você concorda que não irá remover ou desfigurar nenhuma
parte de nenhuma legenda fornecida ou nenhum programa ou documentação licenciado contido na licença,
ou que tenha sido fornecido juntamente com o Guia do Usuário.
Salvo indicação em contrário, as marcas comerciais registradas da 3Com são registradas nos EUA e podem ou
não ser registradas em outros países.
3Com e o logotipo da 3Com são marcas comerciais registradas da 3Com Corporation.
Intel, Pentium e Celeron são marcas comerciais registradas da Intel Corporation. Microsoft e Windows são
marcas comerciais registradas da Microsoft Corporation.
Todos os outros nomes de produtos e empresas podem ser marcas registradas das respectivas empresas às
quais estão associados.
Page 91

Inspeção do conteúdo da embalagem
Antes de iniciar a instalação, verifique se a embalagem do
adaptador PCI inclui estes itens:
■ um Adaptador PCI Wireless 11n 3Com com suporte de PCI
padrão
■ três antenas remotas
■ um suporte de PCI de perfil baixo
■ um CD-ROM de instalação da 3Com, que contém o driver
do adaptador PCI
■ este Guia de Instalação Rápida do Adaptador PCI Wireless
11n 3Com
■ um folheto de garantia
Se algum dos itens acima estiver danificado ou não for
encontrado, favor contatar o fornecedor de equipamentos de
rede da 3Com imediatamente.
Verificação dos requisitos mínimos do sistema
É possível instalar o Adaptador PCI em qualquer computador
desktop executando o Microsoft
ou Windows Vista.
Se estiver usando o Windows 2000, faça download do driver e
do utilitário do site da 3Com.
O computador também deve ter, pelo menos, as seguintes
funcionalidades:
®
Windows® XP, Windows 2000
Page 92

92 Inspeção do conteúdo da embalagem
■ slot PCI disponível
■ processador de 733 MHz Intel
equivalente)
■ 256 MB de RAM
■ 7 MB de espaço livre no disco
■ unidade de CD-ROM
Verificação do suporte de PCI
Por padrão, o suporte de PCI normal ao qual o adaptador PCI está
conectado destina-se a desktops-padrão de altura padrão. Se
estiver usando um desktop de perfil baixo, precisará substituir o
suporte padrão pelo suporte de perfil baixo do adaptador PCI
apropriado.
Para substituir o suporte de PCI:
1 Remova as três porcas e arruelas fixadas aos três conectores
rosqueados de antena.
2 Remova os dois parafusos que prendem o adaptador PCI no
suporte (cuidado para não deixar a blindagem cair, pois esses
parafusos também a mantêm presa). Ponha os parafusos de lado.
3 Substitua o suporte padrão pelo suporte de perfil baixo.
4 Fixe o Adaptador PCI no suporte de perfil baixo usando os
parafusos.
5 Substitua as três porcas e arruelas que você removeu na etapa 1.
™
Pentium™ III ou Celeron (ou
Page 93

Instalação do adaptador PCI sem fio 93
Instalação do adaptador PCI sem fio
A instalação do adaptador PCI consiste em um processo de duas
etapas:
1 Instalação do hardware do Adaptador PCI
2 Instalação do driver do adaptador PCI 3Com
Instalação do hardware do adaptador PCI
Itens necessários:
■ uma chave de fenda Phillips, para remover o gabinete do
computador e a tampa do slot, e fixar o adaptador PCI no
slot.
■ proteção antiestática
Acople as antenas aos conectores das antenas somente após
fixar o adaptador PCI no slot.
Page 94

94 Instalação do adaptador PCI sem fio
Para instalar o adaptador PCI em um slot de PCI:
1 Desligue o computador e, em seguida, desconecte o cabo de
alimentação da fonte de alimentação.
2 Usando a proteção antiestática, remova a tampa do computador.
3 Localize um slot de PCI vazio e remova a tampa correspondente.
Consulte 1, na Figura 1. Ponha os parafusos de lado.
Figura 1 Inserção do adaptador PCI em um slot de PCI
1
4 Insira o Adaptador PCI no slot e pressione-o gentilmente para
baixo, até que se encaixe com segurança no slot. Consulte 2, na
Figura 1.
5 Fixe o adaptador PCI no slot usando o parafuso removido
anteriormente.
6 Recoloque a tampa do computador.
2
Page 95

Instalação do adaptador PCI sem fio 95
7 Acople as 3 antenas aos conectores das antenas do adaptador
PCI e gire as partes rosqueadas no sentido horário, para fixá-las.
Não aperte demais.
Para uma recepção ideal, posicione as antenas de forma que a
central fique reta e as duas outras a um ângulo de 45º, como
mostra a Figura 2.
Figura 2 Ajuste das antenas para a melhor recepção
8 Reconecte o cabo de alimentação à fonte e, em seguida, ligue o
computador.
9 Se o Assistente para adicionar novo hardware aparecer no início
do Windows, clique em Cancelar.
Page 96

96 Instalação do driver do adaptador PCI Wireless 3Com
Instalação do driver do adaptador PCI Wireless 3Com
O adaptador PCI inclui um CD que contém o 3Com Wireless
Driver. A execução do programa de configuração do Adaptador
PCI instala o driver.
Para instalar o driver do adaptador PCI 3Com, siga as instruções
das próximas seções de acordo com o seu sistema operacional.
Instalação no Windows XP
1 Com o computador ligado e o Windows em execução, insira o CD
de instalação da 3Com na unidade de CD-ROM.
O menu de configuração do Gerenciador de Instalação do
Adaptador PCI Wireless PCI 3Com aparece.
Se o menu de configuração não aparecer, clique em Iniciar >
Executar e digite
atribuída à unidade de CD-ROM).
d:\AutoRun.exe (onde d: é a letra da unidade
Page 97

Instalação do driver do adaptador PCI Wireless 3Com 97
2 No menu de configuração, clique em Install/Uninstall Wireless
Product (Instalar/Desinstalar produto sem fio). O assistente
prepara a instalação.
3 O contrato de licença de software de usuário final da 3Com é
exibido. Leia cuidadosamente o contrato e clique em I accept the
terms of the license agreement (Aceito os termos do contrato de
licença) para concordar com todos os termos e condições.
Page 98

98 Instalação do driver do adaptador PCI Wireless 3Com
4 Escolha o país e clique em Next (Avançar).
5 Clique em Install (instalar).
6 Quando a mensagem
(Assistente do InstallShield concluído)
InstallShield Wizard Complete
aparecer, clique
em Finish (Concluir). A instalação do driver do adaptador PCI
3Com Wireless está concluída.
Page 99

Instalação do driver do adaptador PCI Wireless 3Com 99
7 No menu de configuração, clique em Sair.
Page 100

100 Instalação do driver do adaptador PCI Wireless 3Com
Instalação no Windows Vista
1 Com o computador ligado e o Windows em execução, insira o CD
de instalação da 3Com na unidade de CD-ROM.
O menu de configuração do Gerenciador de Instalação do
Adaptador PCI Wireless PCI 3Com aparece.
Se o menu de configuração não aparecer, clique em > Todos
os programas > Acessórios > Executar e digite
(onde
d: é a letra da unidade atribuída à unidade de CD-ROM).
2 No menu de configuração, clique em Install/Uninstall Wireless
Product (Instalar/Desinstalar produto sem fio). O assistente
prepara a instalação.
3 O contrato de licença de software de usuário final da 3Com é
exibido. Leia cuidadosamente o contrato e clique em I accept the
terms of the license agreement (Aceito os termos do contrato de
licença) para concordar com todos os termos e condições. Clique
em Next (Avançar).
d:\AutoRun.exe
 Loading...