


200
3B SCIENTIFIC® PHYSICS
Binokulares Kursmikroskop, Modell 200 U30701
Bedienungsanleitung
10/07 ALF
1. Sicherheitshinweise
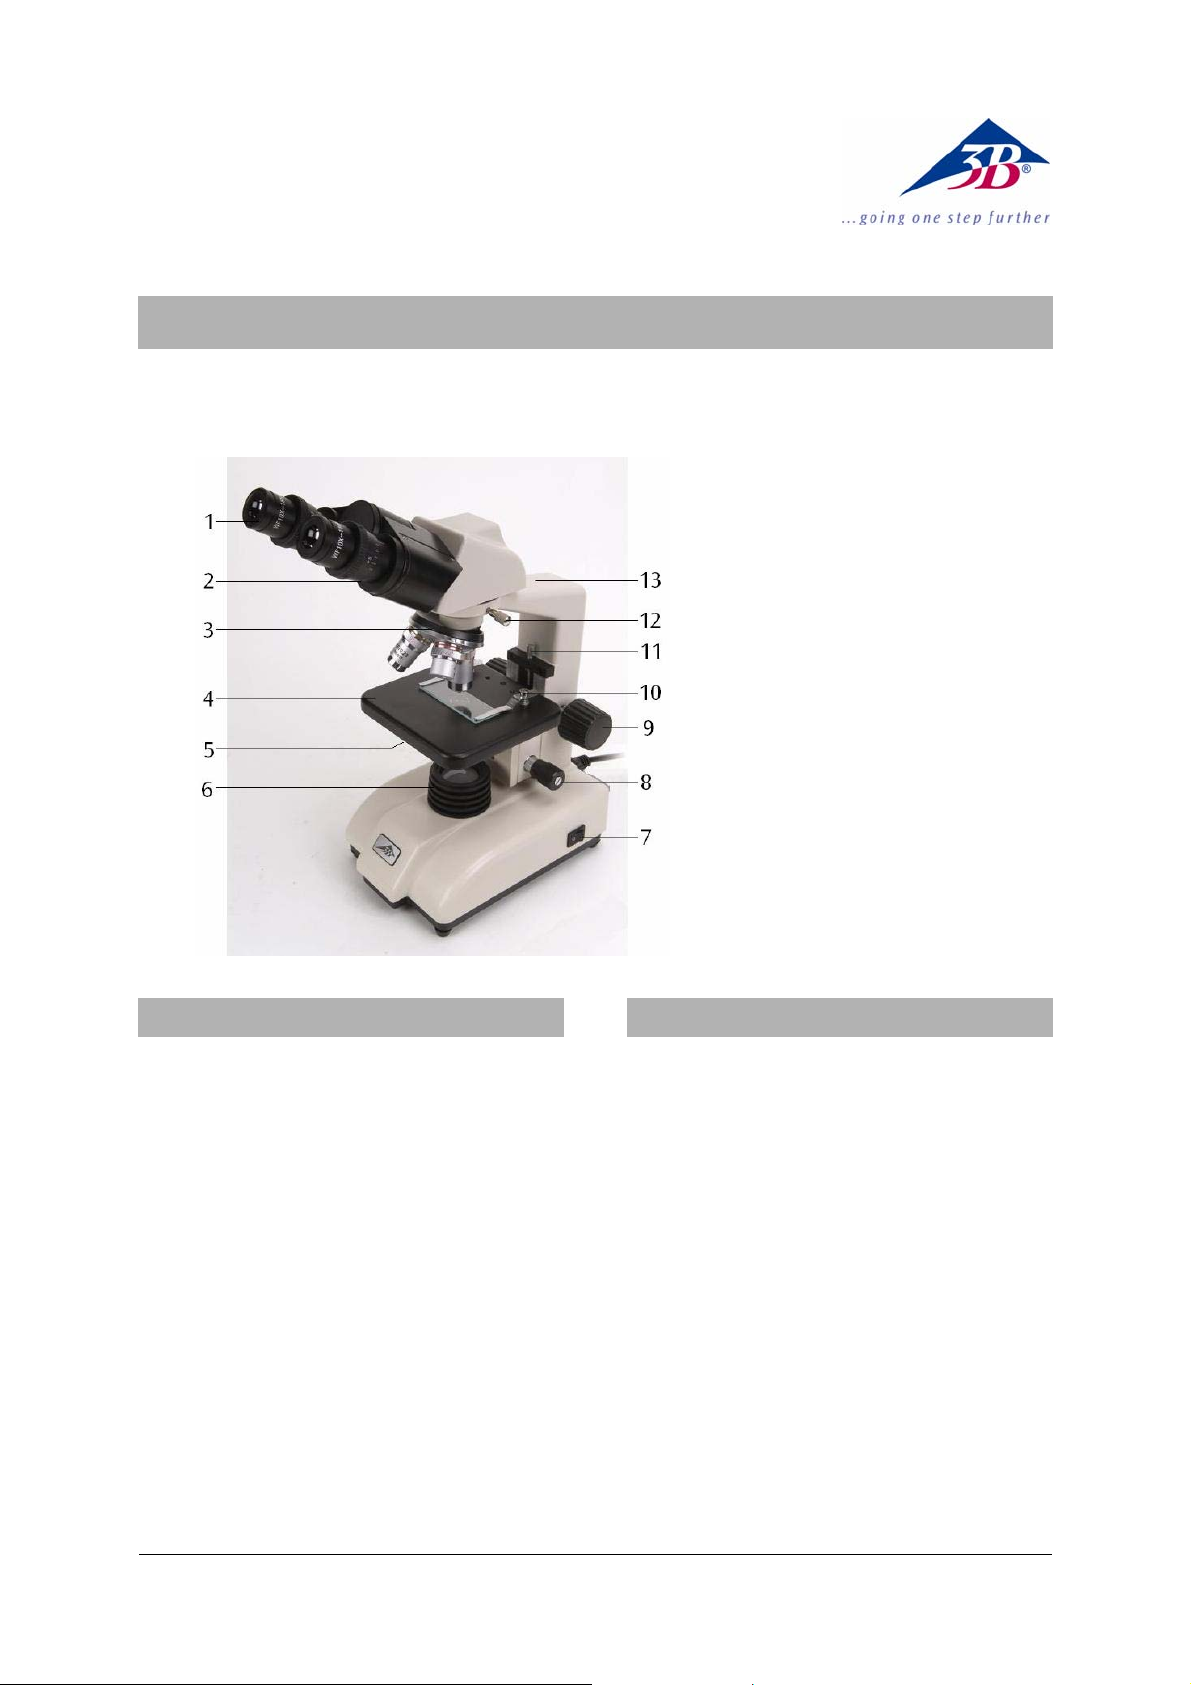
1 Okular
2 Tubus
3 Revolver mit Objektiven
4 Objekttisch
5 Kondensor mit Irisblende und
Filterhalter
6 Beleuchtung
7 Netzschalter
8 Triebknopf für Feintrieb
9 Triebknopf für Grobtrieb
10 Präparateklemmen
11 Feststellschraube für Objekt-
tisch T
12 Feststellschraube für Mikro-
skopkopf
13 Stativ
2. Beschreibung, technische Daten
• Elektrischer Anschluss des Mikroskops darf nur
an geerdeten Steckdosen erfolgen.
• Vor Pflege- und Wartungsarbeiten ist immer
der Netzstecker zu ziehen.
• Das Mikroskop darf mit keinen Flüssigkeiten in
Kontakt kommen.
• Das Mikroskop keinen mechanischen Belastun-
gen aussetzen.
• Optische Teile des Mikroskops nicht mit den
Fingern berühren.
• Zur Reinigung des Mikroskops keine aggressi-
ven Reiniger oder Lösungsmittel verwenden.
• Objektive und Okulare zum Reinigen nicht
auseinander nehmen.
• Bei Beschädigungen oder Fehlern das Mikro-
skop nicht selbst reparieren.
Das binokulare Kursmikroskop ermöglicht die
zweidimensionale Betrachtung von Objekten (dünne Schnitte von Pflanzen- oder Tieren) in 40- bis
400-facher Vergrößerung.
Das Mikroskop U30701-115 ist für eine Netzspannung von 115 V (±10 %) ausgelegt, U30701-230 für
230 V (±10 %).
Stativ: Robustes Ganzmetallstativ, Stativarm fest
mit Fuß verbunden; Fokussierung über beidseitig
am Stativ angebrachte separate Stellknöpfe für
Fein- und Grobtrieb, angetrieben über ein
Zahnstangengetriebe mit Schwalbenschwanzverzahnung; einstellbarer Anschlag zum Schutz der
Objektträger und Objektive
Tubus: Binokularer Seidentopf-Kopf, Schrägeinblick 30°, Kopf um 360° drehbar, Augenabstand
zwischen 54 mm und 75 mm einstellbar, Dioptrienausgleich ±5 für beide Okulare
Okular: Weitfeld-Okularpaar WF 10x 18 mm
1

Objektive: Objektivrevolver mit DIN 3 achromatischen Objektiven 4x / 0,10, 10x / 0,25, 40x / 0,65
(mit Präparateschutz)
Vergrößerung: 40x, 100x, 400x
Objekttisch: 127 x 132 mm
2
mit 2 Präparateklem-
men
Beleuchtung: Im Fuß integrierte 5 W Leuchtstoff-
lampe und Sammellinse im Lampenschacht, Netzanschluss 115 V bzw. 230 V, 50/60 Hz
Kondensor: N.A. 0,65, Irisblende, Filterhalter und
Blaufilter
Abmessungen: ca. 282 x 148 x 357 mm³
Masse: ca. 4,69 kg
3. Auspacken und Zusammenbau
Das Mikroskop wird in einem Karton aus Styropor
geliefert.
• Nach Entfernen des Klebebands den Behälter
vorsichtig öffnen. Dabei darauf achten, dass
keine der optischen Teile (Objektive und Okulare) herausfallen.
• Um Kondensation auf den optischen Bestand-
teilen zu vermeiden, das Mikroskop so lange in
der Verpackung belassen, bis es die Raumtemperatur angenommen hat.
• Das Mikroskop mit beiden Händen (eine Hand
am Stativarm und eine am Fuß) entnehmen
und auf eine ebene Fläche stellen.
• Die Objektive sind separat in Döschen ver-
packt. Sie werden in der Reihenfolge vom Objektiv mit dem kleinsten bis zum Objektiv mit
dem größten Vergrößerungsfaktor im Uhrzeigersinn hinten beginnend in die Öffnungen der
Revolverplatte geschraubt.
• Anschließend den binokularen Mikroskopkopf
auf das Stativ setzen und mit der Feststellschraube fixieren. Okulare in den Tubus einsetzen.
4. Bedienung
4.1 Allgemeine Hinweise
• Das Mikroskop auf einen ebenen Tisch stellen.
• Das zu betrachtende Objekt in die Mitte des
Objekttisches platzieren und mit den Klemmen
festklemmen.
• Netzkabel anschließen und Beleuchtung an-
schalten.
• Objektträger so in den Strahlengang schieben,
dass das Objekt vom Strahlengang deutlich
durchstrahlt wird.
• Augenabstand einstellen bis nur ein Lichtkreis-
sichtbar ist.
• Diopterstärke den Augen anpassen.
• Zur Erreichung eines hohen Kontrasts Hinter-
grundbeleuchtung mittels der Irisblende einstellen.
• Das Objektiv mit der kleinsten Vergrößerung in
den Strahlengang drehen. Ein Klick-Ton zeigt
die richtige Stellung an.
Hinweis: Es ist am besten mit der kleinsten Vergrößerung zu beginnen, um zuerst größere Strukturdetails zu erkennen. Der Übergang zu einer
stärkeren Vergrößerung zur Betrachtung feinerer
Details erfolgt durch Drehen des Revolvers bis zum
gewünschten Objektiv.
Die Stärke der Vergrößerung ergibt sich aus dem
Produkt des Vergrößerungsfaktors des Okulars und
des Objektivs.
• Mit dem Triebknopf für Grobtrieb das unscharf
abgebildete Präparat scharf stellen, dabei darauf achten, dass das Objektiv den Objektträger
nicht berührt. (Beschädigungsgefahr)
• Anschließend mittels Feintrieb die Bildschärfe
nachregeln.
• Zur Benutzung von Farbfiltern Filterhalter
ausschwenken und Farbfilter einlegen.
4.2 Sicherungswechsel
• Stromversorgung ausschalten und unbedingt
Netzstecker ziehen.
• Sicherungshalter an der Rückseite des Mikro-
skops mit einem flachen Gegenstand (z.B.
Schraubenzieher) herausschrauben.
• Sicherung ersetzen und Halter wieder ein-
schrauben.
5. Aufbewahrung, Reinigung
• Das Mikroskop an einem sauberen, trockenen
und staubfreien Platz aufbewahren.
• Bei Nicht-Benutzung das Mikroskop immer mit
der Staubschutzhülle abdecken.
• Das Mikroskop keinen Temperaturen unter 0°C
und über 40°C sowie keiner relativen Luftfeuchtigkeit über 85% aussetzen.
• Nach Gebrauch sofort die Beleuchtung aus-
schalten.
• Bei starker Verschmutzung das Mikroskop mit
einem weichen Tuch und ein wenig Ethanol
reinigen.
• Die optischen Bestandteile mit einem weichen
Linsentuch reinigen.
3B Scientific GmbH • Rudorffweg 8 • 21031 Hamburg • Deutschland • www.3bscientific.com
Technische Änderungen vorbehalten
© Copyright 2007 3B Scientific GmbH

3B SCIENTIFIC® PHYSICS
Binocular Course Microscope Model 200 U30701
Instruction Manual
10/07 ALF
1 Eyepiece
2 Tube
3 Revolver with objectives
4 Object stage
5 Condensor with iris diaphragm
and filter holder
6 Lamp housing
7 Mains switch
8 Adjustment knob for fine
focusing
9 Adjustment knob for coarse
focusing
10 Specimen clips
11 Lock screw for object stage
12 Head lock screw
13 Stand
1. Safety notes
• For power supply use only electrical sockets
with ground contact.
• Always unplug the mains plug before cleaning
or maintenance.
• Be careful not to spill any liquids on the mic-
roscope.
• Do not wipe the optics with your hands.
• Do not disassemble objective or eyepieces to
attempt to clean them.
• Do not mishandle or impose unnecessary force
on the microscope.
• Do not clean the unit with volatile solvents or
abrasive cleaners.
• Do not attempt to service the microscope your-
self.
2. Description, technical data
The binocular course microscope allows twodimensional viewing of objects (thin sections of
plant or animal specimen) in 40x to 400x magnification.
The microscope U30701-115 is for operation with a
mains voltage of 115 V (±10%), and the U30701-230
unit is for operation with 230 V (±10%).
Stand: Robust, all metal stand with arm permanently connected to the base. Focussing by means
of separate knobs for coarse and fine adjustment
located on either side of the stand and operated by
rack and pinion drive with dovetail teeth, adjustable stopper for protecting the object stage and
objective
Tube: Binocular Seidentopf head, 30° viewing
angle, 360° rotatable head, viewing distance adjustable between 54 and 75 mm, ±5 dioptric compensation for both eyepieces
1

Eyepiece: Pair of wide field eyepieces WF 10 x
18 mm
Objectives: Revolver with 3 DIN achromatic objectives 4x / 0.10, 10x / 0.25, 40x / 0.65 (with specimen
protection)
Magnification: 40x, 100x, 400x
Object stage: 127 x 132 mm
2
with 2 specimen clips
Illumination: 5 W incandescent lamp incorporated
in the base integrated in base, with a converging
lens in lamp shaft, power supply 115 V resp. 230 V
50/60 Hz
Condenser: Condenser N.A. 0.65, iris diaphragm,
filter holder and blue filter
Dimensions: 282 x 148 x 357 mm³ approx.
Weight: 4.69 kg approx.
3. Unpacking and assembly
The microscope is packed in a molded styrofoam
container.
• Take the container out of the carton remove
the tape and carefully lift the top half off the
container. Be careful not to let the optical items (objectives and eyepieces) drop down.
• To avoid condensation on the optical compo-
nents, leave the microscope in the original packing to allow it to adjust to room temperature.
• Using both hands (one around the pillar and
one around the base), lift the microscope from
the container and put it on a stable desk.
• The objectives will be found within individual
protective vials. Install the objectives into the
microscope nosepiece from the lowest magnification to the highest, in a clockwise direction
from the rear.
• Put the binocular head onto the top of the
stand and tighten the head-lock-screw. Insert
the eyepieces into the tube.
4. Operation
4.1 General information
• Set the microscope on a level table.
• Place the object to be observed in the center of
the object plate. Use the clips to fasten it into
place.
• Connect the mains cable to the net and turn on
the switch to get the object illuminated.
• Make certain that the specimen is centered
over the opening in the stage.
• Adjust the interpupillary distance so that one
circle of light can be seen.
• Make the necessary eyepiece dioptre adjust-
ments to suit your eyes.
• Adjust the aperture of the iris diaphragm to get
the background brightness suitable for a high
contrast image.
• Rotate the nosepiece until the objective with
the lowest magnification is pointed at the
specimen. There is a definite “click” when each
objective is lined up properly.
NOTE: It is best to begin with the lowest power
objective. This is important to reveal general structural details with the largest field of view first.
Than you may increase the magnification as needed to reveal small details.
To determine the magnification at which you are
viewing a specimen, multiply the power of the
eyepiece by the power of the objective.
• Adjust the coarse-focusing-knob which moves
the stage up until the specimen is focused. Be
careful that the objective does not make contact with the slide at any time. This may cause
damage to the objective and/or crack your
slide.
• Adjust the fine-focusing-knob to get the image
more sharp and more clear.
• Colour filters may be inserted into the filter
holder for definition of specimen parts. Swing
the filter holder out and insert colour filters.
4.2 Changing the fuse
• Turn off the power switch and unplug the
mains plug.
• Unscrew the fuse holder on the back of the
stand base with a screwdriver.
• Replace the fuse and reinsert the holder in its
socket.
5. Storage and cleaning
• Keep the microscope in a clean, dry and dust
free place.
• When not in use always cover the microscope
with the dust cover.
• Do not expose it to temperatures below 0°C
and above 40°C and a max. relative humidity
of over 85%.
• Always turn off the light immediately after use.
• Use a soft linen cloth and some ethanol to
clean the microscope.
• Use a soft lens tissue to clean the optics.
3B Scientific GmbH • Rudorffweg 8 • 21031 Hamburg • Germany • www.3bscientific.com
Subject to technical amendments
© Copyright 2007 3B Scientific GmbH
 Loading...