


O W N E R ’ S M A N U A L
T R U 2 4 6
C O N T E N T S |
Introduction / Features |
inside front cover |
|
|
Controls and Functions . . . . . |
. . . . . . . . . . . . |
2,3 |
|
Getting Started |
|
|
|
Read this first . . . . . . . . . . . . . . . |
. . . . . . . . . . . . |
. 4 |
|
Step 1: Checking the package contents . . . . . . . . . . |
. 5 |
|
|
Step 2: Setting up the base unit. . . |
. . . . . . . . . . . . |
. 6 |
|
Mounting the base unit on a wall . . . . . . . . |
. 9 |
|
|
Step 3: Preparing the battery pack . |
. . . . . . . . . . . |
. 11 |
|
Adjusting the ringer and earpiece volume . . . . . . . |
13 |
|
|
Basics |
|
|
|
Making a call . . . . . . . . . . . . . . . . |
. . . . . . . . . . . . |
14 |
|
Receiving a call . . . . . . . . . . . . . . |
. . . . . . . . . . . . |
16 |
|
Redialing a call . . . . . . . . . . . . . . |
. . . . . . . . . . . . |
17 |
|
Traveling out-of-range . . . . . . . . . |
. . . . . . . . . . . . |
18 |
|
Telephone Features |
|
|
|
Memory dialing |
|
|
|
Storing phone numbers and names . . . . . . . . . . . |
19 |
|
|
Making calls with memory dialing . . . . . . . . . . . . |
21 |
|
|
Chain dialing . . . . . . . . . . . . . . . |
. . . . . . . . . . . . |
22 |
|
Editing a stored name and/or |
|
|
|
phone number . . . . . . . . . . . . . . |
. . . . . . . . . . . . |
23 |
|
Erasing a stored name and phone number . . . . . . |
25 |
|
|
Paging . . . . . . . . . . . . . . . . . . . |
. . . . . . . . . . . . |
26 |
|
Caller ID Features |
|
|
|
Caller ID . . . . . . . . . . . . . . . . . . . |
. . . . . . . . . . . . |
27 |
|
When the telephone rings . . . . . . . . |
. . . . . . . . . . . |
29 |
|
Viewing the Caller ID Message list . . |
. . . . . . . . . . . |
30 |
|
Deleting information from the Caller ID list . . . . . . . |
31 |
|
|
Using the Caller ID list . . . . . . . . . . . |
. . . . . . . . . . . |
33 |
|
Using “Caller ID on call waiting” service. . . . . . . . . |
35 |
|
|
Call Waiting features . . . . . . . . . . . |
. . . . . . . . . . . |
36 |
|
Additional Information |
|
|
|
Changing the digital security code . . |
. . . . . . . . . . . |
37 |
|
Beltclip installation . . . . . . . . . . . . |
. . . . . . . . . . . |
38 |
|
Headset installation . . . . . . . . . . . . |
. . . . . . . . . . . |
38 |
|
Note on power sources . . . . . . . . . . |
. . . . . . . . . . . |
39 |
|
Maintenance . . . . . . . . . . . . . . . . . |
. . . . . . . . . . . |
39 |
|
Troubleshooting . . . . . . . . . . . . . |
. . . . . . . . . . . |
40 |
|
Index . . . . . . . . . . . . . . . . . . . . . |
. . . . . . . . . . . |
42 |

I N T R O D U C T I O N |
Congratulations on your purchase of the TRU 246 cordless telephone. This phone is designed for reliability, |
|
long life, and outstanding performance utilizing the latest in 2.4 GHz Spread Spectrum technology. |
|
Note: Some illustrations in this manual may differ from the actual unit for |
|
explanation purposes. |
F E A T U R E S • 2.4 GHz Spread Spectrum Technology
•Caller ID and Call Waiting Caller ID
•50 Number Caller ID Memory
•Advanced Caller ID with Call Waiting Option
•Lighted Keypad
•3-Line, 16 Character Backlit Handset Display
•20 Enhanced Memory Dial Locations
•32 Digit Redial
•3 Redial Memories
•Flash
•Pause
•Pulse/Tone Dialing
•Page/Find
•10 Day Standby Battery Life
•6 Hour Talk Time
•Handset Earpiece and Ringer Volume Control
•Hearing Aid Compatible
Digital Spread Spectrum Technology utilizes a “wider frequency band” vs. a “single narrow band” used in standard digital transmissions. The 2.4 GHz frequency range was recently released to commercial communications. The result is a more secure conversation with the clarity of digital sound, extended range, and minimal interference from other cordless phones.
Random Code™ digital security automatically selects one of approx. 65,000 codes for the handset and base.
These features enhance your phone’s security and also prevent unauthorized calls as a result of your phone being activated by other equipment.
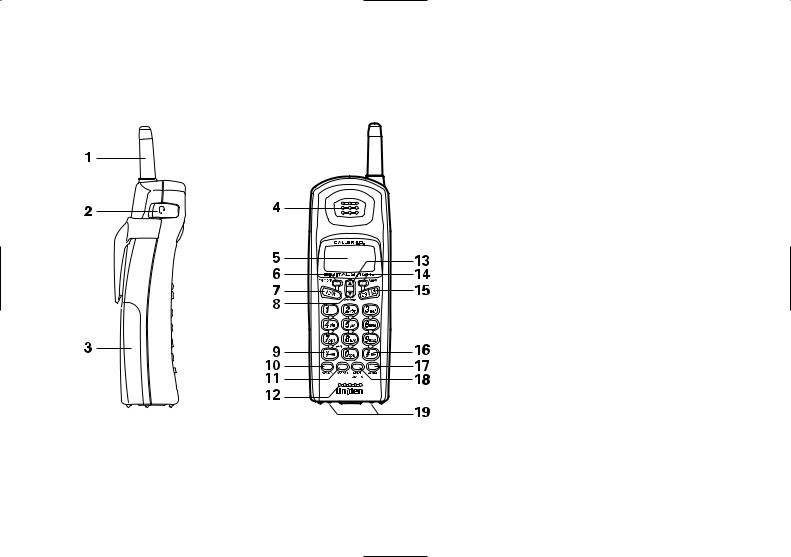
C O N T R O L S A N D F U N C T I O N S
1. Handset antenna
2. Headset jack cover
3. Handset battery compartment
4. Handset earpiece
5. LCD display
6. Memory key
7. Talk key
8. Volume/Cursor down key
9. /tone key
10. Redial/Pause key
11. Options key
12. Handset microphone
13. Volume/Cursor up key
14. Flash key
15. Call ID key
16. # key
17. Delete key
18. Select/Channel key
19. Handset charging contacts
[ 2 ] |
C O N T R O L S A N D F U N C T I O N S |
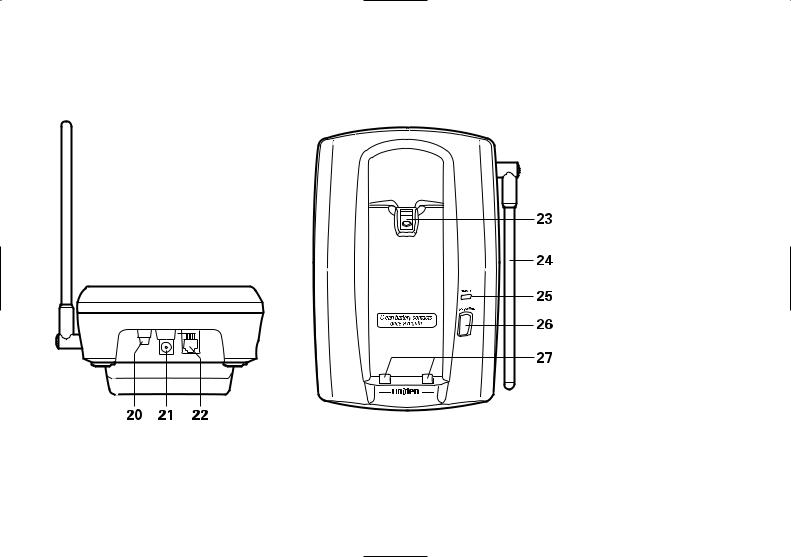
20.Pulse-Tone switch
21.DC power input
22.Phone jack
23.Handset retainer clip
24.Base antenna
25.Status LED
26.Page/Find key
27.Base charging contacts
C O N T R O L S A N D F U N C T I O N S |
[ 3 ] |
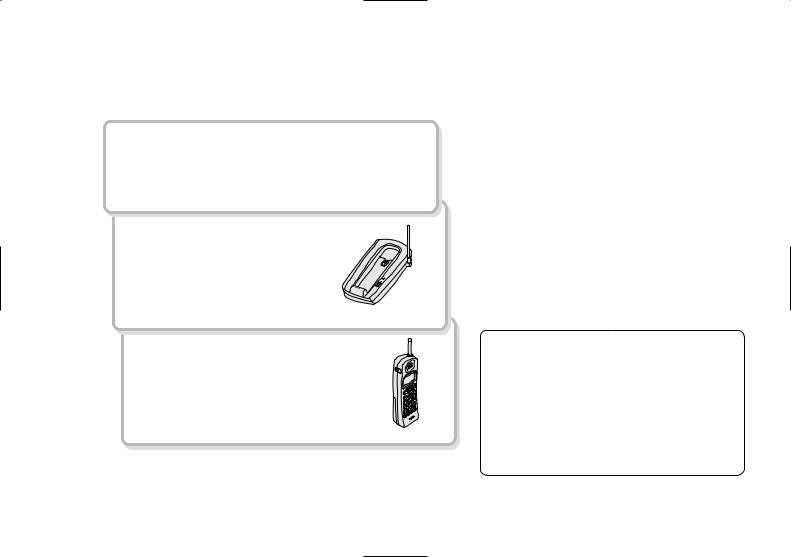
R E A D T H I S F I R S T
This cordless telephone must be set up before use. Follow these steps;
Step 1 (page 5)
Unpack and check the telephone and accessories.
Step 2 (page 6 to 10)
Next, choose the best location to set up the base unit.
Base unit
Step 3 (page 11 to 12)
Then, insert the battery pack into the handset. You must charge the battery pack for 15 hours before using the phone.
Handset
About the digital security code
This cordless telephone uses a digital security code to prevent unauthorized access to your base unit. This security code prevents other cordless handsets from making calls through your base unit.
A random security code will be assigned automatically between your base unit and handset when you charge the battery pack for the
first time.
If you want to reset the security code, see page 37.
[ 4 ] |
G E T T I N G S T A R T E D |
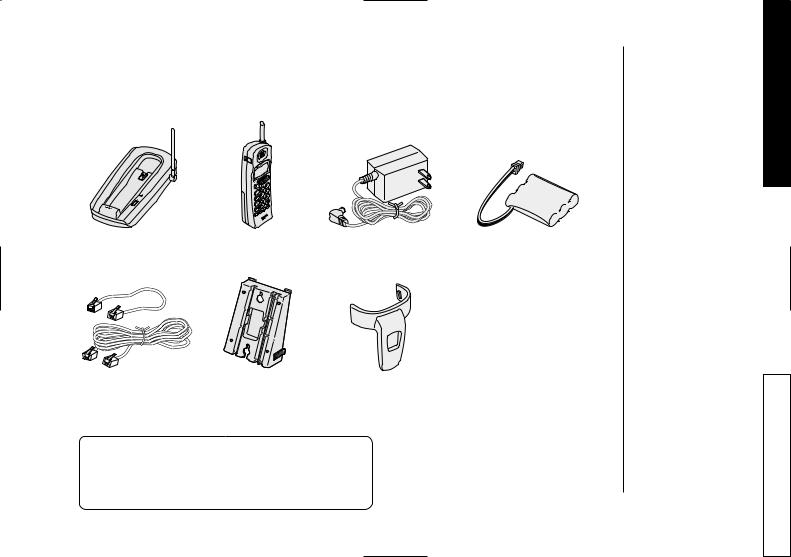
C H E C K I N G T H E P A C K A G E C O N T E N T S
Make sure you have received the following items in the package.
• Base unit |
• Handset |
• AC adapter (AD-311) |
• Rechargeable |
|
|
|
battery pack |
|
|
|
(BT-905) |
|
|
• |
This Owner’s Manual |
|
|
• |
Precautions and Important |
|
|
|
Safety Instructions |
|
|
• |
Quick Reference Guide |
• Telephone line |
• Wall mount |
• |
Registration Card |
• Beltclip |
|
||
cord (2) |
adapter |
|
|
Uniden Parts Department
(800) 554-3988
Hours: M-F 7:00 AM to 5:00 PM CST.
We can also be reached on the web at www.uniden.com.
D E T R A T S G N I T T E G
G E T T I N G S T A R T E D |
[ 5 ] |

S E T T I N G U P T H E B A S E U N I T
Do the following steps.
•Choose the best location
•Connect the base unit
•Choose the dialing mode
Choose the best location
Before choosing a location for your new phone, read the INSTALLATION CONSIDERATIONS included in the PRECAUTIONS AND IMPORTANT SAFETY INSTRUCTIONS brochure. Here are some important guidelines you should consider:
Avoid heat sources, such as radiators, air ducts, and sunlight
Avoid television sets and other electronic equipment
Avoid noise sources such as a window by a street with heavy traffic
Avoid microwave ovens
Avoid excessive moisture, extremely low temperatures, dust, mechanical vibration, or shock
|
|
|
Avoid personal computers |
[ 6 ] |
G E T T I N G S T A R T E D |
Choose a central location |
Avoid other cordless telephones |
|
|||
|
|
•You should charge your handset at least 15 hours before using the phone.
•The location should be close to both a phone jack and a continuous power outlet which is not switchable.
•Keep the base and handset away from sources of electrical noise such as motors and fluorescent lighting.
•Be sure there is sufficient space to raise the base antenna to a vertical position.
•The base can be placed on a desk, tabletop or mounted on a standard wall plate.
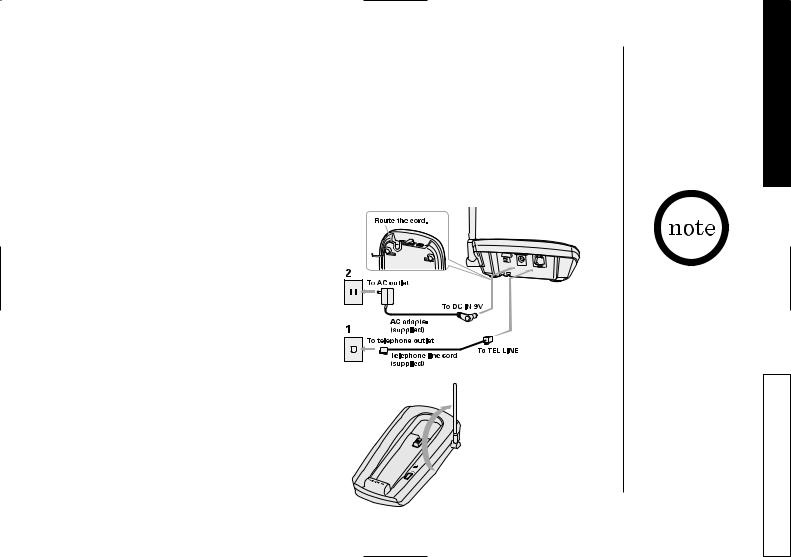
Connect the base unit
If you want to install the base unit on the wall, see page 9
1 Connect the telephone line cord to the TEL LINE jack and to a telephone outlet.
2 Connect the AC adapter to the DC IN 9V jack and to a standard 120V AC
wall outlet.
3Set the base unit on a desk or tabletop and place the handset on the base unit.
Then raise the antenna to a vertical position.
D E T R A T S G N I T T E G
Place the power cord so it does not create a trip hazard or where it could become chafed and create a fire or electrical hazard.
G E T T I N G S T A R T E D |
[ 7 ] |
AD-311 AC adapter. Do not use any other AC adapter.
Connect the AC adapter to a continuous power supply.
Place the base unit close to the AC outlet so that you can unplug the AC adapter easily.
If your telephone outlet isn’t modular, contact your telephone company for assistance.
Modular
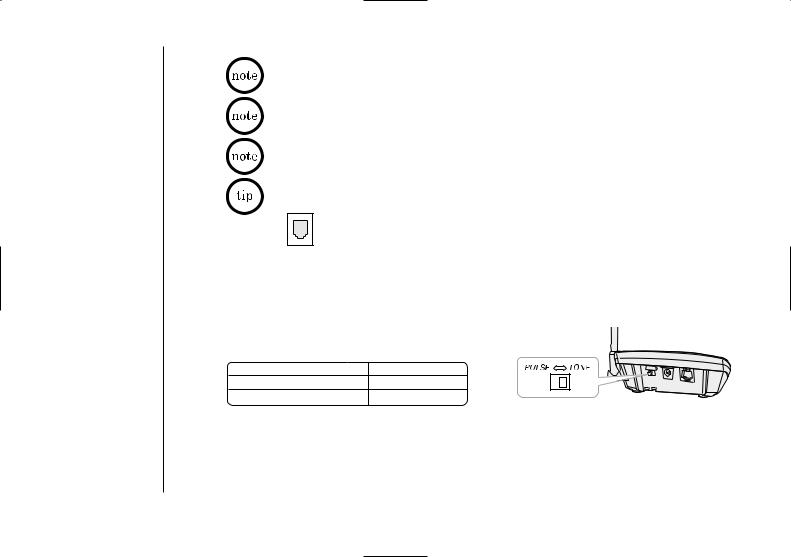
Choose the dialing mode
Depending on your dialing system, set the PULSE-TONE switch as follows:
If your dialing system is Set the switch to
Tone |
TONE |
Pulse |
PULSE |
If you aren’t sure of your dialing system
Make a trial call with the PULSE-TONE switch set to TONE.
If the call connects, leave the switch as is; otherwise, set to PULSE.
[ 8 ] |
G E T T I N G S T A R T E D |
M O U N T I N G T H E B A S E U N I T O N A W A L L
Standard wall plate mounting
This phone can be mounted on any standard telephone wall plate. 1
1 Snap the wall mount adapter into the notches on the base.
2 |
Plug the telephone line cord to the TEL LINE |
jack and the AC |
2 - 7 |
|
|||
|
adapter to the DC IN 9V jack. |
|
|
3 |
Plug the telephone line cord into the telephone outlet. |
|
|
4 |
Wrap the AC adapter cord inside the molded wiring channel. |
|
|
|
Then wrap the cord around the strain relief notch. |
|
|
5 |
Plug the AC adapter into a standard 120V AC wall outlet. |
|
|
6 |
Raise the antenna to a vertical position. |
|
|
7 |
Align the mounting slots on the base with the mounting posts |
|
|
|
on the wall. Push in and down until the phone is firmly seated. |
|
|
8 |
On the base unit, pull the handset retainer out of the slot. |
8, 9 |
|
|
Rotate it clockwise 180 degrees. |
|
|
9 |
Flip the retainer from front to back. Slide it back into the slot |
|
|
|
so that the lip of the retainer is up and the oval is down. The |
|
|
|
retainer holds the handset in place. |
|
|
If you have wall mounted the base, you cannot place the handset with the keypad facing inside.
(See page 38.)
D E T R A T S G N I T T E G
G E T T I N G S T A R T E D |
[ 9 ] |

Direct wall plate mounting
If you don’t have a standard wall plate, you can mount your phone directly to the wall. Before doing this, consider the following:
•Avoid electrical cables, pipes, or other items behind the mounting location that could cause a hazard when inserting screws into
the wall.
•Try to mount your phone within 10 - 15 feet of a working phone jack to avoid excessive cord lengths.
•Make sure the wall material is capable of supporting the weight of the base and handset.
•Use # 10 screws (minimum length of 1-3/8 inches) with anchoring devices suitable for the wall material where the base unit will be placed.
1Insert two mounting screws into the wall, (with their appropriate anchoring device), 3-15/16 inches apart. Allow about 3/16 of an inch between the wall and screwheads for mounting the phone.
2 Refer to steps 1 through 9 on page 9 to mount the telephone.
[ 10 ] |
G E T T I N G S T A R T E D |
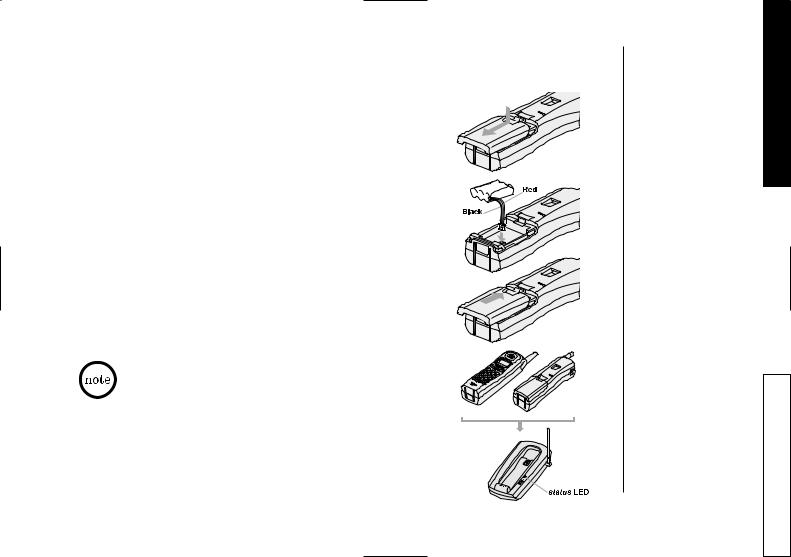
P R E P A R I N G T H E B A T T E R Y P A C K
the battery pack for at least 15 hours before you start phone.
in on the battery cover release and slide the cover down it comes off.
the battery pack connector with the correct polarity and red wires), then insert the battery pack into the
compartment.
close the battery compartment cover by sliding it up it snaps into place.
the handset on the base.
sure that the status LED lights. If the LED doesn’t light, to see that the AC adapter is plugged in and that the
makes good contact with the base charging contacts.
Use only the Uniden Battery (BT-905) supplied with your phone.
D E T R A T S G N I T T E G
G E T T I N G S T A R T E D |
[ 11 ] |
Even |
|
|
being |
|
|
over |
of |
|
time |
|
|
For |
sure |
|
to |
||
after |
||
to t |
||
a |
for |
|
c |
. |
Battery use time (per charge)
From fully charged
•Six hours continuous use.
•Ten days when the handset is in the standby mode.
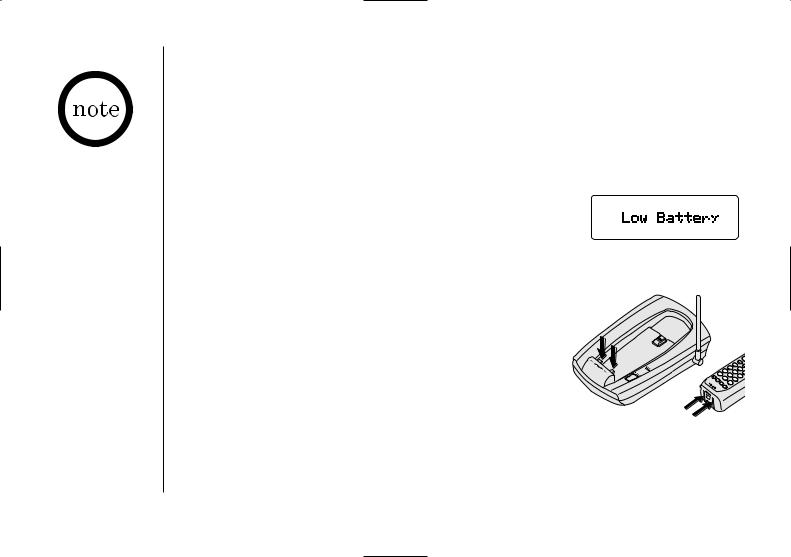
When the battery charge becomes low
When the battery pack is very low and needs to be charged, the
phone is programmed to eliminate functions in order to save power. If the phone is not in use, “Low Battery” flashes
and none of the keys will operate. If the phone is in use, “Low Battery” flashes and the handset beeps. Complete your
conversation as quickly as possible and return the handset to the base unit for charging.
Cleaning the battery contacts
To maintain a good charge, it is important to clean the battery contacts on the handset and base unit with a dry cloth or a pencil eraser about once a month.
Do not use any liquids or solvents.
[ 12 ] |
G E T T I N G S T A R T E D |
A D J U S T I N G T H E R I N G E R A N D E A R P I E C E V O L U M E
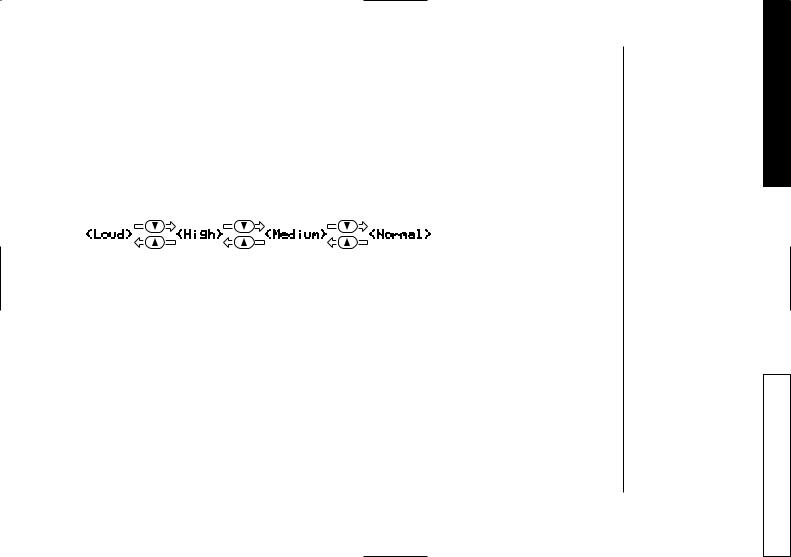
Ringer tone and volume
The phone has four types of ringer tone and volume combinations.
In the standby mode, press  or
or  on the handset repeatedly.
The display shows the setting.
Earpiece volume
Pressing  or
or  during a call will change the earpiece volume of the handset. This setting will remain in effect after the telephone call has ended.
When you press  in Loud mode or press
  in Normal mode, the error tone sounds.
D E T R A T S G N I T T E G
G E T T I N G S T A R T E D |
[ 13 ] |
 Loading...