


UIP1869V
OWNER'S
MANUAL
Contents
WELCOME /FEATURES |
2 |
TERMINOLOGY |
4 |
CONTROLS & FUNCTIONS |
5 |
GETTING STARTED |
7 |
Setting up your Broadband Phone |
7 |
Expanding Your Phone |
15 |
Installing the Beltclip |
18 |
Optional Headset Installation |
18 |
Installing Uniden's Cordless Telephone Customization Tool |
19 |
Using the Interface |
20 |
Main Menu Options |
25 |
Global Setup |
27 |
Setting Up the Handset |
31 |
Setting Display Options |
37 |
BASICS |
40 |
Using Your Phone |
40 |
Redialing a Call |
43 |
Adjusting the Ringer and Speaker Volume |
45 |
Privacy Mode |
47 |
Muting the Ringer |
47 |
Muting the Microphone |
48 |
Find Handset |
48 |
Handset Conferencing |
49 |
Using One Touch Voice Mail Access |
50 |
PHONEBOOK |
51 |
Using the Handset Phonebook |
51 |
Using the Base Phonebook |
58 |
Using Speed Dial |
63 |
CALLER ID |
64 |
Using Caller ID |
64 |
MULTI-HANDSET FEATURES |
68 |
Multi-Handset Features |
68 |
Using the Room/Baby Monitor |
69 |
Using the Intercom |
70 |
Transferring a Call |
71 |
[ 1 ]
TROUBLESHOOTING |
73 |
Troubleshooting |
73 |
ADDITIONAL INFORMATION |
81 |
Note on Power Sources |
81 |
General Information |
83 |
PRECAUTIONS & WARRANTY |
84 |
I.C. NOTICE |
85 |
INDEX |
86 |
w w w . u n i d e n . c o m
Welcome
Features
With the UIP1869V broadband Internet telephone, Vonage's Internet phone service and your broadband connection, you can access the Internet and make phone calls simultaneously. The UIP1869V connects directly to your broadband modem. It separates voice signals from data signals and sends voice traffic to its cordless handsets and data traffic to your computer.
If you a have a local switch or router supporting a LAN, the UIP1869V will pass all Data traffic through to your LAN.
Note: Illustrations in this manual are used for explanation purposes. Some illustrations in this manual may differ from the actual unit.
•5.8GHz Digital Expandable
•Corded/Cordless Telephone System
•Caller ID/Call Waiting
•100 Programmable Memory Locations in the Base and Each Cordless Handset
•Downloadable Images
•Recordable Ringer Tone
w w w . u n i d e n . c o m |
W E L C O M E / F E A T U R E S [ 2 ] |
This series features AutoTalk™ and AutoStandby™. AutoTalk allows you to answer a call by just removing the handset from the cradle so you don't have to waste time pushing buttons. AutoStandby allows you to hang up by simply returning the handset to the cradle.
To protect you against mis-billed calls that might result from your phone being activated by other equipment, this series has Random Code™ digital security, which automatically selects one of more than 10,000,000 digital security codes for the handset and base.
Digital Spread Spectrum Technology uses a wider frequency band than standard digital transmissions. The result is a more secure conversation with the clarity of digital sound, extended range, and minimal interference from other cordless phones.
IntegriSound™ Built in sound quality which provides life-like conversations.
With DirectLink™ mode, you can use two or more handsets as radio transceivers (walkie-talkies).
Be sure to visit our web site: www.uniden.com
Uniden→ is a registered trademark of Uniden America Corporation.
AutoTalk, AutoStandby, DirectLink, IntegriSound and Random Code are trademarks of Uniden America.
Microsoft and Windows are either registered trademarks or trademarks of Microsoft Corporation in the United States and/or other countries.
Vonage→, The Broadband Phone Company→, and Vonage Digital Voice→ are registered service marks owned and used under license from Vonage Marketing, Inc., a wholly-owned subsidiary of Vonage Holdings Corp.
[ 3 ] W E L C O M E / F E A T U R E S |
w w w . u n i d e n . c o m |
Accessibility
If you have a disability and need customer service assistance or if you have any questions about how Uniden's products can accommodate persons with disabilities, please call the accessibility voice/TTY line:1-800-874-9314
A representative is available to talk to you M-F, 8:00 am to 5:00 pm, CST. After hours, you can leave us a message, and we will call you back. Information is also available on our website, www.uniden.com, under the "Accessibility" link.
Terminology
•Standby Mode - |
The handset maybe sitting or off the cradle, but is NOT in use. talk/flash or speaker has |
|
not been pressed. The corded base handset is on the base and speaker on the base has not |
•Talk Mode - |
been pressed. No dial tone is present. |
The handset is off the cradle and talk/flash or speaker has been pressed, or pick up the |
|
•VoIP - |
corded base handset and speaker on the base is pressed and enabling a dial tone. |
Voice over Internet Protocol, a method of sending voice signals over broadband Internet |
|
•Station - |
connections. |
The main base or any registered handset. |
•Configuration utility - The internal user interface that allows you to change configurations settings in the UIP1869V. You can access the configuration utility with an Internet web browser.
w w w . u n i d e n . c o m |
T E R M I N O L O G Y [ 4 ] |
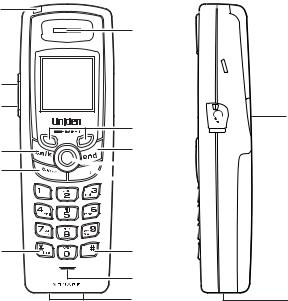
Controls & Functions
1
2
3
4
5
6
7
8
9


 10
10 


 11
11
12
13
14
 15 1. New Message LED
2.Volume  (up) (P. 45)
3.Volume  (down) (P. 45)
4.Talk/flash (P. 40 & 41)
 16 5. Back/hold/intercom (P. 23, 42 & 70)
6. */tone (P. 65)
7. Ear Speaker
17 8. Soft keys (P. 22)
 18 9. end (P. 40) 10.Joystick (P. 23) 11.speaker (P. 40) 12.# (P. 65)
13.Handset Microphone  19 14.Handset Charging Contacts
15.Handset Antenna 16.Beltclip Hole
17.Speakerphone Speaker and Ringer 18.Headset Jack
19.Handset Battery Compartment 20.USB jack
20
[ 5 ] C O N T R O L S & F U N C T I O N S |
w w w . u n i d e n . c o m |
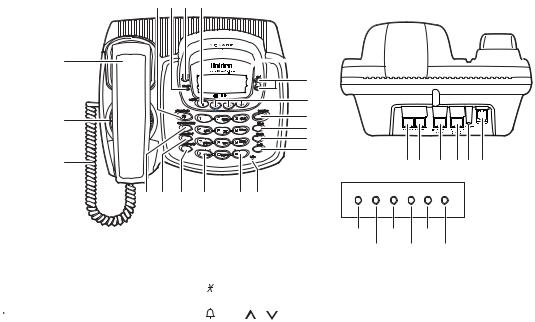
25
26
27
21 22 23 24
 32 33
32 33
34
35
36
37
38
41 42
LEDs
43 |
44 45 46 |
28 |
29 |
30 |
31 |
40 |
Power |
|
LAN WAN |
|
Phone1 Phone2 |
39 |
|
|
|
|
|||||
|
|
|
|
|
Power |
|
LAN |
Phone1 |
|
|
|
|
|
|
Status |
Status |
Status |
||
|
|
|
|
|
Inactive |
WAN |
|
Phone 2 |
|
|
|
|
|
|
|
LED |
Status |
Status |
|
21. phonebook (P. 51) |
30. do not disturb /DND LED (P. 47) |
38. exit (P. 58) |
|||||
22. |
In use LED |
31. |
/tone/< (P. 66) |
39. mic (microphone) |
|||
23. |
New Message LED |
32. |
LCD Display |
40. |
#/> (P. 66) |
||
24. |
|
|
call id (P. 64) |
33. |
/vol / (volume up/down) |
41. |
Phone 1 port |
|
|
||||||
|
|
||||||
25. |
Corded Base Handset |
|
(P. 45 & P. 28) |
42. |
Phone 2 port |
||
26. |
Base Speaker |
34. soft Keys (P. 22) |
43. |
Internet (WAN) port |
|||
27. |
Curl Cord |
35. speaker/speaker LED (P. 40) |
44. |
Ethernet (LAN) port |
|||
28. intercom/hold (P. 70 & 42) |
36. flash (P. 41) |
45. |
Reset switch |
||||
29. find handset (P. 48) |
37. mute (P. 48) |
46. |
Power port |
||||
w w w . u n i d e n . c o m |
C O N T R O L S & F U N C T I O N S [ 6 ] |

Setting up your Broadband Phone
Safety Recommendations
To ensure general safety, follow these guidelines:
•Do not open or disassemble this product.
•Do not expose the product to moisture.
•Do not perform any action that creates a potential hazard to people or makes the equipment unsafe.
•Ultimate disposal of this product should be handled according to all national laws and regulations.
•Do not touch the wires on the cable ports or the wires of cables connected to a port as hazardous voltage may be present on these wires when the equipment is powered on.
•The plug-socket combination must be accessible at all times because it serves as the power disconnect.
•To avoid electric shock, do not connect the UIP1869V to any RJ-11 telephone wall jacks. Use caution when connecting cables. This could damage the UIP1869V or the telephone wiring in the building.
•Do not work on the system or connect or disconnect cables if lightning or thunder are present in your area.
•Do not cover or block the air vents on the top or bottom surface of the UIP1869V. Overheating can cause permanent damage to the unit.
•Read the instructions completely before connecting the system to its power source.
[ 7 ] G E T T I N G S T A R T E D |
w w w . u n i d e n . c o m |

911 Service Notice
911 dialing is not automatic.
Vonage services do not include traditional 911 emergency dialing. You must successfully activate the 911 dialing feature (register and subscribe) by following the instructions at www.vonage.com/911. Vonage's version of 911 is outlined in the Vonage User Guide; your responsibilities as a Vonage subscriber are outlined in the Vonage Terms of Service contract. It is important you read these documents (included with your broadband phone) and understand this feature and its limitations.
Before You Start!
To activate your broadband Internet phone service visit www.vonage.com/activate. You will need your MAC address, a twelve-character ID that identifies your UIP1869V. The MAC address is located on the bottom of your UIP1869V broadband phone. Be sure to enter all of the characters exactly as they appear on the sticker. (All letters should be upper-case.)
Note: If you are an existing Vonage customer and are upgrading your device, please call our customer care department at 1-VONAGE-HELP (1-866-243-4357). Customer Care is available 24 hours a day, 7 days a week.
STEP 1: Check Your Equipment
Check your broadband setup and the other equipment you will need:
•A broadband modem and a broadband Internet connection
•A computer with an Ethernet port (or a local Ethernet switch or router)
•Two CAT-5 Ethernet cables
•If you subscribe to a second phone line or want to use a backup phone off of the UIP1869V, you will need a standard telephone cable (RJ-11)
note 
If you ordered your UIP1869V directly from Vonage, it will already be activated for you.
w w w . u n i d e n . c o m |
G E T T I N G S T A R T E D [ 8 ] |
D E T R A T S G N I T T E G

Check Your Broadband Configuration
The UIP1869V supports the two most common broadband connection protocols: DHCP and PPPoE. If your broadband connection uses DHCP, you do not need to change any settings on the UIP1869V. If your broadband connection uses PPPoE, you will need to enter your user name and password in Step 3.
If your broadband provider has given you a static IP address, you will need a special configuration for your UIP1869V. See the User Interface Guide at www.uniden.com/ voip for more information on configuring for static IP addresses.
STEP 2: Connect Your UIP1869V
Once your account is set up, you can connect your UIP1869V.
1)Use the coil cord to connect the corded handset to the base.
2)Use the blue Ethernet cable to connect your broadband modem to the blue RJ-45 port labeled Internet (WAN). If you have a home router then use the blue Ethernet cable to connect one of the LAN ports on your router to the Internet (WAN) port on your UIP1869V instead.
[ 9 ] G E T T I N G S T A R T E D |
w w w . u n i d e n . c o m |
3)Use the yellow Ethernet cable to connect your PC to the yellow RJ-45 port labeled Ethernet (LAN). If you use a switch or router for a local network, connect it to the Ethernet (LAN) port instead.
4)OPTIONAL: If you have a second phone you want to use for line 1, connect it to Phone1. If you have subscribed to a second VoIP line you can connect an analog phone or Fax machine to Phone2.
note
•You can also connect a wireless access point to the Ethernet (LAN) port, if desired.
•Phone1 is not a separate line. Any phone connected to Phone1 will share VoIP line 1 with all the UIP1869V's cordless handsets.
CAUTION
Do not connect the UIP1869V to a regular telephone wall jack.
w w w . u n i d e n . c o m |
G E T T I N G S T A R T E D [ 1 0 ] |
D E T R A T S G N I T T E G

5) Use the included AC adapter to connect the POWER port to a 120 Vac continuous power outlet.
CAUTION
To avoid risk of fire or electrical hazard, use ONLY the included AC adapter!
All the LEDs will flash several times, and the Power LED will remain on. If the UIP1869V was properly recognized by
Vonage's network, the Phone 1 LED will illuminate. Test your connection by making a call with the corded handset and browsing to a web page from your PC. If you have any difficulty, see the Troubleshooting section.
Configuring Your UIP1869V (PPPoE users only)
If you use PPPoE to connect to the Internet (common for DSL users), your broadband service provider assigned you a user name and password. You will need to enter this user name and password into the UIP1869V. The UIP1869V can take the place of any additional PPPoE software you received from your ISP, allowing you to establish and maintain your broadband connection without running any extra programs on your computer.
Follow the steps below to configure the UIP1869V to use a PPPoE-based connection.
1.Make sure your computer is directly connected to the UIP1869V's LAN port.
2.On your computer, open an Internet web browser window.
[ 1 1 ] G E T T I N G S T A R T E D |
w w w . u n i d e n . c o m |
•Enter http://192.168.15.1 (the UIP 1869V broadband telephone system's default IP address) in the address field of your browser and hit the ENTER key.
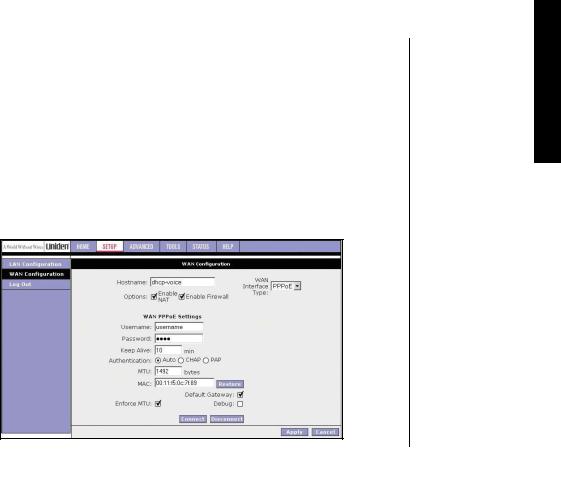
•A screen with fields for your username and password will appear. Enter "admin" in both fields for now (you should set a new password later using the Advanced tab's user configuration screen). Then click "OK".
•Select the Setup Tab at the top of the screen, then select "WAN Configuration" from the menu on the left. This opens the WAN configuration Setup Screen.
•In the pull down menu labeled "WAN Interface Type" (see image below) select PPPoE. This opens the PPPoE configuration screen.
•Enter the username, password and service name (if required) provided by your ISP. This is the same info you enter every time you log in.
•Click "Apply". When asked if you want to save the UIP 1869V configuration, click "Yes".
•When the lights on the UIP 1869V stop flashing, check for Internet access by browsing to a web page.
w w w . u n i d e n . c o m |
G E T T I N G S T A R T E D [ 1 2 ] |
D E T R A T S G N I T T E G

note 
•Use only the Uniden
(BT-0003) rechargeable battery pack supplied with your cordless telephone.
•Replacement battery packs are also available through the Uniden Parts Department.
Install the rechargeable battery pack into the handset
1)Press down on the handset battery case cover (use the finger indention for a better grip) and slide the cover downward to remove.
2)Place the battery pack in the battery compartment with the connectors on the battery and on the compartment aligned.
3)Place the battery case cover back on the handset and slide it upwards until it clicks into place.
[ 1 3 ] G E T T I N G S T A R T E D |
w w w . u n i d e n . c o m |

Connect the charger
The handset is powered by a rechargeable battery pack. The battery recharges automatically when the handset is placed in the charger.
1) Connect the AC adapter to the DC IN 9V jack and to a standard 120V AC wall outlet.
Caution: To avoid risk or fire or shock, use only the included AC adapter.
2) Set the charger on a desk or tabletop, and place the handset in the charger with the keypad facing forward.
3) Make sure that the charge LED illuminates. If the LED does not illuminate, check to see that the AC adapter is plugged in and the handset makes good contact with the base charging contacts.
4)Charge the handset battery pack for at least 15-20 hours before using your new cordless handset for the first time.
note 
For maximum range:
•Do not hold the handset where you might block the signal.
Antenna 
Correct
Incorrect
•Metal and reinforced concrete may affect cordless telephone performance.
w w w . u n i d e n . c o m |
G E T T I N G S T A R T E D [ 1 4 ] |
D E T R A T S G N I T T E G

Expanding Your Phone
Ten Handset Expandability
Your phone supports up to ten handsets, including any handsets supplied with your phone. You can now place a fully-featured cordless handset anywhere AC power is available to connect the handset charger.
Handsets can be used in DirectLink Mode or on an intercom call without interfering with incoming calls. It is possible to have a 4-way conference among the base, two handsets, and one outside line.
All of the handsets ring when a call is received.
Backwards/Forwards Compatibility
Your phone is compatible with other Uniden 5.8GHz Digital Expandable Handsets. Compatible models include the TCX805, ELX500, TCX400, and TCX440. (Please check www.uniden.com for an updated list of expansion handsets compatible with this series.)
[ 1 5 ] G E T T I N G S T A R T E D |
w w w . u n i d e n . c o m |

Registering Expansion Handsets
Handsets supplied with the phone are registered to the base by the factory. When you register an extra handset to the base, the handset ID will be assigned.
Before the expansion handset is registered, the battery pack MUST be charged for 15-20 hours.
To register expansion handsets, follow the steps below:
1)Make sure the main base is in standby mode.
2)On the base, press the MENU soft key, and then select HS Registration.
3)On the handset, press and hold # until you will hear a beep.
4)Press the OK soft key.
5)While the handset is registering, Handset Registering will appear in the Handset LCD. When Registration Complete is displayed, the handset has been registered to the base. If Registration Failed appears, please try these steps again.
note 
If a handset has ever been registered to a different base, you must de-register the handset before you can register it to the new base (see page 17).
w w w . u n i d e n . c o m |
G E T T I N G S T A R T E D [ 1 6 ] |
D E T R A T S G N I T T E G

System Reset
De-register the Handset
When you de-register a handset, the handset will also be removed from the base index. The base must be in range and powered on before you can degister a handset.
1) Press and hold end and # for more than 5 seconds. Select
Deregister HS. |
>GIKUVGT *5 |
2) The phone will ask you to confirm the deregistration. Select Yes. |
4GRNCEKPI $CUG |
When the base information is deleted, the handset displays |
|
MUST place the handset in base to register! Models may vary, |
|
refer to Owners Manual for help. Re-register the handset to the |
|
|
5'.'%6 |
base (see page 16).
Replacing the Base
If the base is unavailable for some reson, you can use the Replacing Base function to de-register the handset. When you replace the base, the handset will not be removed from the base index.
1) Press and hold end and # for more than 5 seconds. Select
Replacing Base. |
>GIKUVGT *5 |
2) Select Yes. |
|
4GRNCEKPI $CUG |
|
|
|
3)You will hear a confirmation tone. The base information will be deleted.
5'.'%6
[ 1 7 ] G E T T I N G S T A R T E D |
w w w . u n i d e n . c o m |

When the base information is deleted, the handset displays |
4GRNCEKPI DCUG |
MUST place the handset in base to register! Models may vary, |
;GU |
refer to Owners Manual for help. Re-register the handset to the |
0Q |
base (see page 16). |
|
|
5'.'%6 |
Installing the Beltclip |
|
To attach the beltclip |
|
Insert the beltclip into the holes on each side of the handset. |
|
Press down until it clicks. |
|
To remove the beltclip |
|
Pull either side of the beltclip to release the tabs from the holes.
Optional Headset Installation
Your phone may be used with an optional headset.
To use an optional headset, insert the headset plug into the headset jack. Your phone is ready for hands-free conversations. (Headsets may be purchased by calling Uniden's Parts Department. See back cover page.)
w w w . u n i d e n . c o m |
G E T T I N G S T A R T E D [ 1 8 ] |
D E T R A T S G N I T T E G
Installing Uniden's Cordless Telephone
Customization Tool
This phone includes Uniden's Cordless Telephone Customization Tool for your Windows PC. You can use this software application to completely configure your phone, download pictures for wallpaper, and import contacts from Microsoft Outlook.
NOTE: Uniden's Cordless Telephone Customization Tool requires either Microsoft®, Windows® 98SE, Windows ME, Windows 2000, Windows XP and more than 150MB free hard drive space.
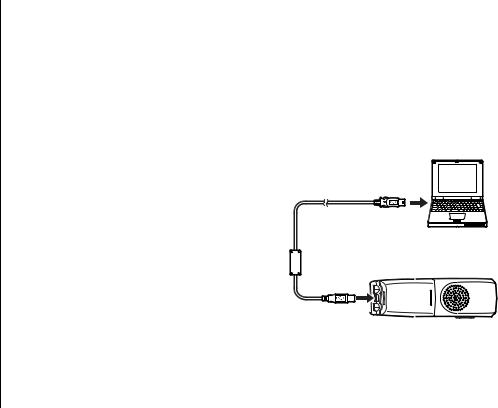
1) |
Insert the Cordless Telephone |
|
|
|
Customization Tool CD into your |
|
|
|
computer's CD-ROM drive. The installation |
|
|
|
application should start automatically. |
|
|
2) |
If the application doesn't start, go to the |
|
|
|
Start menu and select Run. |
To PC |
|
3) |
In the window, type d:\autorun.exe (where |
||
|
|||
|
d is the letter assigned to your CD-ROM |
|
|
|
drive), and click OK. |
|
|
4) |
Once the software is installed, connect |
|
|
|
the USB cable to the handset and your PC |
|
|
|
as shown. |
|
5)Customize your Uniden cordless handset with your personal preferences.
For complete instructions on using Uniden's Cordless Telephone Customization Tool, see the help file on the CD-ROM.
[ 1 9 ] G E T T I N G S T A R T E D |
w w w . u n i d e n . c o m |
Using the Interface
Example of the standby mode display
• Base
|
|
|
|
|
|
|
|
|
|
|
|
|
|
|
|
|
|
|
|
|
|
|
|
|
|
Day of the week and time |
|
|
|
|
|
|
|
|
|
|
|
|
|
|
|
|
|
|
|
|
|
|
|
|
|
|
|
* Ringer Volume Level |
|
|
|
|
|
|
|
|
|
|
|
|
|
|
|
|
|
|
|
|
|
|
|
|
|
envelope icon |
|
|
|
|
|
|
|
|
|
|
|
|
|
|
|
|
|
|
|
|
|
|
Number of new Caller ID calls received |
||||
|
|
|
|
|
|
|
|
|
|
|
|
|
|
|
|
|
|
|
|
|
|
|
|
|
|
|
*This icon changes depending on ringer volume level (High, low and off)
•Handset
 Battery icon
Date, Day of the week, and time
Handset banner or number of new caller ID calls received
w w w . u n i d e n . c o m |
G E T T I N G S T A R T E D [ 2 0 ] |
D E T R A T S G N I T T E G
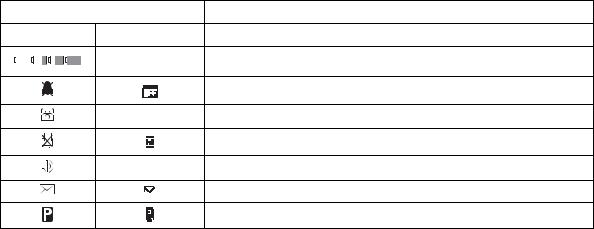
Display Icons
ICON |
DESCRIPTION |
Handset Base
-
Battery icons indicate the handset battery status. This icon cycles depending on the battery status (empty, low, medium, and full).
|
Ringer off icon indicates that the ringer is turned off. |
- |
Telephone icon indicates that the line is in use. |
Mute icon appears when you mute the handset or the base.
- Speaker icon appears when the handset speaker phone is use.
Envelope icon appears when a new message is received.
Privacy icon appears when the Privacy Mode is turned on.
[ 2 1 ] G E T T I N G S T A R T E D |
w w w . u n i d e n . c o m |
Soft Key Functions
"Soft" keys are keys that change function during the operation of the phone. There are two soft keys on the handset and three soft keys on the base.
The text right above the soft key indicates that key's current function. For example, when the phone is in standby mode, pressing soft key 2 on the handset makes a selection. When the phone is in talk mode, pressing soft key 2 brings up the options menu. Complete information on the features controlled by the soft keys can be found under each feature.
In standby mode |
In talk mode |
Handset
5RGCMGT 5GVWR
6CNM 
|
|
|
|
|
|
|
|
|
|
|
|
|
8QNWOG |
|||||||
|
|
|
|
|
|
|
|
|
|
|
|
|
|
|
|
|
|
|
|
|
|
|
|
|
5'.'%6 |
|
|
|
|
|
|
|
|
126+105 |
|
|
|
||||
|
|
|
|
|
|
|
|
|
|
|
|
|
|
|
|
|
|
|
|
|
|
|
|
|
|
|
|
|
|
|
|
|
|
|
|
|
|
|
|
|
|
|
|
|
|
Soft key 2 |
|
|
|
|
|
|
|
|
Soft key 2 |
|
|
|
||||
|
Base |
|
|
|
|
|
|
|
|
|
|
|
|
|
|
|
|
|
|
|
|
|
|
|
|
|
|
|
|
|
|
|
|
6CNM |
|
|
|
|
|
||
570 # |
|
|
|
|
|
|
|
|
|
|
||||||||||
|
|
|
|
|
|
|
|
|
|
|
|
|
|
|
||||||
|
0GY %+& |
|
|
|
|
|
|
|
|
|||||||||||
|
|
|
|
|
|
|
|
|
|
|
|
|
4'&+#. |
|
|
24+8#%; |
|
|||
|
4'&+#. |
|
/'07 |
|
|
|
|
|
|
|
|
|
|
|
|
|
|
|||
|
|
|
|
|
|
|
|
|
|
|
|
|
|
|
|
|
||||
|
|
|
|
|
|
|
|
|
|
|
|
|
|
|
|
|
|
|||
|
Soft |
key 1 |
|
Soft |
key 2 |
|
Soft |
key 3 |
|
Soft |
key 1 |
|
|
|
Soft |
key 3 |
|
|||
|
|
|
|
|
|
|
|
|
|
|
|
|
|
|
|
|
|
|
|
|
w w w . u n i d e n . c o m |
|
|
|
|
|
|
|
G E T T I N G S T A R T E D [ 2 2 ] |
||||||||||||
D E T R A T S G N I T T E G
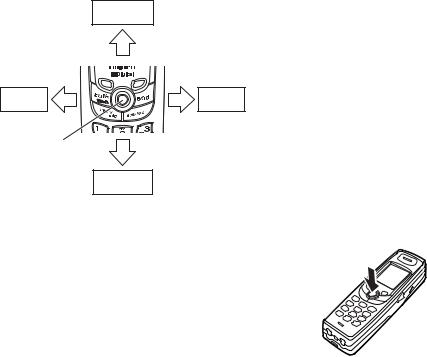
Using the handset joystick
The joystick makes it easy to use your phone. The four most commonly used functions are accessible just by moving the joystick.
Voice Mail Access
View the |
View the |
phonebook |
Caller ID |
Joystick
Redial a number
You will also use the joystick to make menu selections.
Highlight the option you want by moving the joystick up, down, right, or left. This will move the cursor; the option currently highlighted appears in reversed out text.
Select the highlighted option by pressing in on the center of the joystick.
To exit the MENU and return to standby, press the end key. To go back a level in the menu, press back/hold/intercom.
[ 2 3 ] G E T T I N G S T A R T E D |
w w w . u n i d e n . c o m |

Entering text
You can use the number keypad on your phone to enter text by referring to the letters printed on each number key. When you press the number key in a text entry field, the phone displays the first letter printed on the number key. Press the number key twice to display the second letter and three times to display the third. Capital letters are displayed first, then lower case letters, then the number on the key.
If two letters in a row use the same number key, enter the first letter, then press the joystick to the right to move the cursor to the next position to enter the second letter.
For example, to enter Movies:
1) Press 6 once to enter M.
2)Use joystick, or the right key on the base to move the cursor to the right.
3)Press 6 six times to enter o.
4)Press 8 six times to enter v.
5)Press 4 six times to enter i.
6)Press 3 five times to enter e.
7)Press 7 eight times to enter s.
8)Press the center of the joystick or the OK soft key on the base to end your text entry.
If you make a mistake while entering a name, use the joystick, to move the cursor to the incorrect character. Press the DELETE soft key to erase the incorrect character, and then enter the correct character.
To delete all characters in the text entry field, press and hold the DELETE soft key.
w w w . u n i d e n . c o m |
G E T T I N G S T A R T E D [ 2 4 ] |
D E T R A T S G N I T T E G

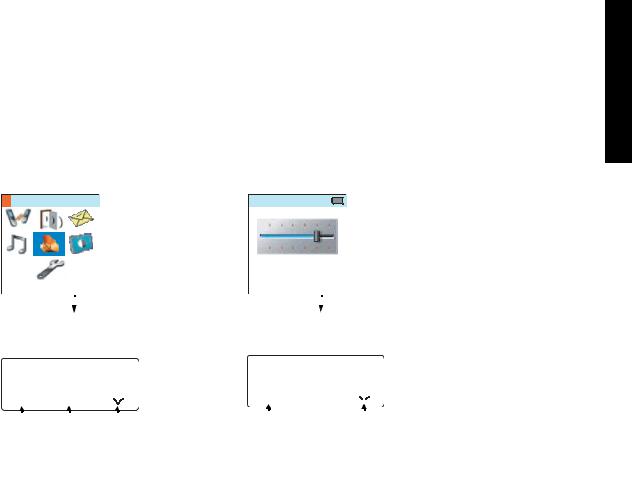
Main Menu Options
On the handset, the options are DirectLink, Room Monitor, Messages, Ringer Options, Speaker Setup, Display Options, and System Setup.
Note:
•If you do not press a key within 30 seconds, the phone will time out and exit the menu mode. When setting the Date and Time, the time-out period is extended to two minutes.
•All of these options can be configured in the Cordless Customization Application.
Handset Main Menu Options
5RGCMGT 5GVWR
5'.'%6
DirectLink |
Room Monitor |
Messages |
Ringer Options |
Speaker Setup |
Display Options |
System Setup
On the base, the options are Room Monitor, Base Setup, Global Setup, and HS Registration.
[ 2 5 ] G E T T I N G S T A R T E D |
w w w . u n i d e n . c o m |
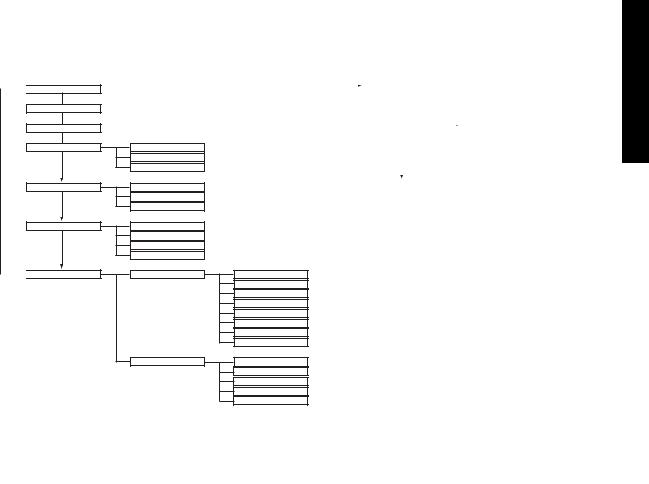
Main Menu Options (Handset)
Main Menu

 DirectLink
Room Monitor
Messages
Ringer Options
Speaker Setup
DisplayOptions
 System Setup
Submenu
Ringer Volume
Ringer Tones
Rec/Edit Rings
Earpiece Volume
Speaker Volume
Audio Tone
Wall Paper
LCD Contrast
Animation Type
Language
Handset Setup
Global Setup
Auto Talk
Any Key Answer
Banner Display
Key Touch Tone
Call Privacy
Room Monitor
Unique ID
Edit Voice Mail
Day & Time
Call Waiting
Area Code
Dial Mode
Voice Mail Tone
Main Menu Options (Base)
|
|
Main Menu |
Submenu |
|||
|
|
|
|
|||
|
|
Room Monitor |
|
|
|
|
|
|
|
|
|
||
|
|
|
|
|
|
|
|
|
Base Setup |
|
|
Language |
|
|
|
|
|
|
|
Contrast |
|
|
|
|
|
|
|
|
|
|
|
|
|
Edit Voice Mail |
|
|
|
|
|
|
|
|
|
Global Setup |
|
|
Day & Time |
|
|
|
|
|
|
|
CIDCW |
|
|
|
|
|
|
|
|
|
|
|
|
|
Area Code |
|
|
|
|
|
|
|
|
|
|
|
|
|
Dial Mode |
|
|
|
|
|
|
|
|
|
HS Registration |
|
|
Voice Mail Tone |
|
|
|
|
|
|||
w w w . u n i d e n . c o m |
G E T T I N G S T A R T E D [ 2 6 ] |
D E T R A T S G N I T T E G

 note
note 
•The Dial Mode setting is pre-configured to support VoIP. Do not change this setting.
•CWDX must remain off. Do not change this setting.
Default Settings
The default settings set from the factory match the features that most people use. You may not need to change them. However, there are a number of options you must set and entries you must make in memory to take full advantage of all the phone features. The table below lists the default settings.
Function |
Handset |
|
Base |
Function |
Handset |
|
Base |
|
|
|
|
|
|
|
|
Edit Voice Mail |
None |
|
Key Touch Tone |
On |
|
- |
|
|
|
|
|
|
|
|
|
Ringer Tone |
Flicker |
|
- |
Animation Screen |
On |
|
- |
|
|
|
|
|
|
|
|
Unique ID |
On |
|
- |
Room Monitor |
On |
|
- |
Auto Talk |
Off |
|
- |
(allow monitoring) |
|
||
|
|
|
|
||||
|
|
|
|
|
|
|
|
Anykey Answer |
Off |
|
- |
Day & Time |
SUN 12:00 AM |
||
|
|
|
|
|
|
||
Banner |
“ “ |
|
- |
CIDCW |
CW on/CWDX off |
||
Language |
English |
|
Area Code |
|
None |
||
|
|
|
|
|
|
||
LCD Contrast |
level 5 |
|
Voice Mail Tone |
|
On |
||
|
|
|
|
|
|
|
|
Global Setup
Global settings apply to all registered handsets and the base. If 5[UVGO 5GVWR you change something under the global menu, you change it for
handsets and the base. Only one handset or the base can change global settings at a time, and you have to make sure the phone is not currently being used.
5'.'%6
[ 2 7 ] G E T T I N G S T A R T E D |
w w w . u n i d e n . c o m |
 Loading...