


User guide
F221m terminal
Fixed Cellular Terminal for residential applications
User guide
F221m terminal
Fixed Cellular Terminal for residential applications
Content |
|
F221m ....................................................................... |
7 |
SUPPLIED PARTS................................................... |
7 |
EXTERNAL CONNECTORS AND LIGHT |
|
INDICATORS........................................................... |
8 |
SIM CARD ............................................................... |
8 |
CONNECTIONS ...................................................... |
9 |
Installing the FCT as a telephone line ..................... |
9 |
Preparing your FCT.................................................. |
10 |
Installing the FCT on the wall ................................. |
12 |
Connecting fixed line devices .................................. |
14 |
USING TELEPHONES............................................ |
16 |
USING CLI DISPLAYS........................................... |
17 |
USING FAX MACHINES ....................................... |
18 |
Sending a fax ............................................................ |
18 |
Receiving a fax......................................................... |
18 |
USING PCs .............................................................. |
19 |
GPRS data access type ............................................. |
19 |
GSM data access type .............................................. |
20 |
ADVANCED FEATURES ....................................... |
22 |
Changing volume...................................................... |
22 |
Diverting calls (call forward) ................................... |
22 |
Restricting calls (call barring).................................. |
24 |
More than one call (call wait, call hold, |
|
call transfer, multiparty call) .................................... |
26 |
Phonebook (abbreviated dialing) ............................. |
28 |
Voice mail ................................................................. |
29 |
Sending tone signals................................................. |
29 |
Controlling call time (minute minder) ..................... |
29 |
Emergency number (hot line)................................... |
29 |
Two voice lines (alternate line service) ................... |
30 |
SIM card security ..................................................... |
31 |
TROUBLESHOOTING AND FCT INDICATORS 33 |
|
Light indicators......................................................... |
33 |
Audible tones............................................................ |
36 |
FCT TECHNICAL DATA ........................................ |
37 |
ACCESSORIES........................................................ |
39 |
DA20 Display Adapter ............................................. |
39 |
Antennas ................................................................... |
39 |
Batteries .................................................................... |
39 |
DC/DC Power Adapter............................................. |
40 |
FCT Data Reference manual .................................... |
40 |
ANNEX: PC DATA CONFIGURATIONS .............. |
41 |
Windows 98 GPRS set-up........................................ |
41 |
Windows NT GPRS set-up ...................................... |
44 |
SAFE AND EFFICIENT USE ................................. |
49 |
Product care .............................................................. |
49 |
Antenna care ............................................................. |
49 |
Radio frequency energy............................................ |
50 |
Electronic devices..................................................... |
50 |
Potentially explosive atmospheres ........................... |
50 |
Power supply ............................................................ |
51 |
Children .................................................................... |
51 |
Disposing of the product .......................................... |
51 |
Battery information................................................... |
51 |
Disposing of the battery ........................................... |
52 |
Moving or storing the FCT ...................................... |
52 |
Accessing the battery compartment ......................... |
52 |
LIMITED WARRANTY .......................................... |
53 |
Limited Warranty Conditions ................................... |
53 |
Ericsson Warranty..................................................... |
53 |
What Ericsson will do .............................................. |
53 |
Conditions ................................................................. |
53 |
REGULATORY INFORMATION ........................... |
55 |
DEFINITIONS.......................................................... |
56 |
Ericsson F221m
First edition, February 2002
This manual has been published by Ericsson España, S.A. Bilbao Technology Centre, without any warranty. Improvements and changes to this manual needed by typographical errors, inaccuracies of current information, or improvements to programs and/or equipment, may be made by Ericsson España, S.A. Bilbao Technology Centre at any time and without notice. Such changes will, however, be incorporated into new editions of the manual.
All rights reserved
© Ericsson España, S.A. Bilbao Technology Centre, 2002
Publication number: EN/LZT 123 7037 R1C
Important information: Some of the services described in this guide might not be supported by all networks. Please, contact your network operator for information on different network services operational in your GSM network.

F221m
The F221m is the best quality solution for providing access to fixed services either when no traditional fixed infrastructure is available or if an additional phone line is required.
With the F221m terminal, the user does not have to wait for the fixed telephone network infrastructure to be developed, as long as GSM services are available in the area.
The F221m terminal can be easily installed by the enduser following the instructions provided in this guide:
•install the terminal
•run cabling from the F221m to any location in your house
•you will be ready to connect and use standard telephones, fax machines, computers (Internet) in the usual way
The terminal features the latest technology, which makes it perfect for everyday communication:
•Triple band GSM (E-GSM 900, GSM 1800, GSM 1900)
•Telephone line providing high quality speech (EFR), G3 fax and up to V.90 data transmission
•GPRS (General Packet Radio Service), which keeps you always on line and facilitates rapid transmission of data (ideal for e-mail and Internet browsing)
•HSCSD (High Speed Circuit Switched Data), which further enhances data transmission
•Embedded modem available over the RS232 port
•Battery back-up
Supplied parts
After unpacking, please check that the following parts are included:
|
|
|
|
|
Antenna |
|
|
|
Screws |
|||||||||
|
|
|
|
|
|
|
|
|
|
|
|
|
AC power |
|||||
GSM FCT |
|
|
|
|
|
|
|
|
|
|
|
|
|
|
|
|
supply |
|
|
|
|
|
|
|
|
|
|
|
|
|
|
|
|
Cable |
|||
Wall bracket |
|
|
|
|
|
|
|
|
|
|
|
|
|
|
User guide |
|||
|
|
|
|
|
|
|
|
|
|
|
|
|
|
|||||
|
|
|
|
|
|
|
|
|
|
|
|
|
|
|
|
|
||
|
|
|
|
|
|
|
|
|
|
|
|
|
|
Battery cable |
||||
|
|
|
|
|
|
|
|
|
|
|
|
|
|
|||||
|
|
|
|
|
|
|
|
|
|
5 m phone cable |
||||||||
|
|
|
|
|
|
|
|
|
|
|||||||||
|
|
|
– Display Adapter DA20 (optional) |
|||||||||||||||
|
|
|
– Battery holder (optional) |
|||||||||||||||
F221m / Supplied parts |
7 |

External connectors and light indicators
|
|
|
|
|
|
|
|
|
|
|
|
|
|
|
|
|
Antenna |
GSM radio |
|
|
|
|
|
|
|
|
|
|
|
connector |
|||||
indicator |
|
|
|
|
|
|
|
|
|
|
|
|
SIM card |
||||
(green led) |
|
|
|
|
|
|
|
|
|
|
|||||||
|
|
|
|
|
|
|
|
|
|
|
|
|
|
|
|
holder |
|
|
|
|
|
|
|
|
|
|
|
|
|
|
|
|
|
||
Power |
|
|
|
|
|
|
|
|
|
|
|
|
|
||||
|
|
|
|
|
|
|
|
|
|
|
|
|
|||||
indicator |
|
|
|
|
|
|
|
|
|
|
|
|
|
|
|
|
|
|
|
|
|
|
|
|
|
|
|
|
|
|
|
|
|
||
(red led) |
|
|
|
|
|
|
|
|
Power connector |
||||||||
Telephone |
|
|
|
|
|
|
|
|
|
|
|
||||||
|
|
|
|
|
|
|
|
|
|
||||||||
|
|
|
|
|
|
|
|
|
|
|
|
|
|
||||
interface |
|
|
|
|
|
|
|
|
|
RS232 port |
|||||||
|
|
|
|
|
|
|
|
|
|
|
|
||||||
|
|
|
|
|
|
|
|
|
|
|
|
||||||
|
|
|
|
|
|
|
|
|
|
|
Reset |
||||||
|
|
|
|
|
|
|
|
|
|
|
|||||||
|
|
|
|
|
|
|
|
Maintenance connector |
|||||||||
|
|
|
|
|
|
|
|
||||||||||
SIM card
Your network operator provides you with a SIM (Subscriber Identity Module) card. The SIM card contains information about your telephone number and the services included in your subscription, among other things.
Warning!: the FCT has to be switched off before inserting or removing your SIM card.
8 External connectors and light indicators / SIM card
Connections
Warning!: please, before you start any connections refer to section “Safe and Efficient Use” on page 49 in this guide and contact your network operator if you have any questions.
Warning!: to get a good FCT protection against electrical discharges and the best audio quality, a good grounding of the power supply is strongly recommended.
Installing the FCT as a telephone line
The FCT is designed to provide a telephone line (RJ11 connector) to which up to 3 Fixed Line devices can be connected in parallel. The FCT provides a single telephone line, which means that only one communication can take place simultaneously, in the same way as the ordinary fixed line (you cannot, for example, receive or originate a telephone call while sending or receiving a fax).
Warning!: in order to avoid GSM interferences (noise), place the FCT at least 3 meters (horizontal) away from electronic devices, including the telephone equipment connected to the FCT, or other household electronic devices such as televisions or radio receivers. The difference in height should be at least 2 meters (vertical). This is not necessary if you use telephone devices that fulfil the Immunity Characteristics settled by the IEC CISPR-24 standard. In this case, a minimum security distance of 20 cm is recommended.
Connections 9
The FCT is also equipped with an RS232 port that enables you to use it as a GSM modem for PC fax, data and SMS services. For this specific configuration, please refer to the FCT Data Reference Manual. See Accessories on page 39.
Preparing your FCT
You need to follow these steps before you install the FCT on the wall and make all definitive connections.
Warning!: the FCT should be switched off before inserting or removing your SIM card or connecting any devices to the FCT.
Assembly
1. Connect the antenna.
2.Remove the front cover, pressing down and pushing the small tab that is in the center of the bottom part of the FCT. Open the SIM Card holder shifting the mobile part of the holder and then rotating it to place the connector upwards.
3.Close the SIM Card holder, placing it horizontally and assuring it with the holder mobile part.
4.Optionally install the battery on the battery compartment (over the SIM Card). To do so, connect the battery cable to the FCT connector. Connect the black cable to the negative pole of the battery, and the red cable to the positive cable. Fit the cable under the holding tab (over the SIM Card) and insert the battery until it is hold by the tab.
5.Place the front cover back in its previous position.
10 Connections
Connect a telephone to the FCT
Connect a fixed telephone to the FCT telephone line.
Important: you will use this telephone to dial the PIN.
Switch on the FCT
Connect the power supply. The FCT switches on automatically and the green and red light indicators start flashing.
Enter PIN
Most SIM cards are protected with a PIN (Personal Identity Number), which you get from your network operator and which you need in order to access the network.
If the SIM card is not protected by a PIN code, then you do not need to enter the PIN. The FCT starts the network search automatically.
If the SIM card is protected by the PIN code, then the green and red lights will flash simultaneously.
Note: if you have the DA20 display adapter accessory (See “Accessories” on page 39), an
“Enter PIN” message will show on your display.
Please follow these steps to enter the PIN:
•Pick up the telephone and dial the PIN code.
Press the # key on your telephone or wait until you hear a beep tone.
•If you make a mistake while entering your PIN, hang up the telephone immediately and try again.
If the PIN is correct, you will hear a beep over the telephone (positive indication tone). If it is incorrect, a deep tone will sound (error indication tone).
If the PIN is entered incorrectly three times, the SIM card will be blocked. If this happens, you can unblock it by using the PUK (Personal Unblocking Key), which you also get from your network operator. See SIM Card Security on page 31.
Note: once you have entered the PIN code for the first time, you will not have to enter it again unless you change your SIM card. The FCT performs this operation automatically in case of power failure.
Connections 11

Network search
After you have switched on your FCT and entered the PIN, the FCT automatically searches for a network.
Note: if the red light is off, there is a problem with the power supply. See “Troubleshooting and FCT indicators” on page 33.
When a network is found, the green light switches on or flashes depending on the GSM signal strength. See Light Indicators on page 33.
Note: if the green light is off, you do not have access to the GSM network at your present location.
Now you have prepared the FCT for wall installation. Please, follow the instructions below for complete wall installation.
Installing the FCT on the wall
FCT Location
The GSM signal strength available at the FCT location affects the performance of the unit. The stronger the GSM signal, the better the FCT performance.
Tip: test several potential locations by moving the
FCT while looking at the green light. Select the location where the green light is steady, or the location with the highest amount of flashes.
Note: moving the FCT as little as 20 cm can affect the GSM reception quality.
Location Testing
Number of Green Light flashes |
Location status |
|||
|
|
|
|
|
0 |
|
|
|
Unacceptable |
|
|
|
|
|
1 |
- |
- |
- |
Acceptable |
|
|
|
|
|
2 |
- - |
- - |
- - |
Good |
|
|
|
|
|
3 |
- - - |
- - - |
- - - |
Very good |
|
|
|
|
|
Steady |
------------------------------- |
|
|
Excellent |
|
|
|
|
|
Please consider the following recommendations:
•Always select an indoor location, preferably close to a window and the roof. Generally, you will experience better GSM signal strength in these places.
•Do not install the FCT in a bathroom, a wet or damp basement or an outdoor location.
12 Connections
• Do not install the FCT on walls or rooms that |
2) Insert the FCT in the wall-mounting bracket |
contain large amounts of metal, steel or wiring. |
|
•Do not expose the FCT to extreme temperatures (near radiators, cooling vents, etc).
If you experience poor reception quality, an outdoor antenna may result in improvement.
See Accessories on page 39.
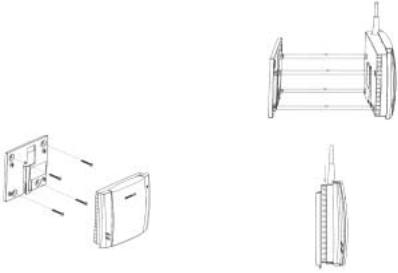
Wall mounting
Please proceed as indicated in the following picture.
1) Fix the wall-mounting bracket on the wall
3) Shift the FCT down
Connections 13

Warning!: once you have fixed the FCT to the wall and switched it on, check the final status of the red and green lights. If either one is off, there is a problem with the power supply or the GSM signal. See “Troubleshooting and FCT indicators” on page 33.
Now the FCT is ready for connecting devices and making calls.
Note: if you want to remove the FCT from the wall bracket, then you have to press the flap (step 1) as indicated in the following picture and then shift the
FCT upwards (step 2).
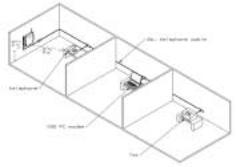
Connecting fixed line devices
Connect the fixed line devices to the FCT (telephone line connector) with telephone wire in the same way as with an analog telephone line.
Fixed line devices are connected in parallel. You can connect the devices directly to the FCT telephone line connector (RJ11) or make an internal telephone wiring, use RJ11 splitters or similar connectors.
GSM Network
|
RS232 |
Pc |
|
|
|
|
|
|
|
Telephone line |
|
Telephone |
Display |
Fax |
Pc |
Note: when making the connections, the two-wire telephone cable polarity does not affect at all.
Tip: if your house or company is already wired with
telephone cable, you only need to connect the cable to the FCT RJ11 connector and your telephone line will be up and running in all rooms.
14 Connections

Note: it is strongly recommended that the telephone wire is installed indoors in order to avoid lightning damage.
Note: the telephone wire should not exceed 600 meters. Larger distances can be achieved by using high quality telephone wire.
Checking connections
Once the fixed line devices (1 up to 3) have been connected, make the “Ring Back Test” as follows in order to check the connections:
•Lift one telephone and dial **#10#. You will hear a beep tone (the FCT red and green lights will start flashing - three flashes synchronized).
•Hang up the telephone and check if all the connected telephones start ringing.
•Lift any of the telephones connected and then hang it up again. The ringing will stop (the red and green lights will go to normal operation mode).
Tip: if any of the telephones has not been ringing,
check your telephone cable layout and connections to make sure that all devices are properly connected.
Checking the calls quality
Use any of the telephones connected to the FCT to make a call. Check the speech quality and ask the receiver to call you back to confirm that you can also receive calls.
If you have problems, see Troubleshooting and FCT indicators on page 33.
Connections 15
Using telephones
Fixed telephones connected to the FCT telephone line work in the same way as if they were connected to a fixed network.
Warning!: you will not be able to make or receive data or fax calls while a speech call is ongoing.
Note: you can also benefit from some FCT functionality that you do not usually have on your fixed network. See “Advanced features” on page 22.
You can find detailed information about the tones that the FCT sends on Audible tones page 36.
16 Using telephones

Using CLI displays
Devices that display the incoming number (telephones with display, external displays, etc.) can be directly connected to the FCT line interface in the same way as an ordinary telephone. If your subscription includes the Calling Line Identification (CLI) service and the caller´s network sends the number, the FCT will send the caller´s number towards your CLI display.
In general, your FCT will be programmed (according to your country specifications) to send the CLI information with the right standard so that your CLI device works properly.
Refer to your CLI telephone or display user guide for further explanations on your CLI indications.
Tip: if you run the Ring Back Test on page 14
(lift the telephone, dial **#10# and hang up), you can check if the following number “1234567890” appears on your CLI display. If it does not, the FCT is not using the right standard.
If you experience that your CLI device is not showing the calling numbers, you may need to change the FCT settings.
This is done by dialing one of the following sequences, depending on the CLI standard that your CLI device supports (check its user guide).
CLI standard |
Dialing sequence |
ETSI DTMF |
**0002*1# |
|
|
ETSI V.23 |
**0002*2# |
|
|
Bellcore |
**0002*3# |
Tip: if you cannot figure out which CLI standard to use, try all three sequences, following each of them by a Ring Back Test. The CLI standard whose Ring Back Test prints a “1234567890” on your display will be the correct one.
In order to disable the CLI Display functionality and therefore stop viewing calling numbers, dial **0002*0# from a DTMF (Pulses) telephone connected to the FCT.
Tip: if you do not want your telephone number to appear at the caller’s location, you can dial #31# before the phone number you are going to call (B-number); in other words, dial #31#B-Number.
To find out about the DA20 accessory display, please check Accessories on page 39.
Using CLI displays |
17 |
 Loading...