


Ericsson G32 / G36
Fixed Wireless Terminal for GSM/EDGE Mobile Networks
User Guide
E
EN/LZT 151 235 R1B
© Ericsson AB 2006 – All Rights Reserved
Table of Contents
Table of Contents ......................................... |
3 |
Welcome...................................................... |
4 |
Fixed Wireless Terminal ................................ |
6 |
Installation .................................................... |
9 |
Connecting Devices to the FWT.................. |
16 |
Advanced Features..................................... |
24 |
PC Data Configurations .............................. |
34 |
Web-based Configuration........................... |
55 |
Troubleshooting.......................................... |
61 |
Technical Data............................................ |
65 |
Accessories................................................ |
68 |
Product Care and Safety ............................ |
71 |
Warranty..................................................... |
75 |
Glossary..................................................... |
78 |
Index .......................................................... |
80 |
Fixed Wireless Terminal: G32 & G36 |
3 |

Welcome
Welcome to the User Guide for the G32 / G36 Fixed Wireless Terminal.
Important information: Some of the services described in this guide might not be supported by all networks. Please, contact your network operator for information on different network services operational in your GSM network.
The latest version of this user guide can be downloaded from:
http://www.ericsson.com/enterprise/library/manual.shtml
Disposal of the product
Your product should not be placed in municipal waste. Please check local regulations for disposal of electronic products.
4 |
Fixed Wireless Terminal: G32 & G36 |

Copyright
No part of this document may be reproduced without the written permission of the copyright owner.
The contents of this document are subject to revision without notice due to continued progress in methodology, design and manufacturing. Ericsson shall have no liability for any error or damage of any kind resulting from the use of this document.
Warranty
ERICSSON MAKES NO WARRANTY OF ANY KIND WITH REGARD TO THIS MATERIAL, INCLUDING, BUT NOT LIMITED TO, THE IMPLIED WARRANTIES OF MERCHANTABILITY AND FITNESS FOR A PARTICULAR PURPOSE. Ericsson shall not be liable for errors contained herein nor for incidental or consequential damages in connection with the furnishing, performance or use of this material.
Declaration of Conformity
Hereby, Ericsson Enterprise AB declares that this product is in conformity with the requirements and other relevant provisions of the European R&TTE directive 1999/5/EC.
Details to be found at: http://ericsson.com/sdoc.
FCC Statement
Before a wireless terminal is available for sale to the public, it must be tested and certified to the FCC that it does not exceed the limit established by the government adopted requirement for safe exposure.
This device complies with 47 CFR Part 15 and Part 24 of the FCC rules. Operation is subject to the following two conditions:
(1) This device may not cause harmful interference, and (2) this device must accept any interference received, including interference that may cause undesired operation.
Fixed Wireless Terminal: G32 & G36 |
5 |
Fixed Wireless Terminal
Product Description
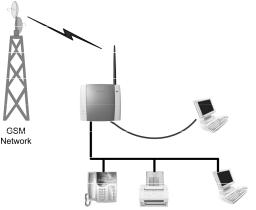
The FWT is a flexible and cost-effective solution for connection to the wireless GSM network when there is no fixed line infrastructure or if you need additional telephone lines.
The G36 can also be connected to a PBX so you can benefit from the Least Cost Routing (LCR) capabilities offered by most PBX vendors to optimize your costs by routing outgoing calls to mobile phones through the GSM network.
The FWT allows automatic network searching between GSM 850/1900 or GSM 900/1800 frequencies, ensuring world wide coverage in the GSM networks.
The FWT features the latest technology, which makes it perfect for everyday communication:
•Available in 2 dual dual-band GSM models (GSM 850/1900 or GSM 900/1800).
•Telephone line providing high quality speech, G3 fax and up to V.90 data transmission.
•EDGE (Enhanced Data Rates for GSM Evolution) is a 3G technology that delivers broadband-like speeds to GSM devices.
•GPRS (General Packet Radio Service), which keeps you always connected and facilitates rapid transmission of data (ideal for e-mail and Internet browsing).
•Embedded modem available over the USB port.
•Battery back-up (optional).
•PBX connectivity (only on the G36 model).
6 |
Fixed Wireless Terminal: G32 & G36 |
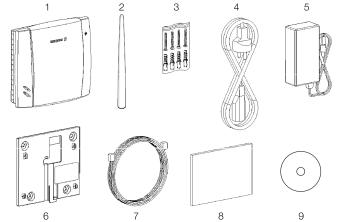
Supplied Parts
After unpacking, please check that the following parts and list of components are included:
List of Components
1.FWT unit
2.Antenna
3.4 x mounting screws
4.Power cable (USA, UK, EU or AUS)
5.AC/DC adapter
6.Wall mount bracket
7.Telephone cable
8.Quick Guide and User Guide manuals
9.CD with USB driver
Fixed Wireless Terminal: G32 & G36 |
7 |

External Connector and Indicators
8 |
Fixed Wireless Terminal: G32 & G36 |
Installation
SIM Card
Your network operator provides you with a SIM (Subscriber Identity Module) card. The SIM card contains information about your telephone number and the services included in your subscription.
Preparing Your FWT
You need to follow these steps before you install the FWT on the wall and finalize all connections.
Warning: The FWT should be switched off before inserting or removing your SIM card or connecting any devices to the FWT.
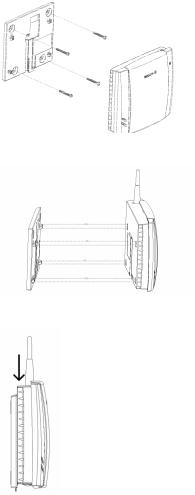
Assembly
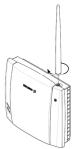
1.Connect the antenna.
Fixed Wireless Terminal: G32 & G36 |
9 |
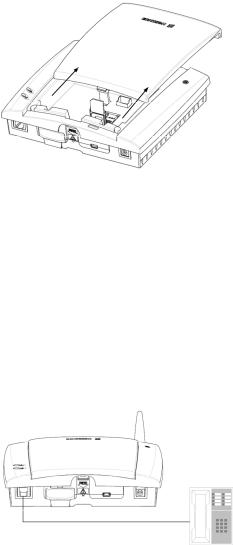
2.Remove the front cover, by pressing down and pushing the small tab that is in the center of the bottom part of the FWT. Open the SIM Card holder and insert the SIM Card.
3.Close the SIM Card holder, placing it horizontally and securing it with the sliding part of the holder.
4.Install the battery (optional) in the battery compartment (over the SIM Card). To do so, connect the battery cable to the FWT connector. Connect the black cable to the negative pole (-) of the battery and the red cable to the positive pole (+). Fit the cable under the holding tab (over the SIM Card) and insert the battery until the tab fixates it.
5.Replace the front cover.
Connecting a telephone to the FWT
Connect an analog telephone to the line interface (RJ11) of the FWT.
Important: You may have to use this telephone to enter the PIN code.
10 |
Fixed Wireless Terminal: G32 & G36 |
Switch on the FWT
Connect the power supply. The FWT switches on automatically and the LED indicators start flashing.
Note: If the Power LED is off, there is a problem with the power supply. Please refer to the topic Troubleshooting documented on
page 61 for more detailed information.
Enter PIN
Most SIM cards are protected with a PIN (Personal Identity Number), which you get from your network operator and which you need in order to access the network. If the SIM card is not protected by a PIN code, then you do not need to enter a PIN.
The FWT starts the network search automatically. If the SIM card is protected by the PIN code, then the LEDs will flash simultaneously.
There are two ways of entering the PIN code:
•With the telephone
•Using the PC
Via telephone
Please follow these steps before you enter your PIN:
1.Pick up the telephone and dial the PIN code. Press the # key on your telephone or wait until you hear a beep tone.
2.If you make a mistake while entering your PIN, hang up the telephone and try again.
If the PIN is correct, you will hear a beep over the telephone (positive indication tone). If it is incorrect, a deep tone will sound (error indication tone).
Via web interface
Please follow these steps before you enter your PIN:
1.Connect your PC to the FWT.
•Via the USB Cable: insert the mini-USB plug into the corresponding connector on the FWT. Then insert the standard USB plug into any available USB port on your PC.
•Via an analog Modem: connect the analog modem to your PC as per modem supplier instructions. Then connect the telephone cable to your modem line output and RJ11 connector on the FWT.
Fixed Wireless Terminal: G32 & G36 |
11 |
2.Check that your computer has the standard modem installed, if not add one by following the steps described in PC Data Configurations on page 34.
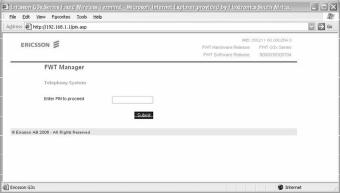
3.Open your Web Browser on your PC, and type in the following URL: http://192.168.1.1/pin.asp
4.The following screen will be displayed.
5. Type in your PIN and then click on the Submit button.
If the PIN is entered incorrectly three times, the SIM card will be blocked. If this happens, you can unblock it by using the PUK (Personal
Unblocking Key), which you also may get from your network operator. Please refer to the topic SIM Card Security documented on page 31 for
more detailed information.
Note: Once you have entered the PIN code for the first time, you will not have to enter it again unless you change your SIM card. The FWT performs this operation automatically in case of power failure.
Network Search
After you have switched on your FWT and entered the PIN, the FWT automatically searches for a network.
When a network is found, the Radio LED is on or flashes depending on the GSM signal strength.
Note: If the Radio LED is off, you do not have access to the GSM network at your present location.
12 |
Fixed Wireless Terminal: G32 & G36 |
Now you have prepared the FWT for wall installation. Please, follow the instructions below for complete wall installation.
Installing the FWT on the Wall
FWT Location
The GSM signal strength available at the FWT location affects the performance of the unit. The stronger the GSM signal, the better the FWT performance.
Tip: Test several potential locations by moving the FWT while looking at the Radio LED. Select the location where the Radio LED is continuous steady, or the location with the highest amount of flashes.
Note: Moving the FWT as little as 20 cm can affect the GSM reception quality.
|
|
|
|
Location Testing |
|
|
|
|
|||
Number of Radio LED flashes |
|
Location status |
|||
|
|
|
|
|
|
0 |
OFF |
|
|
|
Unacceptable |
|
|
|
|
|
|
1 |
- |
- |
- |
|
Acceptable |
|
|
|
|
|
|
2 |
- - |
- - |
- - |
|
Good |
|
|
|
|
|
|
3 |
- - - |
- - - - - - |
|
Very Good |
|
|
|
|
|||
Continuously ………………… |
|
Excellent |
|||
|
|
|
|
|
|
Please consider the following recommendations:
•Always select an indoor location, preferably close to a window and as high as possible in the building. Generally, you will experience better GSM signal strength in these places.
•Do not install the FWT in a wet or damp location.
•Do not install the FWT in an outdoor location.
•Do not install the FWT on walls or in rooms that contain large amounts of metal, steel or wiring.
•Do not expose the FWT to extreme temperatures (near radiators, cooling vents, etc).
If you experience poor reception quality, an outdoor antenna may improve reception. Please refer to the topic Accessories documented on
page 68 for more detailed information,
Fixed Wireless Terminal: G32 & G36 |
13 |
Wall mounting
Please proceed as indicated in the following picture.
1.Fix the wall-mounting bracket on the wall.
2.Press the FWT against the wall-mounting bracket.
3.Slide the FWT downwards.
Warning: Once you have fixed the FWT to the wall and switched it on, check the final status of the LEDs. If either one is off, then there is a problem with the power supply or the GSM signal.
14 |
Fixed Wireless Terminal: G32 & G36 |
Now the FWT is ready for connecting devices and making calls.
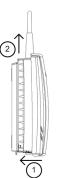
Note: If you want to remove the FWT from the wall bracket, then you have to press the tab (step 1) as indicated in the following picture and then slide the FWT upwards (step 2).
Fixed Wireless Terminal: G32 & G36 |
15 |
Connecting Devices to the FWT
Warning: Before you start any connections please refer to the topic Product Care and Safety documented on page 71 for more
detailed information and contact your network operator if you have any questions.
Warning: To ensure good protection against electrical discharges and the best audio quality, proper grounding of the power supply is strongly recommended.
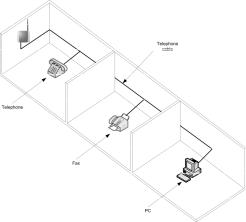
Connecting devices to the FWT
Connect the devices to the FWT (RJ11 connector) in the same way as with an analog telephone line. The devices must be connected in parallel. You can connect the devices directly to the FWT telephone line connector (RJ11) or make an internal telephone wiring, use RJ11 splitters or similar connectors.
16 |
Fixed Wireless Terminal: G32 & G36 |
The FWT is also equipped with a USB port that enables you to use it as a GSM modem. This enables PC fax and for data transfers as well as SMS services.
Note: When making the connections, the two-wire telephone cable polarity does not matter.
Tip: If your home or company is already wired with telephone cable, you only need to connect the cable to the FWT RJ11 connector and your telephone line will be up and running in all rooms.
Note: The telephone wire must be installed indoors.
Note: The telephone wire should not exceed 600 meters.
Checking the connections
Once the devices (1 up to 3) have been connected, do the Ring Back Test as described below in order to check the connections:
•Lift one telephone and dial **#10#. You will hear a beep tone and the terminal LEDs will start flashing. Three flashes indicate it is synchronized.
•Hang up the telephone and check that all the connected telephones start to ring.
•Lift any of the telephones connected and then hang up again. The ringing will stop and the LEDs will return to normal operation mode.
Tip: If any of the telephones are not ringing, check your telephone cable layout and connections to make sure that all devices are properly connected.
Checking the quality of the calls
Use any of the telephones connected to the FWT terminal to make a call. Check the speech quality and ask the receiver to call you back to confirm that you can also receive calls.
If you have problems, please refer to the topic Troubleshooting documented on page 61 for more detailed information.
Installing the FWT as a telephone line
The FWT is designed to provide a telephone line (RJ11 connector) to which up to three (3) Fixed Line devices can be connected in parallel. The FWT provides a single telephone line, which means that only one
Fixed Wireless Terminal: G32 & G36 |
17 |
communication can take place at a time, in the same way as an ordinary fixed line. You cannot, for example, receive or originate a telephone call while sending or receiving a fax.
Warning: In order to avoid GSM interferences (noise), place the FWT at least three (3) meters (horizontal) away from electronic devices, including the telephone equipment connected to the FWT, or other household electronic devices such as televisions or radio receivers. The difference in height should be at least 2 meters (vertical). This is not necessary if you use telephone devices that fulfill the Immunity Characteristics settled by the IEC CISPR-24 standard. In this case, a minimum security distance of 20 cm is recommended.
Connecting the FWT to a PBX
This feature is only available for the FWT G36 model. The G36 FWT is designed to provide a telephone line (RJ11 connector) that behaves in the same way as an analog trunk.
Generic requirements
The PBX should meet the following generic requirements for G36 FWT connectivity:
•The PBX must provide analog trunks.
•One position of the trunk must be assigned to each G36 FWT.
18 |
Fixed Wireless Terminal: G32 & G36 |
•The trunk card must support either Busy Tone Detection (BTD) or Polarity Reversal Detection on answer and release.
•The PBX can be programmed to utilize Least Cost Routing (LCR), if available, to automatically choose the trunk where the G36 FWT is connected.
•If the PBX does not offer LCR, choose the trunk where the G36 FWT is connected manually with a special dialed prefix. Check the installation in the same way as before.
The G36 FWT is compatible with most analog PBXs on the market.
G36 FWT connectivity to the analog trunk of the PBX
If the PBX fulfils the requirements for FWT connectivity, listed above, follow all the installation steps as described in the topic Installing the FWT on the Wall documented on page 13.
Note: A minimum distance of 3 meters between the G36 FWT and the PBX is recommended. The cable distance between the PBX and the G36 FWT should not exceed 600 meters, and the connection cable should be at least 0.4mm2 in diameter.
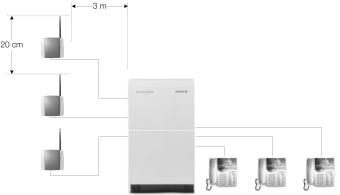
Warning: If you install more than one G36 FWT to a PBX, their antennas have to be separated by 20 cm in height or 2 meters in the horizontal.
If you are using an analog PBX – disconnect the telephone you have used to enter the PIN and test the FWT, and connect the analog trunk cable from the PBX to the FWT telephone line interface.
Check your PBX programming guide to see how to program your PBX to route certain calls through the FWT trunk if you are using a Least Cost
Fixed Wireless Terminal: G32 & G36 |
19 |
Routing (LCR) programmed PBX. Once LCR is programmed, make a call to a mobile telephone number. See if the call is established through the FWT and check the speech quality.
If the PBX does not offer the LCR option, choose the FWT trunk manually with a specific prefix. Check the installation in the same way as before. If you encounter problems, contact your distributor or network operator.
Warning: The PBX may require specific programming: both programming and installation should be done by specialized service personnel.
Using telephones
Telephones connected to the FWT work in the same way as if they were connected to a fixed line network.
Warning: You will not be able to make or receive data or fax calls while a speech call is ongoing.
Note: You can also benefit from some GSM functionality that you
usually do not have in the fixed line network. Please refer to the topic Advanced Features documented on page 24 for more de-
tailed information.
Please refer to the topic Audible Tones documented on page 64 for more detailed information.
Using fax machines
The FWT allows the connection of Group 3 analog fax machines to the telephone line interface, in the same way as a telephone.
Note: The fax communication service has to be registered with your network operator. Otherwise, the network will not allow faxes to be sent or received.
Note: You will not be able to make or receive other calls while a fax communication is established.
Sending a fax
The FWT is programmed to automatically detect outgoing calls made by an analog fax, meaning that the user simply has to use the fax in the same way as a conventional telephone line.
Warning: If your fax is an old model and is not able to send the fax identification, CNG tone, you should include *01* before the
20 |
Fixed Wireless Terminal: G32 & G36 |
destination number (B-number) in order to inform the FWT that the next call is a fax call (Example: *01*B-number). This is not usually necessary, as most faxes automatically send the CNG tone so that the fax call is made automatically by the FWT.
Receiving a fax
Incoming faxes are received in the same way as using a fixed line.
Note: If you have a SIM card that does not support separate voice and fax numbers, the FWT does not recognize the type of incoming call. This means that the calling party will have to inform you each time a fax is about to be sent. In this case, dial *9901# to prepare your FWT to receive a fax call Dial *9903# to change back to voice.
Connecting PCs
Analog modems connected to the FWT telephone line interface works in the same way as if they were connected to a fixed line. In this way, you can use your PCs standard modem to make data calls (Internet browsing, e-mail, etc.) through the FWT line interface. When your PC is connected to the FWT via the USB cable it acts as a modem
To be able to send and receive data calls, you need:
•A PC equipped with an analog modem and the appropriate computer program (Web Browser, E-mail, etc).
•A SIM card that supports data transmission over the GSM network.
Note: If you do not have a modem in your PC, the FWT can be configured to act as a modem. This requires the installation of the FWT modem drivers on your PC.
The FWT should be pre-configured with the settings from your network operator. For detailed information on the FWT data configured settings, please consult your distributor or network operator.
You can choose between the following two connection methods:
EDGE/GPRS data
EDGE/GPRS data allows you to be always online as you are not charged for the connection time but for the amount of data that you exchange.
You need a SIM card that supports EDGE or GPRS. Please contact your network operator for charging subscription details.
Fixed Wireless Terminal: G32 & G36 |
21 |
EDGE/GPRS data access type allows you to make outgoing connections only, usually to connect to the Internet. Your GSM network operator provides you with an Internet connection as part of the EDGE/GPRS service.
Warning: The EDGE /GPRS data communication service has to be registered with your network operator. Otherwise, the network will not accept EDGE connections.
If your SIM card supports EDGE/GPRS, your network operator will supply you with a user name and password in order to access the EDGE/ GPRS network if necessary, and optionally, to improve the Internet connection, a DNS address and a proxy address. All these settings will allow you to configure the Dial-up Networking program in your PC in order to establish an EDGE/GPRS connection.
Note: This procedure is similar to the way you configure an Internet connection from a specific ISP (Internet Service Provider).
If your network operator has provided you with an installation guide, please follow the instructions included in the guide.
Otherwise, the present manual explains the installation process. As the Dialup Networking is different for Windows™ 2000, Windows™ XP and
Windows™ 2003 three separate descriptions are provided. Please refer to the topic PC Data Configurations documented on page 34 for more
detailed information.
If you encounter problems during installation, please contact your distributor or network operator.
GSM data
GSM data is charged by time, this means you pay for the time you are connected. You need a SIM card that support GSM data.
The GSM data access type allows you to make both incoming and outgoing data calls, in the same way as with a fixed line. Therefore, you can connect to the Internet using the same ISP (Internet Service Provider) that you would use with a fixed line.
Note: You will not be able to make or receive other calls while a
GSM data communication is established.
The SIM card must support GSM data. The network operator does not need to supply any specific information, and it is your ISP who provides you with the user name, password and installation information in order to establish an Internet connection. Please contact your ISP for installation instructions.
Note: Your PC should be configured in the same way as if using a fixed line, please check also that are you using the latest driver for the modem.
22 |
Fixed Wireless Terminal: G32 & G36 |
Tip: If you already have an Internet connection configured for a fixed line, you do not need to make any changes, just connect your PC to the FWT line (RJ11) instead of a fixed line.
Note: If your modem is an old model and it is not able to send the CNG tone, you should include *02* before the destination number (B-number) in order to indicate to the FWT that the call to be made is a data call (Example: *02*B-number). This is usually not necessary, as most modems automatically send the CNG tone so that the data call is made automatically by the FWT.
Incoming data calls are received in the same way as using a fixed line.
Note: If you have a SIM card that does not support separate voice and data numbers, the FWT does not recognize the type of incoming call. This means that the calling party will have to inform you each time a data call is about to be made. In this case, dial *9902# to prepare your FWT to receive a data call, Dial *9903# (to change back to voice).
Fixed Wireless Terminal: G32 & G36 |
23 |
Advanced Features
If a DTMF telephone is connected to the FWT, the following features can be accessed.
Changing Volume
During a call, you can increase or decrease the reception volume level.
•Increase volume: dial R####
•Decrease volume: dial R****
Call Divert
You can divert incoming calls to another phone number when you are unable to answer.
The following table shows the divert alternatives as well as the way to proceed to manage this function.
Note: These dialing sequences may vary depending on your network operator. If these do not work, please consult your network operator or check the user guide provided with your subscription.
To manage diversion |
With function ... |
Dial ... |
You will hear ... |
|
of calls ... |
||||
|
|
|
||
|
|
|
|
|
|
Activate |
**21*phone_number# |
1 beep |
|
|
|
|
|
|
Always |
Deactivate |
##21# |
3 beeps |
|
|
|
|
||
|
Check status |
*#21# |
1 beep if activated |
|
|
3 beeps if deactivated |
|||
|
|
|
||
|
|
|
|
24 Fixed Wireless Terminal: G32 & G36
To manage diversion |
With function ... |
Dial ... |
You will hear ... |
|
of calls ... |
||||
|
|
|
||
|
|
|
|
|
|
Activate |
**67*phone_number# |
1 beep |
|
|
|
|
|
|
|
Deactivate |
##67# |
3 beeps |
|
When busy |
|
|
|
|
Check status |
*#67# |
1 beep if activated |
||
|
||||
|
3 beeps if deactivated |
|||
|
|
|
||
|
|
|
|
|
|
Activate |
**61*phone_number# |
1 beep |
|
|
|
|
|
|
|
Deactivate |
##61# |
3 beeps |
|
When no answer |
|
|
|
|
|
Check status |
*#61# |
1 beep if activated |
|
|
3 beeps if deactivated |
|||
|
|
|
||
|
|
|
|
|
|
Activate |
**62*phone_number# |
1 beep |
|
|
|
|
|
|
|
Deactivate |
##62# |
3 beeps |
|
When out of reach |
|
|
|
|
|
Check status |
*#62# |
1 beep if activated |
|
|
3 beeps if deactivated |
|||
|
|
|
||
|
|
|
|
|
All |
Deactivate |
##002# |
3 beeps |
|
|
|
|
|
Note: If instead of hearing beeps you can hear a deep tone, this means that there has been an error in the activation or the deactivation.
Call Restriction / Call Barring
You can restrict certain types of calls that can be made or received. You need a password to turn a call restriction on or off. Initially, this password will be 0000.
We recommend you to change it by dialing:
**03**OLD_PASSWORD*NEW_PASSWORD* NEW_PASSWORD#
The following table shows the restriction alternatives as well as the way to proceed to manage this function.
Note: These dialing sequences may vary depending on your network operator. If these do not work, please consult your network operator or check the user guide provided with your subscription.
Fixed Wireless Terminal: G32 & G36 |
25 |
To manage |
With function ... |
Dial ... |
You will hear ... |
|
restrictions of calls ... |
||||
|
|
|
|
|
|
Activate |
*33*Password# |
1 beep |
|
|
|
|
|
|
|
Deactivate |
#33*Password# |
3 beeps |
|
All outgoing calls |
|
|
|
|
Check status |
*#33# |
1 beep if activated |
||
|
||||
|
3 beeps if deactivated |
|||
|
|
|
||
|
|
|
|
|
|
Activate |
*331*Password# |
1 beep |
|
|
|
|
|
|
All outgoing |
Deactivate |
#331*Password# |
3 beeps |
|
|
|
|
||
international calls |
|
|
|
|
|
Check status |
*#331# |
1 beep if activated |
|
|
3 beeps if deactivated |
|||
|
|
|
||
|
|
|
|
|
|
Activate |
*332*Password# |
1 beep |
|
All outgoing |
|
|
|
|
Deactivate |
#332*Password# |
3 beeps |
||
international calls |
||||
|
|
|
||
except your home |
|
|
|
|
country |
Check status |
*#332# |
1 beep if activated |
|
|
3 beeps if deactivated |
|||
|
|
|
||
|
|
|
|
|
|
Activate |
*35*Password# |
1 beep |
|
|
|
|
|
|
|
Deactivate |
#35*Password# |
3 beeps |
|
All incoming calls |
|
|
|
|
Check status |
*#35# |
1 beep if activated |
||
|
||||
|
3 beeps if deactivated |
|||
|
|
|
||
|
|
|
|
|
|
Activate |
*351*Password# |
1 beep |
|
|
|
|
|
|
All incoming calls |
Deactivate |
#351*Password# |
3 beeps |
|
|
|
|
||
when you are abroad |
|
|
|
|
|
Check status |
*#351# |
1 beep if activated |
|
|
3 beeps if deactivated |
|||
|
|
|
||
|
|
|
|
|
All |
Deactivate |
#330*Password# |
3 beeps |
|
|
|
|
|
Note: If instead of hearing beeps you hear a deep tone, this means that there has been an error in the activation or deactivation
Multiparty Calls
You can handle more than one call simultaneously. For example, you can put an ongoing call on hold, while you make or answer a second call, and then switch between the two calls.
You can also set up a conference call to have a joint conversation with up to four people.
26 |
Fixed Wireless Terminal: G32 & G36 |
 Loading...