

Page 1

Appendix D IP Addresses and Subnetting
Notation
Since the mask is always a continuous number of ones beginning from the left,
followed by a continuous number of zeros for the remainder of the 32 bit mask,
you can simply specify the number of ones instead of writing the value of each
octet. This is usually spec if i e d by wri t ing a “/” followed by the number of bits in
the mask after the address.
For example, 192.1.1.0 /25 is equivalent to saying 192.1.1.0 with subnet mask
255.255.255.128.
The following table shows some possible subnet masks using both notations.
Table 74 Alternative Subnet Mask Notation
SUBNET MASK
255.255.255.0 /24 0000 0000 0
255.255.255.128 /25 1000 0000 128
255.255.255.192 /26 1100 0000 192
255.255.255.224 /27 1110 0000 224
255.255.255.240 /28 1111 0000 240
255.255.255.248 /29 1111 1000 248
255.255.255.252 /30 1111 1100 252
ALTERNATIVE
NOTATION
LAST OCTET
(BINARY)
LAST OCTET
(DECIMAL)
Subnetting
You can use subnetting to divide one network into multiple sub-networks. In the
following example a network administrator creates two sub-networks to isolate a
group of servers from the rest of the company network for security reasons.
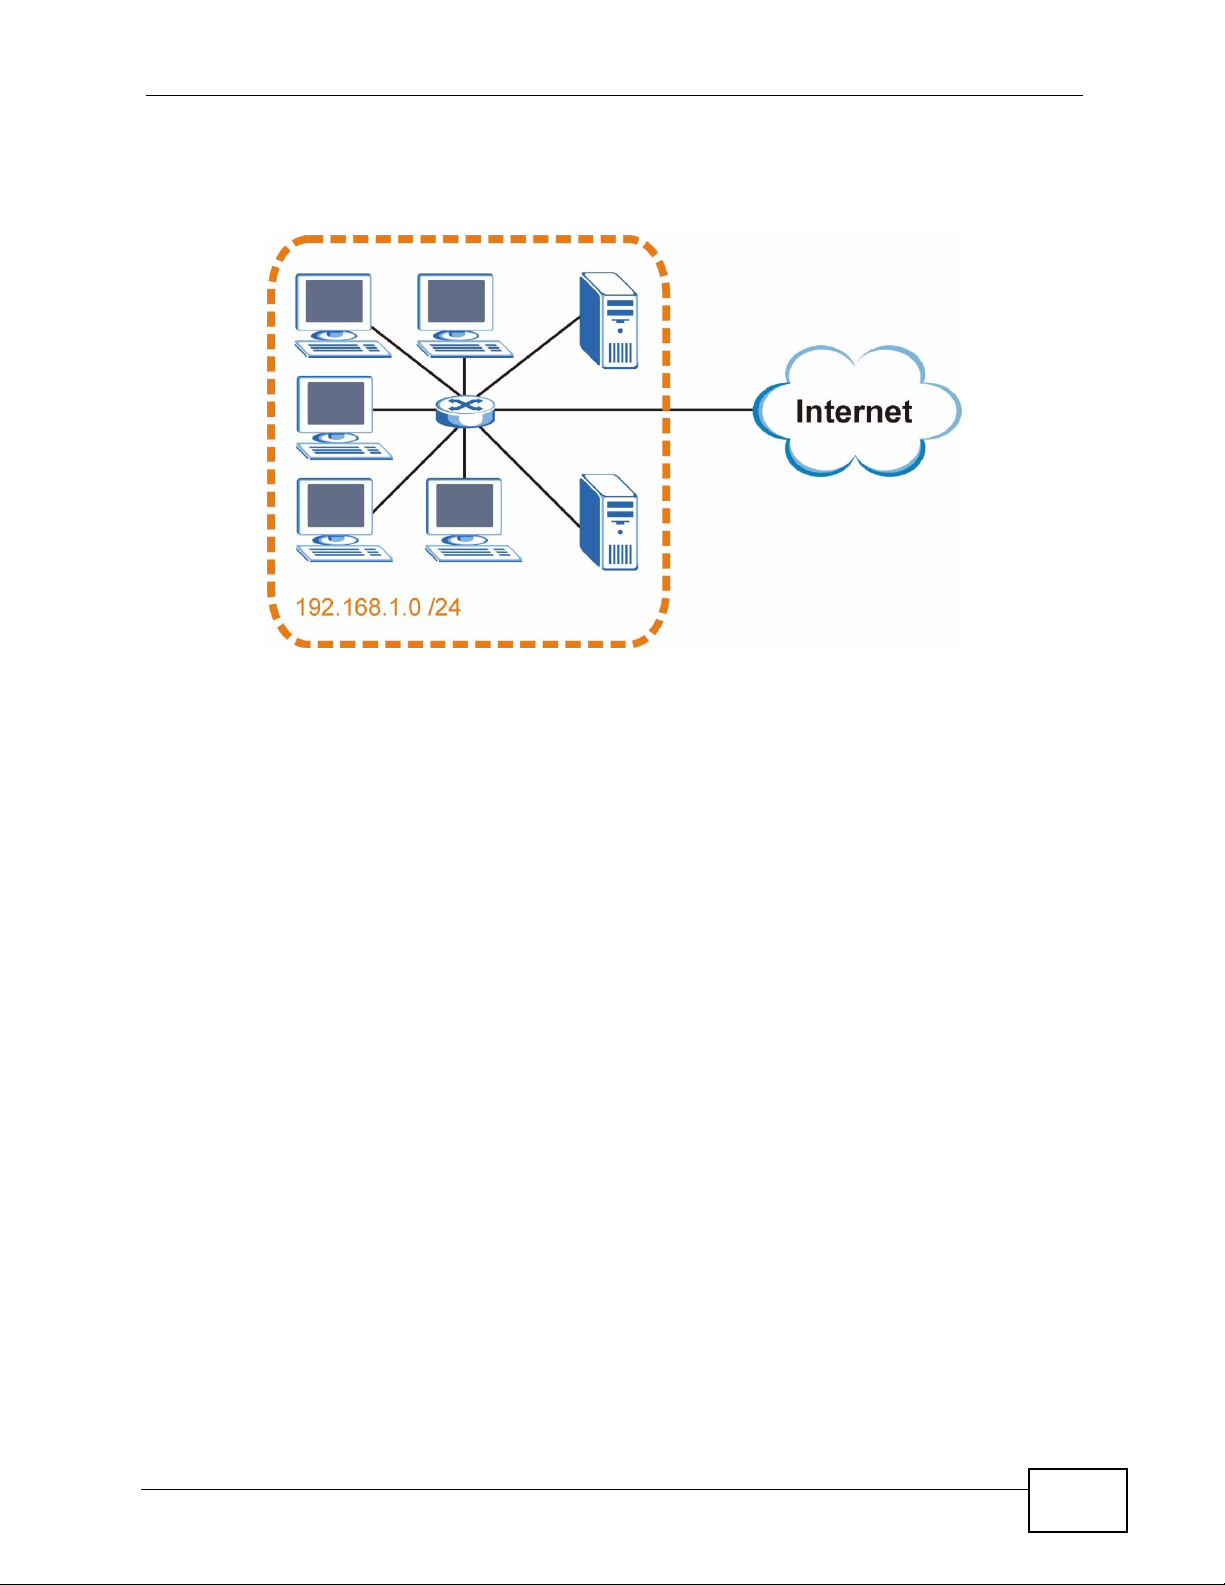
In this example, the company network address is 192.168.1.0. The first three
octets of the address (192.168.1) are the network number, and the remaining
octet is the host ID, allowing a maximum of 2
8
– 2 or 254 possible hosts.
232
User’s Guide
Page 2
Appendix D IP Addresses and Subnetting
The following figure shows the company network before subnetting.
Figure 119 Subnetting Example: Before Subnetting
You can “borrow” one of the host ID bits to divide the network 192.168.1.0 into
two separate sub-networks. The subnet mask is now 25 bits (255.255.255.128 or
/25).
The “borrowed” host ID bit can have a value of either 0 or 1, allowing two
subnets; 192.168.1.0 /25 and 192.168.100.128 /25.
User’s Guide
233
Page 3
Appendix D IP Addresses and Subnetting
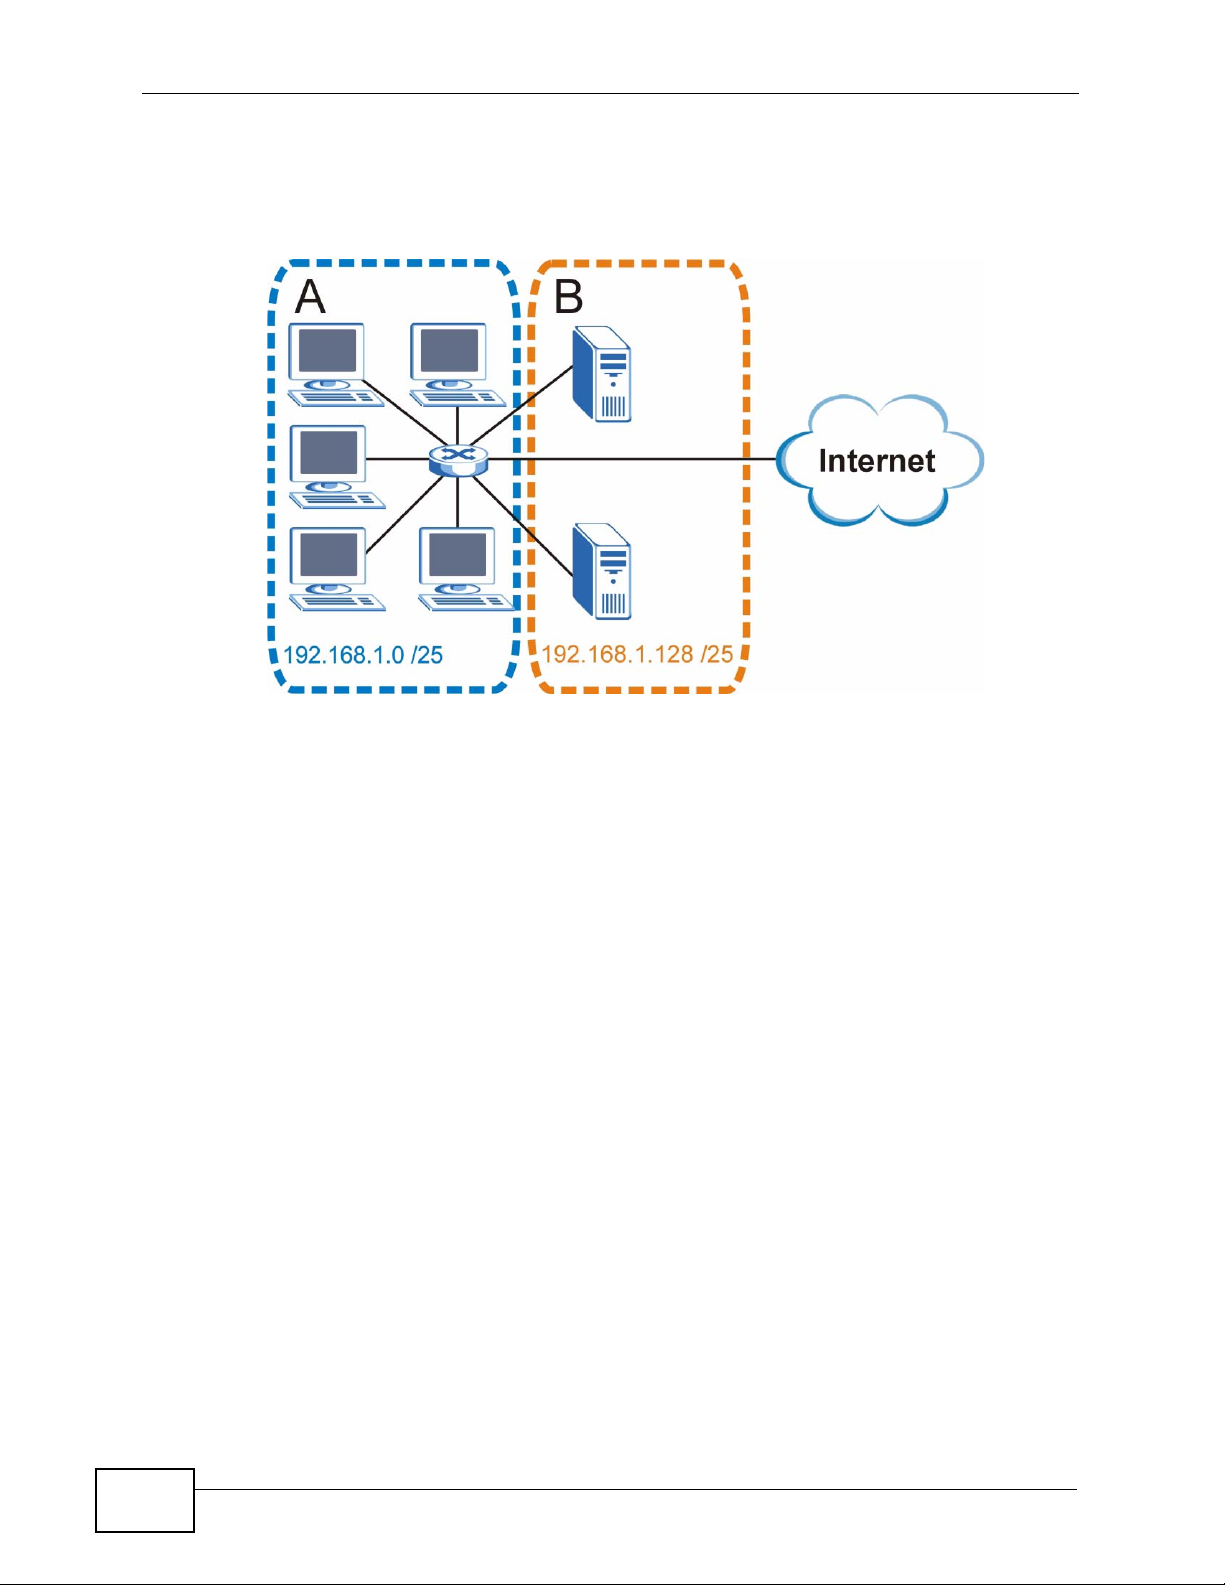
The following figure shows the company network after subnetting. There are now
two sub-networks, A and B.
Figure 120 Subnetting Example: After Subnetting
In a 25-bit subnet the host ID has 7 bits, so each sub-network has a maximum of
7
2
– 2 or 126 possible hosts (a host ID of all zeroes is the subnet’s address itself,
all ones is the subnet’s broadcast address).
192.168.1.0 with mask 255.255.255.128 is subnet A itself, and 192.168.100.127
with mask 255.255.255.128 is its broadcast address. Therefore, the lowest IP
address that can be assigned to an actual host for subnet A is 192.168.100.1 and
the highest is 192.168.100.126.
Similarly, the host ID range for subnet B is 192.168.100.129 to 192.168.1.254.
Example: Four Subnets
The previous example illustrated using a 25-bit subnet mask to divide a 24-bit
address into two subnets. Similarly, to divide a 24-bit address into four subnets,
you need to “borrow” two host ID bits to give four possible combinations (00, 01,
10 and 11). The subnet mask is 26 bits
(11111111.11111111.11111111.11000000) or 255.255.255.192.
234
User’s Guide
Page 4

Appendix D IP Addresses and Subnetting
Each subnet contains 6 host ID bits, giving 26 - 2 or 62 hosts for each subnet (a
host ID of all zeroes is the subnet itself, all ones is the subnet’s broadcast
address).
Table 75 Subnet 1
IP/SUBNET MASK NETWORK NUMBER
IP Address (Decimal) 192.168.1. 0
IP Address (Binary) 11000000.10101000.00000001. 00000000
Subnet Mask (Binary) 11111111.11111111.11111111. 11000000
Subnet Address:
192.168.1.0
Broadcast Address:
192.168.1.63
Lowest Host ID: 192.168.100.1
Highest Host ID: 192.168.1.62
LAST OCTET BIT
VALUE
Table 76 Subnet 2
IP/SUBNET MASK NETWORK NUMBER
IP Address 192.168.1. 64
IP Address (Binary) 11000000.10101000.00000001. 01000000
Subnet Mask (Binary) 11111111.11111111.11111111. 11000000
Subnet Address:
192.168.1.64
Broadcast Address:
192.168.100.127
Lowest Host ID: 192.168.1.65
Highest Host ID: 192.168.100.126
LAST OCTET BIT
VALUE
Table 77 Subnet 3
IP/SUBNET MASK NETWORK NUMBER
IP Address 192.168.1. 128
IP Address (Binary) 11000000.10101000.00000001. 10000000
Subnet Mask (Binary) 11111111.11111111.11111111. 11000000
Subnet Address:
192.168.100.128
Broadcast Address:
192.168.100.191
Lowest Host ID: 192.168.100.129
Highest Host ID: 192.168.100.190
LAST OCTET BIT
VALUE
Table 78 Subnet 4
IP/SUBNET MASK NETWORK NUMBER
IP Address 192.168.1. 192
IP Address (Binary) 11000000.10101000.00000001. 11000000
Subnet Mask (Binary) 11111111.11111111.11111111. 11000000
Subnet Address:
192.168.100.192
Broadcast Address:
192.168.1.255
Lowest Host ID: 192.168.100.193
Highest Host ID: 192.168.1.254
LAST OCTET BIT
VALUE
User’s Guide
235
Page 5

Appendix D IP Addresses and Subnetting
Example: Eight Subnets
Similarly, use a 27-bit mask to create eight subnets (000, 001, 010, 011, 100,
101, 110 and 111).
The following table shows IP address last octet values for each subnet.
Table 79 Eight Subnets
SUBNET
1 0 1 30 31
2 32 33 62 63
3 64 65 94 95
4 96 97 126 127
5 128 129 158 159
6 160 161 190 191
7 192 193 222 223
8 224 225 254 255
SUBNET
ADDRESS
FIRST ADDRESS
LAST
ADDRESS
BROADCAST
ADDRESS
Subnet Planning
The following table is a summary for subnet planning on a network with a 24-bit
network number.
Table 80 24-bit Network Number Subnet Planning
NO. “BORROWED”
HOST BITS
1 255.255.255.128 (/25) 2 126
2 255.255.255.192 (/26) 4 62
3 255.255.255.224 (/27) 8 30
4 255.255.255.240 (/28) 16 14
5 255.255.255.248 (/29) 32 6
6 255.255.255.252 (/30) 64 2
7 255.255.255.254 (/31) 128 1
The following table is a summary for subnet planning on a network with a 16-bit
network number.
Table 81 16-bit Network Number Subnet Planning
NO. “BORROWED”
HOST BITS
1 255.255.128.0 (/17) 2 32766
2 255.255.192.0 (/18) 4 16382
SUBNET MASK NO. SUBNETS
SUBNET MASK NO. SUBNETS
NO. HOSTS PER
SUBNET
NO. HOSTS PER
SUBNET
236
User’s Guide
Page 6

Appendix D IP Addresses and Subnetting
Table 81 16-bit Network Number Subnet Planning (continued)
NO. “BORROWED”
HOST BITS
3 255.255.224.0 (/19) 8 8190
4 255.255.240.0 (/20) 16 4094
5 255.255.248.0 (/21) 32 2046
6 255.255.252.0 (/22) 64 1022
7 255.255.254.0 (/23) 128 510
8 255.255.255.0 (/24) 256 254
9 255.255.255.128 (/25) 512 126
10 255.255.255.192 (/26) 1024 62
11 255.255.255.224 (/27) 2048 30
12 255.255.255.240 (/28) 4096 14
13 255.255.255.248 (/29) 8192 6
14 255.255.255.252 (/30) 16384 2
15 255.255.255.254 (/31) 32768 1
SUBNET MASK NO. SUBNETS
NO. HOSTS PER
SUBNET
Configuring IP Addresses
Where you obtain your network number depends on your particular situation. If
the ISP or your network administrator assigns you a block of registered IP
addresses, follow their instructions in selecting the IP addresses and the subnet
mask.
If the ISP did not explicitly give you an IP network number, then most likely you
have a single user account and the ISP will assign you a dynamic IP address when
the connection is established. If this is the case, it is recommended that you select
a network number from 192.168.0.0 to 192.168.255.0. The Internet Assigned
Number Authority (IANA) reserved this block of addresses specifically for private
use; please do not use any other number unless you are told otherwise. Y ou must
also enable Network Address Translation (NAT) on the WiMAX Modem.
Once you have decided on the network nu mber, pick an IP address for your WiMAX
Modem that is easy to remember (for instance, 192.168.100.1) but make sure
that no other device on your network is using that IP address.
The subnet mask specifies the network number portion of an IP address. Your
WiMAX Modem will compute the subnet mask automatically based on the IP
address that you entered. Y ou don't need to change the subnet mask computed by
the WiMAX Modem unless you are instructed to do otherwise.
User’s Guide
237
Page 7

Appendix D IP Addresses and Subnetting
Private IP Addresses
Every machine on the Internet must have a unique address. If your networks are
isolated from the Internet (running only between two branch offices, for example)
you can assign any IP addresses to the hosts without problems. However, the
Internet Assigned Numbers Authority (IANA) has reserved the following three
blocks of IP addresses specifically for private networks:
• 10.0.0.0 — 10.255.255.255
• 172.16.0.0 — 172.31.255.255
• 192.168.0.0 — 192.168.255.255
You can obtain your IP address from the IANA, from an ISP, or it can be assigned
from a private network. If you belong to a small organization and your Internet
access is through an ISP, the ISP can provide you with the Internet addresses for
your local networks. On the other hand, if you are part of a much larger
organization, you should consult your network administrator for the appropriate IP
addresses.
Regardless of your particular situation, do not create an arbitrary IP address;
always follow the guidelines above. For more information on address assignment,
please refer to RFC 1597, Address Allocation for Private Internets and RFC 1466,
Guidelines for Management of IP Address Space.
IP Address Conflicts
Each device on a network must have a unique IP address. Devices with duplicate
IP addresses on the same network will not be able to access the Internet or other
resources. The devices may also be unreachable through the network.
Conflicting Computer IP Addresses Example
More than one device can not use the same IP address. In the following example
computer A has a static (or fixed) IP address that is the same as the IP address
that a DHCP server assigns to computer B which is a DHCP client. Neither can
access the Internet. This problem can be solved by assigning a different static IP
238
User’s Guide
Page 8
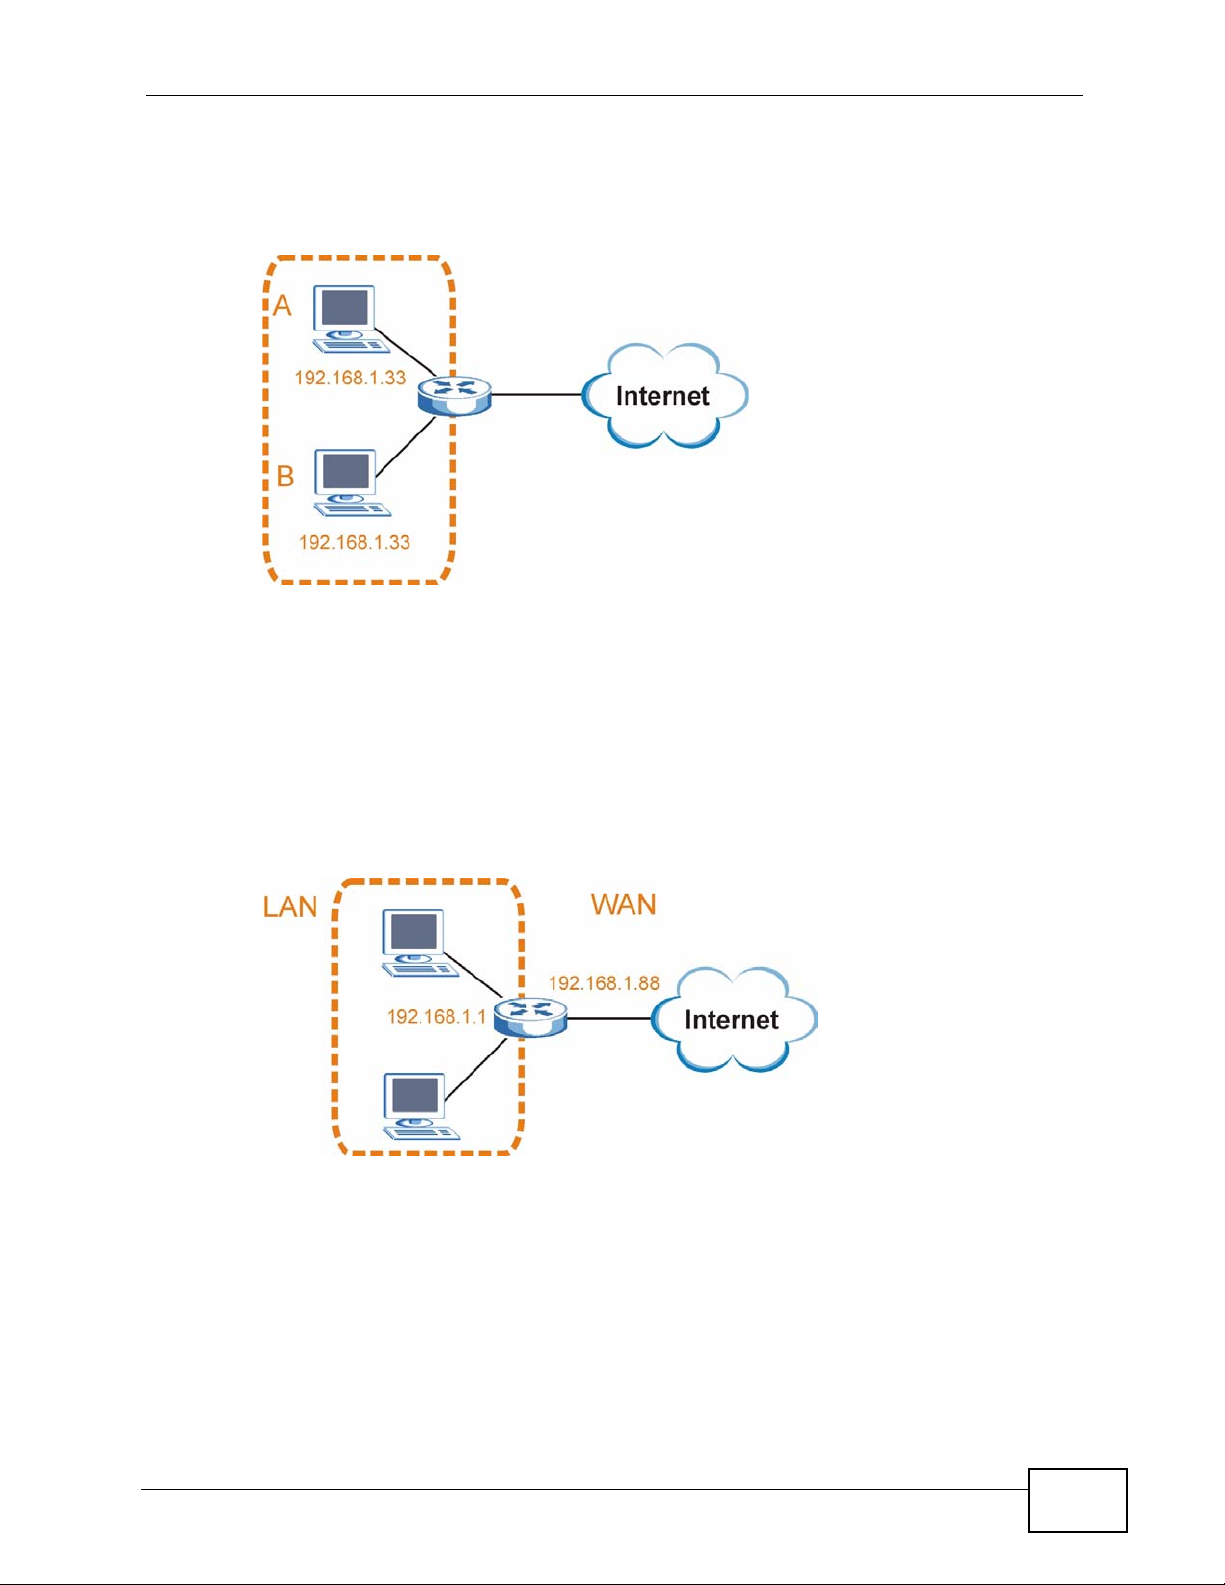
address to computer A or setting computer A to obtain an IP address
automatically.
Figure 121 Conflicting Computer IP Ad dresses Example
Conflicting Router IP Addresses Example
Appendix D IP Addresses and Subnetting
Since a router connects different networks, it must have interfaces using different
network numbers. For example, if a router is set between a LAN and the Internet
(WAN), the router’ s LAN and WAN addresses must be on different subnets. In the
following example, the LAN and WAN are on the same subnet. The LAN computers
cannot access the Internet because the router cannot route between networks.
Figure 122 Conflicting Computer IP Ad dresses Example
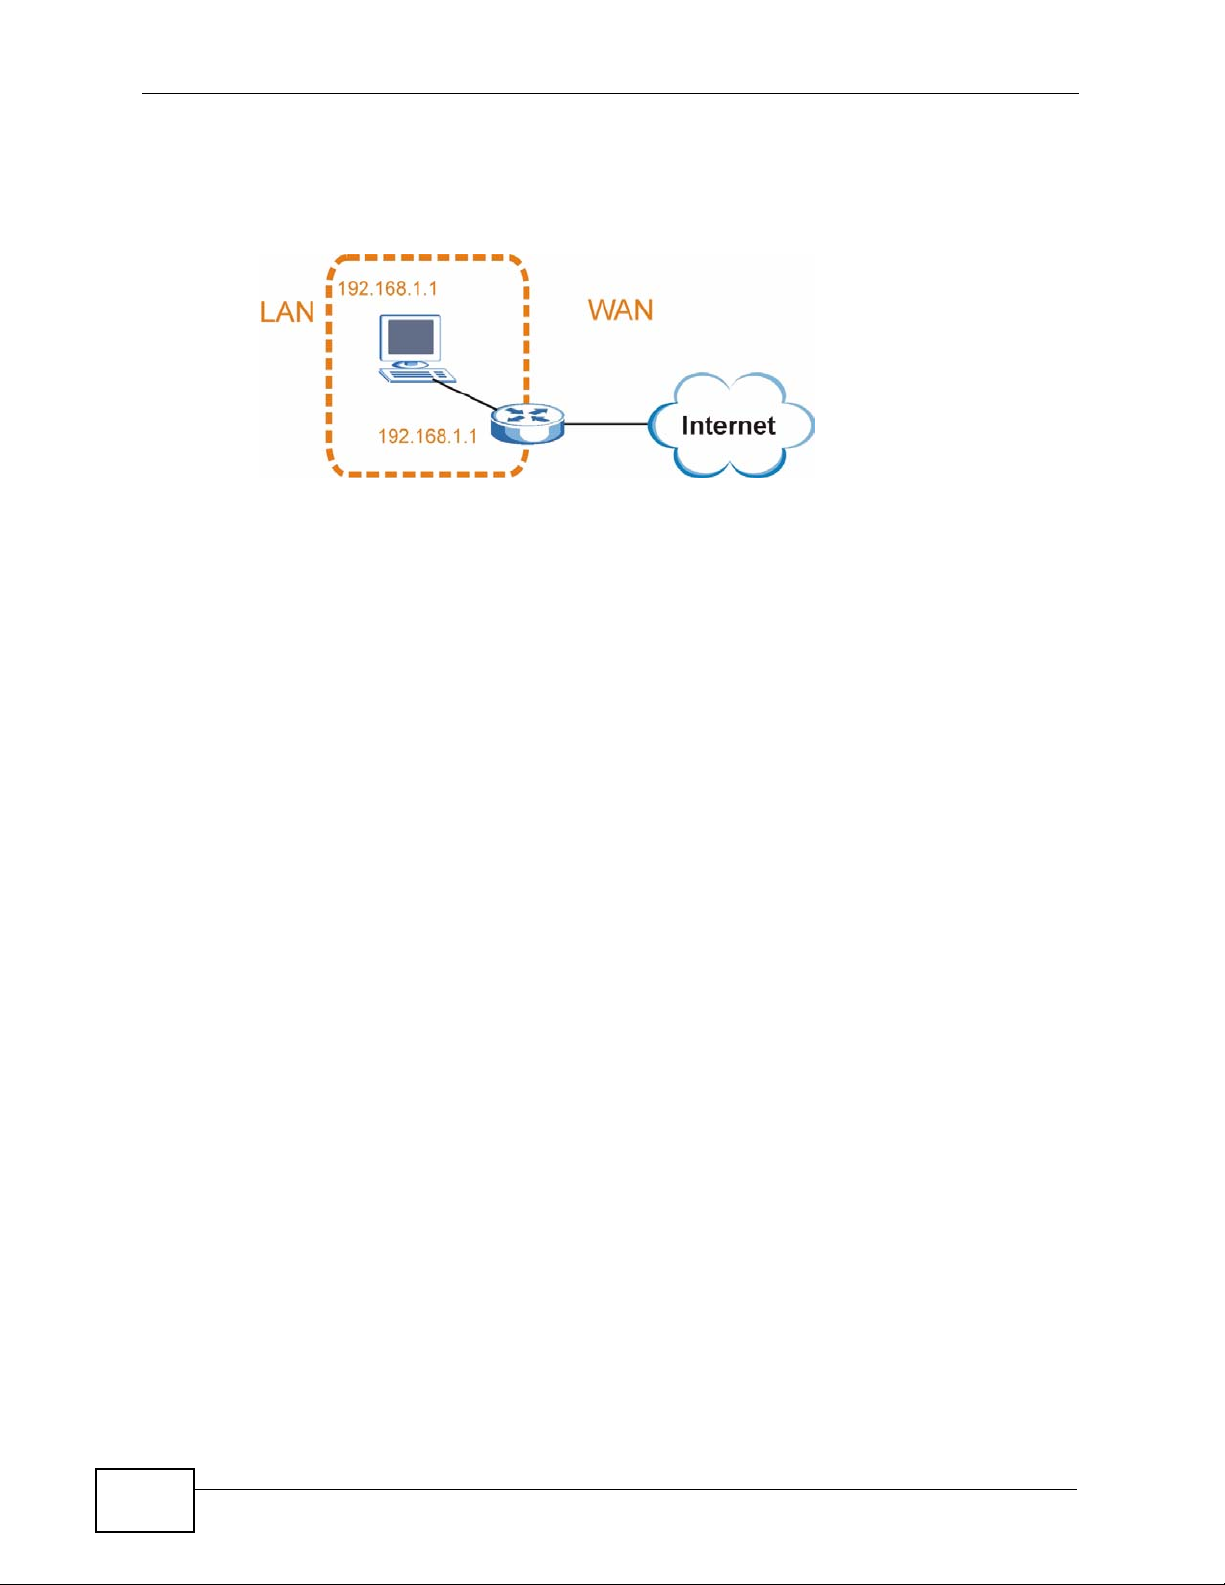
Conflicting Computer and Router IP Addresses Example
More than one device can not use the same IP address. In the following example,
the computer and the router’s LAN port both use 192.168.100.1 as the IP address.
User’s Guide
239
Page 9
Appendix D IP Addresses and Subnetting
The computer cannot access the Internet. This problem can be solved by
assigning a different IP address to the computer or the router’s LAN port.
Figure 123 Conflicting Computer and Router IP Addresses Example
240
User’s Guide
Page 10

APPENDIX E
Importing Certificates
This appendix shows you how to import public key certificates into your web
browser.
Public key certificates are used by web browsers to ensure that a secure web site
is legitimate. When a certificate authority such as VeriSign, Comodo, or Network
Solutions, to name a few, receives a certificate request from a website operator,
they confirm that the web domain and contact information in the request match
those on public record with a domain name registrar. If they match, then the
certificate is issued to the website operator, who then places it on the site to be
issued to all visiting web browsers to let them know that the site is legitimate.
Many ZyXEL products, such as the NSA-2401, issue their own public key
certificates. These can be used by web browsers on a LAN or WAN to verify that
they are in fact connecting to the legitimate device and not one masquerading as
it. However, because the certificates were not issued by one of the several
organizations officially recognized by the most common web browsers, you will
need to import the ZyXEL-created certificate into your web browser and flag that
certificate as a trusted authority.
User’s Guide
Note: You can see if you are browsing on a secure website if the URL in your web
browser’s address bar begins with https:// or there is a sealed padlock
icon ( ) somewhere in the main browser window (not all browsers show the
padlock in the same location.)
In this appendix, you can import a public key certificate for:
• Internet Explorer on page 242
•Firefox on page 252
•Opera on page 258
• Konqueror on page 266
241
Page 11
Appendix E Importing Certificates
Internet Explorer
The following example uses Microsoft Internet Explorer 7 on Windows XP
Professional; however, they can also apply to Internet Explorer on Windows Vista.
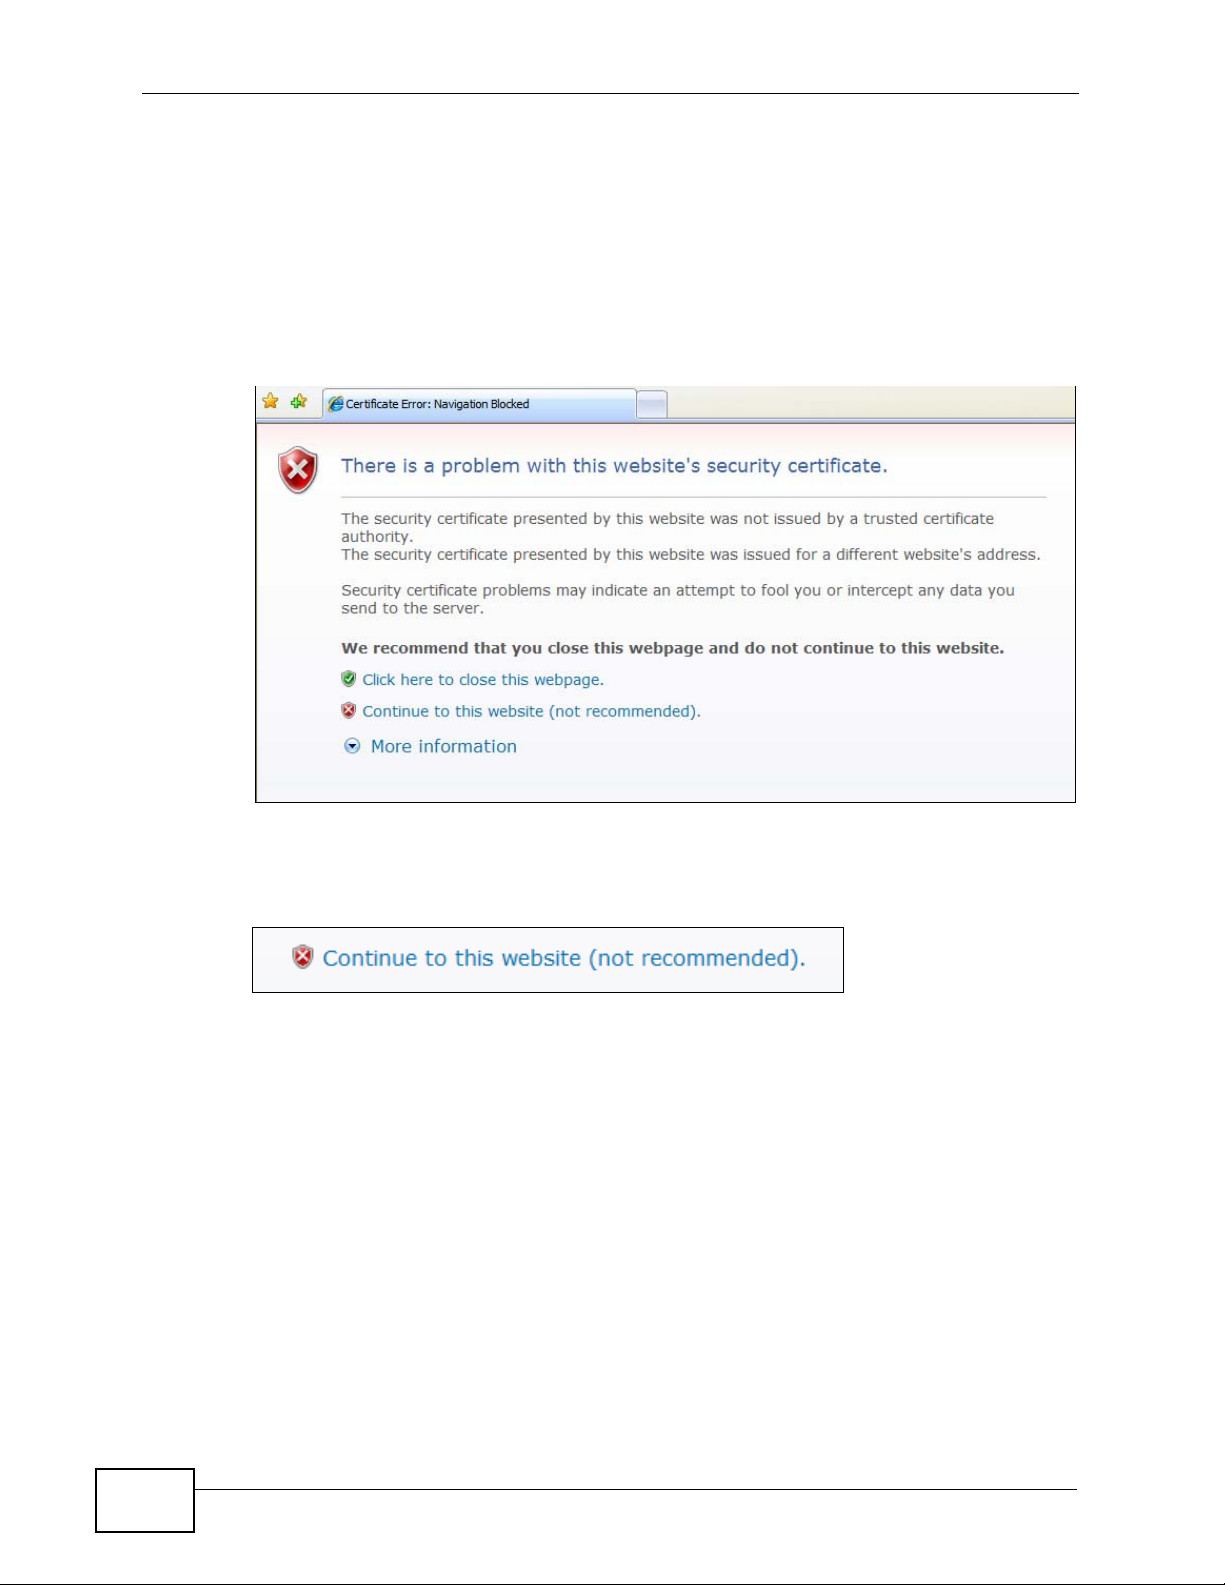
1 If your device’s web configur ator is set t o use SSL c ertification, t hen the first time
you browse to it you are presented with a certification error.
Figure 124 Internet Explorer 7: Certification Error
2 Click Continue to this website (not recommended).
Figure 125 Internet Explorer 7: Certification Error
242
User’s Guide
Page 12
Appendix E Importing Certificates
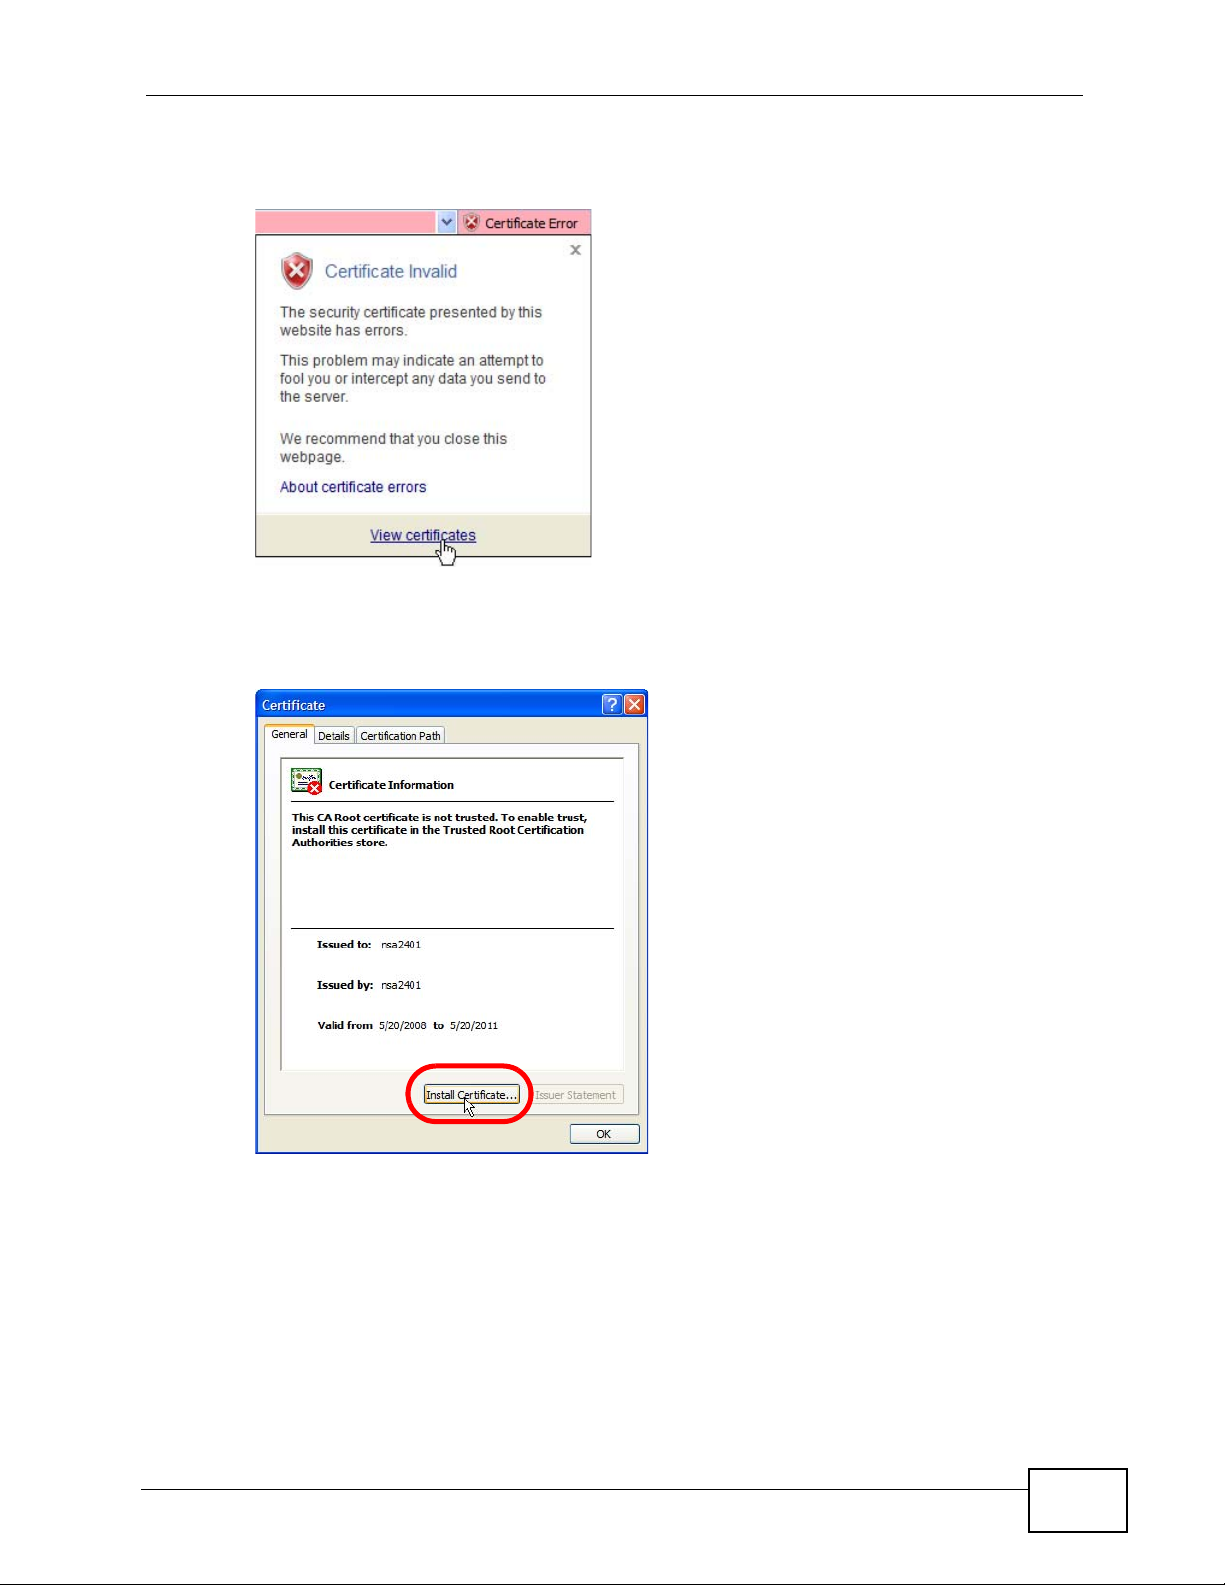
3 In the Address Bar, click Certificate Error > View certificates.
Figure 126 Internet Explorer 7: Certificate Error
4 In the Certificate dialog box, click Install Certificate.
Figure 127 Internet Explorer 7: Certificate
User’s Guide
243
Page 13
Appendix E Importing Certificates
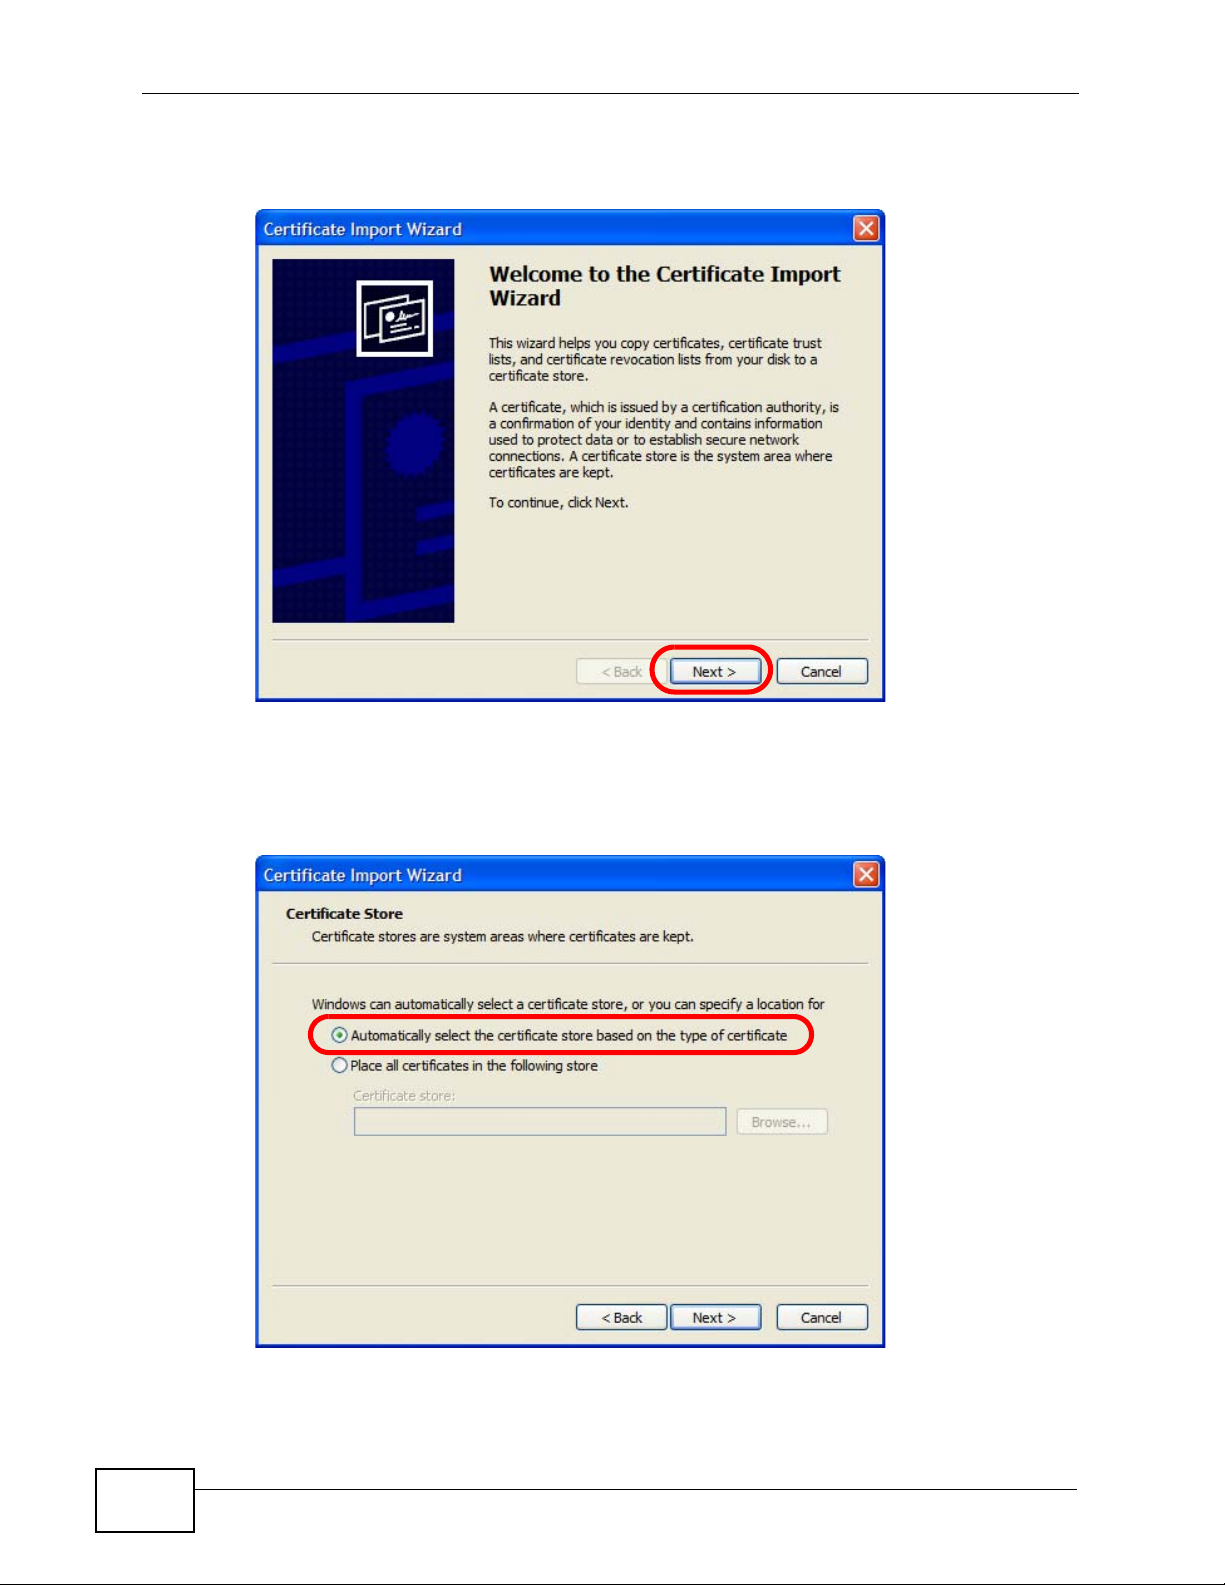
5 In the Certificate Import Wizard, click Next.
Figure 128 Internet Explorer 7: Certificate Import Wizard
6 If you want Internet Explorer to Automatically select certificate store based
on the type of certificate, click Next again and then go to step 9.
Figure 129 Internet Explorer 7: Certificate Import Wizard
244
User’s Guide
Page 14
Appendix E Importing Certificates
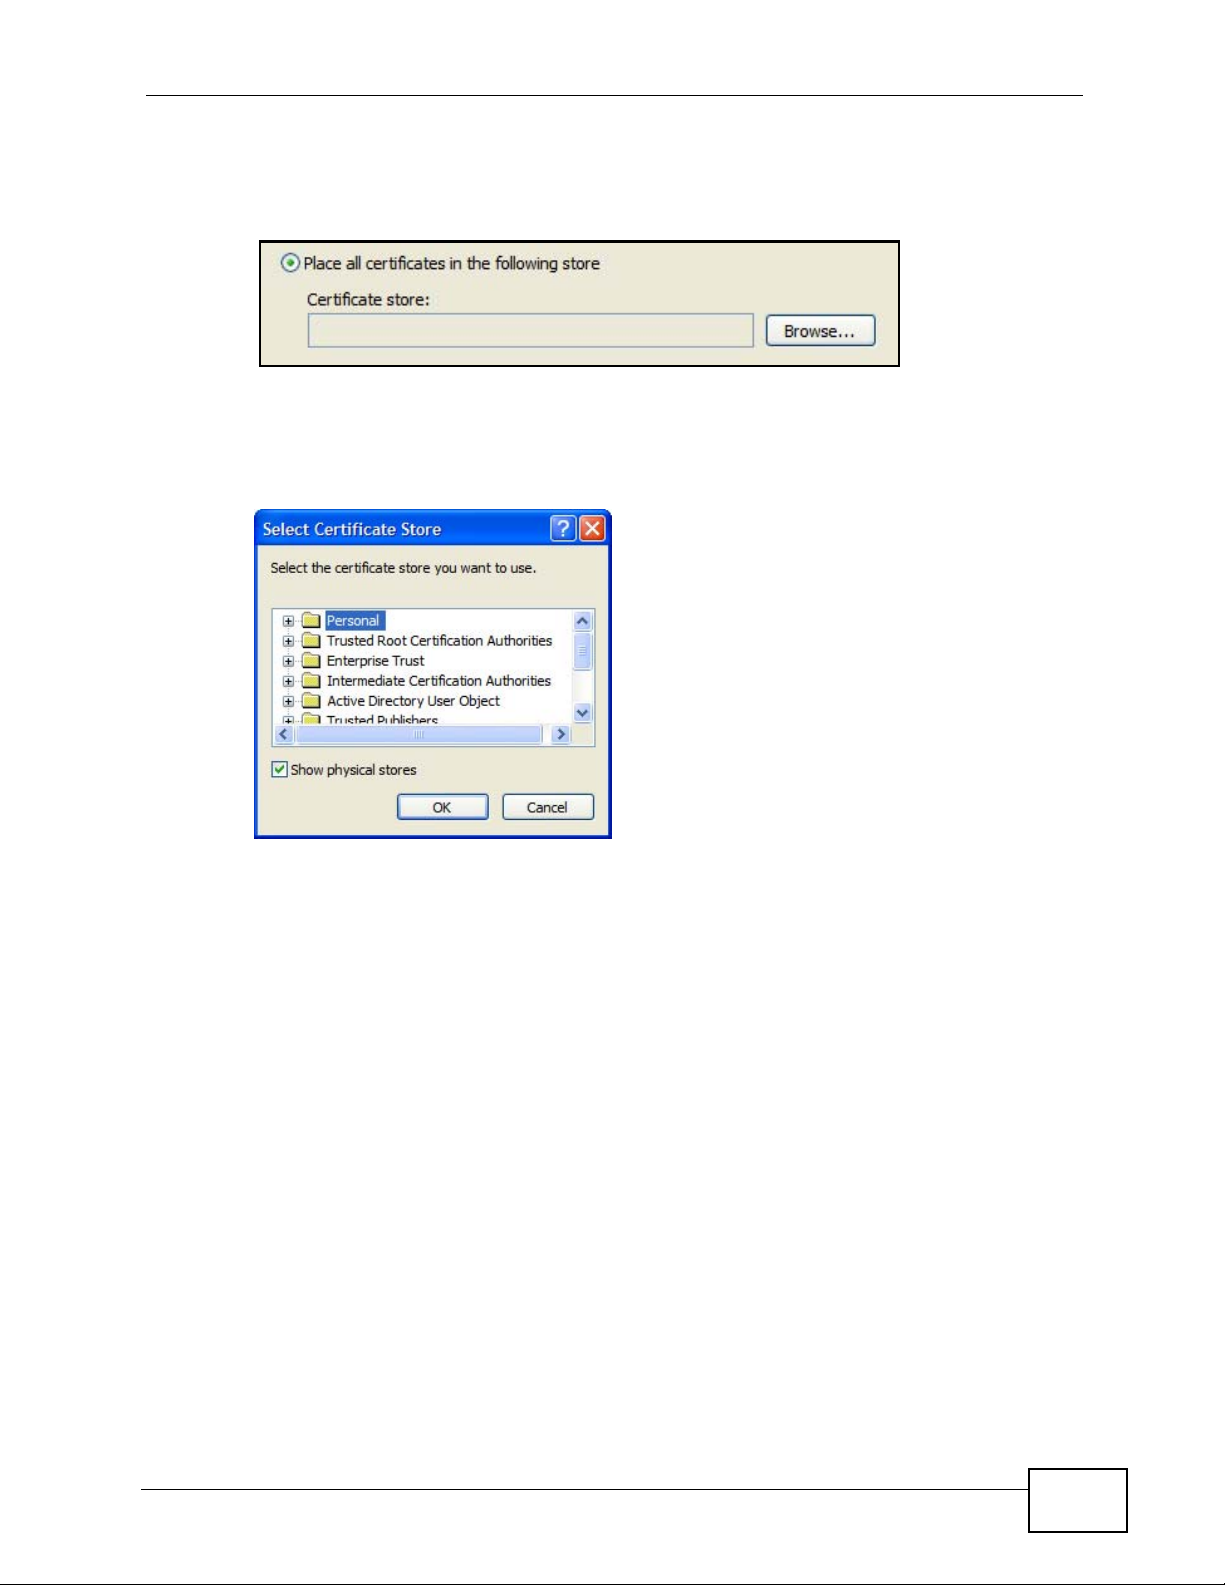
7 Otherwise, select Place all certificates in the following store and then click
Browse.
Figure 130 Internet Explorer 7: Certificate Import Wizard
8 In the Select Certificate Store dialog box, choose a location in which to save the
certificate and then click OK.
Figure 131 Internet Explorer 7: Select Certificate Store
User’s Guide
245
Page 15
Appendix E Importing Certificates
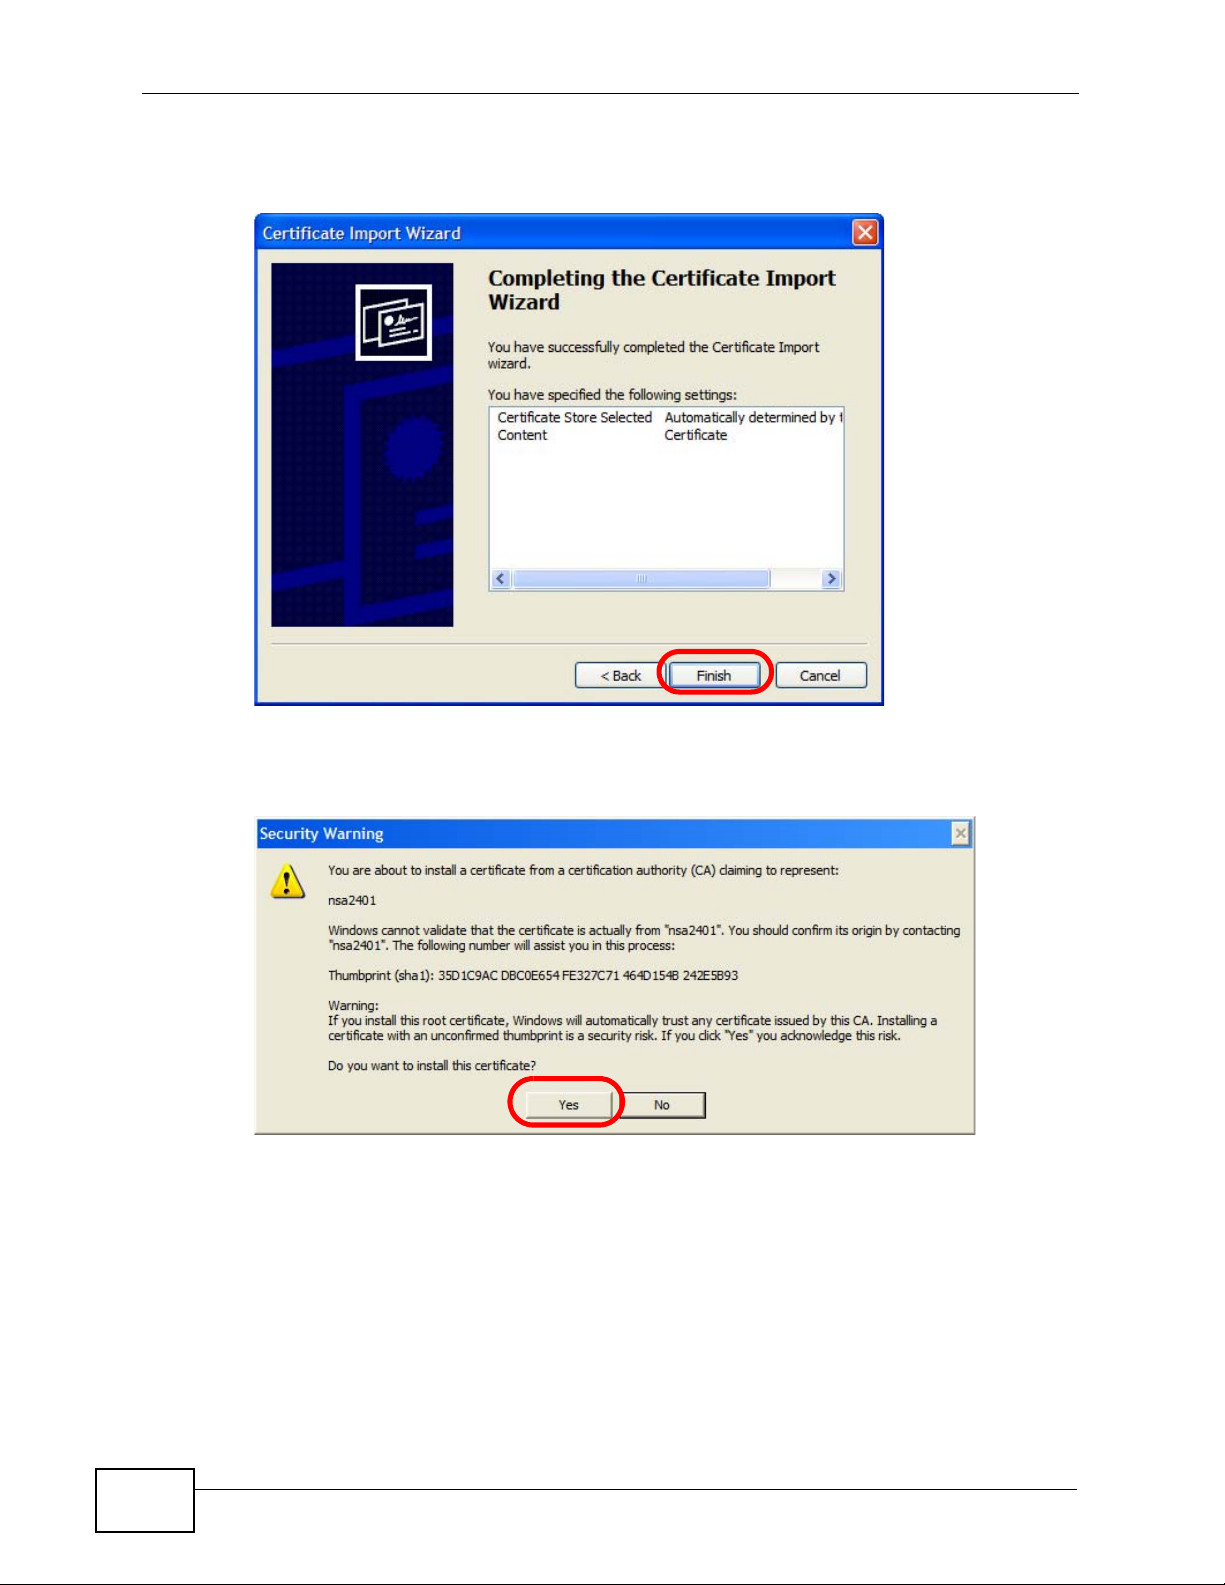
9 In the Completing the Certificate Import Wizard screen, click Finish.
Figure 132 Internet Explorer 7: Certificate Import Wizard
10 If you are presented with another Security Warning, click Yes.
Figure 133 Internet Explorer 7: Security Warning
246
User’s Guide
Page 16

Appendix E Importing Certificates
11 Finally, click OK when presented with the successful certificate installation
message.
Figure 134 Internet Explorer 7: Certificate Import Wizard
12 The next time you start Internet Explorer and go to a ZyXEL web configurator
page, a sealed padlock icon appears in the address bar. Click it to view the page’s
Website Identification information.
Figure 135 Internet Explorer 7: Website Identification
User’s Guide
247
Page 17
Appendix E Importing Certificates
Installing a Stand-Alone Certificate File in Internet Explorer
Rather than browsing to a ZyXEL web configurator and installing a public key
certificate when prompted, you can install a stand-alone certificate file if one has
been issued to you.
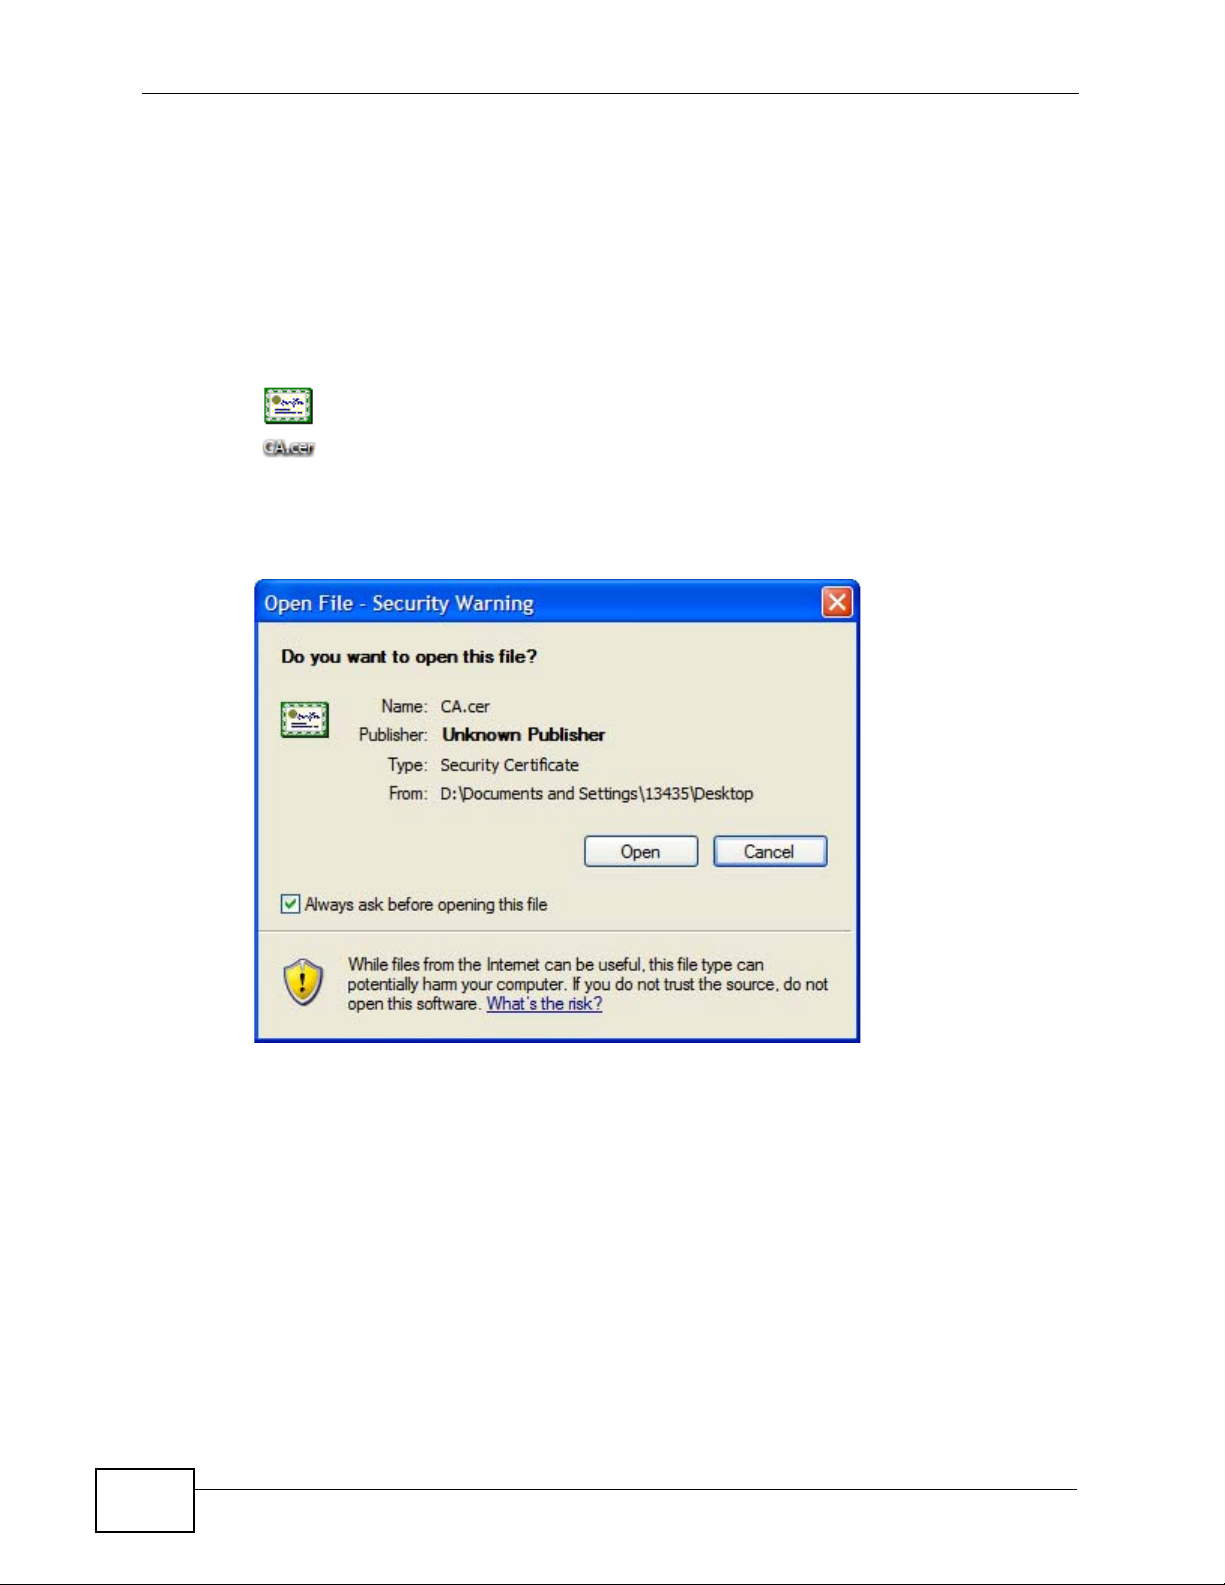
1 Double-click the public key certificate file.
Figure 136 Internet Explorer 7: Public Key Certificate File
2 In the security warning dialog box, click Open.
Figure 137 Internet Explorer 7: Open File - Security Warning
248
3 Refer to steps 4-12 in the Internet Explorer procedure beginning on page 242 to
complete the installation process.
User’s Guide
Page 18
Removing a Certificate in Internet Explorer
This section shows you how to remove a public key certificate in Internet Explorer
7.
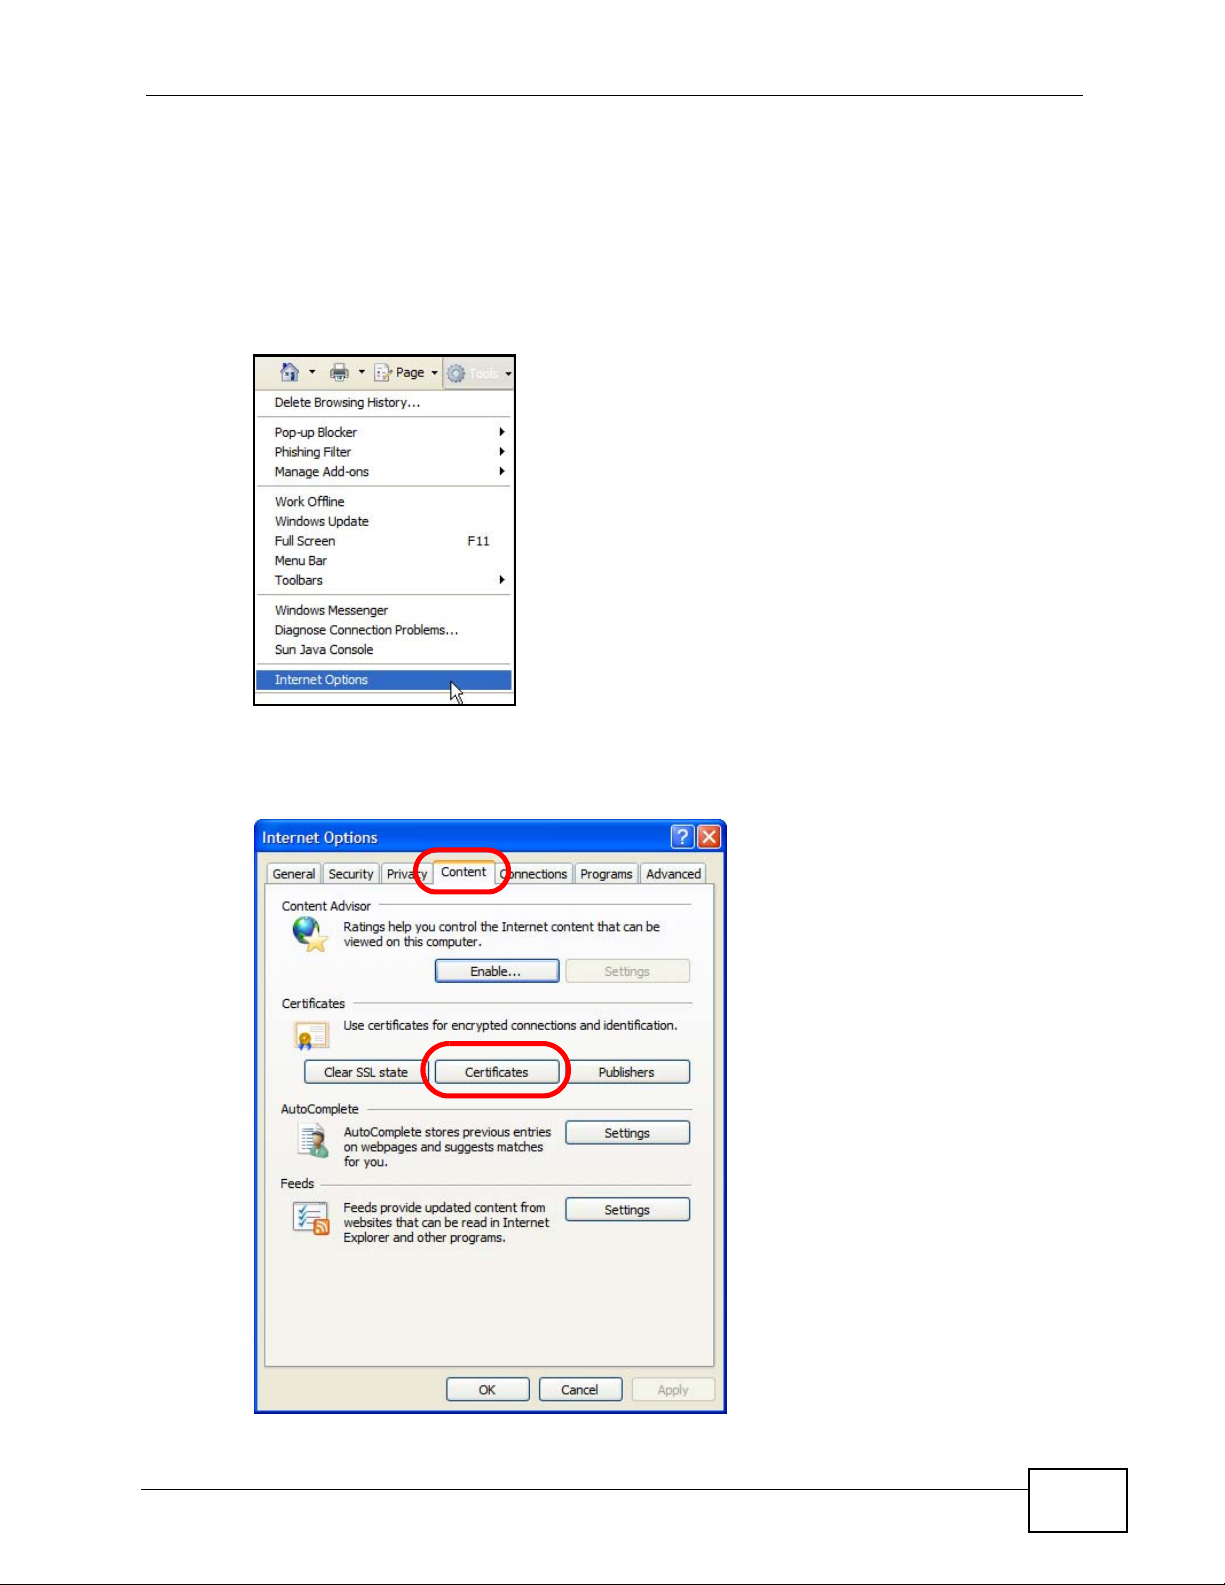
1 Open Internet Explorer and click TOOLS > Internet Options.
Figure 138 Internet Explorer 7: Tools Menu
Appendix E Importing Certificates
2 In the Internet Options dialog box, click Content > Certificates.
Figure 139 Internet Explorer 7: Internet Options
User’s Guide
249
Page 19

Appendix E Importing Certificates
3 In the Certificates dialog box, click the Trusted Root Certificates Authorities
tab, select the certificate that you want to delete, and then click Remove.
Figure 140 Internet Explorer 7: Certificates
4 In the Certificates confirmation, click Yes.
Figure 141 Internet Explorer 7: Certificates
5 In the Root Certificate Store dialog box, click Yes.
Figure 142 Internet Explorer 7: Root Certificate Store
250
User’s Guide
Page 20

Appendix E Importing Certificates
6 The next time you go to the web site that issued the public key certificate you just
removed, a certification error appears.
User’s Guide
251
Page 21

Appendix E Importing Certificates
Firefox
The following example uses Mozilla Firefox 2 on Windows XP Professional;
however, the screens can also apply to Firefox 2 on all platforms.
1 If your device’s web configur ator is set t o use SSL c ertification, t hen the first time
you browse to it you are presented with a certification error.
2 Select Accept this certificate permanently and click OK.
Figure 143 Firefox 2: Website Certified by an Unknown Authority
252
User’s Guide
Page 22

Appendix E Importing Certificates
3 The certificate is stored and you can now connect securely to the web configurator.
A sealed padlock appears in the address bar, which you can click to open the Page
Info > Security window to view the web page’s security information.
Figure 144 Firefox 2: Page Info
User’s Guide
253
Page 23

Appendix E Importing Certificates
Installing a Stand-Alone Certificate File in Firefox
Rather than browsing to a ZyXEL web configurator and installing a public key
certificate when prompted, you can install a stand-alone certificate file if one has
been issued to you.
1 Open Firefox and click TOOLS > Options.
Figure 145 Firefox 2: Tools Menu
2 In the Options dialog box, click ADVANCED > Encryption > View Certificates.
Figure 146 Firefox 2: Options
254
User’s Guide
Page 24

Appendix E Importing Certificates
3 In the Certificate Manager dialog box, click Web Sites > Import.
Figure 147 Firefox 2: Certificate Manager
4 Use the Select File dialog box to locate the certificate and then click Open.
Figure 148 Firefox 2: Select File
5 The next time you visit the web site, click the padlock in the address bar to open
User’s Guide
the Page Info > Security window to see the web page’s security information.
255
Page 25

Appendix E Importing Certificates
Removing a Certificate in Firefox
This section shows you how to remove a public key certificate in Firefox 2.
1 Open Firefox and click TOOLS > Options.
Figure 149 Firefox 2: Tools Menu
2 In the Options dialog box, click ADVANCED > Encryption > View Certificates.
Figure 150 Firefox 2: Options
256
User’s Guide
Page 26

Appendix E Importing Certificates
3 In the Certificate Manager dialog box, select the Web Sites tab, select the
certificate that you want to remove, and then click Delete.
Figure 151 Firefox 2: Certificate Manager
4 In the Delete Web Site Certificates dialog box, click OK.
Figure 152 Firefox 2: Delete Web Site Certificates
5 The next time you go to the web site that issued the public key certificate you just
removed, a certification error appears.
User’s Guide
257
Page 27

Appendix E Importing Certificates
Opera
The following example uses Opera 9 on Windows XP Professional; however, the
screens can apply to Opera 9 on all platforms.
1 If your device’s web configur ator is set t o use SSL c ertification, t hen the first time
you browse to it you are presented with a certification error.
2 Click Install to accept the certificate.
Figure 153 Opera 9: Certificate signer not found
258
User’s Guide
Page 28

Appendix E Importing Certificates
3 The next time you visit the web site, click the padlock in the address bar to open
the Security information window to view the web page’s security details.
Figure 154 Opera 9: Security information
User’s Guide
259
Page 29

Appendix E Importing Certificates
Installing a Stand-Alone Certificate File in Opera
Rather than browsing to a ZyXEL web configurator and installing a public key
certificate when prompted, you can install a stand-alone certificate file if one has
been issued to you.
1 Open Opera and click TOOLS > Preferences.
Figure 155 Opera 9: Tools Menu
260
User’s Guide
Page 30

Appendix E Importing Certificates
2 In Preferences, click ADVANCED > Security > Manage certificates.
Figure 156 Opera 9: Preferences
User’s Guide
261
Page 31

Appendix E Importing Certificates
3 In the Certificates Manager, click Authorities > Import.
Figure 157 Opera 9: Certificate manager
4 Use the Import certificate dialog box to locate the certificate and then click
Open.
Figure 158 Opera 9: Import certificate
262
User’s Guide
Page 32

Appendix E Importing Certificates
5 In the Install authority certificate dialog box, click Install.
Figure 159 Opera 9: Install authority certificate
6 Next, click OK.
Figure 160 Opera 9: Install authority certificate
7 The next time you visit the web site, click the padlock in the address bar to open
the Security information window to view the web page’s security details.
User’s Guide
263
Page 33

Appendix E Importing Certificates
Removing a Certificate in Opera
This section shows you how to remove a public key certificate in Opera 9.
1 Open Opera and click TOOLS > Preferences.
Figure 161 Opera 9: Tools Menu
2 In Preferences, ADVANCED > Security > Manage certificates.
Figure 162 Opera 9: Preferences
264
User’s Guide
Page 34

Appendix E Importing Certificates
3 In the Certificates manager, select the Authorities tab, select the certificate
that you want to remove, and then click Delete.
Figure 163 Opera 9: Certificate manager
4 The next time you go to the web site that issued the public key certificate you just
removed, a certification error appears.
Note: There is no confirmation when you delete a certificate authority, so be
absolutely certain that you want to go through with it before clicking the button.
User’s Guide
265
Page 35

Appendix E Importing Certificates
Konqueror
The following example uses Konqueror 3.5 on openSUSE 10.3, however the
screens apply to Konqueror 3.5 on all Linux KDE distributions.
1 If your device’s web configur ator is set t o use SSL c ertification, t hen the first time
you browse to it you are presented with a certification error.
2 Click Continue.
Figure 164 Konqueror 3.5: Server Authentication
3 Click Forever when prompted to accept the certificate.
Figure 165 Konqueror 3.5: Server Authentication
266
User’s Guide
Page 36

Appendix E Importing Certificates
4 Click the padlock in the address bar to open the KDE SSL Information window
and view the web page’s security details.
Figure 166 Konqueror 3.5: KDE SSL Information
User’s Guide
267
Page 37

Appendix E Importing Certificates
Installing a Stand-Alone Certificate File in Konqueror
Rather than browsing to a ZyXEL web configurator and installing a public key
certificate when prompted, you can install a stand-alone certificate file if one has
been issued to you.
1 Double-click the public key certificate file.
Figure 167 Konqueror 3.5: Public Key Certificate File
2 In the Certificate Import Result - Kleopatra dialog box, click OK.
Figure 168 Konqueror 3.5: Certificate Import Result
The public key certificate appears in the KDE certificate manager, Kleopatra.
Figure 169 Konqueror 3.5: Kleopatra
268
User’s Guide
Page 38

Appendix E Importing Certificates
3 The next time you visit the web site, click the padlock in the address bar to open
the KDE SSL Information window to view the web page’s security details.
User’s Guide
269
Page 39

Appendix E Importing Certificates
Removing a Certificate in Konqueror
This section shows you how to remove a public key certificate in Konqueror 3.5.
1 Open Konqueror and click Settings > Configure Konqueror.
Figure 170 Konqueror 3.5: Settings Menu
2 In the Configure dialog box, select Crypto.
3 On the Peer SSL Certificates tab, select the certificate you want to delete and
then click Remove.
Figure 171 Konqueror 3.5: Configure
270
4 The next time you go to the web site that issued the public key certificate you just
removed, a certification error appears.
User’s Guide
Page 40

Appendix E Importing Certificates
Note: There is no confirmation when you remove a certificate authority, so be
absolutely certain you want to go through with it before clicking the button.
User’s Guide
271
Page 41

Appendix E Importing Certificates
272
User’s Guide
Page 42

APPENDIX F
SIP Passthrough
Enabling/Disabling the SIP ALG
You can turn off the WiMAX Modem SIP ALG to avoid retranslating the IP address
of an existing SIP device that is using STUN. If you wa nt to use STUN with a SIP
client device (a SIP phone or IP phone for example) behind the WiMAX Modem,
use the ip alg disable ALG_SIP command to turn off the SIP ALG.
Signaling Session Timeout
Most SIP clients have an “expire” mechanism indicating the lifetime of signaling
sessions. The SIP UA sends registration pa ck ets to the SIP server periodically and
keeps the session alive in the WiMAX Modem.
If the SIP client does not have this mechanism and makes no call during the
WiMAX Modem SIP timeout default (60 minutes), the WiMAX Modem SIP ALG
drops any incoming calls after the timeout period. You can use the ip alg
siptimeout command to change the timeout value.
Audio Session Timeout
If no voice packets go through the SIP ALG before the timeout period default (5
minutes) expires, the SIP ALG does not drop the call but blocks all voice tr affic and
deletes the audio session. You cannot hear anything and you will need to make a
new call to continue your conversation.
User’s Guide
273
Page 43

Appendix F SIP Passthrough
274
User’s Guide
Page 44

APPENDIX G
Common Services
The following table lists some commonly-used services and their associated
protocols and port numbers. Fo r a comprehe nsive li st of port numbers, ICMP type/
code numbers and services, visit the IANA (Internet Assigned Number Authority)
web site.
• Name: This is a short, descriptive name for the service. You can use this one or
create a different one, if you like.
• Protocol: This is the type of IP protocol used by the service. If this is TCP/
UDP, then the service uses the same port number with TCP and UDP. If this is
USER-DEFINED, the Port(s) is the IP protocol number, not the port number.
• Port(s): This value depends on the Protocol. Please refer to RFC 1700 for
further information about port numbers.
•If the Protocol is TCP, UDP, or TCP/UDP, this is the IP port number.
•If the Protocol is USER, this is the IP protocol number.
• Description: This is a brief explanation of the applications that use this service
or the situations in which this service is used.
Table 82 Commonly Used Services
NAME PROTOCOL PORT(S) DESCRIPTION
AH
(IPSEC_TUNNEL)
AIM/New-ICQ TCP 5190 AOL’s Internet Messenger service. It
AUTH TCP 113 Authentication protocol used by some
BGP TCP 179 Border Gateway Protocol.
BOOTP_CLIENT UDP 68 DHCP Client.
BOOTP_SERVER UDP 67 DHCP Server.
CU-SEEME TCP
DNS TCP/UDP 53 Domain Name Server, a service that
User-Defined 51 The IPSEC AH (Authentication
Header) tunneling protocol uses this
service.
is also used as a listening port by
ICQ.
servers.
UDP
7648
24032
A popular videoconferencing solution
from White Pines Software.
matches web names (for example
www.zyxel.com) to IP numbers.
User’s Guide
275
Page 45

Appendix G Common Services
Table 82 Commonly Used Services (continued)
NAME PROTOCOL PORT(S) DESCRIPTION
ESP
(IPSEC_TUNNEL)
FINGER TCP 79 Finger is a UNIX or Internet related
FTP TCP
H.323 TCP 1720 NetMeeting uses this protocol.
HTTP TCP 80 Hyper Text Transfer Protocol - a
HTTPS TCP 443 HT TPS is a secured http session often
ICMP User-Defined 1 Internet Control Message Protocol is
ICQ UDP 4000 This is a popular Internet chat
IGMP
(MULTICAST)
IKE UDP 500 The Internet Key Exchange algorithm
IRC TCP/UDP 6667 This is another popular Internet chat
MSN Messenger TCP 1863 Microsoft Networks’ messenger
NEW-ICQ TCP 5190 An Internet chat program.
NEWS TCP 144 A protocol for news groups.
NFS UDP 2049 Network File System - NFS is a client/
NNTP TCP 119 Network News Transport Protocol is
PING User-Defined 1 Packet INternet Groper is a protocol
POP3 TCP 110 Post Office Protocol version 3 lets a
User-Defined 50 The IPSEC ESP (Encapsulation
Security Protocol) tunneling protocol
uses this service.
command that can be used to find out
if a user is logged on.
20
TCP
User-Defined 2 Internet Group Management Protocol
21
File Transfer Program, a program to
enable fast transfer of files, including
large files that may not be possible by
e-mail.
client/server protocol for the world
wide web.
used in e-commerce.
often used for diagnostic or routing
purposes.
program.
is used when sending packets to a
specific group of hosts.
is used for key distribution and
management.
program.
service uses this protocol.
server distributed file service that
provides transparent file sharing for
network environments.
the delivery mechanism for the
USENET newsgroup service.
that sends out ICMP echo requests to
test whether or not a remote host is
reachable.
client computer get e-mail from a
POP3 server through a temporary
connection (TCP/IP or other).
276
User’s Guide
Page 46

Appendix G Common Services
Table 82 Commonly Used Services (continued)
NAME PROTOCOL PORT(S) DESCRIPTION
PPTP TCP 1723 Point-to-Point Tunneling Protocol
enables secure transfer of data over
public networks. This is the control
channel.
PPTP_TUNNEL
(GRE)
RCMD TCP 512 Remote Command Service.
REAL_AUDIO TCP 7070 A streaming audio service that
REXEC TCP 514 Remote Execution Daemon.
RLOGIN TCP 513 Remote Login.
RTELNET TCP 107 Remote Telnet.
RTSP TCP/UDP 554 The Real Time Streaming (media
SFTP TCP 115 Simple File Transfer Protocol.
SMTP TCP 25 Simple Mail Transfer Protocol is the
SNMP TCP/UDP 161 Simple Network Management
SNMP-TRAPS TCP/UDP 162 Traps for use with the SNMP
SQL-NET TCP 1521 Structured Query Language is an
SSH TCP/UDP 22 Secure Shell Remote Login Program.
STRM WORKS UDP 1558 Stream Works Protocol.
SYSLOG UDP 514 Syslog allows you to send system logs
TACACS UDP 49 Login Host Protocol used for (T erminal
TELNET TCP 23 Telnet is the login and terminal
User-Defined 47 PPTP (Point-to-Point Tunneling
Protocol) enables secure transfer of
data over public networks. This is the
data channel.
enables real time sound over the web.
control) Protocol (RTSP) is a remote
control for multimedia on the
Internet.
message-exchange standard for the
Internet. SMTP enables you to move
messages from one e-mail server to
another.
Program.
(RFC:1215).
interface to access data on many
different types of database systems,
including mainframes, midrange
systems, UNIX systems and network
servers.
to a UNIX server.
Access Controller Access Control
System).
emulation protocol common on the
Internet and in UNIX environments. It
operates over TCP/IP networks. Its
primary function is to allow users to
log into remote host systems.
User’s Guide
277
Page 47

Appendix G Common Services
Table 82 Commonly Used Services (continued)
NAME PROTOCOL PORT(S) DESCRIPTION
TFTP UDP 69 Trivial File Transfer Protocol is an
VDOLIVE TCP 7000 Another videoconferencing solution.
Internet file transfer protocol similar
to FTP, but uses the UDP (User
Datagram Protocol) rather than TCP
(Transmission Control Protocol).
278
User’s Guide
Page 48

APPENDIX H
Legal Information
Copyright
Copyright © 2009 by ZyXEL Communications Corporation.
The contents of this publication may not be reproduced in any part or as a whole,
transcribed, stored in a retrieval system, translated into any language, or
transmitted in any form or by any means, electronic, mechanical, magnetic,
optical, chemical, photocopying, manual, or otherwise, without the prior written
permission of ZyXEL Communications Corporation.
Published by ZyXEL Communications Corporation. All rights reserved.
Disclaimers
ZyXEL does not assume any liability arising out of the application or use of any
products, or software described herein. Neither does it convey any license under
its patent rights nor the patent rights of others. ZyXEL further reserves the right
to make changes in any products described herein without notice. This publication
is subject to change without notice.
Your use of the WiMAX Modem is subject to the terms and conditions of any
related service providers.
Do not use the WiMAX Modem for illegal purposes. Illegal downloading or sharing
of files can result in severe civil and criminal penalties. You are subject to the
restrictions of copyright laws and any other applicable laws, and will bear the
consequences of any infringements thereof. ZyXEL bears NO responsibility or
liability for your use of the download service feature.
Trademarks
Trademarks mentioned in this publication are used for identification purposes only
and may be properties of their respective owners.
User’s Guide
279
Page 49

Appendix H Legal Information
Certifications
Federal Communications Commission (FCC) Interference Statement
The device complies with Part 15 of FCC rules. Operation is subject to the
following two conditions:
• This device may not cause harmful interference.
• This device must accept any interference received, including interference that
may cause undesired operations.
This device has been tested and found to comply with the limits for a Class B
digital device pursuant to Part 15 of the FCC Rules. These limits are designed to
provide reasonable protection against harmful interference in a residential
installation. This device generates, uses, and can radiate radio frequency energy,
and if not installed and used in accordance with the instructions, may cause
harmful interference to radio communications. However, there is no guarantee
that interference will not occur in a particular installation.
If this device does cause harmful interference to radio/televisi on reception, which
can be determined by turning the device off and on, the user is encouraged to try
to correct the interference by one or more of the following measures:
1 Reorient or relocate the receiving antenna.
2 Increase the separation between the equipment and the receiver.
3 Connect the equipment into an outlet on a circuit different from that to which the
receiver is connected.
4 Consult the dealer or an experienced radio/TV technician for help.
FCC Radiation Exposure Statement
•This transmitter must not be co-located or operating in conjunction
with any other antenna or transmitter.
• To comply with FCC RF exposure compliance requirements, a separation
distance of at least 20 cm must be maintained between the antenna of this
device and all persons.
280
注意 !
依據 低功率電波輻射性電機管理辦法
第十二條 經型式認證合格之低功率射頻電機,非經許可,公司、商號或使用
者均不得擅自變更頻率、加大功率或變更原設計之特性及功能。
User’s Guide
Page 50

Appendix H Legal Information
第十四條 低功率射頻電機之使用不得影響飛航安全及干擾合法通信;經發現
有干擾現象時,應立即停用,並改善至無干擾時方得繼續使用。
前項合法通信,指依電信規定作業之無線電信。低功率射頻電機須忍
受合法通信或工業、科學及醫療用電波輻射性電機設備之干擾。
本機限在不干擾合法電臺與不受被干擾保障條件下於室內使用。
減少電磁波影響,請妥適使用。
Notices
Changes or modifications not expressly approved by the party responsible for
compliance could void the user's authority to operate the equipment.
This Class B digital apparatus complies with Canadian ICES-003.
Cet appareil numérique de la classe B est conforme à la norme NMB-003 du
Canada.
Viewing Certifications
1 Go to http://www.zyxel.com.
2 Select your product on the ZyXEL home page to go to that product's page.
3 Select the certification you wish to view from this page.
ZyXEL Limited Warranty
ZyXEL warrants to the original end user (purchaser) that this product is free from
any defects in materials or workmanship for a period of up to two years from the
date of purchase. During the warranty period, and upon proof of purchase, should
the product have indications of failure due to faulty workmanship and/or
materials, ZyXEL will, at its discretion, repair or replace the defective products or
components without charge for either parts or labor, and to whatever extent it
shall deem necessary to restore the product or components to proper operating
condition. Any replacement will consist of a new or re-manufactured functionally
equivalent product of equal or higher value, and will be solely at the discretion of
ZyXEL. This warranty shall not apply if the product has been modified, misused,
tampered with, damaged by an act of God, or subjected to abnormal working
conditions.
User’s Guide
Note
Repair or replacement, as provided under this warr anty, is the exclusive remedy of
the purchaser. This warranty is in lieu of all other warranties, express or implied,
281
Page 51

Appendix H Legal Information
including any implied warranty of merchantability or fitness for a particul ar use or
purpose. ZyXEL shall in no event be held liable for indirect or consequential
damages of any kind to the purchaser.
To obtain the services of this warr ant y, contact your vendor . You may also refer to
the warranty policy for the region in which you bought the device at htt p://
www.zyxel.com/web/support_warranty_info.php.
Registration
Register your product online to receive e-mail notices of firmware upgrades and
information at www.zyxel.com.
282
User’s Guide
Page 52

Index
Index
Numerics
802.11 mode 68
A
AAA 78–79
AbS 114
access point, See AP 59
accounting server
see AAA
ACK message 121
activity 78
Advanced Encryption Standard
see AES
AES 189
alternative subnet mask notation 232
analysis-by-synthesis 114
AP (Access Point) 59
authentication 78, 80, 187
inner 190
key
server 78
types 190
authentication type 60
open system 61
shared key 61
authorization 187
request and reply 189
server 78
B
base station
see BS
BS 77–78
links 78
BYE request 121
C
CA 145
call
Europe type service mode 133
hold 133–135
service mode 133–134
transfer 134–135
waiting 133–135
CBC-MAC 189
CCMP 187, 189
cell 77
certificates 145, 187
importing 146
verification 189
certification
authority, see CA
notices 281
requests 145
viewing 281
chaining 189
chaining message authentication
see CCMP
channel ID 64
circuit-switched telephone networks 109
Class of Service (CoS) 124
client-server
protocol 122
SIP 122
CMAC
see MAC
codec 113
comfort noise 127
copyright 279
CoS 124
counter mode
see CCMP
coverage area 77
cryptography 187
User’s Guide
283
Page 53

Index
D
data 187–189
decryption 187
encryption 187
flow 189
DHCP 32, 46, 100
client 100
server 32, 46
diameter 79
Differentiated Services
see DiffServ
DiffServ 124
DiffServ Code Point (DSCP) 124
marking rule 125
digital ID 187
DL frequency 86
domain name 100
download frequency
see DL frequency
DS field 125
DSCP
see DiffServ
dynamic DNS 100
Dynamic Host Configuration Protocol
see DHCP
flash key 132
flashing 132
fragmentation threshold 68
frequency
band 87
ranges 86
scanning 87
FTP 100, 150
restrictions 150
G
G.168 127
G.711 113
G.729 114
H
hide SSID 64
hybrid waveform codec 114
I
E
EAP 79
echo cancellation 127
encryption 187–189
traffic 189
encryption type 60
Ethernet
encapsulation 91
Europe type call service mode 133
Extensible Authorization Protocol
see EAP
F
FCC interference statement 280
IANA 238
identity 78, 187
idle timeout 150
IEEE 802.11b 68
IEEE 802.11g 68
IEEE 802.16 77, 187
IEEE 802.16e 77
IEEE 802.1Q VLAN 120
importing a certificate 146
inner authentication 190
Internet
access 79
Internet Assigned Numbers Authority
see IANA 238
Internet Telephony Service Provider
see ITSP
interoperability 77
IP-PBX 109
284
User’s Guide
Page 54

Index
ITSP 109
ITU-T 127
K
key 80, 187
request and reply 189
L
listening port 117
M
MAC 189
MAC address filter 62
action 70
MAC filter 69
MAN 77
Management Information Base (MIB) 154
manual site survey 86
Message Authentication Code
see MAC
message integrity 189
message waiting indication 114
Metropolitan Area Network
see MAN
microwave 77, 78
mobile station
see MS
MS 78
multimedia 110
MWI 114
network
activity 78
services 78
O
OK response 121
outbound proxy 113, 124
server 113
SIP 113
P
pattern-spotting 189
PBX services 109
PCM 113
peer-to-peer calls 137
per-hop behavior 125
PHB (per-hop behavior) 125
phone
services 128
PKMv2 79, 80, 187, 190
plain text encryption 189
preamble 68
Privacy Key Management
see PKM
private key 187
product registration 282
proxy server
SIP 122
public certificate 189
public key 80, 187
public-private key pairs 145
pulse code modulation 113
N
NAT 112, 237
and remote management 150
routers 112
server sets 91
User’s Guide
R
RADIUS 78, 79, 188
Message Types 188
Messages 188
Shared Secret Key 188
285
Page 55

Index
Real-time Transport Protocol
see RTP
redirect server
SIP 123
register server
SIP 110
registration
product 282
related documentation 3
remote management and NAT 150
remote management limitations 150
required bandwidth 114
RFC 1889 110
RFC 3489 113
RFC 3842 114
RTP 110
RTS/CTS threshold 68
S
safety warnings 7
secure communication 80, 187
secure connection 79
security 187
security association 189
see SA
server
outbound proxy 113
service set 64
Service Set IDentification, see SSID
services 78
Session Initiation Protocol
see SIP
silence suppression 127
silent packets 127
SIP 109
account 110
ACK message 121
ALG 124
BYE request 121
call progression 121
client 122
client server 122
identities 110
INVITE request 121
number 110
OK response 121
outbound proxy 113
proxy server 122
redirect server 123
register server 110
servers 122
service domain 110
URI 110
user agent 122
SNMP 150
manager 154
sound quality 113
speed dial 137
SS 77, 78
SSID 64
STUN 113, 124
subnet 229
mask 230
subnetting 232
subscriber station
see SS
supplementary phone services 128
syntax conventions 5
system timeout 150
T
tampering
TCP/IP configuration 32, 46
TEK 189
TFTP restrictions 150
three-way conference 134, 135
TLS 80, 187
transport encryption key
see TEK
transport layer security
see TLS
trigger port forwarding
process 96
TTLS 80, 187, 190
tunneled TLS
see TTLS
286
User’s Guide
Page 56

Index
U
unauthorized device 187
uniform resource identifier 110
USA type call service mode 134
use NAT 124
use NAT feature 110
user agent, SIP 122
user authentication 187
user name 101
V
VAD 127
verification 189
virtual local area network
see VLAN
VLAN 119
group 120
ID tags 120
tags 120
VLAN ID 120
voice
activity detection 127
coding 113
mail 109
Voice over IP
see VoIP
VoIP 109
see MAN
wireless network
access 77
example 59
overview 59
standard 77
wireless security 187
WLAN 59
802.11 mode 68
channel 64
fragmentation threshold 68
hide SSID 64
IEEE 802.11b 68
IEEE 802.11g 68
preamble 68
RTS/CTS thr esh old 68
see also wireless.
WPA-PSK 66
WPA-PSK 66
W
waveform codec 113
WiMAX 77–78
security 189
WiMAX Forum 77
wireless client 59
Wireless Interoperability for Microwave Access
see WiMAX
wireless LAN
channel 64
MAC address filter 62
Wireless Metropolitan Area Network
User’s Guide
287
Page 57

Index
288
User’s Guide
 Loading...