

Page 1
LTE7490-M904
RE S ET
S IM
L AN (P oE )
RE S ET
S IM
L AN (P oE )
4G LTE-A Pro Outdoor Router
Package Contents
LTE7490-M904 Gigabit
Mounting Kit
GbE
Cable
Grounding
Wire
PoE Injector
Cable
Gland
Safety
Warnings
Quick Start
Guide
Quick Start Guide
Location Examples
x6
M6 Washers
x4
Nylon Wall
Plugs
x3 x3
M8 Washers
Tapping Screws
M4x25 mm
M6 Spring
Washers
x4
x6
M8 Spring
Washers
x1 x1 x1 x1x2
Bracket-1 Main Frame U-Type
M Bracket Indoor
x6
M6 Hex
Nuts
x1
M8 Hex
Nut
Screws
See the User's Guide at www.zyxel.com for more information,
including customer support and safety warnings.
EU Importer
Zyxel Communications A/S
Gladsaxevej 378, 2. th. 2860 Søborg, Denmark
https://www.zyxel.com/dk/da/
Copyright © 2020 Zyxel Communications Corp. All Rights Reserved.
Wall Mounting
x1
M8 Hex Bolt
(1.25*120mm)
x2
M8 Screws
Bracket
Pole Mounting
Cat 5e
Power Outlet
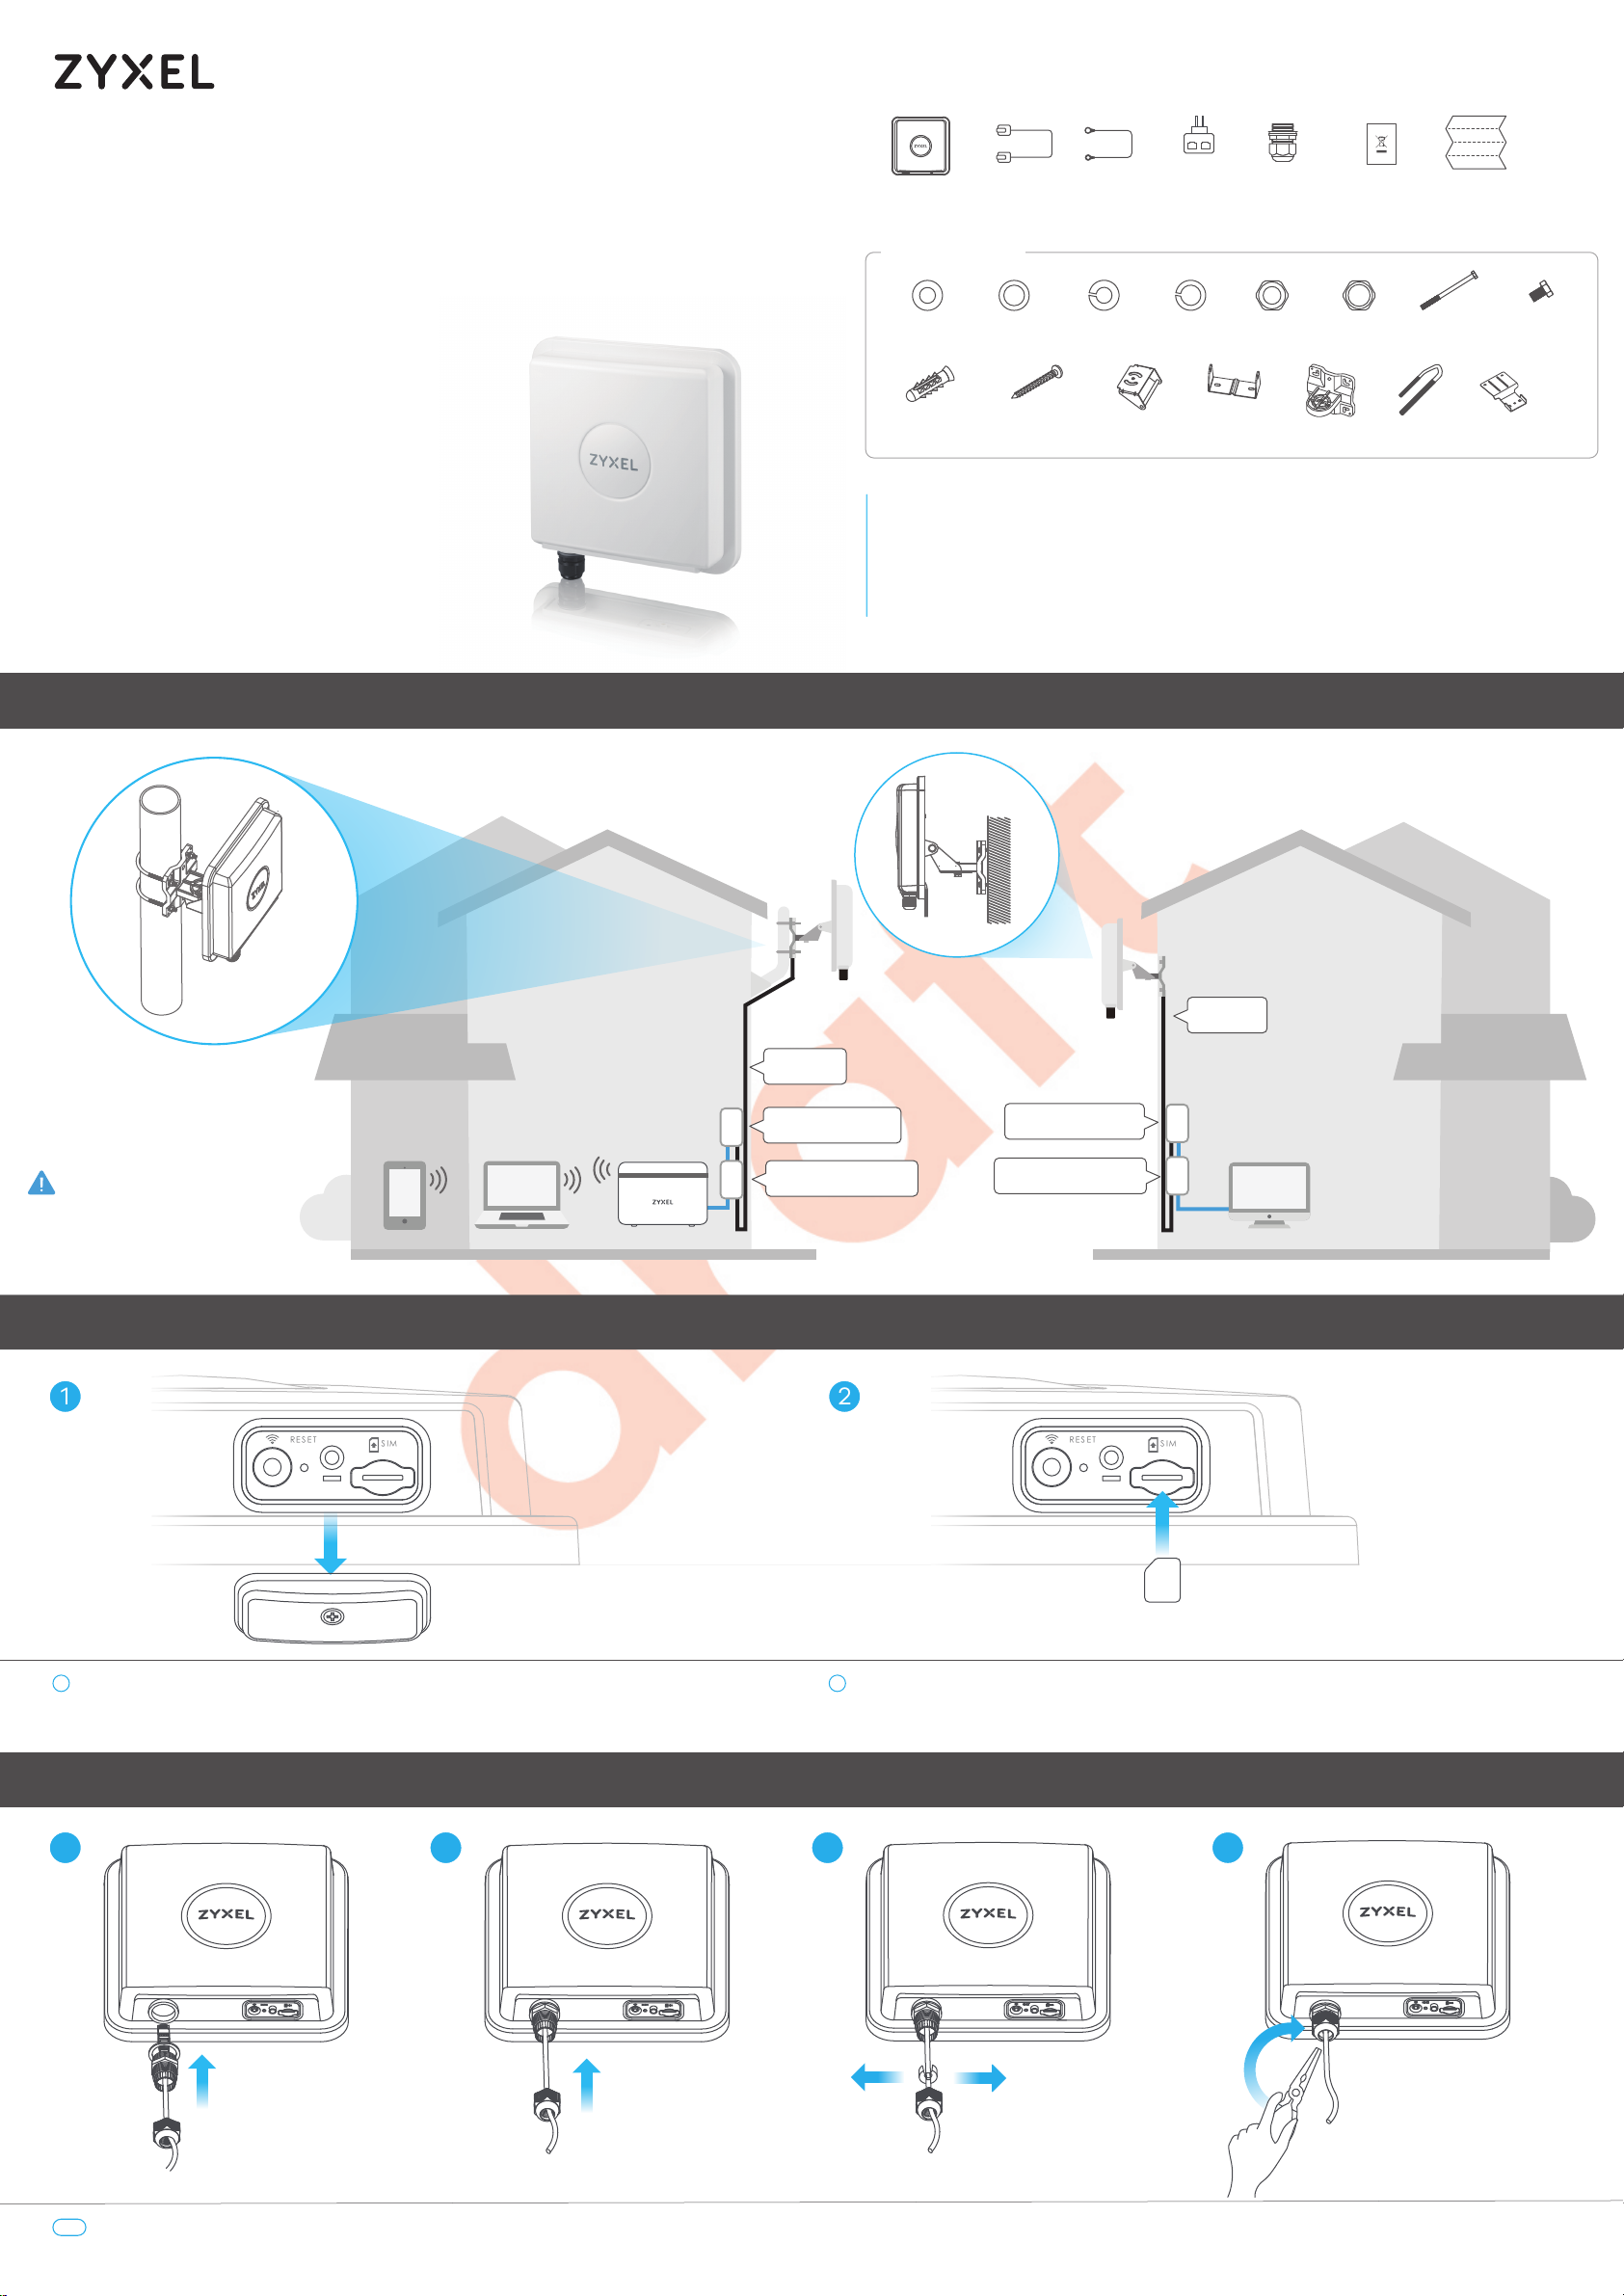
Place the LTE7490 in an open area
free of obstacles, and adjust the angle
to point it towards the base station to
have the strongest possible LTE signal.
LaptopSmartphone
Gateway
Power Injector
Step 1 SIM Card Installation
1 2
Cat 5e
Power Outlet
Power Injector
PC
1
Make sure the LTE7490 is turned off. There should be no Ethernet cable connected providing
power using PoE. Unscrew the SIM card slot cover and remove it.
Step 2 Cable Connections
1 2
1-4
Follow steps 1 to 4 in the drawing to connect an 8-pin Cat 5e Ethernet cable to the LTE7490's LAN port.
2
Insert your SIM card provided by an LTE ISP (Internet Service Provider).
3 4
1/4
Page 2
Step 3 Cable Connections
RE S ET
S IM
L AN (P oE )
RE S ET
S IM
RE S ET
S IM
3
PoE injector
LAN
POE
2
1
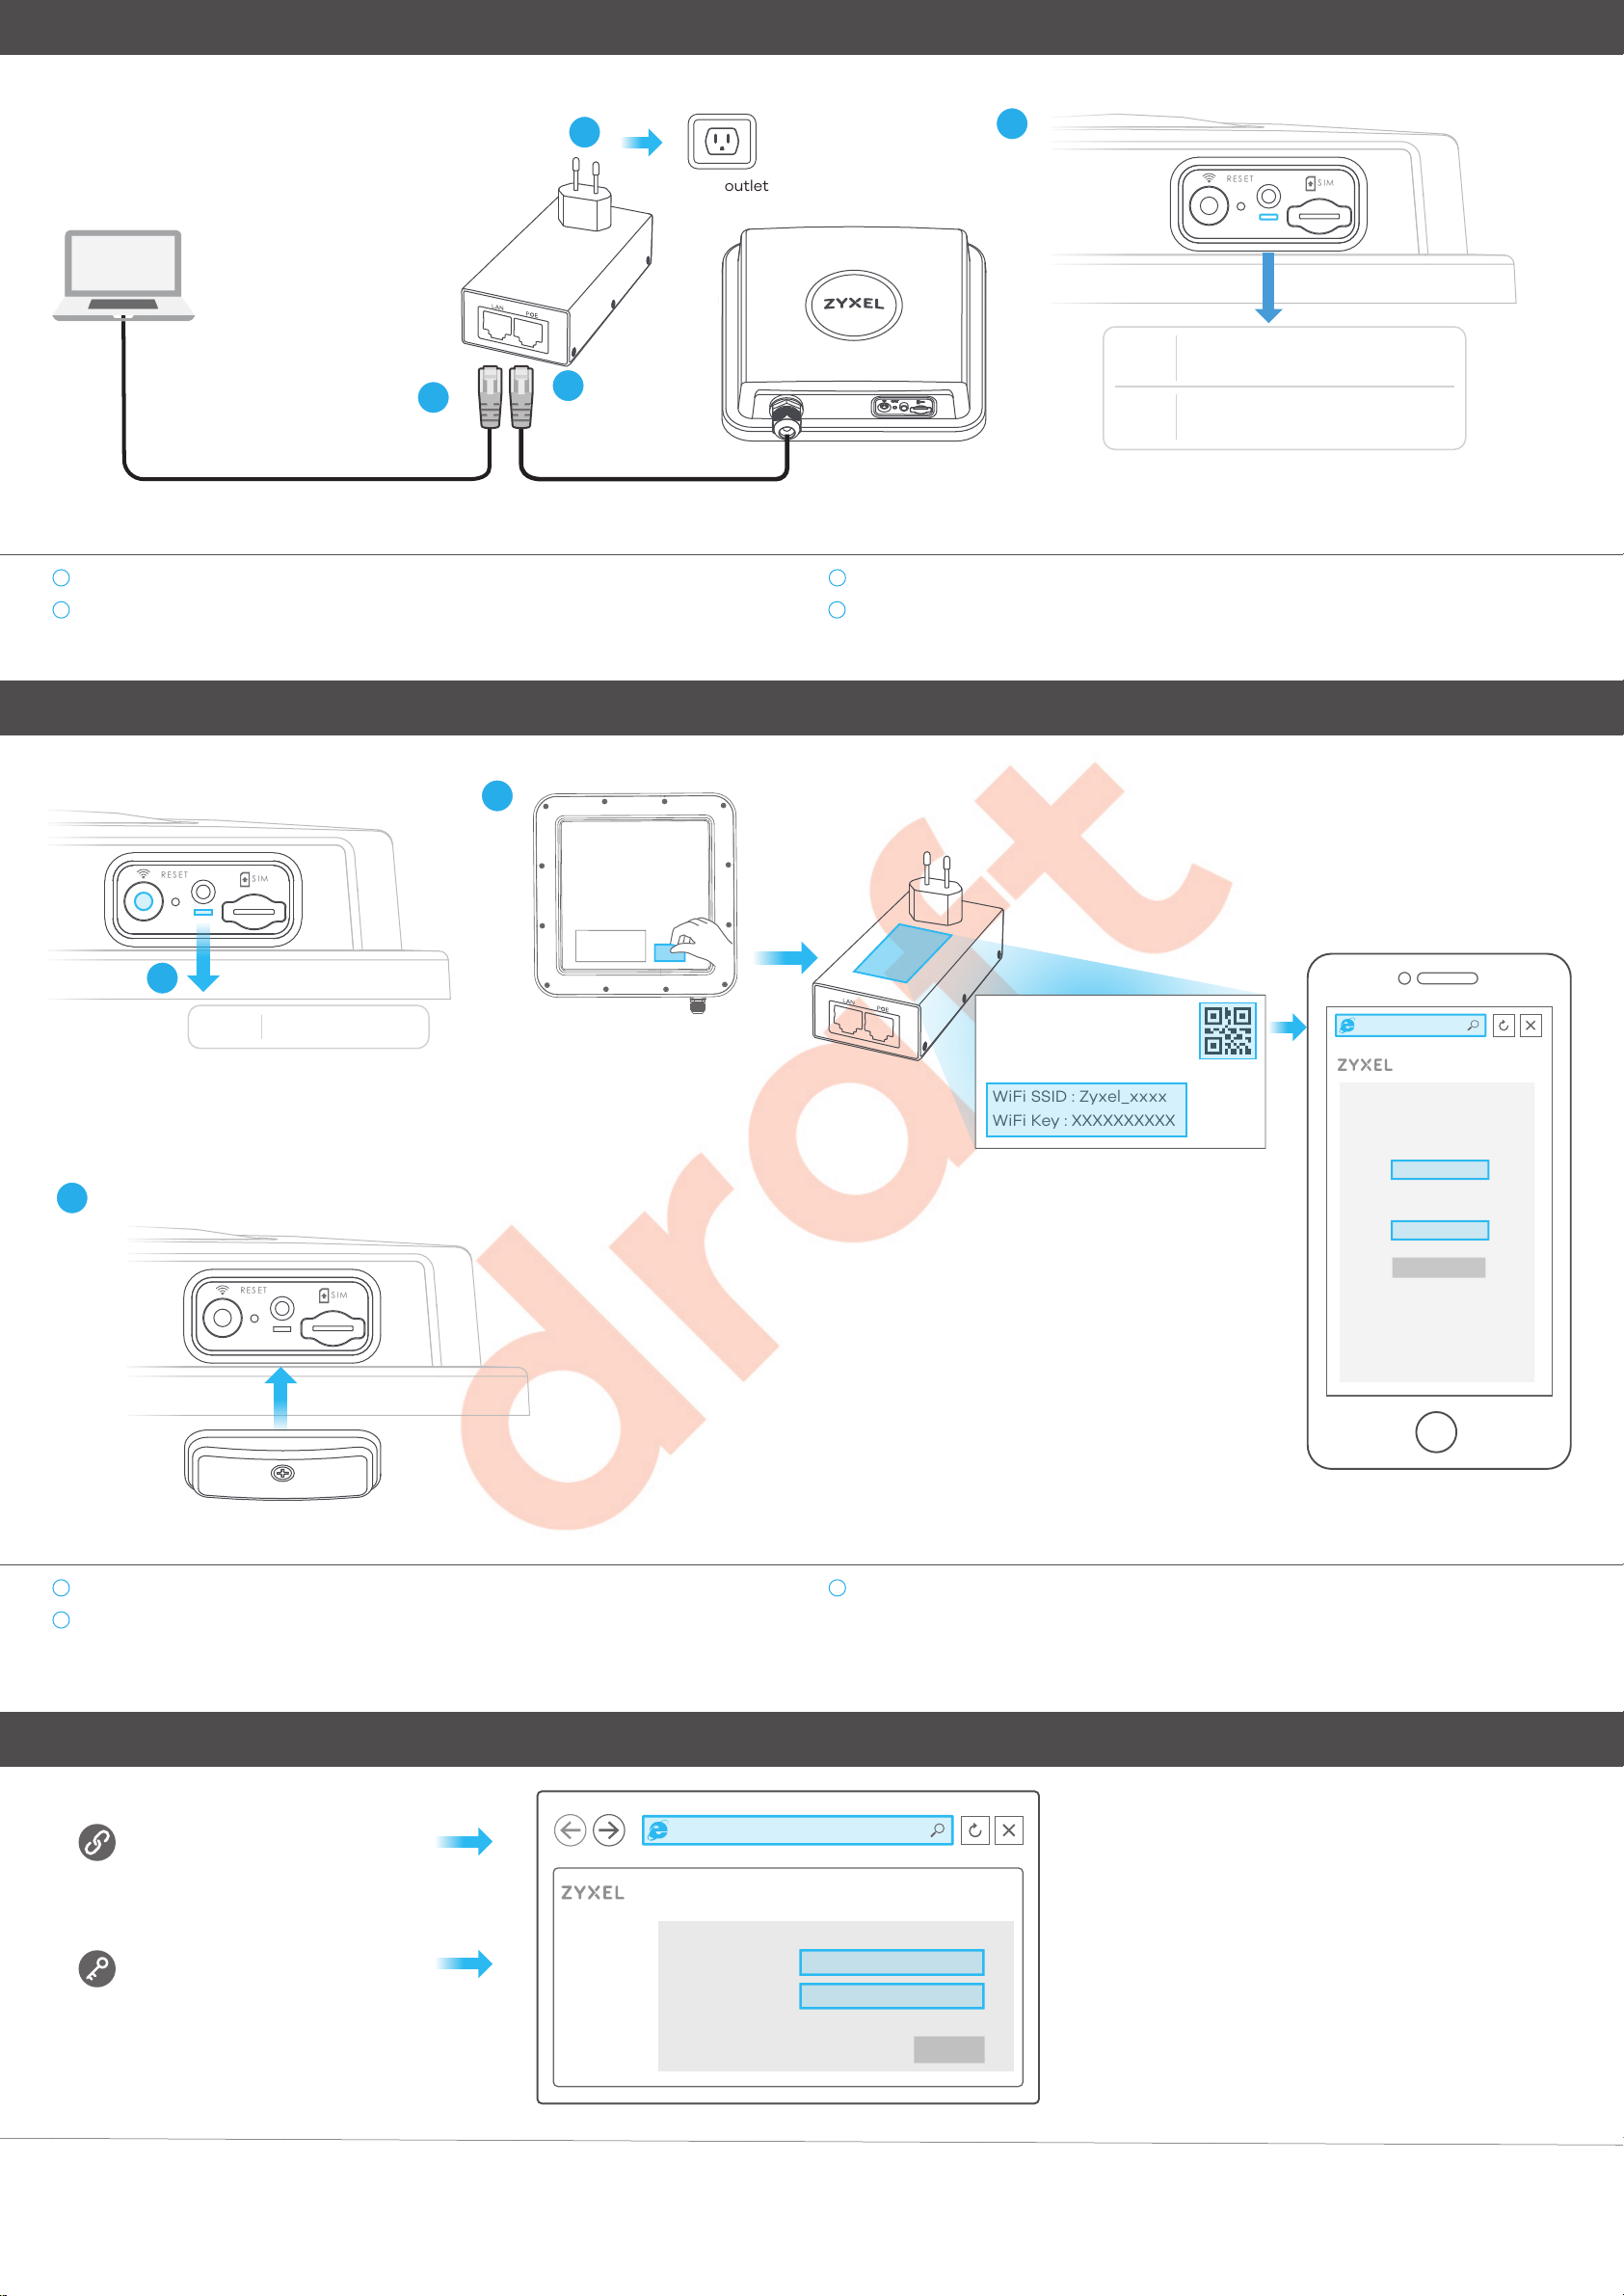
Connect the other end of the Ethernet cable to the provided PoE injector's OUT port.
2
Connect the IN port of the injector to a computer with an Ethernet cable for initial
configuration.
1
Power outlet
4
Red
Green
3
Connect the power plug on the PoE injector to a power outlet.
4
Check the LED next to the SIM card slot.
Blinking - Booting
Steady - Error
Blinking - Connecting to the Internet
Steady - Connected to the Internet
Step 4 Connecting WiFi to Your LTE7490 for Easy Setup
2
1
Amber Blinking - WiFi is on
3
PoE injector
LAN
POE
Login a
ddress : 192.168.1.1
User Name : admin
Login Password : 1234
WiFi SSID : Zyxel_xxxx
WiFi Key : XXXXXXXXXX
Scan the QR code on the device label to see the
SSID and WiFi Key on your smartphone.
https://192.168.1.1
User Name
admin
Password
1234
Login
1
Check if WiFi is on - the amber LED is blinking. If not, press the WiFi button to enable WiFi.
2
Remove the label from the back of the LTE7490 and put it on the injector. Connect to the
LTE7490 WiFi network using the WIFI SSID and WIFI Key on the injector label, or on your
smartphone simply scan the QR code to connect.
Configuring Your LTE7490 (Optional)
https://192.168.1.1
LTE7490-M904
https://192.168.1.1
3
Screw the SIM card slot cover back into place.
Desktop Version
User Name: admin
Login Password: 1234
Open a web browser and go to https://192.168.1.1.
Enter the default username (admin) and password (see label), and then click Login.
See the User’s Guide at www.zyxel.com for more information.
2/4
User Name
Password
admin
1234
Login
Page 3

Step 5 Pole / Wall Mounting: Connect M Bracket and Main Frame
M8 Screws
x2
M8 Spring Washers
M6 Hex NutsM Bracket Bracket-1
1
x2x1
Spring Washers
x2
Washers
x2
3
4
M8 bolt
x1
Main Frame
2
x1
x1
5
x2
M8 Washers
x2
1
Use washers, spring washers, and nuts to attach the M-type bracket to the back of the
LTE7490.
Follow steps 2-3 in the drawing to attach the rotating bracket to the mounting main frame
32
-
using washers, spring washers, and hex nuts. Do not tighten the nuts until you adjust the
mounting angle in the final step.
Wall Mounting (Optional)
Four Nylon Wall Plugs
25.4
x4
8.0
1
Follow steps 4-5 in the drawing to align the rotating bracket with the M-type bracket, insert the
5-4
M8 bolt through the holes, and use washers, spring washers, and nuts to secure it.
2
Unit: mm
M4 Screws
9
x4
Unit: mm
1 2
Use the four corner holes of the M bracket to mark holes on a wall. Drill four holes in a wall.
25.4
4.0
2.38
3
96mm
96mm
Insert the screw anchors and screws into the holes.
3
Insert nylon wall plugs into the wall. Use mounting screws to secure the main frame to the wall
through the nylon plugs.
3/4
Page 4

Pole Mounting (Optional)
U-Type Screws
x2
M6 Washers
x4
M6 Hex Nuts
x4
M6 Spring Washers
x4
1
Place the U-bolt around a pole. Insert the U-bolt into the holes on the main frame. Use a wrench
to secure the main frame to the pole with the washers, spring washers, and nuts.
Table Stand (Optional)
Indoor Bracket
x1
M6 Hex Nuts
x2
M6 Spring Washers
M8 Screws
x2
M8 Spring Washers
Main Frame
x2
x1
M6 Washers
x2
1 2
Use washers, spring washers, and nuts to attach the indoor bracket to the back of the device.
x2
M8 Washers
x2
Step 6 Pole / Wall Mounting Angle Adjustment
1
2
Use washers, spring washers, and screws to attach the main frame to the indoor bracket.
vertical
+0°
Connect the PoE injector to a power outlet. Use the LTE Ally app to find the optimal LTE signal strength and manage your LTE7490.
Note: After configuring the LTE7490, turn WiFi off.
45°
vertical
-48°
horizontal
+40°
Step 7 Grounding
horizontal
-40°
Secure a green/yellow ground cable (18 AWG or smaller) to the LTE7490’s rear panel using the M4 ground screw.
Attach the other end of the cable to the ground, either to the same ground electrode as the pole you installed the device on or to the main grounding electrode of the building.
Follow your country’s regulations and safety instructions to electrically ground the device properly. Qualified service personnel must confirm that the building’s protective earthing
terminal is valid.
4/4
 Loading...