

Page 1

11.1 Overview
This chapter shows you how to enable the Zyxel Device firewall. Use the firewall to protect your Zyxel
Device and network from attacks by hackers on the Internet and control access to it. The firewall:
• allows traffic that originates from your LAN computers to go to all other networks.
• blocks traffic that originates on other networks from going to the LAN.
By default, the Zyxel Device blocks DoS attacks whether the firewall is enabled or disabled.
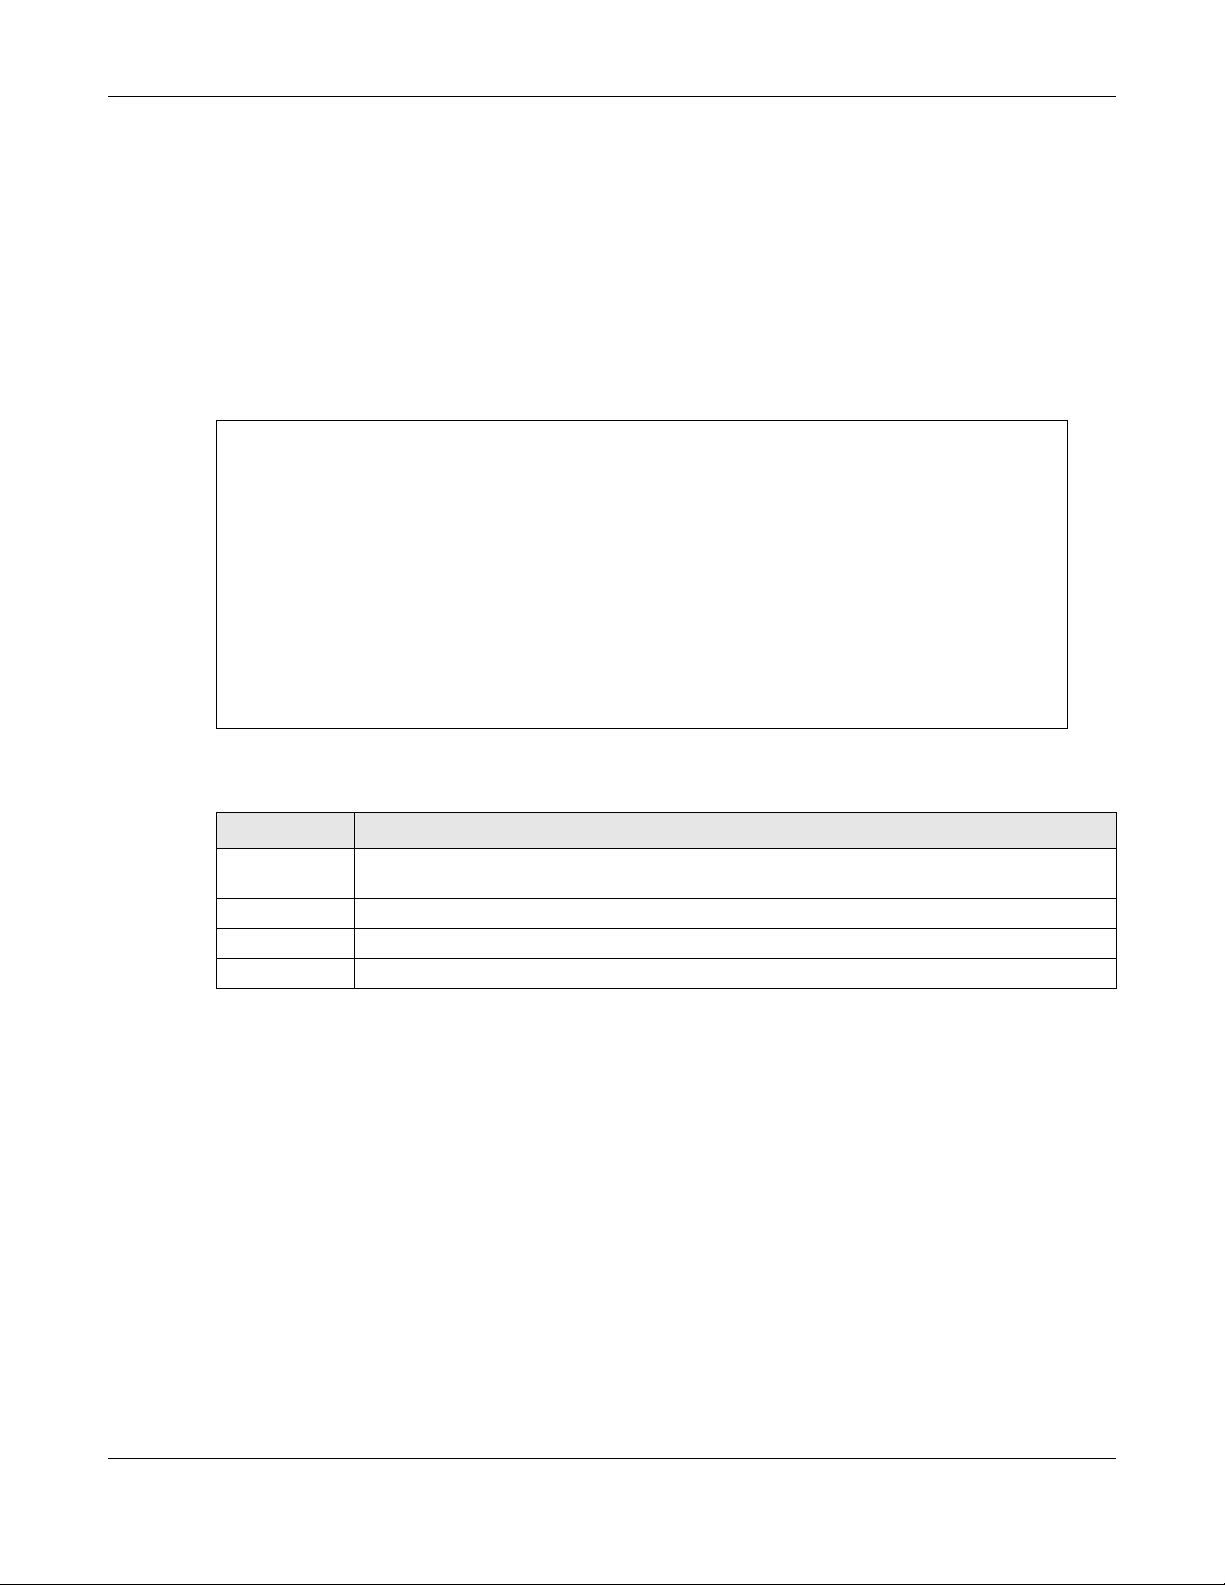
The following figure illustrates the firewall action. User A can initiate an IM (Instant Messaging) session
from the LAN to the WAN (1). Return traffic for this session is also allowed (2). However other traffic
initiated from the WAN is blocked (3 and 4).
Figure 82 Default Firewall Action
C
HAPTER
Firewall
11
11.1.1 What You Need to Know About Firewall
DoS
Denials of Service (DoS) attacks are aimed at devices and networks with a connection to the Internet.
Their goal is not to steal information, but to disable a device or network so users no longer have access
to network resources. The Zyxel Device is pre-configured to automatically detect and thwart all known
DoS attacks.
ICMP
Internet Control Message Protocol (ICMP) is a message control and error-reporting protocol between a
host server and a gateway to the Internet. ICMP uses Internet Protocol (IP) datagrams, but the messages
are processed by the TCP/IP software and directly appar ent to the application user.
LTE7461-M602 User’s Guide
109
Page 2

Chapter 11 Firewall
DoS Thresholds
For DoS attacks, the Zyxel Devi ce uses thresholds to determine when to drop sessions that do not
become fully established. These thresholds apply globally to all sessions. You can use the default
threshold values, or you ca n change them to values more suitable to your security requirements.
11.2 The Firewall Screen
11.2.1 What You Can Do in this Chapter
• Use the General screen to configure the sec urit y lev el of t he firewall on the Zyx el Devic e (Section 11.3
on page 110).
• Use the Protocol screen to add or remove predefined Internet services and configure firewall rules
(Section 11.4 on page 111 ).
• Use the Access Control screen to view and configure incoming/outgoing filtering rules (Section 11.5
on page 113).
• Use the DoS screen to activa te protection against Denial of Service (DoS) attacks (Section 11.6 on
page 115).
11.3 The Firewall General Screen
Use the firewall to protect your Zyxel Device and network from attacks by hackers on the Internet and
control access to it. Use this screen to set the security level of the firewall on the Zyxel Device. Firewall
rules are grouped based on the direction of travel of packets. A higher firewall level means more
restrictions on the Internet activities you can perform. Click Security > Firewall > General to display the
following screen. Use the slider to select the level of firewall protection.
LTE7461-M602 User’s Guide
110
Page 3
Chapter 11 Firewall
Figure 83 Security > Firewall > G en eral
te: LAN to W AN is your access to all Internet services. WAN to LAN is the access of other
No
computers on the Internet to devices behind the Zyxel Device.
When the security level is set to High, access to Telnet, FTP, HTTP, HTTPS, DNS, IMAP,
POP3, SMTP, and IPv6 Ping are still allowed from the LAN.
The following table describes the labels in this screen.
Table 42 Security > Firewall > General
LABEL DESCRIPTION
IPv4
Firewall
IPv6
Firewall
Enable firewal l protection when using IPv4 (Internet Protocol version 4).
Enable firewal l protection when using IPv6 (Internet Protocol version 6).
This setting blocks all traffic to and from the Inter net. Only local network traffic and LAN to WA N serviceHigh
(Telnet, FTP, HTTP, HTTPS, DNS, PO P 3, S MTP) is permitted .
This is the recommen ded se tt ing. It allows traffic to th e In ternet but blocks anyon e f rom the InternetMedium
from accessing any services on your loc al network.
This setting allows traffic to the Internet and also allows someone from the Internet to access services onLow
your local network. This would be used with Port Forwarding, Default Server.
Click this to save your changes.Apply
Click this to restore your previously saved settings.Cancel
11.4 Th
A protocol is a port number rule which defines a service. Services include Email, File sharing, Instant
messaging, Online games, Print servers, Voice over IP and so on. Define services in this screen that you
want to apply access control rules to in the Firewall > Access Control screen. For a compreh ensi ve lis t of
e Protocol (Customized Services) Screen
LTE7461-M602 User’s Guide
111
Page 4
Chapter 11 Firewall
port numbers and services, visit the IANA (Internet Assigned Number Authority) website. Click Security >
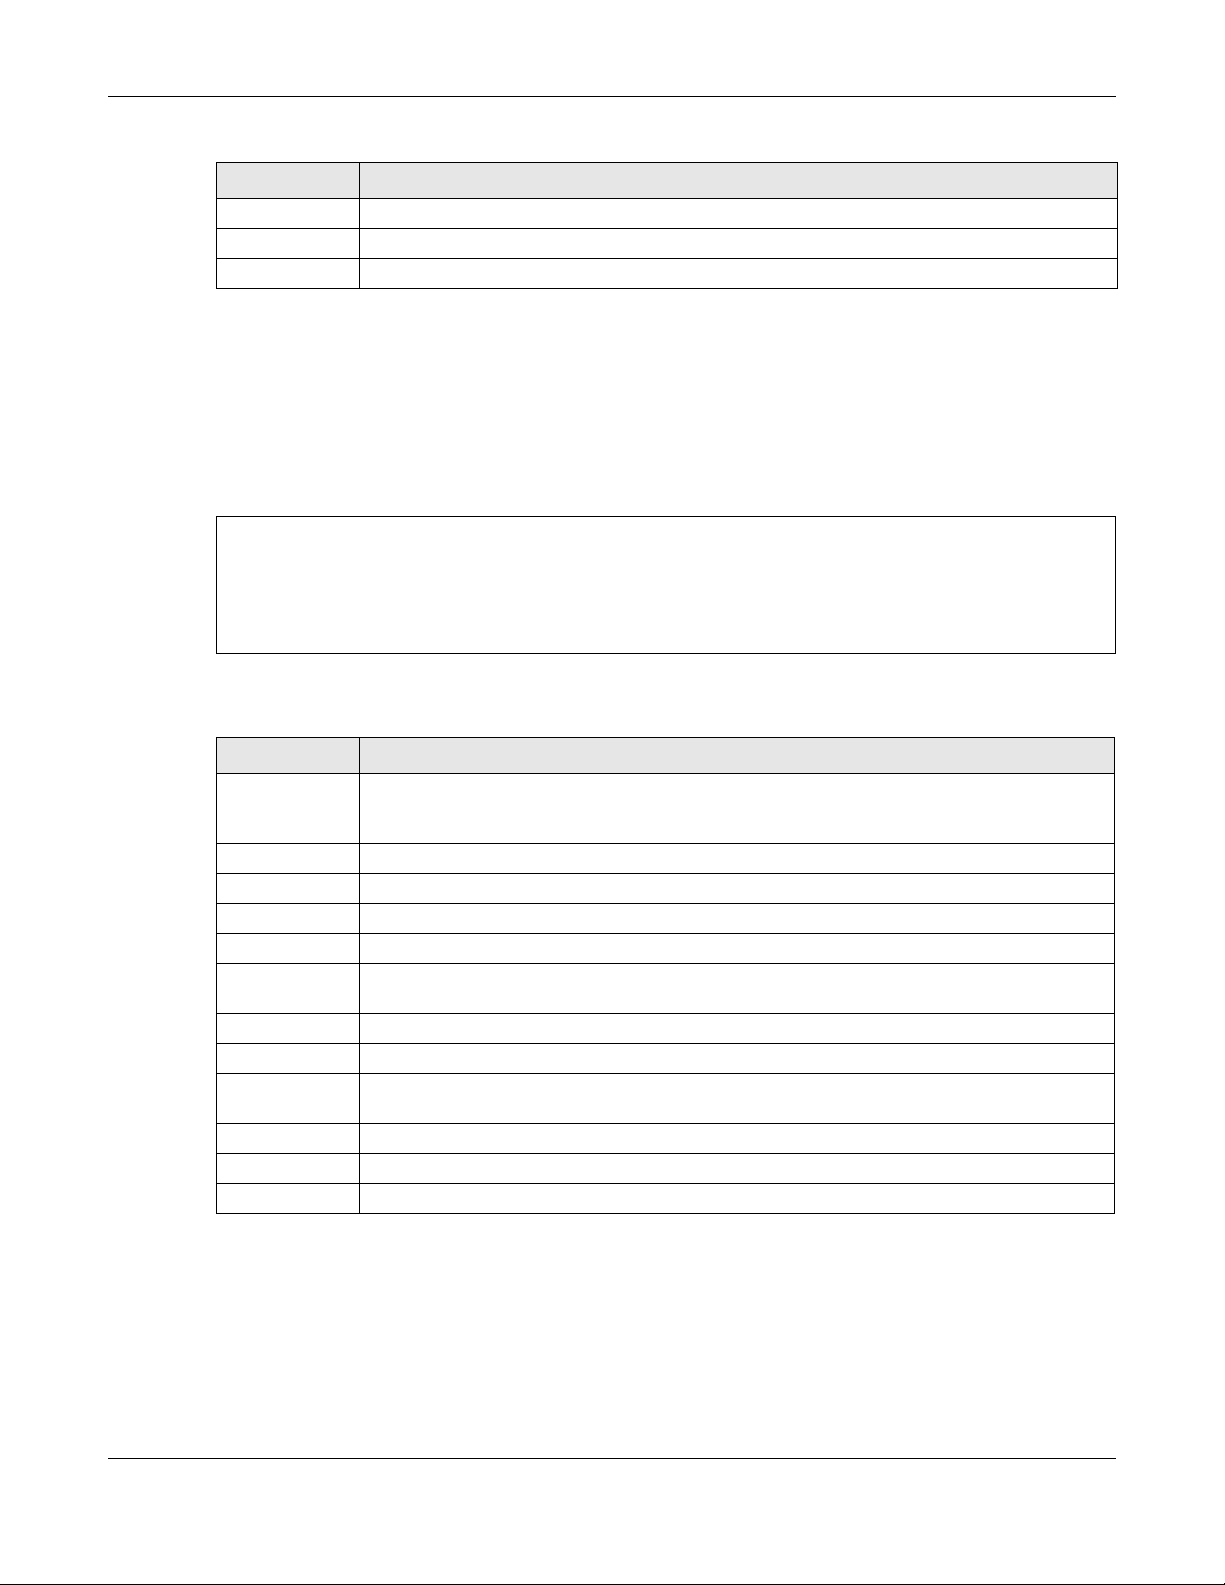
Firewall > Protocol to display the following screen.
ote: Removing a protocol rule will also remove associated ACL rules.
N
Figure 84 Security > Firewall > Protocol
The following table describes the labels in this screen.
Table 43 Security > F irewall > Protocol
LABEL DESCRIPTION
dd New
A
Protocol
Entry
Ports/
Protocol
Number
Click this to configure a customized service.
This is the name of your customized service.Name
This is a description of your customized service.Description
This shows the port number or range and the IP protocol (TCP or UDP) th at defines your customiz ed
service.
Click this to edit a customized service.Modify
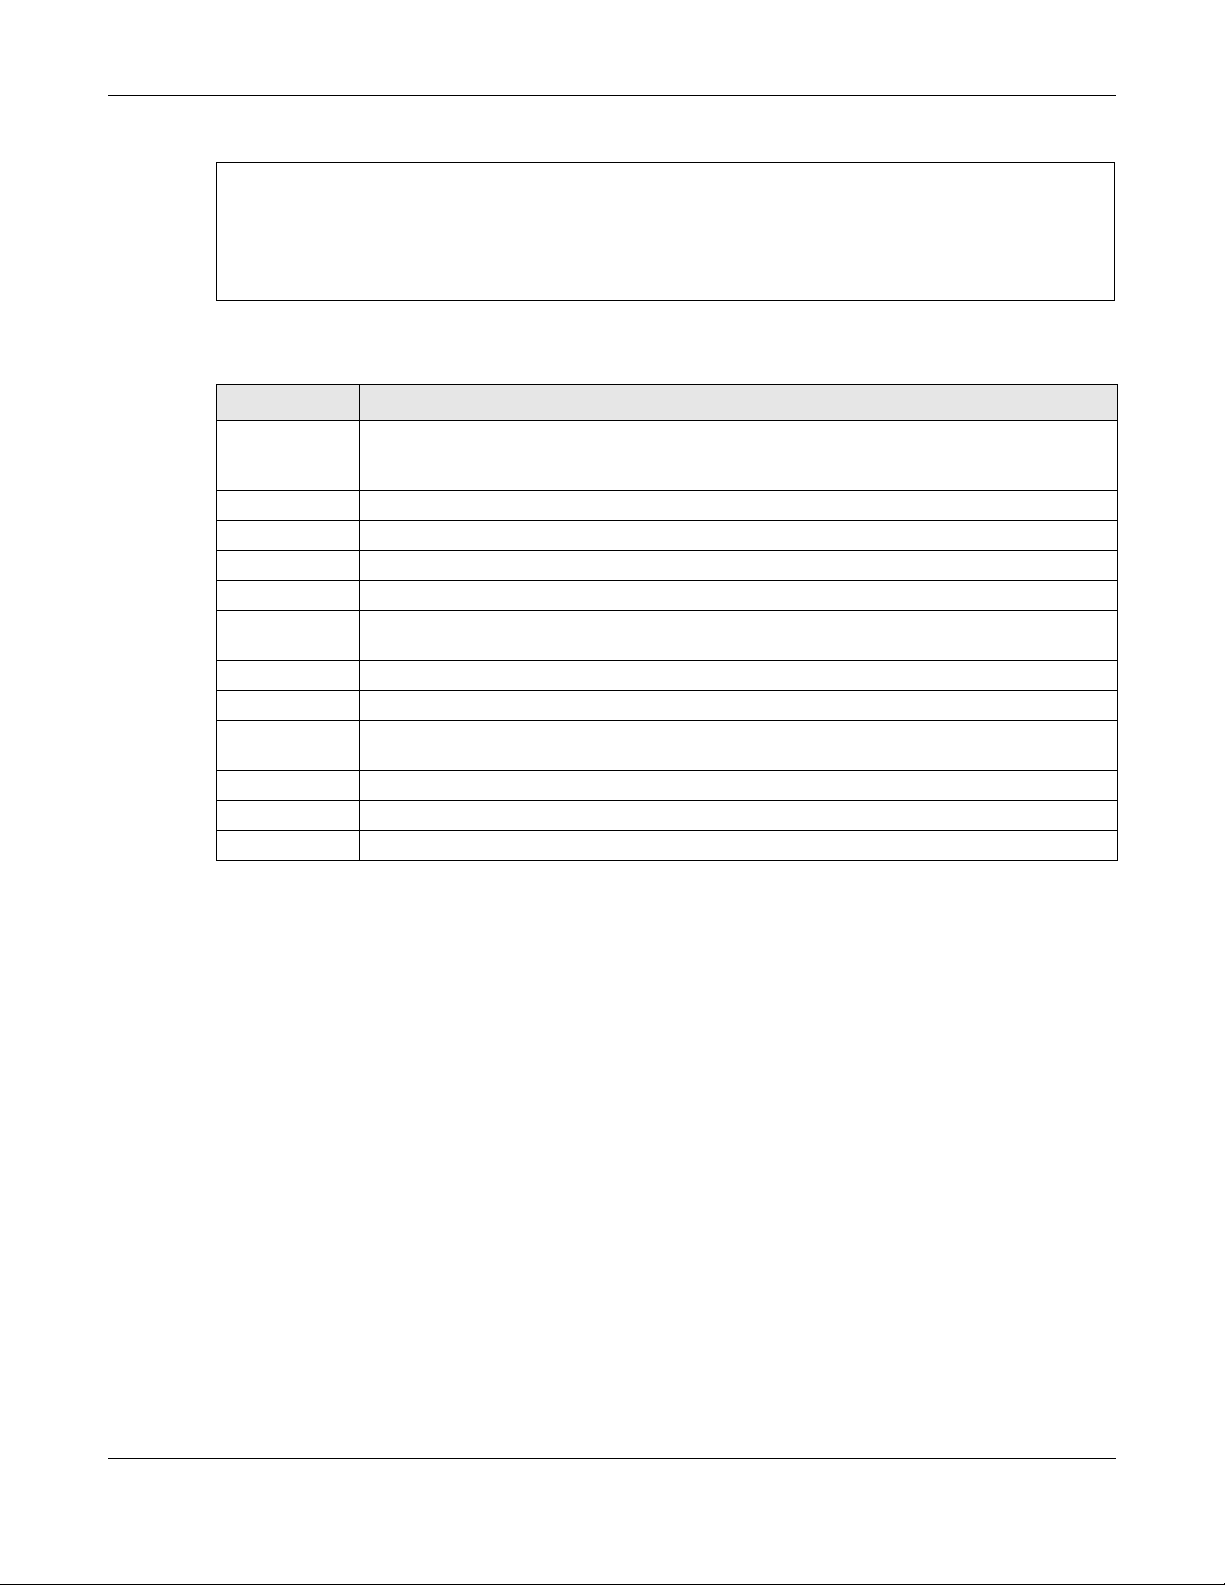
11.4.1 Add Cus
Add a customized rule or edit an existing rule by specifying the IP port and the port num ber(s). Click Add
New Protocol Entry in the Protocol screen to display the following screen.
Figure 85 Security > Firewall > Protocol: Add New Protocol Entry
tomized Service
LTE7461-M602 User’s Guide
112
Page 5
Chapter 11 Firewall
The following table describes the labels in this screen.
Table 44 Security > Firewall > Protocol: Add New Protocol Entry
LABEL DESCRIPTION
Ty
pe a unique name for yo ur custom port.Service Name
Enter a description for your custom port.Description
Choose the IP port (Protocol TCP, UDP, ICMP, ICMPv6, Other) that defines your customized port from the
drop down list box .
Type a single port number or the ra nge of po rt numbers (Protocol Number 0-255) that define your customized
service.
OK Click this to save your changes.
Cancel Click this to exit this screen without saving.
11.5 The Access Control (Rules) Screen
An Access Control List (ACL) rule is a manually-defined rule that can accept, r eject, or drop inc oming or
outgoing packets from your network based on the type of service. For example, you could block users
using Instant Messaging in your network. This screen displays a list of the configured incoming or
outgoing filtering rules. Note the order in which the rules are listed. Click Security > Firewall > Access
Control to display the following screen.
ote: The ordering of your rules is very important as rules are applied in turn.
N
Figure 86 Security > Fire w al l > Ac cess Control
The following table describes the labels in this screen.
Table 45 Security > Firewall > Rules
LABEL DESCRIPTION
R
ules Storage Space
Usage
This read-only bar shows how much of the Zyxel Device's memory for recording firewall
rules it is currently using. When you are using 80% or less of the storage space, the bar is
green. When the amount of space used is over 80%, the bar is red.
Select an inde x numb er an d clickAdd New ACL Rule Add to add a new fir ewal l rule after the select ed in dex
number. For example, if you select “6”, your new rule becomes number 7 and the
previous rule 7 (if there is one) becomes rule 8.
This field displays the rule index number. The ordering of your rules is important as rules are#
applied in turn .
This field displays the rule name.Name
This field dis plays the source IP addresses to which th is rule applies.Src IP
This field displays the destination IP addresses to which this rule applies.Dest IP
This field displays the protocol (TCP, UDP, TCP+UDP or any) used to transport the pack etsService
for which you want to apply the rule.
LTE7461-M602 User’s Guide
113
Page 6
Chapter 11 Firewall
Table 45 Security > Firewall > Rules (continued)
LABEL DESCRIPTION
A
ction Displays wh et her the f ir ewa ll si le nt ly di s car ds pa cket s ( Drop), discards packets and sends
Modify Click the Edit icon to edit the firewall rule.
a TCP reset packet or an ICMP destination-unreachable message to the sender (Reject),
or allow the passage of (Accept) packets that match this rule.
Click the Delete icon to delete an existing firewall rule.
11.5.1 Acc
Use this screen to configure firewall rules. In the Access Control screen, select an index number and click
Add New ACL Rule or click a rule’s Edit icon to display this screen and refer to the following table for
information on the labels.
Figure 87 Security > Firewall > Access Control > Add New ACL Rule
ess Control Add New ACL Rule Screen
The following table describes the labels in this screen.
Table 46 Security > Firewall > Access Control > Add New ACL Rule
LABEL DESCRIPTION
lter Name Type a unique name for yo ur fil ter rule.
Fi
Order Assign the order of your rules as rule s are applied in turn .
LTE7461-M602 User’s Guide
114
Page 7
Chapter 11 Firewall
Table 46 Security > Firewall > Access Control > Add New ACL Rule (continued)
LABEL DESCRIPTION
Se
lect Source IP
Address
Select Destination
Device
Custom Destination
Port
Scheduler Rules
packet(s) per
(1-512)
OK
Cancel Click this to exit thi s s cre en without saving.
If you want the source to come from a particular (single) IP, select Specific IP Address. If
not, select from a detected device.
If you selectedSource IP Address Specific IP Address in the previous item, enter the source device’s IP
address here. Othe r wise this field will be hidden if yo u select the detected devi c e.
If you want your rule to apply to packets with a particular (single) IP, select Specific IP
Address. If not, select a detected device.
If you selectedDestinat ion IP Address Specific IP Address in the previou s item , en te r the destina t io n de vice’ s IP
address here. Othe r wise this field will be hidden if yo u select the detected devi c e.
Select betweenIP Type IPv4 or IPv6. Compared to IPv4, IPv6 (Internet Protocol version 6), is
designed to enhan c e IP add r ess siz e an d f ea tu r es. Th e increase in IPv6 address size to
128 bits (from the 32-bit IPv4 address) allows up to 3.4 x 1038 IP addresses. The Zyxel
Device can use IPv4/IPv6 dual stack to connect to IPv4 and IPv6 networks, and supports
IPv6 rapid deployment (6RD).
Select a service fro m th eSelect Service Select Service box.
Select the protocol (Protocol ALL, TCP/UDP, TCP, UDP, ICMP, ICMPv6) used to transp ort th e packet s
for which you want to apply the rule.
This is a single port number or the starting port number of a range that defines your rule.Custom Source Port
This is a single port number or the ending port num ber o f a range th at defi ne s your rule .
Use the drop-down list box to select whether to discard (Policy Drop), deny and send an ICMP
destination-unreachable message to the sender (Reject), or allow the passage of
(Accept) packets that match this rule.
SelectDirection WAN to LAN to apply the rule to traffic from WAN to LAN. Select LAN to WAN to
apply the rule to traf fic from LAN to WAN. Sele ct WAN to Rou ter to apply th e rule to traf fic
from WAN to router. Selec t LAN to Router to apply the rule to traffic from LAN to router.
Click to enable (switch turns blue) the setting of max imum number of packets perEnable Rate Limit
maximum number of minute/second to lim i t th e th r o ughput of traff ic th at matches th is
rule. If not, the next item will be disabled.
Enter the maximum number of packets (1-512) per minute/second.
Select a schedule rule for this ACL rule form the drop-do w n list bo x . Yo u c a n c on f ig u r e aAdd New Rule
new schedule rule by clicking Add New Rule.
Click this to save your chan ges.
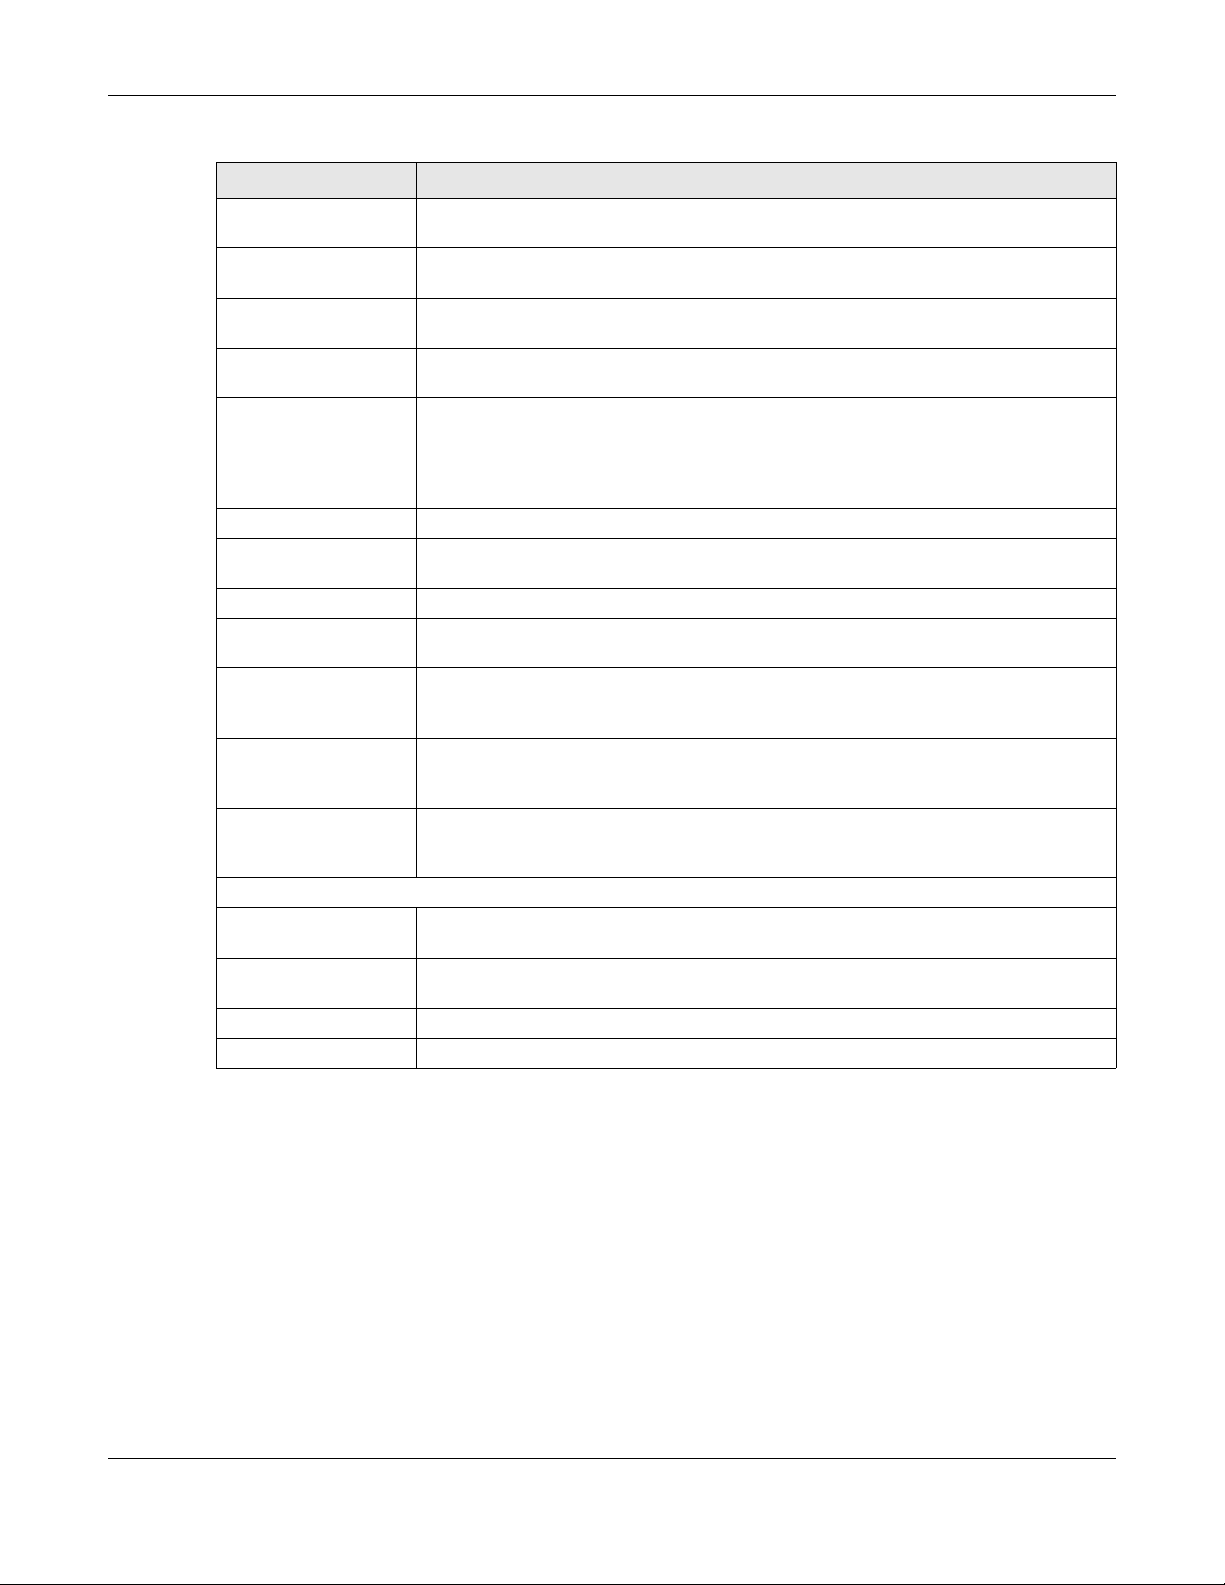
11.6 DoS Screen
Activate protection agai nst DoS attacks. DoS (De nia l of Service) attacks can flood your Internet
connection with invalid packets and connection requests, using so much bandwidth and so many
resources that Internet access becomes unavailable.
Click Security > Firewall > DoS to display the following screen.
LTE7461-M602 User’s Guide
115
Page 8
Chapter 11 Firewall
Figure 88 Security > Firewall > DoS
The following table describes the labels in this screen.
Table 47 Security > F irewall > DoS
LABEL DESCRIPTION
Do
S Protection
Blocking
Enable this to protect against DoS attacks. The Zyxel Device will drop sessions that surpass
maximum threshold s.
Click this to save your changes.Apply
Click this to restore your previously saved settings.Cancel
11.7 Firewall Technical Reference
This section provides some technical background information about the topics covered in this chapter.
11.7.1 Firew
all Rules Overview
Your customized rules take precedence an d over rid e th e Zyxel Devi ce’s de fault setti ng s. The Zyxel
Device checks the source IP address, destination IP address and IP protocol type of network traffic
against the firewall rules (in the order you list them). When the traffic matches a rule, the Zyxel Device
takes the action specified in the rule.
Firewall rules are grouped based on the direction of travel of packets to which they apply:
•LAN to Router •WAN to LAN
• LAN to WAN • WAN to Router
By default, the Zyxel Device’s stateful packet inspection allows packets traveling in the following
directions:
•LAN to Router
These rules specify which computers on the LAN can manage the Zyxel Device (remote
management).
ote: You can also configure the remote management settings to allow only a specific
N
computer to manage the Zyxel Device.
• LAN to WAN
These rules specify which computers on the LAN can access which computers or services on the
WAN.
LTE7461-M602 User’s Guide
116
Page 9

Chapter 11 Firewall
By default, the Zyxel Device’s stateful packet inspection drops packets traveling in the following
directions:
•WAN to LAN
These rules specify which computers on the WAN can access which computers or services on the
LAN.
ote: You also need to configure NAT port forwarding (or full featured NAT address mapping
N
rules) to allow computers on the WAN to access devices on the LAN.
•WAN to Router
By default the Zyxel Device stops computers on the WAN from managing the Zyxel Device. You could
configure one of these rules to allow a WAN computer to manage the Zyxel Device.
N
ote: You also need to configure the remote management settings to allow a WAN
computer to manage the Zyxel Device.
You may define additional rules and sets or modify existing ones but please exercise extreme caution in
doing so.
For example, you may create rules to:
• Block certain types of traffic, such as IRC (Internet Relay Chat), from the LAN to the Internet.
• Allow certain types of traffic, such as Lotus Notes database synchronization, from specific hosts on the
• Allow everyone except your competitors to access a web server.
• Restrict use of certain protocols, such as Telnet, to authorized users on the LAN.
These custom rules work by comparing the source IP address, destination IP address and IP protocol
type of network traffic to rules set by the administrator. Your customized rules take precedence and
override the Zyxel Device’s default rules.
11.7.2 Gu
1 Change the default password via the Web Configurator.
2 Think about access control before you con nect to the network in any way.
3 Limit who can access your router.
4 Don't enable any local service (such as telnet or FTP) that you don't use. Any enabled service could
present a potential security risk. A determined hacker might be able to find creative ways to misuse the
enabled services to access the firewall or the network.
5 For local services that are enabled, protect against misuse. Protect by configuring the services to
communicate only with specific peers, and protect by configuring rules to block packets for the ser vices
at specific interfaces.
Internet to specific hosts on the LAN.
idelines For Enhancing Security With Your Firewall
6 Protect against IP spoofing by making sure the firewall is active.
7 Keep the firewall in a secured (locked) room.
LTE7461-M602 User’s Guide
117
Page 10

Chapter 11 Firewall
11.7.3 Se
N
Consider these security ramifications before creating a rule:
1 Does this rule stop LAN users from accessing critical resources on the Intern et ? For examp le, if IRC
(Internet R elay Chat) is b locked, are there users tha t require this service?
2 Is it possible to modify the rule to be more specific? For example, if IRC is blocked for all users, will a rule
that blocks just certain users be more effective?
3 Does a rule that allows Internet users access to resources on the LAN create a security vulnerability? For
example, if FTP ports (TCP 20, 21 ) are allow ed from the Int ernet to the LAN, Int ernet users ma y be able to
connect to computers with running FTP servers.
4 Does this rule conflict with any existing rules?
Once these que stions have be en answered, a dding rules is simply a matter of entering the information
into the corr ect fields in the Web Configurator screens.
curity Considerations
ote: Incorrectly configuring the firewall may block valid access or introduce security risks to
the Zyxel Device and your protected network. Use caution when creating or deleting
firewall rules and test your rules after you configure them.
LTE7461-M602 User’s Guide
118
Page 11
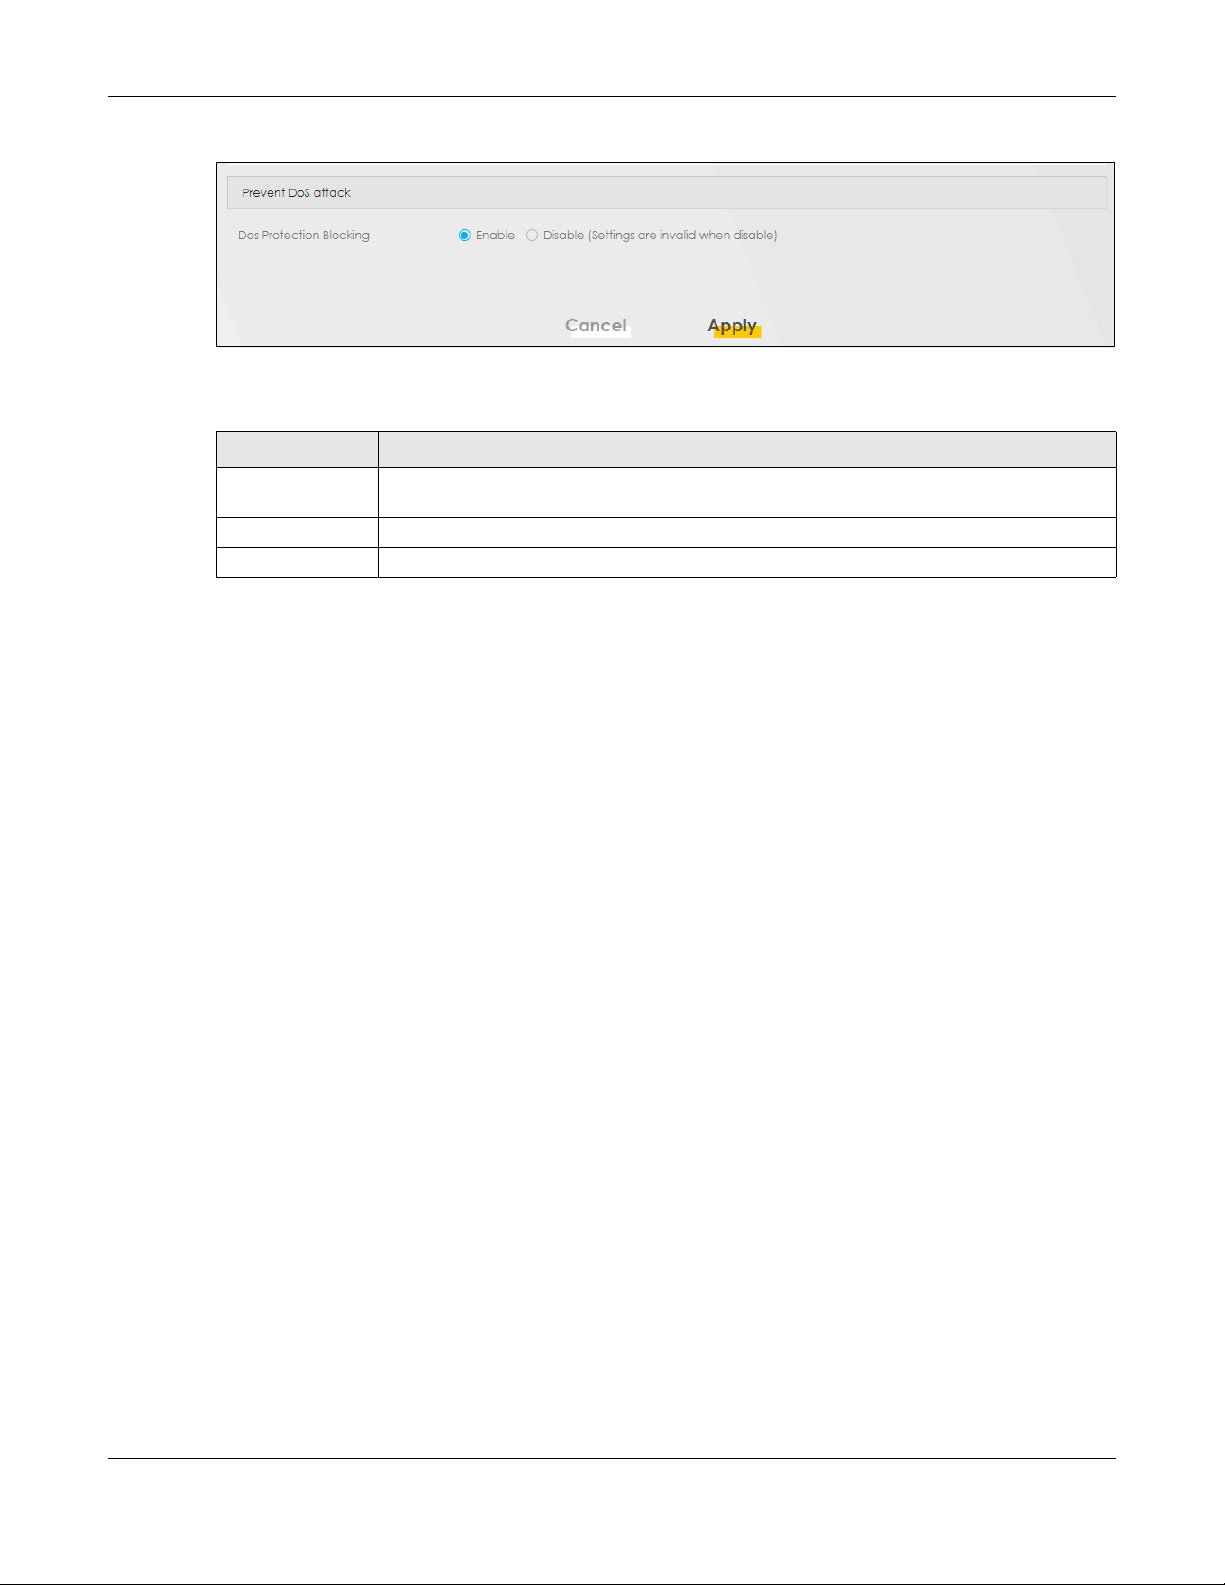
12.1 MAC Filter Overview
You can configure the Zyxel Device to permit access to clients based on their MAC addresses in the
MAC Filter screen. This applies to wired and wireless connections. Every Ethernet device has a unique
MAC (Media Access Control) address. The MAC address is assigned at the factory and consists of six
pairs of hexadecimal characters, for example, 00:A0:C5:00:00:02. You need to know the MAC addresses
of the LAN client to configure this screen.
12.2 The MAC Filter Screen
Enable MAC Address Filter and add the host name and MAC address of a LAN client to the table if you
wish to allow or deny them access to your network. Select Security > MAC Filter. The screen appears as
shown.
C
HAPTER
12
MAC Filter
Figure 89 Security > MAC Filter
You can choose to enable or disable the filters per entry; make sure that the check box under Active is
selected if you want to use a filter, as shown in the example below.
Figure 90 Enabling individual MAC filters
LTE7461-M602 User’s Guide
119
Page 12
Chapter 12 MAC Filter
The following table describes the labels in this screen.
Table 48 Security > MAC Filter
LABEL DESCRIPTION
MA
C Address Filter
MA
C Restrict Mode
dd New Rule
A
Se
t
Active Select Active to enable the MAC filter rule. The rule will not be applied if Allow is not
Ho
st Name
C Address
MA
lete
De
Ca
ncel Click Cancel to restore your previously saved settings.
Ap
ply Click Apply to save your changes.
Sel
ect Enable to activate the MAC filter function.
Sel
ect Allow to only permit the listed MAC addresses access to the Zyxel Device. Select
Deny to permit anyone access to the Zyxel Device except the listed MAC addresses.
ick this button to create a new entry.
Cl
T
his is the index number of the MAC addr es s.
selected unde r MAC Restrict Mode.
E
nter the host name of the wireless or LAN cl ients that are allow ed access to the Zyxel
Device.
nter the MAC addresses of the wireless or LAN clients that are allowed ac ce ss to th e Zyx el
E
Device in these address fields. Enter the MAC addresses in a valid MAC address format, that
is, six hexadecimal character pairs, for example, 12:34:56:78:9a:bc.
ick the Delete icon to delete an existing rul e.
Cl
LTE7461-M602 User’s Guide
120
Page 13

13.1 Overview
The Zyxel Device can use certificates (also called digital IDs) to authenticate users. Certificates are
based on public-private key pairs. A certificate contains the certificate owner’s identity and public key.
Certificates provide a way to exchange public keys for use in authentication.
C
HAPTER
13
Certificates
13.1.1 Wh
at You Can Do in this Chapter
• Use the Local Certificates screen to view and import the Zyxel Device’s CA-signed (Certification
Authority) certificates (Section 13.2 on page 121).
• Use the Trusted CA scre en to save the certificates of trusted CAs to the Zyxel Device. You can also
export the certificates to a computer (Section 13.3 on page 125).
13.2 Local Certificates
View the Zyxel Device’s summary list of certificates, generate certification requests, and import the
signed certificates. You can import the following certificates to your Zyxel Device:
• Web Server - This certificate secures HTTP connections.
• SSH- This certificate secures remote connections.
Click Security > Certificates to open the Local Certificates screen.
Figure 91 Security > Certificates > Local Certificates
LTE7461-M602 User’s Guide
121
Page 14
Chapter 13 Certificates
The following table describes the labels in this screen.
Table 49 Security > Certificates > Local Certificates
LABEL DESCRIPTION
R
eplace Private Key/Certificate file in PEM for m at
Private Key is
protected by
password
Create Certificate
Request
Select the check box and enter the private key into the text box to store it on the Zyxel Device.
The private key should not exceed 63 ASCII characters (not including spaces).
Click this button to find the certificate file you want to upload.Choose File
Click this button to sa ve the ce r ti fic at e th at you have enrolled from a certificat io n authorityImport Certific at e
from your computer to the Zyxel Device.
Click this button to go to the screen where you can have the Zyxel Devic e ge ner at e a
certification re q ues t .
This field displays th e na me used to identify th is ce r ti fic a te. It is recommend ed th at you giveCurrent File
each certificate a unique name.
This field displays id en tif y in g information abou t th e c er t ificate’s owner, s uch asSubject CN (Common
Name), OU (Organizational Unit or department), O (Organization or company) and C
(Country). I t is recommended that each certifica t e have a unique subj ect information.
This field displays id en tif y in g inf o rmation about th e ce rt if icate’s issuing cer t if ication authority ,Issuer
such as a common name, organizational unit or department, organization or company and
country.
This field displays th e da te that the certifi cate becomes applic a ble. The text displa ys in re dValid From
and includes a Not Yet Valid! message if th e ce rt if icate has not yet beco me applicable.
This field displays the date that the cert if i c at e expires. The text displa ys in red an d in c lu des anValid To
Expiring! or Expired! message if the certificate is about to expire or has already expired.
Click theModify View icon to open a screen with an in-d ept h lis t of information abou t the certificate.
13.2.1 Create
Click Security > Certificates > Local Certificates and then Create Certificate Request to open the
following screen. Have the Zyxel Device generate a certification request. To create a certificate signing
request, you need to enter a common name, organization name, state/province name, and the twoletter country code for the certificate.
For a certification request, click Load Signed to import the signed cert ificate.
Click the Remove icon to remove the certificate (or certification request). A window displays
asking you to confirm that you want to delete the certificate. Note that subsequent
certificates move up by one when you take this action.
Certificate Request
LTE7461-M602 User’s Guide
122
Page 15
Chapter 13 Certificates
Figure 92 Create Certificate Request
The following table describes the labels in this screen.
Table 50 Create Certificate Request
LABEL DESCRIPTION
C
ertificate
Name
Type up to 63 ASCII characters (not including spaces) to identify this certifica te.
SelectCommon Name Auto to have the Zyxel Device configure this field automatically. Or select Customize to
enter it manually.
Organization
Name
State/Province
Name
Country/Region
Name
Ca
13.2.2 Vie
View in-depth information about the certificate request. The Certificate is used to verify the authenticity
of the certification authority. The Private Key serves as your digital signature for authentication and must
be safely stored. The Signing Request contains the certificate signing request value that you will copy
upon submitting the ce rtificate request to the CA (certificate authority).
Click the View icon in the Local Certificates screen to open the following screen.
Type the IP address (in dotted deci mal notation), dom ain name or email address in the field
provided. The domain name or email address can be up to 63 ASCII char ac ters. The domai n
name or email addre s s is fo r id en tif i c at io n pur po s es on ly an d c an be an y s tri ng .
Type up to 63 characters to identify the company or group to which the certificate owner
belongs. You may use an y ch a r act e r, inc lu d in g s paces, but the Zyxel Device drops trail in g
spaces.
Type up to 32 ch ar ac te rs t o i de nt if y th e s t at e or pr o vi n ce wh ere t h e ce r ti fi c at e o wn er is l oca t ed.
You may use any char act e r, inc lu d in g s paces, but the Zyxel Device drops trail in g spaces.
Select a country to identify the nation where the cer tificate owner is located.
ncel
lick Cancel to exit this screen without saving.
C
ClickOK OK to save your changes.
w Certificate Request
LTE7461-M602 User’s Guide
123
Page 16
Chapter 13 Certificates
Figure 93 Certificate Request: View
The following table describes the fields in this screen.
Table 51 Certificate Request: View
LABEL DESCRIPTION
Name This field displays th e id entifying name of this c ert if icate.
Type This field displa ys g eneral information about the cer t if icate. ca means tha t a Cert if ication
Subject This field di sp lays i nfo rma ti on t hat id en tif i es t he owne r of the c ert if ica te , su ch as Com mon Nam e
Authority sig ne d th e c er t if icate.
(CN), Organizational Unit (OU), Organization (O) and Country ( C) .
This read-only text bo x displays the certif icate in Privacy Enhanced Mail (PEM) format. PEM usesCertificate
base 64 to convert the binary certif icate into a printable fo rm.
You can copy and paste the certificate into an email to send to friends or colleagues or you can
copy and paste the certificate into a text editor and save the file on a management computer
for later distribution.
This field displays the private key of this certificate.Private Key
LTE7461-M602 User’s Guide
124
Page 17
Table 51 Certificate Request: View (continued)
LABEL DESCRIPTION
T
be provided to a certificate authority, and it includes information about the public key,
organizati on na me, domain name , lo c ation, and coun tr y of this certificate.
ClickBack Back to return to the previous screen.
13.3 Trusted CA
Click Security > Certificates > Trusted CA to open the following screen. A summary list of certificates of
the certification authorities that you have set the Zyxel Device to accept as trusted is listed below. The
Zyxel Device accepts any valid certificate signed by a certification authority on this list as being
trustworthy; thus you do not need to import any certificate that is signed by one of these certification
authorities.
ote: A maximum of 4 certificates can be stored.
N
Figure 94 Security > Certificates > Trusted CA
Chapter 13 Certificates
his field displays the CSR (Certificate Signing Request) information of this certificate. The CSR willSigning Request
The following table describes the labels in this screen.
Table 52 Security > Certificates > Trusted CA
LABEL DESCRIPTION
C
lick this button to open a screen where you c a n s av e the certificate of a ce r ti fic a tio nImport Certific at e
authority that you trust to the Zyxel Device.
This is the index number of the entry.#
This field displays th e name used to identify this certifica te .Name
This field displays in for m at ion that identifies th e owner of the certific at e, suc h as CommonSubject
Name (CN), OU (Organi za ti onal U ni t or depa rtm ent) , Organ iz ati on (O), St ate ( S T) an d Co unt ry
(C). It is recomm ended that each cer t ificate have a un ique subject information.
This field displays general information about the certificate.Type ca means that a Certifi c at io n
Authority s ig ned the certifi c at e .
M
odify
Cl
ick the View icon to open a screen with an in-depth list of information about the certificate
(or certificatio n r equest).
Click the Remove icon to delete the certificate (or certification request). You cannot delete a
certificate that one or more features is configured to use.
LTE7461-M602 User’s Guide
125
Page 18
Chapter 13 Certificates
13.4 Import Trusted CA Certificate
Click Import Certificate in the Trusted CA screen to open the Import Certificate screen. The Zyxel Device
trusts any valid certificate signed by any of the imported trusted CA certificates. Certificates should be in
one of the following formats: B inary X.509, PEM (b ase-64) encoded, Binary PKCS#7, or PEM (base-64)
encoded PKCS#7. You can save a trusted certification authority’s certificate to the Zyxel Device.
ote: You must remove any spaces from the certificate’s filename before you can import the
N
certificate.
Figure 95 Trusted CA > Import
The following table describes the labels in this screen.
Table 53 Security > Certificates > Trusted CA > Import
LABEL DESCRIPTION
ertificate File
C
Path
Type in the location of the file you wan t to upload in this field or click Choose File to find it.
Click this button to find the certif icate file you want to upload.Choose File
Click this to sav e the certificate on th e Z y xe l Device.OK
Click this to exit this screen without saving.Cancel
13.5 View Trusted CA Certificate
View in-depth information about the certification authority’s certificate. The certificate text box is readonly and can be distributed to others.
Click Security > Certificates > Trusted CA to open the Trusted CA screen. Click the View icon to open th e
View Certificate screen.
LTE7461-M602 User’s Guide
126
Page 19
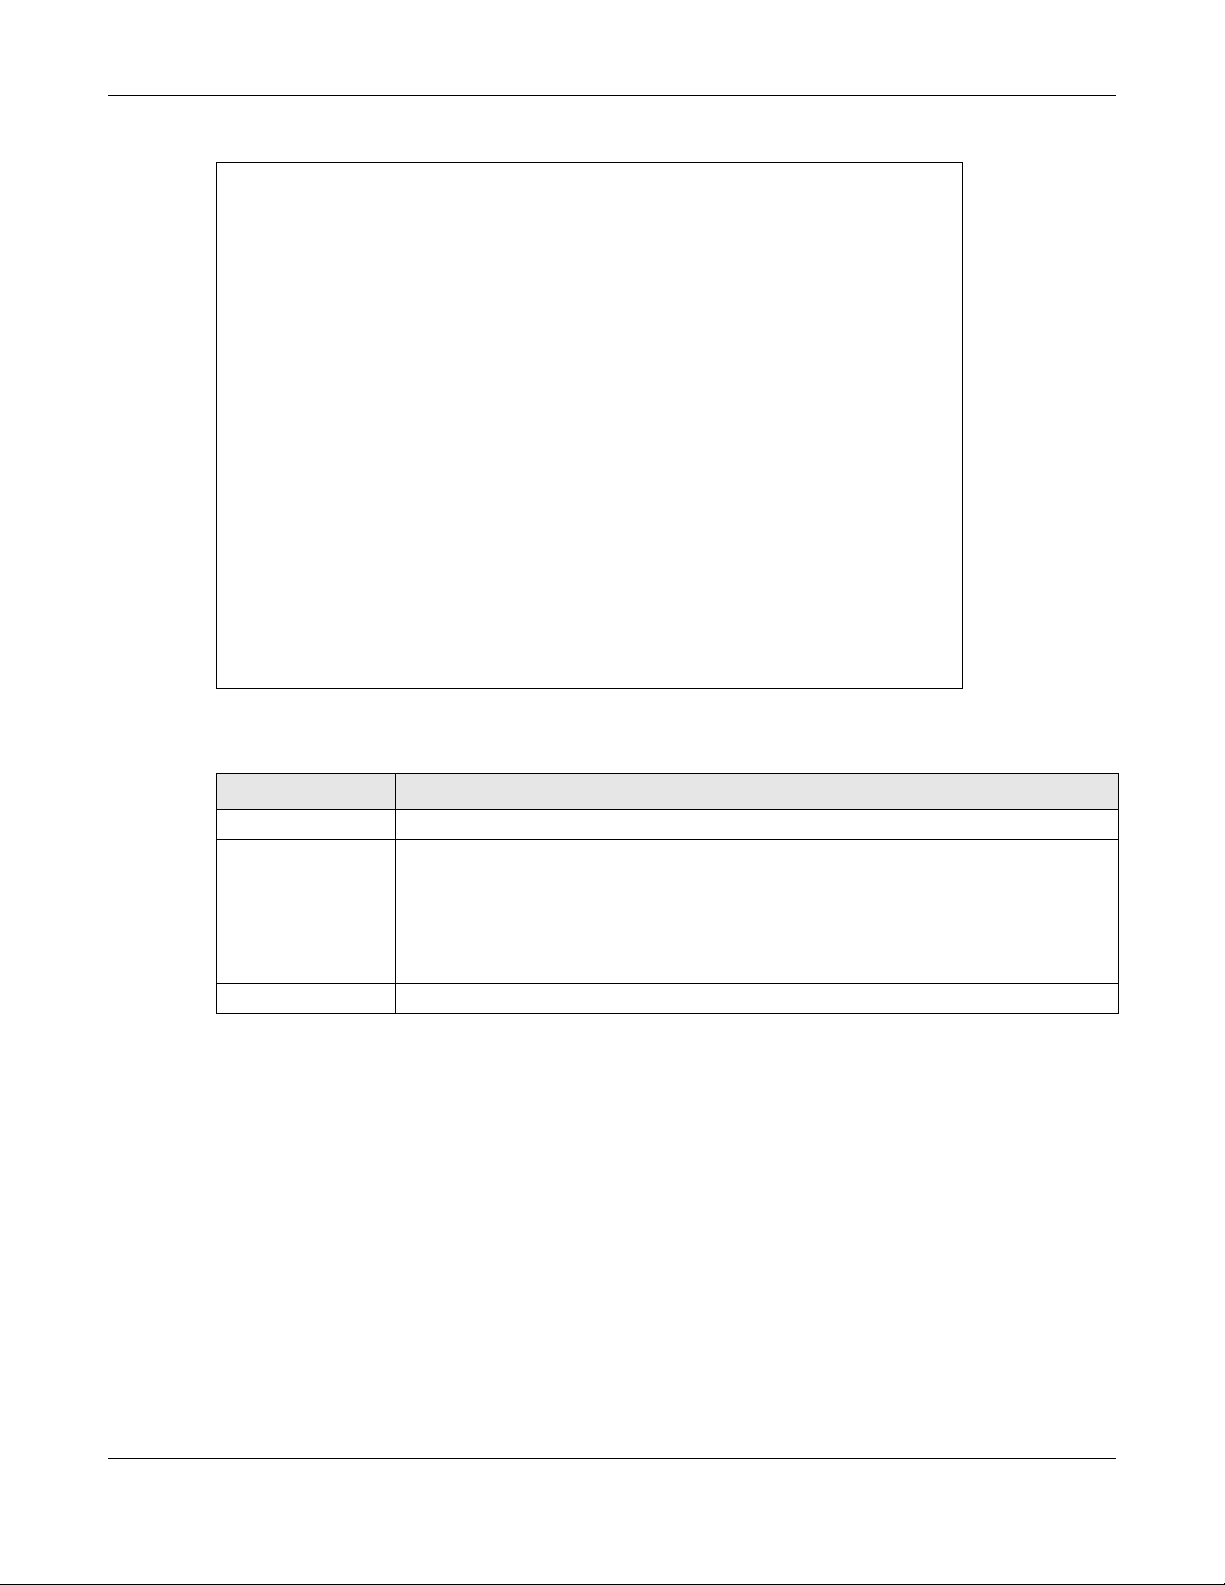
Figure 96 Trusted CA: View
Chapter 13 Certificates
The following table describes the labels in this screen.
Table 54 Trusted CA: View
LABEL DESCRIPTION
ame This field displays the identifying name of this certificate.
N
This read-only text box displays the certificate or certification request in Privacy Enhanced
Mail (PEM) for m at. PEM uses 64 ASC II characters to co nv ert the binary ce rtificate into a
printable form.
You can copy and paste the certificate into an email to send to friends or colleagues or you
can copy and past e the certificate into a text editor and save the fi le on a management
computer for later distribution (via USB thumb drive for example).
Back Click this to return to the previous screen.
13.6 Certificates Technical Reference
This section provides some technical background information about the topics covered in this chapter.
Certification Authorities
A Certification Authority (CA) issues certificates and guarantees the identity of each certificate owner.
There are commercial certification authorities like CyberTrust or VeriSign and government certification
authorities.
LTE7461-M602 User’s Guide
127
Page 20

Chapter 13 Certificates
Public and Private Keys
When using public-key cryptology for authentication, eac h host has two keys. One key is public and can
be made openly available; the other key is private and must be kept secure. Public-key encryption in
general works as follows.
1 Tim wants to send a private message to Jenny. Tim generates a public-private key pair. What is
encrypted with one key can only be decrypted using th e other.
2 Tim keeps the private key and makes the public key openly available.
3 Tim uses his private key to encrypt the message and se nds it to Jenny.
4 Jenny receives the message and uses Tim’s public key to decrypt it.
5 Additionally, Jenny uses her own private key to encrypt a message and Tim uses Jenny’s public key to
decrypt the message.
The Zyxel Device uses certificates based on public-key cryptology to authenticate users attempting to
establish a connection. The method used to secure the data that you send through an established
connection depends on the type of connection. For example, a VPN tunnel might use the triple DES
encryption a l go r i thm.
The certification authority uses its private key to sign certificates. Anyone can then use the certification
authority’s public key to verify the certificates.
Advantages of Certificates
Certificates offer the following benefits.
• The Zyxel Device only has to store the certificates of the certification authorities that you decide to
• Key distribution is simple and very secure since you can freely distribute public keys and you never
Certificate File Format
The certification authority certificate that you want to import has to be in PEM (Base-64) encoded X.509
file format. This Privacy Enhanced Mail format uses 64 ASCII characters to convert a binary X.509
certificate into a printable form.
13.6.1 Ve
Before you import a trusted CA or trusted remote host certificate into the Zyxel Device, you should verify
that you have the actual certificate. This is especially true of trusted CA certificates since the Zyxel
Device also trusts any valid certificate signed by any of the imported trusted CA certificates.
trust, no matter how many de vices you need to authenticate.
need to transmit private keys.
rifying a Certificate
You can use a certificate’s fingerprint to verify it. A certificate’s fingerprint is a message digest
calculated using the MD5 or SHA1 algorithms. The following procedure describes how to check a
certificate’s fingerprint to verify that you have the actual certificate.
1 Browse to where you have the certificate saved on your computer.
LTE7461-M602 User’s Guide
128
Page 21

Chapter 13 Certificates
2 Make sure that the certificate has a “.cer” or “.crt” file name extension.
Figure 97 Certificates on Your Computer
3 Double-click the certificate’s icon to open the Certificate window. Click the Details tab and scroll down
to the Thumbprint Algorithm and Thumbprint fields.
Figure 98 Certificate Details
Use a secure method to verify that the certificate owner has the same information in the Thumbprint
Algorithm and Thumbprint fields. The secure method may vary based on your situation. Possible
examples would be over the telephone or thr oug h an HTT PS conne ct ion.
LTE7461-M602 User’s Guide
129
Page 22

14.1 Log Overview
These screens allow you to determine the categories of events and/or alerts that the Zyxel Device logs
and then display these logs or have the Zyxel Device send them to an administrator (through email) or
to a syslog server.
C
HAPTER
14
Log
14.1.1 Wh
• Use the System Log screen to see the system logs (Section 14.2 on page 131).
• Use the Security Log screen to see the security-related logs for the categories that you select (Section
14.1.2 Wh
The following terms and concepts may help as you read th is chapter.
Alerts and Logs
An alert is a type of log that warrants more serious attention. They include system errors, attacks (access
control) and attempted access to blocked web sites. Some categories such as System Errors consist of
both logs and alerts. You may differentiate them by their color in the View Log screen. Alerts display in
red and logs display in black.
Syslog Overview
The syslog protocol allows devices to send event notification messages across an IP network to syslog
servers that collect the event messages. A syslog-enabled device can generate a syslog message and
send it to a syslog server.
at You Can Do in this Chapter
14.3 on page 131).
at You Need To Know
Syslog is defined in RFC 3164. The RFC defines the packet format, content and system log related
information of syslog messages. Each syslog message has a facility and severity level. The syslog facility
identifies a file in the syslog server. Refer to the documentation of your syslog program for details. The
following table describes the syslog severity levels.
Table 55 Syslog Severity Levels
CODE SEVERITY
0 E
1 Alert: Action mu st be tak e n im mediately.
2 Critical: Th e sys tem condition is cr itical.
3 Error: There is an error condition on th e system.
4 Warning: There is a warning co ndition on the sys t em .
mergency: The system is unusable.
LTE7461-M602 User’s Guide
130
Page 23
Chapter 14 Log
Table 55 Syslog Severity Levels
CODE SEVERITY
5 N
6 Informational: The syslog contains an informational message.
7 Debug: The message is intended for de bu g-level purp oses.
otice: There is a normal but significant condition on the system.
14.2 The System Log Screen
Export or email the system logs. You can filter the entries by clicking the Level and/or Category dropdown list boxes. Click System Monitor > Log to open the System Log screen.
Figure 99 System Monitor > Log > System Log
The following table describes the fields in this screen.
Table 56 System Monitor > Log > System Log
LABEL DESCRIPTION
Level Select a severity level from the drop-down list box. This filters sear ch results according to the
tegory
Ca
ear Log
Cl
Re
fresh
Exp
ort Log
Email Log Now Click this to send the log file(s) to the email address you specify in the Maintenance > Logs
# Thi
Ti
me
Category This fiel d displays the type of the log.
ssages
Me
severity level you have selected. When you select a severity, the Zyxel Device searches through
all logs of that severity or higher.
elect the type of logs to display.
S
lick this to delete all the logs.
C
C
lick this to renew the log screen.
C
lick this to export the selected log(s).
Setting screen.
s field is a seq uential value and is not associated with a specif ic entry.
Thi
s field displays the time the log was recorded.
The log facility allows you to send logs to dif ferent files in the syslog server. Refer to theFacility
documentation of y our syslog progra m for more details.
This field displays the severity level of the logLevel that the devic e is to se n d to this syslog serv er.
his field states the reason for the log.
T
14.3 Th
View the security-related logs for t he categ ories that you select . You can filt er the entr ies by click ing the
Level and/or Category drop-down list boxes. Click System Monitor > Log > Security Log to open the
following screen.
e Security Log Screen
LTE7461-M602 User’s Guide
131
Page 24
Chapter 14 Log
Figure 100 System Monitor > Log > Security Log
The following table describes the fields in this screen.
Table 57 System Monitor > Log > Security Log
LABEL DESCRIPTION
Le
vel
Ca
tegory
Clear Log Click this to delete all the logs.
fresh
Re
ort Log
Exp
Em
ail Log Now
# Thi
me
Ti
Ca
tegory
Me
ssages
S
elect a severit y level from the drop-down list box. This filters sear ch results according to the
severity level you have selected. When you select a severity, the Zyxel Device searches through
all logs of that severity or higher.
S
elect the type of logs to display.
lick this to renew the log screen.
C
lick this to export the selected log(s).
C
C
lick this to send the log file(s) to the email address you specify in the Maintenance > Logs
Setting screen.
s field is a seq uential value and is not associated with a specif ic entry.
s field displays the time the log was recorded.
Thi
The log facility allows you to send logs to dif ferent files in the syslog server. Refer to theFacility
documentation of y our syslog progra m for more details.
This field displays the severity level of the logLevel that the devic e is to se n d to this syslog serv er.
Thi
s field displays the type of the log.
T
his field states the reason for the log.
LTE7461-M602 User’s Guide
132
Page 25

15.1 Traffic Status Overview
View the network traffic status and statistics of the WAN/LAN interfaces.
C
HAPTER
15
Traffic Status
15.1.1 Wh
at You Can Do in this Chapter
• Use the WAN screen to view the WAN traffic statistics (Section 15.2 on page 133).
• Use the LAN screen to view the LAN traffic statistics (Section 15.3 on page 134).
15.2 The WAN Status Screen
Click System Monitor > Traffic Status to open the WAN screen. The figures in this screen show the number
of bytes received and sent through the Zyxel Device. Detailed information about each interface are
listed in the tables below.
Figure 101 System Monitor > Traffic Status > WAN
The following table describes the fields in this screen.
Table 58 System Monitor > Traffic Status > WAN
LABEL DESCRIPTION
fresh IntervalSelect how often you want the Zyxel De vice to update this screen.
Re
Co
nnected
Interface
ckets Sent
Pa
Thi
s shows the name of the WAN inter f ace that is currently connected.
LTE7461-M602 User’s Guide
133
Page 26
Chapter 15 Traffic Status
Table 58 System Monitor > Traffic Status > WAN (continued)
LABEL DESCRIPTION
Da
ta
Er
ror
Drop This indicates the number of outgoing packets dropped on this interface.
ackets Received
P
ta
Da
Er
ror
sabled
Di
Interface
Pa
ckets Sent
Data This indicates the number of transmitted pac kets on this interfa ce.
ror
Er
op
Dr
P
ackets Received
Da
ta
Error This indicates the number of frames with errors receive d on this interface.
T
his indicates the n umber of transmitt e d pa c kets on this interfa ce.
Thi
s indicates the number of frames with errors transmitted on this interface.
his indicates the n umber of received pac k et s on th is in terface.
T
T
his indicates the number of frames with errors received on this interface.
This indicate s the n umber of received pac k et s dropped on this interf a c e.Drop
s shows the name of the WAN interface that is currently disabled.
Thi
s indicates the number of frames with errors transmitted on this interface.
Thi
s indicates the number of outgoing packets dropped on this interface.
Thi
T
his indicates the n umber of received pac k et s on th is in terface.
his indicates the n umber of received pac k et s dropped on this interface.Drop
T
15.3 The LAN Status Screen
Click System Monitor > Traffic Status > LAN to open the following screen. The figures in this screen show
the number of bytes received and sent from each LAN port and wireless network.
Figure 102 System Monitor > Traffic Status > LAN
LTE7461-M602 User’s Guide
134
Page 27
Chapter 15 Traffic Status
The following table describes the fields in this screen.
Table 59 System Monitor > Traffic Status > LAN
LABEL DESCRIPTION
Re
fresh Interval
In
terface
Bytes Sent This indicat es the number of bytes transmitted on this interface.
tes ReceivedThis indicates the number of bytes received on this interface.
By
terface
In
Se
nt (Packets)
Da
ta
Error This indicat es the number of frame s with errors transmitted on this inter face.
op
Dr
Re
ceived (Packets)
Da
ta
Error This indicates the number of frames with errors received on this interface.
op This indicates the number of re ceived packets dr opped on this inte rface.
Dr
S
elect how often you want the Zyxel Devi c e to update this screen.
Th
is shows the LAN or WLAN interface.
is shows the LAN or WLAN interfaces.
Th
T
his indicates the numbe r of transmitted packets on this interface.
his indicates the number of outgoing packets dropped on this interfac e.
T
T
his indicates the number of rec eived packets on th is interface .
LTE7461-M602 User’s Guide
135
Page 28

16.1 ARP Table Overview
Address Resolution Protocol (ARP) is a protocol for mapping an Internet Protocol address (IP address) to
a physical machine address, also known as a Media Access Control or MAC address, on the local area
network.
An IP (version 4) address is 32 bits long. In an Ethernet LAN, MAC addresses are 48 bits long. The ARP
table maintains an association between each MAC address and its corresponding IP address.
C
HAPTER
16
ARP Table
16.1.1 How
When an incoming packet destined for a host device on a local area network arrives at the device, the
device's ARP program looks in the ARP table and, if it finds the address, sends it to the device.
If no entry is found for the IP address, ARP broadcasts the request to all the devices on th e LAN. The
device fills in its own MAC and IP address in the sender address fields, and puts the known IP address of
the target in the target IP address field. In addition, the device puts all ones in the target MAC field
(FF.FF.FF.FF.FF.FF is the Ethernet broadcast address). The replying device (which is either the IP address of
the device being sought or the router that knows the way) replaces the broadcast address with the
target's MAC address, swaps the sender and target pairs, and unicasts the answer dire ctly back to the
requesting machine. ARP updates the ARP table for future reference and then sends the packet to the
MAC address that replied.
ARP Works
LTE7461-M602 User’s Guide
136
Page 29
16.2 ARP Table Screen
Use the ARP table to view the IPv4-to-MAC address mapping(s) for the LAN. The neighbor table shows
the IPv6-to-MAC address mappin g(s) of each neig hbor. To op en t his screen, click System Monitor > ARP
Table.
Figure 103 System Monitor > ARP Table
Chapter 16 ARP Table
The following table describes the labels in this screen.
Table 60 System Monitor > ARP Table
LABEL DESCRIPTION
# This is the ARP table entry number.
IPv4/IPv6
Address
Device This is the type of interface us ed by th e device. You can clic k th e device type to go to it s
This is the learned IPv4 or IPv 6 IP ad dr e ss of a de v ic e connected to a port.
This is the MAC address of the device with the listed IP address.MAC Address
configuratio n s creen.
LTE7461-M602 User’s Guide
137
Page 30

17.1 Routing Table Overview
Routing is based on the destination address only and the Zyxel Device takes the shortest path to forward
a packet.
17.2 The Routing Table Screen
The table below shows IPv4 and IPv6 routing information. The destination can be a network or host. The
IPv4 subnet mask is ‘255.255.255.255’ for a host destination and ‘0.0.0.0’ for the default route. The
gateway address is written as ‘*’(IPv4)/‘::’(IPv6) if none is set. Flags can be U - up, ! - reject, G - gateway,
C - cache, H - host, R - rein stat e, D - dynamic (redirect), or M - m odif i ed ( red ire ct). Met ric is t he dist a nce
to the target (usually counted in hops). Interface is how the packets for this route will be sent.
C
HAPTER
17
Routing Table
LTE7461-M602 User’s Guide
138
Page 31

Chapter 17 Routing Table
Click System Monitor > Routing Table to open the following screen.
Figure 104 System Monitor > Routing Table
The following table describes the labels in this screen.
Table 61 System Monitor > Routing Table
LABEL DESCRIPTION
Pv4/IPv6 Routing Table
I
This indicates the destination IPv4 address or IPv6 address and prefix of this route.Destination
This indicates the IPv4 address or IPv6 ad dr ess of the gateway th at he lp s fo rward this route’sGa teway
traffic.
This indicates th e destination subn et ma s k of the IPv4 route.Subnet Mask
LTE7461-M602 User’s Guide
139
Page 32

Chapter 17 Routing Table
Table 61 System Monitor > Routing Table (continued)
LABEL DESCRIPTION
Fl
ag This indicates the route stat us .
U-Up: The route is up.
!-Reject: The route is blocked and will force a route lookup to fail.
G-Gateway: The route uses a gateway to for ward traffi c.
H-Host: The target of the route is a host.
R-Reinstate: The route is reinstated for dynamic routing.
D-Dynamic (r ed i rect): The route is dynamically installed by a ro uting daemon or redirect.
M-Modified (redirect): The route is modified from a routing daemon or r edirect.
Metric The metric represents the "cost of transmission." A router determines the best route for
transmission by choosing a path with the lowest "cost." The smaller the number, the lower the
"cost."
This indicates the name of the inte rface through which the route is f or warded.Interface
LTE7461-M602 User’s Guide
140
Page 33

C
Cellular WAN Status
18.1 Cellular WAN Status Overview
View the LTE connection details a nd WiFi signal strength value that you can use as reference for
positioning the Zyxel Device, as well as SIM card and module information.
18.2 The Cellular WAN Status Screen
To open this screen, click System Monitor > Cellular WAN Status. Cellular information is available on this
screen only when you insert a valid SIM card in the Zyxel Device.
HAPTER
18
LTE7461-M602 User’s Guide
141
Page 34

Chapter 18 Cellular WAN Status
Figure 105 System Monitor > Cellular WAN Status
The following table describes the labels in this screen.
Table 62 System Monitor > Cellular WAN Status
LABEL DESCRIPTION
S
elect the time in te r val the Zyxel DeviceRefresh Inte r v al will check and refresh the fields shown on this screen.
Select None to stop detection.
Module Information
This shows the International Mobile Equipment Identity of the Zyxel Device.IMEI
Module SW
Version
SIM Status
This shows the software version of the Zyxel Device.
LTE7461-M602 User’s Guide
142
Page 35

Chapter 18 Cellular WAN Status
Table 62 System Monitor > Cellular WAN Status (continued)
LABEL DESCRIPTION
T
his displays the SIM card status:SIM Card Stat us
None - the Zyxel Device does not detect that there is a SIM card inserted.
Available - the SIM card could either have or doesn’t have PIN code security.
Locked - the SIM card has PIN co de security, but you did not enter the PIN code yet.
Blocked - you enter ed an incorrect PIN code too many times, so the SIM card has been locke d;
call the ISP for a PUK (Pin Unlock Key) to unlock the SIM card.
Error - the Zyxel Device detected that the SIM card has erro rs.
This displays the Intern ational Mobile Subscriber Identity (IM SI ) of the ins t alled SIM card. An IMSI isIMSI
a unique ID used to iden ti fy a mo bi le s ub scriber in a mobile netw or k .
I
ICCID
PIN Protection
PIN Remaining
Attempts
IP Passthrough Status
Access
Technology
ntegrated Ci rc ui t C ar d I dentifier (ICCID). This is the serial number of the SIM card.
A
PIN (Personal Identification Numbe r) code is a key to a SIM card. Without the PIN code, you
cannot use the SIM card.
Shows Enable if the service provid er r equires you to enter a PIN to us e the SIM card.
Shows Disable if the service provider lets yo u use the SIM without inputting a PI N.
Th
is is how many more times you can try to enter the PIN code befor e the ISP blocks your SIM
card.
This displays the status of the cellular Internet connection.Cellular Status
This displays if da ta roaming is enabled on the Zyxel De vic e.Data Roaming
4G roaming is to use your Zyxel Device in an area which is not covered by your service provider.
Enable roaming to ens ure tha t your Zyxe l Devic e is kept conne cted to th e Int ernet when you are
traveling outside the geographical coverage ar ea of the network to which you ar e registered.
This displays the name of the service provider.Operator
This displays the PLM N number.PLMN
This displ ays the ty pe of t he m obi le netw ork ( suc h a s LT E, U MTS, G SM) t o w hi ch th e Z yxe l Devi c e is
connecting.
This displays the current LTE band of your Zyxel Device (WCDMA2100).Band
This displays the strength of the WiFi signal between an associated wireless station and an AP.RSSI
The normal range is -30dBm to -79dBm. If the value drops below -80dBm, try moving the
associated wireless station closer to the Zyxel Device to get better signal strength.
This shows the cell ID , wh ic h is a un iq ue number used to identify the Base Tra ns ceiver Station toCell ID
which the Zyxel Device is connecting.
The value depen ds on the Current Ac cess Technolog y :
• For GPRS, it is the Cell Identity as specified in 3GPP-TS.25.331.
• For UMTS, it is the Cell Identity as defined in SIB3 3GPP-TS.25.331, 3GPP-TS.24.008.
• For LTE, it is the 28-bit binary number Cell Identity as specifi ed in SIB1 in 3GPP-TS.36.331.
The value is ‘0’ (zero) or ‘N/A’ if there is no network connection.
LTE7461-M602 User’s Guide
143
Page 36

Chapter 18 Cellular WAN Status
Table 62 System Monitor > Cellular WAN Status (continued)
LABEL DESCRIPTION
R
FCN This displays the Radio Frequen cy Ch anne l Number of DL carrier frequency used by the mo bi le
RSRP This displays the Reference Sign al Recei ve Pow er (R SRP ), whi ch is the avera g e received power
RSRQ This displays the Re fer ence Si gnal Recei ve Qual ity (RSRQ), whic h is th e rat io of R SRP to the E-UTRA
network to which the Zyxel Device is connecting.
The value depen ds on the Current Ac cess Technolog y :
• For GPRS, it is the ARFCN (Absolute Radio-Frequency Channel Number) as specified in 3GPP-
TS.45.005.
• For UMTS, it is the UARFCN (UTRA Absolute Radio-Frequency Channel Number) as specified in
3GPP-TS.25.101.
• For LTE, it is the EARFCN (E-UTRA Absolute Ra dio-Frequency Channel Number) as specifie d in
3GPP-TS.36.101.
The value is ‘0’ (zero) or ‘N/A’ if there is no network connection.
of all Resource Element (RE) that carry cell-specific Reference Signals (RS) within the specified
bandwidth.
The received RSRP level of the connected E-UTRA cell, in dBm, is as specified in 3GPP-TS.36.214.
The reporting range is specified in 3GPP-TS.36.133.
An undetectable signal is indicated by the lower limit, example -140 dBm.
This parameter is for LTE only. The normal range is -30 to -140. The value is -140 if the Current
Access Techno logy is not LTE. The va lu e is ‘N /A ’ if ther e is no network connection.
carrier RSSI and indicates the quality of the received reference signal.
The received RSRQ level of the connected E-UTRA cell, in 0.1 dB, is as specified in 3GPP-TS.36.214.
An undetectable signal is indicated by the lower limit, example -240.
This parameter is for LTE only. The normal range is -30 to -240. The value is -240 if the Current
Access Techno logy is not LTE. The va lu e is ‘N /A ’ if ther e is no network connection.
RSCP This displays the Received Signal Code Power, which measures the power of channel used by
the Zyxel Device.
The received signal level, in dBm, is of the CPICH channel (Ref. 3GPP TS 25.133). An
undetectable signal is indicated by the lower limit, example -120 dBm.
This parameter is for UMTS only. The normal range is -30 to -120. The value is -120 if the Current
Access Technology is not UMTS. The value is ‘N/A’ if there is no network connection.
EcNo This displays the ratio (in dB) of the received en erg y per chip an d th e in terferen ce level.
The measured EcNo is in 0.1 dB and is received in the downlink pilot channel. An undetectable
signal is indicated by the lower limit, example -240 dB.
This parameter is for UMTS only. The normal range is -30 to -240. The value is -240 if the Current
Access Technology is not UMTS or there is no network connection.
TAC This displays the Tracking Area Code (TAC), which is used to identify the country of a mobile
LAC This displays the 2-octet Location Area Code (LAC), which is used to identify a location are a
subscriber.
The physical cell ID of the connected E-UTRAN cell, is as specified in 3GPP-TS.36.101.
This parameter is for LTE only. The value is ‘0’ (zero) or ‘N/A’ if the Current Access Technology is
not LTE or there is no network connection.
within a PLMN.
The LAC of the connected cell is as defined in SIB 1 [3GPP-TS.25.331]. The concatenation of
PLMN ID (MCC+MNC) and LAC uniquely identifies the LAI (Location Area ID) [3GPP-TS.23.003].
This parameter is for UMTS or GPRS. Th e v alue is ‘0’ (zero) if the Current Acce s s Technology is not
UMTS or GPRS. The value is ‘N/A’ if there is no network connection.
LTE7461-M602 User’s Guide
144
Page 37

Chapter 18 Cellular WAN Status
Table 62 System Monitor > Cellular WAN Status (continued)
LABEL DESCRIPTION
RA
C
This displays the RAC (Routing Area Code), which is used in mobile network “packet domain
service” (PS) to identify a routing area within a location area.
In a mobile network, it uses LAC (Locati on Area Code) to identif y the geographical location for
the old 3G voice only s er vice , an d use RAC to id en tif y the loca ti on of dat a s erv ice li ke HSD PA or
LTE.
The RAC of the connected UTRAN cell is as defined in SIB 1 [3GPP-TS.25.331]. The concatenation
of PLMN ID (MCC+MNC), LAC, and RAC uniquely identifies the RAI (Routing Area ID) [3GPPTS.23.003].
This parameter is for UMTS or GPRS. Th e v alue is ‘0’ (zero) if the Current Acce s s Technology is not
UMTS or GPRS. The value is ‘N/A’ if there is no network connection.
The Base Station Iden t ity Cod e (B S IC ) , wh ic h is a co de us e d in GSM to uniquely ident ify a bas eBSIC
station.
This parameter is for GPRS only. The value is ‘0’ ( zero) if the Current Access Technology is not
GPRS. The value is ‘N/A’ if there is no network connection.
LTE7461-M602 User’s Guide
145
Page 38

19.1 System Overview
Give a name to your Zyxel Device (host) and an associated domain name for identification purposes.
19.2 The System Screen
Click Maintenance > System to open the following screen. Assign a unique name so it can be easily
recognized on your network. You can use up to 30 characters , including spaces.
Figure 106 Maintenance > System
C
HAPTER
System
19
The following table describes the labels in this screen.
Table 63 Maintenance > System
LABEL DESCRIPTION
st Name
Ho
Do
main NameType a Domain name for your host Zyxel Device.
Cancel Click Cancel to abandon this screen without saving.
ply
Ap
ype a host name for your Zyxel Device.
T
characters, not including spaces, underscores, and dashes.
ick Apply to save your changes.
Cl
LTE7461-M602 User’s Guide
nter a descriptive name of up to 16 alphanu meric
E
146
Page 39

Chapter 20 User Account
20.1 User Account Overview
View the settings of the “admin” and other user accounts that you use to log into the Zyxel Device.
20.2 The User Account Screen
Click Maintenance > User Account to ope n the following screen. Create or manage user accounts and
their privileges on the Zyxel Device.
Figure 107 Maintenance > User Account
C
HAPTER
20
User Account
The following table describes the labels in this screen.
Table 64 Maintenance > User Account
LABEL DESCRIPTION
A
dd New
Account
# T
Ac
tive
Us
er Name
Re
try Times
le Timeout
Id
Cli
ck this button to add a new use r account (up to 4 Administrator accounts and 4 User
accounts).
his is the index number .
Th
is indicates whether the user account is active or not.
The check box is selected when the user account is enabled. It is cleared when it is disabled.
Th
is displays the name of the acc ount used to log into the Zyxel Devic e Web Configurator.
Th
is displays th e nu mb er of ti mes c ons ecu ti ve wr ong pass wor d s ca n be e n ter ed f o r th is a ccoun t.
0 means there is no lim it .
is displays the length of ina c tive time before the Zyxel Device will automatically log the user
Th
out of the Web Configur ator.
LTE7461-M602 User’s Guide
147
Page 40

Chapter 20 User Account
Table 64 Maintenance > User Account (continued)
LABEL DESCRIPTION
Lock
Period
up
Gro
M
odify
ncel Cl ick Cancel to restore your previously saved settings.
Ca
Ap
ply Click Apply to save your changes.
T
his field displays the length of time a user must wait before attempting to log in again after a
number of consecutive wrong pas swords have been entered as defined in Retry Times .
his field displays whether this user has Administrator or User privileges.
T
Cl
ick the Edit icon to configure the entry.
Click the Delete icon to remove the entry.
20.2.1 The Us
Add or change the name of the user account, set the security password and the retry times, and
whether this user will have Administrator or User privileges.
existing account in the Maintenance > User Account to open the following screen.
Figure 108 Maintenance > User Account > Add/Edit
er Account Add/Edit Screen
Click Add New Account or the Edit icon of an
The following table describes the labels in this screen.
Table 65 Maintenance > User Account > Add/Edit
LABEL DESCRIPTION
Ac
tive
Us
er Name
assword
P
erify PasswordType the new passwor d again for confi rmation.
V
Cli
ck to enable (switch turns blue) or disable (switch turns gray) to activate or deactivate the
user account.
Ent
er a new name f or the acco unt ( up to 15 cha racte rs) . Sp ecial cha ract ers are al low ed exce pt
the following: do uble quot e (") bac k quot e (`) apo stro phe or si ngle quo te (') less th an (<) greate r
than (>) caret or circumflex accent (^) dollar sign ($) vertical bar (|) ampersand (&) semicolon
(;)
ype your new system password (up to 256 characters). Note that as you type a password, the
T
screen displays a (*) for each character you type. After you change the password, use the new
password to access the Zyxel Device.
LTE7461-M602 User’s Guide
148
Page 41

Chapter 20 User Account
Table 65 Maintenance > User Account > Add/Edit (continued) (continued)
LABEL DESCRIPTION
Re
try Times
le Timeout
Id
Lock Period Enter the length of time a user must wait before attempting to log in again af ter a number of
Gro
up
ncel Cl ick Cancel to restore your previously saved settings.
Ca
OK Cli
Ent
er the number of times consecutive wrong passwords can be entered for this account. 0
means there is no limit.
er the length of in active ti me bef ore the Zy xel Devic e will aut omatica lly log the use r out of the
Ent
Web Configurator.
consecutive wro n g pa ss words have been entered as defined in Retry Times.
Sp
ecify whether this user will have Administrator or User privileges.
The Adminis trator privileges are the following:
• Quick Start setup.
• The following screens are visible for setup:
Broadband, Wireless, Home Networking, Routing, NAT, DNS, Firewall, MAC Filter, Certificates,
Log, Traffic Status, ARP Table, Routing Table, Cellular WAN Status, System, User Account,
Remote Managemen t, TR-069 Client, Time, Email Notification, Log Setting, Firmware Upgr ade,
Backup/Restore, Reboot, Diagnostic.
The User privileges are the following:
• The following screens are visible for setup:
Log, Traffic Status, ARP Table, Routing Table, Cellular WAN Status, User Account, Remote
Management, Time, Email Notification, Log Setting, Firmware Upgrade, Backup/Restore,
Reboot, Diagnostic.
ck OK to save your changes.
LTE7461-M602 User’s Guide
149
Page 42

Remote Management
21.1 Overview
Remote management controls through which interface(s), which web services (such as HTTP, HTTPS, FTP,
Telnet, SSH and Ping) can access the Zyxel Device.
N
ote: The Zyxel Device is managed using the Web Configurator.
21.2 The MGMT Services Screen
Configure which interface(s) you can use to access the Zyxel Device for a given service. You can also
specify the service port numbers computers must use to connect to the Zyxel Device. Click
Maintenance > Remote Management to open the fol lowing scre en.
C
HAPTER
21
Figure 109 Maintenance > Remote Management
LTE7461-M602 User’s Guide
150
Page 43

Chapter 21 Remote Man agement
The following table describes the fields in this screen.
Table 66 Maintenance > Remote Management
LABEL DESCRIPTION
WA
N Interface
used for services
rvice This is the service you may use to access the Zyxel Device.
Se
AN/WLAN
L
WAN Select the Enable check box for the corresponding services t hat you w ant to al low acce ss to the
Tr
ust Domain
rt
Po
ply
Ap
ncel Click Cancel to restore your previously saved settings.
Ca
Select Any_WAN to have the Zyxel Device automatically activa te the remote management
service when any WAN connection is up.
Select Multi_WAN and then select one or more WAN connections to have the Zyxel Device
activate the remote management service when the selected WAN connections are up.
Enable the LTE WAN connection configured inCellular WAN
WAN to access the service on the
ect the Enable check box for the correspond ing serv ices that you wan t to all ow acce ss to the
Sel
Zyxel Device from the LAN/WLAN.
Zyxel Device from all WAN connect io n s.
Sel
ect the Enable check box for the correspond ing serv ices that you wan t to all ow acce ss to the
Zyxel Device from the trusted host IP address.
u may change the server port number for a service if needed , howe ver you mu st use the
Yo
same port number in order to use that service for remote management.
ick Apply to save your changes back to the Zyxel Device.
Cl
Zyxel Device
Network Setting > Broadband > Cellular
.
21.3 The MGMT Services for IP Passthrough Screen
Configure which interface(s) you can use to access the Zyxel Device in IP Passthrough mode (bridge
mode) for a given service. You can also specify the service port numbers computers must use to
connect to the Zyxel Device. IP Passthrough allows Internet traffic to go to a LAN computer behind the
Zyxel Device without going through NAT. Make sure to enable IP Passthrough in Network Setting >
Broadband > Cellular IP Passthrough. See Section 5.6 on page 40 for details.
Click Maintenance > Remote Management > MGMT Services for IP Passthrough to open the following
screen.
LTE7461-M602 User’s Guide
151
Page 44

Chapter 21 Remote Management
Figure 110 Maintenance > Remote Management > MGMT Services for IP Passthrough
The following table describes the fields in this screen.
Table 67 Maintenance > Remote Management > MGMT Services for IP Passthrough
LABEL DESCRIPTION
rvice This is the service you may use to access the Zyxel Device.
Se
WA
N
rt
Po
Apply Click Apply to save your changes back to the Zyxel Device.
ncel Click Cancel to restore your previously saved settings.
Ca
Sel
ect the Enable check box for the correspond ing serv ices that you wan t to all ow acce ss to the
Zyxel Device from all WAN connect io n s.
u may change the server port number for a service if needed , howe ver you mu st use the
Yo
same port number in order to use that service for remote management.
21.4 The Trust Domain Screen
View a list of public IP addresses which you want to allow access to the Zyxel Device through the
services configured in this screen. Click Maintenance > Remote Management > Trust Domain to open
the following screen.
N
ote: If this list is empty, all public IP addresses can access the Zyxel Device from the WAN
through the specified services.
Figure 111 Maintenance > Remote Management > Trust Domain
LTE7461-M602 User’s Guide
152
Page 45

Chapter 21 Remote Man agement
The following table describes the fields in this screen.
Table 68 Maintenance > Remote Management > Trust Domain
LABEL DESCRIPTION
A
dd Trust
Domain
elete Click the Delete icon to remove the trus ted host IP addr es s .
D
Click this to add a tr u s te d ho s t I P ad dress.
This field show s a trusted host IP address.IP Address
21.5 The Add Trust Domain Screen
Configure a public IP address which you want to allow access to the Zyxel Device. Click the Add Trust
Domain button in the Maintenance > Remote Management > Trust Domain screen to open t he follow ing
screen.
Figure 112 Maintenance > Remote Management > Trust Domain > Add Trust Domain
The following table describes the fields in this screen.
Table 69 Maintenance > Remote Management > Trust Domain > Add Trust Domain
LABEL DESCRIPTION
P Address
I
OK Click OK to save your changes back to the Zyxel Device.
ncel Click Cancel to restore your previously saved settings.
Ca
Enter a public IPv4/IPv 6 IP ad dr e ss w h ich is allowed to acces s th e se r vic e on th e Z yxel Device
from the WAN.
LTE7461-M602 User’s Guide
153
Page 46

22.1 Overview
This chapter explains how to configure the Zyxel Device’s TR-069 auto-confi guration settings.
22.2 The TR-069 Client Screen
TR-069 defi nes how Custo mer Premise Equipment (CP E), for example your Zyxel Device, can be
managed over the WAN by an Auto Configuration Server (ACS). TR-069 is based on sending Remote
Procedure Calls (RPCs) between an ACS and a client device. RPCs are sent in Extensible Markup
Language (XML) format over HTTP or HTTPS.
An administrat or ca n us e an ACS to remotely se t up t he Zy x el Device, modify settings, perform fi rm wa re
upgrades as well as monitor and diagnose the Zyxel Device . You have to enable the device to be
managed by the ACS and specify the ACS IP address or domain name and username and password.
C
HAPTER
22
TR-069 Client
Allow your Zyxel Device to be managed remotely by an Auto Configuration Server (ACS) using TR-069.
Click Maintenance > TR-069 Client to open the following screen .
LTE7461-M602 User’s Guide
155
Page 47

Chapter 22 TR-069 Client
Figure 113 Maintenance > TR-069 Client
The following table describes the fields in this screen.
Table 70 Maintenance > TR-069 Client
LABEL DESCRIPTION
CPE WAN Management Protocol (CWMP) enables the Zyxel Device to be remotely configuredCWMP Active
via a WAN link. Comm unication betwee n th e Z y xe l Device and the manage m ent server is
conducted via SOAP/HTTP(S) in the form of remote procedure calls (RPC).
Click to enable (switch turns blue) to allow the Zyxel Device to be managed by a management
server. Otherwise, clic k to disab le (switch tu rns gray) to disallo w the Zyxel Devi ce to be managed
by a management server.
Click to enable (switch turns blue)Inform the Zyxel Device to send periodic inform via TR-069 on the
WAN. Otherwise, click to di sable (switch turns gray).
In
form Interval
Protocol
IP
S URL
AC
E
nter the time interval (in seconds) at which the Zyxel Device sends information to the auto-
configuration server.
ect the type of IP protocol to allow TR-069 to operate on.
Sel
ter the URL or IP address of the auto-configuration server.
En
En
ter the TR-069 user name for authentication with the auto-configuration server.ACS User Name
LTE7461-M602 User’s Guide
156
Page 48

Chapter 22 TR-069 Client
Table 70 Maintenance > TR-069 Client (continued)
LABEL DESCRIPTION
E
nter the TR-0 69 password for au thenticatio n w ith the auto-co n figuration serv er.ACS Passwo rd
WAN Interface
used by TR-069
client
splay SOAP
Di
messages on
serial console
nnection
Co
Request
Authentication
nnection
Co
Request User
Name
Co
nnection
Request
Password
Connection
Request URL
Validate ACS
Certificate
Local certificate
used by TR-069
client
Apply Click Apply to save your changes.
Cancel Click Cancel to restore the screen’s last saved settings.
Select a WAN interface through which the TR-069 traffic passes.
If you select Any_WAN, the Zyxel Device automatically passes the TR-069 traffic when any WAN
connection is up.
If you select Multi_WAN, you also need to select two or more pre-configured WAN interfaces. The
Zyxel Device automatically passes the TR-069 traffic when one of the selected WAN connections
is up.
The Zyxel Device automatically passes the TR-069 traffic when cellular WAN connection is upCellular WAN
Click to enable (switch turns blue) the dumping of all SOAP messages during the ACS server
communication with the CPE
Select this opti on to enable authentication when there is a connection re quest from the ACS.
nter the connection request user name.
E
When the ACS makes a connection request to the Zyxel Device, this user name is used to
authenticate the ACS.
E
nter the connection request password.
When the ACS makes a connection request to the Zyxel Device, this password is used to
authenticate the ACS.
This shows the connection request URL.
The ACS can use this URL to make a connection request to the Zyxel Device.
Click to enable (switch turns blue) the validation of a local certificate used by TR-069 client.
You can choose a local certificate used by TR-069 client. The local certificate should be
imported in the Security > Certificates > Local Certificates screen.
.
.
LTE7461-M602 User’s Guide
157
Page 49

23.1 Time Settings Overview
This chapter shows you how to configure system related settings, such as system time, password, name,
the domain name and the inacti vity timeout interval.
23.2 The Time Screen
Configure the Zyxel Device’s time based on your local time zone. You can add a time server address,
select your time zone, and configure Daylight Savings if your location uses it.
To change your Zyxel Device’s time and date, click Maintenance > Time. The screen appears as shown.
C
HAPTER
23
Time Settings
LTE7461-M602 User’s Guide
158
Page 50

Figure 114 Maintenance > Time
Chapter 23 Time Settings
The following table describes the fields in this screen.
Table 71 Maintenance > Time
LABEL DESCRIPTION
rrent Date/Time
Cu
rrent Time
Cu
rrent Date
Cu
me and Date Setup
Ti
ime Protocol
T
is displays the time of your Zyxel Device.
Th
Each time you reload this screen, the Zyxel Device synchronizes the time with the time server.
is displays the da te of your Zyxel Device.
Th
Each time you reload this screen, the Zyxel Device synchronizes the date with the time server.
is displays the time protocol used by your Zyxel Device.
Th
LTE7461-M602 User’s Guide
159
Page 51

Chapter 23 Time Setti n gs
Table 71 Maintenance > Time (continued)
LABEL DESCRIPTION
Fi
rst ~ Fifth Time
Server Address
me Zone
Ti
Ti
me zone
ylight Savings
Da
Active Click this switch to enable or disable Daylight Saving Time. When the switch turns blue ,
St
art Rule
S
elect an NTP time server from the drop-down list box.
Otherwise, select Other and enter the IP address or URL (up to 29 extended ASCII char acters
in length) of your time server.
Select None if you don’t want to config ure the time server.
Check with your ISP/network administrator if you are unsure of this inf ormation.
C
hoose the time zone of your location. This will set the time difference between your time
zone and Greenwich Mean Time (GMT).
aylight Saving Time is a period from late spring to early fall when many countries set their
D
clocks ahead of no r ma l lo c al time by on e ho ur to give more daytim e lig h t in th e ev en ing .
the function is enabled. Otherwise, it’s not.
C
onfigure the day and time when Daylight Saving Time starts if you enabled Daylight Saving.
You can select a spe c if ic date in a particula r m on t h or a s pecific day of a spec ific we e k in a
particular month. The Time field uses the 24 hour format. Here are a couple of e xamples:
Daylight Saving Time starts in most parts of the United States on the second Sunday of March.
Each time zone in the United States starts using Daylight Saving Time at 2 A.M. local time. So in
the United Stat es, s et the day to Second, Sunday, t he month to March and t he time to 2 in the
Hour field.
Daylight Savin g Time starts in the Eur op ean Union on the last Su n day of March. All of th e ti me
zones in the European Union start using Daylight Saving Time at the same moment (1 A.M.
GMT or UTC). So in the European Union you would set the day to Last, Sunday and the month
to March. The time you select in the o'clock field depends on your tim e zone. In Germany for
instance, you would select 2 in the Hour field because Germany's time zone is one hour
ahead of GMT or UTC (GMT+1).
End Rule Configure the day and time when Daylight Saving Time ends if you enabled Daylight Saving.
You can select a spe c if ic date in a particula r m on t h or a s pecific day of a spec ific we e k in a
particular month. The Time field uses the 24 hour format. Here are a couple of examples:
Daylight Saving Time ends in the United States on the first Sunday of November. Each time
zone in the United States stops using Daylight Saving Time at 2 A.M. local time. So in the United
States you wo ul d s et t he da y to First, Sunday, the mont h t o November and the time to 2 in the
Hour field.
Daylight Saving Time ends in the European Union on the last Sunday of October. All of the
time zones in the European Unio n s to p us i ng Da ylight Saving Time at the same mo ment (1
A.M. GMT or UTC). So in th e European Union you w ould set the day to Last, Sunday, and the
month to October. The time you select in the o'clock field depends on your time zone. In
Germany for instance, you would select 2 in the Hour field because Germany's time zone is
one hour ahead of GMT or UTC (GMT+1).
ClickCancel Cancel to exit this screen without saving.
ClickApply Apply to save your changes.
LTE7461-M602 User’s Guide
160
Page 52

Email Notification
24.1 Email Notification Overview
A mail server is an application or a computer that can receive, forward and deliver email messages.
To have the Zyxel Device send reports, logs or notifications via email, you must specify an email server
and the email addresses of the sender and receiver.
24.2 The Email Notification Screen
View, remove and add email account information on the Zyxel Device. This account can be set to send
email notifications for logs.
C
HAPTER
24
Click Maintenance > Email Notification to open the Email Notification screen.
Note: The default port number of the mail server is 25.
Figure 115 Maintenance > Email Notification
The following table describes the labels in this screen.
Table 72 Maintenance > Email Notification
LABEL DESCRIPTION
dd New email
A
Ma
il Server
Address
er name
Us
rt
Po
Se
curity
ck this button to create a new entry (up to 32 can be created).
Cli
T
his displays the server name or the IP address of the mail server.
is displays the user name of the sender’s mail ac count.
Th
is field displays the port number of the mail server.
Th
Th
is field displays the protocol used for encryption.
LTE7461-M602 User’s Guide
161
Page 53

Chapter 24 Email Notification
Table 72 Maintenance > Email Noti fi cation (continued)
LABEL DESCRIPTION
Em
ail Address
move
Re
Th
is field displa ys the emai l addr es s tha t you want to be in th e fr om/ sen de r li ne of the e mail tha t
the Zyxel Device sends.
ck this button to delete the selected entry(ies).
Cli
24.2.1 Em
Click the Add button in the Email Notification screen. Use this screen to configure the required
information for sending email via a mail server.
Figure 116 Email Notification > Add
ail Notification Edit
The following table describes the labels in this screen.
Table 73 Email Notification > Add
LABEL DESCRIPTION
Ma
il Server
Address
Port Enter the same port number here as is on the mail server for mail traffic.
uthentication
A
User name
A
uthentication
Password
A
ccount email
Address
En
ter the server name or the IP address of the mail server for the email address specified in the
Account email Address field.
If this field is left blank, reports, logs or notifi cations will not be sent via email.
ter the user name (up to 32 characters). This is usually the user name of a mail account you
En
specified in t he Account email Address field.
E
nter the password associated with the user name above.
E
nter the email addr e ss t ha t yo u wa nt to be i n th e f rom /s en der line o f th e e mai l not ifi ca ti on t hat
the Zyxel Device sends.
If you activate SSL/TLS authentication, the email address must be able to be authenticated by
the mail server as well.
LTE7461-M602 User’s Guide
162
Page 54

Chapter 24 Email Notification
Table 73 Email Notification > Add (continued)
LABEL DESCRIPTION
Co
nnection
Security
Cancel Click this button to begin configuring this screen afresh.
OK Cl
Sel
ect SSL to use S ec ure Sockets La yer (SSL) or Tran sport Layer S e curity (TLS) if you want
encrypted communications bet w ee n the mail server and the Zy x el Device.
Select STARTTLS to upgrade a plain text connection to a secure connection using SSL/TLS.
ick this button to save your changes and return to the previous scre en.
LTE7461-M602 User’s Guide
163
Page 55

25.1 Log Setting Overview
You can configure where the Zyxel Device sends logs and which logs and/or immediate alerts the Zyxel
Device records.
25.2 The Log Setting Screen
If there is a LAN client on your network or a remote server that is running a syslog utility, you can save log
files from LAN computers to it by enabling Syslog Logging, selecting Remote or Local File and Remote in
the Mode field, and entering the IP address of the syslog server in the Syslog Server field. Remote allows
you to store logs on a syslog server, while Local File allows you to store them on the Zyxel Device. Local
File and Remote means your logs are stored both on the Zyxel Device and on a syslog server. To change
your Zyxel Device’s log settings, click Maintenance > Log Setting. The screen appears as shown.
C
HAPTER
25
Log Setting
LTE7461-M602 User’s Guide
164
Page 56

Chapter 25 Log Setting
Figure 117 Maintenance > Log Setting
The following table describes the fields in this screen.
Table 74 Maintenance > Log Setting
LABEL DESCRIPTION
Syslog Settings
yslog Logging
S
ode
M
lick the switch (it will turn blue ) to enable sys log logging.
C
ect Remote to have the Zyxel Device se nd it to an external syslog serve r.
Sel
Select Local File to have the Zyxel Device save the log file on the Zyxel Device itself.
Select Local File and Remote to have the Zyxel Device save the log file on the Zyxel Device itself
and send it to an external syslog server.
Note: A warning appears upon selecting Remote or Local File and Remote.
Just click OK to continue.
slog Server
Sy
ter the server name or IP address of the syslog server that will log the selected categories of
En
logs.
LTE7461-M602 User’s Guide
165
Page 57

Chapter 25 Log Setti ng
Table 74 Maintenance > Log Setting (continued)
LABEL DESCRIPTION
UD
P Port
Em
ail Log Settings
Email Log Setting Click the switch (it will tur n bl ue) to allow the sending via email the system and security logs to
E
nter the port number used by the syslog server.
the email address specified in Send Log to.
Note: Make sure that the Mail Server Address field is not left blank in the
Maintenance > Email Notifications screen.
il Account
Ma
Sy
stem Log Mail
Subject
S
ecurity Log Mail
Subject
Send Log to This field allows you to enter the log’s designated email recipient. The log’s format is plain text
Se
nd Alarm to
arm Interval
Al
Ac
tive Log
Sy
stem Log
Security Log Select the categories of Security Logs that you want to record.
ply Click Apply to save your changes.
Ap
ncel Click Cancel to restore your previousl y s av ed settings.
Ca
elect a server specified in Maintenance > Email Notifications to send the logs to.
S
Th
is field allows you to enter a descriptive name for the system log email (for example Zyxel
System Log). Up to 127 characters are allowed for the System Log Mail Subject includi ng spec ial
characters inside the square brackets [!#%()*+,-./:=?@[]\{}~].
T
his field allows you to enter a descriptive name for the security log email (for example Zyxe l
Security Log). Up to 127 characters are allowed for the Security Log Mail Subject including
special characters inside the square brackets [!#%()*+,-./:=?@[]\{}~].
file sent as an emai l attachment.
Th
is field allows you to enter the alarm’s designated email recipient. The alarm’s format is plain
text file sent as an email attachment.
elect the frequency of showing of the alarm.
S
Sel
ect the categories of System Log s that you want to record.
LTE7461-M602 User’s Guide
166
Page 58

C
Firmware Upgrade
26.1 Overview
This chapter explains how to upload new firmware to your Zyxel Device. You can download new
firmware releases from your nearest Zyxel FTP site (or www.zyxel.com) to use to upgrade your Zyxel
Device’s performance.
Only use firmware for your Zyxel Device’s specific model. Refer to the
label on the bottom of your Zyxel Device.
26.2 The Firmware Upgrade Screen
Upload new firmware to your Zyxel Device by down loading the latest firmware file from the Zyxel
website. Then, upload it to your Zyxel Device. The upload process uses HTTP (Hypertext Transfer Protocol)
and may take up to three minutes. After a successful upload, the Zyxel Device will reboot.
HAPTER
26
Click Maintenance > Firmware Upgrade to open the following screen.
Do NOT turn off the Zyxel Device while firmware upload is in progress!
Figure 118 Maintenance > Firmware Upgrade
LTE7461-M602 User’s Guide
167
Page 59

Chapter 26 Firmware Upgrade
The following table describes the labels in this screen.
Table 75 Maintenance > Firmware Upgrade
LABEL DESCRIPTION
Up
grade
Firmware
store Default
Re
Settings After
Firmware
Upgrade
U
se these fields to upload firmware to the Zyxel Device.
lick to enable th is op ti on tha t r est ore s the f act ory- def aul t to the Zyx el De vi ce aft er upgra di ng
C
the firmware.
Note: Make sure to backup the Zyxel Device’s configuration settings first in case the
restore to factory-default process is not successful. Refer to Section 27.2 on
page 169.
Cu
rrent Firmware
Version
Fi
le Path
C
hoose File
load
Up
Th
is is the present firmware version.
T
ype in the location of the file you want to upload in this field or click Choose File to find it.
C
lick this to find the .bin file you want to upload. Remember that you must decompress
compressed (.zip) files before you can upload them.
lick this to begin the upload process. This process may take up to three minutes.
C
After you see the firm ware updating screen, wait a few minutes before logging into the Zyxel Device
again.
The Zyxel Device automatically restarts in this time causing a temporary network disconnect. In some
operating systems, you may see the following icon on your desktop.
Figure 119 Network Temporarily Disconnected
After two minutes, log in again and check your new firmware version in the Status screen.
If the upload was not successful, an error screen will appear. Click OK to go back to the Firmware
Upgrade screen.
LTE7461-M602 User’s Guide
168
Page 60

Backup/Restore
27.1 Backup/Restore Overview
Back up and restore your Zyxel Device configurations. You can also reset your Zyxel Device settings back
to the factory default.
27.2 The Backup/Restore Screen
Click Maintenance > Backup/Restore. Information related to factory defaults, backup configuration,
and restoring configuration appear s in this screen, as shown next.
Figure 120 Maintenance > Backup/Restore
C
HAPTER
27
Backup Configuration
Backup Configuration allows you to back up (save) the Zyxel Device’s current configuration to a file on
your computer. On ce the Zyxel Device is c onfigur ed and functioning properly, it is highly recommended
LTE7461-M602 User’s Guide
169
Page 61

Chapter 27 Backup/Restore
that you back up your configuration file before making configuration changes. The backup
configuration file will be useful in case you need to return to your previous settings.
Click Backup to save the Zyxel Device’s current configuration to your computer.
Restore Configuration
Restore Configuration allows you to upload a new or previously saved configuration file from your
computer to your Zyxel Device.
Table 76 Restore Configuration
LABEL DESCRIPTION
le Path
Fi
C
hoose File
load
Up
set
Re
pe in the location of th e f ile you want to upload in this field or click Choose File to find it.
Ty
Cl
ick this to find the file you want to upload. Remember that yo u mu st decompress
compressed (.ZIP) files before you can upload them.
lick this to begin the upload process.
C
ick this to reset your Zyxel Device sett ings back to the factory default.
Cl
Do not turn off the Zyxel Device while configuration file upload is in
progress.
After the Zyxel Device configuration has been restored successfully, the login screen appears. Login
again to restart the Zyxel Device.
The Zyxel Device automatically restarts in this time causing a temporary ne tw o r k di s connect. In some
operating systems, you may see the following icon on your desktop.
Figure 121 Network Temporarily Disconnected
If you restore th e d efaul t con fig urat ion, you m ay ne ed to c han ge th e IP ad dres s of your com put er to be
in the same subnet as that of the default Zyxel Device IP address (192.168.1.1).
If the upload was not successful, an error screen will appear. Click OK to go back to the Configuration
screen.
27.3 The Reboot Screen
Reboot the Zyxel Device remotely without tur ning the power off. You may n ee d to do this if the Zyxel
Device hangs, for example. This does not affect the Zyxel Device's configuration.
Click Maintenance > Reboot. Click Reboot to have the Zyxel Device reboot.
LTE7461-M602 User’s Guide
170
Page 62

Chapter 27 Backup/Restore
Figure 122 Maintenance > Reboot
LTE7461-M602 User’s Guide
171
Page 63

C
HAPTER
Diagnostic
28.1 Diagnostic Overview
You can use different diagnostic methods to test a connection and see the detailed information. The
Diagnostic screens display information to help you identify problems with the Zyxel Device.
28.2 The Ping/TraceRoute/Nslookup Test Screen
Perform ping, traceroute, or nslookup for troubleshooting. Ping and traceroute are used to test whether
a particular host is reachable. After entering an IP address and clicking one of the buttons to start a test,
the results will be shown in the Ping/Traceroute Test area. Use nslookup to find the IP address for a host
name and vice versa. Click Maintenance > Diagnostic to open the Ping/TraceRoute/Nslookup screen
shown next.
28
Figure 123 Maintenance > Diagnostic > Ping/Trace Route/Nslookup
LTE7461-M602 User’s Guide
172
Page 64

Chapter 28 Diagnostic
The following table describes the fields in this screen.
Table 77 Maintenance > Diagnostic
LABEL DESCRIPTION
Pi
ng/
TraceRoute
Test
TC
P/IP
Address Enter either an IP address or a host name to start a test.
ng
Pi
Pi
ng 6
Tr
ace Route
race Route 6
T
Nslookup Click this button to perform a DNS lookup on the IP address or host name.
T
he result of tests is shown here in the info area.
lick this button to perform a ping tes t on the IPv4 address or host name in order to test a
C
connection . Th e pin g st at is t ics will show in the info area .
C
lick this button to perform a ping tes t on the IPv6 address or host name in order to test a
connection . Th e pin g st at is t ics will show in the info area .
C
lick this button to perform the IPv4 trace route function. This determines the path a packet takes
to the specified host.
lick this button to perform the IPv6 trace route function. This determines the path a packet takes
C
to the specified host.
LTE7461-M602 User’s Guide
173
Page 65

29.1 Overview
This chapter offers some suggestions to solve problems you might encounter. The potential problems are
divided into the following categories.
• Power and Hardware Connections
• Zyxel Device Access and Login
• Internet Access
• UPnP
• SIM Card
• Wireless Signal
C
HAPTER
29
Troubleshooting
29.2 Power and Hardware Connections
The Zyxel Device does not turn on.
1 Make sure the Zyxel Device is turned on.
2 Make sure you a re using the power adapter an d cable (Power over Ethernet, PoE) included with the
Zyxel Device.
3 Make sure the PoE is connected to the Zyxel Device and plugged in to an appropriate power source.
Make sure the power source is turned on.
4 Turn the Zyxel Device off and on.
5 If the problem continues, contact the vendor.
29.3 Zy
xel Device Access and Login
I forg
ot the IP address for the Zyxel Device.
LTE7461-M602 User’s Guide
174
Page 66

Chapter 29 Troubleshooting
1 The default IP address is 192.168.1.1.
2 If you changed the IP address and have forgotten it, you might get the IP address of the Zyxel Device by
looking up the IP address of the default gateway for your computer. To do this in most Windows
computers, click Start > Run, enter cmd, and then enter ipconfig. The IP addr ess of t he D efault Gatewa y
might be the IP address of the Zyxel Device (it depends on the network), so enter this IP address in your
Internet browser.
3 If this does not work, you have to reset the Zyxel Device to its factory defaults. Refer to Section 27.2 on
page 169.
I forgot the password.
1 The default admin password is 1234.
2 If you can’t remember the pas sword, you have to reset the Zyx el Device to its factor y defaults. Refer to
Section 27.2 on page 169.
nnot see or access the Login screen in the Web Configurator.
I ca
1 Make sure you are using the correct IP address.
• The default IP address is 192.168.1.1.
• If you changed the IP address (Section 7.2 on page 66), use the new IP address.
• If you changed the IP address and have forgotten it, see the troubleshooting suggestions for I
forgot the IP address for the Zyxel Device.
2 Check the hardware connections, see the Quick St art Guide.
3 Make sure your Internet browser does not block pop-up windows and has JavaScript and Java
enabled.
4 Reset the Zyxel Device to its factory default, and try to access the Zyxel De vice with the default I P
address. Refer to Section 27.2 on page 169.
5 If the problem continues, contact the network administrator or vendor, or try the advanced suggestion.
Advanced Suggestion
• Try to access the Zyxel Device using another service, such as Telnet. If you can access the Zyxel
Device, check the remote management settings and firewall rules to find out why the Z y xel Device
does not respond to HTTP.
I can see the Login screen, but I cannot log in to the Zyxel Device.
LTE7461-M602 User’s Guide
175
Page 67

Chapter 29 Trou bleshooting
1 Make sure you have entered the user name and password correctly. The default user name is admin.
These fields are case-sensitive, so make sure [Caps Lock] is not on.
2 You cannot log in to the Web Configurator while someone is using Telnet to access the Zyxel Device.
Log out of the Zyxel Device in the other session, or ask the person who is logged in to log out.
3 Turn the Zyxel Device off and on.
4 If this does not work, you have to reset the Zyxel Device to its factory default. See Section 29.2 on page
174.
I ca
nnot use FTP, Telnet, SSH or Ping to access the Zyxel Device.
See the Remote Management Section on page 150 for details on allowing web services (such as HTTP,
HTTPS, FTP, Telnet, SSH and Ping) to access the Zyxel Device.
Check the server Port number field for the web service in the Maintenance > Remote Management
screen. You must use the same port number in order to use that web service for remote m a nagement.
29.4 Internet Access
nnot access the Internet.
I ca
1 Check the hardware connections and make sure the LEDs are behaving as expected. See the Quick
Start Guide and Section 1.6 on page 15.
2 Check the SIM card. Maybe it has wrong settings (refer to Section 5.3 on page 36), the account has
expired, it became loose (remove and reinsert it - refer to the Quick Start Guide) or it's missing (stolen).
See Section 29.6 on page 178 for possible SIM card problems.
3 Make sure you entered your ISP account information correctly. These fields are case-sensitive, so make
sure [Caps Lock] is not on.
4 If the problem continues, contact your ISP.
I canno
In
t access the Internet anymore. I had access to the Internet (with the Zyxel Device), but my
ternet connection is not available anymore.
1 Check the hardware connections (refer to the Quick Start Guide).
2 Turn the Zyxel Device off and on.
3 If the problem continues, contact your ISP.
LTE7461-M602 User’s Guide
176
Page 68

Chapter 29 Troubleshooting
The Internet connection is slow or intermittent.
1 There might be a lot of traffic on the network. If the Zyxel Device is sending or receiving a lot of
information, try closing some programs that use the Internet, especially peer-to-peer applications.
2 Turn the Zyxel Device off and on.
3 If the problem continues, contact the network administrator or vendor, or try the advanced suggestion
(refer to I cannot see or access the Login screen in the Web Configurator in this chapter).
te: Since your
No
affect LTE signals.
Zyxel Device is an outdoor-type, inclement weather like rain and hot weather may
29.5 UPnP
When using UPnP and the Zyxel Device reboots, my computer cannot detect UPnP and refresh
M
y Network Places > Local Network.
1 Make sure that UPnP is enabled in your computer. For Windows 7, see Section 7.6 on page 74. For
Windows 10, see Section 7.7 on page 77.
2 Make sure that UPnP is enabled in the Network Settings > Home Networking > UPnP scre en. See Section
7.4 on page 72 for details.
3 Disconnect the Ethernet cable from the Zyxel Device’s Ether net port or fr om your computer.
4 Re-connect the Ethernet cab le.
The Local Area Connection icon for UPnP disappears in the screen.
Restart your computer.
nnot open special applications such as white board, file transfer and video when I use the
I ca
N Messenger.
MS
1 Wait more than three minutes.
2 Restart the applications.
LTE7461-M602 User’s Guide
177
Page 69

29.6 SIM Card
T
he SIM card cannot be detected.
1 Disconnect the Zyxel Dev ice from the power supply.
2 Remove the SIM card from its slot.
3 Clean the SIM card slot of any loose debris using compressed air.
4 Clean the gold connectors on the SIM card with a clean lint-free cloth.
5 Insert the SIM card into it s slot and connect the Zyxel Dev ice to the power supply to restart it.
Chapter 29 Trou bleshooting
I get an Invalid S
1 Make sure you have an active plan with your ISP.
2 Make sure that the Zyxel Device is in the coverage area of a cellular network.
IM card alert.
29.7 Cellular Signal
ow should I positi on the
H
1 Find the location of your nearest cellular base station(s), then install the Zyxel Device towards the
direction of those sites. The nearest site or site with a direct line-of-sight is usually preferred.
Note: It is best to test towards more than one cellular site, as the nearest site / line-of-sight is
not always the best due to the terrain, interference, density of usage, etc. All of these
factors influence the stability, availability and throughput of the link to the Zyxel Device
Zyxel Device to
a strong cellular signal?
get
.
2 Position the Zyxel Device towards a direction where coverage is expected (example the nearest town).
3 Conduct test measurements using the Web Configurator’s System Monitor > Cellular WAN Status screen
to obtain a report of the cellular network signal strength and quality at various test positions.
No
te: It is best to reboot the Zyxel Device before each test measurement is taken to ensure
that it is not camping on the previous cellular site. This is because the Zyxel Device can
‘lock’ onto the previous cellular site even when the new cellular site is at a much better
signal level and quality.
LTE7461-M602 User’s Guide
178
Page 70

Chapter 29 Troubleshooting
Although installing the Zyxel Device as high as possible is the usual rule of thumb, it is sometimes possible
that the Zyxel Device is in a weak coverage spot at that specific height. Adju st the heig ht to achie ve the
best service possible.
ote: Cellular network signals and quality can fluctuate. A measurement taken now and a
N
few moments later can differ substantially even if nothing apparent has changed – this
can be due to many aspects, such as fading, reflections, interference, capacity du e to
high network traffic, etc.
It is possible that the network topology and usage changes over time, even from one minute to the next
as network utilization increases. If poor performance is experienced at a later stage, re-test different
installation locations again. It is possible that the current serving cellular site has become over utilized or
is out-of-service. As the network design and topology changes, so will the experience change, either for
the better or for the worse.
LTE7461-M602 User’s Guide
179
Page 71

PART III
Appendices
Appendices contain general information. Some information may not apply to your Zyxel Device.
178
Page 72

A
PPENDIX
A
Customer Support
In the event of problems that cannot be solved by using this manual, you should contact your vendor. If
you cannot contact your vendor, then contact a Zyxel office for the region in which you bought the
Zyxel Device.
See http://www.zyxel.com/homepage.shtml and also
http://www.zyxel.com/about_zyxel/zyxel_worldwide.shtml for the latest information.
Please have the following information ready when you contact an office.
Required Information
• Product model and serial num b er.
• Warranty Information.
• Date that you received your Zyxel Device.
• Brief description of the problem and the steps you took to solve it.
Corporate Headquarters (Worldwide)
Taiwan
• Zyxel Communications Corporation
• http://www.zyxel.com
Asia
China
• Zyxel Communications (Shanghai) Corp.
Zyxel Communications (Beijing) Corp.
Zyxel Communications (Tianjin) Corp.
• http://www.zyxel.cn
India
• Zyxel Technology India Pvt Ltd
• http://www.zyxel.in
Kazakhstan
•Zyxel Kazakhstan
• http://www.zyxel.kz
LTE7461-M602 User’s Guide
179
Page 73

Korea
•Zyxel Korea Corp.
• http://www.zyxel.kr
Malaysia
• Zyxel Malaysia Sdn Bhd.
• http://www.zyxel.com.my
Pakistan
• Zyxel Pakistan (Pvt.) Ltd.
• http://www.zyxel.com.pk
Philippines
• Zyxel Philippines
• http://www.zyxel.com.ph
Singapore
Appendix A Customer Support
Europe
• Zyxel Singapore Pte Ltd.
• http://www.zyxel.com.sg
Taiwan
• Zyxel Communications Corporation
• http://www.zyxel.com/tw/zh/
Thailand
• Zyxel Thailand Co., Ltd
• http://www.zyxel.co.th
Vietnam
• Zyxel Communications Corporation-Vietnam Office
• http://www.zyxel.com/vn/vi
Austria
•Zyxel Deutschland GmbH
• http://www.zyxel.de
Belarus
•Zyxel BY
• http://www.zyxel.by
LTE7461-M602 User’s Guide
180
Page 74

Appendix A Customer Support
Belgium
• Zyxel Communications B.V.
• http://www.zyxel.com/be/nl/
• http://www.zyxel.com/be/fr/
Bulgaria
•Zyxel България
• http://www.zyxel.com/bg/bg/
Czech Republic
• Zyxel Communications Czech s.r.o
• http://www.zyxel.cz
Denmark
• Zyxel Communications A/S
• http://www.zyxel.dk
Estonia
• Zyxel Estonia
• http://www.zyxel.com/ee/et/
Finland
• Zyxel Communications
• http://www.zyxel.fi
France
•Zyxel France
• http://www.zyxel.fr
Germany
•Zyxel Deutschland GmbH
• http://www.zyxel.de
Hungary
• Zyxel Hungary & SEE
• http://www.zyxel.hu
Italy
• Zyxel Communications Italy
• http://www.zyxel.it/
LTE7461-M602 User’s Guide
181
Page 75

Appendix A Customer Support
Latvia
•Zyxel Latvia
• http://www.zyxel.com/lv/lv/homepage.shtml
Lithuania
•Zyxel Lithuania
• http://www.zyxel.com/lt/lt/homepage.shtml
Netherlands
•Zyxel Benelux
• http://www.zyxel.nl
Norway
• Zyxel Communications
• http://www.zyxel.no
Poland
• Zyxel Communications Poland
• http://www.zyxel.pl
Romania
•Zyxel Romania
• http://www.zyxel.com/ro/ro
Russia
• Zyxel Russia
• http://www.zyxel.ru
Slovakia
• Zyxel Communications Czech s.r.o. organizacna zlozka
• http://www.zyxel.sk
Spain
• Zyxel Communications ES Ltd
• http://www.zyxel.es
Sweden
• Zyxel Communications
• http://www.zyxel.se
Switzerland
•S
tuderus AG
LTE7461-M602 User’s Guide
182
Page 76

• http://www.zyxel.ch/
Turkey
• Zyxel Turkey A.S.
• http://www.zyxel.com.tr
UK
• Zyxel Communications UK Ltd.
• http://www.zyxel.co.uk
Ukraine
•Zyxel Ukraine
• http://www.ua.zyxel.com
Latin America
Argentina
Appendix A Customer Support
• Zyxel Communication Corporation
• http://www.zyxel.com/ec/es/
Brazil
• Zyxel Communications Brasil Ltda.
• https://www.zyxel.com/br/pt/
Ecuador
• Zyxel Communication Corporation
• http://www.zyxel.com/ec/es/
Middle East
Israel
• Zyxel Communication Corporation
• http://il.zyxel.com/homepage.shtml
Middle East
• Zyxel Communication Corporation
• http://www.zyxel.com/me/en/
LTE7461-M602 User’s Guide
183
Page 77

North America
USA
• Zyxel Communications, Inc. - North America Headquarters
• http://www.zyxel.com/us/en/
Oceania
Australia
• Zyxel Communications Corporation
• http://www.zyxel.com/au/en/
Africa
South Africa
• Nology (Pty) Ltd.
• http://www.zyxel.co.za
Appendix A Customer Support
LTE7461-M602 User’s Guide
184
Page 78

Overview
IPv6 (Internet Protocol version 6), is designed to enhance IP address size and features. The increase in
IPv6 address size to 128 bits (from the 32-bit IPv4 address) allows up to 3.4 x 1038 IP addresses.
IPv6 Addressing
The 128-bit IPv6 address is written as eight 16-bit hexadecimal blocks separated by colons (:). This is an
example IPv6 address 2001:0db8:1a2b:0015:0000:0000:1a2f:0000.
IPv6 addresses can be abbreviated in two ways:
• Leading zeros in a block can be omitted. So 2001:0db8:1a2b:0015:0000:0000:1a2f:0000 can be
written as 2001:db8:1a2b:15:0:0:1a2f:0.
• Any number of consecutive blocks of zeros can be replaced by a double colon. A double colon can
only appear once in an IPv6 address. So 2001:0db8:0000:0000:1a2f:0000:0000:0015 can be
written as 2001:0db8::1a2f:0000:0000:0015, 2001:0db8:0000:0000:1a2f::0015,
2001:db8::1a2f:0:0:15 or 2001:db8:0:0:1a2f::15.
A
PPENDIX
IPv6
B
Prefix and Prefix Length
Similar to an IPv4 subnet mask, IPv6 uses an address prefix to represent the network address. An IPv6
prefix length specifies how many most significant bits (start from the left) in the address compose the
network address. The prefix length is written as “/x” where x is a number. For example,
2001:db8:1a2b:15::1a2f:0/32
means that the first 32 bits (2001:db8) is the subnet prefix.
Link-local Address
A link-local address uniquely identifies a device on the local network (the LAN). It is similar to a “private IP
address” in IPv4. You can have the same link-local address on multiple interfaces on a device. A linklocal unicast address has a predefined prefix of fe80::/10. The link-local unicast address format is as
follows.
Table 78 Link-local Unicast Address Format
10 bits 64 bits54 bits
Global Address
A global address uniquely identifies a device on the Internet. It is similar to a “public IP address” in IPv4. A
global unicast address starts with a 2 or 3.
01111 1110 10 Interface ID
LTE7461-M602 User’s Guide
185
Page 79

Unspecified Address
An unspecified address (0:0:0:0:0:0:0:0 or ::) is used as the source address when a device does not have
its own address. It is similar to “0.0.0.0” in IPv4.
Loopback Address
A loopback address (0:0:0:0:0:0:0:1 or ::1) allows a host to send packets to itself. It is similar to “127.0.0.1”
in IPv4.
Multicast Address
In IPv6, multicast addresses provide the same functionality as IPv4 broadcast addresses. Broadcasting is
not supported in IPv6. A multicast address allows a host to send packets to all hosts in a multicast group.
Multicast scope allows you to determine the size of the multicast group. A multicast address has a
predefined prefix of ff00::/8. The following table describes some of the predefined multicast addresses.
Table 79 Predefined Multicast Address
MULTICAST ADDRESS DESCRIPTION
FF01:0:0:0:0:0:0:1 A
FF01:0:0:0:0:0:0:2 All routers on a local node.
FF02:0:0:0:0:0:0:1 All hosts on a local connected link.
FF02:0:0:0:0:0:0:2 All routers on a local connected link.
FF05:0:0:0:0:0:0:2 All routers on a local site.
FF05:0:0:0:0:0:1:3 All DHCP severs on a local site.
Appendix B IPv6
ll hosts on a local node.
The following table describes the multicast addresses which are res erved and cannot be assigned to a
multicast group.
Table 80 Reserved Multicast Address
MULTICAST ADDRESS
FF00:0:0:0:0:0:
FF01:0:0:0:0:0:0:0
FF02:0:0:0:0:0:0:0
FF03:0:0:0:0:0:0:0
FF04:0:0:0:0:0:0:0
FF05:0:0:0:0:0:0:0
FF06:0:0:0:0:0:0:0
FF07:0:0:0:0:0:0:0
FF08:0:0:0:0:0:0:0
FF09:0:0:0:0:0:0:0
FF0A:0:0:0:0:0:0:0
FF0B:0:0:0:0:0:0:0
FF0C:0:0:0:0:0:0:0
FF0D:0:0:0:0:0:0:0
0:0
LTE7461-M602 User’s Guide
186
Page 80

Table 80 Reserved Multicast Address (continued)
MULTICAST ADDRESS
FF0E:0:0:0:0:0:
FF0F:0:0:0:0:0:0:0
Subnet Masking
Both an IPv6 address and IPv6 subnet mask compose of 128-bit binary digits, which are divided into
eight 16-bit blocks and written in hexadecimal notation. Hexadecimal uses four bits for each character
(1 ~ 10, A ~ F). Each block’s 16 bits are then represented by four hexadecimal characters. For example,
FFFF:FFFF:FFFF:FFFF:FC00:0000:0000:0000.
Interface ID
In IPv6, an interface ID is a 64-bit identifier. It identifies a physical interface (for example, an Ethernet
port) or a virtual interface (for example, the management IP address for a VLAN). One interface should
have a unique interface ID.
EUI-64
Appendix B IPv6
0:0
The EUI-64 (Extended Unique Identifier) defined by the IEEE (Institute of Electrical and Electronics
Engineers) is an interface ID format designed to adapt with IPv6. It is derived from the 48-bit (6-byte)
Ethernet MAC address as shown next. EUI-64 inserts the hex digits fffe between the third and fourth bytes
of the MAC address and complements the seventh bit of the first byte of the MAC address. See the
following example.
MAC : 49: 1300
EUI-64 02 :13 :49
Identity Association
An Identity Association (IA) is a collection of addresses assigned to a DHCP client, through which the
server and client can manage a set of related IP addresses. Each IA must be associated with exactly
one interface. The DHCP clie nt uses th e IA assigned to an int erface to obtain configuration from a DHCP
server for that interface. Each IA consists of a unique IAID and associated IP information.
The IA type is the type of address in the IA. Each IA holds one type of address. IA_NA means an identity
association for non-temporary addresses and IA_TA is an identity association for temporar y addresses.
An IA_NA option contains the T1 and T2 fields, but an IA_TA option does not. The DHCPv6 server uses T1
and T2 to control the ti me at which the client contacts with the server to extend the lifetimes on any
addresses in the IA_NA before the lifetimes expire. After T1, the client sends the server (S1) (from which
the addresses in the IA_NA were obtained) a Renew message. If the time T2 is reached and the server
56: 34:12
:
: FF : FE :
56: 34:12
LTE7461-M602 User’s Guide
187
Page 81

does not respond, the client sends a Rebind message to any available server (S2). For an IA_TA, the
T1
T2
Rene
w
Re
bind
Rebind
to S
1
Renew
to S1
Renew
to S1
Renew
to S1
Renew
to S1
Renew
to S1
to S2
to S2
client may send a Renew o r Rebind message at the client's discretion.
DHCP Relay Agent
A DHCP relay agent is on the same network as the DHCP clients and helps forward messages between
the DHCP server and clients. When a client cannot use its link-local address and a well-known multicast
address to locate a DHCP server on its network, it then needs a DHCP relay agent to send a message to
a DHCP server that is not attached to the same network.
The DHCP relay agent can add the remot e identifi cation (rem ote-ID) opti on and the inte rface-ID option
to the Relay-Forward DHCPv6 messages. The rem ot e-ID op tion car ries a user-d efin ed string, such as the
system name. The interface-ID option provides slot number, port information and the VLAN ID to the
DHCPv6 server. The remote-ID option (if any) is stripped from the Rela y-Reply messages before the rela y
agent sends the packets to the clients. The DHCP server copies the interface-ID option from the RelayForward message into the Relay-Reply message and sends it to the relay agent. The interface-ID should
not change even aft er the relay agent restarts.
Appendix B IPv6
Prefix Delegation
Prefix delegation enables a n IPv6 rout er to use the IPv6 pr efix (netw ork addr ess) received from the ISP (or
a connected uplink router) for its LAN. The Zyxel Device uses the received IPv6 prefix (for example,
2001:db2::/48) to generate its LAN IP address. Through sending Router Advertisements (RAs) regularly by
multicast, the Zyxel Device passes the IPv6 prefix information to its LAN hosts. The hosts then can use the
prefix to generate their IPv6 addresses.
ICMPv6
Internet Control Message Protocol for IPv6 (ICMPv6 or ICMP for IPv6) is de fined in RFC 4443. ICMPv6 has
a preceding Next Header value of 58, which is different from the value used to identify ICMP for IPv4.
ICMPv6 is an integral part of IPv6. IPv6 nodes use ICMPv6 to repor t errors encountered in packet
processing and perform other diagnostic functions, such as "ping".
Neighbor Discovery Protocol (NDP)
The Neighbor Discovery Protocol (NDP) is a protocol used to discover other IPv6 devices and track
neighbor’s reachability in a network. An IPv6 device uses the following ICMPv6 messages types:
• Neighbor solicitation: A request from a host to determine a neighbor’s link-layer address (MAC
address) and detect if the neighbor is still reachable. A neighbor being “reachable” means it
responds to a neighbor solicitation message (from the host) with a neighbor advertisement message.
• Neighbor advertisement: A response from a node to announce its link-layer address.
LTE7461-M602 User’s Guide
188
Page 82

• Router solicitation: A request from a host to locate a router that can act as the defau l t router and
• Router advertisement: A response to a router solicitation or a periodical multicast advertisement from
IPv6 Cache
An IPv6 host is required to have a neighbor cache, destination cache, prefix list and default router list.
The Zyxel Device maintains and updates its IPv6 caches constantly using the information from response
messages. In IPv6, the Zyxel Device configures a link-local address automatically, and then sends a
neighbor solicitation message to check if the address is unique. If there is an address to be resolved or
verified, the Zyxel Device also sends out a neighbor solicitation message. When the Zyxel Device
receives a neighbor advertisement in response, it stores the neighbor’s link-layer address in the neighbor
cache. When the Zyxel Device uses a router solicitation message to query for a router and receives a
router advertisement message, it adds the router’s information to the neighbor cache, prefix list and
destination cache. The Zyxel Device creates an en try in th e def ault r outer list cache if the rou ter ca n be
used as a default router.
When the Zyxel Device needs to send a packet, it first consults the destination cache to determine the
next hop. If there is no matching entry in the destination cache, the Zyxel Device uses the prefix list to
determine whether the destination address is on-link and can be reached directly without passing
through a router. If the address is unlink, the address is considered as the next hop. Otherwise, the Zyxel
Device determines the next-hop from the default router lis t or routing table. Once th e next hop IP
address is known, the Zyxel Device looks into the neighbor cache to get the link-layer address and sends
the packet when the neighbor is reachable. If the Zyxel Device cannot find an entry in the neighbor
cache or the state for the neighbor is not reachable, it starts the address resolution process. This helps
reduce the number of IPv6 solicitation and advertisement messages.
Appendix B IPv6
forward packets.
a router to advertise its presence and oth er p a ram e te rs .
Multicast Listener Discovery
The Multicast Listener Discovery (MLD) protocol (defined in RFC 2710) is derived from IPv4's Internet
Group Management Protocol version 2 (IGMPv2). MLD uses ICMPv6 message types, rather than IGMP
message types. MLDv1 is equivalent to IGMPv2 and MLDv2 is equivalent to IGMPv3.
MLD allows an IPv6 switch or router to discover the presence of MLD listeners who wish to receive
multicast packets and the IP addresses of multicast groups the hosts want to join on its network.
MLD snooping and MLD proxy are analogous to IGMP snooping and IGMP proxy in IPv4.
MLD filtering controls which multicast groups a port can join.
MLD Messages
A multicast router or switch periodically sends general queries to MLD hosts to update the multicast
forwarding table. When an MLD host wants to join a multicast group, it sends an MLD Report message
for that address.
An MLD Done message is equivalent to an IGMP Leave message. When an MLD host wants to leave a
multicast group, it can send a Done message to the router or switch. The router or switch then sends a
group-specific query to the port on which the Done message is received to determine if other devices
connected to this port should remain in the group.
LTE7461-M602 User’s Guide
189
Page 83

Example - Enabling IPv6 on Windows 7
Windows 7 supports IPv6 by default. DHCPv6 is also enabled when you enable IPv6 on a Windows 7
computer.
To enable IPv6 in Windows 7:
1 Select Control Panel > Network and Sharing Center > Local Area Connection.
2 Select the Internet Protocol Version 6 (TCP/IPv6) checkbox to enable it.
3 Click OK to save the change.
Appendix B IPv6
4 Click Close to exit the Local Area Connection Status screen.
5 Select Start > All Programs > Accessories > Command Prompt.
6 Use the ipconfig command to check your dynamic IPv6 address. This example shows a global address
(2001:b021:2d::1000) obt a ined from a DHCP se rver.
LTE7461-M602 User’s Guide
190
Page 84

Appendix B IPv6
C:\>ipconfig
Windows IP Configuration
Ethernet adapter Local Area Connection:
Connection-specific DNS Suffix . :
IPv6 Address. . . . . . . . . . . : 2001:b021:2d::1000
Link-local IPv6 Address . . . . . : fe80::25d8:dcab:c80a:5189%11
IPv4 Address. . . . . . . . . . . : 172.16.100.61
Subnet Mask . . . . . . . . . . . : 255.255.255.0
Default Gateway . . . . . . . . . : fe80::213:49ff:feaa:7125%11
172.16.100.254
LTE7461-M602 User’s Guide
191
Page 85

Copyright
This product has been tested and complies with the specifications for a Class B digital device, pursuant to Part 15 of the FCC Rules. These
limits are designed to provide reasonable protection against harmful interference in a residential installation.
This equipment generates, uses, and can radiate radio frequency energy and, if not installed and used according to the instructions,
may cause harmful interference to radio communications. However, there is no guarantee that interference will not occur in a
particular installation.
A
PPENDIX
B
Legal Information
pyright © 2019 by Zyxel Communications Corporation.
Co
The contents of this publication may not be reproduced in any part or as a whole, transcribed, stored in a retrieval system, translated into any
language, or transmitted in any form or by any means, electronic, mechanical, magnetic, optical, chemical, photocopying, manual, or
otherwise, without the prior written permission of Zyxel Communications Corporation.
Published by Zyxel Communications Corporation. All rights reserved.
Disclaime
r
Zyxe
l does not assume any liability arising out of th e appli cation or use of any product s, or software describe d herein. Ne ither d oes it c on vey any
license under its patent rights nor the patent rights of others. Zyxel further reserves the right to make changes in any products described herein
without notice. This publication is subject to change without notice.
Regulatory Notice and Statement
UNITED STATES of AMERICA
The following information applies if you use the product within USA area.
FCC EMC statement
• This device complies with part 15 of the FCC Rules. Operation is subject to the following two conditions:
(1) This device may not cause harmful interference, and
(2) This device must accept any interference received, including interference that may cause undesired operation.
• Changes or modifications not expressly approved by the party responsible for compliance could void the user’s authority to operate the equipment.
generates, uses, and can radiate radio frequency energy and, if not installed and used according to the instructions, may cause harmful
interference to radio communications. However, there is no guarantee that interference will not occur in a particular installation.
•
If this device does cause harmful interference to radio or television reception, which is found by turning the equipment off and on, the user is
encouraged to try to correct the interference by one or more of the following measures:
• Reorient or relocate the receiving antenna
•
Increase the separation between the equipment or devices
Connect the equipment to an outlet other than the receiver’s
•
•
Consult a dealer or an experienced radio/TV technician for assistance
The following information applies if you use the product with RF function within USA area
FCC Radiation exposure statement
This equipment complies with FCC RF radiation exposure limits set forth for an uncontrolled environment.
This transmitter must be at least 30 cm from the user and must not be co-located or operating in conjunction with
any other antenna or transmitter.
LTE7461-M602 User’s Guide
162
Page 86

CANADA
Chain NO.
Antenna Type
Frequency range
WiFi Gain (dBi)
LTE Gain (dBi)
Connector
WLAN-ANT0
PIFA
2.4 ~ 2.4835 GHz
6
N.A.
iPEX
WLAN-ANT1
PIFA
2.4 ~ 2.4835 GHz
5
N.A.
iPEX
WWAN
Dipole
2500 ~ 2570 MHz
N.A.
9
iPEX
698 ~ 716 MHz
N.A.
3.5
iPEX
777 ~ 787 MHz
N.A.
3
iPEX
1850 ~ 1915 MHz
N.A.
8
iPEX
814 ~ 849 MHz
N.A.
3.6
iPEX
2305 ~ 2315 MHz
N.A.
9
iPEX
1710 ~ 1780 MHz
N.A.
7
iPEX
The following information applies if you use the product within Canada area
Innovation, Science and Economic Development Canada ICES statement
CAN ICES-3 (B)/NMB-3(B)
Innovation, Science and Economic Development Canada RSS-GEN & RSS-247
statement
This device contains licence-exempt transmitter(s)/receiver(s) that comply with Innovation, Science and
Economic Development Canada’s licence-exempt RSS(s). Operation is subject to the following two
conditions: (1) This device may not cause interference; and (2) This device must accept any interference,
including interference that may cause undesired operation of the device.
This radio transmitter (2468C-LTE7461M602) has been approved by Innovation, Science and Economic
Development Canada to operate with the antenna types listed below, with the maximum permissible gain
indicated. Antenna types not included in this list that have a gain greater than the maximum gain indicated
for any type listed are strictly prohibited for use with this device.
Antenna information
If the product with 5G wireless function operating in 5150-5250 MHz and 5725-5850 MHz, the following attention must
be paid,
The device for operation in the band 5150-5250 MHz is only for indoor use to reduce the potential for harmful
interference to co-channel mobile satellite systems.
For devices with detachable antenna(s), the maximum antenna gain permitted for devices in the band
5725-5850 MHz shall be such that the equipment still complies with the e.i.r.p. limits as appropriate; and
Where applicable, antenna type(s), antenna models(s), and the worst-case tilt angle(s) necessary to remain
compliant with the e.i.r.p. elevation mask requirement set forth in Section 6.2.2.3 of RSS 247 shall be clearly
indicated.
If the produce with 5G wireless function operating in 5250-5350 MHz and 5470-5725 MHz, the following attention must
be paid.
For devices with detachable antenna(s), the maximum antenna gain permitted for devices in the bands
Page 87

5250-5350 MHz and 5470-5725 MHz shall be such that the equipment still complies with the e.i.r.p. limit
Chaîne NB.
Antenne
Type
Gamme de
fré quences
WiFi Gain
(dBi)
LTE Gain
(dBi)
Connecteur
WLAN-ANT0
PIFA
2.4 ~ 2.4835 GHz
6
N.A.
iPEX
WLAN-ANT1
PIFA
2.4 ~ 2.4835 GHz
5
N.A.
iPEX
WWAN
Dipole
2500 ~ 2570 MHz
N.A.
9
iPEX
698 ~ 716 MHz
N.A.
3.5
iPEX
777 ~ 787 MHz
N.A.
3
iPEX
1850 ~ 1915 MHz
N.A.
8
iPEX
814 ~ 849 MHz
N.A.
3.6
iPEX
2305 ~ 2315 MHz
N.A.
9
iPEX
1710 ~ 1780 MHz
N.A.
7
iPEX
L’émetteur/récepteur exempt de licence contenu dans le présent appareil est conforme aux CNR
d’Innovation, Sciences et Développement économique Canada applicables aux appareils radio exempts
de licence. L’exploitation est autorisé e aux deux conditions suivantes : (1) l’appareil ne doit pas produire de
brouillage; (2) L’appareil doit accepter tout brouillage radioélectrique subi, mê me si le brouillage est
susceptible d’en compromettre le fonctionnement.
Le pré sent é metteur radio (2468C-LTE7461M602) a été approuvé par Innovation, Sciences et Dé veloppement
é conomique Canada pour fonctionner avec les types d'antenne é numé ré s ci-dessous et ayant un gain
admissible maximal. Les types d'antenne non inclus dans cette liste, et dont le gain est supé rieur au gain
maximal indiqué pour tout type figurant sur la liste, sont strictement interdits pour l'exploitation de l'é metteur.
informations antenne
Lorsque la fonction sans fil 5G fonctionnant en5150-5250 MHz and 5725-5850 MHz est activé e pour ce produit , il est
né cessaire de porter une attention particuliè re aux choses suivantes
Les dispositifs fonctionnant dans la bande de 5 150 à 5 250 MHz sont ré servé s uniquement pour une utilisation
à l’intérieur afin de réduire les risques de brouillage préjudiciable aux systèmes de satellites mobiles utilisant
les mê mes canaux;
Pour les dispositifs munis d’antennes amovibles, le gain maximal d’antenne permis (pour les dispositifs utilisant
la bande de 5 725 à 5 850 MHz) doit être conforme à la limite de la p.i.r.e. spé cifiée, selon le cas;
Lorsqu’il y a lieu, les types d’antennes (s’il y en a plusieurs), les numéros de modèle de l’antenne et les pires
angles d’inclinaison nécessaires pour rester conforme à l’exigence de la p.i.r.e. applicable au masque
d’élévation, énoncée à la section 6.2.2.3 du CNR-247, doivent ê tre clairement indiqué s.
Lorsque la fonction sans fil 5G fonctionnant en 5250-5350 MHz et 5470-5725 MHz est activé e pour ce produit , il est
né cessaire de porter une attention particuliè re aux choses suivantes
Pour les dispositifs munis d’antennes amovibles, le gain maximal d'antenne permis pour les dispositifs utilisant
les bandes de 5 250 à 5 350 MHz et de 5 470 à 5 725 MHz doit ê tre conforme à la limite de la p.i.r.e.
Page 88

Industry Canada radiation exposure statement
This equipment complies with ISED radiation exposure limits set forth for an uncontrolled environment. This equipment
should be installed and operated with a minimum distance of 30 cm between the radiator and your body.
Déclaration d’exposition aux radiations:
Cet équipement est conforme aux limites d’exposition aux rayonnements ISED é tablies pour un environnement non
contrô lé .Cet équipement doit ê tre installé et utilisé avec un minimum de 30 cm de distance entre la source de
rayonnement et votre corps.
Page 89

fety Warnings
Sa
Do not use this product near water, for example, in a wet basement or near a swimming pool.
•
• Do not expose your Zyxel Device to dampness, dust or corrosive liquids.
• Do not store things on the device.
• Do not obstruct the Zyxel Device ventilation slots as insufficient airflow may harm your Zyxel Device. For example, do not pla
Device in an enclosed space such as a box or on a very soft surface such as a bed or sofa.
• Do not install, use, or service this Zyxel Device during a thunderstorm. There is a remote risk of electric shock from lightning.
• Connect ONLY suitable accessories to the Zyxel Device.
• Do not open the Zyxel Device or unit. Opening or removing covers can expose you to dangerous high voltage points or other risk
• Only qualified service personnel should service or disassemble this Zyxel Device. Please contact your vendor for further infor
• Make sure to connect the cables to the correct ports.
• Place connecting cables carefully so that no one will step on them or stumble over them.
• Always disconnect all cables from this Zyxel Device before servicing or disassembling.
• Do not remove th e pl u g and con n e ct i t to a po we r outlet by its e lf ; a lw ay s a tt ac h the p lu g to the power ad ap t e r fi r s t be f or e c o
a power outlet.
• Do not allow anything to rest on the power adapter or cord and do NOT place the product where anyone can walk on the power ada
or cord.
• Please use the provided or designated connection cables/power ca
AC in North America or 230V AC in Europe). If the p ower adapter or cord is damaged, it mi ght cause elec trocution. Remove it fr o
Device and the power source, repairing the power adapter or cord is prohibited. Contact your local vendor to order a new one.
• The following warning statements apply, where the disconnect device is not incorporated in the Zyxel Device or where the plug
power supply cord is intended to serve as the disconnect device,
- For permanently connected Zyxel Device, a readily accessible disconnect device shall be incorporated external to the Zyxel De
- For pluggable devices, the socket-outlet shall be instal
Environment Statement
European Union - Disposal and Recycling Information
The symbol below means that according to local regulations your product and/or its battery shall be disposed of separately from
waste. If this product is end of life, take it t o a recycli ng statio n desig nated by lo cal autho rities. At t he t ime of dispo sal,
your product and/or its battery will help save natural resources and ensure that the environment is sustainable development.
Appendix B Legal Information
bles/adapters. Connect it to th
led near the Zyxel Device and shall be easily accessible.
ce the Zyxel
mation.
e right supply voltage (for exa
the separate collection of
domestic
s.
nnecting it to
pter
mple, 110V
m the Zyxel
on the
vice;
Die folgende Symbol bedeutet, dass Ihr Produkt und/oder seine Batterie gemäß den örtlichen Bestimmungen getrennt vom Hausmüll entsorgt
werden muss. Wenden Sie sich an eine Recyclingstation, wenn dieses Produkt das Ende seiner Lebensdauer erreicht hat. Zum Zeitpu
Entsorgung wird die getrennte Sammlung von Produkt und/oder seiner Batterie dazu beitragen, natürliche Ressourcen zu sparen und
und die menschliche Gesundheit zu schützen.
El símbolo de abajo indica que según las regulaciones locales, su
doméstica. Cuando este producto alcance el final de su vida útil, llévelo a un punto limpio. Cuando llegue el momento de desech
producto, la recogida por separado éste y/o su batería ayudará a salvar los recursos naturales y a proteger la salud humana y
medioambiental.
Le symbole ci-dessous signifie que selon les réglementations locales votre produit et/ou sa batterie doivent être éliminés sépa
ménagères. Lorsque ce produit atteint sa fin de vie, amenez-le à un centre de recyclage. Au moment de la mise au rebut, la coll
de votre produit et/ou de sa batterie aidera à économiser les
Il simbolo sotto significa che secondo i regolamenti locali il vostro prodotto e/o batteria deve essere smaltito separatamente
Quando questo prodotto raggiunge la fine della v ita di servizio portarlo a una stazione di riciclaggio. Al mo mento dello smal ti
separata del vostro prodotto e/o della sua batteria aiuta a risp
Symbolen innebär att enligt lokal lagstiftning ska produkten och/eller dess batteri kastas separat från hushållsavfallet. När d
slutet av sin livslängd ska du ta den till en återvinningsstation. Vid tiden för kasseringen bidrar du till en bättre miljö och mänsklig hälsa genom att
göra dig av med den på ett återvinningsställe.
producto y/o su batería deberán depositarse como basura separ
ressources naturelles et protéger
armiare risorse naturali e a proteggere l'ambiente e la salute
l'environnement et la santé humaine.
en här produkten når
nkt der
die Umwelt
ada de la
ar el
rément des ordures
ecte séparée
dai rifiuti domestici.
mento, la raccolta
umana.
LTE7461-M602 User’s Guide
164
Page 90

台灣
Appendix B Legal Information
以下訊息僅適用於產品具有無線功能且銷售至台灣地區
認證合格之低功率射頻電機,非經許可,公司,商號或使用者均不得擅自變更頻率、加大功率或變更原設計之特性及功能。
•
• 第十四條
• 無線資訊傳輸設備忍受合法通信之干擾且不得干擾合法通信;如造成干擾,應立即停用, 俟無干擾之虞,始得繼續使用。
• 無線資訊傳輸設備的製造廠商應確保頻率穩定性,如依製造廠商使用手冊上所述正常操作, 發射的信號應維持於操作頻帶中
• 使用無線產品時,應避免影響附近雷達系統之操作。
• 高增益指向性天線只得應用於固定式點對點系統。
以
下訊息僅適用於產品屬於專業安裝並銷售至台灣地區
•
全警告 - 為了您的安全,請先閱讀以下警告及指示 :
安
•
• 避免設備接觸 :
• 雷雨天氣時,不要安裝,使用或維修此設備。有遭受電擊的風險。
• 切勿重摔或撞擊設備,並勿使用不正確的電源變壓器。
• 若接上不正確的電源變壓器會有爆炸的風險。
• 請勿隨意更換產品內的電池。
• 如果更換不正確之電池型式,會有爆炸的風險,請依製造商說明書處理使用過之電池。
• 請將廢電池丟棄在適當的電器或電子設備回收處。
• 請勿將設備解體。
• 請勿阻礙設備的散熱孔,空氣對流不足將會造成設備損害。
• 請插在正確的電壓供給插座(如:北美/台灣電壓110V AC,歐洲是 230V AC)。
• 假若電源變壓器或電源變壓器的纜線損壞,請從插座拔除,若您還繼續插電使用,會有觸電死亡的風險。
• 請勿試圖修理電源變壓器或電源變壓器的纜線,若有毀損,請直接聯絡您購買的店家,購買一個新的電源變壓器。
• 請勿將此設備安裝於室外,此設備僅適合放置於室內。
• 請勿隨一般垃圾丟棄。
• 請參閱產品背貼上的設備額定功率。
• 請參考產品型錄或是彩盒上的作業溫度。
• 產品沒有斷電裝置或者採用電源線的插頭視為斷電裝置的一部分,以下警語將適用 :
經型式
第十二條
射頻電機之使用不得影響飛航安全及干擾合法通信;經發現有干擾現象時,應立即停用,並改善至無干擾時方得繼續使用。
低功率
前項合法通信,指依電信法規定作業之無線電通信。 低功率射頻電機須忍受合法通信或工業、科學及醫療用電波輻射性電機設備之干擾。
本器材須經專業工程人員安裝及設定,始得設置使用,且不得直接販售給一般消費者。
請勿將此產品接近水、火焰或放置在高溫的環境。
- 任何液體 - 切勿讓設備接觸水、雨水、高濕度、污水腐蝕性的液體或其他水份。
- 灰塵及污物 - 切勿接觸灰塵、污物、沙土、食物或其他不合適的材料。
- 對永久連接之設備, 在設備外部須安裝可觸及之斷電裝置;
- 對插接式之設備, 插座必須接近安裝之地點而且是易於觸及的。
LTE7461-M602 User’s Guide
165
Page 91

bout the Symbols
A
ious symbols are used in this product to ensure correct usage, to prevent danger to the user and others, and to prevent property damage.
Var
The meaning of these symbols are described below. It is important that you read these descriptions thoroughly and fully understand the
contents.
Explanation of the Symbols
SYMBOL EXPLANATION
View
ing Certifications
Go to http://www.zyxel.com to view this product’s documentation and certifications.
Appendix B Legal Information
lternating current (AC):
A
AC is an electric current in which the flow of electric charge periodically reverses direction.
Direct current (DC):
DC if the unidirectional flow or movement of electric charge carriers.
Earth; ground:
A wiring terminal intended for connection of a Protective Earthing Conductor.
Class II equipment:
The method of protection against electric shock in the case of class II equipment is either double insulation or
reinforced insulation.
yxel Limited Warranty
Z
rants to the original end user (purchaser) that this product is free from any defects in material or workmanship for a specific period (the
Zyxel war
Warranty Period) from the date of purchase. The Warranty Period varies by region. Check with your vendor and/or the authorized Zyxel local
distributor for details about the Warranty Period of this product. During the warranty period, and upon proof of purchase, should the product
have indications of failure due to faulty workmanship and/or materials, Zyxel will, at its discretion, repair or replace the defective products or
components without charge for either parts or labor, and to whatever extent it shall deem necessary to restore the product or components to
proper operating condition. Any replacement w ill c onsist of a new or re-manufactured functionally e quivalent pr oduct of e qual or higher value,
and will be solely at the discretion o f Zyxel. This warr anty shall no t apply i f t he produ ct has bee n modif ied, misu sed, tamper ed with, damaged by
an act of God, or subjected to abnormal working conditions.
Note
ir or replacement, as provided under this warranty, is the exclusive remedy of the purchaser. This warranty is in lieu of all other warranties,
Repa
express or implied, including any implied warranty of merchantability or fitness for a particular use or purpose. Zyxel shall in no event be held
liable for indirect or consequential damages of any kind to the purchaser.
To obtain the services of this warranty, contact your vendor. You may also refer to the warranty policy for the region in which you bought the
Zyxel Device at http://www.zyxel.com/web/support_warranty_info.php.
tration
Regis
ister your product online to receive email notices of firmware upgrades and information at www.zyxel.com for global products, or at
Reg
www.us.zyxel.com for North American products.
pen Source Licenses
O
This product contains in part some free software distributed under GPL license terms and/or GPL like licenses. Open source licenses are provided
with the firmware package. You can download the latest firmware at www.zyxel.com. To obtain the source code covered under those Licenses,
please contact support@zyxel.com.tw to get it.
LTE7461-M602 User’s Guide
166
Page 92

Index
Index
A
access
troubleshooting 174
Access Control (Rules) screen 113
ACS 155
activation
firewalls 110
Add New ACL Rule screen 114
Address Resolution Protocol 136
Any_WAN
Remote Management 151
TR-069 traffic 157
APN information
obtain 34
APN Settings 35
Application Layer Gateway (ALG) 103
applications
Internet access 13
ARP Table 136, 138
ARP Table screen 137
authentication 54, 56
RADIUS server 56
Authentication Type
APN 36
Auto Configuration Server, see ACS 155
B
backup
configuration 169
backup configuration 169
Backup/Restore screen 169
Band Configuration Screen 37
Basic Service Set, see BSS
blinking LEDs 14
Broadband 33
BSS 57
example 57
C
CA 127
Cellular WAN 151
TR-069 traffic 157
Cellular WAN Screen 34
Cellular WAN screen 34
certificate
details 129
factory default 122
file format 128
file path 126
import 122, 125
public and private keys 128
verification 128
certificate request
create 122
view 123
certificates 121
advantages 128
authentication 121
CA 127
creating 122
public key 121
replacing 122
storage space 122
thumbprint algorit hms 129
thumbprints 129
trusted CAs 126
verifying fingerprint s 128
Certification Authority, see CA
certifications 196
viewing 198
channel, wireless LAN 54
client list 70
configuration
backup 169
firewalls 110
restoring 170
static route 106
contact information 179
copyright 192
LTE7461-M602 User’s Guide
200
Page 93

Index
Create Certificate Request screen 122
creating certi ficates 122
CTS threshold 51, 54
customer support 179
customized service
add 112
customized services 11 2, 113
D
data fragment threshold 51, 54
Data Roaming
enable 35
Denials of Service, see DoS
DHCP 65
DHCP Server Lease Tim e 68
DHCP Server State 68
diagnostic 172
diagnostic screens 172
digital IDs 121
disclaimer 192
DMZ screen 103
DNS 66
DNS Value s 68
domain name system, see DNS
DoS 109
thresholds 110
DoS protection blocking
enable 116
dynamic DNS 105
wildcard 105
Dynamic Host Configuration Protocol, see DHCP
DYNDNS wildcard 105
F
factory-default
RESET button 15
filters
MAC address 46, 55
firewall
enhancing security 117
security considerations 118
traffic rule direction 115
Firewall DoS screen 115
Firewall General screen 111
firewall rules
direction of travel 116
firewalls 109, 110
actions 115
configuration 110
customized services 11 2 , 113
DoS 109
thresholds 110
ICMP 109
rules 116
security 117
firmware 167
version 28
Firmware Upgrade screen 167
firmware upload 167
firmware versio n
check 168
fragmentation threshold 51, 54
FTP 96
unusable 176
G
E
email
log setting 166
Extended Service Set IDentification 44
General wireless LAN screen 43
H
hardware connections
troubleshooting 174
LTE7461-M602 User’s Guide
201
Page 94

Index
I
IANA 73
ICMP 109
Import Certificate screen 126
importing trusted CAs 126
Internet
no access 176
wizard setup 23
Internet access 13
wizard setup 23
Internet Assigned Numbers Authority
See IANA
Internet connection
slow or erratic 176
Internet Control Message Protocol, see ICMP
Internet Protocol version 6, see IPv6
IP address
WAN 34
IP Passthrough mode 41
IP Passthrough screen 20, 40
IPv4 firewall 111
IPv6 185
addressing 185
EUI-64 187
global address 185
interface ID 187
link-local address 185
Neighbor Discovery Protocol 185
ping 185
prefix 185
prefix length 185
unspecified address 186
IPv6 firewall 111
limitations
wireless LAN 56
WPS 63
Local Area Ne twork, see LAN
local certificate
TR-069 client 157
Local Certificates screen 121
Log Setting screen 164
login 16
passwords 16
troubleshooting 174
Login screen
no access 175
logs 130, 133, 141, 164
M
MAC Address
LAN 71
MAC address 47, 71
filter 46, 55
MAC authentication 46
Mac filter 11 9
managing the dev ice
good habits 14
using FTP. See FTP.
MGMT Services screen 150, 151
MSN Messenger
problem 177
Multi_WAN
Remote Management 151
TR-069 traffic 157
L
LAN 65
client list 70
MAC address 71
status 29, 32
LAN IP address 68
LAN IPv6 Mode Setup 68
LAN Setup screen 66
LAN subnet mask 68
N
NAT
default server 103
DMZ host 103
multiple server example 97
NAT ALG screen 103
Network Address Translation, see NAT
network disconnect
temporary 168
LTE7461-M602 User’s Guide
202
Page 95

Index
network map 20, 26
network type
select 38
Nslookup test 173
P
password
admin 175
good habit 14
lost 175
user 175
passwords 16
PBC 58
PIN Protection 37
PIN, WPS 58
example 60
Ping
unusable 176
Ping test 173
Ping/TraceRoute/Nslookup screen 172
PLMN Configuration Screen 38
PoE injector 13
port forwarding rule
add/edit 98
Port Forwarding screen 97, 98
Port Triggering
add new rule 101
Port Triggering screen 99
ports 14
power
troubleshooting 174
preamble 52, 54
preamble mode 57
problem
troubleshooting 174
Protocol (Customized Services) screen 111
Protocol Entry
add 112
Push Button Configuration, see PBC
push button, WPS 58
R
RADIUS server 56
Reboot screen 170
remote management
TR-069 155
Remote Procedure Calls, see RPCs 155
RESET Button 15
restart system 170
restore default settings
after firmware upgrade 168
restoring configuration 170
RFC 1058. See RIP.
RFC 1389. See RIP.
RFC 1631 95
RFC 3164 130
RIP 93
router features 13
Routing Information Protocol. See RIP
Routing Table screen 139
RPPCs 155
RTS threshold 51, 54
S
security
network 11 7
wireless LAN 54
Security Log 131
service access control 150, 151, 153
Service Set 44
setup
firewalls 110
static route 106
SIM card
status 143
SIM configuration 36
SSH
unusable 176
SSID 55
Static DHCP
Configuration 71
Static DHCP screen 70
LTE7461-M602 User’s Guide
203
Page 96

Index
static route 87, 93
configuration 106
status 26
firmware versio n 28
LAN 29, 32
WAN 28
wireless LAN 29
status indicators 14
syslog
protocol 130
severity levels 130
syslog logging
enable 165
syslog server
name or IP address 165
system
firmware 167
version 28
passwords 16
status 26
LAN 29, 32
WAN 28
wireless LAN 29
time 158
view 126
Trusted CA screen 125
Turning on UPnP
Windows 7 example 74
U
Universal Plug and Play, see UPnP
upgrading firmware 167
UPnP 72
forum 66
security issues 66
State 72
undetectable 177
usage confirmation 66
UPnP screen 72
UPnP-enabled Network Device
auto-discover 75, 79
W
T
Telnet
unusable 176
The 34
thresholds
data fragment 51, 54
DoS 110
RTS/CTS 51, 54
time 158
TR-069 155
ACS setup 155
authentication 157
TR-069 Client screen 155
Trace Route test 173
troubleshooting 174
Trust Domain
add 153
Trust Domain screen 152
Trusted CA certificate
WAN
status 28
Wide Area Network, see WAN 33
warranty 198
note 199
Web Configurator
easy access 82
web configurator
login 16
passwords 16
WEP Encryption 46
Wireless General screen 43
wireless LAN 42
authentication 54, 56
BSS 57
example 57
channel 54
example 53
fragmentation threshold 51, 54
limitations 56
MAC address filter 46, 55
preamble 52, 54
RADIUS server 56
LTE7461-M602 User’s Guide
204
Page 97

RTS/CTS threshold 51, 54
security 54
SSID 55
status 29
WPS 58, 60
example 61
limitations 63
PIN 58
push button 58
wizard setup
Internet 23
WPS 58, 60
example 61
limitations 63
PIN 58
example 60
push button 58
Index
LTE7461-M602 User’s Guide
205
 Loading...