

Page 1
Aero RhythmTrak
A
Operation Manual
© 2017 ZOOM CORPORATION
Copying or reprinting this manual in part or in whole without permission is prohibited.
Page 2

Contents
Usage and Safety Precautions .......................3
Introduction ....................................................6
Explanation of terms ......................................8
Overview
Names of parts ...............................................9
Using the A ..........................................12
The 4 Base Station areas .............................13
STEP key overview.......................................14
Ring Controller overview ..............................15
Connecting other devices ............................17
Switching modes .........................................18
Instrument overview ..................................... 19
Preparations
Turning the power on and o ....................... 20
Loading SD cards ........................................22
Character input screen use ..........................23
PATTERN mode
PATTERN mode overview ............................24
Operation overview ......................................29
Real-time pattern input ................................31
Pattern step input ........................................32
Playing back patterns ..................................34
Clearing parts of patterns ............................35
Arpeggiator ..................................................36
Clearing patterns ..........................................38
Other settings ...............................................39
Making pattern settings ...............................41
Pattern management ...................................44
Editing sounds
Sound editing overview ................................48
Editing instruments ......................................50
REC/PLAY area
REC/PLAY area overview ............................. 70
Motion sequences ........................................72
Capturing audio ...........................................74
Automatic saving .........................................78
EFFECT area
EFFECT area overview .................................79
Selecting and setting eects ........................80
Changing parameters ...................................81
Ring Controller Performance
Controlling parameters with the
Ring Controller .............................................82
System settings
Changing various settings ............................84
Outputting MIDI messages from the Base
Station ..........................................................87
Backing up data ...........................................89
SD card management ..................................91
Ring Controller settings ................................95
Updating the rmware ................................102
Troubleshooting .......................................... 104
Product specications ...............................105
Appendix
Oscillator list ...............................................106
Instrument and parameter lists .................. 11 0
Eects lists ................................................. 11 7
Arpeggiator parameter lists ........................ 11 8
Setting pad LED colors from a computer ..120
MIDI implementation charts .......................121
SONG mode
SONG mode overview .................................57
Operation overview ......................................60
Creating songs .............................................61
Song settings ...............................................65
Managing songs ...........................................67
Page 3
Usage and Safety Precautions
Safety Precautions
In this operation manual, symbols are used to highlight warnings and cautions that you must read to
prevent accidents. The meanings of these symbols
are as follows.
Something that could cause serious injury
or death
Something that could cause injury or
damage to the equipment
Other symbols used
An action that is mandatory
An action that is prohibited
Warning
Operation using an AC adapter
Never use any AC adapter other than a ZOOM AD-
14.
Do not do anything that could exceed the ratings
of outlets and other electrical wiring equipment.
Before using the equipment in a foreign country
or other region where the electrical voltage diers,
always consult with a shop that carries ZOOM
products and use the appropriate AC adapter.
Operation with batteries
Use 2 commercially-available 1.5V AA batteries
(alkaline or nickel metal hydride).
Carefully study warning indications on batteries
before use.
Always keep the battery cover closed during use.
Alterations
Do not open the case or modify the product.
Caution
Product handling
Do not drop, bump or apply excessive force to the
unit.
Be careful not to allow foreign objects or liquids to
enter the unit.
Operating environment
Do not use in extremely high or low temperatures.
Do not use near heaters, stoves and other heat
sources.
Do not use in very high humidity or where it could
be splashed by water.
Do not use in places with frequent vibrations.
Do not use in places with much dust or sand.
AC adapter handling
When disconnecting the power plug from an out-
let, always pull on the plug itself.
Disconnect the power plug from the outlet when
the unit will not be used for a long time and whenever there is lightning.
Battery handling
Install batteries with the correct +/− orientations.
Use the specied batteries.
Do not use new and old batteries together. Do not
use batteries of dierent brands or types together.
Remove the batteries when the unit will not be
used for a long time.
If a leak occurs, thoroughly wipe the battery case
and battery terminals to remove the leaked uid.
Connection cables and input/output jacks
Always turn the power OFF for all equipment be-
fore connecting any cables.
Always disconnect all connection cables and the
AC adapter before moving the unit.
Volume
Do not use at a loud volume for a long time.
Usage Precautions
Interference with other electrical equipment
In consideration of safety, the
signed to minimize its emission of electromagnetic
waves and to suppress interference from external
electromagnetic waves. However, equipment that is
very susceptible to interference or that emits powerful electromagnetic waves could result in interference
if placed nearby. If this occurs, place the
the other device farther apart.
With any type of electronic device that uses digital
control, including the
ference could cause malfunction, corrupt or destroy
data and result in other unexpected trouble. Always
use caution.
Cleaning
Use a soft cloth to clean the exterior of the unit if it
becomes dirty. If necessary, use a damp cloth that
has been wrung out well to wipe it.
If the Ring Controller surface becomes dirty, wipe it
with a soft damp cloth that does not shed bers.
Never use abrasive cleansers, wax or solvents such
as alcohol, benzene or paint thinner.
Breakdown and malfunction
If the unit becomes broken or malfunctions, immediately disconnect the AC adapter, turn the power
off and disconnect other cables. Contact the store
where you bought the unit or ZOOM service with the
following information: product model, serial number
and specic symptoms of breakdown or malfunction,
along with your name, address and telephone number.
A
A
, electromagnetic inter-
has been de-
A
and
Usage and Safety Precautions
3
Page 4

Usage and Safety Precautions (continued)
Copyrights
• Windows
Usage and Safety Precautions
dows
Microsoft
®
, Windows® 10, Windows® 8 and Win-
®
7 are trademarks or registered trademarks of
®
Corporation.
• Mac, Mac OS, iPad and iOS are trademarks or registered trademarks of Apple Inc.
• Intel and Intel Core are trademarks or registered
trademarks of Intel Corporation or its subsidiaries
in the US and other countries.
• The SD, SDHC and SDXC logos are trademarks.
• Bluetooth and the Bluetooth logo are registered
trademarks of Bluetooth SIG, Inc. and are used under license by Zoom Corporation.
• MIDI is a registered trademark of the Association of
Musical Electronics Industry (AMEI).
• Ableton and Ableton Live are trademarks of Ableton
AG.
• Other product names, registered trademarks and
company names in this document are the property
of their respective companies.
Note: All trademarks and registered trademarks in this doc-
ument are for identification purposes only and are not
intended to infringe on the copyrights of their respective
owners.
Recording from copyrighted sources, including CDs, records,
tapes, live performances, video works and broadcasts, without
permission of the copyright holder for any purpose other than
personal use is prohibited by law.
Zoom Corporation will not assume any responsibility related
to infringements of copyrights.
4
Page 5
FCC regulation warning (for U.S.A.)
This equipment has been tested and found to
comply with the limits for a Class B digital device,
pursuant to Part 15 of the FCC Rules. These
limits are designed to provide reasonable protection against harmful interference in a residential
installation. This equipment generates, uses, and
can radiate radio frequency energy and, if not installed and used in accordance with the instructions, may cause harmful interference to radio
communications. However, there is no guarantee
that interference will not occur in a particular installation. If this equipment does cause harmful
interference to radio or television reception, which
can be determined by turning the equipment o
and on, the user is encouraged to try to correct
the interference by one or more of the following
measures:
• Reorient or relocate the receiving antenna.
• Increase the separation between the equip-
ment and receiver.
• Connect the equipment into an outlet on a
circuit different from that to which the receiver is connected.
• Consult the dealer or an experienced radio/
TV technician for help.
For EU Countries
Declaration of Conformity
Usage and Safety Precautions
The contents of this document and the specications of
the product could be changed without notice.
5
Page 6

Introduction
Thank you very much for purchasing a ZOOM
Introduction
Aero RhythmTrak
following features.
A
. The
A
● Ring Controller with 16 pads and LEDs
You can input instruments by assigning dierent sounds to these 16 pads like drums or as-
signing them dierent pitches like a keyboard.
In addition, the multicolor LEDs allow you to
see instrument input status at a glance.
● 32 STEP keys on Base Station
The Base Station has 32 STEP keys especially
for step input.
By using these keys, you can quickly input sequences for the selected instrument.
● Ring Controller can be removed from
Base Station
The Ring Controller can be removed from the
Base Station to perform with it in hand. You
can now realize entertaining performances in
ways that are not possible with conventional
rhythm machines.
●
Accelerometer built into Ring Controller
You can control the arpeggiator timing, instru-
ments and eect parameters by tilting the Ring
Controller. Enjoy a new feeling of controlling
sound with your body.
● Automatic detection of grip area
The grip area setting function can prevent
misoperation when holding the Ring Controller
during performances.
The position can be set easily when holding it
in the most comfortable position.
● Ring Controller and Base Station
can be connected with Bluetooth LE
(using BTA-1 sold separately)
By using BTA-1 units (sold separately), the
Ring Controller and the Base Station can be
connected wirelessly with Bluetooth LE. Power
consumption is low, so use for long periods of
time is possible.
has the
● Use as a MIDI controller possible
The Ring Controller can be independently
used as a multifunction MIDI controller when
connected to a computer or other device by
USB. When using a BTA-1 (sold separately), it
can also be connected to a Mac or iOS device
by Bluetooth LE.
The Base Station also has a MIDI OUT jack.
By connecting it to a computer or synthesizer,
MIDI messages can be output by using the
A
sequences and operating the keys and
knobs on the Base Station.
● Built-in sound sources can be edited in
various ways
The sounds included in the
variety of adjustable parameters that increase
their expressive ranges.
Each of the sound parameters can be set
easily while checking them on the display.
In addition, each pattern can use the sounds
of up to 16 instruments (16 simultaneous
voices), allowing the creation of rich musical
pieces.
A
have a
● Over 400 PCM sound sources and 70
synthesizer oscillator types built-in
From the rich selection of sound sources, you
will be able to nd sounds that t your image
of the music you want to make.
The sounds are organized by categories so
you can nd them quickly.
● Various creation modes
Performance patterns can be created in two
ways. You can build patterns one step at a
time using the STEP keys and you can record
patterns by playing the 16 pads in real time.
Furthermore, in SONG mode, you can combine patterns to create complete songs.
6
Page 7

●
Use up to two eects simultaneously
You can use an effect on individual instru-
ments, as well as a master eect at the same
time. This vastly increases sound design
possibilities.
● Inputs for electronic instruments and
audio devices
You can perform while listening to the input
from a connected device and capture input
sounds to use as sound sources.
● Loading of audio les possible
You can use a computer to save WAV files
on an SD card and load them for use as
sound sources. (An SD card (not included) is
required.)
● Headphone output independent from
other outputs
The second stereo output allows you to output
a metronome just to the headphones, for
example.
Introduction
7
Page 8
Explanation of terms
Pattern
Explanation of terms
This is a short musical part of several bars.
Patterns are made of sequences (performance
information) and oscillators (sounds). You can
also save parameters controlled by the Ring
Controller, quantization and other settings for
each pattern separately.
A
The
variety of musical genres.
has preset patterns that cover a
Song
This is a combination of multiple patterns that
form a single musical piece.
Step
A step is the length of the shortest notes that
can be input to a sequence.
Steps are usually one 16th of a bar, so you can
set sounds to occur in 16th note intervals. This
length can be changed in the settings.
Sequence
A sequence is performance data that records
the timing when various sounds are played.
With the
step at a time and record sequences by playing the pads in real time.
A
you can input sequences one
Instrument
These are the smallest elements of sounds. A
variety of sound sources, including drum sets,
percussion instruments, basses and synthesizers, are already prepared for use.
You can also use WAV files saved on an SD
card by a computer as instruments.
In addition to selecting sounds, various settings are available in each instrument. These
include envelopes with attack and sustain
times, lters and eects.
8
Page 9
Overview
Names of parts
Overview
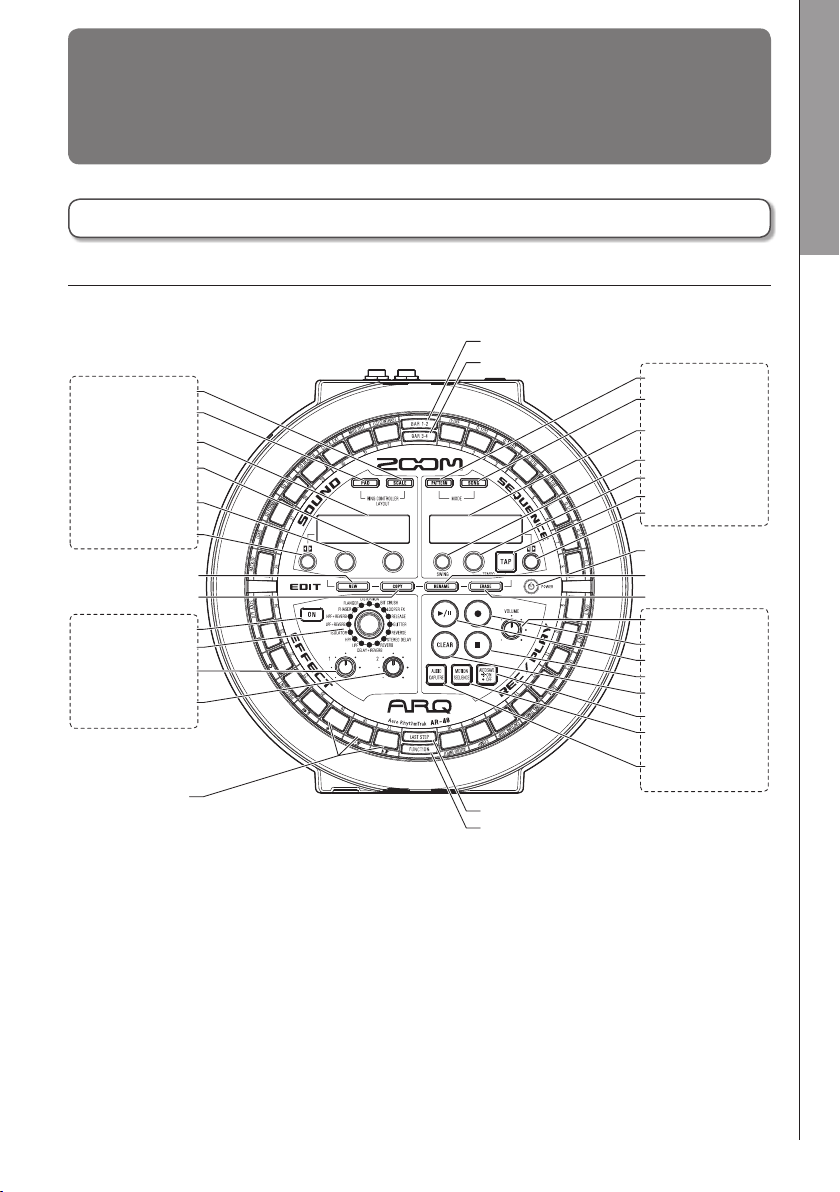
Base Station
■
Top
SOUND area
SCALE button
PAD button
Display
Sound parameter
knob 2
Sound parameter
Selection encoder
knob 1
NEW button
COPY button
Effect ON button
Effect type knob
Effect parameter
knob 1
Effect parameter
knob 2
EFFECT area
STEP button
BAR 1-2 button
BAR 3-4 button
LAST STEP button
FUNCTION button
SEQUENCE area
PATTERN button
SONG button
Display
SWING knob
TEMPO knob
TAP button
Selection encoder
POWER button
RENAME button
ERASE button
VOLUME knob
REC button
PLAY/PAUSE button
STOP button
CLEAR button
AUTO SAVE button
MOTION SEQUENCE
button
AUDIO CAPTURE
button
REC/PLAY area
Names of parts
9
Page 10
Names of parts (continued)
Overview Names of parts
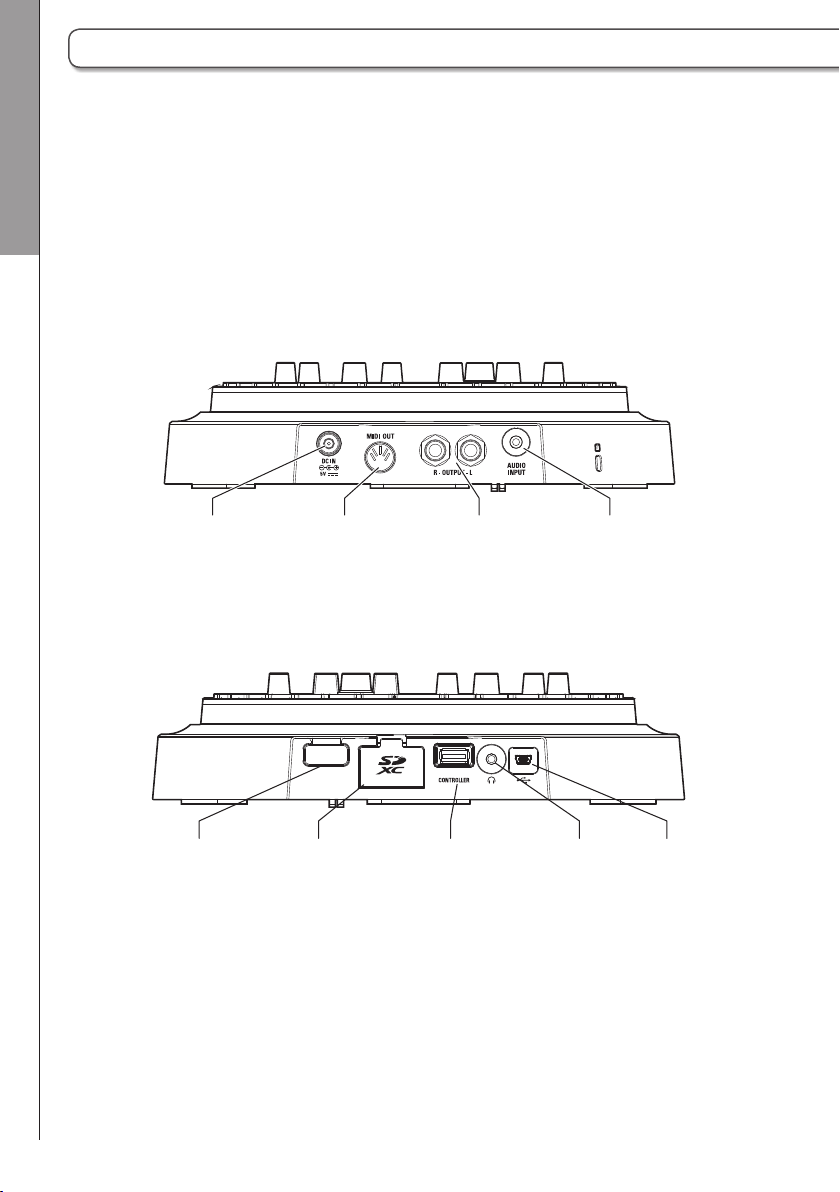
■
Back
■
Front
Power
connector
BTA-1
connector
MIDI OUT
jack
SD card
slot
OUTPUT
jacks
Ring Controller
connection port
AUDIO INPUT
jack
Headphone
jack
USB
port
10
Page 11
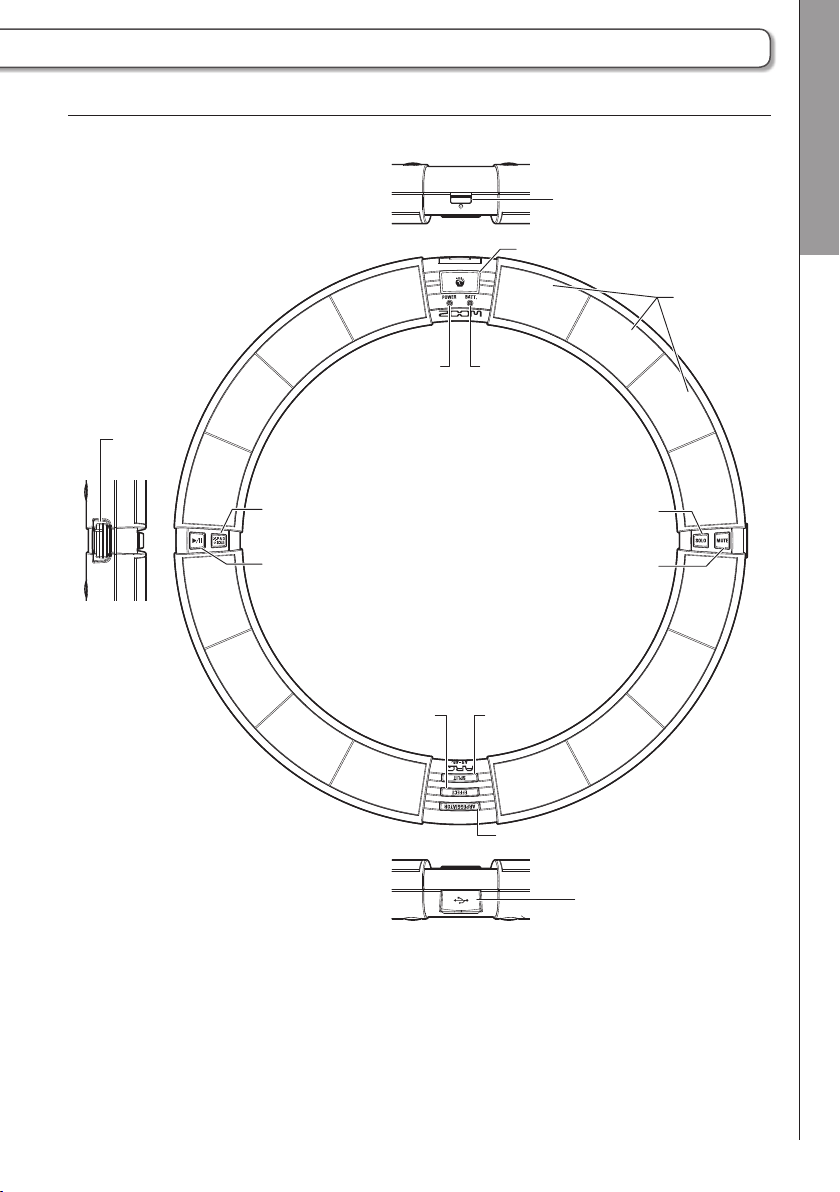
Ring Controller
(Side)
BTA-1
connector
GRIP button
POWER LED BATT LED
(Side)
Power button
Touchpads
Overview
Names of parts
PAD/SCALE button
PLAY/PAUSE button
EFFECT
button
SOLO button
MUTE button
SPLIT
button
ARPEGGIATOR button
(Side)
USB port
11
Page 12
Using the A
Overview
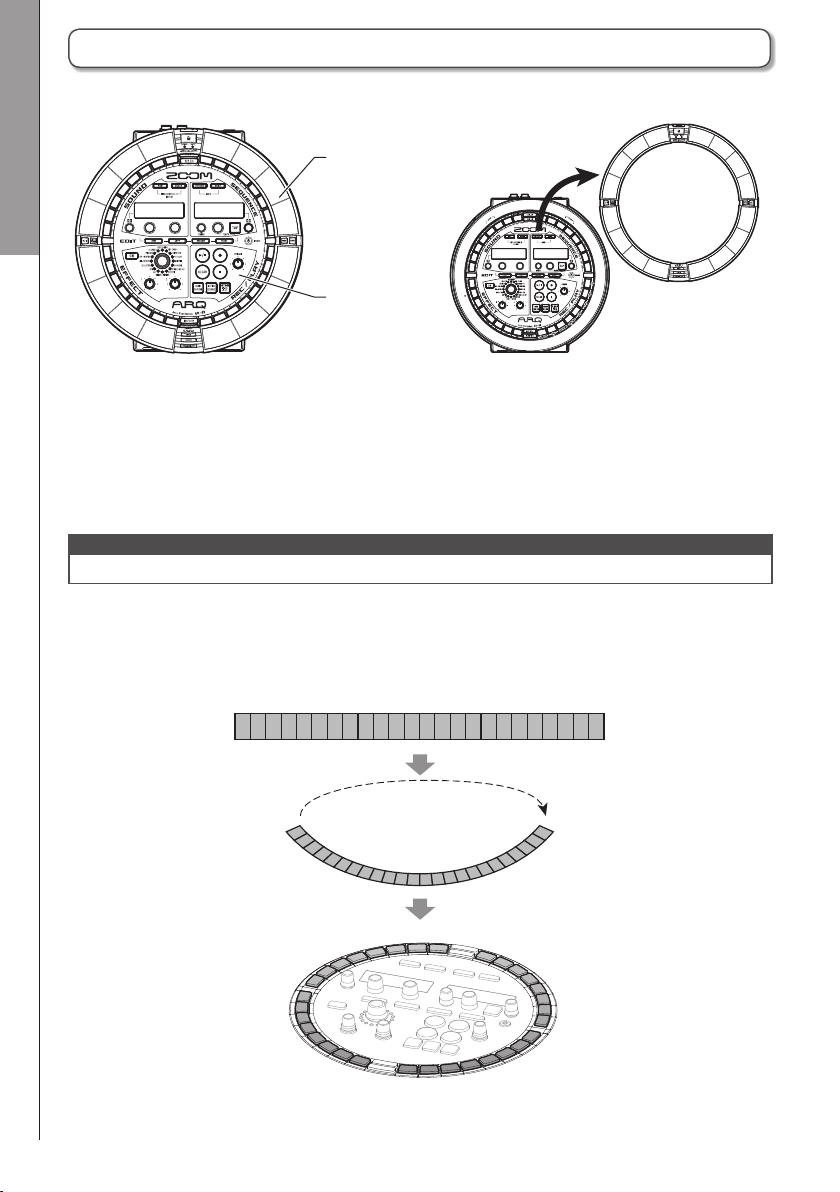
The A consists of a Base Station and a Ring Controller.
Ring Controller
Using the
Base Station
A
With the Base Station, you can create and save patterns, songs and other musical pieces, as well as
edit tones, for example. Use the Ring Controller for input when creating music.
Since the Ring Controller can be detached from the Base Station, you can hold it in your hand and
play it like an instrument. You can also connect it by USB or Bluetooth LE to a Mac computer or iOS
device and use it as a MIDI controller. (→ P. 96)
NOTE
BTA-1 units (sold separately) are necessary to connect by Bluetooth LE.
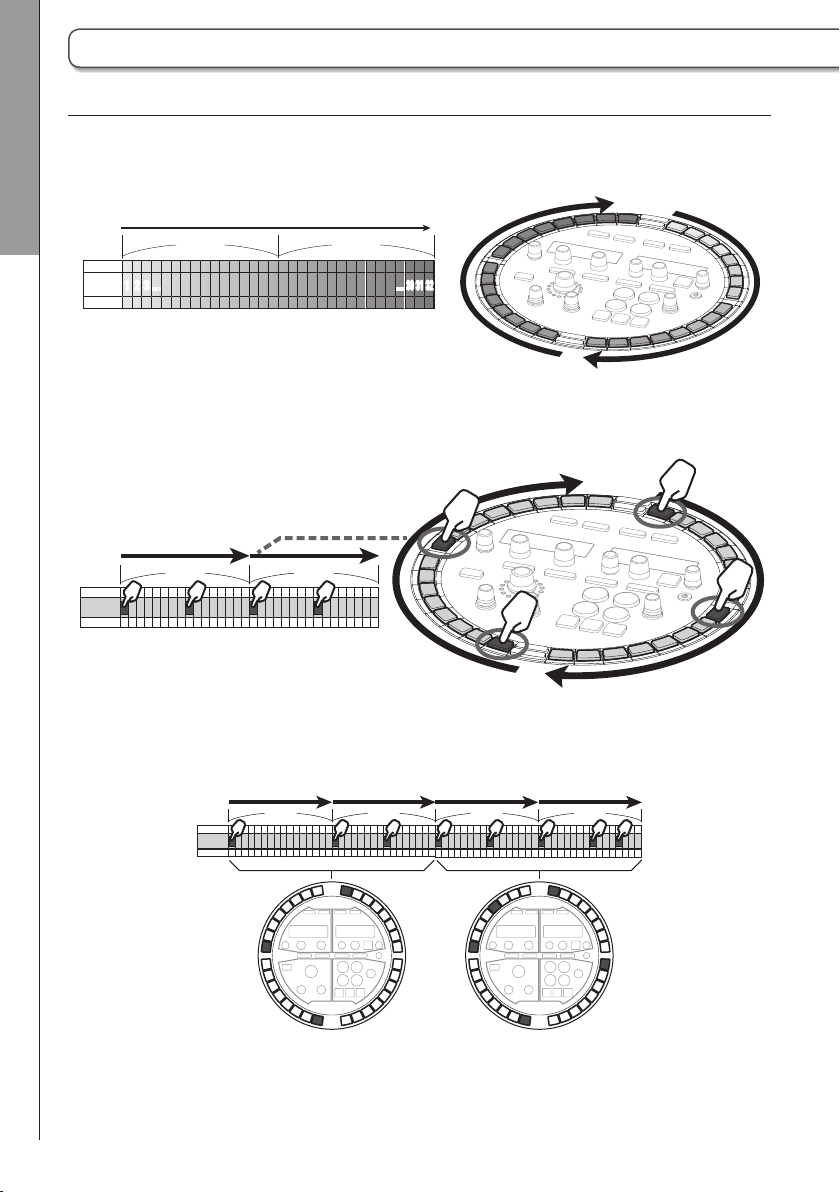
The Ring Controller has 16 pads with multicolor LEDs. The Base Station also has 32 STEP keys, so
you can quickly create patterns and songs. Arranging the STEP keys in a ring, instead of the usual
straight lines, enables conrmation and operation of all steps in a compact form.
1 2 3
…
31
32
30
…
1
30 31 32
…
2
3
…
12
Page 13
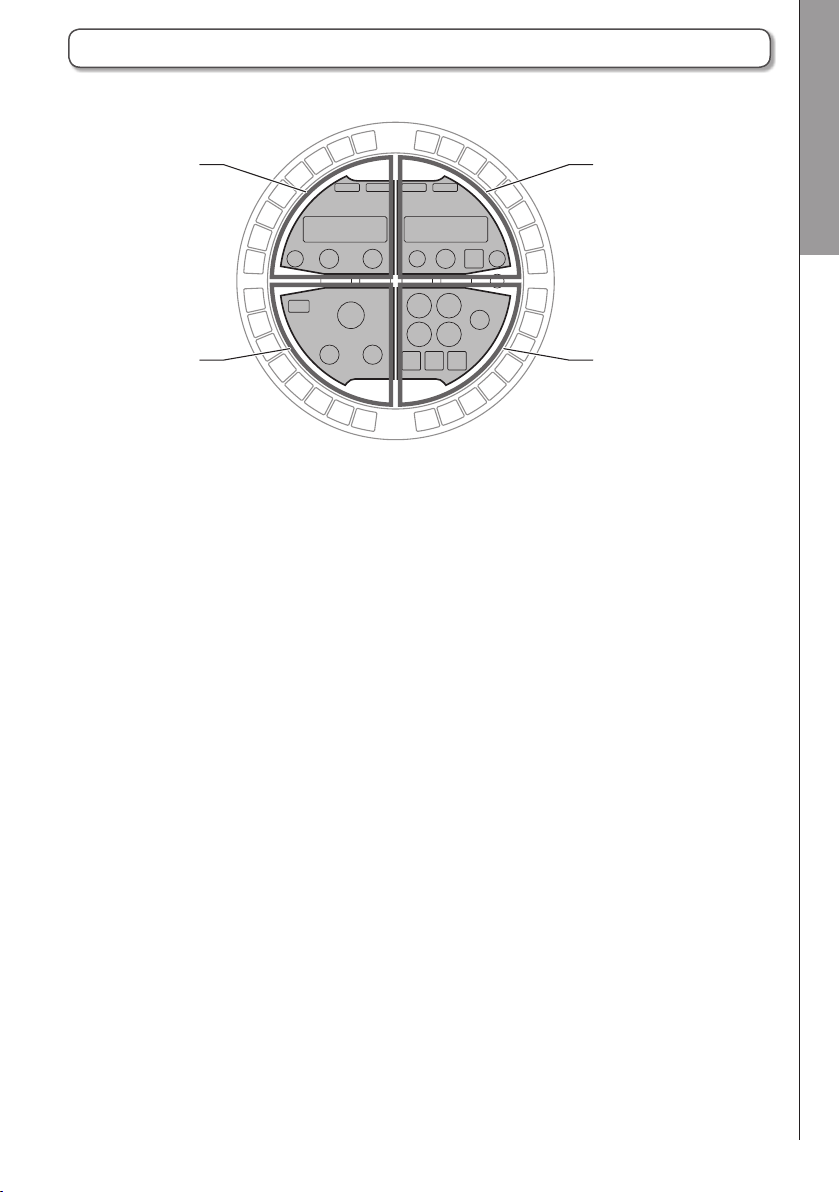
The 4 Base Station areas
The Base Station is divided into four areas according to use.
Overview
SOUND
area
EFFECT
area
SOUND area: Use to control the parameters of instruments assigned to pads. Parameters related to
the instrument are shown on the display.
SEQUENCE area: Use to set the tempo and other sequence parameters. The display shows pattern
and song names.
REC/PLAY area: Use to control sequences, including playback and recording.
EFFECT area: Use to control eects applied to output.
SEQUENCE
area
REC/PLAY
area
The 4 Base Station areas
13
Page 14
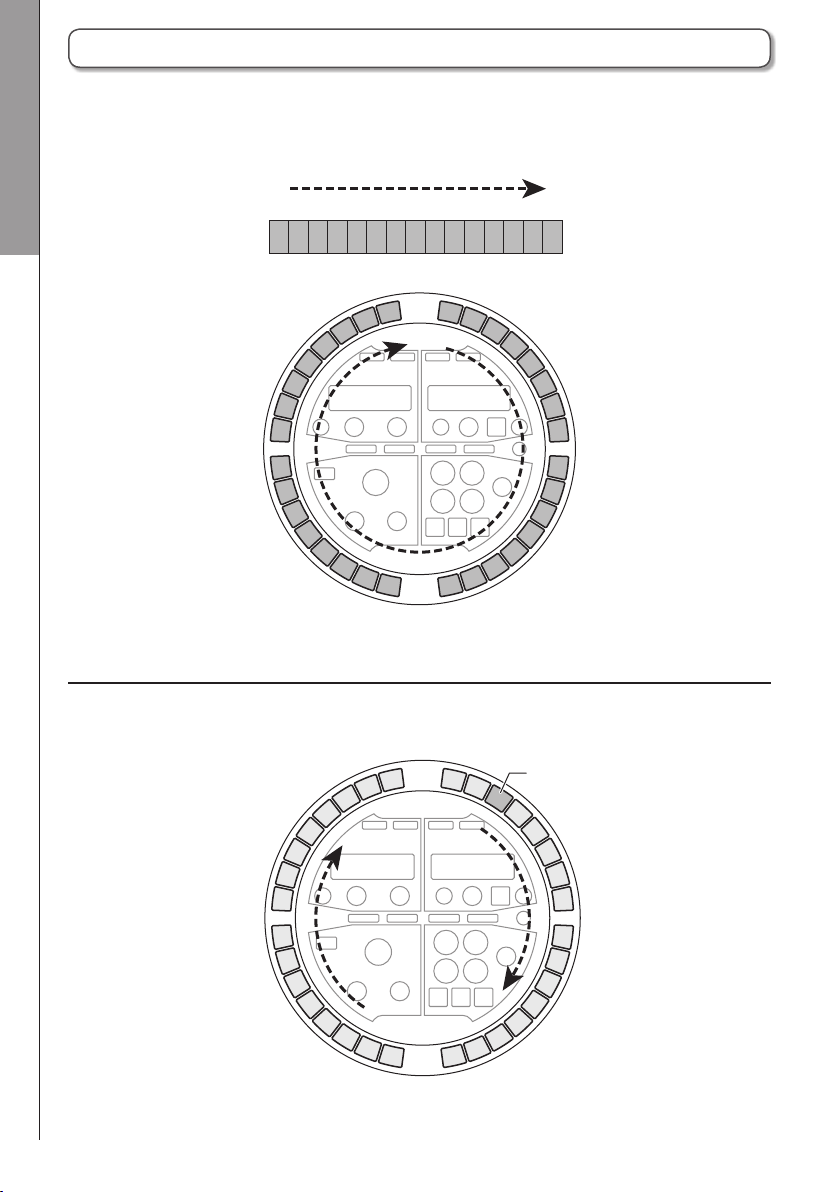
STEP key overview
Overview STEP key overview
The Base Station has 32 STEP keys that can be used to input sequences, for example.
You can input instruments one step at a time to create patterns.
Sequence steps
1
2 3
… …
30 31 32
…
30
31
32
1
2
3
…
Playback position
During playback of a pattern or song, for example, the STEP key LEDs light green at the step currently
playing.
Playback position
14
Page 15
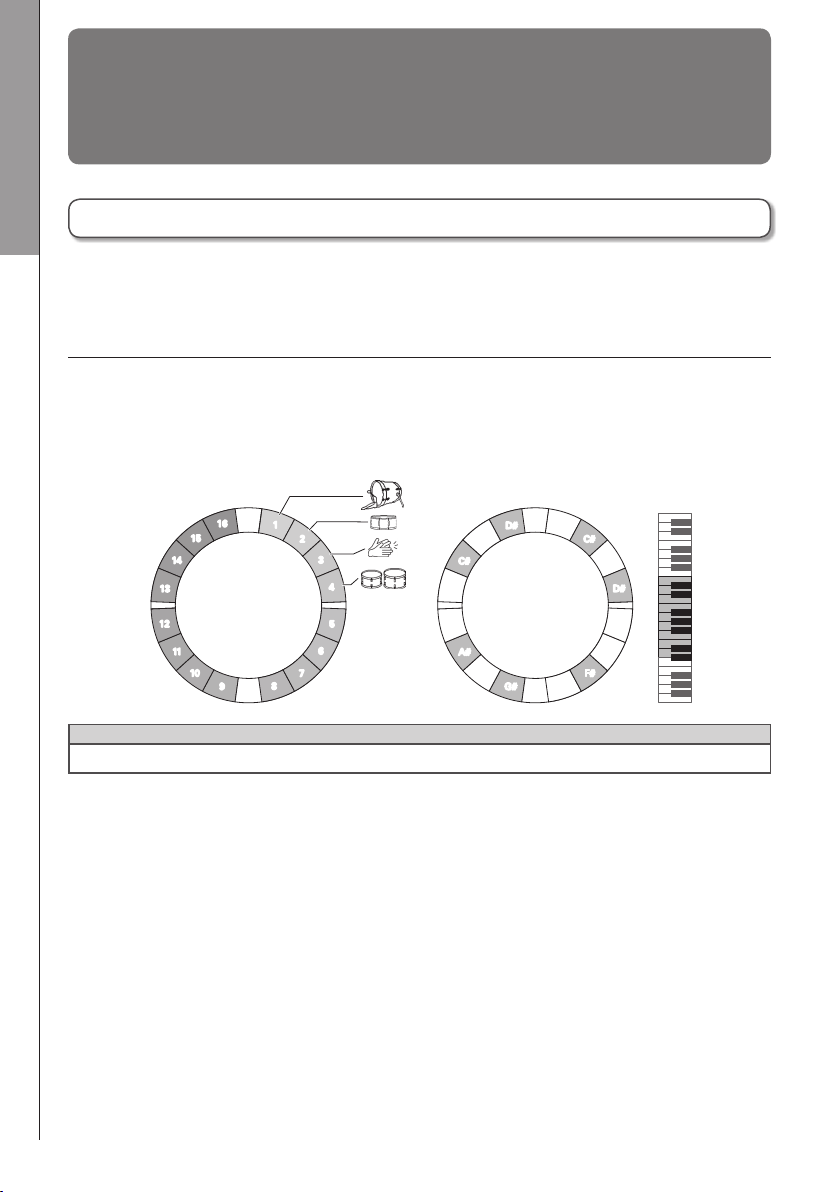
Ring Controller overview
The A Ring Controller surface has 16 pressure-sensitive touchpads.
Using these pads, you can input and edit patterns and songs and perform in real-time, for example.
Overview
Pressure-sensitive
touchpads with
multicolor LED indicators
Assignment of functions
Various functions are assigned to the Ring Con-
troller pads according to the operation status
and mode.
Example: In PATTERN mode and PAD layout,
you can play the instruments assigned to pads
in real-time by tapping them.
Instrument
Touchpad locations
16
15
14
13
12
11
10
1
2
3
4
5
6
7
8
9
Example: In SONG mode, dierent patterns can
be assigned to each pad, allowing you to tap the
pads to change and play back patterns
Pattern
Ring Controller overview
Example: In PATTERN mode and SCALE layout,
you can play the Ring Controller like a keyboard
with each pad having a dierent pitch.
Scale
HINT
Since input procedures dier for each mode,
see the explanation pages for each operation
for details.
15
Page 16
Ring Controller overview (continued)
Overview Ring Controller overview
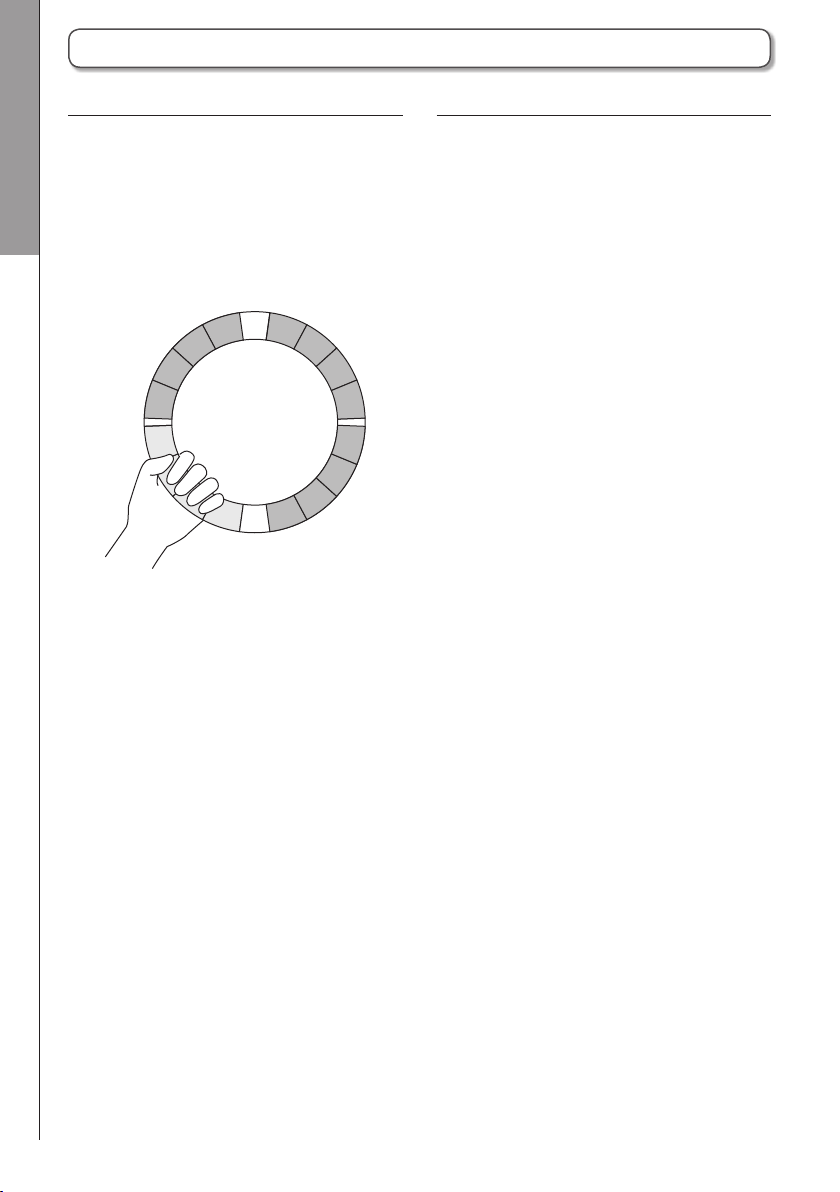
Grip area
Accelerometer
You can set a grip area that does not respond
to touch in order to prevent pads from being
pressed unintentionally when using the Ring
Controller separately from the Base Station. You
can set the grip area range as you like.
For details about how to set this, see "Grip area
setting" (→ P. 98).
Using the accelerometer built into the Ring Con-
troller, you can control arpeggiator timing, instru-
ments and eect parameters by tilting it.
See “Controlling parameters with the Ring Con-
troller” for details (→ P. 82).
16
Page 17
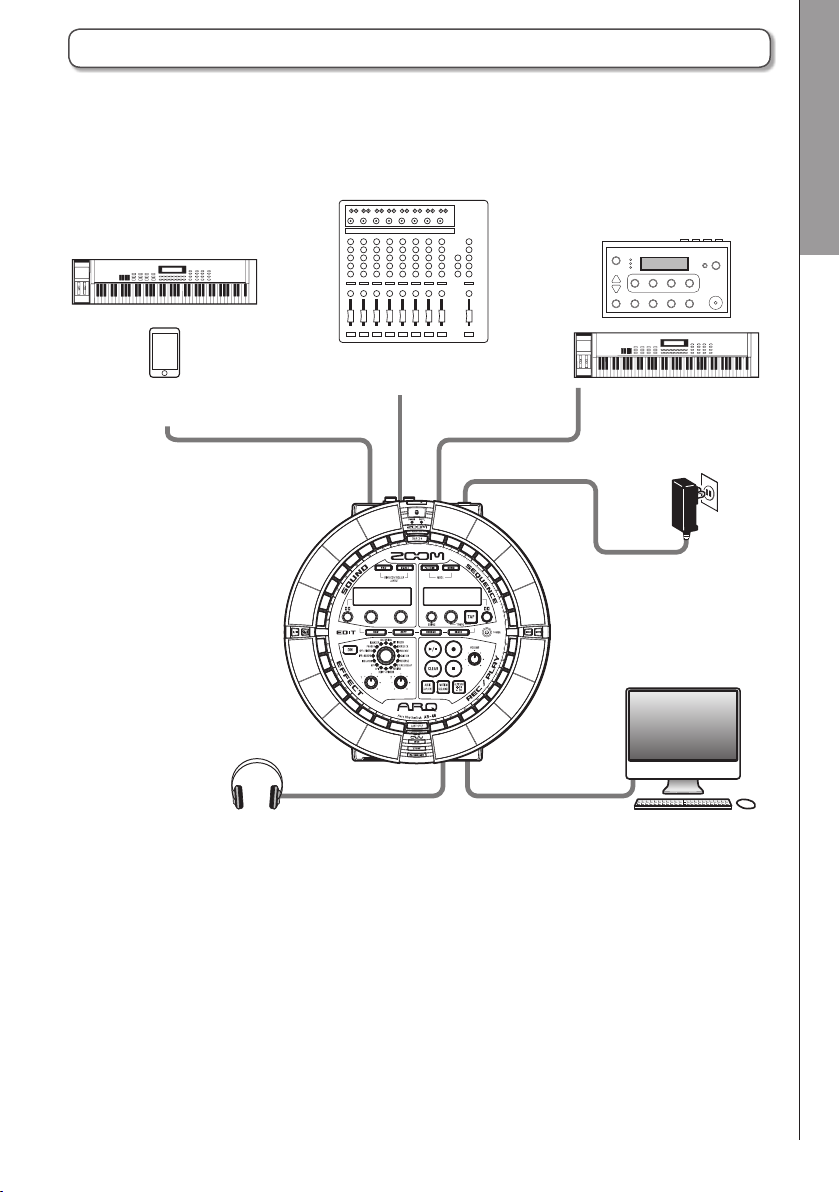
Connecting other devices
Mixer, audio system or
Audio source
for capture
AUDIO INPUT MIDI OUT
other playback device
OUTPUT
Overview
Connecting other devices
Sound module,
synthesizer or other
MIDI device
DC IN
AC adapter
Headphones
A
Computer
(USB connection)
17
Page 18
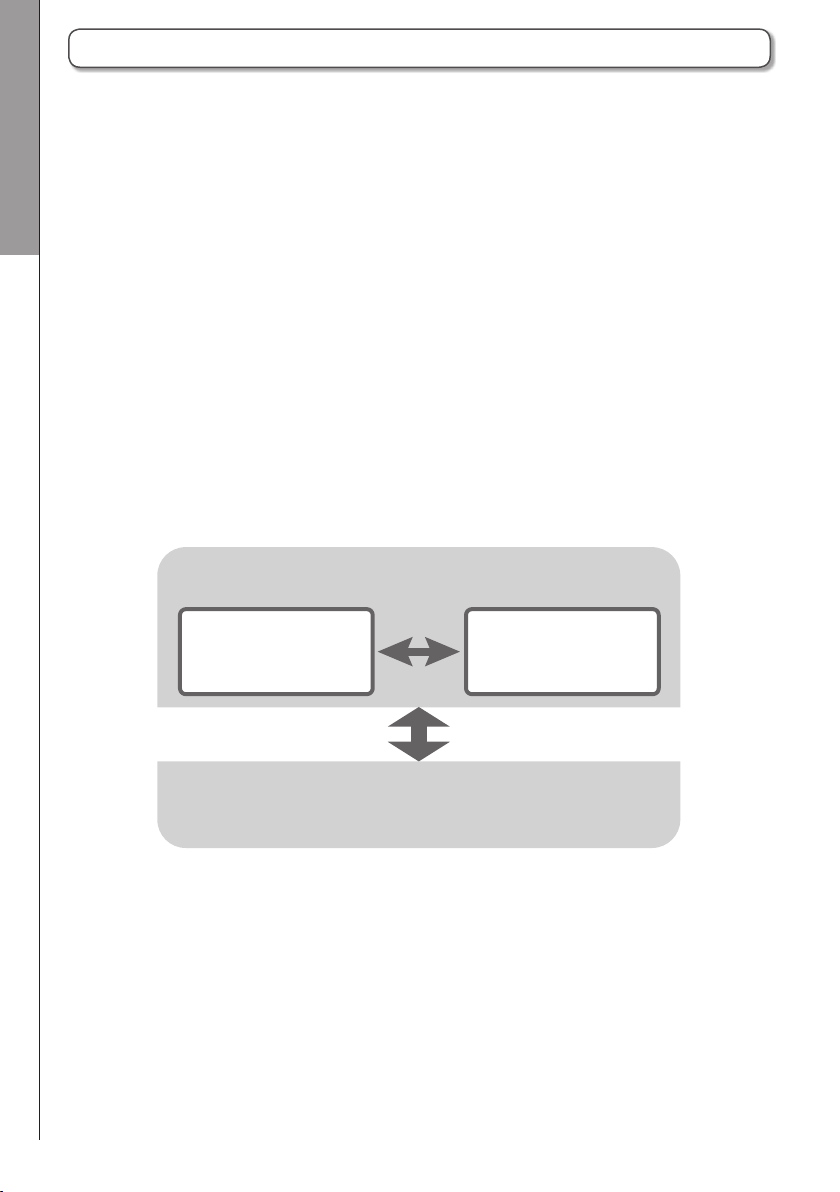
Switching modes
Overview Switching modes
With the A, you can create patterns and
combine multiple patterns to create songs.
The A has two main modes for creating
music . By switching between these modes, you
can alternate between creating patterns and
creating songs.
Use PATTERN mode to create patterns.
The two ways to input patterns are real-time
input and step input.
· Real-time input: Record a performance as a
pattern by playing the pads in real-time.
· Step input: Record instrument sounds one
step at a time to create patterns.
Use SONG mode to create songs.
· In SONG mode, create songs by playing and
changing patterns in real-time and recording
the results.
PATTERN mode
Create and record patterns
Realtime input
Play in real time and
record patterns
Combine created patterns into songs
Step input
Input step by step to
create patterns
SONG mode
18
Page 19

layout
Instrument overview
The A can use up to 16 sound sources in a single pattern. Each of these is called an instrument
and produces sound from waveform data, such as a drum hit, from a WAV le loaded from an SD
card, or from the built-in synthesizer. In addition to its sound (oscillator), each instrument has various
settings. These include envelopes with attack and sustain times, lters, eects and pad colors.
Instruments are assigned numbers from 1 to 16. In PATTERN mode, you can edit the sound and
sequence for the instrument selected by number.
Overview
Changing the Ring Controller layout
The A Ring Controller has the two following layouts. Press W and X to switch between
them. Up to 16 sounds can be generated simultaneously in either layout.
Various instruments can be assigned to the 16 pads and used to perform.
PAD layout
SCALE layout
15
14
13
Instrument No.
12
11
10
This layout is especially useful for playing drum sets, but other instruments can
also be assigned in the same way.
The note (pitch) that sounds when a pad is played in PAD layout is C4.
Play one instrument with a musical scale, using the pads like a keyboard.
The pads become like a keyboard in a musical scale order. The Ring Controller
LEDs light with a pale color for white keyboard keys and a dark color for black
keyboard keys. The scale can also be set to major or minor, for example.
This is useful for playing instruments that produce scaled pitches, but it can also
be used to play snares and other percussion instruments.
PAD layout
16
Selected
instrument
9
1
2
3
4
5
W
6
7
8
X
Switch
C#
C
B
A#
SCALE layout
D#
D
Note
A
G#
C
C#
F#
G
C1
D
C2
D#
E
C3
F
Selected
instrument
Instrument overview
19
Page 20
Preparations Turning the power on and o
Preparations
Turning the power on and o
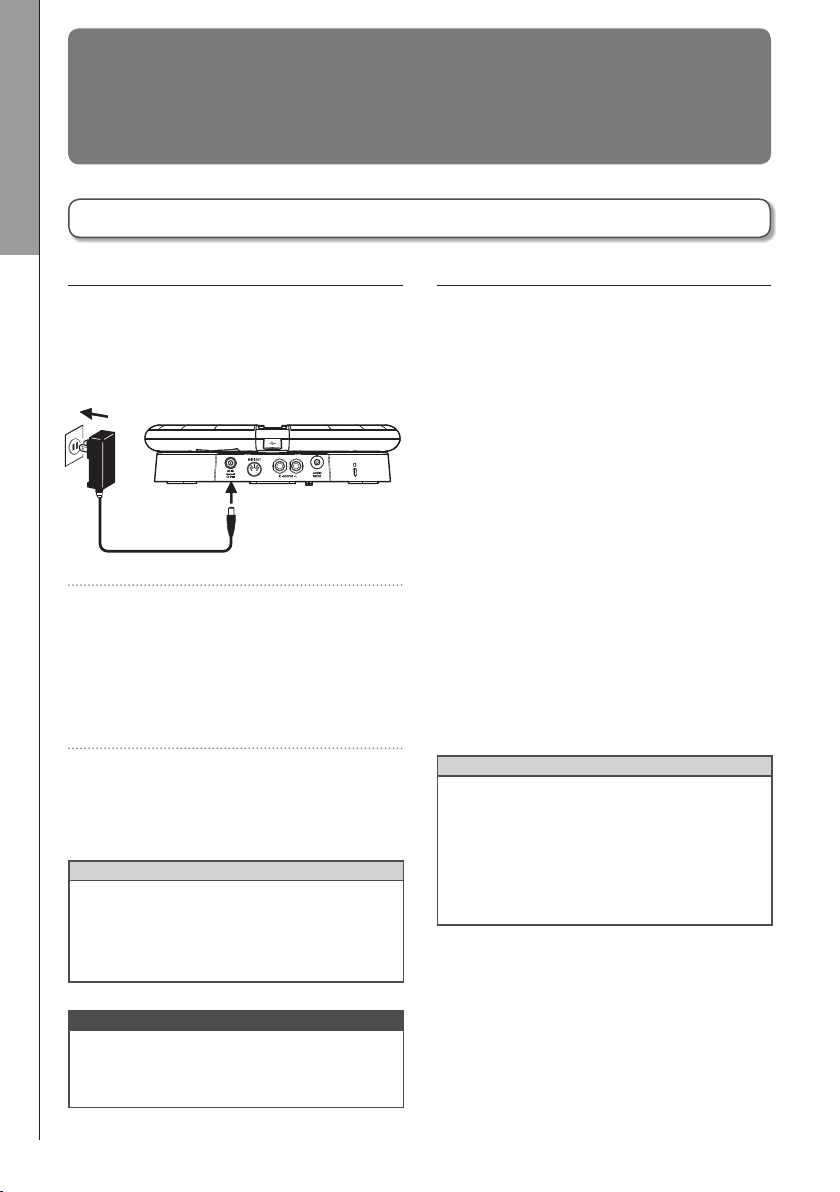
Base Station power
1. Connect the included AC adapter
to the Base Station.
2. Press and hold p on the
Base Station.
The Base Station software version
appears on the screen.
3. Press and hold p to turn the
power OFF.
HINT
When the Ring Controller is connected to the
Base Station by USB, turning the Base Station
power ON/OFF will also turn the Ring Control-
ler ON/OFF.
Ring Controller power
■
When connected by USB
When the Ring Controller is connected to the
Base Station or a computer by USB, it will
automatically turn on and operate on USB bus
power.
When operating on USB bus power, the Ring
Controller POWER LED will light red, and W
will be disabled.
■
When using a BTA-1 and connected
by Bluetooth LE
If BTA-1 (sold separately) units have been
installed in the Base Station and Ring Controller
and they are connected by Bluetooth LE, the
Ring Controller will be powered by AA batteries.
In this case, the Ring Controller BATT LED will
light and W will be enabled.
HINT
• Press W to show the Ring Controller
remaining battery charge on the SOUND
display.
• Even if a BTA-1 is installed, it will operate
on USB bus power if connected by a USB
cable.
NOTE
Use the AC adapter to power the
when it is connected to a computer or other
device by USB.
A even
20
Page 21
Turning the power on and o (continued)
■
Turning the Ring Controller on
1. Press W for at least 2
seconds.
This turns on the Ring Controller.
Preparations
Ring Controller underside
Remove
■
Turning the Ring Controller o
1. Press W for at least 2
seconds.
HINT
• When connected to the Base Station by
Bluetooth LE, turning o the Ring Controller
will also turn o the Base Station.
• When operating on AA batteries, the BATT
LED will blink when the remaining battery
charge is less than 10%.
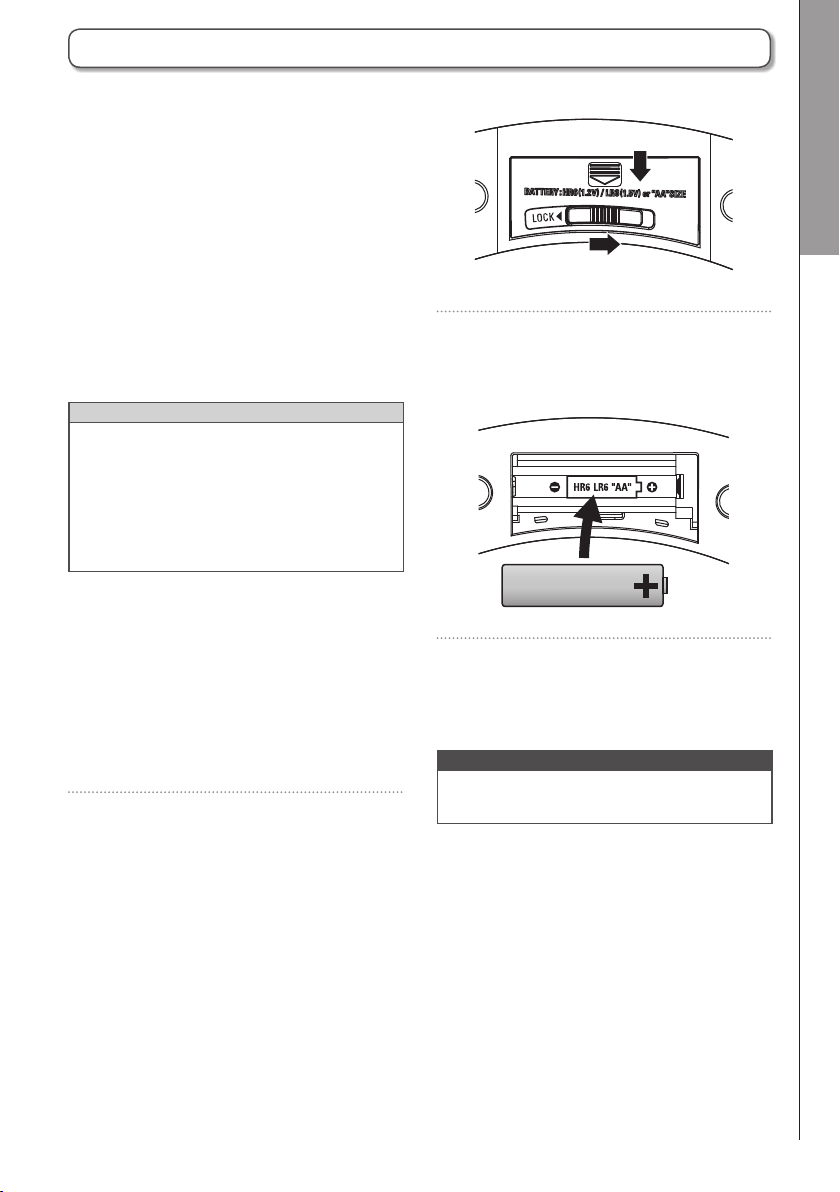
■
Changing the Ring Controller
batteries
The Ring Controller can be powered by two AA
batteries.
1. Turn the Ring Controller o.
2. Unlock and remove the battery
Unlock
Turning the power on and o
3. Install the batteries.
Be sure to orient the batteries correctly.
4. Replace and lock the battery
compartment covers.
NOTE
Always replace both batteries at the same time
with new batteries.
compartment covers.
The Ring Controller has battery compart-
ment covers in two places.
21
Page 22
Preparations Loading SD cards
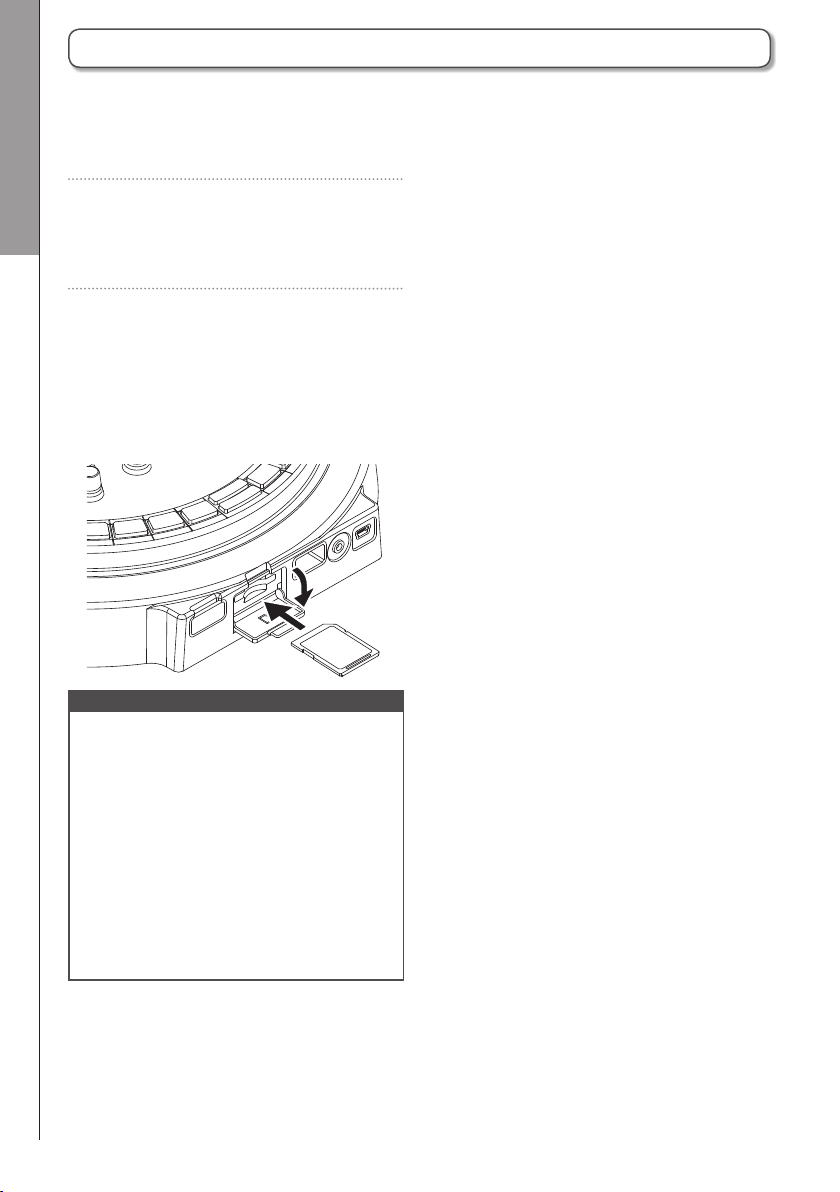
Loading SD cards
■
Loading and removing SD cards
1. Turn the power o.
2. Open the SD card slot cover on the
Base Station.
3. Insert the SD card into the slot.
To eject an SD card:
Push the card further into the slot and
then pull it out.
NOTE
• If no SD card is loaded in the
tured data cannot be saved and patterns and
songs that are created cannot be backed up.
• When inserting an SD card, be sure to insert
the correct end with the top side up as
shown.
• Before using SD cards that have just been
purchased or that have been formatted on
a computer, they must be formatted by the
A.
• SD card formatting instructions (→ P. 91)
A, cap-
22
Page 23
Character input screen use
■
Changing characters
Preparations
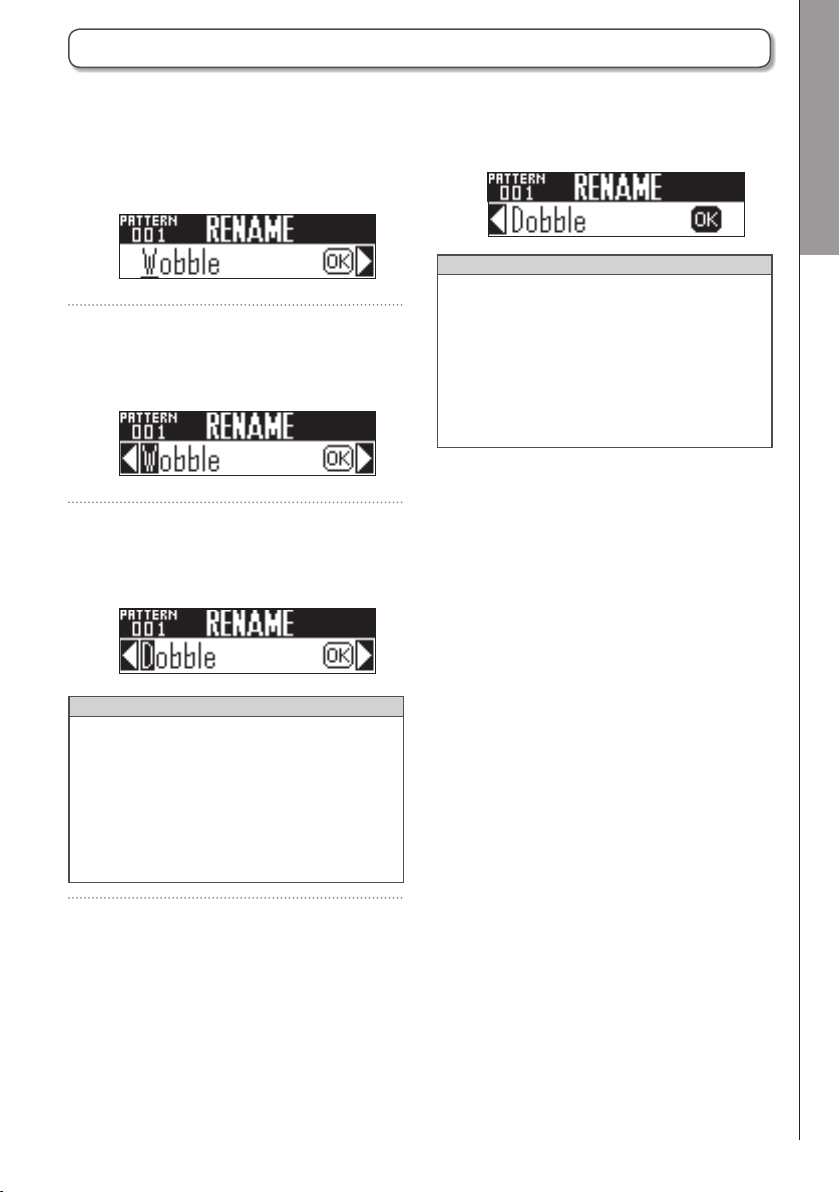
4. To end editing, turn H to select
1. Turn H to underline the charac-
ter to change.
2. Press h to conrm the character
to change.
3. Turn H to change the character,
and press
HINT
Select "INS" to insert a space at that position
and move that character and all those follow-
ing one to the right. This cannot be used if
there are already 16 characters
Select "DEL" to delete that character and
move all those following one to the left.
h to conrm it.
OK, and press
HINT
• The following characters can be used.
(space) ! # & ' ( ) + , - 0 1 2 3 4 5 6 7 8 9 ; =
@ A B C D E F G H I J K L M N O P Q R S T
U V W X Y Z [ ] ^ _ ` a b c d e f g h i j k l m n
o p q r s t u v w x y z { } ~
• Some characters might not be usable
depending on the item being input.
h.
Character input screen use
23
Page 24
PATTERN mode PATTERN mode overview
PATTERN mode
PATTERN mode overview
Use PATTERN mode to create patterns.
You can input patterns in two ways: real-time input and step input.
Real-time input
You can tap pads to perform as you like. You can also record performances in real-time to create
patterns.
With this input method, each pad on the Ring Controller corresponds to a single instrument (PAD
layout) or note (SCALE layout). (→ P. 19)
PAD layout SCALE layout
16
15
14
13
12
11
10
1
2
3
4
5
6
7
8
9
D#
D
C#
C
B
A#
A
G#
HINT
In PAD layout, the note (pitch) C4 is output when a pad is played.
C
C#
G
C1
D
C2
D#
E
C3
F
F#
24
Page 25
PATTERN mode overview (continued)
Creating patterns in PAD layout
After starting real-time input, tap pads for an instrument to input it.
The pattern will start loop playback, and you can overdub as many times as you like.
PATTERN mode
Bar 1 Bar 2
Instrument 1
16
15
1
Instrument 2
Instrument 3
…
Instrument 16
Realtime input (loop playback)
Creating patterns in SCALE layout
After selecting an instrument, start real-time input and tap pads to input their notes.
The pattern will start loop playback. When set to polyphonic, you can also input chords.
Scales can be used to input every instrument numbered 1–16.
Bar 1 Bar 2
B
C
C#
D
D#
E
F
…
G
F#
Realtime input (loop playback)
Instruments
2
3
…
Notes
C
C#
D
PATTERN mode overview
…
25
Page 26
PATTERN mode PATTERN mode overview
PATTERN mode overview (continued)
Step input
With STEP input, you can create patterns by inputting them one step at a time.
Using this input method, each 0 step key on the Base Station corresponds to one step.
31
32
30
29
…
Step
Bar 1 Bar 2
Instrument
……
1 2 3 …
…
30 31 32
Since the Base Station is divided into 32 steps, you can input two musical bars at a time (when the
smallest step is a 16th note).
Bar 2
Bar 1
Bar 2
Step
1
2
3
4
…
…
Instrument
…
Bar 1 Bar 2
Bar 1
If the pattern is longer than two bars, the Base Station display will switch every two bars (when the
smallest step is a 16th note).
…
Instrument
…
Bar 1 Bar 2
Bar 3 Bar 4
Press a Ring Controller pad, to show the sequence for that instrument on the 0 step keys.
26
Page 27
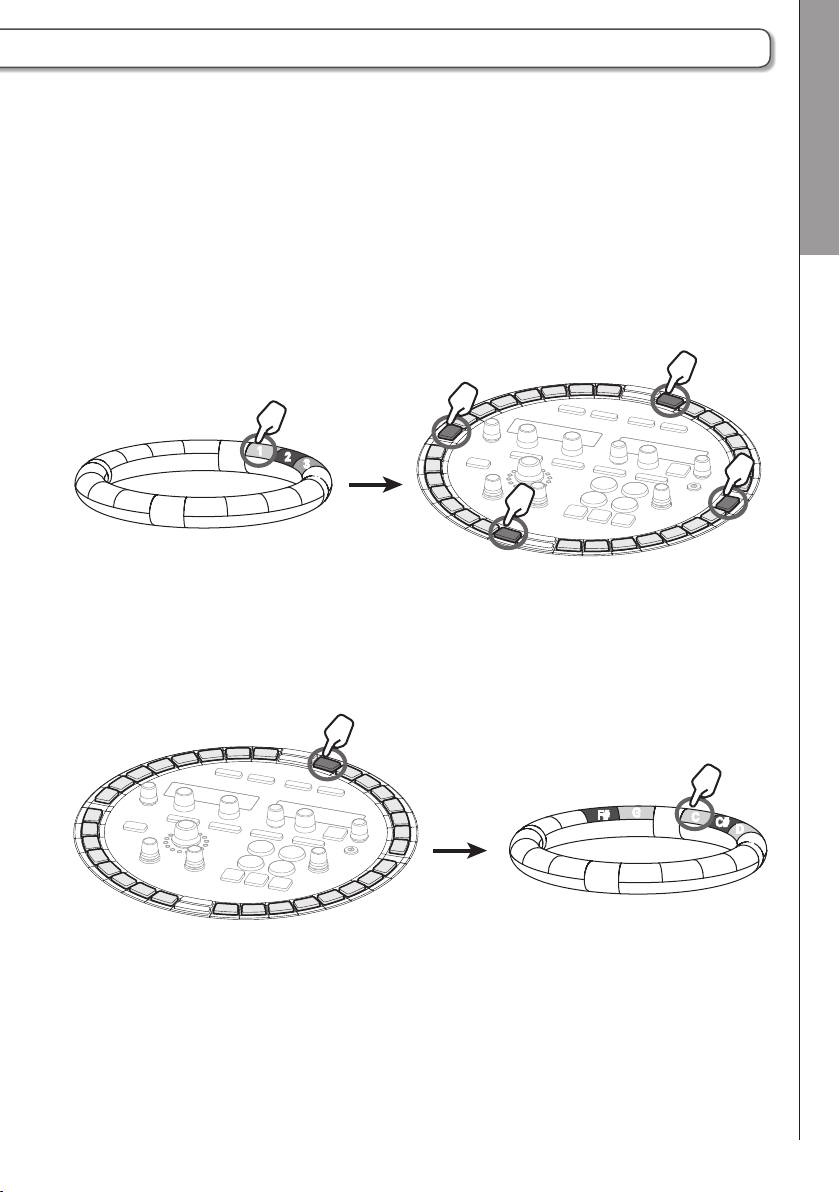
Press a 0 to brightly light the pads on the Ring Controller for the instruments recorded at that step
and play those instrument sounds.
Press a 0 during playback to start the sequence from that position.
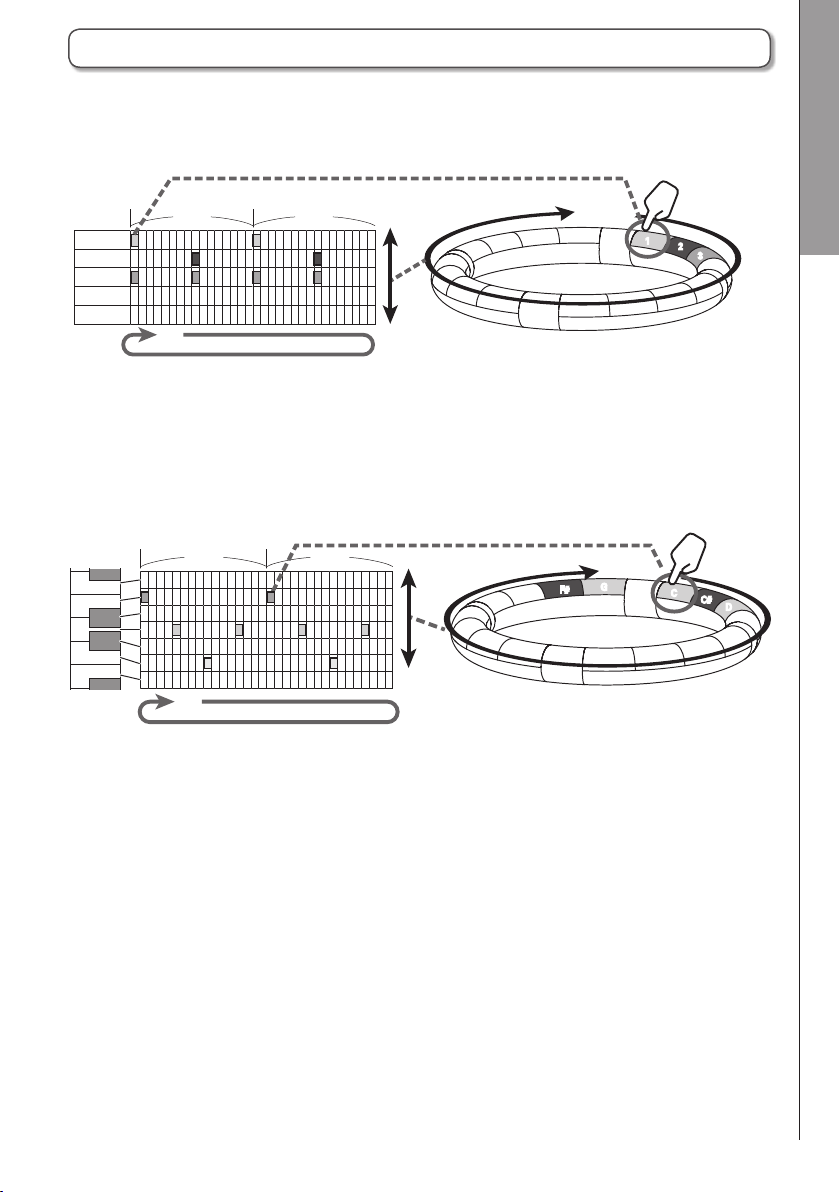
Creating patterns in PAD layout
The Ring Controller pads correspond to dierent instruments. While pressing a pad that corresponds
to an instrument, use the Base Station 0 keys to input the sequence for that instrument.
This method allows you to quickly switch between and input multiple instruments.
16
15
1
2
3
…
While pressing a pad for an instrument… …set its steps
Creating patterns in SCALE layout
The pads on the Ring Controller correspond to notes in a scale. While pressing 0 for the step to
input, tap pads to input notes.
This method allows you to easily input cords.
PATTERN mode
PATTERN mode overview
Press and hold
27
G
F#
…
C
C#
D
…
…set the pitchWhile pressing the key for the step to input…
Page 28
PATTERN mode PATTERN mode overview
PATTERN mode overview (continued)
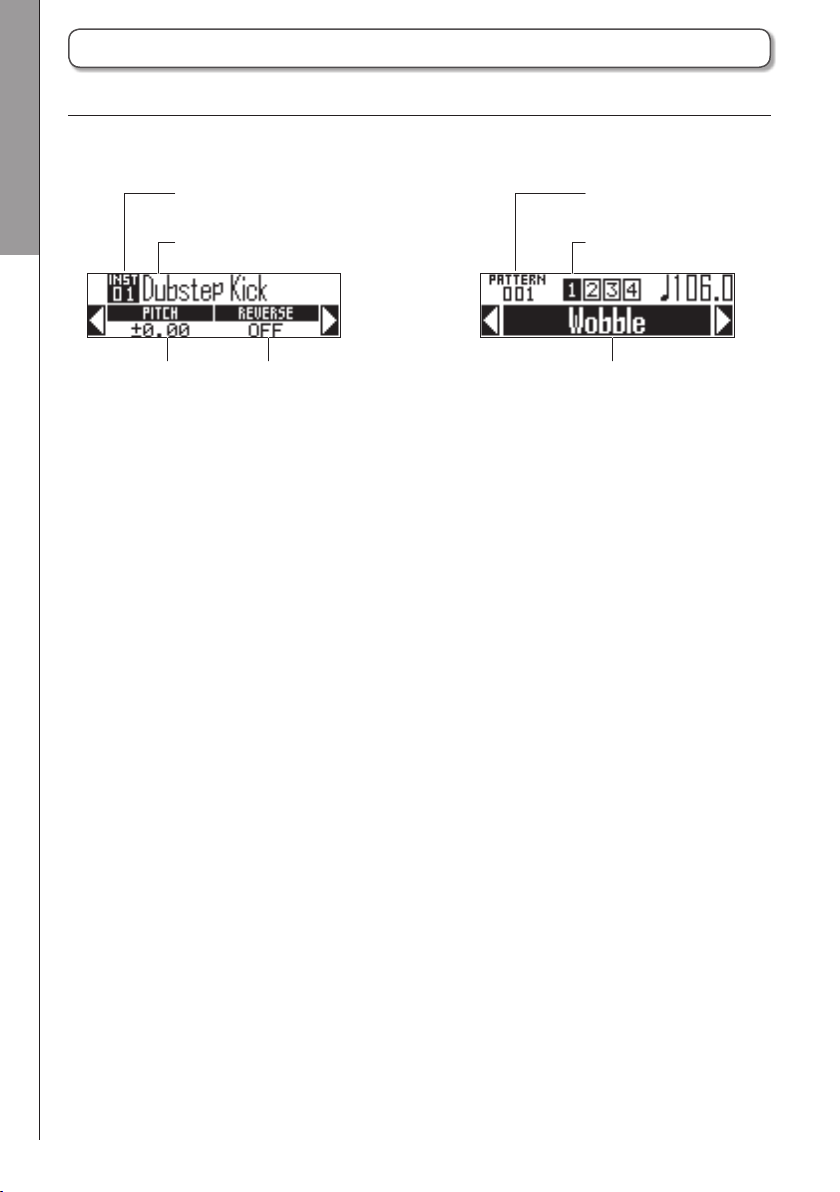
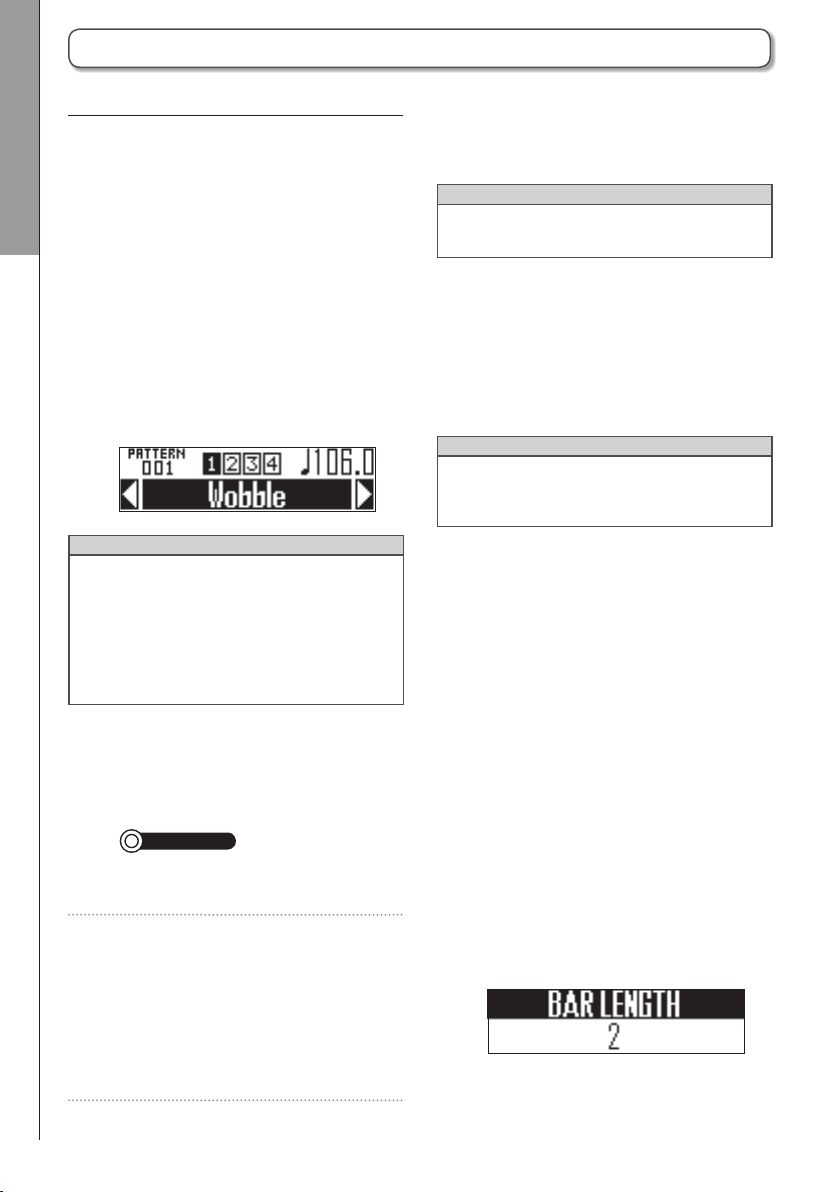
Screen overview
SOUND display SEQUENCE display
Number of currently
selected instrument
Name of currently
selected instrument
Parameter 1
Pattern number
Currently playing bar
Parameter 2 Pattern name
28
Page 29
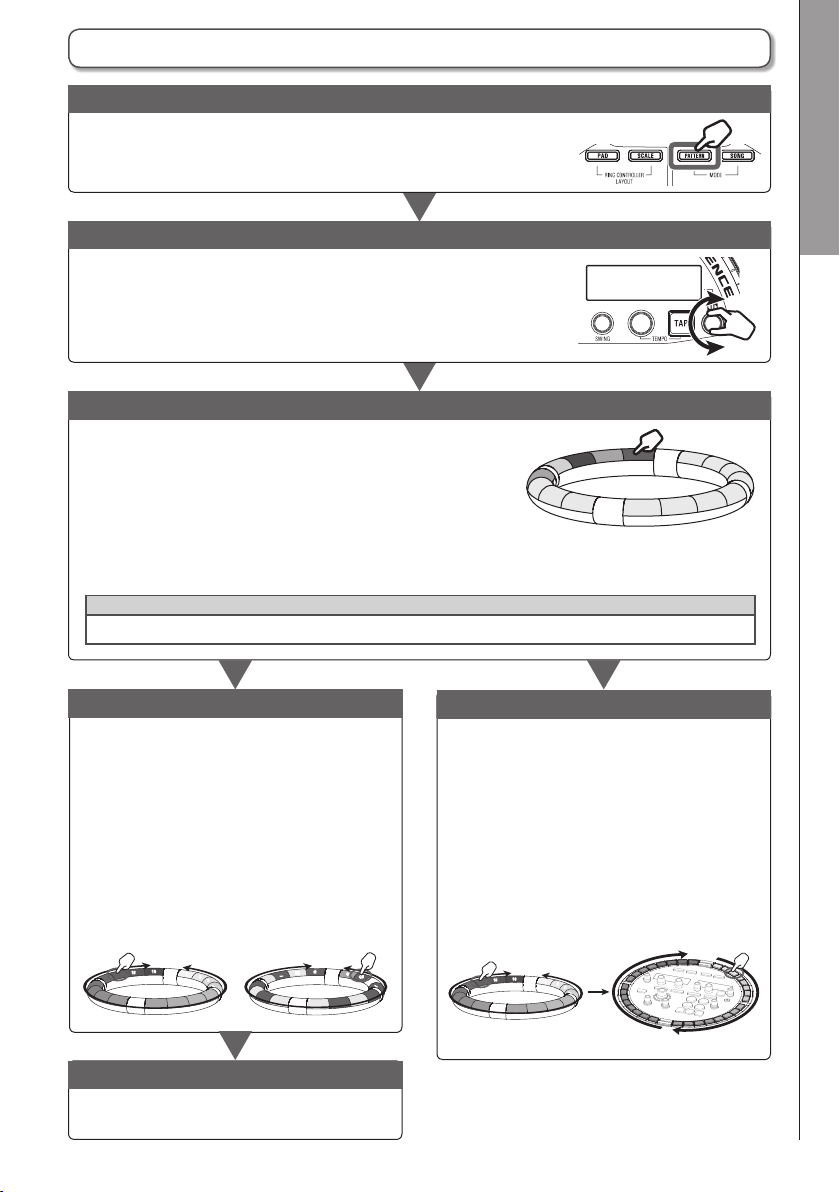
Operation overview
Enter PATTERN mode
Press Y to enter PATTERN mode.
PATTERN mode
Select a pattern
Turn H in the SEQUENCE area to select the pattern number.
Conrm the instruments
Tap the pads on the Ring Controller if you want to listen to
the sounds of the input instruments.
When a pad is tapped, its instrument becomes "selected"
and it lights white. The name and parameters of the instru-
ment are shown on the SOUND display.
Press
X to change the Ring Controller to SCALE layout.
HINT
By pressing
Y as you tap a pad, you can select its instrument without playing its sound.
1 Start real-time input
Press R to enter standby, and press P
to start real-time input.
In PAD layout, tap the pads of instruments
to input them in time with the pattern that
is playing back in a loop.
In SCALE layout, tap the pads of notes to
input them in time with the pattern that is
playing back in a loop.
Instruments
16
15
1
2
3
…
Notes
G
F#
…
C
C#
D
…
While pressing a pad that corresponds
to the instrument to input, press the 0
keys to edit the sequence for that instru-
ment.
In addition, you can tap pads while press-
ing a
0 key to input instruments (in PAD
layout) or notes (in SCALE layout) to input
them at that step.
Instruments
16
15
2 Start step input
30
29
1
2
3
…
…
Steps
31
32
Operation overview
1
2
3
…
4
End real-time input
Press S to end real-time input.
29
Page 30
PATTERN mode Operation overview
Operation overview (continued)
Preparations
■
Enter the mode
1. Press Y.
■
Select a pattern
Select a pattern to use for input.
1. Turn H in the SEQUENCE area
to select the pattern.
The name of the selected pattern
appears on the SEQUENCE display.
HINT
• If a pattern is in the middle of playing back,
the pattern will change after the current pat-
tern plays back. The name of the pattern will
blink until it changes.
• Press
y to create a new empty pat-
tern. (→ P. 47)
■
Select an instrument
Use the Ring Controller pads to select
instruments.
1.
CONTROLLER
instrument to be input.
Tap the pad for the
2. Press h in the SOUND area,
and turn
H to select the instru-
3. Use ! and " to adjust sound
parameters.
HINT
• Editing sounds (→ P. 48)
• One pattern can use up to 16 instruments.
■
Set the tempo
1. Turn
HINT
You can also press
desired tempo to set it (in quarter notes).
■
Set the pattern length
You can change the pattern length. This can be
set between 1 and 4 bars.
When making a pattern longer, you can also
copy the sequence you have already input to the
lengthened part.
When a pattern is shortened, the already input
sequence will not be cleared.
T
.
The tempo can be set from 40.0–250.0
BPM in 0.1BPM increments.
a repeatedly at the
1. While pressing F, press
0-9 (LEN:1) – 0-12 (LEN:4).
The length in bars is set according to the
0 pressed.
Press
0-9 (LEN:1) to set it to 1 bar.
Press 0-12 (LEN:4) to set it to 4 bars.
ment sound parameter that you
want to edit.
30
Page 31

Notes →
SCALE layout
C
C#
D
D#
E
F
F#
G
G#
A
A#
B
C
C#
D
D#
Real-time pattern input
PATTERN mode
Input a pattern
1. Press R.
R lights, showing that recording
standby has started.
2. Press P.
This starts the precount. After the
precount completes, you can input
instruments.
HINT
• Setting the precount (→ P.39)
• You can press
to start input. In this case, there will be no
precount.
3.
In PAD layout, tap the pad for the
instrument you want to input.
In SCALE layout, tap the pad for
the note you want to input.
Play along with the metronome.
R during pattern playback
CONTROLLER
Notes →
C
C#
C
B
A#
D#
D
SCALE layout
A
G#
C#
D
D#
E
F
F#
G
HINT
• By setting quantization, input can automati-
cally be corrected if it varies from the rhythm.
(→ P.41)
• Changing the metronome settings (→ P. 39)
• The velocity that a pad is tapped is also
recorded.
4. Press S to end input.
This ends recording.
HINT
P to pause recording.
Press
Press
R to stop recording but continue play-
back. You can tap pads at this point to check
the sounds without recording the performance.
Real-time pattern input
14
13
12
11
Instruments →
16
15
PAD layout
10
9
1
2
3
4
5
6
7
8
31
Page 32

PATTERN mode Pattern step input
Pattern step input
Pattern input
■
Select an instrument and input a
pattern
1. Press B or b to select
the bars to input.
2.
CONTROLLER
the instrument to be input.
The SEQUENCE display will appear as
shown below. The velocity that the pad is
tapped will be recorded in the step.
Press the pad for
3. To change the length of the sound
input, turn
H in the SEQUENCE
5. To clear an input step, tap that
0 again.
The step will be cleared and the LED will
become unlit.
NOTE
This method can be used when playing back
and when stopped.
area.
4. While pressing the pad from step
2, press
The LED for the tapped key will light red.
15
0 for the step to input.
16
1
2
3
…
32
Page 33

PATTERN mode
■
Select steps and input a pattern
1. Press B or b to select
the bars to input.
2. Press 0 for the step to be input.
The pressed 0 lights green, and the
SEQUENCE display will appear as shown
below.
3. To change the length of the sound
input, turn
area.
H in the SEQUENCE
4. While pressing 0 from step 2,
5. To clear an input instrument, tap
the pad again.
The tapped pad will light dimly.
NOTE
This method can only be used when playback
is stopped.
Pattern step input
HINT
If QUANTIZE is set to 1/32 or 1/16T, the ring of
0 keys will show one bar. In this case, press
B to switch between bars 1 and 2. In the
same manner, press b to switch between
bars 3 and 4.
tap the pad to input.
The tapped pad will light brightly. The
tapping velocity is also recorded in the
step.
16
15
1
2
3
…
33
Page 34

PATTERN mode Playing back patterns
Playing back patterns
1. Press P.
Playback starts and P lights.
2. Press P again to pause.
Playback pauses and P blinks.
3. Press S to stop playback.
P becomes unlit when playback stops.
HINT
• When a pattern has 3 or more bars,
and b will automatically switch during
playback.
• Press a 0 to start playback of the
sequence from that step.
B
34
Page 35

Clearing parts of patterns
1. Press P.
The pattern plays back.
2. Press and hold C.
C lights, and the SEQUENCE display
will appear as shown below.
PATTERN mode
Clearing parts of patterns
3.
4.
CONTROLLER
want to clear is playing back:
In PAD layout, press and hold the
pad for the instrument you want to
clear.
In SCALE layout, press and hold
the pad for the note you want to
delete.
The sequence (performance data) will be
deleted while the pad is being pressed.
CONTROLLER
pad when playback of the part you
want to clear has stopped.
While the part you
Stop pressing the
5. Release C to stop clearing.
35
Page 36

PATTERN mode Arpeggiator
Arpeggiator
This function can be used to make an instru-
ment play automatically when triggered by a
pad. Pressing multiple pads will trigger multiple
instruments in order.
By pressing chord tones in SCALE layout, the
notes in the chord can be played back one at a
time.
■
Operation procedures
1.
2. Use
CONTROLLER
The arpeggiator setting screen opens on
the SEQUENCE display.
G
This enables the arpeggiator.
When ON is selected, sound will be
output automatically while pads are being
pressed.
When LATCH is selected, sounds will
automatically start output when pads are
pressed and stop when their pads are
pressed again.
Press A.
to select ON or LATCH.
3. Turn T to change the arpeggiator
style.
The STYLE can be set to REPEAT,
SEQUENCE, UP, DOWN, UP&DOWN, or
RANDOM.
Depending on the selected STYLE, per-
formance types and other detailed set-
tings can be made.
4. If the selected STYLE has parame-
ters 2 and 3, turn
SEQUENCE area.
Use G and T to make the settings
shown on the next page.
H in the
HINT
Automatic output in LATCH mode can also be
stopped by pressing
S.
36
Page 37

Arpeggiator parameter list
Style Eect
Parameter 2
G to set)
(use
PATTERN mode
Parameter 3
(use T to set)
Repeat Pressed pads will sound repeatedly.
If multiple pads are pressed, they
will all sound at the same time
repeatedly.
Sequence If the pressed pad has a recorded
sequence, the instrument will play
with that sequence.
If the pad does not have a recorded
sequence, it will sound just once
without repeating. If multiple pads
are pressed at the same time, they
will sound at the same time repeatedly.
Up If multiple pads are pressed at the
same time, they will sound in order
from the lowest instrument number.
Down If multiple pads are pressed at the
same time, they will sound in order
from the highest instrument number.
Up & Down If multiple pads are pressed at the
same time, they will sound in order
from the lowest to the highest
instrument number. Then, they
will sound from the highest to the
lowest.
Random If multiple pads are pressed at
the same time, they will sound in
random order.
Pattern
This sets the timing of the
arpeggiator.
In addition to simply repeating
the sounds at xed intervals
(1/32, 1/16Tri, 1/16, 1/8Tri,
1/8, 1/4, 1/2 or 1/1), you can
also select preset sequences
(Seq 1–32).
(Arpeggiator parameter lists
→
P. 119)
Pattern
This sets the timing of the
arpeggiator.
In addition to simply repeating
the sounds at xed intervals
(1/32, 1/16Tri, 1/16, 1/8Tri,
1/8, 1/4, 1/2 or 1/1), you can
also select preset sequences
(Seq 1–32).
(Arpeggiator parameter lists →
P.119)
Number of note
In addition to the note of the
pad, a number of intervals can
also be set to sound.
When set to 1, only the pad
sounds. Higher numbers add
fths and octaves above. If the
number is set to 2 or higher,
you can select Up, Down,
UpDown or Random as the
order they make sound.
(Arpeggiator parameter lists
→
P. 118)
Octave
This can be set from 1 to 4.
If Octave is set to 1, only the
pads pressed will sound. If it
is set to 2, notes one octave
above will sound in addition to
the pad notes.
In the same manner, if sets
to 3 or 4, notes 2–3 octaves
above will also sound.
Arpeggiator
37
Page 38

PATTERN mode Clearing patterns
Clearing patterns
Clearing entire sequences
1. Press S to stop sequence
playback.
2. Press C.
This opens the CLEAR SEQUENCE
screen on the SEQUENCE display.
Press
C again to cancel.
HINT
z if you want to erase all pattern
Press
data, including instruments and pattern names,
along with sequences. (→ P. 45)
3. Use H in the SEQUENCE area to
select the sequence you want to
HINT
• Select "All Instruments" to clear the entire
sequence.
• In SCALE layout, notes will be cleared. Select
"All Notes" to clear the entire SCALE layout
sequence.
• If an instrument is cleared in PAD layout,
notes input in SCALE layout will also all be
cleared.
clear, and press
This opens a confirmation screen.
Use H in the SEQUENCE area to
select YES, and press h to clear the
sequence.
h.
38
Page 39

Other settings
Metronome settings
■
Changing the metronome volume
PATTERN mode
Make settings related to the metronome that
plays back as a guide during recording.
■
Turning METRONOME OUTPUT
on/o
1. While pressing F,
press
0-17.
When the metronome is set to playback,
0-17 lights red.
■
Turning METRONOME headphone
output on/o
1. While pressing F,
press
0-18.
When the metronome is set to playback,
0-18 lights red.
1. To lower the volume, while press-
ing
F, press 0-19.
To raise the volume, while pressing
F, press 0-20.
This can be set from 0 to 10.
■
Turning precount on/o
1. While pressing F,
press
0-21.
When the precount is on, use H in the
SEQUENCE area to set the count to 1–8
or SPECIAL.
Other settings
HINT
When Special is selected, the count will sound
as follows.
39
Page 40

PATTERN mode Other settings
Other settings (continued)
Setting the pad splits
When PAD layout is selected, you can change
the number of instruments assigned to the Ring
Controller.
By default, you can play 16 instruments with the
Ring Controller. You can, however, also reduce
the number of instruments to make it easier to
play when performing with it in hand.
1.
CONTROLLER
L lights, and the number of
instruments assigned to the Ring Con-
troller decreases.
While pressing L, use
the SEQUENCE area to set the number
of assigned instruments to 8, 4, 2 or 1.
Press L.
H in
2. To cancel this split setting, press
L again.
When L is unlit, the number of
instruments assigned to the Ring Con-
troller in PAD layout reverts to 16.
HINT
When the split setting is enabled, the instru-
ments will be assigned to pads in order starting
with instrument number 1.
For example, when set to 4, instruments num-
bered 1–4 will be assigned to pads.
40
Page 41

Making pattern settings
PATTERN mode
Pattern settings include Auto Save, Quantize,
Bar length, and Swing, as well as Ring Controller
Accelerometer parameters.
These settings are saved separately for each
pattern.
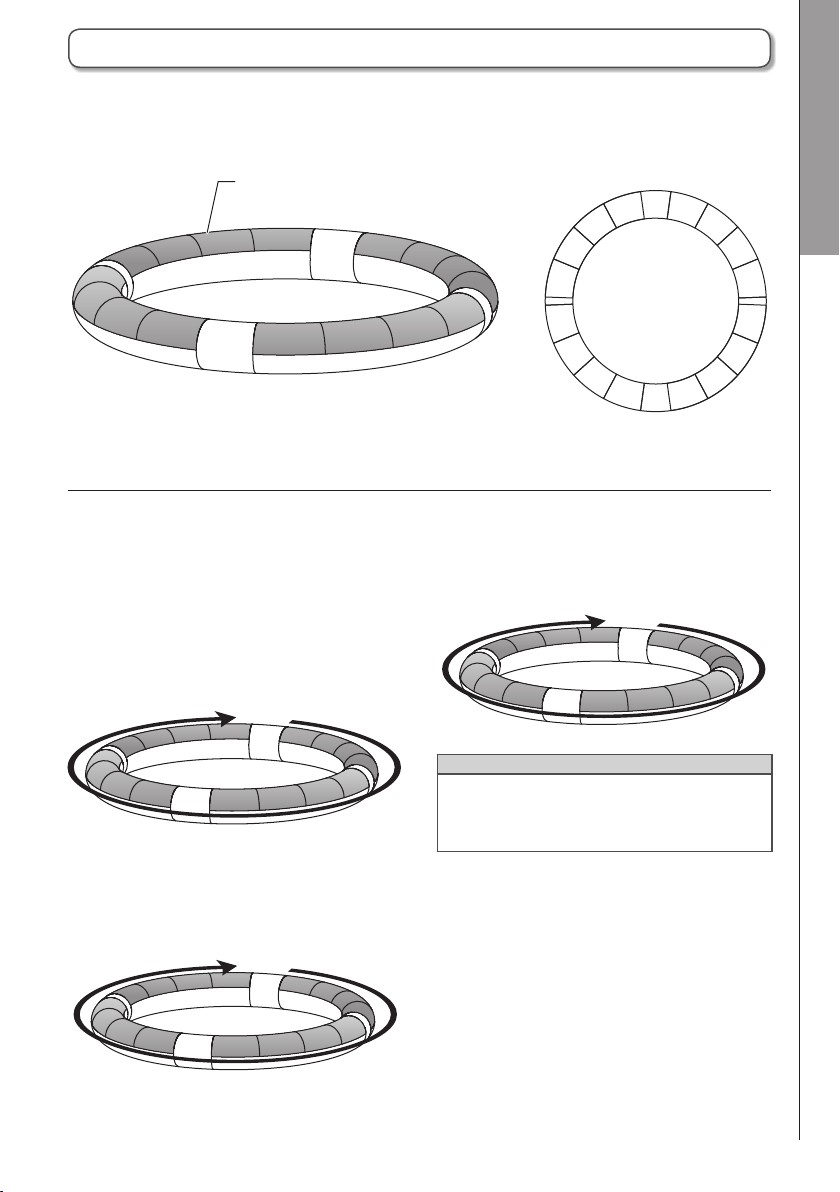
Changing the last step position
You can change the last step in the STEP key
cycle on the Base Station.
For example, you can create patterns in triple
time by setting the cycle to 24 steps.
1. While pressing L, press the
0 that corresponds to the
number you want to set as the nal
step.
This can be set between 1 and 32.
NOTE
• If the Last Step is less than 32, sequence
data up to that step will not be cleared.
• If the QUANTIZE setting is 1/32 or 1/16T, one
step will be 1/32nd of a bar. If the Step set-
ting is 1/16 or 1/8T, one step will be 1/32nd
of 2 bars. So, the timing change when setting
the Last Step will be dierent.
• When inputting steps, instruments and notes
can not be input after the last step.
Quantization setting
This sets the shortest note length that can be
input into the sequence.
This sets timing correction during real-time input
and when input can occur during step input.
1. Press F
2. Press 0-1 to 0-8 to set the
quantization value.
This can be set to OFF, 1/32, 1/16T (16th
note triplet), 1/16, 1/8T (8th note triplet),
1/8, 1/4 or 1 BAR.
Making pattern settings
41
Page 42

1 cycle = 1 bar
1 cycle = 2 bars
PATTERN mode Making pattern settings
Making pattern settings (continued)
1 bar 2 bars
Quantize set to 1/32
8 steps = 1 beat
1 cycle = 1 bar
1 bar 2 bars
Quantize set to 1/16T
6 steps = 1 beat
HINT
• When QUANTIZE is set to OFF, 1/8, 1/4 or 1
BAR, the Base Station
same as when QUANTIZE is set to 1/16.
• When QUANTIZE is set to 1/16T or 1/8T,
instruments and notes cannot be input at
steps 4, 8, 12, 16, 20, 24, 28 or 32.
0 keys function the
Quantize set to 1/16
4 steps = 1 beat
1 cycle = 2 bars
Quantize set to 1/8T
3 steps = 1 beat
Swing setting
The amount of swing (rhythmic groove) can be
set.
1. Turn
G
in the SEQUENCE area to
set the amount of swing.
The swing range is ±50%.
42
Page 43

PATTERN mode
Soloing
You can solo the playback of just the selected
instrument.
1.
CONTROLLER
tap the pad for the instrument to
be soloed.
Only the tapped pad lights, and other
instruments stop making sounds.
S stays lit while the solo function is
activated.
While pressing S,
Muting
You can mute just the selected instrument.
1.
NOTE
The solo and mute functions can only be used
in PATTERN mode with PAD layout.
CONTROLLER
tap the pad for the instrument to
be muted.
The tapped pad becomes unlit and stops
making sound.
M stays lit while the mute function is
activated.
While pressing M,
Making pattern settings
43
Page 44

PATTERN mode Pattern management
Pattern management
Copying and swapping
instruments
1.
CONTROLLER
instrument to be copied or
swapped.
Tap the pad for the
2. Press w.
The destination for copying/swapping
the instrument appears on the SOUND
display.
3. Use H in the SOUND area to
select the copy/swap destination
instrument, and press
This opens copy/swap destination selec-
tion on the SOUND display.
h.
Copying/swapping patterns
1. Turn H in the SEQUENCE area
to select the pattern to copy/swap.
2. Press w.
The destination for copying/swapping
the pattern appears on the SEQUENCE
display.
3. Use H in the SEQUENCE area to
select the copy/swap destination
pattern, and press
This opens copy/swap destination selec-
tion on the SEQUENCE display.
h.
HINT
You can also tap a pad to select the copy
destination.
4. Use H in the SOUND area to
select COPY or SWAP, and
press
h.
Press w to cancel and return to the
previous screen.
4. Use H in the SEQUENCE area to
select COPY or SWAP, and
press
h.
Press w to cancel and return to the
Home Screen.
44
Page 45

PATTERN mode
Erasing instruments
1.
CONTROLLER
instrument to erase.
Tap the pad for the
2. Press z.
The instrument to erase appears on the
SOUND display.
HINT
You can tap a dierent pad to select a dierent
instrument to erase.
3. Use H in the SOUND area to
select Yes, and press
This erases the selection, turning the
oscillator off and restoring the other
parameters to their defaults.
h.
Erasing patterns
1. Turn H in the SEQUENCE area
to select the pattern to erase.
2. Press z.
The pattern to erase appears on the
SEQUENCE display.
3. Use H in the SEQUENCE area to
select Yes, and press
This erases the pattern, including
sequences and pattern names.
h.
Pattern management
45
Page 46

PATTERN mode Pattern management
Pattern management (continued)
Changing instrument names
1.
CONTROLLER
instrument with the name to
change.
Tap the pad for the
2. Press x.
The instrument with the name to change
appears on the SOUND display.
3. Use H in the SOUND area to
select the character to change,
and press
Press x to cancel editing and
return to the Home Screen.
h.
Changing pattern names
1. Turn H in the SEQUENCE area
to select the pattern with the name
to change.
2. Press x.
The pattern with the name to change
appears on the SEQUENCE display.
3. Use H in the SEQUENCE area
to select the character to change,
and press
Press x to cancel editing and
return to the Home Screen.
h.
4. Use H in the SOUND area
to change the character, and
press
h.
5. Use H in the SOUND area
to select OK, and press
to conrm the name change.
h
4. Use H in the SEQUENCE area
to change the character, and
press
h.
5. Use H in the SEQUENCE area
to select OK, and press
conrm the name change.
46
h to
Page 47

Creating new patterns
1. Press y.
The name of a new pattern appears
on the SEQUENCE display and can be
edited.
2. To change the name, use H
in the SEQUENCE area to select
the character to change, and
press
h.
Press y to cancel and return to the
Home Screen.
PATTERN mode
Pattern management
3. Use H in the SEQUENCE area
to change the character, and
press
h.
4. Use H in the SEQUENCE area to
select OK, and press
A new pattern will be created.
NOTE
A new pattern cannot be created if no empty
patterns are available.
h.
47
Page 48

Editing sounds Sound editing overview
Editing sounds
Sound editing overview
Use H, ! and " in the SOUND area to edit instruments and change their sounds.
The instruments are made of the following blocks, which can each be specically set.
Oscillator
SCALE layout
settings
Set the scale and
how sound is made
when in SCALE
layout.
This sets the basic
instrument sound.
You can select
from built-in sound
sources, captured
recordings and
WAV les loaded
from the SD card.
For information
about these sound
parameters, see
the Oscillator list
(→ P. 106).
Oscillator pitch
modulation
The oscillator pitch
can be altered with
an envelope or
LFO.
Noise
Noise can be
added to the
sound.
Noise level
modulation
The noise level can
be altered with an
envelope or LFO.
Insert
Eect
Sounds can be
altered with eects.
Eect parameter modulation
Insert eect parameters can be altered
with an envelope or
LFO. This cannot
be used with some
eects.
Filter
Sounds can be
altered with lters.
Filter frequency
modulation
The lter frequency
can be altered with
an envelope or
LFO.
48
Page 49

Sound editing overview (continued)
Editing sounds
Volume
envelope Output mixer
This sets how
quickly sound starts
when a pad is
tapped, the sound
level while it is being
pressed, and how
quickly it becomes
silent after the pad
is released.
Volume
modulation
The volume can
be altered with an
envelope or LFO.
This sets the
panning (stereo
position) and level.
Pan modulation
The panning can
be altered with an
envelope or LFO.
Eect
send amount
These set the
amounts sent to
the master eect.
LED settings MIDI settings
This sets the pad
color and lighting
style.
NOTE
Modulation blocks will not be shown if their modulation destinations are o.
Use this to set the
MIDI channel used
for playing instrument sounds by
USB MIDI and for
outputting playing
sequences from the
MIDI OUT.
Sound editing overview
49
Page 50

Editing sounds Editing instruments
Editing instruments
Common operations
1.
CONTROLLER
Tap the pad for the
instrument to be edited.
The selected parameters are shown on
the SOUND display.
Selected parameters
2. Press h in the SOUND area,
and turn
to edit.
Use ! and " to adjust the parameters
shown.
HINT
See "Instrument parameter lists" in the appen-
dix for details about each block. (→ P. 110)
H to select parameters
Making SCALE layout settings
You can set, for example, the octave, scale
and whether only a single sound (monophonic)
or multiple sounds (polyphonic) can be output
when the Ring Controller is in SCALE layout.
■
Octave setting (Octave)
You can change the note range that can be
played on the Ring Controller. The octave shown
will start on pad 1.
■
Changing the scale (Scale)
The layout of notes on the Ring Controller
changes according to the scale set.
This allows you to assign only notes from the
desired scale to the Ring Controller.
Select from the following scales.
CHROMATC (Chromatic), MAJOR (Ionian),
MINOR 1 (Harmonic Minor), MINOR 2 (Melodic
Minor), MINOR 3 (Dorian), PHRYGIAN, LYDIAN,
MIXOLYDN (Mixolydian), AEOLIAN, LOCRIAN,
S-LOCRN (Super Locrian), MajBLUES (Major
Blues), MinBLUES (Minor Blues), DIMINISH
(Diminished), COM DIM, MajPENTA (Major Pen-
tatonic), MinPENTA (Minor Pentatonic), RAGA 1
(Bhairav), RAGA 2, RAGA 3, ARABIC, SPANISH,
GYPSY, MinGYPSY (Minor Gypsy), EGYPTIAN,
HAWAIIAN, PELOG, HIROJOSI, IN-SEN, IWATO,
KUMOI, MIYAKO, RYUKYU, CHINESE, WHOLE
(Whole tone), WHOLE1/2 (Whole half), 5th
■
Polyphony setting (Mono/Poly)
This sets whether only a single sound (mono-
phonic) or multiple sounds (polyphonic) are
output when multiple pads are pressed at the
same time.
Select Mono or Poly.
50
Page 51

■
Setting the glide (Glide)
When a dierent note is triggered, the pitch can
change instantly or gradually over time accord-
ing to this setting.
This can be set from 0 to 100.
The higher this value is set, the more gradual the
change will be.
Oscillator
This sets the basic instrument sound.
• Press
h in the SOUND area, and use H
to move to the oscillator block.
Editing sounds
HINT
Glide is only enabled when the polyphony
mode is Mono.
■
Changing the key (Key)
You can change the key when the scale is set to
anything other than Chromatic.
You can select from C, C#, D, D#, E, F, F#, G,
G#, A, A# and B.
NOTE
The Ring Controller layout also changes
according to the key setting.
• Press h.
• Use
! in the SOUND area to select the
oscillator category.
Use H in the SOUND area to select the
oscillator.
■
Selecting captured audio and WAV
les
WAV les saved in the “Capture” subfolder in the
"AR-48" folder on the SD card can be added as
oscillators.
• Select FILE as the oscillator category.
• Use
audio le on the SD card, and press h.
NOTE
When an audio le is selected as an oscillator,
the lter and other parameters will be reset to
default values.
in the SOUND area to select the
H
Editing instruments
51
Page 52

Editing sounds Editing instruments
Editing instruments (continued)
HINT
• Files that meet the following conditions can
be used as oscillators.
– WAV format les that have been recorded
as 16/24-bit PCM audio with 44.1kHz
sampling frequency
– Playback time is 6 minutes (12 minutes if
mono) or less
File name uses only English letters and
numbers
• The total length of audio files that can be
added as instruments on the
minutes (or 12 minutes if mono). For exam-
ple, if a one-minute stereo audio le has been
added, the total length of additional audio
files that can be added as instruments is 5
minutes (or 10 minutes if mono).
• If an audio file is used in multiple patterns,
this will not change the remaining time for
assigning additional les.
■
Playing audio les
The playback method for audio les can be set.
One Shot: The audio file plays once and
stops.
Toggle: Tapping the pad alternately starts
and stops playback of the audio
le.
Gate: The audio le plays back in a loop
while the pad is being pressed.
Playback stops when it is released.
A is 6
Noise
Noise can be added to the sound.
■
Type of noise (Type)
You can change the type of noise.
Select O, White or Pink.
■
Noise level (Level)
You can change the noise volume.
This can be set from 0 to 100.
52
Page 53

Insert eects
Sounds can be altered with eects.
■
Compressor (COMP)
The compressor reduces volume variation.
■
Pumper (PUMPER)
This eect adds a pulsing feeling to the sound.
■
Sub Bass (SUB BASS)
This emphasizes low frequencies.
■
Talk Filter (TALK)
This eect creates a sound like a human voice.
■
3Band Equalizer (3BAND EQ)
This is a three-band equalizer.
■
Ring Modulator (RING MOD)
This eect creates a metallic sound.
■
Lo-Fi (LO-FI)
This eect intentionally lowers the delity of the
sound.
HINT
• See "Instrument parameter lists" in the
appendix for details about each insert eect.
(→ P. 112)
Editing sounds
Editing instruments
■
Flanger (FLANGER)
This eect adds movement and a strong swell-
ing to the sound.
■
Phaser (PHASER)
This effect adds a bubbly undulation to the
sound.
■
Chorus (CHORUS)
This mixes the original sound with the effect
sound, which has fluctuating pitch, to add
movement and thickness.
■
Distortion (DIST)
This eect distorts the sound.
53
Page 54

Editing sounds Editing instruments
Editing instruments (continued)
Filter
The frequency and other parameters can be set
for the lter.
■
Type (TYPE)
You can change the lter type.
Peaking Filter (Peaking)
This lter emphasizes a specic range.
High-pass lter (HPF)
This lter cuts low frequencies and allows high
frequencies to pass through.
Low-pass lter (LPF)
This lter cuts high frequencies and allows low
frequencies to pass through.
Band-pass lter (BPF)
This filter only allows a specific range to pass
through.
■
Frequency (FREQ)
This changes the lter frequency.
Volume envelope (ADSR)
This sets how quickly the sound starts and how
quickly it becomes silent, for example.
■
Attack (Attack)
This changes how fast the sound starts.
This can be set from 0 to 100.
■
Decay (Decay)
This changes how long it takes from the attack
to reach the sustain level.
This can be set from 0 to 100.
■
Sustain (Sustain)
This changes the sound level while the pad is
being pressed.
This can be set from 0 to 100.
■
Release (Release)
This sets how long it takes for the sound to stop
after the pad is released.
This can be set from 0 to 100.
■
Resonance (RESO)
This changes the amount of resonance.
■
Level (LEVEL)
This sets the level after passing through the lter.
54
Page 55

Editing sounds
Output mixer (OUTPUT)
This sets the panning (stereo position) and level.
■
Panning (Pan)
The left and right output level balance can be
changed.
This can be set from R100 to L100.
■
Level (Level)
The output volume can be changed.
This can be set from 0 to 100.
Eect send amount
The amount of sound sent to the master eect
can be changed.
■
Send amount (Amount)
The volume sent to the eect can be changed.
This can be set from 0 to 100.
When set to 0, the master effect will not be
used.
Editing instruments
55
Page 56

Editing sounds Editing instruments
Editing instruments (continued)
LED settings
You can set the color used by the Ring Control-
ler LEDs, as well as how pads light when a pad
is tapped.
■
Color (Color)
You can select from 32 colors. When set to OFF,
LEDs will not light.
■
Animation (Animation)
You can select the animation used when pads
are played.
The animation can be set to O, Moire, Firework,
Cross, Circulation or Rainbow.
MIDI settings
Use this to set the MIDI channel for playing
instrument sounds by USB MIDI and for output-
ting playing sequences from the MIDI OUT.
■
Channel (Channel)
If the unit receives a MIDI message on this chan-
nel by USB, the instrument assigned to the pad
will play at the pitch that corresponds to the note
number.
In addition, if a sequence is recorded for the
selected pad, note numbers will be output on
the set MIDI channel during pattern playback.
This can be set to OFF or from 1 to 16.
The A can output sounds for note numbers
0–108.
NOTE
The
A cannot record MIDI messages
received by USB as a sequence.
56
Page 57

SONG mode
SONG mode overview
In SONG mode, you can combine multiple patterns that you have created into one complete song.
Song
Pattern A Pattern B Pattern C …
You can create songs in two ways: real-time input and step input.
■
Real-time input
The pads on the Ring Controller are assigned 16 patterns. You can change the patterns assigned to
each pad.
Tapping a pad starts playback of its assigned pattern.
After completing preparation, start real-time input and tap pads with assigned patterns to add them to
the song.
Playback order →
…
SONG mode
SONG mode overview
Song
sequence
Pattern 1
Realtime input
57
16
Patterns
15
1
2
3
…
Page 58

SONG mode SONG mode overview
SONG mode overview (continued)
■
Step input
With step input, you can set which patterns to play and how long to play them in order.
Use Base Station 0 to add patterns for playback in order starting with 0-1.
Add the first pattern for playback
Pattern 1 will play
for 4 bars
Add the next pattern for playback
Pattern 2 will play
for 4 bars
STEP key
Song
sequence
Pattern 1
STEP key
Song
sequence
Pattern 1
Pattern 2
HINT
During playback of a completed song, you can use the Ring Controller to perform with the instru-
ments assigned to the playing patterns. You can also switch between PAD and SCALE layouts at
this time.
58
Page 59

Screen overview
■ When song stopped
Song name
Name of pattern
assigned to currently
selected pad
Number of currently
selected pad
Song number Tempo
SOUND display
■ When song stopped
■ When song playing
SEQUENCE display
Parameter 2Parameter 1
■
When song playback stopped
SONG mode
SOUND display
Number of currently
selected pad
Name of pattern
HINT
Tempo appears on the SEQUENCE display only when SONG TEMPO is ON. (→ P. 65)
■
When song playing back
SOUND display SEQUENCE display
assigned to currently
selected pad
Parameter 2Parameter 1
Number of currently
selected instrument
Name of currently
selected instrument
SEQUENCE display
Song number Tempo
Number of next pattern
SONG mode overview
Song name
Playback tempo
Parameter 2Parameter 1
Number of currently
playing pattern
Name of currently
playing pattern
59
Page 60

SONG mode Operation overview
Operation overview
Press Z to enter SONG mode.
Turn H in the SEQUENCE area to select a song.
Tap the pad on the Ring Controller for the pattern to play
back, and check it.
HINT
If the pattern you want to play back has not been assigned
to a pad, use
assign to the pad (→ P. 65).
Enter SONG mode
Select a song
Select a pattern to play back
! in the SOUND area to select the pattern to
1 Start real-time input
Press R to start
real-time input.
Creating songs
Tap pads for patterns
to play them and add
them to the song in
real time.
End real-time input
S to end real-time input.
Press
Patterns
2 Start step input
Press the blinking 0 to add a new pat-
tern at that step.
Press a lit
the pattern at that position on the SE-
QUENCE display. You can edit pattern in-
formation, insert a new pattern, or delete
this step, for example.
60
0 to see information about
Page 61

Creating songs
Preparations
■
Enter the mode
1. Press Z.
■
Selecting songs
Select a song to input.
1. Turn H in the SEQUENCE area
to select a song.
Press y to create a new song
immediately.
Assigning patterns to pads
1.
HINT
Tap a pad while pressing
pad without playing the pattern.
CONTROLLER
it for pattern assignment.
The pattern assigned to the selected pad
is shown on the display and starts play-
ing back.
Tap a pad to select
Z to select a
Real-time input
1. Press R.
This starts the count.
2.
HINT
• If no animation has been set, the tapped pad
will blink.
• If even a single animation has been set, the
tapped pad will show the animation, and it
will light with the pattern color.
3.
HINT
• The timing of pattern changes depends on
the quantize setting (→ P. 66).
• A maximum of 64 pattern changes can be
recorded. Pattern changes over this amount
will not be recorded.
CONTROLLER
a pattern to play.
The tapped pad will light according to the
pattern animation type setting (→ P. 66).
CONTROLLER
switch patterns.
Tap a pad to select
Play other pads to
SONG mode
Creating songs
2. In the SOUND area, press h,
turn
H to open the pattern
selection screen, and turn
change the pattern.
This assigns that pattern to the pad.
! to
4. Press S when done playing all
patterns.
This ends song creation.
61
Page 62

SONG mode Creating songs
Creating songs (continued)
Step input
In SONG mode, the timing of pattern changes is handled in step intervals.
For example, if patterns 1–4 are added in order, the song sequence will have four steps, and the pat-
terns will be assigned to 0-1, 2, 3 and 4.
Pattern 1
(4 bars playback)
Playback order
Pattern 2
(16 bars playback)
Pattern 3
(16 bars playback)
Pattern 1
(2 bars playback)
Blinking
Press the blinking 0 to add a new pattern at that step.
Press a lit 0 to see information about the pattern at that position on the SEQUENCE display. You
can edit pattern information, insert a new pattern, or delete this step, for example.
1. Press the 0 that is blinking red.
The SOUND and SEQUENCE displays
will appear as follows.
SOUND display
2. While pressing 0, use H, !
and
" in the SOUND area to set
the pattern number and playback
length to use.
This screen has two pages.
SEQUENCE display
!: Select the pattern number
Page 1
Page 1
": Set the playback length in
bars
62
Page 63

Page 2 !: Set the playback length in
beats (BEAT)
Page 2
": Set the playback length in
ticks (smallest sequence time
unit, equal to 1/96 beat)
Page 2 !: Set the playback length in
beats (BEAT)
Page 2
": Set the playback length in
ticks (smallest sequence time
unit, equal to 1/96 beat)
SONG mode
3. To add a pattern, press h in
the SEQUENCE area while
pressing
The pattern will be added with the play-
back length set in the SOUND area.
0.
4. Press a 0 that is lit red to edit
an already added pattern.
The SOUND and SEQUENCE displays
will appear as follows.
SOUND display
SEQUENCE display
5. While pressing 0, use H, !
and
" in the SOUND area to set
the pattern number and playback
length to use.
This screen has two pages.
Page 1
!: Select the pattern number
6. To insert a new pattern, while
pressing
SEQUENCE area to select
PATTERN INSERT, and press
The pattern at the current step will be
moved to the following step, and a new
pattern will be inserted with the playback
length set in the SOUND area.
0, use H in the
h.
PATTERN INSERT
Pattern 4
Pattern 1 Pattern 2 Pattern 3
Selected step
7. To delete the selected step, while
pressing
SEQUENCE area to select DELETE
STEP, and press
The pattern added at the current step will
be deleted, and patterns after it will be
moved forward.
0, use H in the
h.
DELETE STEP
Pattern 1 Pattern 2 Pattern 3
Selected step
Creating songs
Page 1
": Set the playback length in
bars
63
Page 64

SONG mode Creating songs
Creating songs (continued)
Playing back songs
Clearing song sequences
1. Press P.
This starts song playback.
The
0 that corresponds to the playing
pattern will light green.
2. Press P to pause.
P will blink.
Press
P again to resume playback.
3. Press S to stop playback.
Playback stops, and the playback posi-
tion returns to the beginning.
HINT
• Sound parameters changed during playback
are not recorded to patterns.
• The
0 that have patterns assigned will
light red. During song playback, pressing a
red 0 will cause the song to play back
from that position.
• The song will stop after patterns have played
to the end.
• As in PATTERN mode, 16 instruments are
assigned to the pads. During song playback,
you can use the Ring Controller to perform
with the instruments assigned to the playing
patterns. You can also switch between PAD
and SCALE layouts.
1. Press S to stop sequence
playback.
2. Press C.
A conrmation message appears on the
display and C lights.
3. Use H in the SEQUENCE area to
select Yes, and press
This clears the song sequence that has
the order for pattern playback.
h.
64
Page 65

Song settings
Setting tempo synchronization
Set whether each pattern uses its own tempo
setting or all patterns use the same tempo when
playing a song.
1. Press F
Making settings for patterns
assigned to pads
■
Assigning patterns to pads
1.
CONTROLLER
Tap a pad.
2. Press h in the SOUND area,
SONG mode
Song settings
2. Press 0-13.
LED lit (SONG TEMPO ON): Patterns
in the song will play back at the same
tempo. The current tempo will be shown
in the SEQUENCE area. You can use a
and T to set the tempo.
LED unlit (SONG TEMPO OFF): Patterns
in the song will play back at their own
tempos. With this setting, the tempo
cannot be set in SONG mode.
and turn
number selection screen.
H to open the pattern
3. Turn ! in the SOUND area to
change the pattern.
65
Page 66

SONG mode Song settings
Song settings (continued)
■
Setting the pattern switching timing
1.
CONTROLLER
Tap a pad.
2. Press h in the SOUND area,
and turn
selection screen.
H to open the quantize
3. Turn " in the SOUND area to
change the timing.
Select OFF, 1/32, 1/16T, 1/16, 1/8T, 1/8,
1/4, 1/2, 1 BAR or 2 BAR.
If OFF is selected, the pattern will switch
as soon as the pad is tapped.
If any other value is selected, the pattern
will switch according to that timing.
■
Setting the pattern LED animation
type
1.
CONTROLLER
Tap a pad.
2. Press h in the SOUND area,
and turn
ANIMATION parameter selection
screen.
H to open the LED
3. Turn " in the SOUND area to
change the LED animation.
■
Setting pattern pad colors
1.
CONTROLLER
Tap a pad.
2. Press h in the SOUND area,
and turn
COLOR selection screen.
H to open the LED
3. Turn ! in the SOUND area to
change the pad color.
66
Page 67

Managing songs
Copying/swapping patterns
assigned to pads
SONG mode
Copying/swapping song
sequences
1.
CONTROLLER
the pattern to be copied/swapped.
Tap the pad with
2. Press w.
The destination for copying/swapping the
pattern appears on the SOUND display.
3. Use H in the SOUND area to
select the copy/swap destination
pad, and press
This opens copy/swap destination
selection on the SOUND display.
h.
1. Turn H in the SEQUENCE area
to select the song to copy/swap.
2. Press w.
The destination for copying/swapping
the song appears on the SEQUENCE
display.
3. Use H in the SEQUENCE area to
select the copy/swap destination
song, and press
This opens copy/swap destination
selection on the SEQUENCE display.
h.
Managing songs
4. Use H in the SOUND area
to select COPY or SWAP, and
press
h.
Press w to cancel and return to the
previous screen.
HINT
You can also tap a pad to select the copy
destination.
4. Use H in the SEQUENCE area
to select COPY or SWAP, and
press
h.
Press w to cancel and return to the
Home Screen.
67
Page 68

SONG mode Managing songs
Managing songs (continued)
Erasing songs
Changing song names
1. Turn H in the SEQUENCE area
to select the song to erase.
2. Press z.
The song to erase appears on the
SEQUENCE display.
3. Use H in the SEQUENCE area to
select Yes, and press
Press z to cancel and return to the
Home Screen.
h.
1. Turn H in the SEQUENCE area
to select the name to change.
2. Press x.
The song with the name to change
appears on the SEQUENCE display.
3. Use H in the SEQUENCE area to
select the character to change,
and press
Press x to cancel and return to the
Home Screen.
h.
4. Use H in the SEQUENCE area
to change the character, and
press
h.
5. Use H in the SEQUENCE area
to select OK, and press
conrm the name change.
68
h to
Page 69

Creating new songs
1. Press y.
The name of a new song appears on the
SEQUENCE display and can be edited.
2. To change the name, use H
in the SEQUENCE area to select
the character to change, and
press
h.
3. Use H in the SEQUENCE area
to change the character, and
press
h.
Press y to cancel and return to the
Home Screen.
SONG mode
Managing songs
4. Use H in the SEQUENCE area to
select OK, and press
A new song will be created with that
name.
NOTE
A new song cannot be created if no empty
songs are available.
h.
69
Page 70

REC/PLAY area REC/PLAY area overview
REC/PLAY area
REC/PLAY area overview
Use the REC/PLAY area to control sequences, including playback and recording.
The following are the main operations that can be made here.
REC/PLAY
area
Clearing
Use C to clear sequence data, for example.
HINT
The function of this button depends on the
selected mode and the statuses of other but-
tons. For details, see the explanation pages for
each operation.
Motion sequences
You can adjust the parameters of instruments
and eects while playing back a created pattern
and record these changes in real time.
These recorded changes will be saved as a part
of the pattern and re-created during playback.
See "Motion Sequences" for detailed information
about this function (→ P. 72).
70
Page 71

REC/PLAY area overview (continued)
REC/PLAY area
Capturing audio
The A can capture (record) as audio data
the sound of patterns and songs it plays back as
well as sounds input through the AUDIO INPUT
jack.
Captured audio data can be used as an
instrument.
For details about this function, see "Capturing
audio" (→ P. 74).
Automatic saving
Use v to change the automatic saving setting.
When AUTO SAVE is ON, changes to patterns
are automatically saved.
Turning this function ON can be useful when
creating patterns.
On the other hand, turn this OFF when per-
forming with already completed patterns so that
changes are not recorded.
For details about this function, see "Automatic
saving" (→ P. 78).
Volume
Use V to adjust the OUTPUT and headphone
volume.
NOTE
The OUTPUT and headphone volumes are
both adjusted together.
REC/PLAY area overview
71
Page 72

REC/PLAY area Motion sequences
Motion sequences
You can adjust the parameters of instruments
and effects and record these changes in
sequences.
You can record changes in real time while a
pattern is playing as well as record parameter
setting values step-by-step.
These recorded changes will be saved as a part
of the pattern and re-created during playback.
NOTE
Motion sequences cannot be recorded in
SONG mode.
Recording motion sequences
in real time
1. Select the pattern for which you
want to record a motion sequence.
2. Press s.
s blinks, showing that standby has
started.
3. Press P.
P lights and pattern playback starts.
4. Adjust the parameters of instru-
ments and eects.
These changes will be recorded as a
motion sequence.
· Editing sounds (→ P. 48)
HINT
• Recording starts from the moment that a
parameter is operated.
• If a parameter that has already been recorded
is operated again, the new data will overwrite
the old.
5. Press s or S when done
recording.
72
Page 73

REC/PLAY area
Recording motion sequences
step by step
1. Stop or pause pattern playback.
2. Press s.
3. Press the 0 for the position
where you will change parameters.
4. While pressing 0, adjust the
parameters of instruments and
eects.
These operations are recorded at the
corresponding 0position.
Clearing motion sequences
1. Press S to stop pattern
playback.
2. Press C.
The sequence clearing screen appears
on the SEQUENCE display.
Press
C again to cancel this operation.
3. Use H in the SEQUENCE area to
select the sequence you want to
clear, and press
This opens a conrmation screen.
h.
Motion sequences
4. Use H in the SEQUENCE area to
select YES, and press
This clears the sequence.
73
h.
Page 74

REC/PLAY area Capturing audio
Capturing audio
Capturing overview
The A can capture (record) audio it is
playing back and audio input through its AUDIO
INPUT jack in every mode.
Captured audio can be used for instruments.
NOTE
• Captured audio data is saved on the SD
card. Be aware that you will not be able to
use the captured recordings if you remove
the SD card or replace it with a dierent SD
card.
• The maximum length of captured record-
ings and audio files that can be added
as instruments on the
minutes (or 12 minutes if mono).
For example, when a one-minute stereo
audio file has been assigned, the remaining
length of audio that can be assigned is 5
minutes if stereo or 10 minutes if mono.
• If a captured recording or an audio file is
used in multiple patterns, this will not change
the remaining time for assigning les.
A is 6
Setting the auto stop function
You can set capturing to automatically stop a set
time after starting.
1. While pressing F,
press
0-14.
2. Turn ! in the SOUND area to
change the AUTO STOP value.
Select O or 1–32 quarter notes.
SOUND display
74
Page 75

REC/PLAY area
Switching between stereo and
mono
Captured audio can be saved as stereo or
mono.
Audio capture is possible for up to 6 minutes in
stereo or 12 minutes in mono.
1. While pressing F,
press
0-14.
2. Use " in the SOUND area to
switch between stereo and mono.
Capturing audio recordings
1. Play the pattern, song or other
sound that you want to capture, or
connect the instrument or other
audio device that you want to use
to capture recordings to the Base
Station AUDIO INPUT jack.
2. Press c.
Capturing starts, and the SOUND display
shows the remaining capture time.
HINT
• REMAIN (remaining time) shows the following
information.
When AUTO STOP is ON: the time until cap-
turing stops
When AUTO STOP is OFF: the maximum
amount of remaining capture time
• Up to 6 minutes stereo or 12 minutes mono
can be captured.
• When capturing, press
to stop capturing.
• If the input level is too high, c will flash
rapidly. Lower the volume of the connected
device or the input level. (→ P. 84)
• Turning effects ON/OFF, changing parame-
ters, playing pads, and changing patterns, for
example, will be recorded while capturing.
• If precount is ON, a click sound will play
before capturing starts. (→ P.39)
• If the metronome is ON, its sound will play
during the capture.
C when you want
Capturing audio
75
Page 76

REC/PLAY area Capturing audio
Capturing audio (continued)
3. After the audio has been captured,
press
c.
You can adjust the captured recording
and save it on the Capture Setting screen
that opens. (→ P. 76)
If automatic stopping is on, capturing will
stop automatically and the capture set-
ting screen will open.
Adjusting and saving captured
audio
After capturing audio completes, the CAPTURE
settings screen opens, and the captured record-
ing begins loop playback.
The captured audio can be edited on the screen.
SOUND display
SEQUENCE display
HINT
P to pause and resume playback.
• Press
• Press
S to stop playback and reset the
playback position to the beginning of the
loop.
• The entire ring of 0 on the Base Station
corresponds to the length between start and
end points. During playback, press a 0 to
start loop playback from that position. Press
a 0 when stopped to play only the interval
assigned to that position.
• The 0 that corresponds to the current
position lights green, and the other 0 light
red.
1. Use ! and " in the SOUND area
to set the range of the captured
audio assigned to the pad.
!: Start point
Change starting point of captured audio.
": End point
Change ending point of captured audio.
When setting start and end points, the
waveforms around those points are
shown magnied.
HINT
• Start and end points can be set after the rst
500 ms and before the last 500 ms of the
captured recording.
• Pressing
editing of the captured recording and reopen
the original screen.
Z , Y or C will cancel
2. Use H in the SEQUENCE area
to select "Assign to PAD", and
press
h.
A screen opens where you can select the
pad for audio assignment.
SOUND display
SEQUENCE display
76
Page 77

REC/PLAY area
HINT
You cannot assign captured audio if it exceeds
the length that can be used as an instrument. If
you try to do so a message will appear. To make
more time available, remove already assigned
captured recordings and other audio files, or
shorten intervals between start and end points.
At this time, it is still possible to just save to the
SD card (Only SAVE to SD).
3. Turn H in the SOUND area to
select the pattern for assignment.
4.
CONTROLLER
it for assignment, turn
Tap a pad to select
H in the
SEQUENCE area to select YES,
and press
This assigns the captured audio to the
selected pad.
h.
6. If you want to change the name of
the captured audio, turn
SEQUENCE area to select
RENAME, and press
HINT
• The captured audio will be saved inside the
“Capture” subfolder in the “AR-48” folder on
the SD card.
• The capture name will be used unchanged
as the le name.
• Captured audio that has been assigned to
a pad can have envelopes, lters and other
parameters set in the same way as the
built-in instruments.
H in the
h.
Capturing audio
5. To save the captured audio to the
SD card without assigning it to a
pad, use
area to select "Only SAVE to SD",
and press
This will save the captured audio as a
WAV le to the SD card.
HINT
Captured audio data is also saved on the SD
card when it is assigned to a pad.
H in the SEQUENCE
h.
77
Page 78

REC/PLAY area Automatic saving
Automatic saving
You can set whether or not changes made to
instruments and eects are saved automatically
to patterns.
When AUTO SAVE is set to OFF, the results
of changes to instruments and effects will not
be saved to patterns. Changes made will be
discarded when you switch to SONG mode or
select a dierent pattern. Moreover, you will not
be able to save sequences.
1. Press v.
v lights and AUTO SAVE is turned ON.
2. Press v again to turn automatic
saving o.
v becomes unlit and AUTO SAVE is
turned OFF.
NOTE
• The automatic saving function cannot be
changed when in SONG mode. Setting
changes are all saved even when the song is
changed.
• When you switch the AUTO SAVE setting
from OFF to ON, a screen will appear to
conrm whether or not you want to save the
current status. If you select "NO", the current
settings will not be saved, but future changes
will be saved.
SEQUENCE display
78
Page 79

EFFECT area
EFFECT area overview
In the EFFECT area, a master eect can be applied to the overall output during the playback of pat-
terns and songs.
EFFECT area
EFFECT area
EFFECT area overview
79
Page 80

EFFECT area Selecting and setting eects
Selecting and setting eects
A variety of types of master eects are available.
Turning the eect ON/OFF
Changing the eect type
1. Use t to change the eect
type.
The LED for the selected eect will light.
NOTE
• The eect type cannot be recorded to motion
sequences.
• In SONG mode, effect operations are only
possible during song sequence playback,
The eect operations during song sequence
playback, however, are not recorded to
patterns.
1. Press o.
o lights when the eect is ON.
The effect stays ON even after
released.
HINT
• The Ring Controller E is linked to
the Base Station
• LOOPER FX and RELEASE are enabled only
while o is being pressed.
o.
o is
2. Press o again to turn the eect
OFF.
80
Page 81

Changing parameters
The eect parameters can be adjusted.
The parameters that can be set depend on the
type of eect.
HINT
See the "Eect list" appendix for details about
eect parameters. (→ P. 117)
EFFECT area
1. Turn 1 and 2 to adjust the
desired parameters.
The current setting values are shown on
the SOUND display.
If the the knob position does not match
the parameter value, turn the knob to the
current value once to enable adjustment.
Changing parameters
81
Page 82

Ring Controller Performance Controlling parameters with the Ring Controller
Ring Controller Performance
Controlling parameters with the Ring Controller
Using the Ring Controller accelerometer, you can
control arpeggiator timing and the parameters
of instruments and effects. Parameters can be
changed by the movement and tilt of the Ring
Controller.
X axis
Y axis
NOTE
• This can be used when the Ring Controller
grip area has been set. (→ P. 98)
• The directions of the X and Y axes are auto-
matically set based on the grip area position.
• Do not hit the Ring Controller with excessive
force.
■
Assigning parameters
1. While pressing F, press
0-24.
This opens a screen where X and Y axis
parameters can be assigned.
SOUND display
SEQUENCE display
2. Turn H in the SEQUENCE area
to select the assignment for the
parameter.
Up to three parameters each can be
assigned to the movement of the X and
Y axes.
82
Page 83

Controlling parameters with the Ring Controller (continued)
Ring Controller Performance
3. Turn H in the SOUND area to
select the parameter.
You can select from the following
parameters.
Parameter Explanation
None No parameter assigned
EFFECT Knob1 Parameter 1 of the selected eect
EFFECT Knob2 Parameter 2 of the selected eect
01 SOUND Knob1
01 SOUND Knob2
02 SOUND Knob1
02 SOUND Knob2
16 SOUND Knob1
16 SOUND Knob2
ARPEGGIATOR
Rate
ARPEGGIATOR
Note
Parameter 1 shown on the SOUND display for
instrument 01
Parameter 2 shown on the SOUND display for
instrument 01
Parameter 1 shown on the SOUND display for
instrument 02
Parameter 2 shown on the SOUND display for
instrument 02
…
Parameter 1 shown on the SOUND display for
instrument 16
Parameter 2 shown on the SOUND display for
instrument 16
The speed of the arpeggiator output will change
in response to the tilt of the Ring Controller.
This is enabled only if the arpeggiator Style
is not “Sequence” and the “Pattern” is set to
1/1–1/32.
The notes output by the arpeggiator will change
in response to the tilt of the Ring Controller. The
notes will change according to the scales set in
the SCALE layout of each instrument.
(→ P. 116)
…
4. Remove the Ring Controller from
the Base Station.
If the eect or arpeggiator has a parame-
ter assigned, enable that function.
5. Set the Ring Controller grip area.
Setting the grip area (→ P. 98)
6. Tilt the Ring Controller to control
the assigned parameters.
Controlling parameters with the Ring Controller
83
Page 84

System settings Changing various settings
System settings
Changing various settings
Setting the audio input and
eect send levels
When a signal is being input through the AUDIO
INPUT jack, set the input level and the amount
sent to the master eect.
1. While pressing F,
press
0-16.
This opens the input setting screen.
2. Turn ! in the SOUND area to
change the input level.
This can be set from 0 to 100.
3. Turn " in the SOUND area to
change the send level.
This can be set from 0 to 100.
Setting the clock mode
Set whether the internal clock or an external
clock is used when connected to other MIDI
devices by USB.
1. While pressing F,
press
0-30.
External clock is selected when 0-30
is lit.
NOTE
• When external clock is selected, songs
cannot be recorded.
• When the CLOCK MODE is set to INTER-
NAL, it will function in the following ways.
- The
A will constantly output MIDI
clock from its USB port.
- The A will send a start message when
playback starts and a stop message when it
stops.
- It will send a continue message when play-
back resumes from a paused state.
- Start, stop and continue messages will not
be output, however, when the A does
not play back because, for example, it does
not have a song sequence.
84
Page 85

Changing various settings (continued)
System settings
Setting the display contrast
The display contrast can be adjusted.
1. While pressing F,
press
0-32.
The SOUND and SEQUENCE displays
show their own contrast settings.
2. Turn H in the same area as the
display to adjust its contrast.
The display contrast can be set from
1 to 13.
Checking the software version
The Base Station software version is shown on
the display when the A starts up.
NOTE
The Ring Controller software version can only
be checked on the Ring Controller update
screen. (→ P. 102)
Changing various settings
85
Page 86

System settings Changing various settings
Changing various settings (continued)
Restoring default settings
■
Ring Controller
The Base Station and the Ring Controller can be
restored to their factory default settings.
■
Base Station
NOTE
Restoring settings to their defaults will erase
everything you have created including pat-
terns and songs. Save them to an SD card in
advance if you do not want to lose them.
Backing up data (→ P. 89)
1. While pressing F, press C.
A conrmation message appears.
2. Use H to select Yes,
and press
This will restore the factory default
settings.
h.
1. While pressing F,
press
0-22.
A conrmation message appears on the
SEQUENCE display.
2. Use H in the SEQUENCE area to
select YES, and press
This resets the Ring Controller to its fac-
tory default settings.
h.
86
Page 87

Outputting MIDI messages from the Base Station
System settings
The Base Station can send MIDI messages from
the USB port and MIDI OUT jack when the Ring
Controller pads and Base Station knobs and
buttons are used. You can set the MIDI mes-
sages output.
The A will output the set MIDI messages
without change even if the mode is switched.
These MIDI messages can be used to control
DAW software, for example.
1. While pressing F,
press
0-31.
This opens the setting screen.
SOUND display
SEQUENCE display
2. Turn H in the SEQUENCE area
to select the assignment for the
parameter.
The Ring Controller pads, Base Station
buttons and knobs, and accelerometer X
and Y axes can be selected.
3. Turn H in the SOUND area to
select the message.
The following parameters can be
selected
■
PAD 1-16
MIDI Ch Message Type Number
O –
Note 0-127
CC (control change) 0-127
Prg Chg (program change) 0-127
1-16
Ch Press (output the same value of
aftertouch only on entire MIDI channel)
PolyPress (output aftertouch only on
each pad)
HINT
If the Message Type is set to CC, the CC
number set by “Number” is sent with the
strength (velocity) that the pad is tapped. “0” is
sent when the pad is released
NOTE
Sequences recorded on the
independently of the MIDI messages sent when
pads are pressed. (→ P. 56)
■
Buttons
MIDI Ch Message Type Number
O –
Note 0-127
1-16
CC (control change) 0-127
Prg Chg (program change) 0-127
HINT
When Message Type is set to Note, pressing
a button will send the note set by “Number”
at a velocity of 127. Releasing the button will
send it at a velocity of 0. If the Ring Controller is
connected to a computer, when the computer
sends a message with a velocity other than
0, the corresponding pad will light. The corresponding pad will become unlit when it sends a
velocity 0 or a note o message.
When Message Type is set to CC, pressing a
button will send the CC number set by “Number”
at a value of 127. Releasing the button will
send it at a value of 0. If the Ring Controller is
connected to a computer, when the computer
sends a message other than 0, the corresponding pad will light. The corresponding pad will
become unlit when it sends a 0 message.
A are output
–
0-127 (Note
Number)
Outputting MIDI messages from the Base Station
87
Page 88

System settings Outputting MIDI messages from the Base Station
Outputting MIDI messages from the Base Station (continued)
■
Knobs (selection encoders, sound parameters, SWING, TEMPO, eect type)
MIDI Ch Type CC Number Minimum/Dec Number Maximum/Inc Number
O
Absolute (send the knob rotation
position as an absolute value)
1-16
Relative (when the knob is turned,
send the counterclockwise (Dec) or
clockwise (Inc) value dierence)
0-127
– –
0-127 (Minimum) 0-127 (Maximum)
0-127 (Dec Number) 0-127 (Inc Number)
HINT
• When Type is set to Absolute, the value of the current knob rotation position is output if it is within
the range between Minimum and Maximum. If turned counterclockwise from the Minimum value or
turned clockwise from the Maximum value, no message will be output. Beware that even though
this can be used with many DAW applications, dierences could occur with the values sent by the
A if the controlled parameters are changed in the DAW.
• When Type is set to Relative, the value set by Dec Number is sent when the knob is turned coun-
terclockwise, and the value set by Inc Number is sent when the knob is turned clockwise.
Even if parameters have been changed in the DAW, values can be increased or decreased rela-
tively. However, correctly setting the Dec Number and Inc Number might be necessary depending
on the DAW.
■
Knobs (eect parameters, volume)
MIDI Ch CC Number Min Value
1-16
OFF –
0-127 0-127
HINT
Sent values are limited to the range from the set Min Value to 127.
■
Accelerometer X and Y axes
MIDI Ch CC Number Min Value
1-16
OFF –
0-127 0-127
HINT
Sent values are limited to the range from the set Min Value to 127.
88
Page 89

Backing up data
System settings
The data for patterns and songs created can be
backed up to SD cards.
Moreover, when saving and loading data, you
can manage all the data at once or choose only
some data.
Backing up data
1. While pressing F,
press
0-25.
The backup type selection appears on
the SOUND display, and a confirmation
message appears on the SEQUENCE
display.
SOUND display
SEQUENCE display
4. Input the backup le name.
HINT
Character input operations (→ P. 23)
5. Use H in the SEQUENCE area to
select OK, and press
This backs up the data with the le name
set in step 4.
h.
Backing up data
2. Turn H in the SOUND area to
select the type of data to back up.
ALL DATA: This backs up all data.
PATTERN: This only backs up the cur-
rently selected pattern.
3. Use H in the SEQUENCE area to
select YES, and press
This opens a screen to input the backup
le name.
h.
89
Page 90

System settings Backing up data
Backing up data (continued)
Loading data
1. While pressing F,
press
0-26.
The backup type to load appears on
the SOUND display, and a confirmation
message appears on the SEQUENCE
display.
SOUND display
SEQUENCE display
2. Turn H in the SOUND area to
select the type of data to load.
ALL DATA: This loads all data.
PATTERN: This only loads a pattern.
ALL SONG SEQUENCE: This loads all
song data.
3. Use H in the SEQUENCE area to
select YES, and press
This opens a screen to select the backup
le.
h.
4. Turn H in the SOUND area to
select the backup data to load.
SOUND display
SEQUENCE display
5. Use H in the SEQUENCE area to
select Yes, and press
The data will be loaded.
HINT
If the type of backup to be loaded is a pattern,
a screen where you can select the pattern to
be loaded to the
Turn H in the SOUND area to select the pattern to load, turn H in the SEQUENCE area
to select YES, and press h.
NOTE
• When you load data, the contents on the
A are overwritten.
• If the loaded pattern uses audio files as
instrument oscillators, those audio les must
be saved in the “Capture” subfolder in the
"AR-48" folder on the SD card.
• When loading song data, pattern data used
by song sequences will not be loaded. If the
current pattern data is dierent from the data
at the time of backup, also load the pattern
data used by the sequence.
• In order to load song data later, you must
select ALL DATA when backing up.
A opens.
h.
90
Page 91

SD card management
System settings
Managing SD card open space
1. While pressing F,
press
0-27.
The SD card space used is shown on the
SOUND display.
Formatting SD cards
1. While pressing F,
press
0-27.
A conrmation message appears on the
SEQUENCE display.
2. Use H in the SEQUENCE area to
select Yes, and press
This formats the SD card.
NOTE
• Before using SD cards that have just been
purchased or that have been formatted on
a computer, they must be formatted by the
A.
• Be aware that all data previously saved
on the SD card will be deleted when it is
formatted.
h.
SD card management
91
Page 92

System settings SD card management
SD card management (continued)
Testing SD card performance
■
Full testing
You can test whether an SD card can be used
with the A. A basic test can be done
quickly, while a full test examines the entire SD
card.
1. While pressing F,
press
0-28.
A test method selection message
appears on the SOUND display.
QUICK: This conducts a quick test.
FULL: This conducts a full test.
HINT
When FULL is selected, the estimated execu-
tion time will appear on the SOUND display.
■
Quick testing
• Turn H in the SOUND area to select
QUICK.
• Use
H in the SEQUENCE area to select
YES, and press h.
This will start the quick SD card test.
The result of the test will be shown when it
completes.
• Turn H in the SOUND area to select
FULL.
• Use
H in the SEQUENCE area to select
YES, and press h.
This will start the full SD card test.
The result of the test will be shown when it
completes.
SOUND display
SEQUENCE display
HINT
You can press
is being executed.
NOTE
Even if a performance test result is "OK",
there is no guarantee that writing errors will
not occur. This information is just to provide
guidance.
F to cancel a test while it
92
Page 93

Exchanging data with
computers
By connecting the A with a computer, you
can check and copy data on the SD card loaded
in it.
■
Connecting
1. While pressing F,
press
0-29.
This puts the A into card reader
mode.
■
Disconnecting
1. Disconnect on the computer.
Windows:
Select
A from "Safely Remove
Hardware".
Mac OS:
Drag the
drop it.
NOTE
Always conduct computer disconnection pro-
cedures before removing the USB cable.
A icon to the Trash and
2. Disconnect the USB cable from the
System settings
SD card management
2. Use a USB cable to connect the
A and the computer.
NOTE
• The supported operating systems are as
follows.
Windows: Windows 7 or later
Mac: OS X 10.8 or later and macOS
• The
A cannot operate on USB bus
power. Use the AC adapter to supply power.
computer and the
press
F.
A, and
93
Page 94

System settings SD card management
SD card management (continued)
SD card folder structure
AR-48_SD
AR-48
Capture
Data
PCM file
UserPCM_001.WAV
UserPCM_002.WAV
DATA0001.ARD
DATA0002.ARD
……
[pattern name]1.PAT
Captured audio files and
files used as instrument
oscillators
Backup files
(all data for patterns
and songs)
Backup files
(data for single patterns)
[pattern name]2.PAT
94
Page 95

Ring Controller settings
System settings
Ring Controller and Base
Station connection and
disconnection
■
Connection methods
The Base Station and a Ring Controller use a
USB connection to communicate.
If BTA-1 (sold separately) units have been
installed in the Base Station and Ring Controller,
wireless transmission using Bluetooth LE is also
possible.
NOTE
If a Ring Controller and Base Station are con-
nected by USB, they will communicate via the
USB cable even if they both have BTA-1 units
installed.
Likewise, USB will be used for communication
if a Ring Controller with a BTA-1 installed is
connected to a computer by USB.
■
Connecting by USB
1. Use a USB cable to connect the
Base Station and Ring Controller.
This automatically turns the Ring Control-
ler on.
■
Connecting by Bluetooth LE
Pairing beforehand is necessary to connect
using Bluetooth LE.
1. Turn o both the Base Station and
2. Install 2 AA batteries in the Ring
Controller (→ P. 21), and turn on
both the Base Station and Ring
Controller.
After the Ring Controller starts up, an
LED animation will appear and it will be in
connection standby mode.
A list of devices that can be con-
nected will appear on the Base Station
SEQUENCE display.
Press F to return to the original
screen.
You can press
show this screen again.
F and 0-23 to
3. Turn H in the Base Station
SEQUENCE area to select the Ring
Controller you want to connect,
and press
The selected Ring Controller will be con-
nected to the Base Station, and all its
pads will ash blue.
A check mark will appear next to the
connected Ring Controller.
h.
Ring Controller settings
the Ring Controller, and Install
BTA-1 units (sold separately) into
both of them.
NOTE
• After doing this once, connection will be
automatic in the future.
• Connecting a Base Station and Ring Control-
ler that have BTA-1 units installed by USB will
automatically pair them.
95
Page 96

System settings Ring Controller settings
Ring Controller settings (continued)
■
Disconnecting a Ring Controller
and Base Station
Connecting a Ring Controller
to a computer by USB.
1. Press F
2. Press 0-23.
This opens a list of devices that can be
connected on the SOUND display.
A check mark will appear next to the cur-
rently connected Ring Controller.
3. Use H in the SOUND area to
select the Ring Controller to dis-
connect, and press
This disconnects it.
h.
The Ring Controller can be used as a MIDI
controller.
■
Connecting to a computer by USB
1. Use a USB cable to connect the
Ring Controller to a computer.
This automatically turns the Ring Control-
ler on.
NOTE
• The Ring Controller will operate on USB bus
power from the computer.
• MIDI messages output when the Ring Con-
troller is connected to a computer or other
device (→ P. 87)
• When the Ring Controller is connected to
a computer, the pads will light white. When
pressed, they will light blue. You can changed
the colors that the pads light by sending MIDI
messages from the computer. (→ P. 120)
96
Page 97

System settings
Connecting the Ring Controller
to a Mac or iOS device using
Bluetooth LE
You can connect the Ring Controller directly to
a Mac or iOS device by Bluetooth LE using a
BTA-1 (sold separately), and use it as a MIDI
controller.
HINT
When waiting to be connected, the Ring Con-
troller pad LEDs show an animation, and the
BTA-1 BLE LED blinks.
NOTE
• Install the BTA-1 before turning the Ring
Controller on.
• The supported computers and operating
systems are as follows.
MacBook, iMac and Mac Pro computers
that support Bluetooth LE and run Mac OS X
10.10.5 or later or macOS
iOS device running iOS 8.0 or later
• The BLE LED will light when connected.
• If a Ring Controller and computer are con-
nected by USB, they will communicate
via the USB cable even if a BTA-1 unit is
installed.
3. Open the Audio MIDI Setup appli-
cation on the Mac
4. Select "Window" in the menu bar,
and then "Show MIDI Window".
This opens the MIDI Studio window.
5. Double-click the Bluetooth icon.
This opens the Bluetooth Configuration
screen.
6. Click "Connect" for the Ring
Controller shown in the list.
When connection succeeds, all of
the pads will blink blue on the Ring
Controller.
NOTE
If connection fails, open the System Prefer-
ences and click the × next to the Ring Control-
ler in the list of Bluetooth devices before trying
again.
Ring Controller settings
■
Connecting to a Mac using
Bluetooth LE
1. Install 2 AA batteries in the Ring
Controller. (→ P. 21)
2. Turn the Ring Controller on.
This puts the Ring Controller into con-
nection standby.
97
Page 98

System settings Ring Controller settings
Ring Controller settings (continued)
■
Connecting to an iOS device using
Bluetooth LE
1. Install 2 AA batteries in the Ring
Controller. (→ P. 21)
2. Turn the Ring Controller on.
This puts the Ring Controller into con-
nection standby.
Grip area
You can set a grip area that does not respond
to touch in order to prevent pads from being
pressed unintentionally when using the Ring
Controller separately from the Base Station.
■
Setting the grip area
1.
CONTROLLER
All the Ring Controller pads will light blue.
Press G.
3. Launch an app that supports MIDI
over Bluetooth LE on the iOS
device.
4. On the app Settings screen, con-
duct Bluetooth connection.
When connection succeeds, all of
the pads will blink blue on the Ring
Controller.
HINT
• For app setting procedures, see the manual
for that app.
• MIDI messages output when the Ring Con-
troller is connected to a computer or other
device (→ P. 87)
• When the Ring Controller is connected to a
computer or other device, the pads will light
white. When pressed, they will light blue.
• You can changed the colors that the pads
light by sending MIDI messages from the
computer. (→ P. 120)
2.
HINT
If a grip is not detected for 30 seconds, detec-
tion will automatically be canceled.
CONTROLLER
set as the grip area.
The pads in the grasped range light white
and the grip area is set.
Pads outside the grip area can be used
as normal.
Grasp the area to
98
Page 99

After the grip area is set, the LED lighting
of the Ring Controller returns to its pre-
vious state, except the LEDs in the grip
area become unlit showing that they will
not respond to use.
HINT
• If a grip is detected and 1 second passes, it
will be set automatically.
• When the grip area is set, the G LED will
light.
■
Disabling the grip area setting
System settings
Ring Controller settings
1.
2.
CONTROLLER
All the Ring Controller pads will light blue.
CONTROLLER
This disables the grip area setting,
making all pads usable again.
Press G.
Press G.
99
Page 100

System settings Ring Controller settings
Ring Controller settings (continued)
Ring Controller function
settings
1. While pressing F, press
0-22.
This opens the Ring Controller Setting
screen.
SOUND display
SEQUENCE display
2. Turn H in the SOUND area to
select items to set, and use
" to change the parameters.
■
Velocity
This sets the pad sensitivity.
Setting Function
MAX Velocity is always maximum regardless
HIGH High sensitivity (playing strength great-
MID Standard
LOW Low sensitivity (playing strength aects
■
LED
This sets the brightness of pads when they light.
Setting Function
BRIGHT Pads will light brightly
DARK
of playing strength
ly aects velocity)
velocity little)
Pads will light dimly (reduces power
consumption)
! and
■
Aftertouch
This aftertouch sensitivity of pads when they are
pressed.
Setting Function
ON (HIGH)
ON (MID) Standard
ON (LOW)
OFF Disables the aftertouch function
■
Accelerometer sensitivity
High sensitivity (reacts easily to changes in pad pressure)
Low sensitivity (does not react easily
to changes in pad pressure)
(X/Y AXIS SENS)
This sets the sensitivity of the Ring Controller
accelerometer.
Setting Function
HIGH
MID Standard
LOW Low sensitivity (less response to tilting)
■
Battery type (BATTERY)
This sets the type of batteries used.
Setting Function
ALKALINE Alkaline batteries (default)
Ni-MH Nickel-metal hydride batteries
NOTE
• Use alkaline batteries or rechargeable NiMH
batteries.
• This setting cannot be changed during
recording or playback.
■
Automatic powering o
High sensitivity (responds even to
slight tilting)
(AUTO OFF)
You can set the Ring Controller to turn off
automatically.
Setting Function
2min When using batteries, automatically
OFF Do not turn o automatically
turn o when not operated for 2 minutes
100
 Loading...