

Page 1

Photomicrography with
35 mm SLR Cameras
Operating Manual
Page 2

INTRODUCTION Photomicrography using
Carl Zeiss Copyright 35 mm SLR cameras
Knowledge of this manual is required for the operation of the instrument. Would you ther efore please
make yourself familiar with the contents of t his manual and pay special att ention to hint s concerning the
safe operation of the instrument.
The specifications are subject to change; the manual is not covered by an update ser vice.
© Unless expressly authorized, forwarding and duplication of this document and the software
package, and the utilization and communicat ion of its contents, are not permitt ed. Violations will
entail an obligation to pay compensation.
All rights reserved in the event of gr anting of patents or registration of a ut ilit y m odel.
Issued by:
Number of this manual: B 40-046 e
Date of issue: 31.03.1999
0-2 B 40-046 e 03/99
Carl Zeiss
Microscopy
D-07740 Jena
Phone: ++49-36 41 64-1616
Telefax: ++49-36 41 64-3144
E-mail: micro@zeiss.de
Internet: www.zeiss.de/micro
Page 3

Photomicrography using INTRODUCTION
35 mm SLR cameras Contents Carl Zeiss
CONTENTS
Page
INTRODUCTION........................................................................................................0-1
Title Page....................................................................................................................0-1
Copyright...................................................................................................................0-2
Table of Contents .......................................................................................................0-3
Notes on Instrument Safety.........................................................................................0-6
Notes on Warranty......................................................................................................0-7
Overall View of 35 mm SLR camera on Adapter for SLR Camera of the
the Stemi 2000-C with 60 mm Camera Port................................................................0-8
Overall View of 35 mm SLR Camera on 2.5× / T2 Camera Adapter on the Front-Port
of the Axiovert 25 C.................................................................................................... 0-9
Overall View of 35 mm SLR Camera above 63 mm Objective and Connector f or
Microscope Camera (Image Position 44 mm) with 10× Photo Eyepiece on the
Axioskop with 44 mm Camera Port ...........................................................................0-10
CHAPTER 1 INSTRUMENT DESCRIPTION .....................................................................................1-1
1 Instrument Description................................................................................................1-3
1.1 Name and Intended Application ..................................................................................1-3
1.2 Instrument Description and Main Features...................................................................1-3
1.3 35 mm SLR Camera Components................................................................................1-4
1.4 Overview of Image Positions (Tube Adapters ) , r e levant Phot ot ubes
and Microscope Stands ...............................................................................................1-7
1.5 Technical Data ............................................................................................................1-9
B 40-046 e 03/99 0-3
Page 4

INTRODUCTION Photomicrography using
Carl Zeiss Contents 35 mm SLR cameras
CHAPTER 2 START-UP.................................................................................................................. 2-1
2 Start-Up .....................................................................................................................2-2
2.1 Unpacking the Photomicrography Components ........................................................... 2-2
2.2 Insertion of Photo Reticles MC 2.5
2.2.1 Assignment of Photo Reticles MC 2.5
2.2.2 Insertion of MC 2.5
Photo Reticles in the Eyepiece..................................................... 2-4
×
.............................................................................2-2
×
........................................................................2-2
×
2.2.3 Focusing of Eyepieces through the Binocular tube ....................................................... 2-4
2.3 Attachment of 35 mm SLR Cameras............................................................................2-5
2.3.1 Attachment of 35 mm SLR Cameras with SLR Adapte r 2. 5
to the
×
60 mm Camera Port................................................................................................... 2-5
2.3.2 Attachment of 35 mm SLR Cameras with Objective f ' = 63 mm to 60 mm
and 40 mm Camera Ports...........................................................................................2-6
2.3.3 Attachment of 35 mm SLR Cameras with 2. 5
/ T2 Adapter to Front Port of
×
Axiovert 25 C / CFL / CA............................................................................................. 2-7
2.3.4 Attachment of 35 mm SLR Cameras to Front Cam er a Por t of Axiover t 35 / 35 M /
135 / 135 M............................................................................................................... 2-8
2.3.5 Attachment of 35 mm SLR Cameras with Objective f' = 63 mm to Camera Ports with
40 mm Clamping Diameter......................................................................................... 2-9
2.4 Determination of the Exposure Time Range for unblurred Photographs...................... 2-10
CHAPTER 3 OPERATION .............................................................................................................. 3-1
3 OPERATION................................................................................................................3-1
3.1 Adaptation and Functions........................................................................................... 3-2
3.2 Photomicrography with 35 mm SLR Cameras..............................................................3-3
3.2.1 Photography in a few Steps ........................................................................................ 3-3
3.2.2 Setting the Color Temperature to 3200 K and setting the Image Brightness.................3-4
3.2.3 Selecting the Film .......................................................................................................3-4
3.2.4 Exposure Correction depending on the Microscopy Technique..................................... 3-5
3.2.5 Setting and Focusing of Image Section........................................................................ 3-6
3.2.6 Exposure Functions..................................................................................................... 3-7
3.2.7 Trigger the Exposure................................................................................................. 3-10
3.2.8 Further Notes............................................................................................................3-11
3.2.8.1 Avoid Blurs...............................................................................................................3-11
3.2.8.2 Color Balance in Color Reversal Films.........................................................................3-11
3.2.8.3 Darkfield and Fluorescence Photography................................................................... 3-13
3.2.8.4 Computing the Magnification...................................................................................3-14
3.2.8.5 Further Filters............................................................................................................ 3-14
3.3 Using Digital Cameras............................................................................................... 3-15
0-4 B 40-046 e 03/99
Page 5

Photomicrography using INTRODUCTION
35 mm SLR cameras Contents Carl Zeiss
CHAPTER 4 MAINTENANCE, CARE, TROUBLESHOOTING AND SERVICE....................................4-1
4 Maintenance, Care, Troubleshooting and Service.........................................................4-2
4.1 Instrument Care..........................................................................................................4-2
4.2 Instrument Maintenance.............................................................................................4-3
4.2.1 Performing Checks......................................................................................................4-3
4.2.2 Changing the Batteries................................................................................................4-3
4.3 Troubleshooting..........................................................................................................4-3
4.4 Consumables and Tools...............................................................................................4-4
4.5 Requesting Service ...................................................................................................... 4-4
ANNEX ..................................................................................................................... A-1
List of Abbreviations................................................................................................... A-2
Physical and Technical Units........................................................................................ A-3
List of Key Words....................................................................................................... A-4
EC Declaration of Conformity .................................................................................... A-7
B 40-046 e 03/99 0-5
Page 6

INTRODUCTION Photomicrography using
Carl Zeiss Instrument safety 35 mm SLR cameras
Notes on Instrument Safety
The following warning and information symbols are used in this manual:
☞
The photomicrography units with 35 mm cameras, including the original accessories, may only be used
for the documentation applications described in this manual.
Particular attention must be paid to the following warning notes:
NOTE
This symbol is a warning which you must observe under all circumstances.
CAUTION
This symbol is a warning which indicates a hazard to the instrument or instrument system.
The manufacturer cannot assum e any liability for any ot her applications, poss ibly also involv ing
individual modules or single parts. This also applies to all service or repair work which is not
carried out by authorized service personnel. Furthermore, this forfeits all the claims against
warranty
Dust and dirt can impair the performance of the instrument. Therefor e, the instrument must be
protected against these influences as far as possible, and covered with the dust cover if it is not
used for longer periods of time. Always check whether the instrument is switched off before
you cover it.
The instruments must be operated by trained personnel only who must be aware of the
possible danger involved with microscopy and the relevant application.
Photomicrography units with 35 mm SLR cameras are precision instruments which can be
impaired in their performance or dam aged when handled improperly.
0-6 B 40-046 e 03/99
Page 7

Photomicrography using INTRODUCTION
35 mm SLR cameras Notes on warranty Carl Zeiss
Notes on Warranty:
The manufacturer guarantees that the instrument has no material and production defects when
delivered. You must inform us of any defects immediately and we must do anything to minimize the
damage. If the manufacturer is informed of such a defect, he is obliged to remove it; it is his decision
whether he does this by repairing the instrument or by deliver ing an instrument free of any defect. No
guarantee is provided for defects caused by natural wear ( w ear ing par t s in par t icular) and im pr oper use.
The instrument manufacturer is not liable for damage caused by faulty operation, negligence or any
other meddling with the instrument, part icularly the removal or replacement of instrument components,
or the use of accessories from other manufacturers. This forfeits all the claims against warranty.
With the exception of the work specified in this manual, no maintenance or repair of the
photomicrography units with 35 mm cameras m ay be per f or m ed. Repair s m ay only be performed by Carl
Zeiss service staff or specially authorized personnel. Should any defect occur with the instrument, please
get in touch with the Carl Zeiss microscopy service in Germany (see page 4-4) or your local Carl Zeiss
agency.
B 40-046 e 03/99 0-7
Page 8
INTRODUCTION Photomicrography using
Carl Zeiss Overall view 35 mm SLR cameras
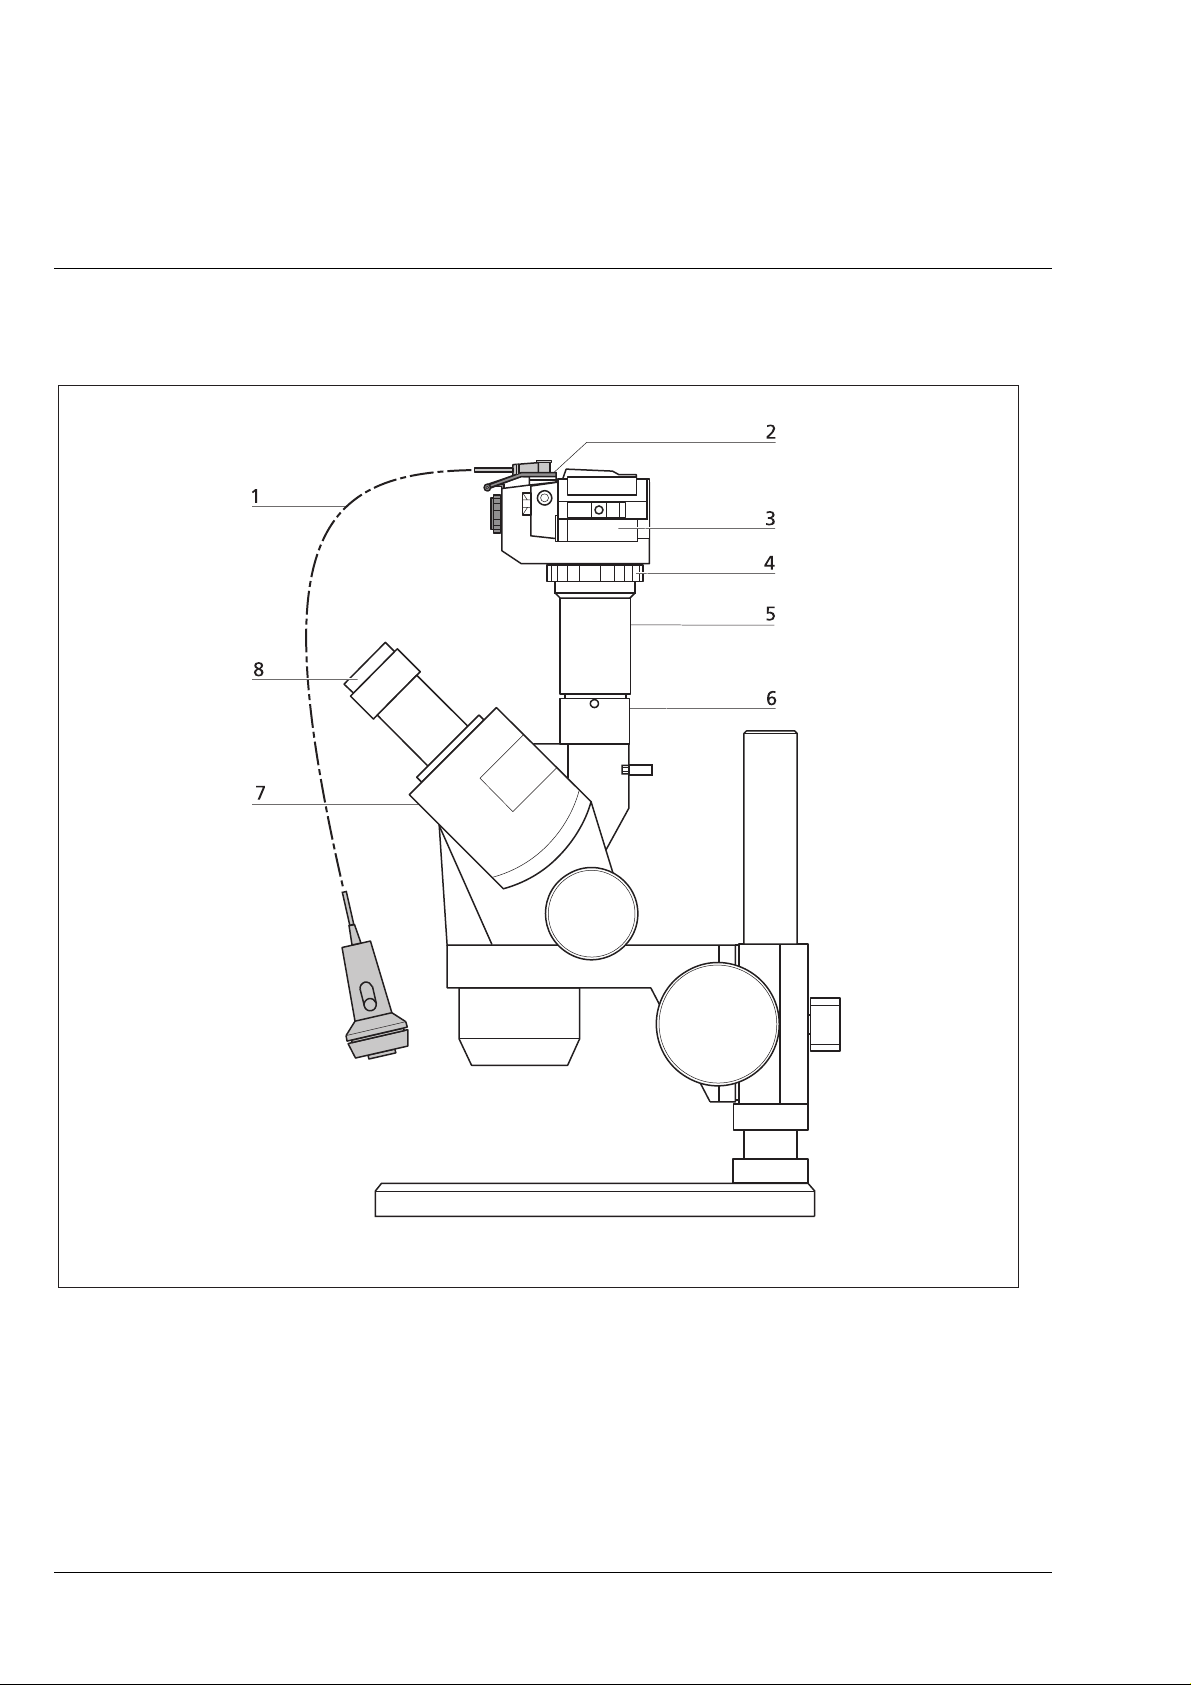
Overall View of 35 mm SLR Camera on 2.5×/T2 Adapter for SLR Cameras on 60 mm Camera Port
of the Stemi 2000-C Stereomicroscope in this Example
1 Cable release
2 Eyepiece cover
3 35 mm SLR camera
4 T2 adapter
5 2.5×/T2 adapter for SLR camera
6 60 mm camera port
7 Stemi 2000 C microscope body
8Eyepiece
0-8 B 40-046 e 03/99
Page 9
Photomicrography using INTRODUCTION
35 mm SLR cameras Overall view Carl Zeiss
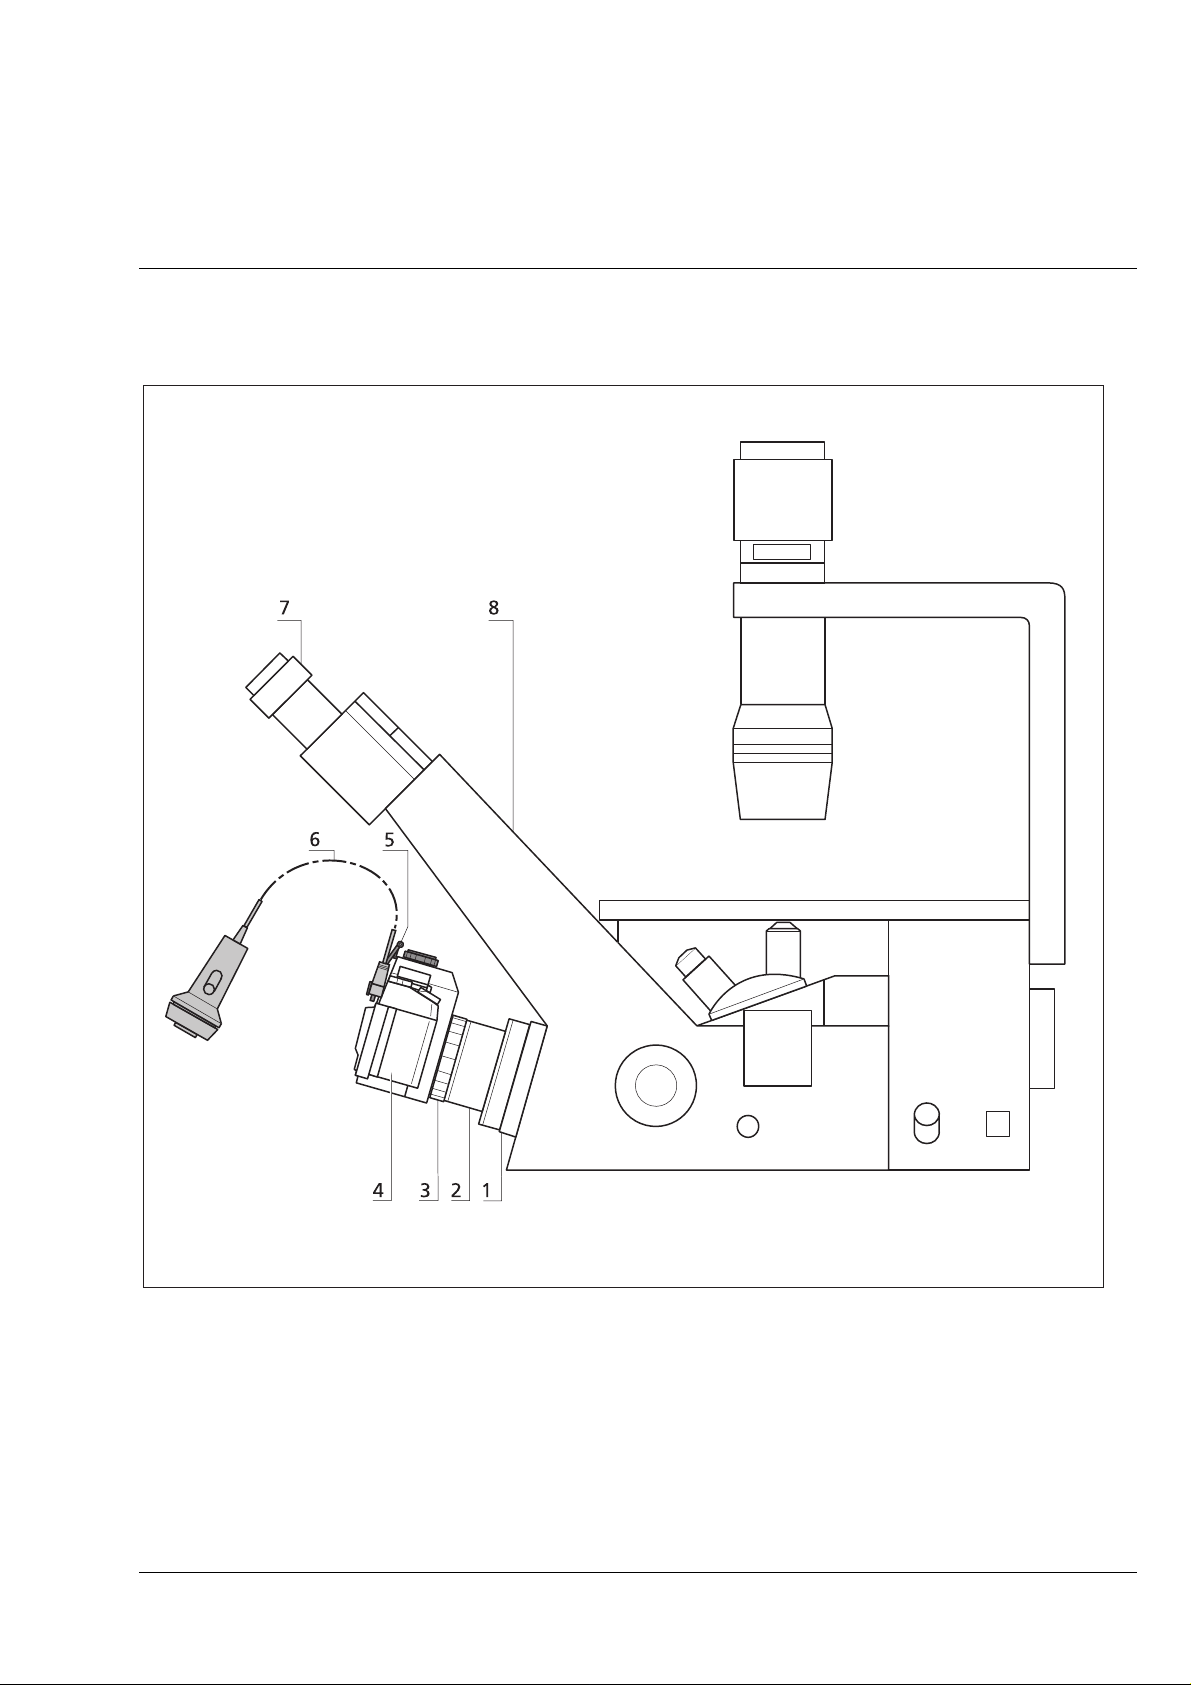
Overall View of 35 mm SLR Camera on 2.5× / T2 Adapter on Front Camera Port of the Axiovert
25 C
1 front camera port
22.5
3 T2 adapter
4 35 mm SLR camera
5 Eyepiece cover
6 Cable release
7Eyepiece
8 Axiovert 25 C
×
/ T2 camera adapter
B 40-046 e 03/99 0-9
Page 10
INTRODUCTION Photomicrography using
Carl Zeiss Overall view 35 mm SLR cameras
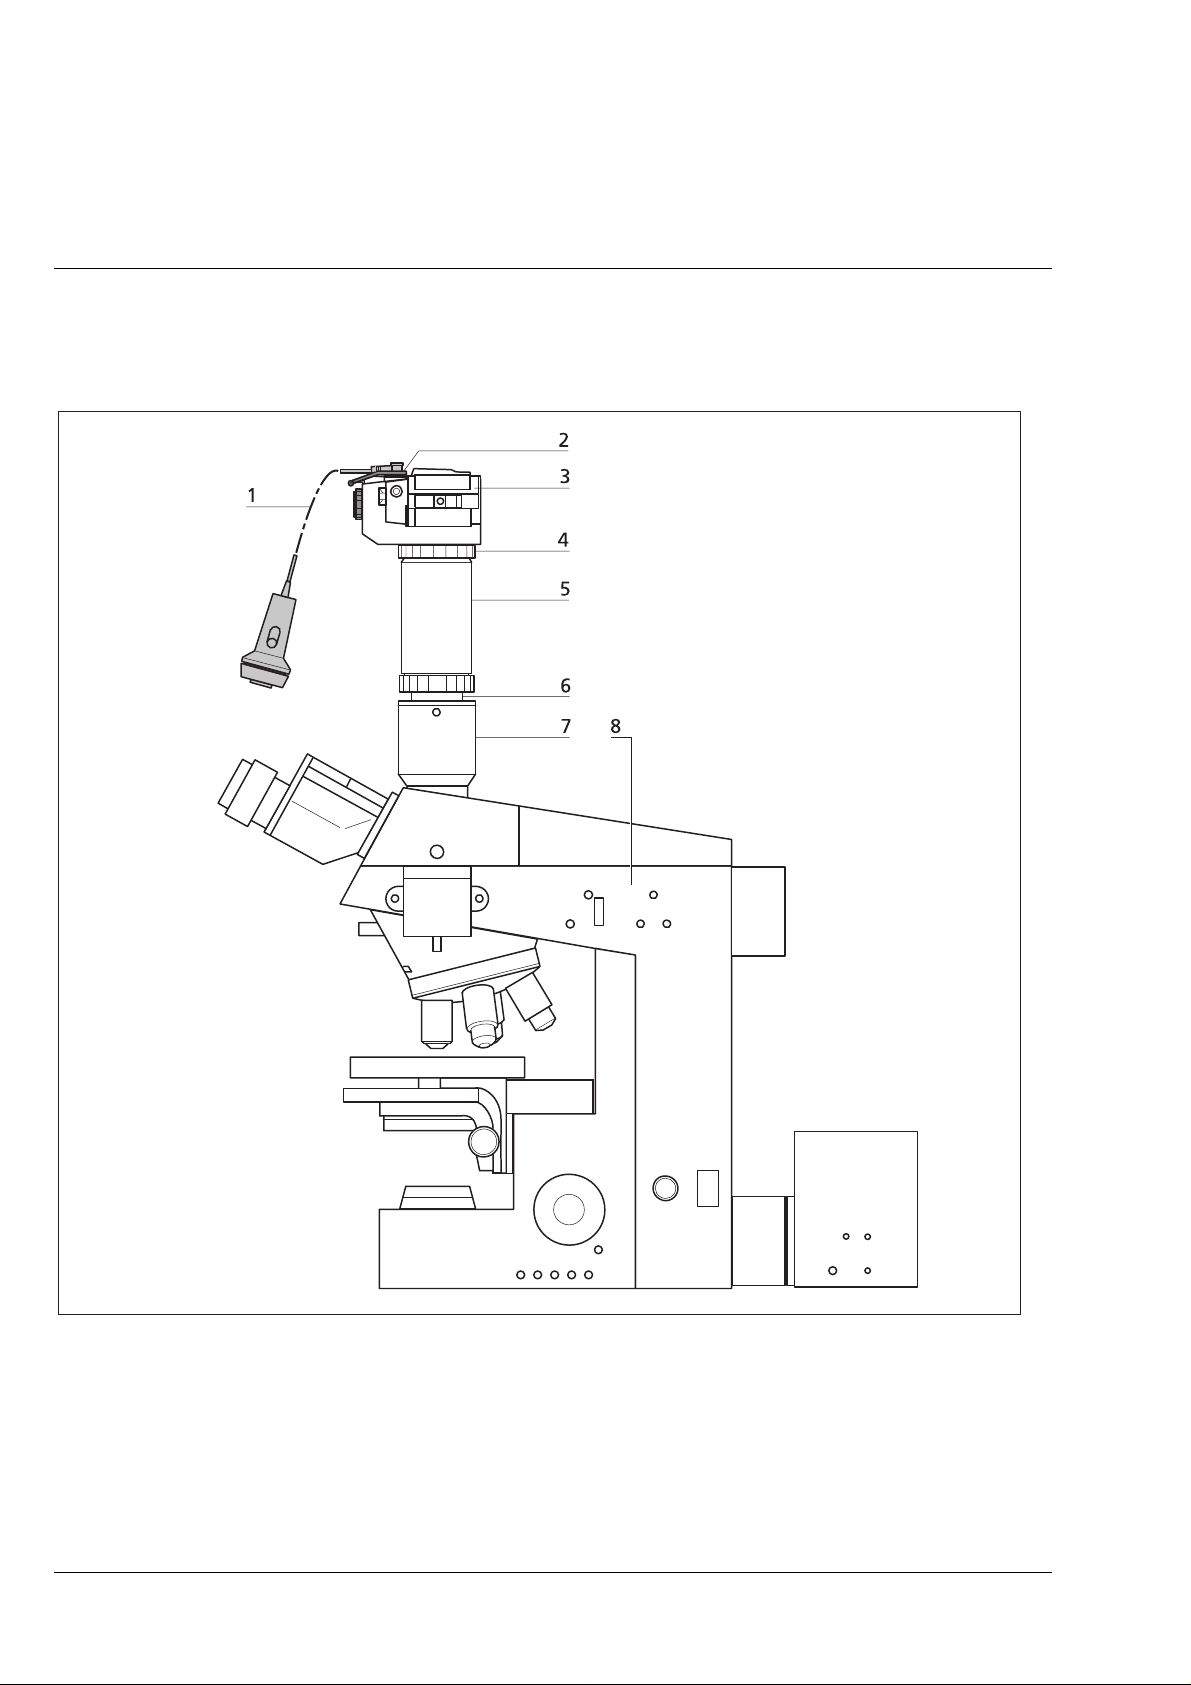
Overall View of 35 mm SLR Camera on 63 mm Objective and Adapter for Microscope Camera
(Image Position 44 mm) with 10× Camera Eyepiece on 44 mm Camera Port – i.e. on the
Axioskop with Phototube in this Example
1 Cable release
2 Eyepiece cover
3 35 mm SLR camera
4 T2 adapter
5 63 mm objective
6 Adapter for microscope camera (image position 44 mm) with 10× phototube
7 44 mm camera port
8Axioskop
0-10 B 40-046 e 03/99
Page 11

Photomicrography with INSTRUMENT DESCRIPTION
35 mm SLR cameras Contents Carl Zeiss
INSTRUMENT DESCRIPTION
Contents
1 INSTRUMENT DESCRIPTION..........................................................................................1-3
1.1 Name and Intended Application.......................................................................................1-3
1.2 Instrument Description and Main Features........................................................................1-3
1.3 35 mm SLR Camera Components.....................................................................................1-4
1.4 Overview of Image Positions (Tube Adapters ) , r e levant Phot ot ubes and
Microscope Stands...........................................................................................................1-7
1.5 Technical Data.................................................................................................................1-9
List of illustrations
Fig. 1-1 35 mm SLR camera components......................................................................................1-4
B 40-046 e 03/99 1-1
Page 12

INSTRUMENT DESCRIPTION Photomicrography with
Carl Zeiss 35 mm SLR cameras
1-2 B 40-046 e 03/99
Page 13

Photomicrography with INSTRUMENT DESCRIPTION
35 mm SLR cameras Instrument Description Carl Zeiss
1 INSTRUMENT DESCRIPTION
1.1 Name and Intended Application
The use of commercially available 35 mm SLR cameras on microscopes from Carl Zeiss is a low-price
alternative to photo documentation using the MC 80
and MC 200
DX
1.2 Instrument Description and Main Features
With the relevant adapters, commercially available 35 mm SLR cameras can be connected to all
microscopes from Carl Zeiss for image documentation in the 24 × 36 mm format.
These adapters feature the magnification factor 2.5×, i.e. the image section covered by the 35 mm
format corresponds to a 17.5 mm field diamet er in t he eyepiece int er m ediat e im age.
microscope cameras.
CHIP
The instrument-side connection surfaces of the adapters correspond to the camera ports of the
microscopes and phototubes from Carl Zeiss, while the T2 adapter is available on t he cam er a side.
The T2 adapter is standardized: M 42 × 0.75 thread
distance between T2 contact surface and film plane = 54.9 mm
SLR cameras are screwed on the T2 connector via the T2 adapter suit able for the relevant camera. The
T2 adapters are tailored to the flange focal distance (distance between lens contact surface and film
plane) and the lens connector (e.g. Contax or F bayonet) of the camera. This ensures that the film plane
of the SLR cameras always lies in the image plane of the microscope adapters.
Depending on the performance parameters, exposur e control is performed by the SLR camera through
TTL metering. Major importance has been attached to automatic exposure control, but manual metering
is also possible.
B 40-046 e 03/99 1-3
Page 14

INSTRUMENT DESCRIPTION Photomicrography with
Carl Zeiss Components 35 mm SLR cameras
1.3 35 mm SLR Camera Components
Fig. 1-1 35 mm SLR camera components
1-4 B 40-046 e 03/99
Page 15

Photomicrography with INSTRUMENT DESCRIPTION
35 mm SLR cameras Components Carl Zeiss
Key to Fig. 1:
1 35 mm SLR camera housing
2 T2 adapter
3 Objective f’ = 63 mm in T2 mount
42.5
52.5
62.5
8, 11 Photo eyepiece
9 Adapter for microscope camera (image position 60 mm)
10 Adapter for microscope camera (image position 44 mm)
12 Camera port clamping diameter 40 mm
13 Camera port image position 44 mm
14 Camera port image position 60 mm
16 Conta ct surface of Axiovert 25 C / CFL / CA front port
17 Camera connection to front port of Axiovert 35 / 35 M / 135 / 135 M
18 Monocular telescope
19 Photo reticle
×
/T2 adapter for SLR cameras
×
SLR adapter comp.
×
/ T2 camera adapters
B 40-046 e 03/99 1-5
Page 16

INSTRUMENT DESCRIPTION Photomicrography with
Carl Zeiss Components 35 mm SLR cameras
35 mm SLR camera components Cat. No. .
The following components for the attachment of 35 mm SLR cameras to microscopes from Carl
Zeiss have been offered and are continued to be offered::
1 35 mm SLR camera housing
Contax 167 MT including eyepiece cover 416181-0000-000
Contax Aria including eyepiece cover 000000-1057-127
Ricoh XR - X 3000 (mainly for use with Axiovert microscopes) 416116-0000-000
Praktica BX 20 35 mm SLR camera housing (mainly for use with Axiovert microscopes) 000000-0219-086
Cable release for Contax 167 MT and Contax Aria 416167-0000-000
2 T2 adapters for 35 mm SLR camera housings
T2 adapter for Contax (Contax bayonet) 416010-0000-000
T2 adapter for Olympus OM (OM bayonet) 416002-0000-000
T2 adapter for Minolta (SR bayonet) 416003-0000-000
T2 adapter for Canon (FD bayonet) 416004-0000-000
T2 adapter for Nikon (F bayonet) 416009-0000-000
T2 adapter for Pentax (KA bayonet) - also for Ricoh XR - X 3000 416011-0000-000
T2 adapter for Minolta Autofocus (Minolta Dynax) 416012-0000-000
T2 adapter for Canon Autofocus (Canon EOS) 416013-0000-000
T2 adapter for Praktica L (M 42 × 1 thread)
Adapter bayonet / M 42 × 1 thread
T2-Adapter for Praktica B bayonet, consisting of
T2-Adapter for Praktica L (M 42 × 1 thread) and
adapter bayonet / M 42 × 1 thread
263060-2505-124
000000-0225-954
T2 camera adapters:
4
Adapter for 2.5× SLR camera for T2
5
SLR adapter 2.5× comp. for Standard 20/25 with phototube 452902-0000-000
6
Camera adapter 2.5× / T2 for Axiovert 25 C / CFL / CA
7
3
Objective f’=63 mm in T2 mount with clamping ring d = 40 mm for microscopes with ICS optics
8
with photo eyepiece S-Pl 10× / 20 for
9
10
11
18
19
19
19
connection of microscope camera (image position 60 mm)
or
connection of microscope camera (image position 44 mm)
or with
wide-angle eyepiece Kpl 10× / 20 Br. for Standard, WL and IM inverted microscope on
camera port with clamping diameter 40 mm
Focusing aids:
Monocular telescope 3 × 12 B
Photo reticle MC 2.5× / d = 26 mm
Photo reticle MC 2.5× / d = 21 mm
Photo reticle MC 2.5× / d = 19 mm
456005-0000-000
456001-0000-000
451265-0000-000
456029-0000-000
444040-0000-000
456006-0000-000
452996-0000-000
464044-9902-000
522012-0000-000
454075-0000-000
454025-0000-000
476021-0000-000
1-6 B 40-046 e 03/99
Page 17

Photomicrography with INSTRUMENT DESCRIPTION
35 mm SLR cameras Technical Data Carl Zeiss
1.4 O verview of Image Positions (Tube Adapters), relevant Phototubes and Microscope
Stands
Image Position
Cat.No. of Phototube Microscope Stand
(Tube Adapter)
60 mm 452902-0000-000 KF 2, Standard 20 / 25
452929-0000-000 KF 2 ICS, Standard 25 ICS, Axiostar
452909-0000-000
Axiolab / Axiolab A / Axiolab Pol
452941-0000-000
452970-0000-000
452974-0000-000
450960-0000-000
450962-0000-000
450963-0000-000
450964-0000-000
455005-0000-000 Stemi DRC
455080-0000-000
Stemi SV 6 / SV 11 / SV 11 Apo
455081-0000-000
455082-0000-000
455053-0000-000
Stemi 2000-C / 2000-CS
455055-0000-000
452934-0000-000 Axiotech / Axiotech var io
451321-0000-000
Axiovert 100 / 135 / 135 M
451322-0000-000
451324-0000-000
451325-0000-000
452947-0000-000
Axioskop
452972-0000-000
452342-0000-000
Axioskop 2
452344-0000-000
452142-0000-000
Axioplan 2
452143-0000-000
452145-0000-000
452146-0000-000
453020-0000-000
B 40-046 e 03/99 1-7
Page 18

INSTRUMENT DESCRIPTION Photomicrography with
Carl Zeiss Technical Data 35 mm SLR cameras
Image Position
(Tube Adapter)
44 mm 452910-0000-000
Clamping diameter 40 mm 452903-0000-000 Standard 20 / 25
Special adapter Telaval 31 front port
T2 adapter Axiovert 35 / 35 M / 135 / 135 M front
Cat.No. of Phototube Microscope Stand
Axioskop / Axioskop 20
452911-0000-000
452912-0000-000
452914-0000-000
451722-0000-000 Axiovert 10 / 35 / 35 M
452920-0000-000
452921-0000-000
452923-0000-000
452925-0000-000
452926-0000-000
452930-0000-000
452931-0000-000
452932-0000-000
452146-0000-000 Axioplan2
451474-0000-000 Co-observation equipment
473024-0000-000 Universal, Photomicr oscope
475083-0000-000 Stemi SR / SV 8
475084-0000-000 Stemi DRC; old
Axioplan / Axiotron / Axiotron 2
Axiovert 25 C / CFL / CA front port
port
1-8 B 40-046 e 03/99
Page 19

Photomicrography with INSTRUMENT DESCRIPTION
35 mm SLR cameras Technical Data Carl Zeiss
1.5 Techni cal Data
Dimensions (outer diameter × depth / height)
35mm SLR camera housing Contax 167 MT....................................................approx. 150
35mm SLR camera housing Contax Aria..........................................................approx. 137
35mm SLR camera housing Ricoh XR - X 3000 ................................................approx. 151
35mm SLR camera housing Praktica BX 20......................................................approx. 138
T2 adapter............................................................................................................... approx. 60
Adapter bayonet / M 42
Adapter for SLR camera 2.5
SLR adapter 2.5
× comp. for Standard 20/25 ........................................................... approx. 44 × 166 mm
Camera adapter 2.5
× 1 thread............................................................................ approx. 60 × 2 mm
× for T2..........................................................................approx. 42 × 88 mm
× / T2 for Axiovert 25 C / CFL / CA............................. approx. 76 / 58 / 35 × 125 mm
Connection for microscope camera (image position 60 mm).....................................approx. 30
Connection for microscope camera (image position 44 mm).............................. approx. 60 / 40
Objective f’ = 63 mm in T2 mount with clamping ring for D = 40 mm.....................approx. 56
×
Photo eyepiece S-Pl 10
Wide-angle eyepiece Kpl 10
Monocular telescope 3
Photo reticle MC 2.5
/ 20.....................................................................................approx. 28 × 60 mm
×
/ 20 Br.........................................................................approx. 25 × 60 mm
× 12 B.................................................................................. approx. 28 × 62 mm
× .................................................................................. approx. 26 / 21 / 19 × 2 mm
× 94 × 52 mm
× 92 × 54 mm
× 95 × 62 mm
× 90 × 48 mm
× 15 mm
× 72 mm
× 56 mm
× 107 mm
Weights
35 mm SLR camera housing Contax 167 MT ............................................................................. 0.620 kg
35 mm SLR camera housing Contax Aria................................................................................... 0.460 kg
35 mm SLR camera housing Ricoh XR - X 3000 ......................................................................... 0.480 kg
35 mm SLR camera housing Praktica BX 20............................................................................... 0.625 kg
Adapter bayonet / M 42
× 1 thread........................................................................................... 0.020 kg
T2 adapter................................................................................................................................ 0.052 kg
for T2........................................................................................... 0.136 kg
Adapter for SLR camera 2.5
comp. for Standard 20/25 .............................................................................. 0.225 kg
SLR adapter 2.5
Camera adapter 2.5
×
/ T2 for Axiovert 25 C / CFL / CA.............................................................. 0.320 kg
×
×
Connection for microscope camera (image position 60 mm)...................................................... 0.106 kg
Connection for microscope camera (image position 44 mm)...................................................... 0.106 kg
Objective f’ = 63 mm in T2 mount with clamping ring for D = 40 mm........................................ 0.434 kg
/ 20...................................................................................................... 0.120 kg
Photo eyepiece S-Pl 10
Wide-angle eyepiece Kpl 10
Monocular telescope 3
Photo reticles MC 2.5
×
/ 20 Br.......................................................................................... 0.056 kg
×
12 B................................................................................................... 0.076 kg
×
×.............................................................................................................. 0.003 kg
B 40-046 e 03/99 1-9
Page 20

INSTRUMENT DESCRIPTION Photomicrography with
Carl Zeiss Technical Data 35 mm SLR cameras
Power supply for 35 mm SLR camera housing
Contax 167 MT................................................................................................... 4 batteries AAA / 1.5 V
Contax Aria............................................................................................................2 batteries CR 2 / 3 V
Ricoh XR - X 3000.............................................................................4 batteries AA / 1.5 V (LR 6 / LR 03)
Praktica BX 20................................................................1 battery KS 28 / 6V or 4 batteries LR 20 / 1.5 V
Ambient conditions
Storage and transport (in packaging)
Permissible ambient temperature ....................................................................................... -10 to +60 °C
Permissible relative humidit y ............................................................................. 20 % to 85 % at +35 °C
Atmospheric pressure............................................................................................. 800 hPa to 1060 hPa
Operation
Permissible ambient temperature...................................................................................... +10 to +45 °C
Permissible relative humidit y ............................................................................. 20 % to 85 % at +35 °C
Permissible altitude for operation........................................................................................ max. 2000 m
Atmospheric pressure............................................................................................. 800 hPa to 1060 hPa
Pollution degree ................................................................................................................................... 2
Operating data
Category of use ................................................................................................................. closed rooms
1-10 B 40-046 e 03/99
Page 21

Photomicrography with START-UP
35 mm SLR cameras Contents Carl Zeiss
START-UP
Contents
2 START-UP.......................................................................................................................2-2
2.1 Unpacking the Photomicrography Components................................................................2-2
2.2 Insertion of Photo Reticles MC 2.5
2.2.1 Assignment of Photo Reticles MC 2.5
2.2.2 Insertion of MC 2.5
× Photo Reticles in the Eyepiece..........................................................2-4
2.2.3 Focusing of Eyepieces through the Binocular Tube............................................................2-4
2.3 Attachment of 35 mm SLR Cameras ................................................................................2-5
2.3.1 Attachment of 35 mm SLR Cameras with SLR Adapte r 2. 5
2.3.2 Attachment of 35 mm SLR Cameras with Objective f ' = 63 mm to 60 mm and 40 mm
Camera Ports...................................................................................................................2-6
2.3.3 Attachment of 35 mm SLR Cameras with 2. 5
Axiovert 25 C / CFL / CA..................................................................................................2-7
2.3.4 Attachment of 35 mm SLR Cameras to Front Cam er a Por t of Axiover t 35 / 35 M /
135 / 135 M....................................................................................................................2-8
2.3.5 Attachment of 35 mm SLR Cameras with Objective f' = 63 mm to Camera Ports with
40 mm Clamping Diameter..............................................................................................2-9
2.4 Determination of the Exposure Time Range for Unblurred Photographs ..........................2-10
× ..................................................................................2-2
×.............................................................................2-2
× to the 60 mm Camera Port....2-5
× / T2 Adapter to Front Port of
List of illustrations
......................................................................................................2-2
Fig. 2-1 Photo reticle MC 2.5
Fig. 2-2 Attachment of phot o r eticle MC 2.5
Fig. 2-3 Attachment of 35 mm SLR cam er as w it h SLR adapte r 2. 5
×
in eyepiece............................................................2-4
×
to 60 mm camera port............2-5
×
Fig. 2-4 Attachment of 35 mm SLR cameras with objective f' = 63 mm to camera ports
44 mm and 60 mm..........................................................................................................2-6
/ T2 to front-port
Fig. 2-5 Attachment of 35 mm SLR cameras with camera adapter 2.5
×
of Axiovert 25 C / CFL / CA Axiovert 200..........................................................................2-7
Fig. 2-7 Attachment of 35 mm SLR cameras with objective f' = 63 mm to camera port with
40 mm clamping diameter...............................................................................................2-9
B 40-046 e 03/99 2-1
Page 22

START-UP Photomicrography with
Carl Zeiss Photomicrography com ponent s/ phot o r et icles 35 mm SLR cameras
2 START-UP
The components for photomicrography with 35 mm SLR came ras can be installed, converted and start ed
up by the customer himself.
However, if requested, it is also possible to have the photomicrography components installed or
converted by Carl Zeiss service staff against payment.
2.1 Unpacki ng the Photomi crography Components
The photomicrography components from Carl Zeiss are delivered in separa t e packaging.
• Remove all components from the packaging and use the delivery note to check for com plet eness.
• Properly dispose of original packaging, or keep it for storage or return of the instrument to the
manufacturer.
2.2 I nserti on of Photo Reti c l es MC 2. 5
×
2.2.1 Assignment of Photo Reticles MC 2.5×
• The photo reticle shows the boundaries of the
image section covered by the 35 mm SLR
camera (2-1/1).
• The double-line cross (2-1/2) in the center is
used for focus checking. It must be in focus
together with the object image.
photo
• The following table shows the MC 2.5
×
reticles and their assignment to the various
eyepieces.
Fig. 2-1 Photo reticle MC 2.5
×
2-2 B 40-046 e 03/99
Page 23

Photomicrography with START-UP
35 mm SLR cameras Photo reticles Carl Zeiss
Photo Reticles Cat. No. Eyepieces Cat. No.
MC 2.5× / d = 26 mm 454075-0000-000 PL 10× / 18 Br. foc.
E-PL 10
W 10
PL 10
W-PL 10
E-PL 10
PL 10
E-PL 10
×
/ 20 Br. foc.
× / 21 foc.
× /23 Br. foc.
×
/ 23 Br. foc.
×
/ 23 Br. foc.
×
/ 25 Br. foc.
×
/ 25 Br. foc.
MC 2.5× / d = 21 mm 454025-0000-000 Kpl 10× / 20 Br. foc.
E-PL 10
PL 16
W-PL 16
×
/ 20 Br. foc.
× /16 Br. foc.
×
/ 16 Br. foc.
444132-9901-000 *
444232-9902-000 *
455042-0000-000
000000-1026-548
455043-0000-000 *
455044-0000-000
000000-1016-758
444235-0000-000
444034-0000-000
444234-0000-000
464048-9902-000
444232-0000-000
444236-0000-000
444054-0000-000
455048-0000-000
MC 2.5
For insertion of the photo reticles please see page 2-4.
*
/ d = 19 mm 476021-0000-000 KF 10
×
W 25
× /10 foc.
/ 18 Br. foc.
×
Kpl 10
×
/ 18 Br. foc.
... and other
comp. eyepieces
455046-0000-000
464027-9901-000
464043-9902-000
B 40-046 e 03/99 2-3
Page 24

START-UP Photomicrography with
Carl Zeiss Photo reticles 35 mm SLR cameras
2.2.2 Insertion of MC 2.5
× Photo Reticles in the Eyepiece
A focusing eyepiece with photo reticle must be
used if focusing is not to be performed t hrough
the viewfinder of the SLR camera.
0
The MC 2.5
eyepieces 10
× photo reticles are inserted into the
× foc. of the relevant microscope.
The photo reticles (2-2/1) from Carl Zeiss have
been adhered to screw-in mounts (2-2/2) to allow
easy replacement.
To insert the photo reticles, just unscrew the
empty reticle mount and replace it with a new
mount (2-2/2) containing the required photo
reticle (2-2/1).
Fig. 2-2 Attachment of photo reticle MC 2.5
in eyepiece
×
The slight image shift caused by the additional
path through the glass is taken into account on
the diopter scale by the fact that the zero point
position is indicated not by the white dot W (2-
2/W) but by the red dot (2-2/R).
For focusing eyepieces without photo reticle ⇒ set diopter zero position to the white dot ( 2-2/W), and
for focusing eyepieces with photo reticle ⇒ set diopter zer o posit ion t o the red dot (2-2/R).
☞
If photo reticles are inserted into the unscrewed mount by the customer, attention must be
paid to the labeling being visible the right way up after inser t ion.
2.2.3 Focusing of Eyepieces through the Binocular Tube
• Insert the eyepiece with photo reticle in one side of the binocular phototube and align the photo
reticle with the microscope camera (microscope camera normally pointing to the observer).
• Use the eyepiece to focus on the line figure of the photo reticle.
• Use the focusing drive to focus on the microscope image of the specimen through t he eyepiece set as
described above.
• Then use the eyepiece without photo reticle to focus the microscope image for the second eye. The
position of the focusing drive on the microscope stand must not be changed.
2-4 B 40-046 e 03/99
Page 25

Photomicrography with START-UP
35 mm SLR cameras Attachment of 35 mm SLR cameras Carl Zeiss
2.3 Attachment of 35 mm SLR Cameras
The attachment of 35 mm SLR cameras to various camera ports is described in detail in the following and
can be performed by the users themselves.
2.3.1 Attachment of 35 mm SLR Cameras with SLR Adapter 2.5
• Remove dust cover or lens from the SLR camera
housing.
• Attach camera-specific T2 adapter (2-3/3) to
the relevant SLR camera housing (2-3/2).
• Remove dust cover from 2.5
SLR cameras (2-3/4) or SLR adapter 2.5
× / T2 adapter for
× comp.
(2-3/5).
• Screw thread of 2.5
cameras (2-3/4) or of SLR adapter 2.5
× / T2 adapter for SLR
× comp.
(2-3/5) in the T2 adapter (2-3/3) attached to the
SLR camera housing (2-3/2).
• Remove dust cover from phototube (2-3/6).
• Insert 2.5
or SLR adapter 2.5
× / T2 adapter for SLR cameras (2-3/4)
× comp. (2-3/5) with SLR
camera housing in the 60 mm camera port (23/6) until stop.
• Align unit in the required position and tighten
the three hexagonal screws (2-3/7) using the
supplied ball-headed screwdriver (2-3/8).
• Fix cable release (2-3/1), if required.
× to the 60 mm Camera Port
Fig. 2-3 Attachment of 35 mm SLR cameras
with SLR adapter 2.5
camera port
to 60 mm
×
B 40-046 e 03/99 2-5
Page 26

START-UP Photomicrography with
Carl Zeiss Attachment of 35 mm SLR cameras 35 mm SLR cameras
2.3.2 Attachment of 35 mm SLR Cameras with Objective f' = 63 mm to 60 mm and 40 mm
Camera Ports
• Remove dust cover or lens from the SLR camera
housing.
• Attach camera-specific T2 adapter (2-4/3) to
the relevant SLR camera housing (2-4/2).
• Remove dust covers from objective f' = 63 mm
(2-4/4).
• Insert thread of objective f' = 63 mm (2-4/4) in
the T2 adapter (2-4/3) attached to the SLR
camera housing (2-4/2).
• Remove dust cover from the 44 or 60 mm
camera port (2-4/8,11).
• Insert connector for microscope camera with
image position 44 mm (2-4/7) in the 44 mm
camera port (2-4/8), or the connector for
microscope camera with image position 60 mm
(2-4/10) in the 60 mm camera port (2-4/11).
• Tighten clamping screws (2-4/9,12) to the 44 or
60 mm camera ports using the supplied ballheaded screwdriver (2-4/13).
• Insert photo eyepiece S-Pl 10
× / 20 (2-4/6) in
the connectors for microscope cameras (24/7,10).
• Attach objective f' = 63 mm (2-4/4) with
camera housing to the connectors for
microscope cameras (2-4/7,10) containing the
photo eyepiece (2-4/6) until stop.
• Align objective f' = 63 mm (2-4/4) with SLR
camera housing in the required position and
Fig. 2-4 Attachment of 35 mm SLR cameras
with objective f' = 63mm to camera
ports 44 mm and 60mm
secure it by turning clamping ring (2-4/ 5) anticlockwise.
• Fix cable release (2-4/1), if required.
2-6 B 40-046 e 03/99
Page 27

Photomicrography with START-UP
35 mm SLR cameras Attachment of 35 mm SLR cameras Carl Zeiss
2.3.3 Attachment of 35 mm SLR Cameras with 2.5
× / T2 Adapter to Front Port of Axiovert
25 C / CFL / CA
• Remove dust cover or lens from the SLR camera housing.
• Attach camera-specific T2 adapter (2-5/3) to the relevant SLR camera housing (2-5/2).
• Remove dust covers from 2.5
• Screw thread of 2.5
× / T2 adapter for Axiovert (2-5/4) in the T2 adapter (2-5/3) attached to the SLR
× / T2 camera adapter for Axiovert 25 (2-5/4).
camera housing (2-5/2).
• Remove dust cover from the front camera port of the Axiovert 25 (2-5/6).
• Push 2.5
× / T2 camera adapter for Axiovert 25 (2-5/4) with SLR camer a housing in t he fr ont cam e r a
port of the Axiovert 25 (2-5/6) until stop.
• Align SLR camera horizontally and tighten clamping screws (2-5/7) using the ball-headed screwdriver
(2-5/10).
• Fix cable release (2-5/1), if required.
Fig. 2-5 Attachment of 35 mm SLR cameras with camera adapter 2.5× / T2 to front-port of Axiovert 25
C / CFL / CA
B 40-046 e 03/99 2-7
Page 28

START-UP Photomicrography with
Carl Zeiss Attachment of 35 mm SLR cameras 35 mm SLR cameras
2.3.4 Attachment of 35 mm SLR Cameras to Front Camera Port of Axiovert 35 / 35 M / 135
/ 135 M
The front camera port (2-6/5) of the Axiovert 35 / 35 M / 135 / 135 M is a T2 adapter with camera factor
× attached to the stand.
2.5
• Remove dust cover or lens from the SLR camera housing (2-6/2).
• Remove dust covers from the front camera ports (2-6/5) of the Axiovert 35 / 35 M/135 / 135 M.
• Screw camera-specific T2 adapter (2-6/3) to the camera port (2-6/5) of the Axiovert 35 / 35 M / 135 /
135 M.
• Attach the SLR camera housing (2-6/2) to the relevant T2 adapter (2-6/3).
• If required, align camera horizontally: loosen thr ee set screws (2-6/4) on the T2 adapter (2-6/3) using
watchmaker's screwdriver, align camera (2-6/2) horizontally, and tighten set screws (2-6/4) again
using the watchmaker's screwdriver.
• Attach cable release (2-5/1), if required.
If the T2 adapter for the Contax bayonet (2-6/7) has already been attached to the camera port in the
factory, only the Contax camera housing (2-6/6) must be attached to the camera port with Contax
bayonet (2-6/7) after removal of all the dust covers. In that case, the SLR camera is also aligned
horizontally.
Fig. 2-6 Attachment of 35 mm SLR cameras to front camera port of Axiovert 35 / 35 M / 135 / 135 M
2-8 B 40-046 e 03/99
Page 29

Photomicrography with START-UP
35 mm SLR cameras Attachment of 35 mm SLR cameras Carl Zeiss
2.3.5 Attachment of 35 mm SLR Cameras with Objective f' = 63 mm to Camera Ports with
40 mm Clamping Diameter
For photomicrography with 35 mm SLR cameras on Standard, WL and IM microscope stands with
phototubes (40 mm outer clamping diameter of cam er a por t )
• Remove dust cover or lens from the SLR camera
housing.
• Attach camera-specific T2 adapter (2-7/3) to
the relevant SLR camera housing (2-7/2).
• Remove dust covers from objective f' = 63 mm
(2-7/4).
• Screw thread of objective f' = 63 mm (2-7/4) in
the T2 adapter (2-7/3) attached to the SLR
camera housing (2-7/2).
• Remove dust cover from the camera port with
40 mm clamping diameter (2-7/7)
• Insert wide-angle eyepiece Kpl 10
× / 20 Br. (2-
7/6) in camera adapter (2-7/7).
• Attach objective f' = 63 mm (2-7/4) with SLR
camera housing to adapter (2-7/7) containing
the photo eyepiece (2-7/6) until stop.
• Align objective f' = 63 mm (2-7/4) with SLR
camera housing in the required position and
secure it by turning clamping ring (2-7/ 5) anticlockwise.
• Attach cable release (2-3/1), if required.
Fig. 2-7 Attachment of 35 mm SLR cameras
with objective f' = 63mm to camera
port with 40mm clamping diameter
B 40-046 e 03/99 2-9
Page 30

START-UP Photomicrography with
Carl Zeiss Attachment of 35 mm SLR cameras 35 mm SLR cameras
2.4 Determi nati on of the Exposure Ti me Range for Unbl urred Photographs
The limits of the exposure time range for unblurred phot ogr aphs depend on t he used SLR cam er a, t he
microscope adaptation, the microscope magnification and the microscope stand to w hich t he came r a is
attached.
These limits for unblurred photographs can be deter m ined as f ollow s :
• Place a suitable object on the stage (high-contrast specimen featuring large and small object details,
testing grid or stage micrometer).
• Swing in 10
× objective.
• Focus on the object.
• Set brightfield illuminator according to KÖHLER.
• Make an exposure series:
trigger one photograph each with the exposure times 1/250s - 1/125s - 1/60s - 1/30s - 1/15s - 1/8s 1/4s - 1/2s and 1s in the "Automatic" mode.
The different exposure times must be set by adjusting the lam p volt age and, if required, by insertion
of neutral density filters int o t he illum inat ion beam path.
• Make a second exposure series using the 40
× objective.
• Evaluate the photographs after the film has been developed:
The photographs featuring high contrast and clearly defined object details ar e blur less.
The exposure time of the first photograph featuring high contrast and clearly defined object details is
the border exposure time of the exposure time range for unblur r e d phot ogr aphs.
All the photographs with exposure times ≥ the border exposur e t ime are unblurred.
2-10 B 40-046 e 03/99
Page 31

Photomicrography with OPERATION
35 mm SLR cameras Contents Carl Zeiss
OPERATION
Contents
3 OPERATION ...................................................................................................................3-2
3.1 Adaptation and Functions................................................................................................3-2
3.2 Photomicrography with 35 mm SLR Cameras ...................................................................3-3
3.2.1 Photography in a Few Steps.............................................................................................3-3
3.2.2 Setting the Color Temperature to 3200 K and Setting the Image Brightness......................3-4
3.2.3 Selecting the Film ............................................................................................................3-4
3.2.4 Exposure Correction Depending on the Microscopy Technique..........................................3-5
3.2.5 Setting and Focusing of Image Section.............................................................................3-6
3.2.6 Exposure Functions..........................................................................................................3-7
3.2.7 Trigger the Exposure......................................................................................................3-10
3.2.8 Further Notes ................................................................................................................3-11
3.2.8.1 Avoid Blurs....................................................................................................................3-11
3.2.8.2 Color Balance in Color Reversal Films..............................................................................3-11
3.2.8.3 Darkfield and Fluorescence Photography ........................................................................3-13
3.2.8.4 Computing the Magnification........................................................................................3-14
3.2.8.5 Further Filters ................................................................................................................3-14
3.3 Using Digital Cameras ....................................................................................................3-15
List of illustrations
Fig. 3-1 Use of bulk film...............................................................................................................3-5
Fig. 3-2 Measur ing r ange of 35 m m SLR cam er a, ISO 100 / 21°, camera lens f / 1.4
with apertures k = 1.4 - 16..............................................................................................3-8
Fig. 3-3 Measuring range of 35 mm SLR camera with T2-Adapter, ISO 100 / 21°...........................3-9
B 40-046 e 03/99 3-1
Page 32

OPERATION Photomicrogr aphy w it h
Carl Zeiss Adaptation and functions 35 mm SLR cameras
3 OPERATION
3.1 Adaptati on and Functi ons
The adaptation components for 35 mm SLR cameras for photomicrography are simple screwing and
clamping adapters which are described in chapter 2, Start-up.
The functions important for photomicrography w ith 35 mm SLR cameras (e.g. exposure pr ograms, film
insertion) are described in the operating instructions of the r elevant SLR cam er a.
The T2 adapters suitable for the used 35 mm SLR cameras are attached and removed in the same way as
camera lenses. This is also described in the relevant camera instructions.
Further information on the use of 35 mm SLR cameras for photomicr ography are given in section 3.2,
photomicrography with SLR cameras.
The following section will not deal with the se tting of microscopes for photomicr ography. The neces sary
steps are described in the relevant operating manuals of the microscopes from Carl Zeiss.
3-2 B 40-046 e 03/99
Page 33

Photomicrography with OPERATION
35 mm SLR cameras Photography in a few steps Carl Zeiss
3.2 Photomi crography with 35 mm SLR Cameras
3.2.1 Photography in a Few Steps
• Carefully set the microscope for observation. If possible, select beam path for simultaneous
observation and photography (see the relevant operating manual of t he m icroscope) .
• Select and implement illumination technique, objective magnification and condenser setting of the
microscope in the usual way (also see the relevant operating instructions of t he m icroscope).
• For photography, set the micr os c ope illum inat or t o t he c olor t e m per at ure 3200 K.
also see section 3.2.2, setting of color temperatur e and im age br ight ness.
☞
• Insert 135 film (35 mm) in 35 mm SLR cam era
☞
• Set exposure correction for illumination technique.
also see section 3.2.3, selecting a film.
also see section 3.2.4, exposure correction depending on microscopy technique.
☞
• If a suitable data back is used with the 35 mm SLR camera: enter the data.
☞
• Carefully adjust and focus the image frame.
☞
• Set the illumination mode.
☞
• Trigger the exposure
☞
• After the exposure, the film is automatically advanced by one frame; when old cameras without
motorized film advance are used, the film advance lever must be activated.
also see the operating instructions of the used data back.
also see section 3.2.5, adjusting and focusing of image frame.
also see section 3.2.6, correct exposure functions.
also see section 3.2.7, trigger exposures.
• The next exposure can be triggered.
B 40-046 e 03/99 3-3
Page 34

Carl Zeiss Selection of color temperature/film 35 mm SLR cameras
3.2.2 Setting the Color Temperature to 3200 K and Setting the Image Brightness
When using color reversal films for artificial light (3200 K), it is recommended to set the illuminator to
OPERATION Photomicrogr aphy w it h
the color temperature 3200 K (approx. maximum lamp voltage in the case of halogen lamps). Image
brightness is very high. In brightfield and with high film speeds in part icular, the r esulting exposure tim es
are very short, and are therefore beyond the range permitting unblurred exposures. The image
brightness must be attenuated by using color-neutral gr ay f ilt er s.
also see section 3.2.8,1, avoiding blur.
☞
3.2.3 Selecting the Film
In photomicrography, reversal film s (slide f ilms) are used for color exposur es. In general, r eversal f ilms for
artificial light (3200 K) are recommended. If daylight film is used, a conversion filter 3200 - 5500 K is
required.
Conversion filter 3200 - 5500 K
Films labeled Professional feature closer tolerances for speed and color balance, i.e. exposure and color
d = 32 mm
467847-0000-000
d = 25 mm
447825-000-000
d = 18 mm
467854-0000-000
are more homogenous.
DX-coded films should always be used in their original cartridge.
Use of bulk film;
We would not recommend the use of bulk film because light leak and scratches or dirt on the film may
lead to complications or problems with film advance if the cartridges are damaged.
If you want to use bulk film nevertheless, please note the follow ing:
Only use film cartridges conforming to DIN 4335 or ISO 1007-1977. Ensure that the maximum
☞
dimensions given in these standards are not exceeded.
Film cartridges are not suitable for continuous operation! They must be scrapped after approx.
10 refills.
3-4 B 40-046 e 03/99
Page 35

Photomicrography with OPERATION
35 mm SLR cameras Image section/Exposure functions Carl Zeiss
The film cuts must always be performed as
7 ... 9 P
stipulated in DIN 4536 or ISO 1977 (also see Fig.
3-1).
23
+0
-5
mm
• The film should be cut so that none of the
perforation holes are cut open.
• The film cut must be 7...9 perforation holes
long and it must be parallel to the film edge.
• The edges should be rounded to ensure that
the film does not get caught at the mouth of
the cartridge or at parts of the cassette.
Fig. 3-1 Use of bulk film
• The end of the film must be cut with a straight
edge and adhered to the film spool with a
piece of adhesive tape.
• Avoid overly long film, as some cartridges
cannot be used for 36 frames or for every film.
This could damage the film advance
mechanism in the film cassette.
3.2.4 Exposure Correction Depending on the Microscopy Technique
Exposure corrections may be required, depending on which microscopy t echnique is used. The following
values are standard in photomicrography:
Extension
factor
Factor 4
Factor 2
Factor 1
Factor 0.5
Factor 0.25
×
×
×
×
×
Microscopy technique
Brightfield
- Few or very small dark structures on a very bright background
Brightfield
- Dark structures on a bright background
Phase or interference contrast
Darkfield / Fluorescence
- Many bright structures on a dark background
Darkfield / Fluorescence
- Bright structures on a dark background
Correction
value
+2
+1
0
-1
-2
B 40-046 e 03/99 3-5
Page 36

Carl Zeiss Selection of color temperature/film 35 mm SLR cameras
Example 1:
The correction value +1 means that one exposure value (+ 1 EV) is added to the exposure time in
brightfield recommended by the automatic exposure control for zero setting (i.e. twice the exposure
time: negatives will be denser, slides and Polar oid phot os br ighter).
The correction value -2 means that two exposure values (-2 EV) are subtracted from the exposure time
for darkfield / fluorescence recommended by the automatic exposure control for zero setting (i.e.
exposure time is reduced by one quarter : negatives will be brighter, slides and Polaroid photos denser).
Most 35 mm SLR cameras feature an exposure correction ring which allows the exposure time to be
corrected in steps of 1/3 EV within a range between +2 EV and -2 EV
Furthermore, some SLR cameras permit exposure bracketing to be made. When the exposure has been
triggered, three photos are taken with different correction values - the correction value is automatically
changed by -1 EV from exposure to exposure.
OPERATION Photomicrogr aphy w it h
Example 2:
The exposure correction ring has been set to +1. The first photo is exposed with +1 EV, the second with
±0 EV and the third with -1 EV.
For the setting of exposure correction and exposure bracketing please see the operating
☞
3.2.5 Setting and Focusing of Image Section
− Via binocular tube;
the section of the microscope object set in accordance with the photo ret icle is imaged on t he f ilm in
focus when the focusing cross and the specimen are clearly defined simultaneously. To achieve
correct focusing even with low objective magnifications, it is recommended to use the 3x12 B
monocular, focused to infinity, as an adjusting aid (monocular at t a ched t o eyepiece w ith phot o
reticle).
☞
− Via the usual focusing screen in the viewfinder of the SLR camera;
the image section on the focusing screen is slightly smaller than the image section on the film.
Therefore, all the image details visible on the focusing screen are also visible on the film.
The set image section is sharply imaged on the film if the structures of the microprism collar with split
image indicator and the image of the microscope object in the matte area or microprism collar are in
focus at the same time.
instructions of the used 35 mm SLR camera!
Insert photo reticle as described in section 2.1.2.1 and focus eyepieces in binocular t ube in
accordance with 2.1.2.2.
Fine object structures and details may be lost because of the granularit y of t he m at t e ar ea and
☞
3-6 B 40-046 e 03/99
the microprism collar.
Object details which can st ill be w e ll r e c ogniz ed s hould therefore be selected for f o c us ing.
Page 37

Photomicrography with OPERATION
35 mm SLR cameras Image section/Exposure functions Carl Zeiss
If the structures of microprism ring and split image indicator are not seen in focus, attach the
☞
special eyepiece for eyeglass wearers to the viewfinder.
− Fine object structures and details can be focused in accordance with the image in the clear glass areas
of the split image indicator.
However, this requires some practice because photomicrographic cameras have different pupil
positions and sizes than standard camera lenses. Therefore, the clear glass areas of the split image
indicator in the center of the focusing screen are dark when you look into the center of the
viewfinder.
We would therefore recommend you not to look into the center of the viewfinder: depending on the
position of the split image edge, move your eye upwards / downwards or obliquely upwards /
obliquely downwards. An image will then be seen in one field of the split image indicator, w hile the
other field remains dark.
The fine object structures and details can then be focused in the field of the split image indicator w ith
the visible image.
Focusing screens with matte area and central clear glass spot with reticle are ideal for the
☞
3.2.6 Exposure Functions
35 mm SLR cameras with TTL (Through The Lens) metering
These 35 mm SLR cameras permit the following metering modes: center-weighted averaging, spot
setting and focusing of the image section.
Some camera manufacturers offer such a changeable screen.
metering and multiple-area metering. Each of these metering modes permits selection between different
exposure modes, e.g.
− Automatic exposure control:
the camera automatically selects the optimum combination of exposure time and aperture value
− Automatic exposure mode with pr eselected shutter speed:
the camera automatically selects the aperture value for a desired shutter speed depending on the image
brightness.
− Automatic exposure mode with preselected aperture:
the camera automatically selects the shutter speed for the desired aperture value depending on the
image brightness.
− Exposure after manual exposure alignment with preselected aperture:
depending on the image brightness, the shutter speed is matched for a desired aper ture by turning t he
shutter speed knob until zero alignment of an indicator ( e . g. pointer on indicator).
− Exposure after manually set exposure time and B/T function.
The measuring range of 35 mm SLR cameras is determined by the r anges of exposur e values (EV),
shutter speed and film sensitivity in combination with the aperture range of the camera lens.
B 40-046 e 03/99 3-7
Page 38

Carl Zeiss Exposure functions 35 mm SLR cameras
OPERATION Photomicrogr aphy w it h
Fig. 3-2 Measuring range of 35 mm SLR camera, ISO 100 / 21°, camera lens f / 1.4 with apertures
k = 1.4 - 16
Example 3:
The camera in Fig. 3-2 measures shutter speeds between T
(here = 16s) and T
max
(here = 1/4000 s) for
min
Iso 100 /21° films and apertures between 4 and 16.
The shortest shutter speed T
of 1/4000 s is also measured with apertures 2.8 - 2 - 1.4, while the
min
longest shutter speed for aperture 2.8 is 8s, 4s f or aper t ur e 2 and only 2 s f or aper t ure 1. 4.
35 mm SLR cameras for photomicrography
Center-weighted averaging, spot metering and mult iple ar ea m et e r ing can also be used for
photomicrography with 35 mm SLR cameras. For phot om icr ogr aphy with 35 mm SLR cameras, T2
adapters are attached to the camera housings with TTL m et er ing instead of t he cam er a lens. Aperture
functions are not transmitted, the camera housing has been inf orm e d t hat t he aper t ur e is f ully open.
3-8 B 40-046 e 03/99
Page 39

Photomicrography with OPERATION
35 mm SLR cameras Exposure functions Carl Zeiss
Therefore, only the following exposure modes are possible:
− Automatic exposure control with open aperture (automatic control with preselected aperture);
depending on the image brightness, the camera automatically selects the shutter speed for the open
aperture, i.e. aperture 1.2 or 1.4
− Exposure after manual exposure time alignment with preselected open aperture;
depending on the image brightness, the shutter speed is matched for the open aperture, i.e. aperture
1.2 or 1.4, by turning the shutter speed knob until zero alignment of an indicator (e.g. pointer on
indicator).
− Exposure after m anually set exposur e t ime and B f unct ion.
The measuring range of cameras with T2 adapter is determined by the ranges of exposure values (EV),
shutter speeds, film sensititvity and by the open apert ur e 1. 2 or 1.4.
Fig. 3-3 Measuring range of 35 mm SLR camera with T2-Adapter, ISO 100 / 21°
B 40-046 e 03/99 3-9
Page 40

Carl Zeiss Exposure functions 35 mm SLR cameras
Example 4:
OPERATION Photomicrogr aphy w it h
The longest shutter speed measured with cameras with T2 adapte r ( Fig. 3-3) for ISO 100/21° and the
open aperture 1.4 is T
= 2s, and the shortest shutter speed T
max
The shortest shutter speed T
of 1/4000 s is measured with film speeds ranging f r om ISO 25 / 15° to ISO
min
= 1/4000 s.
min
3200 /36°; the longest shutter speed of 16s is only measured at ISO 12 / 12°; t he longest shut t er speed
with ISO 3200 / 36° is only 1/15s.
According to section 3.2.8.1, no blurring occurs with shut t er speeds ≥ 1/ 15s.
Therefore, the working ranges for cameras with T2 adapter (Fig. 3-3) are as follows:
− shutter speeds 1/15 s...16 s for ISO 12/12°,
− shutter speeds 1/15 s...2 s for ISO 100/21°,
− shutter speed 1/15 s for ISO 3200/36°.
Any kind of stray light entering the viewfinder of the camera falsifies the measuring result of
☞
the exposure time to be controlled. Therefore, you should w ork in a darkened room and, after
reading or aligning the exposure time in the viewfinder, you should always cover t he view f inder
with the eyepiece cover for SLR before the automatic exposure is triggered.
For the setting of the various measuring techniques and exposure modes, and f or t he display of
☞
3.2.7 Trigger the Exposure
Triggering the exposure by pressing the release button of the SLR camera with your index finger exerts
exposure times, please see the operating manual of the used 35 mm SLR camer a .
lateral pressure on the camera structure. This can result in blurred micrographs.
Therefore, the exposure should always be triggered with the cable release attached to the SLR camera.
There should be no strain between the cable release and the SLR camera.
If available, the selftimer function of the SLR camera can also be used to trigger the exposure. The
vibration of the camera structure caused by the short pr essing of t he r elease but t on is no longer effective
until the exposure is triggered after the exposure delay (usually 8 . . . 10 s).
3-10 B 40-046 e 03/99
Page 41

Photomicrography with OPERATION
35 mm SLR cameras Blurs/Color balance Carl Zeiss
3.2.8 Further Notes
3.2.8.1 Avoid Blurs
Mirror and shutter functions of the SLR camera can cause vibr ation of the photomicrography structur e
resulting in blurred micrographs. The image will be dull, the object structures washed out. This is
normally the case with shutter speeds ≤ 1/30 s, and the effect becomes more pronounced with
increasing magnifications. The expected exposure time for the exposure to be taken must lie within that
shutter speed range in which blurs no longer occur - in this case ≥ 1/15 s. If r equired, the brightness of
the light in the illumination beam path must be att e nuat ed us ing c olor - neut ral gray filters.
The following gray and neutral-density filters are available for t his purpose:
Filter
gray filter 0.50 (50 % transmission) 467840-0000-000
gray filter 0.12 (12 % transmission) 467841-0000-000
gray filter 0.03 (3 % transmission)
neutral-density filters 0.25 (25 %
d = 32 mm
467842-0000-000
transmission)
neutral-density filters 0.06 (6 %
transmission)
The exposure time for the exposure to be taken can be read off the outside of the camera
☞
housing (display or shutter speed setting knob) or from t he viewfinder display. The viewfinder
must be occluded with the eyepiece cover for SLR after the exposure time has been read or
aligned in the viewfinder.
It is recommended to determine the shutter speed range for blur-free exposures of the relevant
☞
3.2.8.2 Color Balance in Color Reversal Fil ms
camera structure before setting up the instrument (see section 2.5).
d = 25 mm
d = 18 mm
447836-0000-000 467856-0000-000
447835-0000-000 467855-0000-000
The color balance of a color reversal film of the same type can differ from batch to batch. Such
deviations can be compensated for by using commercial color - c om pensat ing (CC) filters.
The filter density is designated by a two-digit number and t he color by it s f irst let t e r .
Example 5:
05 - B (blue), 10 - G (green), 20 - R (red): correction of the color balance in color reversal films.
B 40-046 e 03/99 3-11
Page 42

Carl Zeiss Color balance 35 mm SLR cameras
Assessing the Color Balance
OPERATION Photomicrogr aphy w it h
• Make test exposures of a specimen area with as much empty background as possible in transmitted-
light brightfield.
• View slides on a standard light box, the light source of which has the correct illuminance and the
spectral energy distribution of 5500 K.
• The empty background in an exposure series should range from dark gray to middle gray, light gray
and white
Determine the Correction Filter
• Place filter of complementary color of the color distortion on the slide to be corrected.
Color distortion
Blue
Green
Red
Yellow
Magenta
Bluish green
If, for example a filter of density 10 does not display the required color balance on viewing, you should
Color of the CC filter
Yellow Y
Magenta M
Bluish green (Cyan) C
Blue B
Green G
Red R
use a CC filter of half the density for the f ollowing exposure (i.e. 05 in this example). Filter s of density
CC - 05 to CC 10 are usually sufficient for correction.
Perfectly corrected color exposures require the microscope setting, the development process
☞
and the film batches to remain unchanged.
3-12 B 40-046 e 03/99
Page 43

Photomicrography with OPERATION
35 mm SLR cameras Darkfield and fluorescence photography Carl Zeiss
3.2.8.3 Darkfield and Fluorescence Photography
Compared to standard photomicrography, the following special conditions apply to darkfield and
fluorescence photography:
− The low brightness level frequently encountered calls for long exposure times. In the case of low
brightness, switch the beam splitter on the phot ot ube t o "100% of light t o cam er a por t ".
− Fluorescence light is neither daylight nor artificial light, but is generated inside the specimen itself.
Normally, daylight film renders bet t e r f luor escence m icrographs than indoor film.
− Do not be afraid to use fast films. Granularity is har dly ever a pr oblem in f luorescence m icrogr aphs.
− The dark or black background often accounts for a substantial part of the area used for automatic
exposure metering. Estimate the ratio of bright and dark areas, and correct the exposure time
accordingly.
− Because of the high contrast, the exposure latitude is rather high, since luminous structures are
always well set off against a dark background, even if different exposure times are used.
However, if an exact rendition of fluorescence colors is required, it is recommended to make a series
of exposures with different exposure times.
− Some fluorescence dyes will bleach out quickly , espec ially under highly intense, high-energy ex citat ion
light. To protect the specimen, use the aperture diaphragm to use the excitation intensity at least
temporarily.
Weak fluorescence is easier to discern in a dark room.
☞
B 40-046 e 03/99 3-13
Page 44

Carl Zeiss Color balance 35 mm SLR cameras
OPERATION Photomicrogr aphy w it h
3.2.8.4 Computing the Magnification
− SLR connections, 2.5× / T2 adapters:
The magnification of the image on the 35 mm film M
is the product of objective magnification M
film
obj
and the factor of the T2 adapter 2.5×.
− Objective f' = 63 mm with photo eyepieces M
The magnification of the image on the 35 mm film M
M
obj
M
= M
film
× 2.5
obj
, = 10×:
eyep.
is calculated from the objective magnification
film
,, the focal length of objective fOb’ = 63 mm and the reference distance of vision l = 250 mm
= M
× 2.5
obj
M
M
=
film
l
obj
× M
eyep.
× fOb’
M
M
=
Film
250 mm
× 10 × 63 mm
obj
M
film
− If an intermediate imaging system is also used, e.g. an Optovar or zoom system, the factor of the M
intermediate imaging optics also plays a part in the magnification:
3.2.8.5 Further Filters
M
film
= M
× MZ × 2.5
obj
Z
In addition to the conversion, gray and neutral-density filters listed on page 3- 11, the f ollowing f ilters ar e
also available for photomicrography:
Filter
Conversion filter CB 6
Conversion filter CB 3
Interference green filter
d = 32 mm
467851-0000-000
467852-0000-000
467803-0000-000 447805-9901-000
d = 25 mm
3-14 B 40-046 e 03/99
Page 45

Photomicrography with OPERATION
35 mm SLR cameras Use of digital cameras Carl Zeiss
3.3 Usi ng Di gi tal Cameras
Some digital cameras have the same or a similar housing as standard 35 mm SLR cam eras. The film gate
of these cameras contains an area sensor or a scan sensor array instead of the film, and the T2 adapters
suitable for the relevant camera can be attached to t he objective m ount .
These digital cameras can therefore be attached to microscopes from Carl Zeiss, as described in sections
2.3.1 through 2.3.5. However, the following must be taken into consideration:
− Cameras with scan sensor array, e.g. Praktica Color Scan, Leica S1.
During the exposure, a RGB sensor array, which is approx. 36 mm long, scans t he im age line by line
by moving beyond the 24 mm image height.
The content of the scanned image is approximately identical to that on 35 mm film.
The time for the exposure (scanning time for one image) depends on t he im age br ightness and the
required resolution, e.g. 180 - 2400 s for full re solut ion. The motion of the sensor array can cause
vibrations resulting in blurred photos.
− Cameras with area sensor, e.g. Kodak EOS DCS 1 (Canon EOS 1 camera housing),
Kodak DCS 460 (Nikon N90s camera housing)
The outer dimensions of the sensor chip, i.e. 18.4 mm x 27. 6 m m , determine the image contents of
the digital photo. Here, the image contents totals approx. ¾ of the photo on 35 mm f ilm .
Exposure is made via the shutter of the camera.
In the case of short exposure times, the shutter and mirror slap can cause blurred images (see section
3.2.8.1). The Kodak EOS DCS 1 permits the effect of m irr or slap being elim inat ed by m irr or pr e- lock.
− The camera models Kodak EOS DCS 3, Kodak EOS DCS 5 and Kodak DCS 420 have integrated area
sensors of smaller dimensions.
If the outer dimensions of the sensor chip are 16.4 mm
× 20.5 mm, the image contents of t he digital
photo totals approx. 2/3 of a photo on 35 mm f ilm.
14 mm, the image contents of the digit a l
If the outer dimensions of the sensor chip are 9.3 mm
×
photo totals approx. 2/5 of a photo on 35 mm f ilm.
Further information on the use of digital cameras is available from your local Carl Zeiss agency or from
the following Internet address:
micro@zeiss.de
www.zeiss.de/micro
B 40-046 e 03/99 3-15
Page 46

Carl Zeiss Color balance 35 mm SLR cameras
OPERATION Photomicrogr aphy w it h
3-16 B 40-046 e 03/99
Page 47

Photomicrography with
35 mm SLR cameras Contents Carl Zeiss
MAINTENANCE, CARE, TROUBLESHOOTING AND SERVICE
MAINTENANCE, CARE, TROUBLESHOOTING AND
SERVICE
Contents
4 MAINTENENANCE, CARE, TROUBLESHOOTING AND SERVICE....................................4-2
4.1 Instrument Care...............................................................................................................4-2
4.2 Instrument Maintenance..................................................................................................4-3
4.2.1 Performing Checks ..........................................................................................................4-3
4.2.2 Changing the Batteries ....................................................................................................4-3
4.3 Troubleshooting ..............................................................................................................4-3
4.4 Consumables and Tools...................................................................................................4-4
4.5 Requesting Service...........................................................................................................4-4
B 40-046 e 03/99 4-1
Page 48

MAINTENANCE, CARE, TROUBLESHOOTING AND SERVICE Photomicrography with
Carl Zeiss Instrument care 35 mm SLR cameras
4 MAINTENENANCE, CARE, TROUBLESHOOTING AND SERVICE
4.1 Instrument Care
Maintenance of the photomicrography components attached to the microscopes is limited to the
following operations:
• Switch off the instrument after every use and place instrument cover on it to protect it from dust and
humidity.
• Never expose the instrument to inadmissible climatic conditions (high humidity and temper at ur e) .
The best way to remove stubborn dirt on glass surfaces, e.g. finger prints or traces of grease and
immersion oil, is the use of a piece of cotton wrapped ar ound a wooden stick and a small amount of
distilled water or a non-aggressive s olut ion.
• distilled water: clean glass surface using a slightly moistened wad of cotton by moving in circles
starting in the middle.
• Optics cleaning solution, consisting of 85% isopropanol and 15% medical alcohol (benzoline): clean
glass surface using a slightly moistened wad of cotton by moving in circles st ar t ing in t he middle.
• Remove dust from optical surfaces using a natural hair brush or an air blow er .
Please also see the additional notes on camera maintenance contained in the operating manual of the
used SLR camera.
When using the components in humid climatic zones, proceed as follows:
• Store instrument in bright, dry and well ventilated rooms with a humidity of less t han 65%: optical
components and accessories which are particularly susceptible to the growth of fungus, e.g.
objectives and eyepieces, should be stored in a dry closet.
• When the equipment is stored in closed cases for a longer period of time, t he growth of fungus can
be avoided by including cloths soaked in fungicide in the cases.
The risk of growth of fungus on opto-mechanical instrum ent s alw ays exist s in t he f ollow ing conditions:
− Relative humidity of more than 75% and temperatures betw een +15° C and +35° C for more than
three days.
− Installation in dark rooms without air ventilation.
− Dust deposits and fingerprints on optical surfaces.
B 40-046 e 03/99 4-2
Page 49

Photomicrography with
MAINTENANCE, CARE, TROUBLESHOOTING AND SERVICE
35 mm SLR cameras Contents Carl Zeiss
4.2 Instrument Maintenance
4.2.1 Performing Checks
• Check the battery voltage for operation of the SLR camera. If the battery voltage is no longer
sufficient, this is indicated in the SLR camera (e.g. by flashing of the display).
• If any damage is visible, switch off the SLR camera. Repairs may only be performed by authorized
service staff; therefore, please contact the Carl Zeiss service department (see page 4-4).
4.2.2 Changing the Batteries
See the relevant notes in the manual supplied by the camera manufacturer.
4.3 Troubl eshooti ng
See the relevant notes in the manuals of the used microscopes and the used SLR cameras.
B 40-046 e 03/99 4-3
Page 50

MAINTENANCE, CARE, TROUBLESHOOTING AND SERVICE Photomicrography with
Carl Zeiss Instrument care 35 mm SLR cameras
4.4 Consumabl es and Tools
Description Cat. No. Application
SW 3 ball-headed screwdriver 000000-0069-551 to change tubes and illuminators
Dust cover G 459312-0000-000
4.5 Requesting Service
All repairs of mechanical, optical or electronic components of the 35 mm SLR camera may only be
performed by Carl Zeiss service staff or specially authorized personnel.
to cover the instrument after use
To ensure the optimum setting and trouble-free function of the components even for a longer period of
time, we would recommend you to conclude a service/maintenance contract with Carl Zeiss.
Should any components have to be ordered subsequently, or if service is requir ed, please get in touch
with your local Carl Zeiss agency.
Further information is also available in the Internet:
micro@zeiss.de
www.zeiss.de/micro
B 40-046 e 03/99 4-4
Page 51

Photomicrography with ANNEX
35 mm SLR cameras Contents Carl Zeiss
ANNEX
List of Abbreviations ......................................................................................................................... A-2
Physical and Technical Units .............................................................................................................. A-3
List of Key Words.............................................................................................................................. A-4
EC Declaration of Conformity ........................................................................................................... A-5
B 40-046 e 03/99 A-1
Page 52

ANNEX Photom icrography with
Carl Zeiss List of abbreviations 35 mm SLR cameras
List of Abbreviations
B blue
B-function ball-function (shutter remains open until r e lease but ton, formerly a ball, is pressed;
see T-function)
Br. suitable for eyeglass wearers
C Camera, Cyan
CA Camera, Auflicht (=incident light )
CB Color Blue
CC Color Compensation
CFL Camera and fluorescence(application)
Cpl Compens-Plan (eyepiece model)
D, d diameter (e.g. of filter s, photo reticles)
DIN Deutsches Institut für Normung (German standar ds associat ion)
DX coding system for the storage of electronically legible information
(e.g. film speed)
E-PL Extra-Plan (eyepiece model)
EV Exposure Value (of light)
f/1.4 camera lens with focal length f with aperture ratio 1 : 1.4
f’ f ocal lengt h on t he im age side
focal length of objective
f’
Obj
FL fluorescence
foc. focusing
G green
ICS Infinity Color-Corrected System
IM Inverted Microscope
ISO International Organization for Standardization
k stop value
Komp. compensation
Kpl Kompens-Plan (eypiece model)
l reference viewing distance 250 mm
M metric thread, magenta
MC microscope camera
magnification of t he im age on 35 m m film
M
Film
PL Plan
R red
SLR Single Lens Reflex (camera)
S-Pl Sonder-Plan (photo eyepiece, projection lens for photomicrogr aphy)
A-2 B 40-046 e 03/99
Page 53

Photomicrography with ANNEX
35 mm SLR cameras List of abbreviations Carl Zeiss
SW wrench opening
T2-Adapter standard adapter for 35 mm cameras
T-function Time function (shutter remains open after first press and closes only after second press,
see B-function)
maximum exposure time
T
max
minimum exposure time
T
min
magnification of t he object ive
V
Obj
magnification of the eyepiece
V
eyep.
intermediate magnification
V
Z
W-PL Weitfeld-Plan (wide-angle eyepiece model))
Y Yellow
Physical and Technical Data
°C Centigrade
hPa Hecto-Pascal
K Kelvin
kg kilogram
m meter
mm millimeter
s second
V Volt
B 40-046 e 03/99 A-3
Page 54

ANNEX Photom icrography with
Carl Zeiss List of key words 35 mm SLR cameras
List of Key Words
Page
A
adjusting aid......................................................................................................................................3-6
ambient conditions.......................................................................................................................... 1-10
camera port ......................................................................................................................................2-6
C
CC filter..........................................................................................................................................3-12
Changing the fuses ...........................................................................................................................4-3
color balance...................................................................................................................................3-11
color distortion................................................................................................................................3-12
color reversal film............................................................................................................................ 3-11
color temperature..............................................................................................................................3-3
color-compensating (CC) filters........................................................................................................3-11
consumables.....................................................................................................................................4-4
D
darkfield.......................................................................................................................................... 3-13
dimensions........................................................................................................................................1-9
double-line cross ............................................................................................................................... 2-2
E
exposure correction...........................................................................................................................3-5
F
film cassette......................................................................................................................................3-3
I
insert photo reticles...........................................................................................................................2-2
Instrument care.................................................................................................................................4-2
instrument maintenance....................................................................................................................4-3
M
maintenance..............................................................................................................................4-2, 4-3
O
operation........................................................................................................................................1-10
P
performing checks.............................................................................................................................4-3
phototube.................................................................................................................................. 2-5, 2-9
S
START-UP..........................................................................................................................................2-1
T
Technical Data...................................................................................................................................1-9
W
weights.............................................................................................................................................1-9
A-4 B 40-046 e 03/99
 Loading...