

MC17/MC17A/
MC17T/MC17U
QUICK REFERENCE GUIDE

2 MC17/MC17A/MC17T/MC17U Mobile Computer
Zebra reserves the right to make changes to any
product to improve reliability, function, or design.
Zebra does not assume any product liability arising out
of, or in connection with, the application or use of any
product, circuit, or application described herein.
No license is granted, either expressly or by implication,
estoppel, or otherwise under any patent right or patent,
covering or relating to any combination, system,
apparatus, machine, material, method, or process in
which Zebra products might be used. An implied license
exists only for equipment, circuits, and subsystems
contained in Zebra products.
Software Support
Zebra wants to ensure that customers have the latest
release of entitled software at the time of product
purchase.
To confirm that your Zebra device shipped with the latest
release of entitled software, visit:
www.zebra.com/support. Check for the latest software
from Software Downloads > Product Line/Product > Go.
If your device does not have the latest entitled software
release as of your product purchase date, please e-mail
a request to Zebra at: entitlementservices@zebra.com.
You must include the following essential device
information with your request:
•
Model number
•
Serial number
•
Proof of purchase
•
Title of the software download you are requesting.
If it is determined by Zebra that your device is entitled to
the latest software release, you will receive an e-mail
containing a link directing you to a Zebra Web site to
download the appropriate software.
Quick Reference Guide 3
Introduction
This Quick Reference Guide explains how to install and
charge the battery, scan bar codes, reset, maintain and
troubleshoot the mobile computer.
Unpacking
Carefully remove all protective material from around the
mobile computer and save the shipping container for
later storage and shipping.
Verify that you received all equipment listed below:
•
MC17 mobile computer
•
Lithium-ion battery (2400 mAh)
•
Quick Reference Guide.
Inspect the equipment for damage. If you are missing
any equipment or if you find any damaged equipment,
contact the Zebra Support immediately. See Service
Information on backcover for contact information.
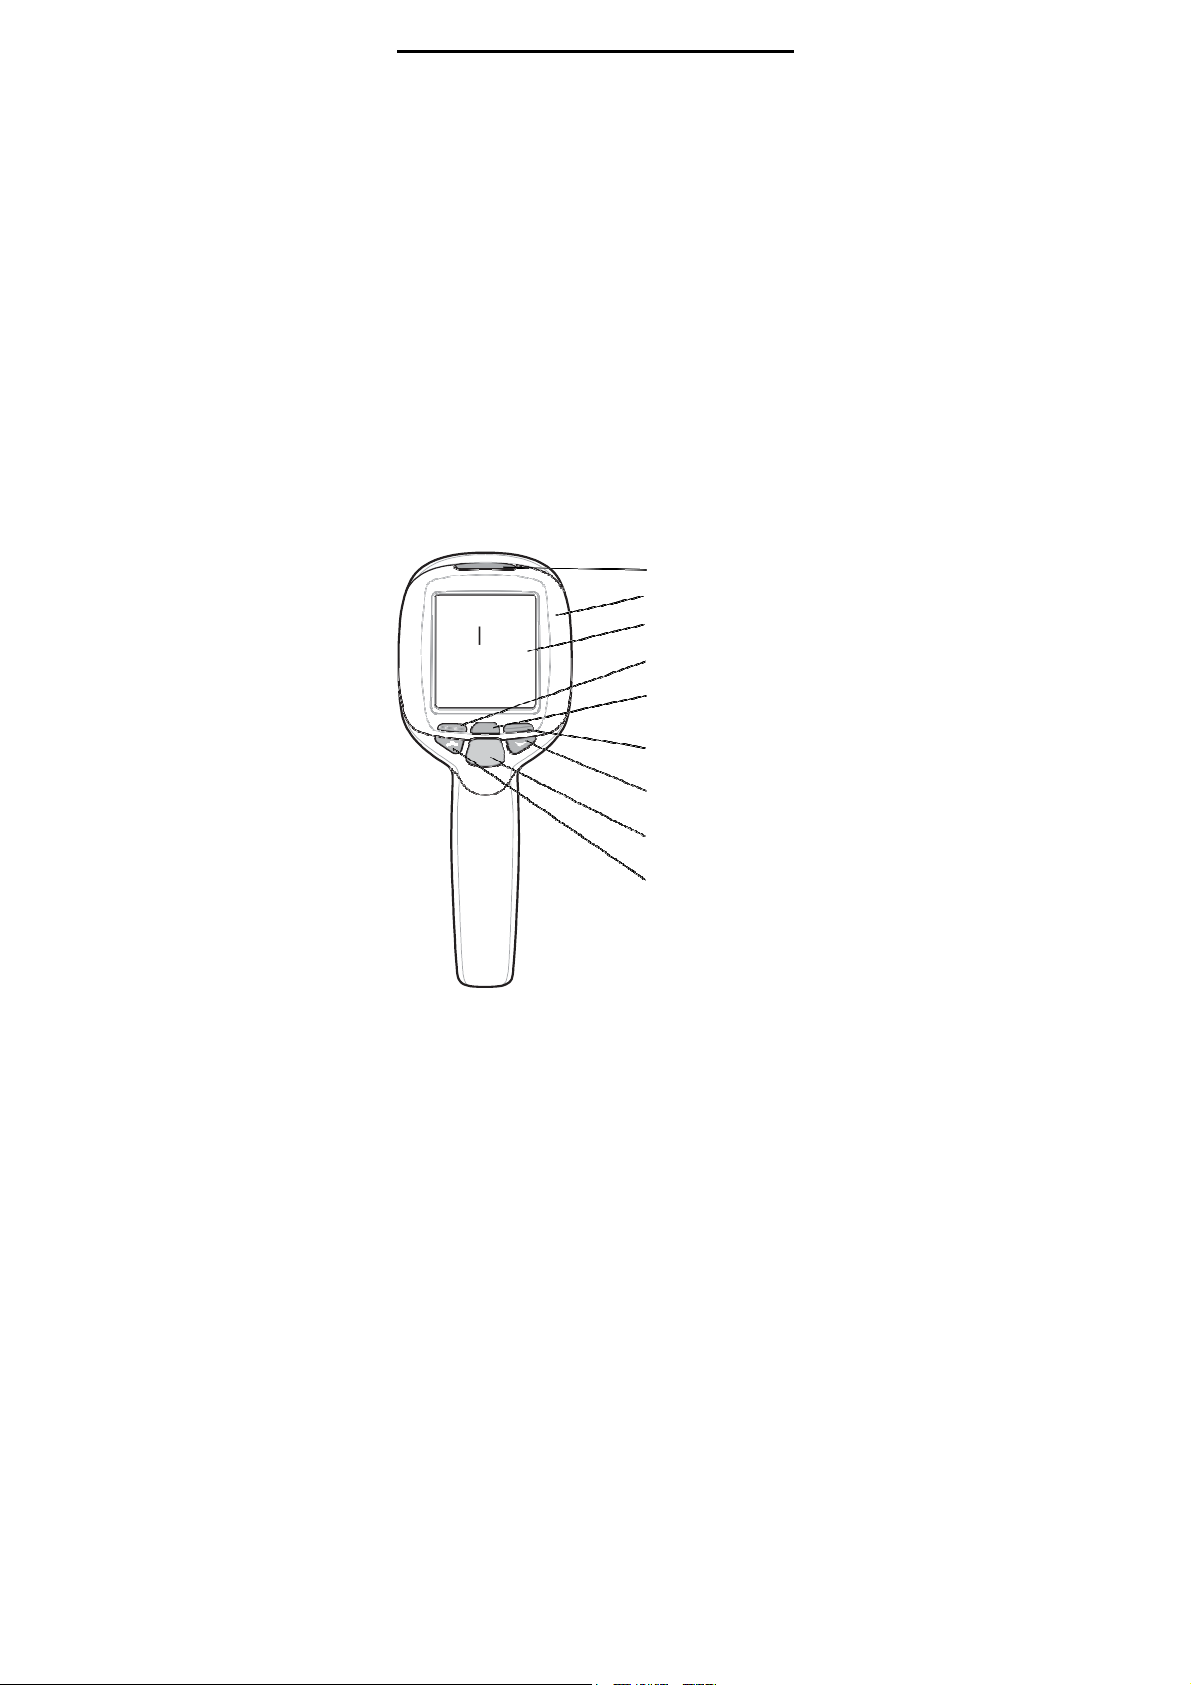
Features
MC17
series
LED
Bezel
Display
Scroll Left key
Enter key
Scroll Right key
Scroll Down key
Scan key
Scroll Up key
4 MC17/MC17A/MC17T/MC17U Mobile Computer
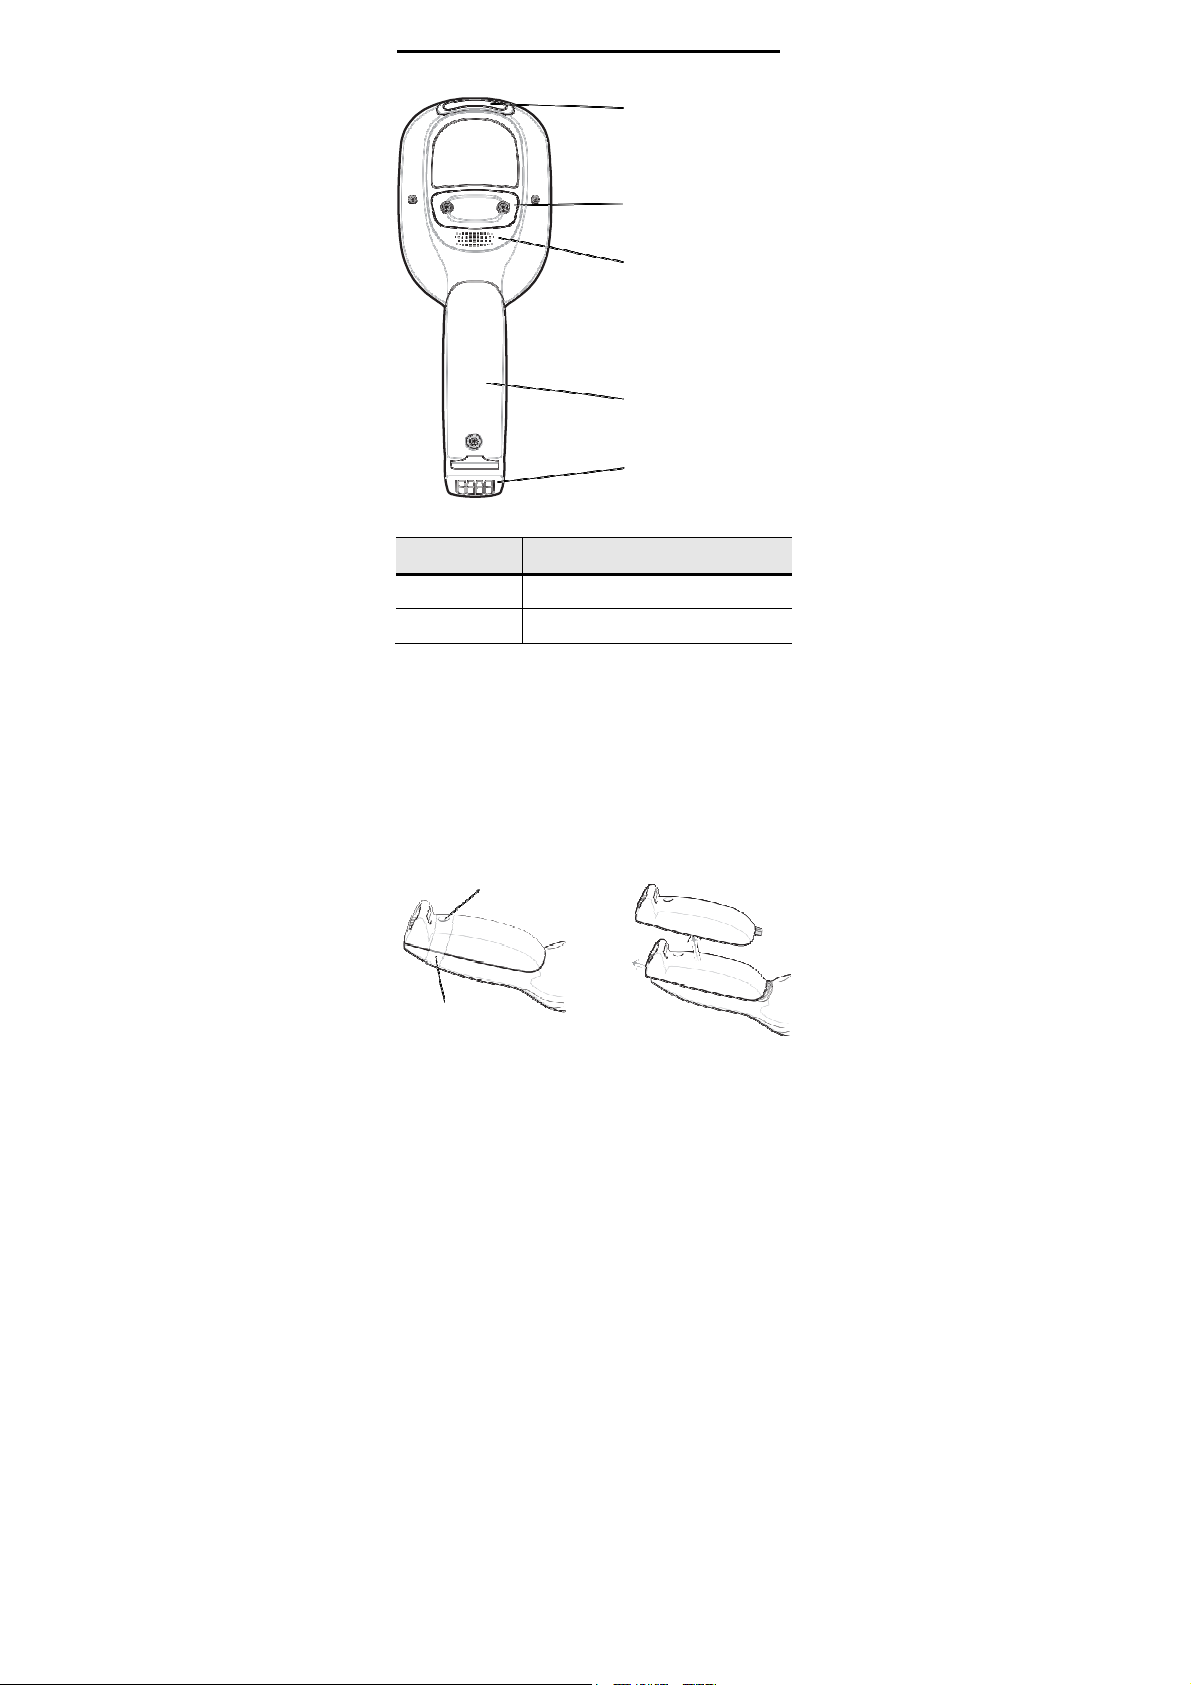
Scan Exit Window
Access Cover
LED State
Speaker
Battery Cover
Power Connector
Description
Solid Red
Solid Green
Getting Started
In order to start using the mobile computer you must
install the battery and then charge it.
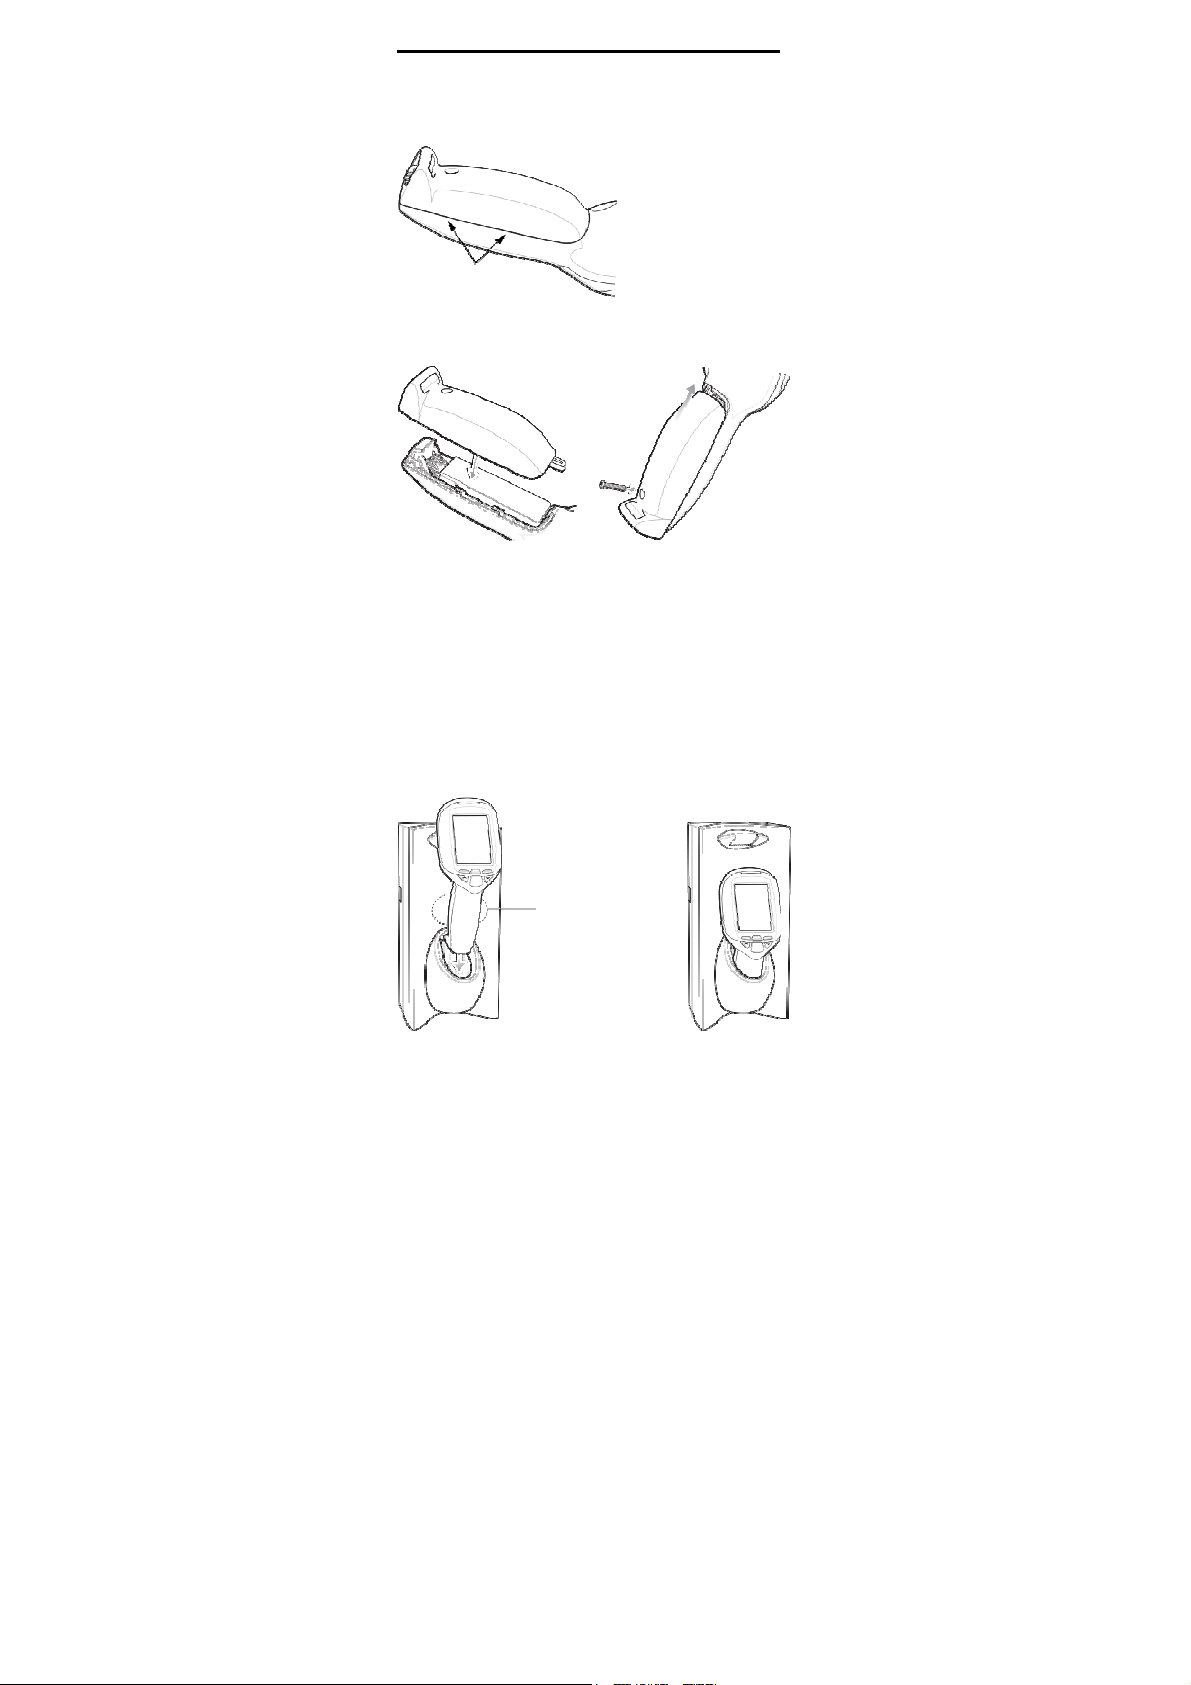
Installing the Battery
1.
Remove tape securing battery cover to handle.
2.
Remove screw from screw hole (under tape).
3.
Slide the battery cover toward the bottom of the
handle and then lift.
Scanner is enabled.
Bar code decode successful.
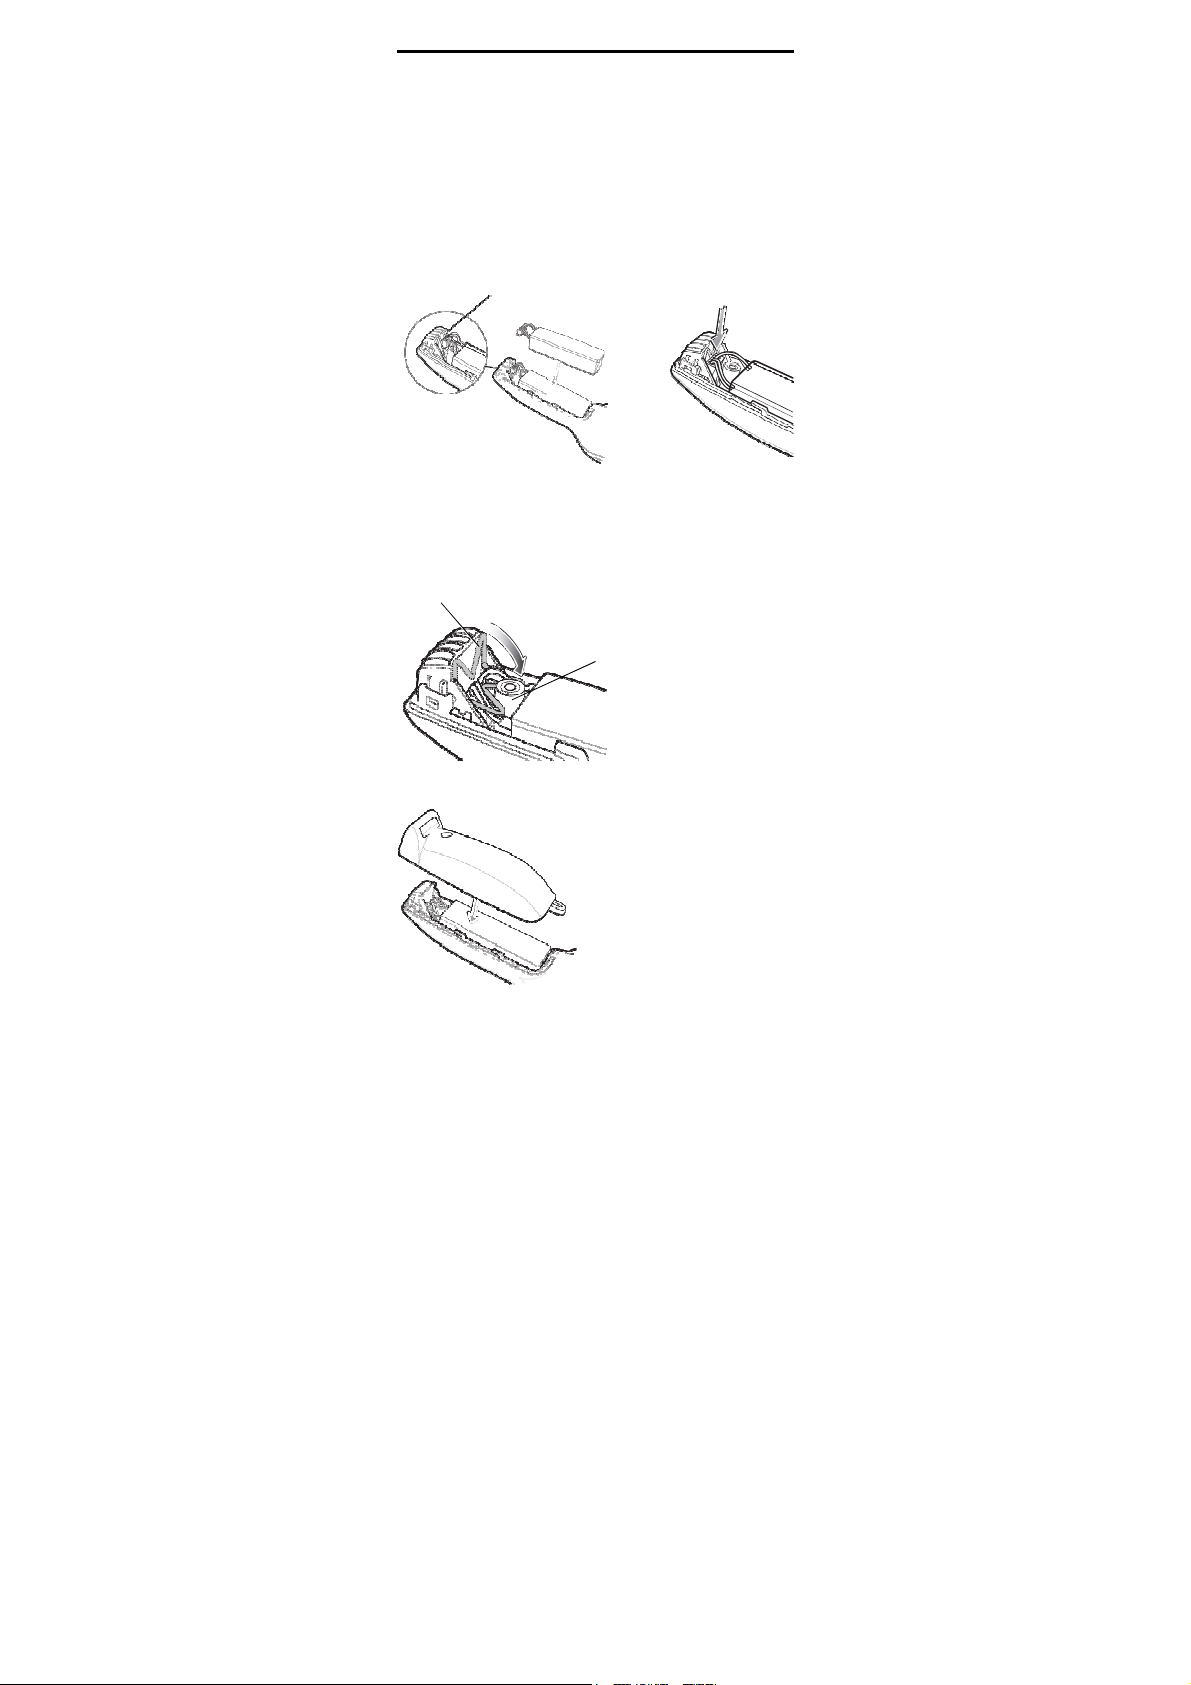
Screw Under Tape
Tape
Quick Reference Guide 5
4.
Ensure that
compartment is lying flat along the bottom of the
compartment, with its smoother side facing up, and
the rubber “fingers” straddling the screw boss.
5.
Ensure the wire latch is in the up position.
6.
Place the battery, rounded side down, in the
compartment. Using a non-metallic tool (if necessary),
guide the battery cable connector into the female battery
connector on the mobile computer.
the black rubber pad
Wire Latch
in
the
battery
The connector is keyed so it only fits one way.
7.
Press the connector down to ensure a positive
connection.
8.
Place wire latch down until just below top of the screw
boss.
Wire Latch
Screw Boss
9.
Place the battery cover onto the handle and slide it
as shown.
6 MC17/MC17A/MC17T/MC17U Mobile Computer
10.
Inspect the position of the battery cover with the main
housing. If the door is misaligned, remove battery
and black rubber pad and re-install.
Battery Door Properly
11.
Aligned
Secure the battery cover with the Torx screw using a
T8 Torx drive. Torque the screw to 3.3 ±0.2 Kgf-cm
(2.8 ±0.17 in-lb).
12.
After installing a new battery, wait approximately one
minute before inserting the mobile computer into a
cradle.
Charging the Battery
Before using the mobile computer, charge the battery.
1.
Ensure the Charging cradle, p/n PSS-3CR01-00R or
PSS-3CR01-NLR, is connected to the appropriate
power source. Refer to the MC17 Product Reference
Guide for detailed information.
2.
Insert the mobile computer into the cradle.
Red Charging LED
Location
Quick Reference Guide 7
3.
The mobile computer starts to charge automatically.
The mobile computer fully charges in approximately
five hours. While charging, a red charging LED can
be seen through the front panel of the cradle behind
the mobile computer. Refer to the MC17 Product
Reference Guide for specific charging profile
information.
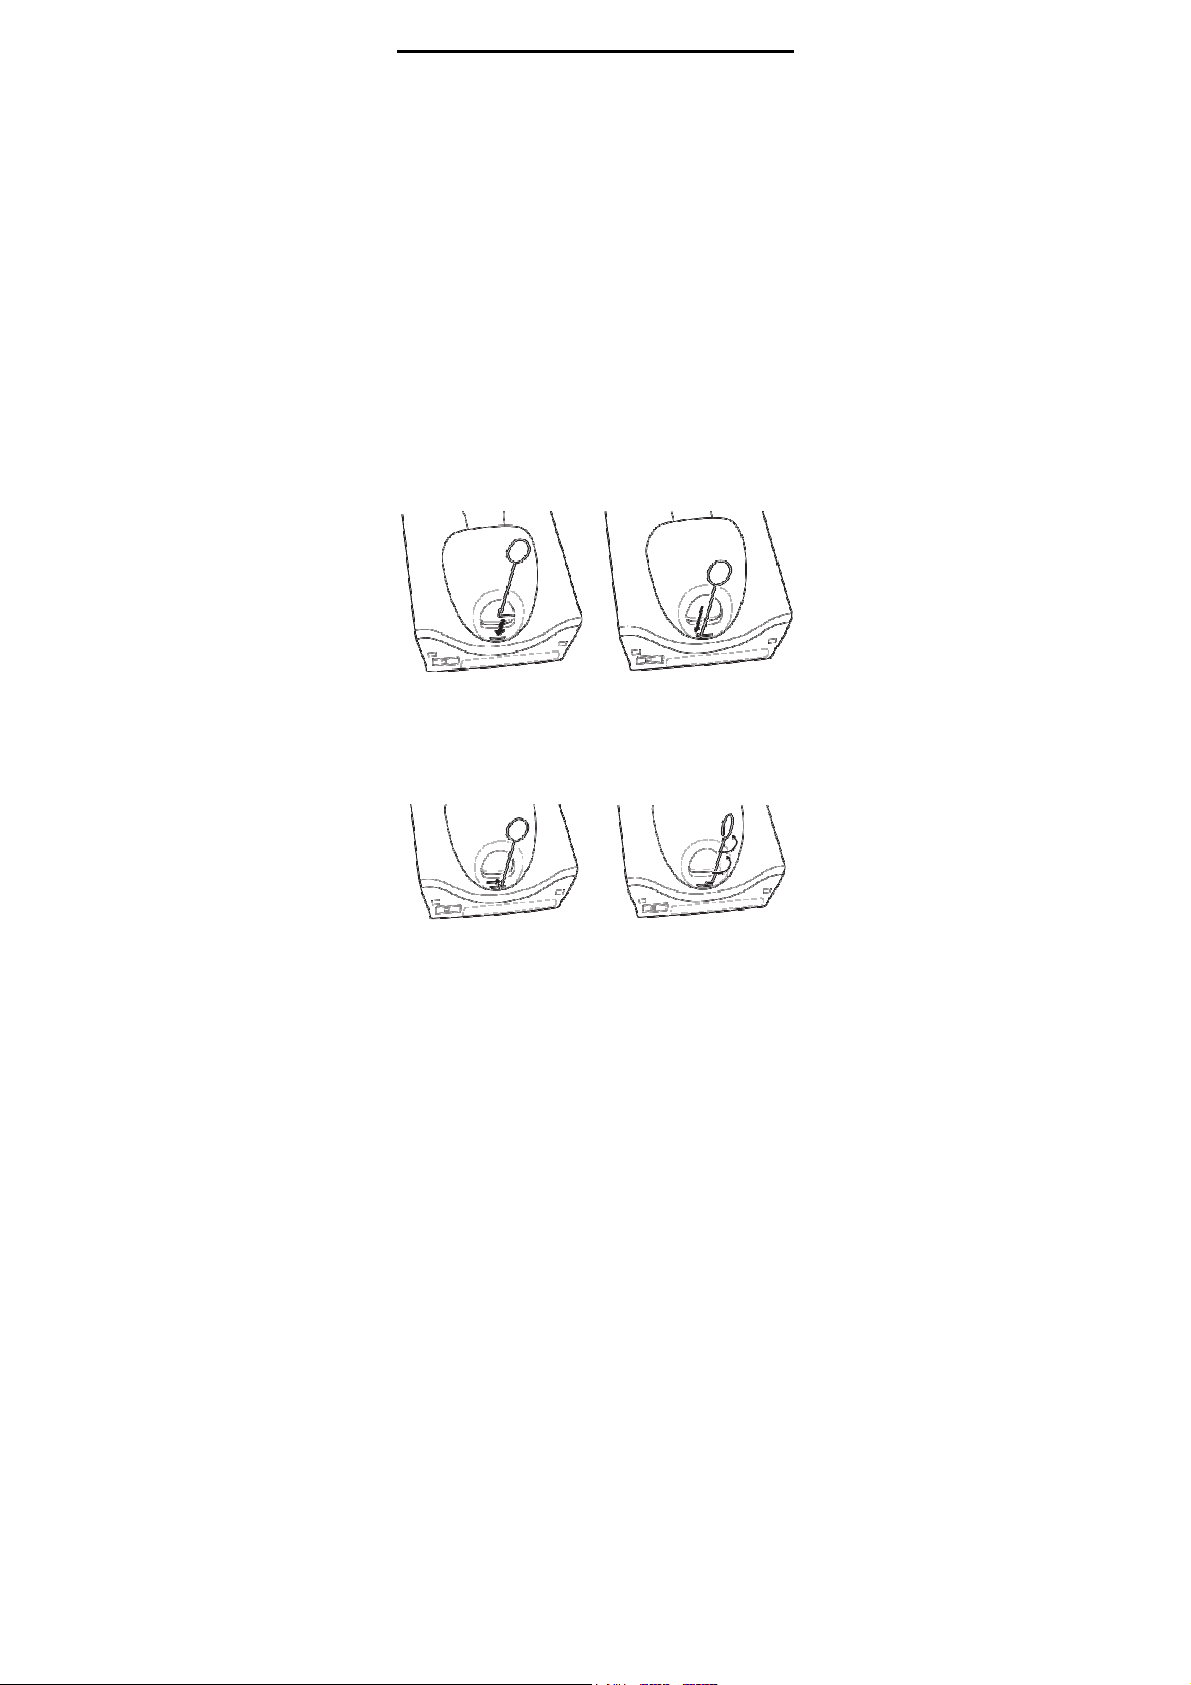
Manual Release of Mobile Computer from Charging
Cradle
The Charging cradle, p /n PSS-3CR01-00R, contains a
locking mechanism that locks the mobile computer into
the cradle. The mobile computer releases from the
cradle via a software command to the cradle. If the
mobile computer does not have the capability to un-lock
the cradle, un-lock it manually using the optional
dispenser (cradle) key, (p/n PSS-3KY01-00R).
1.
Hold the key with hook end pointing to the right.
2.
Insert the key straight into the slot, only to the point
where bend stops on the lip of the slot.
3.
Slide the key to the right until the handle is centered
in the slot.
4.
Rotate the key 90 degrees (1/4 turn)
counterclockwise.
5.
Keeping the handle of the key all the way to the right
in the slot, press the key into the slot. The end of the
key should press on a small spring loaded tab within
the cradle.
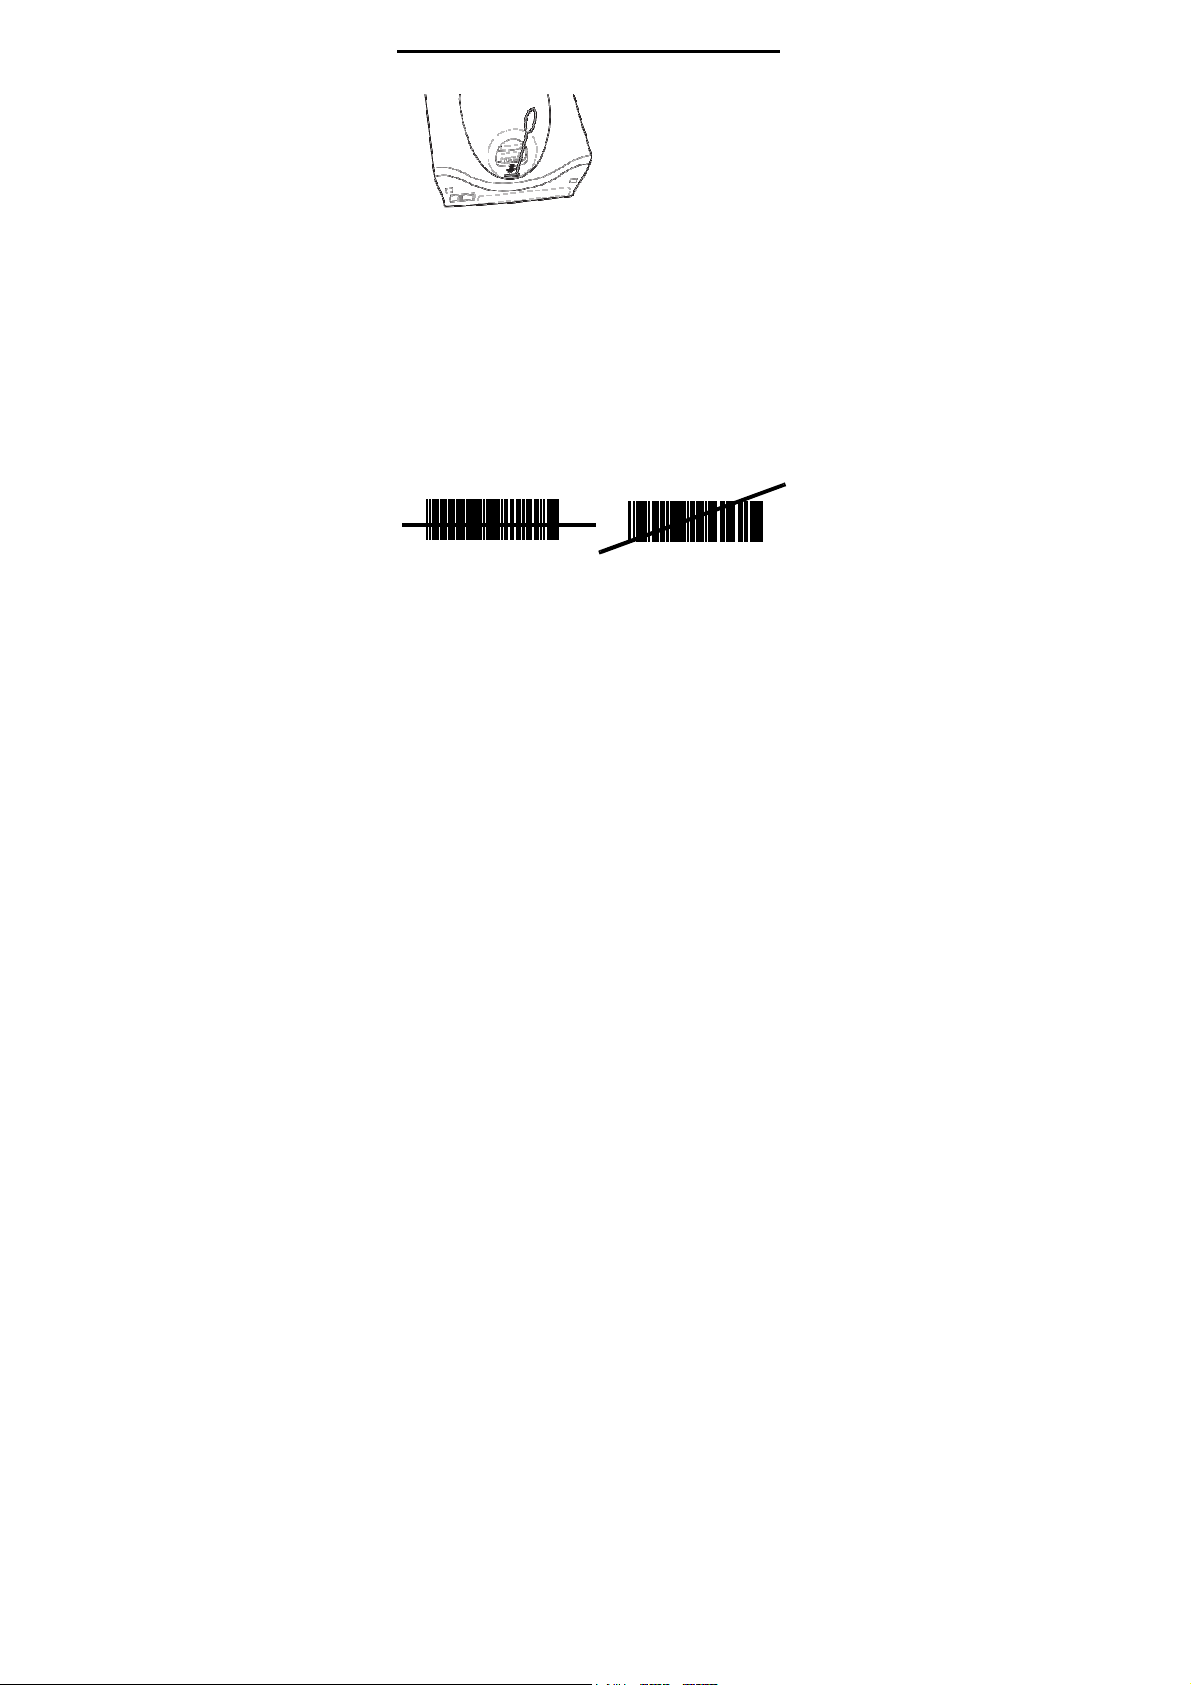
8 MC17/MC17A/MC17T/MC17U Mobile Computer
6.
While holding the key down, lift the mobile computer
out of the cradle.
Scanning
To scan bar codes:
1.
Launch a scanning application.
2.
Press the scan key and aim the mobile computer at a
bar code.
The LED turns red to indicate the scanner is on.
3.
Adjust the aim so that the thin, red laser beam covers
the entire length of the bar code.
Correct
Incorrect
012345
4.
If the decode is successful the LED turns green. The
terminal beeps if programmed accordingly.
Scanning Tips
•
For larger bar codes, hold the mobile computer
farther away from the bar code.
•
For bar codes with bars that are closer together, hold
the mobile computer closer to the bar code.
•
The optimal scanning distance varies with bar code
density, but 10 to 25 cm (4 to 10 inches) generally
works. Practice to determine what distances to work
within.
•
Position the scanner at an angle to the bar code. If
the mobile computer is perpendicular to the bar code
being scanned, light can bounce back into the
scanner’s exit window and prevent a successful
decode.
012345
 Loading...