


 Loading...
MC21XX SERIES MOBILE COMPUTER USER GUIDE
MC21XX SERIES MOBILE COMPUTER USER GUIDE
72E-155020-03
Rev. A
January 2019

ii MC21XX Series User Guide
No part of this publication may be reproduced or used in any form, or by any electrical or mechanical means, without permission in writing from Zebra. This includes electronic or mechanical means, such as photocopying, recording, or information storage and retrieval systems. The material in this manual is subject to change without notice.
The software is provided strictly on an “as is” basis. All software, including firmware, furnished to the user is on a licensed basis. Zebra grants to the user a non-transferable and non-exclusive license to use each software and firmware program delivered hereunder (licensed program). Except as noted below, such license may not be assigned, sublicensed, or otherwise transferred by the user without prior written consent of Zebra. No right to copy a licensed program in whole or in part is granted, except as permitted under copyright law. The user shall not modify, merge, or incorporate any form or portion of a licensed program with other program material, create a derivative work from a licensed program, or use a licensed program in a network without written permission from Zebra. The user agrees to maintain Zebra’s copyright notice on the licensed programs delivered hereunder, and to include the same on any authorized copies it makes, in whole or in part. The user agrees not to decompile, disassemble, decode, or reverse engineer any licensed program delivered to the user or any portion thereof.
Zebra reserves the right to make changes to any software or product to improve reliability, function, or design.
Zebra does not assume any product liability arising out of, or in connection with, the application or use of any product, circuit, or application described herein.
No license is granted, either expressly or by implication, estoppel, or otherwise under any Zebra, intellectual property rights. An implied license only exists for equipment, circuits, and subsystems contained in Zebra products.

iii
Revision History
Changes to the original guide are listed below:
Change |
Date |
Description |
|
|
|
-01 Rev. A |
12/23/11 |
Initial release. |
|
|
|
-02 Rev. A |
03/2015 |
Zebra rebranding. |
|
|
|
-03 Rev. A |
01/2019 |
Update cleaning procedures on page 7-3. |
|
|
|
|
|
|
|
|
|

iv MC21XX Series User Guide

TABLE OF CONTENTS
Revision History.............................................................................................................................. |
iii |
About This Guide |
|
Introduction..................................................................................................................................... |
ix |
Documentation Set ................................................................................................................... |
ix |
Configurations................................................................................................................................. |
x |
Software Versions..................................................................................................................... |
x |
Chapter Descriptions ...................................................................................................................... |
xi |
Notational Conventions................................................................................................................... |
xi |
Related Documents and Software .................................................................................................. |
xii |
Service Information......................................................................................................................... |
xii |
Chapter 1: Getting Started |
|
Introduction .................................................................................................................................... |
1-1 |
Unpacking the Mobile Computer .................................................................................................... |
1-1 |
Features ......................................................................................................................................... |
1-2 |
Mobile Computer Startup ............................................................................................................... |
1-3 |
Install microSD Card ................................................................................................................ |
1-3 |
Install Main Battery .................................................................................................................. |
1-4 |
Battery Charging ............................................................................................................................ |
1-4 |
Spare Battery Charging ................................................................................................................. |
1-6 |
Starting the MC21XX ..................................................................................................................... |
1-6 |
Calibration Screen ................................................................................................................... |
1-6 |
Main Battery Removal .................................................................................................................... |
1-7 |
Turning Off the Radios ................................................................................................................... |
1-8 |
WLAN Radio ............................................................................................................................ |
1-8 |
Safe System Shutdown/Re-boot .................................................................................................... |
1-8 |
Chapter 2: Operation |
|
Introduction .................................................................................................................................... |
2-1 |
Power Button ................................................................................................................................. |
2-1 |
Windows CE Sample Applications Window ................................................................................... |
2-1 |

vi MC21XX Series User Guide
Windows CE Desktop .................................................................................................................... |
2-2 |
Using the Keypad to Navigate Applications ................................................................................... |
2-2 |
Key Combinations .................................................................................................................... |
2-2 |
Selecting Items .................................................................................................................. |
2-3 |
Adjusting the Volume ..................................................................................................................... |
2-4 |
Adjusting the Screen Brightness .................................................................................................... |
2-4 |
Windows CE Status Icons ............................................................................................................. |
2-5 |
Battery Unknown Icon .............................................................................................................. |
2-6 |
Start Button .............................................................................................................................. |
2-6 |
Programs Menu ....................................................................................................................... |
2-7 |
Control Panel ........................................................................................................................... |
2-8 |
Keyboard Input Panel Button ................................................................................................... |
2-9 |
Desktop Display Button ............................................................................................................ |
2-9 |
Task Manager and Properties ....................................................................................................... |
2-9 |
Task Manager .......................................................................................................................... |
2-9 |
Properties ................................................................................................................................. |
2-9 |
Mini Stylus ..................................................................................................................................... |
2-10 |
Entering Information ...................................................................................................................... |
2-11 |
Entering Information Using Keypad ......................................................................................... |
2-11 |
Entering Information Using the Keyboard Input Panel ............................................................. |
2-12 |
Entering Data via the Bar Code Scanner ................................................................................. |
2-12 |
Resetting the MC21XX .................................................................................................................. |
2-12 |
Performing a Warm Boot ......................................................................................................... |
2-12 |
Performing a Cold Boot ............................................................................................................ |
2-12 |
Waking the MC21XX ..................................................................................................................... |
2-13 |
Battery Health ................................................................................................................................ |
2-14 |
Using the Keypad .......................................................................................................................... |
2-15 |
Browser .......................................................................................................................................... |
2-16 |
Audio Routing ................................................................................................................................ |
2-17 |
Chapter 3: Data Capture |
|
Introduction .................................................................................................................................... |
3-1 |
Linear Imager ........................................................................................................................... |
3-1 |
1D Laser Scanner .................................................................................................................... |
3-1 |
2D Imaging ............................................................................................................................... |
3-1 |
Operational Modes ............................................................................................................. |
3-2 |
Scanning Considerations ............................................................................................................... |
3-2 |
Laser Scanning and Linear Imaging .............................................................................................. |
3-3 |
Imager Scanning ...................................................................................................................... |
3-4 |
DataWedge .................................................................................................................................... |
3-5 |
Enable DataWedge .................................................................................................................. |
3-5 |
Disable DataWedge ................................................................................................................. |
3-5 |
Adjusting the Scan Beeper Volume ............................................................................................... |
3-5 |
Using CtlPanel ......................................................................................................................... |
3-5 |
Using DataWedge .................................................................................................................... |
3-5 |
Chapter 4: Bluetooth |
|
Introduction .................................................................................................................................... |
4-1 |
Adaptive Frequency Hopping ........................................................................................................ |
4-1 |
|
Table of Contents vii |
|
|
Security .......................................................................................................................................... |
4-2 |
Bluetooth Configuration ................................................................................................................. |
4-2 |
Bluetooth Power States ................................................................................................................. |
4-3 |
Cold Boot ................................................................................................................................. |
4-3 |
Warm Boot ............................................................................................................................... |
4-3 |
Suspend ................................................................................................................................... |
4-3 |
Power Button Suspend ...................................................................................................... |
4-3 |
During Battery Swap Suspend ........................................................................................... |
4-3 |
Forced Suspend (Start Menu Suspend) ............................................................................. |
4-3 |
Resume .................................................................................................................................... |
4-3 |
Using Microsoft Bluetooth Stack .................................................................................................... |
4-4 |
Power Modes ........................................................................................................................... |
4-4 |
Discovering Bluetooth Device(s) .............................................................................................. |
4-4 |
Available Services .................................................................................................................... |
4-5 |
Dial-Up Networking .................................................................................................................. |
4-5 |
Bluetooth Printing ..................................................................................................................... |
4-8 |
Chapter 5: Wireless Applications |
|
Introduction .................................................................................................................................... |
5-1 |
Signal Strength Icon ....................................................................................................................... |
5-3 |
Turning Off the Radio ..................................................................................................................... |
5-3 |
Minimum Setup .............................................................................................................................. |
5-3 |
Chapter 6: Accessories |
|
Introduction .................................................................................................................................... |
6-1 |
Single-slot USB Cradle .................................................................................................................. |
6-3 |
Battery Charging ...................................................................................................................... |
6-3 |
Four-slot Charge Only Cradle ........................................................................................................ |
6-4 |
Battery Charging ...................................................................................................................... |
6-4 |
Power LED ............................................................................................................................... |
6-4 |
Four-slot Ethernet Cradle ............................................................................................................... |
6-5 |
Battery Charging ...................................................................................................................... |
6-5 |
LED Charge Indications ........................................................................................................... |
6-5 |
Speed LED ............................................................................................................................... |
6-6 |
Link LED .................................................................................................................................. |
6-6 |
Four-slot Spare Battery Charger .................................................................................................... |
6-7 |
Spare Battery Charging ........................................................................................................... |
6-7 |
Modem Adapter Cable/Modem Dongle .......................................................................................... |
6-8 |
Setup ........................................................................................................................................ |
6-9 |
Connecting to the MC21XX ................................................................................................ |
6-9 |
USB ActiveSync/Charge Cable ...................................................................................................... |
6-11 |
Battery Charging and Operating Power ................................................................................... |
6-11 |
LED Charge Indications ........................................................................................................... |
6-12 |
Holster ............................................................................................................................................ |
6-13 |
Handstrap ...................................................................................................................................... |
6-14 |
Installation ................................................................................................................................ |
6-14 |
Removal ................................................................................................................................... |
6-15 |
Lanyard .......................................................................................................................................... |
6-16 |
Installation ................................................................................................................................ |
6-16 |

viii MC21XX Series User Guide
Removal ................................................................................................................................... |
6-16 |
Mini Stylus ..................................................................................................................................... |
6-17 |
Chapter 7: Maintenance & Troubleshooting |
|
Introduction .................................................................................................................................... |
7-1 |
Maintaining the MC21XX ............................................................................................................... |
7-1 |
Battery Safety Guidelines .............................................................................................................. |
7-2 |
Cleaning ......................................................................................................................................... |
7-3 |
Approved Cleanser Active Ingredients ..................................................................................... |
7-3 |
Harmful Ingredients .................................................................................................................. |
7-3 |
Cleaning Instructions ............................................................................................................... |
7-3 |
Special Cleaning Notes ............................................................................................................ |
7-3 |
Materials Required ................................................................................................................... |
7-3 |
Cleaning the MC21XX ............................................................................................................. |
7-4 |
Housing .............................................................................................................................. |
7-4 |
Display ............................................................................................................................... |
7-4 |
Scanner Exit Window ......................................................................................................... |
7-4 |
Connector .......................................................................................................................... |
7-4 |
Cleaning Cradle Connectors .................................................................................................... |
7-4 |
Cleaning Frequency ................................................................................................................. |
7-5 |
Troubleshooting ............................................................................................................................. |
7-6 |
MC21XX ................................................................................................................................... |
7-6 |
Single-slot USB Cradle ............................................................................................................ |
7-8 |
Four-slot Charge Only Cradle .................................................................................................. |
7-9 |
Four-slot Spare Battery Charger .............................................................................................. |
7-9 |
USB ActiveSync/Charge Cable ................................................................................................ |
7-10 |
Appendix A: Specifications |
|
MC21XX and Accessory Technical Specifications ........................................................................ |
A-1 |
Appendix B: Keypad |
|
Introduction .................................................................................................................................... |
B-1 |
27-Key Keypad ........................................................................................................................ |
B-1 |
Glossary
Index
ABOUT THIS GUIDE
Introduction
This guide provides information about using the MC21XX mobile computers and accessories.
NOTE Screens and windows pictured in this guide are samples and may differ from actual screens.
Documentation Set
The documentation set for the MC21XX is divided into guides that provide information for specific user needs.
•MC21XX Series Quick Start Guide - describes how to start using the MC21XX for the first time.
•MC21XX Series Mobile Computer User Guide - describes how to use the MC21XX.
•MC21XX Series Mobile Computer Integrator Guide - describes how to set up the MC21XX and the accessories.
•Microsoft Applications for Windows Mobile 6.1 and CE 6.0 User Guide - describes how to use Microsoft developed applications.
•Application Guide - describes how to use Zebra developed applications.
•EMDK Help File - provides API information for writing applications.
x MC21XX Series User Guide
Configurations
This guide covers the following configurations:
Configuration |
Radios |
Display |
Memory |
Data |
Operating |
|
Capture |
System |
|||||
|
|
|
|
|||
|
|
|
|
|
|
|
MC2100 |
None |
Color, no touch |
128 MB RAM/ |
Linear imager |
Windows CE 6.0 |
|
|
|
|
256 MB Flash |
or 1D laser |
|
|
|
|
|
|
|
|
|
MC2180 |
WLAN: 802.11 b/g/n |
Color touch |
128 MB RAM/ |
Linear imager, |
Windows CE 6.0 |
|
|
WPAN: Bluetooth |
screen |
256 MB Flash |
1D laser or 2D |
|
|
|
|
|
|
imager |
|
|
|
|
|
|
|
|
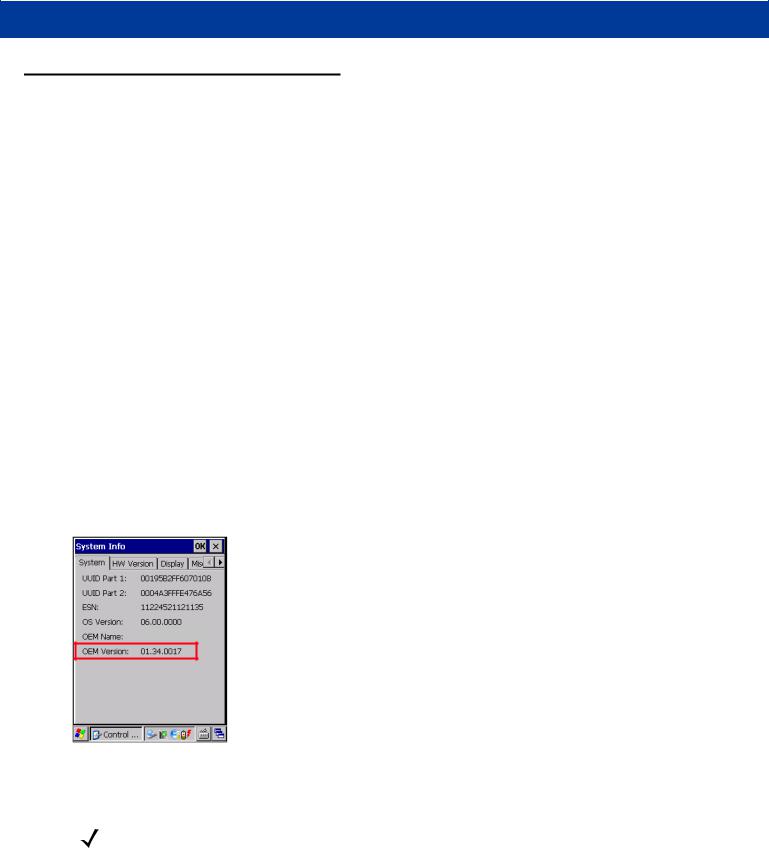
Software Versions
This guide covers various software configurations and references are made to operating system or software versions for:
•OEM version
•Fusion version.
OEM Version
To determine the OEM software version:
Tap Start > Settings > Control Panel > System Info icon > System tab.
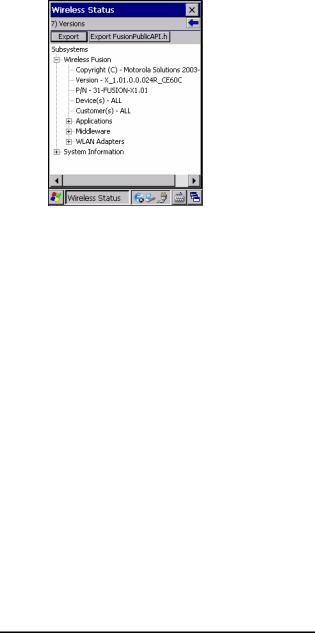
MC2180
Fusion Software
To determine the Fusion software version:
NOTE MC2180 only.
Tap Wireless Strength icon > Wireless Status > Versions.
|
|
|
|
|
|
About This Guide |
xi |
|
|
|
|
|
|
|
|
|
|
|
|
|
|
|
|
|
|
|
|
|
|
|
|
|
|
|
|
|
|
|
|
|
|
|
|
|
|
|
|
Chapter Descriptions
Topics covered in this guide are as follows:
•Chapter 1, Getting Started, describes the MC21XX’s physical characteristics, how to install and charge the batteries, remove and replace the handstrap and how to start the MC21XX for the first time.
•Chapter 2, Operation, provides basic instructions for using the MC21XX and navigating the MC21XX software.
•Chapter 3, Data Capture provides instructions for using the MC21XX to capture data using the linear imager, 1D laser or 2D imager.
•Chapter 4, Bluetooth, explains how to perform Bluetooth functionality on the MC21XX
•Chapter 5, Wireless Applications, explains how to use the Wireless applications on the MC21XX.
•Chapter 6, Accessories, describes the accessories available for the MC21XX and how to use the accessories to charge the MC21XX.
•Chapter 7, Maintenance & Troubleshooting, includes instructions on cleaning and storing the MC21XX, and provides troubleshooting solutions for potential problems during MC21XX operation.
•Appendix A, Specifications, includes a table listing the technical specifications for the MC21XX.
•Appendix B, Keypad, contains keypad descriptions and special character generation tables.
Notational Conventions
The following conventions are used in this document:
•The term “mobile computer” refers to the Zebra MC21XX.
•Italics are used to highlight the following:
•Chapters and sections in this and related documents
•Dialog box, window and screen names
•Drop-down list and list box names
•Check box and radio button names
•Icons on a screen.

xiiMC21XX Series User Guide
•Bold text is used to highlight the following:
•Key names on a keypad
•Button names on a screen.
•Bullets (•) indicate:
•Action items
•Lists of alternatives
•Lists of required steps that are not necessarily sequential.
•Sequential lists (e.g., those that describe step-by-step procedures) appear as numbered lists.
Related Documents and Software
The following items provide more information about the MC21XX.
•MC21XX Quick Start Guide, p/n 72-155017-xx
•MC21XX Regulatory Guide, p/n 72-155018-xx
•MC21XX Integrator Guide, p/n 72E-155021-xx
•Application Guide, p/n 72E-68901-xx
•Microsoft® Applications for Mobile 6.1 and CE 6.0 User Guide, p/n 72E-108299-xx
•Enterprise Mobility Developer Kit (EMDK) Help File
•Windows CE Platform SDK for MC2100c60, available at: http://www.zebra.com/support
•Enterprise Mobility Developer Kit for C (EMDK for C), available at: http://www.zebra.com/support
•ActiveSync software, available at: http://www.microsoft.com.
For the latest version of this guide and all guides, go to: http://www.zebra.com/support
Service Information
If you have a problem with your equipment, contact Zebra Global Customer support for your region. Contact information is available at: http://www.zebra.com/support.
When contacting Zebra Global Customer support, please have the following information available:
•Serial number of the unit
•Model number or product name
•Software type and version number
Zebra responds to calls by email, telephone or fax within the time limits set forth in support agreements.
If your problem cannot be solved by Zebra Global Customer Support, you may need to return your equipment for servicing and will be given specific directions. Zebra is not responsible for any damages incurred during shipment if the approved shipping container is not used. Shipping the units improperly can possibly void the warranty.
If you purchased your product from a Zebra business partner, contact that business partner for support.
About This Guide |
xiii |
|
|
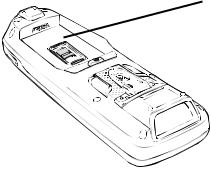
Manufacturing Label Location

xiv MC21XX Series User Guide

CHAPTER 1 GETTING STARTED
Introduction
This chapter describes the MC21XX physical characteristics, how to install and charge the battery, and how to start the mobile computer for the first time.
Unpacking the Mobile Computer
Carefully remove all protective material from around the mobile computer and save the shipping container for later storage and shipping. Verify that the equipment listed below is included:
•Mobile computer
•Mini stylus and tether (touch screen configurations only)
•Battery
•Regulatory Guide
•Quick Start Guide.
Inspect the equipment for damage. If any equipment is missing or damaged, contact the Zebra Global Support immediately. See Service Information on page xvi for contact information.

1 - 2 MC21XX Series User Guide
Features
The features of the MC21XX mobile computer are shown in Figure 1-1.
LED Indicator
Display
|
Scan Button |
|
Navigation Pad |
Volume Up Button |
Power |
(Default) Programmable |
|
MC2180 only |
|
Volume Down Button
(Default) Programmable
MC2180 only
Keypad |
I/O |
|
Connector |
||
|
||
Microphone |
|
|
MC2180 only |
Power Input Port |
|
Battery |
|
Battery Release Latch
Mini Stylus
Speaker
Exit Window
Figure 1-1 MC21XX Mobile Computer
Getting Started |
1 - 3 |
|
|
Mobile Computer Startup
To start using the MC21XX:
•Install the microSD card (optional).
•Install the main battery.
•Charge the main battery and the backup battery.
•Start the MC21XX.
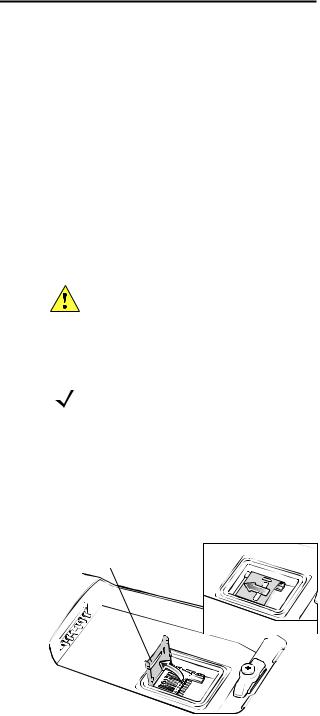
Install microSD Card
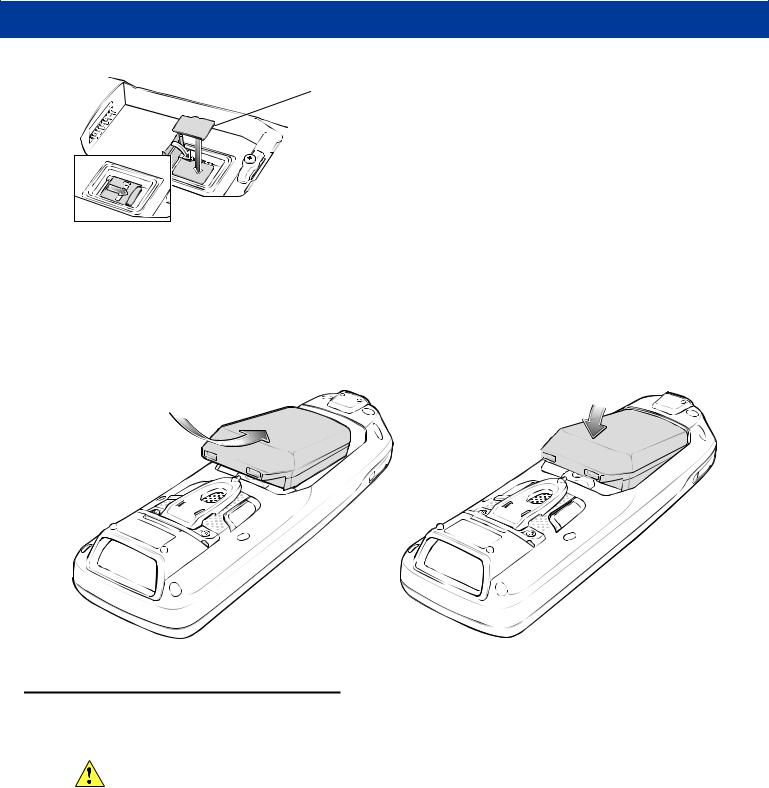
The Secure Device (SD) card provides secondary non-volatile storage (the flash memory is slower than RAM). The SD card holder is located under the battery.
CAUTION Follow proper Electro-Static Discharge (ESD) precautions to avoid damaging the microSD card. Proper ESD precautions include, but are not limited to, working on an ESD mat and ensuring that the operator is properly grounded.
Do not use the microSD card slot for any other accessories.
NOTE Select microSD cards with environmental and/or the write cycle performance specifications that meet or exceed the application requirements.
To insert the microSD card:
1.Place the MC21XX face-down.
2.Slide the card holder door down to unlock.
3.Lift the microSD card holder door.
microSD Card Holder Door
Figure 1-2 Inserting the microSD Card
4.Position the microSD card, with the contacts facing down, into the microSD holder.
5.Close microSD card door.
6.Slide the card holder up to lock.
1 - 4 MC21XX Series User Guide
microSD Card
Figure 1-3 Inserting the microSD Card
Install Main Battery
If the main battery is charged, the MC21XX can be used immediately. If the main battery is not charged, see
Battery Charging on page 1-4. To remove the main battery, see Main Battery Removal on page 1-7.
Insert the battery into the slot, bottom first and press the battery gently into the slot. The battery latches lock the battery into place.
Figure 1-4 Insert Battery
Battery Charging
CAUTION Ensure that you follow the guidelines for battery safety described in Battery Safety Guidelines on page 7-2.
The main battery can be charged before insertion into the MC21XX or after it is installed. Use the Four-slot Battery Charger to charge the main battery (out of the MC21XX) or the supplied power supply to charge the main battery while it is installed in the MC21XX.
Before using the MC21XX for the first time, fully charge the main battery until the LED Indicator remains lit (see Table 1-1 on page 1-5 for charge status indications). The battery fully charges in less than four hours.
The MC21XX is equipped with a memory backup battery which automatically charges from the main battery whether or not the MC21XX is operating or is in suspend mode. The memory backup battery retains data in memory for at least 5 minutes when the MC21XX’s main battery is removed or fully discharged. When the
Getting Started |
1 - 5 |
|
|
MC21XX is used for the first time or after the memory backup battery has fully discharged, the memory backup battery requires approximately 15 hours to fully charge. Do not remove the main battery from the MC21XX for 15 hours to ensure that the memory backup battery fully charges. If the main battery is removed from the MC21XX or the main battery is fully discharged, the memory backup battery completely discharges in several hours.
When the main battery reaches a very low battery state, the combination of main battery and backup battery retains data in memory for at least 72 hours.
NOTE Do not remove the main battery within the first 15 hours of use. If the main battery is removed before the backup battery is fully charged, data may be lost.
Batteries must be charged within the 0° to +40° C (32° to 104° F) ambient temperature range.
To charge the MC21XX using the optional power supply:
AC Line Cord
Power Supply
Power Port
Barrel Jack
Figure 1-5 Charging Using Power Supply
1.Connect the AC Line Cord to the power supply.
2.Connect the AC plug to an AC outlet.
3.Lift the rubber plug covering the MC21XX power port.
4.Plug the power supply barrel jack into the power port on the bottom of the MC21XX. The MC21XX starts to charge. The LED Indicator indicates the charging status.
Table 1-1 LED Indicators
LED |
Indication |
|
|
Off |
MC21XX not placed correctly in the cradle; charge cable not connected correctly or |
|
charger is not powered. |
|
|

1 - 6 MC21XX Series User Guide
Table 1-1 LED Indicators (Continued)
LED |
Indication |
|
|
Fast Blinking Amber |
Error in charging. Check placement of the MC21XX. |
|
|
Slow Blinking Amber |
MC21XX is charging. |
|
|
Solid Amber |
Charging complete. |
|
Note: When the battery is initially inserted in the MC21XX, the LED flashes once if |
|
the battery power is low or the battery is not fully inserted. |
|
|
The following accessories can also be used to charge the battery:
•Cradle (and a power supply):
•Single-slot USB Cradle.
•Cables (and a power supply):
•USB ActiveSync/Charge Cable.
•Chargers (and a power supply):
•Four-slot Spare Battery Charger.
See Chapter 6, Accessories for charging instructions using the accessories.
Spare Battery Charging
To charge a spare battery:
1.Connect the Four-slot Battery Charger to the appropriate power source. See Chapter 6, Accessories for setup instructions.
2.Insert the spare battery, bottom first, into the spare battery charging slot and gently press down on the battery to ensure proper contact.
The battery starts to charge automatically. The LED Indicator blinks amber to indicate the battery is charging. See Chapter 6, Accessories for charging indications. The battery usually fully charges in less than four hours.
Starting the MC21XX
Press the Power button to turn on the MC21XX. If the MC21XX does not power on, perform a cold boot. See
Resetting the MC21XX on page 2-12.
When the MC21XX is powered on for the first time, it initializes. The Splash screen appears for a short period of time. On the MC2180 the Calibration screen appears.
If the MC21XX does not power on, see Resetting the MC21XX on page 2-12.
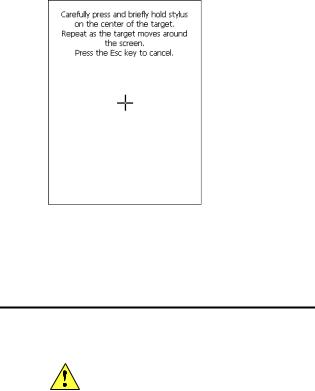
Calibration Screen
NOTE MC2180 only.
Use the Calibration screen to align the touch screen:
Getting Started |
1 - 7 |
|
|
1.Remove the mini stylus from the back of the MC21XX.
2.Carefully press and briefly hold the stylus tip on the center of the Calibration screen target. Repeat the procedure as the target moves and stops at different locations on the screen. This enters the new calibration settings.
Figure 1-6 Calibration Screen
3.Once all of the new calibration settings are input, tap the screen or press the ENTER button to save the new calibration settings. Press ESC to discard the new calibration settings.
Main Battery Removal
CAUTION When removing the battery, follow the Safe Battery Swap procedures below otherwise loss of data or system corruption may occur.
When in Safe Battery Swap mode, the MC21XX goes into a low power suspend state. All wakeup are disabled.
To remove the main battery from an MC21XX:
1.If the MC21XX is in suspend mode, press the Power button to wake the MC21XX.
2.Press the Power button to place the MC21XX in suspend mode.
3.On the MC2180, tap Safe Battery Swap.
On the MC2100, using the navigation pad, scroll down to Safe Battery Swap. Press the Enter key.
4.Wait for the LED Indicator to turn red and then turn off.
5.Using thumbs, push the two battery latches up. The battery ejects slightly.
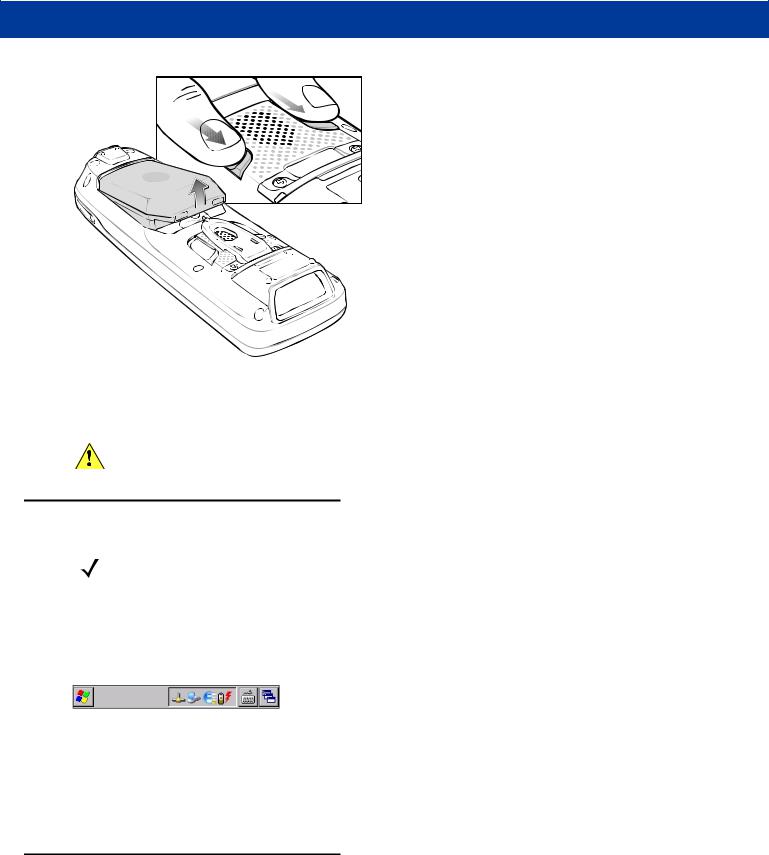
1 - 8 MC21XX Series User Guide
Figure 1-7 Release Latches
6.Remove the battery from the MC21XX.
CAUTION Replace the new battery within five minutes to prevent loss of data.
Turning Off the Radios
NOTE MC2180 only.
WLAN Radio
To turn off the WLAN radio tap the Fusion Signal Strength icon on the task tray and select Disable Radio. An X appears in the icon indicating that the radio is disabled (off).
 Fusion Signal Strength Icon
Figure 1-8 Fusion Signal Strength Icon
To turn the radio back on, tap the Fusion Signal Strength icon on the task tray and select Enable Radio. The X disappears from the icon indicating that the radio is enabled (on).
See Chapter 5, Wireless Applications for more information.
Safe System Shutdown/Re-boot
To ensure that data is not lost or that system corruption does not occurs, the user must follow the Safe Battery Swap procedure when replacing the battery. See Main Battery Removal on page 1-7. If the Safe battery Swap procedure is not followed, a Improper Shutdown message appears on the screen.

Getting Started |
1 - 9 |
|
|
Carefullypressandbrieflyholdstylus
onthecenterofthetarget.
Repeatasthetargetmovesaround
thescreen.
PresstheEsckeytocancel.
Figure 1-9 Improper Shutdown Message
If the MC21XX stops responding, first perform a warm boot. A warm boot maintains radio status and registry settings. Do not perform a cold boot unless necessary.
Performing a cold boot resets the MC21XX to factory defaults and loss of all registry settings.
To perform a warm boot, press and hold the Power button for five seconds.

1 - 10 MC21XX Series User Guide

CHAPTER 2 OPERATION
Introduction
This chapter provides basic instructions for using the MC21XX and navigating the operating system software.
Power Button
Press the Power button to toggle the MC21XX between suspend and resume. When the screen is off the MC21XX is in suspend mode and when the screen is on the MC21XX is on.
Windows CE Sample Applications Window
The MC21XX contains a set of sample applications that can be installed. By default an installation icon is on the Desktop. Double-tap the icon to install the sample applications. When installed, the Sample Applications window appears on the screen whenever the MC21XX re-boots. Refer to the MC21XX Series Mobile Computer Integrator Guide for installation and configuration.
The Sample Applications window links to sample applications. The sample applications are intended to be used by application developers as application development examples. These applications were not developed to support end users. Refer to the Application Guide for the sample applications.
Figure 2-1 Sample Applications Window
2 - 2 MC21XX Series User Guide
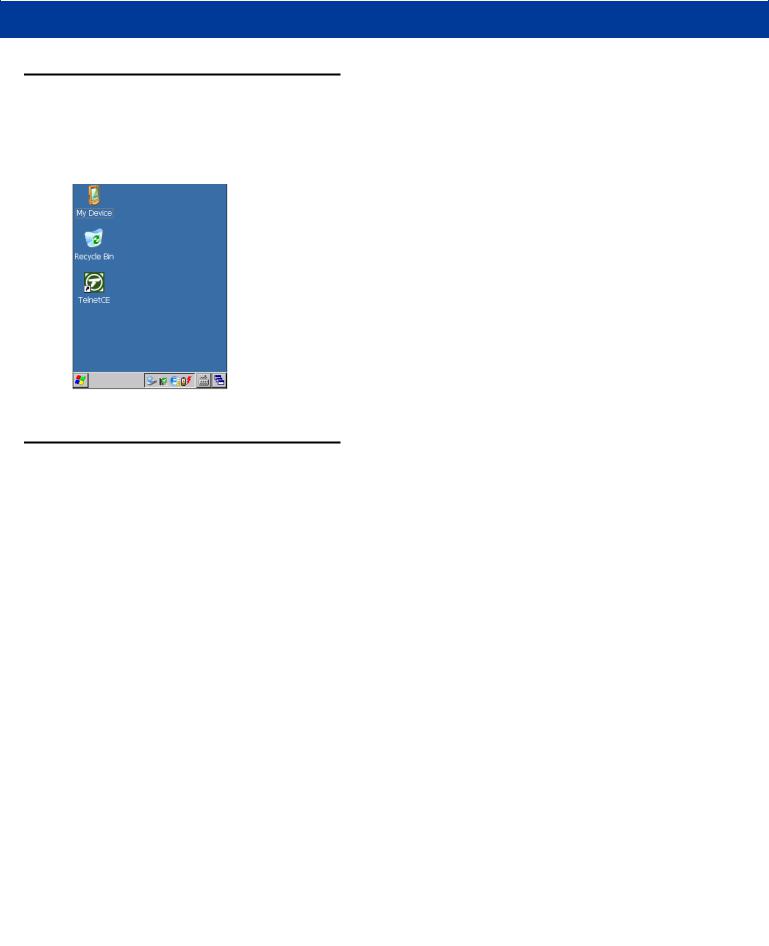
Windows CE Desktop
The desktop displays the applications available with the Windows CE configurations. For information on using the Microsoft® applications refer to the Microsoft® Applications for Mobile and CE 6.0 User Guide, p/n 72E-78456-xx.
Figure 2-2 Windows CE Desktop
Using the Keypad to Navigate Applications
The MC2100 screen is a non-touch screen and therefore navigation and control of an application is performed using the keypad.
Key Combinations
The MC2100 uses special key combinations to easily navigate applications. Table 2-1 lists the key combinations required to perform various application navigation and control.
Table 2-1 Key Combinations
Action |
Key Combination |
|
|
Access the Start menu on the Task bar |
Press CTRL - ESC |
|
|
Switch fields within an application |
Press TAB |
|
|
Close windows or cancel operations |
Press ESC |
|
|
Access the Task Manager |
Press ALT - TAB |
|
|
Switch to next window or desktop |
Press ALT - ESC |
|
|
Access a menu bar |
Press ALT - CTRL |
|
|
Press a button in an application window. |
Press TAB until the button is highlighted. Press SPACE |
|
|
Windows Explorer - Select All |
CTRL - A |
|
|
Windows Explorer - Cut |
CTRL - X |
|
|
Windows Explorer - Copy |
CTRL - C |
|
|

Operation 2 - 3
Table 2-1 Key Combinations
Action |
Key Combination |
|
|
Windows Explorer - Paste |
CTRL - V |
|
|
Open properties window of selected item |
ALT - Enter |
|
|
Display pop-up context menu |
Press SHIFT - F10 |
|
|
Exit DataWedge |
Press CTRL - Q or ESC. |
|
|
Selecting Items
Use a combination of key sequences to select items in a folder or list.
To select continuous items in a folder or list:
1.Open the folder or list.
2.Use the navigation pad to move to the first item to select.
3.Press Orange key to activate the alpha mode.
4.Press SHIFT - navigation pad (either up or down) to select the next item.
5.Repeat the SHIFT - navigation pad combination to select remaining items.
6.Perform the desired function (copy, paste, etc.).
To select multiple items in a folder or list:
1.Open the folder or list.
2.Press Orange key to activate the alpha mode.
3.Use the navigation pad to move to the first item.
4.Press CTRL - navigation pad to move within the list. The item name is outlined.
5.Repeat step 4 to move to the desired item.
6.Press SPACE to highlight the item.
7.Repeat steps 4 through 6 until all items are selected.
8.Perform the desired function (copy, paste, etc.).
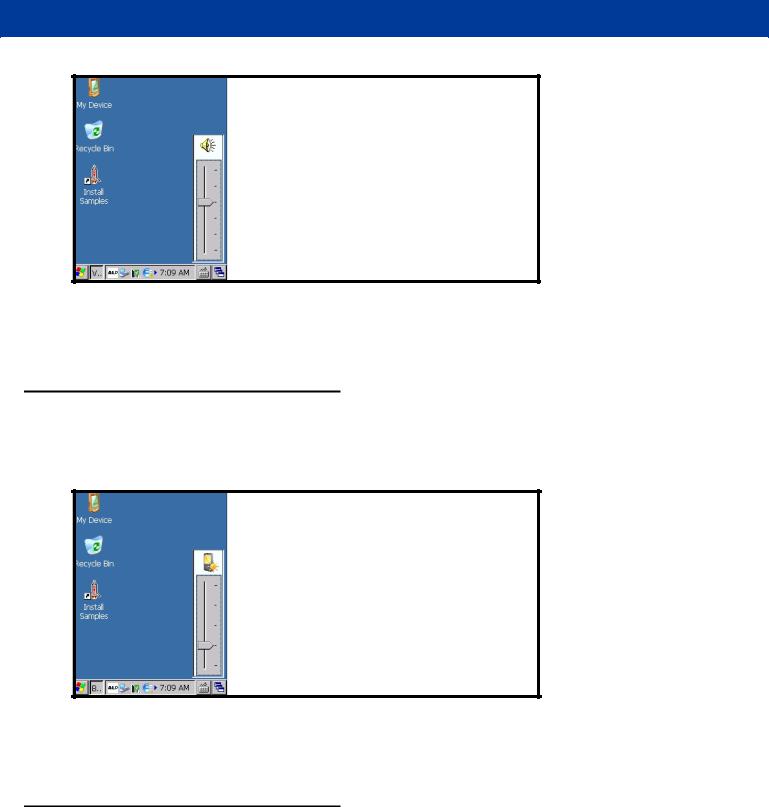
Adjusting the Volume
To adjust the beeper volume on the MC2100 and the audio volume on the MC2180:
1.Press Orange key - F1. The volume control box appears.
2 - 4 MC21XX Series User Guide
Figure 2-3 Volume Control Box
2.Use the navigation pad to adjust the volume.
3.After three seconds of inactivity, the settings are saved and the box disappears.
Adjusting the Screen Brightness
To adjust the screen brightness:
1.Press Orange key - F2. The brightness contrast control box appears.
Figure 2-4 Brightness Control Box
2.Use the navigation pad to adjust the contrast.
3.After three seconds of inactivity, the settings are saved and the box disappears.
Windows CE Status Icons
The taskbar (at the bottom of the screen) displays the Start button, active programs and status icons. The taskbar icons are described in Table 2-2. The taskbar icons display the function status, indicate what programs are active and indicate the battery charge status. The Taskbar buttons are used to access menus, select/deselect functions or to change display windows.
•Status Icons: The status icons indicate the function key status. If the FUNC, SHIFT, CTRL, ALT or ALPHA functions are active the appropriate status icon is displayed.
Loading...