


FL.882

WASHING
MACHINE
FL 882
INSTRUCTION BOOKLET

2

3
CONTENTS
TECHNICAL SPECIFICATIONS
Safety information . . . . . . . . . . . . . . . . . . . . . . . . . . . . . . . . . . . . . . . . . . . . . . . . . . . . . . . . . . . . . . . . . . . . . . . page 4
Installation
Unpacking . . . . . . . . . . . . . . . . . . . . . . . . . . . . . . . . . . . . . . . . . . . . . . . . . . . . . . . . . . . . . . . . . . . . . . . . . . . . . . page 5
Positioning . . . . . . . . . . . . . . . . . . . . . . . . . . . . . . . . . . . . . . . . . . . . . . . . . . . . . . . . . . . . . . . . . . . . . . . . . . . . . . page 5
Water inlet . . . . . . . . . . . . . . . . . . . . . . . . . . . . . . . . . . . . . . . . . . . . . . . . . . . . . . . . . . . . . . . . . . . . . . . . . . . . . . page 5
Water drainage . . . . . . . . . . . . . . . . . . . . . . . . . . . . . . . . . . . . . . . . . . . . . . . . . . . . . . . . . . . . . . . . . . . . . . . . . . . page 5
Levelling . . . . . . . . . . . . . . . . . . . . . . . . . . . . . . . . . . . . . . . . . . . . . . . . . . . . . . . . . . . . . . . . . . . . . . . . . . . . . . . . page 6
Electrical connections . . . . . . . . . . . . . . . . . . . . . . . . . . . . . . . . . . . . . . . . . . . . . . . . . . . . . . . . . . . . . . . . . . . . page 7
Getting to know your machine . . . . . . . . . . . . . . . . . . . . . . . . . . . . . . . . . . . . . . . . . . . . . . . . . . . . . . . . . . . . . . page8
Control panel . . . . . . . . . . . . . . . . . . . . . . . . . . . . . . . . . . . . . . . . . . . . . . . . . . . . . . . . . . . . . . . . . . . . . . . . . . . . page 8
Washing hints . . . . . . . . . . . . . . . . . . . . . . . . . . . . . . . . . . . . . . . . . . . . . . . . . . . . . . . . . . . . . . . . . . . . . . . . . . . page 9
Wash care symbols . . . . . . . . . . . . . . . . . . . . . . . . . . . . . . . . . . . . . . . . . . . . . . . . . . . . . . . . . . . . . . . . . . . . . . page 10
Energetic wash cycles . . . . . . . . . . . . . . . . . . . . . . . . . . . . . . . . . . . . . . . . . . . . . . . . . . . . . . . . . . . . . . . . . . . . . page 11
Gentle wash cycles . . . . . . . . . . . . . . . . . . . . . . . . . . . . . . . . . . . . . . . . . . . . . . . . . . . . . . . . . . . . . . . . . . . . . . . . page 12
Which detergent to use? . . . . . . . . . . . . . . . . . . . . . . . . . . . . . . . . . . . . . . . . . . . . . . . . . . . . . . . . . . . . . . . . . . page 13
And in which form? . . . . . . . . . . . . . . . . . . . . . . . . . . . . . . . . . . . . . . . . . . . . . . . . . . . . . . . . . . . . . . . . . . . . . . page 13
Use of detergent and additives . . . . . . . . . . . . . . . . . . . . . . . . . . . . . . . . . . . . . . . . . . . . . . . . . . . . . . . . . . . . . page 13
Using your machine
Washing 4.5 kg of colour fast cotton at 60¡C . . . . . . . . . . . . . . . . . . . . . . . . . . . . . . . . . . . . . . . . . . . . . . . . . . . . . page 14
Washing 2.25 kg of synthetic fabrics at 40¡C . . . . . . . . . . . . . . . . . . . . . . . . . . . . . . . . . . . . . . . . . . . . . . . . . . . . page 15
Maintenance and cleaning
Descaling, after each wash, external cleaning . . . . . . . . . . . . . . . . . . . . . . . . . . . . . . . . . . . . . . . . . . . . . . . . . . . . page 16
Cleaning the dispenser drawer, cleaning the drawer recess, the dangers of freezing . . . . . . . . . . . . . . . . . . . . . . . page 16
Cleaning the filter . . . . . . . . . . . . . . . . . . . . . . . . . . . . . . . . . . . . . . . . . . . . . . . . . . . . . . . . . . . . . . . . . . . . . . . . . Page 16
The water inlet filters . . . . . . . . . . . . . . . . . . . . . . . . . . . . . . . . . . . . . . . . . . . . . . . . . . . . . . . . . . . . . . . . . . . . . . Page 16
Servicing . . . . . . . . . . . . . . . . . . . . . . . . . . . . . . . . . . . . . . . . . . . . . . . . . . . . . . . . . . . . . . . . . . . . . . . . . . . . . . . Page 17
Peace of mind for twelve months . . . . . . . . . . . . . . . . . . . . . . . . . . . . . . . . . . . . . . . . . . . . . . . . . . . . . . . . . . . Page 18
DIMENSIONS Width 60cm / 23.6 ins
Height 85cm / 33.5 ins
Depth 55cm / 22.7 ins
ELECTRICAL Voltage 230-240 V
Frequency 50 Hz
CONNECTION Max. Power
Absorbed 2100 W (10A)
WATER Minimum (cold) 5N/cm
2
(7psi)
PRESSURE Minimum (hot) 3N/cm
2
(4psi)
Maximum 80N/cm
2
(110psi)
CAPACITY Cotton, Linen 4.5 Kg (10lb)
RECOMMENDED Synthetics &
LOAD delicate fabrics 2.25 Kg (5lb)
Wool 1 Kg (2,2lb)
SPIN SPEED Maximum 800 r.p.m.
This appliance carries the ÒCEÓ mark and complies with the following directives:
-89/336 CEE on electromagnetic compatibility
-73/23/CEE on electric material designed to be used with specified power limits.
Our contribution to the protection of the environment: We use recycled paper.

4
Installation
¥ This appliance is heavy. Care should be taken when
moving it.
¥ It is dangerous to alter the specifications or attempt to
modify this product in any way.
¥ Care must be taken to ensure that the appliance does not
stand on the electrical cable.
¥ All packing and transit bolts must be removed before use.
Serious damage can occur to the product and to property
if this is not adhered to. See relevant sections.
¥ Any electrical work required to install this appliance
should be carried out by a qualified electrician or
competent person.
¥ Any plumbing work required to install this appliance
should be carried out by a qualified plumber or competent
person.
¥ If your machine is situated on a carpeted floor, please
adjust the feet in order to allow air to circulate freely.
¥ This product should be serviced by an authorised Zanussi
Service Centre, and only genuine Zanussi spare parts
should be used.
Child Safety
¥ This appliance is designed to be operated by adults.
Children should not be allowed to tamper with the
controls or play with the product.
¥ Pets and children have been known to climb into washing
machines. Please check your drum before use.
¥ The glass door becomes very hot during the washing
cycle. Keep children away from the vicinity of the
appliance whilst it is in operation.
During Use
¥ Do not overload the appliance. See relevant section in
the instruction book.
¥ Only wash fabrics which are designed to be machine
washed. If in doubt, consult the care label on the clothes.
¥ Only use the advised quantities of detergent and fabric
softener. Damage to the fabric can ensue if you over-fill.
Refer to the manufacturerÕs recommendations of
quantities.
¥ Before washing, ensure that all pockets are empty and
buttons and zips are fastened.
¥ Avoid washing frayed or torn articles and treat stains such
as paint, ink, rust, and grass before washing. Underwired
bras must NOT be machine washed.
¥ Any objects such as coins, safety pins, nails, screws,
stones or any other hard, sharp material can cause
extensive damage and must not be placed into the
machine.
¥ The users should always check that they have not left
their gas lighters (disposable or otherwise) in their
clothing.
¥ Wash small items such as socks, laces, washable belts,
etc. in a washing bag or pillow case as it is possible for
such items to slip down between the tub and the inner
drum.
¥ As some duvets and eiderdowns should be washed in
large commercial machines because of their bulk, please
check with the manufacturer of the item before washing in
a domestic machine.
¥ Garments which have been in contact with volatile
petroleum products should not be machine washed. If
volatile cleaning fluids are used, care should be taken to
ensure that the fluid is removed from the garment before
placing in the machine.
¥ Always look through the glass door to check if water has
drained before opening the door. If water is present do
not open the door before draining the water. If in doubt,
refer to your instruction book.
¥ Always unplug the appliance and turn off the water after
use.
¥ Leave the porthole door slightly ajar between washes to
preserve the door seal.
¥ Under no circumstances should you attempt to repair the
machine yourself. Repairs carried out by inexperienced
persons may cause injury or serious malfunctioning.
Contact you local Zanussi Service Centre. Always insist
on genuine Zanussi spare parts.
SAFETY INFORMATION
It is most important that this instruction book should be retained with the appliance for future reference. Should the
appliance be sold or transferred to another owner, or should you move house and leave the appliance, always ensure
that the new owner can get to know the functioning of the appliance and the relevant warnings.
These warnings have been provided in the interest of safety. You MUST read them carefully before installing or using
the appliance.
5
INSTALLATION
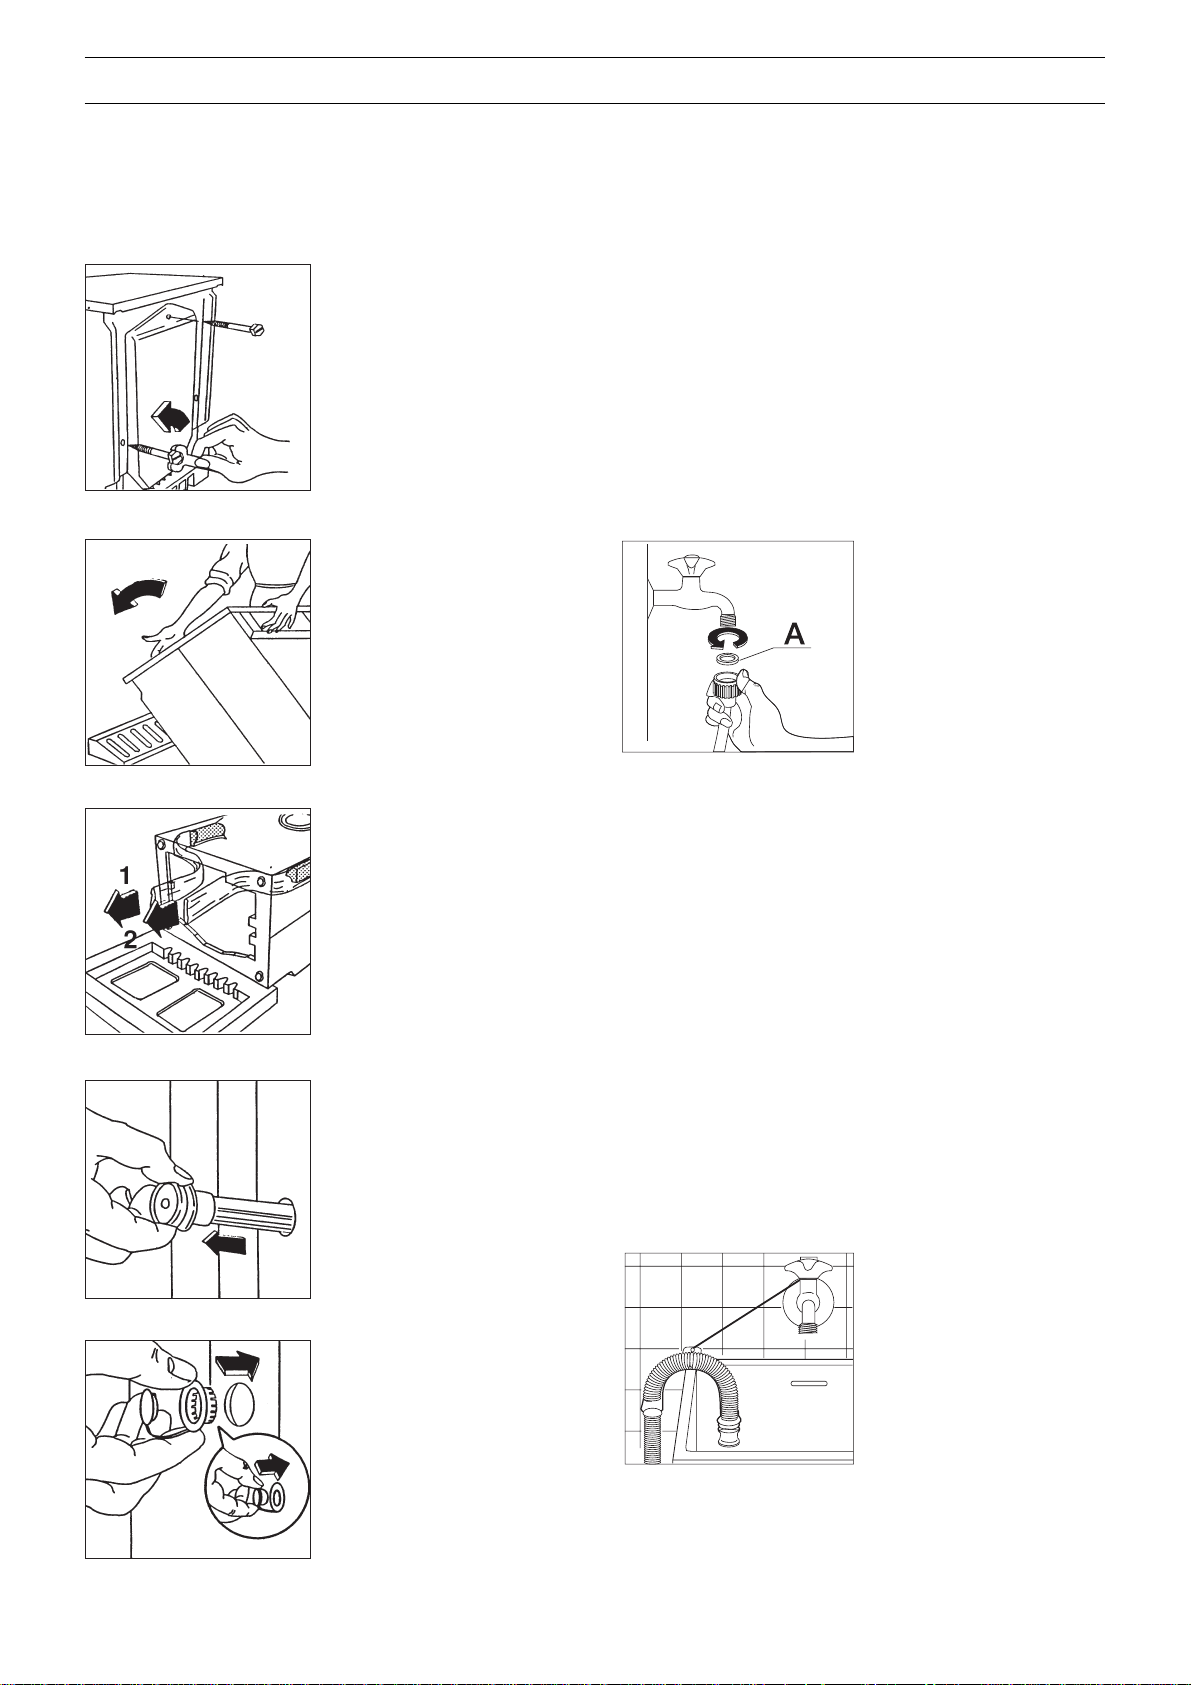
Unpacking
Before starting the machine up, the transport security
bolts must be removed as follows:
You are advised to keep all the packaging for re-use in
case the appliance has to be transported again.
1. Unscrew and remove the
three rear transit bolts
(using a spanner).
2. Lay the machine gently
on its back, making sure
that the hoses are not
squashed.
We suggest a
polystyrene angle
bracket from the packing
is placed on the floor
before tilting it back to
avoid the hoses being
squashed.
3. Carefully remove the
polythene bags located
at the base of the
machine by pulling them
toward the centre of the
machine.
4. Place the machine in an
upright position and
remove the three plastic
bolts.
5. Plug the 3 holes with the
plastic plugs which you
can find in the envelope
containing the instruction
booklet.
Positioning
Your new Zanussi washing machine has been designed to
be permanently plumbed in to you homeÕs water supply and
drainage system. However, if this is not possible, it may be
connected to suitable existing taps, with the drain hose
discharging into the sink.
The appliance has two inlet hoses, hot and cold, with
female 3/4Ó BSP thread connectors. If this connection is
not compatible with the plumbing of the existing installation,
a variety of connectors are available from good hardware
stores and plumbers merchants to suit most domestic
plumbing. Any alterations to your existing plumbing must
be carried out by a competent person, or qualified plumber.
Water inlet
The inlets on the back of the appliance are colour coded,
blue for cold and red for hot.
Before connecting the
hoses, be sure to fit the
black washers supplied as
per diagram.
If only a cold water supply
is available, connect the
two hoses to a cold water
outlet by means of a ÔYÕ
connection piece.
Installation should comply
with local water authority and building regulation
requirements.
The appliance must be given a separate cold water supply
and not be connected to a mixer tap, a single outlet water
heater or a booster pump. A minimum water pressure or
7psi is required for safe operation of the appliance.
If you cannot make the cold water connection direct from
the rising mains, you may be able to operate the appliance
from your cold water storage system.
There should be a minimum distance of 5.02m (16 1/2ft)
between the applianceÕs inlet and the bottom of the tank.
There will be sufficient pressure for the hot water supply
from the hot water cylinder if the height between the
applianceÕs inlet and the bottom of the cold water storage
cistern (not between the appliance and the hot water
cylinder) is at least 2.74m (9ft).
Set the hoses correctly by loosening the ring nuts. After
positioning the inlet hoses, be sure to tighten the ring nuts
again to prevent leaks.
Water drainage
If you intend the drain hose
from the machine to empty
into a sink, make sure that
the sink is empty and that
the plug hole is not blocked.
If the machine is
permanently plumbed in,
hook the end of the hose
into a standpipe installed for
the purpose. The standpipe
must have an internal
diameter of at least 40mm (1 1/2Ó) in order that there is an
air gap between the drain hose and the standpipe. Make
sure, that it is designed in such a way, that the end of the
drain hose cannot be covered with water.
6
Important
Before connecting up the machine to new pipework or to
pipework that has not been used for some time, run off a
reasonable amount of water to flush out any debris that
may have collected in the pipes.
Whether discharging
into a sink or a
standpipe, check that
the end of the drain
hose is neither too high
nor too low. The top of
the curve in the hoseÕs
end should be no more
than 85 cm (34Ó) and
no less than 50 cm
(20Ó) above floor level.
Levelling
Level the washing machine by loosening or tightening the
feet. Accurate levelling prevents vibration, noise and
displacement of the machine during operation. After
levelling the machine, secure the feet by tightening the ring
nuts with the aid of a screwdriver.
Some vibration is inevitable, especially if mounted on a
wooden floor.
Sprung wooden floors are particularly susceptible to
vibration. For advice, consult a builder. If possible, always
place the machine on a solid floor.
Special conditions
If the floor is carpeted with a deep-pile carpet or covered
with crumbly or soft material, insert a rigid support base
under the feet to prevent noise, vibration or displacement.
The base should protrude a few centimetres beyond the
edges of the machine.
Warning
The machine should NOT be placed directly on deep pile
carpeting.
Note
Please ensure that when the appliance is installed it is
easily accessible for the engineer in the event of a
breakdown.
All plumbing and electrical work required to install this
appliance must be carried out by competent persons or
qualified plumbers or electricians.
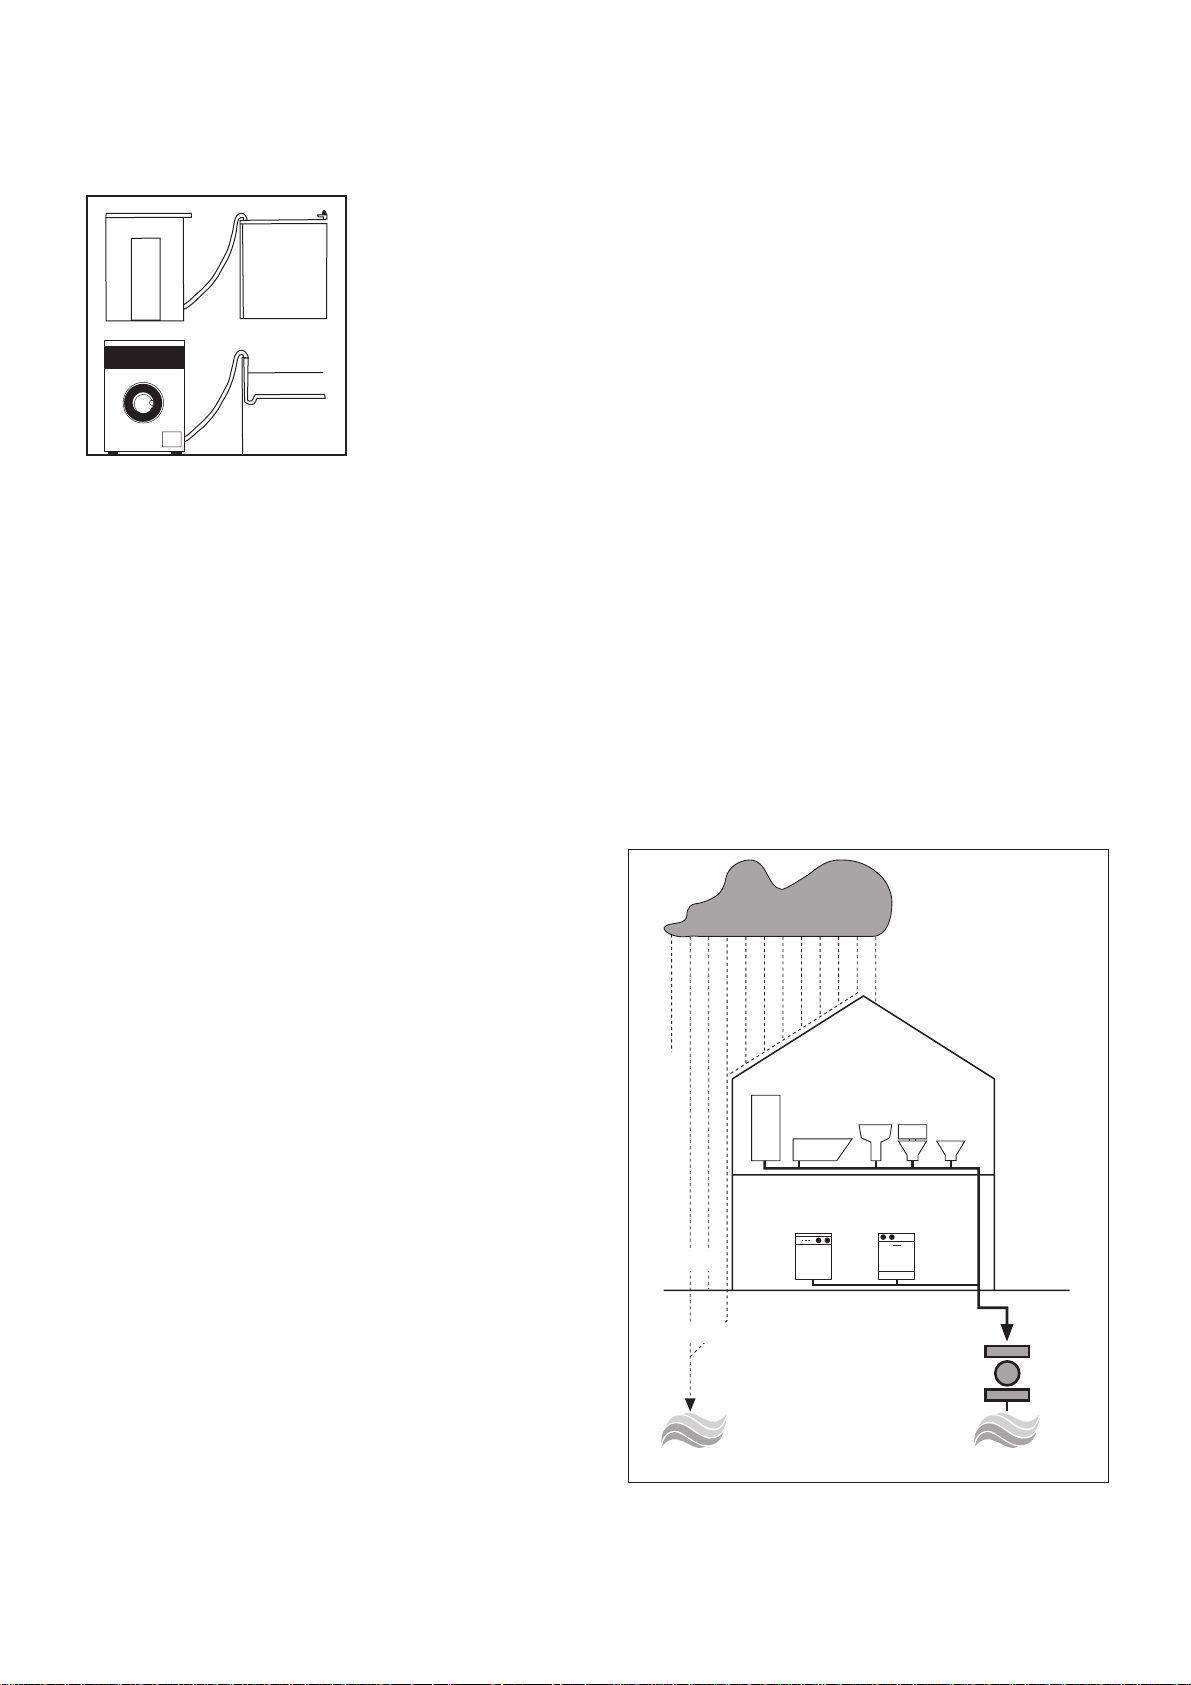
IN THE INTEREST OF THE
ENVIRONMENT
Washing machines and dishwashers should be connected
to the FOUL drainage system, the water will then be taken
to a sewage works for treatment before being discharged
safely into a river.
It is essential that these appliances are not connected to
the surface water drainage system as this water is
discharged directly into a river or stream and may cause
pollution.
If you require any further advice please contact your local
authority drainage department.
500 mm min
850 mm max
40 mm
inside dia min
500 mm min
850 mm max
SHOWER
SINK TOILET
P0987
RAINWATER
'RUN-OFF'
SURFACE WATER
DRAINS & SEWERS
UNTREATED
DISCHARGE
RIVER
BATH
WASHING
MACHINE
DISHWASHER
BIDET
FOUL DRAIN
FOUL SEWERS
SEWAGE
TREATMENT
WORKS
TREATED
DISCHARGE
RIVER
 Loading...