

ZM-NB32J
Features
1. ZM-NB32J does not require a fan, thus it does not need to be powered, nor does it create noise or vibration.
2. The northbridge chipset can be cooled down to an optimal temperature without generation of noise.
(Caution :
Parts
1) One ZM-NB32J Heatsink 2) One Supply of Thermal Grease
3) Two Thermal Adhesives(A, B) 4) Bolts / Nuts / Links / Push Pins / Tapered Springs (Two Each)
Heatsink Specification
1) Model: ZM-NB32J 2) Dimensions : 37(L) X 37(W) X 32(H) mm
3) Material : Aluminium 6063T5 4) Weight : 36g
Compatible North Bridge Chipsets
Usable on all brands of northbridge chipsets
notes)
1) Using push pins and thermal grease can lower the chipset’s temperature better, so if there are holes around
the chipset, use the thermal grease, push pins, bolts, and nuts to attach instead of using the thermal adhesive.
2) If the heatsink(ZM-NB32J) interferes with some components on the mainboard, do not attach.
How to Install
1. Using Thermal Adhesive (No holes around the northbridge chipset)
1) Clean off the surfaces of the northbridge chipset and the ZM-NB32J thoroughly.
2) Spread the Type A thermal adhesive evenly on the northbridge chipset.
3) Then spread the Type B thermal adhesive evenly on the ZM-NB32J's contact surface.
4) After pressing the ZM-NB32J onto the northbridge chipset firmly, lay the mainboard evenly for 15 minutes for
Caution)
1) The heatsink attached with thermal adhesive cannot be removed afterwards.
2) Attach in well-ventilated place.
3) Do not let your skin or eyes get in contact with the adhesive. In case of contact, clean off promptly with
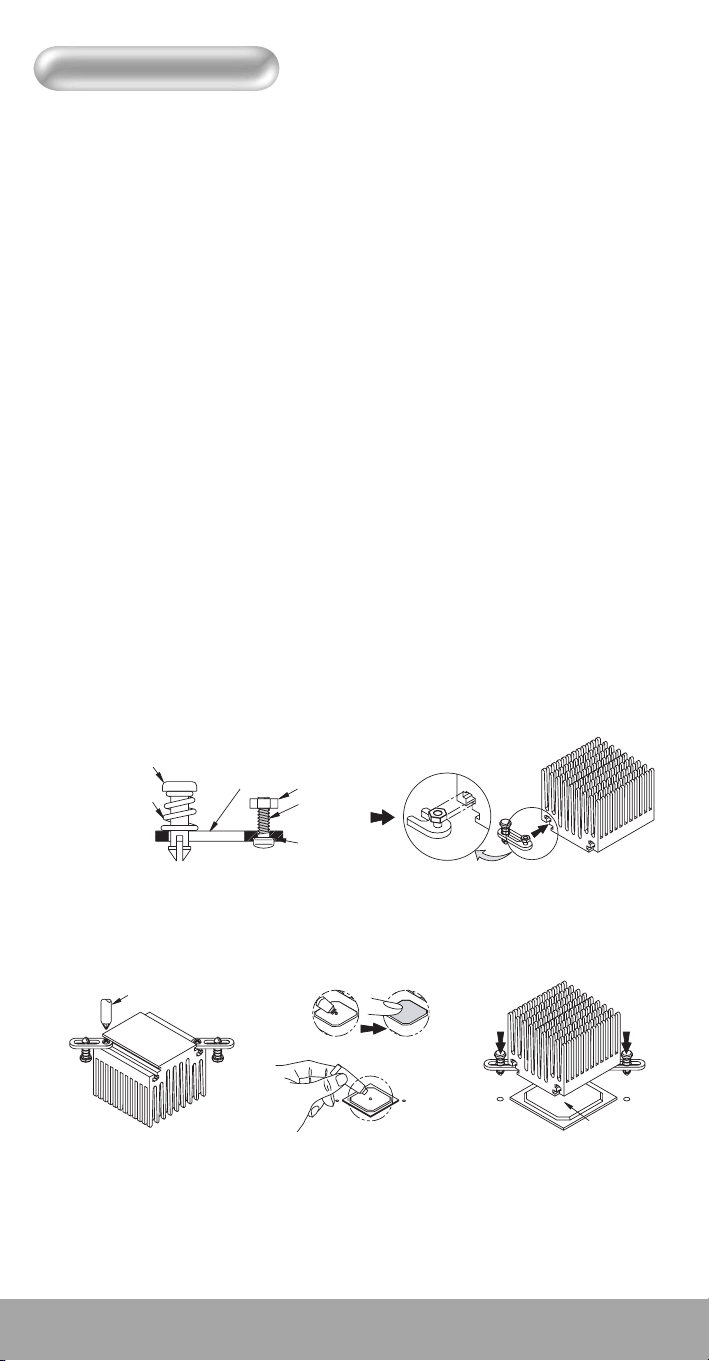
2. Using Push Pins
Tapered Spring
Zalman is not responsible for any damage to system caused by overclocking.)
the adhesive to cure before using the computer.
water, and contact your physician thereafter if it went into your eyes.
Push Pin
Link
Nut
Bolt
Assembly
1. Insert the head of the bolt into the groove under the bolt
hole on the link and screw on the nut as shown in the
diagram.Then, assemble the push pin and the spring onto
(Caution!
the link.
a smaller dlameter should be directed to the head of the
push pin as shown in Figure.)
3. Align the push pins on the assembly
with the holes on the mainboard and
tighten the bolts so that they won’t move.
The end of the tapered spring having
Screw Driver
Groove
2. Insert the assembly into the groove on the heatsink
by the direction of the arrow after adjusting the nut
to appropriate height as shown in the diagram.
Thermal Grease
4. Spread the included thermal
grease evenly on the north
bridge chipset.
Northbridge
5. Check the push pins to see that
there are no problems in installing
or removing the heatsink as you
install.
Chipset
Cautions)
Do not let your skin or eyes get in contact with the thermal grease. In case of contact, clean off promptly
with water, and contact your physician thereafter if it went into your eyes.
* CNPS stands for Computer Noise Prevention System. It is a registered trademark of Zalman, who developed this concept (a world first).
* The specifications of any product may change without prior notice to improve the performance thereof.
www.zalman.co.kr
 Loading...