


Quick Guide
ZM-VE400
English /
- Please download the latest firmware from "www.zalman.com.
- Descargar el último firmware en www.zalman.com
-
Téléchargez la dernière version du micro logiciel sur www.zalman.com.
français / Español
www.ZALMAN.com
WWW.ZALMAN.COM
Ver. 130122
1

Reminder
1
1. Information
■ This manual is for handling and using ZM-VE400.
■ Please read “Caution” before using the device.
■ Please check “Troubleshooting” when issue occurs.
Be sure to always back up important data
■ The external HDD manufacturer is not responsible for any data stored in the
external HDD nor liable for any emotional or physical damages caused due to data
loss.
Do not arbitrarily disassemble.
■ If you disassemble the product or remove/damage the stickers and/or labels
attached on the product, you cannot receive the warranty service.
Caution: Electrostatic
■ Do NOT touch the circuit with bare hands. The chip controlling the ZM-VE400's
virtual CD-ROM is a electrostatic sensitive part. ZM-VE400 may not operate properly if
the circuit is damaged by the electrostatic discharge.
※ Visit official homepage (www.zalman.com) to download firmware upgrades and
ZM-VE400 User Guide.
※ This User Guide is subject to change without prior notice to users in order to
enhance the product features and to apply the firmware upgrade.
2. Components
(Components may be changed without notice.)
ZM-VE400 Pouch Screw Driver & Bolts 2pcs
Quick Guide
Quick Guide
2
USB 3.0 Cable
WWW.ZALMAN.COM

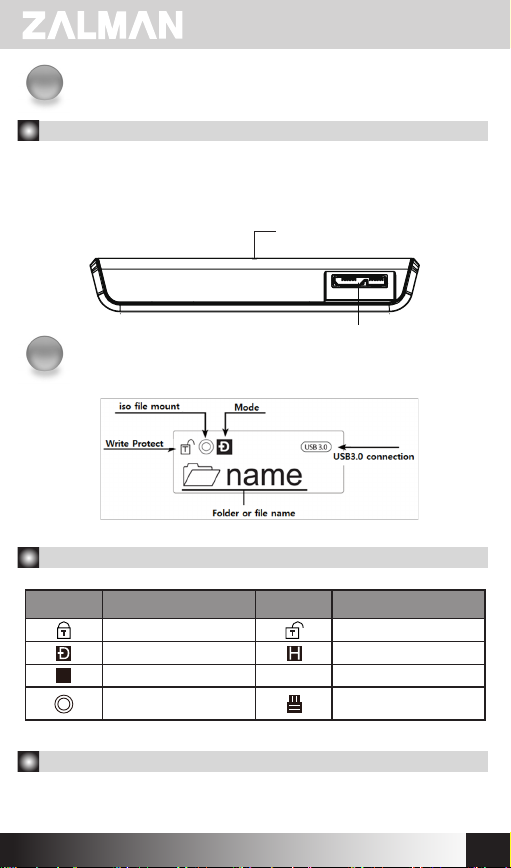
3. Name of Parts
①
④
⑧
⑦
4. Specification
Spec.
Maximum Transfer Rate
Model
Case Material Aluminum alloy, Acryl, Poly carbonates (PC)
Weight 91g (except Hard disk)
Dimensions 146 x 80.8 x 14 (L x W x H / mm)
Interface USB 3.0/2.0/1.1
Power
Support OS
②
③
No. Part Name
①
②
③
④
⑤⑥
⑤
⑥
⑦
1 : Press "1"on touch pad for 3 seconds for
⑧
(It may be changed without notice.)
DC5V(USB Power), 2.5" Hard disk
Window XP / Linux 2.6 / MAC OS X 1.0.0 or higher
USB 3.0 Port :USB 3.0 Cable Port
LED Indicator: Read / Write LED lighting
(Blue LED: USB3.0, White LED: USB2.0)
LCD Display Panel: File list and Menu
Touch Panel: Select file and Control menu
Enter : "Enter" and "Select"
Menu : Enter/ Exit “Menu mode ”
5 : Mount / Unmount Virtual ODD
safe removal
ZM-VE400
5Gbps
5. System Minimum Requirement
■ Intel Pentium / 350MHz or higher CPU
■ Memory 60MB or higher
■ System should have USB CD booting bios
(Most of PC manufactured before 2003 doesn’t support CD-ROM booting)
WWW.ZALMAN.COM
3

6. General Features
■
Encryption function is available through device’s touch panel
■
Does not need application program installation.
■
Has normal external HDD function.
■
External CD-ROM function (or CD/DVD/BD changer) with ISO file instead of CD/
DVD/BD disk.
■
File names are shown in display panel. And the files can be navigated through
∧ / ∨ / < / > on the touch pad.
■
Can check hard disk condition such as internal temperature or health level.
■
Goes to Safety removal mode after hard disk head parking zone. It makes hard
disk much safer.
■
Has write protect function. It protects from unexpected virus attack.
Case Assembly
2
1. Enclosed Parts
■
Screw driver
■
Screw 2EA
2. Assembly Order
① Detach 2 screws from rear aluminum cover
② Take out aluminum cover
③ Insert 2.5” Hard disk to the main body
④ Tighten 2 screws to the aluminum cover
①
②
③
4
④
WWW.ZALMAN.COM
Connect with USB
3
1. Connecting to PC
- Connect device to PC’s USB port using enclosed USB cable.
When disconnecting, please use “Hardware Safety Removal” on the tray.
Please press "1" on touch pad for 3 seconds to do Safe removal.
LED Indicator
USB3.0 Port
Display
4
1. Icon Description
Icon Description Icon Description
Write Protect Read & Write Enabled
Dual Mode HDD Mode
O
ODD Mode Sleep Mode
iso File Mounted to
Virtua l CD
Z
Z
Connect Virtual HDD
2. Functional description
To enter Menu mode, touch "Menu" on touch panel
WWW.ZALMAN.COM
5

Encryption
5
In Menu mode, find Encryption option (Encryption is disabled when released)
1. To use Encryption function, touch "Enter" to enter “Set Encryption”
▶Set Encryption
Reset Encryption
2. Type password (4 ~ 8 numbers), and type it again to confirm password
(* Press "Menu" to delete the wrong numbers)
Input Password
----
3. Setting is completed
4. Delete Encryption function, touch "Enter" at below option
Set Encryption
▶Reset Encryption
5. Please confirm that all the data will be gone.
Data will be lost!
1. Yes 2. No
☞ Please beware that all the data in the hard disk will be lost
6. Password
When Encryption’s enabled, password should be typed whenever connected to PC.
If the password is typed wrong 10 times, device should be reconnected.
Also, type waiting time gets longer as each mistakes made.
7. To copy Date to device, please format hard disk first
when Set / Reset Encryption
Input Password
----
6
Confime Password
----
WWW.ZALMAN.COM
6
Virtual CD-ROM
■ To use Virtual ODD, iso file must be located in the “_iso” folder of the device.
■ After finding iso file with ∧ / ∨ / < / >, touch “5” to select it.
■ External HDD or CD-ROM may not be recognized according to current mode
state.
1. Main Menu
Mode Select Setting Device Mode
Encryption Set / Reset Encryption Function
Setting Setting LCD Brightness or Sleep Mode Time
Information Check HDD Information and Firmware Information
USB Connect
Advanced
Exit
Setting USB Connection
Setting Virtual HDD Mounting
Exit Menu
2. Mode Select (“ ” is shown in selected mode)
Dual Mode Both of external HDD and CD-ROM are recognized.
ODD Mode
HDD Mode
External CD-ROM is recognized.
(Useful when installing OS)
(Useful when connected to other devices except PC)
External HDD is recognized.
3. Encryption
Set Encryption
Reset Encryption
Encryption function is on. All the existed data will be lost
Delete Encryption function. All the existed data will be
after setting password
lost after resetting password
4. Setting
LCD Brightness Adjust LCD backlight brightness
Idle Brightness Adjust LCD backlight brightness in Sleep Mode
Standby Time Sleep Mode time setting
Load Default Return to default value
WWW.ZALMAN.COM
7

5. Information
S.M.A.R.T Hard disk SMART information
HDD Model Display Hard disk model name
HDD Serial Display Hard disk serial number
Firmware Ver. Display device firmware version
6. S.M.A.R.T
HDD Temp. Display HDD temperature
HDD Health
Display HDD health info (Good, Warning, Bad)
-If Warning or Bad is shown, please check HDD carefully
after backup data.
7. USB Connect
Refresh Refreshing device from PC
Safe Removal Safely removing from PC
8. Advanced
Write Protect ON/OFF Write protection
Umount VHDD Disable (Unmount) Virtual HDD function
8
WWW.ZALMAN.COM

Français
WWW.ZALMAN.COM
9

1
Rappel
1. Information
■ Ce manuel est destiné à la manipulation et à l'utilisation du ZM-VE400.
■ Lisez attentivement la notice avant d'utiliser l'appareil.
■ En cas de problème, référez-vous à la partie « Résolution des problèmes »
Assurez-vous de toujours sauvegarder vos données importantes
■ Le fabricant du disque dur externe n’est responsable d'aucune donnée stockée
sur le disque dur externe ni des dommages émotionnels ou physiques pouvant être
causés par la perte de données.
Ne démontez pas le produit de façon arbitraire.
■ Si vous démontez le produit ou enlevez / détériorez les autocollants et / ou les
étiquettes collées sur le produit, vous ne pourrez pas bénéficier du service de garantie.
Caution: Electrostatique
■ Ne touchez pas le circuit les mains nues. La puce qui contrôle le CD-ROM virtuel
ZM-VE400 est composée d'une partie électrostatique sensible. Le ZM-VE400 peut
ne pas fonctionner correctement si le circuit est endommagé par une décharge
électrostatique
※ Consultez notre site officiel (www.zalman.com) pour télécharger les mises à jour
du logiciel et du guide d'utilisation ZM-VE400.
※ Ce guide d'utilisation est sujet à modification sans préavis aux utilisateurs
afin d'améliorer les caractéristiques du produit et afin d'appliquer les possibles
mises à jour du logiciel.
2. Composants
(Les composants peuvent changer sans préavis.)
10
ZM-VE400
Housse de protection Tournevis & Visses 2pcs
Quick Guide
Guide d’installation
Câble USB 3.0
WWW.ZALMAN.COM

3. Descriptif des touches
①
④
⑧
⑦
4. Spécificités
Spec.
Matériau du boitier Alliage aluminium, acrylique, poly carbonates (PC)
Vitesse maximum de
Model
Poids 91g (sans disque dur)
Dimensions 146 x 80.8 x 14 (L x l x h / mm)
Interface USB 3.0/2.0/1.1
transfert
Alimentation
Support OS
②
③
No. Description des différentes parties
Port USB 3.0: Connecteur pour câble USB 3.0
①
Indicateur LED : Lecture / écriture avec une
②
(LED Bleue: USB3.0, LED blanche: USB2.0)
③
Ecran tactile: Sélection de fichier et contrôle du menu
④
⑤⑥
⑤
⑥
⑦
⑧
(Peut être modifié sans préavis)
DC5V (alimentation USB), disque dur 2.5’’
Window XP+ / Linux 2.6+ / MAC OS X 1.0.0 +
LED colorée
Ecran d'affichage LCD :
Affichage des fichiers et Menu
Entrée : "Enter"
Menu : Entrer ou sortir du mode Menu
5 : Activer/désactiver l’ODD virtuel
1: Appuyez «1» sur le pavé tactile pendant 3
secondes pour supprimer en toute sécurité.
ZM-VE400
5Gbps
5. Système minimum requis
■
Intel Pentium / 350MHz ou CPU supérieur
■
Mémoire 60MB ou plus
■
Le système doit avoir un mode boot du bios depuis 'USB La plupart des PC
fabriqués avant 2003 ne supporte pas le boot par le CD-ROM)
WWW.ZALMAN.COM
11

6. Caractéristiques générales
■
La fonction de cryptage est disponible via l'écran tactile de l'appareil.
■
Aucun programme d'installation nécessaire
■
le CD-ROM externe (ou changeur de CD/DVD/BD) fonctionne avec le fichier ISO à
la place des disques CD /DVD /BD
■
Les noms de fichiers sont affichés sur le panneau d'affichage. Et la navigation
dans les fichiers se fait via les touches ∧ / ∨ / < / > du pavé tactile.
■
Possibilité de vérifier l'état du disque dur ainsi que la température interne et son état.
■
Il passe en mode sécurité après un problème d'écriture. Le disque en est plus
sécurisé.
■
Avec la fonction de protection en écriture, le disque est protégé contre les
attaques inattendues de virus.
Assemblage du boitier
2
1. Pièces incluses
■
Tournevis
■
Visses 2EA
2. Ordre d'assemblage
① Retirez les 2 visses du couvercle arrière en aluminium
② Retirez le couvercle en aluminium
③ Insérez le disque dur 2,5'' dans la partie principale
④ Fixez de nouveau les 2 vis sur le couvercle en aluminium
①
②
12
③
④
WWW.ZALMAN.COM

Connexion via USB
3
1. Connexion au PC
- Raccordez l'appareil au port USB d'un PC en utilisant un câble USB fourni.
Lors de la déconnexion, utilisez «Retrait du matériel en toute sécurité».
Appuyez «1» sur le pavé tactile pendant 3 secondes pour supprimer en toute sécurité.
Indicateur LED
Port USB3.0
Affichage
4
iso en émulation
Protection d’écriture
Nom du dossier / fichier
Connexion UBS3.0
1. Description des icônes
Icon Description Icon Description
Protégé en écriture Lecture et écriture Activé
O
Fichier iso activé sur CD
Double mode Mode HDD
Mode ODD Mode veille
virtuel
Z
Z
Connectez HDD Virtuel
2. Description des fonctionnalités
Pour entrer en mode Menu, appuyez sur «Menu» sur l'écran tactile.
WWW.ZALMAN.COM
13

Fonction de Cryptage
5
Dans le mode Menu, trouvez l'option cryptage (l'option est désactivée quand il est
libre)
1. Pour utiliser la fonction cryptage, appuyez sur la touche «Entrée» pour accéder à
«Configuration de Cryptage»
▶Set Encryption
Reset Encryption
2. Entrez le mot de passe (4 ~ 8 chiffres), tapez-le à nouveau pour le confirmer
* Appuyez «Menu» pour effacer les chiffres erronés.
Input Password
----
3. La configuration est terminée
4. Supprimez la fonction de cryptage, appuyez «Entrée» dans l`option en bas.
Set Encryption
▶Reset Encryption
5. Notez que toutes les données seront perdues.
Data will be lost!
1. Yes 2. No
☞ Notez bien que toutes les données du disque dur seront supprimées
lors des manipulations de cryptage (Set / Reset Encryption)
6. Entrer le mot de passe
Input Password
----
Lorsque le cryptage est activé, le mot de passe doit être saisi lorsque le disque dur
est connecté à un PC.
Si un mauvais mot de passe est tapé 10 fois, le dispositif doit être reconnecté. De
plus, le temps d'attente se rallonge à chaque erreur.
7. Pour copier des données dans l`appareil, formatez d'abord le disque dur
14
Confime Password
----
WWW.ZALMAN.COM

6
CD-ROM Virtuel
■
Pour utiliser le mode virtuel, le fichier iso doit se situer dans un dossier source
"_iso" dans le disque dur.
■
Après avoir trouvé le fichier à l'aide de / / < / >, sélectionnez le en
appuyant sur la touche « 5 ».
■
Le disque externe ou CD-ROM peut ne pas être reconnu selon l'état du mode actuel.
1. Menu principal
Mode Select Réglage du mode de l`appareil
Encryption Fixer / réinitialiser la fonction cryptage
Setting Réglage de luminosité de l'écran ou du temps de veille
Information
USB Connect
Advanced
Exit
Vérifiez les informations du disque dur et celles du
Réglage de la connexion USB
Réglage de disque dur virtuel
logiciel
Sortir du menu
2. Sélectionnez le mode (" " est affiché dans le mode sélectionné)
Dual Mode
ODD Mode
HDD Mode
Les disques durs externes et CD-ROM sont tous deux
Le CD-ROM externe est reconnu.
(Généralement lorsqu'il est connecté à des appareils
reconnus.
(Utile lors de l'installation de SE)
HDD externe est reconnu
autres que PC)
3. Cryptage
Set Encryption
Reset Encryption
Activer la fonction de cryptage. Toutes les données
existantes seront perdues après avoir entré votre mot de
Supprimer la fonction de cryptage. Toutes les données
seront perdues après la réinitialisation du mot de passe.
passe.
4. Réglage
LCD Brightness Réglez la luminosité de l'écran LCD allumé
Idle Brightness Réglez la luminosité de l’écran LCD en mode veille
Standby Time Réglage du mode veille
Load Default Retour au mode par défaut
WWW.ZALMAN.COM
15

5. Information
S.M.A.R.T Informations du disque dur SMART
HDD Model Afficher le nom du modèle du disque dur
HDD Serial Afficher le numéro de série du disque dur
Firmware Ver. Affichage de la version du firmware de l'appareil
6. S.M.A.R.T
HDD Temp. Afficher la température du HDD
HDD Health
Affichage de l'état du disque dur (Bon, alerte, mauvais)
-Si le niveau mauvais ou d'alerte s'affiche, vérifiez
attentivement le disque dur après avoir sauvegardé les
données.
7. Connexion USB
Refresh Réinitialisation à partir du PC
Safe Removal Retrait en toute sécurité
8. Avancée
Protection en écriture Protection en écriture par Marche / Arrêt
Désactiver VHDD Désactivez la fonction de HDD virtuel
16
WWW.ZALMAN.COM

Español
WWW.ZALMAN.COM
17

¡Aviso!
1
1. Information
■ Este manual está destinado al manejo y uso del ZM-VE400.
■ Lea atentamente las instrucciones antes de usar el producto.
■ En caso de problema, consulte la sección "Solución de problemas"
Asegúrese de tener siempre una copia de respaldo de los datos
■ El fabricante del disco duro externo no es responsable de los datos almacenados
en el disco duro externo, ni es responsable de cualquier daño físico o emocional
debido a la pérdida de datos.
No desarme el producto arbitrariamente.
■ Si desmonte el producto o retira, o deteriora las pegatinas y etiquetas que lo
revisten, el producto pierde toda garantía.
Precaución: Electrostática
■ No toque con las manos desnudas el circuito. El chip que controla el "CD-ROM"
virtual del ZM-VE400 se compone de una parte muy sensible a la electrostática.
El ZM-VE400 no funcionará correctamente si el circuito sufre una descarga
electrostática.
※ Visite nuestro sitio web oficial (www.zalman.com) ahí podrá actualizar el software
y la guía del usuario del ZM-VE400.
※ Este manual está sujeto a cambios sin previo aviso a los usuarios
2. Componentes
ZM-VE400
18
(Los componentes pueden cambiar sin previo aviso.)
Funda de protection 1 destornillador y 2 tornillos
Quick Guide
Guía de instalación
WWW.ZALMAN.COM
Cable USB 3.0

3. Descriptivo de las teclas
①
④
⑧
⑦
4. Especificaciones
Spec.
Material de la caja Aleación de aluminio, carbonato de acrílico, poli (PC)
Fuente de alimentación
Model
Weight 91g (sin disco duro)
Dimensiones 146 x 80.8 x 14 (A x l x a / mm)
Interfaz USB 3.0/2.0/1.1
Tasa máxima de
transferencia
Soporta los OS
②
③
No. Part Name
① Puerto: USB 3.0 Conector para el cable USB3.0
②
③
④
⑤⑥
⑤ Enter : “Enter”
⑥ Menu: Entrar o salir del menú
⑦
5: Montar / descender de la emulación virtual (ODD)
⑧
(Pueden ser modificadas sin previo aviso)
DC5V (alimentación USB), disco duro 2.5’’
Window XP+ / Linux 2.6+ / MAC OS X 1.0.0 +
Indicador LED: lectura / escritura con un LED
indicador (LED azul: USB3.0, LED blanco: 2,0)
Pantalla LCD: para mostrar archivos y el
Pantalla táctil: Selección de archivos y control
1: Appuyez sur «1» sur le pavé tactile pendant 3
secondes pour supprimer en toute sécurité.
menú
del menú
ZM-VE400
5Gbps
5. Requisitos mínimos del sistema
■ Intel Pentium / 350 MHz o superior CPU
■ Memoria de 60 MB o más
■ Système doit avoir un mode boot du bios depuis l’USB
(La mayoría de los PC fabricados antes de 2003 no soportan el arranque desde el CD-ROM)
WWW.ZALMAN.COM
19

6. Especificaciones generales
■ La función de cifrado disponible a través de la pantalla táctil del dispositivo.
■ No requiere software de instalación
■ Funcionando como un disco duro convencional.
■ CD-ROM externo funciona (o CD / DVD / BD cargador) con el archivo ISO en
lugar de discos CD / DVD / BD
■ Los nombres de archivo se muestra en el panel de visualización. La navegación
de archivos se hace través del ∧ / ∨ / </> teclado táctil
■
Posibilidad de comprobar el estado del disco duro y su temperatura interna.
■
Cambia al modo seguro después de un problema de escritura. El disco estará más seguro.
■ Con la función de protección contra escritura, el disco está protegido contra
ataques inesperados de virus.
Ensamblaje de la Carcasa
2
1. Piezas incluidas
■
Destornillador
■
Tornillo 2EA
2. Orden de montaje
① Quite los 2 tornillos de la tapa posterior de aluminio
② Retire la tapa de aluminio
③ Introducir el disco duro de 2,5'' en elalojamiento
④ Vuelva a colocar los dos tornillos de la cubierta de aluminio
①
②
20
③
④
WWW.ZALMAN.COM

Conexión a través del USB
3
1. Conexión al PC
- Conectar el dispositivo al puerto USB de la computadora usando el cable incluido
con el producto. Para descon.ectar el dispositivo, usar la función “Quitar hardware
de forma segura” en la bandeja. Apretar Apretar “1” en el teclado táctil durante 3
segundos para remover el dispositivo en forma segura
LED Indicator
USB3.0 Port
Affichage
4
iso en émulation
Protection d’écriture
Nom du dossier / fichier
Connexion UBS3.0
1. Description des icônes
Icon Description Icon Description
Protégé en écriture Lecture et écriture Activé
O
Archivo ISO subido al CD
Doble modo Modo HDD
Modo ODD Modo espera
virtual
Z
Z
Conectado virtual HDD
2. Descripción de la funcionalidad
“Enter” para acceder a la opción “Configurar cifrado”
WWW.ZALMAN.COM
21

Función de cifrado
5
En el modo Menú, busque la opción de encriptación
(la opción está desactivada cuando está libre)
1. Para utilizar el cifrado, pulse “Enter” para acceder a la opción “Configurar cifrado”
▶Set Encryption
Reset Encryption
2. Introduzca la contraseña (4 ~ 8 dígitos), para confirmarla vuélvala a escribir
(* Apretar “Menú” para borrar los números incorrectos.)
Input Password
----
3. La configuración ha terminado
4. Para borrar la función de cifrado, apretar “Enter” en la opción que se muestra debajo.
Set Encryption
▶Reset Encryption
5. Tenga en cuenta que todos los datos se perderán.
Data will be lost!
1. Yes 2. No
☞ Please beware that all the data in the hard disk will be lost
6. Introduzca la contraseña
Si la encriptación está activada, la contraseña debe introducirse cuando el disco
duro está conectado al PC.
Si introduce una contraseña incorrecta diez veces, el dispositivo debe ser
reconectado. Además, el tiempo de espera se alarga con cada error.
7. Para copiar datos al dispositivo, primero debe formatear el disco duro
when Set / Reset Encryption
Input Password
----
22
Confime Password
----
WWW.ZALMAN.COM

6
Virtual CD-ROM
■ Para utilizar el modo virtual, el archivo iso debe estar ubicado en una carpeta
"_ ISO" en el disco duro de origen.
■ Una vez que haya encontrado el archivo con la ayuda de: ∧ / ∨ / </>
selecciónelo pulsando la tecla "5".
■ La unidad externa o CD-ROM no puede ser reconocido según el modo actual.
1. Menu principal
Seleccione Modo de Configuración de Dispositivos
Cryptage Fijar / restablecer la función de encriptación
Setting Ajuste de brillo de la pantalla o de espera
Information Verifique la información del disco duro y del software
Connexion USB
Advanced
Exit
Configuración de conexión USB
Avanzado definir el disco duro virtual
Salir del menu
2. Seleccione el modo (" " se muestra en el modo seleccionado)
Dual Mode
ODD Mode
HDD Mode
Los discos duros externos y el CD-ROM los dos han sido
(Útil cuando se instala el sistema operativo)
HDD disco duro externo es reconocido (Por lo general,
cuando se conecta a otros dispositivos, excepto PC)
reconocidos
CD-ROM es reconocido.
3. Cryptage
Al activar la función de cifrado. Todos los datos
Set Encryption
Reset Encryption
existentes se perderán después de haber introducido
Suprimir la función de cifrado. Todos los datos se
perderán después de restablecer la contraseña.
la contraseña.
4. Configuración
LCD Brightness Ajusta el brillo de la retro iluminación de la pantalla LCD
Idle Brightness
Standby Time Configuración del modo de espera
Load Default Regreso al modo por defecto
Brillo de la retro iluminación de la pantalla en modo de
espera
WWW.ZALMAN.COM
23

5. Información
S.M.A.R.T Información del disco duro SMART
HDD Model Mostrar el nombre del modelo del disco duro
HDD Serial Mostrar número de serie del disco duro
Firmware Ver. Muestra la versión de firmware del dispositivo
6. S.M.A.R.T
HDD Temp. Mostrar la temperatura del disco duro
HDD Health
Visualización del estado del disco (OK, advertencia,
Si el nivel malo o alerta aparece, revise con cuidado el
disco duro después de haber protegido los datos.
malo)
7. Conexión USB
Refresh Re- inicialización a partir del PC
Safe Removal Extracción segura
8. Avancée
Protección contra
escritura
Desactivación del VHDD
Protección contra escritura Activado/Desactivado
Desactiva (desmonta) la función disco duro virtual
24
WWW.ZALMAN.COM
 Loading...