


Operations Manual
900 Chlorine Colorimeter
Instruction Manual: Pages 2 - 21
Mode d‘emploi: Pages 22 - 41
Instrucciones: Página 42– 61

Contact Information
ORDERING & TECHNICAL SUPPORT Telephone: (800) 897-4151
(937) 767-7241
Monday through Friday, 8:00 AM to 5:00 PM ET
Fax: |
(937) |
767-9353 |
(orders) |
|
(937) |
767-1058 |
(technical support) |
Email: |
environmental@ysi.com |
||
Mail: |
YSI Incorporated |
||
|
1725 Brannum Lane |
||
|
Yellow Springs, OH 45387 |
||
|
USA |
|
|
Internet: |
www.ysi.com |
|
|
When placing an order please have the following information available:
•YSI account number (if available)
•Name and Phone Number
•Model number or brief description
•Billing and shipping address
•Quantity
•Purchase Order or Credit Card
SERVICE INFORMATION
YSI has authorized service centers throughout the United States and Internationally. For the nearest service center information, please visit www.ysi.com and click ‘Support’ or contact YSI Technical
Support directly at 800-897-4151.
When returning a product for service, include the Product Return form with cleaning certification.
The form must be completely filled out for an YSI Service Center to accept the instrument for service.
The Product Return form may be downloaded at www.ysi.com and clicking on the ‘Support” tab.

Table of Contents
English
• General notes. . . . . . . . . . . . . . . . . . . . . . . |
. . . . . . . 4 |
Guidelines for photometric measurements. . |
. . . . . . . . . . . . . . . . . . 4 |
Method notes.. . . . . . . . . . . . . . . . . . . . . . . . . . . . . . . 4
Replacement of batteries. . . . . . . . . . . . . . . . . . . . . . . . . . |
5 |
•Functional description . . . . . . . . . . . . . . . . . . . . . . . . . . . 6 Operation.. . . . . . . . . . . . . . . . . . . . . . . . . . . . . . . . 6
|
Display backlight. . . . . . . . |
|
. . . . . . . . . . . . . . . . . . . . . . 7 |
||
|
Recall of stored data. . . . . . . . . . . . . . . . . . . . . . . . . . . . .7 |
||||
|
Countdown . . . . . . . . . . |
|
. . . . . . . . . . . . . . . . . . . . . |
. |
7 |
• Methods. . . . . . . . . . . |
. . . . . . . . . . . . . . . . . . . . . . 8 |
||||
|
Chlorine, with tablet (CL 6) . . . . |
|
. . . . . . . . . . . . . . . . . . . . . |
. |
8 |
|
Chlorine HR, with tablet (CL 10). . |
|
. . . . . . . . . . . . . . . . . . . . . |
.10 |
|
|
Chlorine, with powder pack (CL 2). |
. |
. . . . . . . . . . . . . . . . . . . . |
|
12 |
|
Chlorine, with powder pack (CL 8). |
. |
. . . . . . . . . . . . . . . . . . . . |
|
14 |
• |
Menu options. . . . . . . . . |
|
. . . . . . . . . . . . . . . . . . . . . |
.16 |
|
|
Menu selections. . . . . . . . . . . . . . |
. |
. . . . . . . . . . . . . . |
|
16 |
|
Recall of stored data. . . . . . . . . . . . . . . . . . . . . . . . . . . . 16 |
||||
|
Transmitting stored data . . . . . . . . . . . . . . . . . . . . . . . . . . .16 |
||||
|
Setting date and time. . . . . . . . . . |
. |
. . . . . . . . . . . . . . . . |
|
17 |
• |
Calibration Mode. . . . . . . . |
. . . . . . . . . . . . . . . . . . . . |
. |
17 |
|
|
User calibration. . . . . . . . . |
. . . . . . . . . . . . . . . . . . . . |
. |
17 |
|
|
Factory calibration reset . . . . . |
|
. . . . . . . . . . . . . . . . . . . . . |
.19 |
|
• Technical data. . . . . . . . |
. . . . . . . . . . . . . . . . . . . . . . 20 |
||||
|
Operating messages. . . . . . . |
. . . . . . . . . . . . . . . . . . . . |
. |
21 |
|
|
Error codes . . . . . . . . . . |
|
. . . . . . . . . . . . . . . . . . . . . |
.21 |
|
|
Battery disposal. . . . . . . . . |
. . . . . . . . . . . . . . . . . . . . |
. |
21 |
|
 CAUTION
The accuracy of the instrument is only valid if the instrument is used in an environment with controlled electromagnetic disturbances according to DIN 61326.
Wireless devices, e.g. wireless phones, must not be used near the instrument.
3
General Notes
Guidelines for photometric measurements
1.Vials, caps and stirring rods should be cleaned thoroughly after each analysis to prevent interference. Even minor reagent residues can cause errors in the test result.
2.The outside of the vial must be clean and dry before starting the analysis. Clean the outside of the vials with a lint-free cloth (L197635) to remove fingerprints or other marks.
3.Zero calibration and test must be carried out with the same vial as there may be slight differences in optical performance between vials.
4.The vials must be positioned in the sample chamber for zeroing and test with the  mark on the vial aligned with the
  mark on the instrument.
5.Always perform zeroing and test with the vial cap tightly closed. Only use the cap with a lightshielding ring.
6.Bubbles on the inside wall of the vial lead to incorrect measurements. To prevent this, remove the bubbles by gently swirling the vial before performing the test.
7.Avoid spillage of water into the sample chamber because this can lead to incorrect test results.
8.Contamination of the transparent cell chamber can result in incorrect readings. Check at regular intervals and – if necessary – clean the transparent cell chamber using a moist cloth or cotton swab.
9.Large temperature differences between the instrument and the environment can lead to errors e.g. due to the formation of condensation in the cell chamber or on the vial.
10.To avoid errors caused by stray light do not use the instrument in bright sunlight.
11.The reagents must be added in the correct sequence.
Method notes
•Prior to measurement ensure that the sample is suitable for analysis (no major interferences) and does not require any preparation i.e. pH adjustment, filtration etc.
•Reagents are designed for use in chemical analysis only and should be kept well out of the reach of children.
•Ensure proper disposal of reagent solutions.
•Material Safety Data Sheets are available on request.
4
English
Correct position of the vial (Ø 24 mm):
Correct filling of the vial:
10 ml |
10 ml |
5 ml |
5 ml |
correct |
wrong |
correct |
wrong |
|
|
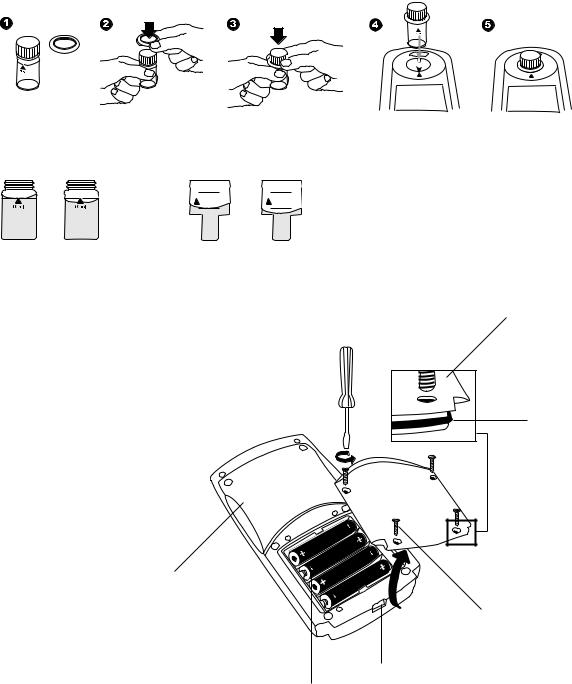
Replacement of batteries:
(B) battery compartment cover
(E) seal ring
(F) instrument back
|
AA |
|
|
R0 |
|
|
A/L |
|
3 |
03 |
|
|
||
|
/LR |
|
|
A |
|
|
AA |
AAAR |
|
|
|
|
0 |
/L |
|
|
|
|
3 |
03 |
|
|
A/LR |
|
|
AA |
(A) screws
(C) notch
CAUTION: |
(D) batteries |
|
To ensure that the instrument is waterproof:
•seal ring (E) must be in position
•battery compartment cover (B) must be fixed with the four screws
If the batteries are removed for more than one minute the date and time menu starts automatically when the photometer is turned on the next time.
5

Functional Description
|
Operation |
|
On |
Turn the unit on using the [ON/OFF] key. |
|
|
||
Off |
The display shows the following: |
|
METHOD |
||
|
Mode
Select the required test using the [MODE] key.
METHOD
Zero
Test
 METHOD
0.0.0
Zero
Test
 METHOD
RESULT
Zero
Test
Zero
Test
Scroll Memory (SM)
To avoid unnecessary scrolling for the required test method, the instrument memorizes the last method used before being turned off. When the instrument is turned on again, the scroll list comes up with the last used test method first.
The display shows the following:
Fill a clean vial with the water sample up to the 10 ml mark, screw the cap on and place the vial in the sample chamber making sure that the  marks are aligned.
Press the [ZERO/TEST] key.
The "Method" symbol flashes for approx. 8 seconds. The display shows the following:
After zero calibration is completed, remove the vial from the sample chamber. The characteristic coloration appears after the addition of the reagents.
Replace the cap on the vial and place in the sample chamber making sure that the  marks are aligned.
Press the [ZERO/TEST] key.
(For Countdown/reaction period see page 7)
The "Method" symbol flashes for approx. 3 seconds.
The result appears in the display.
The result is saved automatically.
Repeating the test:
Press the [ZERO/TEST] key again.
Repeating the zero:
Press the [ZERO/TEST] key for 2 seconds.
6

!
!
!
Zero
Test
English
Display backlight
Press the [!] key to turn the display backlight on or off. The backlight is automatically turned off during the measurement.
Recall of stored data
If the instrument is turned on, press the [!] key for more than
4 seconds to access the recall menu.
Countdown / reaction period
If a reaction period is included in a method a countdown function can be used:
Press the [!] key and hold. Press the [ZERO/TEST] key.
Release the [!] key; the countdown starts.
After the countdown is finished the measurement starts automatically.
It is possible to interrupt the countdown by pressing the [ZERO/TEST] key. Measurement starts immediately.
Caution:
An incomplete reaction period can lead to incorrect test results.
7

Methods
|
CL 6 |
Tablet |
Powder |
|
0.0.0 |
Tablet |
Powder |
|
Zero |
|
Test |
|
CL 6 |
Tablet |
Powder |
|
RESULT |
Tablet |
Powder |
!Zero Test
|
CL 6 |
Tablet |
Powder |
|
RESULT |
Tablet |
Powder |
Chlorine with Tablet: 0.01 – 6.0 mg/l
a) Free Chlorine
Fill a clean vial (24 mm Ø) with 10 ml of the water sample and perform zero calibration (see “Operation”).
Remove the vial from the sample chamber and empty it, leaving a few drops remaining in the vial.
Add one DPD No. 1 tablet straight from the foil to the water sample and crush the tablet using a clean stirring rod.
Add the water sample to the 10 ml mark.
Close the vial tightly with the cap and swirl gently several times until the tablet is dissolved.
Place the vial in the sample chamber making sure that the marks are aligned.
Press the [ZERO/TEST] key.
The method symbol flashes for approx. 3 seconds.
The result is shown in the display in mg/l free Chlorine.
b) Total Chlorine
Add one DPD No. 3 tablet straight from the foil to the same water sample and crush the tablet using a clean stirring rod.
Close the vial tightly with the cap and swirl gently several times until the tablet is dissolved.
Place the vial in the sample chamber making sure that the marks are aligned.
Wait for a reaction period of 2 minutes.
(Countdown can be activated, see page 7)
The method symbol flashes for approx. 3 seconds.
The result is shown in the display in mg/l total Chlorine.
c) Combined Chlorine
combined Chlorine = total Chlorine – free Chlorine
Tolerances:
0 – 1 mg/l: ± 0.05 mg/l
>1 – 2 mg/l: ± 0.10 mg/l
>2 – 3 mg/l: ± 0.20 mg/l
>3 – 4 mg/l: ± 0.30 mg/l
>4 – 6 mg/l: ± 0.40 mg/l
8
English
Notes:
1.Vial cleaning:
As many household cleaners (e.g. dishwasher detergent) contain reducing substances, the subsequent determination of Chlorine may show lower results. To avoid any measurement errors, only use glassware free of Chlorine demand.
Preparation: Put all applicable glassware into Sodium hypochlorite solution (0.1 g/l) for one hour, then rinse all glassware thoroughly with deionized water.
2.For individual testing of free and total Chlorine, the use of different sets of glassware is recommended (EN ISO 7393-2, 5.3)
3.Preparing the sample:
When preparing the sample, the lost of Chlorine, e.g. by pipetting or shaking, must be avoided. The analysis must take place immediately after taking the sample.
4.The DPD color development is carried out at a pH value of 6.2 to 6.5. The reagents therefore contain a buffer for the pH adjustment.
Strong alkaline or acidic water samples must be adjusted between pH 6 and pH 7 before the reagent is added (use 0.5 mol/l Sulfuric acid resp. 1 mol/l Sodium hydroxide).
5.Exceeding the measuring range:
Concentrations above 10 mg/l Chlorine can lead to results showing 0 mg/l. In this case, the water sample must be diluted with water free of Chlorine and the measurement repeated.
6.Turbidity (can lead to errors):
The use of the DPD No. 1 tablet in samples with high Calcium ion contents* and/or high conductivity* can lead to turbidity of the sample and therefore incorrect measurements. In this case, the reagent tablet DPD No. 1 High Calcium should be used as an alternative. Even if turbidity does occur after the DPD No. 3 tablet has been added, this can be prevented by using the DPD No. 1 HIGH CALCIUM tablet.
* it is not possible to give exact values, because the development of turbidity depends on the nature of the sample.
7.Oxidizing agents such as Bromine, Ozone etc. interfere as they react in the same way as Chlorine.
9
Methods
Chlorine HR with DPD Tablet: 0.1 – 10 mg/l
|
CL 10 |
Tablet |
Powder |
a) Free Chlorine
Fill a clean vial (24 mm Ø) with 10 ml of the water sample and perform zero calibration (see “Operation”).
Remove the vial from the sample chamber and empty it, leaving a few drops
0.0.0remaining in the vial.
Tablet |
Powder |
|
Zero |
|||
|
Test |
|||
|
CL 10 |
|
|
|
Tablet |
Powder |
|||
|
||||
RESULT
Add one DPD No. 1 HR tablet straight from the foil to the water sample and crush the tablet using a clean stirring rod.
Add the water sample to the 10 ml mark.
Close the vial tightly with the cap and swirl gently several times until the tablet is dissolved.
Place the vial in the sample chamber making sure that the marks are aligned. Press the [ZERO/TEST] key.
The method symbol flashes for approx. 3 seconds.
The result is shown in the display in mg/l free Chlorine.
Tablet |
Powder |
!Zero Test
|
CL 10 |
Tablet |
Powder |
|
RESULT |
Tablet |
Powder |
b) Total Chlorine
Add one DPD No. 3 HR tablet straight from the foil to the same water sample and crush the tablet using a clean stirring rod.
Close the vial tightly with the cap and swirl gently several times until the tablet is dissolved.
Place the vial in the sample chamber making sure that the marks are aligned.
Wait for a reaction period of 2 minutes.
(Countdown can be activated, see page 7)
The method symbol flashes for approx. 3 seconds. The result is shown in the display in mg/l total Chlorine.
c) Combined Chlorine
combined Chlorine = total Chlorine – free Chlorine
Tolerances:
0 – 2 mg/l: ± 0.1 mg/l
>2 – 4 mg/l: ± 0.3 mg/l
>4 – 8 mg/l: ± 0.4 mg/l
>8 – 10 mg/l: ± 0.5 mg/l
10
English
Notes:
1.Vial cleaning:
As many household cleaners (e.g. dishwasher detergent) contain reducing substances, the subsequent determination of Chlorine may show lower results. To avoid any measurement errors, only use glassware free of Chlorine demand.
Preparation: Put all applicable glassware into Sodium hypochlorite solution (0.1 g/l) for one hour, then rinse all glassware thoroughly with deionized water.
2.Preparing the sample:
When preparing the sample, the loss of Chlorine, e.g. by pipetting or shaking, must be avoided. The analysis must take place immediately after taking the sample.
3.The DPD color development is carried out at a pH value of 6.2 to 6.5. The reagents therefore contain a buffer for the pH adjustment. Strong alkaline or acidic water samples must be adjusted between pH 6 and pH 7 before the reagent is added (use 0.5 mol/l Sulfuric acid resp. 1 mol/l Sodium hydroxide).
4.Turbidity (can lead to errors):
Very high levels of calcium hardness (>1000 mg/L CaCO3) may lead to turbidity when performing the test. If this occurs add one EDTA tablet to 10 ml of the water sample prior to run the test.
5.Oxidizing agents such as Bromine, Ozone etc. interfere as they react in the same way as
Chlorine.
11

Methods
|
CL 2 |
Tablet |
Powder |
|
0.0.0 |
Tablet |
Powder |
|
Zero |
|
Test |
|
CL 2 |
Tablet |
Powder |
|
RESULT |
Tablet |
Powder |
!Zero Test
|
CL 2 |
Tablet |
Powder |
|
RESULT |
Tablet |
Powder |
Chlorine with Powder Pack: 0.02 – 2.0 mg/l
a) Free Chlorine
Fill a clean vial (24 mm Ø) with 10 ml of the water sample and perform zero calibration (see “Operation”).
Remove the vial from the sample chamber.
Add the contents of one Chlorine Free-DPD/F10 Powder Pack straight from the foil into the water sample.
Close the vial tightly with the cap and invert several times to mix the contents (20 sec.).
Place the vial in the sample chamber making sure that the marks are aligned. Press the [ZERO/TEST] key.
The method symbol flashes for approx. 3 seconds. The result is shown in the display in mg/l free Chlorine.
b) Total Chlorine
Remove the vial from the sample chamber.
Rinse the vial and the cap several times and then fill the vial with 10 ml of water sample (Note 2 and 3).
Add the contents of one Chlorine Total-DPD/F10 Powder Pack straight from the foil into the water sample.
Close the vial tightly with the cap and invert several times to mix the contents (20 sec.).
Place the vial in the sample chamber making sure that the marks are aligned.
Wait for a reaction period of 3 minutes.
(Countdown can be activated, see page 7)
The method symbol flashes for approx. 3 seconds.
The result is shown in the display in mg/l total Chlorine.
c) Combined Chlorine
combined Chlorine = total Chlorine – free Chlorine
Tolerances:
0 – 1 mg/l: ± 0.05 mg/l
> 1 – 2 mg/l: ± 0.10 mg/l
12
English
Notes:
1.Vial cleaning:
As many household cleaners (e.g. dishwasher detergent) contain reducing substances, the subsequent determination of Chlorine may show lower results. To avoid any measurement errors, only use glassware free of Chlorine demand.
Preparation: Put all applicable glassware into Sodium hypochlorite solution (0.1 g/l) for one hour, then rinse all glassware thoroughly with deionized water.
2.For individual testing of free and total Chlorine, the use of different sets of glassware is recommended (EN ISO 7393-2, 5.3)
3.Do not use the same sample vial for free and total chlorine without thoroughly rinsing the vial between the two different tests.
4.Preparing the sample:
When preparing the sample, the lost of Chlorine, e.g. by pipetting or shaking, must be avoided. The analysis must take place immediately after taking the sample.
5.The DPD color development is carried out at a pH value of 6.2 to 6.5. The reagents therefore contain a buffer for the pH adjustment. Strong alkaline or acidic water samples must be adjusted between pH 6 and pH 7 before the reagent is added (use 0.5 mol/l Sulfuric acid resp. 1 mol/l Sodium hydroxide).
6.Exceeding the measuring range:
Concentrations above 2 mg/l Chlorine can lead to results showing 0 mg/l. In this case, the water sample must be diluted with water free of Chlorine and the measurement repeated.
7.Oxidizing agents such as Bromine, Ozone etc. interfere as they react in the same way as
Chlorine.
13

Methods
|
CL 8 |
Tablet |
Powder |
|
0.0.0 |
Tablet |
Powder |
|
Zero |
|
Test |
|
CL 8 |
Tablet |
Powder |
|
RESULT |
Tablet |
Powder |
|
0.0.0 |
Tablet |
Powder |
|
Zero |
|
Test |
|
CL 8 |
Tablet |
Powder |
|
RESULT |
Tablet |
Powder |
Chlorine with Powder Pack: 0.1 – 8.0 mg/l
a) Free Chlorine
Fill a clean vial (10 mm  ) with 5 ml of the water sample and perform zero calibration (see “Operation”).
Add the contents of two Chlorine Free-DPD/F10 Powder Pack straight from the foil into the water sample.
Close the vial tightly with the cap and invert several times to mix the contents (20 sec.). Place the vial in the sample chamber making sure that the marks are aligned. Press the [ZERO/TEST] key.
The method symbol flashes for approx. 3 seconds. The result is shown in the display in mg/l free Chlorine.
b) Total Chlorine
Fill a clean vial (10 mm 
 ) with 5 ml of the water sample and perform zero calibration (see “Operation”).
Add the contents of two Chlorine Total-DPD/F10 Powder Pack straight from the foil into the water sample.
Close the vial tightly with the cap and invert several times to mix the contents (20 sec.). Place the vial in the sample chamber making sure that the marks are aligned.
Wait for a reaction period of 3 – 6 minutes.
Press the [ZERO/TEST] key.
The method symbol flashes for approx. 3 seconds. The result is shown in the display in mg/l total Chlorine.
c) Combined Chlorine
combined Chlorine = total Chlorine – free Chlorine
Tolerances:
2 – 3 mg/l: ± 0.2 mg/l
>3 – 4 mg/l: ± 0.3 mg/l
>4 – 8 mg/l: ± 0.4 mg/l
14
English
Notes:
1.Vial cleaning:
As many household cleaners (e.g. dishwasher detergent) contain reducing substances, the subsequent determination of Chlorine may show lower results. To avoid any measurement errors, only use glassware free of Chlorine demand.
Preparation: Put all applicable glassware into Sodium hypochlorite solution (0.1 g/l) for one hour, then rinse all glassware thoroughly with deionized water.
2.For individual testing of free and total Chlorine, the use of different sets of glassware is recommended (EN ISO 7393-2, 5.3)
3.Do not use the same sample vial for free and total chlorine without thoroughly rinsing the vial betweeen the two different tests.
4.Preparing the sample:
When preparing the sample, the lost of Chlorine, e.g. by pipetting or shaking, must be avoided. The analysis must take place immediately after taking the sample.
5.The DPD color development is carried out at a pH value of 6.2 to 6.5. The reagents therefore contain a buffer for the pH adjustment. Strong alkaline or acidic water samples must be adjusted between pH 6 and pH 7 before the reagent is added (use 0.5 mol/l Sulfuric acid resp. 1 mol/l Sodium hydroxide).
6.Concentrations above 8 mg/l Chlorine can lead to results showing 0 mg/l. In this case, the water sample must be diluted with water free of Chlorine and the measurement repeated.
7.If chlorine is at concentrations under 2 mg/l the 0.02 - 2 mg/l measure range should be used
(CL 2).
8.Oxidizing agents such as Bromine, Ozone etc. interfere as they react in the same way as Chlorine.
15
Menu Options
Mode
On
Menu selections
Press the [MODE] key and hold.
Off |
Turn the unit on using the [ON/OFF] key. |
|
!Allow the 3 decimal points to be displayed before releasing the [MODE] key. The [!] key allows for selection of the following menu points:
Store |
Date |
Time |
1 2
Cal
1 |
diS: |
recall stored data |
1 |
Prt: |
printing stored data |
2 |
|
setting the date and time |
Cal |
user calibration |
|
Store |
Date |
Time |
1 diS
Mode
Zero
Test
Mode
!
Store |
Date |
Time |
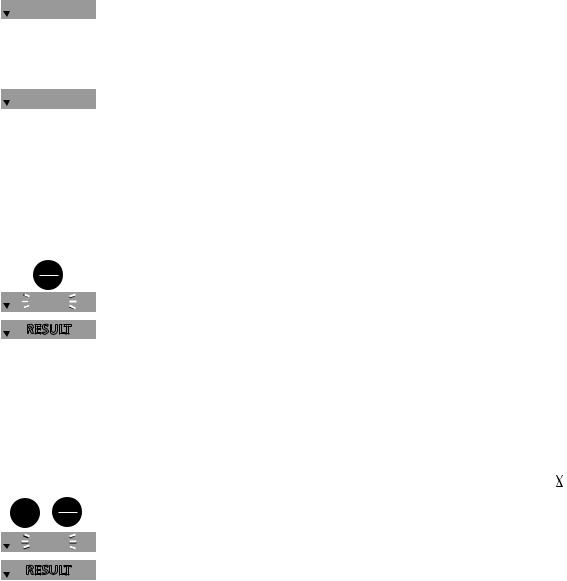
1 diS – Recall of stored data
After confirming the selection with the [MODE] key the colorimeter shows the last 16 data sets in the following format (automatically proceeds every 3 seconds until result is displayed):
Number |
n xx (xx: 16...1) |
Year |
YYYY (e.g. 2010) |
Date |
mm.dd (monthmonth:dayday) |
Time |
hh:mm (hourhour:minuteminute) |
Test |
Method |
Result |
x.xx |
The [ZERO/TEST] key repeats the current data set.
The [MODE] key scrolls through all stored data sets.
Quit the menu by pressing [!] key.
1 Prt
PrtG
On
Off
1 Prt – Transmitting stored data (to Printer or PC)
Note: To print data, or to transmit to a PC, the optional 900 Series Data Hub (Infrared Interface Module) is required.
The 900 Series Data Hub Module and the connected printer/PC must be ready.
Press the [MODE] key to start the transmitting, the instrument displays “PrtG”
(Printing) for approx. 1 second followed by the number of the first data set and its transmission. All data sets will be transmitted one after the other. After finishing the instrument returns to test mode.
The print job can be cancelled by pressing the [On/Off] key. The instrument turns off.
16

E 132
Store |
Date |
Time |
English
If the instrument is not able to communicate with the IRiM, a timeout occurs after approx. 2 minutes. The error E 132 is displayed for approx. 4 seconds. Subsequently, the instrument returns to test mode (see also 900 Series Data Hub manual).
2 Setting date and time (24-hour-format)
Mode
SET
DATE
YYYY (2 sec.)
Mode
Zero
Test
2After confirming the selection with the [MODE] key the value to be edited will be shown for 2 sec.
The setting starts with the year (YYYY) followed by the actual value to be edited. The same applies for month (mm), day (dd), hour (hh) and minutes (mm). Set the minutes first in steps of 10, press the [!] key to continue setting the minutes in steps of 1.
Increase the value by pressing the [MODE] key.
Decrease the value by pressing [ZERO/TEST] key.
!Proceed to the next value to be edited by pressing [!] key.
After setting the minutes and pressing the [!] key the display will show “IS SET” and the instrument returns to the measurement mode.
17

Calibration Mode
Store |
Date |
Time |
|
Cal |
|
cAL
CAL
CAL
METHOD
Zero
Test
user calibration (Display in calibration mode) factory calibration (Display in calibration mode)
USER CALIBRATION (Cal)
After confirming the selection with the [MODE] key the instrument will show CAL/"Method".
Scroll through methods using the [MODE] key.
Fill a clean vial with the standard up to the 10 ml mark, screw the cap on and place the vial in the sample chamber making sure that the marks are aligned.
Press the [ZERO/TEST] key to zero/blank the instrument.
 METHOD
0.0.0
CAL
Zero
Test
The method symbol (Cl2, Cl6, Cl8 or Cl10) flashes for approx. 8 seconds. The display shows the following in alternating mode:
Perform calibration with a standard of known concentration (see "Operation"). Press the [ZERO/TEST] key to measure known standard concentration.
 METHOD
RESULT
CAL
Mode
Zero
Test
CAL
RESULT + x
The method symbol (Cl2, Cl6, Cl8 or Cl10) flashes for approx. 3 seconds.
The result is shown in the display, alternating with CAL.
If the reading corresponds with the value of the calibration standard (within the specified tolerance), exit calibration mode by pressing the [ON/OFF] key.
Changing the displayed value to match calibration standard value: Pressing the [MODE] key once increases the displayed value by 1 digit.
Pressing the [ZERO/TEST] key once decreases the displayed value by
1 digit.
Press the corresponding key until the reading equals the value of the calibration standard.
By pressing the [ON/OFF] key, the new correction factor is calculated and stored in the user calibration software.
Confirmation of calibration (3 seconds).
18

Store |
Date |
Time |
|
Cal |
RESULT |
Mode Zero
Test
On
Off
SEL
CAL
SEL cAL
Mode
SEL
CAL
On
Off
English
FACTORY CALIBRATION RESET
Resetting the user calibration to the original factory calibration will reset all methods and ranges.
A user calibrated method is indicated by a "Cal" symbol while the test result is displayed.
To reset the calibration press both the [MODE] and [ZERO/TEST] key and hold.
Turn the unit on using the [ON/OFF] key.
Release the [MODE] and [ZERO/TEST] keys after approx. 1 second.
The following messages will appear will flash on the display:
The factory setting is active. (SEL stands for Select)
or:
Calibration has been set by the user.
(If the user calibration is to be retained, turn the unit off using the [ON/OFF] key).
Calibration is reset to the factory setting by pressing the [MODE] key. The following messages will appear in turn on the display:
CAL for factory calibration; cAL for user calibration.
Turn the unit off using the [ON/OFF] key.
19

Technical Data
Instrument: |
single wavelength, direct reading colorimeter |
|
Light source: |
LEDs, interference filters (IF) and photosensor in transparent |
|
|
cell chamber. Wavelength specifications of the IF: |
|
|
530 nm |
= 5 nm |
Wavelength accuracy: |
± 1 nm |
|
Photometric accuracy*: |
3% FS (T = 20° C – 25° C) |
|
Photometric resolution: |
0.01 A |
|
Power supply: |
4 batteries (AAA/LR 03) |
|
|
lifetime: approx. 17 hours or 5000 tests |
|
Auto-OFF: |
instrument automatically turns off 20 minutes after last keypress |
|
Display: |
backlit LCD (on keypress) |
|
Storage: |
internal ring memory for 16 data sets |
|
Interface: |
IR interface for data transfer |
|
Time: |
real time clock and date |
|
Calibration: |
user and factory calibration |
|
|
resetting to factory calibration possible |
|
Dimensions: |
155 x 75 x 38 mm (LxWxH) |
|
Weight: |
approx. 260 g (incl. batteries) |
|
Ambient conditions: |
temperature: 5–40°C |
|
|
rel. humidity: 30–90% (non-condensing) |
|
Waterproof: |
floating; IP 68 (1 hour at 0.1 meter) |
|
CE: |
Certificate for Declaration of CE-Conformity |
|
*measured with standard solutions
To ensure maximum accuracy of test results, always use the reagent systems supplied by the instrument manufacturer.
20
 Loading...