

Page 1

CVP-206/204
CVP-206/204
OWNER’S MANUAL
OWNER’S MANUAL
Page 2
SPECIAL MESSAGE SECTION
PRODUCT SAFETY MARKINGS:
Yamaha electronic
products may have either labels similar to the graphics
shown below or molded/stamped facsimiles of these
graphics on the enclosure. The explanation of these
graphics appears on this page. Please observe all cautions
indicated on this page and those indicated in the safety
instruction section.
CAUTION
RISK OF ELECTRIC SHOCK
DO NOT OPEN
CAUTION: TO REDUCE THE RISK OF ELECTRIC SHOCK.
DO NOT REMOVE COVER (OR BACK).
NO USER-SERVICEABLE PARTS INSIDE.
REFER SERVICING TO QUALIFIED SERVICE PERSONNEL.
See bottom of Keyboard enclosure for graphic symbol markings.
The exclamation point within the
equilateral triangle is intended to alert
the user to the presence of important
operating and maintenance (servicing) instructions in the literature
accompanying the product.
The lightning flash with arrowhead
symbol, within the equilateral triangle, is intended to alert the user to the
presence of uninsulated “dangerous
voltage” within the product’s enclosure that may be of sufficient magnitude to constitute a risk of electrical
shock.
Battery Notice:
This product MAY contain a small nonrechargable battery which (if applicable) is soldered in
place. The average life span of this type of battery is
approximately five years. When replacement becomes
necessary, contact a qualified service representative to
perform the replacement.
Warning:
Do not attempt to recharge, disassemble, or
incinerate this type of battery. Keep all batteries away
from children. Dispose of used batteries promptly and as
regulated by applicable laws. Note: In some areas, the
servicer is required by law to return the defective parts.
However, you do have the option of having the servicer
dispose of these parts for you.
Disposal Notice:
Should this product become damaged
beyond repair, or for some reason its useful life is considered to be at an end, please observe all local, state, and
federal regulations that relate to the disposal of products
that contain lead, batteries, plastics, etc.
NOTICE:
Service charges incurred due to lack of knowledge relating to how a function or effect works (when the
unit is operating as designed) are not covered by the manufacturer’ s warranty, and are therefore the owners responsibility. Please study this manual carefully and consult
your dealer before requesting service.
NAME PLATE LOCATION:
The graphic below indicates the location of the name plate. The model number,
serial number, power requirements, etc., are located on
this plate. You should record the model number, serial
number, and the date of purchase in the spaces provided
below and retain this manual as a permanent record of
your purchase.
IMPORTANT NOTICE:
All Yamaha electronic products
are tested and approved by an independent safety testing
laboratory in order that you may be sure that when it is
properly installed and used in its normal and customary
manner, all foreseeable risks have been eliminated. DO
NOT modify this unit or commission others to do so
unless specifically authorized by Yamaha. Product perfor mance and/or safety standards may be diminished.
Claims filed under the expressed warranty may be denied
if the unit is/has been modified. Implied warranties may
also be affected.
SPECIFICATIONS SUBJECT TO CHANGE:
The
information contained in this manual is believed to be
correct at the time of printing. Howev er , Y amaha reserv es
the right to change or modify any of the specifications
without notice or obligation to update existing units.
ENVIRONMENTAL ISSUES:
Yamaha strives to produce products that are both user safe and environmentally
friendly. We sincerely believe that our products and the
production methods used to produce them, meet these
goals. In keeping with both the letter and the spirit of the
law, we want you to be aware of the following:
CVP-206
Model
Serial No.
Purchase Date
CVP-204
92-469
1
(bottom)
Page 3
PRECAUTIONS
PLEASE READ CAREFULLY BEFORE PROCEEDING
* Please keep this manual in a safe place for future reference.
WARNING
Always follow the basic precautions listed below to avoid the possibility of serious injury or even
death from electrical shock, short-circuiting, damages, fire or other hazards. These precautions
include, but are not limited to, the following:
Power supply/Power cord
•
Only use the voltage specified as correct for the instrument. The
required voltage is printed on the name plate of the instrument.
•
Check the electric plug periodically and remove any dirt or dust
which may have accumulated on it.
•
Use only the supplied power cord/plug.
•
Do not place the power cord near heat sources such as heaters
or radiators, and do not excessively bend or otherwise damage
the cord, place heavy objects on it, or place it in a position where
anyone could walk on, trip over, or roll anything over it.
Do not open
•
Do not open the instrument or attempt to disassemble the internal parts or modify them in any way. The instrument contains no
user-serviceable parts. If it should appear to be malfunctioning,
discontinue use immediately and have it inspected by qualified
Yamaha service personnel.
Water warning
•
Do not expose the instrument to rain, use it near water or in
damp or wet conditions, or place containers on it containing liquids which might spill into any openings.
•
Never insert or remove an electric plug with wet hands.
Fire warning
•
Do not put burning items, such as candles, on the unit.
A burning item may fall over and cause a fire.
If you notice any abnormality
•
If the power cord or plug becomes frayed or damaged, or if there
is a sudden loss of sound during use of the instrument, or if any
unusual smells or smoke should appear to be caused by it,
immediately turn off the power switch, disconnect the electric
plug from the outlet, and have the instrument inspected by qualified Yamaha service personnel.
CAUTION
Always f ollo w the basic precautions listed below to avoid the possibility of physical injury to y ou or
others, or damage to the instrument or other pr operty . These precautions inc lude, but are not limited
to, the following:
Power supply/Power cord
•
When removing the electric plug from the instrument or an outlet,
always hold the plug itself and not the cord. Pulling by the cord
can damage it.
•
Remove the electric plug from the outlet when the instrument is
not to be used for extended periods of time, or during electrical
storms.
•
Do not connect the instrument to an electrical outlet using a multiple-connector.
Doing so can result in lower sound quality, or possibly cause
overheating in the outlet.
Assembly
•
Read carefully the attached documentation explaining the
assembly process.
Failure to assemble the instrument in the proper sequence might
result in damage to the instrument or even injury.
(1)B-7
Location
•
Do not expose the instrument to excessive dust or vibrations, or
extreme cold or heat (such as in direct sunlight, near a heater, or
in a car during the day) to prevent the possibility of panel disfiguration or damage to the internal components.
•
Do not use the instrument in the vicinity of a TV, radio, stereo
equipment, mobile phone, or other electric devices. Otherwise,
the instrument, TV, or radio may generate noise.
•
Do not place the instrument in an unstable position where it
might accidentally fall over.
•
Before moving the instrument, remove all connected cables.
•
Do not place the instrument against a wall (allow at least 3 cm/
one-inch from the wall), since this can cause inadequate air circulation, and possibly result in the instrument overheating.
1/2
CVP-206/204
3
Page 4
Connections
•
Before connecting the instrument to other electronic components, turn off the power for all components. Before turning the
power on or off for all components, set all volume levels to minimum. Also, be sure to set the volumes of all components at their
minimum levels and gradually raise the volume controls while
playing the instrument to set the desired listening level.
Maintenance
•
When cleaning the instrument, use a soft, dry or slightly damp
cloth. Do not use paint thinners, solvents, cleaning fluids, or
chemical-impregnated wiping cloths.
Handling caution
•
Take care that the key cover does not pinch your fingers, and do
not insert a finger or hand in any gaps on the key cover or instrument.
•
Never insert or drop paper, metallic, or other objects into the
gaps on the key cover, panel or keyboard. If this happens, turn
off the power immediately and unplug the power cord from the
AC outlet. Then have the instrument inspected by qualified
Yamaha service personnel.
•
Do not place vinyl, plastic or rubber objects on the instrument,
since this might discolor the panel or keyboard.
•
Do not rest your weight on, or place heavy objects on the instrument, and do not use excessive force on the b uttons, s witches or
connectors.
•
Do not operate the instrument for a long period of time at a high
or uncomfortable volume level, since this can cause permanent
hearing loss. If you experience any hearing loss or ringing in the
ears, consult a physician.
Using the bench (If included)
•
Do not place the bench in an unstable position where it might
accidentally fall over.
•
Do not play carelessly with or stand on the bench. Using it as a
tool or step-ladder or for any other purpose might result in accident or injury.
•
Only one person should sit on the bench at a time, in order to
prevent the possibility of accident or injury.
•
If the bench screws become loose due to extensive long-term
use, tighten them periodically using the included tool.
Saving data
Saving and backing up your data
•
Some of the current memory data (see page 43) is lost when y ou
turn off the power to the instrument. Save the data to a floppy
disk/the User Drive (see page 40, 48).
Saved data may be lost due to malfunction or incorrect operation. Save important data to a floppy disk.
When you change settings in a display page and then exit
from that page, System Setup data (listed in the Parameter
Chart of the separate Data List booklet) is automatically
stored. However, this edited data is lost if you turn off the
power without properly exiting from the relevant display.
Backing up the floppy disk
•
To protect against data loss through media damage, we recommend that you save your important data onto two floppy disks.
Caution for data operations
Make sure NEVER to turn the CVP-206/204’s power off during any kind of data operation inv olving the USER/FLOPPY DISK drives — such
as saving, deleting, or copying/pasting — until the operation is completely finished. (Make sure to wait until the alert message disappears.)
Turning the power off during the operation results in the loss of the data being saved or pasted to the respective drive.
Keeping the power on during such operations is particularly important in regard to the USER drive. Turning off the power while performing
a save/delete/paste operation with the USER drive may result in loss of ALL data on the USER drive (upon the next power on) — and not
just the data in question. In other words, if you are performing a save/delete/paste operation on only the song data of the USER drive and
you turn off the power before the operation is completed, you risk losing ALL your USER drive data — including all voices, styles, and Registration Memory presets you’ve saved to the USER drive.
This caution also applies to creating a new folder on the USER drive or using the factory reset operation (page 146).
Yamaha cannot be held responsible for damage caused by improper use or modifications to the instrument, or data that is lost or destroyed.
Always turn the power off when the instrument is not in use.
4
CVP-206/204
(1)B-7
2/2
Page 5
Thank you for purchasing the Yamaha Clavinova!
We recommend that you read this manual carefully
so that you can fully take advantage of the advanced
and convenient functions of the Clavinova.
We also recommend that you keep this manual
in a safe and handy place for future reference.
About this Owner’s Manual and Data List
This manual consists of four main sections: Introduction, Quick Guide, Basic Operation, and Reference.
Also, a separate Data List is provided.
Introduction (page 2): Please read this section first.
Quick Guide (page 20): This section explains how to use the basic functions.
Basic Operation (page 39): This section explains how to use the basic operations including display-based controls.
Reference (page 56): This section explains how to make detailed settings for the Clavinova’s various functions.
Data List : Voice List, MIDI Data Format, etc.
* The models CVP-206/204 will be referred to as the CVP/Clavinova in this Owner’s Manual.
* The illustrations and LCD screens as shown in this owner’s manual are for instructional purposes only, and may appear
somewhat different from those on your instrument.
* The example Operation Guide displays shown in this Manual are taken from the CVP-206, and in English.
* The bitmap fonts used in this instrument have been provided by and are the property of Ricoh co., Ltd.
* Copying of the commercially available software is strictly prohibited except for your personal use.
This product incorporates and bundles computer programs and contents in which Yamaha owns copyrights or with respect to which it has
license to use others’ copyrights. Such copyrighted materials include, without limitation, all computer software, styles files, MIDI files, WAVE
data and sound recordings. Any unauthorized use of such programs and contents outside of personal use is not permitted under relevant
laws. Any violation of copyright has legal consequences. DON’T MAKE, DISTRIBUTE OR USE ILLEGAL COPIES.
Trademarks:
• Apple and Macintosh are trademarks of Apple Computer, Inc.
• IBM-PC/AT is a trademark of International Business Machines Corporation.
• Windows is the registered trademark of Microsoft® Corporation.
• All other trademarks are the property of their respective holders.
CVP-206/204
5
Page 6
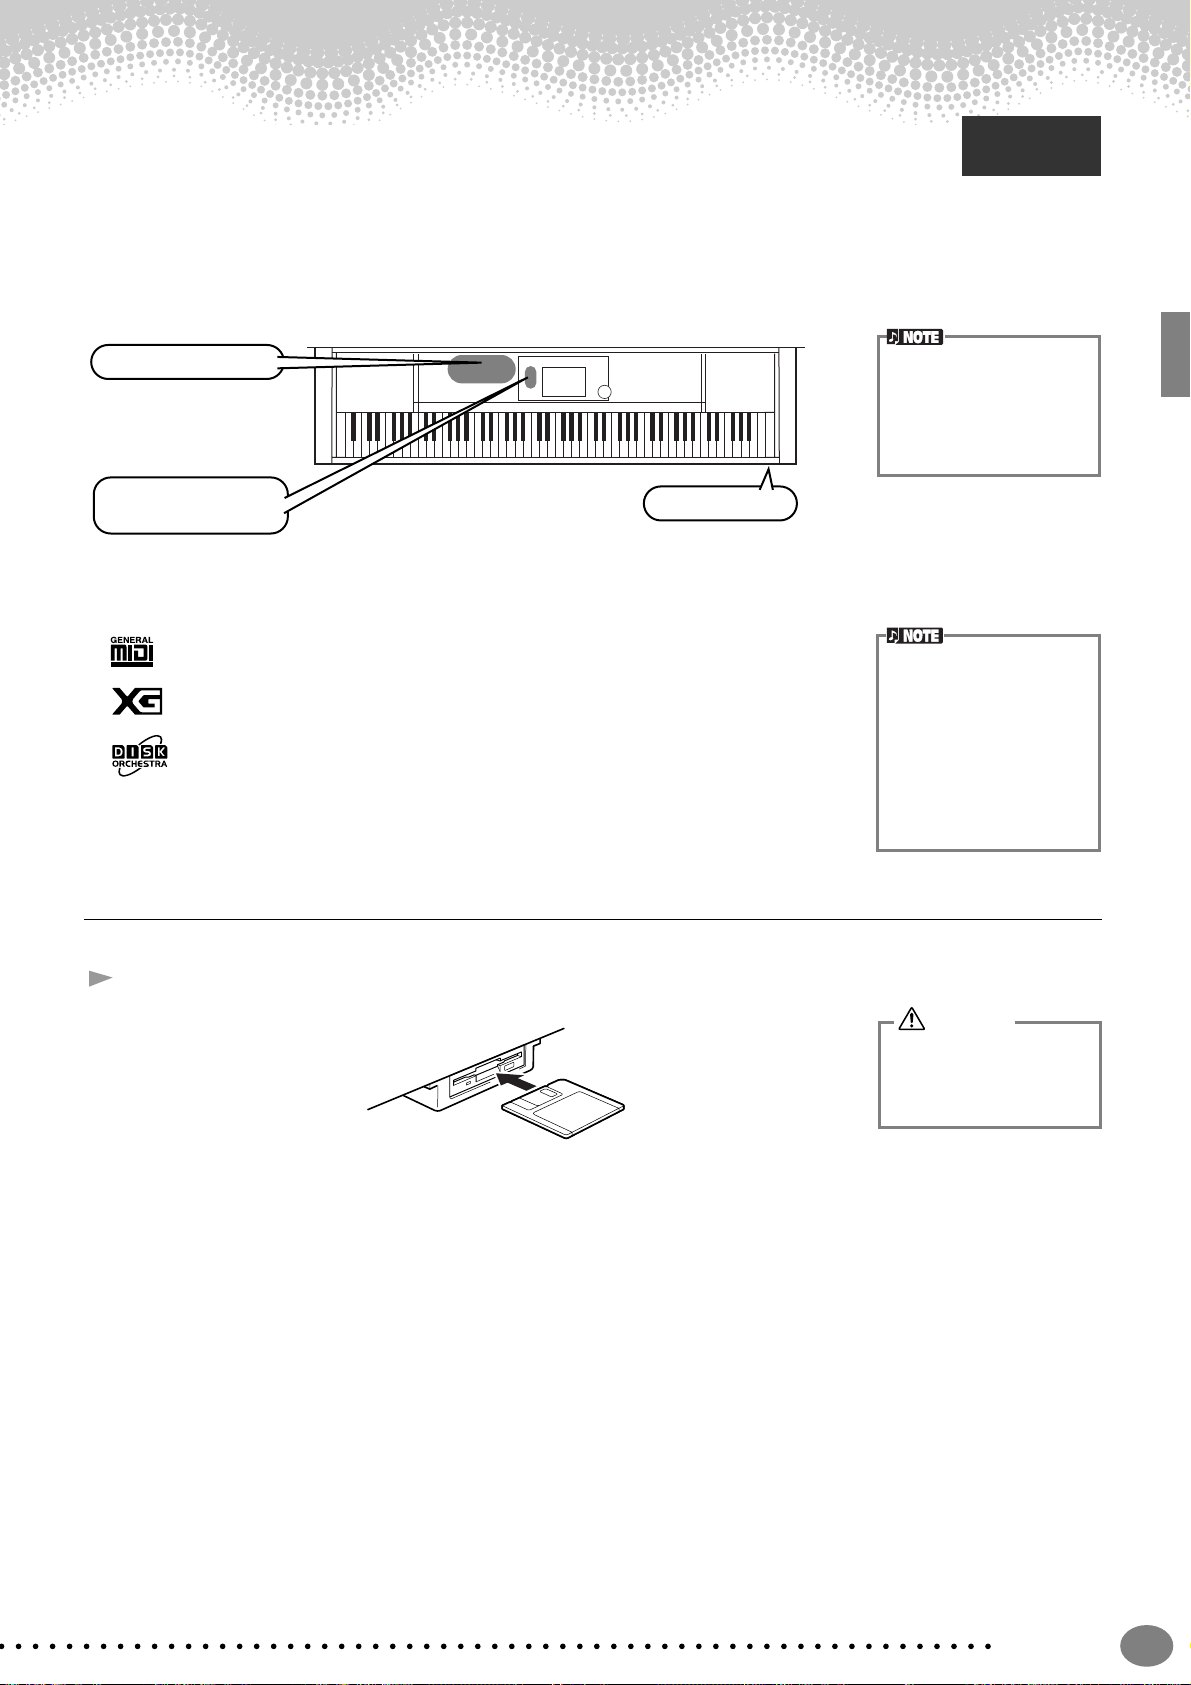
Accessories
Eject button
“50 greats for the Piano” Disk (and Music Book)
Recording disk
Use this blank disk to save your performance.
Owner’s Manual
This manual contains complete instructions for operating your Clavinova.
Data List
This manual contains lists of voices, styles and parameters, etc.
Bench
A bench may be included or optional, depending on your locale.
■
■
■
■
■
Handling the Floppy Disk Drive (FDD) and
Floppy Disk
Precautions
Be sure to handle floppy disks and treat the disk drive with care. Follow the important precautions below.
Compatible Disk Type
• 3.5" 2DD and 2HD type floppy disks can be used.
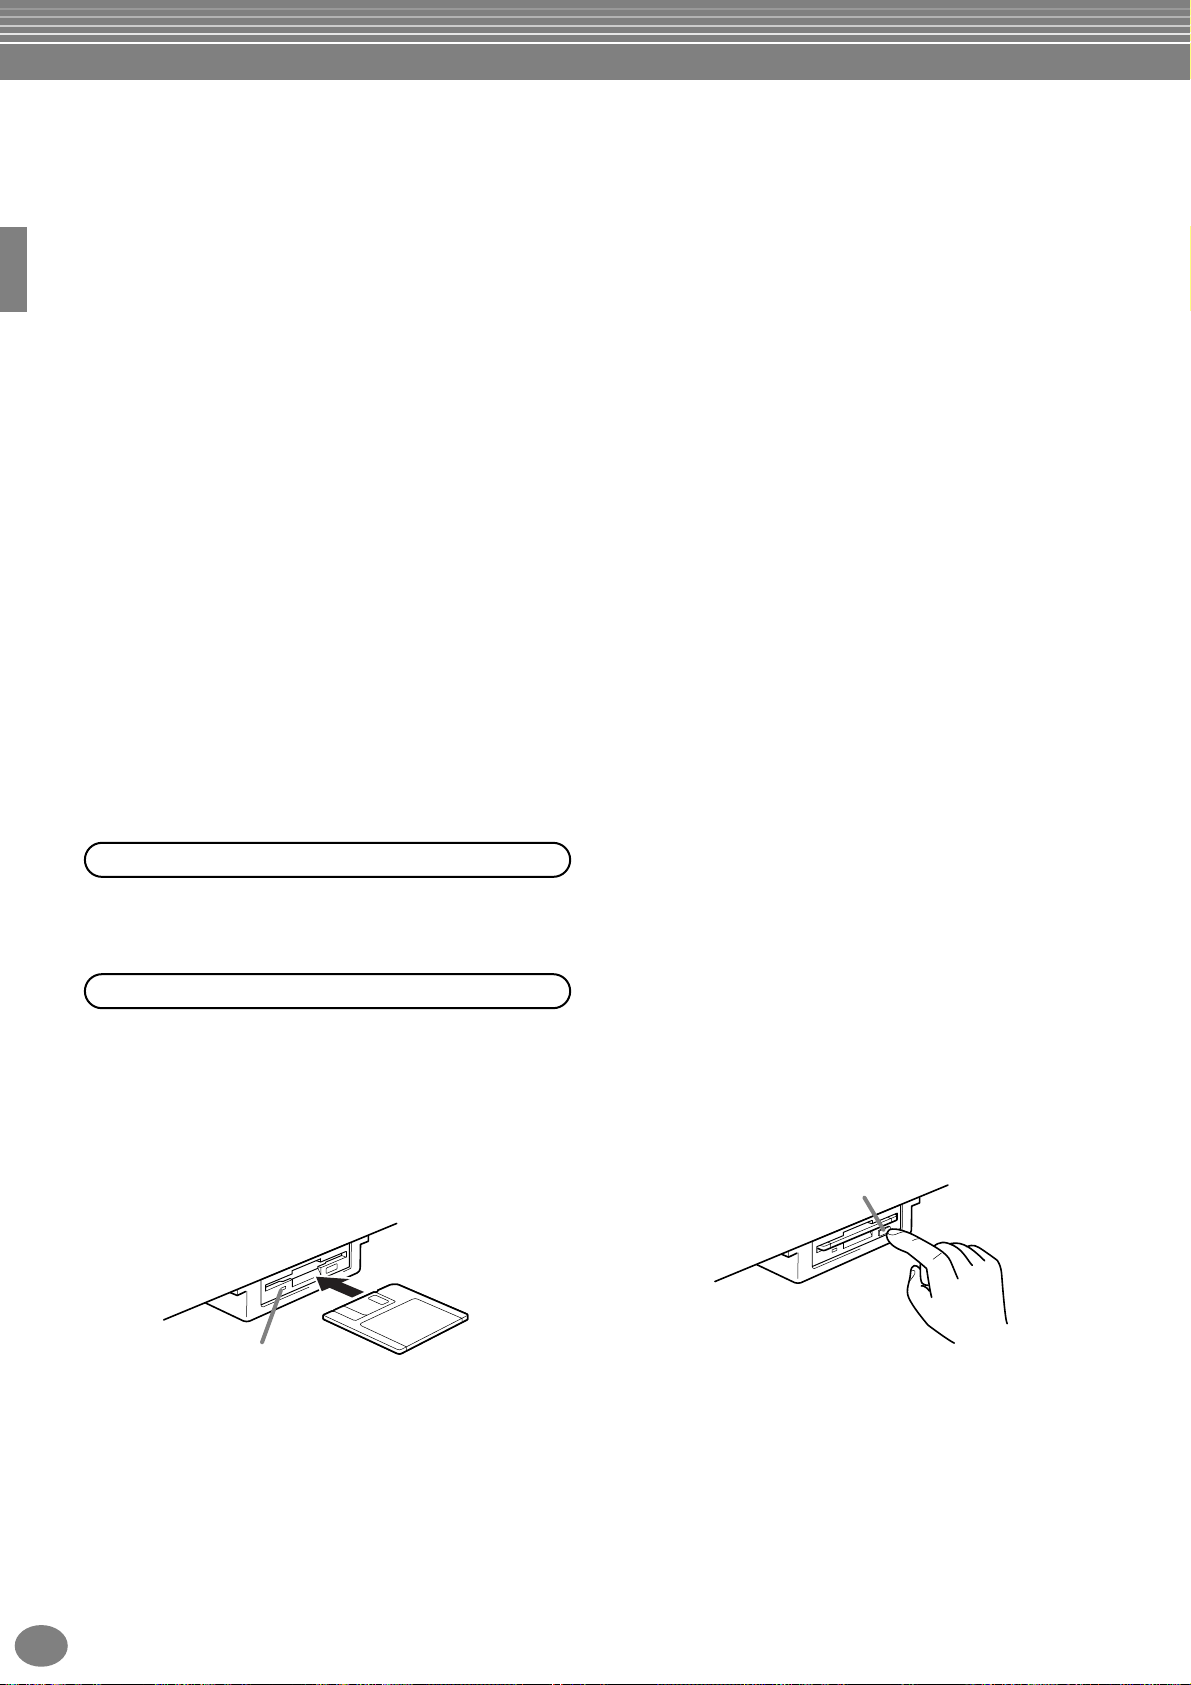
Inserting/Ejecting Floppy Disks
To insert a floppy disk into the disk drive:
• Hold the disk so that the label of the disk is facing
upward and the sliding shutter is facing forward,
towards the disk slot. Carefully insert the disk into the
slot, slowly pushing it all the way in until it clicks into
place and the eject button pops out.
To eject a floppy disk:
Before ejecting the disk, be sure to confirm that data
is not being written to the floppy disk.
If data is currently being written to the floppy disk in
the following operations, the messages “Now
executing,” “Now copying,” and “Now formatting”
appears in the display.
•Moving, copying, pasting, saving, or deleting data
(page 46 - 48).
• Naming files and folders (page 45); creating a new
folder (page 48).
• Copying a disk to an another disk (page 145);
formatting the disk (page 145).
6
Drive lamp
When the power is turned on, the drive lamp (at
the bottom left of the drive) lights to indicate the
drive can be used.
CVP-206/204
Page 7
• Never attempt to remove the disk or turn the power off
when the data is being written to the floppy disk.
Doing so can damage the disk and possibly the disk
drive. Press the eject button slowly as far as it will go;
the disk will automatically pop out. When the disk is
fully ejected, carefully remove it by hand.
• If the eject button is pressed too quickly, or if it is not
pressed in as far as it will go, the disk may not eject
properly. The eject button may become stuck in a halfpressed position with the disk extending from the
drive slot by only a few millimeters. If this happens, do
not attempt to pull out the partially ejected disk, since
using force in this situation can damage the disk drive
mechanism or the floppy disk. To remove a partially
ejected disk, try pressing the eject button once again,
or push the disk back into the slot and then repeat the
eject procedure.
• Be sure to remove the floppy disk from the disk drive
before turning off the power. A floppy disk left in the
drive for extended periods can easily pick up dust and
dirt that can cause data read and write errors.
Cleaning the Disk Drive Read/Write Head
• Clean the read/write head regularly. This instrument
employs a precision magnetic read/write head which,
after an extended period of use, will pick up a layer of
magnetic particles from the disks used that will
eventually cause read and write errors.
•To maintain the disk drive in optimum working order
Yamaha recommends that you use a commerciallyavailable dry-type head cleaning disk to clean the
head about once a month. Ask your Yamaha dealer
about the availability of proper head-cleaning disks.
• Never insert anything but floppy disks into the disk
drive. Other objects may cause damage to the disk
drive or floppy disks.
• Never use a floppy disk with a deformed shutter or
housing.
• Do not attach anything other than the provided labels
to a floppy disk. Also make sure that labels are
attached in the proper location.
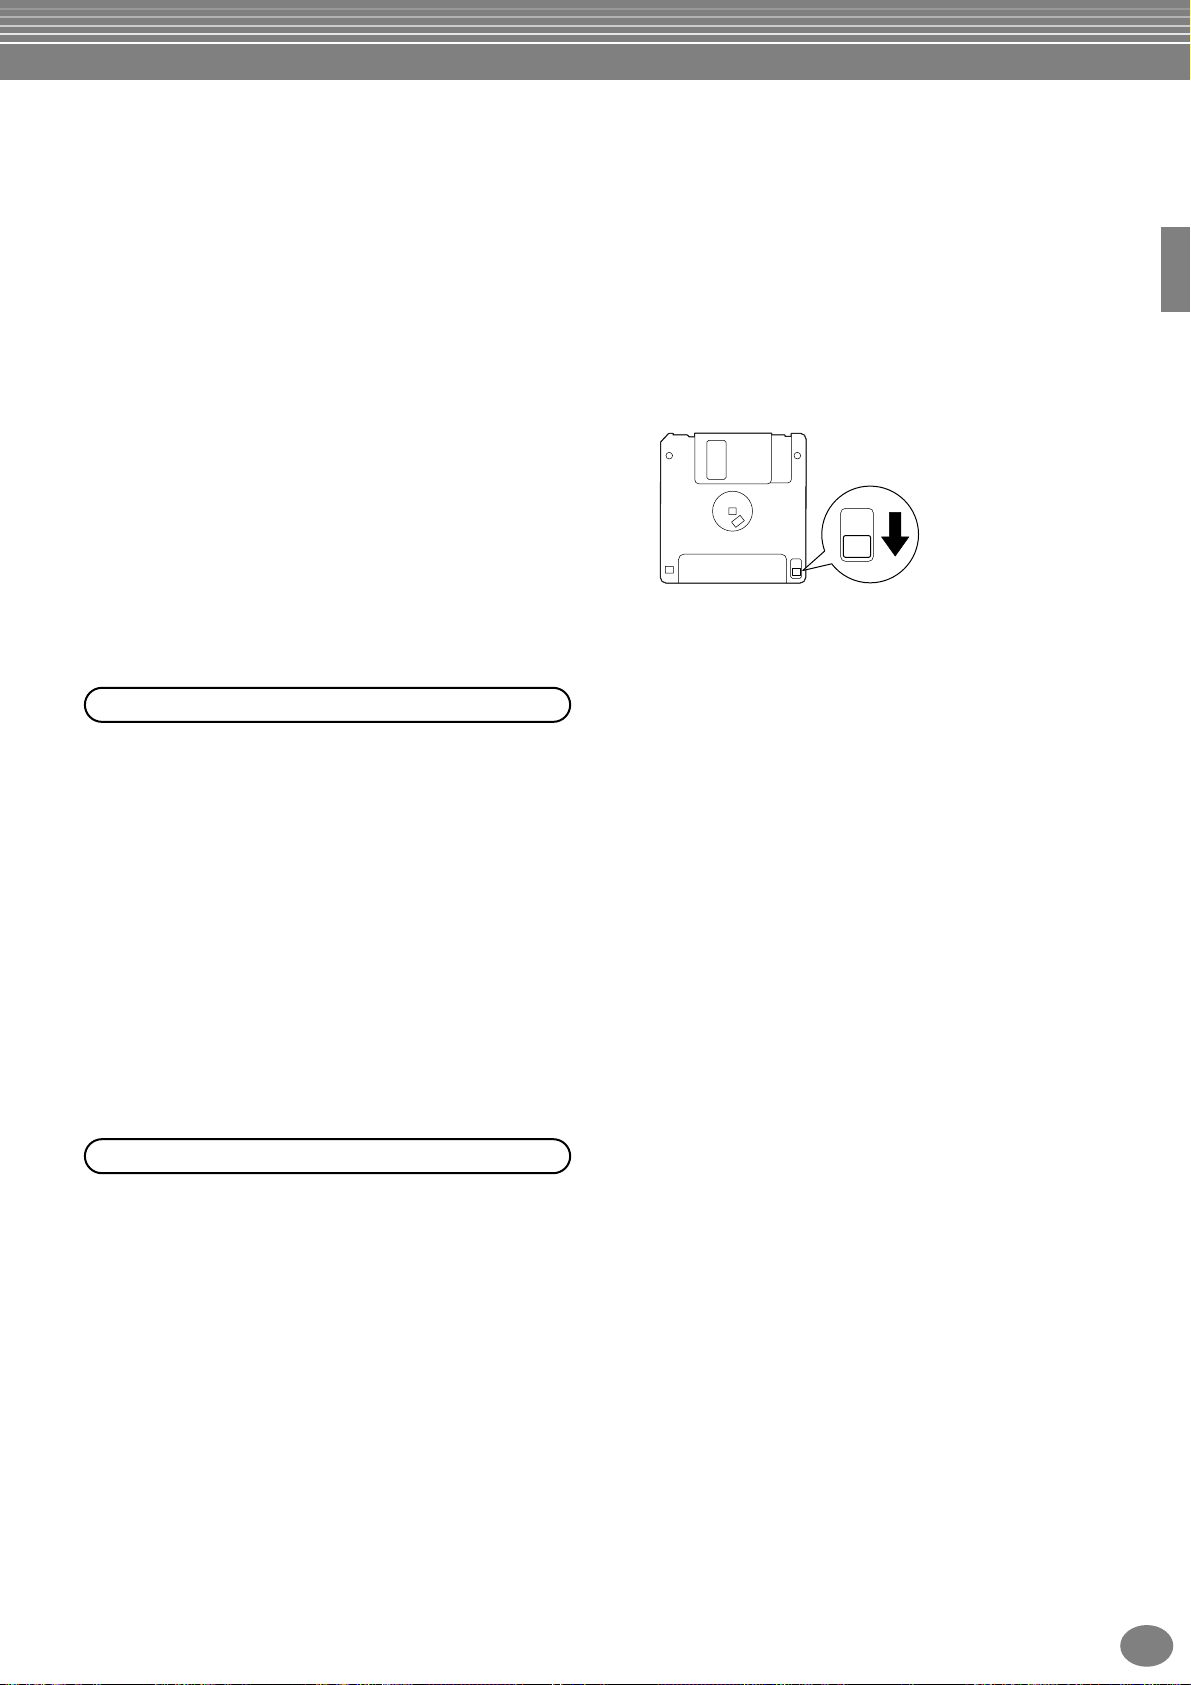
To protect your data (Write-protect Tab):
•To prevent accidental erasure of important data, slide
the disk’s write-protect tab to the “protect” position
(tab open).
write-protect tab open
(protect position)
Data backup
•For maximum data security Yamaha recommends that
you keep two copies of important data on separate
floppy disks. This gives you a backup if one disk is lost
or damaged. To make a backup disk use the Disk to
Disk function on page 145.
About the Floppy Disks
To handle floppy disks with care:
• Do not place heavy objects on a disk or bend or apply
pressure to the disk in any way. Always keep floppy
disks in their protective cases when they are not in
use.
• Do not expose the disk to direct sunlight, extremely
high or low temperatures, or excessive humidity, dust
or liquids.
• Do not open the sliding shutter and touch the exposed
surface of the floppy disk inside.
• Do not expose the disk to magnetic fields, such as
those produced by televisions, speakers, motors, etc.,
since magnetic fields can partially or completely erase
data on the disk, rendering it unreadable.
CVP-206/204
7
Page 8
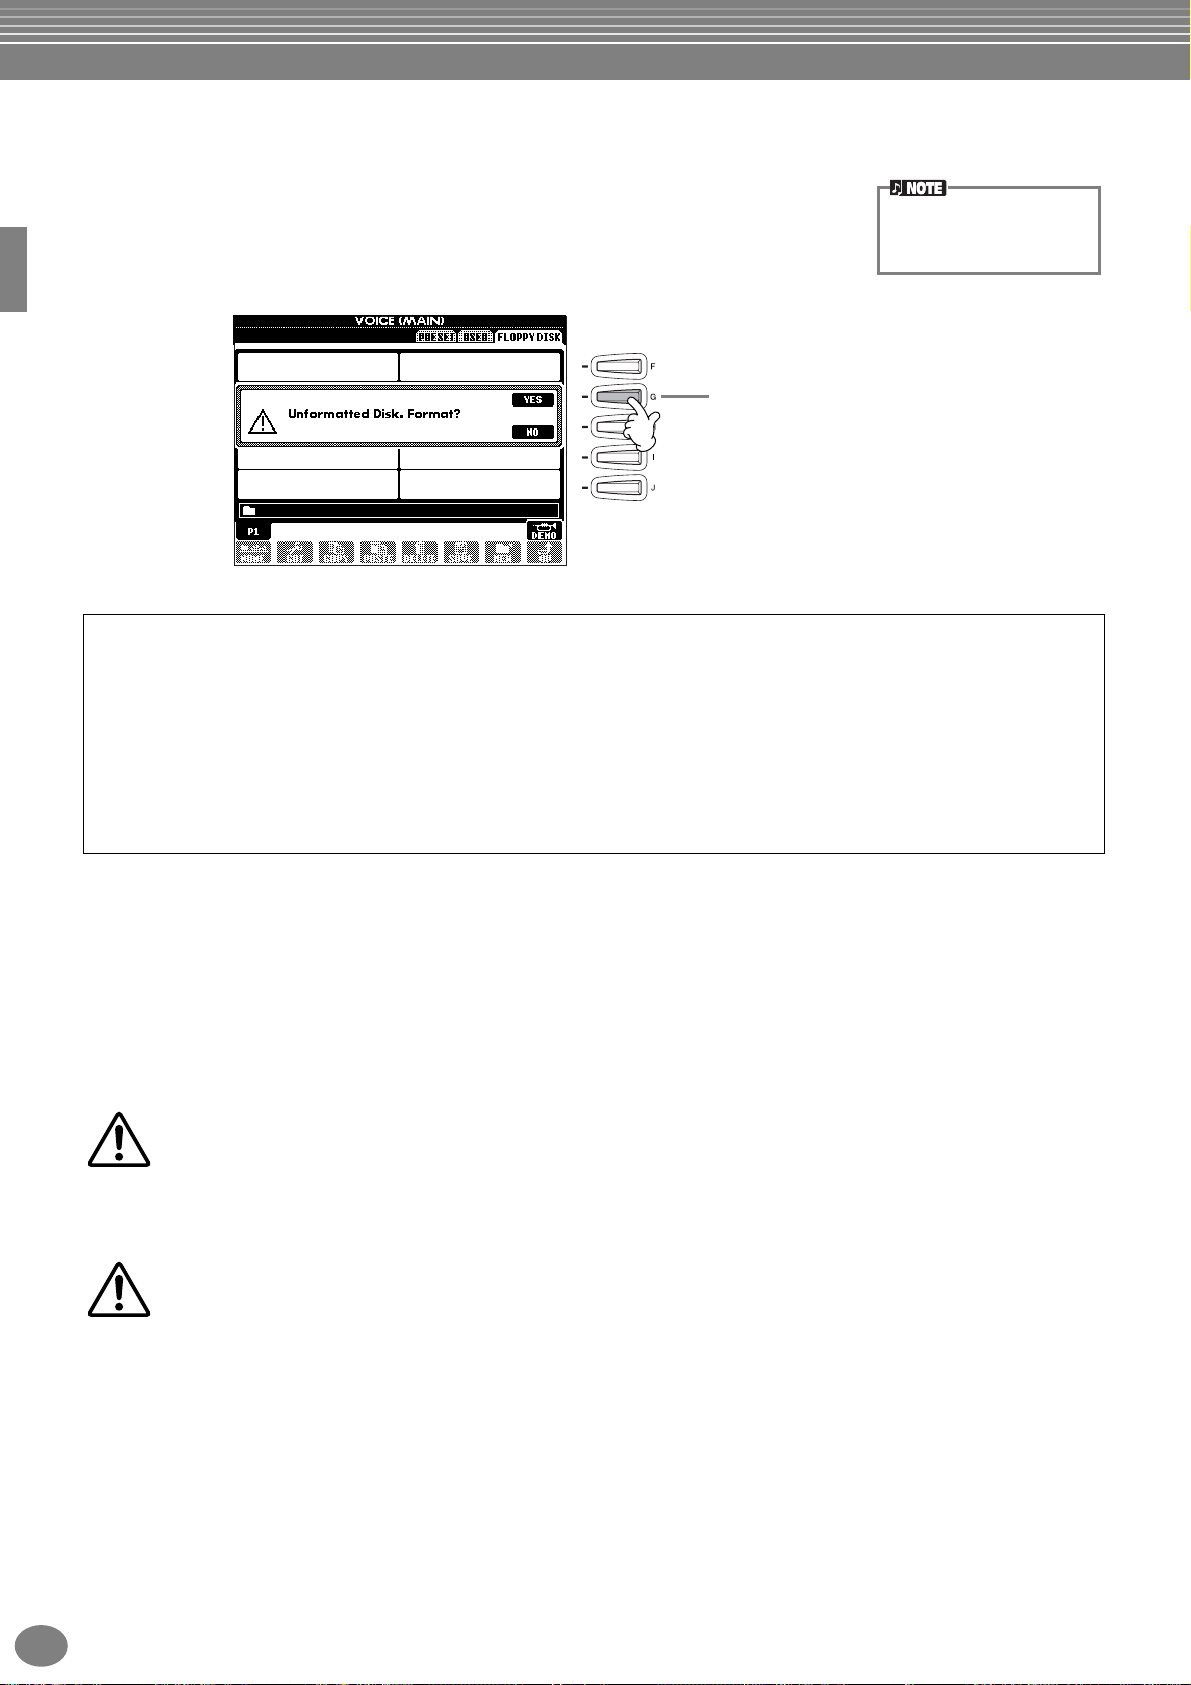
About the Display Messages
A message (information or confirmation dialog) sometimes appears on the screen to
facilitate operation.
When such messages appear, simply follow the instructions as shown by pressing the
corresponding button.
For this example, press the
[G] (YES) button to
execute formatting.
You can select the desired
language from the Help display (page 53).
■
■
“The Clavinova-Computer Connection” is a supplementary guidebook that describes, for beginners, what you can
do with your Clavinova and a personal computer and how to set up a Clavinova-Computer system (the manual is
not written for any specific models). The document is available as a PDF file (in English) at the following Internet
address:
Clavinova Web Site (English only) ........ http://www.yamahaclavinova.com/
Yamaha Manual Library
(Electronic Musical Instruments) ......... http://www2.yamaha.co.jp/manual/english/
Maintenance
Clean the instrument using a dry, soft cloth or slightly damp, soft cloth (wring well).
CAUTION
Do not use benzine, thinner, detergent, or chemical cloth for cleaning. Do not place vinyl, plastic, or rubber
products on the instrument.
Otherwise, the panel or keys may be discolored or degraded.
CAUTION
Before using the Clavinova, be sure to read “Precautions” on pages 3 - 4.
Tuning
Unlike an acoustic piano, the Clavinova does not need to be tuned. It always stays perfectly in tune.
Transporting
If you move to another location, you can transport the Clavinova along with other belongings. You can move the unit
as it is (assembled) or you can disassemble the unit down to the condition it was in when you first took it out of the
box. Transport the keyboard horizontally. Do not lean it up against a wall or stand it up on its side.
Do not subject the instrument to excessive vibration or shock.
CVP-206/204
8
Page 9

Table of Contents
Introduction
SPECIAL MESSAGE SECTION ................................... 2
PRECAUTIONS.......................................................... 3
About this Owner’s Manual and Data List .............. 5
Accessories ............................................................... 6
Handling the Floppy Disk Drive (FDD)
and Floppy Disk..................................................... 6
About the Display Messages.................................... 8
Maintenance ............................................................ 8
Application Index................................................... 12
What can you do with the Clavinova?................... 14
Setting Up the Clavinova....................................... 16
Key cover................................................................................ 16
Music Rest .............................................................................. 16
Sheet Music Braces (CVP-206 only)......................................... 16
Turning the Power On and Off................................................ 17
Using headphones ..................................................................17
Panel Controls and Terminals................................ 18
Quick Guide ........................... 20
Playing the Demos ................................................. 20
Song Playback ........................................................ 21
Playback of Songs ....................................................21
Playing Voices ........................................................ 25
Playing a Voice ........................................................25
Playing Two Voices Simultaneously ..........................26
Playing Different Voices with the Left
and Right Hands...................................................27
Playing Styles ......................................................... 28
Playing a style..........................................................28
Style Sections...........................................................30
One Touch Setting...................................................32
Music Finder........................................................... 33
Using the Music Finder ............................................33
Searching the Music Finder Records.........................34
Saving and Recalling Music Finder Data...................35
Playing and Practicing with the Songs.................. 36
Playing Along with the Clavinova.............................36
Recording ................................................................37
Mastering Your Favorite Songs.................................38
Basic Operations
— Organizing Your Data ....... 39
Contents shown in the Main Display .................... 39
Open/Save Display................................................. 40
Selecting Files and Folders..................................... 44
File/Folder-related Operations .............................. 45
Naming Files/Folders ...............................................45
Moving Files/Folders ................................................46
Copying Files/Folders...............................................47
Deleting Files/Folders...............................................47
Saving Files ..............................................................48
Organizing Files by Creating a New Folder ..............48
Displaying Upper Level pages ................................. 48
Entering Characters and Changing Icons................. 48
Using the [DATA ENTRY] Dial ................................ 50
Direct Access — Instant Selection of Displays....... 51
Help Messages........................................................ 53
Using the Metronome............................................ 54
Adjusting the Tempo ............................................. 54
Tap Tempo ............................................................. 55
Reference
Playing the Demos.................56
Voices.....................................58
Selecting a Voice .................................................... 58
One-touch Piano Play.............................................. 59
Layer/Left
— Playing Several Sounds Simultaneously ......... 60
Layer — Layering Two Different Voices ................... 60
Left — Setting Separate Voices for the Left and Right
Sections of the Keyboard ..................................... 61
Applying Voice Effects ........................................... 61
Using the Pedals..................................................... 62
Styles......................................63
Playing a style ........................................................ 63
Playing a Style’s Rhythm Channels only .................. 65
Adjusting the Volume Balance/Channel Muting ...... 65
Chord Fingerings.................................................... 66
Arranging the Style Pattern (SECTIONS:
MAIN A/B/C/D, INTRO, ENDING, BREAK) ......... 68
Stopping the Style Playback While Releasing Keys
(SYNC. STOP) ...................................................... 69
Selecting Intro and Ending Types
(INTRO/ENDING) ................................................ 70
Playing Fill-in patterns automatically when changing
accompaniment sections — Auto Fill In................ 70
Appropriate Panel Setting for the Selected Style
(ONE TOUCH SETTING) ...................................... 71
Automatically Changing One Touch Settings with the
Sections — OTS Link............................................ 72
Registering the Panel Controls in One Touch Setting
(ONE TOUCH SETTING) ...................................... 72
Calling Up Ideal Setups for Your Music
— Music Finder.................................................... 73
Searching the Ideal Setups — Music Finder Search.. 74
Editing Records — Music Finder Record Edit ........... 75
CVP-206/204
9
Page 10

Song Playback ....................... 77
Creating Accompaniment Styles
Compatible Song Types......................................... 77
Song Playback ........................................................ 78
Playing the Internal Songs........................................78
Playing Back Songs on Disk......................................80
Other Playback-related Operations...........................80
Muting Specific Parts
— Track1/Track2/Extra Tracks............................ 81
Repeat Playback of a Specific Range ..................... 81
Using the Practice Functions — Guide .................. 82
Practice Functions....................................................82
Practicing Music with the Guide Functions...............83
Displaying Music Notation — Score ...................... 84
Displaying the Lyrics .............................................. 87
Saving and Recalling Custom
Panel Setups
— Registration Memory ........ 88
Registering Panel Setups
— Registration Memory...................................... 88
Saving Your Registration Memory Setups.................89
Recalling a Registration Memory Setup ................ 90
Editing Voices
— Sound Creator ................... 91
— Style Creator....................112
About Creating Accompaniment Styles............... 112
Style File Format................................................... 113
Operation ............................................................. 113
Realtime Recording — Basic ................................ 114
Step Recording..................................................... 115
Assembling an Accompaniment Style
— Assembly ....................................................... 116
Edit the Created Accompaniment Style .............. 117
Change the Rhythmic Feel
— Groove and Dynamics ................................... 117
Editing the Channel Data...................................... 119
Making Style File Format Settings — Parameter .... 120
Adjust the Volume Balance and
Changing Voices
— Mixing Console ................122
Operation ............................................................. 122
Setting the Level Balance and Voice
— Volume/Voice ............................................... 123
Changing the Tone of the Voice — Filter............ 124
Changing Pitch-related Settings — Tune ............ 124
Adjusting the Effects ............................................ 125
Effect Structure ..................................................... 127
Operation ............................................................... 91
SOUND CREATOR Parameters ............................... 92
Recording Your Performances
and Creating Songs
— Song Creator ..................... 96
About Song Recording........................................... 96
Quick Recording..................................................... 97
Multi Recording ..................................................... 98
Recording Individual Notes — Step Record ........ 100
Operation ..............................................................100
Recording Melodies — Step Record (Note) ............102
Recording Chord Changes for the Auto
Accompaniment — Step Record (Chord)............103
Select the Recording Options: Starting, Stopping,
Punching In/Out — Rec Mode.......................... 105
Editing a Recorded Song ..................................... 106
Editing Channel-related Parameters — Channel.....106
Editing Note Events — 1 - 16.................................109
Editing Chord Events — CHD.................................110
Editing System Events — SYS/EX.
(System Exclusive) ..............................................110
Inputting and Editing Lyrics ...................................111
Customizing the Event List — Filter........................111
Making Global and Other
Important Settings
— Function...........................128
Operation ............................................................. 128
Fine Tuning the Pitch/Selecting a Scale
— Master Tune/Scale Tune............................... 130
Tuning the Overall Pitch — Master Tune............... 130
Selecting a Scale — Scale Tune ............................. 130
Setting Song-related Parameters
— Song Settings................................................ 132
Setting Auto Accompaniment-related Parameters
— Style Setting, Split Point,
and Chord Fingering......................................... 133
Setting Auto Accompaniment-related Parameters
— Style Setting and Split Point .......................... 133
Setting the Fingering Method — Chord Fingering 134
Making Settings for the Pedals and Keyboard
— Controller...................................................... 134
Making Settings for the Pedals .............................. 134
Changing the Touch Sensitivity and Transpose
— Keyboard/Panel............................................. 136
Setting the Registration Sequence, Freeze, and
Voice Set............................................................ 137
Specifying the Order for Calling Up Registration
Memory Presets — Registration Sequence.......... 137
Maintaining Panel Settings — Freeze .................... 137
10
CVP-206/204
Page 11

Changing the Automatically Selected Voice Settings
— Voice Set ........................................................138
Setting Harmony and Echo.................................. 138
Showing the Clavinova Display on a TV
— Video Out (CVP-206 only) ............................ 139
Setting the MIDI Parameters............................... 140
Making Overall System Settings
(Local Control, Clock, etc.) — System.................140
Transmitting MIDI Data — Transmit ......................141
Receiving MIDI Data — Receive .............................142
Setting Root Note Channels — Root ......................142
Setting Chord Channels — Chord Detect ..............142
Other Settings — Utility ...................................... 143
Making Settings for Fade In/Out, Metronome,
Parameter Lock, and Tap — CONFIG 1...............143
Making Settings for the Display, Speaker System, and
Voice Number Indication — CONFIG 2 ..............144
Copying and Formatting Disks — Disk...................145
Entering Your Name and Language Preference
— Owner............................................................146
Restoring the Factory-programmed Settings of the
CVP-206/204 — System Reset ............................146
Introduction
Quick Guide
Basic Operations - Organizing Your Data
Playing the Demos
Voices
Using Your Clavinova with
Other Devices ...................... 147
Using the Headphones (PHONES jacks)..................147
Connecting the Microphone or Guitar
(MIC./LINE IN jack) (CVP-206 only). ...................147
Connecting Audio & Video Devices .......................148
Using the Pedal (footswitch) or Foot Controller
(AUX PEDAL jack) ...............................................149
Connecting external MIDI devices
(MIDI terminals) .................................................149
Connecting a computer
(USB terminal, MIDI terminal).............................149
What’s MIDI?.........................................................151
What You Can Do With MIDI.................................153
MIDI Data Compatibility...................................... 154
Disk format ............................................................154
Sequence Format...................................................154
Voice Allocation Format .........................................155
CVP-206: Keyboard Stand
Assembly ............................. 156
CVP-204: Keyboard Stand
Styles
Song Playback
Saving and Recalling Custom
Panel Setups - Registration Memory
Editing Voices - Sound Creator
Recording Your Performances
and Creating Songs - Song Creator
Creating Accompaniment Styles
- Style Creator
Adjust the Volume Balance
and Changing Voices - Mixing Console
Making Global and Other Important
Settings - Function
Assembly ............................. 158
Troubleshooting.................. 160
Specifications ...................... 162
Index ................................... 164
Using Your Clavinova with Other Devices
Appendix
CVP-206/204
11
Page 12
Application Index
Use this index to find reference pages that may be helpful for your particular
application and situation.
Listening
Listening to the internal songs................................................................................................................ page 78
Listening to disk songs .......................................................................“Playing Back Songs on Disk” on page 80
Listening to demo songs.........................................................................................................................page 56
Listening to the demo of the selected voices ..........................................................................................page 58
Listening to songs with the special voices of the Clavinova .................................................................. page 123
Playing
Calling up the piano setting ...................................................................................................................page 59
Using the three performance control pedals...........................................................................................page 62
Playing an accompaniment that matches pitch..................................................“Transpose Assign” on page 136
Combining two voices ...................................................... “Layer — Layering Two Different Voices” on page 60
Playing separate voices with the right and left hands
...........................“Left — Setting Separate Voices for the Left and Right Sections of the Keyboard” on page 61
Changing the sound
Enhancing the sound with reverb and other effects .....................................“Applying Voice Effects” on page 61
.................................................................................................................“Adjusting the Effects” on page 125
Adjusting the Level Balance................................................................................................................. page 123
Combining two voices ...................................................... “Layer — Layering Two Different Voices” on page 60
Playing separate voices with the right and left hands
...........................“Left — Setting Separate Voices for the Left and Right Sections of the Keyboard” on page 61
Creating voices ...................................................................................................................................... page 91
Playing the auto accompaniment
Playing the accompaniment automatically.............................................................................................page 63
Calling up ideal panel settings for your music........................................................................................ page 73
Practicing
Muting the right- or left-hand part.......................................................................................................... page 83
Practicing with an accurate and steady tempo.............................................“Using the Metronome” on page 54
Recording
12
Recording your performance...........................................................................................................pages 97, 98
Creating a song by entering notes ........................................................................................................page 100
Creating your original settings
Creating voices ...................................................................................................................................... page 91
Creating accompaniment styles............................................................................................................ page 112
CVP-206/204
Page 13
Using a microphone (CVP-206 only)
Connecting the microphone.............. “Connecting the Microphone or Guitar (MIC./LINE IN jack)” on page 147
Settings
Registering Panel Setups......................................................................................................................... page 88
Tuning the pitch/Selecting a scale ........................................................................................................ page 130
Making detailed settings for playing back songs................................................................................... page 128
Making detailed settings for the auto accompaniment..........................................................................page 133
Making settings for the pedals...........“Making Settings for the Pedals and Keyboard — Controller” on page 134
Making detailed settings for the keyboard voices .................................................................................page 136
Showing the display on a TV (CVP-206 only)
.....................................“Showing the Clavinova Display on a TV — Video Out (CVP-206 only)” on page 139
Making detailed settings for MIDI ........................................................................................................page 140
Connecting the Clavinova to other devices
Basic information on MIDI.....................................................................................“What’s MIDI?” on page 151
Recording your performance................ “Playing the sounds of the Clavinova through an external audio system,
and recording the sounds to an external recorder (AUX OUT jacks)” on page 148
Raising the volume .............................. “Playing the sounds of the Clavinova through an external audio system,
and recording the sounds to an external recorder (AUX OUT jacks)” on page 148
Outputting another instrument’s sound from the Clavinova ............ “Outputting the sound of an external device
through the built in speakers of the Clavinova (AUX IN jacks)” on page 148
Connecting a computer...........................“Connecting a computer (USB terminal, MIDI terminal)” on page 149
Assembling
Assembling and disassembling the Clavinova......................“CVP-206: Keyboard Stand Assembly” on page 156
“CVP-204: Keyboard Stand Assembly” on page 158
Quick solution
Basic functions of the Clavinova and how you can best use it .........................................................pages 12, 14
Resetting the Clavinova to the default setting
.................... “Restoring the Factory-programmed Settings of the CVP-206/204 — System Reset” on page 146
Displaying the Messages......................................................................“About the Display Messages” on page 8
Troubleshooting ................................................................................................................................... page 160
CVP-206/204
13
Page 14
What can you do with the Clavinova?
SONG
Playback previously recorded
songs (page 21, 36, 77)
Enjoy a wide variety of preset songs
as well as songs on commercially
available disks.
POWER
ON
MASTER VOLUME
MIN
STYLE
ACMP
OFF
AUTO FILLIN
OTS LINK
METRONOME
STAR T STOP
FADE IN / OUT
MAX
BREAK
GUIDE
Learn and practice with the
Guide functions (page 38, 82)
Play back the preset songs or the
appropriate disk software, and let
the display and guide lamps show
you when and where to play the
proper notes. It’s never been easier
or more fun to learn new music!
SONG
EXTRA TRACKS
(STYLE)
REC TOPSTART / STOP REW FF REPEAT GUIDE
NEW SONG
TEMPO
INTRO
ABCD
RESET
TRACK 2
SYNC.START
MAIN
(L)
TRACK 1
(R)
TAP TEMPO
ENDING / rit. SYNC.STOP SYNC.START START / STOP
TRANSPOSE
RESET
DEMO
Explore the Demos
(page 20, 56)
These not only showcase the
stunning voices and styles of
the instrument, they
introduce you to the various
functions and features — and
give you hands-on
experience using the
Clavinova!
MENU
DEMO
PART
A
B
C
D
E
BALANCE
CHANNEL
ON / OFF
PART
HELP
FUNCTION
DIGITAL
STUDIO
SOUND
CREATOR
DIGITAL
RECORDING
MIXING
CONSOLE
14
STYLE
Back up your performance with Auto
Accompaniment (page 28, 63)
Playing a chord with your left hand automatically
plays the auto accompaniment backing. Select an
accompaniment style — such as pop, jazz, Latin,
etc. — and let the Clavinova be your backing band!
CVP-206/204
DIRECT ACCESS
1234
DIGITAL RECORDING
Record your performances
(page 96, 112)
With the powerful and easy-to-use song
recording features, you can record your
own keyboard performances, and create
your own complete, fully orchestrated
compositions — which you can then save to
the USER drive or a floppy disk for future
recall.
Page 15
LCD
The large LCD (together
with the various panel
buttons) provides
comprehensive and easyto-understand control of
the Clavinova’s operations.
MUSIC FINDER
Call up the perfect accompaniment
style (page 33, 73)
If you know what song you want to play,
but you don’t know which style or voice
would be right for it, let the Music Finder
help you. Just select the song title, and
the Clavinova automatically calls up the
most appropriate style and voice.
VOICE
Enjoy a huge variety of
realistic voices (page 25, 58)
The Clavinova features a wealth of
exceptionally authentic and
dynamic voices (more than 800)
— including piano, strings,
woodwinds, and more!
5678
PIANO
Set up the piano —
instantly (page 59)
You can call up all the
optimum piano settings for
the Clavinova with just a
single button press — then
play the extraordinarily
realistic grand piano voice.
BACK NEXT
VOICE PART
F
G
H
I
J
EXIT
ON / OFF
LAYER
LEFT
LCD
CONTRAST
ENTER
DATA
ENTRY
VOICE EFFECT
REVERB
VOICE
PIANO & HARPSI.
BRASS
MUSIC FINDER
PIANO
DSP VARIATION HARMONY / ECHO MONO LEFT HOLD
E.PIANO ORGAN & ACCORDION PERCUSSION GUITAR BASS
WOODWIND
REGISTRATION MEMORY
FREEZE
STRINGS CHOIR & PAD SYNTH. XG USER
ONE TOUCH SETTING
1234
12345678
USB terminal
Make music with a computer — quickly and easily (page 149)
Dive in and take advantage of the wide world of computer music
software. Connections and setup are exceptionally easy, and you can
play back your computer recorded parts with different instrument
sounds — all from a single Clavinova!
MEMORY
IN OUT THRU
MIDI
CVP-206
L/L+R R L/L+R R RL
USB AUX PEDAL VIDEO OUT AUX IN AUX OUT
CVP-206/204
(LEVEL FIXED)
15
Page 16
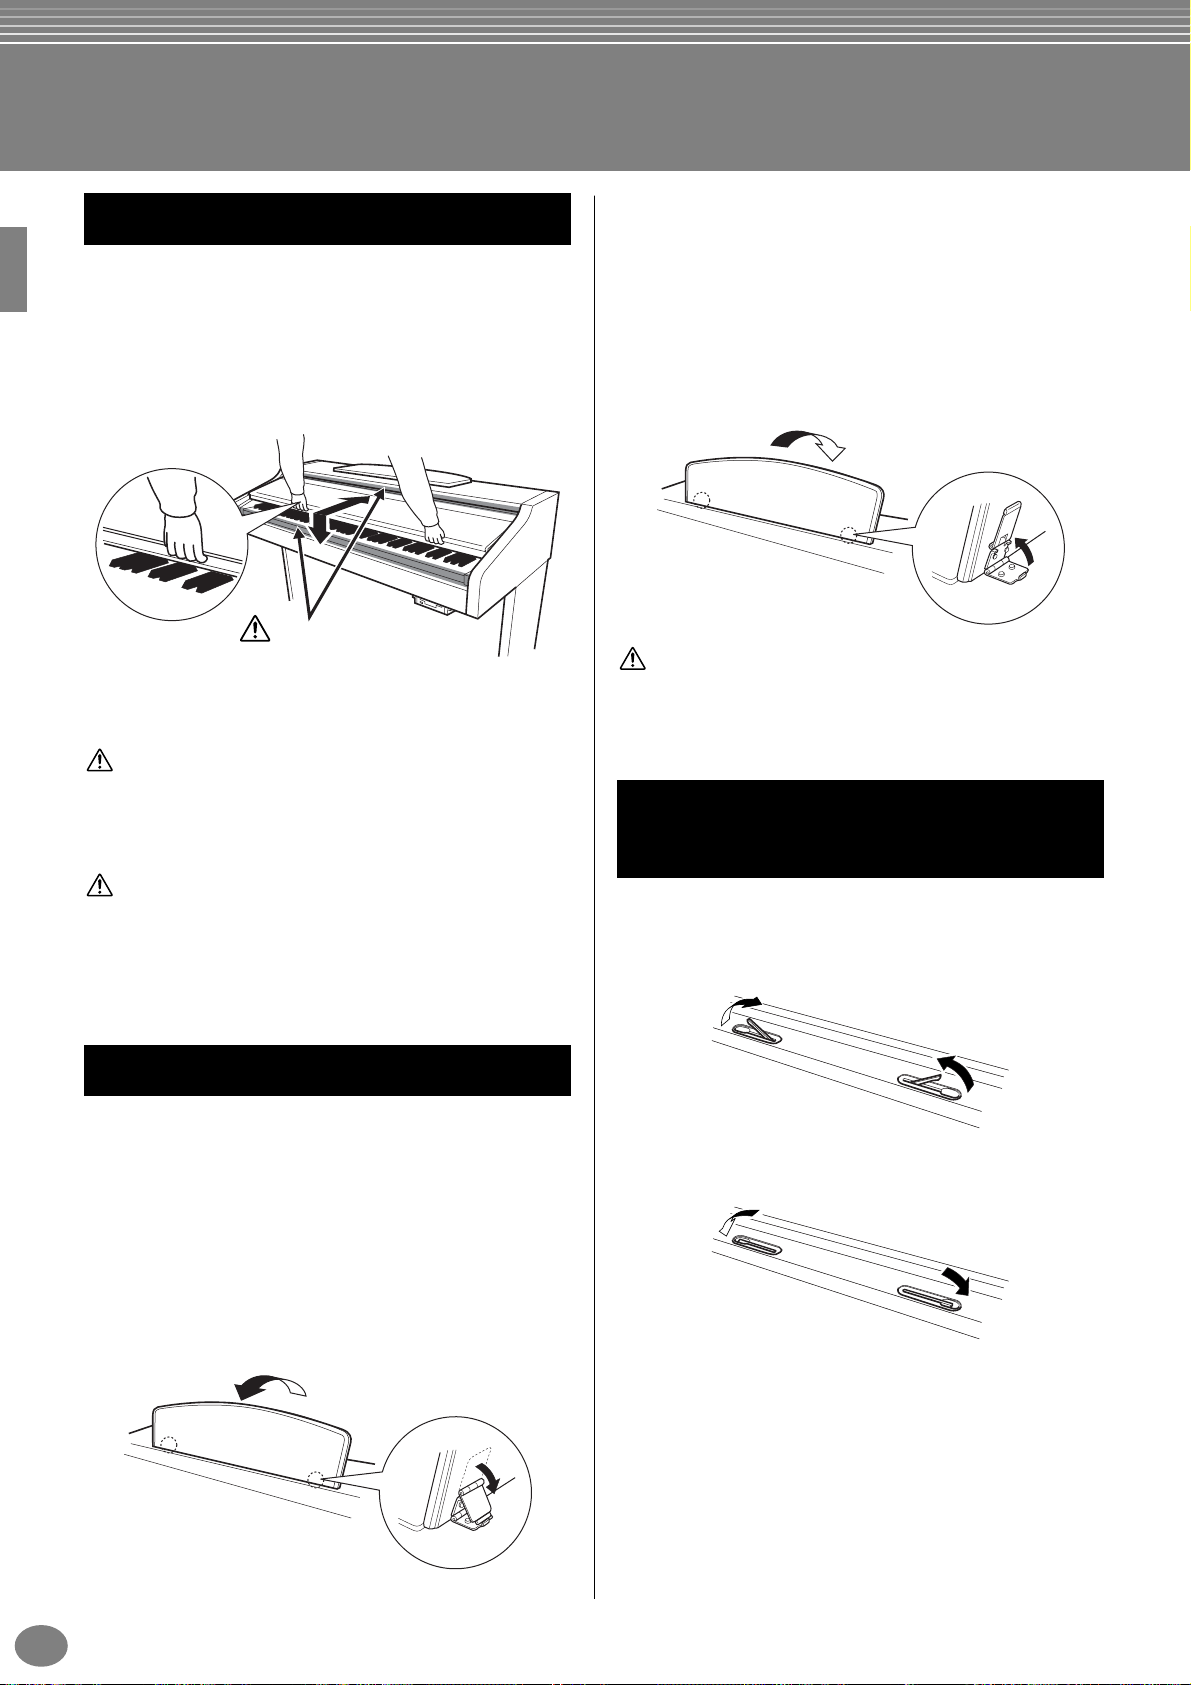
Setting Up the Clavinova
Key cover
■ To open the key cover:
Lift the cover slightly, then push and slide it open.
■ To close the key cover:
Slide the cover toward you and gently lower the
cover over the keys.
CAUTION
Be careful to avoid catching
your fingers when opening or
closing the cover.
CAUTION
Hold the cover with both hands when opening or closing it. Do not
release it until it is fully opened or closed. Be careful to av oid catching
fingers (yours or others, especially children’ s) between the co ver and
the unit.
■ To lower the music rest:
Pull the music rest toward yourself as far as it will go.
1
Raise the two metal supports until they are flat
2
against the rear surface of the music rest.
Gently lower the music rest backward until it is all
3
the way down.
CAUTION
Do not try to use the music rest in a half-raised position. Also, when
lowering the music rest, let the music rest all the way down before
releasing it.
Sheet Music Braces
(CVP-206 only)
CAUTION
Do not place objects such as a piece of metal or paper on top of the
key cover. Small objects placed on the key cover may fall inside the
unit when the cover is opened and may be nearly impossible to
remove. This could cause electric shock, short circuit, fire or other
serious damage to the instrument.
Music Rest
■ To raise the music rest:
Pull the music rest up and toward yourself as far as it
1
will go.
Flip down the two metal supports at the left and the
2
right on the rear of the music rest.
Lower the music rest so that it rests on the metal
3
supports.
These braces are for holding the pages of music books in
place.
■ To open
■ To close
16
CVP-206/204
Page 17
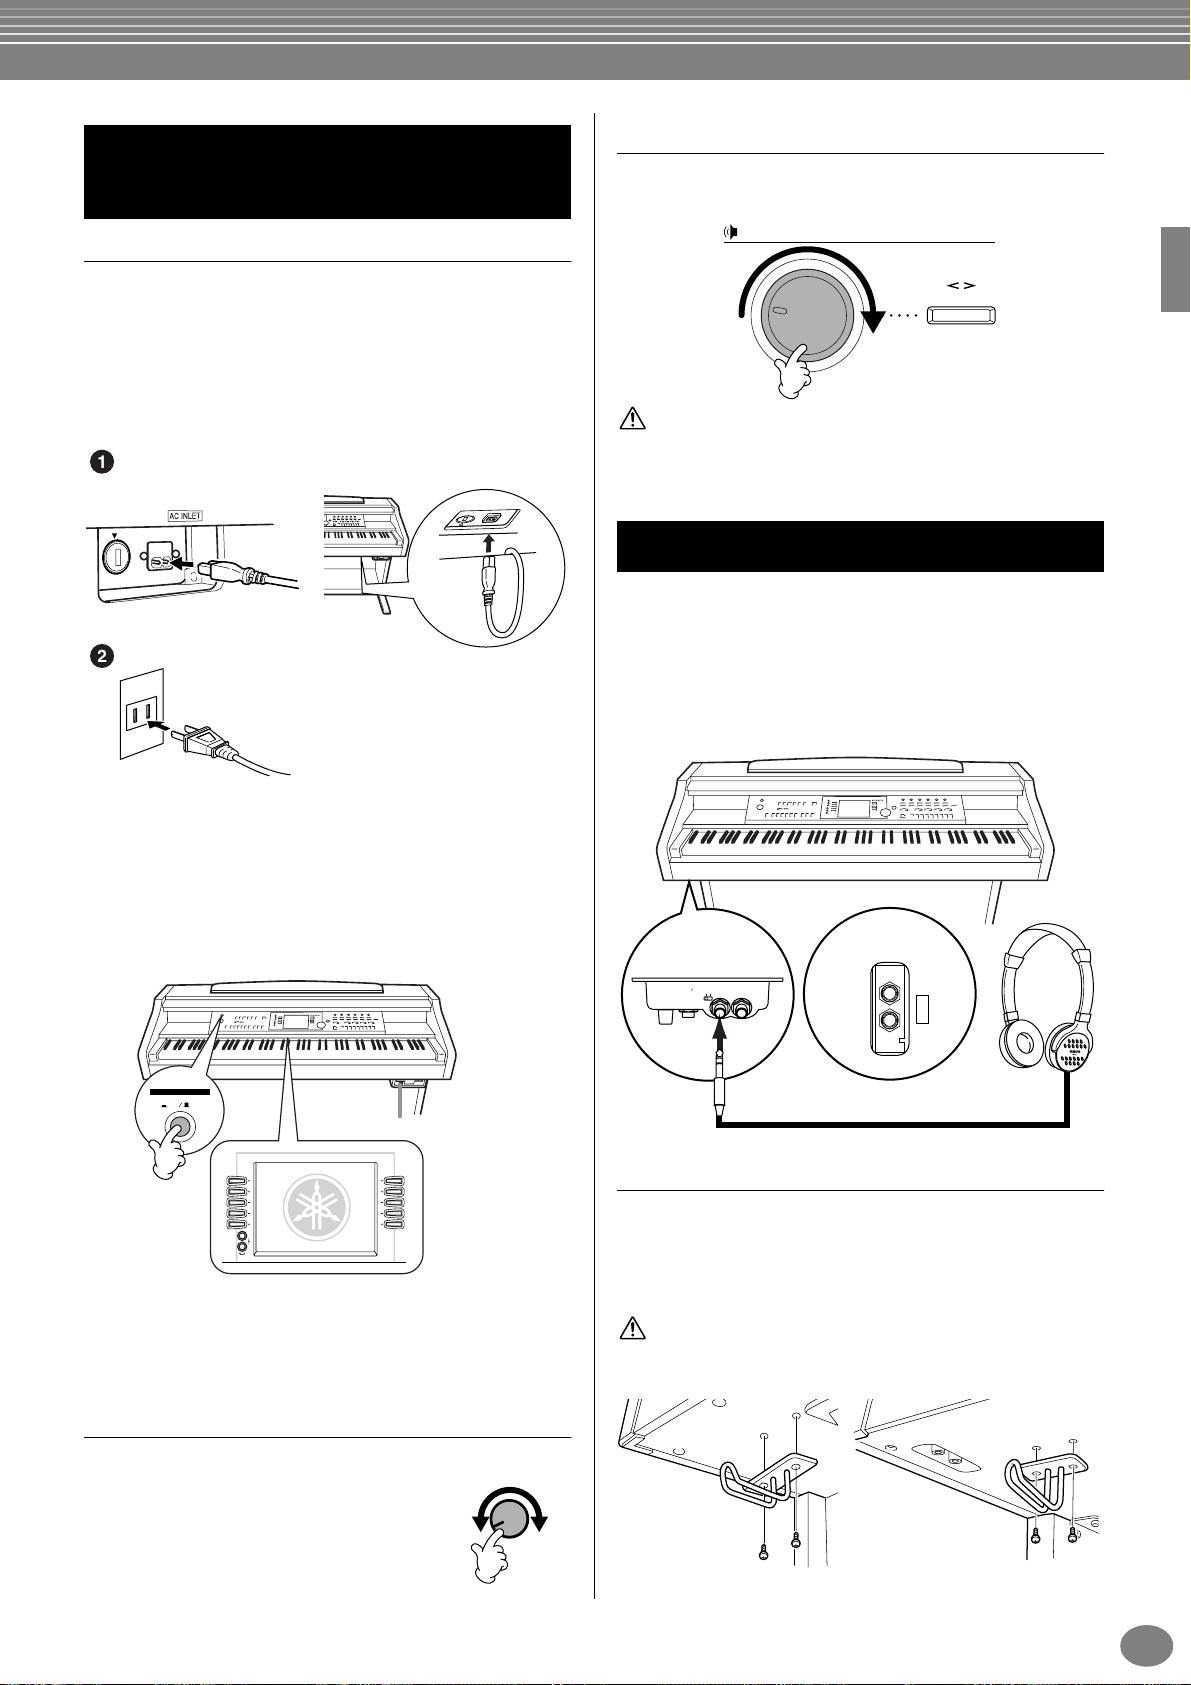
Turning the Power On
and Off
Connect the power cord
Insert the plugs at the ends of the cord, one into the
1
AC INLET on the Clavinova, and the other into a
standard AC outlet.
In some areas, a plug adapter may be provided to
match the pin configuration of the AC wall outlets in
your area.
CVP-206
CVP-204
Setting the volume
Use the [MASTER VOLUME] dial to adjust the volume to
an appropriate level.
MASTER VOLUME
FADE IN / OUT
MIN
CAUTION
Do not use the Clavinova at a high volume level for a long period of
time, or your hearing may be damaged.
MAX
Using headphones
Connect a pair of headphones to one of the [PHONES]
jacks.
Two [PHONES] jacks are provided.
Two sets of standard stereo headphones can be plugged
in. (If you are using only one pair of headphones, you
can plug them into either of these jacks.)
(The shape of plug differs depending on locale.)
Press the [POWER] switch.
2
→ The main display appears in the LCD display. The
drive lamp below the lower right end of the
keyboard also lights.
POWER
ON
OFF
The drive lamp lights.
A
B
C
D
E
BALANCE
CHANNEL
ON / OFF
PART
F
G
H
I
J
When you’re ready to turn off the power, press the
[POWER] switch again.
→ Both the display and the drive lamp below the
right end of the keyboard will turn off.
CVP-204
PHONES
MIN MAX
VOLUME
INPUT
CVP-206
MIC.
MIC. LINE PHONES
LINE IN
Using the Headphone Hanger
A headphone hanger is included in the CVP-206/204
package so that you can hang the headphones on the
Clavinova. Install the headphone hanger using included
two screws (4 × 10 mm) as shown in the figure.
CAUTION
Do not hang anything other than the headphones on the hanger.
Otherwise, the Clavinova or the hanger may be damaged.
Adjusting the display contrast
If the LCD is difficult to read, adjust the
contrast with the [LCD CONTRAST]
knob at the right of the LCD.
LCD
CONTRAST
CVP-206 CVP-204
CVP-206/204
17
Page 18
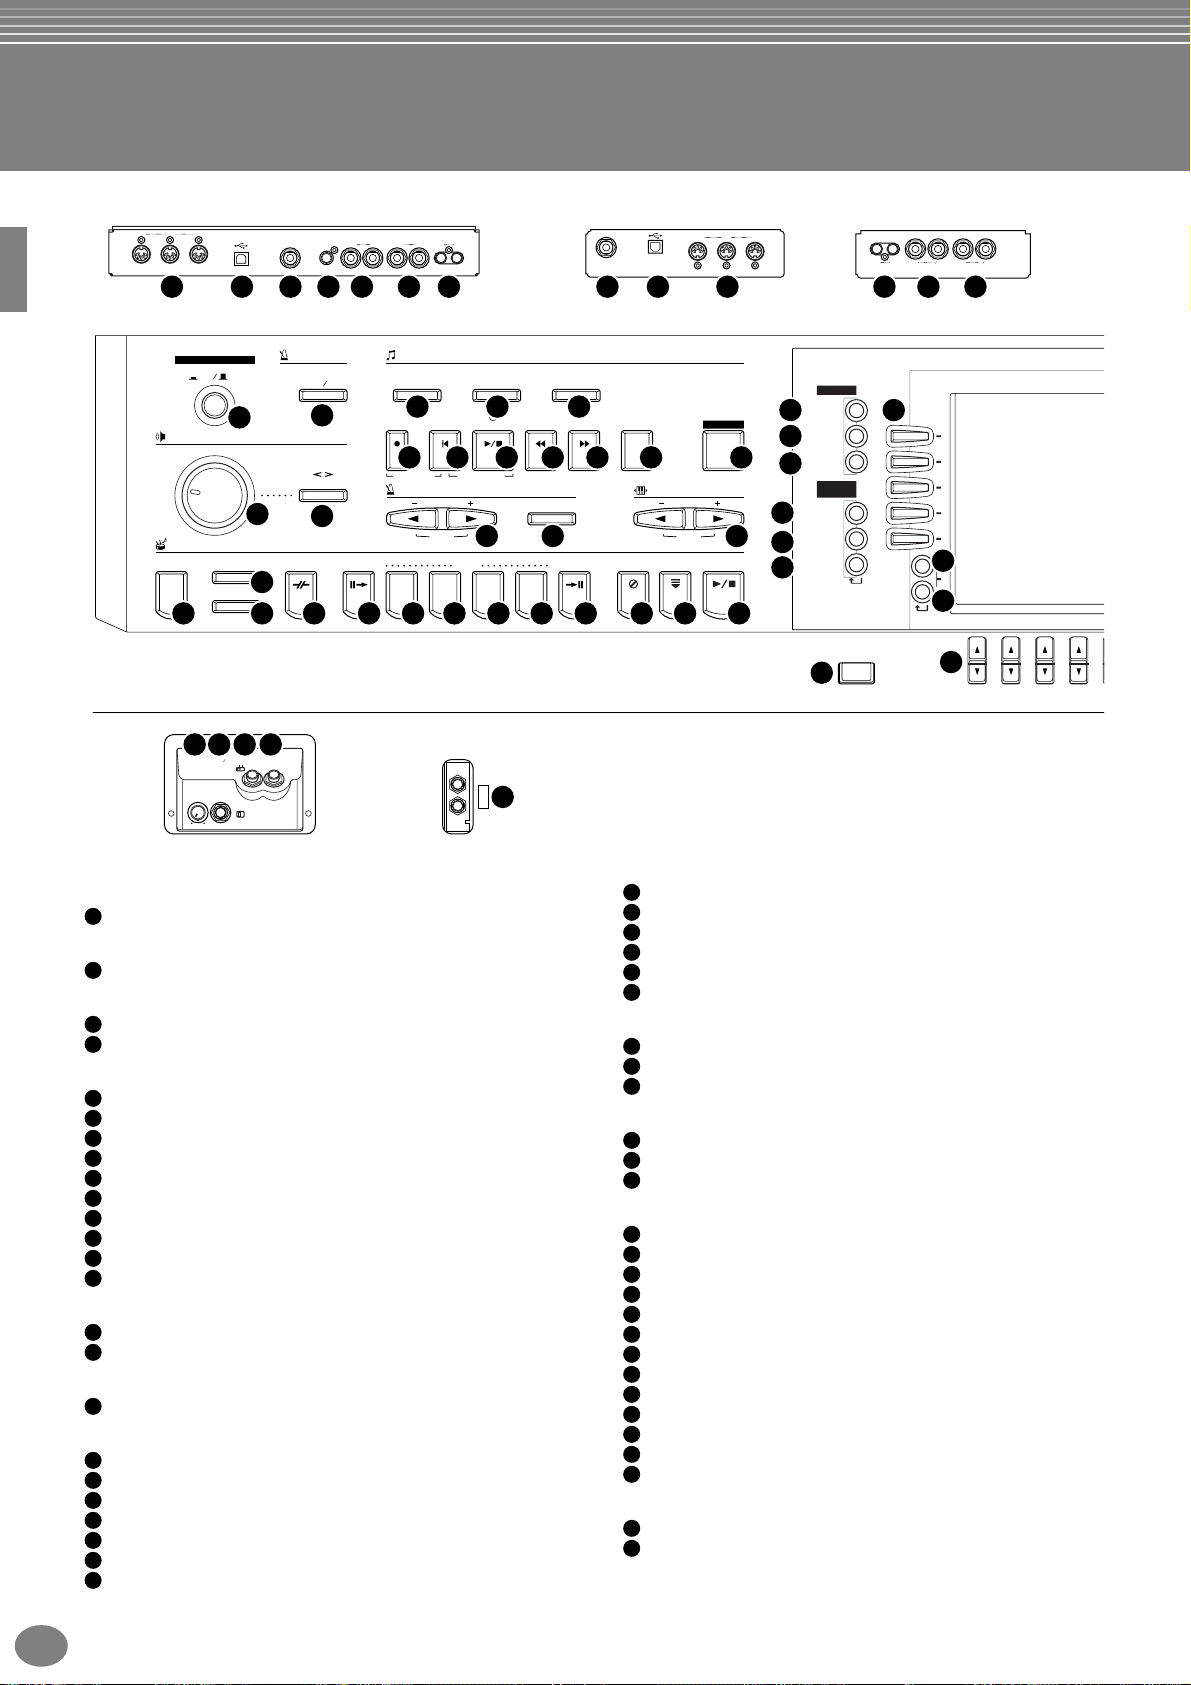
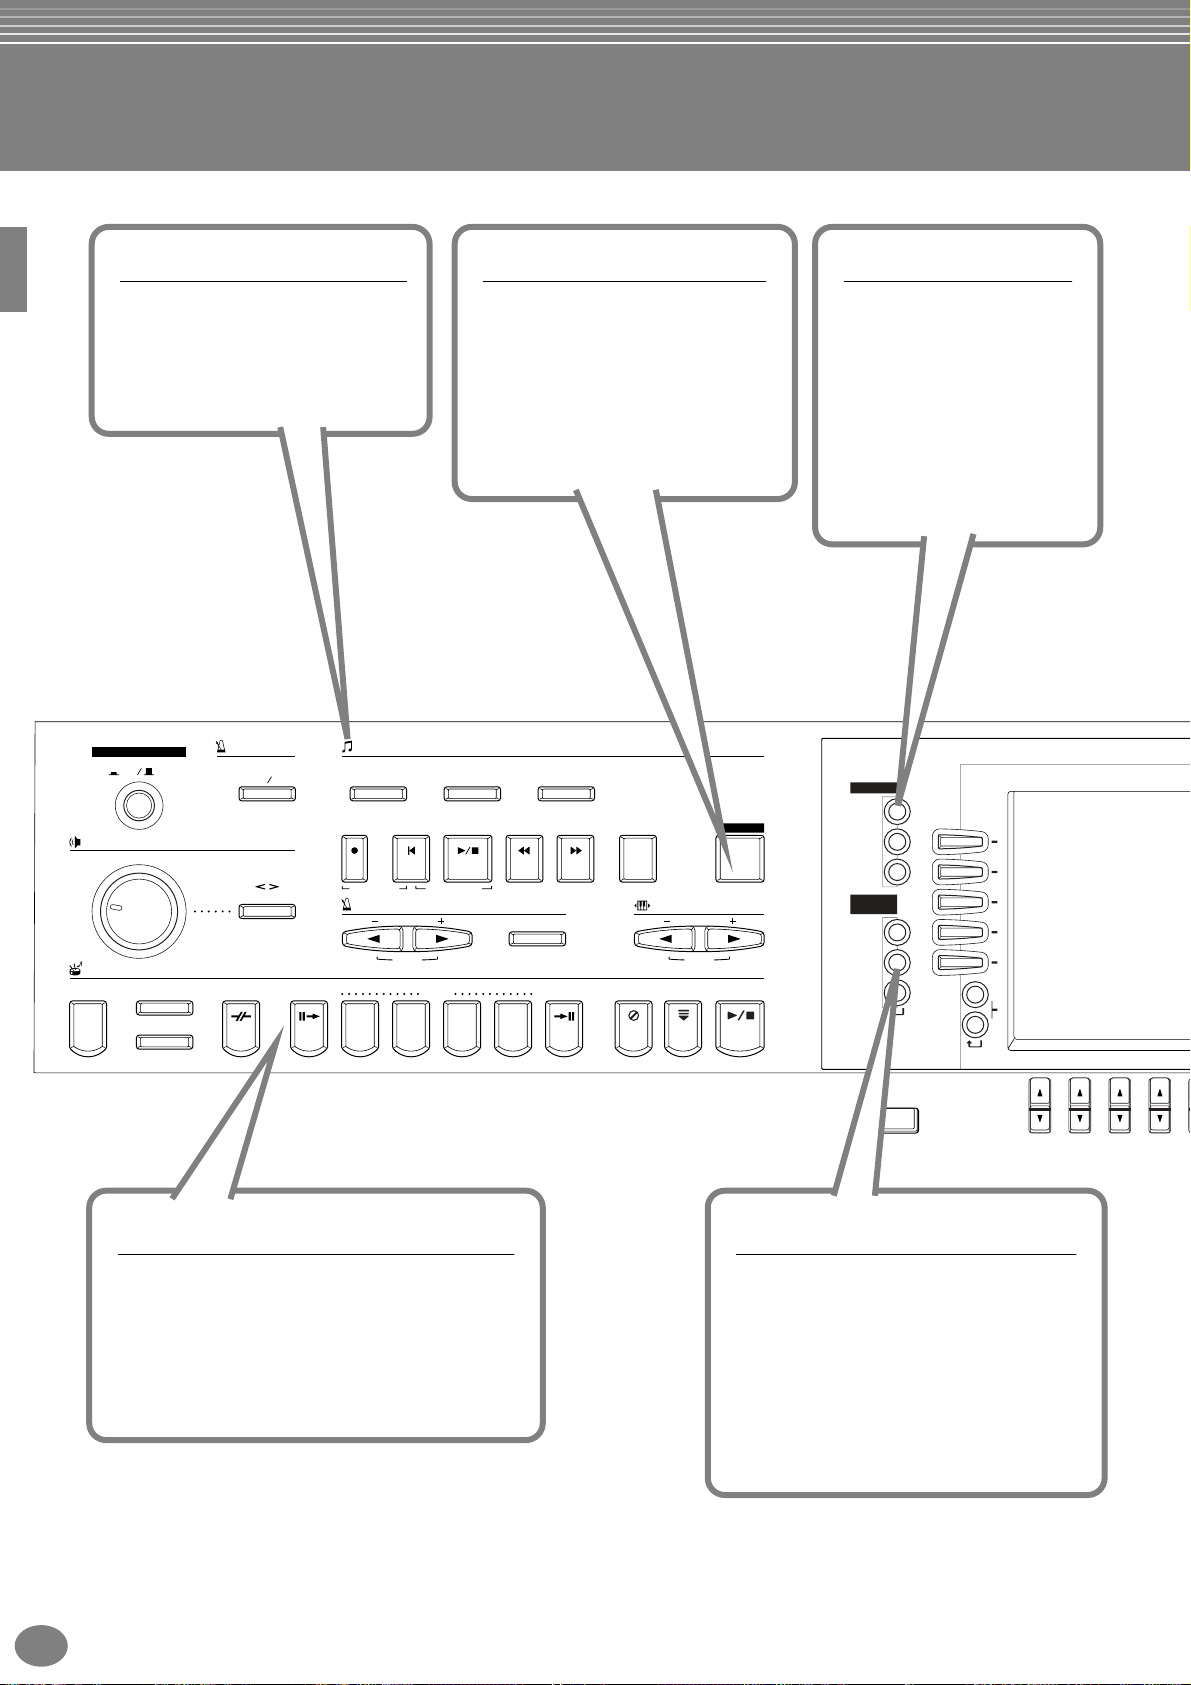
Panel Controls and Terminals
CVP-206 CVP-204
IN OUT THRU
MIDI
USB AUX PEDAL VIDEO OUT AUX IN AUX OUT
L/L+R R L/L+R R RL
69 70 71 72 73 74 75 71 70 75 74 7369
(LEVEL FIXED)
AUX PEDAL
USB
MIDI
INOUTTHRU
(
LEVEL FIXED
LL L+RRR LL+RR
)
AUX OUT AUX IN
POWER
ON
MASTER VOLUME
MIN
STYLE
ACMP
OFF
1
AUTO FILLIN
OTS LINK
METRONOME
START STOP
2
FADE IN / OUT
3
MAX
4
BREAK
19
SONG
EXTRA TRACKS
(STYLE)
5 76
REC TOPSTART / STOP REW FF REPEAT GUIDE
8 9 10 11 12 13 14
NEW SONG
TEMPO
INTRO
ABCD
TRACK 2
(L)
SYNC.START
RESET
15 16 17
MAIN
18 20 21 22 23 24 25 26 27 28 29 30
65 66 6867
MIC.
INPUT
MIC. LINE PHONES
VOLUME
LINE IN
MIN MAX
PHONES
CVP-206
POWER
[ON / OFF] button (POWER)................................................P. 17
1
METRONOME
[START / STOP] button (METRONOME).............................P. 54
2
MASTER VOLUME
[MASTER VOLUME] dial......................................................P. 17
3
[FADE IN / OUT] button........................................................P. 69
4
SONG
[EXTRA TRACKS (STYLE)] button......................................P. 81
5
[TRACK 2 (L)] button............................................................P. 81
6
[TRACK 1 (R)] button...........................................................P. 81
7
[REC] button ........................................................................P. 96
8
[TOP] button......................................................................... P. 80
9
[START / STOP] button (SONG)..........................................P. 78
10
[REW] button........................................................................ P. 80
11
[FF] button............................................................................ P. 80
12
[REPEAT] button .................................................................. P. 81
13
[GUIDE] button..................................................................... P. 82
14
TEMPO
[E] [F] buttons (TEMPO)...............................................P. 54
15
[TAP TEMPO] button............................................................P. 55
16
TRANSPOSE
[E] [F] buttons (TRANSPOSE) ...................................P. 136
17
STYLE
[ACMP] button...................................................................... P. 64
18
[AUTO FILLIN] button...........................................................P. 70
19
[OTS LINK] button................................................................ P. 72
20
[BREAK] button....................................................................P. 68
21
[INTRO] button...............................................................P. 31, 70
22
MAIN [A] button.................................................................... P. 68
23
MAIN [B] button.................................................................... P. 68
24
CVP-204
TRACK 1
(R)
TAP TEMPO
ENDING / rit. SYNC.STOP SYNC.START START / STOP
68
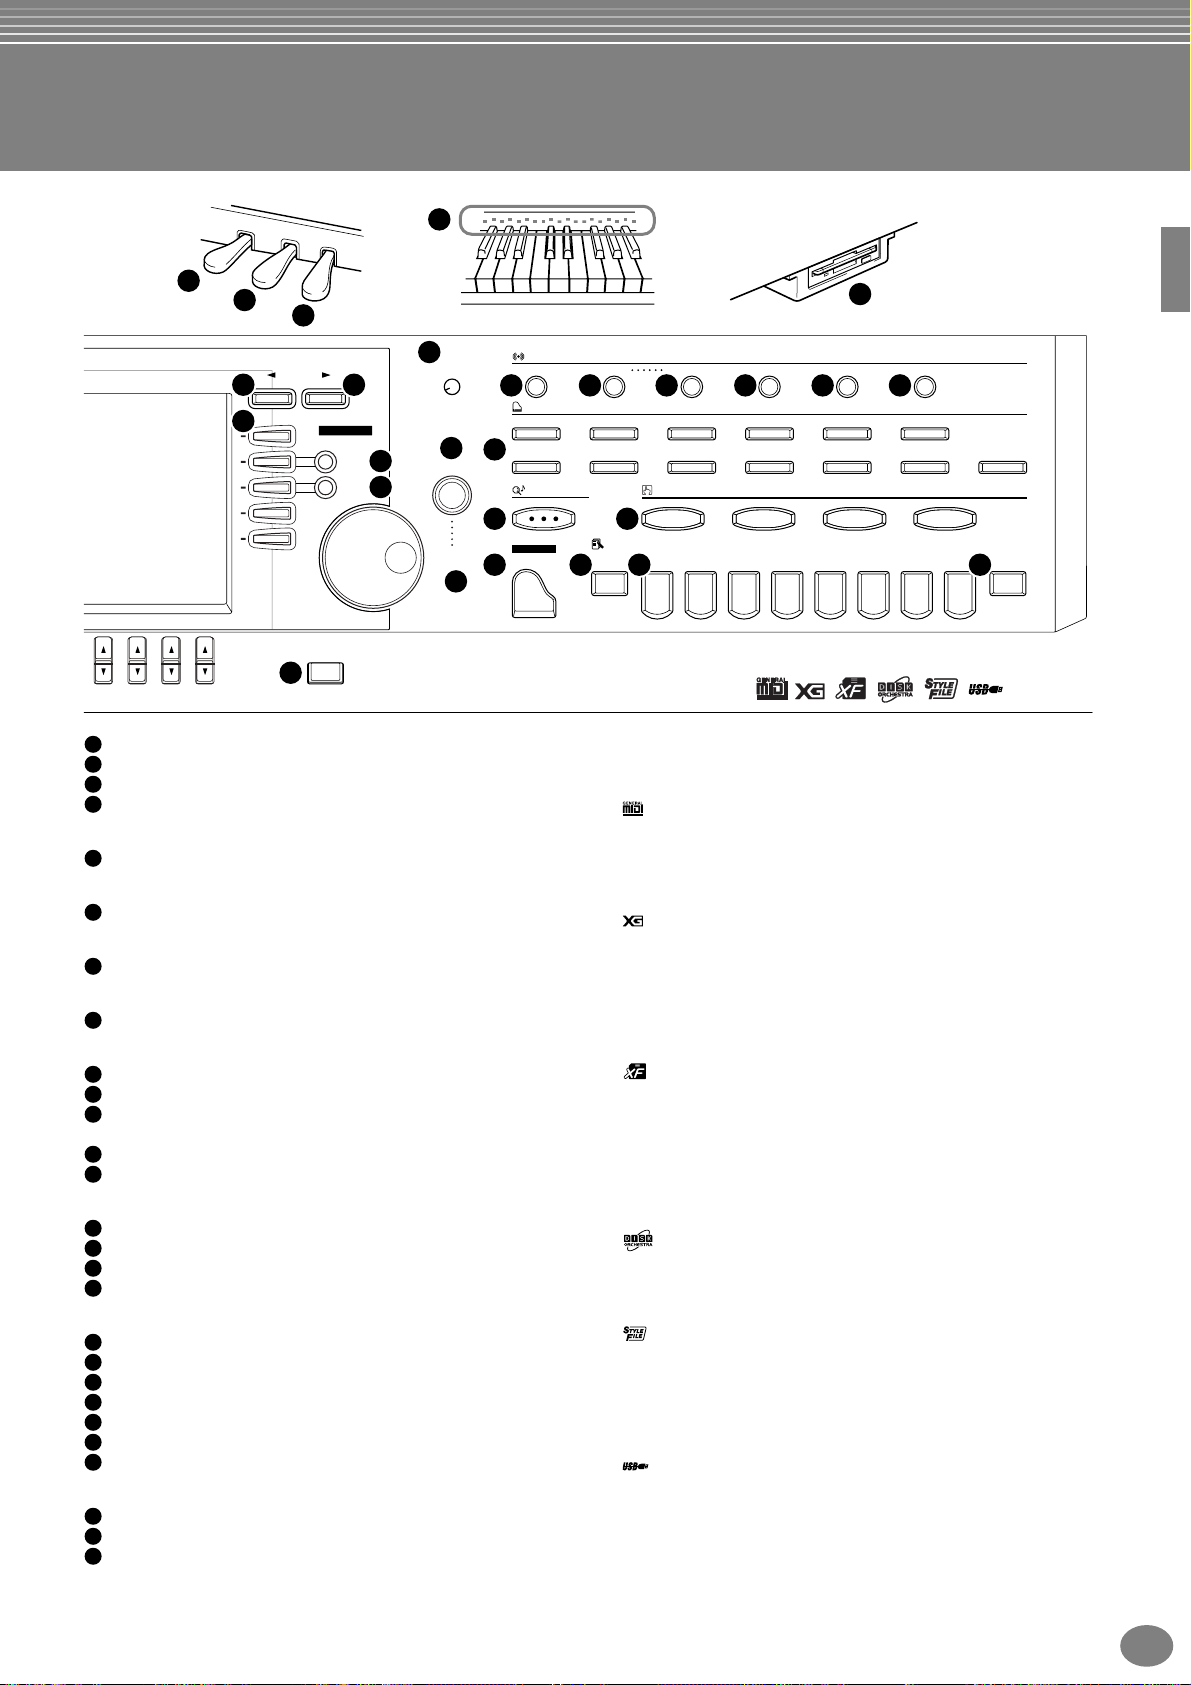
MENU
DEMO
31
HELP
32
FUNCTION
33
34
35
36
DIGITAL
STUDIO
SOUND
CREATOR
DIGITAL
RECORDING
MIXING
CONSOLE
TRANSPOSE
RESET
40
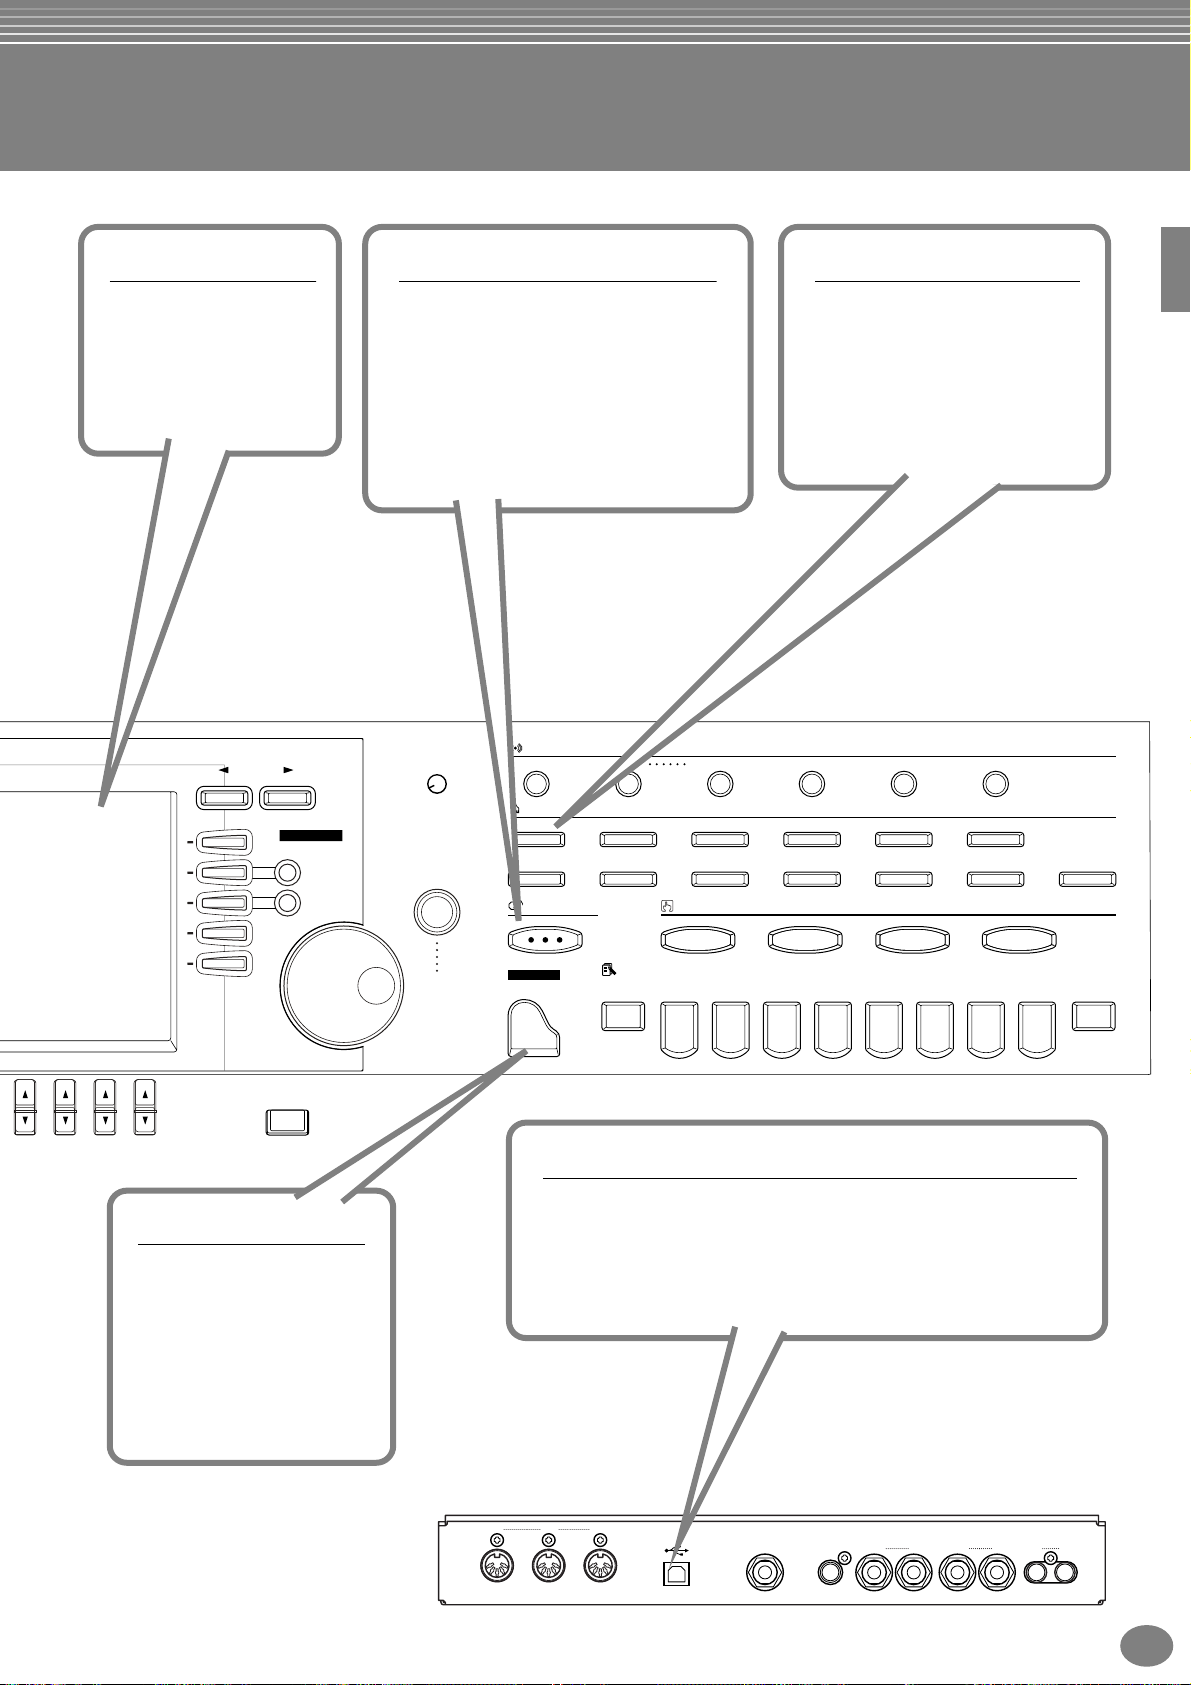
MAIN [C] button ................................................................... P. 68
25
MAIN [D] button ................................................................... P. 68
26
[ENDING / rit.] button.....................................................P. 31, 70
27
[SYNC.STOP] button............................................................P. 69
28
[SYNC.START] button..........................................................P. 64
29
[START / STOP] button (STYLE)......................................... P. 64
30
PART
DIRECT ACCESS
37
A
B
C
D
E
BALANCE
CHANNEL
ON / OFF
PART
38
39
45
1234
MENU
[DEMO] button..................................................................... P. 56
31
[HELP] button....................................................................... P. 53
32
[FUNCTION] button ...........................................................P. 128
33
DIGITAL STUDIO
[SOUND CREATOR] button.................................................P. 91
34
[DIGITAL RECORDING] button ................................... P. 96, 112
35
[MIXING CONSOLE] button............................................... P. 122
36
DISPLAY CONTROL
[A] - [J] buttons..................................................................... P. 44
37
[BALANCE] button............................................................... P. 65
38
[CHANNEL ON / OFF] button........................................ P. 65, 80
39
[DIRECT ACCESS] button................................................... P. 51
40
[BACK] button................................................................ P. 44, 50
41
[NEXT] button ................................................................ P. 44, 50
42
VOICE PART ON / OFF [LAYER] button..............................P. 60
43
VOICE PART ON / OFF [LEFT] button.................................P. 60
44
[1▲▼] - [8▲▼] buttons.................................................P. 44 - 49
45
[LCD CONTRAST] knob...................................................... P. 17
46
[ENTER] button.................................................................... P. 50
47
[DATA ENTRY] dial...............................................................P. 50
48
[EXIT] button........................................................................P. 44
49
VOICE EFFECT
[REVERB] button................................................................. P. 61
50
[DSP] button......................................................................... P. 61
51
18
CVP-206/204
Page 19
64
76
77
78
46
LCD
43
44
CONTRAST
47
56
ENTER
57 58
DATA
ENTRY
59 60 61 62
BACK NEXT
41
37
F
G
H
I
J
42
VOICE PART
ON / OFF
LAYER
LEFT
48
49
5678
[VARIATION] button ............................................................. P. 61
52
[HARMONY / ECHO] button................................................ P. 62
53
[MONO] button.....................................................................P. 62
54
[LEFT HOLD] button............................................................ P. 62
55
VOICE
VOICE buttons.....................................................................P. 58
56
MUSIC FINDER
[MUSIC FINDER] button......................................................P. 73
57
ONE TOUCH SETTING
[1] - [4] buttons (ONE TOUCH SETTING)............................P. 71
58
PIANO Setting
[PIANO] button.....................................................................P. 59
59
REGISTRATION MEMORY
[FREEZE] button..................................................................P. 90
60
[1] – [8] buttons (REGISTRATION MEMORY) ..................... P. 88
61
[MEMORY] button................................................................P. 88
62
Floppy disk drive (3.5”)...........................................................P. 6
63
Keyboard guide lamps .........................................................P. 82
64
Microphone and Headphone Connectors
[INPUT VOLUME] knob......................................................P. 147
65
[MIC. LINE IN] jack............................................................. P. 147
66
[MIC. LINE] switch.............................................................. P. 147
67
[PHONES] jacks................................................................. P. 147
68
Connectors
MIDI [THRU] [OUT] [IN] terminals...................................... P. 149
69
[USB] terminal....................................................................P. 149
70
[AUX PEDAL] jack.............................................................. P. 149
71
[VIDEO OUT] jack..............................................................P. 148
72
AUX IN [L / L+R] [R] jacks..................................................P. 148
73
AUX OUT [L / L+R] [R] jacks..............................................P. 148
74
AUX OUT (LEVEL FIXED) [L] [R] jacks.............................P. 148
75
Pedals
Left pedal............................................................................. P. 62
76
Sostenuto pedal...................................................................P. 62
77
Damper pedal ......................................................................P. 62
78
EXIT
VOICE EFFECT
REVERB
50
VOICE
PIANO & HARPSI.
BRASS
MUSIC FINDER
PIANO
63
DSP VARIATION HARMONY / ECHO MONO LEFT HOLD
51 52 54 5553
E.PIANO ORGAN & ACCORDION PERCUSSION GUITAR BASS
WOODWIND
REGISTRATION MEMORY
FREEZE
STRINGS CHOIR & PAD SYNTH. XG USER
ONE TOUCH SETTING
1234
12345678
MEMORY
The Panel Logos
The logos printed on the Clavinova panel indicate standards/
formats it supports and special features it includes.
GM System Level 1
“GM System Level 1” is an addition to the MIDI standard which
guarantees that any data conforming to the standard will play
accurately on any GM-compatible tone generator or synthesizer
from any manufacturer.
XG Format
XG is a new Yamaha MIDI specification which significantly
expands and improves on the “GM System Level 1” standard with
greater voice handling capacity, expressive control, and effect
capability while retaining full compatibility with GM. By using the
Clavinova’s XG voices, it is possible to record XG-compatible
song files.
XF Format
The Yamaha XF format enhances the SMF (Standard MIDI File)
standard with greater functionality and open-ended expandability
for the future. The Clavinova is capable of displaying lyrics when
an XF file containing lyric data is played. (SMF is the most
common format used for MIDI sequence files. The Clavinova is
compatible with SMF Formats 0 and 1, and records “song” data
using SMF Format 0.)
Disk Orchestra Collection
The DOC voice allocation format provides data playback
compatibility with a wide range of Yamaha instruments and MIDI
devices.
Style File Format
The Style File Format (SFF) is Yamaha’s original style file format,
which uses a unique conversion system to provide high-quality
automatic accompaniment based on a wide range of chord types.
The Clavinova uses the SFF internally, reads optional SFF style
disks, and creates SFF styles using the Style Creator feature.
USB
USB is an abbreviation for Universal Serial Bus. It is a serial
interface for connecting a computer with peripheral devices. It
allows “hot swapping” (connecting peripheral devices while the
power to the computer is on).
CVP-206/204
19
Page 20
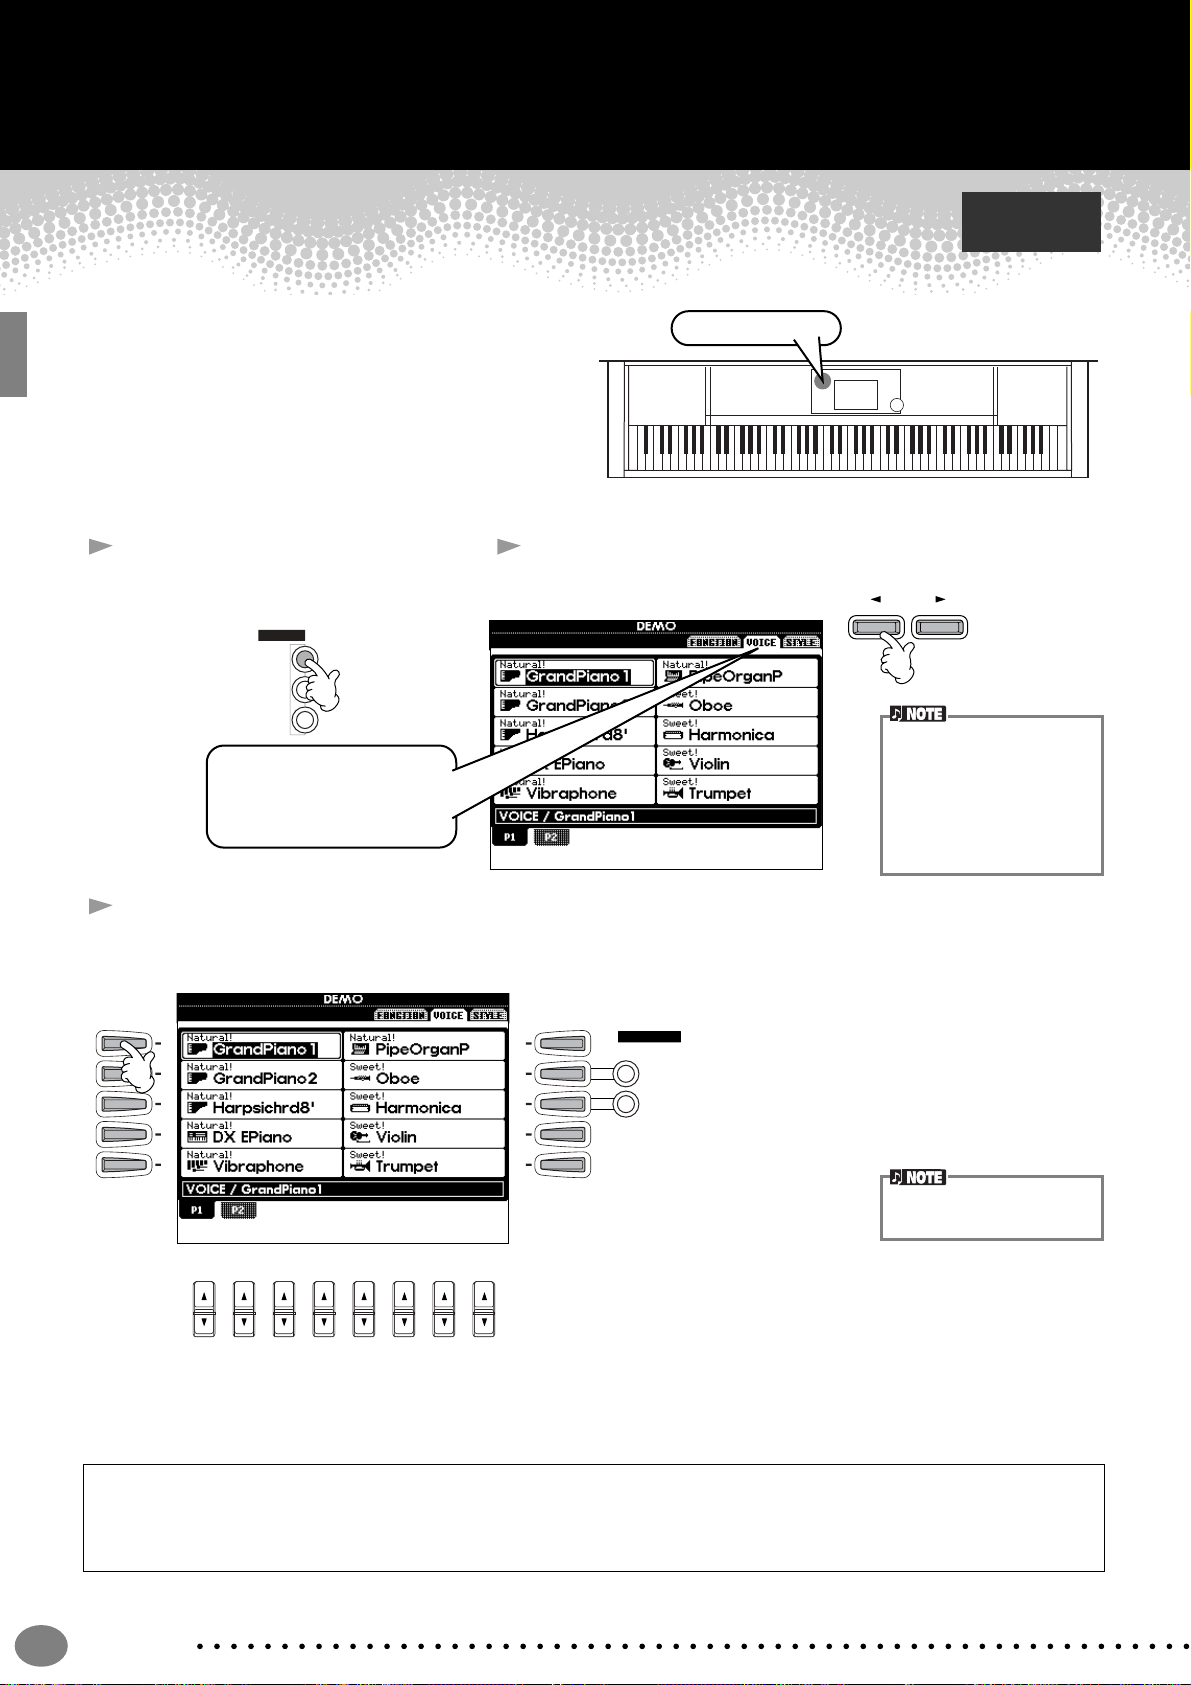
Quick Guide . . . . . . . . . . . . . . . . . . . . . . . . .
Playing the Demos
The Clavinova features an extensive variety of Demo
songs, that showcase its rich, authentic voices and its
dynamic rhythms and styles.
What’s more, there’s a special selection of Demo
functions. These take you through a hands-on journey of
all the important features and functions of the instrument
— letting you see firsthand how to effectively use the
Clavinova in your own music.
1 Press the [DEMO] button to call
up the menu for selecting a
Demo song.
MENU
DEMO
HELP
FUNCTION
For this example, VOICE is
selected. Voice Demos
showcase the voices of the
CVP-206/204.
2 Press the [BACK]/[NEXT] button to select the Demo
Reference
on page 56
Demo button
categories.
BACK NEXT
Function Demos demonstrate many of the different
functions on the CVP-206/
204. Style Demos introduce
you to the rhythms and
accompaniment styles of the
CVP-206/204 (page 56).
3
Press any of the [A] to [J] buttons or [8▼] (AUTO) button (FUNCTION page only) to select the Demo songs.
For this example, press the [A] button to playback the GrandPiano1 demo.
A
B
C
D
E
12345678
F
G
H
I
J
VOICE PART
ON / OFF
LAYER
LEFT
For details about the Demos,
refer to page 56.
Press the [EXIT] button to exit from the demo mode and return to the MAIN display when you’ve finished playing the
demo songs.
When you’re done with the Demos, you can get to know your Clavinova even better with these functions:
• Preset Song (Song Book) playback (page 21)
• Disk Song Playback (page 21)
• Short demo playback of the selected voice (in the Voice Open display; page 26).
20
Quick Guide
Page 21
Song Playback
Song Playback
Reference
on page 77
Here’s where all of the amazing voices, effects, rhythms, styles and other sophisticated features of
the Clavinova come together — in songs!
As you heard in the Demos, the Clavinova contains many built-in recordings. But there’s more. Call up the Song Open
(PRESET) display. And there’s an even greater wealth of song material you can enjoy with your Clavinova — in
commercially available software.
Song related buttons
BALANCE and
CHANNEL buttons
Floppy disk drive
Make sure that the Language setting for the instrument (page 146) is the same
as that of the file name of the
song that you are playing
back.
The following songs are compatible for playback on the CVP-206/204. Refer to pages 77, 154 for more details on the
logos.
Disks bearing this logo contain song data for voices defined in the GM standard.
Disks bearing this logo contain song data using the XG format, an extension of the GM
standard that provides a wider variety of voices and more comprehensive sonic control.
Disks bearing this logo contain song data for voices defined in Yamaha’s DOC format.
Songs containing a large
amount of data may not be
able to be read properly by
the instrument, and as such
you may not be able to
select them. The maximum
capacity is about 200–
300KB, however this may
differ depending on the data
contents of each song.
Playback of Songs
1 If you want to play back a disk song, insert an appropriate disk containing song data into the disk drive.
CAUTION
• Make sure to read the
section “Using the Floppy
Disk Drive (FDD) and
Floppy Disks” on page 6.
Quick Guide
21
Page 22
Song Playback
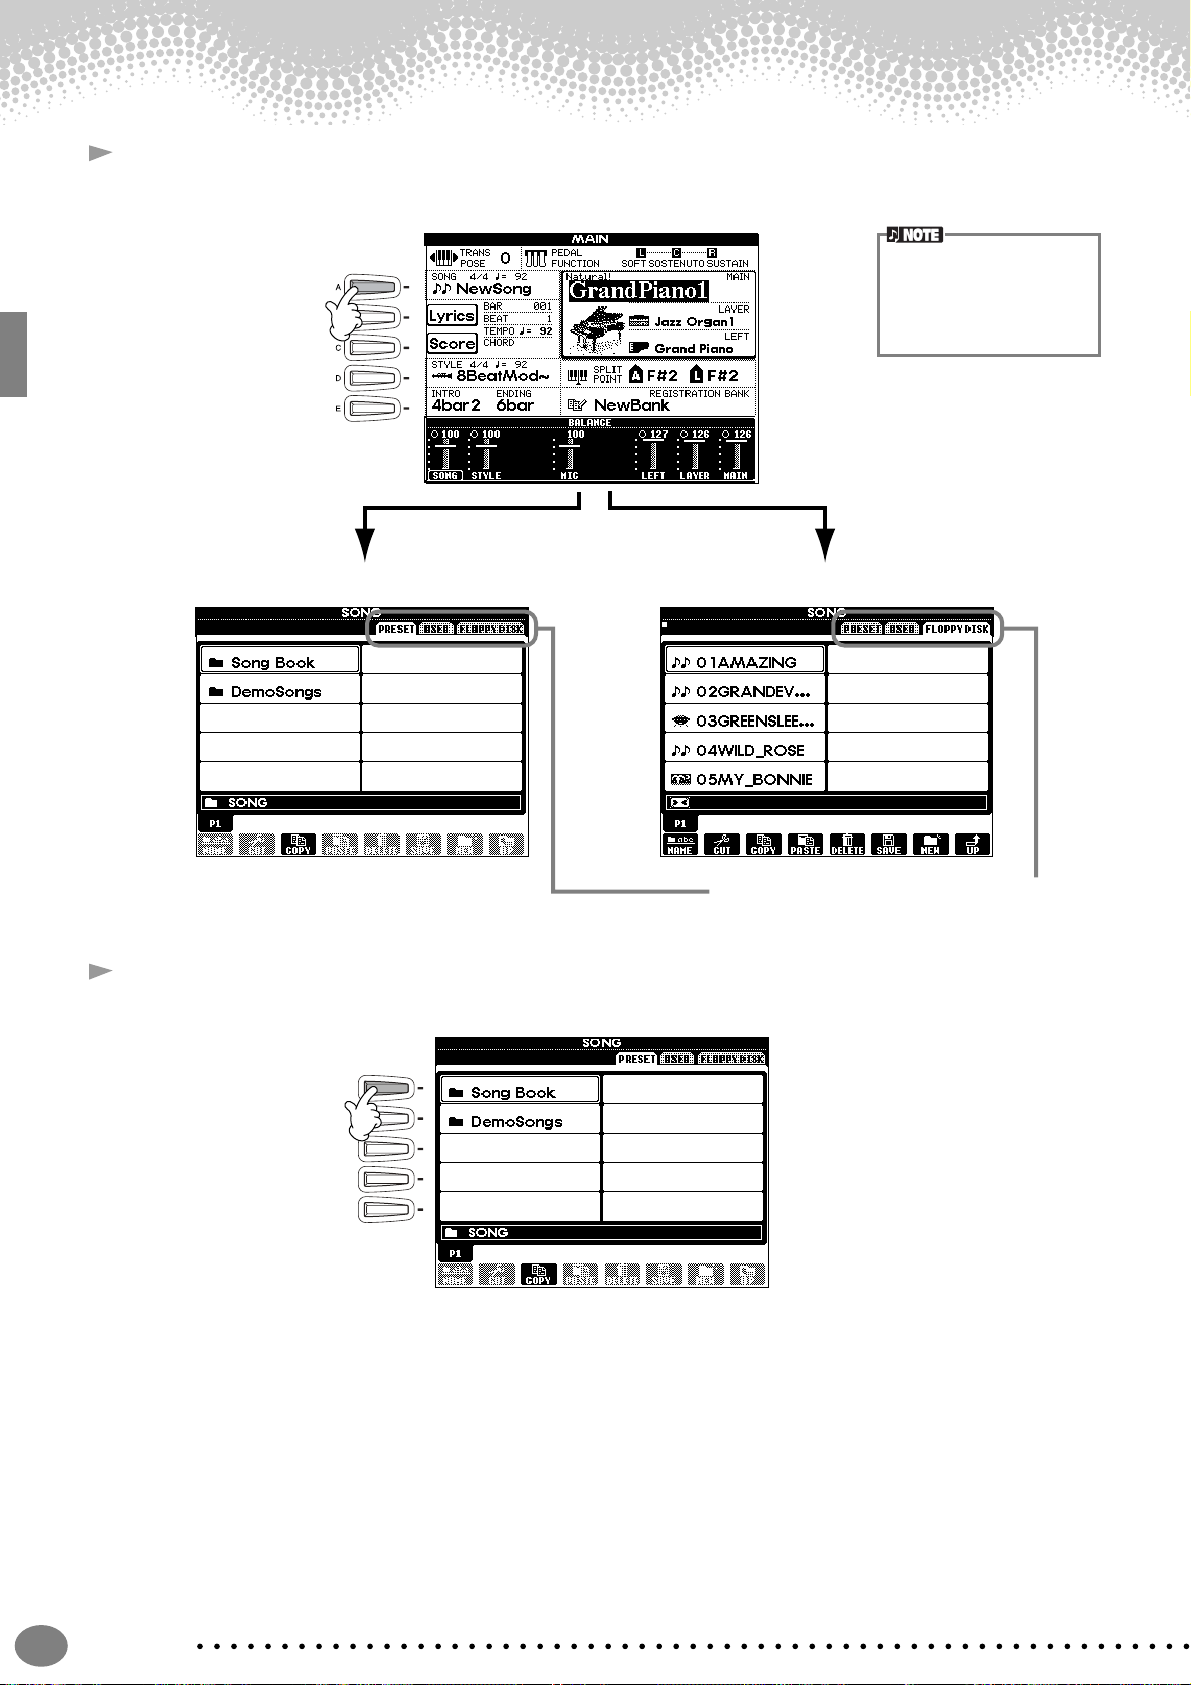
2 Press the [A] button to call up the Song Open display.
If the MAIN screen is not displayed, press the [DIRECT ACCESS] button followed by the [EXIT] button.
PRESET FLOPPY DISK
From the MAIN display (the
display shown when the
power is turned on), you can
select songs, voices, accompaniment styles, etc.
3 PRESET only
Press the [A] button to select the preset songs (Song Book) folder.
A
B
C
D
E
Press the [BACK]/[NEXT] button to select the drive.
22
Quick Guide
Page 23
4 Press one of the [A] to [J] buttons to select a song file.
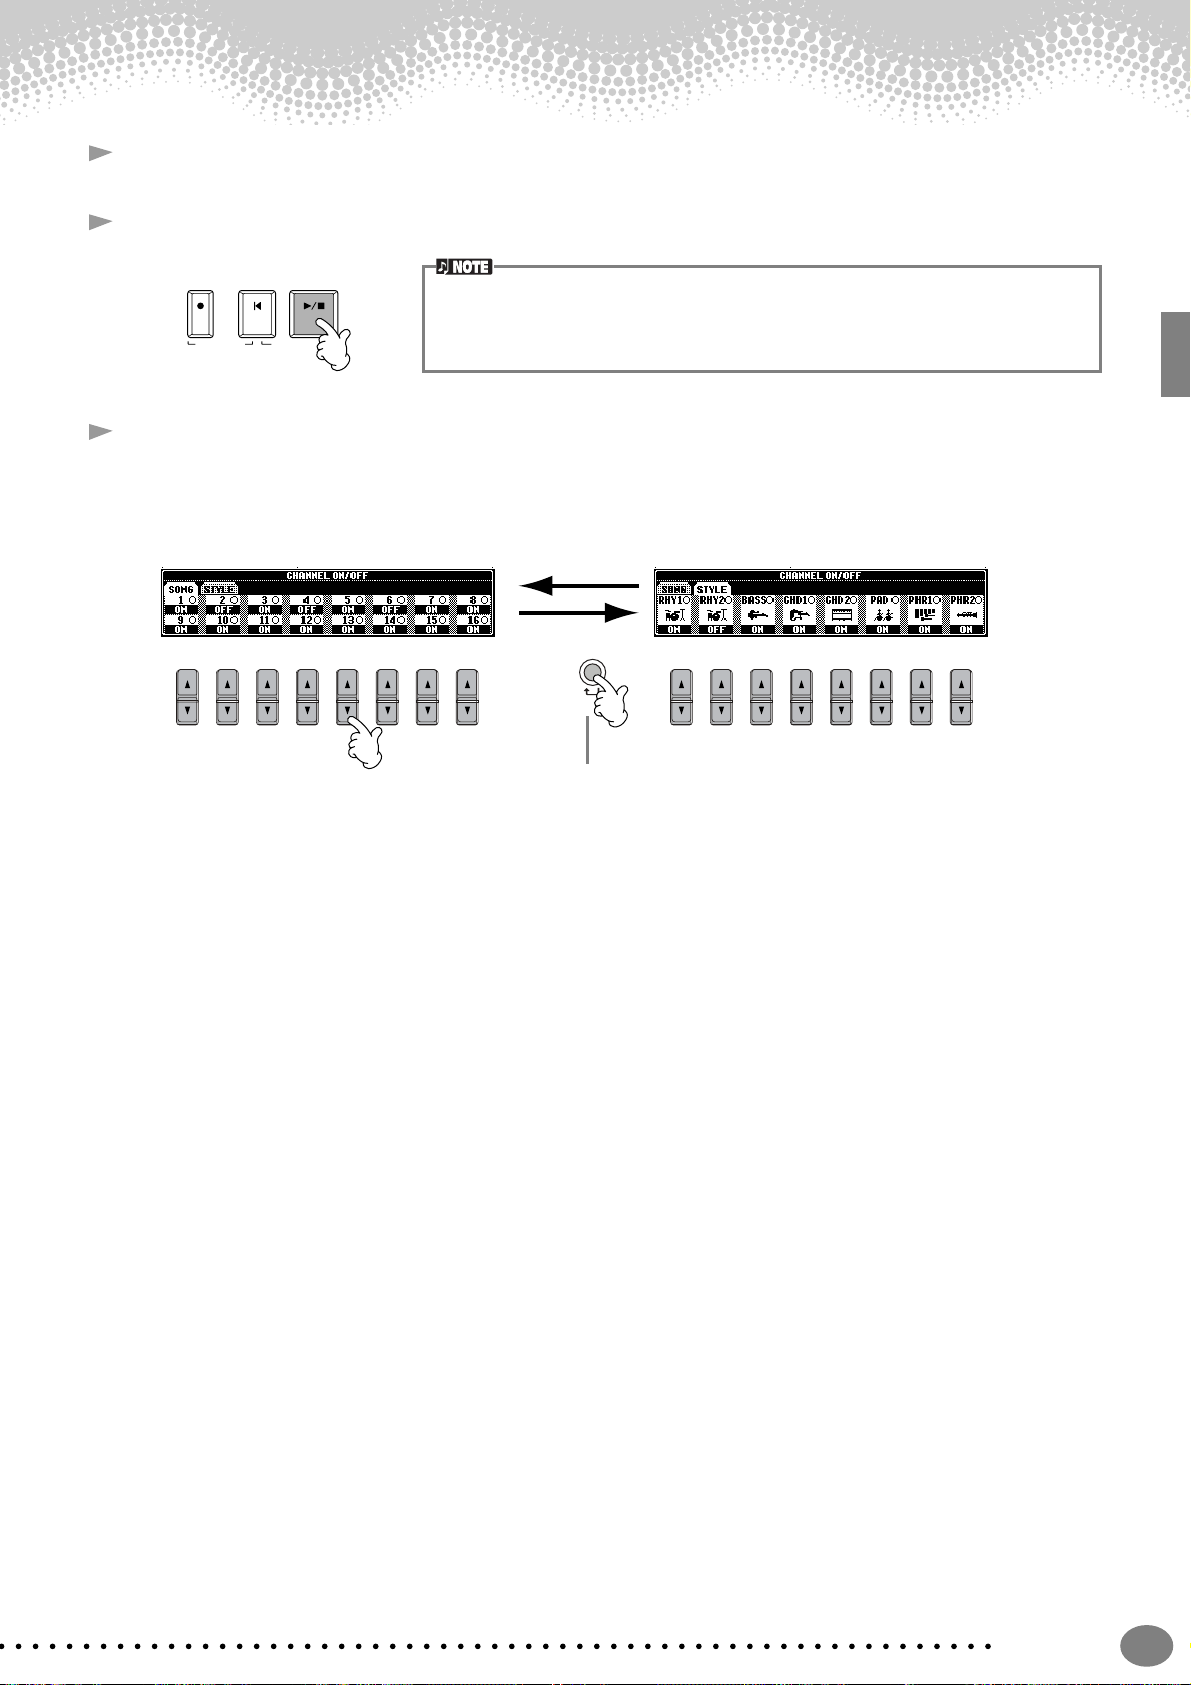
5 Press the SONG [START/STOP] button to start playback.
Song Playback
REC TOP START / STOP
•To rewind or fast forward to the pla yback point of the song, press the [REW] or [FF] button.
• With song data software (Standard MIDI format 0) that includes lyrics, you can view the lyr-
NEW SONG
SYNC.START
ics on the display during playback. You can also view the score. See pages 84 and 87 for
details.
6 While the song is playing, try using the Mute function to turn certain instrument channels off or on —
letting you craft dynamic arrangements on the fly!
1) Press the [CHANNEL ON/OFF] button.
2) Press the [1 - 8▲▼] button corresponding to the channel you wish to turn on or off.
CHANNEL
ON / OFF
PART
12345678 12345678
If the STYLE tab is
selected, press this button
again.
Quick Guide
23
Page 24
Song Playback
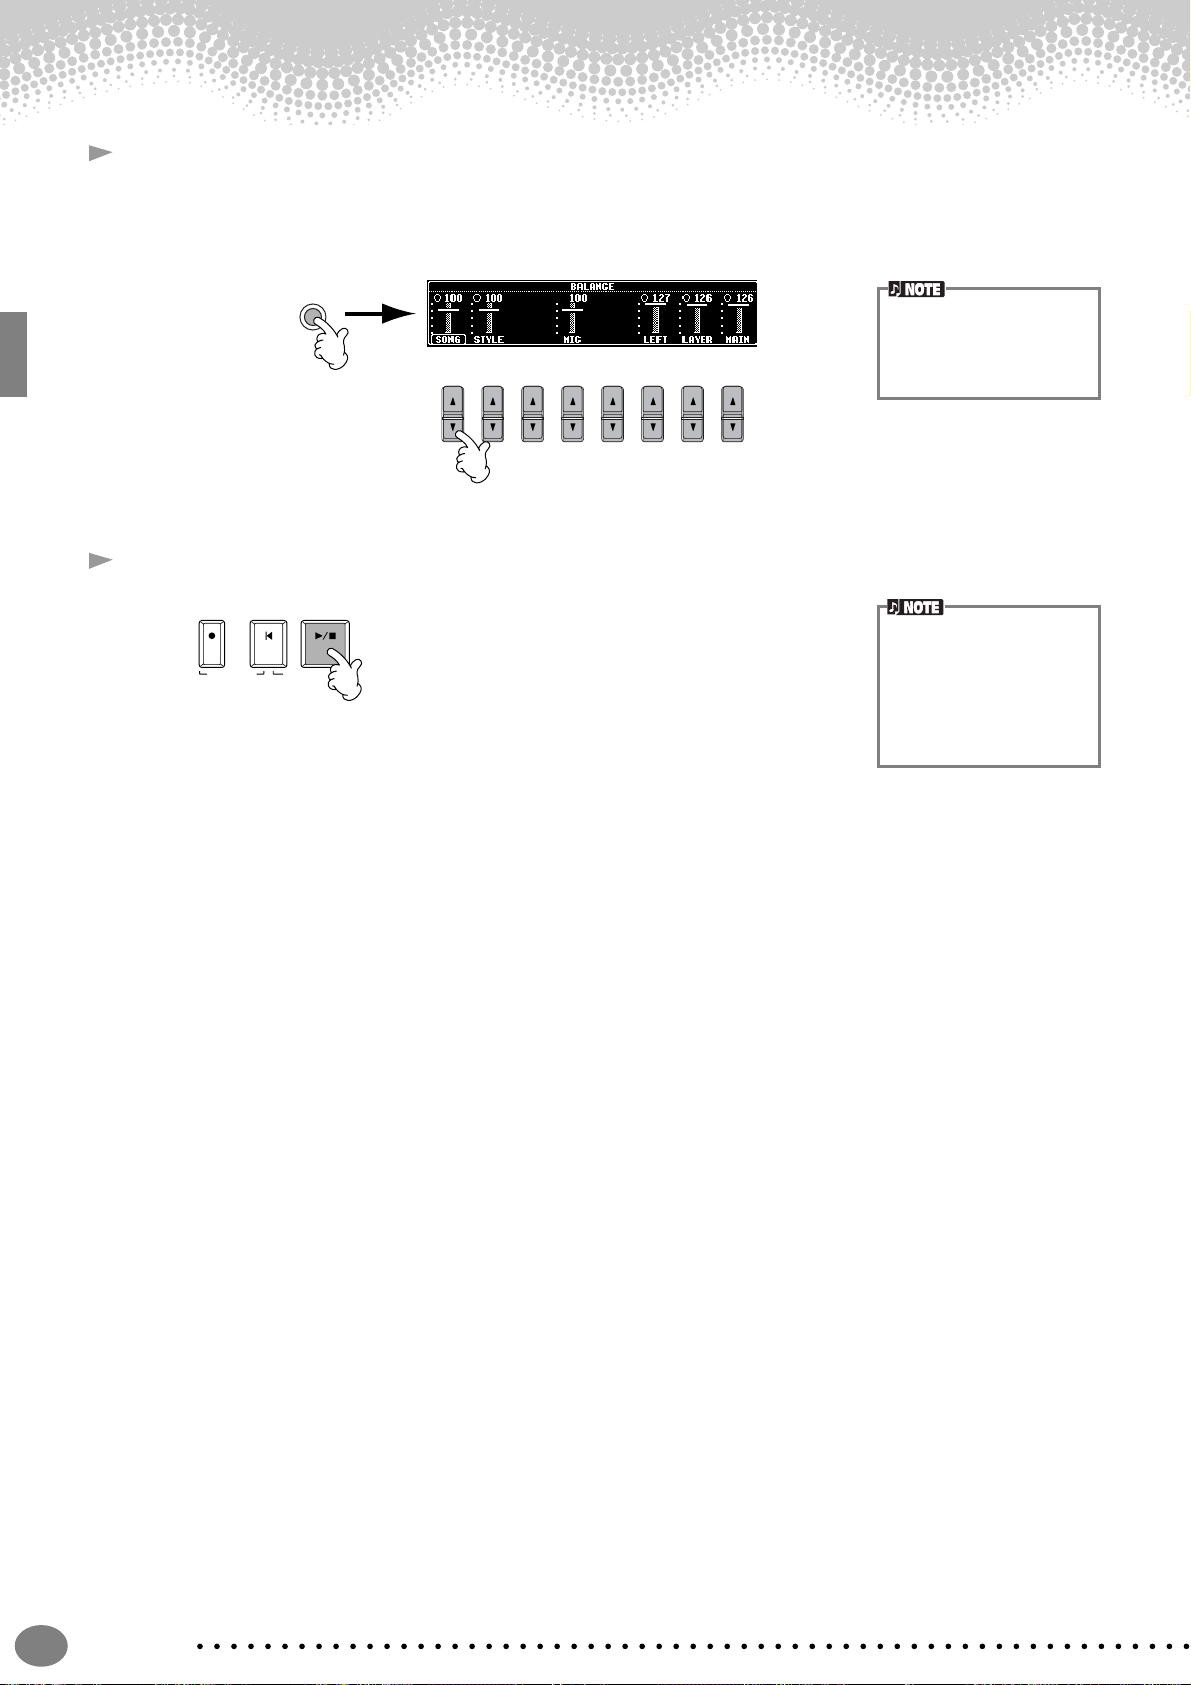
7 Finally, take the producer’s seat and try your hand at mixing. These Balance controls let you adjust the levels
of the individual parts — the song, the style, your singing (CVP-206 only), and your playing.
1) Press the [BALANCE] button.
2) Press the [1 - 8▲▼] button corresponding to the part of which the volume you wish to adjust.
BALANCE
12345678
8 Press the SONG [START/STOP] button to stop playback.
REC TOP START / STOP
NEW SONG
SYNC.START
You can call up a full set of
mixing controls by pressing
the [MIXING CONSOLE]
button (page 122).
• The [FADE IN/OUT] button (page 69) can be used
to produce smooth fadeins and fade-outs when
starting and stopping the
song, as well as the
accompaniment.
24
Quick Guide
Page 25
Playing Voices
Playing Voices
The Clavinova features a stunning variety of over 800 dynamic, rich and realistic voices. Try playing
Reference
on page 58
some of these voices now and hear what they can do for your music. Here, you’ll learn how to
select individual voices, combine two voices in a layer, and split two voices between your left and right hands.
Voice related buttons
Playing a Voice
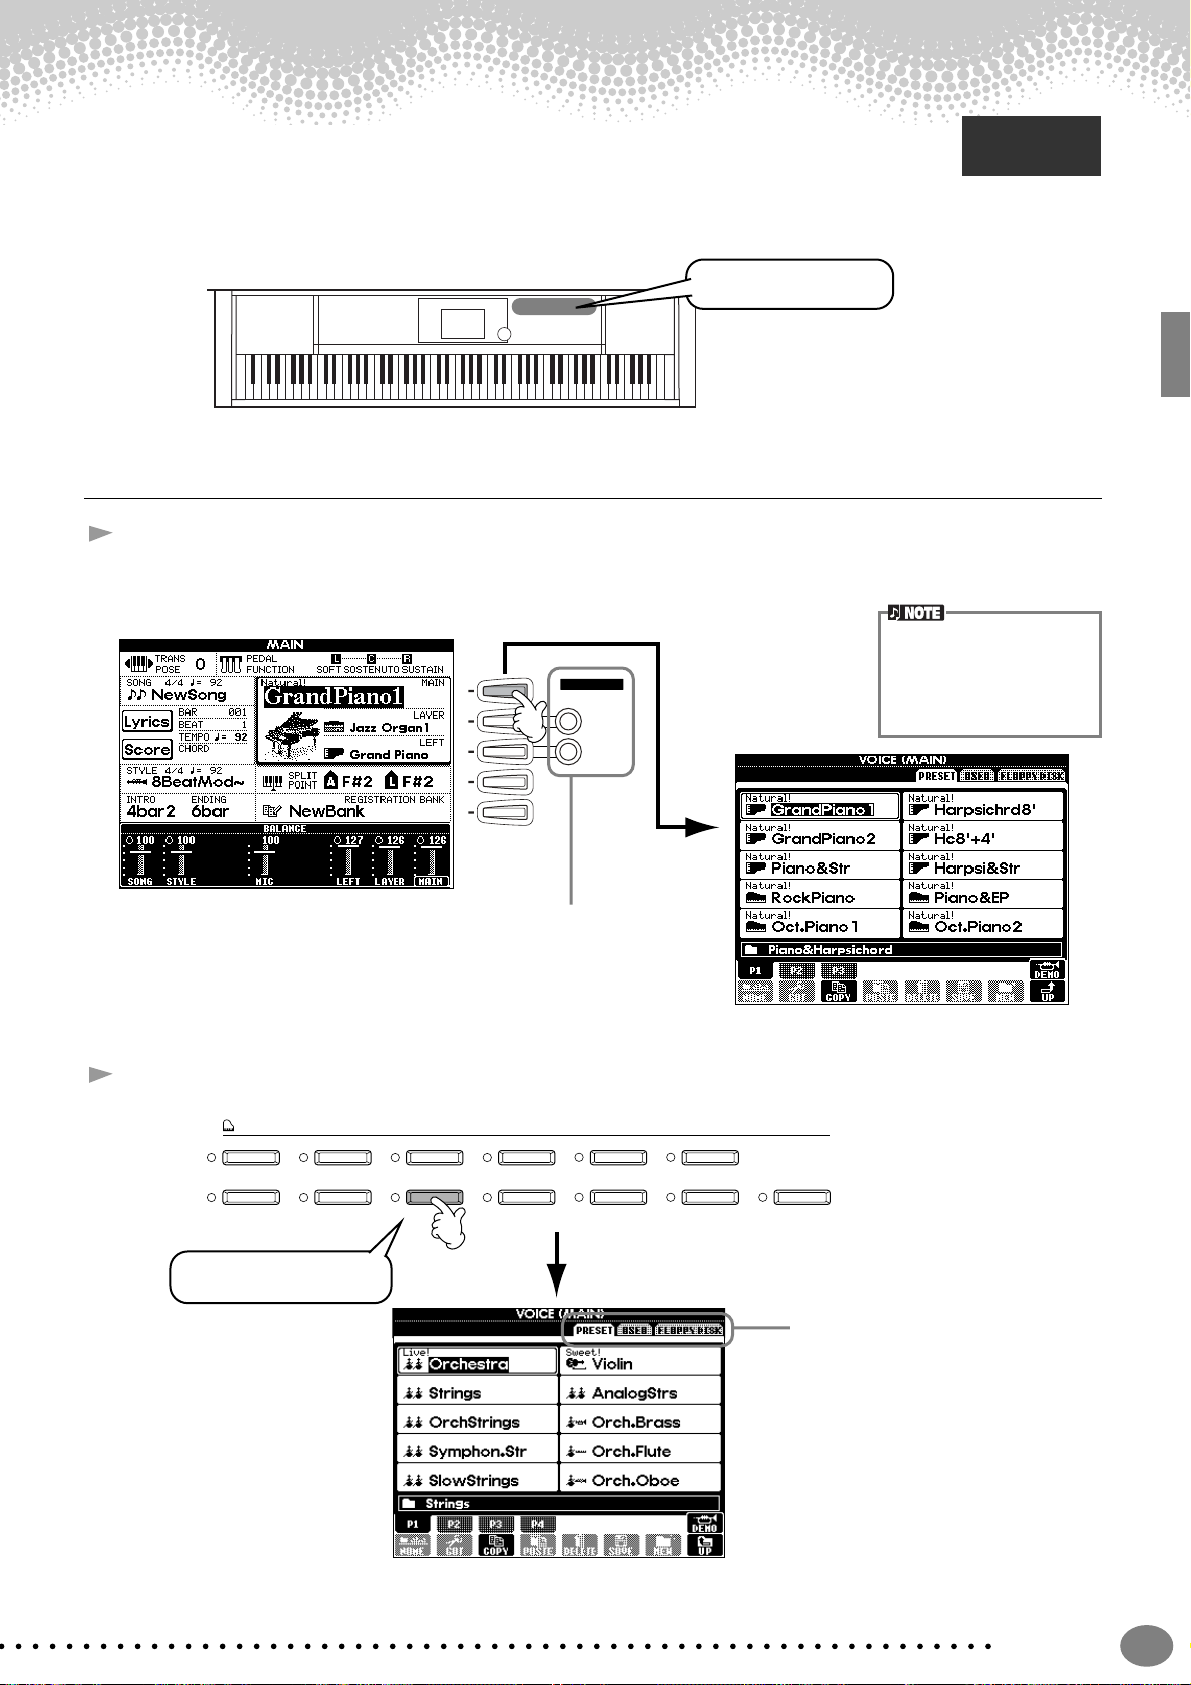
1 Press the [F] button to call up the menu for selecting the MAIN voice.
If the MAIN screen is not displayed, press the [DIRECT ACCESS] button followed by the [EXIT] button.
The voice you’re selecting
here belongs to the MAIN
F
G
H
I
J
VOICE PART
ON / OFF
LAYER
LEFT
part, and is called the MAIN
voice. (See page 60 for more
information.)
2 Select a voice group.
VOICE
PIANO & HARPSI.
BRASS
For this example, STRINGS
is selected.
E.PIANO ORGAN & ACCORDION PERCUSSION GUITAR BASS
WOODWIND
You’ll want to hear the MAIN
voice all by itself — so make sure
that the LAYER and LEFT parts
are turned off.
STRINGS CHOIR & PAD SYNTH. XG USER
Press the [BACK]/[NEXT]
button to select the memory
location of the voice. For this
example, PRESET is
selected.
Quick Guide
25
Page 26
Playing Voices
3 Select a voice.
For this example,
”Orchestra” is
selected.
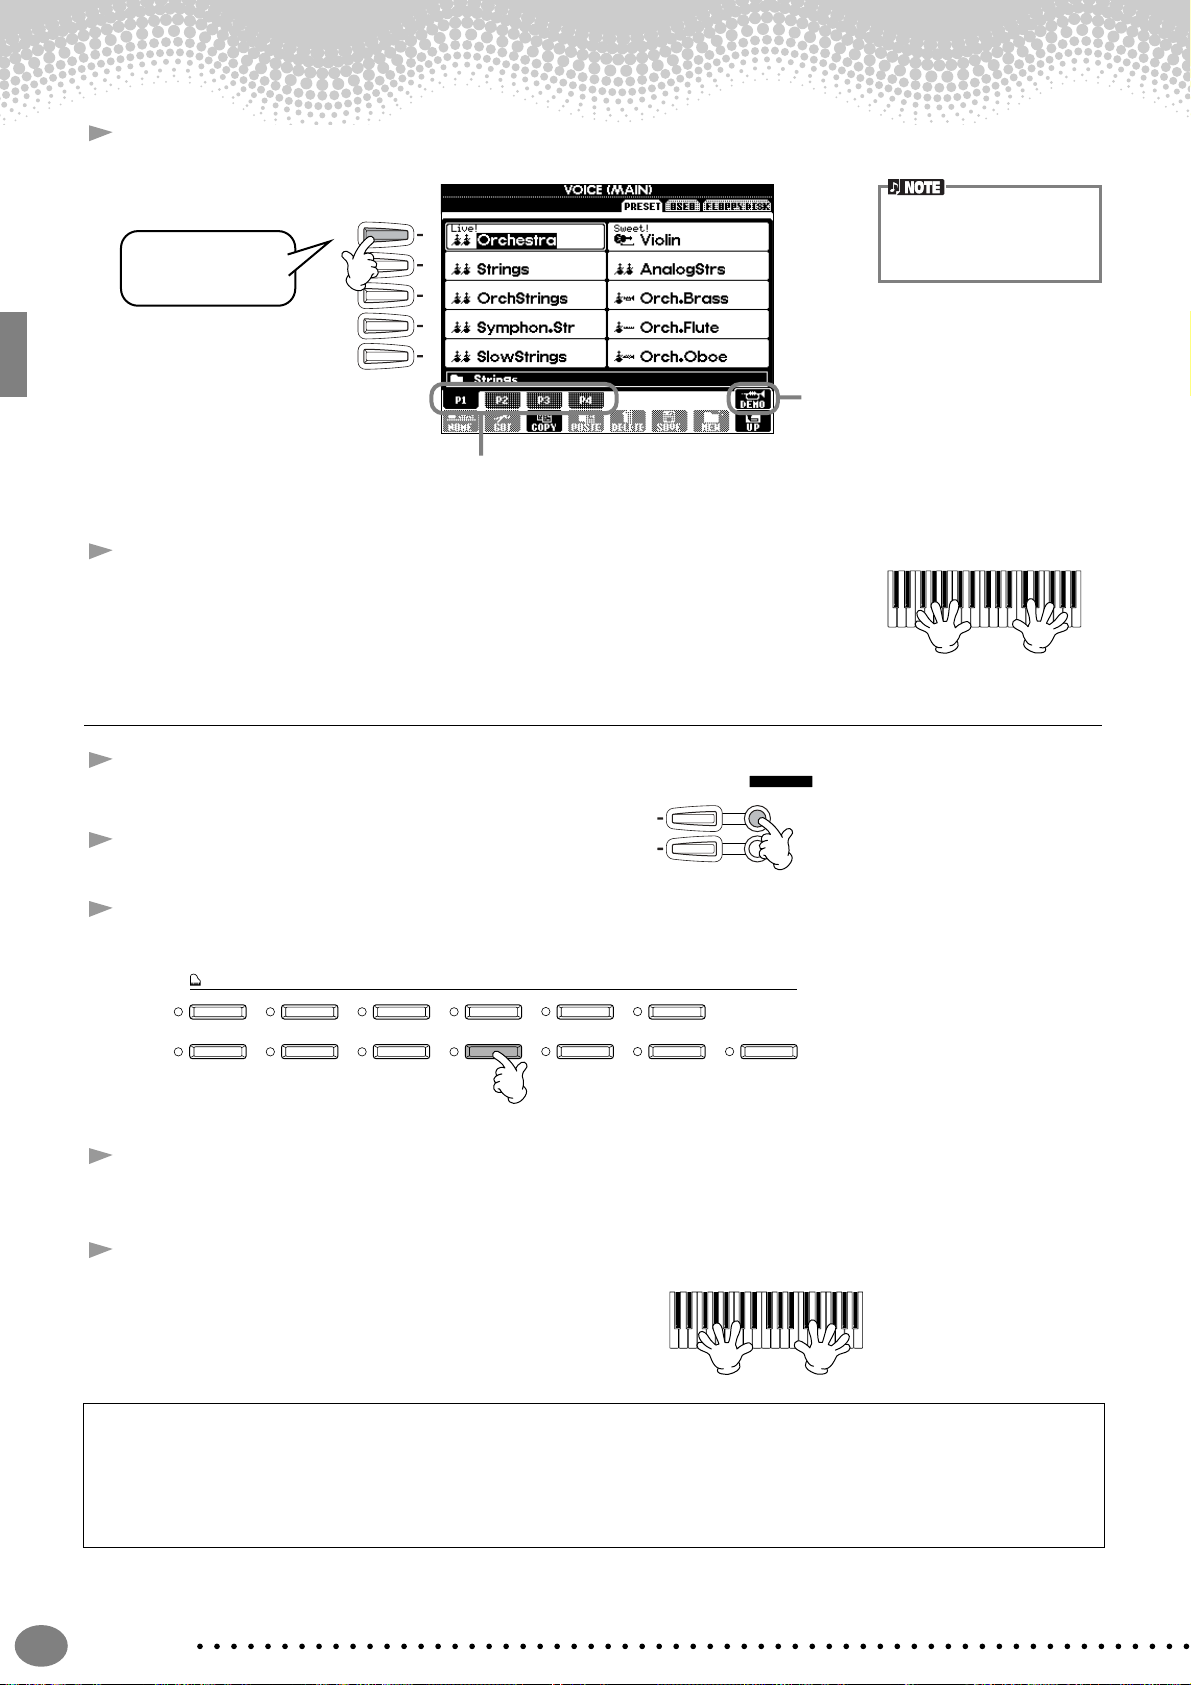
4 Play the voices.
Naturally, you can play the voice yourself from the keyboard, but you can also
have the Clavinova demonstrate the voice for you. Simply press the [8▲] button
from the display above, and a Demo of the voice plays automatically.
You can instantly jump back
A
B
C
D
E
Press the [8▲] button to start the
Demo for the selected voice. To stop
the Demo, press this button again.
Press the corresponding buttons to select the
other pages — and discover even more voices.
There’s more to the Demo features
than just voices, though–for more
information, see page 56.
to the Main display by “double-clicking” on one of the [A]
- [J] buttons.
Playing Two Voices Simultaneously
1 Press the VOICE PART ON/OFF [LAYER] button to
turn the LAYER part on.
2 Press the [G] button to select the LAYER part.
3 Select a voice group.
Here, we’ll select a lush pad to fill out the sound. Call up the “CHOIR & PAD” group.
VOICE
PIANO & HARPSI.
BRASS
4 Select a voice.
For example, select “Hah Choir.”
5 Play the voices.
Now, you can play two different voices together in a
rich sounding layer — the MAIN voice you selected in
the previous section, plus the new LAYER voice you’ve
selected here.
E.PIANO ORGAN & ACCORDION PERCUSSION GUITAR BASS
WOODWIND
STRINGS CHOIR & PAD SYNTH. XG USER
G
H
VOICE PART
ON / OFF
LAYER
LEFT
26
And that’s just the beginning. Check out these other voice-related features:
• Instant setup of the Clavinova for piano play — with the press of a single button (page 59).
• Create your own original voices — quickly and easily — by changing the settings of existing voices (page 91).
• Set up your favorite panel settings — including voices, styles, and more — and call them up whenever you need
them (page 88).
Quick Guide
Page 27

Playing Different Voices with the Left and Right Hands
LAYER
LEFT
1 Press the VOICE PART ON/OFF [LEFT] button to turn the
LEFT part on.
2 Press the [H] button to select the LEFT part.
3 Select a voice group.
Here, we’ll select the “STRINGS” group — so that you can play rich, orchestral chords with your left hand.
VOICE
PIANO & HARPSI.
E.PIANO ORGAN & ACCORDION PERCUSSION GUITAR BASS
Playing Voices
BRASS
WOODWIND
STRINGS CHOIR & PAD SYNTH. XG USER
4 Select a voice, then press the [EXIT] button to return to the MAIN display.
For example, select “Symphon. Str.”
5 Press the [I] button to call up the SPLIT POINT display. From here, you can set the particular key on the
keyboard that separates the two voices — called the Split Point. To do this, simultaneously hold down the [F]
or [G] button and press the desired key on the keyboard. (For more information, see page 133.)
F
G
H
I
J
F
G
H
I
J
6 Play the voices.
The notes you play with your left hand sound one voice, while the notes you play with your right sound a
different voice (or voices).
Split Point
LEFT
MAIN/LAYER
MAIN and LAYER voices are meant to be played with the right hand. The LEFT voice is played with the left
hand.
7 Press the [EXIT] button to return to the MAIN display.
EXIT
Quick Guide
27
Page 28

Playing Styles
Playing Styles
The Clavinova has a huge variety of musical “styles” that you can call upon to back up your own
performance. They give you anything from a simple, yet effective piano backing or percussion
accompaniment to a full band or orchestra.
Style related buttons
Playing a style
1 Press the [D] button to call up the style group.
If the MAIN screen is not displayed, press the [DIRECT ACCESS] button followed by the [EXIT] button.
A
B
C
D
E
Reference
on page 63
Press the
[BACK]/[NEXT]
button to select
the memory
location of the
style. For this
example,
PRESET is
selected.
2 Select a style group and a style.
A
B
C
D
E
For this example, Dance is
selected.
A
B
C
D
E
For this example,
EuroTrance is selected.
28
Quick Guide
Page 29

Playing Styles
3 Turn ACMP on.
The specified left-hand section of the keyboard becomes the “Auto Accompaniment” section, and chords
played in this section are automatically detected and used as a basis for fully automatic accompaniment with
the selected style.
Split Point
ACMP
Auto Accompaniment
section
4 Turn SYNC.START on.
SYNC.ST AR T
5 As soon as you play a chord with your left hand, the style starts.
For this example, play a C major chord (as shown below).
Split Point
• The point on the keyboard
that separates the auto
accompaniment section
and the right-hand section of the keyboard is
called the “split point.”
Refer to page 133 for
instructions on setting the
split point.
Auto Accompaniment
section
6 Change the tempo by using the TEMPO [ ] [ ] buttons if necessary.
Simultaneously press the TEMPO [ ] [ ] buttons to return the tempo to its
original setting. Press the [EXIT] button to leave the TEMPO display.
The Tempo can also be
adjusted by using the [TAP
TEMPO] button (page 55).
7 Try playing other chords with your left hand.
For information on how to enter chords, see “Chord Fingerings” on page 66.
8 Press the STYLE [START/STOP] button to stop the style.
And there’s much more. Check out these other style-related features:
• Easily create your own original styles (page 112).
• Set up your favorite panel settings — including styles, voices, and more — and call them up whenever you need
them (page 88).
Quick Guide
29
Page 30

Playing Styles
VOICE EFFECT
REVERB DSP VARIATION HARMONY / ECHO MONO LEFT HOLD
Embellish and enhance your melodies — with the automatic Harmony and Echo effects
This powerful performance feature lets you automatically add harmony notes to the melodies you play with your
right hand — based on the chords you play with your left. Tremolo, Echo, and other effects are available, too.
1Turn HARMONY/ECHO on.
2Turn ACMP on (page 28).
3 Play a chord with your left hand and play some notes in the right-hand range of the
keyboard.
The CVP-206/204 has various Harmony/Echo types (page 138).
The Harmony/Echo type may change according to the selected MAIN voice.
• Harmony/Echo is just one of the many Voice Effects you can use. Try out some of
the other effects and see how they can enhance your performance (page 61).
For details about Harmony/
Echo types, refer to the separate Data List.
Style Sections
Each style in the auto accompaniment is made up of “sections.” Since each section is a rhythmic variation of the basic
style, you can use them to add spice to your performance and mix up the beats — while you’re playing. Intros, Endings,
Main patterns, and Breaks — they’re all here, giving you the dynamic elements you need to create professionalsounding arrangements.
INTRO This is used for the beginning of the song. When the intro finishes playing, accompaniment shifts to the
MAIN This is used for playing the main part of the song. It plays an accompaniment pattern of se v er al measures,
BREAK This lets you add dynamic variations and breaks in the rhythm of the accompaniment, to make your
ENDING This is used for the ending of the song. When the ending is finished, the auto accompaniment stops
main section.
and repeats indefinitely until another section’s button is pressed.
performance sound even more professional.
automatically.
1 - 4 Use the same operations as in “Playing a style” on pages 28 and 29.
5 Press the [INTRO] button.
BREAK
INTRO
MAIN
ABCD
ENDING / rit.
6 As soon as you play a chord with your left hand, the Intro starts.
For this example, play a C major chord (as shown below).
Auto Accompaniment
section
When the playback of the intro is finished, it automatically leads into main section.
7 Press any of the MAIN [A] to [D] buttons or [BREAK] button
as desired. (See the Accompaniment Structure on the next
page.)
Quick Guide
30
Split Point
BREAK
or
INTRO
MAIN
ABCD
ENDING / rit.
Page 31

Playing Styles
8 Press the [AUTO FILL IN] button to add a fill-in, if
necessary.
Fill-in patterns play automatically between each change in
the Main sections.
9 Press the [ENDING] button.
This switches to the ending section. When the ending is
finished, the style automatically stops.
■ Accompaniment Structure
INTRO (page 70)
MAIN V ARIA TION
INTRO A INTRO B INTRO C
(max. three patterns)
via BREAK
BREAK
AUTO FILLIN
INTRO
ABCD
MAIN
ENDING / rit.
via BREAK
ENDING (page 70)
MAIN
VARIATION
B
MAIN
VARIATION
A
MAIN
VARIATION
D
via BREAK
Press the [ENDING] button.
ENDING A ENDING B ENDING C
(max. three patterns)
MAIN
VARIATION
C
via BREAK
You can have the
ending gradually slow
down (ritardando) by
pressing the [ENDING]
button again while the
ending is playing back.
• An Intro doesn’t necessarily have to be at the beginning! If you want, you can play an Intro section in the middle of y our performance by
simply pressing the [INTRO] button at the desired point.
•Watch your timing with the Break sections. If you press a [BREAK] button too close to the end of the measure (i.e., after the final eighth
note), the Break section starts playing from the next measure. This also applies to the Auto Fill-in.
• Mix up your intros and use any of the other sections to start the style, if you want.
• If you want to come back into the style right away after an Ending, simply press the [INTRO] button while the Ending section is playing.
• If you press the [BREAK] button while the ending is playing, the break will immediately start playing, continuing with the main section.
Quick Guide
31
Page 32

Playing Styles
FADE IN / OUT
Other Controls
FADE IN/OUT The [FADE IN/OUT] button can be used to produce smooth fade-ins and fade-outs (page 69) when starting and stopping
TAP TEMPO The style can be started at any tempo you desire by “tapping” out the tempo with the [T AP TEMPO] button. For details,
TAP TEMPO
SYNC.STOP When Synchro Stop is on, you can stop and start the style anytime you want by simply releasing or playing the keys (in
SYNC.STOP
the style.
see page 55.
the Auto Accompaniment section of the keyboard). This is a great way to add dramatic breaks and accents to your
performance. For details, see page 69.
ONE TOUCH SETTING
buttons
One Touch Setting
One Touch Setting is a powerful and convenient feature that automatically calls up the most appropriate panel settings
(voice number, etc.) for the currently selected style, with the touch of a single button. This is a wonderful way to
instantly reconfigure all the settings on the Clavinova to match the style you want to play.
1 Select a style (page 28).
2 Press one of the [ONE TOUCH SETTING]
buttons.
ONE TOUCH SETTING
Not only does this instantly call up all the settings
(voices, effects, etc.) that match the current style
(see page 71) — it also automatically turns on
ACMP and SYNC. START, so that you can
immediately start playing the style.
3 As soon as you play a chord with your left hand, the auto
accompaniment starts.
4 Play melodies with your right hand and play various chords
with your left hand.
5 Try out other One Touch Setting setups.
You can also create your own One Touch Setting
setups.
For details, refer to page 72.
1234
Split Point
Auto Accompaniment
section
ONE TOUCH SETTING
1234
32
• Here’s another way to further automate musical changes and spice up your performance: Use the convenient OTS
(One Touch Setting) Link function to automatically change One Touch Settings when you select a different Main
section (page 72).
Quick Guide
Page 33

Music Finder
Music Finder
Reference
on page 73
MUSIC FINDER button
If you want to play in a certain song but don’t know which style and voice settings would be appropriate, the
convenient Music Finder can help you out. Simply select the song name from the Music Finder and the CVP-206/204
automatically makes all appropriate panel settings to let you play in that music style!
Using the Music Finder
1 Press the [MUSIC FINDER] button.
MUSIC FINDER
2 Select a record.
Select the desired
record.
For this example, press the [1 - 3▲▼] button to select a record by song title.
3 Play along with the style playback.
Split Point
Press the [BACK]/[NEXT]
button to select the desired
page of records. For this
example, ALL is selected.
You can also have the voice
and other important settings
change automatically with
the style changes. To do this,
turn on OTS LINK (page 72)
and set the OTS LINK TIMING (page 133) to “REAL
TIME.”
Auto Accompaniment
section
Press the [EXIT] button to return to the MAIN display.
Quick Guide
33
Page 34

Music Finder
Searching the Music Finder Records
The Music Finder is also equipped with a convenient search function that lets you enter a song title or keyword — and
instantly call up all the records that match your search criteria.
1 Press the [MUSIC FINDER] button.
MUSIC FINDER
2 Press the [I] button to call up the MUSIC FINDER SEARCH 1 display.
The results of Search 1 and
2 appear in the correspondingly numbered SEARCH 1/
2 displays.
For this example,
4
press the [A]
button to call up
the display for
inputting the song
title.
Enter the song title,
5
then press the [8▲]
(OK) button.
For this example,
ANY is selected.
For this example,
ALL is selected.
Refer to page 49 for instructions on entering characters.
Press the [F], [G]
3
and [H] to clear
the previous
conditions, if
necessary.
Press the [8▲] (START SEARCH)
6
button.
The search function calls up all
records that contain the entered
word or words.
34
Quick Guide
Page 35

7 Select a record (see step #2 on page 33) and play along with the style playback.
Split Point
Auto Accompaniment
section
Press the [EXIT] button to return to the MAIN display.
You can also create your own Music Finder setups and save them to floppy disk (pages 40 and 48). In this
way, you can expand your Music Finder collection by exchanging them with other Clavinova users.
Music Finder
Saving and Recalling Music Finder Data
To save your Music Finder data, call up the MUSIC FINDER Open/Save window from the
SYSTEM RESET page (page 146) of the UTILITY display, and follow the same procedure as
that in the Open/Save window for Voice (page 40, 48). To recall the saved data, execute
the appropriate operation from the MUSIC FINDER’s Open/Save window. Records can be
replaced or added (page 75).
In the instructions above, all Music Finder data is handled together. Besides this, when you save or load style files, the
Music Finder data that uses the relevant style file(s) is stored or added automatically. When you copy or move a style file
on a floppy disk to the USER drive (page 46, 47), the record which was recorded when storing the relevant style is
automatically added to the CVP-206/204.
• In the example above, you specified a song title, but you can also look for relevant records by keyword or music
genre — for example, Latin, 8-beat, etc. (page 74).
Music Finder data is compatible for both the CVP-206
and the CVP-204.
Quick Guide
35
Page 36

Playing and Practicing with the Songs
• If you want to start the song right
away without an intro, use the Sync
Start function. To set Sync Start to
standby, simultaneously hold down
the [TOP] button and press the
SONG [START/STOP] button. Song
playback starts automatically the
moment you start playing the melody.
• If you can hear the Clavinova playing
the melody part as well, check the
channel setting for the melody part in
the song data, and change the channel assigned to Track 1 (page 132).
You can also change the song channel itself permanently (page 107).
Playing and Practicing with the Songs
Reference
on page 77
Song related buttons
Playing Along with the Clavinova
In this section, try using the Clavinova’s song playback features to cancel or mute the right-hand melody while you play
the part yourself. It’s like having a very talented and versatile playing partner accompany you while you perform.
If you haven't yet mastered the melody part, take a look at the section “Mastering Your Favorite Songs” on page 38, and
practice it a while.
1 - 4 Use the same operations as in “Song Playback” on pages 21 - 23.
5 Press the [TRACK 1] button to cancel the right hand melody part.
TRACK 1
(R)
To cancel the left hand part,
press the [TRACK 2] button
6 If you want to have the notation displayed as you play, press the [C] button. If you want to see the lyrics,
press the [B] button.
If the MAIN screen is not displayed, press the [DIRECT ACCESS] button followed by the [EXIT] button.
If the selected song does not
contain lyric data, lyrics are
not displayed.
7 Press the SONG [START/STOP] button and play the part.
REC TOP START / STOP
NEW SONG
36
8 Press the SONG [START/STOP] button to stop playback.
REC TOP START / STOP
NEW SONG
Quick Guide
SYNC.START
SYNC.START
Page 37

Playing and Practicing with the Songs
Recording
The Clavinova lets you record, too — quickly and easily. Try out the Quick Recording feature now and capture your
keyboard performance.
1 - 3 Select a voice for recording. Use the same operations as in “Playing a Voice” on pages 25, 26.
4 Press the [REC] and [TOP] buttons simultaneously to select “New Song” for recording.
REC TOPSTART / STOP REW FF REPEAT
NEW SONG
SYNC.START
5 Press the [REC] button.
REC
6 Recording starts as soon as you start playing the keyboard.
7 When you’ve finished recording, press the [REC] button.
REC
8 To hear your newly recorded performance, return the song to the beginning by
using the [TOP] button and press the SONG [START/STOP] button.
REC TOP START / STOP
NEW SONG
SYNC.START
9 Save the recorded data as required (pages 40, 48).
CAUTION
The recorded data will be
lost if you turn off the
power. To keep your important recordings, you’ll
need to save them to the
User drive or floppy disk.
Quick Guide
37
Page 38

Playing and Practicing with the Songs
Mastering Your Favorite Songs
The Clavinova has several very useful practice features that help learn and master
recorded songs. Here, you’ll try out the Follow Lights function, and use the special guide
lamps to help you play the right notes.
1 - 6 Use the same operations as in “Playing Along with the Clavinova” on
page 36.
For this example, you practice the right hand part of “Playing Along with
the Clavinova.”
7 Press the [GUIDE] button.
GUIDE
Before Practicing
Before starting a practice
session, play back the entire
song (without canceling any
parts) and listen to it carefully. This will give you a
clear idea of how the song
should be played, and will
make your practice sessions
progress more smoothly. If
you want to hear only the
melody part, turn the
[TRACK 2] and [EXTRA
TRACKS] buttons off.
8 Press the SONG [START/STOP] button and practice the missing (muted) part, according to the key guide
lamps.
If you want, you can adjust the tempo by pressing the TEMPO[ ] [ ] buttons.
REC TOP START / STOP
NEW SONG
SYNC.START
TEMPO
RESET
9 You can use the powerful Repeat function to practice and master difficult parts. Simply specify a short
phrase you want to work on and repeat it until you’ve got it down.
1) While the song is playing back, press the [GUIDE] button once to turn the GUIDE function off.
2) Just before the desired phrase comes around, press the [REPEAT] button to designate the beginning point
for Repeat.
3) Just after the phrase finishes, press the [REPEAT] button again to designate the end point.
4) Turn the GUIDE function on again.
10
Press the SONG [START/STOP] button to stop playback.
REC TOP START / STOP
NEW SONG
SYNC.START
See pages 82 and 132 for
more information on the
Guide function.
38
Quick Guide
Page 39

Basic Operations — Organizing Your Data
Contents shown in the Main Display
When the power is turned on, the MAIN Display appears, showing important and
relevant operation information.
Pressing the [A] - [J] buttons when the MAIN Display appears calls up displays
corresponding to each button. The displays called up by the buttons (with the exception
of [B] and [C]) are called Open/Save displays (see following page). Pressing the [B] and
[C] buttons calls up the Lyrics display and Score display respectively.
89
1
2
3
4
5
6
7
0
A
B
C
D
If the MAIN Display is not
shown, press the [DIRECT
ACCESS] button follow ed by
the [EXIT] button.
E
1 Transpose (page 136)
The [TRANSPOSE] buttons allow the pitch of the keyboard and song to be shifted down or up in semitones. The transpose value by the
semitone shifted is displayed here.
2 Song (page 78)
The name of the currently selected song and other song information is displayed.
3 Playback Position of Song (page 78) or Accompaniment Style (page 63)
The current position of the song or the accompaniment style being played is displayed.
4 Tempo (page 54)
When a song or a accompaniment style is playing, the tempo is displayed.
5 Chord (page 66)
When [ACMP] is on, the chord specified in the left hand section is displayed.
6 Accompaniment Style (page 63)
The name, beat, and tempo of the accompaniment style selected currently is displayed.
7 Intro and Ending (page 70)
The names of the intro and ending of the currently selected style are displayed.
8 Pedal Function (page 134)
In addition to the conventional Sustain, Sostenuto and Soft functions, the pedals can be assigned to other various functions, such as Song
Start/Stop and Glide. The functions assigned to the three different pedals are displayed here.
9 Registration Sequence (page 137)
You can save your custom panel settings as a Registration Memory preset and recall it at any time pressing the appropriate REGISTRATION
MEMORY [1] - [8] button. You can also use the Registration Sequence function to program the Registration Memory presets to be selected in
any specified order, and step through that order by using the [BACK]/[NEXT] buttons or the pedal. The Registration Sequence is displayed
here (unless Registration Sequence is set to OFF).
0 Main Part (page 58)
The voice selected for the Main part is displayed.
A Layer Part (page 60)
The voice selected for the Layer part is displayed.
B Left Part (page 61)
The voice selected for the Left part is displayed.
C Split Point (page 133)
Split Points are specific positions on the keyboard that divide the keyboard into separate sections. There are two kinds of Split Points: “A”,
which separates the auto accompaniment from the rest of the keyboard, and “L”, which divides the left-hand and right-hand sections.
D Registration Memory Bank (page 89)
Registration Memory presets are stored in banks, eight presets to a bank. The name of the currently selected Registration Memory bank is
displayed here.
E Volume balance of the parts (page 65)
You can change the volume balance by pressing the [1▲▼] - [8▲▼] buttons under the LCD. The volume balance of each part is displayed.
CVP-206/204
39
Page 40

Basic Operations — Organizing Your Data
Open/Save Display
The CVP-206/204 utilizes a variety of data types — including voices, accompaniment styles, songs and registration
memory settings. Much of this data is already programmed and contained in the CVP-206/204; you can also create and
edit your own data with some of the functions on the instrument.
All this data is stored in separate files — just as is done on a computer.
Here, we’ll show you how to use the basic operations of the display controls in handling and organizing the data of the
CVP-206/204 in files and folders.
Files can be opened, saved, named, moved, or deleted in their respective Open/Save displays. You can select these
displays according to their respective file types, as well: Song, Voice, Style, etc. Moreover, you can organize your data
efficiently by putting various files of the same type into a single folder.
The Open/Save displays for Song, Voice, Style, and Registration Bank can be called up from the MAIN display (the
display shown when the power is turned on) by pressing the appropriate [A] - [J] button.
Open/Save display for Song (page 78)
handles the Song files.
A
B
C
D
E
Open/Save display for Voice (page 58)
handles the Voice files.
The following Open/Save display types
F
G
H
I
J
are also available; however, these are
selected from displays other than the
MAIN display (page 146
• SYSTEM SETUP
• MIDI SETUP
• USER EFFECT
• MUSIC FINDER
).
40
Open/Save display for Style (page 63)
handles the Style files.
CVP-206/204
If the MAIN screen is not displayed,
press the [DIRECT ACCESS] button
followed by the [EXIT] button.
Open/Save display for Registration Bank (page 89)
handles the Registration Bank files.
Page 41

Basic Operations — Organizing Your Data
Example — Open/Save display
Each Open/Save display consists of three kinds of drive pages: PRESET, USER, and FLOPPY DISK.
In the examples given here, the Open/Save display for Voice is shown.
PRESET drive
The files that are preprogrammed and installed
internally to the CVP-206/204
are kept here. Preset files can be
loaded but cannot be re-written.
However, you can use a preset
file as a basis for creating your
own original file (which can be
saved in the USER or FLOPPY
DISK drive).
USER drive
Files kept here are those
containing your own original
data, created or edited using the
various functions of the CVP206/204. They are stored
internally to the CVP-206/204.
FLOPPY DISK drive
You can also store your original
data to floppy disk.
Commercially available disk
software can also be called up
here. Naturally, these files are
available only when the
appropriate disk is inserted in
the floppy disk drive.
BACK NEXT
Changes drives among
PRESET, USER and
FLOPPY DISK.
File
All data, both preprogrammed and your own
original, are stored as “files.”
Calls up the upper
level directory page.
In this example, the
voice folder selection
page can be called
up.
Current Memory
“Current Memory” is the area where the voice is called up when
you select a voice. Also it is the area where you edit your voice
using the SOUND CREATOR function. Your edited voice should
then be saved as a file in the USER or FLOPPY DISK drive.
Recording songs (page 96) and creating accompaniment styles
(page 112) are done within the current memory. Please make
sure to properly save this data to the USER/FLOPPY DISK drive as
a file or files. The data will be lost if you turn off the power
without saving.
For details, see page 43.
CVP-206/204
41
Page 42

Basic Operations — Organizing Your Data
■ Files and Drives
You can also manage files (copying,
saving, etc.) on the USER drive or
floppy disk by using a computer.
(page 149)
PRESET drive
Cannot be overwritten
Voice
Style
Song
System Setup System Setup System Setup
MIDI T emplate
MIDI Setup
User Effect
Music Finder
Copy
USER drive
Voice
Style
Song
Registration Memory Bank
MIDI T emplate
Save
MIDI Setup
User Effect
Music Finder
FLOPPY DISK drive
Registration Memory Bank
Copy & Paste / Cut & Paste
Voice
Style
Song
MIDI Setup
User Effect
Music Finder
This is the Voice Open/Save display
called up by pressing the [PIANO]
button in the VOICE section.
BACK NEXT
Select a Memory drive by
using the [BACK]/[NEXT]
buttons.
The Open/Save display
indicates only those
files that can be managed from the selected
display. The FD (Floppy
Disk) drive of the Voice
Open/Save display, for
example, indicates only
voices even if style or
song files are saved to
the floppy disk.
42
CVP-206/204
Page 43

■ Features and Memory Drives
Basic Operations — Organizing Your Data
Data not maintained when the power is turned off
Data maintained when the power is turned off
Features Current Memory
Unedited voice
Compare
Sound Creator
Style Creator
Panel settings
Song Creator
MIDI
Edit
Record/
Assemble
Register
Register
Creating a
New Record
Record
Edit
Voice
Style
One T ouch Setting
Registration Memory
Music Finder
Record
System Setup
Song
MIDI settings
USER drive
FLOPPY DISK drive
Voice
Style
Registration Memory
Bank
Music Finder
Save
System Setup
Song
MIDI Template
Save
User Effect
(Mixing Console)
Edit
User Effect User Effect
The Save operation is executed from the
CAUTION
• The data in the USER/
FLOPPY DISK drive is
maintainedeven when the
power is turned off. How-
*
Open/Save display.
The corresponding Open/Save display
**
can be called up from the [FUNCTION]
→
ever, currently active data
in memory may be lost
when you select another
file or turn the power off.
Make sure to save any
necessary data in memory to the User drive or
the Floppy Disk drive
before selecting another
file or turning the power
off.
MIDI Setup
UTILITY → SYSTEM RESET display.
CVP-206/204
43
Page 44

Basic Operations — Organizing Your Data
Selecting Files and Folders
Select a file shown in the display. In this example, we’ll select a voice file.
First, press the VOICE [PIANO & HARPSI] button to call up the display containing the files.
This display (“Open/Save” display) is typical of those used to call up and store files (voice files).
The CVP-206/204 already contains a variety of voices in the PRESET section. You can store your own original voices
created with the Sound Creator function to the USER or FLOPPY DISK section.
Use the [1▲] - [7▲] buttons to
2
turn the pages.
When the amount of pages exceeds sev en,
the bottom of the display changes as shown
below.
Press Prev.(previous)
Press Next
Press the [EXIT] button to go back to the MAIN display.
END
You can go back to the previous display by pressing the [EXIT] button.
BACK NEXT
Select the file/folder.
3
There are two ways to select the file/
folder:
• Press the [A] - [J] button.
Press the letter button
corresponding to the file/folder you
wish to call up. (In the example
display shown above, the voice files
are shown.)
• Use the [DATA ENTRY] dial and
the [ENTER] button.
When you turn the [DATA ENTRY]
dial, the highlight moves among the
available files/folders. Highlight the
desired file or folder (voice files are
shown in the example above) and
press the [ENTER] button to call up
the selected item.
1
Select “PRESET,” “USER,” or
“FLOPPY DISK” by using the
[BACK][NEXT] button.
ENTER
DATA
ENTRY
Selecting a different language in the “LANGUAGE”
display (page 53, 146) may
cause the following problems.
• Some characters of the
file names you entered
may be garbled.
• Files may not be accessible.
Restoring the original language solves the above
problems.
Reading the files on the
computer with a different
language system may cause
similar problems to those
above.
Double-clicking the
appropriate [A] -[J] button
calls up the corresponding
file and returns to the MAIN
display.
Highlighting the desired file
and double-clicking the
[ENTER] button calls up the
corresponding file and
returns to the MAIN display.
44
Exiting from small pop-up windows
You can also exit from small pop-up
windows (such as in the illustration
below) by pressing the [EXIT] button.
CVP-206/204
Page 45

Basic Operations — Organizing Your Data
File/Folder-related Operations
Naming Files/Folders
You can assign names to files and folders. Any file/folder in the USER and FLOPPY DISK sections can be named or
renamed. Execute the following steps when there is data in the User drive. If there are Preset files/folders you wish to
rename, copy them beforehand (page 47) and use them as User files/folders.
Press the [1▼] (NAME) button (page 40).
1
The NAME display appears.
Select the appropriate file/folder and press the [7▼](OK) button.
2
The currently selected file/folder is highlighted. To select another file/f older, press one of the
[A] - [J] buttons.
A file/folder name can contain up to 50 half size letters
(or 25 Hiragana and kanji letters), including the Icon ID
(see the note below) and the
extension.
The file name will appear on
your computer as follows. If
you change the Icon ID or
the extension, the icon may
change or the file may not be
properly recognized.
ABCDE.S002.MID
File ID Icon ID
Extension
END
Input the new name (page 49).
Press the [8▲] (OK) button. To cancel,
press the [8▼] (CANCEL) button.
CVP-206/204
45
Page 46

Basic Operations — Organizing Your Data
Moving Files/Folders
You can move files and folders as desired, for organizing your data. Any file/folder in the USER and FLOPPY DISK
sections can be moved, using the cut-and-paste operation described below.
Press the [2▼] (CUT) button (page 40).
1
The CUT display appears.
Select the desired file/folder for moving.
2
Select the appropriate file/folder and press the [7▼](OK) button.
The currently selected file/folder is highlighted. To select another file/folder, press one of the [A] [J] buttons.
Several files/folders can be selected together, even those from other pages. To release or cancel
the selection, press the button of the selected file/folder again.
Press the [6▼] (ALL) button to select all the files/folders in the displayed page (USER/FLOPPY
DISK). When the [6▼] (ALL) button is pressed the [6▼] button changes to “ALL OFF” button to
release or cancel the selection.
Press the [7▼] (OK) button.
3
To stop the operation, press the [8▼] (CANCEL) button.
Call up the destination display.
4
Only the USER and FLOPPY DISK pages can be selected as the destination.
Press the [4▼] (PASTE) button.
END
The file/folder you cut is now pasted at the destination.
This operation cannot be
used to directly move a file/
folder from one floppy disk to
another. If you want to do
this, cut and paste the file or
folder from the first floppy
disk to the USER page, then
change disks and paste it to
the FLOPPY DISK page.
All files/folders in a floppy
disk can be copied to
another disk in one batch
(page 145).
After being pasted, the files
are automatically re-ordered
in alphabetical order and
displayed.
About files/folders in a
floppy disk
In the FLOPPY DISK page
of the Open/Save display,
only the files which can be
handled in that Open/Save
display will appear — even
though a folder in a floppy
disk can contain different
kinds of files.
In the case of a folder cutand-paste operation (for
floppy disk), an entire folder
can be cut; howe ver , only the
specific files which can be
handled in the current Open/
Save display will be pasted.
46
CVP-206/204
Page 47

Basic Operations — Organizing Your Data
Copying Files/Folders
You can also copy files and folders as desired, for organizing your data. Any file/folder in the PRESET, USER and
FLOPPY DISK sections can be copied, using the copy-and-paste operation described below.
Press the [3▼] (COPY) button
1
(page 40).
The COPY display appears.
Press the [7▼] (OK) button.
3
To stop the operation, press the [8▼]
(CANCEL) button.
Call up the destination display.
4
Only the USER and FLOPPY DISK pages can
be selected as the destination.
Select the desired file/folder.
2
Select the appropriate file/folder
and press the [7▼](OK) button.
The currently selected file/folder is
highlighted. To select another file/
folder, press one of the [A] - [J]
buttons.
Several files/f olders can be selected
together, even those from other
pages. To release or cancel the
selection, press the button of the
selected file/folder again.
Press the [6▼] (ALL) button to
select all the files/folders in the
displayed page (PRESET/USER/
FLOPPY DISK). When the [6▼]
(ALL) button is pressed, the [6▼]
button changes to “ALL OFF,”
letting you release or cancel the
selection.
Press the [4▼] (PASTE) button.
END
The file/folder you copied is now pasted at the destination.
Please note that the copy
functions are intended for
your personal use only.
This operation cannot be
used to directly copy a file/
folder from one floppy disk to
another. If you want to do
this, copy and paste the file
or folder from the first floppy
disk to the User page, then
change disks and paste it to
the Floppy Disk page.
Deleting Files/Folders
You can also delete files and folders as desired, for organizing your data. Any file/folder in the USER and FLOPPY DISK
sections can be deleted, using the operation described below.
Press the [5▼] (DELETE) button (page 40).
1
The DELETE display appears.
Select the desired file/folder.
2
Select the appropriate file/folder and press the [7▼](OK)
button.
The currently selected file/folder is highlighted. To select
another file/folder, press one of the [A] - [J] buttons.
Several files/folders can be selected together, even
those from other pages. To release or cancel the
selection, press the button of the selected file/folder
again.
Press the [6▼] (ALL) button to select all the files/folders
in the displayed page (USER/FLOPPY DISK). When the
[6▼] (ALL) button is pressed, the [6▼] button changes
to “ALL OFF,” letting you release or cancel the selection.
END
Press the [7▼] (OK) button.
To cancel the operation, press the [8▼] (CANCEL)
button.
The message “Are you sure you want to delete the
“******” file (or data/folder)? YES/NO” appears.
YES...........Deletes the highlighted item.
NO.............Exits from the prompt without deleting.
When several files have been selected, the message
“Are you sure you want to delete the “******” file (or
data/folder)? YES/YES ALL/NO/CANCEL ” appears.
YES/NO.....Deletes the highlighted item (YES), or
skips the highlighted item without
deleting (NO).
YES ALL...Deletes all selected items at once.
CANCEL...Exits from the prompt without deleting.
CVP-206/204
47
Page 48

Basic Operations — Organizing Your Data
Saving Files
This operation lets you save the data (such as song and voice) you created in current
memory (page 41) to files. The files can be saved only to the USER and FLOPPY DISK
drives.
If the Open/Save display for the type of data you wish to save is not shown, first return to the
MAIN display by pressing the [DIRECT ACCESS] button followed by the [EXIT] button.
Then, press the appropriate button [A] - [J] from the MAIN display to call up the respective
Open/Save display. Finally, call up the USER or FLOPPY DISK page (pages 40, 41).
Press the [6▼]
1
(SAVE) button.
Enter a name for the new file (page 49).
Press the [8▲] (OK) button.
To stop the operation, press the [8▼] (CANCEL) button.
Organizing Files by Creating a New Folder
The internal memory capacity of the Clavinova is about
1.5MB. Memory capacity for
2DD and 2HD floppy disks is
about 720KB and 1.44MB,
respectively. When you store
data to these locations, all
file types of the Clavinova
(Voice, Style, Song, Registration, etc.) are stored
together.
The files of commercially
available DOC software and
Yamaha Disklavier software,
and their edited files on the
CVP-206/204, can be stored
in the USER page, but cannot be copied to another
floppy disk.
This operation lets you easily organize your various files into categories by creating a new
folder for each category. Folders can only be created in the USER and FLOPPY DISK
sections.
Call up the page to
1
which you wish to
Enter the name of the new folder (page 49).
create a new folder
and press the [7▼]
(NEW) button
(page 40).
To cancel the operation, press the [8▼] (CANCEL) button.
Press the [8▲](OK) button.
Folder directories can contain up to four levels.
The maximum total number
of files and folders which can
be stored is 800, but this
may differ depending on the
length of the file names.
The maximum number of
files which can be stored in a
folder will be 250.
Displaying Upper Level pages
Press the [8▼] (UP) button to call up the upper level pages. For example, you can call up the folder level pages from
the file level pages.
Entering Characters and Changing Icons
Press the [1▼]
1
(NAME), [6▼]
(SAVE), or [7▼]
(NEW) button
(page 40).
Change the type of character by using the [1▲] button.
If you select Japanese as the Language in the
FUNCTION display (page 146), the following
different types of characters and sizes can be
entered:
(kana-kan)
Hiragana and kanji, marks (full size)
(kana)
Katakana (normal size), marks (full size)
(kana)
Katakana (half size), marks (half size)
A B C — Alphabet (capital and small letters, full size), numbers (full size), marks (full size)
ABC — Alphabet (capital and small letters, half size), numbers (half size), marks (half size)
If you’ve selected a language other than Japanese in the FUNCTION display (page 146), the
following types of characters are available:
CASE — Alphabet (capital letters, half size), numbers (half size), marks (half size)
case — Alphabet (lowercase letters, half size), numbers (half size), marks (half size)
Call up the ICON SELECT display by pressing
the [1▼] button. This lets you change the icon
at the left of the file name.
48
CVP-206/204
Page 49

Basic Operations — Organizing Your Data
Entering Characters
The instructions that follow show you how to enter characters in naming your files and folders. The method is much the
same as inputting names and numbers to your cell phone.
Move the cursor to the desired position by using the [DATA ENTRY] dial.
1
Press the appropriate button, [2▲] - [7▲] and [2▼] - [6▼], corresponding to the character you wish to enter.
2
Several different characters are assigned to each button, and the characters change each time you press the button.
To actually enter the selected character, move the cursor or press another letter-input button.
If you’ve entered a character by mistake, move the cursor to the character letter you wish to erase and press the
[7▼] (DELETE) button. If you want to delete all of the characters on the line at once, press and hold down the
[7▼] (DELETE) button for a while, or press the [8▼] (CANCEL) button. When the cursor appears in reverse display
(highlight), only the reversed area is deleted.
To actually enter the new name, press the [8▲] (OK) button.
3
To cancel the operation, press the [8▼] (CANCEL) button.
■ Converting into Kanji (Japanese language)
This applies only if you are using the “ (kana-kan)” button (in Japanese). When
the input “hiragana” characters are shown in reverse display (highlighted), press the
[ENTER] button one or several times to convert the characters into the appropriate
kanji. The reversed area can be changed by the [DATA ENTRY] dial. The converted
area can be changed back to “hiragana” by the [7▼] (DELETE) button. The reversed
area can be cleared at once by the [8▼] (CANCEL) button. To actually enter the
change, press the [8▲] (OK) button or enter the next character. To enter the
“hiragana” itself (without converting it), press the [8▲] (OK) button.
The following half-size
marks cannot be used in
naming files and folders:
¥ \ / : * ? “ < > |
■ Entering special character marks (umlaut, accent, Japanese “ ” and “ ”)
Select a character to which a character mark is to be added and press the [6▼] button
(before actual entry of the character.)
■ Entering miscellaneous characters (marks)
You can call up the mark list by pressing the [6▼] button, after actually entering a
character by moving the cursor.
Move the cursor to the desired mark by using the [DATA ENTRY] dial, then press the
▲] (OK) or [ENTER] button.
[8
■ Entering numbers
First, select one of the following: “A B C” (full-size alphabet), “ABC” “CASE” (half-size
capital alphabet) and “case” (half-size lowercase alphabet). Then, press and hold
down the appropriate button, [2
repeatedly until the desired number is selected.
▲] - [7▲] and [2▼] - [5▼], for a while, or press it
In the case of characters
which are not accompanied
by special character marks
(with the exception of kanakan and half-size katakana),
you can call up the mark list
by pressing the [6▼] button
after selecting a character
(before actual entry of a
character).
CVP-206/204
49
Page 50

Basic Operations — Organizing Your Data
BACK NEXT
Cancels the icon selection operation.
Turns pages
for icon
selection.
Enters the selected icon.
Changing the Icon
You can also change the icon that
appears at the left of the file name.
Call up the ICON SELECT display by
pressing the [1▼] (ICON) button from
the character input display (page 49).
Select the desired icon by using the
[A] - [J] buttons, or by using the
[3▲▼] - [5▲▼] buttons, then enter
the selected icon by pressing the [8▲]
(OK) button.
Using the [DATA ENTRY] Dial
This convenient control lets you easily select items in the display or quickly change parameter values. The actual
function of the [DATA ENTRY] dial differs depending on the selected display.
■ Adjusting values
You can change parameter values by
rotating the [DATA ENTRY] dial. In the
example [BALANCE] display, turning
the dial adjusts the volume of the part
in reverse display (highlight). To adjust
the volume of another part, first select
the part by pressing the [
corresponding to the part, then rotate
the [DATA ENTRY] dial.
■ Selecting items
You can select the desired item or
function in the display by rotating the
[DATA ENTRY] dial. The selected item
can then be called up or executed by
using the [ENTER] button.
In the example VOICE display, you
can select the desired voice file with
the [DATA ENTRY] dial, and call up
the selected item by pressing the
[ENTER] button on the panel.
▲▼] button
DATA
ENTRY
ENTER
DATA
ENTRY
50
CVP-206/204
Page 51

Basic Operations — Organizing Your Data
Direct Access — Instant Selection of Displays
DIRECT ACCESS
METRONOME
MASTER VOLUME
MIN
STYLE
ACMP
POWER
ON
OFF
MAX
AUTO FILLIN
OTS LINK
SONG
EXTRA TRACKS
START STOP
FADE IN / OUT
BREAK
INTRO
TRACK 2
(STYLE)
(L)
REC TOPSTART / STOP REW FF REPEAT GUIDE
SYNC.START
NEW SONG
TEMPO
RESET
MAIN
ABCD
TRACK 1
(R)
TRANSPOSE
TAP TEMPO
ENDING / rit. SYNC.STOP SYNC.STARTSTART / STOP
MENU
DEMO
A
HELP
B
FUNCTION
DIGITAL
C
STUDIO
SOUND
D
CREATOR
RECORDING
CONSOLE
DIGITAL
E
MIXING
BALANCE
PART
CHANNEL
ON / OFF
PART
RESET
BACK NEXT
F
G
H
I
J
VOICE PART
ON / OFF
LAYER
LEFT
CONTRAST
DATA
ENTRY
VOICE EFFECT
LCD
REVERB
DSP VARIATION HARMONY / ECHO MONO LEFT HOLD
VOICE
PIANO & HARPSI.
E.PIANO ORGAN & ACCORDION PERCUSSION GUITAR BASS
WOODWIND
BRASS
ENTER
MUSIC FINDER
REGISTRATION MEMORY
PIANO
FREEZE
STRINGS CHOIR & PAD SYNTH. XG USER
ONE TOUCH SETTING
1234
12345678
MEMORY
DIRECT ACCESS
12345678
EXIT
With the convenient Direct Access function, you can instantly call up the desired display — with just a single additional
button press. Press the [DIRECT ACCESS] button and a message appears in the display prompting you to press the
appropriate button. Then, simply press the button corresponding to the desired setting display to instantly call up that
display. In the example below, Direct Access is used to call up the display for selecting the Chord Fingering (page 134).
ACMP
DIRECT ACCESS
Refer to the Direct Access Chart (page 52) for a list of the displays that can be called up
with the Direct Access function.
Here’s a convenient way to
return to the MAIN display
from any other display:
Simply press the [DIRECT
ACCESS] button, then the
[EXIT] button.
CVP-206/204
51
Page 52

Basic Operations — Organizing Your Data
EEE
Direct Access Chart
Operation: [DIRECT ACCESS] button + button listed below Corresponding LCD display and function
STYLE [ACMP] FUNCTION CHORD FINGERING FINGERING TYPE selection 134
SONG [TRACK1]
METRONOME [START/STOP]
TEMPO [T AP TEMPO] TAP settings
TRANSPOSE [ ] CONTROLLER
MENU [DEMO]
DIGITAL STUDIO [SOUND CREATOR]
[BALANCE]
[CHANNEL ON/OFF] VOICE settings
[DIRECT ACCESS] Exit from the Direct Access mode
[NEXT] —
[BACK] —
[ENTER] —
[EXIT] Return to the MAIN display
VOICE PART [LAYER]
VOICE EFFECT [REVERB]
VOICE [PIANO & HARPSI]
[MUSIC FINDER] MUSIC FINDER MUSIC FINDER SEARCH1 (Searching the records) 74
ONE TOUCH SETTING [1] —
[PIANO]
REGISTRATION MEMORY [FREEZE] FREEZE 137
PEDAL RIGHT
[BREAK]
MAIN [A] VOLUME settings
MAIN [B]
MAIN [C] BRIGHTNESS settings
MAIN [D]
[AUTO FILL IN] DSP settings
[OTS LINK]
[SYNC. STOP] SYNC. STOP WINDOW setting
[SYNC. START] —
[START/STOP] —
[TRACK2] TRACK2 CHANNEL selection
[EXTRA TRACKS]
[REPEAT]
[GUIDE] GUIDE MODE selection
[REC] —
[TOP] —
[START/STOP] —
[REW] —
[FF] —
[]
E
[]
[] MIXING CONSOLE TUNE 124
[HELP] LCD BRIGHTNESS settings 144
[FUNCTION] MIDI MIDI settings 140
[DIGITAL RECORDING] SCALE TUNING setting
[MIXING CONSOLE] —
[LEFT]
[VARIATION] EFFECT TYPE selection
[HARMONY/ECHO] FUNCTION HARMONY/ECHO 138
[MONO] MIXING CONSOLE TUNE PORTAMENTO TIME settings 124
[LEFT HOLD]
[E.PIANO]
[ORGAN & ACCORDION]
[PERCUSSION]
[GUITAR]
[BASS]
[BRASS]
[WOODWIND]
[STRINGS]
[CHOIR & PAD]
[SYNTH.]
[XG]
[USER]
[2] —
[3] —
[4] —
[1]
[2]
[3]
[4]
[5]
[6]
[7]
[8]
[MEMORY]
CENTER CENTER PEDAL function assignment
LEFT LEFT PEDAL function assignment
AUX AUX PEDAL function assignment
MIXING CONSOLE (STYLE
PART)
FUNCTION
FUNCTION SONG SETTING
FUNCTION
FUNCTION
MIXING CONSOLE (SONG
PART)
MIXING CONSOLE
FUNCTION
FUNCTION
REGISTRATION BANK REGISTRATION EDIT (Editing the REGISTRATION) 89
FUNCTION
VOLUME/VOICE
FILTER
EFFECT
STYLE SETTING/SPLIT
POINT
UTILITY
MIDI MIDI CLOCK setting 141
UTILITY
MASTER TUNE/SCALE
TUNE
VOLUME/VOICE
TUNE OCTAVE settings 124
EFFECT
STYLE SETTING/SPLIT POINT
VOICE SET 138
CONTROLLER
REGISTRATION SEQUENCE (Creating the REGISTRATION SEQUENCE) 137
CONTROLLER
VOICE settings
HARMONIC CONTENT settings
REVERB settings
TRACK1 CHANNEL selection
METRONOME settings
TRANSPOSE settings
LANGUAGE selection 146
MASTER TUNING setting
VOLUME settings
REVERB settings
SPLIT POINT (LEFT) setting 133
KEYBOARD TOUCH selection
RIGHT PEDAL function assignment
See pages
123[INTRO] PANPOT settings
124
125[ENDING] CHORUS settings
133
132
143[FADE IN/OUT] FADE IN/OUT settings
136
130
123
125[DSP] DSP settings
136
134
52
CVP-206/204
Page 53

Basic Operations — Organizing Your Data
Help Messages
The Help messages give you explanations and descriptions of all the main functions and features of the CVP-206/204.
HELP
METRONOME
MASTER VOLUME
MIN
STYLE
ACMP
POWER
ON
OFF
MAX
AUTO FILLIN
OTS LINK
SONG
EXTRA TRACKS
START STOP
FADE IN / OUT
BREAK
INTRO
TRACK 2
(STYLE)
(L)
REC TOP START / STOP REW FF REPEAT GUIDE
SYNC.START
NEW SONG
TEMPO
RESET
MAIN
ABCD
TRACK 1
(R)
TRANSPOSE
TAP TEMPO
ENDING / rit. SYNC.STOP SYNC.STARTSTART / STOP
MENU
DEMO
A
HELP
B
FUNCTION
DIGITAL
C
STUDIO
SOUND
D
CREATOR
RECORDING
CONSOLE
DIGITAL
E
MIXING
BALANCE
PART
CHANNEL
ON / OFF
PART
RESET
BACK NEXT
F
G
H
I
J
VOICE PART
ON / OFF
LAYER
LEFT
CONTRAST
DATA
ENTRY
VOICE EFFECT
LCD
REVERB
DSP VARIATION HARMONY / ECHO MONO LEFT HOLD
VOICE
E.PIANO ORGAN & ACCORDION PERCUSSION GUITAR BASS
PIANO & HARPSI.
WOODWIND
BRASS
ENTER
MUSIC FINDER
PIANO
STRINGS CHOIR & PAD SYNTH. XG USER
ONE TOUCH SETTING
1234
REGISTRATION MEMORY
FREEZE
12345678
MEMORY
1
MENU
DEMO
HELP
FUNCTION
DIRECT ACCESS
12345678
2
2-1 Select the desired
Help topic.
Select the Language, if necessary. The language
selected here are also used for various “Messages”
shown during operations.
2-2 Call up the topic.
EXIT
Help messages can be displayed in
any one of the following languages:
ENGLISH
JAPANESE
GERMAN
FRENCH
SPANISH
ITALIAN
The language can also be selected
in the FUNCTION “LANGUAGE”
(page 146) display.
Selecting a different language here
may cause the following problems.
• Some characters of the file
names you entered may be garbled.
• Files may not be accessible.
Restoring the original language
solves the above problems.
Reading the files on the computer
with a different language system
may cause similar problems to
those above.
BACK NEXT
3
Use this to select
different pages.
Help messages also feature links to the detailed explanation or actual
setting display of the selected topic. Simply select the underlined word
(using the [DATA ENTRY] dial), and press the [ENTER] button to jump to
the detailed explanation or actual setting display of the selected topic.
ENTER
DATA
ENTRY
END
Press this to return
to the previous
display.
EXIT
CVP-206/204
53
Page 54

Basic Operations — Organizing Your Data
The sound, volume level,
and the beat (time signature)
of the metronome can all be
changed (page 143).
Using the Metronome
The metronome provides a click sound, giving you an accurate tempo guide when you practice, or letting you hear and
check how a specific tempo sounds.
METRONOME
STAR T STOP
METRONOME
MASTER VOLUME
MIN
STYLE
ACMP
POWER
ON
OFF
MAX
AUTO FILLIN
OTS LINK
SONG
EXTRA TRACKS
TRACK 2
(STYLE)
(L)
REC TOPSTART / STOP REW FF REPEAT GUIDE
SYNC.START
NEW SONG
TEMPO
RESET
MAIN
ABCD
BREAK
START STOP
FADE IN / OUT
INTRO
TRACK 1
(R)
TRANSPOSE
TAP TEMPO
ENDING / rit. SYNC.STOP SYNC.STARTSTART / STOP
MENU
DEMO
A
HELP
B
FUNCTION
DIGITAL
C
STUDIO
SOUND
D
CREATOR
RECORDING
CONSOLE
DIGITAL
E
MIXING
BALANCE
PART
CHANNEL
ON / OFF
PART
RESET
BACK NEXT
F
G
H
J
VOICE PART
ON / OFF
LAYER
LEFT
I
CONTRAST
ENTER
DATA
ENTRY
VOICE EFFECT
LCD
REVERB
DSP VARIATION HARMONY / ECHO MONO LEFT HOLD
VOICE
E.PIANO ORGAN & ACCORDION PERCUSSION GUITAR BASS
PIANO & HARPSI.
WOODWIND
BRASS
MUSIC FINDER
PIANO
STRINGS CHOIR & PAD SYNTH. XG USER
ONE TOUCH SETTING
1234
REGISTRATION MEMORY
FREEZE
12345678
MEMORY
DIRECT ACCESS
12345678
EXIT
The metronome starts by pressing the METRONOME [START/STOP]
button. Adjust the tempo by using the TEMPO[ ] [ ] buttons (see below).
To stop the metronome, press the [START/STOP] button again.
Adjusting the Tempo
This section shows you to adjust the playback tempo — which not only affects the metronome, but also the playback of
a song or an accompaniment style.
MASTER VOLUME
MIN
STYLE
ACMP
POWER
ON
AUTO FILLIN
OTS LINK
TEMPO
RESET
METRONOME
SONG
EXTRA TRACKS
OFF
START STOP
FADE IN / OUT
MAX
INTRO
BREAK
TRACK 2
(STYLE)
(L)
REC TOP START / STOP REW FF REPEAT GUIDE
SYNC.START
NEW SONG
TEMPO
RESET
MAIN
ABCD
TAP TEMPO
TRACK 1
(R)
TRANSPOSE
TAP TEMPO
ENDING / rit. SYNC.STOP SYNC.STARTSTART / STOP
VOICE EFFECT
LCD
REVERB
DSPVARIATION HARMONY / ECHO MONO LEFT HOLD
VOICE
E.PIANO ORGAN & ACCORDION PERCUSSION GUITAR BASS
PIANO & HARPSI.
WOODWIND
BRASS
MUSIC FINDER
PIANO
STRINGS CHOIR & PAD SYNTH. XG USER
ONE TOUCH SETTING
1234
REGISTRATION MEMORY
FREEZE
12345678
MEMORY
VOICE PART
ON / OFF
CONTRAST
LAYER
ENTER
LEFT
DATA
ENTRY
MENU
DEMO
A
HELP
B
FUNCTION
DIGITAL
C
STUDIO
SOUND
D
CREATOR
RECORDING
CONSOLE
DIGITAL
E
MIXING
BALANCE
PART
CHANNEL
ON / OFF
PART
RESET
BACK NEXT
F
G
H
I
J
54
TEMPO
1 2
RESET
TAP TEMPO
Press either the TEMPO [ ]
button or the [] button.
Press this to
END
close the
TEMPO display.
CVP-206/204
EXIT
DIRECT ACCESS
12345678
EXIT
Adjust the tempo by using either the TEMPO [ ]
[] buttons or the [DATA ENTRY] dial.
The number in the display indicates how many
quarter-note beats there are in one minute. The
range is between 5 and 500. The higher the value,
the faster the tempo.
When you change the tempo, both tempos of the
current song and style will be changed to the same
tempo. To restore their respective default (initial)
tempo settings, press both the TEMPO [ ] [ ]
buttons simultaneously. Also refer to the “Tempo
Indications — MAIN display” (page 55) for more
about tempo.
Songs and accompaniment
styles have been given
default (initial) tempo
settings, designed to best
suit the song/style.
Page 55

Basic Operations — Organizing Your Data
Tap Tempo
This useful feature lets you tap out the tempo for a song or an accompaniment style.
Simply tap the [TAP TEMPO] button at the desired speed, and the tempo of the song or
the accompaniment style changes to match your tapping.
Playback the song or the
1
accompaniment style
(page 63, 78).
2
■ Tempo Indications — MAIN Display
There are three different tempo indications in the Main display, as shown below.
Indicates the default (initial) tempo
setting for the currently selected
song (unless the tempo has been
changed manually).
Indicates the current tempo for the
selected song, accompaniment
style or the metronome which is
now playing back. When nothing is
playing back (stopped), this
indicates the tempo for the selected
style. When the song and style are
played back simultaneously, the
tempo of the style is automatically
changed to match the tempo of the
song, and is displayed here. This
tempo is used for recording when
recording a song or
accompaniment style.
Indicates the default (initial) tempo
setting for the currently selected
accompaniment style (unless the
tempo has been changed
manually).
TEMPO
TAP TEMPO
RESET
Tap the [TAP TEMPO] button twice
to change the tempo.
Hitting the [T AP TEMPO]
button produces a tapping
sound. You can change this
sound, if desired (page 144).
n
You can also use Tap Tempo
to automatically start the
song or accompaniment
style at the desired tempo.
While both the song and
accompaniment style are
stopped, tap the [TAP
TEMPO] button several
times, and the selected
accompaniment style starts
automatically at the tempo
you tapped.
While a song is set to Sync.
Start stand-by (page 64, 78),
tapping the [TAP TEMPO]
button starts the song playback in the same manner.
For songs and styles in 2/4
and 4/4 time, tap four times;
for 3/4 time, tap three times;
for 5/4 time, tap five times.
CVP-206/204
55
Page 56

Playing the Demos
The CVP-206/204 is an extraordinarily versatile and sophisticated instrument, featuring a wide variety of dynamic
voices and rhythms, plus a wealth of advanced functions. Three different types of Demo songs have been specially
Reference
prepared showcasing the stunning sound and features of the CVP-206/204.
MENU
DEMO
TRACK 1
(R)
HELP
FUNCTION
TRANSPOSE
TAP TEMPO
ENDING / rit. SYNC.STOP SYNC.STARTSTART / STOP
VOICE EFFECT
LCD
REVERB
DSP VARIATION HARMONY / ECHO MONO LEFT HOLD
VOICE
PIANO & HARPSI.
E.PIANO ORGAN & ACCORDION PERCUSSION GUITAR BASS
WOODWIND
BRASS
MUSIC FINDER
PIANO
STRINGS CHOIR & PAD SYNTH. XG USER
ONE TOUCH SETTING
1234
REGISTRATION MEMORY
FREEZE
12345678
VOICE PART
ON / OFF
LEFT
CONTRAST
LAYER
ENTER
DATA
ENTRY
MENU
DEMO
A
HELP
B
FUNCTION
DIGITAL
C
STUDIO
SOUND
D
CREATOR
RECORDING
CONSOLE
DIGITAL
E
MIXING
BALANCE
PART
CHANNEL
ON / OFF
PART
RESET
BACK NEXT
F
G
H
I
J
MASTER VOLUME
MIN
STYLE
ACMP
METRONOME
POWER
ON
OFF
MAX
AUTO FILLIN
OTS LINK
SONG
EXTRA TRACKS
TRACK 2
(STYLE)
(L)
REC TOPSTART / STOP REW FF REPEAT GUIDE
SYNC.START
NEW SONG
TEMPO
RESET
MAIN
ABCD
BREAK
START STOP
FADE IN / OUT
INTRO
MEMORY
1
2
MENU
DEMO
HELP
FUNCTION
2-1 Use the [BACK][NEXT] buttons to select the desired Demo category.
Function Demos ...... These demonstrate each of the different functions on the CVP-206/204.
Voice Demos ............ These showcase the voices of the CVP-206/204.
Style Demos.............These introduce you to the rhythms and accompaniment styles of the CVP-206/204.
BACK NEXT
56
2-2 Use these to select
CVP-206/204
different display pages.
2-3 Press one of these buttons to
start the desired demo.
Press this to play back all Demo songs/items continuously, starting from
the first item at the top left of the display. This is available only from the
FUNCTION page.
All of the available demos are played back in sequence, starting from the one
at top left. The VOICE and STYLE pages do not have the [AUTO] button;
however, all demo songs are played back in sequence.
Pressing this button cancels the interactive features of the Function Demos
(otherwise available in step 3 below).
Page 57

Playing the Demos
For the Function demos, an introduction screen appears in the display and
3
the Demo starts playing.
This example shows the Voices in the
FUNCTION demo.
BACK NEXT
VOICE PART
F
G
H
I
J
ON / OFF
LAYER
LEFT
Select the desired word or item by using the [DATA ENTRY] dial, then press
the [ENTER] button or number buttons ([1▼], [2▼], etc.) to call it up.
ENTER
DATA
ENTRY
Use the [BACK][NEXT]
buttons in the introduction
screen to call up the previous or next page.
n
Press the SONG [START/
STOP] button to stop the
Demo song. To start the
Demo again from the point
at which it was stopped,
press the SONG [START/
STOP] button again.
Rewind and fast-forward
can also be used with the
Demo songs (page 80).
Relevant explanations are shown in the display.
4
END
EXIT
Return to the MAIN screen.
CVP-206/204
57
Page 58

Voices
The CVP-206/204 gives you an enormous selection of authentic voices, including various keyboard instruments, strings
and brass — and many, many more.
VOICE
PIANO & HARPSI.
E.PIANO ORGAN & ACCORDION PERCUSSION GUITAR BASS
BRASS
MASTER VOLUME
MIN
STYLE
ACMP
WOODWIND
METRONOME
POWER
ON
OFF
AUTO FILLIN
OTS LINK
EXTRA TRACKS
START STOP
REC TOPSTART / STOP REW FF REPEAT GUIDE
NEW SONG
FADE IN / OUT
TEMPO
MAX
INTRO
BREAK
ABCD
SONG
(STYLE)
SYNC.START
RESET
MAIN
Selecting a Voice
Select
1
the
desired
voice
group.
Indicates that the display
2
is for selecting the MAIN
voice (page 25).
2-2 Select the
various pages
in the current
voice group.
Play the keyboard to hear the
3
selected
voice.
VOICE
PIANO & HARPSI.
BRASS
E.PIANO ORGAN & ACCORDION PERCUSSION GUITAR BASS
WOODWIND
STRINGS CHOIR & PAD SYNTH. XG USER
TRACK 2
TRACK 1
(L)
(R)
TAP TEMPO
ENDING / rit. SYNC.STOP SYNC.STARTSTART / STOP
MENU
DEMO
A
HELP
B
FUNCTION
DIGITAL
RECORDING
STUDIO
SOUND
CREATOR
DIGITAL
MIXING
CONSOLE
PART
DIRECT ACCESS
C
D
E
BALANCE
CHANNEL
ON / OFF
PART
12345678
TRANSPOSE
RESET
STRINGS CHOIR & PAD SYNTH. XG USER
BACK NEXT
VOICE PART
F
ON / OFF
G
LAYER
H
LEFT
I
J
EXIT
2-1 Select the memory location of the
voice (PRESET/USER/FLOPPY DISK).
BACK NEXT
2-3 Select the voice.
Press this to start the
demo of the selected
voice. To stop the demo
Press this to call up the display for
selecting the voice group.
at any time, press this
button again.
Press this to return to
END
the MAIN display.
VOICE EFFECT
LCD
REVERB
CONTRAST
ENTER
DATA
ENTRY
DSP VARIATION HARMONY / ECHO MONO LEFT HOLD
VOICE
E.PIANO ORGAN & ACCORDION PERCUSSION GUITAR BASS
PIANO & HARPSI.
WOODWIND
STRINGS CHOIR & PAD SYNTH. XG USER
BRASS
ONE TOUCH SETTING
MUSIC FINDER
1234
REGISTRATION MEMORY
PIANO
FREEZE
12345678
MEMORY
When you select a voice
group, the last selected
voice will automatically be
selected.
n
Selecting a voice automatically selects the best-suited
effect and other settings for
that particular voice. Y ou can
disable this so that settings
are not automatically
selected (page 138).
n
You can set how much the
volume of the voice changes
according to your playing
strength (page 136).
n
For a list of the available
voices, refer to the separate
Data List.
n
You can set whether the
voice bank and program
change numbers (“MSBLSB-Program Change number” at the right above the
voice name) are displayed or
not (page 144).
n
XG is a major enhancement
of the GM System level 1 f ormat, and was developed by
Yamaha specially to provide
more voices and variations,
as well as greater expressive
control over voices and
effects, and to ensure compatibility of data well into the
future.
58
EXIT
CVP-206/204
Page 59

Voices
Voice Characteristics
The voice type and its defining characteristics are indicated above the voice name.
Natural!
These rich and luscious voices are comprised mostly of keyboard instrument sounds and are especially intended
for playing piano and other keyboard parts. Since they use a completely independent sound source, you can play
full, sustained chords — even along with the accompaniment style — and not have to worry about notes cutting
off. They also take full advantage of Yamaha’s advanced sampling technology such as Stereo Sampling, Dynamic
Sampling, Sustain Sampling, and Key-off Sampling.
Live!
These acoustic instrument sounds were sampled in stereo, to produce a truly authentic, rich sound — full of
atmosphere and ambience.
Cool!
These voices capture the dynamic textures and subtle nuances of electric instruments — thanks to a huge amount
of memory and some very sophisticated programming.
Sweet!
These acoustic instrument sounds also benefit from Yamaha’s sophisticated technology — and feature a sound so
finely detailed and natural, you’ll swear you’re playing the real thing!
Drum
Various drum and percussion sounds are assigned to individual keys, letting you play the sounds from the
keyboard.
SFX
Various special effect sounds are assigned to individual keys, letting you play the sounds from the keyboard.
Keyboard Percussion
When one of the drum of SFX kits is selected in the PERCUSSION voice group, various drum, percussion, and
special effect sounds are assigned to individual keys, letting you play the sounds from the keyboard. The various
drums and percussion instruments of the Standard Kit are indicated by symbols above the assigned keys. Keep in
mind that even though different kits feature different sounds, some same-named sounds in different kits are
identical.
Refer to the separate Data List (Drum/key Assignment List) for a listing of the sounds in each drum/SFX kit.
One-touch Piano Play
This convenient, easy-to-use feature completely and automatically reconfigures the entire CVP-206/204 for optimum
piano performance. No matter what settings you’ve made from the panel, you can instantly call up the piano settings by
a single button press.
PIANO
PIANO button
This reconfigures all of the panel settings for playing the CVP-206/204 as a
piano.
You can also use the metronome with this function
(page 54).
Piano Lock function
The convenient Piano Lock function lets you “lock” the piano so that you don’t
inadvertently change the settings by pressing another button on the panel. Once
locked, the CVP-206/204 stays in the piano mode, even if other buttons are pressed
— preventing you from accidently starting a song or accompaniment style during a
piano concert.
Hold down the [PIANO] button for a short time, until a message appears prompting
you to enable Piano Lock.
To enable Piano Lock, select “OK.”
To turn Piano Lock off, hold down the [PIANO] button again for a short time.
Even if you turn Piano Lock
off, the piano settings are
still active.
CVP-206/204
59
Page 60

Voices
LEFT part
MAIN part
Split point
Left range Right range
LEFT part
MAIN part
Split point
LAYER part
Left range Right range
Layer/Left — Playing Several Sounds Simultaneously
The CVP-206/204 lets you set three voices for simultaneous play: MAIN, LAYER, and LEFT. By effectively combining
these three, you can create richly textured, multi-instrument setups for your performance.
VOICE PART
ON / OFF
G
METRONOME
OFF
START STOP
FADE IN / OUT
MAX
INTRO
BREAK
SONG
EXTRA TRACKS
TRACK 2
TRACK 1
(STYLE)
(L)
RESET
MAIN
SYNC.START
(R)
TRANSPOSE
TAP TEMPO
ENDING / rit. SYNC.STOP SYNC.STARTSTART / STOP
RESET
REC TOP START / STOP REW FF REPEAT GUIDE
NEW SONG
TEMPO
ABCD
RECORDING
MENU
DEMO
A
HELP
B
FUNCTION
DIGITAL
C
STUDIO
SOUND
D
CREATOR
DIGITAL
E
MIXING
BALANCE
CONSOLE
PART
CHANNEL
ON / OFF
PART
DIRECT ACCESS
12345678
MASTER VOLUME
MIN
STYLE
ACMP
POWER
ON
AUTO FILLIN
OTS LINK
Playing a layer of two voices
Playing two voices separately — on the left
and right sections of the keyboard
LAYER part
BACK NEXT
VOICE EFFECT
LCD
REVERB
VOICE
PIANO & HARPSI.
BRASS
ENTER
MUSIC FINDER
PIANO
DSP VARIATION HARMONY / ECHO MONO LEFT HOLD
E.PIANO ORGAN & ACCORDION PERCUSSION GUITAR BASS
WOODWIND
STRINGS CHOIR & PAD SYNTH. XG USER
ONE TOUCH SETTING
1234
REGISTRATION MEMORY
FREEZE
12345678
MEMORY
CONTRAST
VOICE PART
F
ON / OFF
G
LAYER
H
LEFT
I
J
DATA
ENTRY
EXIT
LAYER
H
LEFT
MAIN part
Playing three different voices — one on the
left section of the keyboard, plus a layer of
two on the right
Layer — Layering Two Different Voices
Press this to
1
turn the LAYER
function on. To
turn it off, press
the button again.
G
H
VOICE PART
ON / OFF
LAYER
LEFT
Select LAYER with the [G] button. Press the same
2
button to call up the VOICE display, from which you
can select the specific voice you want to play in a
layer with the Main voice. The method of selecting a
voice here is the same as that in VOICE (MAIN)
display (page 58).
There is an alternate way for
quickly selecting both the
MAIN and LAYER voices
from the panel: While holding down one panel voice
button, press a second
voice button. The first
selected voice becomes the
MAIN voice, and the second
becomes the LAYER.
60
CVP-206/204
END
Press this to return to the
EXIT
MAIN display.
Page 61

Voices
Left — Setting Separate Voices for the Left and Right Sections of the Keyboard
Set the LEFT to
1
ON. Press this
button again to
set it to OFF.
END
EXIT
Press this to
return to the
MAIN display.
LAYER
LEFT
Select LEFT with the [H] button. Press the same
2
button to call up the VOICE display, from which you
can select the specific voice you want to play in a
left. How to select the voice is the same as the way of
VOICE (MAIN) screen (page 58).
The split point can be freely
set to any key on the keyboard. To set it, call up the
SPLIT POINT display by
pressing the [I] (SPLIT
POINT) button in the MAIN
display. The operation steps
are the same as in the
STYLE SETTING/SPLIT
F
G
H
POINT display of the FUNCTION page (page 133).
n
Each part (MAIN, LAYER,
and LEFT) can have its own
volume setting (page 65).
n
You can also use the LAYER
and LEFT functions
together, to create a combination layer/split. To do this,
set separate voices for the
left and right sections of the
keyboard (as indicated), and
set up a layer of two diff erent
voices on the right.
Applying Voice Effects
This section of the panel lets you add a variety of effects to the voices you play on the keyboard.
VOICE EFFECT
REVERB DSP VARIATION HARMONY / ECHO MONO LEFT HOLD
METRONOME
OFF
START STOP
FADE IN / OUT
MAX
INTRO
BREAK
SONG
EXTRA TRACKS
TRACK 2
TRACK 1
(STYLE)
(L)
SYNC.START
RESET
MAIN
(R)
TRANSPOSE
TAP TEMPO
ENDING / rit. SYNC.STOP SYNC.STARTSTART / STOP
RESET
REC TOPSTART / STOP REW FF REPEAT GUIDE
NEW SONG
TEMPO
ABCD
RECORDING
MENU
DEMO
A
HELP
B
FUNCTION
DIGITAL
C
STUDIO
SOUND
D
CREATOR
DIGITAL
E
MIXING
BALANCE
CONSOLE
PART
CHANNEL
ON / OFF
PART
DIRECT ACCESS
12345678
BACK NEXT
VOICE PART
F
ON / OFF
G
LAYER
H
LEFT
I
J
EXIT
MASTER VOLUME
MIN
STYLE
ACMP
POWER
ON
AUTO FILLIN
OTS LINK
Press one of the effect buttons to turn the corresponding effects on. Press it again to turn the effect off.
For explanations on each of the effects, see below.
■ REVERB
Reverb is an effect that recreates the acoustic ambiance of a performance space — anything from a small jazz club to a
concert hall.
■ DSP
The CVP-206/204 features a variety of dynamic built-in digital effects, letting you process
the sound in various ways. You can use DSP to enhance the voices in subtle ways — such
as by applying chorus to add animation and depth, or using a symphonic effect to give
the sound warmth and richness. DSP also has effects such as distortion that can
completely change the character of the sound. DSP is set for the currently selected part
(MAIN/LAYER/LEFT).
VOICE EFFECT
LCD
REVERB
CONTRAST
ENTER
DATA
ENTRY
DSP VARIATION HARMONY / ECHO MONO LEFT HOLD
VOICE
E.PIANO ORGAN & ACCORDION PERCUSSION GUITAR BASS
PIANO & HARPSI.
WOODWIND
STRINGS CHOIR & PAD SYNTH. XG USER
BRASS
ONE TOUCH SETTING
MUSIC FINDER
1234
REGISTRATION MEMORY
PIANO
FREEZE
12345678
MEMORY
The DSP and VARIATION
effect types and the their
depth can be selected and
adjusted in the MIXING CON-
SOLE display (page 125).
■ VARIATION (Regular voice only; page 92)
This control changes the Variation effect settings, letting you alter some aspect of the effect, depending on the selected
type. For example, when the Rotary Speaker effect is selected (page 125), this lets you switch the rotor speed between
slow and fast.
CVP-206/204
61
Page 62

Voices
■ HARMONY/ECHO
This control adds Harmony or Echo effects to the voices played on the right hand section
of the keyboard (page 138).
■ MONO
This control determines whether the voice is played monophonically (only one note at a
time) or polyphonically for each part (MAIN/LAYER/LEFT). This is set to MONO when the
lamp is lit, and set to polyphonic when the lamp is off. When set to MONO, only the last
note played will sound. This lets you play wind instrument voices more realistically.
Depending on the selected voice, the MONO setting also lets you effectively use the
Portamento effect, when playing in legato.
■ LEFT HOLD
This function causes the left part voice to be held even when the keys are released — the
same effect as when the damper (sustain) pedal is pressed. This function is especially
effective when used with the auto accompaniment. For example, if you play and release a
chord in the auto accompaniment section of the keyboard (with the left part on and the
Left voice set to Strings), the strings part sustains, adding a natural richness to the overall
accompaniment sound.
The Portamento effect creates
a smooth pitch glide between
successively played notes.
You can add special emphasis to melody lines you play
over chords by using the
Layer function with a monophonic voice. Set the Main
voice to play polyphonically
and set the Layer voice to
play monophonically
(MONO). In this case, the
melody you play — including
the top notes of any chords
— sounds monophonically.
Try this using the following
voices.
MAIN voice
(polyphonic) +
Sweet T rump (monophonic)
: Brass Section
LAYER voice
:
Using the Pedals
The CVP-206/204 features three pedals.
Left Pedal
■ Damper Pedal (Right)
The damper pedal performs the same function as the
damper pedal on an actual acoustic piano, letting you
sustain the sound of the voices even after releasing the
keys.
■ Sostenuto Pedal (Center)
If you play a note or chord on the keyboard and press the
sostenuto pedal while the note(s) are held, those notes will
be sustained as long as the pedal is held, but all
subsequently played notes will not be sustained.
Damper Pedal
Sostenuto Pedal
When you press the damper pedal
here, the notes you play before you
release the pedal have a longer sustain.
When you press the sostenuto pedal
here while holding the note, the note will
sustain as long as you hold the pedal.
You can also assign one of
many other functions to
these pedals (as well as the
optional foot controller or
footswitch). For example, you
can use it to start/stop the
accompaniment style, or use
it to play Fill-ins (page 134).
• Some voices may sound
continuously or have a
long decay after the notes
have been released while
the damper pedal is held.
• Certain voices in the [PER-
CUSSION] and [XG]
groups may not be affected
by use of the damper pedal.
• Certain voices, such as
[STRINGS] or [BRASS],
sustain continuously when
the sostenuto pedal is
pressed.
• Certain voices in the
[PERCUSSION] and [XG]
groups may not be
affected by use of the sostenuto pedal.
■ Left Pedal
When the Piano voice is selected, pressing this pedal reduces the volume and slightly
changes the timbre of the notes you play.
The settings assigned to this pedal may differ depending on the selected voice.
■ Foot Controller/Footswitch
An optional Yamaha foot controller (FC7) or footswitch (FC4 or FC5) can be connected to
the AUX PEDAL jack and used to control various functions assigned in the FUNCTION page (page 134).
CVP-206/204
62
The depth of the left pedal
effect can be adjusted
(
page 134
).
Page 63

Styles
The CVP-206/204 features styles (accompaniment patterns) in a variety of different musical genres including pops, jazz,
Latin and dance. To use it, all you have to do is play the chords with your left hand as you perform and the selected
Accompaniment Style (style) matching your music will automatically play along, instantly following the chords you
play. Try selecting some of the different styles (refer to separate Data List (Style List) ) and play them.
METRONOME
POWER
ON
OFF
MASTER VOLUME
MAX
MIN
STYLE
ACMP
AUTO FILLIN
BREAK
OTS LINK
STYLE
ACMP
AUTO FILLIN
OTS LINK
Playing a style
SONG
EXTRA TRACKS
START STOP
FADE IN / OUT
TRACK 2
(STYLE)
(L)
REC TOPSTART / STOP REW FF REPEAT GUIDE
SYNC.START
NEW SONG
TEMPO
RESET
INTRO
MAIN
ABCD
BREAK
TRACK 1
(R)
TRANSPOSE
TAP TEMPO
ENDING / rit. SYNC.STOP SYNC.STARTSTART / STOP
RESET
INTRO
BACK NEXT
RECORDING
MENU
DEMO
A
HELP
B
FUNCTION
DIGITAL
C
STUDIO
SOUND
D
CREATOR
DIGITAL
E
MIXING
BALANCE
CONSOLE
PART
CHANNEL
ON / OFF
PART
DIRECT ACCESS
12345678
MAIN
ABCD
VOICE PART
F
ON / OFF
G
LAYER
H
LEFT
I
J
EXIT
ENDING / rit. SYNC.STOP SYNC.START START / S TOP
VOICE EFFECT
LCD
REVERB
CONTRAST
VOICE
PIANO & HARPSI.
BRASS
ENTER
MUSIC FINDER
PIANO
DATA
ENTRY
DSPVARIATION HARMONY / ECHO MONO LEFT HOLD
E.PIANO ORGAN & ACCORDION PERCUSSION GUITAR BASS
WOODWIND
STRINGS CHOIR & PAD SYNTH. XG USER
ONE TOUCH SETTING
1234
REGISTRATION MEMORY
FREEZE
12345678
MEMORY
1
2
To call up the [MAIN] display, first press the
[DIRECT ACCESS] button,
then press the [EXIT] button.
BACK NEXT
2-1 Select a location (Preset,
User, Floppy Disk) for
saving the style.
2-2 Select a Style.
When you’ve opened a lower directory’s display,
this button (UP) lets you call up the next higher
directory, from which you can select Style groups.
For a list of the available
accompaniment styles, refer
to the separate Data List
(Style List).
CVP-206/204
63
Page 64

Styles
3
ACMP
When the [ACMP] button is set to on, you can play/indicate chords from the auto
accompaniment section of the keyboard. (Depending on the settings, this may be
the range of the Left voice, or the entire keyboard.)
STYLE
AUTO FILLIN
OTS LINK
BREAK
4
STYLE
ACMP
5
The Tempo can be adjusted
using the TEMPO [ ][ ] or
[T AP TEMPO] button.
If you tap the [T AP TEMPO]
button, the tempo will adjust to
the same speed that you tapped.
AUTO FILLIN
OTS LINK
As soon as you play a chord with the auto accompaniment section, the style starts.
For details about chord fingerings, refer to page 66.
BREAK
INTRO
ABCD
Turn SYNC. (SYNCHRONIZED) START on.
INTRO
ABCD
MAIN
MAIN
Auto Accompaniment
section
ENDING / rit.
ENDING / rit. SYNC.STOP SYNC.START START / S TOP
Split point
You can set the key range
for auto accompaniment
(page 133).
SYNC.STOP SYNC.START START / STOP
Sync. Start
Enabling this lets you start
the style simply by playing
the keyboard.
•You can begin the rh ythm
channels (tracks) of the
Style by pressing the
[START/STOP] button.
• The rhythm channels of
the style can also be
started by tapping the
[T AP TEMPO] button.
With the style stopped,
tap the [T AP TEMPO]
button three, four or five
times (three for 3/4 time,
four for 2/4 or 4/4 time,
five for 5/4 time).
6
SYNC.STOP SYNC.START START / STOP
Accompaniment Style Characteristics
The defining characteristics of some of the accompaniment styles are indicated above the relevant style names in the Open/Save display.
Session!
These styles provide even greater realism and authentic bac king b y mixing in original chord types and changes, as well as special riffs with
chord changes, with the Main sections. These have been programmed to add “spice” and a professional touch to your performances of
certain songs and in certain genres. As a result, the styles may not necessarily be appropriate — or even harmonically correct — for all
songs and for all chord playing. In some cases for example, playing a simple major triad may result in a seventh chord, or playing an onbass chord may result in incorrect or unexpected accompaniment.
Piano Combo
These accompaniment styles feature a basic piano trio (piano, bass, and drums), augmented in some cases with other instruments. Since
this is a small combo sound, the accompaniment backing is appropriately sparse, making it useful and effective for a wide variety of songs.
Pianist
These special styles provide piano-only accompaniment — effectively recreating the left-hand performance of an accomplished pianist.
Just by playing the proper chords with your left hand, you can automatically add complicated arpeggios and bass/chord patterns — such
as difficult-to-play stride piano parts.
Stop the style.
END
STYLE
ACMP
Turn ACMP off.
When you simultaneously
play back accompaniment
styles with a song, the
accompaniment parts
recorded to the song (channels 9 - 16) are temporarily
replaced by the selected
accompaniment style — letting you try out and use different accompaniment with
the song (page 79).
64
CVP-206/204
Page 65

Playing a Style’s Rhythm Channels only
Styles
Select a style (page 63).
1
2
STYLE
ACMP
3
AUTO FILLIN
OTS LINK
Set to off.
BREAK
Play along with the rhythm playback.
The Tempo can be adjusted using the TEMPO [ ][ ] or [TAP TEMPO] buttons.
INTRO
MAIN
ABCD
ENDING / rit. SYNC.STOP SYNC.START START / S TOP
Rhythm starts.
If you tap the [TAP TEMPO] button, the tempo will adjust to the same speed that
you tapped.
The Rhythm channels are
part of the styles. Each style
has different rhythm patterns.
You can also start the
rhythm simply by playing a
key on the keyboard, if Sync
Start is enabled (turn on the
[SYNC.START] button).
Press the STYLE [START/STOP] button
END
again to stop the rhythm playback.
Adjusting the Volume Balance/Channel Muting
BALANCE display
MIC part
STYLE part (Auto
Call up the
BALANCE
display.
BALANCE
CHANNEL
ON / OFF
PART
Call up the
Channel ON/
OFF display.
Accompaniment section)
SONG part
Adjust the output level of the Part.
CHANNEL ON/OFF display
Call up the STYLE display by pressing the [CHANNEL ON/OFF]
button, then turn the instrument you want to cancel off. To listen to
only one instrument by itself, hold down the appropriate button for
the channel to set the channel to SOLO. To cancel SOLO, simply
press the appropriate channel button again.
When selecting the style
group “PIANIST,” the
rhythm doesn’t sound.
When you want to use any
of the styles, always make
sure that ACMP is turned
on.
Parts played from the
keyboard (MAIN/LAYER/
LEFT)
Channel
Refers to the MIDI channel
in the song data
(page 153). The channels
are assigned as shown
below.
Song
1 - 16
Accompaniment Style
9 - 16
CVP-206/204
65
Page 66

Styles
Chord Fingerings
The style playback can be controlled by the chords you play in the keys to the left of the split point. There are 7 types of
fingerings as described below. Go to the CHORD FINGERING page (page 134), and select the Chord Fingerings. The
page shows how to play chords with your left hand.
SINGLE FINGER
Single Finger accompaniment makes it simple to produce beautifully orchestrated accompaniment using major,
seventh, minor and minor-seventh chords by pressing a minimum number of keys on the auto accompaniment section
of the keyboard. The abbreviated chord fingerings described below are used.
For a major chord, press the root key only.
C
For a minor chord, simultaneously press the root key
and a black key to its left.
Cm
For a seventh chord, simultaneously press the root
key and a white key to its left.
C7
MULTI FINGER
The Multi Finger mode automatically detects Single Finger or Fingered chord fingerings,
so you can use either type of fingering without having to switch fingering modes. If you
want to play minor, seventh, or minor-seventh chords using the SINGLE FINGER
operation in the MULTI FINGER Mode, always press the closest white/black key(s) to the
root of the chord.
FINGERED
This mode lets you produce accompaniment by playing full chords on the auto
accompaniment section of the keyboard. The Fingered mode recognizes the various
chord types listed on the next page.
FINGERED ON BASS
This mode accepts the same fingerings as the FINGERED mode, but the lowest note
played in the auto accompaniment section of the keyboard is used as the bass note,
allowing you to play “on bass” chords. For example, to indicate a C-on-E chord, play a C
major chord with E as the lowest note (E, G, C).
FULL KEYBOARD
This method detects chords in the entire key range. Chords are detected in a way similar
to Fingered, even if you split the notes between your left and right hands — for example,
playing a bass note with your left hand and a chord with your right, or by playing a chord
with your left hand and a melody note with your right.
AI FINGERED
This mode is basically the same as FINGERED, with the exception that less than three
notes can be played to indicate the chords (based on the previously played chord, etc.).
AI FULL KEYBOARD
When this advanced auto accompaniment mode is engaged, the CVP-206/204 will
automatically create appropriate accompaniment while you play just about anything,
anywhere on the keyboard using both hands. You don’t have to worry about specifying the accompaniment chords.
Although the AI Full Keyboard mode is designed to work with many songs, some arrangements may not be suitable for
use with this feature.
This mode is similarto FULL KEYBOARD, with the exception that less than three notes can be played to indicate the
chords (based on the previously played chord, etc.). 9th and 11th chords cannot be played.
For a minor-seventh chord, simultaneously press the
root key and both a white and black key to its left.
Cm7
Chord detection in the AI
Full Keyboard mode occurs
at approximately 8th-note
intervals. Extremely short
chords — less than an 8th
note in length — may not be
detected.
In Full Keyboard mode,
chords are detected based
on the lowest and second
lowest notes you play. If the
two lowest notes fall within a
single octave, those two
notes determine the chord. If
the lowest note and the second lowest note are separated by more than one
octave, the lowest note
becomes the bass and the
chord is determined from the
second lowest note and the
other notes played in the
same octave.
AI
Artificial Intelligence
66
CVP-206/204
Page 67

Chord Types Recognized in the Fingered Mode (Example for “C” chords)
9
C6
C
C9
C6
CM7
CM7
9
CM7
Styles
11
C
5
CM7
5
Csus4
CmM7
9
C7
( )
Caug
9
CmM7
( )
11
C7
( )
( )
CM7aug
( )
Cm7
5
( )
13
C7
( )
Cm
CmM7
9
C7
( )
5
( )
Chord Name [Abbreviation] Normal Voicing
Cm9
Cdim
C7
( )
Cm6
Cdim7
5
C7aug
Display for root “C”
Major [M] 1 - 3 - 5 C
Ninth [9] 1 - 2 - 3 - 5 C9
( )
( )
Cm7
C7
C7sus4 Csus2
Cm7
( )
C7
( )
• Notes in parentheses can
•For FINGERED, FIN-
Sixth [6] 1 - (3) - 5 - 6 C6
Sixth ninth [69] 1 - 2 - 3 - (5) - 6 or 3 - 6 - 2* C6
9
Major seventh [M7] 1 - 3 - (5) - 7 CM7
Major seventh ninth [M79] 1 - 2 - 3 - (5)j - 7 CM7
Major seventh add sharp eleventh [M711]
Flatted fifth [ 5] 1 - 3 - 5 C 5
Major seventh flatted fifth [M75] 1 - 3 - 5 - 7 CM7
1 - (2) - 3 - 4 - 5 - 7 or 1 - 2 - 3 - 4 - (5) - 7
Suspended fourth [sus4] 1 - 4 - 5 Csus4
Augmented [aug] 1 - 3 - 5 Caug
Major seventh augmented [M7aug] 1 - (3) - 5 - 7 CM7aug
Minor [m] 1 - 3 - 5 Cm
Minor ninth [m9] 1 - 2 - 3 - 5 Cm9
Minor sixth [m6] 1 - 3 - 5 - 6 Cm6
Minor seventh [m7] 1 - 3 - (5) - 7 Cm7
9
Minor seventh ninth [m7
] 1 - 2 - 3 - (5) - 7 or 3 - 7 - 2 Cm7
Minor seventh eleventh [m711] 1 - (2) - 3 - 4 - 5 - ( 7) Cm7
Minor major seventh [mM7] 1 - 3 - (5) - 7 CmM7
Minor major seventh ninth [mM79] 1 - 2 - 3 - (5) - 7 CmM7
Minor seventh flatted fifth [m75] 1 - 3 - 5 - 7 Cm7 5
Minor major seventh flatted fifth [mM75] 1 - 3 - 5 - 7 CmM7
Diminished [dim] 1 - 3 - 5 Cdim
Diminished seventh [dim7] 1 - 3 - 5 - 6 Cdim7
Seventh [7] 1 - 3 - (5) - 7 or 1 - (3) - 5 - 7 C7
9
Seventh flatted ninth [7
Seventh add flatted thirteenth [713] 1 - 3 - 5 - 6 - 7 C7
] 1 - 2 - 3 - (5) - 7 C7
Seventh ninth [79] 1 - 2 - 3 - (5) - 7 or 3 - 7 - 2* C7
Seventh add sharp eleventh [711]
Seventh add thirteenth [713] 1 - 3 - (5) - 6 - 7 or 3 - 6 - 7 C7
Seventh sharp ninth [79] 1 - 2 - 3 - (5) - 7 C7
Seventh flatted fifth [75] 1 - 3 - 5 - 7 C7
Seventh augmented [7aug] 1 - 3 - 5 - 7 C7aug
Seventh suspended fourth [7sus4] 1 - 4 - 5 - 7 C7sus4
1 - (2) - 3 - 4 - 5 - 7 or 1 - 2 - 3 - 4 - (5) - 7
9
11
CM7
5
• Playing two same root
•A perfect fifth (1 + 5) pro-
• The auto accompaniment
9
11
9
•You can also have the
5
9
13
9
11
C7
13
9
5
Suspended second [sus2] 1 - 2 - 5 Csus2
* Only this voicing (inversion) is recognized. Other chords not marked with an asterisk can be played in any inversion.
9
( )
9
( )
Cm7
C7
11
( )
( )
13
be omitted.
GERED ON BASS, and AI
FINGERED, if you play
any three adjacent keys
(including black keys), the
chord sound will be canceled and only the rhythm
instruments will continue
playing (Chord Cancel
function). This let you play
back only the rhythm.
keys in the adjacent
octaves produces accompaniment based only on
the root.
duces accompaniment
based on the root and the
fifth.
Style will sometimes not
change when related
chords are played in
sequence (e.g. some
minor chords followed by
the minor seventh).
CVP-206/204 “teach” you
how to play Fingered
chords. From the CHORD
FINGERING display
(page 134), specify the
chord you want to learn,
and the notes you should
press are indicated in the
display.
CVP-206/204
67
Page 68

Styles
Arranging the Style Pattern
(SECTIONS: MAIN A/B/C/D, INTRO, ENDING, BREAK)
The CVP-206/204 features various types of Auto Accompaniment Sections that allow you
to vary the arrangement of the Style. They are: Intro, Main, Break and Ending. By
switching among them as you play, you can easily produce the dynamic elements of a
professional-sounding arrangement in your performance.
Select a style (page 63).
1
2
STYLE
ACMP
AUTO FILLIN
OTS LINK
BREAK
2-1 Turn the ACMP function on.
INTRO
MAIN
ABCD
ENDING / rit. SYNC.STOP SYNC.START START / S TOP
2-3 Turn the SYNC. START function on.
2-2 Press the [INTRO] button. To cancel the INTRO section
before starting the style, press the [INTRO] button again.
The Intro section starts as soon as you play a key in the Auto
3
Accompaniment section of the keyboard, and changes to the Main section.
Split point
Auto Accompaniment
section
4
Main sections can be shifted.
STYLE
ACMP
AUTO FILLIN
OTS LINK
BREAK
INTRO
ABCD
Press this button to add breaks.
MAIN
ENDING / rit.
SYNC.STOP SYNC.START START / STOP
You can also use this function to play only rhythms
(page 65).
• If you press the [INTRO]
button, you can play bac k
an Intro section while an
accompaniment is playing.
• Section button indications
— [BREAK], [INTRO],
[MAIN], [ENDING] buttons
LED is green
— The section is not
selected.
LED is red
— The section is currently selected.
LED is off
— No section data; the
section cannot be
played.
•You can dynamically control the level of the
accompaniment by how
softly or strongly you play
the keys in the Auto
Accompaniment section
of the keyboard
(page 133).
• If you press the [SYNC.
START] button while an
accompaniment is playing, the accompaniment
will stop and the CVP206/204 will enter Synchronized Start standby
status.
•You can also change
style sections by using
the pedal (page 134).
• The Break section lets
you add dynamic variations and breaks in the
rhythm of the accompaniment, to make your performance sound even
more professional. If you
press the [BREAK] button while an accompaniment is playing, the fill-in
will play back for one
measure.
• The indicator of the destination section (MAIN A/
B/C/D) will flash while the
Break is playing.
• When the [AUTO FILLIN]
button is set to on and
the MAIN [A][B][C][D]
button is pressed after
the final half beat (eighth
note) of the measure, the
fill-in will begin from the
next measure.
68
CVP-206/204
Page 69

Styles
This switches to the ending section. When the ending is finished, the Style stops
END
STYLE
ACMP
AUTO FILLIN
OTS LINK
automatically. You can have the ending gradually slow down (ritardando) by
pressing the same [ENDING/rit.] button again while the ending is playing back.
BREAK
INTRO
ABCD
MAIN
ENDING / rit.
SYNC.STOP SYNC.START START / STOP
Fade-in/Fade-out
The accompaniment style also include a convenient Fade-in/Fade-out function that
gradually fades in and fades out the accompaniment. To start the style with a fade-in,
press the [FADE IN/OUT] button, then turn SYNC. START on. To cancel the fade-in
before starting the style, press the button again.
To fade out and stop the Style, press this button while the style is playing. The time of the
fade-in/fade-out can also be set (page 143).
Stopping the Style Playback While Releasing Keys (SYNC. STOP)
When the Synchro Stop function is engaged, accompaniment playback will stop
completely when all keys in the Auto Accompaniment section of the keyboard are released.
Accompaniment playback will start again as soon as the key in the Auto Accompaniment
section is played.
Turn ACMP (Accompaniment) on.
1
Turn SYNC. STOP on. SYNC. START is also automatically set to on when
2
SYNC. STOP is turned on.
STYLE
ACMP
AUTO FILLIN
OTS LINK
BREAK
INTRO
MAIN
ABCD
ENDING / rit. SYNC.STOP SYNC.START START / S TOP
• Styles can also be started
by pressing the STYLE
[START/STOP] button.
•You can select the Intro
and Ending type by pressing the [E] button in the
MAIN window (page 70).
• If you press the [INTRO]
button while the ending is
playing, the Intro section
will begin playing after the
ending is finished.
• When the [AUTO FILLIN]
button is set to on and you
press a MAIN button while
the ending is playing, fill-in
accompaniment will
immediately start playing,
continuing with the Main
section.
•You can begin the accom-
paniment by using the
Ending instead of the Intro
section. In this case, the
auto accompaniment
doesn’t stop when the
ending is finished.
• If you select a different
style while the style is not
playing, the “default”
tempo for that style is also
selected. If the accompaniment is playing, the
same tempo is maintained
even if you select a different style.
• When STOP ACMP is set
to on and the accompaniment is not playing, you
can play both chords and
bass in the Auto Accompaniment section in the
keyboard (page 133).
As soon as you play a chord with your left hand, the auto accompaniment
3
starts.
Auto Accompaniment section
The auto accompaniment stops when you release your left hand from the keys.
4
Playing a chord with your
5
left hand automatically
restarts the auto
accompaniment.
Split point
END
Press the [SYNC. STOP]/
[SYNC. START] button
again to stop the
accompaniment.
You can also use the SYNC.
STOP function by pressing
the auto accompaniment
section/left-hand range
briefly (page 133).
Synchro Stop cannot be set
to on when the fingering
mode is set to Full Keyboard/AI Keyboard or the
auto accompaniment on the
panel is set to off.
CVP-206/204
69
Page 70

Styles
Selecting Intro and Ending Types (INTRO/ENDING)
1
2
Select a Intro
D
E
Select a Ending
To call up the [MAIN] display, first press the [DIRECT
ACCESS] button, then press
the [EXIT] button.
Play the style using
3
the Intro or Ending
section (page 30, 31).
Playing Fill-in patterns automatically when
changing accompaniment sections — Auto Fill In
1
2
STYLE
ACMP
Play the style and switch among the accompaniment sections as they play
(page 30, 31).
Fill-in patterns play automatically between each change in the Main
sections.
END
AUTO FILLIN
OTS LINK
To cancel the Auto Fill, press the [AUTO FILLIN] button again.
BREAK
INTRO
MAIN
ABCD
ENDING / rit.
SYNC.STOP SYNC.START START / STOP
Fill
A short phrase used to add
variation to the style.
You can also add a fill-in by
pressing the selected MAIN
button again.
You can temporarily disable
Auto Fill In during a performance by pressing the next
Main section’s button twice
quickly.
70
CVP-206/204
Page 71

Styles
Appropriate Panel Setting for the Selected Style
(ONE TOUCH SETTING)
The convenient One Touch Setting function makes it easy for you to select voices and effects that are appropriate to the style
you’re playing. Each preset style has four pre-programmed panel setups that you can select by pressing a single button.
METRONOME
OFF
START STOP
FADE IN / OUT
MAX
INTRO
BREAK
SONG
EXTRA TRACKS
TRACK 2
TRACK 1
(STYLE)
(L)
SYNC.START
RESET
MAIN
(R)
TRANSPOSE
TAP TEMPO
ENDING / rit. SYNC.STOP SYNC.STARTSTART / STOP
RESET
REC TOPSTART / STOP REW FF REPEAT GUIDE
NEW SONG
TEMPO
ABCD
RECORDING
MENU
DEMO
HELP
FUNCTION
DIGITAL
STUDIO
SOUND
CREATOR
DIGITAL
MIXING
CONSOLE
PART
DIRECT ACCESS
A
B
C
D
E
BALANCE
CHANNEL
ON / OFF
PART
12345678
MASTER VOLUME
MIN
STYLE
ACMP
POWER
ON
AUTO FILLIN
OTS LINK
ONE TOUCH SETTING
1234
Select a style (page 63).
1
Press one of the ONE TOUCH SETTING buttons ([1] - [4]).
2
LED is red — The One Touch Setting is currently selected.
ONE TOUCH SETTING
1234
BACK NEXT
VOICE PART
F
ON / OFF
G
LAYER
H
LEFT
I
J
EXIT
VOICE EFFECT
LCD
REVERB
CONTRAST
VOICE
PIANO & HARPSI.
BRASS
ENTER
MUSIC FINDER
PIANO
DATA
ENTRY
DSPVARIATION HARMONY / ECHO MONO LEFT HOLD
E.PIANO ORGAN & ACCORDION PERCUSSION GUITAR BASS
WOODWIND
STRINGSCHOIR & PAD SYNTH. XG USER
ONE TOUCH SETTING
1234
REGISTRATION MEMORY
FREEZE
12345678
3
MEMORY
As soon as you play a
chord with your left
hand, the auto
accompaniment starts.
LED is green — The One Touch
Setting is not selected.
LED is off — No One Touch
Setting data. The button is not
available.
Various settings (such as voices, effects, etc.) that match the selected
style can be instantly recalled. When the style is not playing, Auto
Accompaniment and Sync. Start will automatically be turned on.
For details about the One Touch Setting parameters, refer to the
separate Data List (Parameter Chart).
Stop the Auto Accompaniment.
4
STYLE
ACMP
AUTO FILLIN
OTS LINK
BREAK
INTRO
MAIN
ENDING / rit.
ABCD
SYNC.STOP SYNC.START START / S T OP
Split point
Auto Accompaniment section
Try out other One Touch Setting setups. You can also create your own One
5
Touch Setting setups (page 72).
ONE TOUCH SETTING
1234
CVP-206/204
71
Page 72

Styles
Automatically Changing One Touch Settings with the Sections — OTS Link
The convenient OTS (One Touch Setting) Link function lets you automatically have One Touch Settings change when
you select a different Main section (A - D).
1
END
AUTO FILLIN
OTS LINK
To cancel the OTS Link function, press the [OTS LINK] button again.
When you switch among the Main sections (A
2
- D), the corresponding One Touch Setting will
be called up automatically.
The Main sections A, B, C, and D correspond
to One Touch Settings 1, 2, 3, and 4,
respectively.
The One Touch Settings
can be set to change with
the sections in one of two
different timings (page 133):
• Immediately when you
press a section button.
• At the next measure (in
an accompaniment
style), after you press a
section button.
Registering the Panel Controls in One Touch Setting (ONE TOUCH SETTING)
This section covers how to create your own One Touch Setting setups (four setups per style). For a list of One Touch
Setting setup parameters, refer to the separate Data List (Parameter Chart).
Select a style.
1
Set up the panel controls
2
such as selecting a voice
as required.
Press the [MEMORY]
3
button.
MEMORY
Press one of the ONE TOUCH SETTING buttons: [1] through [4].
4
ONE TOUCH SETTING
1234
The items you can register in a One Touch Setting are Voice, Harmony and Pedal settings.
A message prompting you to save the current style will appear. Select “YES”
END
to call up the STYLE display, then save the panel settings (page 40, 48).
Unless you store the panel
settings here, the registered
settings will be deleted
when you select a different
accompaniment style.
72
CVP-206/204
Page 73

Calling Up Ideal Setups for Your Music — Music Finder
The Music Finder feature lets you instantly call up the appropriate settings for the
instrument — including voice, style, and One Touch Settings — simply by selecting the
desired song title. If you want to play a certain song but don’t know which style and voice
settings would be appropriate, the convenient Music Finder function will help you out.
The recommended settings, which together make up a “record,” can also be edited and
stored. This lets you create and save your own Music Finder records for future recall.
METRONOME
MASTER VOLUME
MIN
STYLE
ACMP
OFF
START STOP
FADE IN / OUT
MAX
INTRO
BREAK
SONG
EXTRA TRACKS
TRACK 2
TRACK 1
(STYLE)
(L)
SYNC.START
RESET
MAIN
(R)
TRANSPOSE
TAP TEMPO
ENDING / rit. SYNC.STOP SYNC.STARTSTART / STOP
RESET
REC TOPSTART / STOP REW FF REPEAT GUIDE
NEW SONG
TEMPO
ABCD
RECORDING
MENU
DEMO
A
HELP
B
FUNCTION
DIGITAL
C
STUDIO
SOUND
D
CREATOR
DIGITAL
E
MIXING
BALANCE
CONSOLE
PART
CHANNEL
ON / OFF
PART
DIRECT ACCESS
12345678
BACK NEXT
VOICE PART
F
ON / OFF
G
LAYER
H
LEFT
I
J
EXIT
POWER
ON
AUTO FILLIN
OTS LINK
MUSIC FINDER
VOICE EFFECT
LCD
REVERB
CONTRAST
VOICE
PIANO & HARPSI.
BRASS
ENTER
MUSIC FINDER
PIANO
DATA
ENTRY
MUSIC FINDER
DSP VARIATION HARMONY / ECHO MONO LEFT HOLD
E.PIANO ORGAN & ACCORDION PERCUSSION GUITAR BASS
WOODWIND
STRINGS CHOIR & PAD SYNTH. XG USER
ONE TOUCH SETTING
1234
REGISTRATION MEMORY
FREEZE
12345678
MEMORY
The MUSIC FINDER records
and its contents is just one
example of the recommended panel setups. You
can also create your own
Music Finder settings for
your favorite songs and
genres.
Keep in mind that Music
Finder is a performance aid
in that it automatically finds
appropriate accompaniment
styles and voices for your
playing. Even though you
can specify song titles, it
does not actually contain
song data.
1
Styles
2
top record by pressing the [1▲▼] button
to call up the recommended setups.
The setting data shown here is referred
to as a “record.”
Select a record by song title.
When sorting records by song title,
use the [1▲▼] button to skip up or
down through the songs
alphabetically. Simultaneously
press the [▲▼] buttons to move the
cursor to the first record.
Select a record. For example, select the
All...........................Show all records.
FAVORITE..............Show the records that have added to the “Favorite” page.
SEARCH1,2...........Show the results by SEARCH function (page 74).
Sorting the records
MUSIC...... The record is sorted by song title.
STYLE.......The record is sorted by style name.
BEAT ........ The record is sorted by beat.
TEMPO.....The record is sorted by tempo.
Change the order of the records
(ascending or descending).
Add the selected record to “Favorite (Bookmark)” page
When you press the [H] button, the “Add selected data to
the favorite list? YES/NO” message will be displayed.
Select [YES] to add the selected page to “FAVORITE” page.
Show the
number of
records of
each page.
To delete the added record, select the record in the
“FAVORITE” page and press the [H](DELETE FROM
FAVORITE) button.
Search record(s). Enter the condition of the search in the
MUSIC FINDER SEARCH display (page 74). The results of
SEARCH 1 or 2 appear in the “SEARCH 1” or “SEARCH 2”
page respectively.
Call up the MUSIC FINDER RECORD EDIT (page 75) display (for
editing the selected record).
Turn TEMPO LOCK on/off. TEMPO LOCK function lets you avoid changing the
Tempo during style playback when selecting another record. The on/off setting affects
all pages (ALL/FAVORITE/SEARCH 1/SEARCH 2).
Select a record by style name. When sorting the records by style name, press these buttons to
move the cursor to the next /previous style. Simultaneously press the [▲▼] buttons to move the
cursor to the first record.
Play the style (page 64).
3
Records can be selected by
using the [DATA ENTRY]
dial and pressing the
[ENTER] button.
CVP-206/204
73
Page 74

Styles
Searching the Ideal Setups — Music Finder Search
You can search the record by music title or keywords. The results appears in the display.
Press the [I]
1
(SEARCH 1)
button or [J]
(SEARCH 2)
button in the
MUSIC FINDER
display.
Enter the
2
conditions for
the search (see
below), then
start search by
using [START
SEARCH] button.
Start searching the record.
The results that satisfy all
the conditions appear in the
SEARCH page. For details
about the search settings in
this display, see below.
■ [A] MUSIC
Searches by music or song title. Press this button to call up the display for
inputting the song title.
When you enter the song title (page 49), the search function calls up all
records that contain the entered word or words.
■ [B] KEYWORD
Searches by keyboard. Press this button to call up the display for inputting the
keyword.
When you enter the keyword (page 49), the search function calls up all
records that contain the entered word or words. You can search several
different keywords simultaneously by inserting a separator (comma) between each. The search function finds and
displays all records that contain at least one match in the keywords.
■ [C] STYLE
Searches by style name. Press this button to call up the STYLE FILE SELECT display. Press
the [A] through [J] button in the display to select the desired accompaniment style. This
convenient function lets you find all songs that use a certain accompaniment style.
■ [D] BEAT
Searches by beat or rhythmic feel.
The STYLE FILE SELECT
display can only be used to
select the style name for
searching; it cannot be used
to call up the actual accompaniment style.
■ [E] SEARCH AREA
Selects a specific location for searching. You can further narrow down your search by using the SEARCH 1 and 2
selections.
■ [F]~[H] CLEAR
Clears the entered item at left.
■ [1▲▼] TEMPO FROM
You can also narrow your search by specifying a tempo range. This lets you set the minimum tempo for the search. Press
the [▲▼] buttons simultaneously to instantly reset the tempo value to the minimum.
■ [2▲▼]TEMPO TO
You can also narrow your search by specifying a tempo range. This lets you set the maximum tempo for the search.
Press the [▲▼] buttons simultaneously to instantly reset the tempo value to the maximum.
■ [3▲▼]~[5▲▼] GENRE
Selects the specific music genre for searching. The available range includes all genres (ANY), the preset genres, and any
genres you’ve entered yourself (page 73).
■ [8▼] CANCEL
Press this to cancel the operation and return to the previous display.
CVP-206/204
74
Page 75

Editing Records — Music Finder Record Edit
You can also change/clear a
preset record. To avoid changing/clearing the record, register
the record as a new record
after editing.
From this display, you can call up existing records and edit them to suit your
preferences. You can even use this to create your own Music Finder records.
Press the [8 ▲▼] (RECORD EDIT) button in the MUSIC FINDER display.
1
Change/clear the record data. You can also register new records. For details
2
about all settings and operations, see below.
Styles
All Music Finder records can be
stored together as a single file
(page 146). When calling up a
stored file, a message appears
prompting you to replace or
append the records as desired.
• Replace:
All Music Finder records currently in the instrument are
deleted and replaced with the
records of the selected file.
• Append:
The records called up are
added to the vacant record
numbers.
■ [A] MUSIC
Selects the music or song title for editing. Press the button to call up the
display for inputting the music or song title, then edit the name as desired.
■ [B] KEYWORD
Selects the keyword for editing. Press the button to call up the display for
inputting the keyword, then edit it as desired.
You can enter several different keywords by inserting a separator (comma)
between each.
■ [C] STYLE
Selects the style name for editing. Always enter the name when a new record is registered.
Press the button to call up the STYLE FILE SELECT display. Press the [A] through [J] button
in the display to select the desired style you want to change/clear/register.
■ [D] BEAT
Selects the beat (time signature) for editing. When another file is selected by pressing the
[C] button, the current beat setting is replaced with the beat setting of the selected file.
■ [E] FAVORITE
Adds the selected record to the FAVORITE page (page 73).
■ [F]~[H] CLEAR
Clears the entered item at left.
■ [I] DELETE RECORD
Clears the selected record. The deleted record number becomes empty. When you press this button, a message appears
prompting you to execute, abort or cancel the operation.
YES .................. Press this to clear the record and close the display.
NO .................. Press this to close the display without clearing the record.
CANCEL........... Press this to close the message box and return to the previous display.
The STYLE FILE SELECT
display can only be used to
select the style name for
record editing; it cannot be
used to call up the actual
accompaniment style.
Keep in mind that the Beat
setting made here is only for
the Music Finder search
function; this does not affect
the actual Beat setting of the
accompaniment style itself.
CVP-206/204
75
Page 76

Styles
■ [J] NEW RECORD
Registers a new record. The smallest available empty record number is used for registering.
When you press this button, a message appears prompting you to execute, abort or cancel
the operation.
YES .................. Press this to register the record and close the display.
NO .................. Press this to close the display without registering the record.
CANCEL........... Press this to close the message box and return to the previous display.
■ [1▼▲] TEMPO
Determines the tempo for the selected style. When changing the style with the [C] button, the tempo is automatically
changed to that of the changed style.
■ [3▼▲]~[5▼▲] GENRE
Indicates and changes the genre to which the selected record is assigned. The available range includes all preset genres
as well as any you’ve entered yourself.
■ [6▼▲] GENRE NAME
For entering a genre name. Press the button to call up the display for inputting
the genre name, then edit the name as desired. A maximum of 200 genre
names can be stored.
The genre name you input becomes effective when the current record is edited (overwritten) by pressing the [8
button, or when a new record is registered by pressing the [J] (NEW RECORD) button.
If you exit from the MUSIC FINDER EDIT display without actually editing or registering a record, the input genre name
is deleted.
The maximum number of
records is 2500, including
internal records.
▲] (OK)
■ [8▲] OK
Executes all editing and changes to the record. When you press this button, a message appears prompting you to
execute, abort or cancel the operation.
YES .................. Press this to replace the record and close the display.
NO .................. Press this to close the display without replacing the record.
CANCEL........... Press this to close the message box and return to the previous display.
■ [8▼] CANCEL
Press this to cancel the operation and return to the MUSIC FINDER display.
CAUTION
To maintain the edited and registered data, make sure to save all Music Finder records as a file (page 146). If no saved, the data will
be lost when another Music Finder file is called up or the factory-programmed settings are restored (page 146).
76
CVP-206/204
Page 77

Song Playback
Commercially available
music data is subject to
copyright restrictions, and is
intended only for your own
personal use.
For more information on the
song file types compatible
with the Clavinova, see
page 154.
Here you’ll learn how to play back songs. Songs include the internal songs of the instrument, performances you’ve
recorded yourself using the recording functions (page 96), and commercially available song data. You can use this
highly versatile feature in a variety of ways — playing along on the keyboard with the recorded song, as well as
practicing and learning new music with the Guide (page 82) and Repeat (page 81) functions. You can also display the
music notation and lyrics in the LCD.
METRONOME
MASTER VOLUME
MIN
STYLE
ACMP
POWER
ON
OFF
MAX
AUTO FILLIN
OTS LINK
SONG
EXTRA TRACKS
START STOP
FADE IN / OUT
BREAK
INTRO
EXTRA TRACKS
TRACK 2
(STYLE)
(L)
REC TOPSTART / STOP REW FF REPEAT GUIDE
SYNC.START
NEW SONG
TEMPO
RESET
MAIN
SONG
ABCD
(STYLE)
TRACK 1
(R)
TRANSPOSE
TAP TEMPO
ENDING / rit. SYNC.STOP SYNC.STARTSTART / STOP
TRACK 2
(L)
MENU
DEMO
A
HELP
B
FUNCTION
DIGITAL
C
STUDIO
SOUND
D
CREATOR
RESET
DIGITAL
RECORDING
MIXING
CONSOLE
TRACK 1
(R)
DIRECT ACCESS
E
BALANCE
PART
CHANNEL
ON / OFF
PART
12345678
BACK NEXT
F
G
H
J
I
VOICE PART
ON / OFF
EXIT
LAYER
LEFT
REC TOPSTART / STOP REW FF REPEAT GUIDE
CONTRAST
ENTER
DATA
ENTRY
VOICE EFFECT
LCD
REVERB
DSPVARIATION HARMONY / ECHO MONO LEFT HOLD
VOICE
E.PIANO ORGAN & ACCORDION PERCUSSION GUITAR BASS
PIANO & HARPSI.
WOODWIND
BRASS
MUSIC FINDER
PIANO
STRINGS CHOIR & PAD SYNTH. XG USER
ONE TOUCH SETTING
1234
REGISTRATION MEMORY
FREEZE
12345678
MEMORY
NEW SONG
SYNC.START
Compatible Song Types
• Internal songs (Song Book)
• Song data on included disk (50 greats for the Piano)
• Commercially available song data
Disks having this logo mark feature song data compatible with GM (General
MIDI).
Disks having this logo mark feature song data compatible with Yamaha’s XG
format. XG is a significant enhancement of the “GM system level 1” standard,
providing more voices, greater editing control, and support for multiple effect
sections and effect types.
Disks having this logo mark feature song data compatible with Yamaha’s DOC (Disk Orchestra Collection)
format.
Disks having this logo mark feature song data compatible with Yamaha’s original MIDI file format.
• Songs you recorded (page 96) and stored to the CVP-206/204 or disk.
CVP-206/204
77
Page 78

Song Playback
Song Playback
Playing the Internal Songs
1
2
2-2 Open a folder and
select a song to be
played back.
BACK
2-1 Select the PRESET tab with the [BACK]
button.
BACK
If the MAIN screen (at left) is
not displayed, press the
[DIRECT ACCESS] button
followed by the [EXIT] button.
n
You can also make a variety
of other settings (such as
tempo, voice selection, settings for the practice functions, etc.) and have them
automatically called up
when you play back the
song (page 108).
You can enable the Synchro
Start for the song by simultaneously pressing the
[TOP] button and the
SONG [START/STOP] but-
ton. The song starts as
soon as you play the keyboard. Y ou can also use this
function along with the
Style’s Synchro Start function (page 64).
n
You can have the volume
automatically fade in and
fade out at the beginning
and end of the song. Simply
press the [FADEIN/OUT]
button at the start of song
playback to f ade in the song,
and press it again at the end
of the song to fade out.
78
The song starts.
3
REC TOPSTART / STOP REW FF REPEAT GUIDE
NEW SONG
Adjust the tempo by using the TEMPO [ ][ ] buttons
(page 54) or the [T AP TEMPO] button.
You can even change the playback speed by tapping out
the tempo — simply tap the [TAP TEMPO] button twice.
CVP-206/204
SYNC.START
Songs can also be played
back continuously. Set
SONG CHAIN PLAY to ON
from the SONG SETTING
display (page 132).
END
START / STOP
To stop the song immediately, press the
button again.
Press the button in order to go back to the
previous screen.
EXIT
Make sure that the Language
setting for the instrument
(page 146) is the same as that
of the file name of the song
that you are playing back.
Page 79

Song Playback
Simultaneously Playing a Song and an Accompaniment Style
When playing back a song and an accompaniment style at the same time, channels 9 16 of the song data are replaced with accompaniment style channels — allowing you
to use the auto accompaniment styles and features in place of the accompaniment parts
of the song. Make the settings below and play your own chord substitutions in place of
the song’s chord data.
• [ACMP] button .................. ...ON
• [AUTO FILL IN] button ........ON
Select the song and start playback by pressing the SONG [START/STOP] button.
1
Select the desired accompaniment style.
2
Start the style by pressing the STYLE [START/STOP] button.
3
While the song is playing, insert a break or change sections (with the STYLE
4
section buttons.)
Fill-in patterns play when you switch sections.
END
The accompaniment stops
when you stop the song. If
the accompaniment style is
playing and you start the
song, the accompaniment
automatically stops. However, for internal songs that
use accompaniment styles,
the accompaniment style is
not stopped.
The style automatically stops when the song finishes or is stopped.
Some of the internal songs have been created using the accompaniment styles. For these songs, the
accompaniment styles are automatically started when starting song playback.
CVP-206/204
79
Page 80

Song Playback
Playing Back Songs on Disk
Insert the disk into the drive.
Insert the disk shutter side
first and label face up.
The method for playing back is the same as in the “Playing the Internal Songs” instructions
(page 78), except that you should select FLOPPY DISK page in the SONG display.
Other Playback-related Operations
■ Repeat / Rewind / Fast forward
During playback, you can hav e the song return to the top and play bac k again
from the beginning by pressing this button. When playback is stopped,
pressing this button returns the song to the beginning.
REC TOPSTART / STOP REW FF REPEAT
NEW SONG
SONG POSITION display
When “BAR” is selected, you can specify a measure number (counted from the
beginning of the song) by using the [REW] and [FF] buttons.
When “PHRASE MARK” is selected, specify the phrase mark number by using the
[REW] and [FF] buttons.
SYNC.START
Press this button to call up the SONG POSITION display (see
below). To return to the SONG display, press the [EXIT] button.
Before proceeding, make
sure to read the section
“Handling the Floppy Disk
Drive (FDD) and Floppy
Disk” (page 6).
n
You can set whether or not
the Clavinova automatically
calls up the first disk song
when a disk is inserted
(page 145).
n
Some song data for the
Clavinova has been
recorded with special “free
tempo” settings. During playback of such song data, the
measure numbers shown in
the display will not correspond to the actual measure; this only serves as a
reference as to how much of
the song has been played
back.
n
Songs containing a large
amount of data may not be
able to be read properly by
the instrument, and as such
you may not be able to
select them. The maximum
capacity is about 200–
300KB, however this may
differ depending on the data
contents of each song.
Phrase Mark
This data specifies a certain
location in the song data.
“PHRASE MARK” is shown only when the song contains phrase marks. Press the
[J] button to toggle between “BAR” and “PHRASE MARK,” then use the [REW]
and [FF] buttons to select the desired measure or phrase mark.
■ Adjusting the Volume Balance / Muting Specific Channels
BALANCE
CHANNEL
ON / OFF
PART
CHANNEL ON/OFF display
Select the [SONG] tab with the [CHANNEL ON/OFF] button, and mute the desired channel
by setting it to [OFF]. To solo a channel (only that channel will sound), hold down the
appropriate button corresponding to the channel. To release the solo for the channel, press
that channel’s button again.
CVP-206/204
80
Press this button to call up the BALANCE display (page 65).
Press this button to call up the CHANNEL ON/OFF display (see below).
Channel
Refers to the MIDI channel
in the song data. The channels are assigned as shown
below for the CVP-206/204.
Song
1 - 16
Accompaniment Style
9 - 16
Page 81

Song Playback
Muting Specific Parts — Track1/Track2/Extra Tracks
This feature lets you mute certain parts of the song (Track1, Track2, Extra Tracks), and play back only those parts you
want to hear. For example, if you want to practice the melody of a song, you can mute just the right-hand part and play
that part yourself.
Select the song to be played back (page 77).
1
2
Use this button to turn on/off the additional performance parts
(all but the right hand/left hand).
SONG
EXTRA TRACKS
(STYLE)
TRACK 2
(L)
TRACK 1
(R)
Use this button to turn on/off the right-hand part.
Use this button to turn on/off the left-hand part.
You can change the channel
assignments for Track 1 and
Track 2 (page 132), letting
you specify which parts are
muted when pressing the
[TRACK 1]/[TRACK 2]/
[EXTRA TRACKS] buttons.
All tracks are automatically
set to on when selecting a
different song.
Start the song.
3
Adjust the tempo by using the TEMPO [ ][ ] buttons (page 54).
REC TOPSTART / STOP REW FF REPEAT GUIDE
END
To stop the song, press the
START / STOP
button again.
NEW SONG
SYNC.START
Repeat Playback of a Specific Range
This feature allows you to specify a certain range of the song (between Point A and Point B), and play it back repeatedly.
Play back the song (page 78, 80).
1
2
3
REC TOPSTART / STOP REW FF REPEAT
NEW SONG
SYNC.START
After an automatic lead-in (to help guide you into the phrase), the range from
point A to point B is played back repeatedly.
Press this button at the point you want the
repeating phrase to start (Point A).
Press this button at the point you want the
repeating phrase to end (Point B).
Regardless of whether the song is playing back or is stopped, pressing the [TOP]
button returns to point A.
You can also specify Points
A and B when the song is
stopped. Set Point A by
pressing the [REPEAT] but-
ton, then use the [FF] button to move to the desired
end location, then set Point
B by pressing the
[REPEAT] button again.
Point B cannot be selected
unless Point A has been
selected first.
n
Specifying only Point A
results in repeat playback
between Point A and the
end of the song.
Stop the song.
4
START / STOP
END
REPEAT
To cancel the Repeat function, press the
button again.
n
The specified A and B
points will be erased when
selecting a different song
number, cancelling the
Repeat function, or selecting a different repeat mode
— such as Phrase Repeat
or repeat in Song Chain
Play (page 132).
CVP-206/204
81
Page 82

Song Playback
Using the Practice Functions — Guide
These fun features make it easy to learn new music. The key guide lamps indicate the notes
you should play, when you should play them, and how long you should hold them down.
Also, when you sing and play along with a song using a connected microphone (CVP-206
only), the Clavinova automatically adjusts the timing of the song to match your vocal
performance.
REC TOPSTART / STOP REW FF REPEAT GUIDE
You can turn the key guide
lamps on/off from the SONG
SETTING display (page 132).
NEW SONG
SYNC.START
Key guide lamp
Practice Functions
For keyboard performance
■ Follow Lights
When this is selected, you can see which notes you should play by watching the key
guide lamps. They light up in time with music, showing you when to play a note. You
can also practice at your own pace — since the accompaniment waits for you to play
the notes correctly.
• Accompaniment Guide
If the song data you’re using contains chord data and the [ACMP] button is turned on,
you can use the guide lamps (page 132) to help you play chords as well. Watch the
guide lamps and try playing the appropriate chords.
■ Any Key
With this function, you can play the melody of a song simply by pressing a single key
(any key is OK) in time with the rhythm. As long as you play the key in time with the
music, the melody flows smoothly with the song.
You can also determine the
timing by which the key
guide lamps light to fit your
playing preference (Guide
Lamp Timing; page 132).
n
If you want to learn how to
play certain chords, use the
Chord T utor function
(page 134).
n
The Accompaniment Guide
function cannot be used if
the chord fingering method
is set to Single Finger, Full
keyboard or AI Full Keyboard.
For sing-along performance
■ Karao-Key
This convenient function lets you control the song and accompaniment playback with just one finger, while you sing
along. Simply play a key on the keyboard in time with the music — any key is fine — and the accompaniment parts
of the song follow your playing. This lets you control the timing and tempo of the song and accompaniment to
perfectly match your singing performance.
CVP-206/204
82
Page 83

Practicing Music with the Guide Functions
Song Playback
Select the desired practice function from the SONG SETTING page in the
1
FUNCTION display (page 132).
Selects the specific practice function.
Turns the key guide lamps on/off.
Determines the timing by which the
key guide lamps light.
JUST.....The guide lamp lights in time with the
NEXT.....The guide lamps light slightly ahead of the
music, at the same time you should play
the appropriate notes.
music, indicating the notes you should
play next. The guide lamp flashes if you
do not play the key with the correct timing.
Determines whether phrase mark sections in the song will be repeatedly played
back or not. When this is set to ON, the specified measures of the phrase play
back repeatedly.
[REW] button or the [FF] button, and select “PHRASE MARK” by pressing the [J]
button. Set the desired phrase mark number by using the [REW] and [FF] buttons.
Select the desired song (page 78, 80) and mute the track you wish to practice
2
(page 81).
3
Call up the SONG POSITION display by pressing either the
REC TOPSTART / STOP REW FF REPEAT GUIDE
NEW SONG
SYNC.START
For details on the SONG SET-
TING display, see page 132.
n
The guide lamps light
according to song channel
recorded to Tracks 1 and 2
and the chord data in the
song (when such data is
included). Normally, you can
leave the AUTO SET CH
function set to ON, and the
song channel will automatically be set. If the results
aren't satisfactory, you'll
need to match the Channel
Setting “TRK1 CH” and
“TRK2 CH” parameters to
the appropriate right- and
left-hand parts.
n
Phrase Mark
This data specifies a certain
location in the song data.
n
Track 1 or Tracks 1 & 2 are
automatically selected for
practicing when calling the
practice function — as long
as you haven’t muted the
track to be practiced.
n
The key guide lamps sometimes light an octave or two
lower/higher than the actual
pitch. Any notes outside of
the 88-key range cannot be
indicated by the key guide
lamps.
4
REC TOPSTART / STOP REW FF REPEAT GUIDE
NEW SONG
Start the song and try playing the part you’ve muted.
Adjust the tempo by using the TEMPO [ ][ ] buttons (page 54).
SYNC.START
5
REC TOPSTART / STOP REW FF REPEAT GUIDE
NEW SONG
Stop the song.
SYNC.START
n
If the right- and left-hand
parts recorded to the song
data have not been properly
separated, the practice functions may not work as
expected.
END
GUIDE
To turn the practice function, press the
button again.
CVP-206/204
83
Page 84

Song Playback
Displaying Music Notation — Score
With this feature, you can have the notation automatically shown on the display as the song plays. This can be used
with your own recordings as well as the internal Demo songs.
Select the
1
desired song
(page 78, 80).
3
2
If the MAIN screen (at left)
is not displayed, press the
[DIRECT ACCESS] button
followed by the [EXIT] button.
The displayed notation is
generated by the Clavinova
based on the song data. As
a result, it may not be
exactly the same as commercially available sheet
music of the same song —
especially when displaying
notation of complicated passages or many short notes.
Enables/disables display of the left-hand k e y range .
Depending on other settings, this parameter may be
unavailable and ma y appear gra yed out. If this is the
case, go to the detailed setting display (shown
below; use the [8▲▼] buttons) and set the LEFT
CH. parameter to any channel except “AUTO.” Or,
go to the SONG SETTING display in the Function
menu (page 132) and set the TRACK 2 parameter
to any channel except “OFF.”
Enables/disables display of the right-hand key range.
Channel 1 is automatically selected when
[TRACK1] is set to [OFF] from the SONG SETTING
display (page 132).
Enables/disables display of the lyrics.
If the selected song does not contain lyric data, lyrics are
not displayed.
Enables/disables display of the chords.
If the selected song does not contain chord data, chords
are not displayed.
Enables/disables display of the note name (pitch).
Determines the display resolution (or zoom level) of the notation.
SMALL ..... Notation is shown in small size.
LARGE ..... Notation is shown in large size.
This calls up the detailed setting display for notation.
For details, see the next page.
n
Some song data for the
Clavinova has been
recorded with special “free
tempo” settings. For such
song data, the tempo, beat,
measure and music notation will not be displayed
correctly.
n
[RIGHT] and [LEFT] cannot
be turned off at the same
time.
n
The note name is indicated
at the left of the note. When
the space between the
notes is too small, the indication may be moved to the
top left of the note.
n
You can increase the number of measures that will be
displayed by decreasing the
other items to be displayed
(parts, lyrics, chords, etc.).
n
When accidentals (sharp
and flats) and notes cannot
be displayed on one line,
they are displayed in the
next line from the middle of
the measure.
84
n
The notation functions cannot be used to create song
data by inputting notes. For
information on creating
song data, see page 100.
CVP-206/204
Page 85

Song Playback
Detailed Settings for Notation
When “LEFT” and “RIGHT”
are set to the same channel,
the notation of the right-hand
notes and left-hand notes
are displayed in piano format
(two connected staves).
■ [1▲▼] LEFT CH/[2▲▼] RIGHT CH
This determines the Left channel (channel for the left-hand part) and Right channel (channel for the right-hand part).
This setting returns to AUTO when a different song is selected.
AUTO .........................The channels for the right- and left-hand parts are assigned automatically — setting the parts
to the same channel as the channel which is specified in the SONG SETTING display of the
Function menu (page 132).
1-16............................Assigns the part to the specified channel, 1- 16.
OFF (LEFT CH only)....No channel assignment.
■ [3▲▼], [4▲▼] KEY SIGNATURE
This lets you enter key signature changes in the middle of a song, at the stopped position. This menu is useful when
the selected song contains no key signature settings for displaying notation.
For a list of the key signatures, with their relative minor keys and accidentals, see the chart below.
Key Signatures and Accidentals
C Maj (A min) G Maj (E min) D Maj (B min) A Maj (F min) E Maj (C min) B Maj (G min) F Maj (D min) C Maj (A min)
C Maj (A min) G Maj (E min) D Maj (B min) A Maj (F min) E Maj (C min) B Maj (G min) F Maj (D min)
The note indicates the root note of the major key, and the note indicates the root of the relative minor.
■ [5▲▼] QUANTIZE
This gives you control over the note resolution in the notation, letting you shift or correct
the timing of all displayed notes so that they line up to a particular note value. Make sure
to select the smallest note value which is used in the song.
Note resolution:
1/4 note, 1/8 note, 1/16 note, 1/32 note, 1/4 note triplet, 1/8 note triplet, 1/16 note
triplet, 1/32 note triplet
Short notes and ornamented
notes (such as trills and
grace notes) which are
shorter than the Note resolution will not be displayed in
the notation.
CVP-206/204
85
Page 86

Song Playback
■ [6▲▼] NOTE NAME
Select the Note Name type when “NOTE” (page 84) is set to ON.
ABC ................. Note names are indicated as letters (C, D, E, F, G, A, B).
Fixed Do .......... Note names are indicated in solfeggio and differ depending on the selected language (page 53).
English.............. Do Re Mi Fa Sol La Ti
French..............Ut Re Mi Fa Sol La Si
Italian............... Do Re Mi Fa Sol La Si
German............Do Re Mi Fa Sol La Si
Spanish............. Do re Mi Fa Sol La Si
Japanese...........
Movable Do..... Note names are indicated in solfeggio according to the scale intervals, and as such are relative to
the key. The root note is indicated as Do. For example, in the key of G major the root note of Sol
would be indicated as Do.
As with “Fixed Do,” the indication differs depending on the selected language.
■ [8▲] OK
This closes the detailed setting display and starts generating the notation. You can also
execute this by pressing the [ENTER] button on the panel.
■ [8▼] CANCEL
This closes the detailed setting display without changing the settings. You can also
execute this by pressing the [EXIT] button on the panel.
You can select the display
pages (one before and after)
by the using the [BACK]/
[NEXT] buttons or the pedal
(page 134).
86
CVP-206/204
 Loading...