


 Supplementary Manual
Using the 01X with Cubase SX 3
To all 01X users — thank you for your continued use of the Yamaha 01X Digital Mixing Studio!
Since the 01X was first released, software programs that can be used with the device have undergone revisions. The original Cubase SX is now up to version 3, and the changes in the software naturally affect how the 01X is used with it. This supplementary manual is a revision of the original manual (pages 66 to 83) and has been updated to reflect the changes in Cubase SX 3.
NOTE
In these instructions, the 01X with firmware version 1.03 was used with Cubase SX version 3.1.0.933 running on Windows XP.
•Copying of the commercially available musical data including but not limited to MIDI data and/or audio data is strictly prohibited except for your personal use.
•This product incorporates and bundles computer programs and contents in which Yamaha owns copyrights or with respect to which it has license to use others’ copyrights. Such copyrighted materials include, without limitation, all computer software, style files, MIDI files, WAVE data, musical scores and sound recordings. Any unauthorized use of such programs and contents outside of personal use is not permitted under relevant laws. Any violation of copyright has legal consequences. DON’T MAKE, DISTRIBUTE OR USE ILLEGAL COPIES.
•The illustrations and screen displays as shown in this owner’s manual are for instructional purposes only, and may appear somewhat different from those on your instrument.
•Most of the computer display examples in this owner’s manual are taken from the English version OS/software.
•The name “mLAN” and its logo ( 
 ) are trademarks of Yamaha Corporation.
•The company names and product names in this Owner’s Manual are the trademarks or registered trademarks of their respective companies.
EN
Reference Started Getting Section Basics Using Before
Appendix
Recording/Playback/Remote Control
Recording/Playback/Remote Control
You’ve seen how the 01X is a full-featured stand-alone mixer and an exceptionally versatile front-end mixer for recording and mixdown with a computer system. In this section, you’ll discover that it’s also a convenient, comprehensive control surface for your audio sequencer or DAW (digital audio workstation).
The 01X gives you tape recorder style transport controls, a wealth of buttons for navigating and controlling your song, and most importantly, lets you use the faders, knobs and channel buttons ([SEL] buttons and [ON] buttons) for mixing your sequencer tracks in real time. Full automation — with moving faders — is implemented, and you can even change and automate EQ and effect settings for each track. In short, the 01X provides a completely transparent hardware link with your computer-based music production.
Templates are included for most major DAW applications and MIDI/audio sequencers, including Cubase SX/SL, Nuendo, Logic, SONAR, and Digital Performer. Naturally, the Yamaha SQ01 V2 is supported as well.
Throughout this section, we’ve used Cubase SX 3 (running on Windows XP) for the examples, but most or all of these control features are available for the other supported sequencers as well. If you’re familiar with the concepts and basic functions covered here, and are aware how they apply to your own particular sequencer, you should have no problem learning from these instructions, no matter what sequencer you use.
•The example below uses mLAN Auto Connector.
•For Mac OS X users:
Even though these instructions cover use of Cubase SX 3 running on Windows XP, operations with Mac OS X are identical, unless indicated otherwise.
•Keep in mind that some of the control features covered here may not be implemented on all of the compatible software programs.
•Remote control is only possible when the version of your particular DAW application and operating system matches the system requirements. For details, see the separate Installation Guide.
•The latest information can be found at the website below.
http://www.yamahasynth.com
Setting up
Open or record a song in Cubase SX 3, and as you read through this section, try out the controls with the song. (Ideally, the song should have several tracks of audio and/ or MIDI data.)
Install the mLAN driver and connect your computer to the 01X
For details on setting up your computer and DAW application for use with the 01X, see the separate Installation Guide.
Here, we’ll show you how to set up Cubase SX 3 for mLAN connection with the 01X.
• Remote control setup
Before you can use the 01X with Cubase SX 3, you’ll need to specify the particular hardware control set that Cubase recognizes.
q From the Devices menu, select “Device Setup...”
wClick on the “plus” button (  ) at the top left. This calls up a list of devices that can be used to control Cubase SX 3.
66 01X Owner’s Manual (Supplementary Manual)

Recording/Playback/Remote Control
eFrom the pull-down list that appears, select “Yamaha 01X.”
The Yamaha 01X will now be listed in the Remote Devices folder.
rThe next step is to specify the MIDI In and Out ports for remote control operation.
Click on “Yamaha 01X” in the Remote Devices folder, then click the arrow next to “MIDI Input” and select the unnumbered mLAN MIDI In port. This corresponds to Port 1, which should be used for the remote control functions.
tDo the same for the MIDI Output parameter, selecting the unnumbered mLAN MIDI Out port.
•For details on which mLAN MIDI port numbers are available for the 01X, see page 95.
yWhen finished, click “Apply” to enter the changes, then click “OK.”
uEnable the 01X for remote control of Cubase SX 3. Press the [UTILITY] button, then press knob 1 to call up the REMOTE SELECT page. Press knob 3 to select CUBASE/NUENDO, then press knob 8 (YES). Finally, press the [REMOTE] button on the 01X panel to enable the Remote mode (the button lamp lights).
Keep in mind that, unless indicated otherwise, the Remote mode should be enabled throughout the remainder of this section on using the 01X with Cubase SX 3.
• Audio and MIDI setup
Since the mLAN connection serves not only as a control surface for Cubase SX 3 but also as an audio and MIDI, you’ll need to make the appropriate audio and MIDI settings in Cubase SX 3. Many of the necessary settings are automatically made when you run the mLAN Auto Connector (see the separate Installation Guide); this section covers other important settings made after running Auto Connector.
Audio setup
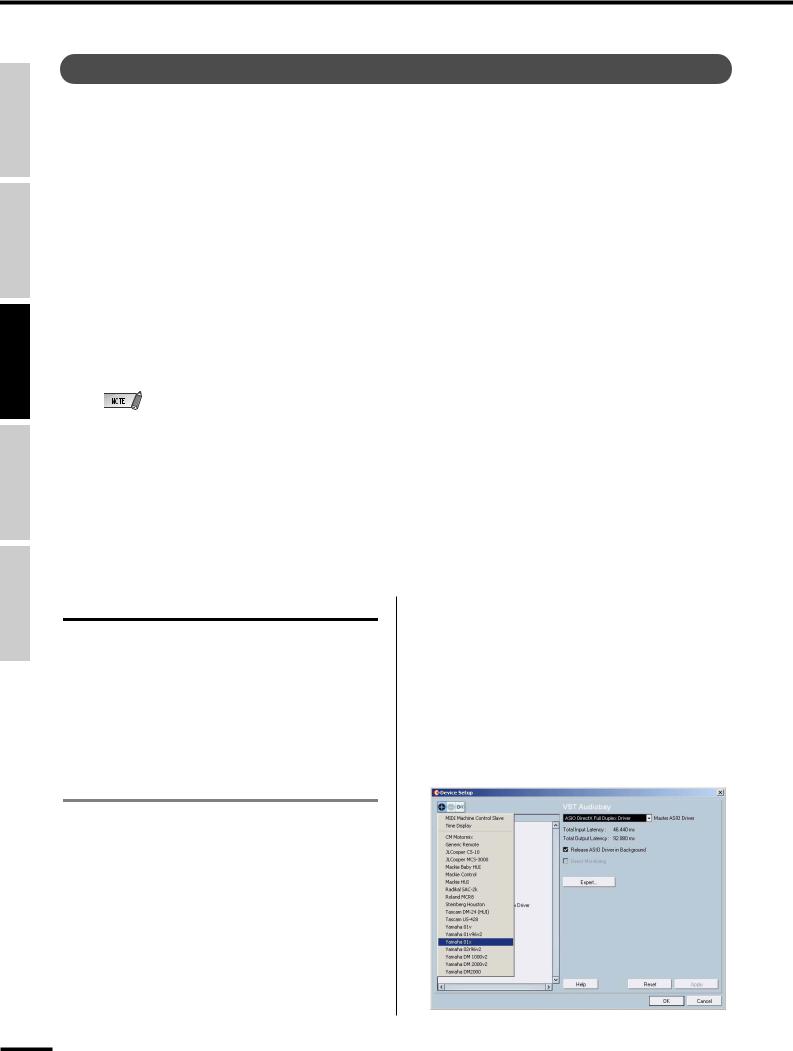
q From the Devices menu, select “Device Setup...”
w Select “VST Audiobay.”
eClick the Master ASIO Driver pull-down menu, and select “ASIO mLAN.”
• For Mac OS X, select “mLAN Network.”
Reference Getting Started Basics Section Before Using
Appendix
01X Owner’s Manual (Supplementary Manual) 67

Reference Started Getting Section Basics Using Before
Appendix
Recording/Playback/Remote Control
r At the prompt that appears, click “Switch” to activate |
MIDI setup |
the new setting. |
q From the Devices menu, select “Device Setup...” |
|
w Select “Default MIDI Ports” from the list. |
|
e Set the MIDI Input and Output ports. |
|
Click on the arrow to call up the pull-down menu for |
|
each setting, Input and Output. If you intend to use the |
|
01X as a MIDI interface (with the MIDI A and B termi- |
|
nals on the rear panel), set these to mLAN MIDI Port 2 |
|
or 3. |
tWhen finished, click “Apply” to enter the changes, then click “OK.”
r Click “Apply” to enter the changes.
t Select “All MIDI Inputs” from the list at left.
y In the list at right, disable mLAN MIDI In Ports 1 and 4 - 8, by clicking on “Yes” in the appropriate Active column box and changing it to “No” (as shown).
• For Mac OS X, disable ports 1, 4, and 5.
Port 1 is the unnumbered selection. Ports 2 and 3 should remain active (“Yes”). Make sure the settings correspond to the example above.
68 01X Owner’s Manual (Supplementary Manual)
Recording/Playback/Remote Control
uWhen finished, click “Apply” to enter the changes, then click “OK.”
•For details on which mLAN MIDI port numbers are available for the 01X, see page 95.
Setting the Inputs and Outputs
This operation shows you how to make specific input and output assignments for the mLAN channels within Cubase SX 3. Keep in mind that since each song or project can have a different input/output assignment scheme, this must be set separately for each song. However, you can also save each assignment scheme as part of a project template and then instantly call up the desired template as needed. For example, you could have eight (or more) channels of input for band recording, or want to set up separate output channels for use with external signal processors.
• Inputs
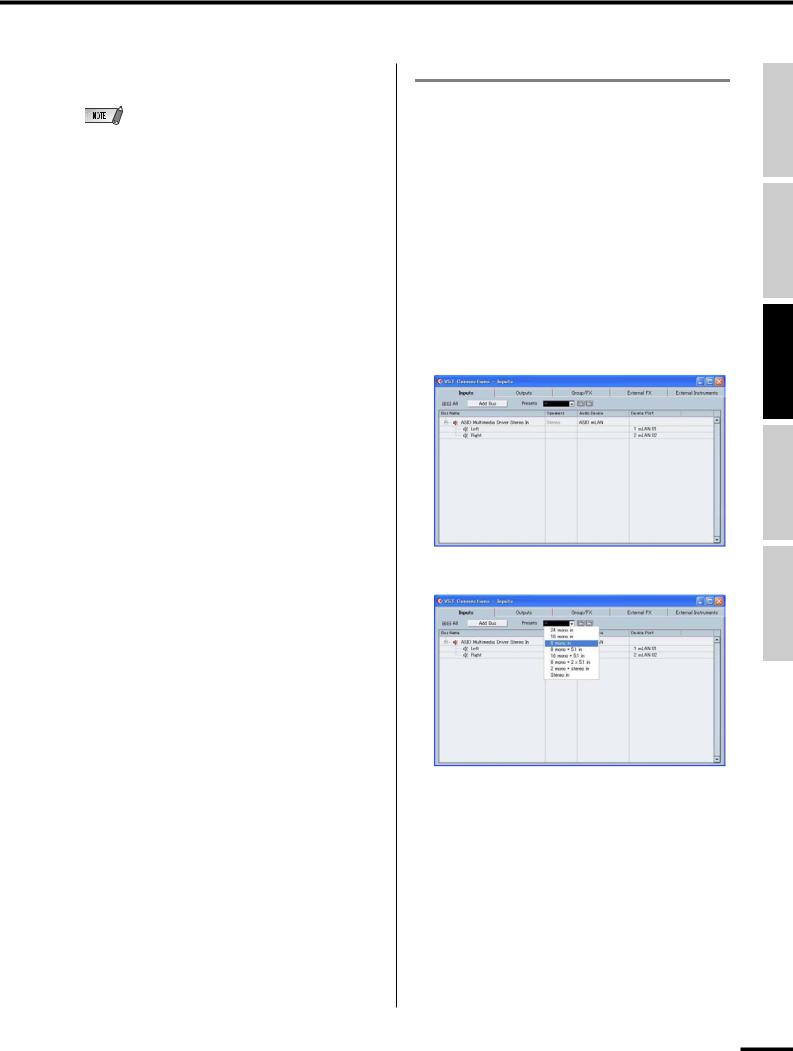
q From the Devices menu, select “VST Connections.”
w Click on the Inputs tab.
e Select the desired Input preset.
Notice that a variety of input configurations are available from this preset menu. This is an exceptionally easy and convenient way to re-configure the input assignments for the system. However, if you don’t see anything here that fits your particular application, you can easily create your own input setup by using the “Add Bus” button.
Reference Getting Started Basics Section Before Using
Appendix
01X Owner’s Manual (Supplementary Manual) 69

Reference Started Getting Section Basics Using Before
Appendix
Recording/Playback/Remote Control
In this example, we’ve selected “8 mono in.” The new |
r When finished, click the Close (“X”) box at the top |
bus configuration should look like this: |
right. |
|
• When you are using WDM and ASIO simultaneously, refer to |
|
“Setting in the mLAN Auto Connector” in the separate Installation |
|
Guide. |
rWhen finished, click the Close (“X”) box at the top right.
•When the 01X is set to 96kHz/88.2kHz operation, mLAN output (from 01X to the computer) is limited to 16 channels. In this case, the maximum number of input channels that can be activated is 16.
• Outputs
q From the Devices menu, select “VST Connections.”
w Click on the Outputs tab.
eSelect the desired Output preset.
As with Inputs above, there are a variety of common configurations available from this preset menu. If you don’t see anything here that fits your particular application, you can easily create your own output setup by using the “Add Bus” button.
In this example, we’ve selected “Stereo out.” The new bus configuration should look like this:
70 01X Owner’s Manual (Supplementary Manual)
 Loading...