

Page 1
UHF FM TRANSCEIVER
VX-246
Operating Manual
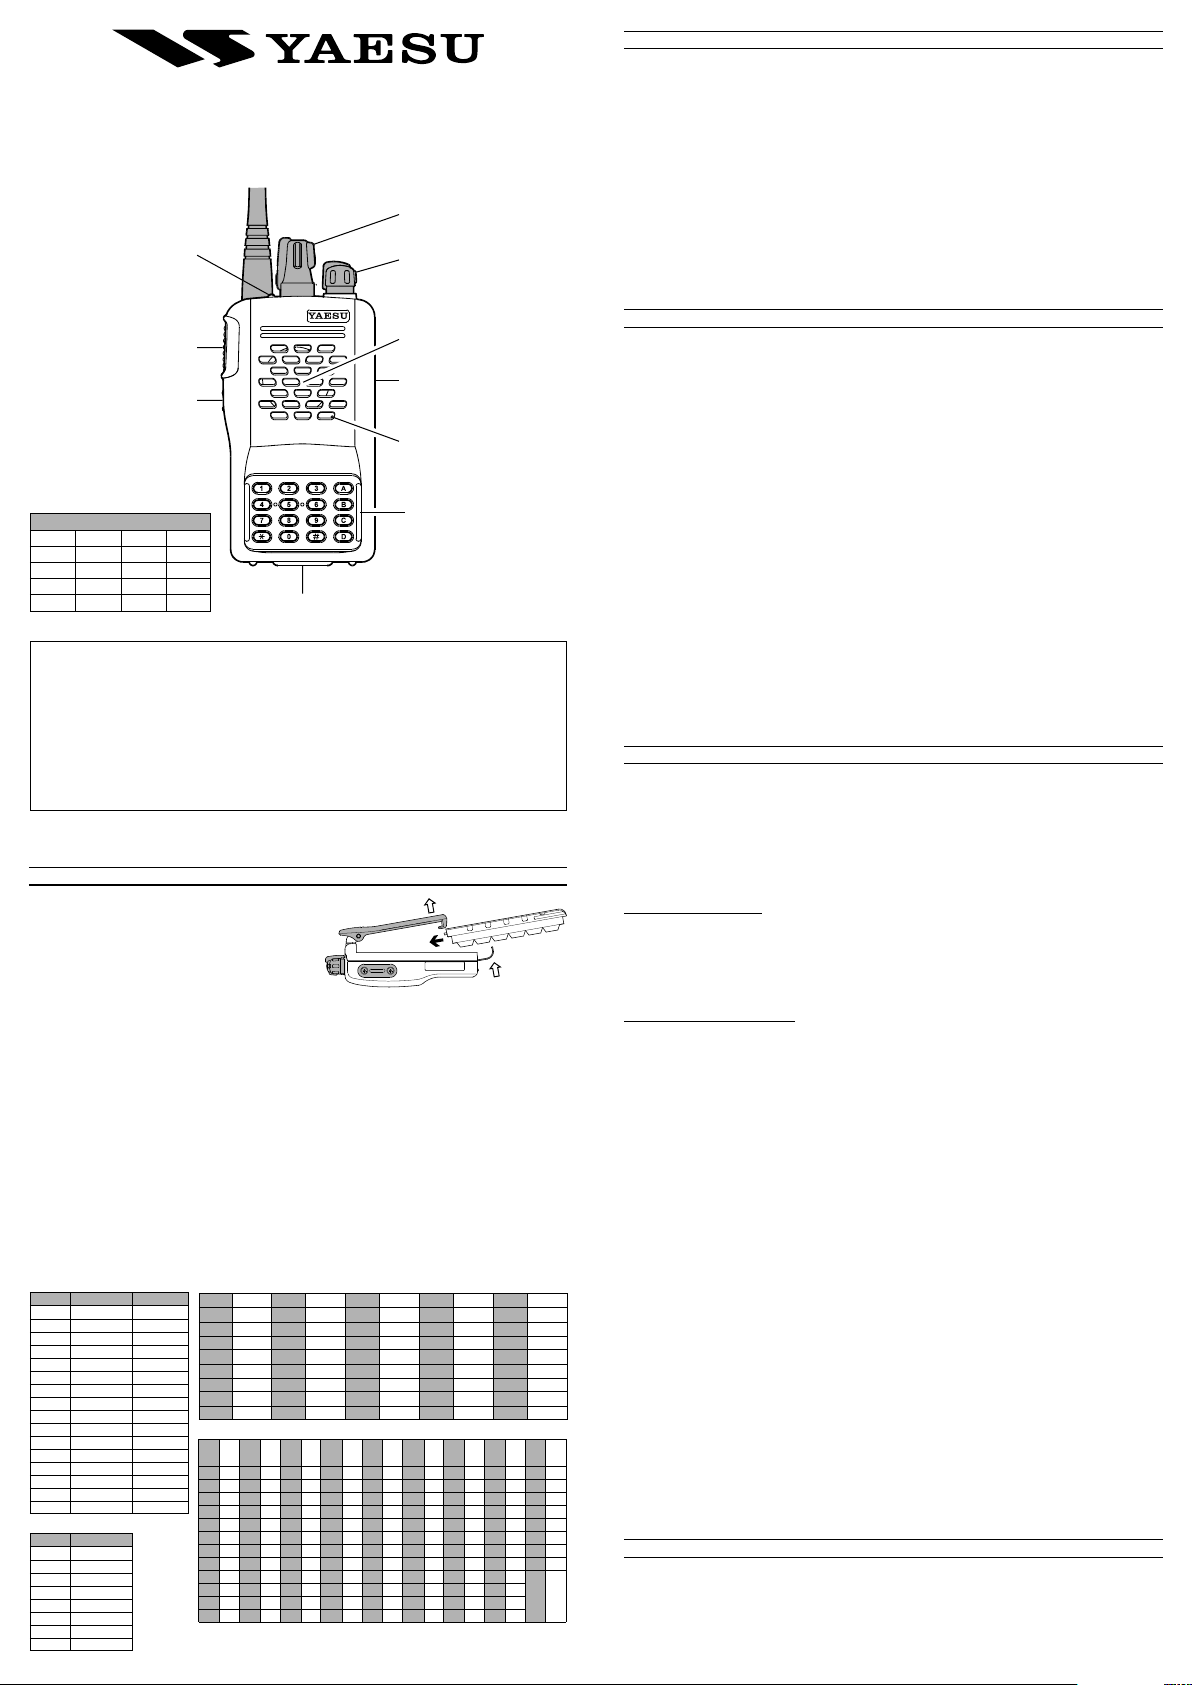
CH knob
LED Indicator
PTT Button
MONI Button
List of the practicable area
AUT BEL DNK FIN
FRA DEU GRC ISL
IRL ITA LIE LUX
NLD NOR PRT ESP
SWE CHE GBR
Battery Pack Latch
IMPORTANT NOTICE
Please read this manual carefully to become familiar with the features of this transceiver.
Do not hold the transceiver so that the antenna is very close to (or touching exposed parts of) the
body, especially the face or eyes, while transmitting. The transceiver will perform best if the microphone is 3 to 5 cm away from the mouth and the transceiver is vertical.
Do not expose the transceiver to long periods of direct sunlight, nor place it close to heating appli-
ances.
Do not place the transceiver in excessively dusty, humid, or wet areas, nor on unstable surfaces.
Do not modify this transceiver for any reason.
Refer service of this apparatus to qualified technicians only.
BATTERY PACK INSTALLATION AND REMOVAL
When using the FNB-64 Ni-Cd Battery Pack
To install the battery, hold the transceiver with your hand,
so your palm is over the speaker and your thumb is on
the top of the Belt Clip. Insert the battery pack into the
battery compartment on the back of the radio while tilting the Belt Clip outward, then close the Battery Pack
Latch until it locks in place with a “click.”
To remove the battery, turn the radio off and remove any protective cases. Open the Battery Pack Latch on
the bottom of the radio, then slide the battery downward and out from the radio while tilting the Belt Clip
upward slightly.
Battery Charging
Install the FNB-64 Ni-Cd battery pack onto the transceiver. Ensure that the transceiver is switched off.
Plug the NC-76 into the AC line outlet.
Insert the transceiver into the NC-76; the antenna jack should be at the left side when viewing the charger
from the front.
If the transceiver is inserted into the NC-76 correctly, the RED indicator will glow. A fully-discharged pack
will be charged completely in 15 hours.
When using the optional FBA-25 Battery Case
The FBA-25 Battery Case allows operation of the VX-246 using six “AA” size Alkaline batteries. When installing batteries, inset the (–) end first, then press in the (+) end so the battery snaps into place. Always replace all
six batteries at the same time.
To install the Battery Case into the transceiver, follow the same procedure as used for the Ni-Cd Battery Pack,
described previously.
Note: The FBA-25 must not be used with rechargeable cells of any kind.
VX-246 DEFAULT SETTING
Channel Frequency CTCSS/DCS
1 446.00625 MHz DCS (114
2 446.01875 MHz DCS (115
3 446.03125 MHz DCS (023
4 446.04375 MHz DCS (025
5 446.05625 MHz DCS (026
6 446.06875 MHz DCS (071
7 446.08125 MHz DCS (072
8 446.09375MHz DCS (073
9 446.00625MHz DCS (152
10 446.01875MHz DCS (155
11 446.03125MHz DCS (156
12 446.04375MHz DCS (162
13 446.05625MHz DCS (165
14 446.06875MHz DCS (205
15 446.08125MHz DCS (212
16 446.09375 MHz DCS (223
FREQUENCY NUMBER
Number Frequency
1 446.00625 MHz
2 446.01875 MHz
3 446.03125 MHz
4 446.04375 MHz
5 446.05625 MHz
6 446.06875 MHz
7 446.08125 MHz
8 446.09375 MHz
)
)
)
)
)
)
)
)
)
)
)
)
)
)
)
)
Tone No. Frequency Tone No. Frequency Tone No. Frequency Tone No. Frequency Tone No. Frequency
01 67.0 Hz 09 91.5 Hz 17 118.8 Hz 25 156.7 Hz 33 210.7 Hz
02 71.9 Hz 10 94.8 Hz 18 123.0 Hz 26 162.2 Hz 34 218.1 Hz
03 74.4 Hz 11 97.4 Hz 19 127.3 Hz 27 167.9 Hz 35 225.7 Hz
04 77.0 Hz 12 100.0 Hz 20 131.8 Hz 28 173.8 Hz 36 233.6 Hz
05 79.7 Hz 13 103.5 Hz 21 136.5 Hz 29 179.9 Hz 37 241.8 Hz
06 82.5 Hz 14 107.2 Hz 22 141.3 Hz 30 186.2 Hz 38 250.3 Hz
07 85.4 Hz 15 110.9 Hz 23 146.2 Hz 31 192.8 Hz 00 CTCSS
08 88.5 Hz 16 114.8 Hz 24 151.4 Hz 32 203.5 Hz Off
DCS DCS DCS DCS DCS DCS DCS DCS DCS DCS DCS DCS DCS DCS DCS DCS DSC DCS
No. Code No. Code No. Code No. Code No. Code No. Code No. Code No. Code No. Code
001 023 013 071 025 143 037 225 049 266 061 356 073 452 085 532 097 703
002 025 014 072 026 145 038 226 050 271 062 364 074 454 086 546 098 712
003 026 015 073 027 152 039 243 051 274 063 365 075 455 087 565 099 723
004 031 016 074 028 155 040 244 052 306 064 371 076 462 088 606 100 731
005 032 017 114 029 156 041 245 053 311 065 411 077 464 089 612 101 732
006 036 018 115 030 162 042 246 054 315 066 421 078 465 090 624 102 734
007 043 019 116 031 165 043 251 055 325 067 413 079 466 091 627 103 743
008 047 020 122 032 172 044 252 056 331 068 423 080 503 092 631 104 754
009 051 021 125 033 174 045 255 057 332 069 431 081 506 093 632 000 DCS
010 053 022 131 034 205 046 261 058 343 070 432 082 516 094 654 Off
011 054 023 132 035 212 047 263 059 346 071 445 083 523 095 662
012 065 024 134 036 223 048 265 060 351 072 446 084 526 096 664
CTCSS TONE NUMBER
DCS SIGNALING NUMBER
VOL Control
Speaker
MIC/EAR Jack
Microphone
Tilt the Belt Clip
Keypad
Insert the Battery Pack
Close the Battery Pack Latch
Switch on the transceiver by rotating the VOL control clockwise out of the click-stop. For now, adjust the VOL
control to about mid-position (12-o’clock); later you can adjust the level to suit the operating environment.
Rotate the CH knob to select a channel for operation.
To transmit, press the PTT (Push-To-Talk) button. Hold the radio 3 ~ 5 cm from your mouth, and speak in a
normal voice into the microphone.
Note: While you are transmitting, the LED indicator will glow red continuously. Do not transmit on a BUSY
channel (where the LED indicator is blinking green); wait until the channel is clear (no blinking green LED).
To receive weak stations better, disable the squelch momentarily by pressing and holding in the MONI
button on the side of the radio for one second. With the squelch disabled, the LED indicator will blink green
and channel noise and weak stations will be heard. To quiet the radio again, press and hold in the MONI
button for one second.
When your communication session is finished, switch off the radio by rotating the VOL control to the fully
counter-clockwise position (into the click-stop).
Note: The VX-246 can be programmed for DTMF Paging operation (this requires the optional FVP-25 Encryp-
tion/DTMF Pager Unit), and also for CTCSS and DCS operation. Each of these modes provides different
levels of selective calling. Refer to the “Changing the Channel Data” section for details.
ADVANCED OPERATION
BASIC OPERATION
DTMF Pager ON/OFF (requires optional FVP-25 Encryption/DTMF Pager Unit)
DTMF Pager operation allows paging and selective calling, using a user-programmed DTMF tone sequence. When
your radio is paged by a station bearing a tone sequence which matches yours, your radio’s squelch will open.
To enable or disable the DTMF Pager, press and hold in the [A] key for two seconds;
When you hear a “low tone” beep followed by a “high tone” beep, the DTMF Pager is now activated.
When you hear a “high tone” beep followed by a “low tone” beep, the DTMF Pager is now disabled.
CTCSS/DCS Bell Operation
When this feature is activated, the Bell will ring when a station calls you whose transceiver is sending a
CTCSS tone or DCS code which matches that set into your Decoder.
To enable or disable the CTCSS/DCS Bell Operation, press and hold in the [B] key for two seconds;
When you hear a“low tone” beep followed by a “high tone” beep, CTCSS/DCS Bell Operation is now
activated.
When you hear a “high tone” beep followed by a “low tone” beep, CTCSS/DCS Bell Operation is now
disabled.
Voice Encryption (requires optional FVP-25 Encryption/DTMF Pager Unit)
When the optional FVP-25 is installed, the VX-246 can be operated using voice encryption for privacy during
communications.
To enable/disable the voice encryption feature, press and hold in the [C] key for two seconds;
When you hear a “low tone” beep followed by a “high tone” beep, voice encryption is now activated.
When you hear a “high tone” beep followed by a “low tone” beep, voice encryption is now disabled.
Keypad Locking
The VX-246’s keypad may be locked out to prevent accidental changing of its settings.
To lock out the keypad, press and hold in the [D] key for two seconds;
When you hear a “low tone” beep followed by a “high tone” beep, the keypad is now locked out.
When you hear a “high tone” beep followed by a “low tone” beep, the keypad locking is now canceled.
PROGRAMMING THE CHANNEL DATA
How to activate the Programming mode.
1. Turn the radio off by rotating the VOL control fully counterclockwise (into the click-stop).
2. Press and hold in the [A] key; while holding it in, turn the radio on.
3. Press the key the function of which you wish to change, then program the new setting according to the
procedures described below.
4. When re-programming is finished, turn the radio off by rotating the VOL control fully counter-clockwise (into
the click-stop).
DTMF Paging
Programming Your ID Code
Your radio’s ID code is the three-digit code which your radio will send out when paging another radio.
1. Activate the Programming mode.
2. Press the [A] key.
3. If you wish to enable the Auto-Respond Paging feature, press the [] key. If you wish to disable the AutoRespond Paging feature, press the [#] key.
4. Enter the three digit code that you want to use for your radio’s ID from the keypad.
Programming DTMF Paging Code
The “DTMF Paging Code” is the three-digit code of the station you wish to page, which your radio will send out
during Pager operation. Ten different Paging Codes may be stored into Paging Memory registers, allowing you
to page ten different stations (or groups of stations).
1. Activate the Programming mode.
2. Press the [A] key, then enter the DTMF Paging Code memory number (“0” ~ “9”) to be programmed from
the keypad.
3. Enter the three digit code Paging Code from the keypad.
Operating Channel
You may change the operating frequency (from among the eight available channel frequencies) of the channel
selected by the CH knob. This function may be useful if you wish to change the order in which the frequencies
are selected by the CH knob.
1. Activate the Programming mode.
2. Rotate the CH knob to select the channel on which you wish change the operating frequency.
3. Press the [B] key, then enter the frequency number from the keypad.
CTCSS Operation
“CTCSS” is a selective calling system which uses a continuous, very-low-frequency tone that is filtered out so
as not to be heard. If many stations are using the same channel frequency, CTCSS will keep your radio’s
receiver squelched until a CTCSS tone is received matching the CTCSS tone you have selected for your
radio. If CTCSS is turned off, any signal received can open your radio’s squelch.
1. Activate the Programming mode.
2. Rotate the CH knob to select a channel on which you wish change the CTCSS configuration.
3. Press the [C] key, then enter the two-digit CTCSS Tone number from the keypad.
DCS and ARTS* Operation
“DCS” is similar in use to CTCSS, except DCS uses digital codes for more reliable operation. “ARTS” is a
transponder feature, available when DCS is engaged, which will alert two ARTS-equipped radios when an “Out
of Range” condition exists. The stations can then move to a better location to re-establish communications.
1. Activate the Programming mode.
2. Rotate the CH knob to select a channel on which you wish change the DCS configuration.
3. Press the [D] key.
4. If you wish to enable ARTS operation, press the [] key. If you wish to disable ARTS operation (DCS
operation only), press the [#] key.
5. Enter the three-digit DCS signaling number from the keypad.
RESETTING THE TRANSCEIVER
This procedure initializes the transceiver into its factory-default configuration (the settings installed before you
used if for the first time). In the event of erratic behavior, resetting the microprocessor may clear up any corrupt
date, often restoring normal operation. However, any customized settings will have to be re-programmed.
1. Turn the transceiver off.
2. Press and hold in the [A] and [D] keys while turning the transceiver on.
3. Press the MONI button to initialize the transceiver.
Page 2

Page 3

Manuel de Fonctionnement du
VX-246
UHF FM EMETTEUR-RÉCEPTEUR
Bouton CH
Indicateur LED
Bouton PTT
Bouton MONI
Zone d’utilisation
AUT BEL DNK FIN
FRA DEU GRC ISL
IRL ITA LIE LUX
NLD NOR PRT ESP
SWE CHE GBR
Loquet du Pack Batterie
NOTE IMPORTANTE
Lisez ce Manuel attentivement pour vous familiariser avec les caractéristiques de ce transceiver.
Ne tenez pas le transceiver de telle façon que l’antenne soit très proche (ou touche des parties exposées) du
corps, spécialement le visage ou les yeux, pendant l’émission. Le transceiver fonctionnera mieux si le microphone
est éloigné de 3 à 5 cm de la bouche et si le transceiver est vertical.
N’exposez pas le transceiver pendant de longues périodes au rayonnement direct du soleil, et ne le placez pas
près d’une source de chaleur.
Ne placez pas le transceiver dans des zones excessivement poussiéreuses, humides, ou mouillées, ni sur des
surfaces instables.
Ne modifiez pas ce transceiver pour aucune raison.
Ne faites effectuer la maintenance de cet appareil que par des techniciens qualifiés uniquement.
MISE EN PLACE ET RETRAIT DU PACK BATTERIE
Avec le Pack Batterie Cad-Ni FNB-64
Pour installer les accus, maintenez le transceiver avec vos
mains, les paumes sur le haut-parleur et les pouces au-dessus
du Clip ceinture. Insérez le pack batterie dans le compartiment
au dos de l’appareil tout en basculant le Clip ceinture vers
l’extérieur, puis fermez le loquet du pack batterie jusqu’à ce
qu’il se verrouille en place avec un “clic.”
Pour retirer les accus, éteignez l’appareil et ôtez si nécessaire la housse de protection. Déverrouillez le loquet du pack
batterie en dessous de l’appareil, puis glissez les accus vers le bas le bas et l’extérieur de l’appareil tout en basculant le
Clip ceinture doucement vers le haut.
Recharge des Accus
Installez le pack batterie Cad-Ni FNB-64 fourni dans le transceiver. Assurez-vous que le transceiver est éteint.
Branchez le chargeur NC-76 à une prise secteur.
Insérez le transceiver dans le chargeur NC-76; le jack antenne doit être du côté gauche quand on regarde le chargeur de
face.
Si le transceiver est inséré correctement dans le chargeur NC-76, le témoin ROUGE s’illuminera. Un pack entièrement
déchargé sera complètement rechargé en 15 heures.
Avec le Boîtier Pile FBA-25 optionnel
Le Boîtier Pile FBA-25 permet de faire fonctionner le VX-246 en utilisant six piles Alcalines de type “AA”.
Quand vous installez les piles, insérez les extrémités (–) en premier, puis pressez les extrémités (+) de telle façon que les piles
se mettent en place. Toujours remplacer les six piles à la fois.
Pour installer le Boîtier Pile dans le transceiver, suivez la même procédure que celle utilisée pour le Pack Batterie Cad-Ni,
décrite précédemment.
Note: le FBA-25 ne doit pas être utilisé avec des piles de type rechargeables.
VX-246 DÉFAULT
Canal Fréquence CTCSS/DCS
1 446.00625 MHz DCS (114
2 446.01875 MHz DCS (115
3 446.03125 MHz DCS (023
4 446.04375 MHz DCS (025
5 446.05625 MHz DCS (026
6 446.06875 MHz DCS (071
7 446.08125 MHz DCS (072
8 446.09375MHz DCS (073
9 446.00625MHz DCS (152
10 446.01875MHz DCS (155
11 446.03125MHz DCS (156
12 446.04375MHz DCS (162
13 446.05625MHz DCS (165
14 446.06875MHz DCS (205
15 446.08125MHz DCS (212
16 446.09375 MHz DCS (223
NUMÉRO DE FRÉQUENCE
Number Frequency
1 446.00625 MHz
2 446.01875 MHz
3 446.03125 MHz
4 446.04375 MHz
5 446.05625 MHz
6 446.06875 MHz
7 446.08125 MHz
8 446.09375 MHz
No. Ton Fréquence No. Ton Fréquence No. Ton Fréquence No. Ton Fréquence No. Ton Fréquence
)
01 67.0 Hz 09 91.5 Hz 17 118.8 Hz 25 156.7 Hz 33 210.7 Hz
)
02 71.9 Hz 10 94.8 Hz 18 123.0 Hz 26 162.2 Hz 34 218.1 Hz
)
03 74.4 Hz 11 97.4 Hz 19 127.3 Hz 27 167.9 Hz 35 225.7 Hz
)
04 77.0 Hz 12 100.0 Hz 20 131.8 Hz 28 173.8 Hz 36 233.6 Hz
)
05 79.7 Hz 13 103.5 Hz 21 136.5 Hz 29 179.9 Hz 37 241.8 Hz
)
06 82.5 Hz 14 107.2 Hz 22 141.3 Hz 30 186.2 Hz 38 250.3 Hz
)
07 85.4 Hz 15 110.9 Hz 23 146.2 Hz 31 192.8 Hz 00 CTCSS
)
08 88.5 Hz 16 114.8 Hz 24 151.4 Hz 32 203.5 Hz Off
)
)
)
No. Code No. Code No. Code No. Code No. Code No. Code No. Code No. Code No. Code
)
DCS DCS DCS DCS DCS DCS DCS DCS DCS DCS DCS DCS DCS DCS DCS DCS DCS DCS
)
001 023 013 071 025 143 037 225 049 266 061 356 073 452 085 532 097 703
)
002 025 014 072 026 145 038 226 050 271 062 364 074 454 086 546 098 712
)
003 026 015 073 027 152 039 243 051 274 063 365 075 455 087 565 099 723
)
004 031 016 074 028 155 040 244 052 306 064 371 076 462 088 606 100 731
005 032 017 114 029 156 041 245 053 311 065 411 077 464 089 612 101 732
006 036 018 115 030 162 042 246 054 315 066 421 078 465 090 624 102 734
007 043 019 116 031 165 043 251 055 325 067 413 079 466 091 627 103 743
008 047 020 122 032 172 044 252 056 331 068 423 080 503 092 631 104 754
009 051 021 125 033 174 045 255 057 332 069 431 081 506 093 632 000 DCS
010 053 022 131 034 205 046 261 058 343 070 432 082 516 094 654 Off
011 054 023 132 035 212 047 263 059 346 071 445 083 523 095 662
012 065 024 134 036 223 048 265 060 351 072 446 084 526 096 664
NUMÉRO D’IDENTIFICATION DES TONS CTCSS
NUMÉRO D’IDENTIFICATION DES CODES DCS
Commande VOL
Haut-parleur
Prise MIC/EAR
Microphone
Clavier
FONCTIONNEMENT
Fonctionnement de base
Allumez le transceiver en tournant la commande VOL dans le sens horaire hors du clic. Ensuite, ajustez la commande
VOL à mi-course (position 12 heure); plus tard vous pourrez ajuster le niveau pour l’adapter à l’environnement d’utilisation.
Tournez le bouton CH pour sélectionner un canal d’utilisation.
Pour transmettre, pressez le bouton PTT (Pressez-pour-Parler). Tenez le poste entre 3 et 5 cm de votre bouche, et parlez
d’une voix normale dans le microphone.
Note: pendant que vous transmettez, l’indicateur LED s’illuminera en rouge continuellement. Ne transmettez pas sur un
canal BUSY (occupé) lorsque l’indicateur LED clignote en vert; attendez que le canal soit libre (plus de clignotement vert
de la LED).
Pour mieux recevoir les stations faibles, désactivez le squelch momentanément en pressant et maintenant le bouton
MONI sur le côté de l’appareil pendant une seconde. Avec le squelch désactivé, l’indicateur LED clignotera en vert et le
bruit de fond et les stations faibles seront entendus. Pour rendre l’appareil silencieux de nouveau, pressez et maintenez le
bouton MONI pendant une seconde.
Quand votre communication est terminée, éteignez l’appareil en tournant la commande VOL à fond dans le sens anti-horaire
(jusqu’au clic).
Note: le VX-246 peut être programmé pour fonctionner en Paging DTMF (nécessite le Module Pager DTMF/brouilleur de
parole optionnel FVP-25), ainsi qu’en modes CTCSS et DCS. Chacun de ces modes permet différentes possibilités d’appel
sélectif. Référez-vous à la section “Programmation des Données de Canal” pour plus de détails.
FONCTIONNEMENT AVANCÉ
Avec/Sans Pager DTMF
Le mode Pager DTMF permet l’appel sélectif et “pager”, en utilisant une séquence de tons DTMF programmée par l’utilisateur.
Lorsque votre appareil est “pagé” par une station produisant une séquence de tons qui correspond à la vôtre, le squelch de
votre appareil s’ouvre.
Pour activer ou désactiver le Pager DTMF, pressez et maintenez la touche [A] pendant deux secondes;
Quand vous entendez un beep “grave” suivi d’un beep “aigu”, le Pager DTMF est activé.
Quand vous entendez un beep “aigu” suivi d’un beep “grave”, le Pager DTMF est désactivé.
Fonction sonnerie CTCSS/DCS
Quand cette fonction est activée, la sonnerie se déclenche lorsque qu’une station vous appelle et dont le transceiver envoie un
ton CTCSS ou un code DCS correspondant à celui enregistré dans votre appareil.
Pour activer ou désactiver la fonction sonnerie CTCSS/DCS, pressez et maintenez la touche [B] pendant deux secondes;
Quand vous entendez un beep “grave” suivi d’un beep “aigu”, la fonction sonnerie CTCSS/DCS est activée.
Quand vous entendez un beep “aigu” suivi d’un beep “grave”, la fonction sonnerie CTCSS/DCS est désactivée.
Brouilleur de parole
Lorsque le FVP-25 optionnel est installé, le VX-246 peut fonctionner en utilisant un brouilleur de parole pour la confidentialité
des communications.
Pour activer/désactiver la fonction brouilleur de parole, pressez et maintenez la touche [C] pendant deux secondes;
Quand vous entendez un beep “grave” suivi d’un beep “aigu”, la fonction brouilleur de parole est activée.
Quand vous entendez un beep “aigu” suivi d’un beep “grave”, la fonction brouilleur de parole est désactivée.
Verrouillage Clavier
Le clavier du VX-246 peut être verrouillé pour empêcher tout changement accidentel des réglages.
Pour verrouiller le clavier, pressez et maintenez la touche [D] pendant deux secondes;
Quand vous entendez un beep “grave” suivi d’un beep “aigu”, le clavier est verrouillé.
Quand vous entendez un beep “aigu” suivi d’un beep “grave”, le clavier est déverrouillé.
(nécessite le Module Pager DTMF/brouilleur de parole optionnel FVP-25)
(nécessite le Module Pager DTMF/brouilleur de parole optionnel FVP-25)
PROGRAMMATION DES DONNÉES DE CANAL
Pour activer le mode Programmation.
1. Eteignez l’appareil en tournant la commande VOL à fond dans le sens anti-horaire (jusqu’au clic).
2. Pressez et maintenez la touche [A
3. Pressez la touche de la fonction que vous souhaitez modifier, puis programmez le nouveau réglage selon la procédure
décrite ci-dessous.
4. Lorsque la programmation est terminée, éteignez l’appareil en tournant la commande VOL à fond dans le sens anti-horaire
(jusqu’au clic).
Paging DTMF
Programmation du Code ID
Votre identificateur (ID) est un code à trois digits que votre appareil enverra en mode PAGE.
1. Activez le mode Programmation.
2. Pressez la touche
3. Si vous souhaitez activer la fonction Paging Réponse Auto, pressez la touche []. Si vous souhaitez désactiver la fonction
Paging Réponse Auto, pressez la touche
4. Entrez le code à trois digits que vous voulez utiliser comme identificateur de votre appareil depuis le clavier.
Programmation du Code Paging DTMF
Le “Code Paging DTMF” est un code à trois digits des station que vous souhaitez "pager", que votre appareil enverra avec la
fonction Pager activée. Dix codes Paging différents peuvent être enregistrés dans le registre de Mémoire Paging, vous
permettant de “pager” dix stations différentes (ou groupes de stations).
1. Activez le mode Programmation.
2. Pressez la touche
clavier.
3. Entrez les trois digits du code Paging depuis le clavier.
[A]
[A]
]
; tout en la maintenant, allumez l’appareil.
.
[#]
.
, puis entrez le numéro de mémoire de Code Paging DTMF (“0” ~ “9”) à programmer depuis le
Fréquence du Canal
Vous pouvez changer la fréquence d’utilisation (parmi les huit fréquences de canal disponibles) du canal sélectionné par le bouton
CH. Cette fonction peut être utile si vous souhaitez changer l’ordre des fréquences sélectionnées par le bouton CH.
1. Activez le mode Programmation.
2. Tournez le bouton CH pour sélectionner le canal dont vous souhaitez changer la fréquence d’utilisation.
3. Pressez la touche
Fonction CTCSS
Le “CTCSS” est un système d’appel sélectif qui utilise une tonalité continue de très basse fréquence qui est filtrée pour ne pas être
entendue. Si plusieurs stations utilisent la même fréquence de canal, le CTCSS maintiendra fermé le squelch réception de votre
appareil jusqu’à ce qu’un ton CTCSS soit reçu et qu’il corresponde avec le ton CTCSS que vous avez programmé dans votre
appareil. Si la fonction CTCSS est désactivée, tout signal reçu pourra ouvrir le squelch de votre appareil.
1. Activez le mode Programmation.
2. Tournez le bouton CH pour sélectionner le canal dont vous souhaitez changer la configuration CTCSS.
3. Pressez la touche
[B]
, puis entrez le numéro de fréquence depuis le clavier.
[C]
, puis entrez les deux digits du numéro d’identification du ton CTCSS depuis le clavier.
Fonctions DCS et ARTS*
La fonction “DCS” est similaire en utilisation à la fonction CTCSS, excepté que la fonction DCS utilise des codes digitaux pour
plus de fiabilité. “ARTS” est une fonction transpondeur, disponible lorsque la fonction DCS est activée, qui alertera deux
appareils compatibles ARTS lorsqu’une condition “Hors de Portée” existera. Les opérateurs pourront alors se déplacer vers un
meilleur emplacement pour rétablir les communications.
1. Activez le mode Programmation.
2. Tournez le bouton CH pour sélectionner le canal dont vous souhaitez changer la configuration DCS.
3. Pressez la touche
4. Si vous souhaitez activer la fonction ARTS, pressez la touche []. Si vous souhaitez désactiver la fonction ARTS (fonction
DCS seulement), pressez la touche
5. Entrez les trois digits du numéro d’identification du code DCS depuis le clavier.
[D]
.
[#]
.
INITIALISATION DU TRANSCEIVER
Cette procédure rétablit le transceiver dans sa configuration usine par défaut (les réglages avant votre première utilisation).
Dans l’éventualité d’un comportement ératique, l’initialisation du microprocesseur supprimera les données altérées, et rétablira
un fonctionnement normal. Toutefois, tous les réglages personnalisés devront être de nouveau programmés.
1. Eteignez le transceiver.
2. Pressez et maintenez les touches
3. Pressez le bouton MONI pour initialiser le transceiver.
[A]
[D]
et
tout en rallumant le transceiver.
Page 4

Page 5

Lista delle aree autorizzate
AUT BEL DNK FIN
FRA DEU GRC ISL
IRL ITA LIE LUX
NLD NOR PRT ESP
SWE CHE GBR
Page 6

VERTEX STANDARD CO., LTD.
4-8-8 Nakameguro, Meguro-Ku, Tokyo 153-8644, Japan
VERTEX STANDARD
US Headquarters
10900 Walker Street, Cypress, CA 90630, U.S.A.
YAESU EUROPE B.V.
P.O. Box 75525, 1118 ZN Schiphol, The Netherlands
YAESU UK LTD.
Unit 12, Sun Valley Business Park, Winnall Close
Winchester, Hampshire, SO23 0LB, U.K.
VERTEX STANDARD HK LTD.
Unit 5, 20/F., Seaview Centre, 139-141 Hoi Bun Road,
Kwun Tong, Kowloon, Hong Kong
 Loading...