


Yaesu FT DX 9000 TFT OPERATION MANUAL
FTDX9000
TFT
OPERATION MANUAL
FTDX9000 TFT OPERATION MANUAL
PLEASE READ THIS FIRST
When turning on the transceiver for the first time, please set the local time as soon as possible. If this is not done, the various functions of the World Clock and Great Circle Map will not function correctly.
Note: If you wish to add a city to the City List that was programmed at the factory, you will need to supply your own USB or PS2 Keyboard. If you utilize one of the pre-loaded cities, a keyboard is not necessary.
You may also set up the local time for other locations, without a keyboard, using the cities that have been preloaded at the factory.
1. Powering Up the Transceiver
On the rear panel, move the Power switch to the “I” position to apply power from the power supply. The transceiver will not turn on yet, but power will now be supplied to the OCXO.
Hold in the front panel POWER switch to turn the transceiver on.
Note: The opening screen will appear on the TFT display, and the self-check function of the CPU inside the radio will begin. Then, the μ-Tuning circuitry will receive the data from the CPU, and it will perform its own self-check, and will preset itself to the proper settings for the current operating frequency.
While the μ-Tuning circuitry is obtaining the data, the drive mechanism will move from one end of its range to the other end (fast), and this will cause a temporary “motor” noise that can be heard; this, does not represent any trouble or problem.
When the radio is turned on for the first time, it takes about 50 seconds (from turning the radio on to completing the selfcheck) until the radio becomes ready to use; however, from the next time you turn it on, it will take around 10 seconds until the transceiver is ready for full operation.
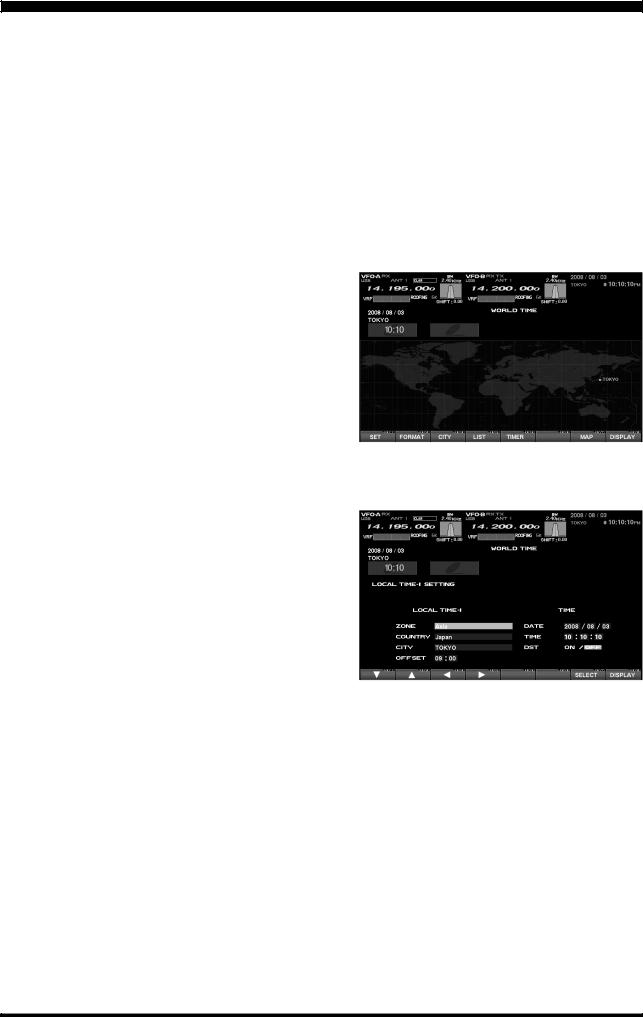
2. Local Time-1 Setup
On the TFT, there should be a World Map displayed; if the World Map does not appear, find the [DISP](Display) key below and to the right of the TFT; press this key as many times as required to get the World Map to display on the TFT.
Below the TFT, press the [F1](SET) key; the TFT should now show LOCAL TIME -1; this setting has been pre-set for Japanese time at the factory.
FTDX9000 TFT OPERATION MANUAL
PLEASE READ THIS FIRST
3. Changing the Location
(1) Using the World Map
To set the (highlighted) “ZONE,” press the [F7](SELECT) key to engage setting of the desired Time Zone. Use the [F1](T) ~ [F4](X) keys to choose the Time Zone, then press the [F7](SELECT) key once more.
The name of the country associated with the highlighted Time Zone may now be selected using the [F1](T) ~ [F4](X) keys. Press [F7](SELECT) when you have made your selection.
You may now choose one of the cities displayed in the same way. When you have made your choice, press the [F7](SELECT) key.
Press and hold in the [F7](SELECT) key for 2 seconds to exit. You’ll get a double beep, and now the new city is displayed on the world map.
Advice: Depending on the country, there may be only one city (or no cities) listed. In these instances, to modify the setting, please first select the city name on the list, even if you do not see the city you want on the list; you may modify the city name later.
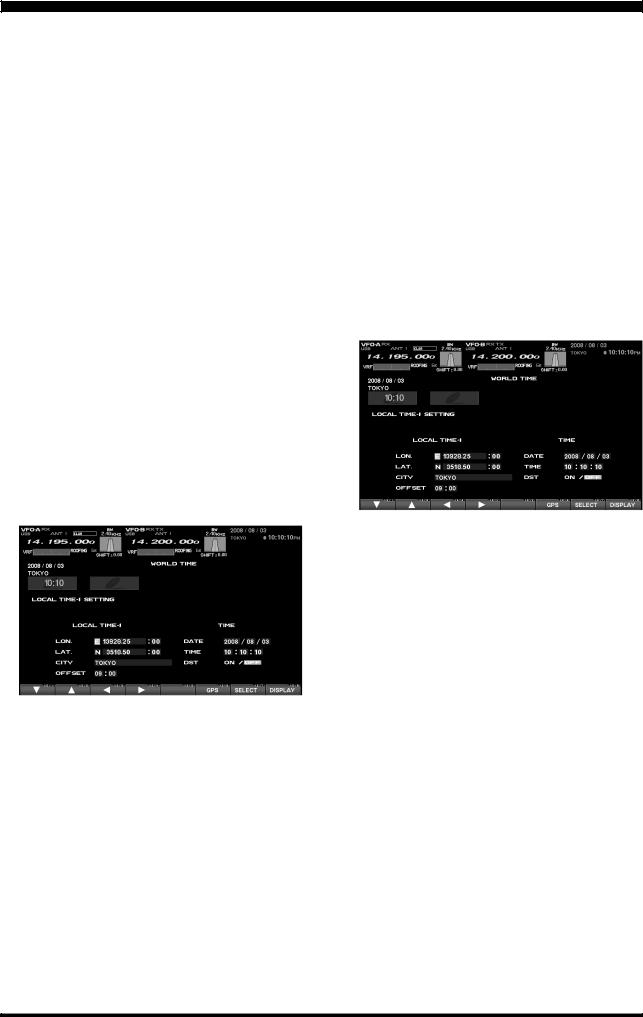
(2) Using the Longitude/Latitude Data
If you know a Longitude/Latitude of the your location, you may set the location from the Longitude/Latitude data.
Press the [F6](LON/LAT) key. The display changes as follows.
Press the [F7](SELECT) key, then enter the Longitude using the [F1](T) ~ [F4](X) keys. Use the [F3](W) and [F4](X) keys to navigate to each column, then use the [F1](T) and [F2](S) keys to select the desired numbers in each column.
Note: The Longitude data is input in decimal form. The seconds may also be input in sexagenary form. For example, if you want to input 138 degree 28 minutes 15 seconds,
1. Input “13828.00” by using [F1](T) ~ [F4](X)
keys.
2. Press [F4](X) key and move the cursor to the right side of the column.
3. Input “15.”
4. Press [F7](SELECT) key, and the numeric (second) will be converted to the decimal number and the Longitude input is completed.
When entry is complete, press the [F7](SELECT) key again.
Choose (highlight) “LAT” using the [F1](T) ~ [F4](X) keys, then press the [F7](SELECT) key.
Enter the Latitude in the same manner as described above.
When entry is complete, press the [F7](SELECT) key again.
Press and hold in the [F7](SELECT) key for 2 seconds to exit. You’ll get a double beep, and now the new city is displayed on the world map.
(3) Using the GPS Receiver
If you connect the GPS receiver (not supplied) to the COM jack on the rear panel, your location (Longitude/ Latitude) is set automatically.
Press the [F6](LON/LAT) key. The display will indicate the Longitude/Latitude of your location.
Press the [F5](GPS) key to re-read the GPS data.
Press and hold in the [F7](SELECT) key for 2 seconds to exit. You’ll get a double beep, and now the new city is displayed on the world map.
FTDX9000 TFT OPERATION MANUAL
PLEASE READ THIS FIRST
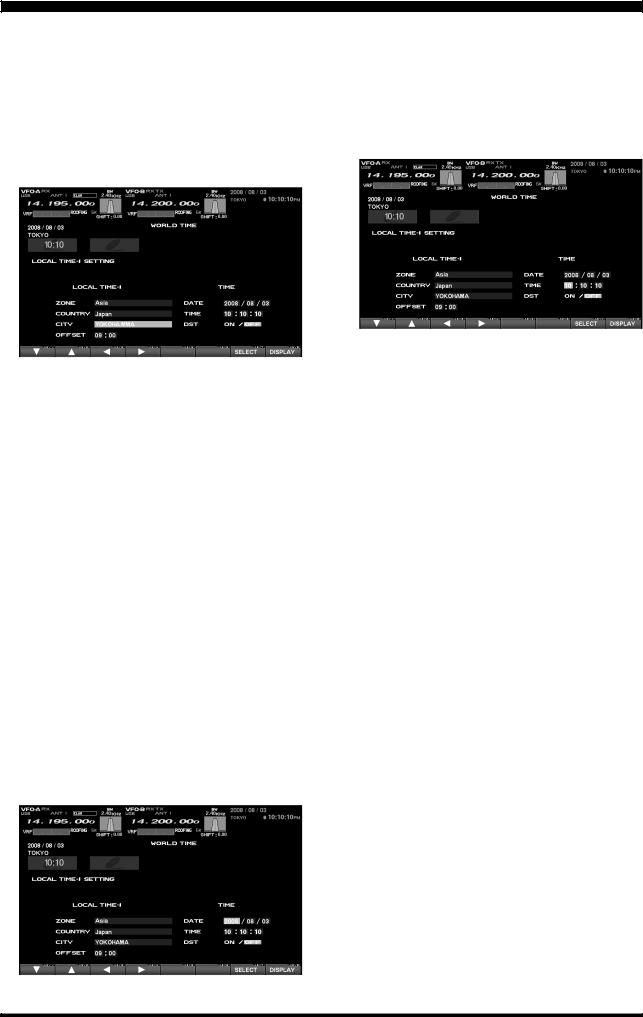
4. Changing the City Name
(Please connect a PS/2 or USB Keyboard (not supplied) to do manual entry of a city name. If you are not entering a new city name, please skip to step
(5) below).
Below the TFT, press the [F1](SET) key; the TFT should now show LOCAL TIME -1.
Use the [F1](T) or [F2](S) key and scroll down to the City name you wish to change.
Press the [F7](SELECT) key. The yellow highlight will be replaced with standard background color.
Now use the “Right Arrow” ON THE KEYBOARD (not below the TFT) to take the cursor to the right end of the city name, and then use the backspace button to completely erase the current city name, then enter the name of desired city. If entry of the city name is not successful with PS/2 (6-pin MiniDIN) Keyboard (no keyboard response), we recommend using a USB Keyboard on the DMU-9000 (Some PS/2 keyboards are NOT compatible with DMU computers).
When you have completed your input, press and hold in the [F7](SELECT) key for 2 seconds to exit. You’ll get a double beep, and now the new city is displayed on the world map.
5. Correcting the Date
Press the [F1](SET) key.
Use the [F1](T) and [F2](S) keys to highlight “DATE,” then press the [F7](SELECT) key.
Use the [F3](W) and [F4](X) keys to navigate to each column of the date, then use the [F1](T) and [F2](S) keys to select the desired numbers in each column. Repeat for each column, to complete the date.
When entry is complete, press the [F7](SELECT) key.
6. Time Setting
Press the [F1](T) and [F2](S) keys to highlight “TIME,” then press the [F7](SELECT) key to enter the time entry mode.
Use the [F3](W) and [F4](X) keys to navigate to the desired column in the date, then use the [F1](T) and [F2](S) keys to select the desired number in each column. Time is entered in 24-hour format.
When entry is complete, press the [F7](SELECT) key.
7. Setting up Daylight Saving Time
Once you have selected the city to be utilized, use the [F1](T) and [F2](S) keys to highlight DST (DAYLIGHT SAVING TIME).
Use the [F3](W) and [F4](X) keys to choose ON or OFF.
8. Saving and Closing
When you have completed all the above entries to your satisfaction, press and hold in the [F7](SELECT) key for two seconds to save all the new settings. The chosen city and time zone will appear on the World Map page.
FTDX9000 TFT OPERATION MANUAL

PLEASE READ THIS FIRST
9. Local Time-2 Setup
It is possible to display the local time of the desired city on the World Map screen as the Local Time-2.
Press the [F3](CITY) key while the World Map is displayed, and the TFT will show the “Area Selection” screen.
Press the [F1](T), [F2](S), [F3](W), [F4](X) keys to select the time zone in which the desired city is located.
Confirm that the desired area is highlighted, and press the [F7](SELECT) key momentarily. Now the country list for the selected zone will be displayed.
Use the [F1](T), [F2](S), [F3](W), [F4](X) keys to select the desired country in this area.
Now press the [F7](SELECT) key momentarily, and you will see the list of the city names in the country selected.
Press the [F1](T), [F2](S), [F3](W), [F4](X) key to select the desired city. Even if the city displayed is the only one in the country, select it anyway.
Press the [F7](SELECT) key momentarily, and the country name and the city you selected in the above procedure will be indicated. If you want to input a city name which is not in the list, press the [F7](SELECT) key and confirm that the city name is highlighted. Then, enter the city name you want.
Use the [F1](T), [F2](S), [F3](W), [F4](X) keys to set DAYLIGHT SAVING TIME (Summer Time), DISPLAY MAP (display or not display city names on the World Map screen), or HIGHLIGHT (highlighted indication (yellow) or normal (white)).
When finished, press and hold in the [F7](SELECT) key for 2 seconds to exit. The local time of the selected city will show on the Local Time-2 Field of the World Map screen. You may add up to 9 cities and local times by repeating the above procedure.
Note: The [F1](SET) key is only used when setting the city name and local time. If you make a mistake, press the [F7](SELECT) key momentarily. Pressing the [F7](SELECT) key for two seconds will return you to the World Map screen.
FTDX9000 TFT OPERATION MANUAL
BEFORE USING THE TFT DISPLAY
OPERATION OF THE TFT SCREEN
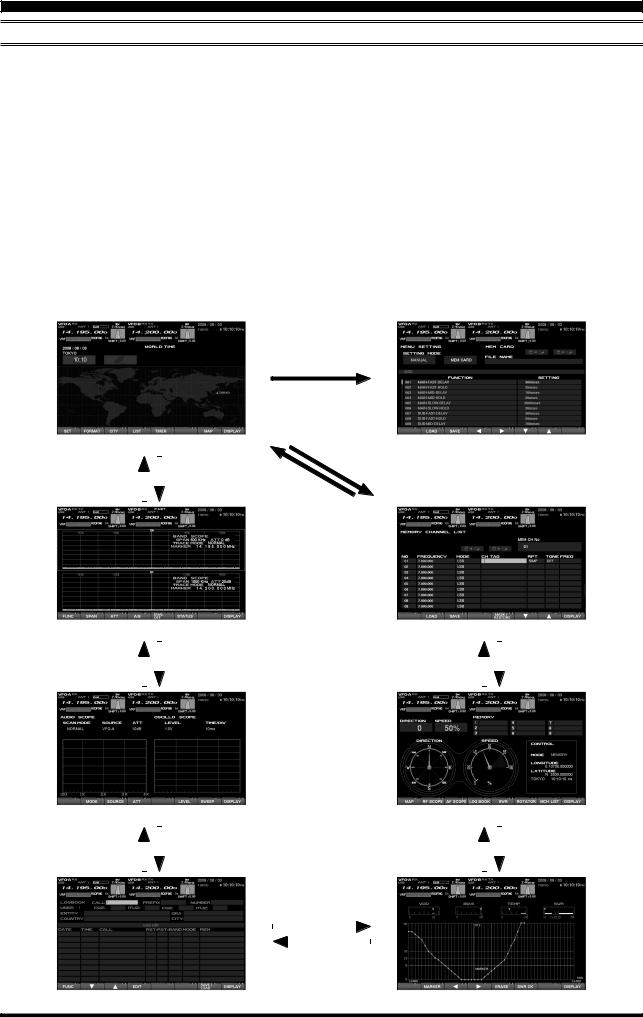
This TFT screen can show any of 8 different display options, described on the following pages. These are: World Clock, Spectrum Scope, Audio Scope/Oscilloscope, Log Book, Thermal Indication/SWR display, Great-Circle Map/Rotator Control, and the Memory Channel list. Also, the Menu will appear on the TFT, if engaged. To move to the desired screen, use the [DISP](DISPLAY) key, located at the right low end of the screen.
When the [DISP](DISPLAY) key is pressed momentarily, the screen changes, one by one, to the next consecutive.
If the [DISP](DISPLAY) key is pressed for 2 seconds, the screen goes back to the previous screen.
If you do not want to change the setting, or if you wish to suspend the setting procedure, press the [DISP](DISPLAY) key. Any changes you started will not be saved, and the screen will move forward to the next display.
On each screen, the action of the function key may vary. At the bottom area of the screen, the function is indicated; please confirm the function displayed as you read along.
You may omit (skip) one or more screens from the screen selection loop for faster recall of your favorite screen, if desired. See the box on the next page for “My Screen” Setup.
Press the [MNU] button
|
|
|
|
|
|
|
|
|
|
|
Press and hold in the |
|
||
|
|
|
|
|
|
|
|
|
|
[ |
( |
)] |
button |
|
|
|
|
“WORLD CLOCK” Screen |
|
|
DISP DISPLAY |
|
“MENU LIST” Screen |
||||||
|
|
|
|
|
|
|
|
|||||||
|
Press and hold in the |
|
|
Press the |
|
|
|
|
|
|
||||
|
|
|
|
|
|
|
|
|
||||||
|
|
|
|
|
|
|
|
|||||||
[ |
( |
DISPLAY |
)] |
button |
|
|
[ |
( |
)] |
button |
|
|
|
|
|
DISP |
|
|
|
|
DISP DISPLAY |
|
|
|
|
||||
|
|
|
|
|
|
|
|
|
|
|
Press the |
|
|
|
|
|
|
|
|
|
|
|
|
|
|
|
|
||
|
|
|
|
|
|
|
|
|
|
[ |
( |
)] |
button |
|
|
|
|
|
|
|
|
|
|
|
|
DISP DISPLAY |
|
|
|
|
|
“SPECTRUM SCOPE” Screen |
|
|
|
“MEMORY CHANNEL LIST” Screen |
|
|
||||||||||||
|
Press and hold in the |
|
|
Press the |
|
|
|
Press the |
|
|
Press and hold in the |
|||||||||
|
|
|
|
|
|
|
|
|||||||||||||
|
|
|
|
|
|
|||||||||||||||
[ |
( |
DISPLAY |
)] |
button |
|
|
[ |
( |
)] |
button |
[ |
( |
)] |
button |
|
|
[ |
( |
)] |
button |
|
DISP |
|
|
|
|
DISP DISPLAY |
|
|
DISP DISPLAY |
|
|
|
|
DISP DISPLAY |
|
|||||
|
|
|
|
|
|
|
|
|
|
|
|
|
|
|
|
|
|
|
|
|
“AUDIO SCOPE/OSCILLO SCOPE” Screen |
|
|
|
|
|
|
“ROTATOR CONTROL” Screen |
||||||
Press and hold in the |
|
|
Press the |
|
|
|
|
|
|
Press the |
|
|
Press and hold in the |
|
|
|
|
|
|
|
|
|
|
||||
|
|
|
|
|
|
||||||||
[DISP(DISPLAY)] button |
|
|
[DISP(DISPLAY)] button |
|
[DISP(DISPLAY)] button |
|
|
[DISP(DISPLAY)] button |
|||||
|
|
|
|
|
|
Press the |
|
|
|
|
|
|
|
|
|
|
|
|
|
|
|
|
|
|
|
||
|
|
|
[ |
( |
)] |
button |
|
||||||
|
|
|
|
DISP DISPLAY |
|
|
|||||||
|
|
|
|
|
|
|
|
|
|
|
|
||
|
|
|
|
Press and hold in the |
|
||||||||
|
|
|
[DISP(DISPLAY)] button |
|
|||||||||
“LOG BOOK” Screen |
|
|
|
|
|
|
“SWR MONITOR” Screen |
||||||
Page 2 |
FTDX9000 TFT OPERATION MANUAL |
BEFORE USING THE TFT DISPLAY
OPERATION OF THE TFT SCREEN
“MY Screen” Setup
1. |
Press the [MNU] key to enter the Menu mode. |
Note: The “ON” command sets the selected |
||||||
2. |
[ |
] |
screen to be skipped, while the “OFF” com- |
|||||
Rotate the |
Main Tuning Dial knob to select |
|||||||
|
Menu item DISPLAY “021: MY SCREEN”. |
mand sets the selected screen to be included |
||||||
3. |
Rotate the [CLAR/VFO-B] knob to choose a |
in the screen selection loop. |
||||||
|
screen you wish to omit (skip) from the screen |
6. Press and hold in the |
[ |
] |
||||
|
|
MNU key for two sec- |
||||||
|
selection loop. |
onds to store the new number and exit to nor- |
||||||
4. |
Press the [ENT] key to set the omission com- |
mal operation. |
|
|
||||
|
mand to “ON”. |
You may want to select more than one screen while |
||||||
5. |
Repeat steps 3 and 4 to select/deselect as |
|||||||
in “My Screen”. If you select only one screen, you |
||||||||
|
many screens as you like. |
|||||||
|
will not be able to call any other screens when you |
|||||||
|
|
|
||||||
|
|
|
press the |
[ |
]( |
|
) |
|
|
|
|
|
DISP DISPLAY key. |
||||
MENU MODE OPERATION
If you want to change a configuration setting of this radio, you are able to display the Menu mode on the TFT screen, so you can change it efficiently. In order to enter the “Menu” mode, press the [MNU] key momentarily; the Menu screen will now appear on the screen. By rotating the Main Tuning knob, you can move to the desired item you want to change now you can choose the revised setting by rotating the CLAR/ VFO-B knob. It is also possible to move the Menu items and values by pressing the function keys located below the TFT screen. For details, please refer to “How to Use the Menu Mode.”
When you have completed the changes to the Menu item(s), press and hold in the [MNU] key for 2 seconds; the setting(s) will now be saved. If you do not want to save the new setting, press the [MNU] key momentarily; the radio will revert to its previous condition.
There are 176 items in the Menu mode, and they are grouped; the group name is displayed at the left top of the list screen. It will be convenient for you if you initially select the group, by rotating the Main Tuning knob, and then select the item you want.
The groups are as follows.
1.AGC:
2.DISPLAY:
3.FH-2:
4.GENERAL:
5.MODE-AM,MODE-CW,MODE-DATA,MODE-DM, MODE-PKT, MODE-RTTY, MODE-SSB
6.RX AUDIO:
7.RX DSP: RX Filter bandwidth and shaping
8.SCOPE: Setup of the starting frequency for the Spectrum Scope
9.TUNING: Setup of the Dial steps
10.TX AUDIO: Setup of the Parametric Equalizer
11. TX GNRL:Setup of the
For detailed information regarding the Menu mode, please see the “How to Use the Menu Mode” section of this manual, and the operation manual of the radio.
MENU MODERESET
It is possible to reset (only) the Menu mode settings back to their factory default. Do this if you want to clear all settings out, and start fresh with the original values.
1.Turn off the radio.
2.Turn the radio on while pressing and holding in the [MNU] key.
FTDX9000 TFT OPERATION MANUAL |
Page 3 |
BEFORE USING THE TFT DISPLAY
 Main (VFO-A) & Sub (VFO-B) Fields
These areas of the TFT contain information about the status of the Main (VFO-A) and Sub (VFO-B) VFOs.
 MODE Fields
These fields indicate the operating mode in use on the above VFOs.
 TX Frequency/Clarifier/ Antenna Selection Fields
These notations advise which VFO is being used for transmission, status of the Clarifier, and a notation of which antenna has been selected on that VFO.
 Filter Fields
These fields note the offset status for the Tuning or VRF filters, as well as the Roofing filter selection, for each VFO.
 Filter Shift Fields
These fields graphically depict the positions of the DSP RX filters for the Main and Sub VFOs, indicating any “IF Shift” or “Width” tuning changes applied.
 Bandwidth Fields
This field indicates the net receiver bandwidth currently set for the Main (VFO-A) and Sub (VFO-B) VFOs.
 Date Field
The current date is displayed here.
 Local Time-1 Field
The current time at your location (Local Time-1) is displayed here.
 GPS Field
If you have connected an after-market GPS unit (one providing NMEA location data) to the rear panel of the transceiver, “ ” icon (Base color is white) will appear here. When display the your location on a World Map with the GPS data, a base color of the “
 ” icon turns into yellow.
 Local Time-2 Field
The Local Time-2 time, as programmed, will appear here.
 Timer Field
When the On Timer has been engaged, “TIMER” will appear here; when the Alarm has been engaged, “ALARM” will appear in this field.
Page 4 |
FTDX9000 TFT OPERATION MANUAL |
BEFORE USING THE TFT DISPLAY
 Local Time-1 Field
The current time at your location (Local Time-1) is displayed here.
 Local Time-2 Field
The Local Time-2 time, as programmed, will appear here.
 World Time Field
This area shows the current time at the city selected on the World Map display.
 TFT Display Pages
Individual pages are provided for a wide variety of information or command purposes. Included are the World Map page, Spectrum Scope page, Audio Scope/Oscilloscope page, TX PA Temperature/SWR page, Direction finding/Rotator Control Page, Log Book Page, Memory Channel page, and the Menu page.
FTDX9000 TFT OPERATION MANUAL |
Page 5 |

TABLE OF CONTENTS |
|
Before Using the TFT Display ....................................................................................................................... |
2 |
How to Use the World Clock function .......................................................................................................... |
7 |
About the World Clock ................................................................................................................................ |
7 |
Explanation of the Function Keys on the World Map Screen ....................................................................... |
7 |
SET (LOCAL-TIME1) Setup ......................................................................................................................... |
8 |
FORMAT (TIME FORMAT) Setup ................................................................................................................ |
8 |
City Selection ............................................................................................................................................. |
9 |
Miscellaneous World Clock Setup Options ................................................................................................ |
10 |
OFF Timer and Alarm Setup ....................................................................................................................... |
11 |
Spectrum Scope ........................................................................................................................................... |
12 |
About the Spectrum Scope ........................................................................................................................ |
12 |
Explanation of the Function Keys on the Spectrum Scope Screen ............................................................. |
12 |
Using the CTR (Center) Display Mode ........................................................................................................ |
14 |
Using the LBWS (Limited Band Width Sweep) Function ............................................................................ |
16 |
Using the FIX (Fixed) Mode ........................................................................................................................ |
17 |
Audio Scope/Oscilloscope ........................................................................................................................... |
18 |
About the Audio Scope/Oscilloscope ......................................................................................................... |
18 |
Explanation of the Function Keys on the Audio Scope and Oscilloscope Screen ....................................... |
18 |
Using the Audio Scope ............................................................................................................................... |
19 |
Audio Scope Specifications ........................................................................................................................ |
19 |
Using the Oscilloscope .............................................................................................................................. |
20 |
Oscilloscope Specifications ....................................................................................................................... |
20 |
Log Book Function ....................................................................................................................................... |
22 |
About the Log Book ................................................................................................................................... |
22 |
Explanation of the Function Keys on the Log Book Screen ........................................................................ |
22 |
Log Book Example ..................................................................................................................................... |
23 |
CONFIG Setting ......................................................................................................................................... |
24 |
CONFIG SETTING Mode Setup .................................................................................................................. |
25 |
Log Book Data Input .................................................................................................................................. |
26 |
Log Book Previous-QSO Check (CHECK) .................................................................................................. |
27 |
Editing Log Book Entries............................................................................................................................ |
27 |
Saving Log Book ........................................................................................................................................ |
28 |
Loading Log Data (LOAD) .......................................................................................................................... |
28 |
Summary Check ........................................................................................................................................ |
29 |
Temperature/SWR Indication ...................................................................................................................... |
30 |
About the Temperature/SWR Indication ...................................................................................................... |
30 |
Explanation of the Function Keys on the Temperature/SWR Indication Screen ........................................... |
30 |
Graphic Meter Display................................................................................................................................ |
31 |
Swept SWR Display .................................................................................................................................. |
31 |
Using the Marker on the SWR Graph ......................................................................................................... |
32 |
Great Circle Map/Rotator Control Function ................................................................................................ |
34 |
About the Great Circle Map/Rotator Control Function Screen ..................................................................... |
34 |
Explanation of the Function Keys on the Great Circle Map/Rotator Control Function Screen ...................... |
34 |
Manual Mode ............................................................................................................................................. |
36 |
Preset Mode .............................................................................................................................................. |
37 |
Memory Mode ............................................................................................................................................ |
38 |
Using the Memory Channel List .................................................................................................................. |
39 |
About the Memory Channel List ................................................................................................................. |
39 |
Explanation of the Function Keys on the Memory Channel List Screen ...................................................... |
39 |
Erasing a Memory Channel/Restoring an Erased Memory Channel ............................................................ |
40 |
Saving Memory Data .................................................................................................................................. |
40 |
Loading Memory Data ................................................................................................................................ |
41 |
Using the MENU Mode .................................................................................................................................. |
42 |
About the MENU Mode .............................................................................................................................. |
42 |
Menu Mode Reset ................................................................................................................................. |
42 |
Explanation of the Function Keys on the Menu Mode Screen ..................................................................... |
43 |
Memu Mode Configuration Changes ........................................................................................................... |
44 |
Saving Menu Configuration Data ................................................................................................................. |
45 |
Loading Menu Data .................................................................................................................................... |
46 |
Page 6 |
FTDX9000 TFT OPERATION MANUAL |
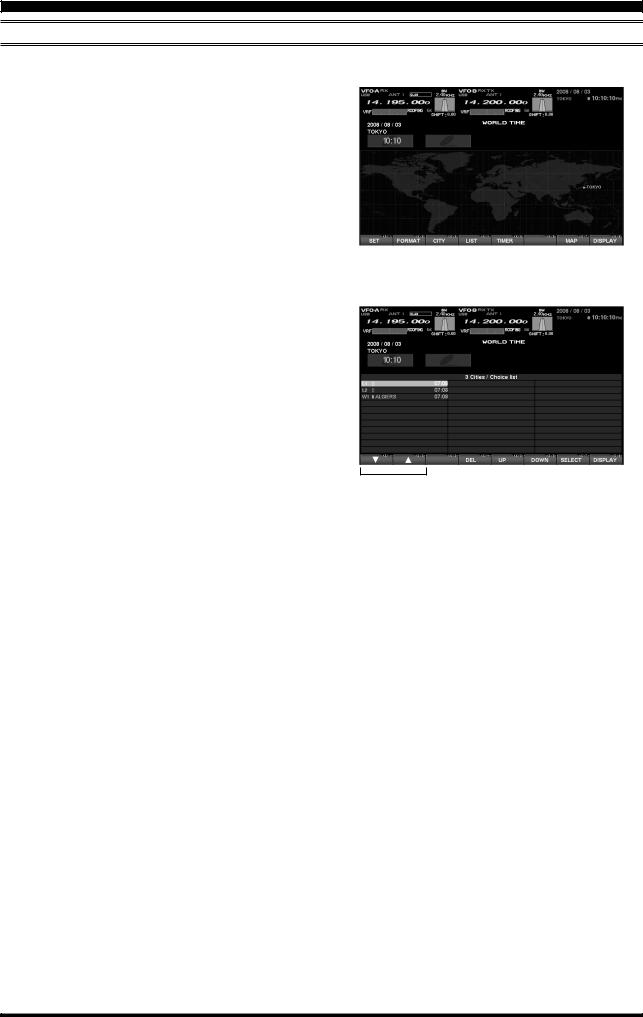
HOW TO USE THE WORLD CLOCK
ABOUT THE WORLD CLOCK
The World Clock displays the time in various countries, and the day/night areas are also indicated on the map, including the Grey Line near the terminator. The difference between the daylight areas in the Southern and Northern Hemispheres is displayed correctly, and is updated in real time. For DX hunting, this can be a very important and convenient tool for specific long distance HF QSOs, for example, as you can target the time the other station might have access to, say, the 80-meter band, enabling you to complete a QSO. In addition, an alarm is provided which beeps with respect to a designated area at a designated time, and the auto-off timer can also be
matched to any desired area you stipulate.
Note: When you turn on the transceiver for the first time after your purchasing this radio, please set the local time (the place where you operate this radio), and confirm this setting. If this is not done, the various functions of the World clock and Great Circle map will not function correctly. Regarding the setting of the Local time, please see the “PLEASE READ THIS FIRST” information.
If the World Map does not initially appear, press the [DISP](DISPLAY) key (momentarily) as many times as necessary to display the World Map screen.
EXPLANATION OF THE FUNCTION KEYS ON THE WORLD MAP SCREEN
c d e f g |
h i |
c [F1](SET)
Selects the LOCAL TIME-1 setup screen.
g[F5](TIMER)
Selects the TIMER setup screen.
d [F2](FORMAT)
Selects 12-hour or 24-hour time format.
e [F3](CITY)
Selects the World Map for City selection.
f[F4](LIST)
Displays the City setup list.
h[F7](MAP)
This lets you select between the World Map regular screen and the map that includes Daylight/Darkness display.
i[DISP](DISPLAY)
Press this key to switch the TFT to the “SPECTRUM SCOPE” screen.
Press and hold in this key to switch the TFT to the
“MEMORY CHANNEL LIST” screen.
FTDX9000 TFT OPERATION MANUAL |
Page 7 |

HOW TO USE THE WORLD CLOCK
SET (LOCAL-TIME1) SETUP
Please see the “PLEASE READ THIS FIRST” information.
FORMAT (TIME FORMAT) SETUP
This procedure lets you choose between 12-hour and24-hour time display format.
1.While the World Map is displayed, press [F2](FORMAT) key to select TIME FORMAT.
2.Press the [F1](T), [F2](S), [F3](W), [F4](X) key, and select 12-hour or 24-hour display for LOCALTIME1, CLOCAL-TIME2, and the WORLD CITY LIST.
When SEC is set to “ON”, the “seconds” digits will be shown at the top right corner of the TFT screen, in the Local Time indication area.
Advice: If you press [F6](SECADJ) key, the “seconds” indication will reset to “00.” Use this to sunc your clock to a time standard such as WWV.
3.When all settings are complete, press and hold in [F7](SELECT) key for 2 seconds to exit.
Ï |
Ø |
“TIME FORMAT” Select |
|
Ï |
|
|
“SELECT” Keys |
Set to “00” Second |
Page 8 |
FTDX9000 TFT OPERATION MANUAL |
HOW TO USE THE WORLD CLOCK
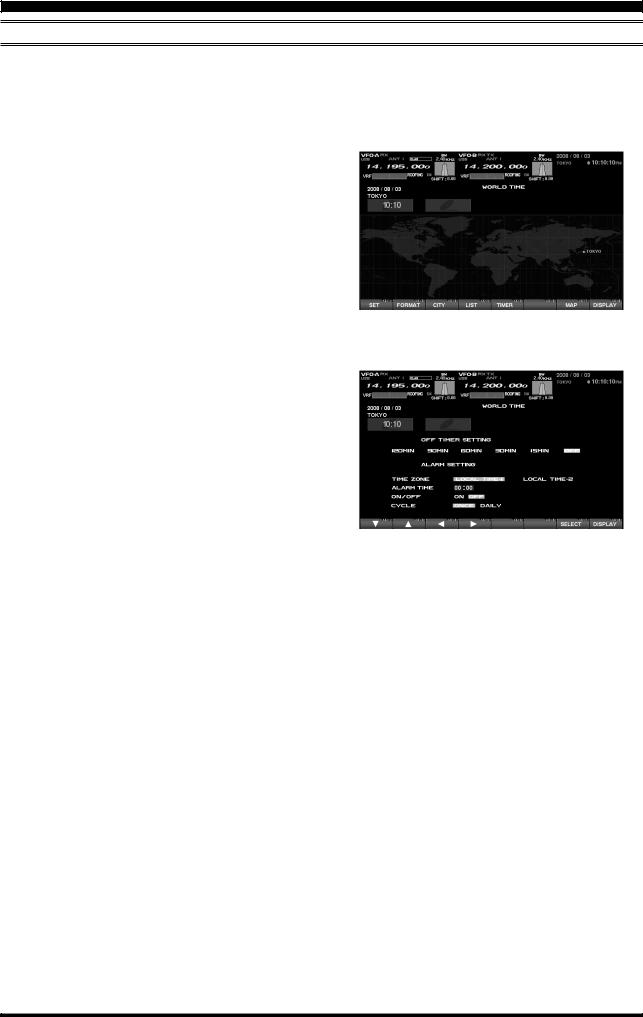
CITY SELECTION
It is possible to enter up to a total of 11 cities in the register. All cities in the register will be displayed on the World Clock screen.
Advice: The order of the display of the cities can be changed later; for now, please just select one of the supplied city names.
There may only be one city shown in some countries; however, it is possible to add cities, if desired.
If you wish to add a city to the City List that was programmed at the factory, you will need to supply your own USB or PS/2 Keyboard. If you utilize one of the pre-loaded cities, a keyboard is not necessary.
1.Press the [F3](CITY) key while the World Map is displayed, and the TFT will show the “Area Selection” screen.
2.Press the [F1](T), [F2](S), [F3](W), [F4](X) keys to select the time zone in which the desired city is located.
3.Confirm that the desired area is highlighted, and press the [F7](SELECT) key momentarily. Now the country list for the selected zone will be displayed.
4.Use the [F1](T), [F2](S), [F3](W), [F4](X) keys to select the desired country in this area.
5.Now press the [F7](SELECT) key momentarily, and you will see the list of the city names in the country selected.
6.Press the [F1](T), [F2](S), [F3](W), [F4](X) key to select the desired city. Even if the city displayed is the only one in the country, select it anyway.
7.Once you have pressed the [F7](SELECT) key momentarily, the selected country name and the city name will be indicated, thanks to the procedure mentioned above. If you want to input a city name which is not in the list, press the [F7](SELECT) key after confirming that the city name is highlighted. Then, enter the city name you want.
8.Press the [F1](T), [F2](S), [F3](W), [F4](X) key to set DAYLIGHT SAVING TIME (Summer Time), DISPLAY MAP (display or not display city names on the World Clock screen), or HIGHLIGHT (select highlighted indication (yellow) or normal (white) indication).
9.When finished, press and hold in the [F7](SELECT) key for 2 seconds to exit.
“AREA SELECTION” SCREEN Ø
“COUNTRY SELECTION” SCREEN Ø
FTDX9000 TFT OPERATION MANUAL |
Page 9 |
HOW TO USE THE WORLD CLOCK
MISCELLANEOUS WORLD CLOCK SETUP OPTIONS
It is possible to change the order of selection of the city times, as well as the display color, etc.
1. On the World Map Screen, press the [F4](LIST) key to select the “City Name List” screen.
2. If you want to change the order of the city times as indicated at the middle of the TFT screen, press the [F1](T) or [F2](S) keys to move the cursor to the city name you want to change the position of. When the [F6](DOWN) key is pressed, the position goes downward. If you need to move it further, repeat as necessary.
3.If you want to change other settings of a city, select the city name by pressing the [F1](q) or [F2](p) keys to highlight the city, then press the [F7](SELECT) key momentarily. Now the screen will change to the city setup screen, where the following settings can be done: DAYLIGHT SAVING TIME (to select Summer time), DISPLAY MAP (display or not display city names on the World Clock screen), and HIGHLIGHT (select yellow or white highlighting indication for cities).
4.If you want to delete a city from the World Clock screen, move the cursor to the city name by pressing the [F1](T) or [F2](S) keys , then press the [F4](DEL) key.
5.When finished, press and hold in [F7](SELECT) for 2 seconds to exit.
Advice: On the DISPLAY MAP setting, if the city name indication is selected, the city name will be displayed on the World Map. When “NO” is selected, the city name will not be displayed, and only the city name and the current time is indicated at the middle of the TFT screen.
For the HIGHLIGHT setting (city name: highlighted or not highlighted), if “Highlight” (YES) is selected, the city name on the world map will be shown in yellow font color.
If “NOT Highlighted” (NO) is selected, the city name will be indicated in white.
Ï
“LIST” SelectØ
Ï
“SELECT” Keys “DELETE” Key
Page 10 |
FTDX9000 TFT OPERATION MANUAL |
HOW TO USE THE WORLD CLOCK
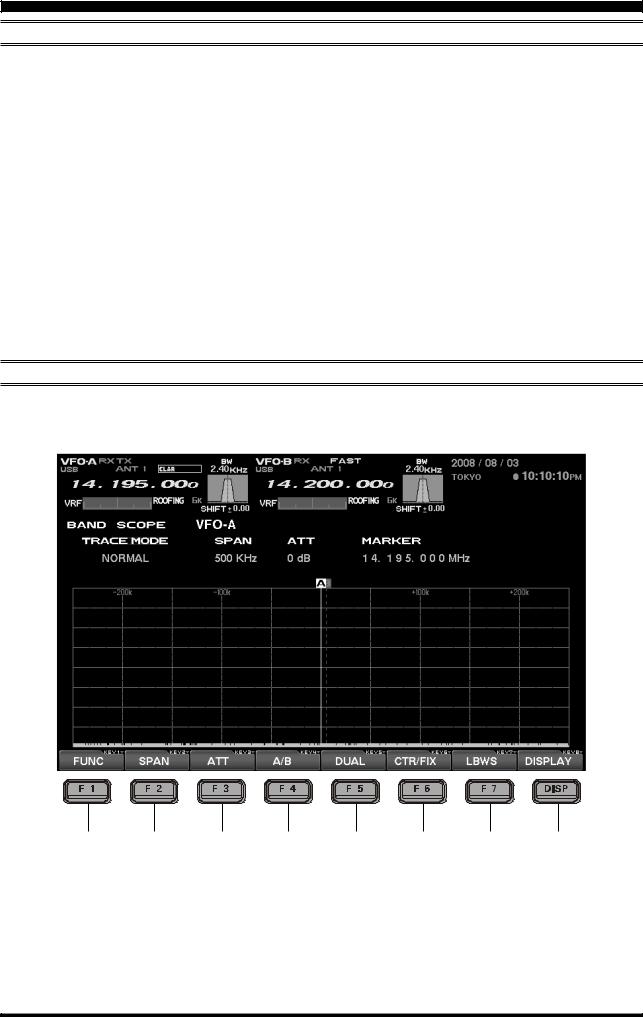
OFF TIMER AND ALARM SETUP
It is easy to set the OFF Timer and Alarm times.
As to the OFF TIMEER, countdown intervals of 120/90/60/30/15 minutes, and OFF, can be selected.
For the alarm setting, it is possible to choose either LOCAL-TIME1 or LOCAL-TIME2, set the alarm time, set the Alarm ON or OFF, and/or sound the alarm one time only or every day.
1.On the World Map screen, press the [F5](TIMER) key to move to the OFF TIMER and ALARM setup screen.
2.Press the [F1](T), [F2](S), [F3](W), [F4](X) key to move the cursor to the desired setup item; the selected item will be highlighted.
OFF TIMER setup:
120/90/60/30/15 minutes, and OFF ALARM setup:
(When setting up the Alarm, be sure to set the OFF TIMER setting to OFF!)
TIME ZONE (LOCAL TIME-1/LOCAL TIME-2) ALARM TIME
ALARM ON/OFF CYCLE (ONCE/DAILY)
3.Press and hold in [F7](SELECT) key for 2 seconds to close and exit.
Advice: When the OFF timer is engaged (power is shut off), the condition of the radio is the same as if the power switch on the front panel has been turned off. The Main power (circuit breaker) is not turned off. Therefore, power to the OCXO will be Maintained, retaining the high frequency stability.
The Alarm will ring for around 60 seconds. If you want to stop the alarm, press any of the keys located on the front panel.
Ï
Ø“TIMER” Select
OFF TIMER AND ALARM SETUP PAGE
FTDX9000 TFT OPERATION MANUAL |
Page 11 |
SPECTRUM SCOPE
ABOUT THE SPECTRUM SCOPE
This page displays the Spectrum Scope which is convenient for monitoring band activity.
The entire screen will become the spectrum display, and you can see both strong and weak signals clearly and easily. Not only the Main (VFO-A) is shown, but the spectrum of the Sub (VFO-B) side can be also switched in and displayed simultaneously.
Besides simultaneous display of the Main (VFO-A) and Sub (VFO-B) spectra, the LBWS function allow you to realize very high-speed signal detection over a limited band segment. The CTR mode let you monitor close by your current frequency (your frequency is located at the center of the screen), and the FIX mode can also be engaged, whereby the left edge frequency is fixed. These features have been carefully considered for their utility in actual Amateur Ra-
dio operation.
If the Spectrum Scope is not currently displayed, press the [DISP](DISPLAY) key momentarily as many times as needed to bring up the Spectrum Scope display screen.
Advice: The Spectrum Scope function of the FTDX9000 is a very intelligent capability, and it includes a wide array functions; if you lose your way during operation of this function, press the [DISP](DISPLAY) key momentarily to change the screen, and then return again to the Spectrum Scope screen.
Quick Point: The vertical axis of the Spectrum Scope is 10 dB per division.
During transmission, the transmitter’s waveform will be displayed.
EXPLANATION OF THE FUNCTION KEYS ON THE SPECTRUM SCOPE SCREEN
Below you will find the explanation of the function keys utilized while the Spectrum Scope is displayed. Depending on the individual screen in use, the functions of the function keys located just below the TFT screen varies. Please confirm the function displayed on the screen during operation.
c d e f
c [F1](FUNC)
Moves you to the function screen of the Spectrum Scope used for setup of the MKR (Marker) function, etc.
Advice: On this screen, the functions assigned to the function keys can be changed. If you want to go back to the previous screen, press the [F7](EXIT) key.
g h i j
d[F2](SPAN) “Bandwidth”
By pressing this key momentarily, it is possible to set the range of frequencies from the left edge to the right edge. If the setting is toggled to 2500 kHz, and you press this key once more, the span returns to 25 kHz again. At the top of the screen, the current span is indicated below the span indication.
Page 12 |
FTDX9000 TFT OPERATION MANUAL |
 Loading...