

Page 1

Version 1.0
November 2020
702P08367
Xerox
®
Versant
®
Quick Start Guide
280 Press
Page 2

© 2020 Xerox Corporation. All rights reserved. Xerox®, Xerox and Design®, and Versant®are trademarks of Xerox
Corporation in the United States and/or other countries.
®
Adobe
and the Adobe logo, InDesign®, Illustrator®, PageMaker®, Photoshop®, Acrobat®, Distiller®, PostScript, and the
Acrobat logo are either registered trademarks or trademarks of Adobe Systems Incorporated in the United States and/
or other countries.
Macintosh, Mac OS, Power Macintosh, TrueType, and Mac are registered trademarks of Apple Computer, Inc. in the
United States and/or other countries.
Microsoft
®
Windows 2000®, Windows XP, Windows 7, Windows 10, and Microsoft®Windows are trademarks of
Microsoft Corporation in the United States and/or other countries.
Mozilla and Firefox are trademarks of The Mozilla Foundation
PANTONE
®
, PANTONE Goe™, PANTONE MATCHING SYSTEM®, PMS®, and X-Rite PANTONE®are either registered
trademarks or trademarks of Danaher Corporation.
The CentOS Marks are trademarks of Red Hat, Inc.
Changes are periodically made to this document. Changes, technical inaccuracies, and typographic errors will be
corrected in subsequent editions.
Page 3

Table of Contents
1 Getting Started.......................................................................................................................... 5
Press Components..... ............. ........ .... .... .... ................. .... .... .... .... ................. .... .... .... ................ 6
Locating the Press Serial Number . ............. .... .... .... .... .... ................. .... .... .... ..................... ... 7
Power On or Off the Press...... .... .... .... ..................... ........ .... .... .... ................. .... .... .... .... ............. 8
Power On the Press ........... .... .... .... ..................... .... .... .... ..................... .... .... .... ................... 8
Power Off the Press... .... .... .... .... ................. .... .... .... .... ................. .... .... .... ..................... .... .. 8
Power Saver ... .... ............. ........ .... .... .... ..................... .... .... .... ..................... .... .... .... ................. .. 9
Low Power Mode. .... .... ..................... .... .... .... ..................... .... .... .... ..................... .... .... .... .... 9
Sleep Mode............ .... .... .... ..................... .... .... .... ..................... .... .... .... ..................... .... .... . 9
Exiting Power Saver......... .... .... .... ..................... .... .... .... .... ..................... .... .... .... ................. 9
2 Copy ..........................................................................................................................................11
Basic Copying with the Document Feeder (DADF) . .... .... .... ..................... .... .... .... .... ................ 12
Basic Copying with the Document Glass.................. .... .... .... ..................... .... .... .... .................. 13
3 Paper and Media ....................................................................................................................15
Loading Paper in Trays 1, 2, and 3.. .... .... .... ..................... .... .... .... ..................... .... .... .... .......... 16
Loading Paper in the Bypass (Tray 5) .. .... ................. .... .... .... .... ................. .... .... .... ........ ......... 17
Loading Envelopes in Tray 5 (Bypass) ................. .... .... .... ........ ..................... .... .... .... ............... 19
4 Maintenance ...........................................................................................................................21
Cleaning the Press Overview. ................. .... .... .... .... ................. .... .... .... ..................... .... .... .... ... 22
Cleaning the Exterior ............. .... .... .... ..................... .... .... .... .... ............. ........ .... .... .... ........ 22
Cleaning the Document Cover and Glass.. .... .... .... ..................... .... .... .... .... .... ................. .. 22
Replacing Consumable Supplies ..................... .... .... .... ..................... .... .... .... .... ..................... .. 25
Ordering Supplies.... .... .... ..................... .... .... .... ..................... .... .... .... ......................... .... .. 25
Checking the Status of Consumables .... .... .... .... .... ..................... .... .... .... ..................... .... . 26
Replacing a Dry Ink/Toner Cartridge.... .... .... .... ..................... .... .... .... ..................... .... .... ... 27
Replacing the Dry Ink/Toner Waste Bottle ........... .... .... .... ........ ............. ........ .... .... .... ........ 28
Replacing a Drum Cartridge ... .... .... .... ..................... .... .... .... .... ..................... .... .... .... ........ 29
5 Troubleshooting......................................................................................................................33
Paper Jams . .... .... ................. .... .... .... .... ................. .... .... .... ..................... .... .... .... .... .... ............ 34
Paper Jams in the Document Feeder .......... .... .... .... ..................... .... .... .... ..................... .... 34
Press Paper Jams.... ......................... .... .... .... ..................... .... .... .... ..................... .... .... .... ... 37
Paper Jams in the Bypass (Tray 5)........ .... .... .... ..................... .... .... .... ........ ................. .... .. 41
Calling for Service . .... .... ..................... .... .... .... ..................... .... .... .... ..................... .... .... .... ...... 42
Xerox®Versant®280 Press
Quick Start Guide
3
Page 4

Table of Contents
4
Xerox®Versant®280 Press
Quick Start Guide
Page 5

1
Getting Started
This chapter contains:
• Press Components............... .... .... .... .... ..................... .... .... .... ..................... .... .... .... ................. .... .. 6
• Power On or Off the Press... .... .... .... ................. .... .... .... .... .... ..................... .... .... .... ..................... ... 8
• Power Saver .... ................. .... .... .... ..................... .... .... .... ..................... .... .... .... ..................... .... .... . 9
Xerox®Versant®280 Press
Quick Start Guide
5
Page 6
Getting Started
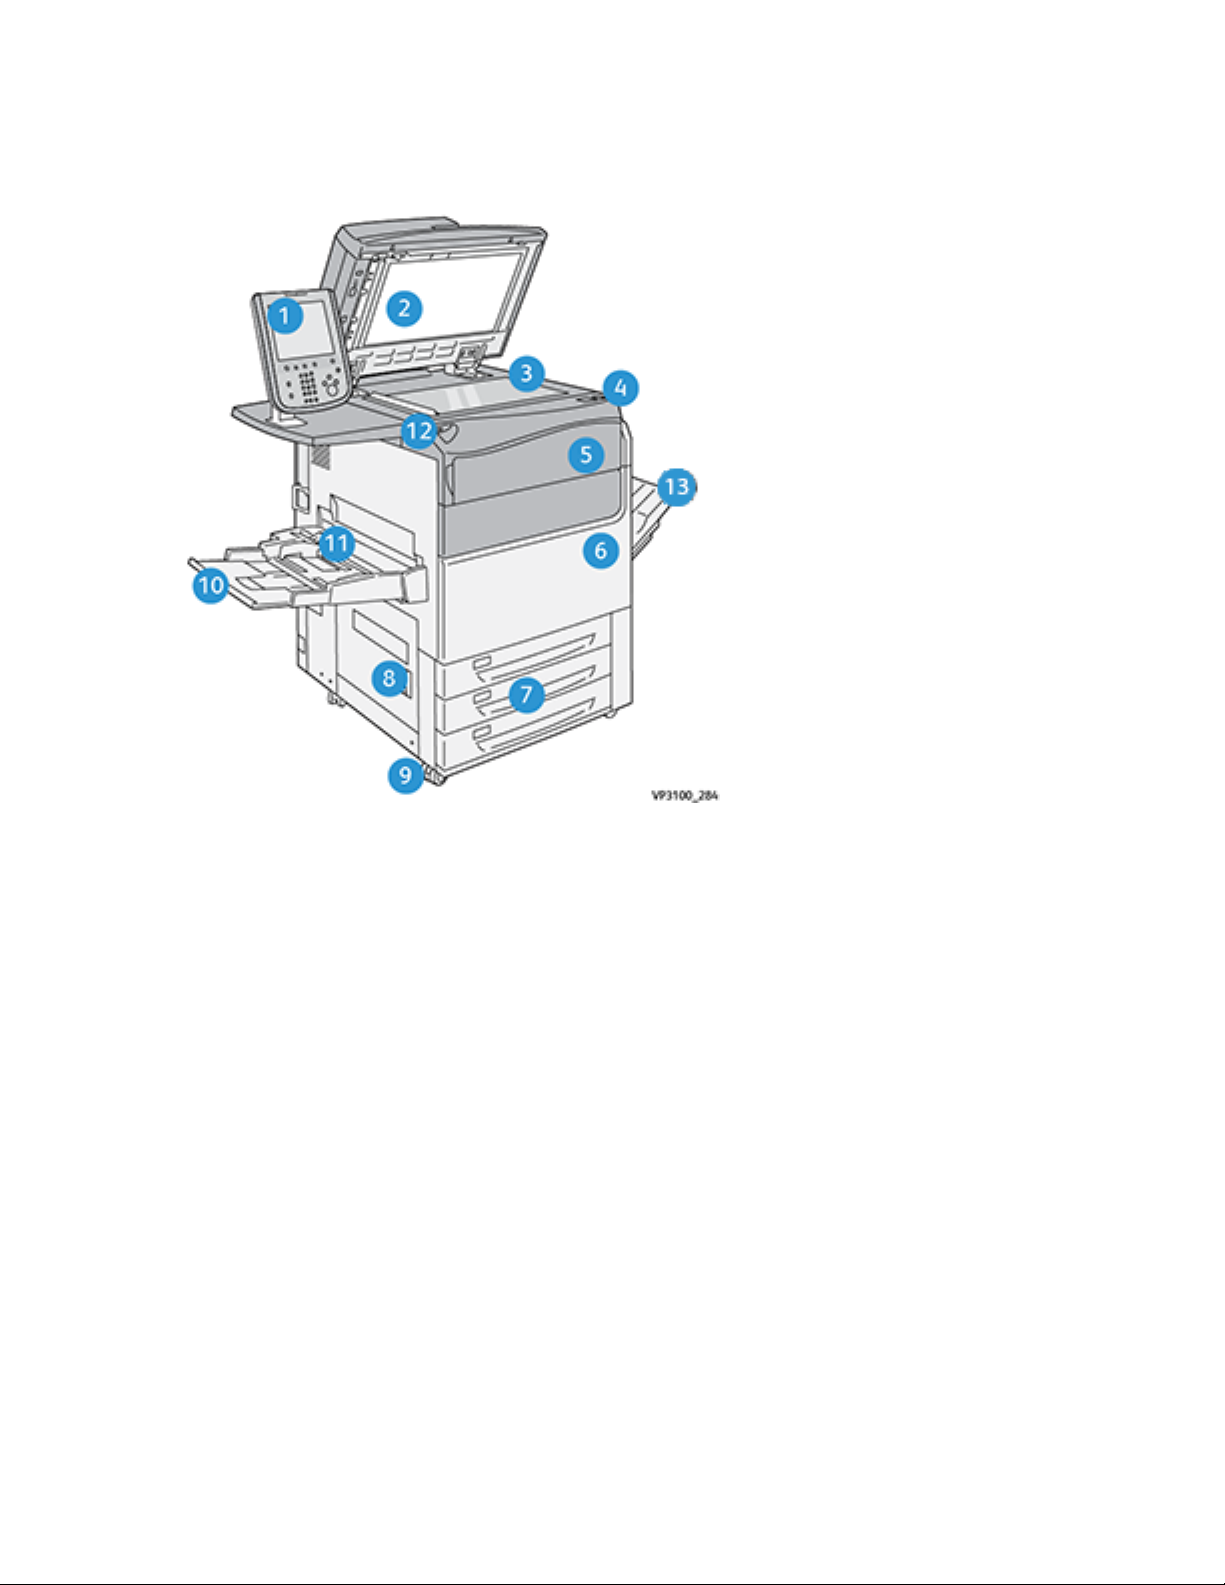
Press Components
1. User Interface
2. Document Feeder
3. Document Glass
4. Press Power Switch
5. Dry Ink/Toner Front Cover
6. Press Front Door
7. Trays 1-3
8. Bottom Left Door
9. Casters
10. Tray 5 (Bypass)
11. Tray 5 (Bypass) Top Cover
12. USB Memory Port
13. Offset Catch Tray (OCT)
6
Xerox®Versant®280 Press
Quick Start Guide
Page 7

Getting Started
LLooccaattiinngg tthhee PPrreessss SSeerriiaall NNuummbbeerr
The press serial number can be accessed from the User Interface (UI) or from the serial number plate
which is located on the inside frame of Tray 1.
1. Press the Machine Status button on the UI.
2. From the Machine Status screen, ensure that the Device Information tab is displayed.
The press serial number is displayed under Device Serial Number near the bottom of the screen.
3. If there is a loss of power and it is not possible to access the Machine Status screen, the press
serial number can also be found on the inside frame of the press near the Paper Tray 1 drawer:
a. At the press, fully open Tray 1.
b. At the left of the tray, on the press frame, locate the plate with the serial number (SER#).
Xerox®Versant®280 Press
Quick Start Guide
7
Page 8

Getting Started
Power On or Off the Press
PPoowweerr OOnn tthhee PPrreessss
1. Check that the Main Power switch behind the Front Door is On.
2. Press the Power button on top of the press to the ON position.
The Services button glows blue.
A screen message advises of a short wait while the fuser warms up and the press runs a system
check. You can set features for a job during this time and the printing process will start
automatically when the press is ready.
PPoowweerr OOffff tthhee PPrreessss
Important: Always power off the power button first, and then power off the main power
switch.
1. Press the Power On/Off button on the top of the press to Off.
Wait until the lights on UI stop blinking, as this allows the fuser to begin cooling.
2. Switch Off the Main Power switch behind the Front Door.
Note: Allow the press to remain off for a minimum of 10 seconds before switching on the
power again.
8
Xerox®Versant®280 Press
Quick Start Guide
Page 9

Getting Started
Power Saver
The Power Saver feature allows the press to enter a reduced power consumption mode when all print
jobs have completed and there are no jobs currently processing. There are two power saving modes:
Low Power and Sleep.
By default, the press automatically enters the Low Power mode after 1 minute of inactivity. After 1
minute of inactivity, the press then enters Sleep mode. These time intervals for both modes can be
changed by the system administrator.
Refer to the following example:
• Low Power Mode is set to 1 minute.
• Sleep Mode is set to 10 minutes.
• Sleep Mode activates after 10 minutes of total inactivity and not 10 minutes after the Low Power
Mode begins.
LLooww PPoowweerr MMooddee
In this mode, the power to the User Interface (UI) and fuser unit is lowered to save power. The
display goes out and the Power Saver button on the UI lights. To use the press, press the Power
Saver button. The Power Saver button is no longer lit, indicating that the Power Saver feature is
canceled.
SSlleeeepp MMooddee
In this mode, the power is lowered more than in the Low Power mode. The display goes out and the
Power Saver button on the UI lights. To use the press, press the Power Saver button. The Power Saver
button is no longer lit, indicating that the Power Saver feature is canceled.
EExxiittiinngg PPoowweerr SSaavveerr
The press exits Power Saver mode by doing one of the following:
• Pressing the Power Saver button on the press UI
• Receiving print data for an incoming job to be printed
• Programming and performing a copy or scan job
Xerox
®
Versant®280 Press
Quick Start Guide
9
Page 10

Getting Started
10
Xerox®Versant®280 Press
Quick Start Guide
Page 11

2
Copy
This chapter contains:
• Basic Copying with the Document Feeder (DADF) ................... .... .... .... ................. .... .... .... .......... 12
• Basic Copying with the Document Glass....... .... .... .... .... ..................... .... .... .... ..................... .... .... 13
Xerox®Versant®280 Press
Quick Start Guide
11
Page 12
Copy
Basic Copying with the Document Feeder (DADF)
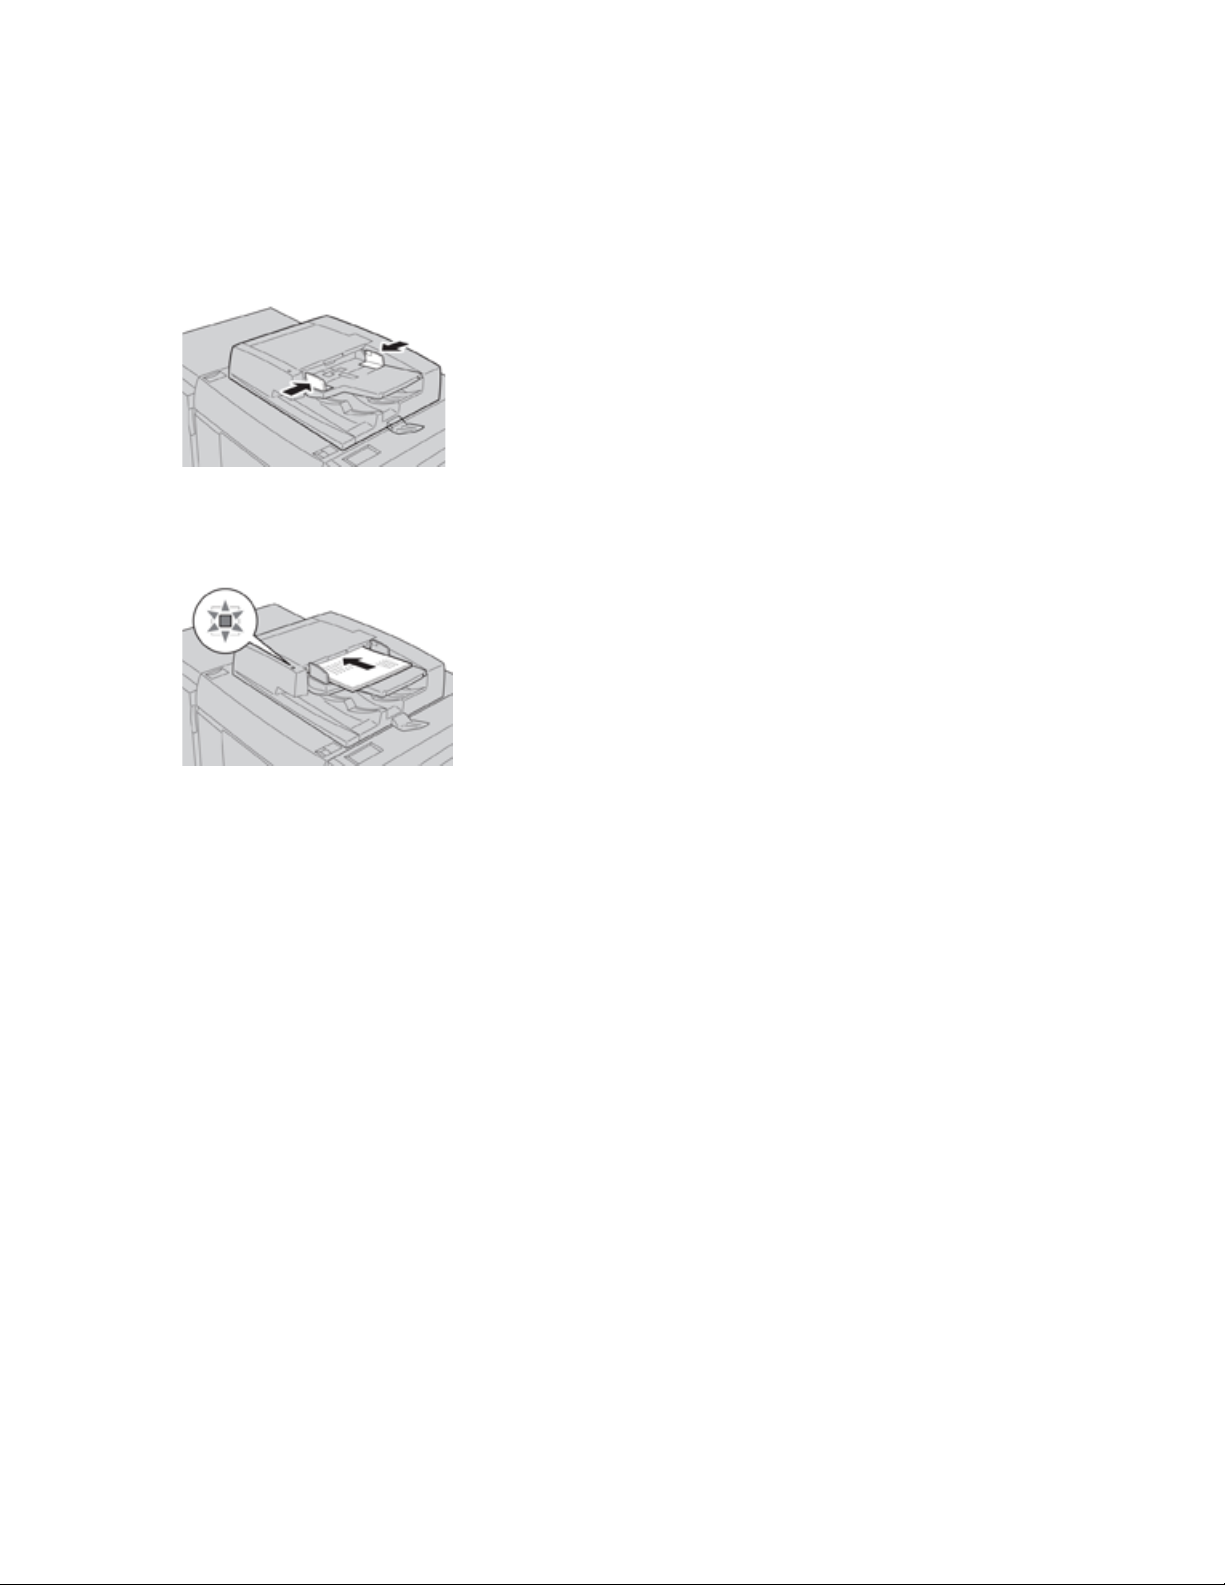
1. Adjust the movable document guides to their widest position.
2. Load the documents face up with the first page on top and with the headings toward the back or
left of the press.
The confirmation indicator lights to show that the documents are loaded correctly.
3. Press the Home button on the press UI.
4. Select Copy on theHome window.
5. Select the desired Copy features/options:
• Paper Supply
• Reduce/Enlarge
• Output Color
• 2-Sided Copying
• Original Type
• Lighten/Darken
The features displayed on the main Copy window vary depending on how it is configured by the
administrator.
6. Enter the quantity.
7. Press Start.
12
Xerox®Versant®280 Press
Quick Start Guide
Page 13

Basic Copying with the Document Glass
1. Open the document feeder.
2. Place the document face down by aligning it as shown in the illustration.
Copy
3. Press the Home button on the press UI.
4. Select Copy on the Home window.
5. Select the desired Copy features or options:
• Paper Supply
• Reduce or Enlarge
• Output Color
• 2-Sided Copying
• Original Type
• Lighten/Darken
The features displayed on the main Copy window vary depending on how it is configured by the
administrator.
6. Enter the quantity.
7. Press Start.
Xerox
®
Versant®280 Press
Quick Start Guide
13
Page 14

Copy
14
Xerox®Versant®280 Press
Quick Start Guide
Page 15

3
Paper and Media
This chapter contains:
• Loading Paper in Trays 1, 2, and 3... .... ..................... .... .... .... ..................... .... .... .... ..................... 16
• Loading Paper in the Bypass (Tray 5)....... .... .... .... ................. .... .... .... ........ ............. ........ .... .... .... . 17
• Loading Envelopes in Tray 5 (Bypass) ...... .... .... .... ..................... .... .... .... .... .... ..................... .... .... . 19
Xerox®Versant®280 Press
Quick Start Guide
15
Page 16

Paper and Media
Loading Paper in Trays 1, 2, and 3
Note: A paper jam may occur if a tray is opened while it is being used to feed stock.
1. Select the appropriate paper stock for your print or copy job.
2. Pull out the tray slowly until it stops.
3. Open the ream of paper with the seam side facing up.
4. Fan the sheets before loading them into the tray.
5. Load and align the edge of the paper against the left edge of the tray.
Paper can be loaded in either the LEF/portrait or SEF/landscape direction.
6. Adjust the paper guides by pressing in the guide release and carefully moving the Edge Guide
until it lightly touches the edge of the material in the tray.
Do not load materials above the MAX line located on the rear Edge Guide.
7. Gently push in the tray until it comes to a stop.
If enabled by your System Administrator, the Paper Tray settings/Tray Properties window may be
displayed on the UI. You can view and set stock attributes and verify trays are assigned with the
correct stock.
8. From the Paper Tray settings/Tray Properties window, choose one of the following:
• No changes were made to the paper tray; select Confirm to close the window.
• Changes were made to the paper tray; go to the next step.
9. Select the Change Settings button.
a. Make the desired selections for Paper Type/Paper Weight, Paper Size, and Paper Color.
b. If necessary, make the desired changes to paper curl and alignment adjustment.
c. Select Save until you are returned to the Paper Tray settings/Tray Properties window.
d. Select Confirm or OK to save the information and close the Paper Tray settings/Tray
Properties window.
16
Xerox®Versant®280 Press
Quick Start Guide
Page 17

Loading Paper in the Bypass (Tray 5)
Note: The following procedure shows the Bypass (Tray 5) located on top of the 2-Tray OHCF.
1. Gently extend the Bypass tray (Tray 5) as necessary to accommodate the paper.
2. Hold the center of the paper guides and slide them to the desired paper size.
Paper and Media
3. Select the appropriate paper stock for your print/copy job.
4. Open the ream of paper with the seam side facing up.
5. Fan the sheets before loading them into the tray.
6. Insert the paper or media into the tray until it stops.
7. Adjust the paper guides so that they touch the edges of the stack.
If enabled by your System Administrator, the Paper Tray settings/Tray Properties window may be
displayed on the UI.
®
Xerox
Versant®280 Press
Quick Start Guide
17
Page 18

Paper and Media
8. If the Paper Tray settings/Tray Properties window displays on the UI, confirm the correct tray to
which it is printing and other information, including size, type (precut tab), and, if necessary,
paper curl and/or alignment option.
9. Select Confirm or OK to save the information and close the Paper Tray settings/Tray Properties
window.
18
Xerox®Versant®280 Press
Quick Start Guide
Page 19

Paper and Media
Loading Envelopes in Tray 5 (Bypass)
It is recommended that you print envelopes from the Bypass (Tray 5). If you are required to print
envelopes from the optional Trays 6 and 7, use the Postcard Bracket.
Note: For information on supported envelope types and sizes, refer to the Customer
Expectation and Installation Guide.
When setting up your print job, select from the following options:
• Envelope Feeder: used for standard-sized envelopes
• Change Settings: used for custom-sized envelopes
Note: Store unused envelopes in their original packaging to avoid the excess moisture or
dryness that can affect print quality and cause wrinkling. Excessive moisture can cause the
envelopes to seal before or during printing.
Some wrinkling or embossing can occur when printing on envelopes. Successful envelope printing
depends on the quality and construction of the envelopes. Try another envelope brand if problems
occur.
When defining custom paper settings at the Paper Tray settings/Tray Properties window, assign the
custom stock to the Bypass Tray (Tray 5) or an Advanced Oversized High Capacity Feeder (Tray 6 or
7). Select Auto Detect for automatic size-detection or measure the height and width of the envelope
with the flap closed, then enter the dimensions. For more detailed information, refer to the following
steps.
1. Always load envelopes with the flaps closed.
Do not use padded envelopes.
2. When loading in the SEF direction, place the flaps facing the back of the press. When loading in
the LEF direction, place the flaps facing the lead edge.
3. When submitting your network print file, select Custom Paper as the Paper Type. Enter the
dimensions of the envelope.
Measure the width from the lead edge to the trail edge of the envelope. For example, if you load
SEF, enter the long dimension of the envelope as the width. If you load the envelope LEF, enter
the short dimension of the envelope as the width.
4. Enter a heavy paper weight value, such as 220 g/m
A paper weight of 220 is a good starting point. If the printing is blurred or smeared, enter a
higher value.
5. Select the Bypass Tray (Tray 5) as the Paper Source.
2
in the Paper Weight field.
Xerox
®
Versant®280 Press
Quick Start Guide
19
Page 20

Paper and Media
20
Xerox®Versant®280 Press
Quick Start Guide
Page 21

4
Maintenance
This chapter contains:
• Cleaning the Press Overview....... ........ .... .... .... ..................... .... .... .... ................. .... .... .... .............. 22
• Replacing Consumable Supplies .. .... .... .... ..................... .... .... .... ..................... .... .... .... ........ ......... 25
Xerox®Versant®280 Press
Quick Start Guide
21
Page 22

Maintenance
Cleaning the Press Overview
• Before you start to clean the press, be sure to switch off the power using the rear breaker switch
and unplug the press. Cleaning the press without switching off the power may cause an electric
shock.
• Always use a dry lint-free cloth for all cleaning actions unless otherwise directed.
• Do not use benzene, paint thinner, other volatile liquids, or spray insect repellent on the press as
doing so may discolor, deform, or crack covers.
• If a moistened cloth is used, wipe afterwards with a dry lint-free cloth. Cleaning the press with an
excessive amount of water may cause the press to malfunction and/or damage documents during
printing.
CClleeaanniinngg tthhee EExxtteerriioorr
1. Wipe the exterior with a soft cloth moistened with water. If dirt is difficult to remove, try gently
wiping with a soft cloth moistened with a small amount of neutral detergent.
2. Wipe off any excess water from the exterior with a soft cloth.
CClleeaanniinngg tthhee DDooccuummeenntt CCoovveerr aanndd GGllaassss
1. Cleaning the document cover
a. Raise the document feeder.
22
Xerox®Versant®280 Press
Quick Start Guide
Page 23

b. To remove dirt, wipe the document cover with a soft cloth moistened with water and then
wipe it dry with a soft cloth. If dirt is difficult to remove, try gently wiping with a soft cloth
moistened with a small amount of neutral detergent.
2. Cleaning the document (platen) glass
a. To remove dirt, wipe the document glass with a soft cloth moistened with water and then
wipe it dry with a soft cloth. If dirt is difficult to remove, try gently wiping with a soft cloth
moistened with a small amount of neutral detergent.
Maintenance
Caution: Do not press heavily on the document glass to avoid damaging the glass
surface.
3. Cleaning the second-side scanning lens assembly
a. The second-side scanning lens assembly is located along the left side of the document
cover. The assembly consists of the mirrored-glass strip, a metal strip, a white-plastic strip,
and rollers. All parts of the assembly must be cleaned to ensure the best image quality when
making copies.
Xerox
®
Versant®280 Press
Quick Start Guide
23
Page 24

Maintenance
b. With the document feeder open, pull the lever that is located at the top of the document
cover.
Part of the document cover pulls away from the assembly, which allows better access to the
second-side scanning lens assembly.
c. To remove dirt, wipe the mirrored glass, metal strip, both sides of the white-plastic strip, and
the rollers with a soft cloth moistened with water, then wipe it dry with a soft cloth.
Caution: Do not press heavily on the mirrored glass as this will result in damage to the
film around the glass surface.
Note: If dirt is difficult to remove, try gently wiping with a soft cloth moistened with a
small amount of neutral detergent.
4. Once the second-side scanning assembly is clean, return the document cover to its original
position and ensure that the lever is locked in place.
If you touch the document cover with your bare hands, wipe it clean before closing the document
feeder.
5. Gently close the document feeder.
24
Xerox®Versant®280 Press
Quick Start Guide
Page 25

Maintenance
Replacing Consumable Supplies
The following items are the Customer Replaceable Units (CRU) for the press. It is recommended that
you have a supply of these items available to eliminate down time when they need to be replaced.
• Dry Ink/Toner cartridges (C, M, Y, K)
• Drum cartridges (C, M, Y, K)
• An empty Waste Dry Ink/Toner bottle
• Suction Filter
Refer to www.xerox.com for the latest consumable part numbers.
Note: The Fuser Module may be replaced by the customer only if directed to do so by Service.
Note: Store supply items and Xerox parts in their original packages in a convenient location.
Always recycle/dispose the used CRU according to the disposal instructions supplied with the
new CRU.
OOrrddeerriinngg SSuupppplliieess
Xerox supplies, paper, and throughput material can be ordered from the web site www.xerox.com and
clicking on the Supplies link. For any item that is not orderable from the web site, contact your Xerox
Service Representative.
Note: The cleaning pads used with the ROS Window cleaning wand are not orderable. Contact
your Xerox representative for any additional cleaning pads.
Approximate Print Yield (Full
CRUs (Supply Item) Reorder Quantity
Black Dry Ink/Toner Cartridge 1 per box, 2 per press 50,000
Cyan Dry Ink/Toner Cartridge 1 per box 55,000
Magenta Dry Ink/Toner Cartridge 1 per box 51,000
Yellow Dry Ink/Toner Cartridge 1 per box 51,000
Waste Dry Ink/Toner Bottle 1 45,000
Suction Filter 1 200,000
Drum Cartridge (R1) 1 per box 348,000
Drum Cartridge (R2) 1 per box 348,000
Drum Cartridge (R3) 1 per box 348,000
Color 8.5x11/A4 Prints)
Drum Cartridge (R4) 1 per box 348,000
OHCF Feed Roll Kit 1 kit 500,000
Standard Finisher Staple Cartridge and
Staple Waste Container
4 Staple Cartridges (5,000
staples per cartridge) and 1
Staple Waste Container per
carton
5,000 staples each cartridge
Xerox®Versant®280 Press
25
Quick Start Guide
Page 26
Maintenance
CRUs (Supply Item) Reorder Quantity
Approximate Print Yield (Full
Color 8.5x11/A4 Prints)
Booklet Maker Finisher Staple Cartridge 4 pack: 5,000 staple refills
each
Business Ready (BR) Finisher Staple
Cartridge
Business Ready (BR) Finisher with Booklet
Maker Staple Cartridge
Staple Refills for the Business Ready
Finisher and Business Ready Finisher with
Booklet Maker
1 Staple Cartridge 5,000 staples per cartridge
4 pack: 5,000 staple refills
each
3 refills per carton 5,000 each refill for a total of
5,000 staples each cartridge
5,000 staples per cartridge
15,000
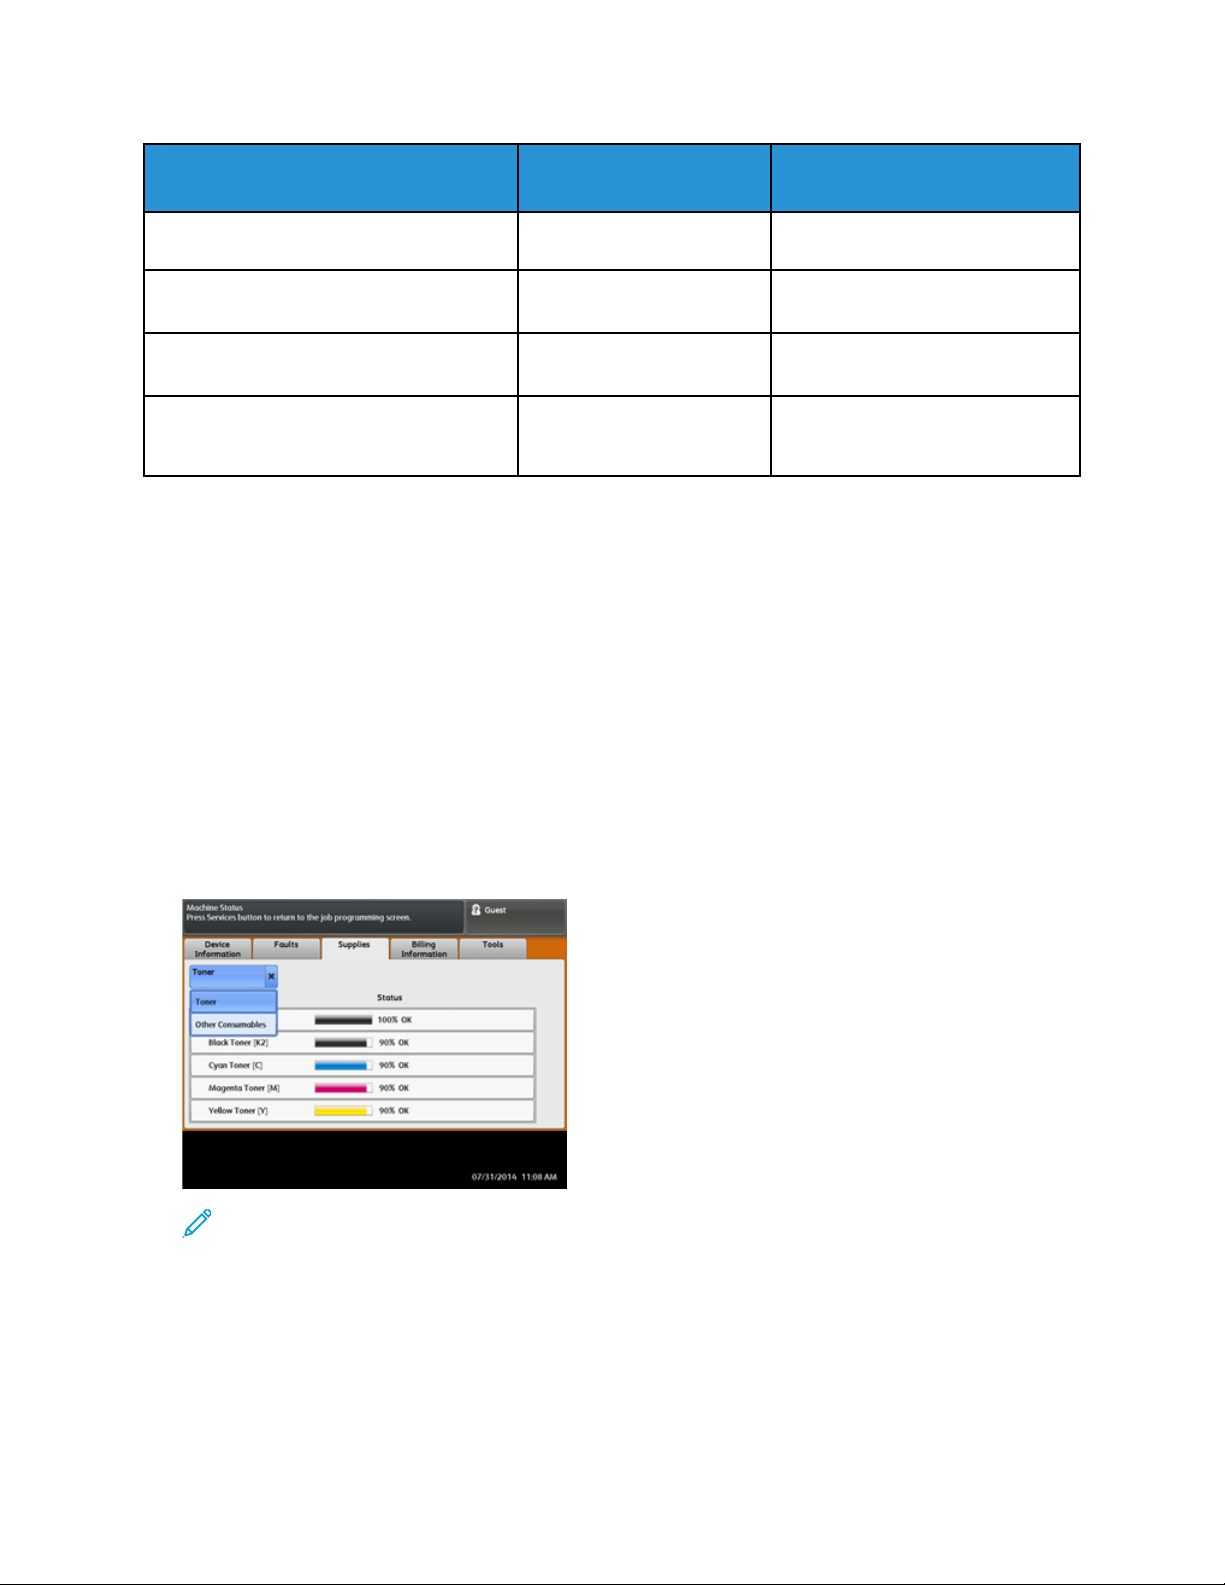
CChheecckkiinngg tthhee SSttaattuuss ooff CCoonnssuummaabblleess
When a consumable is reaching the time it should be replaced, a message is displayed on the press
UI. This indicates when it is time to order and/or install a new consumable item. With some CRUs, the
screen indicates that the press may continue to run print jobs without immediately replacing the
item. Otherwise, when it is time to replace it, a message appears and the press stops running.
1. Press the Home button on the UI.
2. Press Machine Status and select the Supplies tab.
The Supplies area shows a 1 to 100% indicator bar of the remaining amount of dry ink/toner.
Remaining dry ink/toner is updated in 10% increments.
3. From the Supplies pull-down menu, select Other Consumables to view the status of other
consumables, such as the drum cartridges the Dry Ink/Toner Waste Bottle, and any applicable
optional devices (such as the OHCF feed rolls).
Note: The status of the Fuser and Suction Filter are not shown, but a message displays
when these items require replacing.
26
Xerox®Versant®280 Press
Quick Start Guide
Page 27

Maintenance
RReeppllaacciinngg aa DDrryy IInnkk//TToonneerr CCaarrttrriiddggee
Note: Refer to the following information:
• The dry ink/toner cartridge can be replaced while a job is printing.
• If the press is installed with Xerox
configuration.
• After you replace a dry ink/toner cartridge, the system automatically resets the usage counter to
zero (0) for this CRU. Check the Consumables Supplies screen to verify the reset and new status.
1. Open the Dry Ink/Toner cover, located just above the press front door.
®
Adaptive CMYK+ Kit, ensure to install the correct color
2. Lay paper on the floor before removing the cartridge. This will allow any excess dry ink/toner to
fall on the paper.
3. Grasp the handle of the dry ink/toner cartridge matching the color indicated in the message.
4. Remove the dry ink/toner cartridge by slowly and gently pulling it straight out. While pulling out,
hold the bottom of the cartridge with your other hand to give it support.
5. Dispose of or recycle the cartridge per your local authorities and regulations.
In the United States, also refer to the Electronic Industries Alliance website: www.eiae.org. For
more information about Xerox environmental programs, go to www.xerox.com/environment.
6. Remove the new dry ink/toner cartridge from its packaging.
7. With one hand on either side of the cartridge, vigorously shake and rotate the new cartridge up
and down and left and right for 30 seconds to redistribute the dry ink/toner.
8. Install the new dry ink/toner cartridge by gently and evenly sliding the cartridge into the press
until it stops.
9. Close the dry ink/toner cover. If the cover does not close completely, make sure the cartridge is in
the lock position and is installed into the appropriate dry ink / toner location.
®
Xerox
Versant®280 Press
Quick Start Guide
27
Page 28

Maintenance
RReeppllaacciinngg tthhee DDrryy IInnkk//TToonneerr WWaassttee BBoottttllee
The Dry Ink/Toner Waste Bottle collects dry ink/toner that accumulates during the printing process.
When the bottle is full, a message displays on the press UI informing you to exchange the full bottle
with an empty one.
The press contains one waste bottle located at the front of the press behind the Dry Ink/Toner Waste
Bottle Door. When removing a full Dry Ink/Toner Waste bottle, SLOWLY pull it out of the press. This
will prevent any dry ink/toner from spilling out of the bottle.
Note: After you replace the Dry Ink/Toner Waste Bottle, the system automatically resets the
usage counter to zero (0) for this CRU component. Check the Consumables Supply screen to
verify the reset.
1. Ensure that the press is stopped (not running any jobs).
2. Open the front door of the press.
3. Open the Dry Ink/Toner Waste Bottle Door.
4. Grasp the handle of the Dry Ink/Toner Waste bottle and pull it halfway out of the press.
5. Support the underside of the bottle with your other hand and continue pulling it out from the
press.
Caution: Never use a vacuum cleaner when cleaning up spilled dry ink/toner. Use a broom
or a cloth moistened with a neutral detergent.
6. Use both hands to place the old used Dry Ink/Toner Waste Bottle into the provided plastic bag.
7. Remove a new, empty waste bottle from the packaging.
8. Hold the center part on the top of a new bottle and insert it evenly and gently into the press until
it comes to a stop.
9. Close the waste bottle door.
10. Close the press front door.
28
Xerox®Versant®280 Press
Quick Start Guide
Page 29

Maintenance
RReeppllaacciinngg aa DDrruumm CCaarrttrriiddggee
You need to replace a drum cartridge if it has reached the end of its component life, if it is damaged
by light, or if you are experiencing spots and streaks on your output.
Note: All four Drum cartridges are interchangeable.
Note: After replacing the drum cartridge, the system automatically resets the usuage counter
of this CRU component to zero (0). Check the Consumables screen for the reset and new status.
Caution: Drums are light sensitive. Do not leave the Drum Cartridge Drawer open for more
than one minute. Exposing the drum cartridges to direct sunlight or strong light from indoor
fluorescent lighting for more than one minute can cause image quality defects.
Caution: Replace drum cartridges while the press is powered ON.
1. Ensure that the press is stopped and is not currently printing jobs.
2. Open the press Front Door.
Xerox®Versant®280 Press
Quick Start Guide
29
Page 30

Maintenance
3. Rotate and turn the R1-R4 Drum Drawer Handle to the unlock position.
4. Open the bag containing the new drum cartridge. Place the new drum cartridge near the press.
Caution: Do not touch or scratch the surface of the drum when you take it out from the
bag.
5. Unwrap the sheet covering the new drum cartridge and place it under the cartridge. Some drum
cartridges may include a protective film. Remove the film on the drum cartridge, if the film is
present.
30
Xerox®Versant®280 Press
Quick Start Guide
Page 31

Maintenance
6. Grab the Release Handle and pull the Drum Drawer straight out.
7. Remove the old drum cartridge by holding the finger rings provided at both ends of the drum
cartridge and gently lifting up.
Caution: Drums are light sensitive. Do not leave the Drum Cartridge Drawer open for more
than one minute when replacing cartridges. Exposing the drum cartridges to direct sunlight
or strong light from indoor fluorescent lighting for more than one minute can cause image
quality defects.
8. Install the new drum cartridge into the press following the guides with the side marked front
facing the front.
Xerox®Versant®280 Press
Quick Start Guide
31
Page 32

Maintenance
9. Press both ends of the drum cartridge to place it in a horizontal position.
10. Immediately close the drum cartridge drawer to protect the other drums from light.
11. Return the Release Handle to its original position.
12. Return the R1-R4 handle to the original position and close the front door.
13. Insert the used drum cartridge into an empty container for recycling.
32
Xerox®Versant®280 Press
Quick Start Guide
Page 33

5
Troubleshooting
This chapter contains:
• Paper Jams .... .... .... .... .... ................. .... .... .... ..................... .... .... .... .... .... ................. .... .... .... ........ 34
• Calling for Service ....... .... .... .... ........ ............. .... .... .... .... ..................... .... .... .... ..................... .... .... 42
Xerox®Versant®280 Press
Quick Start Guide
33
Page 34

Troubleshooting
Paper Jams
PPaappeerr JJaammss iinn tthhee DDooccuummeenntt FFeeeeddeerr
DDooccuummeenntt FFeeeeddeerr JJaammss
1. Gently lift the latch of the document feeder top cover until it is completely open.
2. Open the left cover until it comes to a stop.
3. If the document is not caught in the entry of the document feeder, then remove it.
4. If instructed to open the inner cover, lift up the lever, then open the inner cover. Remove the
jammed document.
Note: If the document is stuck, do not pull on it forcefully, as this could damage the
document.
34
Xerox®Versant®280 Press
Quick Start Guide
Page 35

Troubleshooting
5. If the jam is inside of the left cover, remove the jammed document.
6. Close the following open covers until they click into place. Close them in the following order:
• Inner cover
• Top cover
• Left cover
7. If a document jam cannot be found, slowly raise the document feeder and, if the document is
there, remove it.
8. Close the document feeder.
9. If indicated, raise the feeder tray area and remove the document.
10. Gently return the feeder tray to its original position.
11. After removing the jammed document, follow the instructions to reload the entire document set
into the document feeder.
Note: Ensure that there are not any torn, wrinkled, or folded documents in the document
set. To scan torn, wrinkled or folded documents, use the Document Glass, only. The already
scanned document sheets are automatically skipped and scanning resumes from the
document sheet last scanned prior to the jam.
Xerox
®
Versant®280 Press
Quick Start Guide
35
Page 36

Troubleshooting
DDooccuummeenntt JJaammss UUnnddeerr tthhee DDooccuummeenntt FFeeeeddeerr BBeelltt
1. Open the document feeder.
2. Open the belt of the document cover while gripping the lever and remove the jammed document.
3. Gently return the belt to the original position.
4. Close the document feeder.
5. Follow the instructions to reload the entire document set into the document feeder.
Note: Ensure that there are not any torn, wrinkled, or folded documents in the document
set. To scan torn, wrinkled or folded documents, use the Document Glass, only. The already
scanned document sheets are automatically skipped and scanning resumes from the
document sheet last scanned prior to the jam.
36
Xerox®Versant®280 Press
Quick Start Guide
Page 37

PPrreessss PPaappeerr JJaammss
PPaappeerr JJaammss IInnssiiddee tthhee PPrreessss
WARNING: Never touch a labeled area, found on the fuser unit or nearby, indicating High
Temperature and Caution. Contact can lead to burns.
1. Open the Press Front Door.
Troubleshooting
2. Rotate Handle 2 to the right until it is in the horizontal position, then pull out the transfer
module.
3. Remove the visible jammed paper.
4. After clearing the jammed sheets, ensure that no torn paper pieces are left in the press.
Xerox
®
Versant®280 Press
Quick Start Guide
37
Page 38

Troubleshooting
5. Move Handle 2b and remove any jammed paper.
6. Return Handle 2b to its original position.
7. Move Handle 2e and remove any jammed paper.
8. Return Handle 2e to its original position.
9. Pull down Handle 2f and remove the jammed paper.
10. Return Handle 2f to its original position.
11. Push in the transfer module completely and rotate Handle 2 to the left.
38
Xerox®Versant®280 Press
Quick Start Guide
Page 39

Troubleshooting
12. Close the press Front Door.
13. Run five blank sheets to clean left-over toner from the fuser roll and resume the copying/printing
process.
Xerox
®
Versant®280 Press
Quick Start Guide
39
Page 40

Troubleshooting
PPaappeerr JJaammss iinn TTrraayyss 11--33
Note: Paper is sometimes torn and remains inside the press if you open a tray without checking
the paper jam position. This may cause a malfunction. Check where the paper jam occurred
before clearing the problem.
1. Open the tray where the paper jam occurred.
2. Remove the jammed paper.
3. Push the tray in gently until it comes to a stop.
40
Xerox®Versant®280 Press
Quick Start Guide
Page 41

Troubleshooting
PPaappeerr JJaammss iinn tthhee BByyppaassss ((TTrraayy 55))
PPaappeerr JJaammss iinn tthhee SSttaannddaalloonnee BByyppaassss ((TTrraayy 55))
Important: Use this procedure to clear paper jams in the Bypass (Tray 5) when it is a
standalone feeding device and is not installed on any optional feeder (such as the Advanced
Oversized High Capacity Feeder).
Tip: Always ensure that all paper jams, including any small, ripped pieces of paper, are cleared
before proceeding with any copy/print jobs.
1. Remove the jammed paper and any paper that is loaded from the Bypass tray.
Note: If paper is torn, check inside the press and remove it.
2. Open the Bypass Top Cover and remove jammed paper.
3. Close the cover.
4. Reload paper into the tray and resume copying / printing.
Xerox
®
Versant®280 Press
Quick Start Guide
41
Page 42

Troubleshooting
Calling for Service
1. Record any displayed fault codes.
2. Record the press serial number.
a. Select the Machine Status button at the press UI.
b. From the Machine Status screen, select the Device Information tab to view the serial
number listed.
If the serial number is not displayed, open the press Paper Tray 1 drawer and locate the serial
number plate on the left side of the frame (SER #).
3. If output quality is a problem, take a sample as a reference to assist you in describing the
problem over the telephone when answering the questions from the customer support operator
about the defects.
4. If possible, use a phone near the press when calling for assistance. Follow the instructions
provided by the operator.
5. For system support, user help, and service support, call the appropriate number. For the specific
number in your area, go to www.xerox.com and select the Support link.
42
Xerox®Versant®280 Press
Quick Start Guide
Page 43

Page 44

 Loading...