

Page 1

ApeosPort-II C4300/C3300/C2200
ApeosPort Function Guide
Page 2
Microsoft, MS-DOS, Windows NT, Microsoft Network are trademarks or registered trademarks of
Microsoft Corporation in the U.S. and other countries.
Novell, NetWare, IntranetWare, NDS are registered trademarks of Novell, Inc. in the United States.
and other countries.
Adobe, Acrobat, PostScript, Adobe PostScript 3, and the PostScript logo are trademarks of Adobe
Systems Incorporated.
EtherTalk, Macintosh, Mac OS, TrueType are registered trademarks of Apple Computer, Inc.
Intel and Pentium are trademarks or registered trademarks of Intel Corporation.
UNIX is a registered trademark in the United States and other countries, licensed exclusively through
X/Open Company Ltd.
Solaris, Sun OS, and NIS (Network Information Services) are trademarks or registered trademarks of
Sun Microsystems Inc. in the United States.
PCL, HP-GL, and HP-GL/2 are registered trademarks of Hewlett-Packard Corporation.
RSA and BSAFE are either registered trademarks or trademarks of RSA Security Inc. in the U.S. and/
or other countries.
All product/brand names are trademarks or registered trademarks of the respective holders.
Permission has been obtained from Microsoft Corporation for use of software screen shots.
The data saved in the hard disk of the machine may be lost if there is any problem in the hard disk.
Fuji Xerox is not responsible for any direct and indirect damages arising from or caused by such data
loss.
Fuji Xerox is not responsible for any breakdown of machines due to infection of computer virus or
computer hacking.
Important
1. This manual is copyrighted with all rights reserved. Under the copyright laws, this manual may not
be copied or modified in whole or part, without the written consent of the publisher.
2. Parts of this manual are subject to change without prior notice.
3. We welcome any comments on ambiguities, errors, omissions, or missing pages.
4. Never attempt any procedure on the machine that is not specifically described in this manual.
Unauthorized operation can cause faults or accidents. Fuji Xerox is not liable for any problems
resulting from unauthorized operation of the equipment.
An export of this product is strictly controlled in accordance with Laws concerning Foreign
Exchange and Foreign Trade of Japan and/or the export control regulations of the United States.
Xerox, The Document Company, Ethernet, CentreWare, and the digital X are trademarks of Xerox
Corporation. All Xerox and Fuji Xerox product names are either registered trademarks or trademarks
of Xerox Corporation and Fuji Xerox Co., Ltd.
DocuWorks is a trademark.
Page 3

Table of Contents
Table of Contents ..............................................................................................1
1 Before Using the Machine .............................................................................. 5
Preface ..............................................................................................................6
Using This Guide............................................................................................... 7
Related Information Sources ........................................................................7
Organization of This Guide........................................................................... 8
Conventions.................................................................................................. 9
Features Overview ..........................................................................................10
2 Control Panel .................................................................................................13
Standard Control Panel...................................................................................14
Customizing the Control Panel........................................................................16
Differences in the Screen Operations ............................................................. 18
Table of Contents
3 Copy ...............................................................................................................19
Copy Feature List ............................................................................................ 20
Differences in the Copy Feature...................................................................... 25
[Layout Adjustment] Tab.............................................................................25
[Output Format] Tab ................................................................................... 26
4 Fax .................................................................................................................. 33
Fax Feature List .............................................................................................. 34
Differences in the Fax Feature........................................................................ 37
[Transmission Options] Tab........................................................................37
5 Scan................................................................................................................ 39
Scan Feature List ............................................................................................40
Differences in the Scan Feature......................................................................44
[General Settings] Tab (Network Scanning) ............................................... 44
[General Settings] Tab (E-mail) .................................................................. 45
[Output Format] Tab ................................................................................... 51
6 Send from Mailbox ........................................................................................ 53
Selecting a Mailbox .........................................................................................54
Checking/Operating Documents in a Mailbox .................................................55
Checking Document Details............................................................................ 57
Printing Documents in a Mailbox.....................................................................58
Configuring/Starting Job Flow .........................................................................60
Job Flow Restrictions.................................................................................. 63
7 Stored Programming.....................................................................................65
1
Page 4

Stored Programming Overview ....................................................................... 66
Registering/Deleting/Renaming Stored Programs .......................................... 67
Registering a Stored Program .................................................................... 68
Registering Stored Program for Build Job .................................................. 69
Calling a Stored Program................................................................................ 70
Calling a Stored Program for Build Job ...................................................... 70
8 Job Flow Sheets............................................................................................ 71
Job Flow Procedure ........................................................................................ 72
Step 1 Opening the [Job Flow Sheets] Screen........................................... 72
Step 2 Selecting a Job Flow Sheet............................................................. 72
Step 3 Confirming/Changing the Job Flow Sheet....................................... 73
Step 4 Starting the Job Flow Sheet ............................................................ 73
Selecting/Changing a Job Flow Sheet ............................................................ 74
9 Web Applications .......................................................................................... 77
Web Applications ............................................................................................ 78
Setting an Access Destination ........................................................................ 78
Configuring/Canceling the Auto Jump Destination..................................... 80
Accessing Web Applications ........................................................................... 81
10 System Settings ............................................................................................ 83
System Settings Procedure............................................................................. 84
Step 1 Entering the System Administration Mode ...................................... 84
Step 2 Entering the Administrator ID and Password .................................. 84
Step 3 Selecting the Operation Mode on the System Administrator Menu 85
Step 4 Selecting an Item on the [System Settings] Screen ........................ 85
Step 5 Setting the Feature.......................................................................... 86
Step 6 Exiting the System Administration Mode......................................... 86
System Settings Menu List.............................................................................. 87
Differences in Common Settings................................................................... 110
Paper Tray Settings.................................................................................. 110
Print Universal Unique ID .........................................................................110
Differences in Copy Mode Settings...............................................................112
General Settings Tab - Features Allocation.............................................. 112
Differences in Network Settings .................................................................... 113
Proxy Server Settings............................................................................... 113
Remote Authentication Server/Directory Service ..................................... 114
PKI Settings (Public Key Infrastructure) ................................................... 118
Differences in Job Flow Settings................................................................... 120
Differences in Setup Menu............................................................................ 121
Job Flow Sheets....................................................................................... 121
Address Book (Address Number)............................................................. 126
Differences in Login Setup/Auditron Administration...................................... 128
2
Page 5

Table of Contents
11 Job Status ....................................................................................................129
Job Status Screens ....................................................................................... 130
Job Status Overview ..................................................................................... 132
3
Page 6

Page 7

1 Before Using the Machine
This chapter describes how to use this guide and the features available on the
ApeosPort series.
z
Preface .........................................................................................................6
z
Using This Guide ..........................................................................................7
z
Features Overview......................................................................................10
Page 8

1 Before Using the Machine
Preface
Before Using the Machine
Thank you for selecting the Fuji Xerox ApeosPort-II C4300/C3300/C2200 (hereafter
referred to as “the machine”).
This guide is intended for users who use the machine for the first time, and describes
features unique to the ApeosPort series. For features common to both the ApeosPort
and DocuCentre series, refer to the User Guide.
Please read this guide thoroughly as well as the User Guide to obtain the best
performance on this product.
After reading this guide, keep it handy for future reference when you encounter
difficulties with the machine during use.
1
6
Page 9

Using This Guide
Using This Guide
This section describes the organization of this guide.
Related Information Sources
We provide the following guides for optimum usage of the machine.
Included Manuals
Several manuals are included with this product. They are referred to as accompanying
manuals.
These accompanying manuals include descriptions on configurations and operation of
the product.
The following manuals are included with the machine.
User Guide
Describes all the necessary steps for copy/print/scan/fax, clearing paper jams, daily
care, setting the various items and safety information.
ApeosPort Function Guide (this guide)
Describes unique functions in the copy/print/scan/fax features of the ApeosPort series
that differ from functions described in the User Guide. For common features, refer to
the User Guide.
Before Using the Machine
1
Network Administrator Guide
Aimed toward network administrators, as a guide to setting up the network
environment.
Manual (HTML)
A guide for installing print drivers, configuring the printer environment, etc. This manual
is included in the CD-ROM of the Driver CD Kit.
Guides for Optional Accessories
Optional accessories are also available for the machine. User Guides are provided with
the optional accessories exclusively for ApeosPort-II C4300/C3300/C2200. These
User Guides are referred to as "guides for optional accessories". Guides for optional
accessories are provided in two forms, as printed or as On-line Help.
Guides for optional accessories describe all the necessary steps for operating optional
accessories and installing software.
7
Page 10

1 Before Using the Machine
Organization of This Guide
This guide consists of the following chapters.
Before Using the Machine
Information on computer operations, paper types, authentication and auditron
administration, maintenance, problem solving, machine status, specifications, and
emulation modes is written in the User Guide.
For the features, specifications, notes and restrictions not described in this guide, refer to the User
Guide.
1 Before Using the Machine
Describes how to use this guide and the features available on the ApeosPort series.
2 Control Panel
Describes how to use the touch screen.
1
3Copy
Describes differences from the copy feature written in the User Guide.
4Fax
Describes differences from the fax feature written in the User Guide.
5Scan
Describes differences from the scan feature written in the User Guide.
6 Send from Mailbox
Describes the mailbox features and how to work with mailboxes.
7 Stored Programming
Describes the stored programming feature for recording a series of procedures on the
machine.
8 Job Flow Sheets
Describes operations using a job flow sheet created by a remote system.
9 Web Applications
Describes the operations to connect to web applications.
10 System Settings
Describes differences from the system settings written in the User Guide.
11 Job Status
Describes differences from the job status screen written in the User Guide.
8
Page 11
Conventions
z
z
z
z
Using This Guide
In this document, “Computer” refers to a personal computer or workstation.
The screen images that are used in this guide are based on the machine
configuration with the various options. Some of the items in the screen images may
not be displayed or there may be features that cannot be used depending on the
machine configuration.
The following icons are used in this guide.
Important Indicates important information that you should read.
Note Indicates additional information on operations or features.
The following conventions are used in this guide:
" " : A cross-reference included in this guide.
Before Using the Machine
" " : Refers to names of CD-ROM, features, and touch screen
messages and input text.
[ ] : Refers to folders, files, applications, button or menu names
displayed in the touch screen, as well as the names of menus,
commands, windows, or dialog boxes displayed on the
computer screen and their buttons and menu names.
< > button: Indicates a hardware button on the computer.
< > key: Indicates a key on the keyboard of the computer.
z
Orientation of documents or paper is described in this guide as follows:
, ,Long Edge Feed (LEF) : Loading with one of the long edges of the document
or paper.
, ,Short Edge Feed (SEF): Loading with one of the short edges of the document
or paper.
LEF Orientation
Paper feed direction
SEF Orientation
Paper feed direction
1
9
Page 12
1 Before Using the Machine
Features Overview
Before Using the Machine
Various remote services and application software are available on this machine.
Note • Remote services and application software are optional. For more information, contact our
Web Applications
The dedicated browser on the control panel allows you to access a DocuShare server.
You can store scanned documents in the DocuShare server.
Note • The Remote Access Kit (optional) and DocuShare (optional) are required to use this feature.
1
Customer Support Center.
Browse, Search
Upload scanned documents
Print documents stored in the server
Scan
Print
Signature and Encrypted Communication with Certificate
You can receive and print encrypted E-mail, or send scanned documents as E-mail with
signature.
Note • The Data Security Kit (optional) is required to use this feature.
Scan
Encrypted e-mail
Scan
Certificate
E-mail with signature
Certificate
Print
10
Page 13
Automatic Processing of Routine Tasks using Job Flow Sheets
Once you have registered on the machine a job flow sheet created on a network
connected computer, you can automatically execute a series of operations beginning
with a scan operation.
You can create advanced job flow sheets with ApeosWare Flow Service.
Note • ApeosWare Flow Service (optional) is required to use this feature.
Features Overview
Before Using the Machine
1
Network Scanning
Documents can be automatically scanned and transferred to the server by selecting a
file (job template) in which information on scanning conditions and a forward
destination is stored. Network Scanning is useful to increase operating efficiency
because you only need to select a job template when scanning documents..
11
Page 14
1 Before Using the Machine
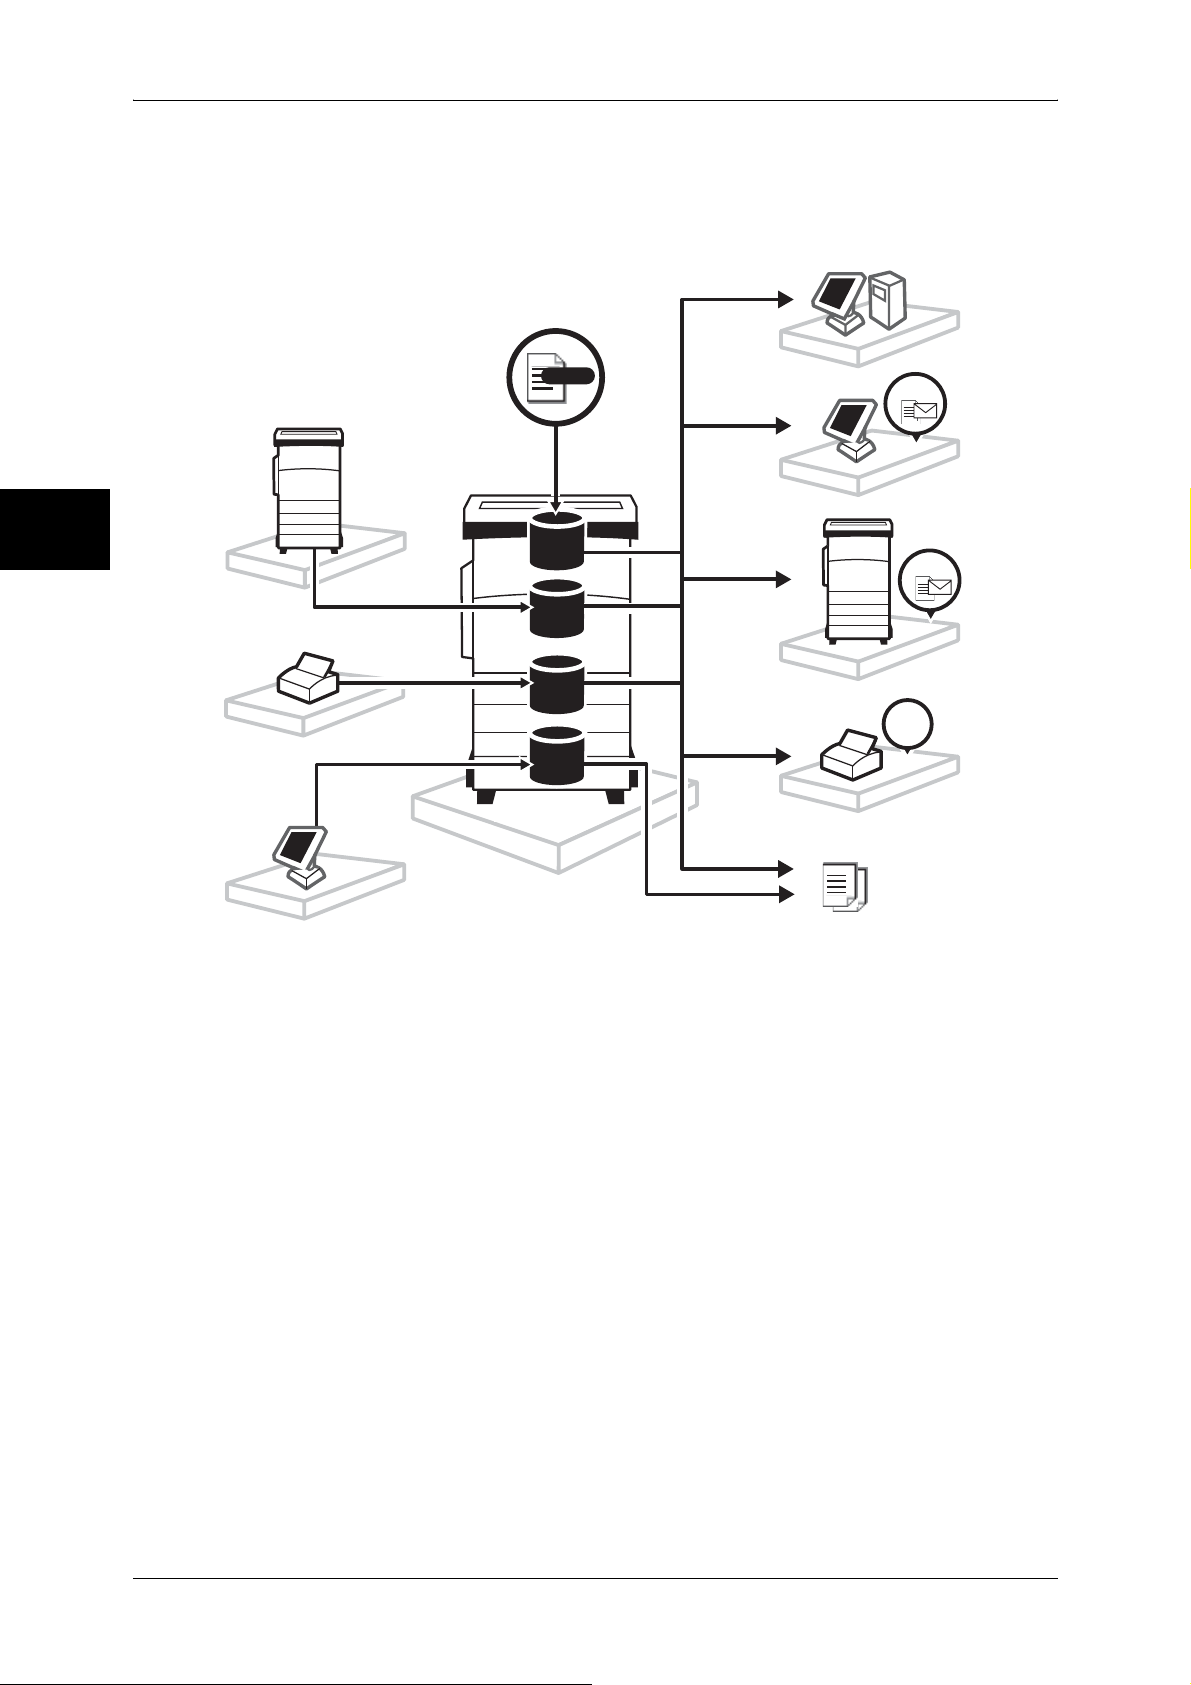
Input-Output Processes of Mailbox
Various methods are available to store or import documents in or from mailboxes.
Before Using the Machine
You can use mailboxes to reduce the amount of paper used or maintain confidentiality
of documents.
1
iFAX
Fax
Scan
Mailbox
Mailbox
ⷫዷ
Mailbox
ࡏ࠶ࠢࠬ
Mailbox
Scan
Server
ฃା
Receipt
E-mail
iFAX
Receipt
ฃା
Receipt
Fax
Print
12
Page 15

2 Control Panel
This chapter describes how to use the touch screen.
z
Standard Control Panel ..............................................................................14
z
Customizing the Control Panel ...................................................................16
z
Differences in the Screen Operations.........................................................18
Page 16
2 Control Panel
Standard Control Panel
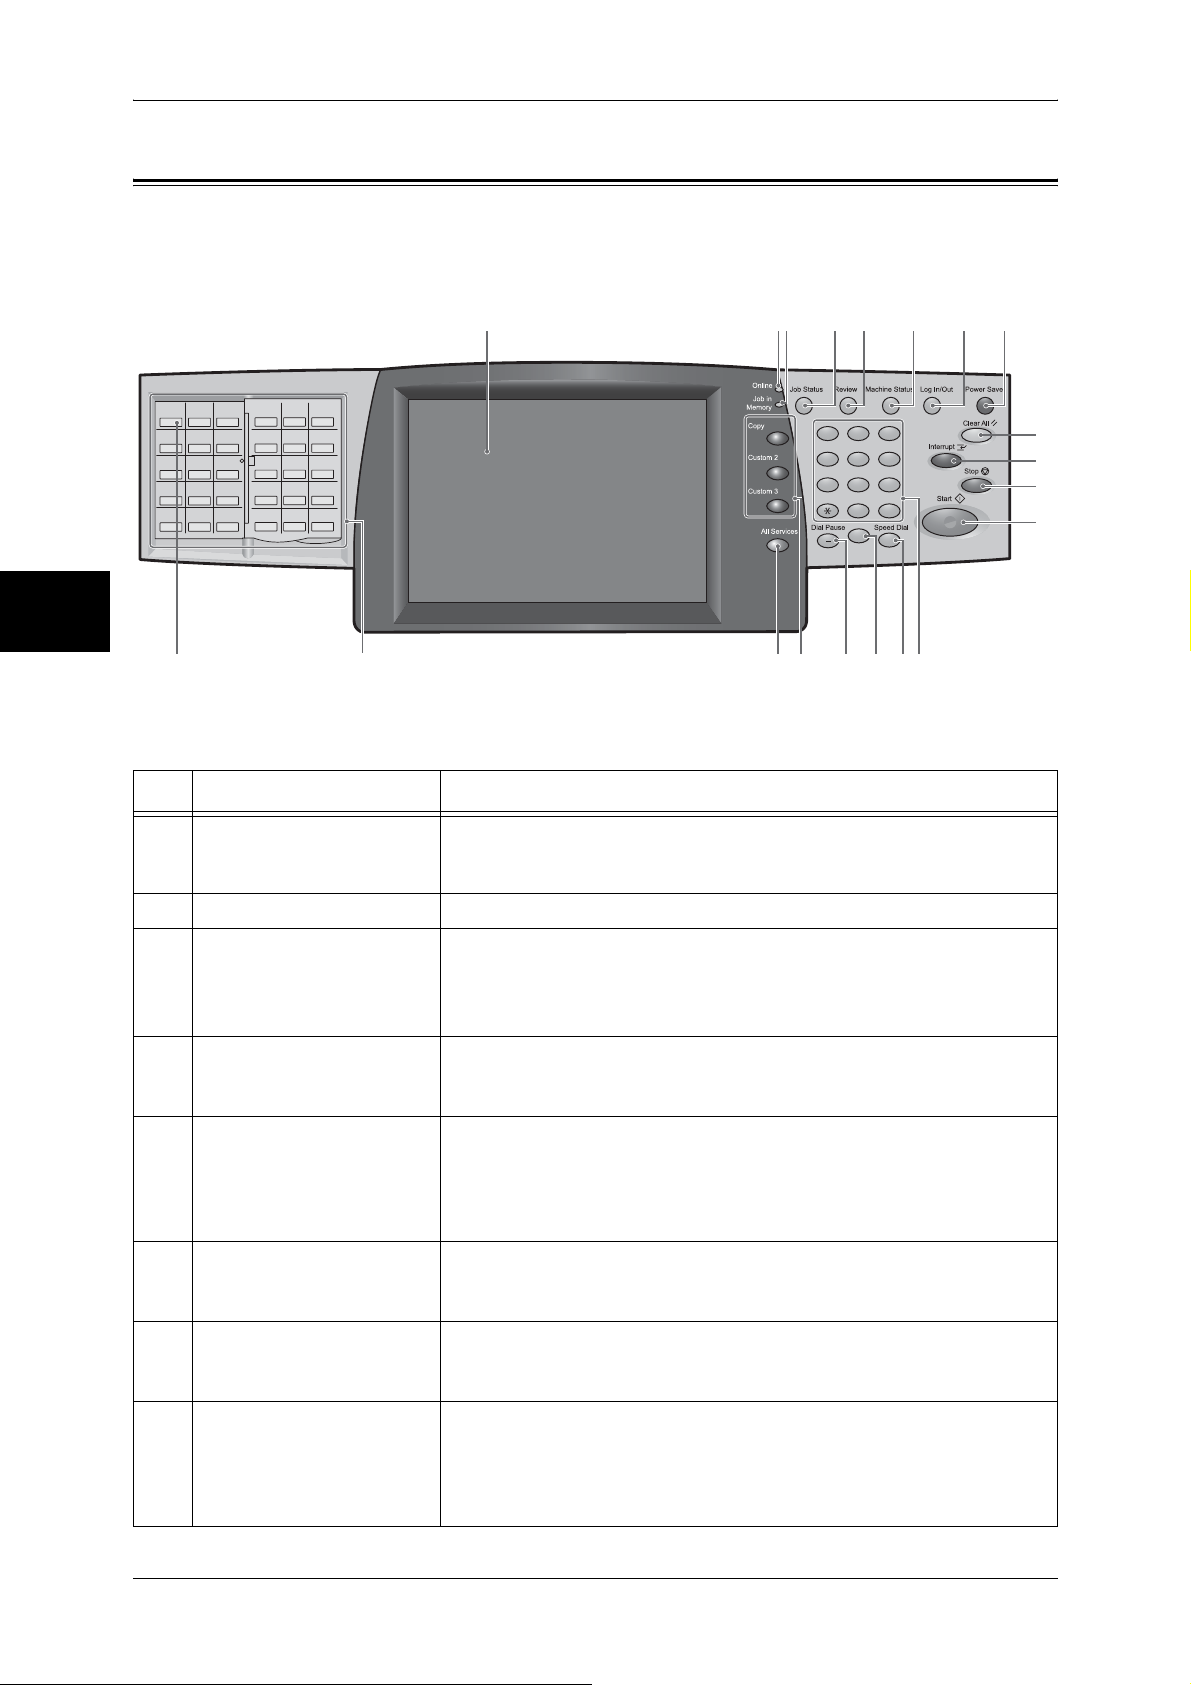
The following describes the names and functions of components on the standard
control panel.
Control Panel
2
3 8
4 5 6 7
123
456
789
0 㧏
C
15
1416 131718
001 002 003
004 005 006
007 008 009
010 011 012
013 014 015
1 2
016 017 018
019 020 021
022 023 024
025 026 027
028 029 030
1920
No. Component Function
1 Touch screen Displays messages required for operation, and buttons for various
features. You can directly touch the touch screen to instruct operations
in screens and set features.
9
10
11
12
2 <Online> indicator Lights when the machine is sending or receiving data to or from a client.
3 <Job in Memory> indicator Lights when data is stored in the machine's memory.
You can check stored documents in [Stored Documents List]. For information
on [Stored Documents List], refer to “Print Report/List” under “Chapter 12
Machine Status” in the User Guide.
4 <Job Status> button Press this button to confirm or cancel the current job, confirm or print
saved documents, or confirm completed jobs.
In this manual, this button is indicated as the <Job Status> button.
5 <Review> button Press this button to open the [Review] screen. In this screen, you can
check a list of the status of copy, fax and scan features whose settings
have changed from the defaults. You can also check the destination
information for sending faxes and e-mail.
In this manual, this button is indicated as the <Review> button.
6 <Machine Status> button Press this button to confirm the machine status and meters, check the
state of consumables, and print reports.
In this manual, this button is indicated as the <Machine Status> button.
7 <Log In/Out> button Press this button to display the Administrator ID input screen for System
Administration mode or Login Setup/Auditron Administration.
In this manual, this button is indicated as the <Log In/Out> button.
8 <Power Saver> button If the machine is not operated for a while, the machine's power
consumption is lowered to enter the power saver mode. In the power
saver mode, this button lights up. To cancel the power saver mode,
press this button again.
In this manual, this button is indicated as the <Power Saver> button.
14
Page 17
Standard Control Panel
No. Component Function
9 <Clear All> button Returns the statuses of all displayed services to their default values.
The machine will be reset to this state after it is turned on.
In this manual, this button is indicated as the <Clear All> button.
10 <Interrupt> button Press this button to temporarily stop a continuous copy job or printing to
give another job higher priority. During an interrupt, the interrupt button
lights up. Pressing the <Interrupt> button again cancels the interrupt
and the previous operation is resumed.
In this manual, this button is indicated as the <Interrupt> button.
Some jobs such as print jobs designated from client computers cannot be
executed during the interruption. For detail information, refer to “Notes and
Restrictions on the Interrupt Mode” under “Chapter 16 Appendix” in the User
Guide.
11 <Stop> button Press this button to stop the current copy job or communications.
In this manual, this button is indicated as the <Stop> button.
12 <Start> button Press this button to start copying or scanning.
In this manual, this button is indicated as the <Start> button.
13 Numeric keypad Press these buttons to enter the number of copies, passwords and other
numerical values.
In this manual, these buttons are indicated as the numeric keypad.
Control Panel
2
14 <Speed Dial> button Used to specify a destination phone number for fax or e-mail.
In this manual, this button is indicated as the <Speed Dial> button.
15 <C (Clear)> button Press this button if you have entered a wrong numerical value with the
numeric keypad.
In this manual, this button is indicated as the <C> button.
16 <Dial Pause> button Used to insert a pause into a destination number.
In this manual, this button is indicated as the <Dial Pause> button.
17 <Custom> buttons
(<Copy>, <Custom 2>,
<Custom 3> buttons)
18 <All Services> button Used to display the [All Services] screen.
19 One touch button panels Panels for one touch buttons.
20 One touch buttons Specify a recipient with one button. These buttons are available for fax
Used to call a custom feature.
The features assigned to the buttons are selected from the features
displayed on the [All Services] screen and [Language].
In this manual, these buttons are indicated as the <Copy>, <Custom 2>,
and <Custom 3> buttons.
For information on registering a feature with a button, refer to “Screen/Button
Settings” of “Common Settings” under “Chapter 10 System Settings” in the
User Guide.
In this manual, this button is indicated as the <All Services> button.
You can change the features that appear in the All Services screen. For detail
information, refer to “Screen/Button Settings” of “Common Settings” under
“Chapter 10 System Settings” in the User Guide.
You can leaf through panels to display 001 to 030, 031 to 060, and 061
to 070.
M01 to M20 are reserved for the stored programming feature. These
buttons correspond to jobs registered in 01 to 20.
Note • This feature is not available for some models. An optional package is
necessary. For details, contact our Customer Support Center.
and iFax.
Registered preset recipient numbers 001 to 070 are supported.
15
Page 18
Control Panel
2
2 Control Panel
Customizing the Control Panel
You can customize items displayed on the screen when turning the machine on or
canceling the power saver mode, items displayed on the screen after auto clear, the
<Custom> buttons, and items on the [All Services] screen.
For detail information, refer to “Screen/Button Settings” of “Common Settings” under “Chapter 10
System Settings” in the User Guide.
In addition, the brightness of the middle-sized color control panel can be adjusted.
Customizing the Screen Default
Allows you to customize the features displayed on the screen that appears after turning
the machine on or canceling the Power Saver mode.
Customizing the Screen after Auto Clear
Allows you to customize items displayed on the screen after Auto Clear. You can select
from [Last Selection Screen] and [All Services].
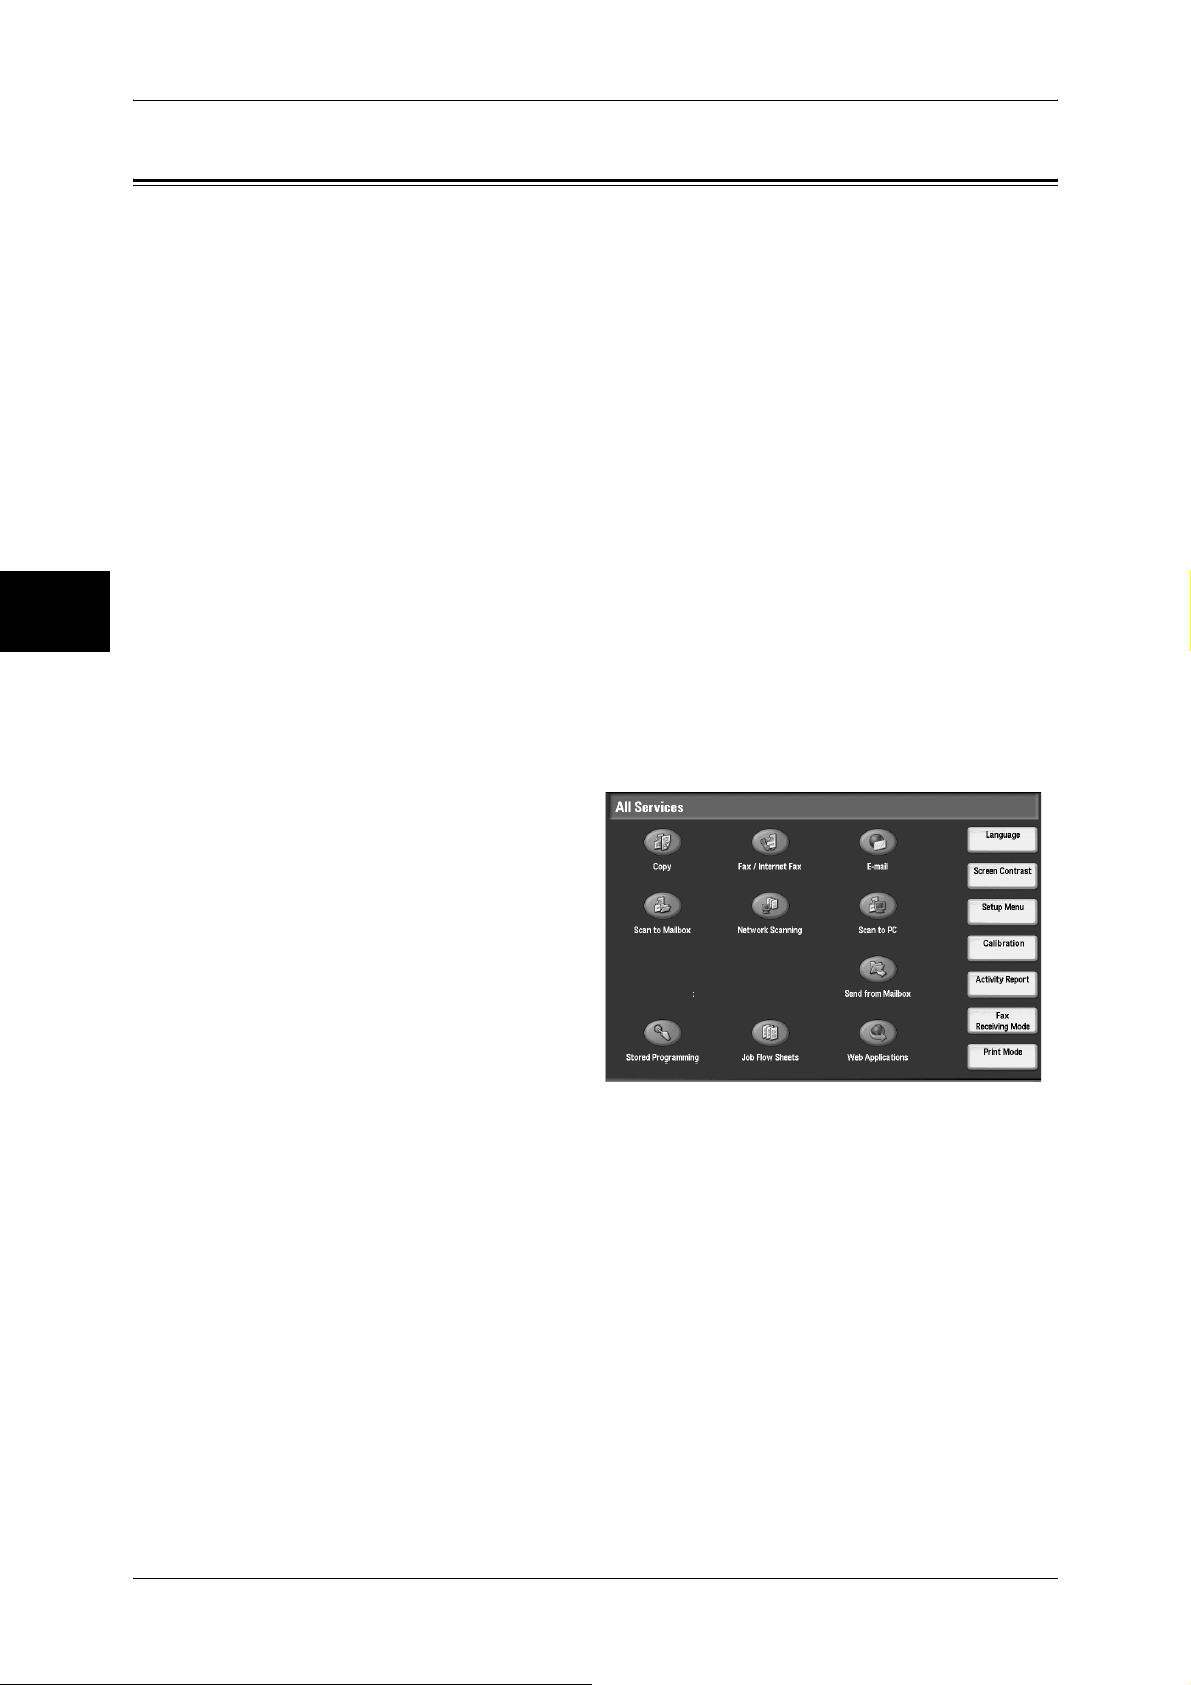
Customizing the [All Services] Screen
Allows you to customize the types of features and the location of buttons on the [All
Services] screen.
The following is the factory default settings.
Note • When the feature is not available, the button will not be displayed. Also, if the feature is
unavailable due to hardware problems, the button will be grayed out.
z
Copy
z
Fax/Internet Fax
z
E-mail
z
Scan to Mailbox
z
Network Scanning
z
Scan to PC
z
Send from Mailbox
z
Stored Programming
z
Job Flow Sheets
z
Web Applications
z
Language
z
Screen Contrast
z
Setup Menu
z
Calibration
z
Activity Report
z
Fax Receiving Mode
z
Print Mode
Assigning Features to <Custom> Buttons
Allows you to assign features to the <Custom> buttons on the control panel: <Custom
1> to <Custom 3>.
16
Page 19
Customizing the Control Panel
By assigning features to the <Custom> buttons, you can switch to the features without
returning to the [All Services] screen. To leave a feature unassigned, select [Not Set].
As the factory defaults, [Copy] is assigned to the <Copy> button. No feature is assigned
to the <Custom 2>, and <Custom 3> buttons. The features assigned to the buttons are
selected from the features displayed on the [All Services] screen and [Language].
Attach the labels included in the machine when you have changed the assignment. If
you have used a feature for which no label is provided, use a blank label and write down
the feature using a permanent marker, and then attach the label to the appropriate
button.
Changing the Feature Screen
You can customize items displayed on the setting screen of the following features on
the [All Services] screen.
z
Copy
z
Fax/Internet Fax
z
E-mail
z
Scan to Mailbox
z
Network Scanning
z
Scan to PC
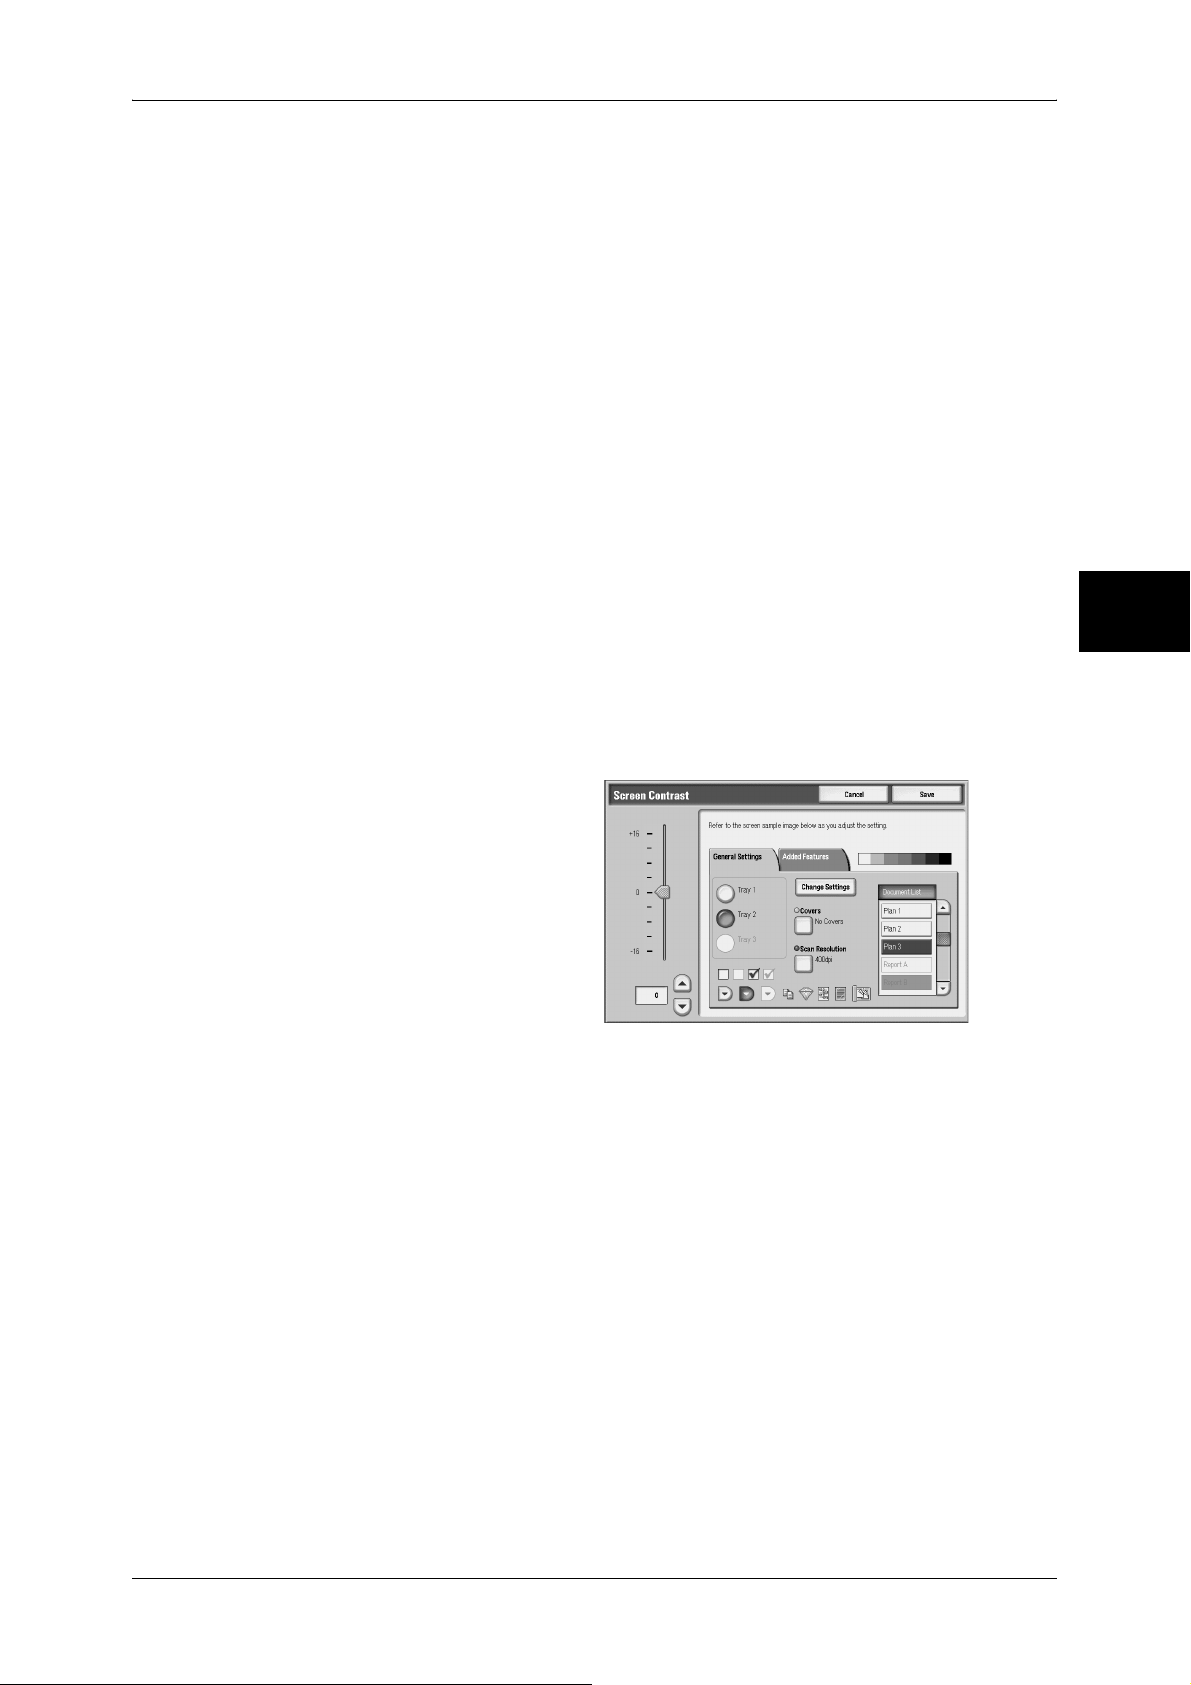
Screen Contrast
The [Screen Contrast] button on the [All Services] screen allows you to adjust the
contrast of the screen.
Control Panel
2
17
Page 20
Control Panel
2
2 Control Panel
Differences in the Screen Operations
This section describes differences on the screens that are common among features.
Screen Changes
List screen The buttons to jump to the first screen [ ] and the last
screen [ ] are added.
Keyboard screen The [Clear All] button is added. This button allows you to
delete all characters you entered at once.
18
Page 21

3Copy
This chapter describes differences from the copy feature written in the User
Guide.
z
Copy Feature List .......................................................................................20
z
Differences in the Copy Feature .................................................................25
Page 22
3 Copy
Copy Feature List
Copy
This section describes items in the copy feature.
3
20
Page 23

[General Settings] Tab
Copy Feature List
Item
Reduce/Enlarge Options for Preset %Twelve scaling factors are preset.
Paper Supply Paper Color When [Enabled] is selected for [Paper Color]
Output Color - -
2 Sided Copying - -
Original Type - -
Copy Output/
Stapling
Feature changed/
location
Independent X-Y% A scaling factor can be entered with the
numeric keypad.
under [Customize Paper Supply Screen] in the
System Settings, the paper colors specified
under [Paper Tray Attributes] are displayed.
Size Detection When [Size Detection] is selected for [Other
Attributes] under [Customize Paper Supply
Screen] in the System Settings, the specified
size detection method is displayed.
Options for
Standard Size of
Tray 5 (Bypass)
--
Twenty paper sizes are preset.
Changes Refer to
User Guide
Copy
3
Multiple-Up - -
Lighten/Darken - - User Guide
[Image Quality] Tab
Item
Original Type - -
Image Options - -
Image
Enhancement
Color Effects - -
Color Balance - -
Color Shift - -
Feature changed/
location
--
Changes Reference
User Guide
21
Page 24

3 Copy
[Layout Adjustment] Tab
Copy
3
Item
Book Copying - - User Guide and
2 Sided Book
Copy
Original Size Options for
Mixed Sized
Originals
Edge Erase - [Original Orientation] is added. User Guide and
Feature changed/
location
--
Standard Size
- [Original Orientation] is added.
- [Edge Erase] and [Border Erase] are added. User Guide and
Changes Refer to
Seventeen paper sizes are preset.
"Original
Orientation
(Specify the
Orientation of
Loaded
Documents)"
(P.26)
"Original
Orientation
(Specify the
Orientation of
Loaded
Documents)"
(P.26)
"Edge Erase
(Erasing Edges
and Margin
Shadows in the
Document)" (P.25)
Image Shift/
Variable Shift
Image Rotation - -
Invert Image - -
Original
Orientation
2 Sided Copying - [Original Orientation] is added.
- [Original Orientation] is added.
--
[Output Format] Tab
Item
Booklet Creation Covers [Printed Covers - 2 Sided], [Printed Covers -
Covers - Allows to specify the settings for a front cover
Transparency
Separators
Multiple-Up - [Original Orientation] is added.
Poster - -
Repeat Image - -
Feature changed/
location
- - User Guide and
Changes Refer to
Print Outside], and [Last Original as Back
Cover] are added.
and a back cover individually.
User Guide and
"Original
Orientation
(Specify the
Orientation of
Loaded
Documents)"
(P.26)
"Booklet Creation
(Creating a
Booklet)" (P.26)
"Covers (Attaching
a Cover to
Copies)" (P.28)
"Original
Orientation
(Specify the
Orientation of
Loaded
Documents)"
(P.26)
22
Page 25

Copy Feature List
Item
Annotation - [Original Orientation] is added. "Original
Watermark - [Original Orientation] is added. User Guide and
Secure
Watermark
Feature changed/
location
[Stamp Position]
screen
[Date Position]
screen
[Page Number]
Screen
[Page Number Print On] Screen
Text Effect [Original Orientation] is added.
[Side 2] can be selected.
[Side 2] can be selected.
[-1/N-, -2/N-, -3/N-] and [Page1/N, Page2/N,
Page3/N] are added to [Style].
Allows you to select [Include Covers/
Separators] when specifying [All Pages].
Changes Refer to
Orientation
(Specify the
Orientation of
Loaded
Documents)"
(P.26)
"Annotation
(Adding Stamp/
Date/Page
Number to
Copies)" (P.29)
"Original
Orientation
(Specify the
Orientation of
Loaded
Documents)"
(P.26)
Copy
3
Folding - - User Guide and
Preset Repeat
Image
2 Sided Copying - [Original Orientation] is added.
Copy Output/
Stapling
--
- [Original Orientation] is added.
"Original
Orientation
(Specify the
Orientation of
Loaded
Documents)"
(P.26)
23
Page 26

3 Copy
[Job Assembly] Tab
Copy
3
Item
Build Job Separators [Printed Separator - Side 1], [Printed
Sample Set - -
Combine Original
Sets
Delete Outside/
Delete Inside
Feature changed/
location
Screen during
copying
- [Original Orientation] is added.
- [Original Orientation] is added.
Changes Refer to
Separator - Side 2], and [Printed Separator - 2
Sided] are added.
z
Blank Separators
The number of separators can be set from 1 to
99.
z
Printed Separator - Side 1
Copies on Side 1 when inserting separators.
z
Printed Separator - Side 2
Copies on Side 2 when inserting separators.
z
Printed Separator - 2-Sided
Copies on the both sides when inserting
separators.
You can insert separators for the first
document set.
A [Sample Set] button is added.
User Guide
24
Page 27

Differences in the Copy Feature
Differences in the Copy Feature
This section describes differences from the copy feature written in the User Guide.
[Layout Adjustment] Tab
Edge Erase (Erasing Edges and Margin Shadows in the Document)
When you make copies with the document cover open or make copies from a book,
black shadows sometimes appear along the edges and center margin of the paper. If
it happens, you can make copies with the shadows erased.
Important • Confirm that the orientation of the document and the setting for [Original Orientation] are the
same.
Note • For 2-sided originals, the same edge erase amounts are set for the front and back sides.
• If you set [Reduce/Enlarge], the edge erase amounts will be reduced or enlarged in
proportion to the ratio you configured.
For information on the areas that can actually be printed, refer to “Printable Area” under “Chapter 16
Appendix” in the User Guide.
Copy
Normal
The edge erase amount is set to 2 mm for the top and bottom, and left and right. Select
one of [Margin Erase], [Edge Erase] and [Border Erase] to change the edge erase
amount.
Margin Erase
Erases shadows in the center of booklets or facing documents, or shadows at the top,
bottom, left, and light of documents. You can specify values for [Top & Bottom Erase],
[Left & Right Erase], and [Center] individually.
Edge Erase
Erases shadows in the center of booklets or facing documents, or shadows at the top,
bottom, left, and light of documents. You can specify values for [Top Erase], [Bottom
Erase], [Left Erase], [Right Erase], and [Center] individually.
Border Erase
Erases shadows in the center of booklets or facing documents, or shadows at the top,
bottom, left, and light of documents. You can specify values for [4 Edges], and [Center]
individually.
Erase Value
You can erase only the necessary amount. Specify the value within the range from 0
to 50 mm in 1 mm increments.
3
Original Orientation
The [Original Orientation] screen is displayed.
Refer to "Original Orientation (Specify the Orientation of Loaded Documents)" (P.26).
25
Page 28

3 Copy
Side 2
Appears when [Edge Erase] is selected.
Set whether the same value is set to the edge erase amount of Side 1 and Side 2.
z
Same as Side 1
The same value is set to the edge erase amount of Side 1 and Side 2.
z
Opposite to Side 1
The edge erase amounts of Side 1 and Side 2 are set symmetrically.
Original Orientation (Specify the Orientation of Loaded Documents)
In order to identify the top of the document, the orientation of the originals must be
configured.
Note • If the [Original Orientation] differs from the actual document orientation, then the machine
may mistakenly detect the head of the document.
Copy
3
Upright Images
Select this item when placing the top of the document facing the inner side of the
document glass or document feeder.
Sideways Images
Select this item when placing the top of the document facing the left side of the
document glass or document feeder. Be sure to select [Sideways Images] when the top
of the document is placed facing the left side (horizontal text).
[Output Format] Tab
Booklet Creation (Creating a Booklet)
You can make copies to create a booklet. The machine automatically lays out the
pages appropriately for booklet creation. You can also set the binding shift and attach
covers when making booklets.
When a C Finisher with Booklet Maker is installed, Folding or Folding + Stapling
become available.
Important • Confirm that the orientation of the document and the [Original Orientation] setting of the
[Layout Adjustment] screen are the same.
Note • This feature does not appear for some models. An optional package is necessary. For more
information, contact our Customer Support Center.
• If the number of pages in the booklet is not a multiple of four, the remaining pages will be
output as blank pages.
26
Off
No booklet is created.
On Create Booklet
Copies are made to enable left binding or top binding.
On - Right Bind Create Booklet
Copies are made to enable right binding.
On - Do not Create Booklet
You can output the copies of scanned documents as they are by specifying Bi-fold/
Stapling. Select this item when you do not need a document to be copied in page order.
Page 29

Differences in the Copy Feature
Covers
You can attach a cover to a booklet.
z
No Covers
No cover is added.
z
Blank Covers
A blank sheet of paper is attached as the cover.
z
Printed Covers - 2 Sided
The first and second pages of the document are copied on both sides of the cover.
z
Printed Cover - Print Outside
The first page of the document is copied on the front side of the cover.
Last Original as Back Cover
The last page of the original is used as the back cover of the booklet. Select the check
box to use the last page as the back cover. When using [Subsets] to separate booklets,
the cover will be made on the last page of the last subset.
Note • Depending on the number of pages in the original, a blank sheet may be inserted before the
last page.
Copy
Binding Shift
Displays the [Booklet Creation - Binding Shift] screen.
You can set the width of Binding Shift within the range from 0 to 50 mm in 1mm
increments.
Divide Output
Displays the [Booklet Creation - Divide Output] screen.
When you have a large number of originals, the originals are divided to create subsets
to reduce the thickness of each booklet. The machine folds copies in half, and piles
them up to form a booklet. This feature can be set to from 1 to 50 pages in 1 page
increments.
Note • When specifying [Folding], set the dividing number of sheets in the range from 1 to 15.
Finishing
Displays the [Booklet Creation - Finishing] screen.
When a C Finisher with Booklet Maker is installed, [Folding] and [Folding + Stapling]
are selectable.
z
Off
No Finishing is carried out.
z
Folding
Outputs copies folded in half.
z
Folding + Stapling
3
Outputs copies that are folded in half and stapled at the center.
27
Page 30

3 Copy
Covers (Attaching a Cover to Copies)
You can make copies with a cover attached.
The front cover can be output before the first page of the document on a different type
of paper (e.g. colored paper or heavyweight paper).
Note • When making 2-sided copies, copies are made on both sides of the top cover/back cover in
accordance with the page order of the document.
Front Cover
Attaches a front cover to the copies.
z
No Covers
No cover is added.
z
Blank Covers
A blank sheet of paper is attached as a front cover.
z
Printed Cover - Print Outside
Copy
The first page of the document is copied on the front side of the front cover. When a
back cover is to be attached, the second page is copied on the back cover.
z
Printed Cover - Print Inside
3
The first page of the document is copied on the back side of the front cover. When a
back cover is to be attached, the second page is copied on the back cover.
z
Printed Cover - 2 Sided
The first and second pages of the document are copied on the front and back sides
of the front cover. When a back cover is to be attached, the 3rd and 4th pages are
copied on the front and back sides of the back cover.
Back Cover
Attaches a back cover to the copies.
z
No Covers
No back cover is attached.
z
Blank Covers
A blank back cover is attached.
z
Printed Cover - Print Inside
The first page of the document is copied on the front side of the back cover.
z
Printed Cover - Print Outside
The first page of the document is copied on the back side of the back cover.
z
Printed Cover - 2 Sided
The first and second pages of the document are copied on the front and back sides
of the back cover.
28
Paper Tray Settings
Displays the [Covers - Paper Tray Settings] screen.
Allows you to set the paper tray to use.
z
Front Cover Tray
Set a tray used for front covers.
z
Back Cover Tray
Page 31

Set a tray used for back covers.
z
Main Body Tray
Set a tray used for the main bodies of documents.
Front Cover Quantity
Displays the [Front Cover Quantity] screen.
Back Cover Quantity
Displays the [Back Cover Quantity] screen.
Annotation (Adding Stamp/Date/Page Number to Copies)
You can add a stamp, date, and page number not included on the document to copy
paper when outputting copies.
You can select from already provided formats for the stamp type, date, page number,
and printing position.
Note • The annotation image and character size is not changed even if you set the enlarge/reduce
setting.
• If Stamp, Date, and Page Number are specified at the same time, we recommend confirming
that none of the positions overlap before making copies.
• If [Multiple-Up] is set, the annotation is added to the combined image.
• If [Repeat Image] or [Booklet Creation] is set, the annotation is added to each individual
image.
Differences in the Copy Feature
Copy
3
Stamp
Displays the [Stamp] screen.
Allows to set the style and position of the stamp.
z
Off
No stamp is added.
z
On
A stamp is added.
z
Text
Eight standard types and registered character strings (maximum eight types) are
available.
z
Print On...
Displays the [Stamp - Print On] screen.
You can select the page(s) to print the stamp from [First Page Only] and [All Pages].
z
Position
Displays the [Stamp - Position] screen.
Nine positions on Side 1 for Stamp are available.
[Same as Side 1] and [Opposite to Side 1] can be selected for Side 2.
z
Detailed Settings
Displays the [Stamp - Detailed Settings] screen.
Three stamp sizes and seven stamp colors are available.
The size can be specified from 6 to 64 points in increments of 1 point.
Note • If [Date] and [Page Number] are both set, specify [Black].
29
Page 32

Copy
3
3 Copy
Date
Displays the [Date] screen.
You can make copies with a date added. The printed date is the date and time when
the copy was made.
The format of the date printed on can be changed. For information on the settings, refer to “Watermark”
of “Common Settings” under “Chapter 10 System Settings” in the User Guide.
z
Off
No date is added.
z
On
A date is added.
z
Print On
Displays the [Date - Print On] screen.
You can select from [First Page Only] and [All Pages].
z
Position
Displays the [Date - Position] screen.
Six positions on Side 1 for Date are available.
[Same as Side 1] and [Opposite to Side 1] can be selected for Side 2.
z
Size
Displays the [Date - Size] screen.
Three sizes for Date are available. The size can be specified from 6 to 24 points in
increments of 1 point.
Page Number
Displays the [Page Number] screen.
Allows you to specify the position of page numbers.
z
Off
No page number is added.
z
On
A page number is added.
z
Style
You can set the style for the page number.
-1, 2, 3
A page number is added.
- -1-, -2-, -3-
Hyphens are added to the left and right of the page number. (Example: -1-)
- Page 1, Page 2, Page 3
“Page” is added in front of the page number. (Example: Page1, Page2)
30
- 1/N, 2/N, 3/N
The total number of pages is added to the right side of the page number.
(Example: 1/50, 2/50)
When selecting [1/N, 2/N, 3/N], the value specified in [Total Page(N)] screen is
used.
Page 33

Differences in the Copy Feature
- -1/N-, -2/N-, -3/N-
The total page number is added to the right of page number and hyphens are also
added to the right and left of the numbers. (Example: -1/50-, -2/50-)
When selecting [-1/N-, -2/N-, -3/N-], the value specified in [Total Page(N)] screen
is used.
- Page 1/N, Page 2/N, Page 3/N
“Page” is added in front of the page number. (Example: Page1/50, Page2/50)
When selecting [Page 1/N, Page 2/N, Page 3/N], the value specified in [Total
Page(N)] screen is used.
z
Total Pages (N)
Displays the [Page Number - Total Pages (N)] screen.
Set how to count the maximum number of pages.
-Auto
The number of pages of the document is automatically counted as the total
number of pages.
- Enter Number
Allows you to specify the total number of pages within the range from 1 to 999.
z
Print On
Displays the [Page Number -Print On] screen.
You can specify the page(s) to add a page number.
- All Pages
A page number is added to all pages.
- Enter First Page Number
Specify the start page for adding page numbers within the range from 1 to 999.
- Enter End Page Number
Specify the last page for adding page numbers within the range from 1 to 999.
- Enter First & Last Page No.
Specify the start and last pages for adding page numbers within the range from 1
to 999.
- Include Covers/Separators
Available when [All Pages] is selected. Add a check to include a cover or
separators.
Copy
3
- Start Number
Specify the start page for adding page numbers within the range from 1 to 999. To
enter the number with the numeric keypad, select [Enter Number Using Keypad]
and then enter the number.
z
Position
Displays the [Page Number -Position] screen.
Six positions on Side 1 for Page Number are available.
[Same as Side 1] and [Opposite to Side 1] can be selected for Side 2.
z
Size
Displays the [Page Number -Size] screen.
Three sizes for Page Number are available. The stamp size can be specified from 6
to 24 points in increments of 1 point.
31
Page 34

Copy
3 Copy
3
32
Page 35

4Fax
This section describes differences from the fax feature written in the User Guide.
z
Fax Feature List..........................................................................................34
z
Differences in the Fax Feature ...................................................................37
Page 36

4 Fax
Fax Feature List
This section describes items in the fax feature.
Fax
4
[General Settings] Tab
Item
iFax/Fax - -
Address Book - -
Keyboard - The procedures described in “Speed Dialing
Feature changed/
location
(entering numbers using address number)”,
“Specifying Destination Using the Keyboard
Screen”, and “Entering Specific Symbols” are
available.
Changes Refer to
User Guide
Next Recipient - -
Show Fax No./
E-mail Address
Lighten/Darken - - User Guide
--
34
Page 37

Fax Feature List
Item
2 Sided Originals - -
Resolution - -
Feature changed/
location
Changes Refer to
[Layout Adjustment] Tab
Item
2 Sided Originals - -
Original Size - -
Mixed Sized
Originals
Book Scanning - -
Reduce/Enlarge - -
Stamp - -
Feature changed/
location
--
Changes Refer to
[Transmission Options] Tab
User GuideOriginal Type - -
User Guide
Fax
Item
Report/Read
Receipts
Communication
Mode
Priority Send/
Delayed Start
Send Header - -
Cover Note - -
iFax Subject - -
iFax Comment
(Mail Contents)
Recipient Print
Sets
Multiple-up - -
Remote Mailbox - -
F Code - -
iFax Profile - -
Feature changed/
location
--
--
--
--
--
Changes Refer to
4
User Guide
Encryption - A button is added. "Encryption
(Sending iFax
Encrypted by S/
MIME)" (P.37)
Digital Signature - A button is added. "Digital Signature
(Sending iFax with
a Digital Signature
by S/MIME)"
(P.37)
35
Page 38

4 Fax
[Advanced Fax Features] Tab
Fax
4
Item
Polling - -
Store for Polling - -
On-hook (Manual
Send/Receive)
Feature changed/
location
--
Changes Refer to
User Guide
36
Page 39

Differences in the Fax Feature
This section describes differences from the fax feature written in the User Guide.
[Transmission Options] Tab
Encryption (Sending iFax Encrypted by S/MIME)
When using the iFax feature, you can send iFax encrypted by S/MIME.
When sending encrypted iFax, select a recipient with a certificate that can be encrypted
from Address Book.
Off
Sends iFax without encryption.
On
Sends encrypted iFax.
Differences in the Fax Feature
Digital Signature (Sending iFax with a Digital Signature by S/MIME)
When using the iFax feature, you can send iFax with a digital signature by S/MIME.
Digital Signature allows a recipient to confirm whether contents of the iFax are
changed, or whether the iFax is sent from the proper sender.
To use this feature, the machine's mail address must be linked to a certificate.
For information on how to link a certificate to the machine’s e-mail address, refer to the Network
Administrator Guide.
Off
Sends iFax without a digital signature.
On
Sends iFax with a digital signature.
Fax
4
37
Page 40

4 Fax
Fax
4
38
Page 41

5 Scan
This chapter describes differences from the scan feature written in the User
Guide.
z
Scan Feature List........................................................................................40
z
Differences in the Scan Feature .................................................................44
Page 42

5 Scan
Scan Feature List
This section describes items in the scan feature.
Note • Items displayed vary depending on the selected feature.
Scan
5
[General Settings] Tab (E-mail)
Item
- - The tab configuration is changed. -
Feature changed/
location
40
Changes Refer to
Page 43

Scan Feature List
Item
Address Book - [Remote Search (Directory Svc.)] is added.
Keyboard - -
Add Me - -
Recipient(s) Change Settings S/MIME certificates can be selected in the
From - When a digital signature is used, the e-mail
Subject - -
Message - Up to 512 characters are allowed.
Scanning Color - -
2 Sided Originals - -
Original Type - -
File Format More... Items relating to encryption and digital
Feature changed/
location
Changes Refer to
The contents are the same as [Local Search].
[Change Recipient] screen.
address of the machine is set as the sender's
address.
signature with certificates are added.
[General Settings] Tab (Scan to Mailbox)
User Guide
User Guide
"[File Format]
Screen" (P.45)
Scan
Item
- - The tab configuration is changed. -
Mailbox - -
Go to - -
Document List - -
Scanning Color - -
2 Sided Originals - -
Original Type - -
Feature changed/
location
Changes Refer to
[General Settings] Tab (Network Scanning)
Item
- - The [Network Scanning] button is added.
Scanning Color - -
2 Sided Originals - -
Original Type - -
File Format - -
Go to - -
Feature changed/
location
Changes Refer to
5
User Guide
"[General
Settings] Tab
(Network
Scanning)" (P.44)
Template
Description
Refresh - -
--
41
Page 44

5 Scan
[General Settings] Tab (Scan to PC)
Item
- - The tab configuration is changed. -
Transfer Protocol - -
Address Book - -
Browse... - -
Forwarding
destination
Scanning Color - -
Original Type - -
File Format More... Items relating to encryption and digital
[Image Quality] Tab
Item
Scan
Photographs - -
Feature changed/
location
--
Feature changed/
location
Changes Refer to
signature with certificates are added.
Changes Refer to
User Guide
User Guide2 Sided Originals - -
"[File Format]
Screen" (P.45)
5
Image Options - -
Image
Enhancement
Shadow
Suppression
Color Space - -
--
--
[Layout Adjustment] Tab
Item
Scan Resolution - -
2 Sided Originals - -
Book Scanning - -
Original Size Options for Scan
Mixed Sized
Originals
Edge Erase - -
Reduce/Enlarge Options for Preset %Twelve scaling factors are preset.
Feature changed/
location
Size
- [Original Orientation] is added.
Changes Refer to
Seventeen paper sizes are preset.
User Guide
User Guide
42
Options for [Output
Size] when [Auto %]
is selected.
Seventeen scaling factors are preset.
Page 45

[Output Format] Tab
Scan Feature List
Item
Image
Compression
Read Receipts - -
Split Send - -
Document Name - When specifying a job template, the file name
File Name - When specifying a job template, the file name
File Name
Conflict
Reply To - -
Encryption - The [Encryption] button is added. "Encryption
Digital Signature - The [Digital Signature] button is added. "Digital Signature
Feature changed/
location
--
--
Changes Refer to
User Guide
is taken from the template, and cannot be
changed.
is taken from the template, and cannot be
changed.
User Guide
(Sending E-mail
Encrypted by S/
MIME)" (P.51)
(Sending E-mail
with a Digital
Signature by S/
MIME)" (P.51)
Scan
5
43
Page 46

5 Scan
Differences in the Scan Feature
This section describes differences from the scan feature written in the User Guide.
[General Settings] Tab (Network Scanning)
Scans a document by specifying a file (job template) that includes information such as
scanning conditions and a destination server.
Job templates are created on a computer using the job template utility of CentreWare
Scan Service and stored on a server. Scanned data is converted to the TIFF format,
and automatically sent to the server. The machine can automatically import job
templates from the server.
For information on CentreWare Scan Services, refer to the CentreWare Scan Services Installation
Guide.
Important • If characters not supported by the machine are used in names or description of job
templates, the characters will not be displayed or will be garbled on the screen. For
information on characters that can be used in names or description of job templates, refer to
“Notes and Restrictions on the Use of the Machine” of “Notes and Restrictions” under
“Chapter 16 Appendix” in the User Guide.
Note • CentreWare Scan Services (optional) is required to use this feature.
Scan
5
1 Select [Network Scanning] on the
[All Services] screen.
2 Select a job template.
Network Scanning
Select a job template that includes the scan conditions you want.
Note • Select [ ] to return to the previous screen or [ ] to move to the next screen.
Go to
Use the numeric keypad to enter a 3-digit job template number. The job template then
appears at the top of the list.
Template Description
Displays the [Template Description] screen. This screen displays the description of a
job template. The description only appears if it has been set during the creation of the
job template.
Refresh
44
Refreshes the information. If a created job template has not been displayed, selecting
[Refresh] will display the job template.
Page 47

[General Settings] Tab (E-mail)
Recipient(s)
Allows you to confirm, delete or change recipients using the pop-up menu displayed.
Remove
Deletes the selected recipients.
Edit
Displays the [Edit Recipient] screen. You can confirm or change the e-mail address,
recipient name, and S/MIME certificate.
Refer to "[Edit Recipient] Screen" (P.45).
Cancel
Hides the pop-up menu.
[Edit Recipient] Screen
Allows you to confirm and change recipients.
Differences in the Scan Feature
E-mail Address
To change the e-mail address, select [Change Settings] to display the keyboard and
enter the new address.
Recipient Name
To change the recipient name, select [Change Settings] to display the keyboard and
enter the new name.
The recipient name appears when registered in Address Book.
S/MIME Certificate
To confirm whether there is a linked certificate or not, select [Change Settings].
When S/MIME communication is available and the address is linked with a certificate,
you can confirm the details of the S/MIME certificate.
For more information on S/MIME communication, refer to "S/MIME Settings" (P.118).
Change Settings
Allows you to confirm and change the settings of the selected item.
[File Format] Screen
Allows you to select the output file
format.
Scan
5
TIFF/JPEG Auto Select
Automatically selects JPEG or
TIFF. The file format is determined
for each page: [JPEG] for full color
and grayscale images, [TIFF] for
monochrome.
Multi-page TIFF
Saves multiple pages as one TIFF file.
45
Page 48

Scan
5
5 Scan
Single-page TIFF
Saves each page as a TIFF file.
JPEG
Saves as a JPEG file. When either [Color] or [Grayscale] is selected for [Output Color],
configure the image compression method. You can also configure the compression
ratio with [Image Compression] in the [Output Format] screen.
PDF
Saves as a PDF file.
Important • The version of output PDF files is Adobe® Acrobat® 4.0 (PDF 1.3).
DocuWorks
Saves as a DocuWorks file.
PDF High Compression
Saves as a PDF file with a high compression rate.
DocuWorks High Compression
Saves as a DocuWorks file with a high compression rate.
When selecting [DocuWorks High Compression], you can create thumbnail images of
the scanned data.
Important • Creating thumbnail images increases the size of the output data. Check the size before you
send it by E-mail.
• DocuWorks 5.0.x and earlier versions (including trial version) do not support highcompressed DocuWorks files.
Note • To browse or print an output DocuWorks file on a computer, one of the following software is
required.
- DocuWorks 6.0 or later
- DocuWorks Viewer Light 5.1 or later
- DocuWorks Viewer Light for Web 5.1 or later
PDF Security
Allows you to configure security on the data saved as a PDF file to prevent
unauthorized access.
The [File Format - PDF Security] screen appears.
Refer to "[File Format - PDF Security] Screen" (P.47).
DocuWorks Security
Allows you to configure security on the data saved as a DocuWorks file to prevent
unauthorized access.
The [File Format - DocuWorks Security] screen appears.
Refer to "[File Format - DocuWorks Security] Screen" (P.48).
DocuWorks Signature
The [File Format - DocuWorks Signature] screen appears.
A digital signature added to a file enables to detect alterations in the file, or prevent
impersonation of the sender.
z
Off
No digital signature is added.
46
Page 49

Differences in the Scan Feature
z
On
Adds a digital signature using the certificate of the machine.
z
Signature Field Location
Select the position where the signature is displayed.
PDF Signature
The [File Format - PDF Signature] screen appears.
A digital signature added to a file enables to detect alterations in the file, or prevent
impersonation of the sender.
To verify the signature with Adobe Acrobat, select [Digital Signatures] under
[Preferences] on Acrobat, and then select the following option for [Signing Method].
- Acrobat 6.0.x : Windows Digital Certificate Security
- Acrobat 7.0.x : Adobe Default Security
z
Off
No digital signature is added.
z
Visible Signature
Adds a digital signature using the certificate of the machine.
z
Invisible Signature
Adds an invisible digital signature using the certificate of the machine.
z
Signature Field Location
Select the position for [Visible Signature] where the signature is displayed.
[File Format - PDF Security] Screen
Allows you to encrypt a PDF file by password, and assign the access privileges for the
file operation.
Off
The file is not encrypted, and no access privilege is configured.
Password
Encrypts the file using password.
Scan
5
Encryption Algorithm
Set the encryption method.
z
128-bit RC4
Encrypts by the 128-bit RC4 method. Files encrypted by this method can be opened
with Adobe
Important • Files encrypted by the 128-bit RC4 method with [PDF Signature] can only be opened with
®
Acrobat® 5.0 or later.
®
Acrobat® 5.0 or later.
Adobe
47
Page 50

5 Scan
z
128-bit AES
Encrypts by the 128-bit AES method. Files encrypted by this method can be opened
with Adobe
Supported Version
The supported Adobe
Document Open Password
The [PDF Security - Document Open Password] screen appears.
If you select [On] and set a password, the password is required to open the file.
You can enter a password up to 32 characters.
Permissions
The [PDF Security - Permissions] screen appears.
Refer to "[PDF Security - Permissions] Screen" (P.50).
®
Acrobat® 7.0 or later.
®
[File Format - DocuWorks Security] Screen
Allows you to encrypt a DocuWorks file by password, and assign the access privileges
for the file operation.
Scan
Off
The file is not encrypted, and no
access privilege is configured.
Acrobat® versions are displayed.
5
Password (V4 Compatible)
Encrypts the file by the 56 bit DES
method using password. Files
encrypted by this method can be
opened with DocuWorks Ver.4.0 or
later.
Select [Open Password], and set a
password.
Password (V4 Incompatible)
Encrypts the file by the 128 bit AES method using password. Files encrypted by this
method can be opened with DocuWorks Ver.5.0 or later.
Select [Open Password], and set a password.
Digital Certificate (V4 Incompatible)
Encrypts the file by the 128 bit AES method using certificate. Files encrypted by this
method can be opened with DocuWorks Ver.5.0 or later.
Select [Certificate] to set a certificate.
Important • If you encrypt a file using a certificate without Basic Constraints, DocuWorks Ver.5.0.1 and
Ver.6.0.1 cannot open the file. To use such certificates, use DocuWorks Ver.5.0.2, or
Ver.6.0.2 or later.
Encryption Algorithm
Displays the encryption methods.
48
Restricted Operations
Select file operations to which access privileges are assigned. When assigning access
privileges, configure [Full Access Password] or [Full Access Certificate] as well.
Page 51

Open Password
The [DocuWorks Security - Open Password] screen appears.
If you select [On] and set a password, the file is encrypted. To open the file, the
password is required. The access privileges set in [Operation Restriction] are assigned.
You can enter a password up to 32 characters.
Full Access Password
The [DocuWorks Security - Full Access Password] screen appears.
When setting a password, the password is required to change the access privileges set
in [Operation Restriction].
You can enter a password up to 32 characters.
Certificate
The [DocuWorks Security - Certificate] screen appears.
Refer to "[DocuWorks Security - Certificate] Screen" (P.49).
[DocuWorks Security - Certificate] Screen
Select a certificate added to the file.
Differences in the Scan Feature
Remove
Deletes the selected certificates from the list.
Edit
Displays the [Change Settings] screen.
You can change the access privileges and confirm the certificate information.
z
Access Right
Allows you to change the access privileges to open or operate files.
z
Certificate Detail
The [Certificate Information] screen appears.
Certificate information including issuer, expiration date, persons to whom the
certificate is issued, and the like is displayed.
Cancel
Closes the pop-up menu.
Delete All
Deletes all settings of the certificate.
Add Device Certificate
Scan
5
If a valid certificate is linked to the machine, the machine certificate is added to the
certificate list.
Add from Address Book
The [DocuWorks Security - Address Book] screen appears.
Refer to "[DocuWorks Security - Address Book] Screen" (P.50).
49
Page 52

5 Scan
[PDF Security - Permissions] Screen
Allows you to assign access privileges to a file.
1 Select [Permissions].
2 Enter the password.
3 Select any item.
Security Password
The [PDF Security - Security Password] screen appears.
Authorization Password allows to assign access privileges to files. The password is
required when changing the access privileges or performing unauthorized operations.
You can enter a password up to 32 characters.
Permissions - Printing
The [Permissions - Printing] screen appears.
Configure whether to allow to print the file. If allowed, select the print resolution as well.
Scan
5
Permissions - Changes Allowed
The [Permissions - Changes Allowed] screen appears.
Configure whether to allow to modify the file contents such as inserting pages or adding
notes.
Allow Contents Copying and Extraction
The [Allow Contents Copying and Extraction] screen appears.
Configure whether to allow to copy the file contents such as text and images included.
[DocuWorks Security - Address Book] Screen
Allows you to select parties to whom the encrypted file is disclosed, and address to
whom privileges are assigned.
Open Document
Displayed only when [Local Address List] is selected.
Configure certificates of persons who are allowed to open the file.
Full Access
Displayed only when [Local Address List] is selected.
Configure certificates of persons who are allowed to change access privileges
including editing or operating the file (full access).
50
Go to
Displayed only when [Local Address List] is selected.
Enter a recipient number using the numeric keypad to display the recipient on the list.
Page 53

Differences in the Scan Feature
Certificate Details
The [Certificate Details] screen appears.
Certificate information including issuer, expiration date, persons to whom the certificate
is issued, and the like is displayed.
Local Address List
Displays the local address list.
For information on Local Search, refer to “Address Book” of “E-mail” under “Chapter 5
Scan” in the User Guide.
Local Search
Searches recipients in the local address list.
For information on Local Search, refer to “Local Search” of “E-mail” under “Chapter 5
Scan” in the User Guide.
Remote Search (Directory Svc.)
For information on Remote Search (Directory Svc.), refer to “Local Search” of “E-mail”
under “Chapter 5 Scan” in the User Guide. For information on Directory Service, refer
to "LDAP Server/Directory Service" (P.115).
[Output Format] Tab
Encryption (Sending E-mail Encrypted by S/MIME)
When using the [E-mail] feature, you can send e-mail encrypted by S/MIME.
When sending encrypted e-mail, select an e-mail address with a certificate that can be
encrypted from Address Book.
Off
Sends e-mail without encryption.
On
Sends e-mail with encryption.
Digital Signature (Sending E-mail with a Digital Signature by S/MIME)
When using the [E-mail] feature, you can send e-mail with a digital signature
by S/MIME.
Digital Signature allows a recipient to confirm whether contents of the e-mail are
changed, or whether the e-mail is sent from the proper sender.
To use this feature, the machine's mail address must be linked to a certificate.
For information on how to link a certificate to the e-mail address, refer to the Network Administrator
Guide.
Scan
5
Off
Sends e-mail without a digital signature.
On
Sends e-mail with a digital signature.
51
Page 54

5 Scan
Scan
5
52
Page 55

6 Send from Mailbox
This chapter describes the basic operations and features of the mailbox.
z
Selecting a Mailbox.....................................................................................54
z
Checking/Operating Documents in a Mailbox.............................................55
z
Printing Documents in a Mailbox ................................................................58
z
Configuring/Starting Job Flow..................................................................... 60
Page 56

6 Send from Mailbox
Selecting a Mailbox
This section describes how to select a mailbox.
Selectable mailboxes depend on the settings on the user authentication feature.
For more information, refer to “Types of Mailboxes” of “Authentication for Job Flow Sheets and
Mailboxes” under “Chapter 13 Authentication and Auditron Administration” in the User Guide.
1 Press the <All Services> button.
2 Select [Send from Mailbox].
3 Select a mailbox.
Note • Select [ ] to return to the
previous screen or [ ] to
move to the next screen.
• An arrow is displayed next to
each mailbox which has a link
to a job flow and for which the
auto start is set.
• If you are prompted for a
password, enter the password and select [Confirm].
Send from Mailbox
6
Go to
Displays a mailbox at the top when you enter the three-digit mailbox number with the
numeric keypad.
54
Page 57

Checking/Operating Documents in a Mailbox
Checking/Operating Documents in a Mailbox
You can confirm or operate documents stored in a mailbox.
1 On the [Send from Mailbox] screen,
select a mailbox.
2 Select a document.
Note • The number of documents
stored is displayed in [No. of
Documents].
• Select [ ] to return to the
previous screen or [ ] to
move to the next screen.
• You can sort documents in
ascending or descending
order by pressing either [Document Name] or [Stored Date].
• At the left of the document name, an icon is displayed to show the document type.
:Scanned document
:Document to be printed
:Document for Private Polling
:Fax to Mailbox
:iFax to Mailbox
• Up to 100 documents can be selected separately. You can also select all documents. When
you select documents separately, a number appears at the left of the document icon to
indicate the order in which it was selected. Documents are processed in this order.
3 Select any item.
Send from Mailbox
Refresh
Displays refreshed information.
List
Lists the documents stored in the mailbox, with their stored dates and pages.
Thumbnail
Displays the images and names of the documents stored in the mailbox
Important • If power supply is cut off immediately after a scanned document is stored in a mailbox, or if
the hard disk space is insufficient to display thumbnails, documents in the mailbox may not
be displayed in thumbnail view. In that case, display them in list view.
• The thumbnail view may not available for long documents. If a long document is not
displayed in thrumbnail view, display it in list view.
• Characters and images in thumbnail view may not be correctly displayed because they are
scaled down from the actual sizes.
Note • The orientation of an image displayed in thumbnail view depends on which orientation the
document was stored in.
• This feature may not be displayed depending on the machine configuration. Some models
require an optional package to use this feature. For more information, contact our Customer
Support Center.
No. of Documents
Displays the number of documents stored in the selected mailbox.
6
Select All
Selects all the documents in the mailbox. This selection will be canceled if [Select All]
is selected again.
Delete
55
Page 58

6 Send from Mailbox
Deletes the selected documents in the mailbox.
Document Details
Previews the selected document to allow you to check its details.
For more information, refer to "Checking Document Details" (P.57).
Note • Some models require an optional package to use this feature. For more information, contact
Job Flow Settings
Displays the [Job Flow Settings] screen. This screen allows you to create and execute
job flows.
Refer to "Configuring/Starting Job Flow" (P.60).
Note • Print documents are not supported by job flows. If print documents are included in the
Print
Allows you to print the selected documents.
Refer to "Print" (P.58).
our Customer Support Center.
selected documents, the job flow is executed for the documents other than the print
documents.
Send from Mailbox
6
Batch Print
Allows you to print the selected multiple documents as one document.
Refer to "Batch Print" (P.58).
56
Page 59

Checking Document Details
You can preview a document to check its details.
Important • Monochrome images with high gradation levels may appear bluish when previewed.
Note • Some models require an optional package to use this feature. For more information, contact
our Customer Support Center.
1 Select a document on the [Mailbox
- Document List] screen.
2 Click [Document Details].
3 Select any item.
View Size
Checking Document Details
Select whether to display the whole page or to enlarge the image by 200%.
Important • A small document may not be enlarged even if you select [Enlarge View].
Rotation
Select an angle to preview the image from [Right 90 degrees], [Left 90 degrees], and
[180 degrees].
Change Document Name
Allows you to change the document name. Use the keyboard displayed to enter a new
name.
Target Page
Specify a page to preview on the screen.
Send from Mailbox
6
57
Page 60

6 Send from Mailbox
Printing Documents in a Mailbox
You can print selected documents in a mailbox.
1 On the [Document List] screen,
select documents.
2 Select any item.
Enter the number of copies using
the numeric keypad, if necessary.
3 Click [Print].
Print
Configure the Print settings.
Paper Supply
Allows you to select paper.
Send from Mailbox
6
Batch Print
2 Sided Printing
Allows you to set 2-sided printing.
Output
Allows you to set stapling, hole punching, and output trays.
For examples of the settings of stapling and hole punching, refer to “[Mailbox - Print Settings] Screen”
of “Printing/Deleting Documents in the Mailbox” under “Chapter 6 Send from Mailbox” in the User
Guide.
Document Details
Displays the [Document Details] screen. Select a document from the list to check its
preview image.
For details on previewing a document, refer to "Checking Document Details" (P.57).
Note • Some models require an optional package to use this feature. For more information, contact
our Customer Support Center.
Configure the Batch Print settings.
Batch Print allows you to print multiple documents as one document. The Documents
are bound in selected order.
Note • For 2-sided printing, the last page becomes blank when the total number of printed pages is
odd. For printing of multiple documents, a blank page is inserted after the final page of each
document.
• If mixed size documents are included in the multiple documents, the documents may be
printed in improper orientation.
• [Batch Print] is not available while interrupting another job.
• [Batch Print] is not available for fax/iFax documents such as confidential polling reserved
documents, fax confidential reception documents, and iFax confidential reception
documents. If fax/iFax documents are included in the selected documents, the fax/iFax
documents are not printed. Only scan/print documents are printed.
58
Paper Supply
Allows you to select paper.
Page 61

Printing Documents in a Mailbox
2 Sided Printing
Allows you to set 2-sided printing.
Output
Allows you to set stapling, hole punching, and output trays.
For examples of the settings of stapling and hole punching, refer to “[Mailbox - Print Settings] Screen”
of “Printing/Deleting Documents in the Mailbox” under “Chapter 6 Send from Mailbox” in the User
Guide.
Document Details
Displays the [Document Details] screen. Select a document to check its preview image.
For details on previewing a document, refer to "Checking Document Details" (P.57).
Note • Some models require an optional package to use this feature. For more information, contact
our Customer Support Center.
Send from Mailbox
6
59
Page 62

6 Send from Mailbox
Configuring/Starting Job Flow
Job flow is a feature for executing a series of registered actions.
Documents stored in mailboxes can be targets of a job flow sheet. Two methods are
provided to start a job flow sheet: 1) automatically select a job flow sheet when a
document is stored in a mailbox, and 2) manually select a job flow sheet that processes
documents stored in a mailbox.
To start a job flow automatically, you must make a link with a mailbox and a job flow
sheet in advance. Documents are automatically processed by the job flow sheet when
they are stored in the mailbox.
Important • If the Authentication feature is not used, a job flow created in [Send from Mailbox] can only
be used/edited/duplicated/deleted through the mailbox where the job flow is created. This
type of job flow is not displayed on the [Job Flow Sheets] screen. When using the
Authentication feature, job flows whose owners are authenticated are displayed on the [Job
Flow Sheets] screen.
Features that can be registered are listed below.
Forward
Multiple forwarding recipients can be configured for each forwarding method.
z
FTP
Send from Mailbox
Forwards via FTP. Up to 2 recipients can be specified.
z
SMB
6
Forwards via SMB. Up to 2 recipients can be specified.
z
Mail
Forwards via E-mail. Up to 100 recipients can be specified.
z
Fax
Forwards via fax. Up to 100 recipients can be specified.
z
iFax Transmission
Forwards via iFax. Up to 100 recipients can be specified.
Print
Prints documents in a mailbox.
Some features are unavailable depending on the store type of the document.
Output
Input
Fax Documents for
Private Polling
Scanning O O OOOO
Fax to Mailbox O
iFax Received O O
Print Fax
OOOOOO
*2
OOOOO
iFax
Trans-
mission
UU
E-mail FTP SMB
*1
OO
60
Print Stored XXXXXX
O: Available
X: Not available
U: Available depending on the System Administration mode settings
*1 Load an A4 document in landscape orientation when TIFF-S has been selected for iFax forwarding profile. Loading
the document in portrait orientation will reduce the size of the iFax image.
*2 Even if you have set to delete documents after printing, a printed document in a mailbox will not be deleted if the
Page 63

Configuring/Starting Job Flow
USB cable is disconnected while the document is being printed.
1 On the [Document List] screen,
select documents.
2 Select [Job Flow Settings].
3 Select any item.
Auto Start
Sets auto start of the job flow for documents stored in the mailbox. If Auto Start is
selected, the job flow automatically starts when a document is stored.
Start Current Job Flow
Select a document in the mailbox and press this button to starts the job flow linked to
the mailbox.
Important • After executing the job flow, print the job history report to check the result. For information on
the job history report, refer to “Job Status/Activity Report” of “Print Report/List” under
‘Chapter 12 Machine Status’ in the User Guide.
Cut Link
Cancels the link between a mailbox and its job flow sheet.
Create/Change Link
Displays the [Link Job Flow Sheet to Mailbox] screen.
You can change the link between the mailbox and its job flow.
Important • Pressing [Save] without selecting a job flow does not set a link. If the selected job flow is
already linked, then the link is cancelled.
Note • The settings for linking, delinking, and Auto Start can also be made during the creation of a
mailbox.
z
Save
Links the selected job flow.
z
Search by Name
Searches for job flows that partially match the entry. The machine searches through
job flow names that were registered upon each job flow creation. The entry can be
up to 128 characters long.
z
Search by Keyword
Searches for job flows that fully match the entry. The machine searches through
keywords that were registered upon each job flow creation. The entry can be up to
12 characters long.
z
Select Keyword
Send from Mailbox
6
Displays the [Select Keyboard] screen. Select a keyword registered in the system
settings to search for job flows. Job flows that fully match the entry are searched. The
machine searches through keywords that were registered upon each job flow
creation.
For information on how to register keywords, refer to "Job Flow Sheet Keywords" of
"Setup Menu" under "Chapter 11 System Settings" in the User Guide.
z
Sheet Filtering
Displays the [Sheet Filtering] screen.
61
Page 64

6 Send from Mailbox
Filters the job flow sheets displayed. The screen display depends on the settings of
the user authentication feature.
Displayed job flow sheets may vary depending on the user authentication feature. For more information,
refer to “Job Flow Sheet Types” of “Authentication for Job Flow Sheets and Mailboxes” under “Chapter
13 Authentication and Auditron Administration” in the User Guide.
z
Create
The [Create New Job Flow Sheet] screen appears.
Refer to "Create New Job Flow Sheet" (P.123).
z
Edit/Delete
The [Details] screen appears.
For information on the settings, refer to “Job Flow Sheets” of “Setup Menu” under “Chapter 10
System Settings” in the User Guide.
Select Job Flow Sheet
Select a document and then select this button to display the [Job Flow Sheets] screen.
You can specify a job flow sheet to execute a document.
z
Search by Name
Send from Mailbox
6
Searches for job flows that partially match the entry. The machine searches through
job flow names that were registered upon each job flow creation. The entry can be
up to 128 characters long.
z
Search by Keyword
Searches for job flows that fully match the entry. The machine searches through
keywords that were registered upon each job flow creation. The entry can be up to
12 characters long.
z
Select Keyword
Displays the [Select Keyboard] screen. Select a keyword registered in the system
settings to search for job flows. Job flows that fully match the entry are searched. The
machine searches through keywords that were registered upon each job flow
creation.
For information on how to register keywords, refer to "Job Flow Sheet Keywords" of
"Setup Menu" under "Chapter 11 System Settings" in the User Guide.
z
Sheet Filtering
Displays the [Sheet Filtering] screen.
Filters the job flow sheets displayed. The screen display depends on the settings of
the user authentication feature.
Displayed job flow sheets may vary depending on the user authentication feature. For more information,
refer to “Job Flow Sheet Types” of “Authentication for Job Flow Sheets and Mailboxes” under “Chapter
13 Authentication and Auditron Administration” in the User Guide.
z
Start
62
Starts a job flow sheet.
z
Details
The [Details] screen appears.
For information on the settings, refer to “Job Flow Sheets” of “Setup Menu” under “Chapter 10
System Settings” in the User Guide.
z
Change Settings
Page 65

If the selected job flow sheet setting is editable, the [Change Settings] screen
appears. You can temporarily change the settings.
Refer to "[Change Settings] Screen" (P.76).
Job Flow Restrictions
Job flow sheets can be assigned to an individual, shared by many users, or only
accessible from the specified mailbox to which they are linked.
Job flow restrictions may vary depending on the user authentication feature. For more information, refer
to “Job Flow Sheet Types” of “Authentication for Job Flow Sheets and Mailboxes” under “Chapter 13
Authentication and Auditron Administration” in the User Guide.
Configuring/Starting Job Flow
Send from Mailbox
6
63
Page 66

6 Send from Mailbox
Send from Mailbox
6
64
Page 67

7 Stored Programming
This chapter describes the Stored Programming feature for recording
procedures provided by the machine.
z
Stored Programming Overview................................................................... 66
z
Registering/Deleting/Renaming Stored Programs......................................67
z
Calling a Stored Program ...........................................................................70
Page 68

7 Stored Programming
Stored Programming Overview
Frequently used features can be registered as Stored Programming and recalled by a
single button operation. In addition, you can also register a screen to open from a
shortcut button.
Stored Programming not only remembers feature settings, but also can record a series
of operations. This enables you to record the hierarchy of displayed screens for each
step.
For example, Stored Programming can be used when you want to record a procedure
starting from pressing the <Machine Status> button, to display the [Report Job] screen
to print a job history report.
In addition, Stored Programming also can be used for the scan settings of the
remaining document stacks while Build Job is running.
Stored Programming
7
66
Page 69

Registering/Deleting/Renaming Stored Programs
Registering/Deleting/Renaming Stored Programs
The [Stored Programming] screen allows you to register and delete stored programs.
Important • When registering a stored program to select a paper size or paper quality of the Bypass tray,
register both the size and quality. Only registering the paper size or paper quality may not
call for the stored program correctly.
• If one of the following operations is launched while a stored program is being registered, the
stored program may not be registered correctly, or the registered stored program may not
run properly.
- Removing and inserting a paper tray.
- Loading or reloading paper into the Bypass tray.
- Removing and inserting a Doculyzer card.
• If one of the following operations is launched after registering a stored program, the
registered stored program may not be called out correctly
- When the default Watermark settings are changed after registering a stored program in
which Watermark is registered.
- When features registered in a stored program become unavailable after the default settings
are changed in [System Settings].
- When the password of a mailbox that is a target of the operations registered in a stored
program is changed after registering the stored program.
Note • Services using [System Settings], [Network Browser] of Scan to PC, Job Flow Sheet,
Network Scanning, or Address Book cannot be registered.
• The registering procedure for a stored program is cancelled when the <Interrupt> button is
pressed, another stored program is called, the Auto Clear feature causes a time-out, or a
popup window (paper jam, etc.) appears.
1 Press the <All Services> button.
Stored Programming
2 Select [Setup Menu].
3 Select [Stored Programming].
4 Select the feature.
Store
Registers a stored program.
Refer to “Registering a Stored Program”
(P.68).
Store Build Job
Registers a stored program for
Build Job.
Refer to “Registering Stored Program for Build Job” (P.69).
Delete
7
Deletes stored programs. Select the number to delete.
z
Yes
Deletes a stored program.
Note • Deleted stored programs cannot be restored.
67
Page 70

7 Stored Programming
z
No
Cancels deleting stored programs.
Enter/Change Name
Allows you to enter or change a registered stored program name. Select a number to
register or change a name.
Up to 18 characters are allowed for a stored program's name.
For information on the settings, refer to “Entering Text” under “Chapter 10 System Settings” in the User
Guide.
Assign/Change Icon
Displays the [Assign/Change Icon] screen.
Configure an icon for a registered stored program. 12 icons are available. Select a
number to assign or change an icon.
z
No Icon
No icon is assigned to the registered stored program.
z
Icon
Select an icon according to the content of the registered stored program.
Stored Programming
7
Registering a Stored Program
Up to 100 actions can be registered with one stored program. Up to 40 stored programs
can be registered in the machine.
The one touch buttons M01 to M20 are provided for Stored Programming 1 to 20.
The following is the procedure for registering actions with stored programs.
1 Select [Store].
2 Select a number to register a
stored program.
Note • Press the <Interrupt>
button to cancel the
registration.
• Once a job is stored to a
button, it cannot be
overwritten.
• Select [ ] to return to the
previous screen or [ ] to move to the next screen.
3 Set the feature you want to register.
Note • The machine produces an audible tone while a stored program is registered.
You can change the volume of the sound that notifies of stored program registration. For information on
the settings, refer to “Audio Tones” of “Common Settings” under “Chapter 10 System Settings” in the
User Guide.
4 Press the <Start> button or <Clear All> button.
68
If no name is entered for a registered stored program, the name becomes “No Name”.
For information on how to name a registered stored program, refer to “Enter/Change Name” (P.68).
Page 71

Registering Stored Program for Build Job
Up to 100 actions can be registered with one stored program for Build Job. Up to 40
stored programs can be registered in the machine.
The following is the procedure for registering actions with stored programs.
1 Select [Store Build Job].
2 Select a number to register a
stored program.
Note • Once a job is stored to a
button, it cannot be
overwritten.
• Select [ ] to return to the
previous screen or [ ] to
move to the next screen.
3 Set the feature you want to register.
Note • The machine produces an audible tone while a stored program is registered.
You can change the volume of the sound that notifies of stored program registration. For information on
the settings, refer to “Stored Programming Tone” in “Audio Tones” of “Common Settings” under
“Chapter 10 System Settings” in the User Guide.
4 Press the <Start> button or <Clear All> button.
Note • At the left of a stored program for Build Job on the list, the icon is displayed.
If no name is entered for a registered stored program, the name becomes “No Name”.
For information on how to name a registered stored program, refer to “Enter/Change Name” (P.68).
Registering/Deleting/Renaming Stored Programs
Stored Programming
7
69
Page 72

7 Stored Programming
Calling a Stored Program
Describes the procedure for calling a stored program.
When calling a specified stored program, the last screen shown when you registered
the stored programming appears.
1 Press the <All Services> button.
Select [Stored Programming].
2
3 Select a number of a stored
program containing the features
you want to use.
Note • You can only select registered
numbers.
• Select [ ] to return to the
previous screen or [ ] to
move to the next screen.
4 After the stored program is called, select other features if necessary.
5 Press the <Start> button.
Stored Programming
7
Calling a Stored Program for Build Job
You can call a stored program for Build Job on the [Copy] screen displayed while Build
Job is running.
1 Select [Change Settings...].
Select the [Job Assembly] tab.
2
3 Select [Stored Programming].
4 Select a number of a stored
program containing the features
you want to use.
Note • You can only select registered
numbers.
70
Page 73

8 Job Flow Sheets
This chapter describes the scanning operation using a job flow sheet created on
a network computer and registered in the machine.
Job Flow is a feature for executing a series of registered actions.
z
Job Flow Procedure....................................................................................72
z
Selecting/Changing a Job Flow Sheet........................................................74
Page 74

8 Job Flow Sheets
Job Flow Procedure
The following shows the reference sections of the job flow operation.
To create and register a job flow sheet, use a personal computer.
For information on how to create and register a job flow sheet, refer to the manual stored on the CDROM of the Driver CD Kit.
Step 1 Opening the [Job Flow Sheets] Screen ............................................................................72
Step 2 Selecting a Job Flow Sheet ..............................................................................................72
Step 3 Confirming/Changing the Job Flow Sheet.......................................................................73
Step 4 Starting the Job Flow Sheet .............................................................................................73
Step 1 Opening the [Job Flow Sheets] Screen
Follow the procedure below to open the [Job Flow Sheets] screen.
1 Press the <All Services> button.
123
456
789
0 #
C
<All Services>
button
Job Flow Sheets
8
2 Select [Job Flow Sheets].
Step 2 Selecting a Job Flow Sheet
Select a job flow sheet.
1
For more information on the [Job Flow
Sheet] screen, refer to “Selecting/
Changing a Job Flow Sheet” (P.74).
72
Page 75

Step 3 Confirming/Changing the Job Flow Sheet
Select a job flow sheet.
1
2 To see the details, select [Details].
To change the settings, select
[Change Settings].
For information on checking/changing job
flow settings, refer to “Selecting/Changing
a Job Flow Sheet” (P.74).
Step 4 Starting the Job Flow Sheet
Load the originals.
1
Note • A job flow sheet with application linkage does not require loading documents.
2 Press the <Start> button.
Important • After executing the job flow, print the job history report to check the result. For information on
the job history report, refer to “Print Report/List” of “Billing Meter/Print Report” under
“Chapter 12 Machine Status” in the User Guide.
Job Flow Procedure
Job Flow Sheets
8
73
Page 76

8 Job Flow Sheets
Selecting/Changing a Job Flow Sheet
Job Flow is a feature for executing a series of registered actions.
To use a job flow sheet whose target is scanned documents from a network computer
with CentreWare EasyOperator, select the job flow sheet from this list.
Important • If characters not supported by the machine are used in names or description of job flow
sheets, the characters will not be displayed or will be garbled on the screen. For information
on characters that can be used in names or description of job flow sheets, refer to “Notes
and Restrictions on the Use of the Machine” of “Notes and Restrictions” under “Chapter 16
Appendix” in the User Guide.
Note • To communicate with network computers, [SOAP Port] must be enabled on the machine.
• Job flow sheets created on a network computer can be deleted, but cannot be edited or
copied. However, You can temporarily edit a job flow sheet only if it is permitted to be edited.
• Job flow sheets stored on the pool server cannot be edited, copied, or deleted. However,
you can temporarily edit a job flow sheet only if it is permitted to be edited.
For information on how to enable the port, refer to “Port Settings” of “Network Settings” under
“Chapter 10 System Settings” in the User Guide.
1 Select a job flow sheet.
Displayed job flow sheets may vary
depending on the user
authentication feature.
For more information, refer to “Job Flow
Sheet Types” of “Authentication for Job
Flow Sheets and Mailboxes” under
“Chapter 13 Authentication and Auditron
Administration” in the User Guide.
Job Flow Sheets
Note • Select [ ] to return to the
previous screen or [ ] to move to the next screen.
• You can sort the list in ascending or descending order by pressing either [Name] or [Last
Updated].
8
Refresh
Displays refreshed information.
Details
The [Details] screen appears. Allows you to confirm the detail information.
Note • Some operations may be restricted according to types of job flow owners, authentication
settings, and user types. For more information, refer to “Types of Mailboxes” of
“Authentication for Job Flow Sheets and Mailboxes” under “Chapter 13 Authentication and
Auditron Administration” in the User Guide.
Change Settings
Displays the [Change Settings] screen. Allows you to change the job flow settings.
Refer to “[Change Settings] Screen” (P.76).
Search by Name
Searches for job flows that partially match the entry. The machine searches through job
flow names that were registered upon each job flow creation. The entry can be up to
128 characters long.
74
Page 77

Search by Keyword
Searches for job flows that fully match the entry. The machine searches through
keywords that were registered upon each job flow creation. The entry can be up to 12
characters long.
Select Keyword
Displays the [Select Keyboard] screen. Select a keyword registered in the system
settings to search for job flows. Job flows that fully match the entry are searched. The
machine searches through keywords that were registered upon each job flow creation.
Sheet Filtering
Displays the [Sheet Filtering] screen. Filters the job flow sheets displayed.
For more information on this screen, refer to “[Sheet Filtering] Screen” (P.75).
[Sheet Filtering] Screen
Filters the job flow sheets displayed. Job flow sheets displayed on the screen depends
on the settings of the Authentication feature.
Displayed job flow sheets may vary depending on the user authentication feature. For more information,
refer to “Job Flow Sheet Types” of “Authentication for Job Flow Sheets and Mailboxes” under “Chapter
13 Authentication and Auditron Administration” in the User Guide.
Selecting/Changing a Job Flow Sheet
1 Select the filtering conditions, then
select [Save].
Save In
Select a location where a job flow is stored.
Note • [Pool Server] in [Save In] is available when the pool server is set. For information on the pool
server, refer to “Differences in Job Flow Settings” (P.120).
Owner
Select an owner of job flow sheets displayed on the screen.
Target
Select the start point of job flow operation.
Note • Job flow sheets whose [Job Flow Target] is [Mailbox] can use Send from Mailbox only.
Job Flow Sheets
8
75
Page 78

8 Job Flow Sheets
[Change Settings] Screen
1 Select a group to be changed from
[Group of Items].
2 Select [Change Settings].
3 Select the item to be changed.
Note • A triangle icon appears at the
left of each mandatory item.
4 Select any item.
Job Flow Sheets
8
Items
The items set for the job flow sheet.
Current Settings
The values set for the job flow sheet.
Delete E-mail Recipient
Deletes recipients of the e-mail.
Add E-mail Recipient
Adds recipients of the e-mail.
Change Settings
Allows you to add or change recipients, and confirm the settings.
76
Page 79

9 Web Applications
This chapter describes the operations when the Remote Access Kit (optional) is
installed.
z
Web Applications ........................................................................................78
z
Setting an Access Destination .................................................................... 78
z
Accessing Web Applications....................................................................... 81
Page 80

9 Web Applications
Web Applications
You can access web applications to store scanned document in folders or print stored
files.
Setting an Access Destination
This section describes the settings to access web applications.
1 Press <Log In/Out> button.
Web Applications
2 Enter the Administrator ID with the
numeric keypad or a keyboard
displayed by selecting [Keyboard],
and select [Confirm].
Note • The default Administrator ID is
“11111”. When using the
Authentication feature, a
pascode is required. The
default passcode is “x-admin”.
3 Select [System Settings].
123
456
789
0 #
C
<Log In/Out>
button
9
4 Select [System Settings].
78
Page 81

5 Select [Web Applications].
6 Select [Server Setup].
Setting an Access Destination
7 Select an access destination you
want to register, and select
[Change Settings].
8 Select the item to be set, and
select [Change Settings].
Server Name
Enter the access destination name
with up to 32 characters.
URL
Enter the URL of the access destination with up to 256 characters.
The URL must include the type of the protocol used.
(Example)
- http://myhost.example.com
- http://192.168.1.1
- https://myhost.example.com
- https://192.168.1.1
Web Applications
9
Description
Enter the description of the access destination with up to 128 characters.
User ID
79
Page 82

9 Web Applications
Enter the User ID to access the remote service, with up to 128 characters as
necessary.
Important • Depending on the settings on the remote service, the entry for [User ID] may be invalid.
Check the settings on the remote service.
Note • Along with [User ID], set also [Password]. [User ID] will be invalid unless [Password] is set.
Password
Enter the password for the User ID, with up to 128 characters as necessary.
Machine/Authentication Notification
Set whether to notify the remote server of machine information and user authentication
information every time the machine is connected to the remote service.
Note • The remote service determines whether to use the information. No need to configure
settings on the control panel.
Reset Account
Deletes all settings registered.
Configuring/Canceling the Auto Jump Destination
Web Applications
9
To configure or cancel the auto jump destination (default access server), follow the
procedure below.
1 Select the access destination you
want to set as the auto jump
destination.
2 Select [Enter].
To cancel the settings, select
[Clear].
80
Page 83

Accessing Web Applications
To access web applications, follow the procedure below.
1 Press the <All Services> button..
2 Select [Web Applications].
Note • If Auto Jump Destination has
been set, the machine access
the remote service.
123
456
789
0 #
C
Accessing Web Applications
<All Services>
button
3 Select an access destination.
4 Select [open] on the pop-up menu
displayed.
Open...
Accesses the specified remote service.
Details...
Web Applications
9
Displays the information of the specified remote service.
Cancel
Hides the pop-up menu.
81
Page 84

9 Web Applications
Web Applications
9
82
Page 85

10 System Settings
The machine has factory default (initial) settings, but you can customize the
system settings. To change the settings, enter the System Administration mode,
and use the [System Settings] screen.
This chapter describes differences from the features whose settings can be
changed written in the User Guide, and the procedures to change the settings
for system administrators.
z
System Settings Procedure ........................................................................84
z
System Settings Menu List .........................................................................87
z
Differences in Common Settings ..............................................................110
z
Differences in Copy Mode Settings ..........................................................112
z
Differences in Network Settings................................................................ 113
z
Differences in Job Flow Settings ..............................................................120
z
Differences in Setup Menu .......................................................................121
z
Differences in Login Setup/Auditron Administration .................................128
Page 86

10 System Settings
System Settings Procedure
To make or change the system settings, it is necessary to be in the System
Administration mode.
This section describes the basic procedures for system settings. The following shows
the reference section for each procedure.
Step 1 Entering the System Administration Mode......................................................................84
Step 2 Entering the Administrator ID and Password..................................................................84
Step 3 Selecting the Operation Mode on the System Administrator Menu................................85
Step 4 Selecting an Item on the [System Settings] Screen .........................................................85
Step 5 Setting the Feature ...........................................................................................................86
Step 6 Exiting the System Administration Mode........................................................................86
Step 1 Entering the System Administration Mode
Press <Log In/Out> button.
System Settings
10
123
456
789
0 #
C
Step 2 Entering the Administrator ID and Password
Enter the Administrator ID for entering the System Administration mode. If you are
using the authentication feature, a password may be required.
It is recommended to change the Administrator ID and password immediately after installing the
machine. For information on the settings, refer to “System Administrator Settings” under “Chapter 10
System Settings” in the User Guide.
1 Enter the Administrator ID with the
numeric keypad or a keyboard
displayed by selecting [Keyboard],
and select [Confirm].
Note • The default Administrator ID is
“11111”. When using the
Authentication feature, a
passcode is required. The
default passcode is “x-admin”.
• If authentication of the system
administrator failed, the
following message appears.
“Login failed. Enter User
Details and select [Confirm].”
• If authentication of the system administrator failed more than preset times, the following
message appears.
“The number of authentication attempted exceeds the maximum. No operation is available.”
<Log In/Out>
button
84
Page 87

System Settings Procedure
Step 3 Selecting the Operation Mode on the System Administrator Menu
Select [System Settings].
1
User Mode
While still in the System Administration mode, you can carry out normal operations
such as copying and scanning.
Note • To exit a mode entered from [User Mode], use the following procedure.
(1) Press the <Log In/Out> button.
(2) In the login screen, select [Cancel].
System Settings
Allows you to set and register the system settings.
Step 4 Selecting an Item on the [System Settings] Screen
In the [System Settings] screen, select an item to be set.
For the items that can be set in the [System Settings] screen, refer to "System Settings Menu List"
(P.87).
1 Select the item to be set.
System Settings
You can change the default value for each feature.
Common Settings
System Settings
Allows you to configure the settings relating to the machine itself.
Copy Mode Settings
Allows you to configure the copy feature defaults, copy operation control, button indications,
and so on.
Network Settings
Allows you to configure the ports, protocols, and so on.
Print Mode Settings
Allows you to configure the memory settings, print operation control, and so on.
10
85
Page 88

10 System Settings
Scan Mode Settings
Allows you to configure the scanner feature defaults, button indications, and so on.
Fax Mode Settings
Allows you to configure the fax feature defaults, fax operation control, button
indications, and so on.
E-mail/Internet Fax Settings
Allows you to configure the e-mail and iFax feature defaults, address search settings,
and so on.
Mailbox Settings
Allows you to configure the settings relating to mailboxes.
Job Flow Settings
Allows you to configure the settings relating to a pool server in which job flow sheets
are stored.
Stored Document Settings
Allows you to configure the settings relating to stored documents.
System Settings
10
Web Applications
Allows you to configure an access destination server.
Setup Menu
You can create a mailbox, and register and change Address Book (address numbers).
System Administrator Settings
You can set the Administrator ID and password to enter the System Administration
mode.
Login Setup/Auditron Administration
You can set restrictions on users using features of the machine, or administer jobs by
user.
Step 5 Setting the Feature
1
Set any feature.
2 After setting the feature, select [Save].
Step 6 Exiting the System Administration Mode
When the settings are complete, select [Close] until the [System Settings] screen
1
appears.
2 Select [Exit].
86
Page 89

System Settings Menu List
System Settings Menu List
The following table shows a list of the items that can be set. Note that the items
appearing depend on the configuration of the machine.
Common Settings
Item Subitem Changes Refer to
Date -
Time -
Machine Clock/
Timers
NTP Time
Synchronization
Connection Interval
Auto Clear -
Auto Job Release -
Auto Print -
Printer Lockout
Duration
Auto Power Saver/
Energy Saver
Time Zone -
Daylight Saver -
Control Panel Select
Tone
Control Panel Alert
Tone
Base Tone -
Machine Ready
Tone
Copy Job Complete
Tone
The location is changed from [Connection
Interval] under [NTP Time Synchronization].
-
User Guide
-
-
-
-
-
System Settings
-
Audio Tones
Non-Copy Job
Complete Tone
Fault Tone -
Auto Clear Alert
Tone
Alert Tone -
Out of Paper
Warning Tone
Low Toner Alert
Tone
Stored Programming
Tone
Line Monitor Volume -
Ringing Volume -
-
User Guide
-
10
-
-
-
87
Page 90

10 System Settings
Item Subitem Changes Refer to
The number of buttons displayed is up to 12
-
Screen Default -
for feature buttons and up to 7 for auxiliary
feature buttons.
Screen/Button
Settings
Screen After Auto
Clear
Auto Display of
Login Screen
Custom Buttons 1 to
3
All Services
All Services Additional Features
Job Type on Job
Status Screen
Default Language -
Screen Contrast
Custom Paper Name -
Paper Tray
Attributes
The name is changed from [Services] in [All
Services].
The name is changed from [Additional
Features] in [All Services].
The item is added.
Allows to adjust the screen contrast within the
range from -16 to +16.
z
The name is changed from [Paper Size/
Type].
z
The paper color can be set if you select
[Enabled] for [Paper Color] under
[Customize Paper Supply Screen].
-
-
-
User Guide
-
User Guide
System Settings
10
Paper Tray
Settings
Image Quality
Adjustment
Customize Paper
Supply Screen
Paper Tray
Attributes on Setup
Menu
Paper Tray
Attributes During
Loading
Paper Tray Priority -
Paper Type Priority -
Tray 5 (Bypass)
Paper Size Defaults
Auto Tray Switching -
Image Quality -
Image Quality -
Calibration -
The button name displayed on the [Setup
Manu] screen is [Paper Tray Attributes].
Twenty paper sizes are preset.
-
-
"Paper Tray
Settings" (P.110)
User Guide
User Guide
88
Page 91

System Settings Menu List
Item Subitem Changes Refer to
Print Report Button -
Job History Report -
Activity Report -
Reports
Maintenance
Transmission Report
- Undelivered
Transmission Report
- Cancelled
Mailbox Report -
Broadcast/Multi-Poll
Report
Relay Broadcast
Report
Scan File Transfer
Report
2 Sided Report -
Recipient on Activity
Report
Job Flow Error
Report
Initialize Hard Disk -
Software Options -
Date Format -
-
-
-
-
-
-
User Guide
User GuideDelete All Data -
Watermark
Text Effect Default -
Text Default -
Text Size -
Background Pattern -
Color -
Density -
Text/Background
Contrast
Force Watermark Copy Job
Force Watermark -
Client Print
Force Watermark -
Mailbox Print
Custom Text 1 to 3 -
System Settings
-
-
-
-
User Guide
10
89
Page 92

10 System Settings
Item Subitem Changes Refer to
Secure
Watermark
Print Universal
Unique ID
Secure Watermark
Control
Digital Codes
Settings
Force Secure
Watermark
Secure Watermark
Defaults
Text Effects -
Print Universal
Unique 1D
Print Position -
Print Position
Adjustment
Print Position
(Side 2)
Auto Job Promotion -
Offset Stacking
(Center Output Tray)
Offset Stacking
(Finisher Tray)
-
-
-
-
-
-
-
-
-
User Guide
"Print Universal
Unique ID"
(P.110)
System Settings
10
Other Settings
Default Print Paper
Size
Odd Page 2 Sided -
Paper Size Settings -
Millimeters/Inches -
Keyboard Input
Restriction
Operation of Up/
Down Buttons
Display
Consumables
Screen
Overwrite Hard Disk -
Data Encryption -
Service Rep.
Restricted Operation
Software Download -
Recipient Selection
Method
-
-
User Guide
-
-
-
-
90
Page 93

System Settings Menu List
Copy Mode Settings
Item Subitem Changes Refer to
General Settings
Tab - Features
Allocation
Preset Buttons
Copy Defaults
Features The name is changed from [Copy Tab].
Paper Supply Button 2 - 5
Reduce/Enlarge Button 3 - 5
Paper Supply -
Reduce/Enlarge
Output Color -
Single Color -
Dual Color - Source
Color
Dual - Target Area
Color
Dual - Non-target
Area Color
Allows you to assign frequently used trays to
the 2nd to 5th Paper Tray buttons.
Allows you to assign frequently used
magnifications to the 3rd to 5th Reduce/
Enlarge buttons.
Fourteen buttons are available for Reduce/
Enlarge.
-
-
-
"General Settings
Tab - Features
Allocation" (P.112)
User Guide
User Guide
91
System Settings
10
Page 94

10 System Settings
Item Subitem Changes Refer to
Original Type -
Copy Defaults
Original Type - Auto
(Non-Black)
Original Type - Auto
(Black)
Lighten/Darken -
Contrast -
Sharpness -
Saturation -
Background
Suppression
Color Balance Yellow
Color Balance Magenta
Color Balance Cyan
Color Balance Black
Color Shift -
2 Sided Copying -
-
-
-
-
-
-
-
User Guide
System Settings
10
Mixed Sized
Originals
Edge Erase
- Top Edge
- Bottom Edge
- Left Edge
- Right Edge
- Center Erase
/Binding Erase
- Side 2
Image Shift - Side 1 -
Image Shift - Side 2 -
Image Rotation -
Image Rotation Rotation Direction
Original Orientation -
Copy Output Separators Tray
Uncollated Output -
Sample Set -
Stamp Text -
Allows to set edge erase values for top,
bottom, left, and right, individually.
-
-
-
92
Page 95

System Settings Menu List
Item Subitem Changes Refer to
Allows to specify [Side 1] and [Side 2].
[Side 1]
Nine positions are available.
[Side 2]
z
Same as Side 1
z
Opposite to Side 1
Allows to specify [Side 1] and [Side 2].
[Side 1]
Six positions are available.
[Side 2]
z
Same as Side 1
z
Opposite to Side 1
Allows to specify [Side 1] and [Side 2].
[Side 1]
Six positions are available.
[Side 2]
z
Same as Side 1
z
Opposite to Side 1
Copy Defaults
Stamp Position
(Side 1)
(Side 2)
Stamp Size -
Stamp Color -
Date Position
(Side 1)
(Side 2)
Date Size -
Page Number Style [-N/M-] and [Page N/M] are added.
Page Number
Position (Side 1)
(Side 2)
User Guide
Page Number Size -
Booklet Creation Covers Tray
Covers
- Front Cover Tray
- Back Cover Tray
Insert Separators -
Separators Tray
Allows to set [Front Cover Tray] and [Back
Cover Tray], individually.
Set the default value for [Separators Tray] in
the [Build Job - Separators] screen.
-
-
System Settings
10
93
Page 96

10 System Settings
Item Subitem Changes Refer to
Copy Control
Memory Full
Procedure
Maximum Stored
Pages
Auto Paper Off -
Mixed Sized
Originals - 2 Sided
Copy
Fine-tune 100% -
Background
Suppress (Photo &
Text)
Background
Suppression Level
(Text)
Photo & Text/
Printed Original
Original Type Lightweight
Originals
-
-
-
-
-
-
-
User Guide
System Settings
10
94
Page 97

System Settings Menu List
Item Subitem Changes Refer to
Stamp Density -
Stamp Position
- Top Left
Stamp Position
- Top Center
Stamp Position
- Top Right
Stamp Position
- Left Center
The name is changed from [Stamp Position on
Side 2]. Advanced settings are available.
The name is changed from [Data Position on
Side 2]. Advanced settings are available.
Copy Control
Stamp Position
- Center
Stamp Position
- Right Center
Stamp Position
- Bottom Left
Stamp Position
- Bottom Center
Stamp Position
- Bottom Right
Date Position
- Top Left
Date Position
- Top Center
Date Position
- Top Right
Date Position
- Bottom Left
Date Position
- Bottom Center
Date Position
- Bottom Right
User Guide
Original Size
Defaults
Page Number
Position
- Top Left
Page Number
Position
- Top Center
Page Number
Position
- Top Right
Page Number
Position
- Bottom Left
Page Number
Position
- Bottom Center
Page Number
Position
- Bottom Right
Quantity Display
Number of Buttons Seventeen paper are preset. User Guide
The name is changed from [Page Number
Position (Side 2)]. Advanced settings are
available.
The items are added.
z
Quantity and Memory
z
Quantity and Original Count
z
Quantity (Big Font)
System Settings
10
95
Page 98

10 System Settings
Item Subitem Changes Refer to
Reduce/Enlarge
Presets
Custom Colors - - User Guide
Annotation Create Stamps
Number of Buttons Twelve paper are preset. User Guide
-User Guide
Network Settings
Item Subitem Changes Refer to
--Network
Port Settings
Protocol Settings
Ethernet Settings -
TCP/IP - Get IP
Address
TCP/IP - IP Address -
TCP/IP - Subnet
Mask
TCP/IP - Gateway
Address
TCP/IP - IP Filter -
-
-
-
Administrator
Guide
Network
Administrator
Guide
System Settings
10
Machine’s E-mail
Address/Host
Name
E-mail Address -
Host Name -
Domain Name -
Network
Administrator
Guide
96
Page 99

System Settings Menu List
Item Subitem Changes Refer to
Use Proxy Server -
Proxy Server Setup -
Proxy Server
Settings
Address to Bypass
Proxy Server
HTTP Proxy Server
Name
HTTP Proxy Server
Port Number
HTTP Proxy Server
Authentication
HTTP Proxy Server
Login Name
HTTP Proxy Server
Password
HTTPS Proxy
Server Name
HTTPS Proxy
Server Port Number
HTTPS Proxy
Server
Authentication
HTTPS Proxy
Server Login Name
-
-
-
-
-
"Proxy Server
-
-
-
-
-
Settings" (P.113)
Outgoing/
Incoming E-mail
Settings
Remote
Authentication
Server/Directory
Service
PKI Settings
(Public Key
Infrastructure)
HTTPS Proxy
Server Password
POP3 Server
Settings
SMTP Server
Settings
Domain Filter -
Authentication
System
Kerberos Server
Settings
LDAP Server/
Directory Service
Settings
SMB Server
Settings
[Device Certificate - Server], [Device
Certificate - Client], and [Remote Server
SSL/TLS Settings
Certificate Validation] are added.
Use the numeric keypad or keyboard
displayed on the screen to enter values.
-
-
Network
-
Administrator
Guide
System Settings
-
-
-
-
"Remote
Authentication
Server/Directory
Service" (P.114)
10
"PKI Settings
(Public Key
Infrastructure)"
(P.118)S/MIME Settings -
PDF/DocuWorks
Security Settings
-
97
Page 100

10 System Settings
Item Subitem Changes Refer to
-Network
Other Settings
E-mail Receive
Protocol
Print Mode Settings
Item Subitem Changes Refer to
PostScript Memory -
Allocate Memory
HP-GL/2 Auto
Layout Memory
Receiving Buffer
- Parallel
Receiving Buffer
- USB
Receiving Buffer
- LPD Spool
Receiving Buffer
- NetWare
Receiving Buffer
- SMB Spool
Receiving Buffer
- IPP Spool
-
-
-
-
-
-
-
Administrator
Guide
User Guide
System Settings
10
Delete Form
Other Settings
Receiving Buffer
- EtherTalk
Receiving Buffer
- Port 9100
ESC/P -
Form Name -
Print Area -
Substitute Tray -
Paper Type
Mismatch
Unregistered Forms -
Print User ID -
Banner Sheet -
Banner Sheet Tray -
PostScript Default
Color
PostScript Paper
Supply
-
-
User GuideForm Number -
-
User Guide
-
-
98
PostScript Font
Absence
PostScript Font
Substitution
-
-
 Loading...