

Xerox ApeosPort-II 6000, ApeosPort-II 7000, DocuCentre-II 6000, DocuCentre-II 7000 Administrator Guide
Page 1
Page 2

Microsoft, Windows, Windows NT, and Windows Server, Windows Vista, and Microsoft Network are
trademarks or registered trademarks of Microsoft Corporation in the U.S. and other countries.
NetWare is a registered trademark of Novell, Inc. in the United States and other countries.
Adobe, Acrobat, PostScript, and Adobe PostScript 3 are trademarks of Adobe Systems Incorporated.
EtherTalk, Macintosh, and Mac OS are registered trademarks of Apple Computer, Inc.
PCL, HP-GL, and HP-GL/2 are registered trademarks of Hewlett-Packard Corporation.
RSA, BSAFE are either registered trademarks or trademarks of RSA Security Inc. in the United States
and/or other countries.
RSA Security Inc. All right reserved.
All product/brand names are trademarks or registered trademarks of the respective holders.
Permission has been obtained from Microsoft Corporation for use of software screen shots.
For information on license, refer to About License.
The data saved in the hard disk of the machine may be lost if there is any problem in the hard disk.
Fuji Xerox is not responsible for any direct and indirect damages arising from or caused by such data
loss.
Fuji Xerox is not responsible for any breakdown of machines due to infection of computer virus or
computer hacking.
Important
1. This manual is copyrighted with all rights reserved. Under the copyright laws, this manual may not
be copied or modified in whole or part, without the written consent of the publisher.
2. Parts of this manual are subject to change without prior notice.
3. We welcome any comments on ambiguities, errors, omissions, or missing pages.
4. Never attempt any procedure on the machine that is not specifically described in this manual.
Unauthorized operation can cause faults or accidents. Fuji Xerox is not liable for any problems
resulting from unauthorized operation of the equipment.
An export of this product is strictly controlled in accordance with Laws concerning Foreign
Exchange and Foreign Trade of Japan and/or the export control regulations of the United States.
XEROX, THE DOCUMENT COMPANY, Ethernet, CentreWare, and the stylized X are registered
trademarks of Xerox Corporation. DocuWorks is a trademark of Xerox Corporation and Fuji Xerox Co.,
Ltd. All Xerox and Fuji Xerox product names are either registered trademarks or trademarks of Xerox
Corporation and Fuji Xerox Co., Ltd.
Page 3

Table of Contents
Table of Contents ........................................................................................................ 1
1 Before Using the Machine ...................................................................................... 11
Preface...................................................................................................................... 12
Types of Manuals ...................................................................................................... 13
Using This Guide....................................................................................................... 14
Organization of This Guide................................................................................... 14
Conventions.......................................................................................................... 15
About License............................................................................................................ 17
RSA BSAFE.......................... ...... ..... ...... ................................ ...... ..... ...... .............. 17
Heimdal................................................................................................................. 17
LAMA.................................................................................................................... 17
JPEG Code........................................................................................................... 18
Libcurl ................................................................................................................... 18
FreeBSD............................................................................................................... 18
OpenLDAP............................................................................................................ 19
DES....................................................................................................................... 21
AES....................................................................................................................... 21
Table of Contents
2 Paper and Other Media ........................................................................................... 23
Paper Types .............................................................................................................. 24
Supported Paper Type.......................................................................................... 24
Loading Paper ........................................................................................................... 26
Loading Paper in the Trays 1 to 2......................................................................... 26
Loading Tab Paper in the Trays 1 to 2.................................................................. 27
Loading Paper in the Trays 3 to 4......................................................................... 28
Loading Paper in the Tray 5 (Bypass) .................................................................. 29
Loading Tab Paper in the Tray 5 (Bypass) ........................................................... 29
Loading Paper in the Tray 6 (HCF (A4 1 Tray)).................................................... 30
Loading Paper in the Trays 6 to 7 (HCF (A4 2 Tray))........................................... 31
Loading Paper in the Tray 8 (Interposer).............................................................. 32
Loading Tab Paper in the Tray 8 (Interposer)....................................................... 32
Changing the Paper Size........................................................................................... 33
Changing the Paper Size for the Trays 1 to 2....................................................... 33
Changing the Paper Size for the Tray 6 (HCF (A4 1 Tray)).................................. 34
Changing the Paper Size for the Trays 6 to 7 (HCF (A4 2 Tray))......................... 36
Changing the Paper Settings..................................................................................... 38
3 Maintenance............................................................................................................. 41
Replacing Consumables............................................................................................ 42
Replacing the Toner Cartridge......... ................................. ..... ...... ......................... 43
Replacing the Waste Toner Bottle .................... ..... ................................. ..... ...... ... 45
1
Page 4

Replacing the Staple Cartridge
for C-Finisher or C-Finisher with Booklet Maker..........................................47
Replacing the Booklet Staple Cartridge
(C-Finisher with Booklet Maker or Booklet Finisher D2)..............................48
Replacing the Staple Cartridge for Staple Finisher D2 or Booklet Finisher D2 .....49
Emptying the Punch Scrap Container
for C-Finisher or C-Finisher with Booklet Maker..........................................51
Emptying the Punch Scrap Container
for Staple Finisher D2 or Booklet Finisher D2 .............................................52
Replacing the Staple Scrap Container
for Staple Finisher D2 or Booklet Finisher D2 .............................................53
Cleaning the Machine.................................................................................................55
Cleaning the Exterior ............................................. ...... ..... ................................. ....5 5
Cleaning the Document Cover and Document Glass............................................55
Cleaning the Narrow Glass Strip and Document Press er
for ApeosPort Series Models.......................................................................56
Cleaning the Document Feeder Roller for ApeosPort Series Models....................57
Cleaning the Narrow Glass Strip and Document Press er
for DocuCentre Series Models.....................................................................57
Cleaning the Document Feeder Roller for DocuCentre Series Models .................58
Printing a Report/List..................................................................................................60
4 Job Status.................................................................................................................61
Job Status Overview ..................................................................................................62
Checking Current/Pending Jobs................. ..... ................................. ..... .....................63
Checking Completed Jobs .............. ..... ...... ................................ ...... ..... .....................64
Printing and Deleting Stored Documents ...................................................................65
Charge Print.......... ..... ................................. ...... ..... ...... ................................ ...... .... 6 5
Private Charge Print ..............................................................................................67
Secure Print...........................................................................................................69
Sample Print ..........................................................................................................70
Delayed Print .........................................................................................................72
Printing Pending Jobs ................................................................................................73
Handling Error Terminations ......................................................................................74
5 Machine Status.........................................................................................................75
Overview of Machine Status.......................................................................................76
Machine Status...........................................................................................................77
Machine Information ..............................................................................................77
Paper Tray.............................................................................................................78
Overwrite Hard Disk...............................................................................................79
Print Mode .............................................................................................................79
Billing Meter/Print Report ...........................................................................................82
Billing Meter...........................................................................................................82
User Account Billing Meter ....................................................................................82
Print Report/List.....................................................................................................83
2
Page 5

Table of Contents
Automatically Printed Reports/Lists ...................................................................... 89
Supplies..................................................................................................................... 90
Faults......................................................................................................................... 91
6 System Settings....................................................................................................... 93
System Settings Procedure....... ...... ..... ...... ................................ ...... ..... .................... 94
Step 1 Entering System Administration Mode ...................................................... 94
Step 2 Entering the System Administrator User ID and Passcode....................... 94
Step 3 Selecting the Operation Mode from the System Administrator Menu........ 95
Step 4 Selecting an Item on the [System Settings] Screen .................................. 95
Step 5 Setting a Feature....................................................................................... 96
Step 6 Exiting the System Administration Mode................................................... 97
System Settings Menu List........................................................................................ 98
Menu List for DocuCentre Series Models ............................................................. 98
Menu List for ApeosPort Series Models.............................................................. 104
Common Settings.................................................................................................... 114
Machine Clock/Timers ..................... ...... ................................ ...... ..... .................. 114
Audio Tones........................................................................................................ 117
Screen/Button Settings ....................................................................................... 118
Paper Tray Settings ............................................................................................ 119
Watermark .......................................................................................................... 121
Secure Watermark.............................................................................................. 123
Image Quality............. ...... ................................. ..... ...... ................................ ...... . 125
Reports ............................................................................................................... 125
Maintenance ....................................................................................................... 126
Image Log Control (ApeosPort series models only) ........................................... 127
Print Universal Unique ID (ApeosPort series models only)................................. 128
Other Settings..................................................................................................... 128
Copy Mode Settings ............................. ................................. ..... ...... ..... .................. 136
Copy Tab (DocuCentre series models) /
General Settings Tab - Features Allocation (ApeosPort series models)............. 136
Preset Buttons (ApeosPort series models)......................................................... 137
Copy Defaults ..................................................................................................... 137
Copy Control....................................................................................................... 141
Original Size Defaults ......................................................................................... 143
Reduce/Enlarge Presets....... ...... ..... ................................. ..... ............................. 144
Annotation - Create Stamps................................................................................ 144
Network Settings ........................................................ ...... ..... ..... ............................. 1 45
Port Settings ....................................................................................................... 145
Protocol Settings................................................................................................. 148
Machine’s E-mail Address/Host Name ............................................................... 150
Proxy Server Settings (ApeosPort series models).............................................. 150
Outgoing / Incoming E-mail Settings................................................................... 151
Remote Authentication Server/Directory Service
(ApeosPort series models only)................................................................ 153
3
Page 6

PKI (Public Key) Settings............................ ...... ..... ...... ................................ ...... ..15 7
Other Settings......................................................................................................158
Print Mode Settings..................................................................................................159
Allocate Memory..................................................................................................159
Delete Form.........................................................................................................161
Other Settings......................................................................................................161
Scan/Fax Mode Settings ................. ..... ...... ..... ................................. ..... ...... ..... ........164
General Settings Tab...........................................................................................164
Scan Defaults ........................................................ ...... ..... ..... ..............................16 4
Scan to PC Defaults ............................................................................................166
Original Size Defaults ..........................................................................................166
Output Size Defaults............................................................................................167
Reduce/Enlarge Presets......................................................................................167
Other Settings......................................................................................................167
E-mail Settings ..................... ................................. ..... ...... ..... ................................. .. 16 9
E-mail Control......................................................................................................169
Mailbox/Stored Document Settings (DocuCentre series models) /
Mailbox Settings (ApeosPort series models) and
Stored Document Settings (ApeosPort series models) ............................................172
Mailbox Settings ..................................................................................................172
Stored Document Settings................................ ..... ...... ................................ ...... .. 17 2
Job Flow Settings for ApeosPort Series Models Only..............................................174
Web Applications Settings for ApeosPort Series Models Only ................................175
Server Setup........................................................................................................175
Configuring/Canceling the Auto Link Server........................................................176
Setup Menu..............................................................................................................177
Mailbox ................................................................................................................177
Job Flow Sheets.............................. ...... ..... ................................. ..... ...... .............179
Job Flow Sheet Keywords ...................................................................................184
Address Book ......................................................................................................184
Paper Size/Type ..................................................................................................188
System Administrator Settings .................................................................................189
System Administrator Login ID............................................................................189
System Administrator’s Passcode .......................................................................189
Maximum Login Attempts....................................................................................190
Login Setup/Auditron Administration........................................................................191
Create/Check User Accounts ..............................................................................191
Account Details...................................... ..... ...... ..... ................................. ..... ...... ..193
Reset User Accounts............ ...... ..... ...... ................................ ...... ..... ...................193
System Administrator's Meter (Copy Jobs)..........................................................194
User Details Setup...............................................................................................194
Charge / Private Print Settings ............................................................................195
Passcode Entry from Control Panel.....................................................................197
Login Setup/Auditron Mode.................................................................................197
4
Page 7

Table of Contents
7 Using CentreWare Internet Services ................................................................... 201
Installation of CentreWare Internet Services........................................................... 202
Preparations........................................................................................................ 202
Configuration on the Machine............................................................................. 202
Starting CentreWare Internet Services.................................................................... 204
Setting Items Using CentreWare Internet Services................................................. 205
8 Printer Environment Settings............................................................................... 209
Print Features Overview.......................................................................................... 210
Installation When Using USB Port........................................................................... 213
Preparations........................................................................................................ 213
Installation Overview.. ...... ..... ................................. ...... ..... ................................. . 213
Configuration on the Machine............................................................................. 213
CentreWare Internet Services Setting Items....................................................... 214
Configuration on the Computer........................................................................... 214
Installation When Using TCP/IP (LPD/Port 9100) ................................................... 215
Preparations........................................................................................................ 215
Installation Overview.. ...... ..... ................................. ...... ..... ................................. . 215
Configuration on the Machine............................................................................. 215
CentreWare Internet Services Setting Items....................................................... 216
Configuration on the Computer........................................................................... 217
Installation When Using NetWare............................................................................ 218
Preparations........................................................................................................ 218
Installation Overview.. ...... ..... ................................. ...... ..... ................................. . 218
Configuration on the Machine............................................................................. 218
CentreWare Internet Services Setting Items....................................................... 220
Configuration on the Computer........................................................................... 220
Installation When Using Microsoft Network (SMB).................................................. 221
Preparations........................................................................................................ 221
Installation Overview.. ...... ..... ................................. ...... ..... ................................. . 221
Configuration on the Machine............................................................................. 221
CentreWare Internet Services Setting Items....................................................... 222
Configuration on the Computer........................................................................... 222
Installation When Using Internet Printing Protocol (IPP)......................................... 223
Preparations........................................................................................................ 223
Installation Overview.. ...... ..... ................................. ...... ..... ................................. . 223
Configuration on the Machine............................................................................. 223
CentreWare Internet Services Setting Items....................................................... 224
Configuration on the Computer........................................................................... 224
Installation When Using EtherTalk .......................................................................... 225
Preparations........................................................................................................ 225
Installation Overview.. ...... ..... ................................. ...... ..... ................................. . 225
Configuration on the Machine............................................................................. 225
CentreWare Internet Services Setting Items....................................................... 226
5
Page 8

Configuration on the Computer......................... ................................ ...... .............226
9 E-mail Environment Settings ................................................................................227
E-mail Overview ................... ..... ...... ..... ................................. ..... ...... ..... ...................228
Preparations.............................................................................................................229
Installation Procedure...............................................................................................231
Installation Overview............................................................................................231
Enabling Port and Setting TCP/IP .......................................................................231
Configuring E-mail Environment..........................................................................232
CentreWare Internet Services Setting Items .......................................................233
10 Scanner Environment Settings.............................................................................235
Scan Service Overview ............................................................................................236
Configuration of Scan to Mailbox .............................................................................237
Installation Overview............................................................................................237
Enabling Port and Setting TCP/IP .......................................................................237
Configuration of Network Scanning (Job Template Scanning).................................239
Preparations ........................................................................................................239
Installation Overview............................................................................................239
Enabling Port and Setting TCP/IP .......................................................................239
Configuring the SNMP Port .................................................................................240
Configuration of Scan to PC.....................................................................................241
Preparations ........................................................................................................241
Installation Overview............................................................................................241
Enabling Port and Setting TCP/IP .......................................................................242
Configuration of the Job Flow...................................................................................243
Installation Overview............................................................................................243
Enabling Port and Setting TCP/IP .......................................................................243
Configuring the SNMP Port .................................................................................244
11 Using the Server Fax Service................................................................................245
Server Fax Overview................................................................................................246
Preparations.............................................................................................................247
System Requirements for the Machine................................................................247
Installation Procedure...............................................................................................248
Installation Overview............................................................................................248
Fax Settings.........................................................................................................248
Setting the Server Fax Feature............................................................................249
12 Security ...................................................................................................................251
Security Service Overview .......................................................................................252
Communication Security Service............................................................ ..... ...... ..252
Scan File Security Services.................................................................................253
Configuration of HTTP Communication Encryption..................................................254
Installation Overview............................................................................................254
6
Page 9

Table of Contents
Configuration on the Machine............................................................................. 254
Configuration of E-mail Encryption/Digital Signature............................................... 256
Installation Overview.. ...... ..... ................................. ...... ..... ................................. . 256
Configuration on the Machine............................................................................. 256
Configuration on a Computer.............................................................................. 257
Configuration of Scan File Signature
(PDF/DocuWorks Signature) for Only ApeosPort Series Models............................ 259
Installation Overview.. ...... ..... ................................. ...... ..... ................................. . 259
Configuration on the Machine............................................................................. 259
13 Authentication and Auditron Administration...................................................... 261
Overview of Authentication...................................................................................... 262
Users Controlled by Authentication........................ ................................. ..... ...... . 262
Types of Authentication ...................................................................................... 262
Features Controlled by Authentication................................................................ 263
Authentication for Job Flow Sheets and Mailboxes................................................. 265
Job Flow Sheet Types ........................................................................................ 265
Types of Mailboxes............................................................................................. 268
Linking Job Flow Sheets to Mailboxes................................................................ 270
Overview of Auditron Administration ....................................................................... 272
Authentication and Auditron Administration........................................................ 272
Manageable Features and Services ................................................................... 273
14 Problem Solving ............................ ..... ...... ..... ...... ................................ ...... ..... ...... . 277
Troubleshooting....................................................................................................... 278
Machine Trouble...................................................................................................... 279
Image Quality Trouble ............................................................................................. 284
Trouble during Copying ........................................................................................... 289
Unable to Copy ................................................................................................... 289
The Copy Result is Not What was Expected ...................................................... 289
Trouble during Printing ............................................................................................ 293
Unable to Print .................................................................................................... 293
The Print Result is Not What was Expected ....................................................... 294
Trouble during Scanning ......................................................................................... 296
Unable to Scan with the Machine ....................................................................... 296
Unable to Import Scanned Documents to the Computer.................................... 296
Unable to Send a Scanned Document over the Network (FTP/SMB) ................ 297
Unable to Send E-mail........................................................................................ 299
The Image is not What was Expected ................................................................ 299
Network-related Problems....................................................................................... 302
When using SMB ................................................................................................ 302
When using NetWare.......................................................................................... 303
When using TCP/IP ............................................................................................ 307
When using EtherTalk......................................................................................... 308
7
Page 10

CentreWare Internet Services Problems .............................................................309
E-Mail Features Problems ...................................................................................310
Internet/Intranet Connection Problems................................................................311
Error Code................................................................................................................313
Other Errors.........................................................................................................369
Paper Jams ..............................................................................................................370
Paper Jams in the Trays 1 to 2............................................................................371
Paper Jams in the Tray 3.....................................................................................371
Paper Jams in the Tray 4.....................................................................................372
Paper Jams in the Tray 5 (Bypass) .....................................................................372
Paper Jams in the Tray 6 (HCF (A4 1 Tray)).......................................................373
Paper Jams in the Trays 6 to 7 (HCF (A4 2 Tray))..............................................375
Paper Jams at the HCF (A4 2 Tray) Unit.............................................................376
Paper Jams in the Transfer Module.....................................................................378
Paper Jams in the Bottom Left Cover..................................................................382
Paper Jams in the Output Tray............................................................................383
Paper Jams in the C-Finisher and the C-Finisher with Booklet Maker ................383
Paper jams in the Staple Finisher D2 and the Booklet Finisher D2.....................391
Document Jams for ApeosPort Series Models.........................................................402
Document Jams for DocuCentre Series Models ......................................................405
Stapler Faults ................. ...... ..... ................................. ...... ..... ................................. ..40 7
Staple Jams in the Staple Cartridge
for C-Finisher or C-Finisher with Booklet Maker........................................408
Staple Jam s in the Bookl et Staple Car tridge
for the C-Finisher with Booklet Maker or Booklet Finisher D2...................409
Staple Jams in the Staple Cartridge
for the Staple Finisher D2 or the Booklet Finisher D2 ...............................411
Staple Cartridge Taken Off from Unit
for the Staple Finisher D2 or the Booklet Finisher D2....................................413
Solving Curled Output for the Staple Finisher D2 or the Booklet Finisher D2..........415
15 Appendix.................................................................................................................417
Specifications ...........................................................................................................418
Printable Area...........................................................................................................430
Standard Printable Area ......................................................................................430
Extended Printable Area......................................................................................430
Internal Fonts ...........................................................................................................431
Optional Components...............................................................................................433
ESC/P Emulation......................................................................................................435
Emulation.............................................................................................................435
Fonts....................................................................................................................436
Output Feature.....................................................................................................436
ESC/P Emulation Print Features .........................................................................436
ESC/P Emulation Settings...................................................................................437
Magnification Table..............................................................................................443
8
Page 11

Table of Contents
Paper Size and Number of Printable Characters................................................ 447
PDF Direct Print.............. ...... ..... ...... ................................. ..... ..... ...... ....................... 4 49
PDF Direct Print Settings.................................................................................... 449
PCL Emulation......................................................................................................... 451
HP-GL2 Emulation................................................................................................... 454
Hard Clip Area .................................................................................................... 458
Printable Area ..................................................................................................... 459
Auto Layout......................................................................................................... 461
Notes and Restrictions ............................................................................................ 468
Notes and Restrictions on the Use of the Machine............................................. 468
Notes and Restrictions in the Interrupt Mode...................................................... 470
Notes and Restrictions when Connecting with Internet Service Provider........... 471
Notes and Restrictions for Using SMB................................................................ 472
Notes and Restrictions for Using TCP/IP............................................................ 474
Notes and Restrictions for Using EtherTalk........................................................ 476
Notes and Restrictions for Using Bonjour........................................................... 476
Notes and Restrictions for Using Scanner Features........................................... 477
Notes and Restrictions when Connecting to Internet or Intranet ........................ 478
Index.............................................................................................................................. 479
9
Page 12

Page 13

1 Before Using the Machine
This chapter describes organization of this guide and conventions.
z
Preface .......................................................................................................12
z
Types of Manuals .......................................................................................13
z
Using This Guide ........................................................................................14
z
About License.............................................................................................17
Page 14
1 Before Using the Machine
Preface
Before Using the Machine
1
Thank you for selecting the Fuji Xerox ApeosPort-II 7000/6000, DocuCentre-II 7000/
6000 (hereafter referred to as “the machine”).
This guide explains how to operate the machine and the precautions that must be
followed du ring oper ati on. To get the m ost out of the mach ine and to use it effe cti vel y,
be sure to read this guide before use.
This guide aimed toward machine administrators, provides maintenance information
like how to r eplace consumables, instructions on configurin g your networ k
environment, and troubleshooting procedures.
This guide assumes that an operator has a basic knowledge of the operating
environment of the personal computer in use, networking environments, and how to
operate a personal computer. For information on the environment of the personal
computer in use, basic knowledge of networking environments, and how to operate a
personal computer, refer to the manuals provided with the personal computer,
operating system, and network system.
After reading this guide, be sure to keep it handy for quick reference. It will be useful
in case you forget how to perform operations or if a problem occurs with the machine.
Refer to the User Guide for copy/print/scan operating procedures. For information
about optional accessories for the printer functionality, also refer to the guide provided
with each optional accessory.
12
In this manual, safety instructions are preceded by the symbol .
Always read and follow the instructions before performing the required procedures.
The equipment is certified by NEMKO in compliance with [IEC60950-1 (AS/NZS
3260)]. The equipment is manufactured under an ISO 9001 Quality System. The
equipment is also certified in compliance with applicable standards by various
national bodies.
The equipment was tested and is certified by the New Zealand Ministry of Commerce
in conformance with CISPR publ. 22 (AS/NZISS CISPR22:2002) which relates to
radio frequency interference regulations, and also complies with the Australian
Communication Authority requirements.
NOTE: Machines intended for use in South Korea and Taiwan have been certified
separately in compliance with their requirements.
Any unauthorized alteration, which includes the addition of new functions or the
connection of external devices, may impact this certification.
Contact your local Xerox representative for a list of approved accessories.
Page 15

Types of Manuals
Types of Manuals
We provide the following guides for optimum usage of the machine.
Included Manuals
Several manuals are included with this product. They are referred to as accompanying
manuals.
These accompanying manuals include descriptions on configurations and operation of
the product.
The following manuals are included with the machine.
User Guide
Describes all the necessary steps for copy/print/scan.
Administrator Guide (this guide)
Aimed toward machine administrators, as a guide to setting up the network
environment and to solving problems that may occur with the machine.
Quick Reference Guide
Introduces the basic operations of the machine, as well as daily management and
maintenance.
Manual (HTML)
A guide for installing print drivers, configuring the printer environment, etc. This manual
is included in the CD-ROM of the Driver CD Kit.
Before Using the Machine
1
Guides for Optional Accessories
Optional accessories are also available for the machine. User Guides are provided with
the optional accessories exclusively for ApeosPort-II 7000/6000, DocuCentre-II 7000/
6000. Thes e U se r G ui de s ar e re f er r ed to as "g ui d es fo r op ti on a l ac ce ss or ie s" . G ui d es
for optional accessories are provided in two forms, as printed or as On-line Help.
Guides for optional accessories describe all the necessary steps for operating optional
accessories and installing software.
13
Page 16

1 Before Using the Machine
Using This Guide
Before Using the Machine
This guide aimed toward machine administrators, provides maintenance information
like how to r eplace consumables, instructions on configurin g your networ k
environment, and troubleshooting procedures.
Organization of This Guide
This guide consists of the following chapters.
1 Before Using the Machine
Describes organization of this guide and conventions.
1
2 Paper and Other Media
Describes t he ty pe s of pa per th at can be us e d on th e ma c hi ne an d ho w t o lo a d pape r
in trays.
3 Maintenance
Describes how to replace consumables and to clean the machine.
4Job Status
Describes how to check job status and to cancel jobs.
5 Machine Status
Describes how to check the faults that occurred on the machine and to print various
reports/lists.
6 System Settings
Describes how to configure the system settings.
7 Using CentreWare Internet Services
Describes how to use CentreWare Internet Services.
8 Printe r Environment Settings
Describes how to set up the printer’s operating environment.
9 E-mail Environment Settings
Describes the configuration to use the E-mail features on the machine.
10 Scanner Environment Settings
Describes the configuration to use the scan services on the machine.
11 Using the Server Fax Service
Describes how to use the Server Fax service on this machine.
12 Security
14
Describes the configuration to utilize the security services on the machine.
Page 17

13 Authentication and Auditron Administration
Describes the authorization feature for restricting use of the machine, as well as the
administration feature for monitoring usage statuses for each feature using the
authorization feature.
14 Problem Solving
Describes troubles that may occur with the machine and their solutions.
15 Appendix
Describes the machine specifications, optional accessories, and cautions/restrictions.
Conventions
z
z
z
z
Using This Guide
The screen images and illustrations of control panel that are used in this guide are
for the DocuCentre series models.
The screen images and illustrations that are used in this guide are based on the
machine configuration with the various options. Some of the items in the screen
images may not be displayed or there may be features that cannot be used
depending on the machine configuration.
In this document, "Computer" refers to a personal computer or workstation.
The following terms are used in this guide.
Before Using the Machine
1
Important Indicates important information that you should read.
Note Indicates additional information on operations or features.
z
The following symbols are used in this guide:
" " : Cross-references in this guide, reference to other guides,
messages displayed on the touch screen, names of CD-ROM,
and input strings
[ ] : • The names of screens, tabs, buttons, features, and options
displayed on the touch screen
• The names of menus, windows, dialog boxes, buttons, and
other items displayed on computer monitors
< > button : Hardware buttons on the machine’s control panel
< > key : Keys on computer keyboards
> : • Indicates a path to a certain item within a procedure on the
control panel.
Example: When you see a procedure to "select [System
Settings] > [Setup Menu] > [Mailbox]", this means that you
need to first select [System Settings], then [Setup Menu], and
lastly [Mailbox].
• Indicates a path to a certain item within a procedure on a
computer.
Example: When you see a procedure "to search for files and
folders, select [Start] > [Search] > [For Files or Folders]", this
means that you need to click [Start], then select [Search] and
[For Files or Folders] in order to search for files and folders.
• The reference is indicated in the following manner:
"Refer to "6 S yste m Setting s" > "C ommon Settings " > "Aud io
Tone" in the Administrator Guide."
The sentence above means that you need to refer to a section
15
Page 18
1 Before Using the Machine
Before Using the Machine
"Audio Tone ", whic h can be f ound u nder "C ommon Se ttin gs"
in the chapter 6 System Settings of the Administrator Guide.
z
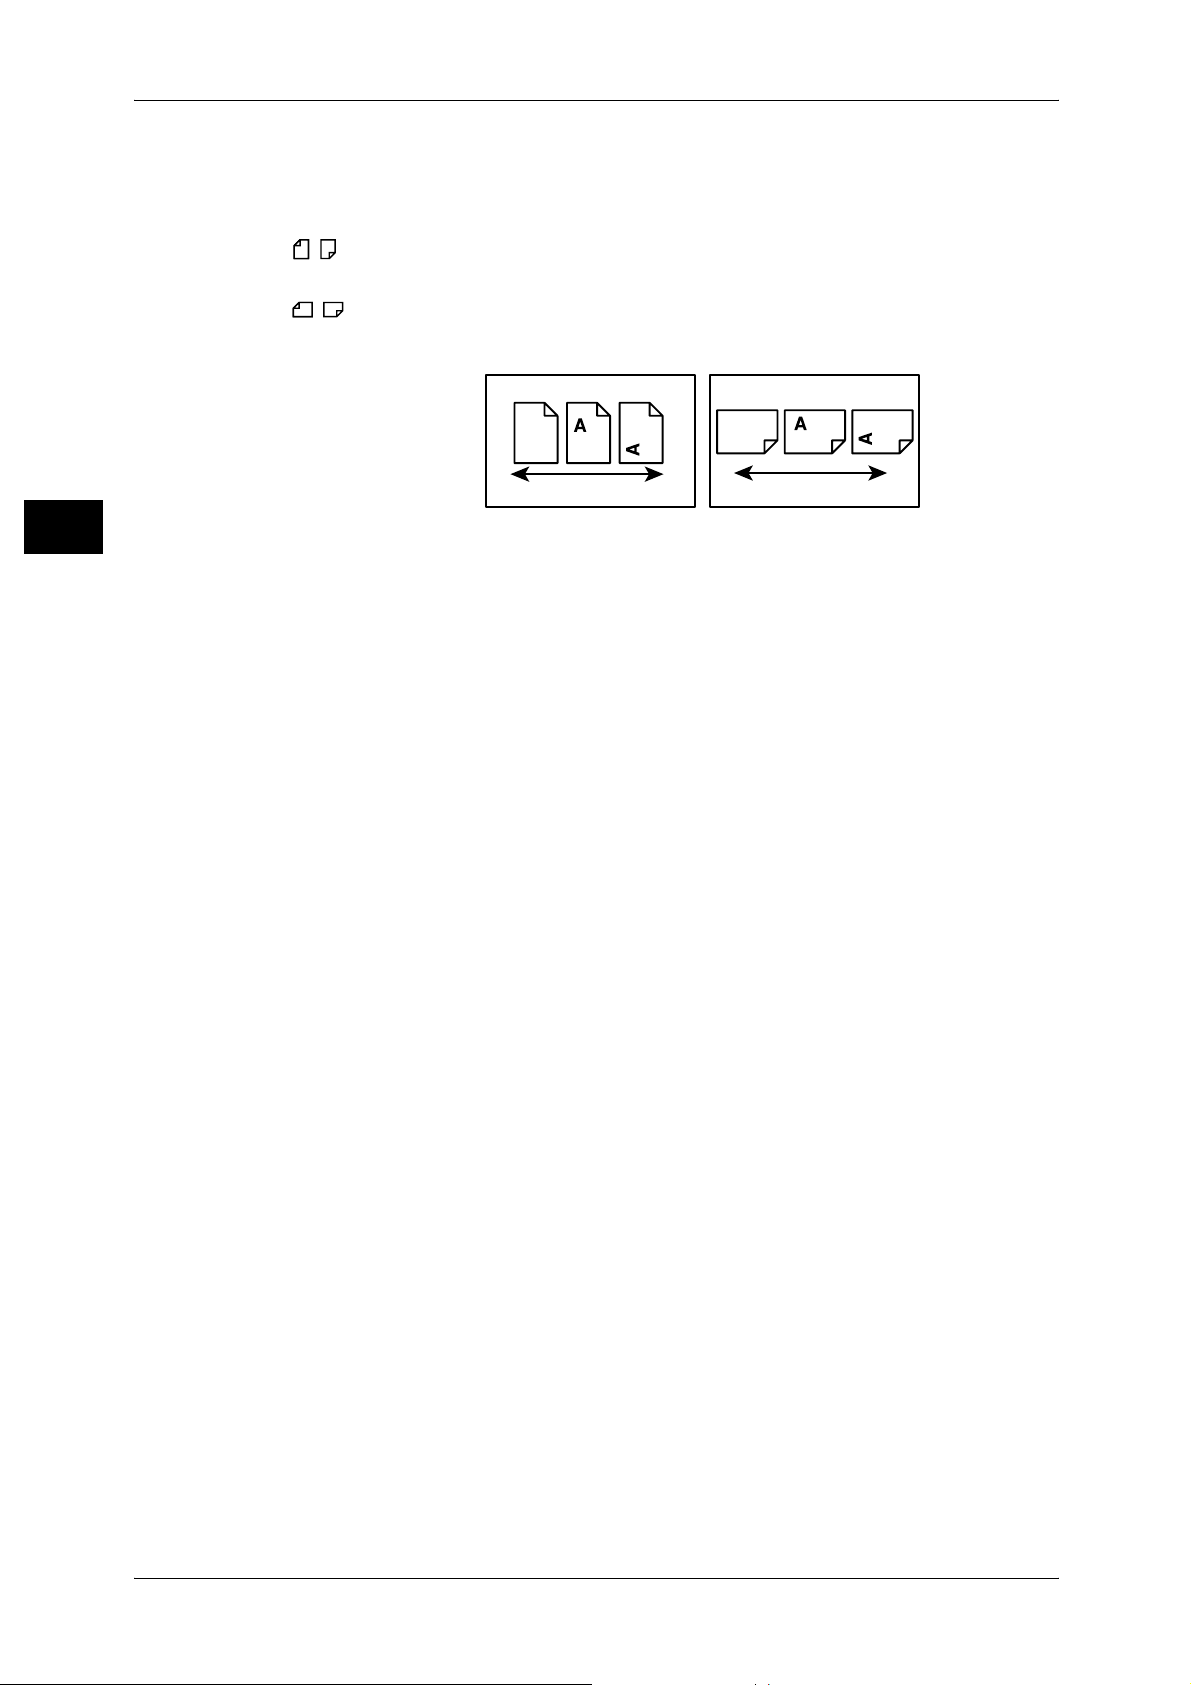
Orientation of documents or paper is described in this guide as follows:
, ,Long Edge Feed (LEF):Loading with one of the long edges of the document or
paper.
, ,Short Edge Feed (SEF):Loading with one of the short edges of the document
or paper.
1
LEF Orientation
Paper feed direction
SEF Orientation
Paper feed direction
16
Page 19

About License
About License
RSA BSAFE
This product includes RSA BSAFE® Cryptographic software from RSA Security Inc.
Heimdal
Copyright (c)2000 Kungliga Tekniska Högskolan (Royal Institute of Technology,
Stockholm, Sweden). All rights reserved.
Redistribution and use in source and binary forms, with or without modification, are
permitted provided that the following conditions are met:
1. Redistributions of source code must retain the above copyright notice, this list of
2. Redistributions in binary form must reproduce the above copyright notice, this list of
3. Neither t he name of the Institute nor the names of its contributors may be used to
Before Using the Machine
1
conditions and the following disclaimer.
conditions and the following disclaimer in the documentation and/or other materials
provided with the distribution.
endorse or promote products derived from this software without specific prior written
permission.
LAMA
THIS SOFTWARE IS PROVIDED BY THE INSTITUTE AND CONTRIBUTORS ''AS
IS'' AND ANY EXPRESS OR IMPLIED WARRANTIES, INCLUDING, BUT NOT
LIMITED TO, THE IMPLIED WARRANTIES OF MERCHANTABILITY AND FITNESS
FOR A PARTICULAR PURPOSE ARE DISCLAIMED. IN NO EVENT SHALL THE
INSTITUTE OR CONTRIBUTORS BE LIABLE FOR ANY DIRECT, INDIRECT,
INCIDENTAL, SPECIAL, EXEMPLARY, OR CONSEQUENTIAL DAMAGES
(INCLUDING, BUT NOT LIMITED TO, PROCUREMENT OF SUBSTITUTE GOODS
OR SERVICES; LOSS OF USE, DATA, OR PROFITS; OR BUSINESS
INTERRUPTION) HOWEVER CAUSED AND ON ANY THEORY OF LIABILITY,
WHETHER IN CONTRACT, STRICT LIABILITY, OR TORT (INCLUDING
NEGLIGENCE OR OTHERWISE) ARISING IN ANY WAY OUT OF THE USE OF THIS
SOFTWARE, EVEN IF ADVISED OF THE POSSIBILITY OF SUCH DAMAGE.
LZMA SDK 4.21 Copyright (c) 1999-2005 Igor Pavlov (2005-06-08)
http://www.7-zip.org/
LZMA SDK 4.22 Copyright (c) 1999-2005 Igor Pavlov (2005-06-10)
http://www.7-zip.org/
17
Page 20

1 Before Using the Machine
JPEG Code
Before Using the Machine
Libcurl
1
Our printer software uses some of the codes defined by the Independent JPEG Group.
COPYRIGHT AND PERMISSION NOTICE
Copyright (c) 1996 - 2006, Daniel Stenberg, <daniel@haxx.se>.
All rights reserved.
Permission to use, copy, modi fy, and distribute this so ftware for any purpose with or
without fee is hereby granted, provided that the above copyright notice and this
permission notice appear in all copies.
THE SOFTWARE IS PROVIDED "AS IS", WITHOUT WARRANTY OF ANY KIND,
EXPRESS OR IMPLIED, INCLUDING BUT NOT LIMITED TO THE WARRANTIES OF
MERCHANTABILITY, FITNESS FOR A PARTICULAR PURPOSE AND
NONINFRINGEMENT OF THIRD PARTY RIGHTS. IN NO EVENT SHALL THE
AUTHORS OR COPYRIGHT HOLDERS BE LIABLE FOR ANY CLAIM, DAMAGES
OR OTHER LIABILITY, WHETHER IN AN ACTION OF CONTRACT, TORT OR
OTHERWISE, ARISING FROM, OUT OF OR IN CONNECTION WITH THE
SOFTWARE OR THE USE OR OTHER DEALINGS IN THE SOFTWARE.
Except as contained in this notice, the name of a copyright holder shall not be used in
advertising or otherwise to promote the sale, use or other dealings in th is Software
without prior written authorization of the copyright holder.
FreeBSD
This product contains the pa rt of F reeBS D codes.
The FreeBSD Copyright
Copyright 1994-2006 T he FreeB SD Pr oject. All ri ghts rese rved.
Redistribution and use in sou rce and binary forms, with o r without modification, are pe rmitted
provided that the following conditions are m et:
Redistributions of source code must retain the above copyright notice, this list of conditions
and the following disclaimer .
Redistributions in binary form must reproduce the above copyright notice, this list of
conditions and the following disclaime r in the documentatio n and/or other materia ls provided
with the distribution.
18
Page 21

OpenLDAP
About License
THIS SOFTWARE IS PROVIDED BY THE FREEBSD PROJECT ''AS IS'' AND ANY
EXPRESS OR IMPLIED WARRANTIES, INCLUDING, BUT NOT LIMITED TO, THE
IMPLIED WARRANTIES OF MERCHANTABILITY AND FITNESS FOR A PARTI CULAR
PURPOSE ARE DISCLAIMED. IN NO EVENT SHALL THE FREEBSD PROJECT OR
CONTRIBUTORS BE LIABLE FOR ANY DIRECT, INDIRECT, INCIDENTAL, SPECIAL,
EXEMPLARY, OR CONSEQUENTIAL DAMAGES (INCLUDING, BUT NOT LIMITED TO,
PROCUREMENT OF SUBSTITUTE GOODS OR SERVICES; LOSS OF USE, DATA , OR
PROFITS; OR BUSINESS INTERRUPTION) HOWEVER CAUSED AND ON ANY
THEORY OF LIABILITY, WHETHER IN CONTRACT, STRICT LIABILITY, OR TORT
(INCLUDING NEGLIGENCE OR OTHERWISE) ARISING IN ANY WAY OUT OF THE USE
OF THIS SOFTWARE, EVEN IF ADVISED OF THE POSSIBILITY OF SUCH DAMAGE.
The views and conclusions c ontai ned in th e software an d docu menta tion a re those of t he
authors and should not b e interp reted a s repre senting o fficial policies, e ither exp ressed o r
implied, of the FreeBSD Projec t.
Copyright 1998-2006 The OpenLDAP Foundation All rights reserved.
Before Using the Machine
1
Redistribution and use in source and binary forms, with or without modification, are
permitted only as authorized by the OpenLDAP Public License.
A copy of this licens e is availab le in the file LICENSE in the top-lev el directory o f the
distribution or, alternatively, at <http://www.OpenLDAP.org/license.html>.
OpenLDAP is a registered trademark of the OpenLD AP Founda tio n.
Individual files and/or contrib uted package s may be co pyright by other p arties and/or
subject to additional restrictions.
This work is derived from the University of Michigan LDAP v3.3 distributio n. Information concerning this software is ava ilable at <htt p://www.umich. edu/~dirsvcs/lda p/ldap. html>.
This work also contains materials derived from public sources.
Additional information about OpenLDAP can be obtained at <http://www.openldap.org/>.
--Portions Copyright 1998-2006 Kurt D. Zeilenga.
Portions Copyright 1998-2006 Net Boolean Incorporated.
Portions Copyright 2001-2006 IBM Corporation.
All rights reserved.
Redistribution and use in source and binary forms, with or without modification, are
permitted only as authorized by the OpenLDAP Public License.
---
19
Page 22

1 Before Using the Machine
Portions Copyright 1999-2005 Howard Y.H. Chu.
Portions Copyright 1999-2005 Symas Co rpo ratio n.
Before Using the Machine
1
Portions Copyright 1998-2003 Hallvard B. Furuseth.
All rights reserved.
Redistribution and use in source and binary forms, with or without modi fication, are
permitted provided that this notice is preserved.
The names of the copyrigh t holders may no t be use d to end orse or pro mote pro ducts
derived from this software without their specific prior written permission. This software
is provided ''as is'' without express or implied warranty.
--Portions C opyright (c ) 1992-1996 Regents of the University of Michigan.
All rights reserved.
Redistribution and use in source and binary forms are permitted provided that this
notice is preserved and that due cred it is given to the University of Michigan at Ann
Arbor. The name of t he University may not be used to endorse or promote pro ducts
derived from this software without s pecific prior written permission. This software is
provided ''as is'' without express or implied warranty.
-----------------------------------------The OpenLDAP Public License
Version 2.8, 17 August 2003
Redistribution and use of this software and associated documentation ("Software"),
with or without modifi cation, are permitted provid ed that the following conditio ns are
met:
1. Redistributions in source form must retain copyright statements and notices,
2. Redistributions in binary form must reproduce applicable copyright statements and
notices, this list of conditions, and the following disclaimer i n the documentation
and/or other materials provided with the distribution, and
3. Redistributions must contain a verbatim copy of this document.
The OpenLDAP Foundation may revise this license from time to time.
Each revision is distinguished by a version number. You may use this Software under
terms of this license revision or under the terms of any subsequent revision of the
license.
THIS SOFTWARE IS PROVIDED BY THE OPENLDAP FOUNDATION AND ITS
CONTRIBUTORS ''AS IS'' AND ANY EXPRESSED OR IMPLIED WARRANTIES,
INCLUDING, BUT NOT LIMITED TO, THE IMPLIED WARRANTIES OF MERCHANTABILITY AND FITNESS FOR A PARTICULAR PURPOSE ARE DISCLAIMED. IN NO
EVENT SHALL THE OPENLDAP FOUNDATION, ITS CONTRIBUTORS, OR THE
AUTHOR(S) OR OWNER(S) OF THE SOFTWARE BE LIABLE FOR ANY DIRECT,
INDIRECT, INCIDENTAL, SPECIAL, EXEMPLARY, OR CONSEQUENTIAL DAMAGES (INCLUDING, BUT NOT LIMITED TO, PROCUREMENT OF SUBSTITUTE
GOODS OR SERVICES; LOSS OF USE, DATA, OR PROFITS; OR BUSINESS
INTERRUPTION) HOWEVER CAUSED AND ON ANY THEORY OF LIABILITY,
20
Page 23

DES
About License
WHETHER IN CONTRACT, STRICT LIABILITY, OR TORT (INCLUDING NEGLIGENCE OR OTHERWISE) ARISING IN ANY WAY OUT OF THE USE OF THIS
SOFTWARE, EVEN IF ADVISED OF THE POSSIBILITY OF SUCH DAMAGE.
The names of the authors and copyright holders must not be used in advertising or
otherwise to promote the sale, use or other dealing in this Software without specific,
written prior permission. Title to copyright in this Software shall at all times remain with
copyright holders.
OpenLDAP is a registered trademark of the OpenLD AP Founda tio n.
Copyright 1999-2003 The OpenLDAP Foundation, Redwood City, California, USA. All
Rights Reserved. Permissi on to copy and distribu te verbati m copies of this docu ment
is granted.
This product includes software developed by Eric Young(eay@mincom.oz.au)
Before Using the Machine
1
AES
Copyright (c) 2003. Dr Brian Gladman. Worcester. UK. All rights reserved.
This product uses published AES software provided by Dr Brian Gladman under BSD
licensing terms.
21
Page 24

Page 25

2 Paper and Other Media
This chapter describes the types of paper that can be used on the machine,
precautions when handling paper, and how to load paper in trays.
z
Paper Types .... ...... ..... ................................. ...... ..... ..... ...............................24
z
Loading Paper ............................................................................................26
z
Changing the Paper Size............................................................................33
z
Changing the Paper Settings......................................................................38
Page 26
2 Paper and Other Media
WARNING
Paper Types
This section describes the kinds of paper available for this machine.
Use of inappropriate paper may result in paper jams, cause reduced print quality,
malfunctions and other trouble. To make full and effective use of the machine's
Paper and Other Media
performance, we recommend using only paper recommended by Fuji Xerox.
If you want to use paper not recommended by Fuji Xerox, contact our Customer
Support Center.
Do not use conductive paper such as carbonic paper or coated paper. When paper
jam occurs, it may cause short-circuit and eventually a fire accident.
Important • The printed image may fade due to moisture such as water, rain or vapor. For more
2
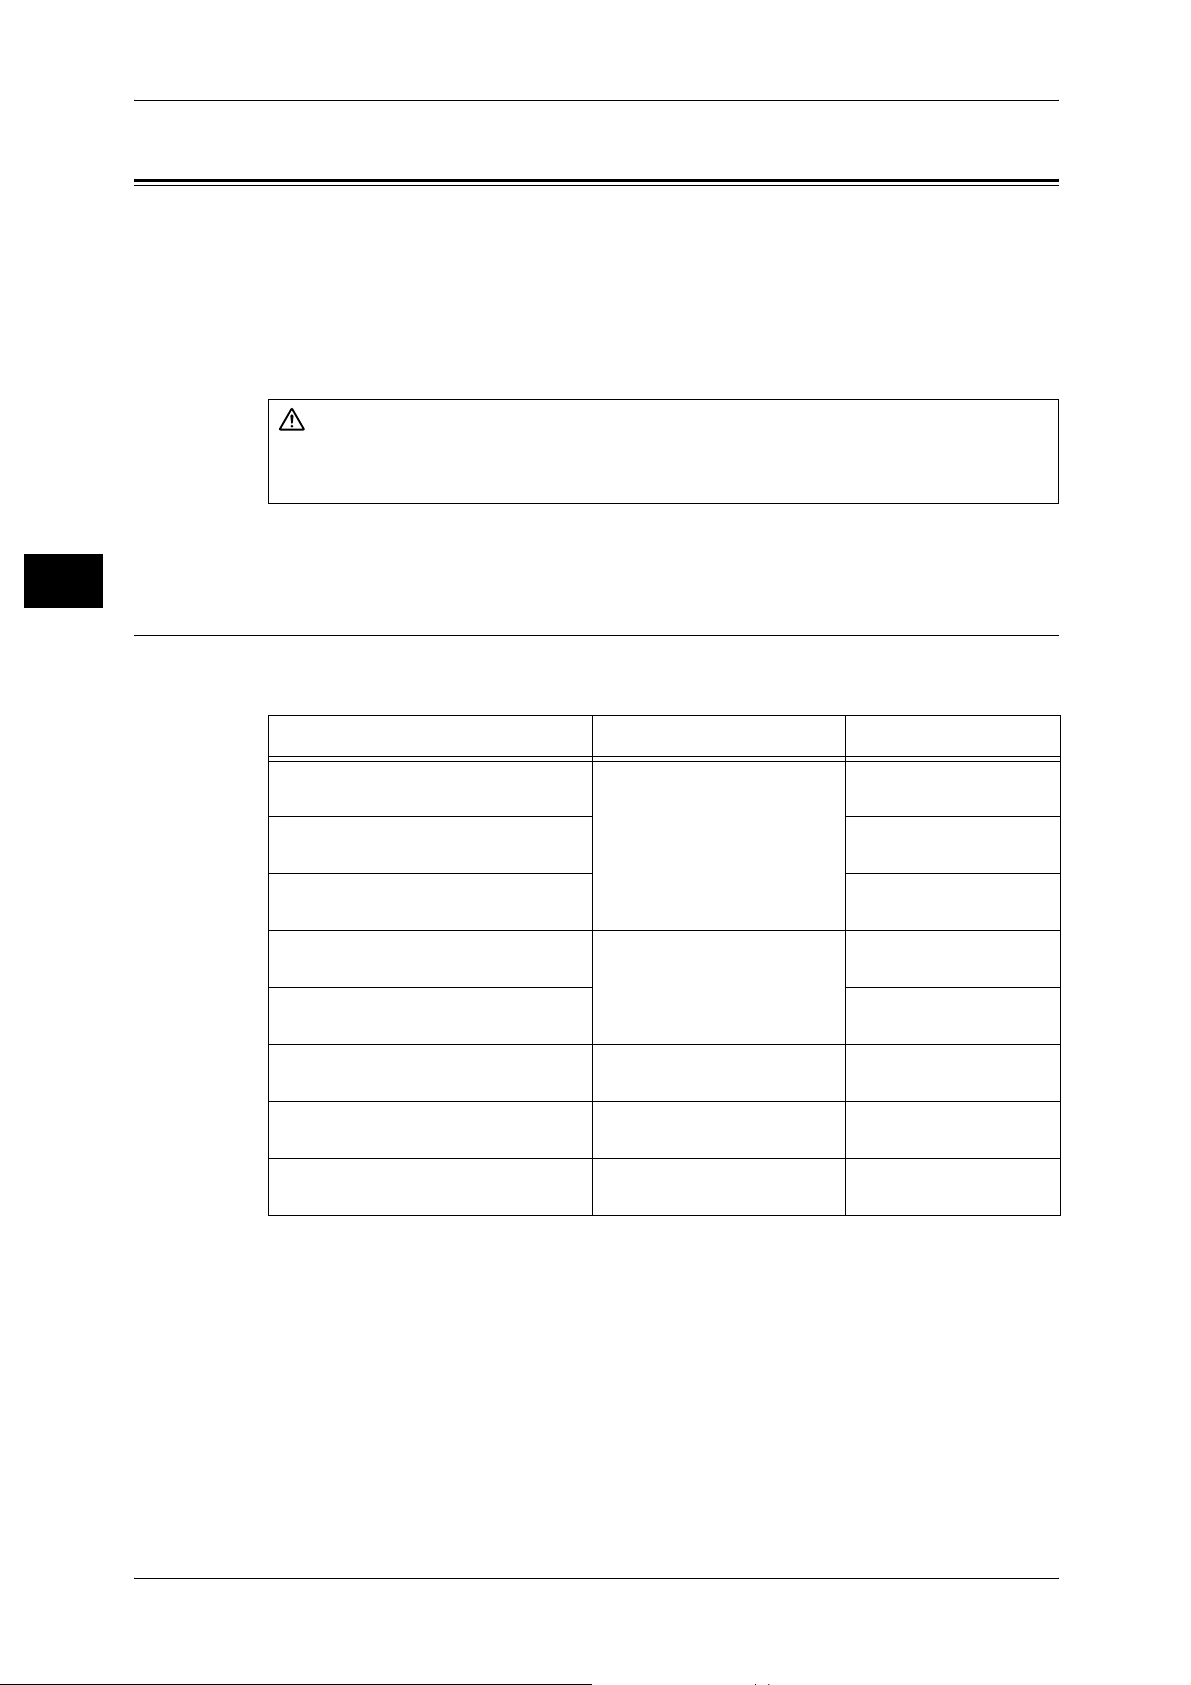
Supported Paper Type
When using commonly used paper (known as printable paper) for copying or printing,
make sure that it complies with the following specifications.
information, contact our Customer Support Center.
Paper tray Weight Loadable quantity
Trays 1 to 2 52 to 200 g/m
Ream Weight: 45 - 171 kg
Tray 3 1,490 sheets
Tray 4 1,860 sheets
Tray 5 (bypass) 52 to 270 g/m
Ream Weight: 45 - 232 kg
Tray 5 (bypass)
(When HCF (A4 2 Tray) is installed)
Tray 6 (HCF (A4 1 Tray))
(optional)
Trays 6 to 7 (HCF (A4 2 Tray))
(optional)
Tray 8 (Interposer)
(optional)
52 to 200 g/m
Ream Weight: 45 - 171 kg
52 to 200 g/m
Ream Weight: 45 - 171 kg
60 to 220 g/m
Ream Weight: 52 - 189 kg
2
2
2
2
2
500 sheets
(80 g/m2)
(80 g/m
(80 g/m2)
Up to 10mm 100 sheets
(80 g/m2)
Up to 27mm 250 sheets
(80 g/m2)
2,000 sheets
(80 g/m2)
2,000 sheets x 2 trays
(80 g/m2)
200 sheets
(80 g/m2)
2
)
24
Page 27

The following table lists the paper types supported for each paper tray.
Paper Types
Paper Type
Plain Paper
Recycled Paper
Plain Paper (Side 2)
Transparency Labels Lightweight 52 - 63
Heavyweight 1
Heavyweight 2
Tab Stock 1
Tab Stock 2
Hole Punched 64 - 105
*
Weight
2
(g/m
64 - 105
106 - 200
201 - 270
106 - 200
201 - 270
Tray 1-2 Tray 3-4
)
OOOOO
OOOOO
OOOOO
XXOXX
XXOXX
OOOO X
OOOOO
XXOXX
OXOX O
XXOXX
OOOOO
Tray 5
(Bypass)
Tray 6-7
Tray 8
(Interposer)
*: Plain Paper (Side 2) means the paper already printed on the one side (i.e., scrap paper).
O: Available
X: Not available
Important • Printing with paper whose type or si ze differs fr om the paper sp ecified by the print driv er, or
printing from a tray not supporting the loaded paper can result in paper jams. To ensure
correct printing, select the correct paper size, paper type, and paper tray.
Note • Weight mea ns a weight of 1 m
• Ream weight means weight of 1,000 sheets of paper in duodecimo size (788 x 1,091 mm).
• When copying with a non-standard size paper from the Tray 5 (bypass), you must manually
enter the paper size. If you use non-standard size paper often, you can preset the size on
the machine. Then the preset size appears under [Standard Sizes] in the [Tray 5 (Bypass)]
screen. For more information, refer to "Tray 5 (Bypass) - Paper Size Defaults" (P.121).
2
of a paper sheet.
Paper and Other Media
2
Storing and Handling Paper
Please keep the following points in mind when storing paper
z
Store paper inside a cabinet or other dry place. Paper that has absorbed moisture
can cause paper jams and image quality defects.
z
After opening a package of paper, wrap up the remaining paper to store it. It is
recommended that you include moisture prevention packets.
z
Paper should be stored flat to prevent bends or warping.
Please adhere to the following when setting paper into the tray
z
Align the stack of paper neatly before setting it in the tray.
z
Do not use paper that is folded, creased, or heavily warped.
z
Do not use waved or curled paper.
z
Do not load paper of mixed size together into the tray.
z
Transparency paper and label paper can cause paper jams, and multiple sheets can
be fed to the printer at once. Be sure to carefully fan these types of paper.
z
When continuously outputting onto transparencies, transparency sheets may
sometimes stick to each other. Remove transparencies from the output tray every 20
or so sheets, and fan them to cool them down.
25
Page 28

2 Paper and Other Media
Loading Paper
This section describes how to load paper.
Types of paper loaded in trays
Paper and Other Media
2
The machine automatically detects the size and orientation of loaded paper in trays.
You need to set a paper type, however. Normally, each of the trays is set to plain paper.
When loading paper other than plain paper in trays, change the paper type settings.
Paper can also be named and set as user-defined paper. Up to five paper types can be
set as user-defined paper.
For information on changing the paper type in trays, refer to "Changing the Paper Settings" (P.38).
Automatic Tray Selection
If you set paper source on the [Paper/Output] tab to [Paper Tray] in the PCL print
driver's properties screen when making prints, the machine automatic all y sele cts the
corresponding paper tray according to the size and orientation of the document to print.
This is called [Automatic Tray Selection].
When making copies, automatic tray selection is active if [Auto Paper] is selected for
[Paper Supply]. If the machine detects two or more corresponding trays in the
automatic tray selection, the machine gives higher priority to the tray having the highest
[Paper Type Priority] set at [Paper Tray Settings]. During automatic tray selection, trays
whose [Paper Type Priority] setting is set to [Auto Paper Off] are not targeted in the
automatic tray selection. Also, if the [Paper Type Priority] setting is exactly the same,
the tray priority is determined by [Paper Tray Priority].
Note • The Tray 5 (bypass) cannot be selected in the automatic tray selection.
• When the machine runs out of paper during copying or printing, select the tray containing the
paper of the same size and ori entation that was being used for copying or printing, and
continue copying or printing (Auto Tray Switch feature). During this operation, a tray
containing paper of type whose [Paper Ty pe Priori ty] setting is set to [Au to Paper O ff] cannot
be switched to.
For information about setting [Paper Type], [Paper Type Priority], [Paper Tray Priority], and setting the
paper substitute feature, refer to "Paper Tray Settings" (P.119). The same settings can also be made from
CentreWare Internet Services.
Adding paper
When the machine runs out of paper during copying or printing, a message is displayed
on the control panel display. Add paper according to the displayed instructions.
Copying or Printing is automatically resumed when paper is added.
Note • Fan the paper well before loading paper in a tray. It prevents paper from sticking to each
other and reduces paper jams.
Loading Paper in the Trays 1 to 2
The following describes the procedure for loading paper in the Trays 1 to 2.
When the machine runs out of paper during copying or printing, a message is displayed
on the control panel display. Add paper according to the displayed instructions.
Copying or printing is automatically resumed when paper is added.
Note • Before loading paper in a tray, fan the paper well. It prevents paper from sticking to each
other and reduces paper jams.
For information on changing the paper size and orientation, refer to "Changing the Paper Size for the
Trays 1 to 2" (P.33).
26
Page 29

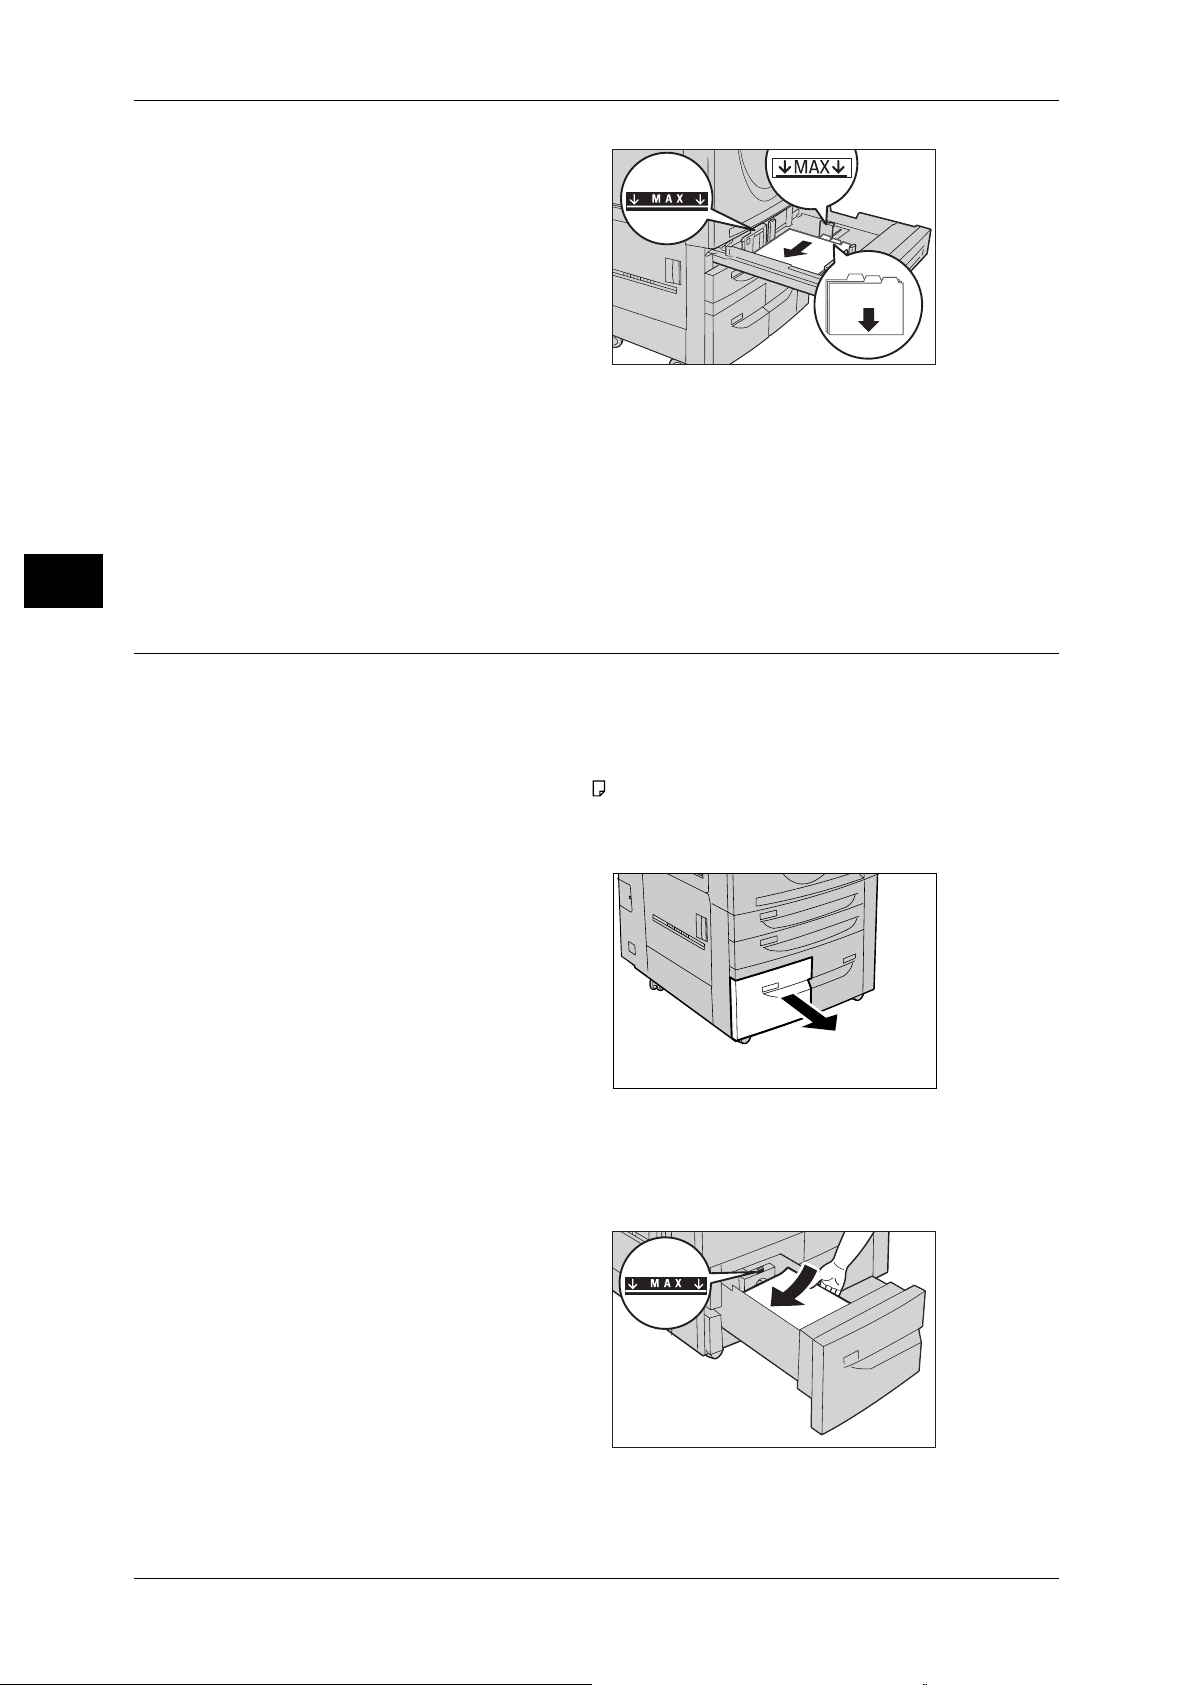
1 Pull out the tray towards you until it
stops.
Important • M ake sure to pull out the tray
slowly. When the tray is being
pulled out with force, the tray
may possibly hit your kn ees or
other parts of your body
causing injuries.
• While the machine processes
a job, do not pull the tray out
that the job uses.
• Do not add a new stack of paper on top of the remaining paper in the tray, in order to prevent
paper jams or any othe r troubl es. First , remove the remai ning pape r in the tra y, then loa d the
new stack of paper.
2 Load and align the edge of the
paper against the left edge of the
tray with the side to be copied or
printed on facing down.
Important • Do not load paper exceeding
the maximum fill line. It might
cause paper jams or machine
malfunctions.
• Do not place any paper or
things in the empty space on
the right si de of the Tray 1 or 2. It may cause paper jams or machine malfu nctions.
Loading Paper
Paper and Other Media
2
3 Push the tray in gently until it comes to a stop.
Loading Tab Paper in the Trays 1 to 2
Following describes the procedure for loading tab paper in the Trays 1 to 2.
Important • Tab paper cannot be loaded on the Trays 3, 4, 6 and 7.
• Tab paper can be used only fo r [Tab Margined Sh ift], Covers, and Separators.
Note • Before loading paper in a tray, fan the paper well. It prevents paper from sticking to each
other and reduces paper jams.
For information on changing the paper size and orientation, refer to "Changing the Paper Size for the
Trays 1 to 2" (P.33).
1 Pull out the tray towards you until it
stops.
Important • M ake sure to pull out the tray
slowly. When the tray is being
pulled out with force, the tray
may possibly hit your kn ees or
other parts of your body
causing injuries.
• While the machine processes
a job, do not pull the tray out
that the job uses.
• Do not add a new stack of
paper on top of the remaining paper in the tray, in order to prevent paper jams or any other
troubles. First, remove the remaining paper in the tray, then load the new stack of paper.
27
Page 30
2 Paper and Other Media
2 Turn tab paper face down with its
tabs oriented to the right, and then
load it into the tray by aligning its
left edge against the left-side of the
tray.
3 Hold the paper guide by its lever,
Paper and Other Media
and then slide the guide to fit snugly
against the edge of the paper.
Important • Do not load paper exceeding
the maximum fill line. It might
cause paper jams or machine malf unc tions.
• Fit the hole-punched edge again st the lef t -ha nd side of the tray.
Note • When copying or printing on multiple set of tab stock of a set with which tab po sitions dif fer,
load each tab paper with the side to be copied or printed on facing down to set the first paper
coming on top.
4 Push the tray in gently until it comes to a stop.
2
Loading Paper in the Trays 3 to 4
3
2
1
Following describes the procedure for loading paper in the Trays 3 to 4.
When the machine runs out of paper during copying or printing, a message is displayed
on the control panel display. Add paper according to the displayed instructions.
Copying or printing is automatically resumed when paper is added.
Note • The trays 3 and 4 accept A4 ( ) paper only.
• Before loading paper in a tray, fan the paper well. It prevents paper from sticking to each
other and reduces paper jams.
1 Pull out the tray towards you until it
stops.
Important • Make sure to pull out the tray
slowly. When the tray is being
pulled out with force, the tray
may possibly hit your knees or
other parts of your body
causing injuries.
• While the machine processes
a job, do not pull the tray out
that the job uses.
• Do not add a new stack of
paper on top of the remaining paper in the tray, in order to prevent paper jams or any other
troubles. First, remove the remaining paper in the tray, then load the new stack of paper.
2 Load and align the edge of the
paper against the left edge of the
tray with the side to be copied or
printed on facing down.
Important • Do not load paper exceeding
the maximum fill line. It might
cause paper jams or machine
malfunctions.
28
3 Push the tray in gently until it comes to a stop.
Page 31

Loading Paper in the Tray 5 (Bypass)
When printing or copying with paper sizes or types that cannot be set in the Trays 1 to
4, 6 and 7, use the Tray 5 (Bypass).
The following describes how to load paper into the Tray 5 (Bypass).
To make detailed instructions for printings, specify the instructions using the [Tray/
Output] tab in the print driver. When doing this, also specify the type of paper to load.
Important • Do not supply new paper until the loaded paper run out in order to prevent paper jams or
making mistakes of paper loading.
Note • Before loading paper in a tray, fan the paper well. It prevents paper from sticking to each
other and reduces paper jams.
1 Open the Tray 5 (bypass) as
necessary.
Note • If necessary, extend the
extension flap. When pulling
out the extension flap, do it
gently.
Loading Paper
Paper and Other Media
2
2 Hold the center of the paper guides
and slide the m to th e de s ire d pap e r
size.
3 Load paper with the side to be
copied or printed on facing up, and
insert the paper lightly along the
paper guide until it comes to a stop.
Important • Do not load mixed paper types
into the tray.
• Do not load paper exceeding
the maximum fill line. It might
cause paper jams or machine
malfunctions.
4 When loading a non-standard paper size on the Tray 5 (bypass), move the paper
guides to accommodate the paper.
Loading Tab Paper in the Tray 5 (Bypass)
Following describes the procedure for loading tab paper in the Tray 5.
Important • Tab paper cannot be loaded on the Trays 3, 4, 6 and 7.
• Tab paper can be used only fo r [Tab Margined Sh ift], Covers, and Separators.
Note • Before loading paper in a tray, fan the paper well. It prevents paper from sticking to each
other and reduces paper jams.
29
Page 32
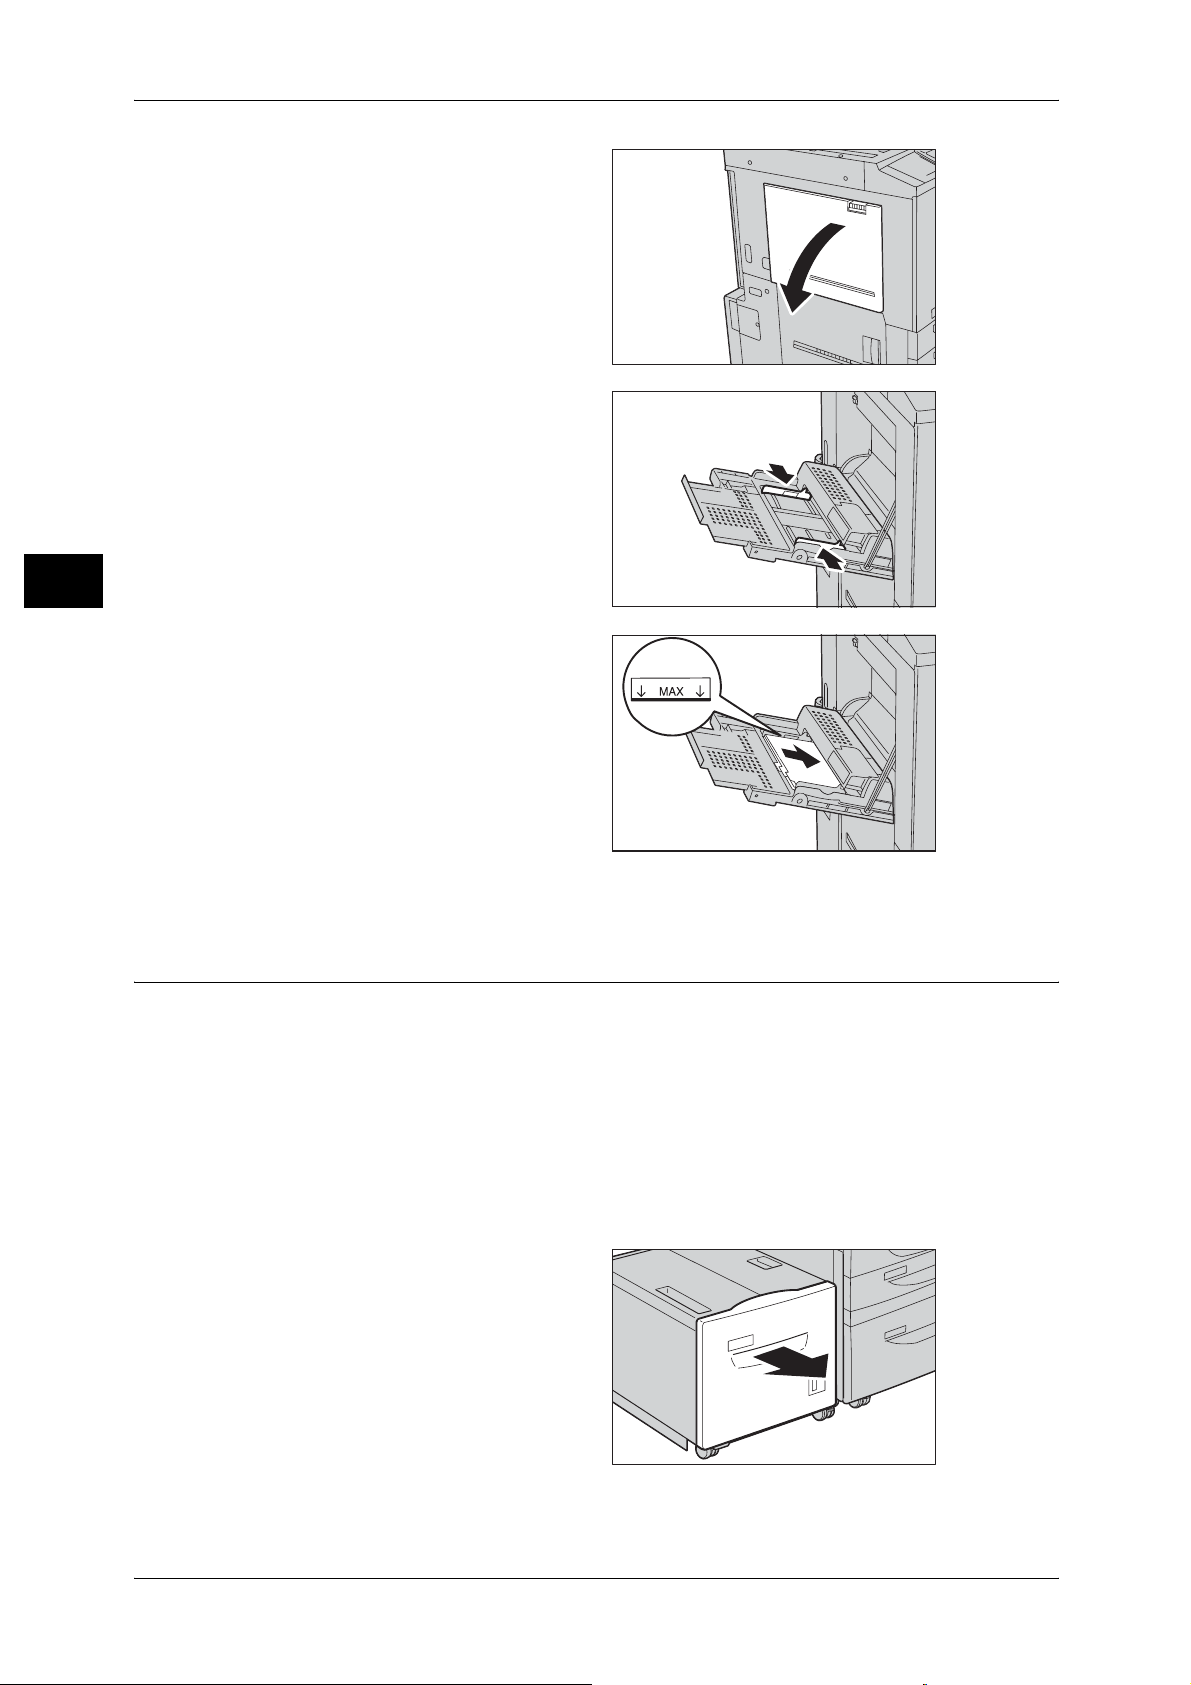
2 Paper and Other Media
Paper and Other Media
2
1 Open the Tray 5 (bypass).
Note • If necessary, extend the
extension flap. When pulling
out the extension flap, do it
gently.
2 Hold the center of the paper guides
and slide them to the desired paper
size.
3 Load paper with the side to be
copied or p rinted on facing up and
the top edge frontward, and insert
the paper lightly along the paper
guide until it comes to a stop.
Important • Do not load mixed paper types
into the tray.
• Do not load paper exceeding
the maximum fill line. It may
cause paper jams or machine
malfunctions.
Loading Paper in the Tray 6 (HCF (A4 1 Tray))
Following describes the procedure for loading paper in the Tray 6 (HCF (A4 1 Tray))
(optional).
When the machine runs out of paper during copying or printing, a message is displayed
on the control panel display. Add paper according to the displayed instructions.
Copying or printing is automatically resumed when paper is added.
Note • Before loading paper in a tray, fan the paper well. It prevents paper from sticking to each
other and reduces paper jams.
For information about changing the paper size and orientation, refer to "Changing the Paper Size for the
Tray 6 (HCF (A4 1 Tray))" (P.34).
1 Pull out the Tray 6 towards you until
it stops.
Important • Make sure to pull out the tray
slowly. When the tray is being
pulled out with force, the tray
may possibly hit your knees or
other parts of your body
causing injuries.
• While the machine is
processing a job, do not pull
out the tray.
30
Page 33

• Do not add a new stack of paper on top of the remaining paper in the tray, in order to prevent
paper jams or any othe r troubl es. First , remove the remai ning pape r in the tra y, then loa d the
new stack of paper.
2 Load and align the edge of the
paper against the right edge of the
tray with the side to be copied or
printed on facing up.
Important • Do not load paper exceeding
the maximum fill line. It might
cause paper jams or machine
malfunctions.
3 Push the tray in gently until it comes to a stop.
Loading Paper in the Trays 6 to 7 (HCF (A4 2 Tray))
Following describes the procedure for loading paper in the Trays 6 and 7 (HCF (A4 2
Tray)) (optional).
When the machine runs out of paper during copying or printing, a message is displayed
on the control panel display. Add paper according to the displayed instructions.
Copying or printing is automa tic all y resu med when paper is add ed.
Note • Fan the paper well before loading paper in a tray. It prevents paper from sticking to each
other and reduces paper jams.
For information about changing the paper size and orientation, refer to "Changing the Paper Size for the
Trays 6 to 7 (HCF (A4 2 Tray))" (P.36 )
Loading Paper
Paper and Other Media
2
1 Pull out the tray towards you until it
stops.
Important • M ake sure to pull out the tray
slowly. When the tray is being
pulled out with force, the tray
may possibly hit your kn ees or
other parts of your body
causing injuries.
• While the machine is
processing a job, do not pull
out the tray.
• Do not add a new stack of paper on top of the remaining paper in the tray, in order to prevent
paper jams or any othe r troubl es. First , remove the remai ning pape r in the tra y, then loa d the
new stack of paper.
2 Load and align the edge of the
paper against the right edge of the
tray with the side to be copied or
printed on facing up.
Important • Do not load paper exceeding
the maximum fill line. It may
cause paper jams or machine
malfunctions.
/#:
3 Push the tray in gently until it comes to a stop.
31
Page 34

2 Paper and Other Media
Loading Paper in the Tray 8 (Interposer )
Following describes the procedure for loading paper in the Tray 8 (Interposer)
(optional).
Interposer allows you to load paper (blank, copied paper, etc.), which will only be used
as separators and covers, so that the machine does not output on the paper loaded in
Paper and Other Media
this tray.
Note • When adding paper to inter poser, rem ove any p aper rema ining in the tray, add it to th e stack
of paper to be added, then load all of the paper into the interpos er at once.
1 Hold the center of the paper guides
and slide them to the desired paper
size.
2
2 Load the paper, neatly aligning all
edges.
Important • Do not load paper exceeding
the maximum fill line. It might
cause paper jams or machine
malfunctions.
Loading Tab Paper in the Tray 8 (Interposer)
Following describes the procedure for loading tab paper in the Tray 8 (Interposer)
(optional).
1 Hold the center of the paper guides
and slide them to the desired paper
size.
2 If the paper in already printed on,
load the paper with the printed side
facing up and with the tab side to be
fed first.
Important • Do not load paper exceeding
the maximum fill line. It might
cause paper jams or machine
malfunctions.
A
A
32
Page 35

Changing the Paper Size
The following describes how to change the paper size for the Trays 1, 2, 6 and 7.
Note • The fixed paper sizes ar e set fo r Tray 3 and Tr ay 4 . To cha nge th e pape r si ze for T ray 3 an d
Tray 4, contact our Customer Support Center.
• The paper types for the Trays 1, 2, 6 and 7 are preset. Normally, plain paper is set. When
replacing the loaded paper with other types of paper, change the paper type settings to
match the type of paper to be loaded to maintain print quality.
For information about changing the paper types, refer to "Changing the Paper Settings" (P.38)
Changing the Paper Size for the Trays 1 to 2
Following describes how to change the paper size for the Trays 1 to 2.
1 Pull out the tray towards you until it
stops.
Important • M ake sure to pull out the tray
slowly. When the tray is being
pulled out with force, the tray
may possibly hit your kn ees or
other parts of your body
causing injuries.
• While the machine processes
a job, do not pull the tray out
that the job uses.
• Do not add a new stack of paper on top of the remaining paper in the tray, in order to prevent
paper jams or any othe r troubl es. First , remove the remai ning pape r in the tra y, then loa d the
new stack of paper.
Changing the Paper Size
Paper and Other Media
2
2 Remove any paper loaded on the tray.
3 Hold the long-side paper guide and
slide it to the desired paper size (1).
Hold the short-side paper guide on
the right side and slide it to the
desired paper size (2).
4 Load and align the edge of the
paper against the left edge of the
tray with the side to be copied or
printed on facing down.
Important • Do not load paper exceeding
the maximum fill line. It might
cause paper jams or machine
malfunctions.
• Do not place any paper or
things in the empty space on
the right side of the Tray 1 or 2.
It may cause paper jams or
machine malfunctions.
2
1
33
Page 36

2 Paper and Other Media
5 Move the two paper guid es while
holding their grips so that they
lightly contact the edges of the
paper.
6 Push the tray in gently until it comes
Paper and Other Media
to a stop.
Note • Affix the paper size label to the
front of the paper tray.
Changing the Paper Size for the Tray 6 (HCF (A4 1 Tray))
Following describes how to change the paper size for the Tray 6 (HCF (A4 1 Tray)).
1 Pull out the Tray towards you until it
stops.
2
Important • Make sure to pull out the tray
slowly. When the tray is being
pulled out with force, the tray
may possibly hit your knees or
other parts of your body
causing injuries.
• While the machine processes
a job, do not pull the tray out
that the job uses.
• Do not add a new stack of
paper on top of the remaining paper in the tray, in order to prevent paper jams or any other
troubles. First, remove the remaining paper in the tray, then load the new stack of paper.
2 Remove any paper loaded on the tray.
3 Open the end guide (1) and
unscrew the screw (2). Then
remove the guide from the Tray.
4 Insert the small protrusions at the bottom of the guide into holes corresponding to the
paper size (1). Insert the screw into a hole corresponding to the paper size on the top
of the guide and screw up (2).
34
Page 37

Changing the Paper Size
5 Unscrew the screw of the front
guide and remove the guide from
the Tray.
6 Insert the small protrusions at the bottom of the guide into holes corresponding to the
paper size (1). Insert the screw into a hole corresponding to the paper size on the top
of the guide and screw up (2).
2
1
Paper and Other Media
2
7 Pull the lever up of the end guide
and move it along the slot (1). Set
the lever at the position
corresponding to the paper size (2)
and press the lever down (3).
Important • Adjust the end guide
accordingly with the size of
paper. If the end guide is not
adjusted correctly, the
machine cannot feed the paper
properly, resulting in a paper
jam.
Note • The slot on the left of 8.5” is not used.
8 Open the end guide (1) and load
and align the edge of the paper
against the right edge of the tray
with the side to be copied or printed
on facing up (2).
Important • Do not load paper exceeding
the maximum fill line. It might
cause paper jams or machine
malfunctions.
1
3
2
35
Page 38

2 Paper and Other Media
9 Close the end guide tightly.
Paper and Other Media
10 Push the tray in gently until it comes to a stop.
Changing the Paper Size for the Trays 6 to 7 (HCF (A4 2 Tray))
Following describes how to change the paper size on the Trays 6 to 7 (HCF (A4 2
Tray)).
2
Note • When changing the paper size to non-standard size loaded in trays 6 and 7, contact our
Customer Support Center. If doing so, it never returns to the original setting.
1 Pull out the tray towards you until it
stops.
Important • Make sure to pull out the tray
slowly. When the tray is being
pulled out with force, the tray
may possibly hit your knees or
other parts of your body
causing injuries.
• While the machine processes
a job, do not pull the tray out
that the job uses.
• Do not add a new stack of paper on top o f the remai ning pape r in the tray, in order to preven t
paper jams or any oth er trou bles. Firs t, remov e the rema ining paper in the tr ay, then lo ad the
new stack of paper.
2 Remove any paper loaded on the tray.
3 Loosen the screws (1), and remove
the guides from the front and back
of the tray (2).
4 Attach the guides according to the
hole of the paper size to change (1),
and tighten the screws (2).
36
Page 39

5 Load and align the edge of the
paper against the right edge of the
tray with the side to be copied or
printed on facing up.
Important • Do not load paper exceeding
the maximum fill line. It might
cause paper jams or machine
malfunctions.
/#:
6 Push the tray in gently until it comes to a stop.
Changing the Paper Size
Paper and Other Media
2
37
Page 40

2 Paper and Other Media
Changing the Paper Settings
The following describes how to change the paper types for trays.
Note • Users can name User1 to User5 displayed in the paper type.
• The [Setup Menu] screen, which can be displayed by selecting [Setup Menu] in the [All
Paper and Other Media
For information on how to set names to User1 to User5, refer to "Custom Paper Name" (P.119).
1 Press the <Log In/Out> button.
Services] screen, allows you to change the paper type setting without entering the System
Administration mode, if you have configured the settings to do so in advance.
2
2 Enter the user ID with the numeric
keypad or the keyboard displayed
by pressing [Keyboard], and select
[Confirm].
Note • The default user ID is "11111".
When using the
Authentication feature, a
passcode is required. The
default passcode is "x-admin".
3 Select [System Settings].
123
456
789
0 #
C
<Log In/Out>
button
38
4 Select [System Settings].
5 Select [Common Settings].
6 Select [Paper Tray Settings].
Page 41

7 When using DocuCentre series
models, select [Paper Size/Type].
When using ApeosPort series
models, select [Paper Tray
Attributes].
8 Select the paper tray wh ose paper
type setting is to be changed at
[Items], and select [Change
Settings].
Note • Select [ ] to return to the
previous screen or [ ] to
move to the next screen.
9 When using DocuCentre series
models, select [Paper Type].
When using ApeosPort series
models, select [Change Settings ].
Changing the Paper Settings
Paper and Other Media
2
10 Select the paper type to be set and
then select [Save].
Note • When using ApeosPort series
models, the paper color can
be set if you select [Enabled]
for [Paper Color] under
[Customize Paper Supply
Screen]. For more in form ation
on [Customize Paper Supply ],
refer to "Customize Paper
Supply Screen (ApeosPort
series models only)" (P.120).
• Select [ ] to return to the previous screen or [ ] to move to the next screen.
11 Make sure on the screen that the paper type you selected has been set for the tray,
and then select [Confirm].
12 Select [Close] repeatedly until the [System Settings] screen is displayed.
13 Select [Exit] to exit the System Administration mode.
39
Page 42

Page 43

3 Maintenance
This chapter describes how to replace consumables, clean the machine, and
print a report/list.
z
Replacing Consumables.............................................................................42
z
Cleaning the Machine.................................................................................55
z
Printing a Report/List ..................................................................................60
Page 44

3 Maintenance
WARNING
CAUTION
Replacing Consumables
The machine is provided with t he following cons umables and peri odical replacem ent parts.
We recommend the use of the following co nsumables as they have b een manufac tured to
meet the specifi cat io ns of t he m achine .
Maintenance
3
Type of Consumables/
Periodical Replacement Parts
Toner cartridge CT200943 1 unit/box
Waste Toner Bottle CWAA0663 1 unit/box
Staple cartridge for 50 sheets XE CWAA0540 5,000 staples × 3 sets/box
Staple cartridge for booklet maker finisher
XC
Staple cartridge for 100 sheets XF CWAA0677 5,000 staples × 4 sets/box,
Note • We recommend that you always have spare consumables/periodical replacement parts
available.
z
Use a broom or a wet cloth to wipe off spilled toner. Never use a vacuum cleaner
Product
Code
CWAA0501 5,000 staples × 4 sets/box
Quantity/Box
Staple Scrap Container × 1
unit/box
for the spills. It may catch fire by electric sparks inside the vacuum cleaner and
cause explosion. If you spill a large volume of toner, contact your local Fuji Xerox
representative.
z
Never throw a toner cartridge into an open flame. Remaining toner in the cartridge
may catch fire and cause burn injuries or explosion.
If you have a used toner cartridge no longer needed, contact your local Fuji Xerox
representative for its disposal.
42
z
Keep the toner cartridges out of the reach of children. If a child accidentally
swallows toner, spit it out, rinse mouth with water, drink water and consult a
physician immediately.
z
When replacing the toner cartridges, be careful not to spill the toner. In case of any
toner spills, avoid contact with clothes, skin, eyes and mouth as well as inhalation.
z
If toner spills onto your skin or clothing, wash it off with soap and water.
If you get toner particles in your eyes, wash it out with plenty of water for at least
15 minutes until irritation is gone. Consult a physician if necessary.
If you inhale toner particles, move to a fresh air location and rinse your mouth with
water.
If you swallow toner, spit it out, rinse your mouth with water, drink plenty of water
and consult a physician immediately.
Handling consumables/periodical replacement parts
z
Do not store boxes for consumables/periodical replacement parts upright.
z
Do not unpack consumables/periodical replacement parts before use. Avoid storing
consumables/periodical replacement parts in the following locations:
- In extreme temperature and humidity
Page 45

Replacing Consumables
- Near heat-generating devi ce s
- In direct sunlight
- In dusty locations
z
Use consumables/periodical replacement parts only as directed on their packages.
z
We recommend always having spare consumables/periodical replacement parts
available.
z
When calling our Customer Support Center to order consumables/periodical
replacement parts, have the product codes ready.
z
Use of consumables/periodical replacement parts not recommended by Fuji Xerox
can impair machine quality and perfor mance. Use only consumables/periodical
replacement parts recommended by Fuji Xerox.
Checking the status of consumables
The status of consumables can be checked on the [Supplies] screen.
For information about consumables, refer to "Supplies" (P.90).
Maintenance
Replacing the Toner Cartridge
The machine comes with a toner cartridge. The machine will display the following
messages before the toner cartridge is empty. Follow the messages and replace the
toner cartridge as necessary.
Message
Toner Cartridge [K] needs to be
replaced.
Toner Cartridge [K] needs to be
replaced.
Press Machine Status button and
select Supplies tab for details.
*1 The page yield after each message is displayed is for when A4 paper LEF is used. The value is an
estimate and varies depending on the conditions such as the print content, dot coverage (area
coverage), paper size, paper type, copy density, input image type, and the machine usage
environment.
Important • When replacing the toner cartridge, toner may spill and soil the floor. We recommend laying
paper on the floor beforehand.
• The use of toner cartridges not re commended by Fuji Xerox may impair quality and
performance. Use only toner cartridges recommended by Fuji Xerox.
• When the remaining amount of toner becomes small, the machine may stop during printing
and displa y a message. If this happen s, replace the toner cartridge to continue copying or
printing.
• Replace toner cart ridges while the machine is on.
• If a partially used toner cartridg e is us ed , a message appears and th e nu mb er of pages that
you can copy or print displayed on the screen may differ considerably.
Page yield after the
message is
displayed
Approx. 1,500 pages Get a spare of the displayed
*1
toner cartridge. Replace the
toner cartridge with a new one.
Replace the toner cartridge
-
with a new one.
Solution
3
43
Page 46

Maintenance
WARNING
3
3 Maintenance
1 Make sure that the machine is not
in operation, and open the front
cover.
2 Turn the toner cartridge to the left
until it aligns with the unlock sign.
3 Remove the toner cartridge by
holding the bottom of the cartridge
while gently pulling out it.
Never throw a toner cartridge into
an open flam e. Remaining toner
in the cartridge may catch fire
and cause burn injuries or
explosion.
If you have a used toner cartridge
no longer needed, contact your
local Fuji Xerox representative
for its disposal.
Important • Pull out the toner cartridge gently. Otherwise, toner may fly out of the cartridge.
4 Take out the new toner cartridge
from its box, and gently tilt the
cartridge up and down, and then
left and right several times.
5 Hold the toner cartridge with the
arrow mark facing up.
44
Page 47

6 Push the toner cartridge slowly to
the end and turn the right until it
aligns with the lock sign.
7 Close the front cover.
Note • A message will be display ed
and the machine will not
operate if the front cover of
the finish er is even sl ightly
open.
Replacing Consumables
Replacing the Waste Toner Bottle
The machine comes with a waste toner bottle. The machine will sound an alarm and
display the message "Please order a new Waste Toner Bottle" approximately 3,000
pages before the waste toner bottle is full. When this message appears, order a new
waste toner bottle. The machine will stop when the waste toner bottle ends its life.
Note • The above value "3,000 pages" is based on when copies are made at 6% area coverage
using A4 size paper. The value is for reference only and will vary depending on the
conditions such as the print conten ts, dot cov erage (ar ea cove rage) , paper si ze, paper typ e,
copy density, input image type, and machine usage environment.
Important • When replacing the waste toner bottle, toner may spill and soil the floor. We recommend
laying paper on the floor beforehand.
• The use of waste toner bottles not recommended by Fuji Xerox may impair quality and
performance. Use only waste toner bottles recommended by Fuji Xerox for the machine.
• Replace the waste toner bottle w hile the machi ne is on.
1 Make sure that the machine is not
in operation, and open the front
cover.
Maintenance
3
2 Open the waste toner bottle cover.
45
Page 48

3 Maintenance
WARNING
Maintenance
3 Grip the handle of the waste toner
bottle and pull out about half of it.
4 Hold the center part on the top of
the container, and then remove it.
3
5 Hold the used waste toner bottle
firmly with both hands and put it
into the provided plastic bag.
Never throw a toner waste bottle
into an open flame. Remaining
toner in the toner waste bottle
may catch fire and cause burn
injuries or explosion.
If you have a used toner waste
bottle no longer needed, contact
your local Fuji Xerox
representative for its disposal.
Important • Place the used waste toner bottle into the special bag and then close it firmly using ring
rubber provided with the bag. If the zipper is left open, the toner may leak out during
disposal.
6 Hold the center part on the top of a
new container and insert it until it
comes to a stop.
Important • When inser ting the waste
toner bottle, do not grip the
handle of the container.
7 Close the waste toner bottle cover.
8 Close the front cover.
Note • A message will be disp layed and the machine w ill not oper ate if the fro nt cover of th e finisher
is even slightly open.
46
Page 49

Replacing Consumables
Replacing the Staple Cartridge for C-Finisher or C-Finisher with Booklet Maker
When the C-Finisher (optional) or the C-Finisher with Booklet Maker (optional) is
installed and it is time to replace the staple cartridge, a message appears on the touch
screen. When this message appears, replace the staple cartridge with a new one.
This section explains how to replace the staple cartridge in the C-Finisher with Booklet
Maker. Use the same procedures for the C-Finisher.
Important • The use of staple cartridges not recommended by Fuji Xerox may impair quality and
performance. Use only staple cartridges recommended by Fuji Xerox for the machine.
Note • To order a staple cartridge, contact our Customer Support Center.
1 Make sure that the machine has
stopped, and open the front cover
of the finisher.
2 Grip the lever R1 of the staple
cartridge holder, and pull out the
holder to the right towards you.
3 Remove the staple cartridge holder
by gripping the orange l ever.
Note • The staple cartridge is firmly
held. When remove t he sta ple
cartridge, strongly pull the
cartridge.
Maintenance
3
4 Pick the empty staple case with
your fingers (1), and then remove
the case from the cartridge (2) as
shown in the figure.
2
1
1
47
Page 50

3 Maintenance
Maintenance
3
5 Prepare a new staple case. Insert
the front of the staple case into the
staple cartridge (1), and push the
rear of the case to set (2).
2
1
6 Hold the orange lever to push the
staple cartridge into the machine
until it clicks into place.
7 Close the front cover of the finisher.
Note • A message will be disp layed and the machine w ill not oper ate if the fro nt cover of th e finisher
is even slightly open.
Replacing the Booklet St aple Cartridg e (C-Finisher with Booklet Maker or Booklet Finisher D2)
When the C-Finisher with Booklet Maker (optional) or the Booklet Finisher D2 (optional)
is installed and it is time to replace the booklet staple cartridge, a message appears on
the touch screen. When this message appears, replace the staple cartridge with a new
one.
This section explains how to replace the staple cartridge in the C-Finisher with Booklet
Maker. Use the same procedures for the Booklet Finisher D2.
Important • The use of staple cartridges not recommended by Fuji Xerox may impair quality and
performance. Use only staple cartridges recommended by Fuji Xerox for the machine.
Note • To order a staple cartridge, contact our Customer Support Center.
1 Make sure that the machine has
stopped, and open the front cover
of the finisher.
48
Page 51

2 While pressing the levers R2 and
R3 to the right (1), pull out the unit
(2).
3 Hold the left and right tabs on the
staple cartridge to pull the cartridge
out.
Replacing Consumables
R3
R2
Maintenance
4 Hold the left and right tabs on the
new staple cartridge to return the
cartridge to its original position, and
gently push the cartridge until it
clicks into place.
5 Return the unit to its original
position.
6 Close the front cover of the finisher.
Note • A message will be displayed an d the machine will no t operate if th e front cov er of the fini sher
is even slightly open.
3
Replacing the Staple Cartri d ge for Staple Finisher D2 or Booklet Finisher D2
When the Staple Finisher D2 (optional) or Booklet Finisher D2 (optional) is installed and
it is time to replace the staple cartridge, a message appears on the touch screen. When
this message appears, replace the staple cartridge with a new one.
Important • The use of staple cartridges not recommended by Fuji Xerox may impair quality and
performance. Use only staple cartridges recommended by Fuji Xerox for the machine.
Note • To order a staple cartridge, contact our Customer Support Center.
49
Page 52

3 Maintenance
Maintenance
1 Make sure that the machine has
stopped, and open the right cover
of the finisher.
2 Hold the R1 at the position shown
in the figure.
3
3 Pull out the unit.
4 Hold the positions indicated by an
arrow to remove the staple
cartridge from the unit.
5 Push a new staple cartri dge into
the unit.
50
Page 53

Replacing Consumables
6 Push the removed unit back to the
original position.
7 Close the right cover of the finisher.
Note • A message will be displaye d and the machin e will not ope rate if the ri ght cover of the finisher
is even slightly open.
Emptying the Punch Scrap Container for C-Finisher or C-Finisher with Booklet Maker
When the C-Finisher (optional) or C-Finisher with Booklet Maker (optional) is installed
and the punch scrap container becomes full, a message appears on the touch screen.
Discard the scraps according to the message.
If you take the punch scrap container out of the machine, make sure to empty it
completely. If it is reinstalled with some scraps remaining, it may become full before the
message appears again, and this can cause machine breakdown.
Important • When emptying the punch scrap container, make sure that the machine is switched on. If not
switched on, the machine will not recognize that the punch scrap container has been
emptied.
Maintenance
3
1 Make sure that the machine has
stopped, and open the front cover
of the finisher.
2 Pull out the punch scrap container
R4 towards you.
51
Page 54

3 Maintenance
CAUTION
Maintenance
3 Discard all the scraps.
4 Insert the empty punch scrap
container into its original position
until it comes to a stop.
3
5 Close the front cover of the finisher.
Note • A message will be disp layed and the machine w ill not oper ate if the fro nt cover of th e finisher
is even slightly open.
Emptying the Punch Scrap Container for Staple Finisher D2 or Booklet Finisher D2
When the St aple Finish er D2 (optiona l) or Booklet Finisher D2 (optional) i s installed an d
the punch scrap container becomes full, a message appears on the touch screen.
Discard the scraps according to the message.
If you take the punch scrap container out of the machine, make sure to empty it
completely. If it is reinstalled with some scraps remaining, it may become full before the
message appears again, and this can cause machine breakdown.
Be careful not to get injured by waste staples when detaching a staple dust box.
Important • When emptying the punch s crap con tainer, m ake sure that the ma chine is switch ed on. If n ot
switched on, the machine will not recognize that the punch scrap container has been
emptied.
1 Make sure that the machine has
stopped, and open the right cover
of the finisher.
52
Page 55
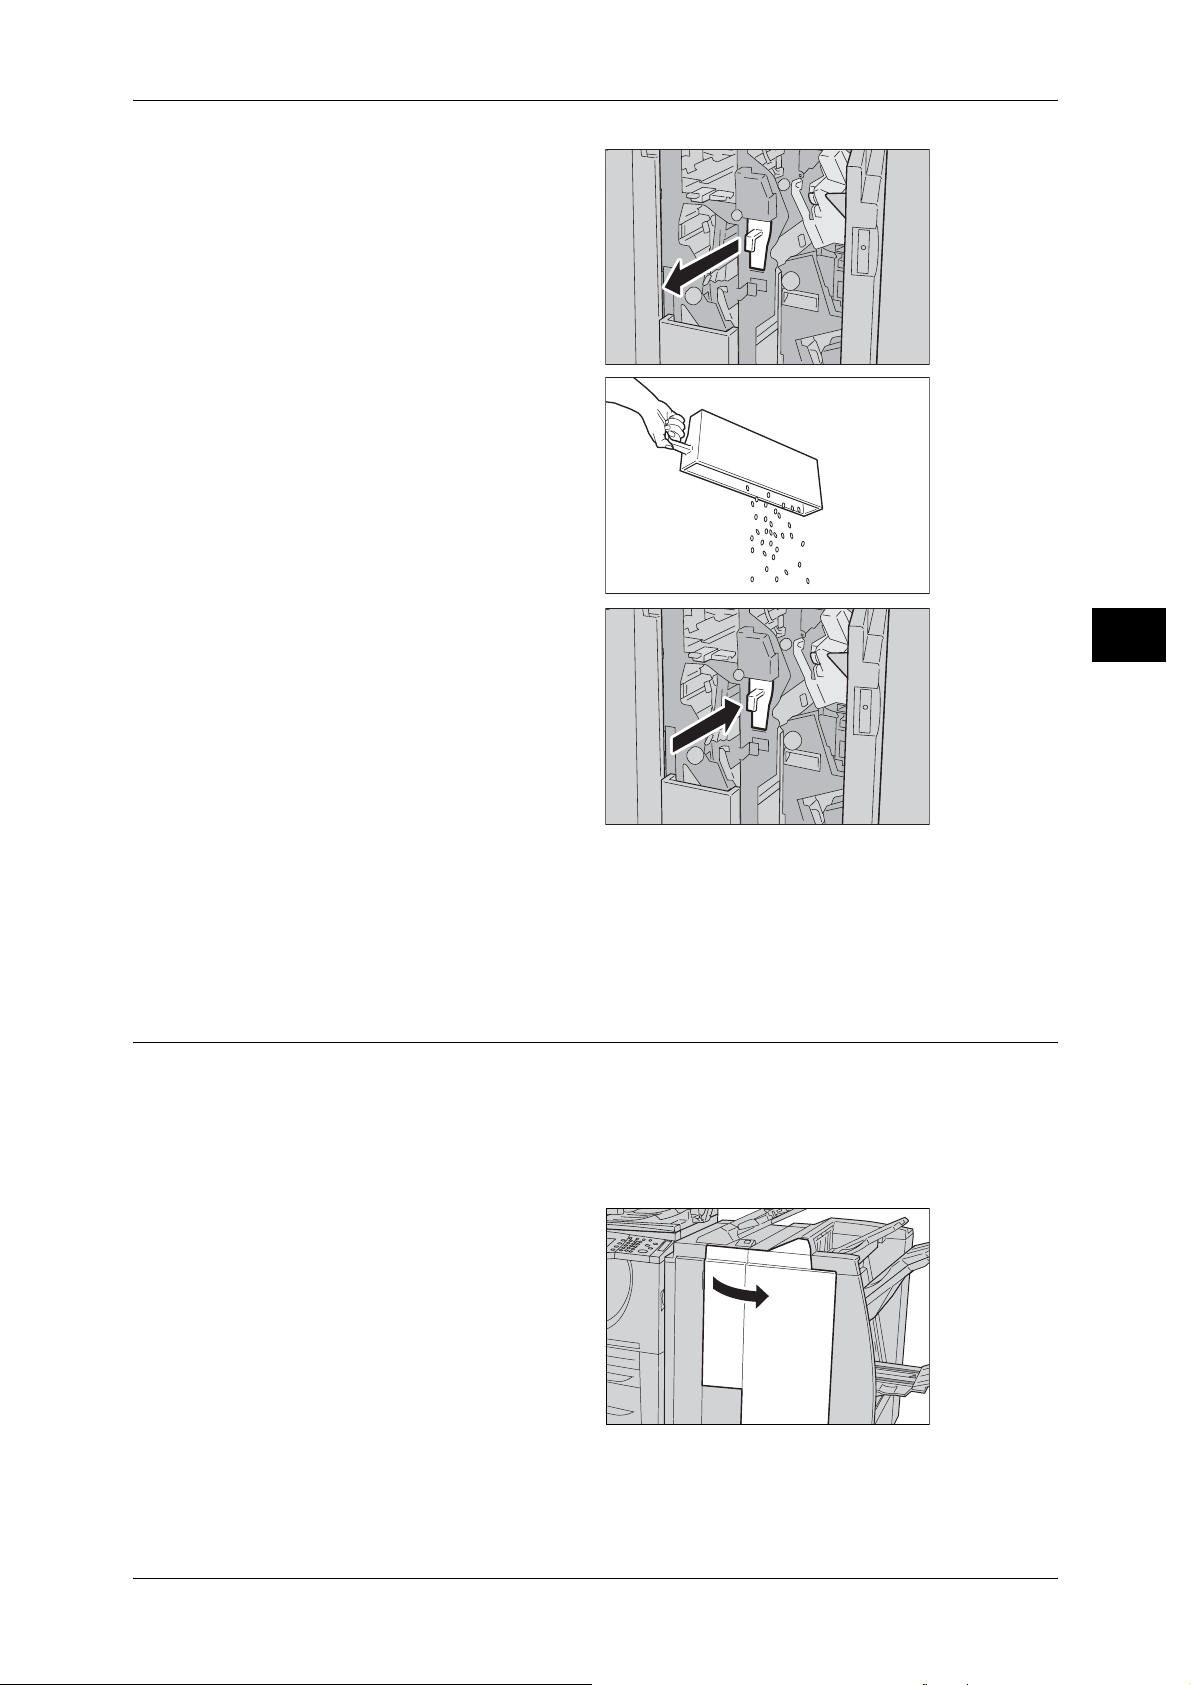
2 Pull out the punch scrap container
R4 towards you.
3 Discard all the scraps.
4 Insert the empty punch scrap
container into its original position
until it comes to a stop.
Replacing Consumables
Maintenance
3
5 Close the right cover of the finisher.
Note • A message will be displaye d and the machin e will not ope rate if the ri ght cover of the finisher
is even slightly open.
Replacing the Staple Scrap Container for Staple Finisher D2 or Booklet Finisher D2
When the Staple Finisher D2 or Booklet Finisher D2 is Installed and the staple scrap
container becomes full, a message appears on the touch screen. Replace the staple
scrap container according to the message.
Important • Replace the staple scrap container while the power is on.
• A Staple scrap container is included in a Staple Cartridge for 100 sheets XF.
1 Make sure that the machine has
stopped, and open the right cover
of the finisher.
53
Page 56

3 Maintenance
Maintenance
2 Move the lock lever, shown in the
figure, leftward to the position.
3 Securely hold the staple scrap
container by its R5 section, and
take the container out of the
machine.
3
4 Put the old container into the
plastic bag supplied.
Important • Do not disassemble the
container and return it to our
Customer Support Center.
5 Hold a new staple scrap container
by its R5 secti on, and insert the
container, bottom first, into the
machine.
Important • To prevent injury, do not put
your fingers on top of the
container.
6 Push the R5 section of the
container until the lock lever moves
to the position.
7 Close the right cover of the finisher.
Note • A message will be displayed
and the machine will operate
unless the right cover of the
finisher is completely closed.
54
Page 57

Cleaning the Machine
WARNING
CAUTION
The following describes how to clean the machine.
The cleaning instructions will be explained individually for various parts of the machine:
the machine exterior, document cover/document glass, film/constant velocity transport
glass, and document feeder roller.
When cleaning this product, use the designated cleaning materials exclusive to it.
Other cleaning materials may result in poor performance of the product. Never use
aerosol cleaners, or it may catch fire and cause explosion.
When cleaning this product, always switch off and unplug it. Access to a live machine
interior may cause electric shock.
Cleaning the Machine
Maintenance
Cleaning the Exterior
The following describes how to clean the exterior of the machine.
Important • Always switch the power off and unplug the power cord before cleaning any part of the
machine. Cleaning the mac hine with the power on may cause an electric shock.
• Do not use benzene, paint thinner, or other volatile liquids or spray insect repellent on the
machine as they might discolor, deform, or crack covers.
• Cleaning the machine with an excessive amount of water may cause the machine to
malfunction or damage documents during copying.
1 Wipe the exterior with a firmly
wrung soft cloth moistened with
water.
Important • Do not use cleaning agents
other than water or neutral
detergent.
Note • If dirt does not come off easily,
gently wipe it with a soft cloth
moistened with a small
amount of neutral detergent.
2 Wipe off any excess water with a soft cloth.
3
Cleaning the Document Cover and Document Glass
If the document cover and document glass are dirty, streaks or smears may appear on
copies and the machine may not properly detect document sizes.
To ensure clean copies at all times, clean the document cover and the document roller
about once a month.
Important • Do not use benzene, paint thinner, or other organic solvents. Doing so might damage paint
or coating on plastic parts.
• Cleaning the machine with an excessive amount of water may cause the machine to
malfunction or damage documents during copying.
55
Page 58

3 Maintenance
r
s
1 Wipe the document cover with a
soft cloth moistened with water to
remove any dirt and then wipe it
with a soft, dry cloth.
Important • Do not use cleaning agents
other than water or neutral
detergent.
Note • If dirt does not co me off easily ,
gently wipe it with a soft cloth
moistened with a small
amount of neutral detergent.
2 Wipe the document glass with a soft cloth moistened with water to remove any dirt,
Maintenance
and then wipe it with a soft, dry cloth.
Important • Do not use cleaning agents other than water or neutral detergent.
Note • If dirt does not come off eas ily, ge ntl y wipe it w ith a s oft clot h mois tened with a smal l amou nt
of neutral detergent.
Cleaning the Narrow Glass Strip and Document Presser for ApeosPort
3
Series Models
Document cove
Document glas
If the narrow glass strip and document presser are dirty, streaks or smears may appear
on copies and the machine may not properly detect document sizes.
To ensure clean copies at all times, clean the narrow glass strip and document presser
about once a month.
Important • Do not use ben zene, paint thinner, or other organic sol vents. Doing so might damage paint
or coating on plastic parts.
• Cleaning the machine with an excessive amount of water may cause the machine to
malfunction or damage documents during copying.
1 Wipe the narrow glass strip,
document presser, and the guide
with a soft cloth moistened with
water to remove any dirt, and then
wipe them with a soft, dry cloth.
Important • Do not use cleaning agents
other than water or neutral
detergent.
Note • If dirt does not co me off easily ,
gently wipe it with a soft cloth
moistened with a small amount of neutral detergent.
Document
presser
Narrow glass
strip
Guide
2 Holds the lever to open the part of
the figure on the right. Wipe the
narrow glass strip with a soft cloth
moistened with water to remove
any dirt on the optical glass, and
then wipe it with a soft, dry cloth.
Important • Do not push the narrow glass
strip strongly sinc e it is eas y to
damage the film around the
optical glass surface.
• Do not use cleaning agents other than water or neutral detergent.
Note • If dirt does not come off eas ily, ge ntl y wipe it w ith a s oft clot h mois tened with a smal l amou nt
of neutral detergent.
Narrow glass
strip
Lever
56
Page 59

Cleaning the Machine
3 Push the center-left side of the document cover to close the belt area until it clicks into
place.
Cleaning the Document Feeder Roller for ApeosPort Series Models
If the document feeder roller is dirty, streaks or smears may appear on copies and
paper jams m ay occur.
To ensure clean copies at all times, clean the document feeder roller about once a
month.
Important • Do not use benzene, paint thinner, or other organic solvents. Doing so might damage paint
or coating on plastic parts.
• Cleaning the machine with an excessive amount of water may cause the machine to
malfunction or damage documents during copying or printing.
1 Lift the latch of the Document
Feeder top cover, until it is
completely open.
Note • When you fully open the
cover, it enters a fixed
position. Open the cover
gently.
Maintenance
3
2 While turning the roller, gently
clean it with a soft cloth moistened
with water.
Important • Do not use cleaning agents
other than water or neutral
detergent.
• Use a cloth firmly wrung to
prevent water drops from
falling into the machine. If
water gets into the machine , it
may cause machine malfunction.
Note • If dirt does not come off easily, gently wipe it with a soft cloth moistened with a small amount
of neutral detergent.
3 Close the top cover of the document feeder until it clicks into place.
4 Close the left cover of the document feeder until it clicks into place.
Cleaning the Narrow Glass Strip and Document Presser for DocuCentre Series Models
If the narrow glass strip and document presser are dirty, streaks or smears may appear
on copies and the machine may not properly detect document sizes.
To ensure clean copies at all times, clean the narrow glass strip and document presser
about once a month.
Important • Do not use benzene, paint thinner, or other organic solvents. Doing so might damage paint
or coating on plastic parts.
• Cleaning the machine with an excessive amount of water may cause the machine to
malfunction or damage documents during copying.
57
Page 60

3 Maintenance
r
1 Wipe the narr ow glass strip,
document presser, and the guide
with a soft cloth moistened with
water to remove any dirt, and then
wipe it with a soft, dry cloth.
Important • Do not use cleaning agents
other than water or neutral
detergent.
Note • If dirt does not come off
easily, gently wipe it with a
soft cloth moistened with a
small amount of neutral detergent.
Document presse
Narrow glass
strip
Guide
Maintenance
2 Holds the lever to open the part of
the figure on the right. Wipe the
narrow glass strip with a soft cloth
moistened with water to remove
any dirt on the optical glass, and
then wipe it with a soft, dry cloth.
Important • Do not push the narrow glass
3
Note • If dirt does not come off eas ily, ge ntl y wipe it w ith a s oft clot h mois tened with a smal l amou nt
strip strongly sinc e it is eas y to
damage the film around the
optical glass surface.
• Do not use cleaning agents other than water or neutral detergent.
of neutral detergent.
3 Push the center-left side of the document cover to close the belt area until it clicks into
place.
Cleaning the Document Feeder Roller for DocuCentre Series Models
If the document feeder roller is dirty, streaks or smears may appear on copies and
paper jams may occur.
To ensure clean copies at all times, clean the document feeder roller about once a
month.
Important • Do not use ben zene, paint thinner, or other organic sol vents. Doing so might damage paint
or coating on plastic parts.
• Cleaning the machine with an excessive amount of water may cause the machine to
malfunction or damage documents during copying or printing.
Narrow glass
strip
Lever
58
1 Lift the latch of the document
feeder top cover, until it is
completely open.
Note • When you fully open the
cover, it enters a fixed
position. Open the cove r
gently.
Page 61

Cleaning the Machine
2 While turning the roller, gently
clean it with a soft cloth moistened
with water.
Important • Do not use cleaning agents
other than water or neutral
detergent.
• Use a cloth firmly wrung to
prevent water drops from
falling into the machine. If
water gets into the machine , it
may cause machine malfunction.
Note • If dirt does not come off easily, gently wipe it with a soft cloth moistened with a small amount
of neutral detergent.
3 Close the top cover of the document feeder until it clicks into place.
Maintenance
3
59
Page 62

3 Maintenance
Printing a Report/List
This section describes how to print a report/ list.
Note • The items displayed vary depending on the optional features installed.
For information about report/list types, refer to "Print Report/List" (P.83).
1 Press the <Machine Status>
button.
Maintenance
• When the <Job in Memory> indicator is lit, you can confirm the documents stored to memory
in the [Stored Documents List].
123
456
789
0 #
C
<Machine
Status> button
3
2 Select the [Billing Meter/Print
Report] tab.
3 Select [Print Report/List].
Note • If [Print Report Button] under
[Reports] is set to [Disabled],
the [Print Report/List] button
appears only in [User Mode]
of the System Administration
mode. For information on [Reports], refer to "Reports" (P.125).
4 Select a report or list you want to
print and press the <Start> button.
60
Page 63

4 Job Status
This chapter describes the job status feature.
z
Job Status Overview...................................................................................62
z
Checking Current/Pending Jobs.................................................................63
z
Checking Completed Jobs..........................................................................64
z
Printing and Deleting Stored Documents....................................................65
z
Printing Pending Jobs.................................................................................73
z
Handling Error Terminations.......................................................................74
Page 64

4 Job Status
Job Status Overview
The job status feature allows you to check current, pending, and completed jobs. You
can also cancel printing and print pending jobs.
1 Press the <Job Status> button.
Job Status
4
123
456
789
0 #
C
<Job Status>
button
You can do the following on the [Job Status] screen.
Checking Current/Pending Jobs
Lists current and pending jobs, and displays their details. Also allows you to cancel
current or pending jobs.
For more information, refer to "Checking Current/Pending Jobs" (P.63).
Checking Completed Jobs
Displays the status of completed jobs. Also displays their details.
For more information, refer to "Checking Completed Jobs" (P.64).
Checking Stored Documents
Prints or deletes do cuments stored using t he Charge Print, Secure Print, Private
Charge Print, Sample Print, and Delayed Print features.
For more information, refer to "Printing and Deleting Stored Documents" (P.65).
62
Page 65

Checking Current/Pending Jobs
This section describes how to check current or pending jobs. On the status screen, you
can cancel or preferentially execute jobs.
1 Press the <Job Status> button.
2 Check the cur rent/pending jobs.
Note • Select [ ] to return to the
previous screen or [ ] to
move to the next screen.
• When using ApeosPort series
models, you can select job
type to be displayed from [All
Jobs], [All Printing Jobs], [All
Non-printing Jobs] and
[Mailbox Transfer Jobs].
3 Select the job to be cancelled or
preferentially exe cu t ed .
4 Select [Cancel] or [Promote Job].
Checking Current/Pending Jobs
Job Status
4
Print Waiting Jobs
Select this to print the jobs that are waiting to be output.
For more information, ref e r to "Printing Pending Jobs" (P.73).
Cancel
Cancels the current or pending job.
Promote Job
Preferentially executes the selected job.
A [ ] will be marked on the [Status] of the job set to [Promote Job].
Stop
Stops the job processing.
Last Original
Select this to end scanning of documents. The job is then executed.
Next Original
Select this when you have another document to scan.
Start
Resumes the stopped job.
63
Page 66

4 Job Status
Checking Completed Jobs
This section describes how to check completed jobs.
You can check whether a job has been completed successfully. Also, you can select a
job to see the details.
1 Press the <Job Status> button.
2 Select the [Completed Jobs] tab.
Note • Select [ ] to return to the
previous screen or [ ] to
move to the ne xt screen.
• When using ApeosPort series
models, you can select job
type to be displayed from [All
Job Status
3 Select a job to see the details.
Jobs], [All Printing Jobs], [All
Non-printing Jobs] and
[Mailbox Transfer Jobs].
4
4 Select [Close] after the check.
Group Parent Jobs
Allows you to check the list or history of related jobs (such as job flow jobs).
Show Children Jobs
Displays a job list.
Job History Report
Prints the job results to allow you to check the job history.
Job Report (ApeosPort series models only)
Prints a job status information report.
64
Page 67
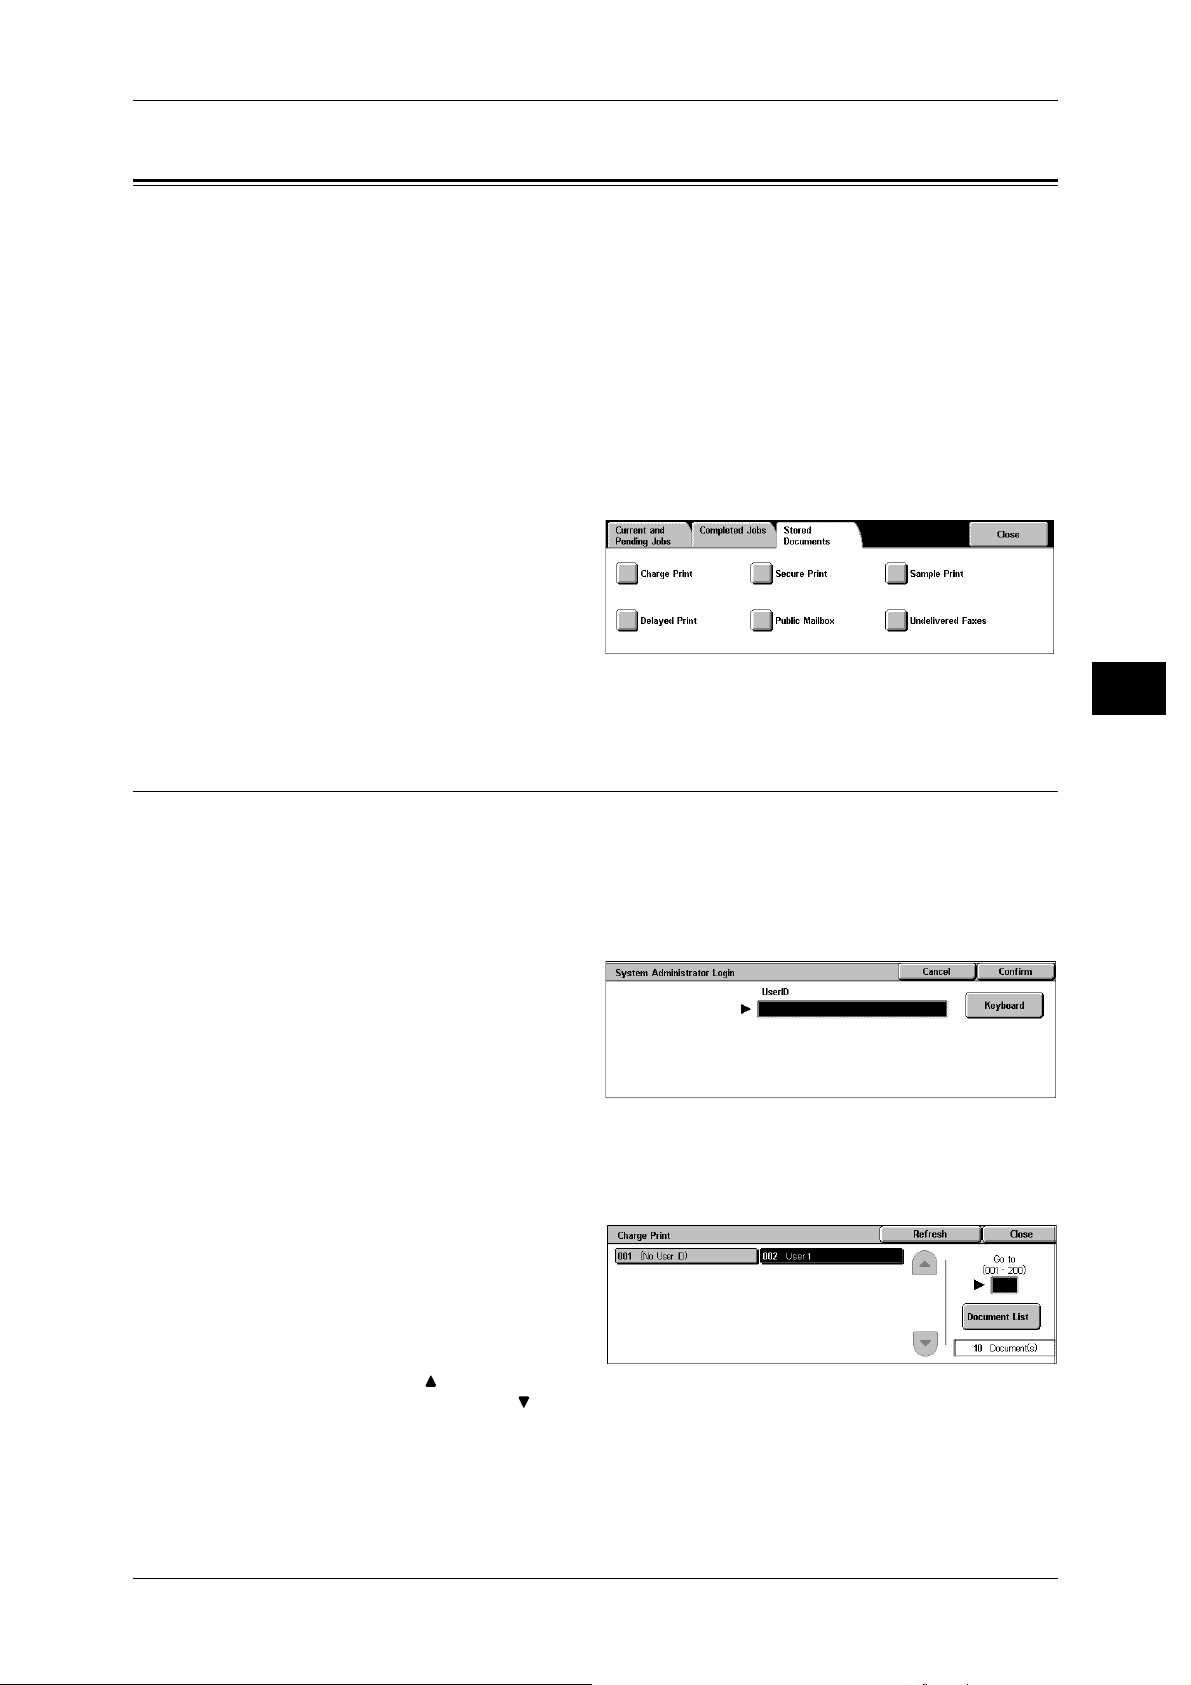
Printing and Deleting Stored Documents
This section describes how to print or delete documents stored with the Secure Print or Sample
Print feature, or stored with the charge print receiving control.
you to print or delete stored documents.
The following shows the reference section for each item.
Charge Print................................................................................................................................65
Private Charge Print................................................................................................................... 67
Secure Print................................................................................................................................69
Sample Print...............................................................................................................................70
Delayed Print..............................................................................................................................72
Printing and Deleting Stored Documents
The [Job Status] screen allows
1 Press the <Job Status> button.
2 Select the [Stored Documents] tab.
Note • The buttons displayed on the
For more information, refer to "Charge / Private Print Settings" (P.195).
Charge Print
When you set to use the Charge Print feature under [Charge/Private Print Settings] >
[Receive Control], received print jobs are saved for each Billing ID. Any jobs that were
not given a Billing ID on the print driver are saved in [No User ID].
For more information, refer to "Charge / Private Print Settings" (P.195).
The following describes how to print and delete a document saved in Charge Print.
1 When printing the stored jobs, the
authentication is required. Press
the <Log In/Out> button. Enter the
target user ID using the numeric
keypad or the keyboard displaye d
by pressing [Keyboard], and select
[Confirm].
When deleting the stored jobs, the
authentication in not required.
Job Status
screen vary dependin g on the
settings related to the Private
Charge Print feature.
4
2 Select [Charge Print].
3 Select the user to be checked, and
select [Document List].
Note • Select [Refresh] to display th e
updated information .
• Select [ ] to return to the
previous screen or [ ] to move to the next screen.
• Entering a 3-digit user ID with the numeric keypad specifies the user directly.
65
Page 68

4 Job Status
4 Enter the passcode, and select
[Confirm].
Note • If no passcode is assigned,
the passcode entry scr een will
not appear.
5 Select the document to be printed
or deleted.
6 Select any item.
Delete
Deletes the document stored with Charge Print.
Refer to "When [Delete] is Selected" (P.66).
Job Status
Print
Prints the document stored with Charge Print.
Refer to "When [Print] is Selected" (P.66).
When [Delete] is Selected
4
1 Select [Yes].
Yes
Deletes the document.
Important • Once the document is deleted, it cannot be restored.
No
Cancels deleting the document.
When [Print ] is Selected
1 Select what to do with the
document after printing.
66
Print and Delete
Starts printing the document. After printing, deletes the document.
Print and Save
Starts printing the document. After printing, the document remains undeleted.
Cancel
Cancels printing the document.
Quantity
Allows to specify the number of print.
Note • When you select [Print and Save], the setting of [Print Quantity] is also saved.
Page 69

Private Charge Print
When you set to use the Private Charge Print feature, received print jobs are saved for
each authentication user ID.
Note • This item is displayed when the Private Charge Print feature is enabled by using one of the
following procedures:
- Select [Save in Private Charge Print] under [Receive Control].
- Select [According to Print Auditron] under [Receive Control], and then set [Job Login
Success] to [Save in Private Charge Print]. Under [Login Setup / Auditron Mode], select an
option other than [Off], and then set [Print Service] under [Auditron Mode] to [On].
• When deleting the print job instructed with an invalid user ID, display the list of print jobs in
the authenticated system administrator mode, and then select the job to be deleted.
For more information, refer to "Deleting the Print Job with an Invalid User ID" (P.68)
For more information, refer to "Charge / Private Print Settings" (P.195).
The following describes how to print or delete a document stored with the Private
Charge Print feature.
1 Press the <Log In/Out> button.
2 Enter the user ID with the numeric
keypad or the keyboard displayed
by pressing [Keyboard], and select
[Confirm].
3 Select [Private Charge Print].
Note • If you are authenticat ed as a
system administrato r, selectin g [Private Charge Print ] will dis play a list o f authenti cation use r
IDs. Select a user ID from the list, and then select [Document List] to display a list of
documents stored for the selected user.
4 Select the document to be printed
or deleted.
Printing and Deleting Stored Documents
Job Status
4
5 Select any it em.
Select All
Selects all documents. To deselect all the documents, select this button again.
Delete
Deletes the Private Charge Print document.
Note • If documents with the same user ID are all deleted, the user ID will be deleted.
Refer to "When [Delete] is Selected" (P.67).
Print
Prints the Private Charge Print document.
Refer to "When [Print] is Selected" (P.68).
When [Delete] is Selected
1 Select [Ye s].
67
Page 70

4 Job Status
Yes
Deletes the document.
Important • Once the document is deleted, it cannot be restored.
No
Cancels deleting the document.
When [Print ] is Selected
1 Select what to do with the
document after printing.
Job Status
4
Print and Delete
Starts printing the document. After printing, deletes the document.
Print and Save
Starts printing the document. After printing, the document remains undeleted.
Cancel
Cancels printing the document.
Quantity
Allows to specify the number of print.
Note • [Print Quantity] is disabled when you have selected all the documents using [Select All].
• When you select [Print and Save], the setting of [Print Quantity] is also saved.
Deleting the Print Job with an Invalid User ID
All the print jobs that have a User ID regardless whether it is valid User ID or not are
stored with the Private Charge Print feature. To minimize the unnecessary print jobs,
specify how long print jobs can be saved for, so that they can be automatically deleted
after a specified period of time. Or the system administrator can manually delete them.
The following describes how to delete documents that have an invalid User ID stored
with the Private Charge Print feature.
For details on how to specify a duration of how long the print jobs are kept, refer to "Mailbox/Stored
Document Settings" (P. 180).
68
1 Press the <Log In/Out> button.
2 Enter the user ID with the numeric
keypad or the keyboard displayed
by pressing [Keyboard], and select
[Confirm].
3 Select [User Mode].
4 Press the <Job Status> button.
5 Select the [Stored Documents] tab.
6 Select [Private Charge Print].
7 Select the User ID to be deleted.
8 Select the document to be deleted, and then select [Delete].
Page 71

Secure Print
This section describes how to print or delete documents stored with the Secure Print
feature.
For information on secure print operations, refer to the print driver's help.
Note • This feature is not displayed when the Private Charge Print feature is enabled by using one
For more information, refer to "Charge / Private Print Settings" (P.195).
Printing and Deleting Stored Documents
of the following procedures:
- Select [Save in Private Charge Print] under [Receive Control].
- Select [According to Print Auditron] under [Receive Control], and then set [Job Login
Success] to [Save in Private Charge Print]. Under [Login Setup / Auditron Mode], select an
option other than [Off], and then set [Print Service] under [Auditron Mode] to [On].
• When you have selected [Save in Private Charge Print] or [Save in Charge Print] for
[Receive Control] under [Charge/Private Print Settings], jobs will not be saved in [Secure
Print] under [Stored Documents] even if you select [Secure Print] on the print driver.
1 Select [Secure Print].
2 Select the user to be che c ke d, an d
select [Document List].
Note • Select [Refresh] to display the
updated information .
• Select [ ] to return to the
previous screen or [ ] to
move to the next screen.
• Entering a 3-digit billing ID with the numeric keypad specifies the user directly.
3 Enter the passcode, and select
[Confirm].
Note • If no pass code is assigned,
the passcode entry screen will
not appear.
4 Select the document to be printed
or deleted.
5 Select any it em.
Select All
Selects all documents. To deselect all the documents, select this button again.
Job Status
4
Delete
Deletes the selected document.
Note • If documents with the same Billing ID are all deleted, the Billing ID will be deleted.
Refer to "When [Delete] is Selected" (P.70).
Print
Prints the selected document.
Refer to "When [Print] is Selected" (P.70).
69
Page 72

4 Job Status
When [Delete] is Selected
1 Select [Yes].
Yes
Deletes the document.
Important • Once the document is deleted, it cannot be restored.
No
Cancels deleting the document.
When [Print ] is Selected
Job Status
4
Sample Print
1 Select what to do with the
document after printing.
Print and Delete
Starts printing the document. After printing, deletes the document.
Print and Save
Starts printing the document. After printing, the document remains undeleted.
Cancel
Cancels printing the document.
Quantity
Allows to specify the number of print.
Note • [Print Quantity] is disabled when you use [Select All] to select all documents.
• When you select [Print and Save], the setting of [Print Quantity] is also saved.
70
This section describes how to print or delete documents stored with the Sample Print
feature.
After a sample copy is output, the remaining copies will automatically be output if the
machine is left uninstructed for the period specified under [Auto Job Release]. You can
change the value of [Auto Job Release] as necessary.
For information on sample print operations, refer to the print driver's help.
Note • When you have selected [Save in Private Charge Print] or [Save in Charge Print] for
[Receive Control] under [Charge/Private Print Settings], jobs will not be saved in [Sample
Print] under [Stored Documents] even if you select [Sample Print] on the print driver.
For more information, refer to "Charge / Private Print Settings" (P.195).
1 Select [Sample Print].
2 Select the user to be checked, and
select [Document List].
Note • Select [Refresh] to dis play th e
updated inf ormation.
Page 73

Printing and Deleting Stored Documents
• Select [ ] to return to the previous screen or [ ] to move to the next screen.
• Entering a 3-digit user ID with the numeric keypad specifies the user directly.
3 Select the document to be printed
or deleted.
4 Select any it em.
Select All
Selects all documents. To deselect all the documents, select this button again.
Delete
Deletes the selected document.
Refer to "When [Delete] is Selected" (P.71).
Print
Prints a Sample Print document. After printing the remaining sets of the document, the
stored Sample Print document is deleted.
Refer to "When [Print] is Selected" (P.71)
Job Status
When [Delete] is Selected
1 Select [Ye s].
Yes
Deletes the document.
Important • Once the document is deleted, it cannot be restored.
No
Cancels deleting the document.
When [Print] is Selected
1 Select [Ye s].
Print and Delete
Starts printing the document. After printing, deletes the document.
Note • After the first set is output, the second set will automatically be output if the machine is left
uninstructed for the p eri od spec ified u nder [A uto Job Re lease] . You ca n chan ge the va lue of
[Auto Job Release] as necessary. For information on how to change the value, refer to "Auto
Job Release" (P.116)
4
Print and Save
Cancels printing the document.
Quantity
Allows to specify the number of print.
Note • [Print Quantity] is disabled when you use [Select All] to select all documents.
71
Page 74
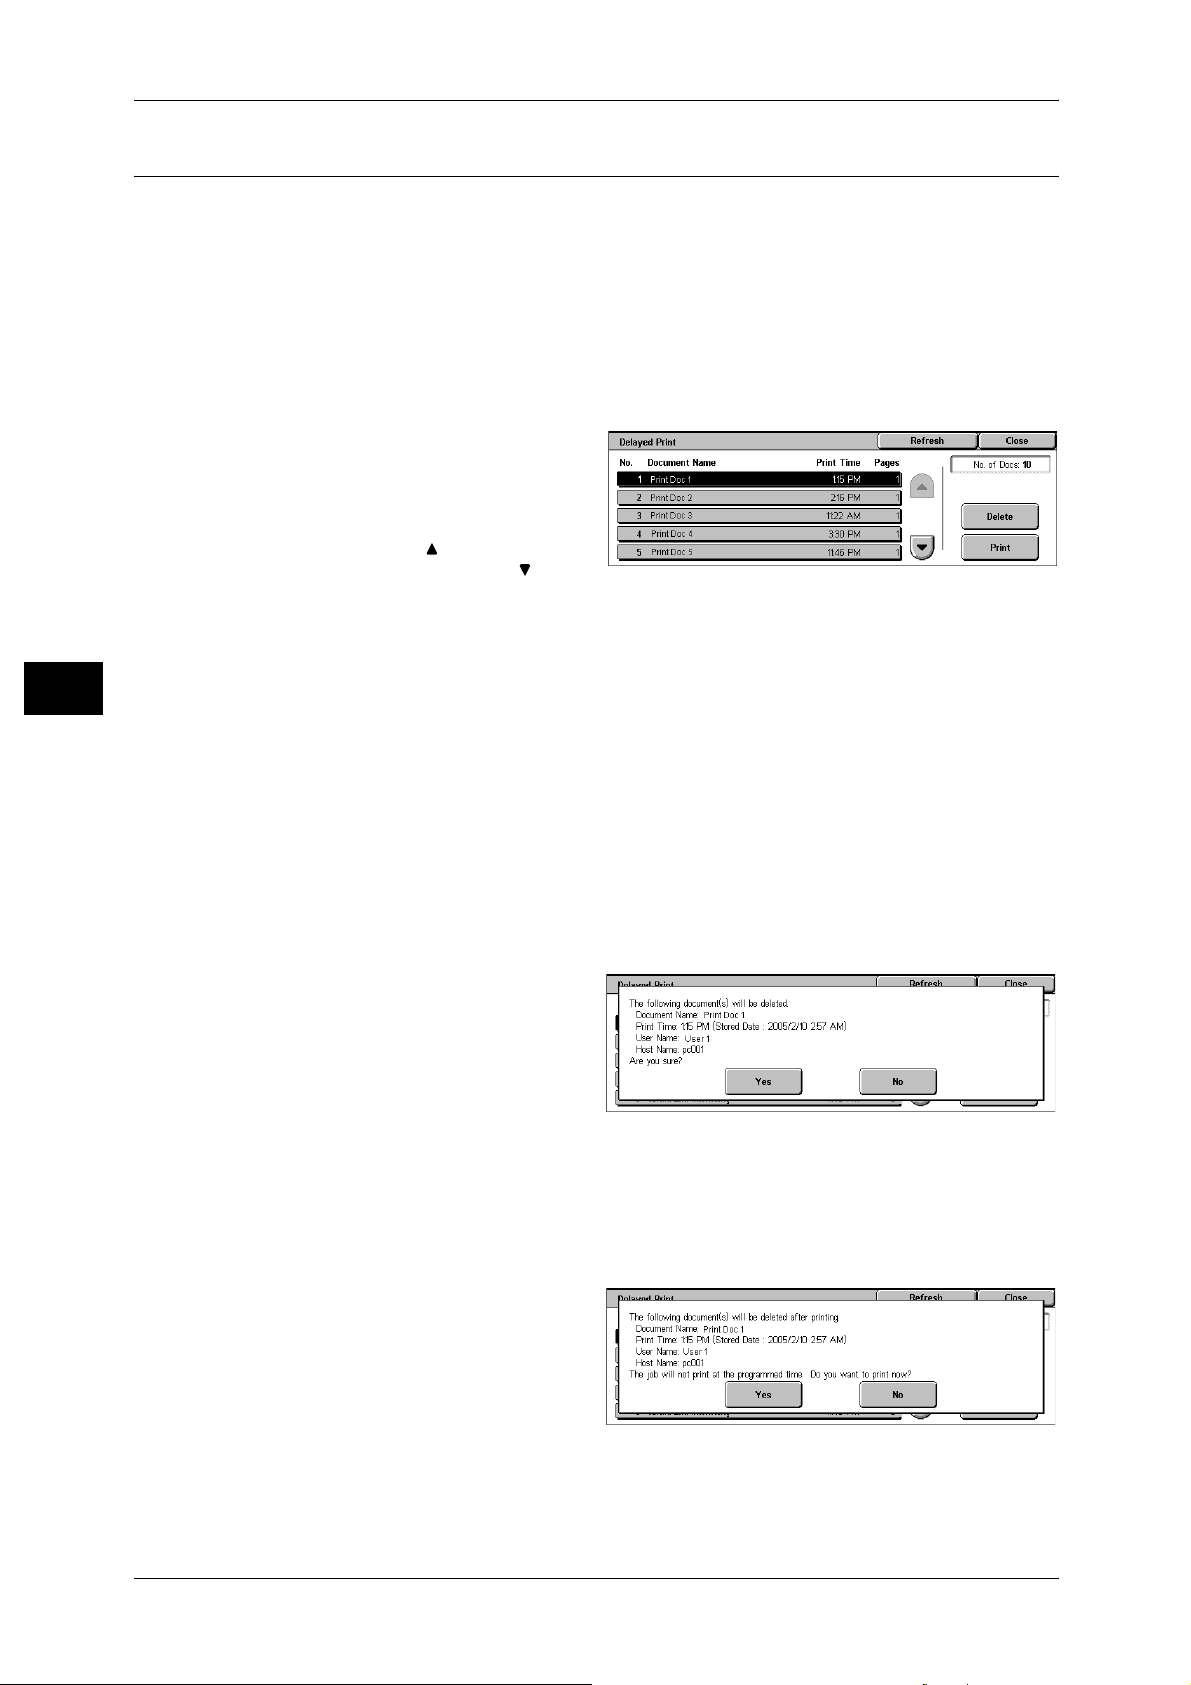
4 Job Status
Delayed Print
Job Status
This section describes how to print or delete documents stored with the Delayed Print
feature.
For information on Delayed Print operations, refer to the print driver's help.
Note • When you have selected [Save in Private Charge Print] or [Save in Charge Print] for
[Receive Control] under [Charge/Private Print Settings], jobs will not be saved in [Delayed
Print] under [Stored Documents] even if you select [Delayed Print] on the print driver.
For more information, refer to "Charge / Private Print Settings" (P.195).
1 Select [Delayed Print].
2 Select the document to be printed
or deleted.
Note • Select [Refresh] to dis play th e
updated inf ormation.
• Select [ ] to return to the
previous screen or [ ] to
move to the ne xt screen.
• [Print Time] shows the time to start printing.
3 Select any item.
4
Delete
Deletes the selected document.
Refer to "When [Delete] is Selected" (P.72).
Print
Prints the selected document. After printing, deletes the document. If printed manually,
the document will not be printed at the specified time.
Refer to "When [Print] is Selected" (P.72).
When [Delete] is Selected
1 Select [Yes].
Yes
Deletes the document.
Important • Once the document is
No
Cancels deleting the document.
When [Print ] is Selected
deleted, it cannot be restored.
72
1 Select [Yes].
Yes
Starts printing the document. After
printing, deletes the document.
No
Cancels printing the document.
Page 75

Printing Pending Jobs
This section describes how to print pending jobs.
Note • If there are no pending jobs, the [Print Waiting Jobs] button is disabled.
1 Press the <Job Status> button.
2 Select [Print Waiting Jobs].
Printing Pending Jobs
Job Status
4
73
Page 76

4 Job Status
Handling Error Terminatio ns
This section describes how to handle error terminations.
For a Print Job
Select a job shown as an error termination in the [Completed Jobs] tab to check the
error code. Follow the error code instructions.
For information on error codes, refer to "Error Code" (P.313).
For a Scan Job
A transmission report (undelivered) is printed.
For more information on trans mission reports (undelivered), refer to "Transmission Report Undelivered" (P.89). For details on how to print transmission reports (undelivered) automatically, refer
to "Scan File Transfer Report" (P.126).
Job Status
For Other Jobs
Print a Job History Report, and check the execution results.
For information about job his t ory reports, refer to "Job Statu s" (P.84).
4
74
Page 77

5 Machine Status
This chapter describes the features for checking the machine status.
z
Overview of Machine Status.......................................................................76
z
Machine Status...........................................................................................77
z
Billing Meter/Print Report....... ................................. ..... ...... ..... ....................8 2
z
Supplies......................................................................................................90
z
Faults..........................................................................................................91
Page 78

5 Machine Status
Overview of Machine Status
You can check machine status and the number of printed pages on the screen. You
can also print various reports/lists to check the job history, settings and registered
information.
1 Press the <Machine Status>
button.
123
456
789
0 #
C
<Machine
Status> button
Machine Status
5
The [Machine Status] screen offers the following features.
Machine Status
You can check the machine configuration, paper tray status, and hard disk overwriting
status. You can also set print modes.
For more information, refer to "Machine Status" (P.77).
Billing Meter/Print Report
You can check the number of pages printed by meter or user. You can also print
various reports/lists to check the job history, settings and registered information.
For more information, refer to "Billing Meter/Print Report" (P.82).
Supplies
You can check the status of consumables.
For more information, refer to "Supplies" (P.90).
Faults
You can check the faults that occurred on the machine.
For more information, refer to "Faults" (P.91).
76
Page 79

Machine Status
On the [Machine Status] screen, you can check the machine configuration and paper
tray status. You can also change settings for the print mode.
The following shows the reference section for each item.
Machine Information......................................... ................................ ................................. .. ...... 77
Paper Tray..................................................................................................................................78
Overwrite Hard Disk.................................................................................................................. 79
Print Mode........................................... ................................. ......................................................79
1 Press the <Machine Status> button.
2 On the [Machine Status] screen
displayed, you can check the
machine status.
Machine Information
Machine Status
Machine Status
On the [Machine Information] screen, you can check the serial number of the machine,
machine configuration, and software version.
1 Select [Machine Information].
2 Check the machine information in a
screen displayed.
For enquiry on maintenance and operation
Indicates how to make maintenance and operating enquiries.
Serial Number
Indicates the serial number of the machine.
Machine Configurati on
Displays the [Machine Configuration] screen.
Software Version
Displays the [Software Version] screen.
5
[Machine Configuration] Screen
You can check the machine configuration.
1 Select [Machine Configuration].
77
Page 80

5 Machine Status
2 Check the machine configuration in
a screen displayed.
Note • Select [ ] to return to the
previous screen or [ ] to
move to the ne xt screen.
On the [Machine Configuration] screen, you can check the following items.
z
z
z
z
z
z
Machine Status
z
Note • [Output Device] indicates whether or not a finisher (optional) is installed. If Finisher is
[Software Version] Screen
You can check the software version.
5
1 Select [Software Version].
2 Check the software version in a
screen dis played.
Note • Select [ ] to return to the
Configuration Code
Auto Document Feeder
Paper Tray
High Capacity Feeder
Separators/Covers Tray
Offset Stacking Module
Output Device
installed, it is display ed as "F in ish er" .
previous screen or [ ] to
move to the ne xt screen.
z
Booklet Maker
z
2 Sided Printing Unit
z
Hard Disk
z
Page Memory Size
z
System Memory Size
z
Image High Compression Kit
z
PostScript
z
ESC/P
z
HP-GL/2
z
PCL
z
PDF
z
USB
Paper Tray
On the [Machine Configuration] screen, you can check the following items.
z
Controller ROM
z
IOT ROM
z
HCF ROM
z
Finisher C ROM
z
Finisher D ROM
z
IIT ROM
z
IIT Option ROM
z
ADF ROM
z
IPS Accelerator ROM
z
SJFI
z
SSMI
You can check the paper trays set on the machine. On the screen, you can check the
following items.
z
Status
z
Filled (Amount of paper remaining)
z
Paper Size
z
Paper Type
78
Page 81

1 Select [Paper Tray].
2 Check the paper trays in a screen
displayed.
Overwrite Hard Disk
You can check the overwriting status of the hard disk. The indication "Overwriting"
shows that the overwriting is in progress. "Standby" shows the completion of the
overwriting process.
Note • This feature does no t a ppe ar for some models. A n o ptional package is n ec es sar y. F or more
information, contact our Customer Support Center.
• [Overwrite Hard Disk] appears only when [Overwrite Hard Disk] is enabled in [System
Settings]. For more information, refer to "Overwrite Hard Disk" (P.132).
1 Select [Overwrite Hard Disk].
2 Check the overwriting status of the
hard disk.
Machine Status
Machine Status
Print Mode
1 Select [Print Mode].
2 Select [Off-line] or [On-line].
Off-line
On-line
3 Select a printer language.
4 Select the item to be set.
5
You can change and register each setting in the print mode.
Note • The items displayed vary depending on the options installed.
The printer cannot accept data. Any dat a being sent is cancelled and not printed.
The printer can accept data.
79
Page 82

5 Machine Status
Retrieve Programming
1 Select [Retrieve Programming].
2 Select the memory number to be
Factory Defaults
Custom Settings
Machine Status
Programming
5
You can retrieve and use settings registered in the memory.
used.
You can use the factory default settings.
The numbers stored in the memory appear.
You can check or change the values set for the print mode item numbers.
For information on item numbers that can be set in the each emulation mode menus, refer to "Appendix"
(P.417).
For information on KS/KSSM emulation mode, refer to the User Guide for the Korean model. For
information on the ESCPK emulation mode, refer to the User Guide for the Traditional Chinese model
or Simplified Chinese model.
1 Select [Programming].
2 Enter the feature number to be set
in [Item Number] using the numeric
keypad.
3 Select [Confirm] as necessary.
4 Select [Change Value].
5 Enter [New Value] using the
numeric keypad.
6 Select [Save].
Item number
Enter the item number of the feature to be set.
Current Value
When you enter [Item Number], the currently set value appears.
New Value
Enter a new value.
Store/Delete Programming
80
For ESC/P, HP-GL/2 emulations, you can register settings in the memory.
You can register up to 20 print modes for ESC/P and HP-GL/2 emulations.
1 Select [Store/Delete Programming].
2 Select [Store Current Selections] or [Delete].
Page 83

3 Select the memory number to be stored or to be deleted.
Store Current Selections
Stores the current selections. If you select a number already stored, its settings will be
overwritten with the new settings. The overwritten settings cannot be restored.
Delete
When you select [Delete] and then select the number to be deleted, the number will be
deleted.
Important • The deleted numbers cannot be restored.
Default Programming
You can start the printer using the settings stored in the memory as default settings.
1 Select [Default Programming].
2 Select [Factory Defaults] or
[Custom Settings].
3 When you select [Custom
Settings], select the memory
number to be used.
Machine Status
Machine Status
Password
Factory Defaults
5
You can use the factory default settings.
Custom Settings
The numbers stored in the memory appear.
For PDF emulation, if a password is set for PDF files, set the password here in
advance. PDF files can be printed only when their password matches the password set
here.
You can use up to 32 characters for the password.
1 Press [Password].
2 Select [Keyboard].
3 Enter a password of up to 32
characters, and select [Save].
4 Repeat Steps 2 and 3 to reenter
the same password.
5 Select [Save].
81
Page 84

5 Machine Status
Billing Meter/Print Report
On the [Billing Meter/Print Report] screen, you can check the number of printed pages
for each meter or user. You can also print various reports/lists to check the job history,
settings and registered information.
The following shows the reference section for each item.
Billing Meter...............................................................................................................................82
User Account Billing Meter........................................................................................................82
Print Report/List..........................................................................................................................83
Automatically Printed Reports/Lists...........................................................................................89
1 Press the <Machine Status> button.
2 Select the [Billing Meter/Print
Machine Status
Report] tab.
Important • If [Print Report Button] under
[Reports] is set to [Disabled],
[Print Report/List] appears
only in [User Mode] of the
System Administration mode.
For information on [Reports],
refer to "Reports" (P.125).
5
Billing Meter
You can confirm the total number of copies and printed pages.
1 Select [Billing Meter].
2 Confirm the total number of copies
and printed pages in a screen
displayed.
Serial Number
Displays the serial number of the machine.
Meter 1
This shows the number of pages copied or printed.
User Account Billing Meter
You can check the number of pages printed for each user and meter.
When the Login Setup/Auditron Administration feature is enabled, you can check the
billing meters for the currently authenticated user IDs.
For information on the Login Setup/Auditron Administration feature, refer to "Login Setup/Auditron
Mode" (P.197).
82
1 Press the <Log In/Out> button.
Page 85

Billing Meter/Print Report
To check the billing meter of a currently authenticated user ID
1) Using the numeric keypad or the
keyboard displayed by pressing
[Keyboard], enter the user ID of
a user whose billing meter
needs to be checked, and select
[Confirm].
Note • Enter the passcode if required.
2) Press the <Machine Status> button.
3) Proceed to Step 2.
To check the system administ rator meter
1) Using the numeric keypad or the keyboard displayed by pressing [Keyboard], enter
the user ID to enter the System Administration mode, and select [Confirm].
Note • Enter the passcode if required.
2) Select [User Mode].
3) Press the <Machine Status>
button.
Machine Status
4) Proceed to Step 2.
2 Select the [Billing Meter/Print
Report] tab.
3 Select [User Account Billing Meter].
4 Select the meter to be checked.
Meter (Copy Jobs)
Displays the number of pages copied.
Meter (Scan Jobs)
Displays the number of pages scanned.
Meter (Print Jobs)
Displays the number of pages printed.
5
Print Report/List
This section describes how to print a report/ list.
Note • The items displayed vary depending on the optional features installed.
1 Select [Print Report/List].
83
Page 86

5 Machine Status
2 Select the report/list to be output.
Job Status
1 Select [Job Status].
2 Select the report/list to be output.
Note • The image shown ri ght is the
screen displayed by
selecting [User Mode] in the
System Administration
mode.
• Select [ ] to return to the
previous screen, select [ ] to move to the next screen.
Note • To display the [Job Status] screen, select the <Machine Status> button, and then select
[Billing Meter/Print Report] > [Print Report/List] > [Job Status].
Machine Status
5
Copy Mode Settings
3 Press the <Start> button.
Job History Report
You can check job results. The data for the latest 200 jobs is printed. Select [All Jobs],
[E-mail/Scan Jobs], [Auto Transfer Jobs], or [Print Jobs].
If [All Jobs] is selected, the [Include Children Jobs] check box appears. Clearing this
check box prints the related jobs (such as job flow jobs) on one line. Selecting this
check box prints each related job on each line.
You can als o automatica lly print a [Job History Report] every 50 jobs.
For information about the Auto Print setting, refer to "Reports" (P.125). The Auto Print feature prints the
results of all jobs.
Error History Report
You can print error information about the machine. The latest 50 errors are printed.
1 Select [Copy Mode Settings].
Note • To display the [Copy Mode Settings] screen, select the <Machine Status> button, and then
select [Billing Meter/Print Report] > [Print Report/List] > [Copy Mode Settings].
2 Select [Settings List - Common
Items].
3 Press the <Start> button.
Settings List - Common Items
You can check the hardware configuration, network information, and print and copy
settings of the machine.
Note • The content of [Settings List] is identical whether it is printed from [Copy Mode Settings],
Print Mode Settings
1 Select [Print Mode Settings].
Note • To display the [Print Mode Settings] screen, select the <Machine Status> button, and then
84
[Print Mode Settings], or [Scan/Fax Mode Settings].
select [Billing Meter/Print Report] > [Print Report/List] > [Print Mode Settings].
Page 87

Billing Meter/Print Report
2 Select the list to be printed.
3 Press the <Start> button.
Note • The items displayed vary
depending on the options
installed.
Settings List - Common Items
Allows you to check the hardware configuration, network information, and print and
copy settings of the machine.
Note • The content of [Settings List] is identical whether it is printed from [Copy Mode Settings],
[Print Mode Settings], or [Scan/Fax Mode Settings].
PDF Settings List
Prints the settings configured in the PDF printer mode.
TIFF / JPEG Settings List
Prints the settings configured in the TIFF printer mode.
TIFF / JPEG Logical Printers List
Prints the list of logical printers created in the TIFF and JPEG printer mode.
TIFF and JPEG logical printers are configured on CentreWare Internet Services. For more information,
refer to the online help of CentreWare Internet Services.
ESC/P Settings List
Prints the settings configured in the ESC/P emulation mode.
ESC/P Stored Programming List
Prints the stored programming settings configured in the ESC/P emulation mode.
ESC/P User Defined List
Prints the information on forms, logos, and patterns that can be used in the ESC/P
emulation mode.
Fonts List
Prints the list of fonts available on the machine.
Note • Printed information depends on the installed options.
Machine Status
5
PS Logical Printers List
Prints the list of logical printers created in PostScript.
PostScript logical printers are configured on CentreWare Internet Services. For more information, refer
to the online help of CentreWare Internet Services.
PostScript Fonts List
Prints the fonts available in PostScript.
HP-GL/2 Settings List
Prints the settings for the HP-GL, HP-GL/2 and HP-RTL emulation modes.
HP-GL/2 Stored Programming List
Prints the stored programming settings for the HP-GL, HP-GL/2, and HP-RTL
emulation modes.
85
Page 88

5 Machine Status
PCL Settings List
Prints the settings for the PCL virtual printer.
PCL Macro List
Prints the list of forms registered for PCL.
PCL Fonts List
Prints the fonts available in PCL.
Scan/Fax Mode Settings
1 Select [Scan/Fax Mode Settings].
Note • To display the [Scan/Fax Mode Settings] screen, select the <Machine Status> button, and
2 Select the list to be printed.
Machine Status
3 Press the <Start> button.
Settings List
then select [Billing Meter/Print Report] > [Print Report/List] > [Scan/Fax Mode Settings].
5
You can print the [Settings List - Common Items], [Extended Features Settings List],
and [Domain Filter List]. Select the list to be printed, then press the <Start> button.
z
Settings List - Common Items
You can check the hardware configuration, network information, and print and copy
settings of the machine.
Note • The content of [Settings List] is identical whether it is printed from [Copy Mode Settings],
[Print Mode Settings], or [Scan/Fax Mode Settings].
z
Extended Features Settings List
You can check the settings configured for the scan features.
z
Domain Filter List
You can check the permitted domains registered for domain filtering.
Job Template List
You can print the settings for the server where the job templates, which are created
using scan service setting tools, are stored.
Address Book
You can check the settings for the address numbers.
When you specify a range of address numbers, the list of settings for the specified
address numbers will be printed. Each page contains the settings information on 50
address numbers.
If you select [Address Book], the screen for specifying a range of address numbers is
displayed. Select a range of numbers, and press the <Start> button.
86
1 Select [Address Book].
2 Specify a range of address
numbers to be printed.
3 Press the <Start> button.
Page 89

Mailbox List
Prints the list of mailbox settings and the procedure for saving documents to mailboxes.
Note • [Mailbox List] appears when [Use r Mode] is sele cte d in the System Administration mode.
1 Select [Mailbox List].
Note • To display the [Mailbox List] screen, select the <Machine Status> button, and then select
2 Select a range of mailbox numbers
to be printed.
3 Press the <Start> button.
Job Counter Report
Billing Meter/Print Report
[Billing Meter/Print Report] > [Print Report/List] > [Mailbox List].
Prints the counter report for each feature.
Note • [Job Counter Repo rt] appears when [Use r Mode] is selec t ed i n the System Admi nistration
mode.
1 Select [Job Counter Report].
Note • To displ ay the [Job Cou nter Report] screen, sel ect the <Machine Status> button, and then
select [Billing Meter/Print Report] > [Print Report/List] > [Job Counter Report].
2 Select [Job Counter Report].
3 Press the <Start> button.
Auditron Administration
You can print an auditron report by user. Note that the content on the screen differs
depending on whether the Auditron Administration feature is enabled.
Note • [Auditron Administration] appears when [User Mode] is selected in the System
Administration mode.
When the Auditron Administration feature of each service is set to [Off]
When the Auditron Administration feature of each service is set to [Off], the following
screen appears, allowing you to print a printer meter report.
For information on enabling the Auditron Administration feature for each service, refer to "Auditron
Mode" (P.199).
Machine Status
5
1 Select [Auditron Administration].
Note • To display the [Auditron Administration] screen, select the <Machine Status> button, and
then select [Billing Meter/Print Report] > [Print Report/List] > [Auditron Administration].
2 Select [Meter Report (Print Jobs)].
3 Press the <Start> button.
Meter Report (Print Jobs)
You can check the total printed pages and the total sheets used for each client (job
owner). [Meter Report (Print Jobs)] counts pages from the time at which the data has
been initialized.
87
Page 90

5 Machine Status
Machine Status
When the Auditron Administration feature is set to [On]
When the Auditron Administration feature is set to [On], the following screen appears.
The auditron report for each user organized by each service can be printed for the services of
which the Auditron Administration feature is set to [On].
For information on enabling the Auditron Administration feature for each servic e, refer to "Auditron
Mode" (P.199).
1 Select [Auditron Administration].
Note • To display the [Auditron Administration] scre en, select the <Machine Status> button, and
then select [Billing Meter/Print Report] > [Print Report/List] > [Auditron Administration].
2 Select the auditron report to be
printed.
3 Select a range of user numbers to
be printed.
Note • Selecting [Select All]
selects all users.
4 Press the <Start> button.
Auditron Report (Print Jobs)
5
You can check the total printed pages and the total sheets used for each client (job
owner).
[Auditron Report (Print Jobs)] counts pages from the time at which the data has been
initialized.
Note • [No.] displayed on the report is the No. (User Administration Number) registered for the
Login Setup/Auditron Administration feature.
Auditron Report (Copy Jobs)
You can check the total number of pages copied on the machine. If the maximum limit
is set for the number of pages or colors that can be scanned, you can also view the limit
value. [Auditron Report (Copy Jobs)] counts pages from the time at which the data has
been initialized.
Note • [No.] displayed on the report is the No. (User Administration Number) registered for the
Login Setup/Auditron Administration feature.
Auditron Report (Scan Jobs)
You can check the total number of pages scanned on the machine. If the maximum limit
is set for the number of pages or colors that can be scanned, you can also view the limit
value. [Auditron Report (Scan Jobs)] counts pages from the time at which the data has
been initialized.
Note • [No.] displayed on the report is the No. (User Administration Number) registered for the
Login Setup/Auditron Administration feature.
88
Auditron Report (Fax Jobs)
You can check the number of fax transmissions and receptions and the number of
pages transmitted for each user.
Note • [No.] displayed on the report is the No. (User Administration Number) registered for the
Login Setup/Auditron Administration feature.
Page 91

Automatically Printed Reports/Lists
Some reports/lists relating to the scan service can only be printed automatically. This
section describes reports/lists that can be printed automatically.
Transmission Report - Undelivered
Printed when a transmission of transferring the scanned data to the computer on the
network, or sending the scanned data by e-mail has failed. You can check a reduced
image of the scanned data and its transmission result.
Set whether to print out the Transmission Report - Undelivered automatically from the
system administrator mode.
For information on specifying whether or not to have the report printed automatically, refer to "Scan
File Transfer Report" (P.126).
Transmission Report
Billing Meter/Print Report
Printed when a transmission of transferring the scanned data to the computer on the
network, or sending the scanned data by e-mail ha s succeeded. You can check a
reduced image of the scanned data and its transmission result.
Set whether to print out the Transm ission Report - Undelivered aut omatically from
the system administrator mode.
For information on how to automatically print out the transmission report, refer to "Scan File Transfer
Report" (P.126).
Job Flow Error Report
You can check the errors caused in the job flow. The date and time when the error
occurred and the error codes are recorded.
For information on specifying whether or not to have the report printed automatically, refer to "J ob Flow
Error Report" (P.126).
Fax Server Report
This report is output after image data scanned by the machine is sent to a Server Fax
server via a network. It contains the scanned document image and the transmission
result. To have the report printed, enter the System Administration mode.
For information on specifying whether or not to have the report printed automatically, refer to "Fax
Server Report" (P.126)
Machine Status
5
89
Page 92

5 Machine Status
Supplies
1 Press the <Machine Status> button.
2 Select the [Supplies] tab.
You can check the status of consumables on the [Supplies] screen. The status of
consumables is shown as "OK", "Replace Soon (Order Now)", or "Replace Now".
The following describes the procedure for checking the status of consumables.
For information on replacing consumables, refer to "Maintenance" (P.41).
Note • Select [ ] to return to the
previous screen or [ ] to
move to the ne xt screen.
Machine Status
5
On the [Supplies] screen, you can
check the following items.
Note • The items displayed vary depending on the options installed.
• [Staple Cartridge] and [Hole Punch Container] appears when finisher is installed on the
machine.
• [Booklet Staple Cartridge] appears when the booklet finisher is installed.
• [Staple Scrap Container] appears when the Staple Finisher D2 or Booklet Finisher D2 is
installed.
z
Toner Cartridge [K]
z
Drum Cartridge [R2]
z
Waste Toner Container [R1]
z
Fuser Cartridge [R4]
z
Staple Cartridge [R1]
Important • If using a partly consumed toner cartridge (such as a toner cartridge removed from another
ApeosPort-II 7000/6000 unit or DocuCentre-II 7000/6000 unit), the status shown may not
match the actual remaining amount. When replacing toner cartridges, we recommend you
use new ones.
z
Booklet Staple Cartridge [R2]
z
Booklet Staple Cartridge [R3]
z
Staple Scrap Container [R5]
z
Hole Punch Container [R4]
90
Page 93

Faults
This section describes how to check the information of errors that occurred on the
machine.
The error history report shows the latest 50 errors. The items displayed include the date
and time, error code, and error category.
The following describes how to print the error history report.
1 Press the <Machine Status> button.
2 Select the [Faults] tab.
3 Select [Error History Report] .
4 Press the <Start> button.
Note • You can also access the
[Error History Report] from the
[Job Status/Activity Report] on the [Billing Meter/Print Report] scree n.
• If [Print Report Button] under [Reports] is set to [Disabled], the [Error History Report] button
does not appear on the screen. For information on [Reports], refer to "Reports" (P.125).
Faults
Machine Status
5
91
Page 94

Page 95

6 System Settings
Each feature of the machine is set to the factory default (initial) settings, but you
can customize these settings. To change the settings, enter the System
Administration mode, and use the [System Settings] screen.
This chapter explains the features that can be changed, and the procedures to
change the settings.
z
System Settings Procedure ............................................... ..... ...... ..............94
z
System Settings Menu List.........................................................................98
z
Common Settings .....................................................................................114
z
Copy Mode Settings ... ................................. ...... ..... ..... .............................136
z
Network Settings......... ................................. ...... ..... ................................. .145
z
Print Mode Settings ..................................................................................159
z
Scan/Fax Mode Settings...........................................................................164
z
E-mail Settings..........................................................................................169
z
Mailbox/Stored Document Settings (DocuCentre series models) /
Mailbox Settings (ApeosPort ser ies models) and Stored Document Settings
(ApeosPort series models) .......................................................................172
z
Job Flow Settings for ApeosPort Series Models Only..............................174
z
Web Applications Settings for ApeosPort Series Models Only.................175
z
Setup Menu ..............................................................................................177
z
System Administrator Settings..................... ...... ..... ..... ...... .......................189
z
Login Setup/Auditron Administration ........................................................191
Page 96

6 System Settings
System Settings Procedure
To make or change the system settings, it is necessary to enter the System
Administration mode.
This section describes the basic procedures for system settings. The following shows
the reference section for each procedure.
Step 1 Entering System Administration Mode ...........................................................................94
Step 2 Entering the System Administrator User ID and Passcode .............................................94
Step 3 Selecting the Operation Mode from the System Administrator Menu............................95
Step 4 Selecting an Item on the [System Settings] Screen.................................. .......................95
Step 5 Setting a Feature ..............................................................................................................96
Step 6 Exiting the System Administration Mode........................................................................97
Step 1 Entering Syste m Administration Mode
System Settings
Press the <Log In/Out> button.
1
123
456
789
0 #
6
C
Step 2 Entering the System Administrator U ser ID and Passco de
To enter System Administration mode, enter the system administrator User ID. If
[Passcode Entry from Control Panel] in [Login Setup / Auditron Administration] is
activated, the passcode needs to be entered.
It is recommended to change the system administrator user ID and passcode immediately after installing
the machine. For more information, refer to "System Administrator Settings" (P.189).
1 Enter the user ID with the numeric
keypad or a keyboard displayed by
pressing [Keyboard], and select
[Confirm].
Note • The default user ID is "11111".
When using the
Authentication feature, a
passcode is required. The default passcode is "x-admin".
• The machine displays the following message if the system administration login failed:
"Login faile d. Re-enter User Details an d select Confirm."
• The machine displays the following message if the authentication failed more than the
specified number of times:
"You have made the maximum number of attempts to access the system. Access denied."
<Log In/Out>
button
94
Page 97

System Settings Procedure
Step 3 Selecting the Operation Mode from the System Administrator
Menu
Select [System Settings].
1
User Mode
While still in the System Administration mode, you can carry out normal operations
such as copying and scanning.
Note • To exit a mode entered from [User Mode], use the following procedure.
(1) Press the <Log In/Out> button.
(2) In the [Login] screen, select [Cancel].
System Settings
You can set o r register th e system settings.
Step 4 Selecting an Item on the [System Settings] Screen
System Settings
In the [System Settings] screen, select an item to be set.
For the items that can be selected in the system settings, refer to "System Settings Menu List" (P.98).
Note • Names of menus and screens may be worded differently on DocuCentre series models and
1 Select the item to be set.
System Settings
You can set or change the default values.
Common Settings
Allows you to configure the settings relating to the machine itself.
For more information, refer to "Common Settings" (P.114).
Copy Mode Settings
Allows you to configure the copy feature defaults, copy operation control, button
indications, and so on.
For more information, refer to "Copy Mode Settings" (P.136).
ApeosPort series models. If different menu names and screen names are used for
DocuCentre series models and ApeosPort series models though they both serve the same
functionality, both na mes are list ed next to each other de limite d by "/ (sl ash)" in this cha pter.
For details on menu names, refer to "System Settings Menu List" (P.98).
6
Network Settings
Allows you to configure the ports, protocols, and so on.
For more information, refer to "Network Settings" (P.145).
Print Mode Settings
Allows you to configure the memory settings, print operation control, and so on.
For more information, refer to "Print Mode Settings" (P.159).
95
Page 98

6 System Settings
System Settings
Scan/Fax Mode Settings
Allows you to configure the scanner and server fax feature defaults, button indications,
and so on.
For more information, refer to "Scan/Fax Mode Settings" (P.164).
E-mail Settings
Allows you to configure the e-mail defaul ts, add ress searc h sett ing s, and so on.
For more information, refer to "E-mail Settings" (P.169).
Mailbox/Stored Document Settings
Allows you to set how to delete documents stored in mailboxes and how to delete print
documents stored in the machine.
For more information, refer to "Mailbox/Stored Document Settings (DocuCentre series models) /
Mailbox Settings (ApeosPort series models) and Stored Document Settings (ApeosPort series models)"
(P.172).
Job Flow Settings
Allows you to configure the settings relating to job flows.
For more information, refer to "Job Flow Settings for ApeosPort Series Models Only" (P.174).
Web Applications
Allows you t o configure an access destination server.
For more information, refer to "Web Applications Settings for ApeosPort Series Models Only" (P.175).
Setup Menu
6
You can create mailboxes and job flow sheets, and can create and change an address
book (address numbers).
For more information, refer to "Setup Menu" (P.177).
System Administrator Settings
You can set the system administrator ID and system administrator passcode for
entering System Administration mode.
For more information, refer to "System Administrator Settings" (P.189).
Login Setup/Auditron Administration
You can set restrictions on users using features of the machine, or administer jobs by
user.
For more information, refer to "Login Setup/Auditron Administration" (P.191).
Step 5 Setting a Feature
96
Set any feature.
1
2 After setting the feature, select [Save].
Page 99

Step 6 Exiting the System Administration Mode
When the settings are completed,
1
select [Close] until the [System
Settings] sc reen appears.
2 Select [Exit].
System Settings Procedure
System Settings
6
97
Page 100

6 System Settings
System Settings Menu List
The following table shows a list of the items that can be set. Note that the items
appearing depend on the configuration of the machine.
Menu List for DocuCentre Series Models
System Settings
Common Settings
System Settings
6
Machine Clock/Timers (P.114)
Audio Tones (P.117)
Screen/Button Settings (P.118)
Paper Tray Settings (P.119)
z
Date (P.114)
z
Time (P.114)
z
Time Zone (P.115)
z
Daylight Savings (P.115)
z
NTP Time Synchronization (P.115)
z
Auto Clear (P.115)
z
Auto Job Release (P.116)
z
Auto Print (P.116)
z
Printer Lockout Duration (P.116)
z
Auto Power Saver (P.116)
z
Control Panel Select Tone (P.117)
z
Control Panel Alert Tone (P.117)
z
Machine Ready Tone (P.117)
z
Copy Job Complete Tone (P.117)
z
Non-Copy Job Complete Tone (P.117)
z
Fault Tone (P.117)
z
Alert Tone (P.117)
z
Out of Paper Warning Tone (P.117)
z
Low Toner Alert Tone (P.118)
z
Stored Programming Tone (P.118)
z
Auto Clear Alert Tone (P.118)
z
Base Tone (P.118)
z
Screen Default (P.118)
z
Screen After Auto Clear (P.118)
z
Auto Display of Login Screen (P.118)
z
All Services (P.118)
z
Custom Buttons 1 to 3 (P.119)
z
Job Type on Job Status Screen (P.119)
z
Default Language (P.119)
z
Custom Paper Name (P.119)
z
Paper Size/Type (P.119)
z
Paper Tray Attributes on Setup Menu (P.120)
z
Paper Tray Attributes During Loading (P.120)
z
Paper Tray Priority (P.120)
z
Paper Type Priority (P.121)
z
Tray 5 (Bypass) - Paper Size Defaults (P.121)
z
Auto Tray Switching (P.121)
98
 Loading...