


GCGM2991TQ1
COMMERCIAL
DRYERS
Use &CareGuide
For questions about features, operation/performance, parts,
acceesories or service, call: 1-800-NO BELTS (1-800-622-3587)
For installation and service, call: 1-8_O-NO BELTS (1-800-622-3567)
or visit our website at...
wl_lN.coinop.com
SECADORAS
COMERCIALES
ManualdeUse y Cuidado
Pare consut_ss respecto a csracfedaticas, operacibnidesempe_o,
partes, aeoesorios o servioio t6onioo, Ilame al:
1-800-NO BELTS (1-800-622-3587)
Para instalacibn y servico Ilame al: 1-8_0-NO BELTS (1-800-622-3567)
o visite nueatra p&gina de Internet
www.coinop.com
Tsble ofContenteJfndice ...................................... 2
8527907
TABLEOFCONTENTS
DRYER SAFETY .............................................................................. 3
PARTS AND FEATURES ................................................................ 5
CHECKING YOUR VENT ............................................................... 6
DRYER USE .................................................................................... 7
Starting Your Dryer....................................................................... 7
Stopping and Restarting .............................................................. 7
Loading ......................................................................................... 7
Drying, Cycle and Temperature Tips ........................................... 8
Cycles ........................................................................................... 8
DRYER CARE ................................................................................. g
Cleaning the Lint Screen .............................................................. 9
Cleaning the Dryer Interior ........................................................... 9
Removing Accumulated Lint ........................................................ 9
TROUBLESHOOTING .................................................................. 10
ASSISTANCE OR SERVICE ......................................................... 11
WARRANTY' .................................................................................. 12
INDICE
BEGURIDAD DE LA SECADORA ................................................ 14
PARTEB Y CARACTER|STICAS .................................................. 16
REVISION DE SU VENTILACION ................................................ 17
USO DE SU SECADORA .............................................................. 18
Puesta en marcha de su escadora ............................................ 18
Pare datener y volver a poner en marcha .................................. 18
Cbmo cargar ............................................................................... 19
Conesjos de escedo, cicIos ytemperatura ............................... 19
Ciclos .......................................................................................... 19
CUIDADO DE LA BECADORA ..................................................... 20
Limpieza del filtro de pelusa ...................................................... 20
Limpieza del interior de la escadora .......................................... 21
Eliminacibn de pelues acumuleda ............................................. 21
BOLUCION DE PROBLEMAB ...................................................... 21
AYUDA O BERVlCIO TI_CNICO .................................................. 22
GARANT[A ..................................................................................... 24
2
O • O •
JUST IMAGINE" _ 'roDo LO IMAGINAS
DRYER SAFETY
Your safety and the safety of others are very important.
We have provided many important safety messages in this manual and on your appliance. Always read and obey all
safety messages.
p_ his is the safety alert symbol.
This symbol alerts you to potential hazards that can kill or hurt you and others.
All safety messages will follow the safety alert symbol and either the word "DANGER" or
"WARNING." These words mean:
You can be killed or seriously injured if you don't
immediately follow instructions.
You can be killed or seriously injured if you don't
follow instructions.
All safety messages will tell you what the potential hazard is, tell you how to reduce the chance of injury, and tell you
what can happen if the instructions are not followed.
WARNING: For your safety, the information in this manual must be followed to minimize
the risk of fire or explosion, or to prevent property damage, personal injury, or death.
- Do not store or use gasoline or other flammable vapors and liquids in the vicinity of this
or any other appliance.
- WHAT TO DO IFYOU SMELL GAS:
• Do not try to light any appliance.
• Do not touch any electrical switch; do not use any phone in your building.
• Clear the room, building, or area of all occupants.
• Immediately call your gas supplier from a neighbor's phone. Follow the gas supplier's
instructions.
• If you cannot reach your gas supplier, call the fire department.
- Installation and service must be performed by a qualified installer, service agency, or
the gas supplier,
IMPORTANT SAFETY INSTRUCTIONS
WARNING: To reduce the risk of fire, electric shock, or injuryto persons when using the dryer, follow basic
precautions, including the following:
Read all instructions before using the dryer.
Do not place items exposed to cooking oils in
your dryer. Items contaminated with cooking oils
may contribute to a chemical reaction that could
cause a load to catch fire.
Do not dry articles that have been previously
cleaned in, washed in, soaked in, or spotted with
gasoline, dry-cleaning solvents, other flammable,
or explosive substances as they give off vapors
that could ignite or explode.
Do not allow children to play on or in the dryer.
Close supervision of children is necessary when
the dryer is used near children.
Before the dryer is removed from service or dis-
carded, remove the door to the drying compart-
ment.
Do not reach into the dryer if the drum is moving.
Do not install or store the dryer where itwill be
exposed to the weather.
Do not tamper with controls.
• Do not repair or replace any part of the dryer or
attempt any servicing unless specifically recom-
mended in this Use and Care Guide or in published
user-repair instructions that you understand and have
the skillsto carry out.
• Do not use fabric softeners or products to eliminate
static unless recommended by the manufacturer of
the fabric softener or product.
• Do not use heat to dry articles containing foam rubber
or similarly textured rubber-like materials.
• Clean lint screen before or after each load.
• Keep area around the exhaust opening and adjacent
surrounding areas free from the accumulation of lint,
dust, and dirt.
• Theinteriorofthedryerandexhaustventshouldbe
cleaned periodically by qualified service personnel.
• See installation instructions for grounding require-
ments.
SAVETHESE INSTRUCTIONS
4
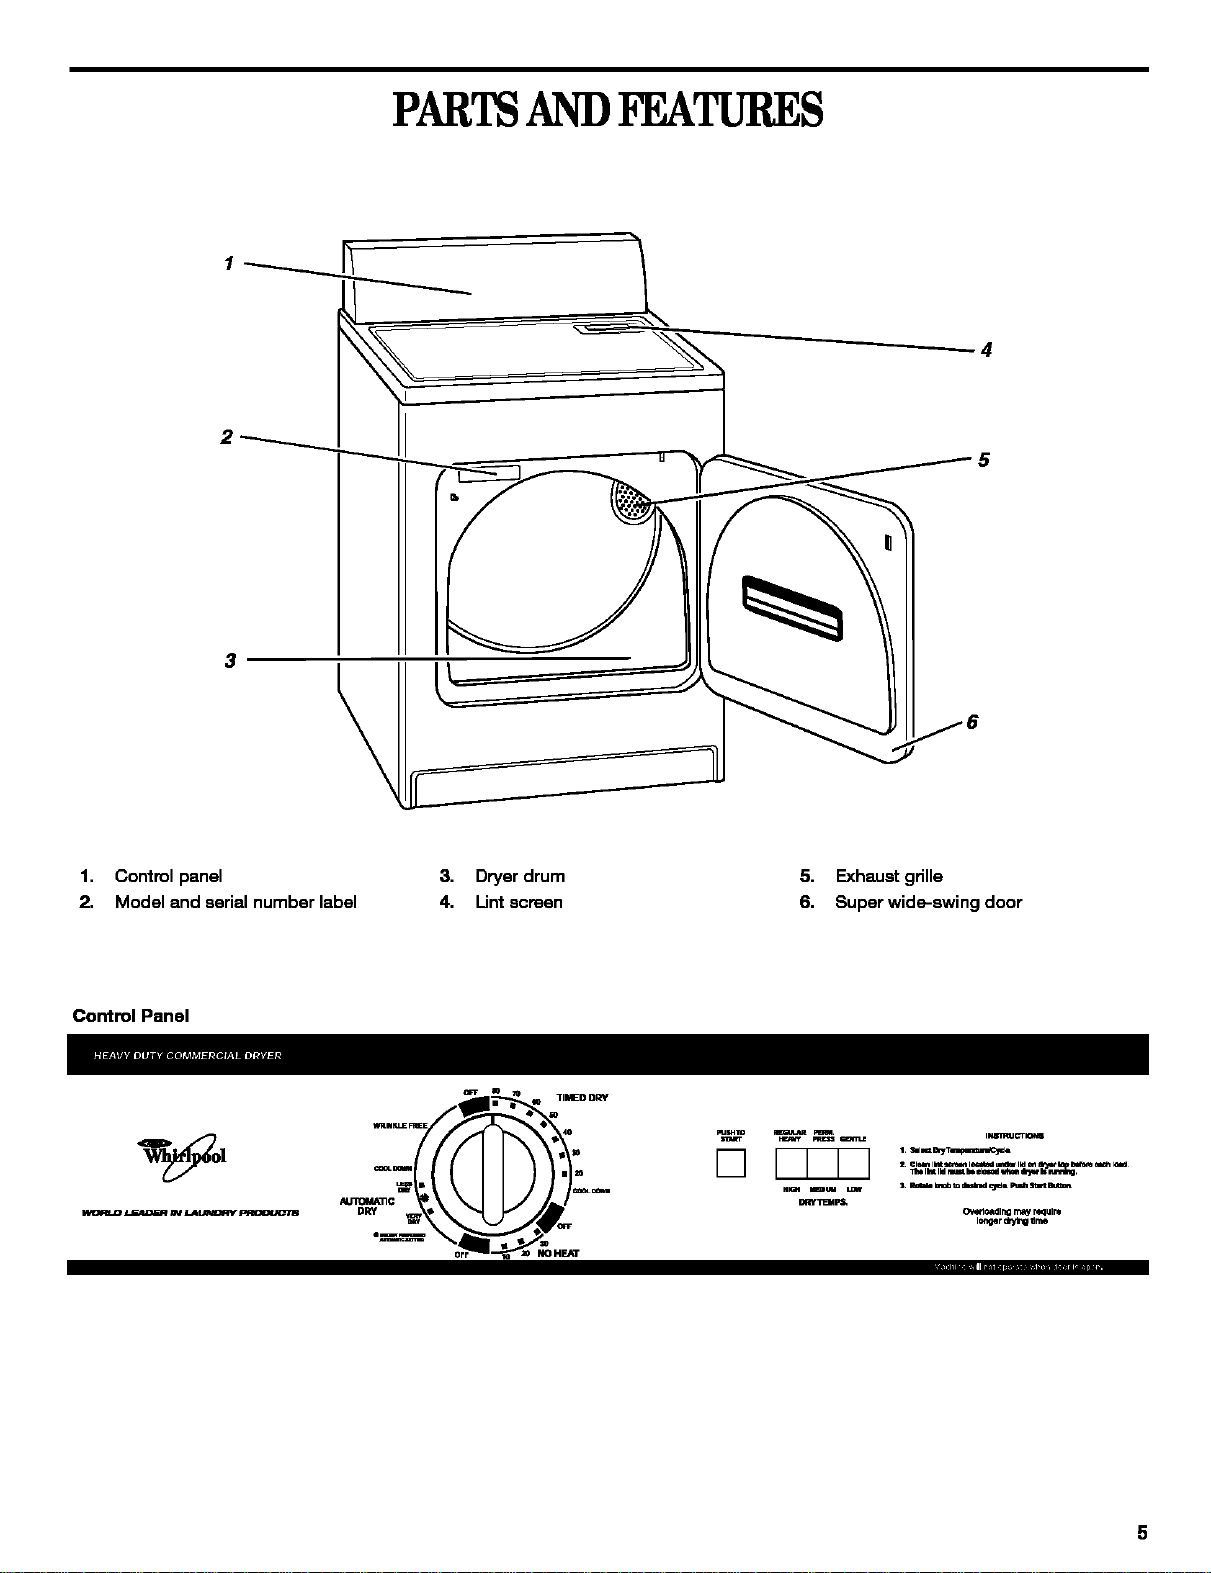
PART8ANDFEATURES
4
1. Control panel
2. Model and serial number label
3. Dryer drum
4. Lint screen
5. Exhaust grille
6. Super wide-swing door
Control Panel
N.nOMA_¢
DRY
NOHEAT
[]
2 ©Ira Ibk m leca_mdunemImm d_ _
O_1Oedlng may mqulm
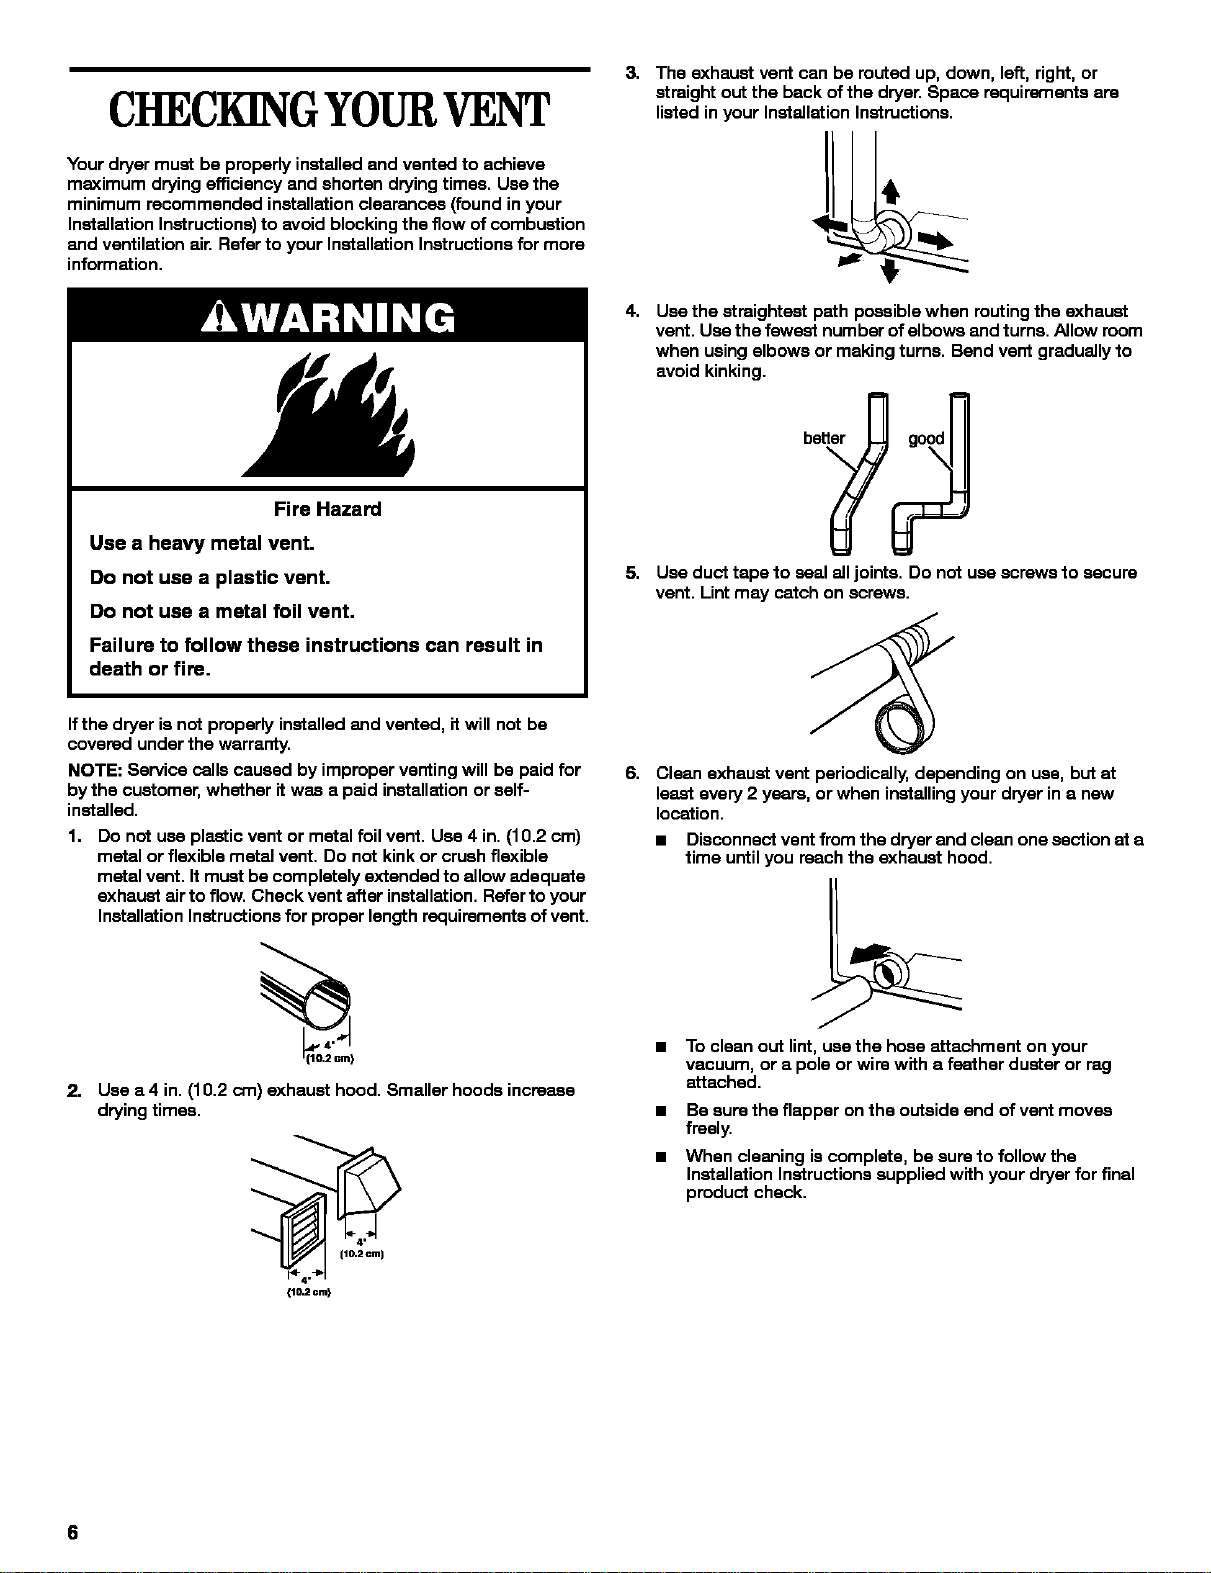
CHECKINGYOURVENT
Your dryer must be properly installed and vented to achieve
maximum drying efficiency and shorten drying times. Use the
minimum recommended installation clearances (found in your
Installation Instructions) to avoid blocking the flow of combustion
and ventilation air. Refer to your Installation Instructions for more
information.
Fire Hazard
Use a heavy metal vent.
Do not use a plastic vent.
Do not use a metal foil vent.
Failure to follow these instructions can result in
death or fire.
3. The exhaust vent can be routed up, down, left, right, or
straight out the back of the dryer, Space requirements are
listed in your Installation Instructions,
4,
Use the straightest path possible when routing the exhaust
vent. Use the fewest number of elbows and turns. Allow room
when using elbows or making turns. Bend vent gradually to
avoid kinking.
bettor
\
5. Use duct tape to seal all joints. Do not use screws to secure
vent. Lint may catch on screws.
Ifthe dryer is not properly installed and vented, it will not be
covered under the warranty.
NOTE: Service cells caused by improper venting will be paid for
by the customer, whether it was a paid installation or self-
installed.
1,
Do not use plastic vent or metal foil vent. Use 4 in. (10.2 cm)
metal or flexible metal vent. Do not kink or crush flexible
metal vent. It must be completely extended to allow adequate
exhaust air to flow. Check vent after installation. Refer to your
Installation Instructions for proper length requirements of vent.
2, Use a 4 in. (10.2 cro) exhaust hood. Smaller hoods increase
drying times.
6. Clean exhaust vent periodically, depending on use, but at
least every 2 years, or when installing your dryer in a new
location.
a Disconnect vent from the dryer and clean one section at a
time until you reach the exhaust hood.
a To clean out lint, use the hose attachment on your
vacuum, or a pole or wire with a feather duster or rag
attached.
a Be sure the flapper on the outside end of vent moves
freely.
a When cleaning is complete, be sure to follow the
Installation Instructions supplied with your dryer for final
product check.
6

DRYERUSE
StartingYourDryer
2. Turnthe Cycle Control knob to the recommended cycle for
the type of load being dried. Use the Energy Preferred
Automatic Setting (*) to dry most heavyweight and medium
weight loads. See "Drying, Cycle, and Temperature Tips."
Explosion Hazard
Keep flammable materials and vapors, such as
gasoline, away from dryer.
Do not dry anything that has ever had anything
flammable on it (even after washing).
Failure to follow these instructions can result in
death, explosion, or fire.
Fire Hazard
No washer can completely remove oil.
Do not dry anything that has ever had any type of
oil on it (including cooking oils).
Items containing foam, rubber, or plastic must be
dried on a clothesline or by using an Air Cycle.
Failure to follow these instructions can result in
death or firs.
3. Select a DRYTEMPS cycle. The cycle descriptions include
temperature setting suggestions,
4. Press the PUSH TO START button,
StoppingandRestarting
You can stop your dryer any time during a cycle.
To stop your dryer
Open the dryer door or turn the Cycle Control knob to OFR
NOTE: The Cycle Control knob should point to an Off ares when
the dryer is not in use.
To restart your dryer
1. Clceethe door.
2. Select a new cycle and temperature (ifdesired).
3. Press the PUSH TO START button.
L0=t
Load clothes loosely intothe dryer. Do not pack the dryer. Allow
space for clothes to tumble freely. The following chart shows
examples of balanced loads that would allow for proper tumbling.
Heavy work 3 pair of pants, 4 pair of jeans, 2 pair of
clothes overalls, 3 shirts
De,cotes 3 camisoles, 1 robe, 4 slips,
6 undergarments, 2 sets of slespwesr,
1 child's outfit
Towels 10 bath towels, 10 hand towels, 14 wash
cloths, 1 bath mat
Mixed Load 3 double sheets, 4 pillowcases,
8 T-shirts, 6 pair of shorts, 2 blouses,
8 handkerchiefs
Before using your dryer, wipe the dryer drum with a damp cloth to
remove dust from storing and shipping.
1. Load clothes loosely into the dryer and close the door. Do not
pack the dryer. Allow space for clothes to tumble freely.
7
Drying,CycleandTemperatureTips
Select the correct cycle and temperature for your load.
Cool Down tumbles the load without heat during the last few
minutes of all cycles to make the load easier to handle.
Drying tips
= Follow care label directions when they are available.
a If you use fabric softener sheets, use only those labeled
"dryer safe." Follow package instructions.
a Remove the load from the dryer as soon as tumbling stops, to
reduce wrinkling. This is especially important for permanent
press, knits, and synthetic fabdcs.
Cycle and temperature tips
a Dry most loads using the Energy Preferred Automatic
Setting (*), if available on your dryer,
a Use a High heat setting for drying heavyweight items such as
towels and work clothes.
a Use a Medium heat setting for drying medium weight items,
such as sheets, underwear, permanent press fabrics, and
some knits.
a
a
Use a Low heat setting for drying lightweight items such as
lingerie, blouses, dresses, and some knits.
Use a no-heet (air) setting for rubber, plastic, or heet-sanaltive
fabrics.
a Line dry bonded or laminated fabrics.
NOTE: Ifyou have questions about drying temperatures for
various loads, refer to the care label directions. If you are unsure
of the temperature to select for a load, select a lower setting
rather than a higher setting.
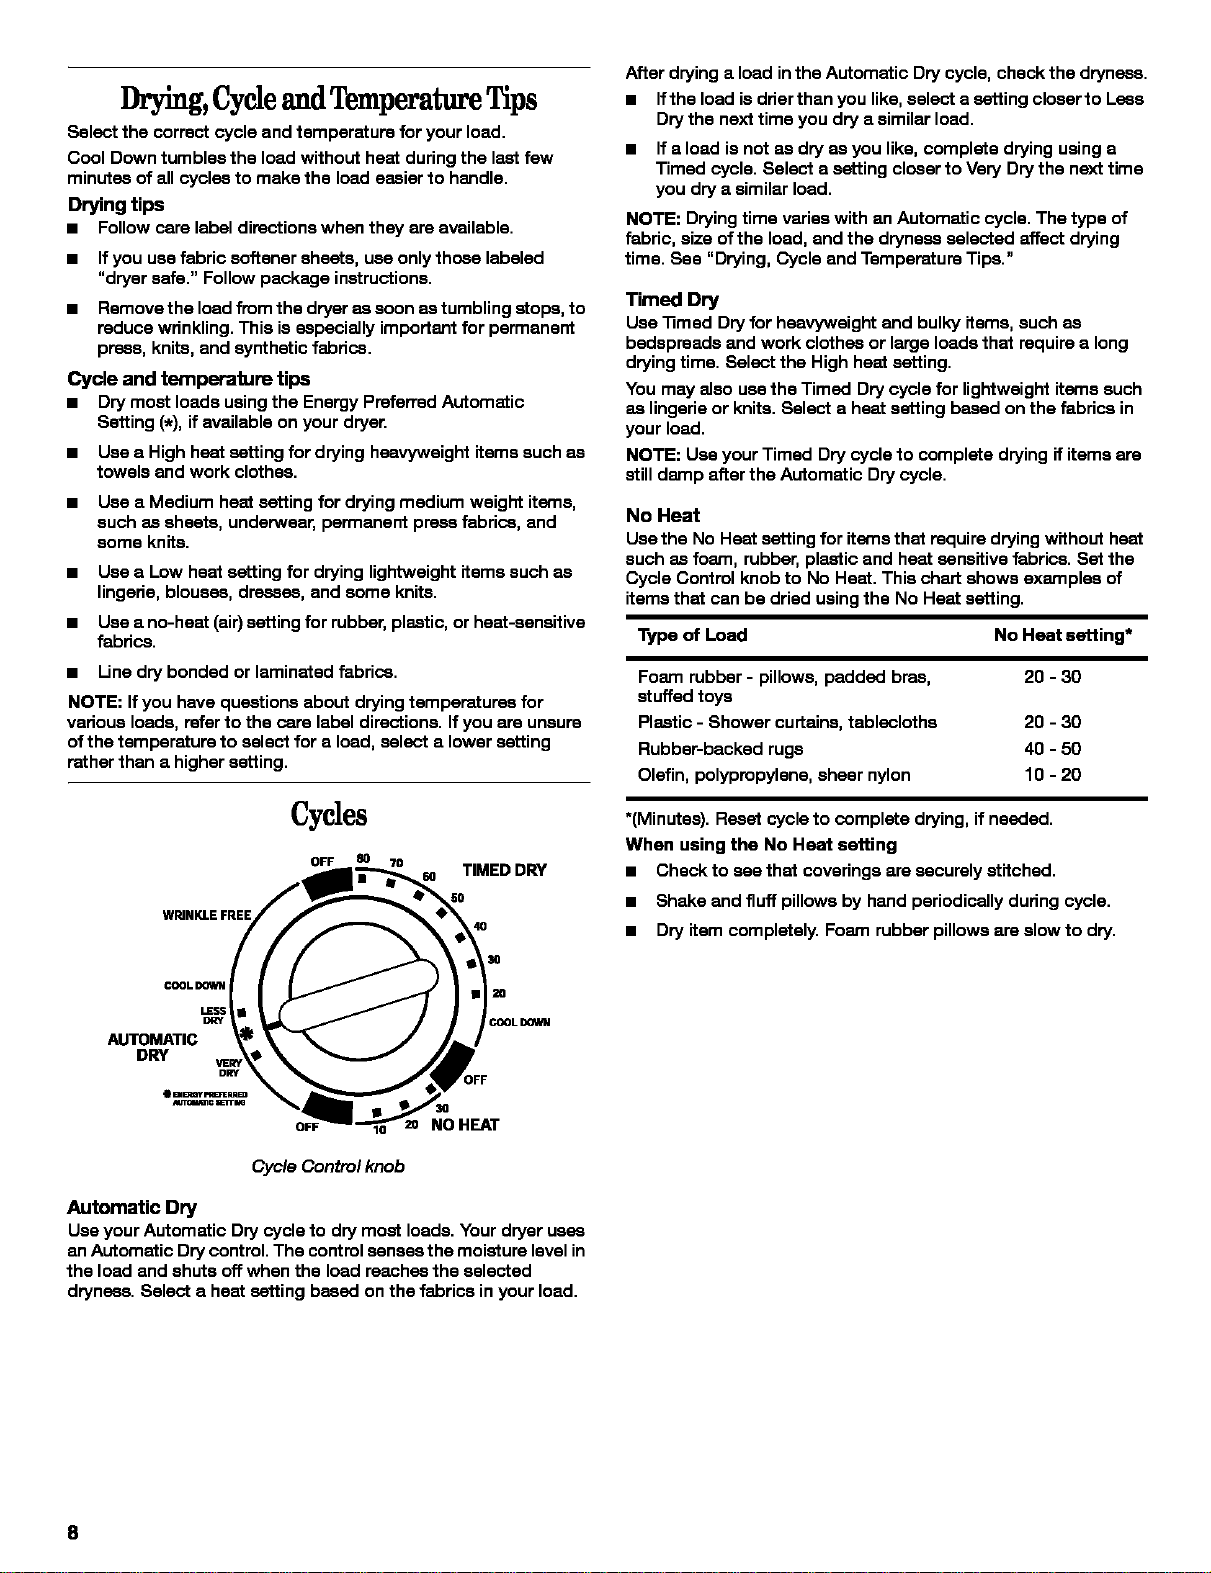
Cydes
OFF 80 70
TIMED DRY
WRINKLE FREE
4O
COOL DOWN
LESS
AUTOMATIC
DRY
OFF
3O
2O
COOLm
)FF
SO
10 NO HEAT
Cycle Control knob
Automatic Dry
Use your Automatic Dry cycle to dry most loads, Your dryer uses
an Automatic Dry control, The control senses the moisture level in
the load and shuts off whan the load reanhes the selected
dryness, Select a heat setting based on the fabrics in your load,
After drying a load in the Automatic Dry cycle, check the dryness.
a If the load is drier than you like, select a setting closer to Less
Dry the next time you dry a similar load.
a If a load is not as dry as you like, complete drying using a
Timed cycle. Select a setting closer to Very Dry the next time
you dry a similar load.
NOTE: Drying time varies with an Automatic cycle. The type of
fabric, size of the load, and the dryness selected affect drying
time. See "Drying, Cycle and Temperature Tips."
Timed Dry
Use _med Dry for heavyweight and bulky items, such as
bedspreads and work clothes or large loads that require a long
drying time, Select the High heat setting,
You may also usethe Timed Dry cycle for lightweight items such
as lingerie or knits, Select a heat setting based on the fabrics in
your load.
NOTE: Use your Timed Dry cycle to complete drying if items are
still damp after the Automatic Dry cycle.
No Heat
Use the No Heat setting for items that require drying without heat
such as foam, rubber, plastic and heat sensitive fabrics, Set the
Cycle Control knob to No Heat, This chart shows examples of
items that can be dried using the No Heat setting,
Type of Load No Heat satting*
Foam rubber - pillows, padded bras, 20 - 30
stuffed toys
Plastic - Shower curtains, tablecloths 20 - 30
Rubber-becked rugs 40 - 50
Olefin, polypropylane, sheer nylon I g - 20
*(Minutes). Reset cycle to complete drying, if needed.
When using the No Heat setting
m Check to see that coverings are securely stitched.
m Shake and fluff pillows by hand periodically during cycle.
m Dry item completely. Foam rubber pillows are slow to dry.
8
 Loading...