


ISANDE
GB
DE
FR
IT
ENGLISH 4 DEUTSCH 16 FRANÇAIS 29 ITALIANO 47

ENGLISH
Contents
Safety information |
4 |
Product description |
6 |
First use |
7 |
Daily use |
7 |
Cleaning and maintenance |
9 |
Safety Information
Before first use
This appliance is intended to be used in household. To ensure best use of your appliance, carefully read this User Manual which contains a description of the product and useful advice.
Keep these instructions for future reference.
1.After unpacking the appliance, make sure it is not damaged and that the door closes properly.
Any functional fault must be reported to IKEA After Sales Service as soon as possible.
2.Wait at least two hours before switching the appliance on, to ensure that the refrigerant circuit is fully efficient.
3.The electrical installation and the electrical connection must be carried out by a qualified technician according to the manufacturer’s instructions and in compliance with the local safety regulations.
4.Clean the inside of the appliance before using it.
Precautions and general recommendations Installation and connection
•The appliance must be handled and installed by two or more persons.
•Be careful not to damage the floors (e.g. parquet) when moving the appliance.
•During installation, make sure the appliance does not damage the power cable.
•Make sure the appliance is not near a heat source.
•To guarantee adequate ventilation, leave a space on both sides and above
4
What to do if ... |
10 |
Technical data |
12 |
Environmental concerns |
13 |
IKEA GUARANTEE |
14 |
the appliance and follow the installation instructions.
•Keep the appliance ventilation openings free.
•Do not damage the appliance refrigerant circuit pipes.
•Install and level the appliance on a floor strong enough to take its weight and in a place suitable for its size and use.
•Install the appliance in a dry and wellventilated place.
The appliance is arranged for operation in places where the temperature comes within the following ranges, according to the climatic class given on the rating plate.
The appliance may not work properly if it is left for a long time at a temperature outside the specified range.
•Make sure the voltage specified on the rating plate corresponds to that of your home.
Climatic Class |
Amb. T. (°C) |
Amb. T. (°F) |
|
|
|
SN |
From 10 to 32 |
From 50 to 90 |
|
|
|
N |
From 16 to 32 |
From 61 to 90 |
|
|
|
ST |
From 16 to 38 |
From 61 to100 |
|
|
|
T |
From 16 to 43 |
From 61 to 110 |
|
|
|
•Do not use single/multi adapters or extension cords.
•For the water connection, use the pipe supplied with the new appliance; do not reuse that of the previous appliance.
•Power cable modification or replacement must only be carried out by qualified personnel or by After-sales Service.
ENGLISH |
5 |
•It must be possible to disconnect the appliance from the power supply by unplugging it or by means of a mains two-pole switch installed upstream of the socket.
Safety
•Do not store explosive substances such as aerosol cans with a flammable propellant in this appliance.
•Do not store or use petrol, flammable liquids or gas in the vicinity of this or other electrical appliances. The fumes can cause fires or explosions.
•Do not use mechanical, electric or chemical means other than those recommended by the Manufacturer to speed up the defrost process.
•Do not use or place electrical devices inside the appliance compartments if they are not of the type expressly authorised by the Manufacturer.
•This appliance is not intended for use by persons (including children) with reduced physical, sensory or mental capabilities, or lack of experience and knowledge, unless they have been given supervision or instruction concerning use of the appliance by a person responsible for their safety.
•To avoid the risk of children becoming trapped and suffocating, do not allow them to play or hide inside the appliance.
•Do not swallow the contents (non-toxic) of the ice packs (in some models).
•Do not eat ice cubes or ice lollies immediately after taking them out of the freezer since they may cause cold burns.
Use
•Before carrying out any maintenance or cleaning operation, unplug the appliance or disconnect it from the power supply.
•All appliances equipped with an automatic ice-maker and water dispenser must be connected to a water supply that only delivers drinking water (with mains water pressure of between 0.17 and 0.81 Mpa (1.7 and 8.1 bar)). Automatic ice-makers and/or water dispensers not directly connected to the water supply must be filled with drinking water only.
Use the refrigerator compartment only for storing fresh food and the freezer compartment only for storing frozen food, freezing fresh food and making ice cubes.
•Do not store glass containers with liquids in the freezer compartment since they may break.
•Avoid storing unwrapped food in direct
contact with internal surfaces of the refrigerator or freezer compartments.
The Manufacturer declines any liability if the above advice and precautions are not respected.
ENGLISH |
6 |
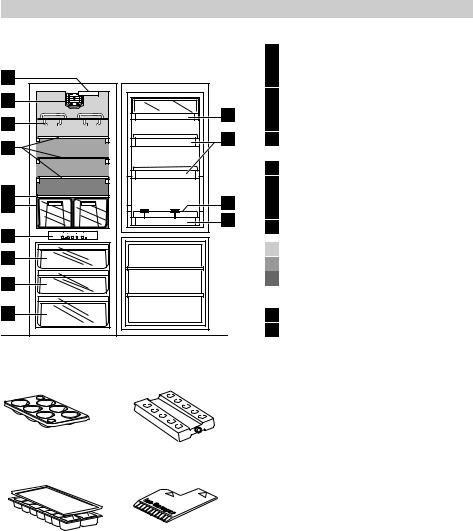
Product description |
|
|
||
Carefully read the operating instructions |
|
Refrigerator compartment |
||
before using the appliance. |
1 |
Fan |
||
|
|
2 |
LED light |
|
2 |
|
3 |
Shelves |
|
1 |
|
4 |
Bottle rack |
|
|
5 |
Crisper drawer cover |
||
|
11 |
|||
4 |
6 |
Crisper(s) |
||
|
||||
3 |
12 |
7 |
Rating plate |
|
|
|
(located at side of crisper) |
||
|
|
|
||
|
|
8 |
Control panel |
|
5 |
|
11 |
Dairy compartment |
|
13 |
12 |
Door trays |
||
6 |
||||
13 |
Bottle holder |
|||
|
||||
|
14 |
|||
|
14 |
Bottle bin |
||
7 |
|
|||
|
|
|
||
8 |
|
|
Least cold zone |
|
|
|
Intermediate zone |
||
|
|
|
||
9 |
|
|
Coldest zone |
|
|
|
|
||
|
|
|
Freezer compartment |
|
10 |
|
9 |
Top drawer (freezing area) |
|
|
|
10 |
Middle and bottom drawers (storage |
|
|
|
|
area for frozen and deep frozen |
|
Accessories |
|
|
food) |
|
Egg tray |
Freezer block |
Note: All shelves, door trays and racks are |
||
|
|
|||
|
|
removable. |
||
1x
2x
Ice tray
Ice scraper
The ideal temperatures for preserving foods are already factory-set.
Carefully read the user handbook provided before using the appliance.
2x 1x
ENGLISH |
7 |
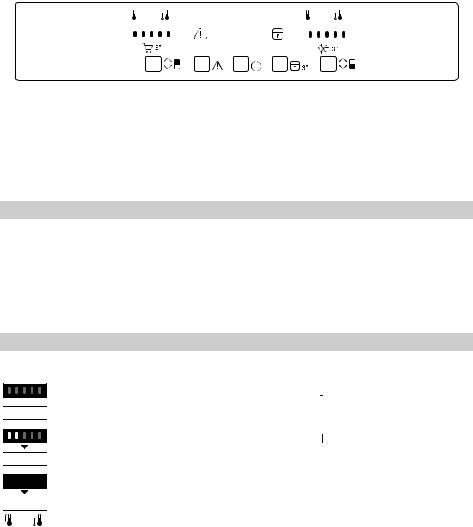
Control panel
|
|
|
|
|
|
|
|
|
|
|
|
|
|
|
|
|
|
|
|
|
|
|
|
|
|
|
|
|
|
|
|
|
|
|
|
|
|
|
|
|
|
|
|
|
|
|
|
|
|
|
|
|
|
|
|
|
|
|
|
|
|
|
|
|
|
|
|
|
|
|
|
|
|
|
|
|
|
A |
|
C |
|
D |
|
|
E |
|
G |
|
||||||
|
|
|
|
|
|
|
|
|
|
|||||||||
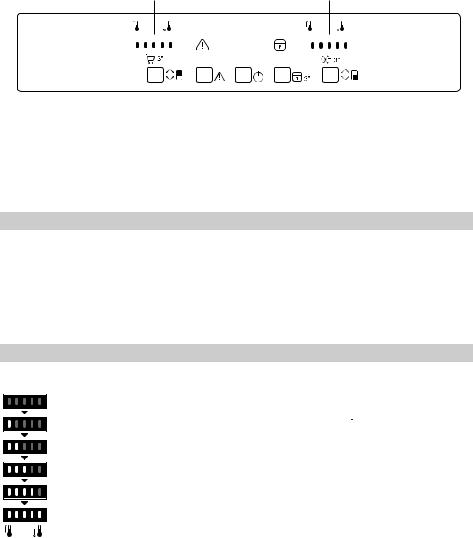
A |
“Fridge / Shopping function” button |
|
|
E |
“Key Lock” button |
|||||||||||||
|
|
|
|
|
|
|
|
|
|
|||||||||
B |
Refrigerator compartment temperature |
|
|
F |
Freezer compartment temperature |
|||||||||||||
|
|
|
|
|
|
|
|
|
|
|
|
|
||||||
C |
“Reset Alarm” button |
|
|
|
|
|
|
G |
“Freezer / Fast Freezing” button |
|||||||||
|
|
|
|
|
|
|
|
|
|
|
|
|
|
|
|
|
||
D |
“On/Standby” button |
|
|
|
|
|
|
|
|
|
|
|
|
|
|
|||
First use
Connect the appliance to the mains power supply.
A beep may be emitted by some models, to indicate that the temperature alarm has intervened: press and hold the button to switch off acoustic alarms.
Note: after switching on, the refrigerator needs approximately 4/5 hours to reach the correct temperature for storing a normal fridge load of food.
Daily use
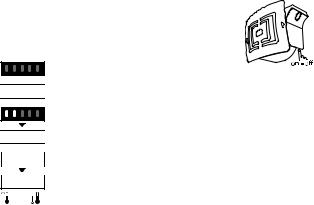
Shopping function 
Press the “Fridge” button for 3  seconds before placing large


 quantities of fresh food in the
  refrigerator compartment.
When the function is active, the 


 sequence shown in the figure
  will appear on the display.
  This function is automatically


 deactivated after 6 hours, or
manually by pressing the “Fridge” button.
Refrigerator compartment temperature
A different temperature can be set using the “Fridge” button.
Five adjustments can be made, from warmer temperatures  (left)
to the coldest temperature  (right).
Reset Alarm 
To deactivate acoustic signals, press the “Reset Alarm” button.
On/Standby
Press for 3 seconds to switch off the appliance. In Standby mode, no icons are lit on the display and the light in the
refrigerator compartment does not come on. To switch the product back on, simply press the button briefly again.
Note: this operation does not disconnect the appliance from the power supply.
Key Lock
The key lock can be activated/deactivated by pressing and holding the “Key Lock”
ENGLISH |
8 |
button for 3 seconds, until you hear a confirmation tone (the icon lights up).
If you press any button while the key lock is active, you will hear a sound and the “Key Lock” icon will start to flash.
Freezer compartment temperature
A different temperature can be set using the “Freezer” button.
Five adjustments can be made, from warmer temperatures  (left) to the coldest temperature
  (right).
Fast Freezing 
Press the “Freezer” button for 3  seconds 24 hours before placing


 large quantities of fresh food
  in the freezer compartment.
When the function is active, the 


 sequence shown in the figure
  will appear on the display.
  This function is automatically
  deactivated after 48 hours,
or manually by pressing the “Freezer” button again.
Note: Do not place fresh food to be frozen in direct contact with already frozen food.
Refrigerator compartment
Refrigerator compartment defrosting is completely automatic. Droplets of water on the rear wall inside the refrigerator compartment indicate that the automatic defrost phase is in progress. The defrost water is automatically run into a drain hole and collected in a container, where it evaporates.
Important: refrigerator accessories must not be washed in a dishwasher.
Note: the ambient temperature, the door opening frequency and the position of the appliance may affect temperatures inside the two compartments. Set the temperature in accordance with these factors.
Note: when there is a lot of moisture inside the refrigerator compartment and on the
glass shelves in particular, condensation may form. In this case, we recommend closing any liquid-filled containers (e.g.: saucepans full of stock), wrapping foods with a high liquid content (e.g.: vegetables) and setting the temperature to a warmer value.
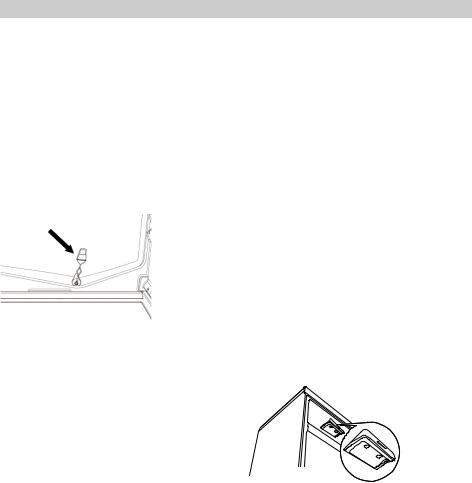
Fan
The fan is factory set to ACTIVE. The fan can be deactivated by pressing the button on the base (as shown in the figure). If the room temperature exceeds 27°C or if water droplets form on the glass shelves, the fan must be on in order to guarantee the correct preservation of food. Deactivation of the fan enables energy consumption to be optimised. Do not obstruct the suction zone with food.
Freezer compartment
The freezer compartment  stores frozen food (for the period indicated on the package) and freezes fresh food. The amount of fresh food that can be frozen in 24 hours is shown on the rating plate; place the food in the freezer compartment (see ‘Fast Freezing’ paragraph), leaving enough space around the packages to allow air to circulate. Refreezing partially thawed food is not recommended.
Note: the ambient temperature, door opening frequency and position of the appliance can affect the temperatures inside the two compartments. Set the temperature based on these factors.
Making ice cubes
Fill the ice cube tray 2/3 full and place it in the freezer compartment. Never use sharp or pointed objects to remove the ice.
ENGLISH |
9 |
Removing drawers
To create more space, the freezer compartment can be used without drawers. Pull the drawers all the way out, lift them up a little and remove. Make sure that, once the food has been placed on the shelves, the door closes properly.
Freezer block
Freezer blocks could be placed directly
on the frozen food (for best efficiency we recommend placing them in upper drawer). In case of power faillure they guarantee a longer cold reserve that protects the froozen food. All performance declarations are without considering the freezer blocks.
Cleaning and maintenance
Appliance maintenance and cleaning
Clean the appliance regularly using a cloth and a solution of lukewarm water and neutral detergent specifically formulated for refrigerator interiors. Never use abrasive detergents. Clean inside the defrost
water drain outlet on the rear wall of the refrigerator (near the fruit and vegetable crisper drawer) regularly, using the tool supplied with the appliance so as to ensure defrost water is removed correctly (see figure).
Before all cleaning or maintenance procedures, unplug the appliance from the mains or disconnect the electricity supply.
Defrosting the freezer compartment
No Frost models do not need defrosting.
Storing food
Wrap food so that no water, moisture or condensate can enter; this will prevent odours or aromas going from one part to another in the refrigerator, ensuring better preservation of frozen foods.
Never place hot food in the freezer. Cooling hot foods before freezing saves energy and prolongs the life of the appliance.
When the appliance is not in use
Unplug the appliance from the mains, then empty, defrost (if necessary) and clean
it. Leave the doors ajar, so that air can circulate inside the compartments. This will prevent the formation of mould and bad odours.
During blackouts
Keep the doors closed to allow the stored food to stay cold as long as possible. Do not refreeze partially thawed food. If the blackout persists, the blackout alarm may sound.
Changing led
To replace LED lighting, contact the AfterSales Service for assistance.
LED lights last longer than normal bulbs, they illuminate better and are more environmentally friendly.

ENGLISH |
10 |
What to do if ...
What to do if... |
Possible causes: |
Solutions: |
|
|
|
The control panel is switched |
The appliance could be |
Activate the appliance with |
off, the appliance does not |
in On/Standby mode. |
the On/Standby button. |
work. |
|
|
|
|
|
|
There may be an |
Make sure: |
|
appliance power supply |
- there is not a power outage |
|
problem. |
- the plug is properly inserted |
|
|
in the power socket and the |
|
|
mains double-pole switch |
|
|
(if present) is in the correct |
|
|
position (i.e. allows the |
|
|
appliance to be powered) |
|
|
- the household electrical |
|
|
system protection devices are |
|
|
efficient |
|
|
- the power cable is not |
|
|
broken. |
|
|
|
The inside light does not work. |
The light may need |
Models with lamp: disconnect |
|
replacing. |
the appliance from the power |
|
|
supply, check the lamp and, |
|
|
if necessary, replace it with |
|
|
a new one (see the section |
|
|
“Changing LED”). Models with |
|
|
LED lights: contact the After |
|
|
Sales Service. |
|
|
|
|
The appliance could be |
Activate the appliance with |
|
in On/Standby mode. |
the On/Standby button. |
|
|
|
The temperature inside the |
There could be various |
Make sure: |
compartments is not low |
causes (see "Solutions"). |
- the doors close properly |
enough. |
|
- the appliance is not installed |
|
|
near a heat source |
|
|
- the set temperature is |
|
|
adequate |
|
|
- the circulation of air through |
|
|
the vents at the bottom of the |
|
|
appliance is not obstructed. |
|
|
|
There is water on the bottom of |
The defrost water drain |
Clean the defrost water |
the refrigerator compartment. |
is blocked. |
drain hole (see the section |
|
|
"Appliance Maintenance and |
|
|
Cleaning"). |
|
|
|
ENGLISH |
11 |
What to do if... |
|
|
|
Possible causes: |
Solutions: |
||
|
|
|
|
|
|
|
|
The front edge of the |
This is not a defect. It |
No remedy is necessary. |
|||||
appliance, at the door striker |
prevents condensation |
|
|||||
seal, is hot. |
|
|
|
from forming. |
|
||
|
|
|
|
|
|
|
|
|
|
|
|
Door open alarm |
Close the doors of the product |
||
The red light |
|
|
flashes and |
||||
|
|||||||
an acoustic alarm sounds. |
Activated when a door |
to deactivate the acoustic |
|||||
|
|
|
|
|
|
remains open for a long |
alarm. |
|
|
|
|
|
|
period of time. |
If the acoustic alarm does |
|
|
|
|
|
|
|
not go off it is a power |
|
|
|
|
|
|
|
failure alarm (see the section |
|
|
|
|
|
|
|
Blackout alarm). |
|
|
|
|
|
|
|
|
|
|
|
|
Malfunction alarm |
Call the authorised Service |
||
The red light |
|
|
comes on, an |
||||
|
|||||||
acoustic alarm sounds and |
The alarm indicates |
Centre. Press the “Stop Alarm” |
|||||
the refrigerator compartment |
a fault in a technical |
button to deactivate the |
|||||
temperature indicators flash as |
component. |
acoustic signal. |
|||||
shown in the figure: |
|
|
|
|
|||
|
|
|
|
|
|
|
|
|
|
Blackout alarm |
Press the stop alarm button to |
||||
The red light |
|
|
flashes and |
||||
|
|||||||
an acoustic alarm sounds |
Activated when the |
deactivate the acoustic signal. |
|||||
even with the door closed. |
power is cut off for |
If the freezer compartment |
|||||
The freezer compartment |
an extended period |
has not yet reached the |
|||||
temperature indicators may |
of time, causing the |
optimum food storage |
|||||
flash. |
|
|
|
freezer compartment |
temperature, the freezer |
||
|
|
|
|
|
|
temperature to rise. |
compartment temperature |
|
|
|
|
|
|
|
alarm may be activated |
|
|
|
|
|
|
|
(see freezer compartment |
|
|
|
|
|
|
|
temperature alarm). Check |
|
|
|
|
|
|
|
the food before consuming it. |
|
|
|
|
|
|
|
|
|
|
Freezer compartment |
Press the Stop Alarm button |
||||
The red light |
|
|
comes on |
||||
|
|||||||
(without flashing), an acoustic |
temperature alarm |
to deactivate the acoustic |
|||||
alarm sounds and the freezer |
The temperature |
signal. When the optimal |
|||||
compartment temperature |
alarm indicates that |
temperature conditions have |
|||||
indicators flash. |
|
|
|
the temperature of the |
been reached, the red light |
||
|
|
|
|
|
|
compartment is not at its |
switches off automatically. |
|
|
|
|
|
|
optimum level. This may |
If the temperature alarm |
|
|
|
|
|
|
happen: when it is first |
persists, contact the After |
|
|
|
|
|
|
used, after defrosting |
Sales Service. |
|
|
|
|
|
|
and/or cleaning, if |
|
|
|
|
|
|
|
large amounts of food |
|
|
|
|
|
|
|
are placed inside the |
|
|
|
|
|
|
|
freezer or when the |
|
|
|
|
|
|
|
freezer door has not |
|
|
|
|
|
|
|
been shut properly. |
|
|
|
|
|
|
|
|
|
ENGLISH |
12 |
Before contacting the After-sales service:
Switch the appliance on again to see if the problem has disappeared. If not, switch it off again and repeat the operation after an hour.
If your appliance still does not work properly after carrying out the checks listed in the troubleshooting guide and switching the appliance on again, contact the Aftersales service, clearly explaining the problem and specifying:
•the type of fault;
•the model;
•the type and serial number of the appliance (given on the rating plate);
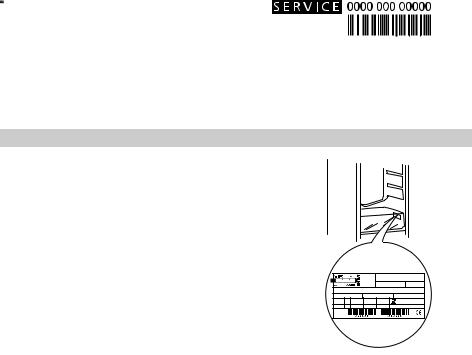
•the Service number (the number after the word SERVICE on the rating plate inside the appliance)
Note:
Reversing of appliance door opening is not covered by the warranty.
Technical data
Product dimensions |
ISANDE |
|
|
Height |
1770 |
|
|
Width |
540 |
|
|
Depth |
545 |
|
|
Net Volume (l) |
|
|
|
Fridge |
201 |
|
|
Freezer |
63 |
|
|
Defrost system |
|
|
|
Fridge |
Automatic |
|
|
Freezer |
Automatic |
|
|
Star Rating |
4 |
|
|
Rising Time (h) |
16 |
|
|
Freezing Capacity (kg/24h) |
9 |
|
|
Energy consumption (kwh/24h) |
0,640 |
|
|
Noise level (dba) |
38 |
|
|
Energy class |
A++ |
|
|
|
|
00000 |
XXXXXXXXXXXXX |
XXXXXXXXX |
|
|
|
XXXXXXXXXXXXX |
XXXXXXXXX |
||
|
|
|
|
|
|
XXXXXXXXXXXXX |
XXXXXXXXX |
|
XXXXXXXXXXXXX |
XXXXXXXXX |
|
XXXXXXXXXXXXX |
XXXXXXXXXXXXX |
XXXXXXXXXXXXX |
|||
XXXXX |
XXXXX |
XXXXX |
XXXXX |
XXXXX |
|
XXXXX |
XXXXX |
XXXXX |
XXXXX |
XXXXX |
|
XXXXX |
XXXXX |
XXXXX |
XXXXX |
XXXXX |
|
The technical information are situated in the rating plate on the internal side of the appliance and in the energy label
ENGLISH
Environmental concerns
1. Packing
The packing material is 100% recyclable and bears the recycling symbol. For disposal, comply with the local regulations. Keep the packing materials (plastic bags, polystyrene parts, etc.) out of the reach of children, as they are a potential source of danger.
2. Scrapping/Disposal
The appliance is manufactured using recyclable material. This appliance is marked in compliance with European Directive 2002/96/EC on Waste Electrical and Electronic Equipment (WEEE). By ensuring the correct disposal of this appliance, you can help prevent potentially negative consequences for the environment and the health of persons.
The symbol  on the appliance, or on the accompanying documents, indicates that this appliance should not be treated as domestic waste but must be taken to a special collection centre for the recycling of electrical and electronic equipment.
When scrapping the appliance, make it unusable by cutting off the power cable and removing the doors and shelves so that children cannot easily climb inside and become trapped.
Scrap the appliance in compliance with local regulations on waste disposal, taking it to a special collection centre; do not leave the appliance unattended even for a few days, since it is a potential source of danger for children.
For further information on the treatment, recovery and recycling of this product, contact your competent local office, the household waste collection service or the shop where you purchased the appliance.
13
Information:
This appliance does not contain CFCs. The refrigerant circuit contains R600a (HC) (see the rating plate inside the appliance). Appliances with Isobutane (R600a): isobutane is a natural gas without environmental impact, but is flammable. Therefore, make sure the refrigerant circuit pipes are not damaged.
Declaration of conformity
•This appliance has been designed for preserving food and is manufactured in compliance with Regulation (CE) No. 1935/2004.
N
• This appliance has been designed, manufactured and marketed in compliance with:
-safety objectives of the “Low Voltage” Directive 2006/95/CE (which replaces 73/23/CEE and subsequent amendments);
-the protection requirements of Directive “EMC” 2004/108/EC.
Electrical safety of the appliance can only be guaranteed if it is correctly connected to an approved earthing system.

ENGLISH
IKEA GUARANTEE
How long is the IKEA guarantee valid?
This guarantee is valid for five (5) years from the original date of purchase of your appliance at IKEA, unless the appliance is named LAGAN in which case two (2) years of guarantee apply. The original sales receipt, is required as proof of purchase. If service work is carried out under guarantee, this will not extend the guarantee period for the appliance.
Which appliances are not covered by the IKEA five (5) years guarantee?
The range of appliances named LAGAN and all appliances purchased in IKEA before 1st of August 2007.
Who will execute the service?
IKEA service provider will provide the service through its own service operations or authorized service partner network.
What does this guarantee cover?
The guarantee covers faults of the appliance, which have been caused by faulty construction or material faults from the date of purchase from IKEA. This guarantee applies to domestic use only. The exceptions are specified under the headline “What is not covered under this guarantee?” Within the guarantee period, the costs to remedy the fault e.g. repairs, parts, labour and travel will be covered, provided that the appliance is accessible for repair without special expenditure. On these conditions the EU guidelines (Nr. 99/44/EG) and the respective local regulations are applicable. Replaced parts become the property of IKEA.
What will IKEA do to correct the problem?
IKEA appointed Service Provider will examine the product and decide, at its sole discretion, if it is covered under this guarantee. If considered covered, IKEA Service Provider or its authorized service partner through its own service operations, will then, at its sole discretion, either repair
14
the defective product or replace it with the same or a comparable product.
What is not covered under this guarantee?
•Normal wear and tear.
•Deliberate or negligent damage, damage caused by failure to observe operating instructions, incorrect installation or by connection to the wrong voltage, damage caused by chemical or electrochemical reaction, rust, corrosion or water damage including but not limited to damage caused by excessive lime in the water supply, damage caused by abnormal environmental conditions.
•Consumable parts including batteries and lamps.
•Non-functional and decorative parts which do not affect normal use of the appliance, including any scratches and possible color differences.
•Accidental damage caused by foreign objects or substances and cleaning or unblocking of filters, drainage systems or soap drawers.
•Damage to the following parts: ceramic glass, accessories, crockery and cutlery baskets, feed and drainage pipes, seals, lamps and lamp covers, screens, knobs, casings and parts of casings. Unless such damages can be proved to have been caused by production faults.
•Cases where no fault could be found during a technician’s visit.
•Repairs not carried out by our appointed service providers and/or an authorized service contractual partner or where non-original parts have been used.
•Repairs caused by installation which is faulty or not according to specification.
•The use of the appliance in a nondomestic environment i.e. professional use.
•Transportation damages. If a customer transports the product to his home or another address, IKEA is not liable for
ENGLISH |
15 |
any damage that may occur during transport. However, if IKEA delivers the product to the customer’s delivery address, then damage to the product that occurs during this delivery will be covered by IKEA.
•Cost for carrying out the initial installation of the IKEA appliance. However, if an IKEA appointed Service
Provider or its authorized service partner repairs or replaces the appliance under the terms of this guarantee,
the appointed Service Provider or its authorized service partner will reinstall the repaired appliance or install the replacement, if necessary.
These restrictions do not apply to fault-free work carried out by a qualified specialist using our original parts in order to adapt the appliance to the technical safety specifications of another EU country.
How country law applies
The IKEA guarantee gives you specific legal rights, which cover or exceed all the local legal demands. However these conditions do not limit in any way consumer rights described in the local legislation.
Area of validity
For appliances which are purchased in one EU country and taken to another EU country, the services will be provided in the framework of the guarantee conditions normal in the new country.
An obligation to carry out services in the framework of the guarantee exists only if the appliance complies and is installed in accordance with:
-the technical specifications of the country in which the guarantee claim is made;
-the Assembly Instructions and User Manual Safety Information.
The dedicated AFTER SALES for IKEA appliances
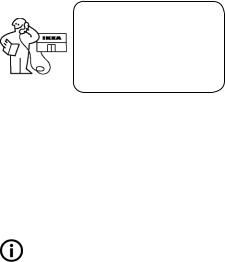
Please don’t hesitate to contact IKEA appointed After Sales Service Provider to:
•make a service request under this guarantee;
•ask for clarifications on installation of the IKEA appliance in the dedicated IKEA kitchen furniture;
•ask for clarification on functions of IKEA appliances.
To ensure that we provide you with the best assistance, please read carefully the Assembly Instructions and/or the User Manual before contacting us.
How to reach us if you need our service
Please refer to the last page of this manual for the full list of IKEA appointed After Sales Service Provider and relative national phone numbers.
 In order to provide you a quicker service, we recommend to use the specific phone numbers listed on this manual. Always refer to the numbers listed in the booklet of the specific appliance you need an assistance for. Please also always refer to the IKEA article number (8 digit code) and 12 digit service number placed on the rating plate of your appliance.
SAVE THE SALES RECEIPT!
It is your proof of purchase and required for the guarantee to apply. The sales receipt also reports the IKEA name and article number (8 digit code) for each of the appliances you have purchased.
Do you need extra help?
For any additional questions not related to After Sales of your appliances please contact your nearest IKEA store call centre. We recommend you read the appliance
documentation carefully before contacting us.

DEUTSCH |
16 |
Inhalt
Sicherheitsinformationen |
16 |
Was tun, wenn... |
22 |
Beschreibung des Gerätes |
18 |
Technische Daten |
24 |
Inbetriebnahme |
19 |
Umweltschutz |
25 |
Täglicher Gebrauch |
19 |
IKEA GARANTIE |
26 |
Reinigung und Plege |
21 |
|
|
Sicherheitsinformationen
Vor dem ersten Gebrauch
Dieses Gerät ist für die Verwendung in einem Haushalt bestimmt. Lesen Sie bitte für die optimale Nutzung Ihres Gerätes die vorliegende Gebrauchsanleitung sorgfältig durch, in der die Beschreibung des Produkts und hilfreiche Hinweise enthalten sind. Heben Sie diese Anleitung bitte als Nachschlagewerk gut auf.
1.Überprüfen Sie das Gerät nach dem Auspacken auf Beschädigungen und kontrollieren Sie, ob die Tür einwandfrei schließt. Jede Funktionsstörung muss dem IKEA Kundendienst so schnell wie möglich gemeldet werden.
2.Warten Sie vor der Inbetriebnahme des Gerätes mindestens zwei Stunden, damit der Kühlkreislauf seine volle Funktionstüchtigkeit erreichen kann.
3.Die Installation und der elektrische Anschluss müssen von einer Fachkraft gemäß den Herstelleranweisungen und den gültigen örtlichen Sicherheitsbestimmungen ausgeführt werden.
4.Reinigen Sie den Innenraum vor der Inbetriebnahme des Gerätes.
Vorsichtsmaßnahmen und allgemeine Empfehlungen
Installation und Anschluss
•Das Gerät muss von mindestens zwei Personen transportiert und installiert werden.
•Achten Sie beim Umstellen des Gerätes darauf, dass der Fußboden (z. B. Parkett) nicht beschädigt wird.
•Achten Sie bei der Installation darauf, dass das Gerät nicht auf dem Netzkabel steht.
•Stellen Sie das Gerät nicht neben einer Wärmequelle auf.
•Lassen Sie zur ausreichenden Belüftung an beiden Seiten und oberhalb des Geräts einen
Zwischenraum frei und befolgen Sie die Installationsanweisungen.
•Die Belüftungsöffnungen des Gerätes nicht abdecken oder zustellen.
•Die Leitungen des Kühlkreislaufs dürfen nicht beschädigt werden.
•Nivellieren Sie das Gerät auf einer tragfähigen Fläche und stellen Sie es in einem seinen Abmessungen und seinem Verwendungszweck entsprechenden Raum auf.
•Stellen Sie das Gerät in einem trockenen und gut belüfteten Raum auf.
Das Gerät ist für den Einsatz in Räumen mit nachstehenden Temperaturbereichen ausgelegt, die ihrerseits von der Klimaklasse auf dem Typenschild abhängig sind.
Wird der vorgegebene Temperaturbereich für das Gerät für einen längeren Zeitraum unteroder überschritten, kann es zu Funktionsstörungen kommen.
•Die auf dem Typenschild angegebene Spannung muss der Spannungsversorgung in Ihrem Haus entsprechen.
DEUTSCH |
17 |
Klimaklasse |
RaumTemp. |
RaumTemp. |
|
(°C) |
(°F) |
|
|
|
SN |
von 10 bis 32 |
von 50 bis 90 |
N |
von 16 bis 32 |
von 61 bis 90 |
|
|
|
ST |
von 16 bis 38 |
von 61 bis 100 |
T |
von 16 bis 43 |
von 61 bis 110 |
|
|
|
•Verwenden Sie keine Verlängerungskabel oder Einzel-/Mehrfachstecker.
•Verwenden Sie zum Anschließen an die Wasserleitung den im Lieferumfang des neuen Gerätes enthaltenen Schlauch und nicht den des Vorgängergerätes.
•Die Änderung oder der Austausch des Netzkabels darf ausschließlich durch qualiizierte Techniker oder den Kundendienst erfolgen.
•Die elektrische Abschaltung des Gerätes muss durch Ziehen des Netzsteckers oder durch einen der Steckdose vorgeschalteten Zweipolschalter möglich sein.
Sicherheit
•Lagern Sie keine Behälter mit brennbaren Materialien wie z.B. Spraydosen in diesem Gerät.
•Lagern und verwenden Sie kein Benzin, Gas oder andere entlammbare Stoffe/ Flüssigkeiten in der Nähe des Geräts oder anderer Haushaltsgeräte. Durch die Dämpfe besteht Brandoder Explosionsgefahr.
•Zum Beschleunigen des Abtauvorganges niemals zu anderen mechanischen, elektrischen oder chemischen Hilfsmitteln greifen als zu den vom Hersteller empfohlenen.
•Keine elektrischen Geräte in den Geräteräumen verwenden, wenn diese nicht den vom Hersteller genehmigten entsprechen.
•Das Gerät darf von Personen (einschließlich Kindern) mit herabgesetzten physischen, sensorischen oder geistigen Fähigkeiten und Mangel
an Erfahrung und Kenntnissen nur unter Aufsicht oder nach ausreichender
Einweisung durch eine für ihre Sicherheit verantwortliche Person benutzt werden.
•Kindern das Spielen und Verstecken im Gerät nicht gestatten, um Erstickungsund Einschließgefahr zu vermeiden.
•Die in den (eventuell vorhandenen) Kälteakkus enthaltene (ungiftige) Flüssigkeit darf nicht verschluckt werden.
•Eiswürfel oder Wassereis nicht sofort nach der Entnahme aus dem Gefrierraum verzehren, da sie Kälteverbrennungen hervorrufen können.
Gebrauch
•Ziehen Sie vor jeder Reinigungsund Wartungsarbeit den Netzstecker des Geräts oder unterbrechen Sie die Stromversorgung.
•Alle Geräte, die mit einem Eisautomaten und Wasserspender ausgestattet
sind, müssen an eine Wasserleitung angeschlossen werden, die nur Trinkwasser (mit einem Hauptdruck zwischen 0,17 und 0.81 MPa (1,7 und 8,1 bar)) abgibt.
Nicht direkt an die Wasserleitung angeschlossene Eisautomaten und/ oder Wasserspender dürfen nur mit Trinkwasser gefüllt werden. Verwenden Sie den Kühlraum nur zur Lagerung von frischen Lebensmitteln und den Gefrierraum nur zur Lagerung
von Tiefkühlware, zum Einfrieren frischer Lebensmittel und zur Herstellung von Eiswürfeln.
•Stellen Sie keine Glasbehälter mit lüssigem Inhalt in den Gefrierraum, da diese platzen können.
•Lagern Sie unverpackte Lebensmittel so, dass sie nicht mit den Innenwänden des Kühloder Gefrierraums in Berührung kommen.
Bei Nichtbeachtung der o. g. Empfehlungen und Vorschriften lehnt der Hersteller jede Verantwortung ab.

DEUTSCH |
18 |
Beschreibung des Gerätes
Lesen Sie bitte vor dem Gebrauch |
|
|
Kühlraum |
|
Ihres Gerätes die Bedienungsanleitung |
|
1 |
Lüfter |
|
sorgfältig durch. |
|
2 |
LED Beleuchtung |
|
|
|
3 |
Ablagen |
|
2 |
|
4 |
Flaschengestell |
|
1 |
|
5 |
Abdeckung für Obstund |
|
11 |
|
Gemüsefächer |
||
|
6 |
|||
4 |
Obstund Gemüsefächer |
|||
12 |
||||
3 |
7 |
Typenschild (neben den Obstund |
||
|
8 |
Gemüsefächern) |
||
|
|
Bedienfeld (Display) |
||
5 |
|
11 |
Fach für Milchprodukte |
|
13 |
12 |
Türablagen |
||
6 |
13 |
Flaschenhalter |
||
7 |
14 |
14 |
Flaschenbehälter |
|
|
|
Zone mit der geringsten Kühlleistung |
||
8 |
|
|
||
|
|
Zwischenzone |
||
9 |
|
|
Kälteste Zone |
|
|
|
Gefrierraum |
||
|
|
9 |
||
10 |
|
Obere Schublade (Gefrierbereich) |
||
|
|
10 |
Mittlere und untere Schublade |
|
|
|
|
(Lagerbereich für Gefriergut und |
|
Zubehör |
|
|
Tiefkühlgut) |
Eierbehälter |
Gefrierblock |
Hinweis: Sämtliche Ablagen, Türablagen |
|
|
und Gestelle sind herausnehmbar. |
|
|
Die idealen Temperaturen zur |
1x |
|
sachgerechten Aufbewahrung der |
|
2x |
Lebensmittel wurden bereits werkseitig |
Eiswürfelschale |
Eiskratzer |
voreingestellt. |
|
Lesen Sie bitte sorgfältig die mitgelieferte |
|
|
|
Bedienungsanleitung vor dem Gebrauch |
|
|
des Gerätes. |
2x |
1x |
|
DEUTSCH |
19 |
|||
Bedienfeld (Display) |
|
|
|
|
|
|
|
|
|
|
B |
F |
||
|
|
|
|
|
|
|
|
|
|
|
|
|
|
|
|
|
|
|
|
|
A |
|
C |
|
D |
|
|
E |
|
G |
|
||||||
|
Taste “Kühlschrank/Shopping-Funktion” |
|
|
|
|
Taste “Kindersicherung” |
||||||||||||
A |
E |
|||||||||||||||||
|
Kühlraumtemperatur |
|
|
|
|
|
|
|
|
Gefrierraumtemperatur |
||||||||
B |
|
|
|
|
F |
|||||||||||||
|
Taste “Alarm-Rücksetzung” |
|
|
|
|
|
|
|
|
Taste “Gefrierraum / Schnellkühlen” |
||||||||
C |
|
|
|
|
G |
|||||||||||||
|
Taste “Ein/Standby” |
|
|
|
|
|
|
|
|
|
|
|
|
|
|
|
||
D |
|
|
|
|
|
|
|
|
|
|
|
|
|
|
|
|||
Inbetriebnahme
Das Gerät an das Stromnetz anschließen. Bei einigen Modellen ertönt ein Signalton, um anzuzeigen, dass ein Temperaturalarm ausgelöst wurde: drücken Sie die Taste zum Ausschalten des akustischen Alarms längere Zeit. Falls vorgesehen, bringen Sie den
Täglicher Gebrauch
Shopping-Funktion 
Drücken Sie die Taste “Kühlraum” 3 Sekunden lang, bevor Sie große
Mengen frischer Lebensmittel im
Kühlraum einlagern möchten. Wenn
diese Funktion aktiviert ist, erscheint
die in der Abbildung gezeigte
Sequenz auf dem Display. Diese
Funktion schaltet sich nach 6 Stunden
automatisch aus, kann aber auch
manuell durch Drücken der Taste
“Gefrierraum” vorzeitig abgebrochen werden.
Temperatur im Kühlraum
Die Temperatureinstellung kann mit der Taste “Kühlraum” geändert werden. Es können fünf Einstellungen vorgenommen werden, von
Bakterienilter wie auf der Filterverpackung angegeben im Ventilator an.
Hinweis: Nach dem Einschalten dauert es bei einem normal gefüllten Kühlschrank ca. 4 bis 5 Stunden, bis die erforderliche Aufbewahrungstemperatur erreicht ist.
wärmeren Temperaturen  (links) bis zur kältesten Temperatur
  (rechts).
Alarm-Rücksetzung 
Zum Ausschalten akustischer Signale die Taste “Alarmrücksetzung” drücken.
Ein/Standby 
Drücken Sie diese Taste 3 Sekunden lang zum Ausschalten des Gerätes. Im Standby-Modus leuchten keine Symbole am Display und die Leuchte im Kühlraum leuchtet nicht. Zum Wiedereinschalten des Gerätes drücken Sie einfach die Taste erneut kurz. Hinweis: bei diesem Vorgang wird das Gerät nicht von der Stromversorgung getrennt.
Kindersicherung 
Die Kindersicherung wird einund ausgeschaltet,

DEUTSCH |
20 |
indem Sie die Taste “Kindersicherung” 3 Sekunden lang drücken, bis Sie zur Bestätigung einen Signalton hören (und das Symbol auleuchtet). Wenn Sie jetzt eine beliebige Taste drücken, während die Kindersicherung aktiviert ist, hören Sie einen Signalton, und das Symbol der Kindersicherung beginnt zu blinken.
Gefrierraumtemperatur
Die Temperatureinstellung kann mit der Taste “Gefrierraum” geändert werden. Es können fünf Einstellungen vorgenommen werden, von wärmeren Temperaturen  (links) bis zur kältesten Temperatur
  (rechts).
Schnellgefrieren
Drücken Sie 24 Stunden, bevor Sie


 große Mengen frischer Lebensmittel
 im Gefrierraum einfrieren möchten, die Taste “Gefrierraum” 3 Sekunden lang. Wenn diese Funktion aktiviert
 ist, erscheint die in der Abbildung


 gezeigte Sequenz auf dem Display.
 Diese Funktion schaltet sich nach 48 Stunden automatisch aus, kann aber
 auch manuell durch Drücken der Taste “Gefrierraum” vorzeitig abgebrochen werden.
Hinweis: Frische, noch nicht eingefrorene Lebensmittel dürfen nicht mit der Tiefkühlware in Kontakt kommen.
Kühlraum
Das Abtauen des Kühlraums erfolgt komplett automatisch. Die von Zeit zu Zeit an der Innenrückwand des Kühlfachs auftretenden Wassertropfen zeigen die automatische Abtauphase an. Das Tauwasser läuft automatisch durch eine Ablussöffnung in einen Behälter, in dem es verdampft. Wichtig: Das Kühlschrankzubehör darf nicht im Geschirrspüler gewaschen werden.
Hinweis: Die Raumtemperatur, die Häuigkeit der Türöffnungen und der Aufstellungsort des Gerätes können die Innentemperaturen im
Kühlund Gefrierraum beeinlussen. Bei der Temperatureinstellung müssen diese Faktoren berücksichtigt werden. Hinweis: Bei hoher Luftfeuchtigkeit kann sich im Kühlraum und
besonders auf den Glasablagen Kondenswasser bilden. Wir empfehlen Ihnen in diesem Fall, alle unverschlossenen Flüssigkeitsbehälter zu schließen (zum Beispiel einen Soßentopf) und Lebensmittel mit einem hohen Flüssigkeitsgehalt (wie Gemüse) einzupacken und die Temperatur
auf einen wärmeren Wert einzustellen.
Gebläse
Der Lüfter wurde werkseitig auf AKTIVIERT
voreingestellt: Der Lüfter kann mit der Taste am Sockel (wie in der Abbildung gezeigt) ausgeschaltet werden. Wenn die Raumtemperatur 27 °C übersteigt oder wenn sich Wassertropfen auf den Glasablagen bilden, muss der Lüfter eingeschaltet werden, um eine ausreichende Kühlung der Lebensmittel zu garantieren. Das Ausschalten des Lüfters optimiert den Energieverbrauch. Den Ansaugbereich nicht mit Lebensmitteln verdecken.
Gefrierraum
Im Gefrierraum  können Sie Tiefkühlware (bezüglich der Lagerdauer siehe die Hinweise auf der Verpackung) aufbewahren und frische Lebensmittel einfrieren. Die Menge frischer Lebensmittel, die innerhalb von 24 Stunden eingefroren werden kann, ist auf dem Typenschild angegeben. Legen Sie die Lebensmittel in den Gefrierraum (siehe den Abschnitt “Schnellkühlen”). Lassen Sie um die Kühlpäckchen ausreichend Platz für eine freie Luftzirkulation. Angetaute Lebensmittel dürfen nicht wieder eingefroren werden. Hinweis: Die Raumtemperatur, die Häuigkeit der Türöffnungen und der Aufstellungsort des Gerätes können die Innentemperaturen im Kühlund Gefrierraum beeinlussen. Bei der Temperatureinstellung müssen diese Faktoren berücksichtigt werden.
 Loading...