

Page 1

E020401CW 26/11/04
ISTRUZIONI D’USO
ESSICCATOI
DIRECTIONS FOR USE OF
TUMBLE DRYERS
NOTICE
SECHOIRS
MANUAL DE USUARIO
SECADORAS
BEDIENUNGSANLEITUNG
TROCKNER
ADN454
ADN455
ADN456
Page 2

E020401CW 26/11/04
INDICE
1. Contenuto del manuale
2. Norme di sicurezza
3. Responsabilità del costruttore
4. Messa in servizio
5. Utilizzo della macchina
6. Utilizzo della macchina ICD
7. Utilizzo della macchina tilting
8. Pausa e stop
9. Ciclo singolo
10. Programmi in memoria
11. Programmazione
12. Programmazione per macchine coin op
13. Allarmi
14. Manutenzione
INDEX
1. Introduction
2. Normes de sécurité
3. Responsabilité du constructeur
4. Mise en marche
5. Usage du séchoir standard
6. Usage du séchoir à sondes ICD
7. Usage du séchoir tilting
8. Pause et stop
9. Cycle manuel simple
10. Programmes en mémoire
11. Programmation des cycles
12. Programmation de version monnayeur
13. Alarmes
14. Entretien
INHALTSVERZEICHNIS
1. Über diese Anleitung
2. Sicherheitshinweise
3. Verantwortlichkeit des Herstellers
4. Inbetriebnahme
5. Verwendung der Maschine
6. Verwendung der ICD Maschine
7. Verwendung der Maschine mit Tiltiing
8. Pause und Stop
9. Einzelzyklus
10. Gespeicherte Programme
11. Programmierung
12. Programmierung der Münzsteuerung
13. Alarmsignale
14. Wartung
3
3
3
3
3
4
4
5
5
5
5
6
7
8
14
14
14
14
14
15
15
16
16
16
17
18
18
19
26
26
26
26
26
27
27
27
28
28
28
29
30
31
INDEX
1. Introduction
2. Safety preacutions
3. Manufacturer’s liability
4. Machine starting
5. Operating instructions
6. Operating instructions ICD
7. tilting operating instructions
8. Pausa and stop
9. Single cycle
10. Memorised programs
11. Programing
12. Programing for coin op machines
13. Alarms
14. General maintance
INDICE
1. Contenido del manual
2. Precauciones de seguridad
3. Responsabilitad del fabricante
4. Puesta en marcha
5. Modo de empleo de la máquina
6. Modo de empleo de la máquina ICD
7. Modo de empleo de la máquina tilting
8. Pausa y stop
9. Ciclo único
10. Programas en memoria
11. Programación
12. Programación máquinas con monedero
13. Alarmas
14. Mantenimiento
9
9
9
9
10
10
10
10
10
11
11
12
13
13
20
20
20
20
20
21
21
22
22
22
22
24
24
25
2
Page 3

E020401CW 26/11/04
1. CONTENUTO DEL MANUALE
Il presente manuale è dedicato all’uso di
essiccatoi industriali. E’ redatto in considerazione
delle direttiva comunitarie vigenti. Le informazioni
sono indirizzate all’utilizzatore, il quale dovrà
essere certo di averle comprese pienamente
prima di operare sulla macchina. Il manuale d’uso
deve essere sempre disponibile, per la
consultazione. Nel caso di smarrimento o
danneggiamento, richiedere al costruttore un
nuovo manuale. Il costruttore non risponde delle
conseguenze derivanti da un uso incauto della
macchina dovuto ad una mancata o incompleta
lettura del presente manuale. Il fabbricante si
riserva di modificare le specifiche menzionate in
questo manuale o le caratteristiche di ciascuna
macchina. Alcune figure di questo manuale
possono riportare particolari che risultano
parzialmente diversi da quelli assemblati sulle
macchine. Disegni e dati tecnici potranno essere
modificati senza preavviso.
2. NORME DI SICUREZZA
Il mancato rispetto delle seguenti norme di
sicurezza può causare danni alle persone, cose e
animali.
L’installazione e la manutenzione delle macchine
descritte in questo manuale devono essere fatte
da personale autorizzato che conosca il prodotto
ed il rispetto delle norme europee
sull’installazione delle macchine industriali.
La destinazione d’uso degli essiccatoi industriali
qui descritti è l’asciugatura professionale di
indumenti e biancheria: è perciò vietata qualsiasi
altra destinazione d’uso se non è stata
preventivamente autorizzata in forma scritta dal
costruttore.
Non avvicinarsi alla macchina con prodotti
combustibili o infiammabili onde evitare rischio di
incendi e di esplosioni.
Seguire sempre con molta cura le istruzioni di
lavaggio riportate su ciascun capo di biancheria.
E’ vietato l’uso della macchina ai minori di anni
14.
Collegamenti supplementari alla macchina
dall’esterno, non eseguiti a regola d’arte sollevano
il costruttore da ogni responsabilità
3. RESPONSABILITA’ DEL COSTRUTTORE
Le istruzioni riportate in questo manuale non
sostituiscono ma integrano gli obblighi per il
rispetto della legislazione vigente sulle norme di
sicurezza ed antinfortunistica. Con riferimento a
quanto riportato in questo manuale, il costruttore
declina ogni responsabilità in caso di:
9 uso della macchina contrario alle leggi
comunitarie sulla sicurezza e
sull’antinfortunistica.
9 errata install azione della macchina.
9 mancata manutenzione periodica e
programmata
9 mancata o errata osservanza delle
istruzioni fornite dal manuale.
9 difetti di tensione e di alimentazione di
rete.
9 modifiche alla macchina non
autorizzate.
9 utilizzo della macchina da parte di
personale non autorizzato.
4. MESSA IN SERVIZIO
Dare alimentazione elettrica alla macchina
chiudendo l’interruttore che l’installatore deve
prevedere a monte della macchina: il
microprocessore procede ad un breve test dei
propri sistemi di diagnostica. Se la macchina è a
gas o a vapore, aprire lentamente la valvola di
alimentazione che l’installatore deve prevedere a
monte della macchina.
5. UTILIZZO DELLA MACCHINA
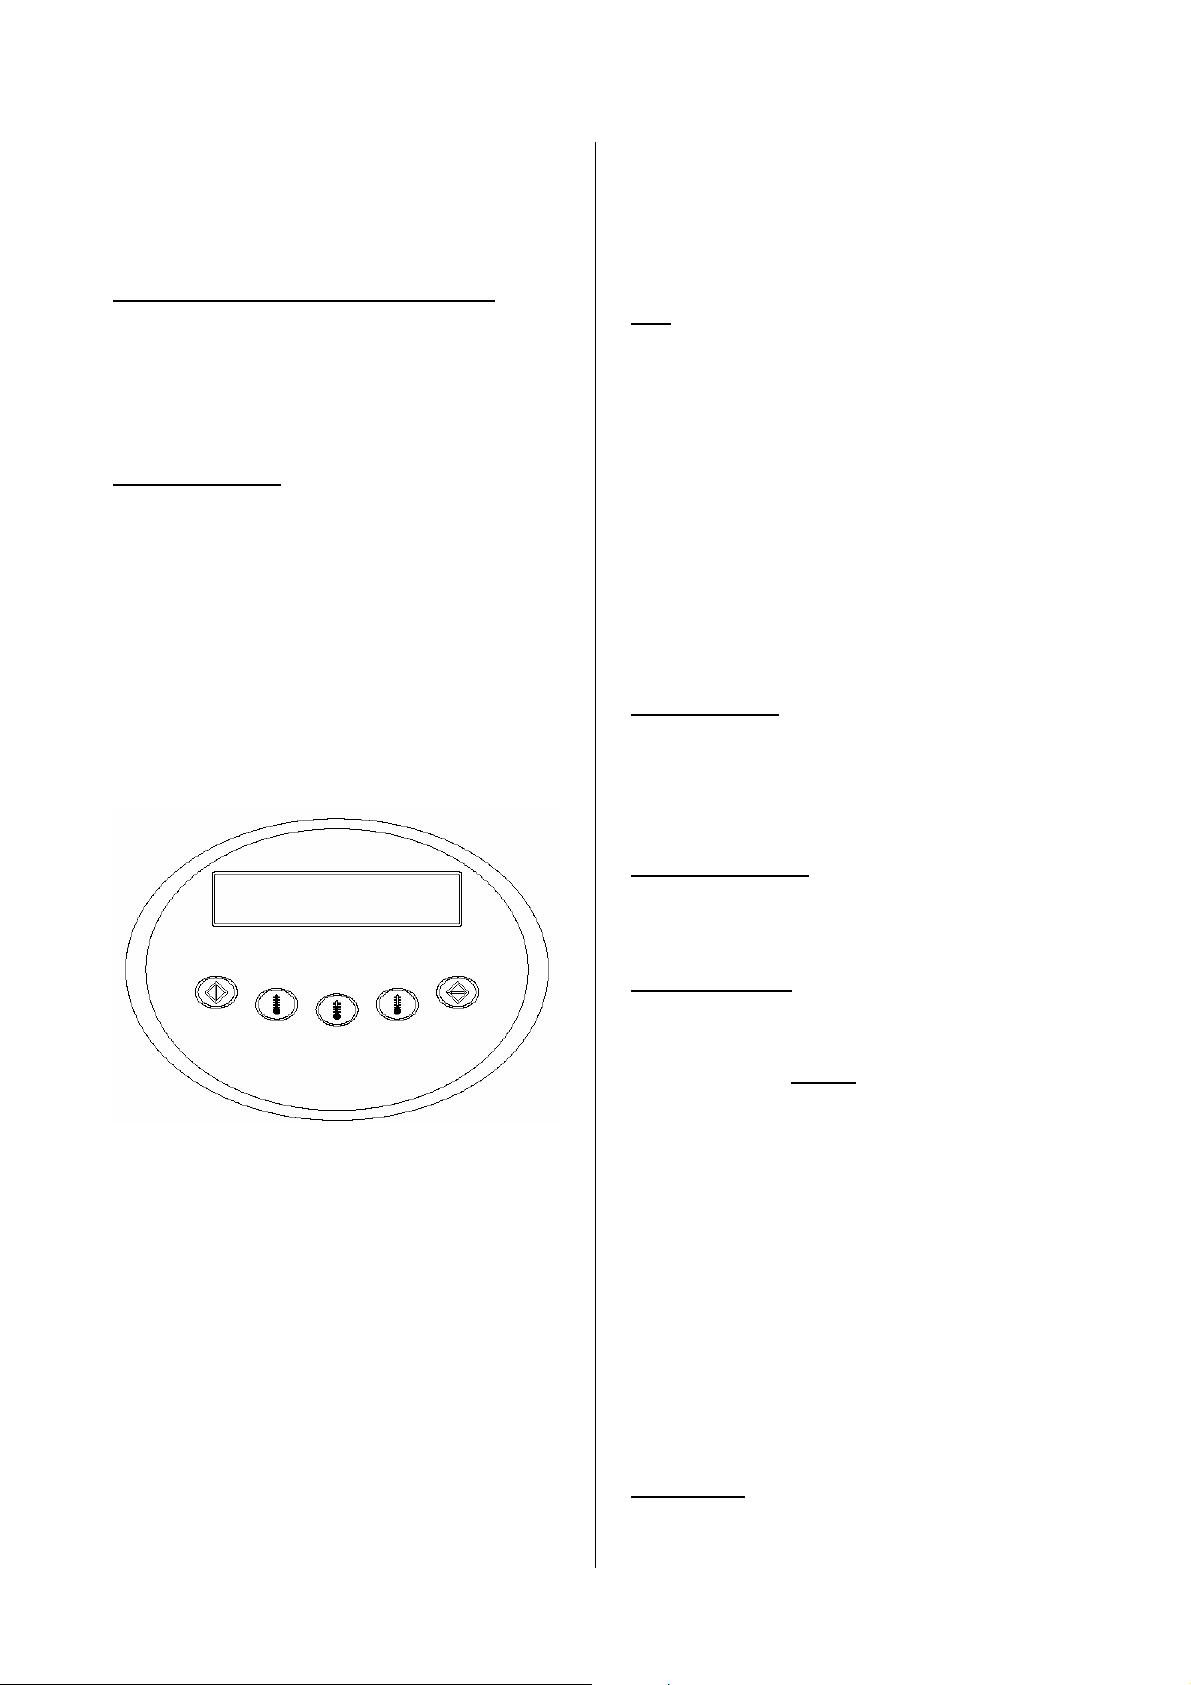
All’accensione della macchina, sul display appare
la versione software del microprocessore. La
macchina è pronta per essere caricata con la
biancheria: il peso della biancheria da asciugare
non deve superare del 10% la capacità prevista.
Nel caso di funzionamento con controllo di umidità
il carico di biancheria deve essere pari al 50% del
carico nominale.
Aprire l’oblò caricare la macchina (per le
macchine tilting, si vedano i paragrafi successivi);
chiudere l’oblò.
Queste avvertenze non coprono tutti i
possibili rischi. L’utilizzatore deve perciò
procedere con la massima cautela nel
rispetto delle norme.
3
Page 4
E020401CW 26/11/04
Selezionare uno dei dieci programmi già inseriti
nella memoria del microprocessore premendo uno
dei tasti numerici, da 0 a 9 (si veda il paragrafo
relativo). A display appare il nome che identifica il
programma, ad esempio, “50 min 90°C”.
Premere il pulsante di START: la macchina avvia
il programma desiderato.
Avviato il programma, sul display appaiono,
alternandosi, la temperatura in gradi centigradi ed
il tempo rimanente al completamento del ciclo di
riscaldamento. Se l’essiccatoio è dotato di sonda
di umidità, a display vengono visualizzate la
temperatura ed il valore della percentuale di
umidità residua.
Concluso il ciclo di riscaldamento, la macchina
inizia una fase di raffreddamento. In questa fase a
display appare la scritta “RAFFREDDAMENTO”.
La fase di raffreddamento è caratterizzata da due
parametri programmabili: un tempo ed una
temperatura. La macchina conclude il programma
quando il tempo si esaurisce o quando la
temperatura viene raggiunta.
Se a fine programma è prevista una fase
antigrinze, durante il relativo svolgimento a
display apparirà la scritta “ANTIGRINZE”.
Completato il programma, la macchina si ferma e
a display appare la scritta “FINE”, accompagnata
da un segnale acustico. Aprire l’oblò e scaricare la
macchina.
A display riappare la scritta “SELEZIONARE UN
PROGRAMMA” e la macchina si predispone alla
selezione di un nuovo programma.
6. UTILIZZO DELLA MACCHINA ICD
Alla descrizione del paragrafo precedente vanno
aggiunte le seguenti puntualizzazioni, nel caso in
cui la macchina sia dotata di sistema di
rilevamento dell’umidità residua.
Il carico di biancheria deve essere pari al 50% del
carico nominale.
Prima di inserire la biancheria in
macchina, verificare che le eventuali zip
presenti siano completamente aperte, e
che eventuali bottoni metallici vengano
rimossi od opportunamente isolati.
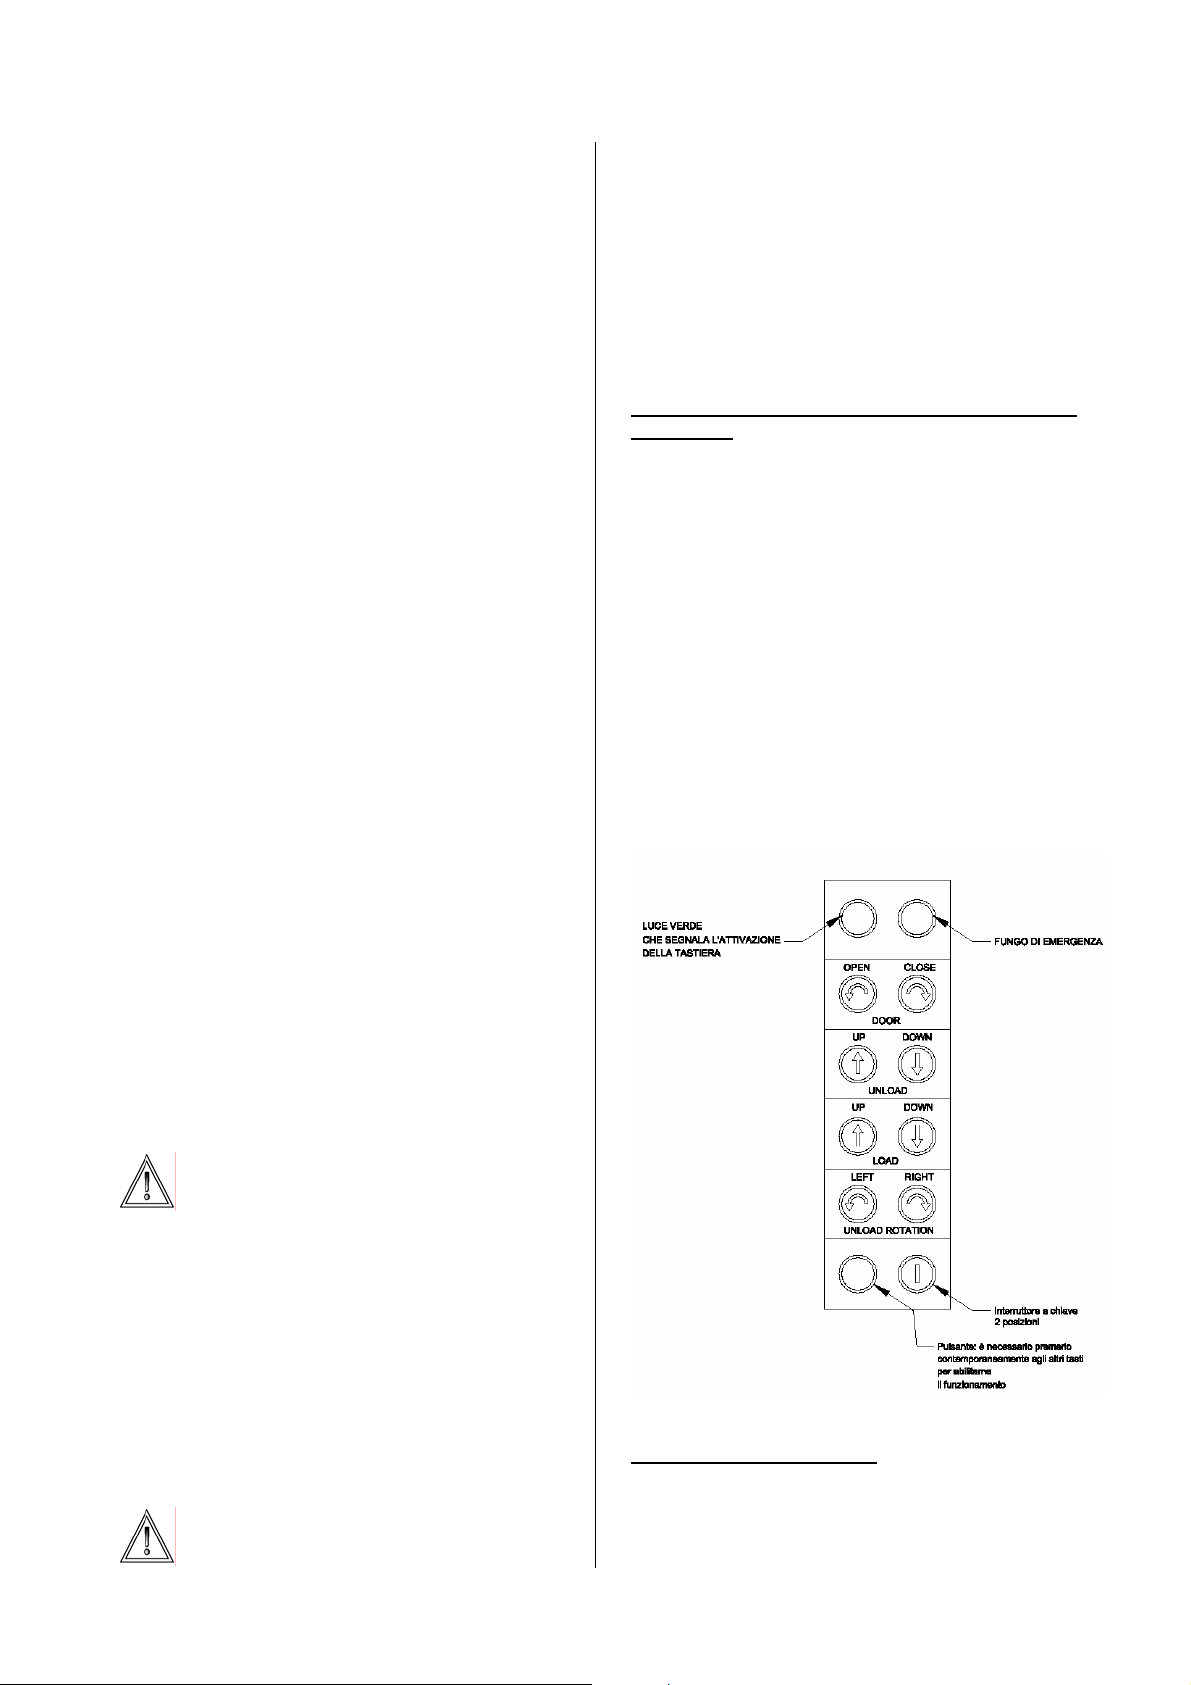
7. UTILIZZO DELLA MACCHINA TILTING
Alla descrizione dei paragrafi precedenti vanno
aggiunte le seguenti puntualizzazioni, nel caso in
cui la macchina sia dotata di sistema pneumatico
tilting per il rovesciamento del cesto in avanti e/o
all’indietro. In questo caso i comandi vengono
gestiti tramite pulsantiera remota.
ATTENZIONE: quando la macchina è in
fase di tilting, o di apertura pneumatica
della porta, l’operatore deve mantenersi
fuori dalla portata della macchina e
dell’oblò, utilizzando l’opportuno
telecomando.
Attendere sempre la conclusione di un
programma prima di azionare il tilting. L’uso del
telecomando viene abilitato o disabilitato,
azionando l’interruttore a chiave in basso a
destra. Quando il telecomando è attivo, il
microprocessore della macchina viene disattivato.
L’attivazione della pulsantiera è segnalata
dall’accensione della luce verde in alto a sinistra.
OPERAZIONI DI CARICO (per le macchine che lo
prevedono)
Azionare l’interruttore a chiave per attivare la
pulsantiera. Aprire la porta premendo
contemporaneamente il tasto di abilitazione (in
basso a sinistra) ed il tasto di apertura oblò
“DOOR OPEN”. Quando l’apertura dell’oblò è
completata, rovesciare la macchina all’indietro
premendo contemporaneamente il tasto di
abilitazione (in basso a sinistra) ed il tasto “LOAD
UP”. Quando l’operazione di carico è completata
riportare la macchina in posizione orizzontale
premendo contemporaneamente il tasto di
abilitazione (in basso a sinistra) ed il tasto “LOAD
DOWN”. Chiudere l’oblò premendo
contemporaneamente il tasto di abilitazione (in
basso a sinistra) ed il tasto “CLOSE DOOR”.
Disattivare la pulsantiera azionando l’interruttore a
chiave in basso a destra.
OPERAZIONI DI SCARICO
Azionare l’interruttore a chiave per attivare la
pulsantiera. Aprire la porta premendo
contemporaneamente il tasto di abilitazione (in
basso a sinistra) ed il tasto di apertura oblò
4
Page 5
E020401CW 26/11/04
“DOOR OPEN”. Quando l’apertura dell’oblò è
completata, rovesciare la macchina in avanti
premendo contemporaneamente il tasto di
abilitazione (in basso a sinistra) ed il tasto
“UNLOAD DOWN”. Quando la macchina è in
posizione di scarico è possibile favorire l’uscita
della biancheria facendo ruotare il cesto
lentamente (a destra e/o a sinistra) premendo
contemporaneamente il tasto di abilitazione (in
basso a sinistra) ed il tasto “UNLOAD
ROTATION” (RIGHT e/o LEFT). Quando
l’operazione di scarico è completata riportare la
macchina in posizione orizzontale premendo
contemporaneamente il tasto di abilitazione (in
basso a sinistra) ed il tasto “UNLOAD UP”.
Chiudere l’oblò premendo contemporaneamente il
tasto di abilitazione (in basso a sinistra) ed il tasto
“CLOSE DOOR”. Disattivare la pulsantiera
azionando l’interruttore a chiave in basso a
destra.
8. PAUSA E STOP
Mentre la macchina è in funzione non è possibile
modificare le caratteristiche del programma in
corso. Aprendo l’oblò la macchina si ferma e a
display appare “OBLO’ APERTO”.
Richiuso l’oblò, a display appare “PREMI START”:
premere START per far ripartire il programma dal
punto in cui era stato interrotto.
Se durante il funzionamento viene premuto STOP
una volta, la macchina si mette in pausa: a display
appare “PAUSA”. Premendo START si fa ripartire
il programma da dove era stato interrotto;
premendo STOP una seconda volta, si interrompe
definitivamente il programma.
9. CICLO SINGOLO
E’ possibile realizzare un programma “usa e
getta”, che può essere costruito in pochi secondi
ma rimane valido per un unico utilizzo.
Premere il tasto SINGLE CYCLE: si entra nella
programmazione del ciclo singolo. A display
appare la scritta “DURATA CICLO”: Premere
ENTER. A display appare “0”: inserire il tempo
desiderato (compreso tra 1 e 99 minuti) e
confermare con ENTER.
A display appare “TEMPERATURA CICLO”.
Premere ENTER: a display appare “0”. Inserire la
temperatura desiderata (compresa tra 29 e 90°C)
e confermare con ENTER.
A display appare “PREMI START”. Premendo il
tasto START si avvia il ciclo appena
programmato.
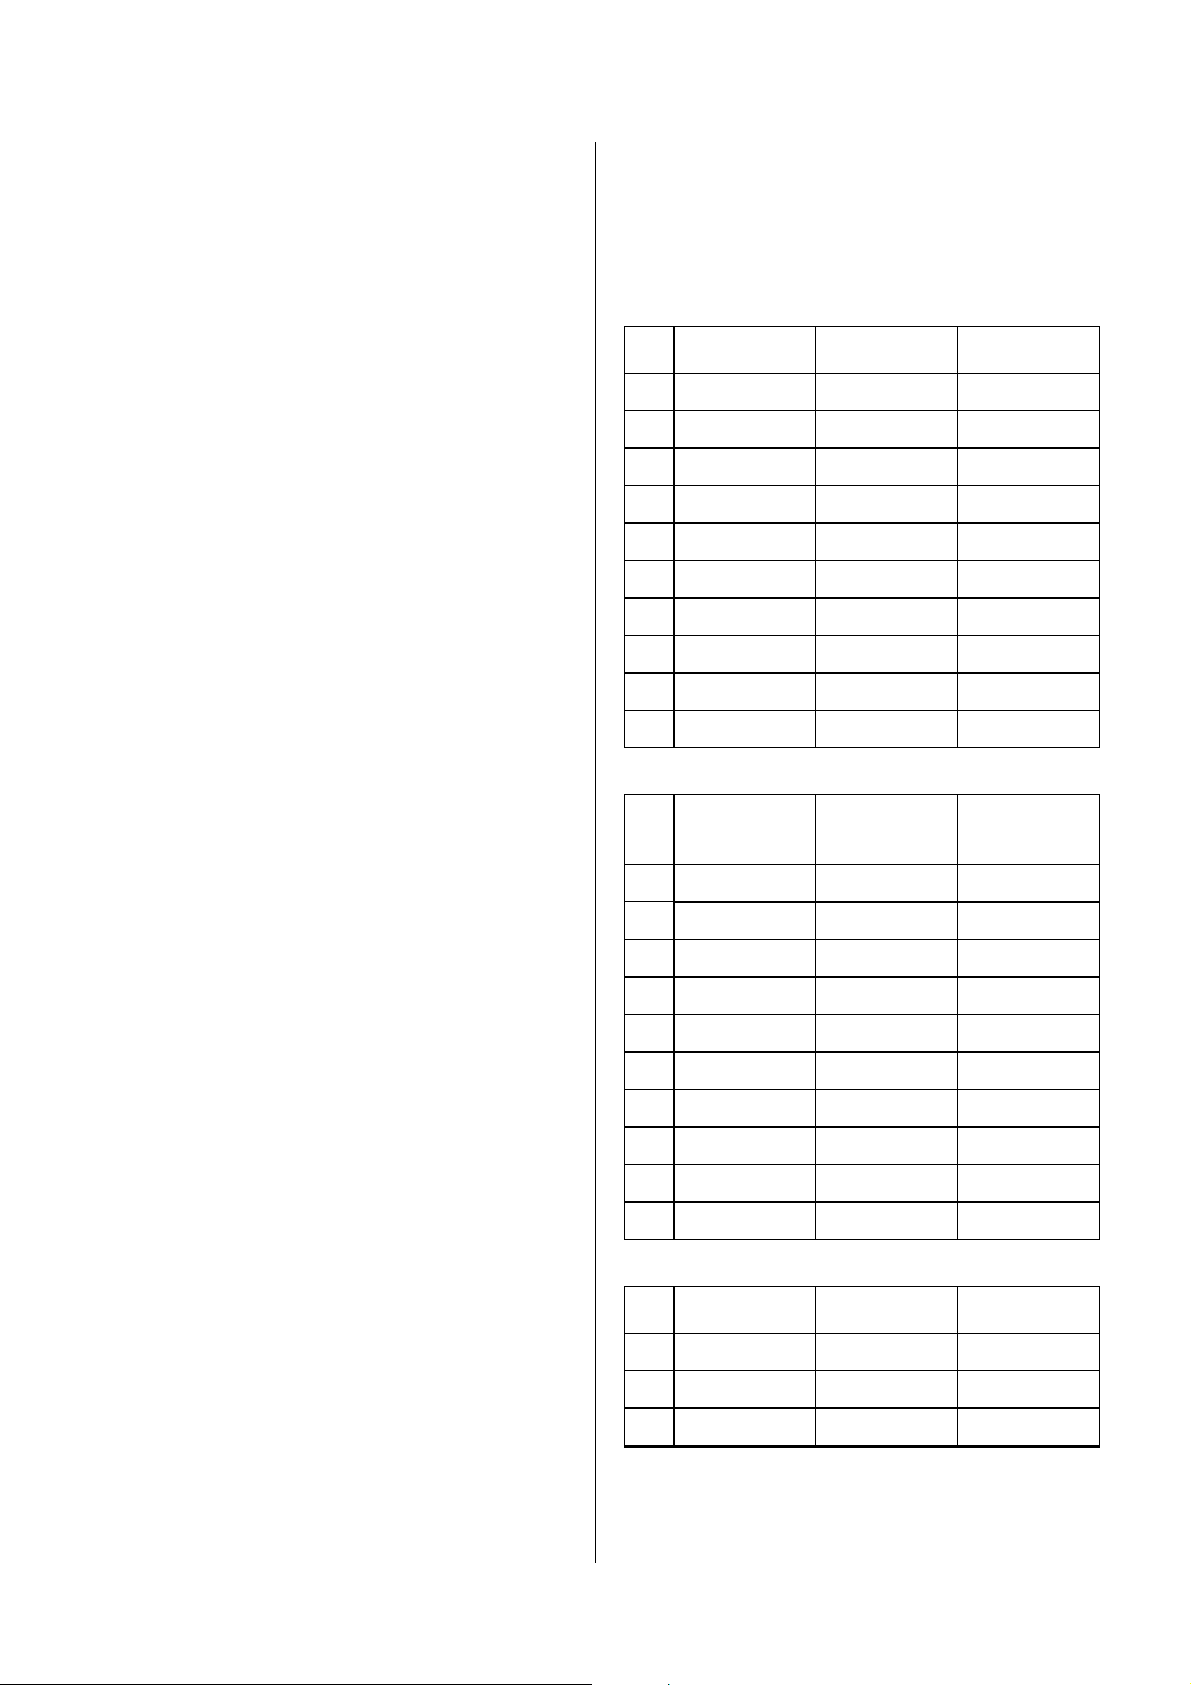
10. PROGRAMMI IN MEMORIA
Nella tabella seguente vengono elencate le
caratteristiche dei programmi inseriti in memoria
dal costruttore. Il tempo di raffreddamento è pari a
10 minuti e la temperatura di raffreddamento è
pari a 30°C per tutti i programmi.
Nr. Nome
Durata
[minuti]
Temperatura
[°C]
0 50 min 90°C 50 90
1 40 min 75°C 40 75
2 30 min 60°C 30 60
3 30 min 45°C 30 45
4 40 min 60°C 40 60
5 25 min 50°C 25 50
6 20 min 45°C 20 45
7 30 min 40°C 30 40
8 20 min 40°C 20 40
9 25 min 40°C 25 40
Versione standard
Nr. Nome
Umidità
residua
[%]
Temperatura
[°C]
0 COTONE 10 90
1 VELLUTO 10 75
2 LANA 10 60
3 SINTETICO 10 45
4 Pr. 04 10 60
5 Pr. 05 10 50
6 Pr. 06 10 45
7 Pr. 07 10 40
8 Pr. 08 10 40
9 Pr. 09 10 40
Versione con rilevamento dell’umidità
Nr. Nome
Durata
[minuti]
Temperatura
[°C]
0 HIGH tempo base 90
1 MED tempo base 75
2 LOW tempo base 60
Versione coin op
11. PROGRAMMAZIONE
E’ possibile modificare le caratteristiche di ognuno
5
Page 6

E020401CW 26/11/04
E’ possibile modificare le caratteristiche di ognuno
dei dieci programmi inseriti in memoria,
procedendo nel modo seguente.
Mentre a display scorre la scritta “SELEZIONARE
UN PROGRAMMA”, premere
contemporaneamente i tasti “UP” e “DOWN”.
A display appare la scritta “PASSWORD”:
premere il tasto “ENTER”. A display appare “0”.
Inserire la password di accesso digitando “777” e
confermare con “ENTER”. A display appare il
primo parametro: “INFORMAZIONI”.
Si precisa che i parametri disponibili possono
essere sfogliati con i tasti “UP” e “DOWN” e che è
possibile uscire dalla programmazione,
mantenendo le modifiche eseguite, premendo il
tasto “STOP” più volte, finché a display appare
“SELEZIONARE UN PROGRAMMA”.
Si procede ad analizzare i parametri disponibili.
LINGUA
Per visualizzare il valore del parametro premere
“ENTER”. A display appare “ITALIANO”. Per
modificare la lingua, utilizzare i tasti “UP” e
“DOWN”. Quando appare la lingua desiderata,
premere “ENTER” per confermare.
INFORMAZIONI
Per visualizzarne il valore premere il tasto
ENTER. A display appare “ORE LAVORO”.
Premere ancora il tasto “ENTER”: a display
vengono visualizzate le ore di lavoro accumulate
dal giorno di installazione della macchina. Per
uscire dal parametro premere il tasto “ENTER”.
DATA (solo per macchine ICD)
Per visualizzarne il valore premere il tasto
“ENTER”. Modificare il valore con l’uso della
tastiera alfanumerica e confermare con il tasto
“ENTER”.
ORA (solo per macchine ICD)
Per visualizzarne il valore premere il tasto
“ENTER”. Modificare il valore con l’uso della
tastiera alfanumerica e confermare con il tasto
“ENTER”.
PROGRAMMI
Per modificare le caratteristiche di uno o più
programmi, premere il tasto “ENTER”. A display
appare “50 min 90°C”, che è il nome del primo
programma. Con i tasti “UP” e “DOWN” sfogliare i
programmi in memoria. Quando viene visualizzato
il nome del programma che si desidera
modificare, premere il tasto “ENTER”. Si entra
così nel menu dei parametri del programma
prescelto. Si procede ad analizzare i parametri
programmabili per ogni singolo programma.
NOME
Premere il tasto “ENTER” per entrare nel
parametro: utilizzare la tastiera alfanumerica per
compilare il nome desiderato. Utilizzare il tasto
“CICLO SINGOLO” per cancellare eventuali errori
di compilazione. Premere il tasto “ENTER” per
confermare e passare al parametro successivo.
AUTO (solo per macchine dotate di sensore di
umidità)
Premere il tasto “ENTER” per visualizzare il
parametro. Utilizzare i tasti “UP” e “DOWN” per
modificarlo. Quando il parametro è “NO”, il
programma sarà caratterizzato da un tempo e da
una temperatura di asciugatura. Quando il
parametro è “SI” il programma sarà automatico e
sarà caratterizzato da una temperatura e da un
livello di umidità residua da raggiungere. Utilizzare
i tasti “UP” e “DOWN” per selezionare una delle
curve presenti in memoria e che meglio si adegua
al materiale da asciugare. Premere il tasto
“ENTER” per confermare e passare al parametro
successivo.
DURATA CICLO
Premere il tasto “ENTER” per visualizzare il valore
del parametro. Usare la tastiera alfanumerica per
inserire la durata del ciclo di riscaldamento (valore
compreso tra 1 e 99 minuti). Premere il tasto
“ENTER”.
TEMPO ROTAZIONE (solo per macchine dotate
di inversione)
Premere il tasto “ENTER” per visualizzare il valore
del parametro. Usare la tastiera alfanumerica per
inserire il tempo di rotazione in senso orario e
antiorario (valore compreso tra 10 e 40 secondi).
Premere il tasto “ENTER” per confermare.
PAUSA INVERSIONE (solo per macchine dotate
di inversione)
Premere il tasto “ENTER” per visualizzare il valore
del parametro. Usare la tastiera alfanumerica per
inserire il tempo di pausa (valore compreso tra 5 e
15 secondi). Premere il tasto “ENTER” per
confermare.
TEMPERATURA CICLO
Premere il tasto “ENTER” per visualizzare il valore
del parametro. Usare la tastiera alfanumerica per
inserire la temperatura del programma (valore
compreso tra 25 e 90°C). Premere il tasto
“ENTER” per confermare.
DURATA RAFFREDDAMENTO
Premere il tasto “ENTER” per visualizzare il valore
del parametro. Usare la tastiera alfanumerica per
inserire la durata del ciclo di raffreddamento
(valore compreso tra 0 e 15 minuti). Premere il
tasto “ENTER” per confermare.
TEMPERATURA FINE RAFFREDDAMENTO
Premere il tasto “ENTER” per visualizzare il valore
del parametro. Usare la tastiera alfanumerica per
inserire la temperatura di fine raffreddamento
(valore compreso tra 20 e 35°C). Premere il tasto
“ENTER” per confermare.
UMIDITA’ FINE CICLO (solo per macchine dotate
di sonda di umidità)
Premere il tasto “ENTER” per visualizzare il valore
del parametro. Usare la tastiera alfanumerica per
inserire il valore di umidità residua (valore
compreso tra 50 e 10%). Premere il tasto
“ENTER” per confermare.
COSTO PROGRAMMA (solo per macchine coin
op)
Premere il tasto “ENTER” per visualizzare il valore
del parametro. Usare la tastiera alfanumerica per
inserire la somma di denaro che l’Utente Finale
6
Page 7
E020401CW 26/11/04
dovrà pagare, per acquistare un tempo definito
dal parametro “tempo base”. Il costo programma è
visualizzato nella valuta corrente, con il punto
decimale (se necessario). Il valore è compreso tra
0 e 64000. Premere poi il tasto “ENTER” per
confermare.
TEMPO BASE (solo per macchine coin op)
Premere il tasto “ENTER” per visualizzare il valore
del parametro. Usare la tastiera alfanumerica per
inserire il tempo che si potrà acquistare, pagando
la somma stabilita dal parametro precedente
“costo programma”.
Il valore è compreso tra 1 e 255. Premere poi il
tasto “ENTER” per confermare.
DURATA BUZZER
Premere il tasto “ENTER” per visualizzare il valore
del parametro. Usare la tastiera alfanumerica per
inserire il tempo di attivazione del buzzer a fine
programma (valore compreso tra 1 e 15 secondi).
Premere il tasto “ENTER” per confermare.
12. PROGRAMMAZIONE PER MACCHINE COIN
OP
Le macchine dotate di gettoniera possono essere
programmate, modificando tempi temperature e
prezzi dei singoli programmi. Per eseguire la
programmazione è necessario utilizzare una
tastiera membrana a 16 tasti.
Togliere alimentazione elettrica alla macchina:
aprire poi con l’uso di un cacciavite, lo sportellino
anteriore. Scollegare i flat della tastiera a cinque
tasti (in figura) dalla scheda elettronica e collegare
al suo posto la tastiera a sedici tasti (viene
consegnata assieme alla documentazione della
macchina).
Riaccendere la macchina.
Mentre il display mostra “SELEZIONARE UN
PROGRAMMA”, premere i tasti “UP” e “DOWN”
contemporaneamente. A display appare
“PASSWORD”. Premere il tasto “ENTER”.
A display appare “0”. Inserire il codice 777 e
confermare premendo il tasto “ENTER”.
A display appare “INSTALLAZIONE”: premere il
tasto “ENTER”.
A display appare “VALUTA”: premere il tasto
“ENTER”.
A display appare il primo parametro: “XXX”.
Si precisa che i parametri disponibili possono
essere sfogliati con i tasti “UP” e “DOWN” e che è
possibile uscire dalla programmazione,
mantenendo le modifiche eseguite, premendo il
tasto “STOP” più volte, finché a display appare
“SELEZIONARE UN PROGRAMMA”.
XXX
Con questo parametro è possibile selezionare il
tipo di valuta che appare a display quando viene
richiesto il pagamento. Sfogliare i simboli di valuta
disponibili con i tasti “UP” e “DOWN” e di seguito
elencati:
XXX gettone
EUR euro
DKR corona danese
L lira sterlina
SKR Corona svedese
SFR franco svizzero
CS dollaro canadese
USD dollaro statunitense
YEN yen giapponese
Visualizzato il simbolo desiderato, premere il tasto
“ENTER” per confermare.
ALTRA VALUTA
E’ possibile aggiungere una valuta personalizzata
(della lunghezza di tre lettere) a quelle
precedentemente elencate. Se lo si desidera,
premere il tasto “ENTER” ed inserire le tre lettere
che individuano la nuova valuta. Confermare poi
con il tasto “ENTER”.
DECIMALI VALUTA
Consente di definire il numero di cifre decimali
della valuta personalizzata. Premere il tasto
“ENTER” ed inserire il numero di cifre decimali.
Confermare poi con il tasto “ENTER”
PREZZO MINIMO
Rappresenta il coefficiente per cui viene
moltiplicato il prezzo specifico (parametro “costo
programma”) di tutti i programmi, per poter
ottenere l’importo minimo di partenza.
Esempio: avendo definito i parametri “costo
programma” e “tempo base” (descritti nel par. 11),
si sia fissato che il primo programma HIGH (90°C)
abbia una durata di 10 minuti (tempo base) e che
il suo costo sia di 1€ (costo programma). Se si
impone PREZZOMINIMO=3, l’importo minimo per
avviare il programma sarà di 3€. L’Utente Finale
acquisterà in questo caso un’asciugatura a 90°C
della durata di 30 minuti. Avviato il programma,
sarà poi possibile incrementare il tempo di
asciugatura pagando anche solamente 1€ (costo
programma) ed acquistando così ulteriori 10
minuti di asciugatura (tempo base).
Mentre sul display appare “PREZZO MINIMO”
premere il tasto “ENTER”. A display appare “1”.
Per modificare, inserire il valore desiderato, e
confermare poi con il tasto “ENTER”.
GETTONE 1
E’ il valore riconosciuto dalla prima gettoniera.
Premere il tasto “ENTER” ed inserire il valore,
nell’unità monetaria prescelta, della moneta
7
Page 8

E020401CW 26/11/04
utilizzata nella prima gettoniera. Confermare con il
tasto”ENTER”.
GETTONE 2
E’ il valore riconosciuto dalla seconda gettoniera
(per le macchine che ne sono dotate). Premere il
tasto “ENTER” ed inserire il valore, nell’unità
monetaria prescelta, della moneta utilizzata nella
seconda gettoniera. Confermare con il
tasto”ENTER”.
A display appare “UNITA’ TEMPERATURA”.
Premere stop due volte ed uscire dalla
programmazione (i parametri successivi sono ad
uso dei Rivenditori).
Per la programmazione dei costi programma e dei
tempi base dei singoli programmi, fare riferimento
ai corrispondenti parametri, descritti nel par. 11
“PROGRAMMAZIONE”.
13. ALLARMI
Si dà di seguito un elenco dei possibili allarmi che
possono bloccare la macchina. Si ricorda che in
caso di guasto, può intervenire solo personale
specializzato e autorizzato.
DEPRESSIONE
All’avviamento della batteria di riscaldamento, non
si è creata sufficiente depressione all’interno
dell’essiccatoio; suona il buzzer e la macchina si
arresta. Premendo il tasto “STOP” si elimina
l’allarme e sul display appare la scritta “PREMI
START”: la macchina è pronta per ripartire con un
nuovo programma. Verificare la pulizia del filtro
filacce: se il segnale persiste spegnere la
macchina, togliere tutte le alimentazioni e
rivolgersi al servizio di Assistenza Tecni ca.
SENSORE DEPRESSIONE
L’allarme appare quando si tenta di avviare un
programma mentre la ventola è ancora in
funzione. Attendere trenta secondi e ritentare
l’avviamento. Se il segnale persiste spegnere la
macchina, togliere tutte le alimentazioni e
rivolgersi al servizio di Assistenza Tecni ca
OBLO’ APERTO
E’ stato aperto l’oblò. Richiudere l’oblò e premere
“START” per riavviare il programma o “STOP” per
interromperlo. Se il segnale persiste, anche
quando la porta è invece chiusa, spegnere la
macchina, togliere tutte le alimentazioni e
chiamare il servizio di Assistenza Tecnica
FILTRO APERTO
La cassa filtro non è chiusa correttamente.
Richiudere la cassa filtro e premere “START” per
riavviare il programma o “STOP” per
interromperlo. Se il segnale persiste, anche
quando la cassa filtro è invece chiusa, spegnere
la macchina, togliere tutte le alimentazioni e
chiamare il servizio di Assistenza Tecnica.
GUASTO SONDA
La sonda di temperatura risulta guasta: la
macchina si blocca. Suona il buzzer. Premendo
“STOP” si elimina l’allarme e sul display appare la
scritta “SELEZIONARE UN PROGRAMMA”. La
macchina è pronta a ripartire con un nuovo
programma. Se il segnale persiste spegnere la
macchina, togliere tutte le alimentazioni e
rivolgersi al servizio di Assistenza Tecni ca
BLOCCO TERMICO MOTORE
Uno dei motori si è surriscaldato: la macchina si
blocca. Suona il buzzer. Premendo “STOP” si
elimina l’allarme e a display appare la scritta
“SELEZIONARE UN PROGRAMMA”. Attendere
qualche minuto affinché si raffreddino i motori.
Riarmare i relè termici ed avviare la macchina. Se
il segnale persiste spegnere la macchina, togliere
tutte le alimentazioni e rivolgersi il servizio di
Assistenza Tecnica
FIAMMA SPENTA
E’ un segnale che può apparire solo nelle
macchine alimentate a gas. Sono falliti tre tentativi
consecutivi di accensione del bruciatore; suona il
buzzer e la macchina si blocca. Premendo
“STOP” si elimina l’allarme e sul display appare la
scritta “SELEZIONARE UN PROGRAMMA”: la
macchina è pronta per ripartire con un nuovo
programma. Se il segnale persiste spegnere la
macchina, togliere tutte le alimentazioni e
rivolgersi al servizio di Assistenza Tecni ca.
PRESSIONE GAS
E’ un segnale che può apparire solo nelle
macchine alimentate a gas; si è avuta una caduta
di pressione nell’alimentazione del gas. Suona il
buzzer e la macchina si blocca. Premendo
“STOP” si elimina l’allarme e sul display appare la
scritta “SELEZIONARE UN PROGRAMMA”; la
macchina è pronta per ripartire con un nuovo
programma. Se il segnale persiste spegnere la
macchina, togliere tutte le alimentazioni e
rivolgersi al servizio di Assistenza Tecni ca.
ATTENZIONE: qualunque caso di guasto
deve in ogni caso essere verificato e
risolto dal servizio di assistenza tecnica
specializzato.
14. MANUTENZIONE
La manutenzione della macchina deve essere
eseguita esclusivamente da personale qualificato:
qualunque tipo di operazione sulla macchina deve
essere eseguita esclusivamente dopo aver
staccato l’alimentazione elettrica, e, se esistente,
del gas o del vapore.
Si dovranno eseguire con regolarità le seguenti
operazioni di manutenzione ordinaria.
GIORNALIERA
Pulire il filtro almeno ogni tre/quattro asciugature.
Controllare il filtro e sostituirlo se è rotto o
consumato. Togliere alimentazione elettrica e, se
esistente, del gas o del vapore alla conclusione di
ogni giornata lavorativa.
8
Page 9
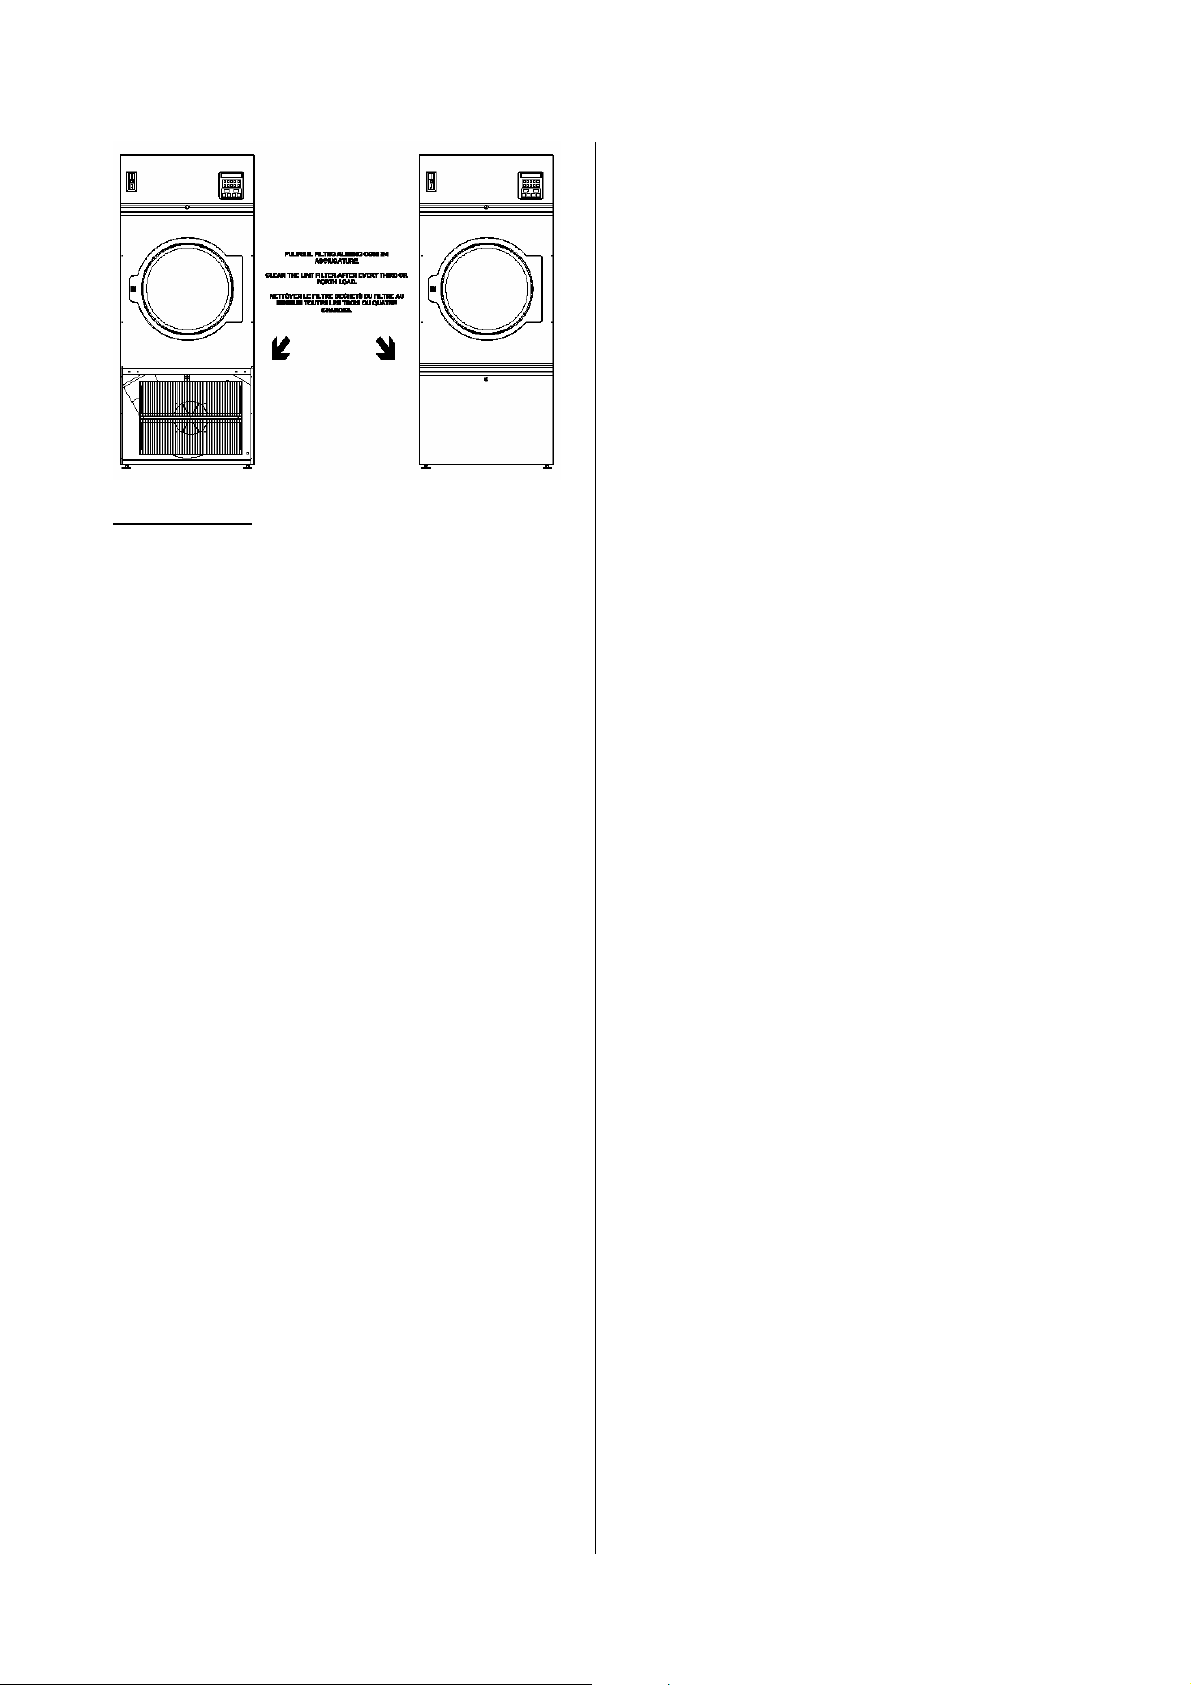
E020401CW 26/11/04
SETTIMANALE
Pulire gli accumuli di filacce dalla camera del filtro
e dalla sonda di temperatura (come mostrato in
figura).
9
Page 10

E020401CW 26/11/04
1. INTRODUCTION
This manual includes all the specifications
necessary for a safe and correct use of dryers.
Installation and maintenance of machines must be
performed by authorised and qualified
technicians; they have to know our products and
be acquainted with European standards for
installation of industrial laundry equipment. This
manual is for installer’s and technician’s use; they
have to read and understand it carefully before
installing, using or servicing the machine.
This manual should be kept with the machine and
consulted before operation; in case of loss or
damage please ask the builder for a new copy.
The builder is not responsible for any
consequences arising from the neglecting of all
instructions reported in this manual.
The manufacturer has the right to modify the data
contained in this manual or the technical features
of each single machine. The drawings of this
manual may represent details which partially differ
from the components installed on machines.
Drawings and technical data are subjected to
variations without previous notification to the
client
.
2. SAFETY PRECAUTIONS
Ignoring the following safety precautions can
cause damage either to people, linen, animals
and to the machine.
Installation and maintenance of machines of this
manual must be performed by authorised and
qualified technicians; they have to know our
products and be acquainted with European
standards for installation of industrial laundry
equipment.
These tumble dryers must be used only to dry
garments and linen exclusively with water. Any
other use is forbidden unless builder authorises it
in writing.
It is forbidden to put anything in the machine other
than the items to be dried. Do not load the
machine with fabrics contaminated by dangerous
substances such as explosives, inflammables,
etc. Make sure they are rinsed or aired before
washing.
It is forbidden to dry garments soaked in
substances known to be harmful to persons such
as lead, poison or cancer-producing products
To prevent fire hazard or explosions do not stand
near the machine with explosive or inflammable
products.
Please stick accurately to instructions and
dosages recommended by manufacturers; Make
sure to check and comply with washing
instructions of each item to be washed.
Use of the machine is forbidden to children under
14 years of age.
The builder is not responsible for external
connections not duly performed.
These precautions do not include all
possible risks. Therefore the user
must proceed with caution in the
observance of all safety
specifications.
3. MANUFACTURER’S LIABILITY
This manual instructions are not intended to
substitute, but only to combine obligations of
current legislation on safety standards.
With reference to information included in this
manual, the manufacturer is not responsible in
case of:
9 neglect of European safety standards
during machine utilisation;
9 incorrect installation of the machine;
9 neglect or incorrect observance of
instructions included in this manual;
9 faults of voltage or of the feeding
systems;
9 unauthorised changes on the machine;
9 utilisation of the machine by
unauthorised operators.
4. MACHINE STARTING
Connect the power feeding by turning on the main
switch the installer has to mount on top of the
machine: the microprocessor performs the selftesting of the diagnostics system. For gas and
steam machine be sure to open the main gate
valve to be installed on top of the machine.
5. OPERATING INSTRUCTIONS
When the machine starts, the display shows the
software version.
The machine is ready to be loaded; linen weight
have not to exceed the 10% of the declared
capacity.
In case of humidity control linen loading has to be
equal to the 50% of the normal loading.
Open the door and load the machine (for tilting
machines see the following paragraphs); close the
door.
Select one of the ten programs just included into
the microprocessor memory pressing one of the
buttons, from 0 to 9 (see the relative paragraph).
In the display appears the name of the program,
for example, “50 min 90°C”.
Press the button START: the machine starts the
selected program.
When the program starts, on the display appears
the temperature on centigrade degree, and the
remaining time to complete the cycle of heating. If
the tumble dryer has the humidity probe, in the
display appears the temperature and the value of
10
Page 11

E020401CW 26/11/04
the rate of the residual humidity.
Finished the heating cycle, the machine starts a
phase of cooling, during this phase in the display
appears the writing “COOLING”. This phase has
two programmable parameters: time and
temperature. The machine stops the program
when time finishes or when temperature has
reached.
If in the program you have included also the
phase of anti-wrinkle, in the display will appear the
writing “ANTIWRINKLE
When the writing “END” and an acoustic sound
appear, it means that the machine finishes. Open
the door and discharge the machine.
“SELECT A PROGRAM” appears and it is
possible to select another program.
6. OPERATING INTRUCTIONS ICD
In the previous paragraph, we have to add the
following information, in case the machine has the
system of survey of residual humidity.
The linen loading has to be equal to the 50% of
the nominal load.
Before introducing linen into the machine,
control eventual zip is completely opened,
and eventual metallic buttons are totally
removed or isolated.
7. TILTING OPERATIONS INSTRUCTIONS
In case the machine has the pneumatic tilting to
reverse the drum, add the following information.
ATENTION: when the machine is in tilting
or during the pneumatic opening door, the
user must keep himself out of the
machine, using the telecontrol.
Before using tilting, wait for the conclusion of a
program. Telecontrol use can be on or off using
the key switch low in the right side. When the
telecontrol is on, the microprocessor of the
machine is off. When the green light up in the left
side, is on means the push-button panel is on.
OPERATIONS OF LOADING (for the machines
which foreseen)
Operate the key switch to activate the push-button
panel. Open the door pressing at the same time
the facilitation button (low in the left side) and the
button “DOOR OPEN”. While the door opening is
concluded, invert the machine pressing at the
same time the facilitation button and “LOAD UP”.
When the charging operation is completed the
machine has to be put in horizontal position
pressing in the same time the facilitation button
and “LOAD DOWN”. Close the door pressing the
facilitation button and “CLOSE DOOR”.
CHARGE OPERATIONS
Operate the key switch to activate the push-button
panel. Open the door pressing at the same time
the facilitation button (low in the left side) and the
button “DOOR OPEN”. When the door opening is
concluded, reverse the machine pressing in the
same time the facilitation button (low in the left
side) and the button “UNLOAD DOWN”. When the
machine is in the charging position you can take
out the linen reversing the drum slowly (right
and/or left) pressing at the same time pressing the
facilitation button and the “UNLOAD ROTATION”
(RIGHT and/or LEFT). When the discharge is
ended the machine has to be positioned
horizontally pressing at the same time the
facilitation button and the “UNLOAD UP”. Close
the door pressing the facilitation button and the
“CLOSE DOOR”.
8. PAUSE AND STOP
During the functioning of the machine it is not
possible to change the characteristics of the
program. Opening the door the machine stops
and appears the writing “DOOR OPEN”
11
Page 12

E020401CW 26/11/04
When the door is closed, the writing “PRESS
START” appears, press START in order to begin
again the program.
If you press the button STOP one time the
machine puts in stand by: in the display “PAUSE”.
Pressing START the program restarts from
interruption: pressing STOP for a second time, the
program will be interrupted.
9. SINGLE CYCLE
A single program may be implemented for single
operation with automatic erase at the end of the
program itself.
Pressing the button SINGLE CYCLE: you are in
the programming of the single cycle. “DURATION
CYCLE” is what appeared on the display: Press
ENTER. On display appears “0”: put into the
wished time (1 and 99 minutes) and confirm with
ENTER.
On display appears “TEMPERATURE CYCLE”.
Pressing ENTER: On display appears “0”. ”: put
into the wished time (29 and 90°C) and confirm
with ENTER.
On display appears “PRESSING START”.
Pressing START, the cycle just programmed will
start.
10. MEMORISED PROGRAMS
herewith the characteristics of the builder
implemented programs. The cooling time is equal
to 10 minutes and the cooling temperature is
equal to 30°C for all the programs.
Nr. Name
Duration
[minutes]
Temperature
[°C]
0 50 min 90°C 50 90
1 40 min 75°C 40 75
2 30 min 60°C 30 60
3 30 min 45°C 30 45
4 40 min 60°C 40 60
5 25 min 50°C 25 50
6 20 min 45°C 20 45
7 30 min 40°C 30 40
8 20 min 40°C 20 40
9 25 min 40°C 25 40
Standard
Nr. Name
Residual
humidity
[%]
Temperature
[°C]
0 COTTON 10 90
1 VELVET 10 75
2 WOOL 10 60
3 SYNTHETIC 10 45
4 Pr. 04 10 60
5 Pr. 05 10 50
6 Pr. 06 10 45
7 Pr. 07 10 40
8 Pr. 08 10 40
9 Pr. 09 10 40
Machine with humidity version
Nr. Name
0 HIGH
1 MED
2 LOW
Duration
[minutes]
Minimum
Time
Minimum
Time
Minimum
Time
Temperature
[°C]
90
75
60
Coin op version
11. PROGRAMMING
The characteristics of the ten programs in the
memory can be modified proceeding as follow
Press the buttons “UP” and “DOWN” at the same
time while the display shows “SELECT A
PROGRAM”. Appears “PASSWORD”. Press
“ENTER”.
Appears “0”. Insert the code” 777” and confirm
pressing “ENTER”. Appears “INSTALATION”:
With the buttons “UP” and “DOWN” is possible to
defoliate the parameters and to go out from the
programming system, keeping the modification
done, with the button “STOP” many times up to
the display shows “SELECT A PROGRAM”
The parameters modifiable are:
LANGUAGE
Press “ENTER” in order to modify the parameter.
Appears “ENGLISH”. Press the buttons “UP” and
“DOWN” to modify the language seeing the
possibilities. Chosen the language press “ENTER”
to confirm.
INFORMATION
Press “ENTER” in order to modify the parameter.
Appears “WORKING HOURS”. Press again the
buttons “ENTER”: in the display appears the
hours accumulated since the date of installation of
the machine. To go out from the parameter press
“ENTER”. and “DOWN” to change the language
seeing the possibilities. Chose the language and
press “ENTER”.
DATE (only for ICD model)
Press “ENTER” in order to modify the parameter.
Change the value using the alphabetical keyboard
12
Page 13

E020401CW 26/11/04
and press “ENTER” to confirm
HOURS (only for ICD model)
Press “ENTER” in order to modify the parameter.
Change the value using the alphabetical keyboard
and press “ENTER” to confirm
PROGRAMME
Press “ENTER” to change the characteristic of
one or more program. Appears “50 min 90°C”
which is the first program. Pressing the buttons
“UP” and “DOWN” is possible to defoliate the
parameters, when appears the program you
would like to modify press “ENTER” in order to
enter in a menu of parameters of the chosen
program.
NAME
Press “ENTER” in order to enter in the parameter.
Insert the name chosen using the alphabetical
keyboard. Use the bottom “SINGLE CYCLE” to
delete any mistakes and press “ENTER” to
confirm and go on to the next step.
AUTO (only for machine equipped with the
humidity sensor)
Press “ENTER” in order to visualize the
parameter. Press “ENTER” and “DOWN” to
change it. When the parameter is “NO”, the
program has a specific duration and temperature
of drying. When the parameter is “YES”, the
program is automatic and has a temperature and
a residual level of humidity to reach. Press
“ENTER” and “DOWN” to select one of the curve
in the memory more suitable for the linen to dry.
Press “ENTER” to confirm and go on to the next
step.
CYCLE DURATION
Press “ENTER” in order to visualize the parameter
value. Use the alphabetical keyboard to insert the
duration of the heating cycle (value between 1
and 99 minutes), and press “ENTER”.
ROTATION TIME (only for machine equipped with
inverter)
Press “ENTER” in order to visualize the parameter
value. Use the alphabetical keyboard to insert the
duration of the rotation clockwise and
anticlockwise (value between 10 and 40 seconds),
and press “ENTER for confirmation.
REVERSING PAUSE (only for machine equipped
with the reversing drum)
Press “ENTER” in order to visualize the parameter
value. Use the alphabetical keyboard to insert the
duration of the pause (value between 5 and 15
seconds), and press “ENTER for confirmation.
TEMPERATURE CYCLES
Press “ENTER” in order to visualize the parameter
value. Use the alphabetical keyboard to insert the
temperature (value between 25 and 90° C), and
press “ENTER for confirmation.
COOLING DURATION
Press “ENTER” in order to visualize the parameter
value. Use the alphabetical keyboard to insert the
duration of the cooling cycle (value between 0 and
15 minutes), and press “ENTER for confirmation.
END COOLING TEMPERATURE
Press “ENTER” in order to visualize the parameter
value. Use the alphabetical keyboard to insert the
end cooling temperature (value between 20 and
35° C), and press “ENTER for confirmation.
END CYCLE HUMIDITY (only for machine
equipped with the humidity feeler)
Press “ENTER” in order to visualize the parameter
value. Use the alphabetical keyboard to insert the
value of humidity (value between 50 and 10%),
and press “ENTER for confirmation.
COST OF THE PROGRAM (only for coin op
machines)
Press “ENTER” to visualize the parameter value.
Use the alphameric keyboard to insert the amount
of money to be payed for the chosen time defined
by the parameter “minimum time”. The cost of the
program is displayed in the actual currency, with a
decimal figure (if necessary). The value is
between 0 and 64000. Press “ENTER” to confirm.
MINIMUM TIME (only for coin op machines)
Press “ENTER” to visualize the value of the
parameter. Use the alfameric keyboard to select
the time you want to buy, by paying the amount
selected from the previous parameter “cost of the
program”.
The value is between 1 and 255. Press “ENTER”
to confirm.
BUZZER DURATION
Press “ENTER” to visualize the value of
parameter. Use the alphameric keyboard to insert
the time of activation of the buffer at the end the
program (value between 1 and 15 seconds), and
press “ENTER” for confirmation.
12. PROGRAMMING FOR COIN BOX
MACHINES
Coin box machines can be programmed,
modifying times, temperature and prices of the
singles programs. It is necessary to have a
keyboard of 16 buttons.
Remove electric feeding on the machine: open the
anterior door with a screwdriver. Disconnect the
flats of 5 buttons keyboard (as in the picture) from
the electronic plate and connect the 16 buttons
ones (it is included with the documents of the
machine)
13
Page 14

E020401CW 26/11/04
Restart the machine.
Press the buttons “UP” and “DOWN” at the same
time while the display shows “SELECT A
PROGRAM”. Appears “PASSWORD”. Press
“ENTER”.
Appears “0”. Insert the code 777 and confirm
pressing “ENTER”.
Appears “INSTALLATION”: press “ENTER”.
Appears “CURRENCY”: press “ENTER”.
Appears the first parameter : “XXX”.
With the buttons “UP” and “DOWN” is possible to
defoliate the parameters and to go out from the
programming system with the button “STOP”
different times up tot eh display shows “SELECT
A PROGRAM”
XXX
With this parameter is possible to select the type
of currency, seeing the possibilities with the
buttons “UP” and “DOWN” XXX token
EUR euro
DKR Danmark Krona
L English Pound
SKR Swedish Krona
SFR Swiss Franc
CS Canadian Dollar
USD American Dollar
YEN Japanese Yen
Chosen the symbol press “ENTER” to confirm.
ANOTHER CURENCY
You can add another personalized currency (three
letters), by pressing “ENTER” insert the three
letters and confirm with ENTER.
DECIMAL CURRENCY
Permits to define the number of decimal cipher of
the personalized currency. Press “ENTER” and
include the number. Press “ENTER” again to
confirm
MINIMUM PRICE
The coefficient for which the specific price of all
the programs is multiplied, to obtain the starting
minimum amount.
For example: having defined the parameters “Cost
of the program” and “minimum time” (par. 11), it
has been programmed that the first program
HIGH (90°) has a 10 minutes duration (minimum
time) and that its cost is 1€ (cost of the program).
If it is programmed for a MINIMUM PRICE=3€,
the minimum amount to start the program will be
of 3€. The final customer will buy a 30 minutes
drying at 90°C. Started the program it will be
possible to increase the drying time by adding just
1€ (cost of the program) which it will add a further
10 minutes drying (minimum time).
While appears “MINIMUM PRICE” on the display
press “ENTER”. The display will show “1”. To
modify it, insert the amount as for the desired
program and press “ENTER”.
TOKEN 1
Recognized by the first coin box. Press “ENTER”
and insert the value of the coin in the first coin
box. “ENTER” to confirm.
TOKEN 2
Recognized by the second coin box (if provided).
Press “ENTER” and insert the value of the coin in
the second coin box. ENTER to confirm
“UNITY TEMPERATURE” appears on display .
Press stop twice and go out from programming.
To program the costs and the minimum times of
each program, please refer to the correspondent
parameters, (par. 11) “PROGRAMMING”.
13. ALARMS
Please find hereafter a list of the alarms which
stops the machine:
DEPRESSION
At the starting -up of the heating phase there is
not enough depression inside the dryer; the
buzzer will ring and the machine will be blocked.
Press the STOP key to stop the alarm; the display
will show “PRESS STORT”: the machine is ready
for operation. If the alarm rings again, turn off
power connection and call technical assistance
SENSOR DEPRESSION
This alarm is displayed when you try to start a
program while the fun is still functioning. Please
wait 30 seconds and try again the operation.
If the warning still appear, switch off the machine,
disconnected the alimentation and call our
technical assistance
OPEN DOOR
The door is open. Close the door and press
START to activate the program or STOP to
interrupt it. If the alarm rings again, turn off the
machine, take off all connections and call for
assistance.
OPEN FILTER
The filter box is not closet correctly. Close again
the filter box and press “START” to restart the
program or “STOP” to interrupt it. If the alarm
rings again, also when the filter box is closed, turn
off the machine, take off all the alimentations and
call for assistance.
TEMPERATURE PROBE
The temperature probe is broken: the machine
stops and the buzzer rings. Press STOP to stop
the sound signal; the display will show “SELECT”.
The machine is ready for operation, If the alarm
rings again, take off all connections and call
technical assistance
BLOCK THERMIC MOTOR
One of the motor is overheated: the machine stop
and the buzzer rings. Pressing STOP the alarm
disappears and on the display appears “SELECT
A PROGRAM”. Wait for few seconds until the
motors cool down. Rearm thermal cutout and start
the machine. If the signal persists switch off the
machine, take off all the feedings and call
technical assistance
FLAME OFF
It appears only in machines with gas heating.
Three consecutive attempts of lighting of burner
have failed. The buzzer rings and the machine
stops. Pressing STOP the alarm disappears and
14
Page 15

E020401CW 26/11/04
on the display appears “SELECT A PROGRAM”;
the machine can restart with a new program. If the
signal persists switch off the machine, take off all
the feedings and call technical assistance
GAS PRESSION
It appears only in machines with gas heating; a
fall of alimentation has occured. The buzzer rings
and the machine stops. Pressing STOP the alarm
disappears and on the display appears “SELECT
A PROGRAM”; the machine can restart with a
new program. If the signal goes on switch off the
machine, take off all the alimentations and call
technical assistance.
ATTENTION: We recommend to
call for authorised technical
assistance every time a failure
occurs.
14. GENERAL MAINTENANCE
Servicing and maintenance of the machine must
be performed only by experienced technicians:
before servicing be sure to take off power supply
and either gas or steam connection according to
the type of heating.
The following operations must be performed
regularly
DAILY
Clean the lint filter after every third or forth load.
Control the filter and replace it if torn.
Turn off power supply and either gas or steam
connection according to the type of heating after
working.
WEEKLY
Clean lint accumulation from lint chamber,and
temperature probe (as from the example)
15
Page 16

E020401CW 26/11/04
1. INTRODUCTION
Ce manuel concerne l’usage de séchoirs
industriels en conformité avec la Directive
Communautaire en vigueur.
Ces renseignements s’adressent aux utilisateurs
qui doivent en prendre connaissance avant de
mettre en marche ou de réaliser l’entretien du
séchoir. Ce manuel doit toujours être à disposition
pour consultation. En cas de perte ou
d’endommagement, nous vous prions de
demander un nouveau manuel à votre
fournisseur.
Le fabricant ne peut pas être tenu responsable
des conséquences d’une mauvaise utilisation
suite au non respect des consignes d’usages
décrites dans le manuel. Le fabricant se réserve
le droit de modifier les caractéristiques des
machines, sans préavis. Ainsi, les dessins et
données techniques du séchoir peuvent différer
de ce manuel. Le schéma électrique
correspondant à le séchoir est livré avec chaque
appareil.
2. NORMES DE SURETE
Le non respect des règles de sécurité suivantes
peut causer des dommages aux personnes, aux
machines, aux tissus et aux animaux.
L’installation et l’entretien des séchoirs doivent
être réalisés par des techniciens autorisés, ayant
la connaissance des produits et des normes
européennes de la mise en service de machines
industrielles.
Les connexions supplémentaires à l’extérieur du
séchoir doivent être réalisées par une personne
habilitée.
L’usage du séchoir est le séchage des vêtements
et du linge lavés à l’eau. Tout autre usage est
interdit et annule purement et simplement la
responsabilité du fabricant.
Il est interdit d’y introduire des objets différents de
ceux-ci. Les vêtements et le linge ne doivent pas
avoir été en contact avec des matières
dangereuses (explosifs, produits chimiques ou
inflammables). De même il est interdit de déposer
des produits inflammables à proximité du séchoir
pouvant entraîner des incendies et/ou des
explosions.
Il est impératif de lire attentivement et de tenir
compte des instructions de lavage annotées sur le
linge.
L’utilisation du séchoir est interdite aux personnes
de moins de 14 ans, de même qu’il ne faut pas
laisser les enfants jouer à proximité de la laveuse
et des lessives.
Ces renseignements ne couvrent pas tous
les risques possibles, l’utilisateur doit
procéder avec la plus grande précaution
dans le respect des normes.
3. RESPONSABILITE DU CONSTRUCTEUR
Les instructions de ce manuel ne remplacent pas,
mais complètent les obligations de respect des
règles de sécurité et de prévention des accidents.
Selon les instructions données dans ce manuel, le
constructeur décline toute responsabilité dans les
suivants cas :
9 Emploi du séchoir contraire aux lois
communautaires sur la sécurité.
9 Installation incorrecte du séchoir.
9 Non respect des in structions du manuel.
9 Alimentation électrique ou d’énergie
incorrecte.
9 Modifications non autorisées sur le
séchoir.
9 Utilisation par des opérateurs non
autorisés.
4. MISE EN MARCHE
Mettre le séchoir sous tension à l’aide du
disjoncteur ou sectionneur mis en place par
l’installateur : le microprocesseur effectue alors un
test de ses systèmes de sécurité (diagnostic). Si
le séchoir est à chauffage gaz ou vapeur, ouvrir
lentement la vanne d’alimentation mise en place
par l’installateur en amont du séchoir.
5. USAGE DU SÉCHOIR
A l’allumage du séchoir, le display affiche la
version du software du microprocesseur. Le
séchoir est prêt à être chargé avec le linge bien
essoré : le poids du linge à sécher ne doit pas
dépasser de 10% la capacité prévue. Dans le cas
de fonctionnement avec contrôle de l’humidité
(modèle spécial ICD), la charge de linge doit être
réduite de moitié (50% de la charge nominale).
Ouvrir le hublot et charger le séchoir (pour les
séchoirs tilting, voir les paragraphes suivants);
fermer le hublot.
Sélectionner un des 10 programmes déjà
présents dans la mémoire du microprocesseur à
l’aide des touches de 0 à 9. Le display affiche le
nom du programme, par exemple “50 min 90°C ”.
Appuyer sur START: le séchoir démarre le
programme désiré.
Après avoir démarré le programme, le display
affiche, alternativement, la température en degrés
et le temps restant jusqu’à la fin du cycle de
séchage. Si le séchoir est équipé d’une sonde
d’humidité, le display affiche la température et la
valeur du pourcentage d’ humidité résiduelle.
Quand le cycle de séchage est terminé, le séchoir
enchaîne avec une phase de refroidissement.
16
Page 17

E020401CW 26/11/04
Durant cette phase, le display affiche
“REFROIDISSEMENT”. Cette phase est
caractérisée par 2 paramètres programmables :
une durée et une température. Le séchoir termine
le programme quand le temps est écoulé ou
quand la température est atteinte.
Une phase anti-froissage peut également être
programmée pour s’exécuter en fin de
programme, avec le message “ANTIPLIS” dans
le display.
Lorsque le programme est terminé, le séchoir
s’arrête, le display affiche “FIN”, et il y a un signal
acoustique. Ouvrir le hublot et décharger le
séchoir.
Le display affiche de nouveau “SELECTIONNER
UN PROGRAMME” et le séchoir est prêt pour un
nouveau séchage
6. USAGE DU SÉCHOIR ICD
Il faut ajouter, à la description du paragraphe
précèdent, les spécifications suivantes, dans le
cas où le séchoir est équipé du système de
contrôle de l’humidité résiduelle.
Le charge de linge doit être égale à 50% de la
charge nominale.
Avant d’introduire le linge, vérifier que les
éventuelles fermetures « zip » soient
complètement ouvertes, et que les
boutons métalliques soient enlevés ou
protégés.
7. USAGE DU SÉCHOIR TILTING
Il faut ajouter, à la description du paragraphe
précèdent, les spécifications suivantes, dans le
cas où le séchoir est équipé du système
pneumatique tilting pour le basculement du
tambour en avant et/ou à l’arrière. Dans ce cas
les commandes sont positionnées sur un tableau
à poussoirs.
ATTENTION: quand le séchoir est en
phase de tilting, ou d’ ouverture
pneumatique du hublot, l’utilisateur doit se
maintenir à distance du séchoir et du
hublot, en utilisant la télécommande
spécifique.
Attendre la conclusion d’un programme avant
d’actionner le tilting. La télécommande est activée
ou pas selon la position de l’interrupteur à clé
situé en bas à droite. Quand la télécommande est
activée, le microprocesseur du séchoir est
désactivé. L’activation du tableau à poussoir est
signalé par l’allumage de la lumière vert en haut à
gauche.
OPERATIONS DE CHARGEMENT (pour les é
séchoirs avec cette fonction)
Actionner l’interrupteur à clé pour activer le
tableau à poussoirs. Ouvrir le hublot en appuyant
en même temps sur la touche d’habilitation (en
bas à gauche) et la touche d’ouverture hublot
“DOOR OPEN”. Quand l’ouverture du hublot est
terminée, basculer le séchoir en arrière en
appuyant en même temps sur la touche
d’habilitation (en bas à gauche) et la touche
“LOAD UP”. Quand l’opération de chargement est
terminée, basculer le séchoir dans la position
horizontale en appuyant en même temps sur la
touche d’habilitation (en bas à gauche) et la
touche “LOAD DOWN”. Fermer le hublot en
appuyant en même temps sur la touche
d’habilitation (en bas à gauche) et la touche
“CLOSE DOOR”. Désactiver le tableau à
poussoirs avec l’interrupteur à clé en bas à droite.
OPERATIONS DE DECHARGEMENT
Actionner l’interrupteur à clé pour activer le
tableau à poussoirs. Ouvrir le hublot en appuyant
en même temps sur la touche d’habilitation (en
17
Page 18

E020401CW 26/11/04
bas à gauche) et la touche d’ouverture hublot
“DOOR OPEN”. Quand l’ouverture du hublot est
terminée, basculer le séchoir en avant en
appuyant en même temps sur la touche
d’habilitation (en bas à gauche) et la touche
“UNLOAD DOWN”. Quand le séchoir est en
position de déchargement, il est possible de
permettre la sortie du linge en faisant tourner le
tambour lentement (à droite et/ou à gauche) en
appuyant en même temps sur la touche
d’habilitation (en bas à gauche) et la touche
“UNLOAD ROTATION” (RIGHT et/ou LEFT).
Quand l’opération de déchargement est terminée
replacer le séchoir en position horizontale en
appuyant en même temps sur la touche
d’habilitation (en bas à gauche) et la touche
“UNLOAD UP”. Fermer le hublot en appuyant en
même temps sur la touche d’habilitation (en bas à
gauche) et la touche “CLOSE DOOR”. Désactiver
le tableau à poussoirs en actionnant l’interrupteur
à clé en bas à droite.
8. PAUSE ET STOP
Quand le séchoir est en fonctionnement, il n’est
pas possible de modifier les caractéristiques du
programme en cours. Quand le hublot est ouvert
le séchoir s’arrête et le display affiche “HUBLOT
OUVERT”.
Quand le hublot est fermé de nouveau, le display
affiche “APPUYER SUR START”, ce qui permet
de relancer le programme là où il s’était
interrompu.
Si pendant le fonctionnement la touche STOP est
enfoncée une fois, le séchoir se met en pause : le
display affiche “PAUSE”. Le programme est
relancé en appuyant sur START ou annulé
complètement en appuyant sur STOP une
deuxième fois.
9. CYCLE MANUEL SIMPLE
En complément des programmes préréglés, le
séchoir peut être utilisé en manuel à l’aide de la
touche SINGLE CYCLE. Les paramètres ne sont
pas mémorisés et doivent être entrés à chaque
utilisation.
En appuyant sur la touche SINGLE CYCLE, le
display affiche “DUREE CYCLE” : appuyer sur
ENTER. Le display affiche “0” : sélectionner le
temps désiré (compris entre 1 et 99 minutes) et
confirmer avec ENTER.
Le display affiche “TEMPERATURE CYCLE” :
appuyer sur ENTER. Le display affiche “0” :
sélectionner la température désirée (compris
entre 30 et 90°C) et confirmer avec ENTER.
Le display affiche “APPUYER SUR START” :
appuyer sur START pour lancer le programme.
Celui-ci sera automatiquement suivi d’une phase
de refroidissement.
10. PROGRAMMES EN MEMOIRE
Les 10 programmes pré-établis en usine sont
numérotés de 0 à 9. Le tableau ci-dessous en
donne les caractéristiques. A noter : le temps de
refroidissement est égal à 10 minutes et la
température de refroidissement est égale à 30°C
pour tous les programmes.
Nr. Nom
Durée
[minutes]
Température
[°C]
0 50 min 90°C 50 90
1 40 min 75°C 40 75
2 30 min 60°C 30 60
3 30 min 45°C 30 45
4 40 min 60°C 40 60
5 25 min 50°C 25 50
6 20 min 45°C 20 45
7 30 min 40°C 30 40
8 20 min 40°C 20 40
9 25 min 40°C 25 40
Version standard
Nr. Nom
Humidité
Residuelle
[%]
Température
[°C]
0 COTON 10 90
1 VELOURS 10 75
2 LAINE 10 60
3 SYNTHETIQUE 10 45
4 Pr. 04 10 60
5 Pr. 05 10 50
6 Pr. 06 10 45
7 Pr. 07 10 40
8 Pr. 08 10 40
9 Pr. 09 10 40
Version avec contrôle de l’humidité
Nr. Nome
Durata
[minuti]
Temperatura
[°C]
0 HIGH tempo base 90
1 MED tempo base 75
2 LOW tempo base 60
Version en coin op
18
Page 19

E020401CW 26/11/04
11. PROGRAMMATION
Il est possible de modifier très simplement les
caractéristiques des dix programmes préréglés en
usine pour les adapter aux besoins spécifiques de
votre buanderie.
Alors que le display affiche “SELECTIONNER UN
PROGRAMME”, appuyer en même temps sur
“UP” et “DOWN”.
Le display affiche “PASSWORD” : appuyer sur
“ENTER”. Le display affiche “0” : taper le mot de
passe “777” et confirmer avec “ENTER”. Le
display affiche le premier paramètre :
“INFORMATIONS”.
Note : les touches “UP” et “DOWN” permettent de
défiler parmi les menus de paramètres. En
appuyant plusieurs fois sur la touche “STOP”, on
remonte progressivement dans les menus jusqu’à
l’affichage “SELECTIONNER UN PROGRAMME”.
Détail des paramètres ajustables :
LANGUE
Pour visualiser la valeur du paramètre, appuyer
sur “ENTER”. Le display affiche “FRANCAIS”.
Pour modifier la langue, utiliser les touches “UP”
et “DOWN”. Quand la langue désirée sera
affichée, appuyer sur “ENTER” pour confirmer.
INFORMATIONS
Pour visualiser la valeur appuyer sur ENTER. Le
display affiche “HEURE TRAVAIL”. Appuyer sur
“ENTER”: Le display affiche les heures de travail
accumulées depuis l’installation du séchoir. Pour
sortir du paramètre appuyer sur “ENTER”.
DATE (seulement pour machine ICD)
Pour visualiser la valeur appuyer sur “ENTER”.
Modifier la valeur avec le clavier alphanumérique
et confirmer avec “ENTER”.
HEURE (seulement pour machine ICD)
Pour visualiser la valeur appuyer sur “ENTER”.
Modifier la valeur avec le clavier alphanumérique
et confirmer avec “ENTER”.
PROGRAMMES
Pour modifier les caractéristiques d’un ou
plusieurs programmes, appuyer sur “ENTER”. Le
display affiche “50 min 90°C ”, qui est le nom
préréglé du premier programme. Avec les
touches “UP” et “DOWN” défiler les programmes
en mémoire. Quand le nom du programme que
vous voulez modifier apparaît, appuyer sur
“ENTER” : vous avez alors accès aux différents
paramètres du programme détaillés ci-après.
NOM
Appuyer sur “ENTER” pour entrer dans le
paramètre : utiliser le clavier alphanumérique pour
former le nom désiré. Utiliser la touche “CYCLE
SIMPLE” pour effacer d’éventuelles erreurs.
Appuyer sur “ENTER” pour confirmer et passer au
paramètre suivant.
AUTO (seulement pour séchoir équipé de sonde
de humidité modèle ICD)
Appuyer sur “ENTER” pour visualiser le
paramètre. Utiliser les touches “UP” et “DOWN”
pour le modifier. Quand le paramètre est “NO”, le
programme sera caractérisé par un temps et par
une température de séchage. Quand le paramètre
est “OUI” le programme sera automatique et sera
caractérisé par une température et par un niveau
d’humidité résiduelle à atteindre. Utiliser les
touches “UP” et “DOWN” pour sélectionner une
des courbes présentes en mémoire et qui
s’adapte le mieux aux fibres à sécher. Appuyer
sur “ENTER” pour confirmer et passer au
paramètre suivant.
DUREE CYCLE
Appuyer sur “ENTER” pour visualiser la valeur du
paramètre. Utiliser le clavier alphanumérique pour
introduire la durée du cycle de chauffage (entre 1
et 99 minutes). Appuyer sur “ENTER”.
TEMPS ROTATION (seulement pour séchoir avec
rotation alternée)
Appuyer sur “ENTER” pour visualiser la valeur du
paramètre. Utiliser le clavier alphanumérique pour
introduire le temps de rotation en sens horaire et
antihoraire (entre 10 et 40 secondes). Appuyer
sur “ENTER” pour confirmer.
PAUSE INVERSION (seulement pour séchoir
avec rotation alternée)
Appuyer sur “ENTER” pour visualiser la valeur du
paramètre. Utiliser le clavier alphanumérique pour
introduire le temps de pause (entre 5 et 15
secondes). Appuyer sur “ENTER” pour confirmer.
TEMPERATURE CYCLE
Appuyer sur “ENTER” pour visualiser la valeur du
paramètre. Utiliser le clavier alphanumérique pour
introduire la température du programme (entre 25
et 90°C). Appuyer sur “ENTER” pour confirmer.
DUREE REFROIDISSEMENT
Appuyer sur “ENTER” pour visualiser la valeur du
paramètre. Utiliser le clavier alphanumérique pour
introduire la durée du cycle de refroidissement
(entre 0 et 15 minutes). Appuyer sur “ENTER”
pour confirmer.
TEMPERATURE FIN REFROIDISSEMENT
Appuyer sur “ENTER” pour visualiser la valeur du
paramètre. Utiliser le clavier alphanumérique pour
introduire la température de fin refroidissement
(entre 20 et 35°C). Appuyer sur “ENTER” pour
confirmer.
HUMIDITE FIN CYCLE (seulement pour séchoir
équipé de sonde de humidité)
Appuyer sur “ENTER” pour visualiser la valeur du
paramètre. Utiliser le clavier alphanumérique pour
introduire la valeur de humidité résiduelle (entre
50 et 10%). Appuyer sur “ENTER” pour confirmer.
COUT PROGRAMME (seulement pour les
machines coin op)
Appuyer sur “ENTER pour visualiser la valeur du
paramètre. Utiliser la clavier alphanumérique pour
Introduire le montant d’argent que l’on doit payer
pour acheter un temps défini. Le coût du
programme peut être visualisé à valeur courante.
La valeur est compris entre 0 et 64000. Appuyer
sur « ENTER » pour confirmer.
TEMPS FIXE (seulement pour les machines coin
op)
19
Page 20

E020401CW 26/11/04
Appuyer sur “ENTER pour visualiser la valeur du
paramètre. Utiliser le clavier alphanumérique pour
choisir le temps, le montant du paiement est fixé
par le paramètre « coût programme » La valeur
est comprise entre 1 et 255. Appuyer sur
« ENTER » pour confirmer.
DUREE BUZZER
Appuyer sur “ENTER” pour visualiser la valeur du
paramètre. Utiliser le clavier alphanumérique pour
introduire le temps de la sonnerie (buzzer) en fin
de programme (entre 1 et 15 secondes). Appuyer
sur “ENTER” pour confirmer.
12. PROGRAMMATION POUR SECHOIRS A
MONNAYEUR
Les séchoirs équipés de monnayeur doivent être
programmés, en indiquant les températures,
durées et prix des 3 programmes. Pour effectuer
la programmation il est nécessaire d’utiliser un
clavier membrane à 16 touches.
Couper l’alimentation électrique du séchoir, ouvrir
le portillon supérieur puis le compartiment du
microprocesseur (2 vis). Débrancher les câbles
plats du clavier 5 touches (en figure) et brancher
le clavier 16 touches livré avec la documentation
du séchoir).
Remettre le séchoir sous tension.
Quand le display affiche “SELECTIONNER UN
PROGRAMME”, appuyer sur “UP” et “DOWN” en
même temps. Le display affiche “PASSWORD”.
Appuyer sur “ENTER”.
Le display affiche “0”. Introduire le mot de passe
777 et confirmer avec “ENTER”.
Le display affiche “INSTALLATION” : appuyer sur
“ENTER”.
Le display affiche “DEVISE” : appuyer sur
“ENTER”.
Le display affiche le premier paramètre: “XXX”.
Les paramètres disponibles peuvent être
parcourus avec les touches “UP” et “DOWN” et il
est possible de sortir de la programmation en
appuyant plusieurs fois sur la touche “STOP”
jusqu’à que le display affiche “SELECTIONNER
UN PROGRAMME”.
XXX
Ce paramètre correspond au type de devise qui
est affichée sur le display pour demander le
paiement. Parcourir les symboles de devise
disponibles avec les touches “UP” et “DOWN” :
XXX jeton
EUR euro
DKR couronne danois
L lire sterling
SKR couronne suédoise
SFR franc suisse
CS dollar canadien
USD dollar américaine
YEN yen japonais
Lorsque le symbole désiré est affiché, appuyer
sur “ENTER” pour confirmer.
AUTRE DEVISE
Il est possible d’ajouter une devise personnalisée
(de la longueur de trois lettres) à la liste ci-dessus.
Pour cela, appuyer sur la touche “ENTER” et
introduire les trois lettres qui indiquent la nouvelle
devise. Confirmer avec “ENTER”.
DECIMALES DEVISE
Permet de définir le nombre de décimales de la
devise personnalisée. Appuyer sur “ENTER” et
introduire le nombre de décimales. Confirmer
avec “ENTER”
PRIX MINIMUM
Représente le coefficient par lequel est multiplié le
prix spécifique (paramètre coût du programme)
de tous les programmes pour obtenir le prix
minimum à payer au début.
Exemple: le prix d’un programme est fixé à 1€
pour 10 minutes. Si le PRIXMINIMUM=3, le
montant minimum pour faire partir le programme
sera de 3€ pour 30 minutes. Lorsque le
programme sera lancé, il suffira d’1€ pour
incrémenter de 10 minutes le crédit du temps de
séchage.
Quand le display affiche “PRIX MINIMUM”
appuyer sur “ENTER”. Le display affiche “1”. Pour
modifier, introduire la valeur désirée, et confirmer
avec “ENTER”.
JETON 1
C’est la valeur attribuée à la première entrée
monnayeur. Appuyer sur “ENTER” et introduire la
valeur, dans l’unité monétaire choisie, de la pièce
utilisée dans le premier monnayeur. Confirmer
avec ”ENTER”.
JETONS 2
C’est la valeur attribuée à la deuxième entrée
monnayeur (les machines avec deux entrées).
Appuyer sur “ENTER” et introduire la valeur, dans
l’unité monétaire choisie, de la pièce utilisée dans
le premier monnayeur. Confirmer avec ”ENTER”.
Le display affiche “UNITE TEMPERATURE”.
Appuyer sur stop deux fois et sortir de la
programmation (les paramètres suivants sont
pour l’usage des Revendeurs).
Procéder ensuite au réglage des programmes et
des singles programmes, afin que les
programmes correspondent en suivant les
20
Page 21

E020401CW 26/11/04
instructions du paragraphe 11.
13. ALARMES
Le séchoir est équipé de nombreuses sécurités.
Leur déclenchement se traduit par l’affichage d’un
message. Nous vous rappelons que seules les
personnes habilitées peuvent intervenir
techniquement sur le séchoir.
MANQUE DEPRESSION
Le débit d’air du séchoir n’est pas suffisant ; le
buzzer sonne et le séchoir s’arrête. Le message
peut être effacé en appuyant sur “STOP” et le
display affiche alors “APPUYER SUR START”: le
séchoir est prêt pour repartir. Vérifier le nettoyage
du filtre à peluche et de la gaine d’évacuation. Si
malgré tout l’alarme se déclenche de nouveau,
couper toutes tous les alimentations du séchoir et
contacter le service d’Assistance Technique.
DETECTEUR DEPRESSION
Cette alarme apparaît lorsqu’un programme est
lancé alors que le ventilateur tourne encore. Si
vous ouvrez le hublot du séchoir ou si vous
appuyer sur STOP pendant un programme, il faut
attendre 30 secondes avant de relancer le cycle.
Si malgré tout l’alarme se déclenche de nouveau,
couper toutes tous les alimentations du séchoir et
contacter le service d’Assistance Technique.
HUBLOT OUVERT
Le hublot a été ouvert. Fermer le hublot et
appuyer sur “START” pour re-démarrer le
programme ou “STOP” pour l’annuler. Si l’alarme
est encore présente, alors que le hublot est fermé,
couper toutes tous les alimentations du séchoir et
contacter le service d’Assistance Technique.
FILTRE OUVERT
La porte du filtre n’est pas fermée correctement.
Refermer et appuyer sur “START” pour relancer le
programme ou “STOP” pour l’annuler. Si l’alarme
est encore présente, alors que la porte est
fermée, couper toutes tous les alimentations du
séchoir et contacter le service d’Assistance
Technique.
PANNE SONDE
La sonde de température est défectueuse : le
buzzer sonne et le séchoir s’arrête. Le message
peut être effacé en appuyant sur “STOP” et le
display affiche alors “APPUYER SUR START”: le
séchoir est prêt pour repartir. Si malgré tout
l’alarme se déclenche de nouveau, couper toutes
tous les alimentations du séchoir et contacter le
service d’Assistance Technique.
BLOCAGE THERMIQUE MOTEUR
Le moteur indique une surcharge thermique : le
buzzer sonne et le séchoir s’arrête. Le message
peut être effacé en appuyant sur “STOP” et le
display affiche alors “SELECTIONNER UN
PROGRAMME”. Couper l’alimentation générale
du séchoir et attendre quelques minutes pour faire
refroidir les moteurs. Ré-enclencher les relais
thermiques situés dans le compartiment de
raccordement électrique à l’arrière et allumer le
séchoir. Si l’alarme se déclenche de nouveau,
couper toutes tous les alimentations du séchoir et
contacter le service d’Assistance Technique.
FLAMME ETEINTE
Concerne les séchoirs à gaz. Le brûleur ne
s’allume pas malgré 3 tentatives. Le buzzer sonne
et le séchoir s’arrête. Le message peut être effacé
en appuyant sur “STOP” et le display affiche alors
“SELECTIONNER UN PROGRAMME”. Le séchoir
est prêt pour un nouveau programme Si l’alarme
se déclenche de nouveau, couper toutes tous les
alimentations du séchoir et contacter le service
d’Assistance Technique.
PRESSION GAZ
Concerne les séchoirs à gaz. La pression
d’alimentation en gaz n’est pas suffisante. . Le
buzzer sonne et le séchoir s’arrête. Le message
peut être effacé en appuyant sur “STOP” et le
display affiche alors “SELECTIONNER UN
PROGRAMME”. Le séchoir est prêt pour un
nouveau programme. Vérifier que la vanne gaz
est bien ouverte et relancer un programme. Si
l’alarme se déclenche de nouveau, couper toutes
les alimentations du séchoir et contacter le
service d’Assistance Technique.
ATTENTION : chaque panne doit être
soumise au service d’assistance
technique pour avis.
14. ENTRETIEN
Les opérations d’ entretien normal doivent être
effectuées très régulièrement.
ENTRETIEN JOURNALIER
Chaque trois ou quatre cycles, nettoyer le filtre.
Contrôler le filtre et le remplacer s’il est cassé ou
abîmé.
En fin de journée de travail, couper l’alimentation
électrique et, si elles existent, gaz ou vapeur
ENTRETIEN HEBDOMADAIRE
Nettoyer les accumulations de peluches dans le
compartiment du filtre et de la sonde de
température ( voir les dessins à la fin de la
notice).
21
Page 22

E020401CW 26/11/04
1. CONTENIDO DEL MANUAL
Este manual está dedicado al uso de secadoras
industriales. Ha sido hecho teniendo en
consideración las directivas comunitarias
vigentes. La información está dirigida al usuario,
que se asegurará de haberla entendido
completamente antes de trabajar con la máquina.
El manual de uso tiene que estar siempre
disponible, para su consulta. En caso de pérdida
o daño, pedir al fabricante un nuevo manual. El
fabricante no responde de las consecuencias
derivadas de un uso inadecuado de la máquina
debido a una falta o incompleta lectura del
presente manual. El fabricante puede modificar
las especificaciones descritas en este manual o
las características de cada máquina. Algunas
figuras de este manual pueden reportar
especificaciones que resultan parcialmente
diferentes de aquellas ensambladas en las
máquinas. Dibujos y datos técnicos podrán ser
modificados sin preaviso.
2. PRECAUCIONES DE SEGURIDAD
El incumplimiento de estas normas de seguridad
puede ocasionar daño a las personas, a las cosas
y a los animales.
La instalación y mantenimiento de los equipos del
fabricante deben ser hechas por técnicos
competentes y autorizados; los técnicos deben
conocer los productos y las normas Europeas de
instalación de los equipos industriales.
La destinación de uso de las secadoras
industriales es el secado profesional de prendas:
está por eso prohibido destinar las máquinas a un
uso diferente salvo que el fabricante lo autorice
por escrito.
Para prevenir riesgos de incendios y explosiones
no acercar a la máquina explosivos y sustancias
inflamables.
respetar las instrucciones y las dosificaciones
indicadas por los fabricantes; además, es
importante leer y seguir las instrucciones de
lavado de las prendas y ropas.
Está prohibida la utilización de la máquina a niños
menores de 14 años.
Conexiones suplementarias a la máquina en su
exterior, el fabricante se libera de cualquier
responsabilidad.
Estas precauciones no incluyen
todos los riesgos posibles. Por
eso, el operador, debe proceder
con cuidado respetando las
especificaciones de seguridad
3. RESPONSABILIDAD DEL FABRICANTE
Las instrucciones de este manual no quieren
sustituir sino completar los compromisos para el
respeto de las normas vigentes sobre seguridad.
Con respecto a las especificaciones contenidas
en este manual, el fabricante no es responsable
en los siguientes casos:
9 uso de la máquina contrario a las
normas nacionales sobre seguridad.
9 incorrecta instalación de la máquina.
9 Falta de mantenimiento periódico y
programado.
9
falta o incorrecto respeto de las
instrucciones del manual
.
9 defecto de voltaje o de alimentación del
sistema eléctrico.
9 modificaciones no autorizadas en la
máquina.
9 utilización de la máquina por parte de
personas no autorizadas.
4. PUESTA EN MARCHA
Conectar la corriente eléctrica girando el
interruptor general que el instalador debe poner
arriba de la máquina: el microprocesador ejecuta
un test auto-diagnóstico. Para los modelos a gas
o a vapor asegurarse de abrir la válvula de
alimentación que el instalador debe preveer arriba
de la secadora.
5. MODO DE EMPLEO DE LA MAQUINA
Al poner en marcha la secadora, la pantalla
muestra la versión del software. La máquina está
lista para ser cargada; el peso de ropa no debe
superar el 10% de la capacidad declarada. En el
caso de funcionamiento con control de humedad
la carga de ropa tiene que ser igual al 50% de la
carga nominal.
Abrir la puerta, cargar la máquina (para las
máquinas tilting véanse las paginas siguientes);
cerrar la puerta.
Seleccionar uno de los 10 programas
memorizados apretando una de las teclas
númericas (0-9) (véase el párrafo relativo). La
pantalla mostrará el nombre del programa
seleccionado, por ejemplo “50 min 90°C”.
22
Page 23

E020401CW 26/11/04
Apretar START para ejecutar el programa
seleccionado
Durante la ejecución del programa la pantalla
visualiza sucesivamente la temperatura en grados
°C y el tiempo que falta para el final del ciclo de
secado. Si la secadora tiene las sondas de
humedad residual (opcional), la pantalla
visualizará sucesivamente la temperatura y el
porcentaje de humedad residual.
Después del ciclo de secado la secadora ejecuta
el enfriamiento: durante este ciclo la pantalla
visualiza el siguiente mensaje “ENFR”. La fase de
enfriamiento está caracterizada por dos
parámetros programables: un tiempo y una
temperatura. La máquina concluye el programa
cuando el tiempo termina o cuando la
temperatura viene conseguida.
Si el programa tiene el ciclo antiarrugas, la
pantalla visualiza “ANTIARRUGAS” durante la
ejecución. Al final del programa, la secadora se
para y aparece el mensaje “FIN” seguido por una
señal acústica: ahora es posible abrir la puerta y
descargar la secadora.
La pantalla muestra de nuevo “SELECT” y la
secadora está lista para un nuevo ciclo de
secado.
6. MODO DE EMPLEO DE LA MAQUINA ICD
Tenemos que adjuntar las siguientes
informaciones al párrafo precedente, en el caso
en que la máquina esté equipada de sistema de
humedad residual.
La carga de ropa tiene que ser igual al 50% de la
carga nominal.
Antes de introducir la ropa en la máquina,
verificar que las eventuales zip presentes
estén completamente abiertas y que
posibles botones metálicos sean quitados
o aislados
7. MODO DE EMPLEO DE LA MAQUINA
TILTING
A la descripción de los párrafos precedentes
adjuntar las siguientes informaciones, en el caso
en que la máquina esté equipada de sistema
pneumático tilting para la inversión del tambor
adelante y/o atrás. En este caso los mandos
vienen dirigidos a traves de la caja de
pulsadores.
ATENCION: cuando la máquina está en
fase de tilting, o de abertura pneumática
de la puerta, el operador tiene que estar
fuera de la máquina, utilizando el
oportuno telecomando.
Esperar sempre la conclusion de un programma
antes de accionar el tilting. El uso del
telecomando viene habilitado o deshabilitado,
accionando el interuptor de la llave baja a la
derecha. Cuando el telecomando está activo, el
microprocessador de la máquina viene
desactivado. La activación de la caja de
pulsadores está señalada por el encendido de la
luz verde arriba a la izquierda.
OPERACIONES DE CARGA (para las máquinas
que lo preveen)
Accionar el interuptor llave para activar la caja de
pulsadores. Abrir la puerta apretando
simultaneamente el botón de habilitación (abajo a
la izquierda) y el botón de abertura puerta “DOOR
OPEN”. Cuando la abertura de la puerta está
completada, volcar la máquina atrás apretando
simultaneamente el botón de habilitación (abajo a
la izquierda) y el botón “LOAD UP”. Cuando la
operación de carga está completada reponer la
máquina en posición horizontal apretando
simultaneamente el botón de habilitación (abajo a
la izquierda) y el botón “LOAD DOWN”. Cerrar la
puerta apretando simultaneamente el botón de
habilitación (abajo a la izquierda) y el botón
“CLOSE DOOR”. Deshabilitar la caja de
pulsadores accionando el interuptor llave (abajo a
la derecha).
OPERACIONES DE DESCARGA
Accionar el interuptor llave para activar la caja de
pulsadores. Abrir la puerta apretando
simultaneamente el botón de habilitación (abajo a
la izquierda) y el botón de abertura de la puerta
“DOOR OPEN”. Cuando la abertura de la puerta
está completada, volcar la máquina adelante
apretando simultaneamente el botón de
habilitación (abajo a la izquierda) y el botón
“UNLOAD DOWN”. Cuando la máquina está en
posición de descarga es posible favorecer la
salida de la ropa haciendo girar el tambor
lentamente (a la derecha y/o a izquierda)
23
Page 24

E020401CW 26/11/04
apretando simultaneamente el botón de
habilitación (abajo a la izquierda) y el botón
“UNLOAD ROTATION” (RIGHT y/o LEFT).
Cuando la operación de descarga está
completada reponer la máquina en posición
horizontal apretando simultaneamente el botón de
habilitación (abajo a la izquierda) y el botón
“UNLOAD UP”. Cerrar la puerta apretando
simultaneamente el botón de habilitación (abajo a
la izquierda) y el botón “CLOSE DOOR”.
Desactivar la caja de pulsadores accionando el
interuptor llave (abajo a la derecha).
8. PAUSA Y STOP
Mientras la máquina está trabajando no es
posible modificar las características del programa
en curso. Abriendo la puerta la máquina se para
y en el display aparece “PUERTA ABIERTA”.
Vuelva a cerrar la puerta, en el display aparece
“APRETA START”: Apretar START para hacer
funcionar otra vez el programa en el punto en que
se había interrumpido.
Si durante el funcionamento aprieta STOP una
vez, la máquina se pone en pausa: en el display
aparece “PAUSA”. Apretando START se hace
funcionar otra vez el programa desde donde se
había interrumpido; apretando STOP una
segunda vez, se interrumpe definitivamente el
programa.
9. CICLO UNICO
Es posible realizar un programa “desechable”,
que puede ser construido en pocos segundos
pero es válido para un único uso.
Apretar el botón SINGLE CYCLE: se entra en la
programación del ciclo único. En el display
aparece la escritura “DURACION CICLO”: Apretar
ENTER. En el display aparece “0”: insertar el
tiempo deseado (comprendido entre 1 y 99
minutos) y confirmar con ENTER.
En el display aparece “TEMPERATURA CICLO”.
Apretar ENTER: en el display aparece “0”.
Insertar la temperatura deseada (comprendida
entre 29 y 90°C) y confirmar con ENTER.
En el display aparece “APRETA START”.
Apretando el botón START se pone en marcha el
ciclo recien programado.
10. PROGRAMAS EN MEMORIA
En la tabla siguiente están listadas las
características de los programas insertados en
memoria por el fabricante. El tiempo de
enfriamiento es igual a 10 minutos y la
temperatura de enfriamiento es igual a 30°C para
todos los programas.
Nr. Nombre
Duración
[minutos]
Temperatura
[°C]
0 50 min 90°C 50 90
1 40 min 75°C 40 75
2 30 min 60°C 30 60
3 30 min 45°C 30 45
4 40 min 60°C 40 60
5 25 min 50°C 25 50
6 20 min 45°C 20 45
7 30 min 40°C 30 40
8 20 min 40°C 20 40
9 25 min 40°C 25 40
Versión estandard
Nr. Nombre
Humedadd
residua
[%]
Temperatura
[°C]
0 ALGODON 10 90
TERCIOPELO
1
10 75
2 LANA 10 60
3 SINTETICO 10 45
4 Pr. 04 10 60
5 Pr. 05 10 50
6 Pr. 06 10 45
7 Pr. 07 10 40
8 Pr. 08 10 40
9 Pr. 09 10 40
Versión con Humedad
Nr. Nome
Durata
[minuti]
Temperatura
[°C]
0 HIGH tempo base 90
1 MED tempo base 75
2 LOW tempo base 60
Version coin op
11. PROGRAMACION
Es posible modificar las características de los diez
programas insertados en memoria procediendo
así:
Mientras que en el display aparece la escritura
“SELECCIONAR UN PROGRAMA”, apretar
simultaneamente los botónes “UP” y “DOWN”.
En el display aparece la escritura “PASSWORD”:
apretar el botón “ENTER”. En el display aparece
“0”. Introducir el password de accesso pulsando
“777” y confirmar con “ENTER”. En el display
24
Page 25

E020401CW 26/11/04
aparece el primer parámetro:
“INFORMACIONES”.
Se especifica que los parámetros disponibles
pueden ser vistos utilizando los botónes “UP” y
“DOWN” y que es posible salir de la
programación, manteniendo las modificaciones
hechas, apretando el botón “STOP” más veces,
hasta que en el display aparece “SELECCIONAR
UN PROGRAMA”.
Se procede a analizar los parámetros disponibles.
IDIOMA
Para visualizar el valor del parámetro apretar
“ENTER”. En el display aparece “ITALIANO”.
Para modificar el idioma, utilizar los botónes “UP”
y “DOWN”. Cuando aparece el idioma deseado,
apretar “ENTER” para confirmar.
INFORMACIONES
Para visualizar su valor apretar el botón ENTER.
En el display aparece “HORAS TRABAJO”.
Apretar otra vez el botón “ENTER”: en el display
se ven las horas de trabajo acumuladas desde el
día de instalación de la máquina. Para salir del
parámetro apretar el botón “ENTER”.
FECHA (sólo para máquinas ICD)
Para visualizar su valor apretar el botón “ENTER”.
Modificar el valor con el uso del teclado
alfanumérico y confirmar con el botón “ENTER”.
HORA (sólo por máquinas ICD)
Para visualizar su valor apretar el botón “ENTER”.
Modificar el valor con el uso del teclado
alfanumérico y confirmar con el botón “ENTER”.
PROGRAMAS
Para modificar las características de uno o más
programas, apretar el botón “ENTER”. En el
display aparece “50 min 90°C”, que es el nombre
del primer programa. Con los botones “UP” y
“DOWN” es posible ver los programas en
memoria. Cuando visualice el nombre del
programa que se desea modificar, apretar el
botón “ENTER”. Así se entra en el menú de los
parámetros del programma escogido
previamente. Se procede a analizar los
parámetros programables por cada único
programa.
NOMBRE
Apretar el botón “ENTER” para entrar en el
parámetro: utilizar el teclado alfanumerico para
llenar el nombre deseado. Utilizar el botón
“CICLO UNICO” para eliminar eventuales errores
de compilación. Apretar el botón “ENTER” para
confirmar y pasar al parámetro sucesivo.
AUTO (solo para máquinas equipadas de sensor
de humedad)
Apretar el botón “ENTER” para visualizar el
parámetro. Utilizar los botones “UP” y “DOWN”
para modificarlo. Cuando el parámetro es “NO”, el
programa estará caracterizado por un tiempo y
una temperatura de secado. Cuando el parámetro
es “SI” el programa será automático y será
caracterizado de una temperatura y de un nivel de
humedad residual de llegar. Utilizar los botónes
“UP” e “DOWN” para seleccionar una de las
curvas presentes en memoria y que mejor se
adécue al material a secar. Apretar el botón
“ENTER” para confirmar y pasar al parámetro
siguiente.
DURACION CICLO
Apretar el botón “ENTER” para visualizar el valor
del parámetro. Usar el teclado alfanumérico para
insertar la duración del ciclo de calentamiento
(valor comprendido entre 1 y 99 minutos). Apretar
el botón “ENTER”.
TIEMPO ROTACION (sólo para máquinas
equipadas de inversión)
Apretar el botón “ENTER” para visualizar el valor
del parámetro. Usar el teclado alfanumérico para
insertar el tiempo de rotación en sentido horario y
antihorario (valor comprendido entre 10 y 40
segundos). Apretar el botón “ENTER” para
confirmar.
PAUSA INVERSION (sólo para máquinas
equipadas de inversión)
Apretar el botón “ENTER” para visualizar el valor
del parámetro. Usar el teclado alfanumérico para
insertar el tiempo de pausa (valor comprendido
entre 5 y 15 segundos). Apretar el botón “ENTER”
para confirmar.
TEMPERATURA CICLO
Apretar el botón “ENTER” para visualizar el valor
del parámetro Usar el teclado alfanumérico para
insertar la temperatura del programa (valor
comprendido entre 25 y 90°C). Apretar el botón
“ENTER” para confirmar.
DURACION ENFRIAMIENTO
Apretar el botón “ENTER” para visualizar el valor
del parámetro. Usar el teclado alfanumérico para
insertar la duración del ciclo de enfriamiento
(valor comprendido entre 0 y 15 minutos). Apretar
el botón “ENTER” para confirmar.
TEMPERATURA FIN ENFRIAMIENTO
Apretar el botón “ENTER” para visualizar el valor
del parámetro. Usar el teclado alfanumérico para
insertar la temperatura del fin enfriamiento (valor
comprendido entre 20 y 35°C). Apretar el botón
“ENTER” para confirmar.
HUMEDAD FIN CICLO (sólo para máquinas
equipadas de sonda de humedad)
Apretar el botón “ENTER” para visualizar el valor
del parámetro Usar el teclado alfanumérico para
insertar el valor de humedad residual (valor
comprendido entre 50 y 10%). Apretar el botón
“ENTER” para confirmar.
COSTO PROGRAMA (solo por maquinas coin op)
Apretar “ENTER” para visualizar el valor del
parametro. Usar el teclado alfanumerica para
inseritar el importe de dinero que el Utente Final
tendrá que pagar, para comprar un tiempo
definido del parametro “tiempo base”. El costo
programa está visualizado en el valor corriente,
con il punto decimal (si necessario). El valor está
comprendilo entre 0 y 64000. Apretar “ENTER”
para confirmar.
TIEMPO BASE (solo por maquinas coin op)
Apretar “ENTER” para visualizar el valor del
25
Page 26

E020401CW 26/11/04
parametro. Usar el teclado alfanumerico para
inseritari el tiempo que se podrá comprar,
pagando el importe del parametro precedente
“costo programa”.
El valor está comprendilo entre 1 y 255. Apretar
“ENTER” para confirmar.
DURACION BUZZER
Apretar el botón “ENTER” para visualizar el valor
del parámetro Usar el teclado alfanumérico para
insertar el tiempo de activación del buzzer al final
del programa (valor comprendido entre 1 y 15
segundos). Apretar el botón “ENTER” para
confirmar.
12. PROGRAMACION PARA MAQUINAS CON
MONEDERO
Las máquinas equipadas con monederos pueden
ser programadas, modificando tiempos
temperaturas y precios de los programas. Para
ejecutar la programación es necesario utilizar un
teclado membrana de 16 botones.
Quitar alimentación electrica a la máquina: abrir
con un destornillador, el portillo anterior.
Desconectar los flat del teclado de cinco botones
(en figura) de la placa electrónica y conectar en
su lugar el teclado de 16 botones (que hay junto a
la documentación de la máquina).
Encender la máquina.
Mientras el display muestra “SELECCIONAR UN
PROGRAMA”, apretar los botones “UP” y
“DOWN” simultaneamente. En el display aparece
“PASSWORD”. Apretar el botón “ENTER”.
En el display aparece “0”. Insertar el codigo 777 y
confirmar apretando el botón “ENTER”.
En el display aparece “INSTALACION”: apretar el
botón “ENTER”.
En el display aparece “VALOR”: apretar el botón
“ENTER”.
En el display aparece el primer parámetro: “XXX”.
Se precisa que los parámetros disponilbes
pueden ser vistos con los botones “UP” y
“DOWN” y que es posible salir de la
programación, manteniendo las modificaciones
hechas, apretando el botón “STOP” varias veces,
hasta que en el display aparece “SELECCIONAR
UN PROGRAMA”.
XXX
Con este parámetro es posible selecc ionar el tipo
de valor que aparece en el display cuando viene
pedido el pago. Con los botones “UP” y “DOWN”
es posible ver la lista de los valores:
XXX ficha
EUR euro
DKR corona danese
L libra esterlina
SKR Corona svedese
SFR franco suizo
CS dólar canadese
USD dólar statunitense
YEN yen giapponese
Visualizado el simbol deseado, apretar el botón
“ENTER” para confirmar.
OTRO VALOR
Es posible adjuntar un valor personalizado (de
tres letras) a los precedentes. Si lo desea, apretar
el botón “ENTER” e insertar las tres letras que del
nuevo valor. Confirmar después con el botón
“ENTER”.
DECIMALES VALOR
Consiste en definir el número de cifras decimales
del valor personalizado. Apretar el botón “ENTER”
e insertar el número de cifras decimales.
Confirmar después con el botón “ENTER”
PRECIO MINIMO
Representa el coeficiente por el que viene
multiplicado el precio específico de todos los
programas para obtener el importe mínimo de
salida.
Ejemplo: el precio de un programa es de 1€. Si se
plantea PRECIO MINIMO=3, el importe mínimo
para arrancar el programma será de 3€. El utente
final tendrá en este caso una secado a 90°C de
30 minutos. Arrancado el programa, para
incrementar el crédito del tiempo de secado, será
después suficiente insertar una sola moneda de
1€.
Mientras que en el display aparece “PRECIO
MINIMO” apretar el botón “ENTER”. En el display
aparece “1”. Para modificar, insertar el valor
deseado, y confirmar después con el botón
“ENTER”.
FICHA 1
Es el valor reconocido del primer monedero.
Apretar el botón “ENTER” e insertar el valor, en la
unidad monetaria preferida, de la moneda
utilizada en el primer monedero. Confirmar con el
botón ”ENTER”.
FICHA 2
Es el valor reconocido del segundo monedero
(para las maquinas que lo tiene). Apretar el botón
“ENTER” e insertar el valor, en la unidad
monetaria preferida, de la moneda utilizada en el
segundo monedero. Confirmar con el botón
”ENTER”.
En el display aparece “UNIDAD
TEMPERATURA”. Apretar stop dos veces y salir
de la programación (los parámetros sucesivos
26
Page 27

E020401CW 26/11/04
pueden ser utilizados por los revendedores).Para
la prgramación de los gastos programa y de los
tiempos base de los singles programas, hacer
riferimiento a los corispondientes paramentros
describidos en el par.11 “PROGRAMACION”.
13. ALARMAS
Hay un elenco de alarmas que pueden bloquear
la máquina. Es importante recordar que en caso
de avería, debe intervenir sólo personal
autorizado.
VACIO
Al comienzo de la fase de calentamiento no hay
bastante vacio dentro de la máquina; la alarma
suena y la máquina queda bloqueada. Apretar la
tecla STOP para parar la alarma; el display
visualizará “APRIETA START”: la máquina está
lista para la ejecución de un progra ma. Veri ficar la
limpieza del filtro: si la alarma suena de nuevo,
cortar todas las alimentaciones y llamar al servicio
de asistencia.
SENSOR DE PRESION
la presión puede ser rota o simplemente se debe
esperar que la ventola se pare completamente.
Esperar treinta segundos e intentar poner en
marcha otra vez. Si la alarma suena de nuevo
apagar la máquina, cortar todas las
alimentaciones y llamar al servicio de asistencia.
PUERTA ABIERTA
La puerta está abierta. Cerrar la puerta y apretar
START para activar el programa o STOP para
pararlo. Si la alarma suena de nuevo, cortar todas
las alimentaciones y llamar al servicio de
asistencia.
FILTRO ABIERTO
La caja filtro no está cerrada correctamente.
Cerrar otra vez la caja filtro y apretar “START”
para re-arrancar el programa o “STOP” para
interrumpirlo. Si la alarma sigue sonando, tambien
cuando la caja filtro está cerrada, apagar la
máquina, cortar todas las alimentaciones y llamar
al servicio de asistencia
AVERIA SONDA
La sonda de la temperatura está rota: la máquina
se para y la alarma suena. Apretar STOP para
parar la señal acústica; la pantalla visualiza
“SELECCIONAR UN PROGRAMA”. La máquina
está lista para la ejecución del programa. Si la
alarma suena de nuevo, cortar todas las
alimentaciones y llamar al servicio de asistencia.
BLOQUEO TERMICO MOTOR
Si ocurre una sobrecarga térmica, la secadora se
para. La alarma suena. Apretar STOP para parar
la alarma: aparecerá “SELECCIONAR UN
PROGRAMA”. Esperar algunos segundos para
permitir a los motores enfriarse. Rearmar los relés
térmicos y poner en marcha la secadora. Si la
alarma suena de nuevo, cortar todas las
alimentaciones y llamar al servicio de asistencia.
LLAMA APAGADA
Es una alarma que puede parecer sólo en las
máquinas con calentamiento a gas. Han
quebrado tres tentativas de acensión del
quemador; suena el buzzer y la máquina se
bloquea. Pulsando STOP se elimina la alarma y
en el dispaly aparece « SELECIONAR UN
PROGRAMA » : la máquina está lista para la
puesta en marcha con un nuevo programa. Si la
señal sigue, apagar la máquina, quitar todas las
alimentaciones y preguntar por el deparamento
técnico.
PRESS GAS
Este mensaje aparece sólo en las secadoras a
gas si la presión del gas se reduce de repente; en
este caso la secadora se para. Apretar STOP
para parar la alarma; la pantalla muestra
“SELECCIONAR UN PROGRAMA”. La máquina
está lista para la ejecución del programa. Si la
alarma suena de nuevo, cortar todas las
alimentaciones y llamar al servicio de asistencia.
ATENCION Cualquier problema
técnico debe ser soluccionado por
técnicos cualificados.
14. MANTENIMIENTO
El mantenimiento debe ser efectuado por técnicos
cualificados: antes de efectuar cualquier
operación cortar la corriente eléctrica y sea el gas
o el vapor según la tipología de calentamiento de
la máquina Las siguientes operaciones deben ser
efectuadas regularmente:
CADA DIA Limpiar el filtro de pelusas cada tres o
cuatro secados. Controlar el filtro y sustituirlo si
está desgastado.
Cortar la corriente y el gas o el vapor según la
tipología de calentamiento de la máquina después
del trabajo.
CADA SEMANA
Limpiar las pelusas de la cámara del filtro y de la
sonda de temperatura (véanse las figuras finales
del manual).
27
Page 28

E020401CW 26/11/04
1. ÜBER DIESE ANLEITUNG
Diese Anleitung bezieht sich auf die Installation,
Betrieb und Wartung der
Waschschleudermaschine und entspricht des
europäischen Vorschriften. Diese Hinweise
werden an den Installateur und an den
Ausbesserer gerichtet; bevor sie mit der
Installation der Waschmaschine beginnen,
müssen diese Anleitung bitte sorgfältig lesen und
unbedingt die darin enthaltenen Hinweise und
Vorschläge beachten. Diese Anleitug muß jedem
Anwender zugänglich gemacht werden. Im Fall
von Verlegung, der Hersteller eine neue Kopie
bitten. Der Hersteller trägt keinerlei
Verantwortungen für eventuelle Schäden, die von
einem unvorsichtigen Gebrauch der Maschine
oder von einem falschen und unvollständigen
Lesen dieser Betriebsanleitung entstanden sein
könnten. Der Hersteller behält sich das Recht vor,
jegliche, durch eine Weiterentwicklung der
genannten Maschine bedingte Änderungen
anbringen zu können. Einige Abbildungen der
Betriebsanleitung können Einzelheiten enthalten,
die zum Teil verschieden von den Einzelheiten
sind, die in den Maschinen eingebaut worden
sind. Zeichnungen und technische Daten können
ohne Ankündigung geändert werden.
2. SICHERHEITSHINWEISE
Die verfehlte Beachtung der nachstehenden
Sicherheitshinweise den Leuten, den Geräten,
den Textilien, und den Tieren Schäden
verursachen:
die Aufstellung und die Wartung der
Maschine müssen von genehmigter
Belegschaft gemacht werden, die unsere
Produkte und die europäischen Vorschriften über
die Aufstellung der industriellen Maschinen
kennt.
Der Betriebshinweis der Maschine ist das
gewerbliche Trocknen von Kleidungsstücken und
Wäsche: jede andere Verwendungsart ist
verboten, wenn sie nicht schriftlich von dem
Hersteller genehmigt worden ist.
Die Maschine mit entzündbaren Stoffen nicht
nahekommen, um Brände und Explosionen zu
vermeiden.
Bitte, die geschriebenen Anweisungen auf den
Packungen und auch die Waschenanweisungen
auf den Kleidungsstücken immer befolgen.
Der Gebrauch der Maschine ist für Jugendliche
unter 14 Jahren verboten.
Der Hersteller lehnt jede Verantwotlichkeit für
Schäden ab, die von unvorsichtigen Extra
Anschlussen an der Maschine enstehen.
Diese Warnungen können nicht alle
mögliche Gefahren vorbeugen. Vor
jeglichen Arbeiten muß sich der
Anwender mit der Maschine vertraut
machen und mit der höchsten Vorsicht
verfahren.
3. VERANTWORTLICHKEIT DES
HERSTELLERS
Diese Anleitung fällt insbesondere die Kenntnis
und Beachtung der Sicherheits- und
Warnhinweise.
Der Hersteller lehnt jede Verantwortung in den
nachstehenden Fällen ab:
9 Gesetzwidriger Gebrauch der Maschine .
9 Falsche Installation der Maschine.
9 Verfehlte Beachtung der in diesem
Handbuch geschriebenen Anweisungen.
9 Spannungs- und Versorgungsschaden.
9 Nicht bewilligte Änderungen in der
Maschine.
9 Gebrauch der Maschinen von
unberechtigten Leuten.
4. INBETRIEBNAHME
Geben Sie Betriebsspannung zur Maschine mit
dem Schließen des Schalters, den der Monteur
aufwärts der Maschine voraussehen muß. Der
Mikroprozessor prüft die Diagnostiksysteme. Mit
Maschine Gas od. Dampf beheizt: machen Sie
ganz langsam das Spannungsventil auf, das den
Monteur aufwärts der Maschine voraussehen
muß.
5. VERWENDUNG DER MASCHINE
Das Display zeigt den Software des
Mikroprozessor. Die Maschine ist fertig zur
Wäschebeladung: das Wäschegewicht muß nicht
über 10% der Füllmenge sein. Mit
Feuchtigkeitsabmessung die Wäschebeladung
muß gleich zu 50% der nominale Beladung.
Das Bullauge aufmachen; die Maschine beladen
(für Maschine mit Tilting, lesen Sie die nächsten
Abschnitte); das Bullauge zumachen.
Wählen Sie eins von den 10 schon gespeicherten
Programmen des Mikroprozessor mit dem Druck
auf einer Taste von 0 bis 9 (Siehe Abschnitt 10).
Das Display zeigt den Namen der Programmwahl,
z.B. “ 50 min 90°C”.
Die Taste START drücken: das gewünschte
Programm wird gestartet. Wann das Programm
läuft, das Display zeigt die Temperatur in
Celsiusgrad und die Endzeit des Heizungszyklus.
Wenn der Trockner mit Feuchtigkeitsabmessung
ausgerüstet ist, das Display zeigt die Temperatur
und den Restfeuchtigkeitsprozentsatz.
Am Ende des Heizungszyklus fängt die Maschine
die Abkühlungsphase an. Das Display zeigt
28
Page 29

E020401CW 26/11/04
„ABKÜHLUNG”. Die Abkühlungsphase hat 2
programmierbaren Parameter: Zeit und
Temperatur. Die Maschine endet das Programm
wenn die Zeit vergangen ist oder wenn die
Temperatur erreicht wird. Die Programmen mit
Antiknitterphase bei dieser Phase zeigt das
Display “ANTIKNITTER”.
Die Maschine stoppt sich am Ende des Programm
und das Display zeigt “ENDE” mit einem
Tonsignal. Das Bullauge aufmachen und die
Wäsche entladen.
Das Display zeigt “PROGRAMMWAHL” wieder
und die Maschine ist für ein neues Programm
fertig.
6. VERWENDUNG DER ICD MASCHINE
Die Maschinen mit Nassreinigungssystem muß
die Füllmenge gleich zu 50% der nominale
Beladung sein.
Vor der Wäschebeladung prüfen Sie ob
alle die Scharnier ganz offen sind und
dass eventuellen Metallknöpfe
herausgenommen worden sind oder
vorsichtig isoliert worden sind.
7. VERWENDUNG DER MASCHINE MIT
TILTING
Die Maschine mit Tilting: Umkehrung nach vorn
od./u. nach hinten der Trommel sind auf einer
Fernsteuerung.
ACHTUNG: während der Tiltingphase
oder während der pneumatischen
Türöffnungs muß der Benutzer weit von
der Maschine und von der Tür sein.
Warten Sie immer auf das Endprogramm vor der
Tiltingbetätigung. Die Fernsteuerung funktioniert
durch den Schlüsselschalter rechts unten. Wann
die Fernsteuerung in Betrieb ist, der
Mikroprozessor der Maschine wird entaktiviert.
Die Fernsteuerung funktioniert, wann das grüne
Licht links oben leuchtet.
BELADUNGSPHASEN (wenn installiert)
Setzen Sie mit dem Schlüsselschalter die
Fernsteuerung in Betrieb. Türöffnung: die
Betriebstaste (links unten) und die Taste „DOOR
OPEN“ gleichzeitig drücken. Nach der Türöffnung
drücken Sie gleichzeitig die Betriebstaste (links
unten) und die Taste “LOAD UP”, um die
Maschine nach hinten zu kippen. Nach der
Beladung drücken Sie gleichzeitig die
Betriebstaste (links unten) und die Taste “LOAD
DOWN”, um die Maschine in der
Waagerechtstellung wieder zu stellen. Tür zu: die
Betriebstaste (links unten) und die Taste „CLOSE
DOOR“ gleichzeitig drücken.
Schalten Sie die Fernsteuerung mit dem
Schlüsselschalter aus.
ENTLADUNGSPHASEN
Setzen Sie mit dem Schlüsselschalter die
Fernsteuerung in Betrieb. Türöffnung: die
Betriebstaste (links unten) und die Taste „DOOR
OPEN“ gleichzeitig drücken. Nach der Türöffnung
drücken Sie gleichzeitig die Betriebstaste (links
unten) und die Taste “UNLOAD UP”, um die
Maschine nach vorne zu kippen. Wann die
Maschine in der Entladungsstellung ist, kann man
die Wäsche mit der Drehung der Trommel (nach
links u./od. nach rechts) entladen; drücken Sie
gleichzeitig die Betriebstaste (links unten) und die
Taste “UNLOAD ROTATION” (RIGHT e/o LEFT).
Nach der Entladung drücken Sie gleichzeitig die
Betriebstaste (links unten) und die Taste
“UNLOAD UP”, um die Maschine in der
Waagerechtstellung wieder zu stellen. Schliessen
Sie die Tür: die Betriebstaste (links unten) und die
Taste „CLOSE DOOR“ gleichzeitig drücken.
29
Page 30

E020401CW 26/11/04
Schalten Sie die Fernsteuerung mit dem
Schlüsselschalter (rechts unten) aus.
8. PAUSE UND STOP
Mit Maschine in Betrieb kann man nicht die
Programme ändern. Bei der Türöffnung schaltet
sich die Maschine aus und das Display zeigt “TÜR
AUF”. Wann die Tür wieder zu ist, zeigt das
Display “START DRÜCKEN”: START drücken,
um das Programm wieder laufen zu lassen. Wenn
man während des Betriebs einmal “STOP” drückt,
die Maschine stellt sich in Pause: das Display
zeigt "PAUSE". Mit START läuft das Programm
wieder ein; mit dem zweiten Druck auf STOP das
Programm stoppt sich definitv.
9. EINZELZYKLUS
Man kann ein Programm in wenigen Sekunden
speichern aber gültig nur für einen einzigen
Betrieb. Drücken Sie die Taste SINGLE CYCLE,
das Display zeigt “ZYKLUSDAUER”: ENTER
drücken. Das Display zeigt “0”: legen Sie die
gewünschte Zeit (v. 1 bis 99 Minuten) ein, ENTER
bestätigen.
Das Display zeigt “TEMPERATUR ZYKLUS”.
ENTER drücken: das Display zeigt “0”. Legen Sie
die gewünschte Temperatur ein (v. 29 bis 90°C),
ENTER zu bestätigen.
Das Display zeigt “START DRÜCKEN”. Mit
START läuft das gespeicherte Programm ein.
10. SCHON GESPEICHERTE PROGRAMME
Hintereinander geben wir eine Auflistung der
schon gespeicherten Programmen. Die
Abkühlungszeit ist gleich zu 10 Minuten und die
Verkühlungstemperatur ist gleich zu 30°C für alle
Programme.
Nr. Name
Dauer
[Minuten]
Temperatur
[°C]
0 50 min 90°C 50 90
1 40 min 75°C 40 75
2 30 min 60°C 30 60
3 30 min 45°C 30 45
4 40 min 60°C 40 60
5 25 min 50°C 25 50
6 20 min 45°C 20 45
7 30 min 40°C 30 40
8 20 min 40°C 20 40
9 25 min 40°C 25 40
Standard
Nr. Name
Rest-
feuchtigkeit
[%]
Temperatur
[°C]
0 BAUMWOLLE 10 90
1 SAMT 10 75
2 WOLLE 10 60
3 SYNTHETISCH 10 45
4 Pr. 04 10 60
5 Pr. 05 10 50
6 Pr. 06 10 45
7 Pr. 07 10 40
8 Pr. 08 10 40
9 Pr. 09 10 40
Mit Feuchtigkeitsabmessung
Nr. Name
Dauer
[Minuten]
Temperatur
[°C]
0 HIGH Minimumzeit 90
1 MED Minimumzeit 75
2 LOW Minimumzeit 60
Für Münzensteuerungsmachinen
11. PROGRAMMIERUNG
Man kann die Parameter der schon gespeicherten
30
Page 31

E020401CW 26/11/04
Programmen ändern.
Wann das Display “PROGRAMM WÄHLEN” zeigt,
drücken Sie gleichzeitig die Taste “UP” und
“DOWN”.
Das Display zeigt “PASSWORD”: “ENTER”
drücken. Das Display zeigt “0”. Legen Sie das
Passwort “777” ein, “ENTER” zu bestätigen. Das
Diaplay zeigt das erste Parament: “AUSKÜNFTE”.
Man kann die Parameter mit den tasten “UP” und
“DOWN” durchlesen. Man kann die
Programmierung mit den Programmänderungen
beenden mit dem Druck auf “STOP” bis wann das
Display “PROGRAMM WÄHLEN” zeigt.
Die Paramenter:
SPRACHE
“ENTER” drücken, um das Wert des Paramenters
zu lesen. Das Display zeigt “ITALIENISCH”. “UP”
und “DOWN” drücken, um die Sprache zu ändern.
“ENTER” drücken, um die gewünschte Sprache
zu bestätigen.
AUSKÜNFTE
“ENTER” drücken, um das Wert des Paramenters
zu lesen. Das Display zeigt
“BETRIEBSTUNDEN”. Noch einmal “ENTER”
drücken: das Display zeigt die Betriebstunden v.
Inbetriebnahme der Maschine. Per uscire dal
parametro premere il tasto “ENTER” drücken, um
den nächsten Parameter zu lesen.
DATUM (nur für ICD-Maschine)
“ENTER” drücken, um das Wert des Paramenters
zu lesen. Ändern Sie das Wert mit der Tastatur,
“ENTER” zu bestätigen.
UHR (nur für ICD-Maschine)
“ENTER” drücken, um das Wert des Paramenters
zu lesen. Ändern Sie das Wert mit der Tastatur,
“ENTER” zu bestätigen.
PROGRAMME
“ENTER” drücken, um die Parameter v. eins od.
mehr Programme zu ändern. Das Display zeigt
“50 min 90°C ”, das das erste Programm ist. “UP”
und “DOWN” drücken, um die schon
gespeicherten Programme durchzulesen. Wann
das Display das gewünschte Programm zeigt,
“ENTER” drücken. Das Parametermenu des
ausgewählten Programm wird gezeigt. Hiermit die
programmierbaren Parameter für
Einzelprogramm.
NAME
“ENTER” drücken, um den Parameter zu lesen.
Mit der Tastatur legen Sie den gewünschten
Name ein. “EINZELZYKLUS” drücken, um
eventuelle Fehler zu löschen. “ENTER” zu
bestätigen und den nächsten Parameter lesen.
AUTO (nur für Maschine mit Feuchtigkeitsfühler)
“ENTER” drücken, um den Parameter zu lesen.
“UP” und “DOWN” drücken, um den Parameter zu
ändern. Wann der Parameter “NEIN” ist, das
Programm hat Trocknerzeit und
Trocknertemperatur. Wann den Parameter “JA”
ist, das Programm ist automatisch und hat die
Temperatur und das Restfeuchtigkeitsniveau zu
erreichen. “UP” und “DOWN” drücken, um eine
der schon gespeicherten Kurven für das Trocknen
auszuwählen. “ENTER” zu bestätigen und den
nächsten Parameter lesen.
ZYKLUSDAUER
“ENTER” drücken, um das Wert des Paramenters
zu lesen. Mit der Tastatur legen Sie die
Zyklusdauer der Heizung (v. 1 bis 99 Minuten)
ein. “ENTER” zu bestätigen.
DREHUNGSZEIT (nur für Maschine mit
Reversierung)
“ENTER” drücken, um das Wert des Paramenters
zu lesen. Mit der Tastatur legen Sie die Rechtsund Linksdrehungszeit (v. 10 bis 40 Sekunden)
ein. “ENTER” zu bestätigen.
REVERSIERUNGSPAUSE (nur für mAschine mit
Reversierung)
“ENTER” drücken, um das Wert des Paramenters
zu lesen. Mit der Tastatur legen Sie die Pausezeit
(v. 5 bis 15 Sekunden) ein. “ENTER” zu
bestätigen.
TEMPERATUR DES ZYKLUS
“ENTER” drücken, um das Wert des Paramenters
zu lesen. Mit der Tastatur legen Sie die
Temperatur des Programms (v. 25 bis 90
Sekunden) ein. “ENTER” zu bestätigen.
DAUER DER VERKÜHLUNG
“ENTER” drücken, um das Wert des Paramenters
zu lesen. Mit der Tastatur legen Sie die
Zyklusdauer der Verkühlung (v. 0 bis 15 Minuten)
ein. “ENTER” zu bestätigen.
TEMPERATUR DES VERKÜHLUNGSENDE
“ENTER” drücken, um das Wert des Paramenters
zu lesen. Mit der Tastatur legen Sie die
Temperatur des Verkühlungsende (v. 20 bis
35°C) ein. “ENTER” zu bestätigen.
ENDZYKLUSFEUCHTIGKEIT (nur für Maschine
mit Feuchtigkeitsfühler)
“ENTER” drücken, um das Wert des Paramenters
zu lesen. Mit der Tastatur legen Sie das Wert der
Restfeuchtigkeit (v. 50 bis 10%) ein. “ENTER” zu
bestätigen.
PROGRAMMSKOSTEN (nur für
Münzsteuerungsmachinen)
“ENTER“ drücken, um das Wert des Parameters
zu lesen. Mit der Tastatur legen Sie die
gewünschte Summe ein, um einen bestimmten
Zeit des Parameters zu kaufen. Sie Können die
Programmskonsten auf gengbaren Sorten auch
mit Dezimalpunkt lesen, der Wert ist zwischen 0
und 64000. “ENTER“ zu bestätigen.
MINIMUM ZEIT (nur für
Münzenteuerungsmachinen)
“ENTER“ um das Wert des Parameters zu lesen.
Der Tastatur benützen um den Zeit zuwählen.
Einwerfen Sie die Summe von dem Parameter
“Programmskosten“ festgesetzt.
Das Wert ist zwischen 1 und 255. “ENTER“ zu
bestätigen.
BUZZERDAUER
“ENTER” drücken, um das Wert des Paramenters
zu lesen. Mit der Tastatur legen Sie Die
Buzzerzeit am Endprogramm (v. 1 bis 15
31
Page 32

E020401CW 26/11/04
Sekunden) ein. “ENTER” zu bestätigen.
12. PROGRAMMIERUNG DER
MÜNZSTEUERUNG
Die Maschine mit Münzsteuerung können
gespeichert werden. Man kann die Temperaturzeit
und die Preise der Programme ändern. Für die
Programmierung braucht man eine Tastatur mit
16 Tasten.
YEN japanische Yen
“ENTER” zu bestätigen.
SONSTIGE WÄHRUNG
Man kann eine neue Währung (max 3
Buchstaben) einlegen. Einfach „ENTER“ drücken
und die 3 Buchstaben der neuen Währung
einlegen. „ENTER“ zu bestätigen.
DEZIMALWÄHRUNG
“ENTER” drücken und die Zahl des
Währungbetrag einlegen. “ENTER” zu bestätigen.
MINDESTPREIS
Preiskalkutationsbasis:
z.B.: Programmpreis ist 1€. Wenn man
MINDESTPREIS=3 speichert, den Mindestpreis
für das Programmstart wird v. 3€ sein. Beim
Programmlauf kann man den Kredit des
Trocknenzeit erhöhen: einfach nur eine Münze v.
1€ einwerfen.
Während des Display “MINDESTPREIS” zeigt,
“ENTER“ drücken. Das Display zeigt “1”. Legen
Sie den gewünschten Wert ein; “ENTER” zu
bestätigen.
MÜNZE 1
Schalten Sie die Spannung aus. Öffnen Sie
vordere Klappe mit einem Schrabenzieher.
Entfernen Sie die flat der Tastatur mit 5 Tasten
von der Platine und am gleichen Stecker
verbinden Sie die Tastatur mit 16 Tasten (Die
Tastatur mit 16 Tasten wird mit der
Dokumentation der Maschine geliefert).
Schalten Sie die Maschine wieder ein.
Währed des Display “PROGRAMM WÄHLEN”
zeigt, die Taste “UP” und “DOWN” gleichzeitig
drücken. Das Display zeigt “PASSWORT”.
“ENTER” drücken.
Das Display zeigt “0”. Legen Sie die Kode 777 ein
und “ENTER” zu bestätigen.
Das Display zeigt “INSTALLATION”: “ENTER”
drücken.
Das Display zeigt “WÄHRUNG”: “ENTER”
drücken.
Das Display zeigt den ersten Parameter: “XXX”.
Man kann die Parameter mit den tasten “UP” und
“DOWN” durchlesen. Man kann die
Programmierung mit den Programmänderungen
beenden mit dem Druck auf “STOP” bis wann das
Display “PROGRAMM WÄHLEN” zeigt.
XXX
Mit diesem Parameter kann man die Währung bei
der Bezahlung auswählen. Man kann die
Währungssymbolen mit den Tasten “UP” und
“DOWN” durchlesen.
XXX Jeton
EUR Euro
DKR Dänische Krone
L Pfund Sterling
SKR Schwedische Krone
SFR Schweizer Franken
CS kanadischer Dollar
USD USA-Dollar
Es ist den Wert der ersten Münzsteuerung.
“ENTER” drücken und den Wert der ausgewählte
Münze einlegen. ”ENTER” zu bestätigen.
MÜNZE 2
Es ist den Wert der zweiten Münzsteuerung. (für
augestattenden Machinen). “ENTER” drücken
und den Wert der ausgewählte Münze einlegen.
”ENTER” zu bestätigen.
Das Display zeigt “TEMPERATUREINHEIT”.
Zweimal STOP drücken und die Programmierung
beenden (die nächsten Parameter sind nur für
den Verkäufer).
Für Programmskosten und Zeitbasis der einzeln
Programmen bitte sehen die entsprechenden
Parameter, (Par. 11) PROGRAMMIERUNG.
13. DIE ALARMSIGNALEN
Hintereinander geben wir eine Auflistung der
Aufschriften, die das Display zeigen könnte.
BEMERKUNG: Alle Arbeiten zur Installation und
Inbetriebnahme sowie Instandhaltung sind nur
von qualifiziertem Fachpersonal auszuführen.
UNTERDRUCK
Beim Heizregisterstart gibt es nicht genug
Unterdruck in dem Trockner; der Buzzer klingt
und die Maschine stoppt sich. Mit “STOP” das
Alarmsignal wird gelöscht und das Display zeigt
“START DRÜCKEN”; die Maschine ist fertig für
ein neues Programm. Prüfen Sie die Sauberkeit
des Flusenfilters.
Wenn das Alarmsignal weiter klingt, also schalten
Sie die Maschine aus und unterbrechen Sie alle
Stromanschlüsse. Bitte wenden Sie sich an den
technischen Kundendienst.
Verificare la pulizia del filtro filacce:
UNTERDRUCKFÜHLER
Das Alarm wird beim Programmstartversuch,
während des Laufrads noch in Betrieb ist,
32
Page 33

E020401CW 26/11/04
gezeigt. Warten Sie 30 Sekunden und schalten
Sie die Maschine wieder ein. Wenn das
Alarmsignal weiter klingt, also schalten Sie die
Maschine aus und unterbrechen Sie alle
Stromanschlüsse. Bitte wenden Sie sich an den
technischen Kundendienst.
TÜR OFFEN
Das Bullauge wurde aufgemacht. Machen Sie das
Bullauge wieder zu. Drücken Sie “START”, um
das Programm wieder laufen zu lassen oder
“STOP”, um das Programm zu unterbrechen.
Wenn das Alarmsignal weiter klingt, also schalten
Sie die Maschine aus und unterbrechen Sie alle
Stromanschlüsse. Bitte wenden Sie sich an den
technischen Kundendienst.
FILTER OFFEN
Der Filterkasten ist nicht richtig zugemacht.
Machen Sie den Filterkasten wieder zu. Drücken
Sie “START”, um das Programm wieder laufen zu
lassen oder “STOP”, um das Programm zu
unterbrechen. Wenn das Alarmsignal, auch mit
dem Filterkasten richtig zu, weiter klingt, also
schalten Sie die Maschine aus und unterbrechen
Sie alle Stromanschlüsse. Bitte wenden Sie sich
an den technischen Kundendienst.
DEFEKTER FÜHLER
Der Temperaturfühler ist kaputt. Die Maschine
stoppt sich und der Buzzer klingt. Mit “STOP” das
Alarmsignal wird gelöscht und das Display zeigt
“PROGRAMM WÄHLEN”; die Maschine ist fertig
für ein neues Programm. Wenn das Alarmsignal
weiter klingt, schalten Sie die Maschine aus und
unterbrechen Sie alle Stromanschlüsse. Bitte
wenden Sie sich an den technischen
Kundendienst.
THERMOSICHERUNG
Ein Motor ist überheizt. Die Maschine stoppt sich.
Der Buzzer klingt. Mit “STOP” das Alarmsignal
wird gelöscht und das Display zeigt “PROGRAMM
WÄHLEN”; warten Sie einigen Minuten für die
Abkühlung der Motoren. Bewehren Sie die
thermischen Relais wieder und schalten Sie die
Maschine ein. Wenn das Alarmsignal weiter klingt,
schalten Sie die Maschine aus und unterbrechen
Sie alle Stromanschlüsse. Bitte wenden Sie sich
an den technischen Kundendienst.
FLAMME AUS
Es wird nur mit Gasheizung gezeigt.
Nach 3 Entzündungsversuchen des Brenners.
Der Buzzer klingt und die Maschine stoppt sich.
Mit “STOP” das Alarmsignal wird gelöscht und
das Display zeigt “PROGRAMM WÄHLEN”; die
Maschine ist fertig für ein neues Programm. Wenn
das Alarmsignal weiter klingt, schalten Sie die
Maschine aus und unterbrechen Sie alle
Stromanschlüsse. Bitte wenden Sie sich an den
technischen Kundendienst.
GASDRUCK
Es wird nur mit Gasheizung gezeigt. Druckgefälle
bei der Gasheizung. Der Buzzer klingt und die
Maschine stoppt sich. Mit “STOP” das Alarmsignal
wird gelöscht und das Display zeigt “PROGRAMM
WÄHLEN”; die Maschine ist fertig für ein neues
Programm. Wenn das Alarmsignal weiter klingt,
schalten Sie die Maschine aus und unterbrechen
Sie alle Stromanschlüsse. Bitte wenden Sie sich
an den technischen Kundendienst.
ACHTUNG: Alle Arbeiten zur Installation
und Inbetriebnahme sowie Instandhaltung
sind nur von qualifiziertem Fachpersonal
auszuführen.
14. WARTUNG
Die Wartung des Trockners sind nur von
qualifiziertem Fachpersonal auszuführen.
Vor der Wartung muß man die Stromanschlüsse
od. die eventuellen Gas- od. Dampfanschlüsse
unterbrechen.
Vor der Wartung muß man die Stromanschlüsse
od. die eventuellen Gas- od. Dampfanschlüsse
unterbrechen.
Bitte machen Sie immer die folgenden
Wartungsarbeiten:
TÄGLICH
Säubern Sie den Filter nach 3 od. 4 Trocknen.
Prüfen Sie den Filter und erneuern Sie den Filter
wenn kaputt oder defekt.
Unterbrechen Sie immer die Stromanschlüsse od.
die eventuellen Gas- od. Dampfanschlüsse am
Ende des Tagewerks.
WÖCHENTLICH
Reinigen Sie die Flusen aus dem Filterkasten und
aus dem Temperaturfilter (Siehe die Bilder am
Ende der Anleitung).
33
 Loading...