

Page 1

Welch Allyn®
RScribe™
12-LEAD electrocardiograph SYSTEM
USER MANUAL
Manufactured by Welch Allyn, Inc. Skaneateles Falls, NY U.S.A.
CAUTION: Federal law restricts this device to sale by or on the order of a physician.
Page 2
©2019 Welch Allyn This document contains confidential information that belongs to Welch Allyn, Inc. No part of
this document may be transmitted, reproduced, used, or disclosed outside of the receiving organization without the
express written consent of Welch Allyn, Inc. Welch Allyn is a registered trademark of Welch Allyn, Inc. AM12,
RScribe, WAM, and ELI are trademarks of Welch Allyn, Inc. SCF (Source Consistency Filter) is a copyright of
Welch Allyn, Inc. Microsoft and Windows are registered trademarks of Microsoft Corporation. Adobe and Acrobat
are registered trademarks of Adobe Systems Incorporated. DICOM is the registered trademark of the National
Electrical Manufacturers Association for its standards publications relating to digital communications of medical
information. Citrix and Citrix XenApp are registered trademarks of Citrix Systems, Inc. Software V7.0.0 2017-03
For patent information, please visit www.welchallyn.com/patents
For information about any Welch Allyn product, visit: https://www.welchallyn.com/en/about-us/locations.html
Customer Service and Technical Support: https://www.welchallyn.com/en/other/contact-us.html 1.888.667.8272,
mor_tech.support@hillrom.com
9515-217-50-ENG Rev B
Revision Date 2019-08
901127 ELECTROCARDIOGRAPH
EU IMPORTER
Welch Allyn, Inc.
4341 State Street Road
Skaneateles Falls, NY 13153 USA
www.welchallyn.com
Welch Allyn Limited
Navan Business Park, Dublin Road,
Navan, Co. Meath C15 AW22
Ireland
Page 3

Page | 1
TABLE OF CONTENTS
NOTICES ................................................................................................................................................................. 4
MANUFACTURER’S RESPONSIBILITY .................................................................................................................................... 4
RESPONSIBILITY OF THE CUSTOMER .................................................................................................................................... 4
EQUIPMENT IDENTIFICATION ............................................................................................................................................. 4
COPYRIGHT AND TRADEMARK NOTICES ............................................................................................................................... 4
OTHER IMPORTANT INFORMATION ..................................................................................................................................... 4
NOTICE TO EU USERS AND/OR PATIENTS: ........................................................................................................................... 4
WARRANTY INFORMATION ................................................................................................................................... 5
YOUR WELCH ALLYN WARRANTY ....................................................................................................................................... 5
USER SAFETY INFORMATION ................................................................................................................................. 7
WARNINGS ................................................................................................................................................................. 7
CAUTION....................................................................................................................................................................... 9
NOTES ........................................................................................................................................................................ 10
EQUIPMENT SYMBOLS AND MARKINGS .............................................................................................................. 12
SYMBOL DELINEATION ................................................................................................................................................... 12
PACKAGE SYMBOL DELINEATION ...................................................................................................................................... 13
GENERAL CARE .................................................................................................................................................... 14
PRECAUTIONS .............................................................................................................................................................. 14
INSPECTION ................................................................................................................................................................. 14
CLEANING AND DISINFECTING ......................................................................................................................................... 14
DISPOSAL .................................................................................................................................................................... 14
ELECTROMAGNETIC COMPATIBILITY (EMC) ......................................................................................................... 15
REGULATORY RADIO COMPLIANCE ................................................................................................................................... 19
INDUSTRY CANADA (IC) EMISSIONS .................................................................................................................................. 20
EUROPEAN UNION ........................................................................................................................................................ 21
INTRODUCTION ................................................................................................................................................... 23
MANUAL PURPOSE ....................................................................................................................................................... 23
AUDIENCE ................................................................................................................................................................... 23
INTENDED USE ............................................................................................................................................................. 23
INDICATIONS FOR USE ................................................................................................................................................... 24
SYSTEM DESCRIPTION .................................................................................................................................................... 24
ACQUISITION MODULE TYPES ......................................................................................................................................... 25
LEAD FAIL ................................................................................................................................................................... 26
RSCRIBE SOFTWARE INSTALLATION PROCESS ...................................................................................................................... 27
FEATURE ACTIVATION .................................................................................................................................................... 31
RSCRIBE LOGIN AND MAIN DISPLAY ................................................................................................................................. 32
RSCRIBE PROGRAM ICONS AND DESCRIPTIONS ................................................................................................................... 33
USER ROLES AND PERMISSIONS ....................................................................................................................................... 34
RSCRIBE WORKSTATION SPECIFICATIONS .......................................................................................................................... 35
WAM SPECIFICATIONS .................................................................................................................................................. 37
WAM AND AM12 ACCESSORIES .................................................................................................................................... 40
RSCRIBE NETWORK OPERATION IN A DISTRIBUTED CONFIGURATION ...................................................................................... 41
Page 4

TABLE OF CONTENTS
Page | 2
USING RSCRIBE .................................................................................................................................................... 43
SCHEDULE AN EXAM ...................................................................................................................................................... 43
START A RESTING EXAM .................................................................................................................................................. 43
ACQUIRING A STAT ECG EXAM ...................................................................................................................................... 43
REVIEWING AND SIGNING AN EXAM AND PRINTING A REPORT................................................................................................. 43
REAL-TIME DISPLAY....................................................................................................................................................... 43
RECORDING AN ECG ..................................................................................................................................................... 44
PREVIEW ACQUISITION SCREEN ....................................................................................................................................... 44
PAIRING WAM WITH RSCRIBE ........................................................................................................................................ 46
MWL/PATIENTS ................................................................................................................................................... 47
MWL ........................................................................................................................................................................ 47
EDIT ORDER ................................................................................................................................................................ 47
NEW ORDER ................................................................................................................................................................ 48
DELETE AN EXISTING ORDER ........................................................................................................................................... 48
EXIT MWL/PATIENTS ................................................................................................................................................... 48
RECORD AN ECG .................................................................................................................................................. 50
PATIENT PREPARATION .................................................................................................................................................. 50
PATIENT HOOKUP ......................................................................................................................................................... 50
PATIENT DEMOGRAPHIC ENTRY ....................................................................................................................................... 52
STAT ECG .................................................................................................................................................................. 52
START A RESTING EXAM ................................................................................................................................................. 52
ECG ACQUISITION, PRINTING, AND STORAGE .................................................................................................................... 54
DISPLAY OVERVIEW....................................................................................................................................................... 54
ACQUIRE ECGS ............................................................................................................................................................ 56
CONTEXT MENUS ................................................................................................................................................. 60
CONTEXT MENU SETTINGS ............................................................................................................................................. 60
EXAM SEARCH ..................................................................................................................................................... 65
SELECTING ECG REPORTS TO REVIEW ............................................................................................................................... 65
ADVANCED SEARCH....................................................................................................................................................... 66
EDIT A RESTING ECG REPORT ......................................................................................................................................... 67
REPORT PRINT PREVIEW ................................................................................................................................................ 69
ICON TOOL BAR............................................................................................................................................................ 70
SECTIONS .................................................................................................................................................................... 70
SYSTEM SETTINGS ................................................................................................................................................ 71
MANAGE USER ACCOUNTS AND PERSONNEL ...................................................................................................................... 71
NEW USER .................................................................................................................................................................. 72
MANAGE/CREATE GROUPS ............................................................................................................................................ 72
MODALITY SETTINGS ..................................................................................................................................................... 73
WAVEFORMS TAB ......................................................................................................................................................... 74
ACQUIRE TAB ............................................................................................................................................................... 76
FULL DISCLOSURE TAB ................................................................................................................................................... 77
RESTING ECG TAB ........................................................................................................................................................ 79
CFD CONFIGURATION ................................................................................................................................................... 81
ELI LINK CONFIGURATION .............................................................................................................................................. 82
UNLOCK EXAMS ........................................................................................................................................................... 83
MANAGE ARCHIVE STORAGE .......................................................................................................................................... 83
AUDIT TRAIL LOGS ........................................................................................................................................................ 85
Page 5

TABLE OF CONTENTS
Page | 3
SERVICE LOGS .............................................................................................................................................................. 85
CONFIGURE WORKFLOW ................................................................................................................................................ 86
USER PREFERENCES ....................................................................................................................................................... 87
RSCRIBE WILL PRESENT THE DEFAULT SETTINGS ON ANY OF THE WORKSTATIONS THAT THE USER LOGS INTO. ....... 87
REPORT CONFIGURATION TOOL ....................................................................................................................................... 88
USER ROLE ASSIGNMENT TABLE ...................................................................................................................................... 89
Page 6

Page | 4
NOTICES
Manufacturer’s Responsibility
Welch Allyn, Inc. is responsible for the effects on safety and performance only if:
• Assembly operations, extensions, readjustments, modifications, or repairs are carried out only by persons
authorized by Welch Allyn, Inc.
• The device is used in accordance with the instructions for use.
Responsibility of the Customer
The user of this device is responsible for ensuring the implementation of a satisfactory maintenance schedule.
Failure to do so may cause undue failure and possible health hazards.
Equipment Identification
Welch Allyn, Inc. equipment is identified by a serial and reference number on the back of the device. Care should
be taken so that these numbers are not defaced. Software equipment is accompanied by an identification card;
carefully store this card as the information is needed for activation, upgrade and customer service.
Copyright and Trademark Notices
This document contains information that is protected by copyright. All rights are reserved. No part of this
document may be photocopied, reproduced, or translated to another language without prior written consent of Welch
Allyn, Inc.
Other Important Information
The information in this document is subject to change without notice.
Welch Allyn, Inc. makes no warranty of any kind with regard to this material including, but not limited to, implied
warranties of merchantability and fitness for a particular purpose. Welch Allyn, Inc. assumes no responsibility for
any errors or omissions that may appear in this document. Welch Allyn, Inc. makes no commitment to update or to
keep current the information contained in this document.
Notice to EU Users and/or Patients:
Any serious incident that has occurred in relation to the device, should be reported to the manufacturer and the
competent authority of the Member State in which the user and/or patient is established.
Page 7

Page | 5
WARRANTY INFORMATION
Your Welch Allyn Warranty
WELCH ALLYN, INC. (hereafter referred to as “Welch Allyn”) warrants that components within Welch Allyn
products (hereafter referred to as “Product/s”) will be free from defects in workmanship and materials for the
number of years specified on documentation accompanying the product, or previously agreed to by the purchaser
and Welch Allyn, or if not otherwise noted, for a period of thirteen (13) months from the date of shipment.
Consumable, disposable or single use products such as, but not limited to, PAPER or ELECTRODES are warranted
to be free from defects in workmanship and materials for a period of 90 days from the date of shipment or the date
of first use, whichever is sooner.
Reusable product such as, but not limited to, BATTERIES, BLOOD PRESSURE CUFFS, BLOOD PRESSURE
HOSES, TRANSDUCER CABLES, Y-CABLES, PATIENT CABLES, LEAD WIRES, MAGNETIC STORAGE
MEDIUMS, CARRY CASES or MOUNTS, are warranted to be free from defects in workmanship and materials for
a period of 90 days. This warranty does not apply to damage to the Product/s caused by any or all of the following
circumstances or conditions:
a) Freight damage;
b) Parts and/or accessories of the Product/s not obtained from or approved by Welch Allyn;
c) Misapplication, misuse, abuse, and/or failure to follow the Product/s instruction sheets and/or information guides;
d) Accident; a disaster affecting the Product/s;
e) Alterations and/or modifications to the Product/s not authorized by Welch Allyn;
f) Other events outside of Welch Allyn’s reasonable control or not arising under normal operating conditions.
THE REMEDY UNDER THIS WARRANTY IS LIMITED TO THE REPAIR OR REPLACEMENT WITHOUT
CHARGE FOR LABOR OR MATERIALS, OR ANY PRODUCT/S FOUND UPON EXAMINATION BY WELCH
ALLYN TO HAVE BEEN DEFECTIVE. This remedy shall be conditioned upon receipt of notice by Welch Allyn
of any alleged defects promptly after discovery thereof within the warranty period. Welch Allyn’s obligations under
the foregoing warranty will further be conditioned upon the assumption by the purchaser of the Product/s (i) of all
carrier charges with respect to any Product/s returned to Welch Allyn’s principal place or any other place as
specifically designated by Welch Allyn or an authorized distributor or representative of Welch Allyn, and (ii) all risk
of loss in transit. It is expressly agreed that the liability of Welch Allyn is limited and that Welch Allyn does not
function as an insurer. A purchaser of a Product/s, by its acceptance and purchase thereof, acknowledges and agrees
that Welch Allyn is not liable for loss, harm, or damage due directly or indirectly to an occurrence or consequence
there from relating to the Product/s. If Welch Allyn should be found liable to anyone under any theory (except the
expressed warranty set forth herein) for loss, harm, or damage, the liability of Welch Allyn shall be limited to the
lesser of the actual loss, harm, or damage, or the original purchase price of the Product/s when sold.
Page 8

WARRANTY INFORMATION
Page | 6
EXCEPT AS SET FORTH HEREIN WITH RESPECT TO REIMBURSEMENT OF LABOR CHARGES, A
PURCHASER’S SOLE EXCLUSIVE REMEDY AGAINST WELCH ALLYN FOR CLAIMS RELATING TO
THE PRODUCT/S FOR ANY AND ALL LOSSES AND DAMAGES RESULTING FROM ANY CAUSE SHALL
BE THE REPAIR OR REPLACEMENT OF DEFECTIVE PRODUCT/S TO THE EXTENT THAT THE DEFECT
IS NOTICED AND WELCH ALLYN IS NOTIFIED WITHIN THE WARRANTY PERIOD. IN NO EVENT,
INCLUDING THE CLAIM FOR NEGLIGENCE, SHALL WELCH ALLYN BE LIABLE FOR INCIDENTAL,
SPECIAL, OR CONSEQUENTIAL DAMAGES, OR FOR ANY OTHER LOSS, DAMAGE, OR EXPENSE OF
ANY KIND, INCLUDING LOSS OF PROFITS, WHETHER UNDER TORT, NEGLIGENCE OR STRICT
LIABILITY THEORIES OF LAW, OR OTHERWISE. THIS WARRANTY IS EXPRESSLY IN LIEU OF ANY
OTHER WARRANTIES, EXPRESS OR IMPLIED, INCLUDING, BUT NOT LIMITED TO THE IMPLIED
WARRANTY OF MERCHANTABILITY AND THE WARRANTY OF FITNESS FOR A PARTICULAR
PURPOSE.
Page 9
Page | 7
USER SAFETY INFORMATION
WARNING:
Means there is the possibility of personal injury to you or others.
Caution:
Means there is the possibility of damage to the device.
Note:
Provides information to further assist in the use of the device.
NOTE: This manual may contain screen shots and pictures. Any screen shots and pictures are provided for
reference only. Consult the actual screen in the host language for specific wording.
WARNINGS
1. This manual gives important information about the use and safety of this device. Deviating from operating
procedures, misuse or misapplication of the device, or ignoring specifications and recommendations could
result in increased risk of harm to users, patients and bystanders, or damage to the device.
2. Device captures and presents data reflecting a patient’s physiological condition that when reviewed by a trained
physician or clinician can be useful in determining a diagnosis; however, the data should not be used as a sole
means for determining a patient’s diagnosis.
3. Users are expected to be licensed clinical professionals knowledgeable about medical procedures and patient
care, and adequately trained in the use of this device. Before attempting to use this device for clinical
applications, the operator must read and understand the contents of the user manual and other accompanying
documents. Inadequate knowledge or training could result in increased risk of harm to users, patients and
bystanders, or damage to the device. Contact Welch Allyn service for additional training options.
4. To maintain designed operator and patient safety, peripheral equipment and accessories used that can come in
direct patient contact must be in compliance with UL 60601-1, IEC 60601-1, and IEC 60601-2-25. Only use
parts and accessories supplied with the device and available through Welch Allyn, Inc.
5. Patient cables intended for use with the device include series resistance (9 Kohm minimum) in each lead for
defibrillation protection. Patient cables should be checked for cracks or breakage prior to use.
6. Conductive parts of the patient cable, electrodes, and associated connections of type CF applied parts, including
the neutral conductor of the patient cable and electrodes, should not come into contact with other conductive
parts including earth ground.
7. Do not attempt to clean the patient cables by submersing into a liquid, autoclaving, or steam cleaning as this
may damage equipment or reduce its usable life. Wipe the exterior surfaces with a warm water and mild
detergent solution and then dry with a clean cloth. Use of unspecified cleaning/disinfecting agents, failure to
follow recommended procedures, or contact with unspecified materials could result in increased risk of harm to
users, patients and bystanders, or damage to the device.
8. The device is part of an integral personal computer-based diagnostic system. The user must adhere to all
warnings in order to ensure safe and reliable performance.
9. If operated on AC (~) power, the personal computer must be connected with its original power cable to an
electrical installation that complies with applicable regulations for environments where patients are treated.
10. The personal computer used and any peripheral devices connected to it must be approved to the appropriate
safety standard for nonmedical information technology equipment per IEC 60950, or its national variants. The
personal computer and any peripheral devices connected to it, being non-medical electrical equipment, must be
Page 10

USER SAFETY INFORMATION
Page | 8
situated outside the patient environment per IEC 60601-1–1. To ensure the safety of the patient it must not be
possible for the operator to touch the patient and the computer at the same time. In general, at least 1.5 meters
(5’) of open area must surround the patient to achieve this.
11. If the personal computer is situated within the patient environment, ensure that its level of safety is that of
medical electrical equipment per IEC 60601-1. This may be accomplished by powering the computer and any
other equipment connected to it through an isolation transformer or by operating on battery power.
12. If the personal computer is situated within the patient environment, to maintain designed operator and patient
safety when a LAN network connection is being used, the network cable must be connected to the device
through an Ethernet isolator module that complies with IEC 60601-1-1 (available from Welch Allyn).
13. ECG electrodes could cause skin irritation; patients should be examined for signs of irritation or inflammation.
Electrode materials and ingredients are specified on the packaging or are available from the vendor upon
request.
14. To avoid the possibility of serious injury or death during patient defibrillation, do not come into contact with
device or patient cables. Additionally, proper placement of defibrillator paddles in relation to the electrodes is
required to minimize harm to the patient.
15. Proper clinical procedure must be employed to prep the electrode sites and to monitor the patient for excessive
skin irritation, inflammation, or other adverse reactions. Electrodes are intended for short-term use and should
be removed from the patient promptly following testing. Do not mix electrodes made of dissimilar metals.
16. To avoid potential for spread of disease or infection, single-use disposable components (e.g., electrodes) must
not be reused. To maintain safety and effectiveness, electrodes must not be used beyond their expiration date.
17. A possible explosion hazard exists. Do not use the device in the presence of flammable anesthetic mixture.
18. Possible malfunction risks may be present when installing third-party software. Welch Allyn, Inc. cannot verify
the compatibility of all possible hardware/software combinations.
19. The device has not been designed for use with high-frequency (HF) surgical equipment and does not provide a
protective means against hazards to the patient.
20. When the 40 Hz filter is used, the frequency response requirement for diagnostic ECG equipment cannot be
met. The 40 Hz filter significantly reduces high-frequency components of the ECG and pacemaker spike
amplitudes, and is recommended only if high-frequency noise cannot be reduced by proper procedures.
21. The quality of the signal produced by the device may be adversely affected by the use of other medical
equipment, including but not limited to defibrillation and ultrasound machines.
22. Use only recommended alkaline battery cells with WAM™. Use of other cells may present a risk of fire or
explosion.
23. The WAM low battery warning function is designed for alkaline battery cells only. Use of other cells may
result in failure of the low battery warning possibly resulting in a malfunction of the device.
24. Test RScribe functions after each Microsoft critical and security update with a simulator prior to patient use.
25. Damaged or suspected inoperative equipment must be immediately removed from use and must be
checked/repaired by qualified service personnel prior to continued use.
Page 11

USER SAFETY INFORMATION
Page | 9
26. To prevent emission of substances that may damage the environment, dispose of the device, its components and
accessories (e.g., batteries, cables, electrodes), and/or packing materials that are past the shelf life in accordance
with local regulations.
27. When necessary, dispose of the device, its components and accessories (e.g., batteries, cables, electrodes),
and/or packing materials in accordance with local regulations.
28. Proper functioning backup items such as a spare patient cable, display monitor, and other equipment are
recommended on hand to prevent delayed treatment due to an inoperable device.
Caution
1. Do not pull or stretch patient cables as this could result in mechanical and/or electrical failures. Patient cables
should be stored after forming them into a loose loop.
2. Proper functioning backup items such as a spare patient cable, front-end device, display monitor, and other
equipment are recommended on hand to prevent delayed treatment due to an inoperable device.
3. Windows compatibility, updates and anti-virus policy: The RScribe™ software has been fully tested with
Windows 7 Professional Service Pack 1, Windows 8.1 Professional, and Windows 10 Pro operating systems.
The RScribe software has also been tested with Windows Server 2008 R2 Service Pack 1 and Windows Server
2012 R2. Although it is unlikely that Windows updates and security patches affect RScribe functionality,
Welch Allyn recommends turning automatic Windows update off, and periodically running it manually. A
functional test should be executed after update, which includes acquiring a recording, editing measurements and
printing a report, as well as importing an order and exporting results, if activated. Compatibility of RScribe
with corporate anti-virus software packages has been evaluated. Welch Allyn recommends excluding the
RScribe database folder (Normally C:\ProgramData\MiPgSqlData on a stand-alone system or the server) from
the folders to be scanned. In addition, anti-virus patch updates and system scans should be scheduled for time
periods when the system is not actively in use or performed manually.
4. No other non-recommended PC application software should be running while the RScribe application is being
used.
5. It is recommended that all resting ECG workstations and review stations be periodically updated with Microsoft
critical and security updates to protect from malware attacks and to fix critical Microsoft software issues.
6. To prevent delivery of malware into the system Welch Allyn recommends that institution operating procedures
are written to prevent malware to be transmitted into the system from removable media.
7. The WAM will only work with receiving devices that are equipped with the appropriate option.
8. This WAM is not recommended for use in the presence of imaging equipment such as Magnetic Resonance
Imaging (MRI) and Computed Tomography (CT) devices, etc.
9. The following equipment may cause interference with the WAM RF channel: microwave ovens, diathermy units
with LANs (spread spectrum), amateur radios, and government radar.
10. AA batteries are known to leak their contents when stored in unused equipment. Remove battery from WAM
when not used for an extended period of time.
Page 12

USER SAFETY INFORMATION
Page | 10
11. Be careful to insert the correct lead wire into the connector block with the appropriate input connector by matching
the lead wire labels to the WAM or AM12 lead labels.
Notes
1. Local Administrator permissions are required for software installation, application configuration, and software
activation. Local User privileges are required for application users. Roaming and temporary accounts are not
supported.
2. 8-hour timeout expiration is automatically controlled by the system. Each operation that occurs (e.g. Exam
Search, Patient Search, editing exams, starting an exam, etc.) will reset the timeout start time. When there is no
interaction with the system for the timeout duration, the user is prompted to enter login information.
3. When the server is unavailable in a distributed configuration, the client workstation will notify the user with a
prompt to proceed in Offline Mode or cancel. Scheduled orders are not available. An exam can be conducted
with manually entered demographics and will be stored locally. When the server comes available, the user is
prompted with a list of unsent exams and a selection to send exams to the modality manager database.
4. Patient movements may generate excessive noise that may affect the quality of the ECG traces and the proper
analysis performed by the device.
5. Proper patient preparation is important to proper application of ECG electrodes and operation of the device.
6. There is no known safety hazard if other equipment, such as pacemakers or other stimulators, is used
simultaneously with the device; however, disturbance to the signal may occur.
7. If an electrode is not properly connected to the patient, or one or more of the patient cable lead wires is damaged,
the display will indicate a lead fault for the lead(s) where the condition is present.
8. A thick baseline presentation on the display while using the AM12 may be due to a calibration error. Review the
LED indicator on the AM12 to ensure the unit is connected, or disconnect and reconnect to the PC USB port to
re-calibrate.
9. The WAM will automatically start flashing LEDs if the batteries have been discharged below 1.0 volts.
10. During normal WAM/AM12 operation, the green LED will display continuously.
11. If the WAM battery cover is opened during transmission, the device will stop transmitting. The battery must be
reinserted and the cover must be applied to resume operation.
12. The WAM will automatically turn off (LEDs off) if the battery has been severely discharged.
13. The WAM will automatically turn off when the electrocardiograph is powered down.
14. The WAM will automatically turn off after being disconnected from the patient. This will happen regardless of
RScribe battery/AC power state.
15. A thick baseline presentation on the display while using the WAM may be due to the WAM being turned off,
having no battery, not being paired correctly, operating out of range, or due to a calibration error. Review the
LED indicator and auditory advisory on the WAM to ensure the unit is turned on, has proper battery level, is
paired correctly, and is within recommended proximity of the electrocardiograph, or power cycle the WAM to
re-calibrate.
16. As defined by IEC 60601-1 and IEC 60601-2-25, the device is classified as follows:
- Type CF, defibrillation-proof applied parts.
Page 13

USER SAFETY INFORMATION
Page | 11
If not specifically indicated otherwise, personal computer equipment used with the device can be regarded as:
- Class I (if the computer has a three-prong power inlet) or class II (if it has a two-prong inlet)
- Ordinary equipment.
- Equipment not suitable for use in the presence of a flammable anesthetic mixture.
- Continuous operation.
17. To prevent possible damage to the device during transport and storage (while in original packaging) the
following environmental conditions must be adhered to:
Ambient temperature: -20 C to 65 C (-4 F to 149 F)
Relative humidity: 10% to 95%, non-condensing
18. Allow the device and any computer equipment used to stabilize within its intended operating environment
for a minimum of two hours prior to use. Refer to the computer equipment user manual for allowable
environmental conditions. The allowable environmental conditions for the AM12 and WAM acquisition
modules are as follows:
Ambient temperature: 10 C to 40 C (50 F to 104 F)
Relative humidity: 10% to 95%, non-condensing
19. The WAM is UL classified:
WITH RESPECT TO ELECTRIC SHOCK,
FIRE AND MECHANICAL HAZARDS ONLY IN ACCORDANCE WITH
UL2601-1, IEC60601-1, CAN/CSA CC22.2 No. 601.1, IEC60601-2-25,
Page 14
Page | 12
EQUIPMENT SYMBOLS AND MARKINGS
Symbol Delineation
NOTE: Refer to the manual(s) accompanying the device that pertain to the computer hardware for
additional definitions of symbols that may be present.
WARNING The warning statements in this manual identify conditions or practices
that could lead to illness, injury, or death. In addition, when used on a patient applied
part, this symbol indicates defibrillation protection is in the cables. Warning symbols
will appear with a grey background in a black and white document.
CAUTION The caution statements in this manual identify conditions or practices that
could result in damage to the equipment or other property, or loss of data.
PC
USB connection to PC
Defibrillator-proof type CF applied part
Do not dispose as unsorted municipal waste. Requires separate handling for waste
disposal according to local requirements
Indicates compliance to applicable European Union directives
Non-ionizing electromagnetic radiation
Follow instructions/directions for use (DFU) -- mandatory action. A copy of the DFU
is available on this website. A printed copy of the DFU can be ordered from Welch
Allyn for delivery within 7 calendar days.
Consult directions for use (DFU). A copy of the DFU is available on this
website. A printed copy of the DFU can be ordered from Welch Allyn for
delivery within 7 calendar days
Medical Device
Model Identifier
Reorder Number
Page 15
EQUIPMENT SYMBOLS AND MARKINGS
Page | 13
Package Symbol Delineation
This side up
Fragile
Keep Dry
Keep Away from Heat
Acceptable Temperature Range
Page 16

Page | 14
GENERAL CARE
Precautions
Turn off the device before inspecting or cleaning.
Do not immerse the device in water.
Do not use organic solvents, ammonia based solutions, alcohol, or abrasive cleaning agents which may
damage equipment surfaces.
Inspection
Inspect your equipment daily prior to operation. If you notice anything that requires repair, contact an authorized
service person to make the repairs.
Verify that all cords and connectors are securely seated.
Check the case and chassis for any visible damage.
Inspect cords and connectors for any visible damage.
Inspect keys and controls for proper function and appearance.
Cleaning and Disinfecting
1. Disconnect the power source. Remove cables and lead wires from device before cleaning.
2. For general cleaning of cables and lead wires, use a soft, lint-free cloth lightly moistened with a mild soap
and water solution. Wipe and air dry.
3. For disinfecting the exterior surfaces of the device, patient acquisition module, cables, and lead wires, wipe
exterior using:
Clorox Healthcare® Bleach Germicidal Wipes (use according to instructions on product label), or
a soft, lint-free cloth with a solution of Sodium Hypochlorite (10% household bleach and water solution)
minimum 1:500 dilution (minimum 100 ppm free chlorine) and maximum 1:10 dilution as recommended
by the APIC Guidelines for Selection and Use of Disinfectants
WARNING: Prevent liquid from penetrating the device and do not attempt to clean/disinfect
the device or patient cables by submerging into a liquid, autoclaving, or steam cleaning. Never expose
cables to strong ultra-violet radiation. Do not sterilize the device or ECG lead wires with Ethylene
Oxide (EtO) gas.
WARNING: Use of unspecified cleaning/disinfecting agents or failure to follow recommended procedures
could result in increased risk of harm to users, patients and bystanders, or damage to the device.
Disposal
This product and its accessories must be disposed of according to local laws and regulations. Do not dispose of this
product as unsorted municipal waste. For more specific disposal information see www.welchallyn.com/weee.
Page 17

Page | 15
ELECTROMAGNETIC COMPATIBILITY (EMC)
Electromagnetic compatibility with surrounding devices should be assessed when using the device.
An electronic device can either generate or receive electromagnetic interference. Testing for electromagnetic
compatibility (EMC) has been performed on the device according to the international standard for EMC for medical
devices (IEC 60601-1-2). This IEC standard has been adopted in Europe as the European Norm (EN 60601-1-2).
The device should not be used adjacent to, or stacked on top of other equipment. If the device must be used adjacent
to or stacked on top of other equipment, verify that the device operates in an acceptable manner in the configuration
in which it will be used.
Fixed, portable, and mobile radio frequency communications equipment can affect the performance of medical
equipment. See the appropriate EMC table for recommended separation distances between the radio equipment and
the device.
The use of accessories, transducers, and cables other than those specified by Welch Allyn may result in increased
emissions or decreased immunity of the equipment.
Page 18

ELECTROMAGNETIC COMPATIBILITY (EMC)
Page | 16
Guidance and Manufacturer’s Declaration: Electromagnetic Emissions
The equipment is intended for use in the electromagnetic environment specified in the table below. The customer or
the user of the equipment should ensure that it is used in such an environment.
Emissions Test
Compliance
Electromagnetic Environment: Guidance
RF Emissions CISPR 11
Group 1
The equipment uses RF energy only for its internal function.
Therefore, its RF emissions are very low and not likely to cause
any interference in nearby electronic equipment.
RF Emissions CISPR 11
Class A
The equipment is suitable for use in all establishments other
than domestic and those directly connected to the public lowvoltage power supply network that supplies buildings used for
domestic purposes.
Harmonic Emissions
IEC 61000-3-2
Complies
Voltage Fluctuations/
Flicker Emissions
IEC 61000-3-3
Complies
Guidance and Manufacturer’s Declaration: Electromagnetic Immunity
The equipment is intended for use in the electromagnetic environment specified in the table below. The customer or
the user of the equipment should ensure that it is used in such an environment.
Emissions Test
Compliance
Compliance Level
Electromagnetic Environment: Guidance
Electrostatic
discharge (ESD)
IEC 61000-4-2
+/- 6 kV contact
+/- 8 kV air
+/- 6 kV contact
+/- 8 kV air
Floors should be wood, concrete, or ceramic
tile. If floors are covered with synthetic
material, the relative humidity should be at
least 30%.
Electrical fast
transient/burst
IEC 61000-4-4
+/- 2 kV for
power supply lines
+/- 1 kV for
input/output lines
+/- 2 kV for
power supply lines
+/- 1 kV for
input/output lines
Mains power quality should be that of a
typical commercial or hospital environment.
Surge
IEC 61000-4-5
+/- 1 kV differential
mode
+/- 2 kV common
mode
+/- 1 kV differential
mode
+/- 2 kV common
mode
Mains power quality should be that of a
typical commercial or hospital environment.
Voltage dips,
short
interruptions,
and voltage
variations on
power supply
input lines
IEC 61000-4-11
<5% UT
(>95% dip in UT)
for 0.5 cycle
40% UT
(60% dip in UT)
for 5 cycles
<5% UT
(>95% dip in UT)
for 0.5 cycle
40% UT
(60% dip in UT)
for 5 cycles
Mains power quality should be that of a
typical commercial or hospital environment.
Power frequency
(50/60 Hz)
magnetic field
3 A/m
3 A/m
Power frequency magnetic fields should be at
levels characteristic of a typical location in a
typical commercial or hospital environment.
NOTE: UT is the AC Mains voltage prior to application of the test level.
Page 19
ELECTROMAGNETIC COMPATIBILITY (EMC)
Page | 17
Guidance and Manufacturer’s Declaration: Electromagnetic Immunity
The equipment is intended for use in the electromagnetic environment specified in the table below. The customer or
the user of the equipment should ensure that it is used in such an environment.
Emissions Test
IEC 60601 Test
Level
Compliance
Level
Electromagnetic Environment: Guidance
Conducted RF
IEC 61000-4-6
3 Vrms
150 kHz to
80 MHz
3 Vrms
150 kHz to
80 MHz
Portable and mobile RF communications equipment
should be used no closer to any part of the equipment,
including cables, than the recommended separation
distance calculated from the equation applicable to the
frequency of the transmitter.
Recommended separation distance
P
Vrms
d
3
5.3
P
mV
d
/3
5.3
80 MHz to 800 MHz
P
mV
d
/3
7
800 MHz to 2.5 GHz
Where P is the maximum output power rating of the
transmitter in watts (W) according to the transmitter
manufacturer and d is the recommended separation
distance in meters (m).
Field strengths from fixed RF transmitters, as
determined by an electromagnetic site surveya, should
be less than the compliance level in each frequency
rangeb.
Interference may occur in the vicinity of equipment
marked with the following symbol:
Radiated RF
IEC 61000-4-3
3 V/m
80 MHz to
2.5 GHz
3 V/m
80 MHz to
2.5 GHz
a. Field strengths from fixed transmitters, such as base stations for radio (cellular/cordless) telephones and land mobile radios,
amateur radios, AM and FM radio broadcast, and TV broadcast cannot be predicted theoretically with accuracy. To assess
the electromagnetic environment due to fixed RF transmitters, an electromagnetic site survey should be considered. If the
measured field strength in the location in which the equipment is used exceeds the applicable RF compliance level above, the
equipment should be observed to verify normal operation. If abnormal performance is observed, additional measures may be
necessary, such as reorienting or relocating the equipment.
b. Over the frequency range 150 kHz to 80 MHz, field strengths should be less than [3] V/m.
Page 20
ELECTROMAGNETIC COMPATIBILITY (EMC)
Page | 18
Recommended Separation Distances Between Portable and Mobile RF Communications Equipment and the Equipment
The equipment is intended for use in the electromagnetic environment in which radiated RF disturbances are
controlled. The customer or the user of the equipment can help to prevent electromagnetic interference by
maintaining a minimum distance between portable and mobile RF communications equipment (transmitters) and the
equipment as recommended in the table below, according to the maximum output power of the communications
equipment.
Rated Maximum Output Power
of Transmitter W
Separation Distance According to Frequency of Transmitter (m)
150 KHz to 800 MHz
800 MHz to 2.5 GHz
Pd 2.1
Pd 3.2
0.01
0.1 m
0.2 m
0.1
0.4 m
0.7 m
1
1.2 m
2.3 m
10
4.0 m
7.0 m
100
12.0 m
23.0 m
For transmitters rated at a maximum output power not listed above, the recommended separation distance d in
meters (m) can be estimated using the equation applicable to the frequency of the transmitter, where P is the
maximum output power rating of the transmitter in watts (W) according to the transmitter manufacturer.
NOTE 1: At 800 MHz, the separation distance for the higher frequency range applies.
NOTE 2: These guidelines may not apply in all situations. Electromagnetic propagation is affected by the
absorption and reflection from structures, objects, and people.
Page 21

ELECTROMAGNETIC COMPATIBILITY (EMC)
Page | 19
Regulatory Radio Compliance
Federal Communications Commission (FCC)
This device complies with part 15 of the FCC Rules. Operation is subject to the following two conditions:
This device may not cause harmful interference.
This device must accept any interference received, including interference that may cause undesired
operation.
This equipment has been tested and found to comply with the limits for a Class B digital device, pursuant to Part
15 of FCC Rules. These limits are designed to provide reasonable protection against harmful interference in a
residential installation. This equipment generates, uses, and can radiate radio frequency energy. If not installed and
used in accordance with the instructions, it may cause harmful interference to radio communications. However,
there is no guarantee that interference will not occur in a particular installation. If this equipment does cause
harmful interference to radio or television reception, which can be determined by turning the equipment off and
on, the user is encouraged to try and correct the interference by one or more of the following measures:
Reorient or relocate the receiving antenna
Increase the distance between the equipment and the receiver
Connect the equipment to an outlet on a circuit different from that to which the receiver is connected
Consult the dealer or an experienced radio/TV technician for help
The user may find the following booklet prepared by the Federal Communications Commission helpful: The
Interference Handbook This booklet is available from the U.S. Government Printing Office, Washington, D.C.
20402. Stock No. 004-000-0034504. Welch Allyn is not responsible for any radio or television interference caused
by unauthorized modification of the devices included with this Welch Allyn product, or the substitution or
attachment of connecting cables and equipment other than specified by Welch Allyn. The correction of
interference caused by such unauthorized modification, substitution, or attachment will be the responsibility of the
user.
WLAN
B&B electronics1 WLNN-SP-MR551 (Radio module 9373)
FCC ID: F4AWLNN551
1
Manufacturer also called B+B SmartWorx
Page 22

ELECTROMAGNETIC COMPATIBILITY (EMC)
Page | 20
Industry Canada (IC) Emissions
RF Radiation Hazard Warning
Using higher gain antennas and types of antennas not certified for use with this product is not allowed. The device
shall not be co-located with another transmitter.
Cet avertissement de sécurité est conforme aux limites d'exposition définies par la norme CNR-102 at relative aux
fréquences radio.
This device complies with RSS 210 of Industry Canada.
Operation is subject to the following two conditions: (1) this device may not cause interference, and (2) this device
must accept any interference, including interference that may cause undesired operation of this device.
L’utilisation de ce dispositif est autorisée seulement aux conditions suivantes: (1) il ne doit pas produire de
brouillage et (2) l’ utilisateur du dispositif doit étre prêt à accepter tout brouillage radioélectrique reçu, même si ce
brouillage est susceptible de compromettre le fonctionnement du dispositif.
This Class B digital apparatus complies with Canadian ICES-003.
Cet appareil numérique de la classe B est conform à la norme NMB-003 du Canada.
WLAN
B&B electronics1 WLNN-SP-MR551 (Radio module 9373)
IC: 3913A-WLNN551
1
Manufacturer also called B+B SmartWorx
Declaración de conformidad Mexico
La operación de este equipo está sujeta a las siguientes dos condiciones:
1. es posible que este equipo o dispositivo no cause interferencia perjudicial y
este equipo o dispositivo debe aceptar cualquier interferencia, incluyendo la que pueda causar su operación no
deseada.
Page 23

ELECTROMAGNETIC COMPATIBILITY (EMC)
Page | 21
European Union
Czech
Welch Allyn tímto prohlašuje, ze tento WLAN device je ve shodě se základními
požadavky a dalšími příslušnými ustanoveními směrnice 2014/53/ES.
Danish
Undertegnede Welch Allyn erklærer herved, at følgende udstyr WLAN device
overholder de væsentlige krav og øvrige relevante krav i direktiv 2014/53/EF
Dutch
Bij deze verklaart Welch Allyn dat deze WLAN device voldoet aan de essentiële eisen
en aan de overige relevante bepalingen van Richtlijn 2014/53/EC.
English
Hereby, Welch Allyn, declares that this WLAN device is in compliance with the
essential requirements and other relevant provisions of Directive 2014/53/EC.
Estonian
Käesolevaga kinnitab Welch Allyn seadme WLAN device vastavust direktiivi
2014/53/EÜ põhinõuetele ja nimetatud direktiivist tulenevatele teistele
asjakohastele sätetele.
Finnish
Welch Allyn vakuuttaa täten että WLAN device tyyppinen laite on direktiivin
2014/53/EY oleellisten vaatimusten ja sitä koskevien direktiivin muiden ehtojen
mukainen.
French
Par la présente, Welch Allyn déclare que ce WLAN device est conforme aux
exigences essentielles et aux autres dispositions de la directive 2014/53/CE qui lui
sont applicables
German
Hiermit erklärt Welch Allyn die Übereinstimmung des Gerätes WLAN device mit den
grundlegenden Anforderungen und den anderen relevanten Festlegungen der
Richtlinie 2014/53/EG. (Wien)
Greek
ΜΕ ΤΗΝ ΠΑΡΟΥΣΑ Welch Allyn ΔΗΛΩΝΕΙ ΟΤΙ WLAN device ΣΥΜΜΟΡΦΩΝΕΤΑΙ ΠΡΟΣ
ΤΙΣ ΟΥΣΙΩΔΕΙΣ ΑΠΑΙΤΗΣΕΙΣ ΚΑΙ ΤΙΣ ΛΟΙΠΕΣ ΣΧΕΤΙΚΕΣ ΔΙΑΤΑΞΕΙΣ ΤΗΣ ΟΔΗΓΙΑΣ
2014/53/ΕΚ
Hungarian
Alulírott, Welch Allyn nyilatkozom, hogy a WLAN device megfelel a vonatkozó
alapvetõ követelményeknek és az 2014/53/EC irányelv egyéb elõírásainak.
Italian
Con la presente Welch Allyn dichiara che questo WLAN device è conforme ai requisiti
essenziali ed alle altre disposizioni pertinenti stabilite dalla direttiva 2014/53/CE.
Latvian
Ar šo Welch Allyn deklarē, ka WLAN device atbilst Direktīvas 2014/53/EK būtiskajām
prasībām un citiem ar to saistītajiem noteikumiem.
Lithuanian
Šiuo Welch Allyn deklaruoja, kad šis WLAN device atitinka esminius reikalavimus ir
kitas 2014/53/EB Direktyvos nuostatas.
Malti
Hawnhekk, Welch Allyn, jiddikjara li dan WLAN device jikkonforma mal-htigijiet
essenzjali u ma provvedimenti ohrajn relevanti li hemm fid-Dirrettiva 2014/53/EC
Portuguese
Welch Allyn declara que este WLAN device está conforme com os requisitos
essenciais e outras disposições da Directiva 2014/53/CE.
Slovak
Welch Allyn týmto vyhlasuje, ze WLAN device spĺňa základné požiadavky a všetky
príslušné ustanovenia Smernice 2014/53/ES.
Slovene
Šiuo Welch Allyn deklaruoja, kad šis WLAN device atitinka esminius reikalavimus ir
kitas 2014/53/EB Direktyvos nuostatas.
Spanish
Por medio de la presente Welch Allyn declara que el WLAN device cumple con los
requisitos esenciales y cualesquiera otras disposiciones aplicables o exigibles de la
Directiva 2014/53/CE
Page 24

ELECTROMAGNETIC COMPATIBILITY (EMC)
Page | 22
Swedish
Härmed intygar Welch Allyn att denna WLAN device står I överensstämmelse med de
väsentliga egenskapskrav och övriga relevanta bestämmelser som framgår av
direktiv 2014/53/EG.
Page 25

Page | 23
INTRODUCTION
Manual Purpose
This manual is intended to provide the user with information about the RScribe resting electrocardiograph’s display
screen, menu structure, icons, and navigation tools pertaining in the following sections:
Using RScribe
Preparing the Patient
Using MWL/Patients
Record an ECG
Context menus
Exam Search
System Settings
NOTE: This manual contains screen images that are for illustration, and might be different in the actual
product. Consult the actual screen in the host language for specific wording.
Audience
This manual is written for clinical professionals with a working knowledge of medical procedures and terminology
as required for monitoring cardiac patients.
Intended Use
The RScribe Electrocardiograph is a multi-channel electrocardiograph product used for acquiring, analyzing,
displaying and printing resting ECG’s. The RScribe is a 12-channel diagnostic electrocardiograph intended for
recording and printing ECG’s of adult and pediatric patients. The acquired ECG will be displayed for quality check
purpose, analyzed using the Welch Allyn VERITAS resting interpretation, optionally printed, stored and/or
transmitted to a ECG Management System or Hospital Information System. The device is not intended to be used as
a vital signs physiological monitor.
It is a system comprised of a Welch Allyn ECG amplifier (Wireless Acquisition Module [WAM] or AM12 Patient
Cable) and an off-the-shelf personal computer with Welch Allyn software application that allows clinicians to
collect ECGs on patients during routine visits. The patient populations for which the device will be used may be
healthy or diseased of any age. ECG’s are taken with the patient in the supine position. The RScribe is intended to
be used by a licensed health care practitioner in a hospital, medical clinic and offices of any size, including Clinical
Research Organizations.
Page 26

INTRODUCTION
Page | 24
Indications for Use
The RScribe electrocardiograph is a non-invasive prescription device.
The device is indicated for use to acquire, analyze, display, transmit and print electrocardiograms.
The device is indicated for use to provide interpretation of the data for consideration by a physician.
The device is indicated for use in a clinical setting, by a physician or by trained personnel who are acting
on the orders of a licensed physician. It is not intended as a sole means of diagnosis.
The interpretations of ECG offered by the device are only significant when used in conjunction with a
physician over-read as well as consideration of all other relevant patient data.
The device is indicated for use on adult and pediatric populations.
The device is not intended to be used as a vital signs physiological monitor.
The device is not designed for out of hospital transport.
The device is not designed for use in highly invasive environments, such as an operating theatre.
System Description
RScribe is a multi-lead, diagnostic, computer-based resting electrocardiograph capable of acquiring, viewing,
transmitting, printing, and storing ECG data.
RScribe models ordered with the VERITAS™ resting ECG interpretation algorithm option are capable of specific
age and gender interpretation criteria. The VERITAS algorithm provides an over-reading physician with a silent
second opinion through diagnostic statements displayed on the ECG report. For additional information on the
VERITAS algorithm, please refer to the Physician’s Guide to VERITAS with Adult and Pediatric Resting ECG
Interpretation (see Accessories).
RScribe can be configured with bidirectional connectivity and DICOM® protocol support.
The RScribe application is integrated with a patient and exam management system that handles the scheduling of
exams, database storage and maintenance, exam and patient search, printing, communication with external systems
and dispatches the modality dependent acquisition and review functions. RScribe can be configured for data
distribution. When so configured, the database resides on a server supporting a number of networked client
workstations.
The RScribe Review software offers authorized users with the ability to schedule new exams when not linked to an
external scheduling system, view reports, enter conclusions, and generate printed or electronic reports for completed
exams.
The RScribe server, workstations, and review stations can be set up as Citrix® Application Servers for remote access
from client computers with Citrix XenApp™ installed.
The RScribe supports print formats that include:
Standard or Cabrera,
3+1,
3+3,
12,
6+6 channel in automatic mode;
Single channel on one page (60 min of acquired ECG for rhythm strip (Full Disclosure) printing.
The RScribe packing list includes:
Acquisition module with lead wire set and accessory starter kit
Software CD
Physician’s Guide to VERITAS and User Manual PDFs on CD
Page 27
INTRODUCTION
Page | 25
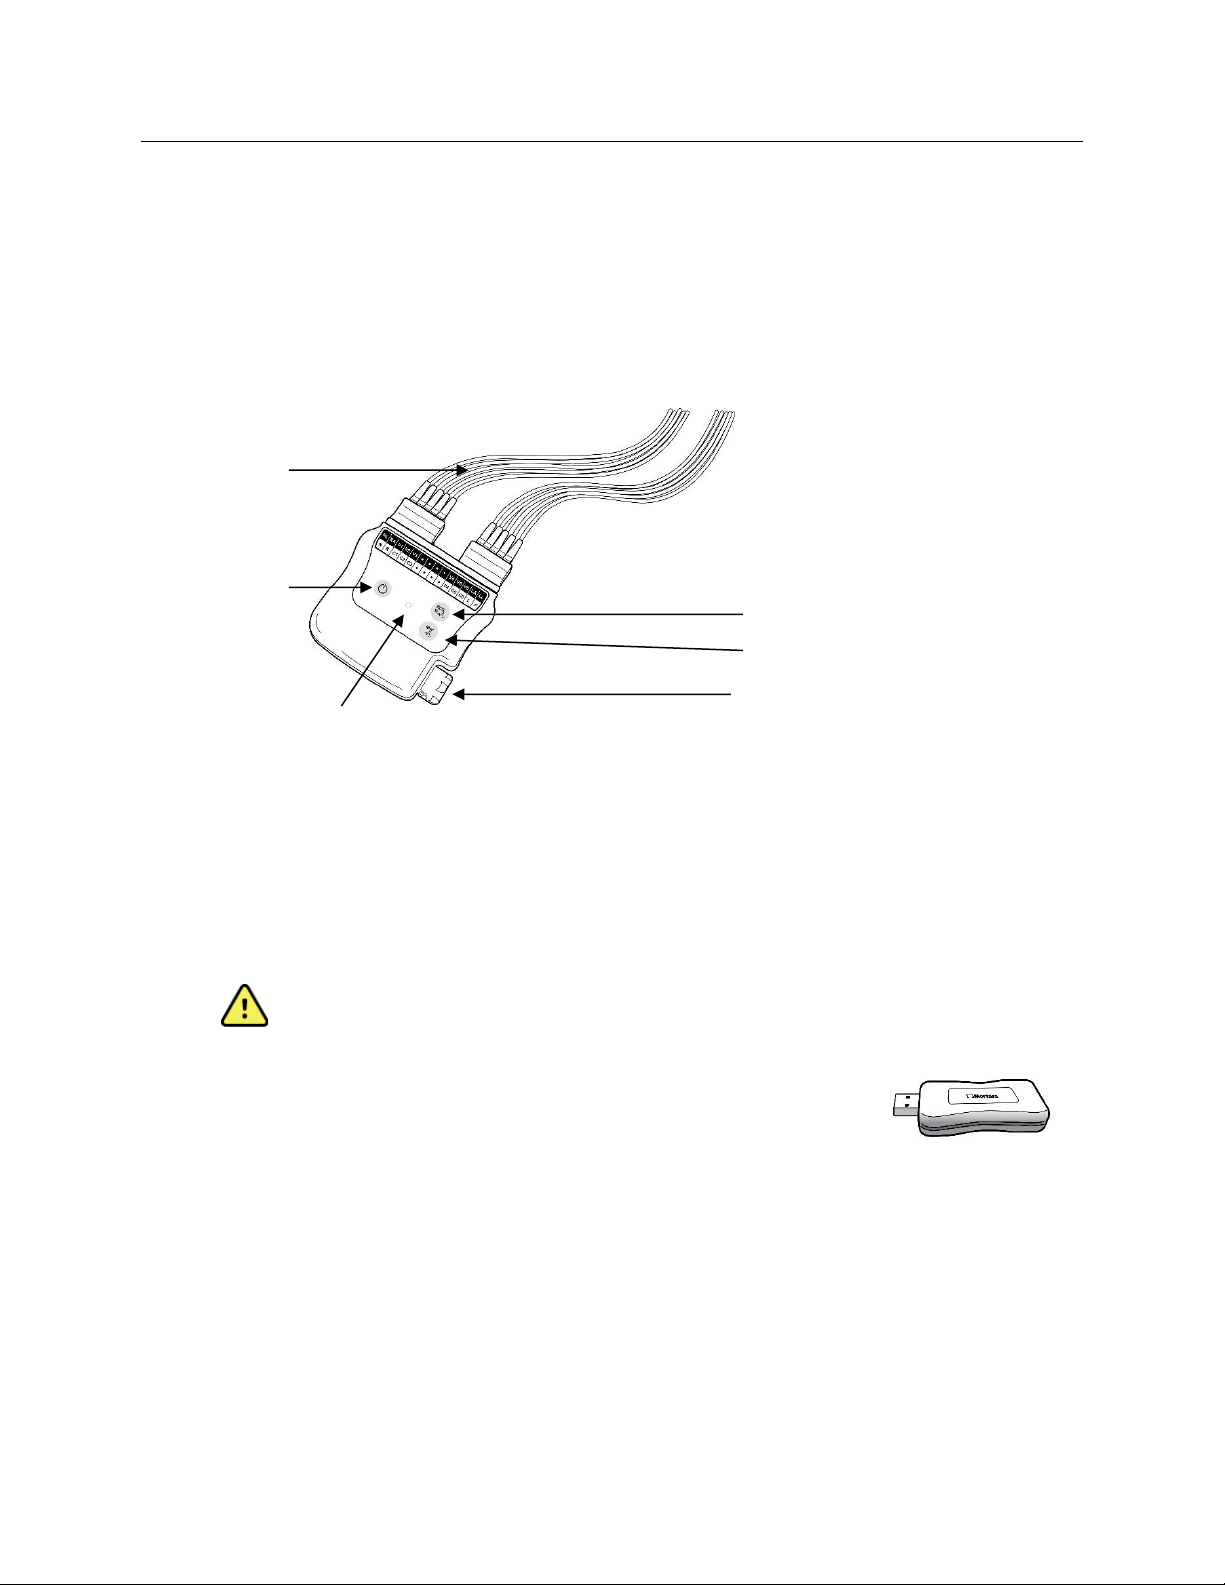
Acquisition Module Types
Two acquisition module types, the Wireless Acquisition Module (WAM) or AM12 patient cable, for ECG
acquisition are used with RScribe.
WAM with Lead Wires
Figure 1 WAM with Lead Wires
Replaceable
Lead Wires
Power On/Off
12-Lead ECG button
Rhythm button
Battery compartment
LED Indicators
The WAM incorporates frequency-hopping technology in the 2500 MHz frequency range with 40,000 Hz ECG
acquisition and is operated by two buttons located on the front of the device when used with RScribe:
1. Power On/Off
2. Acquiring a 12-lead ECG
NOTE: Rhythm button is non-functional for use with RScribe.
The WAM uses one AA alkaline, 1.5V battery for approximately 8-hours of continuous operation.
WARNING: Use of other cells may present a risk of fire or explosion.
USB Transceiver Key (UTK)
The UTK connected to the RScribe USB port receives ECG signals from the paired
WAM for presentation of the electrocardiogram. The UTK connected to USB cable
(6400-015) from the PC port is positioned in an unobstructed location.
Page 28
INTRODUCTION
Page | 26
WAM LED Indicators
LED
+ Audio
MODE
GREEN off
YELLOW off
Intermittent beeping
WAM is on but not paired to an electrocardiograph, is
out of range of the paired electrocardiograph.
YELLOW solid or flashing
GREEN off
One or more leads are not connected properly.
GREEN solid
YELLOW off
No lead fail condition is detected; battery is OK.
GREEN solid
YELLOW off
Intermittent beeping
WAM is collecting a 10-second ECG.
Blinking LED
(yellow or green
depending on lead fault
status)
WAM has detected a low battery condition. Replace
the battery within 15 minutes.
GREEN off
YELLOW off
1 second audio on, then
device turns off.
WAM has detected a very low battery status and
powered off.
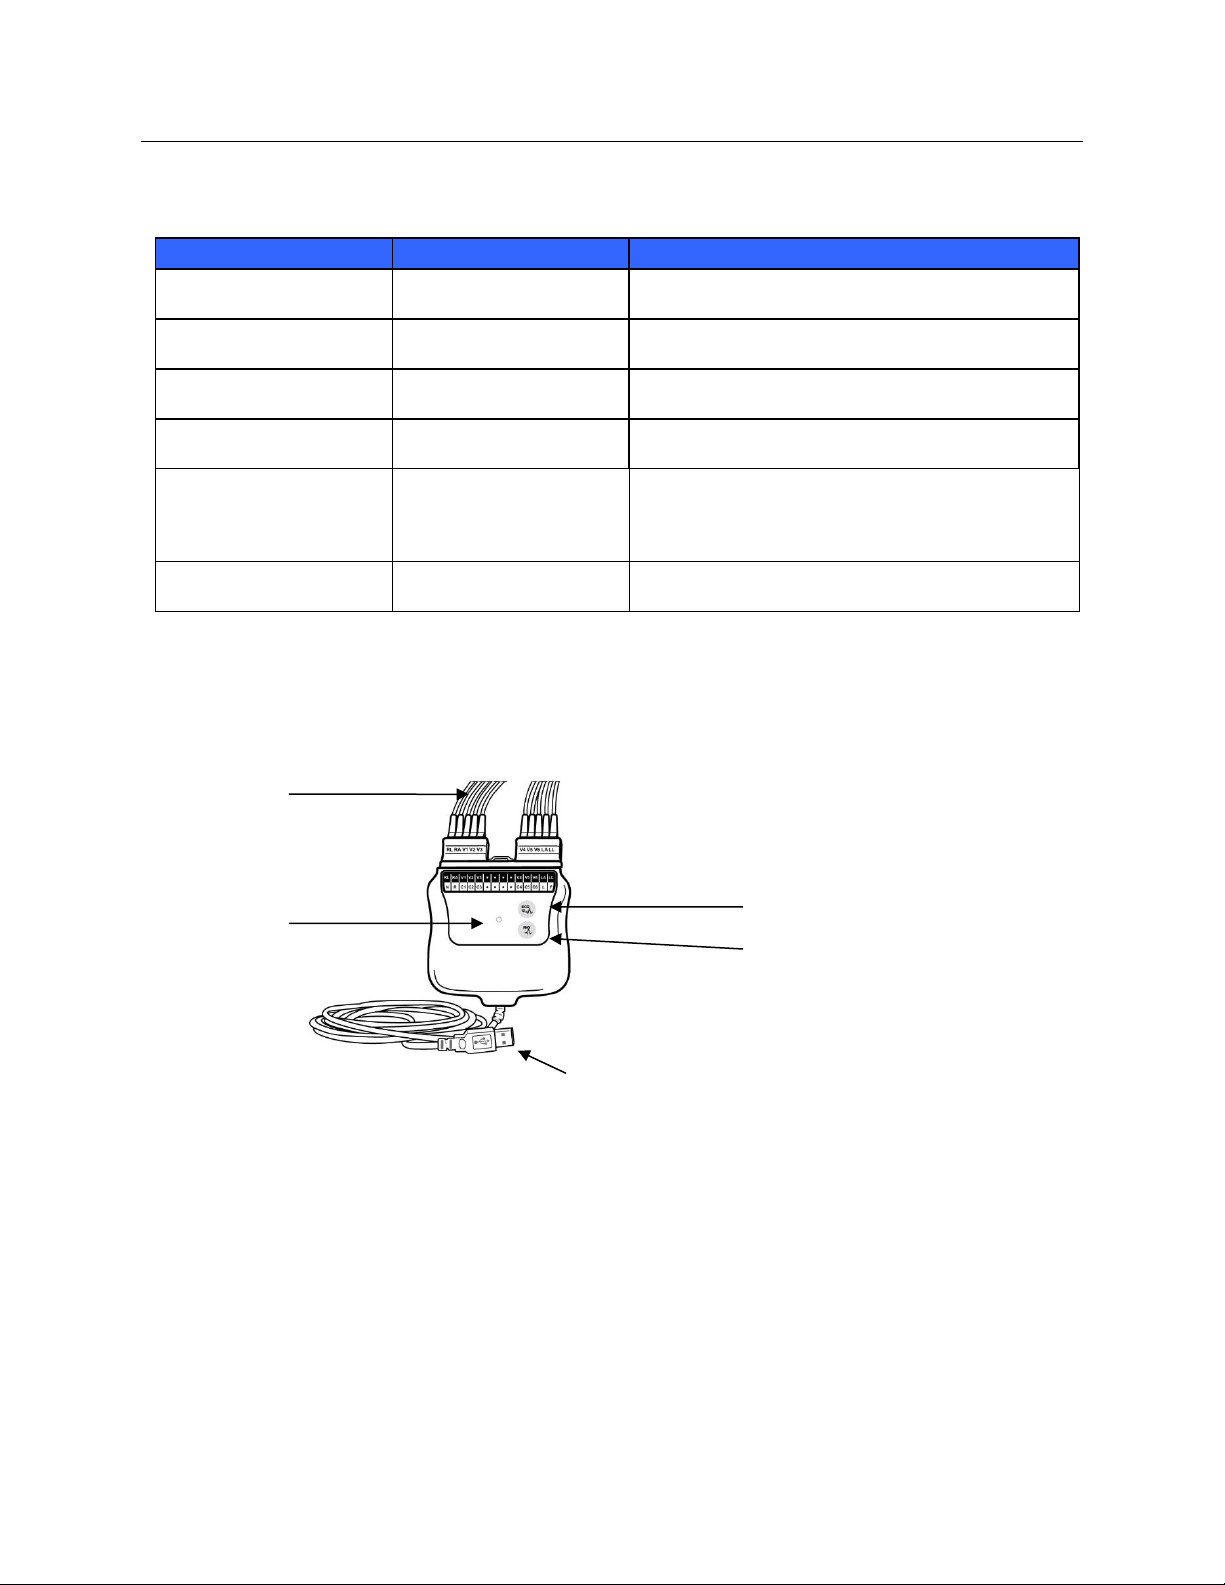
AM12 with Lead Wires
Figure 2 AM12 with Lead Wires
Replaceable
Lead Wires
LED
Indicators
12-Lead ECG button
Rhythm button
USB cable
The AM12 is available for a traditional wired connection with direct USB connection and 40,000 Hz ECG
acquisition. The 12-Lead ECG button can be used to acquire a 12-lead ECG at the patient’s side.
NOTE: Rhythm button is non-functional for use with RScribe.
Lead Fail
Lead fail is done automatically through visual communication with the LEDs located on the front of the WAM and
AM12. A yellow LED (solid or flashing) indicates a lead fail condition is present. A solid green LED indicates
proper lead connection as well as adequate WAM battery voltage for ECG acquisition.
Page 29

INTRODUCTION
Page | 27
RScribe Software Installation Process
Navigate to the location of the software to be installed and double click on the “Setup” application file.
If asked, allow the program to make changes to the computer by clicking Yes.
The Exam setup window will appear prompting you to install Welch Allyn PDF, click Install.
The RScribe V7.x.x Setup window will appear, click Next to continue.
Page 30

INTRODUCTION
Page | 28
Select the appropriate Setup Type for the installation:
There are four installation choices that simplify the
installation process.
Standalone: Choose the standalone option if you are
loading a single RScribe application with the Database
Server functionality included on a single computer.
Server: This option allows for installations using
multiple networked computers with the Database
Server functionality loaded onto a separate computer or
Server hardware platform.
Client: Choose this option if you are loading the
RScribe application on a computer that will be
networked to the Database Server functionality on a
different computer.
Review Station: Choose this option when loading the ability to review exams that are acquired on a networked
computer, with the Database Server functionality already loaded onto a separate networked computer.
The Server Configuration window displays the default Database Port number (5432) and an option to enable or
disable the Unique Patient option.
Database Port: It is recommended that you use
the default port number for the installation. If the
port is already in use the installation tool will alert
the user that the port is already taken and that a
new port number will need to be entered to
continue with the installation.
Unique Patient: This option defaults to an enabled
(checked) condition to configure the system to
utilize the Patient ID field as a unique identifier for
patient demographic information. This is the
system configuration most typically used.
The Unique Patient option box can be UNCHECKED to NOT use the Patient ID field as a unique identifier
for patient demographics. Choose to uncheck the Unique Patient ID when patients can be entered from different
institutions (such as scanning centers) that use different ID schemes. Choose to uncheck the Unique Patient
when the Patient ID field is not used to identify a patient, such as with clinical research studies.
Page 31

INTRODUCTION
Page | 29
Set Database Location: Selection of this button
allows you to Browse to a location for the RScribe
application and database other than the local default (C:\)
directory, beneficial when it is necessary to define the
application and database locations on a different data
drive.
This selection allows a preview of Disk Usage
to ensure requirements are met.
The Reset selection will return all changes to
default settings.
Select Next to return to the Server Configuration
window to continue the installation steps.
Select Cancel to exit the installation process.
Select Next and the Installation window below will
appear.
Click Install to load the software files to the defined
location and then present the Modality Manager
Configuration window.
The wizard will now load the software files to the
defined location and then present the Modality
Manager Configuration window.
During the software installation, you may be prompted
to install device driver software. This is needed for the
AM12 or WAM UTK drivers.
Select Install this driver software anyway
Page 32

INTRODUCTION
Page | 30
The Modality Manager Configuration window is
presented.
NOTE: If any changes are needed, the Modality
Manager Configuration Utility can also be
accessed after the installation process is completed
by selecting the Modality Configuration settings
from the Windows START menu All Programs
Welch Allyn.
Language: This setting is always available to select the
desired language.
Default units: Choose any combination of height and
weight units using the drop-down lists.
Server Address: This setting is grayed out when the
Database Server functionality is installed on the local
computer, but is an active selection when the RScribe
will access a remote Database Server.
Log Port: This setting is always available to select the port to be used for the event log service. Leave on the
default if the port is not occupied for other purposes.
API Port: This setting is always available to select the port to be used for Modality Manager service. Leave on
the default if the port is not occupied for other purposes
Remote slot settings SDM (Single Directory Management): This setting is only intended for Server systems.
Normally, when an exam is active (selected), all data will be copied from the system database to the local client
workstation. If a path is entered here, the temporary data will be copied to a central (local) folder on the server.
This method can only be used for Holter workstations and is not applicable to RScribe.
Logon Mode: This setting can be set to either Local or Active Directory depending on the user preference. If
Local is selected, the Modality Manager Service will maintain its own local listing of user/password pairs for
logging onto the system. If Active Directory is selected, the Modality Manager Service will access the list of
users from the Windows domain on which the computer has been joined.
The Single Sign On box is grayed out unless the installation includes the database services and is using Active
Directory logon authentication.
Once the Modality Manager Configuration Utility settings
are correct, select Save (if you changed anything), then
select Exit to continue.
If you exit without saving modified settings, a warning
message will appear.
Click Finish to complete the installation process and exit
installation. If checked, the Activation Tool window will
launch for entry of your product serial number and for entry
of the activation code.
Page 33

INTRODUCTION
Page | 31
Feature Activation
An activation code is required to permanently operate full RScribe software functions such as start an exam, access
stored exams, schedule patients, review exams, store exams, archive exams, export results and other tasks. Without
activation, the system will function for a period of fourteen days and will then become invalid.
To prepare for activation, run the Modality Manager Activation Tool accessed from the following menus:
Start menu
All Programs
Welch Allyn
Modality Manager Activation Tool (click Yes when prompted to allow changes to the computer)
Once your system serial number is entered, this utility generates the site code that is needed for activation by Welch
Allyn Technical Support personnel. You can click on the Copy to Desktop or the Copy to Clipboard button to
generate a file to be e-mailed to mor_tech.support@hillrom.com.
Welch Allyn Technical Support will return an activation code that can be typed or copied and pasted into the white
space above the "Activate License" button. Select the Activate License button to activate the software. You can
activate the software at any time after installation with the Modality Manager Activation Tool. Contact Welch
Allyn Technical Support personnel for further information.
Page 34

INTRODUCTION
Page | 32
RScribe Login and Main Display
Use the icon on the desktop to start the RScribe
application.
If not set up with "single sign on", RScribe will require user
credentials on startup. Enter your RScribe Username and
Password and then select OK to open the application main menu.
Note: The default Username and Password are "admin"
(password is case-sensitive).
Upon successful login, the RScribe application screen will appear
displaying the user name and software version in the bottom left
corner.
The icons in the center of the screen indicate workflow tasks in
presumed order left to right. Click the icon representing workflow
task you wish to perform.
Hover the mouse over an icon to display its function.
Grayed out icons indicate functions that are not available to the
user without prior authorization set up previously in system
configuration.
The first time you login, select the System Configuration icon to setup your access to all functions.
1. Select the User’s Database button and you will see the” IT
Admin” user. Double-click on the name to open the role
privileges and check all functions.
2. Click OK Exit Exit and start up RScribe again. If you
don’t do this, most icons are grayed and unavailable.
Page 35

INTRODUCTION
Page | 33
RScribe Program Icons and Descriptions
Icon and Hover Text
Description
Desktop shortcut icon to launch the Resting ECG application.
MWL/Patients
Opens a window with two selectable tabs. A MWL (Modality Work List)
tab allows exam scheduling (when no orders interface exists) and
schedule review. A Patients tab allows addition of new patient
information and editing of existing patient information.
STAT ECG
Use to bypass Exam Data Entry and proceed directly to real-time ECG
for immediate acquisition
Start a Resting Exam
Use to enter exam data and begin real-time ECG acquisition
Exam Search
Use to search for exams in the database using filters.
User Preferences
Use to configure user preferences for the Worklist and to change the
password.
System Configuration
For administrative users to configure system settings such as
creating/modifying users, changing the RScribe default acquisition
criteria, defining archive directories, and so on.
Exit
Use to close the RScribe application and return to the desktop.
Use to minimize or exit the application and return to the desktop.
Page 36

INTRODUCTION
Page | 34
User Roles and Permissions
RScribe supports a workflow-oriented setup for defining user roles and controlling user access to the various
operations. Role assignments are comprised of a set of permissions for each user type (e.g. IT administrator, clinical
administrator, ECG Tech, and so on).
Each user can be assigned a single role or a combination of roles. Some roles will include permissions assigned to
other roles where applicable. After installation, a single user is created, with the role of "IT Administrator". Before
using RScribe, this user should log in and create required users and roles.
Roles
Permission Assignment
IT Administrator
Manage user permissions; manage personnel lists; export settings; archive
settings; workflow configuration; storage system configuration; unlock exams;
view audit trail reports; export service logs; create and modify groups.
Clinical Administrator
Manage database exams (delete, archive, and restore); copy exams offline to
share with Welch Allyn personnel or other sites; view audit trail reports; modify
modality settings (profiles, protocols, and other resting ECG specific settings);
reconcile; export service logs.
Schedule Procedure
Create new patient orders; associate an order with an existing patient; modify
demographics of an existing patient; export service logs.
Scheduling and order entry is only available when RScribe is not linked to an
external scheduling system.
Patient Hookup
(Start a Resting Exam)
Ability to start a test using Start a Resting Exam icon. Includes the ability to create
a new patient; associate an order with an existing patient; export service logs.
Edit Holter Diary
Not applicable to the RScribe application.
View Exams/Reports
Review exams and final reports only. Includes the ability to search exams, view
and print reports; export service logs.
Prepare Report
Review and edit exams to move them from an acquired state to the edited state.
Includes ability to search exams and view and print reports; export service logs.
Review and Edit Report
Review and edit exams to move them to the reviewed state. Includes ability to
search exams and view and print reports; modify and create conclusions; export
service logs.
Edit Conclusions
Create and modify conclusions. Includes ability to review exams and final reports
only; search exams and view and print reports; export service logs.
Sign Report
Ability to move exams to a signed state. Includes ability to review exams and final
reports; search exams and view and print reports; export service logs. May
require user authentication.
Export Report
Ability to export a PDF and XML file when features are enabled. Must be
assigned in conjunction with another role (e.g. Review, View, or Conclusions).
Refer to User Role assignment table with details.
Page 37

INTRODUCTION
Page | 35
RScribe Workstation Specifications
Feature
Specification*
Input Channels
Simultaneous acquisition of all 12 leads
Standard Leads Acquired
I, II, III, aVR, aVL, aVF, V1, V2, V3, V4, V5, V6
Waveform Display
Compatible with 1024 x 768, 1366 x 768, 1280 x 800, 1680 x 1050, 1920
x 1080, 1920 x 1200, and 2736 x 1824 resolutions
Compatible Operating Systems
Compatible with: Microsoft® Windows® 7 Professional 32 bit or 64 bit and
Microsoft® Windows® 10 Pro 64-bit operating systems
Storage Capacity
100 GB SATA hard disk drive minimum
Memory 2 Gb minimum
USB ports 3 minimum
Archive
Network or external USB disks (standalone installation)
Input devices
Standard keyboard and 2-button scroll mouse
DVD drive
DVD-ROM, DVD-DRIVE
Network Support
Option to utilize industry-standard database server
Network Infrastructure
100 Mbps connection or better required for use with server
Printing Device
HP M501dn Windows printer with HPUPD PCL 5 driver or equivalent
Optional Function
Welch Allyn VERITAS resting ECG interpretation algorithm with age and
gender specific criteria; connectivity with bidirectional communication
On-Screen Tools
Time and amplitude calipers; 40 Hz and 150 Hz noise filters; various lead
layouts and grid
Digital Sampling Rate
40,000 s/sec/channel used for pacemaker spike detection;
1,000 s/sec/channel used for recording and analysis
Gain Setting
2.5, 5, 10, 20
Report Formats
Standard or Cabrera; 3+1, 3+3, 6, 6+6, or 12 channel
Rhythm Print Format
Single lead of up to 60 minutes of data
Frequency Response
0.05 – 300 Hz
Filters
High-performance baseline filter; AC interference filter 50/60 Hz; low-pass
filters 40 Hz, 150 Hz, 300 Hz
Power Requirements
Dependent on computer, 100 – 240 VAC at 50/60 Hz
* Specifications subject to change without notice.
Page 38

INTRODUCTION
Page | 36
RScribe Minimum Server Specifications
Feature
Server Minimum Specifications*
Processor
Performance equivalent to an Intel Xeon class; Quad-core with
hyperthreading
Graphics
1024 x 768
RAM
4 GB
Operating System
Microsoft Windows 2008 or 2012 server R2, 64-bit
System Disk
100 GB for OS and product installation (RAID recommended for data
redundancy)
Data Disks
550 GB hard drive space available
HD controller with 128 MB read/write cache
RAID recommended for data redundancy
Archive
Network or external USB drive
Software Installation
CD-ROM
Network
100 Mbps connection or better
Input Devices
Standard keyboard and mouse
*Specifications subject to change without notice.
Requirements for RScribe as a Citrix XenApp
Requirements*
Client Machines that will run
Citrix XenApp
Windows 7 Professional 64-bit or Windows 10 Pro Operating System
Citrix Receiver
Internet Browser – any that is supported by Citrix
Internet Explorer 11 and 10 (HTTP connections only)
Safari 7
Google Chrome 43 and 42
Mozilla Firefox 38 and 37
Citrix Domain Controller Server
Citrix XenDesktop Enterprise Edition 7.9
Any operating system supported by Citrix
Citrix App Servers
Windows 7 Professional (64-bit) or Windows 10 Pro
Citrix Virtual Delivery Agent 7.9
RScribe software version 7.0.0
*Requirements subject to change without notice.
Page 39

INTRODUCTION
Page | 37
WAM Specifications
Feature
Specification*
Instrument Type
12-lead wireless acquisition module for resting ECG
Input Channels
12-lead signal acquisition and transmission
ECG Leads Transmitted
I, II, III, aVR, aVL, aVF, V1, V2, V3, V4, V5, and V6
WAM Transmission Protocol
Bidirectional and frequency hopping; beacon and response method
links a single acquisition module to a single electrocardiograph
Frequency Range
2400.96 MHz to 2482.56 MHz
WAM and Receiver Distance
Approximately 10 feet (3 meters)
Lead Set
RA, LA, RL, LL, V1, V2, V3, V4, V5, and V6 (R, L, N, F, C1, C2, C3,
C4, C5, and C6) with detachable lead wires
Sampling Rate
40,000 samples/second/channel acquisition; 1,000
samples/second/channel transmitted for analysis
Resolution
1.875 microvolt LSB
User Interface
Two-button operation: ON/OFF and 12-lead ECG acquisition;
Rhythm button is non-functional
Defibrillator Protection
Complies with AAMI standards and IEC 60601-2-25
Special Functions
LED indication of power status, operating mode, lead fail, and
remaining battery charge
Device Classification
Type CF, battery operated
Weight
6.7 oz. (190 g) with battery
Dimensions
4.45 x 4.25 x 1.1” (11.3 x 10.8 x 2.79 cm)
Battery
1 AA alkaline battery typically powers WAM for acquisition of 250
resting ECGs
* Specifications subject to change without notice.
WAM / UTK
Radio specifications and certification information for the Wireless Acquisition Module (WAM) and USB
Transceiver Key (UTK), can be found in the WAM user manual.
Page 40

INTRODUCTION
Page | 38
Radio Compliance Table for:
WAM / UTK
Argentina
Ente Nacional de las Comunicaciones
(ENACOM)
H-22661 (WAM)
H22622 (UTK)
Australia
Australian Communications and
Media Authority (ACMA) Radio
Compliance Mark (RCM).
Brazil
Agência Nacional de
Telecomunicações (ANATEL)
Modelo: WAM
01142-14-05187
Este equipamento opera em caráter
secundário, isto é, não tem direito a
proteção contra interferência
prejudicial, mesmo de estações do
mesmo tipo, e não pode causar
interferência a sistemas operando em
caráter primário.
EAC
Products meet all requirements of the
corresponding technical regulations
and have passed all conformity
assessment procedures.
Indonesia
Keterangan
Identification
a. [58975/SDPPI/2018] (UTK)
adalah nomor sertifikat yang
diterbitkan untuk setiap alat
dan perangkat telekomunikasi
b. [8260] (UTK) adalah nomor
PLG ID (identitas pelanggan)
berdasarkan database
Lembaga Sertifikasi
a. [60825/SDPPI/2019] (WAM)
adalah nomor sertifikat yang
diterbitkan untuk setiap alat
dan perangkat telekomunikasi
b. [8260] (WAM) adalah nomor
PLG ID (identitas pelanggan)
berdasarkan database
Lembaga Sertifikasi
a. [58975/SDPPI/2018] (UTK) is a number of
certificate issued for certified
telecommunication equipment
b. [8260](UTK) is a number of PLG ID based
on one Certification Body database
a. [60825/SDPPI/2019] (WAM) is a number
of certificate issued for certified
telecommunication equipment
b. [8260](WAM) is a number of PLG ID
based on one Certification Body database
Mexico
Instituto Federal de Telecomunicaciones
(Federal Telecommunications Institute—
IFETEL)
This product contains
and Approved module,
Model No. WAM,
IFETEL No.
RCPWEWA19-0527
This product contains
and Approved module,
Model No. UTK,
IFETEL No.
RCPWEUT19-0526
La operación de este equipo está sujeta
a las siguientes dos condiciones: (1) es
posible que este equipo o dispositivo
no cause interferencia perjudicial y (2)
este equipo o dispositivo debe aceptar
cualquier interferencia, incluyendo la
que pueda causar su operación no
deseada.
Morocco
AUTHORIZED BY MOROCCO ANRT
WAM: Approval number: MR 17489 ANRT 2018
Page 41

INTRODUCTION
Page | 39
Date of approval: 13-SEP-2018
UTK: Approval number: MR 17488 ANRT 2018
Date of approval: 13-SEP-2018
Oman
Telecommunications Regulatory Authority
WAM : R/6168/18
D172250
UTK: R/6164/18
D172250
Paraguay
Comisión Nacional de
Telecomunicaciones
NR:121/2019 (WAM)
NR:122/2019 (UTK)
Pakistan
Pakistan Telecom Authority
Philippines
National Telecommunications
Commission
WAM: ESD-18-18399C
UTK: ESD-19-19449C
Singapore
Info-Communications Media
Development Authority (IMDA)
South
Korea
Korea Communications Commission
(대한민 국 방송통 신위원 회) –
KCC
Certification number:
WAM: IC MSIP-CRI-S83-WAM
UTK: IC MSIP-CRI-S83-UTK
This equipment is Industrial (Class A)
electromagnetic wave
suitability equipment and
seller or user should take notice of it,
and this equipment is to be used in the places except for
home.
이 기기는 업무용(A급) 전자파적합기기로서 판 매자
또는 사용자는 이 점을 주의하시기 바라 며,
가정외의 지역에서 사용하는 것을 목적으로 합니다.
Class A Equipment
(Industrial Broadcasting
& Communication
Equipment)
A급 기기 (업무용 방 송통신기자재)
UAE
WAM: ER65767/18
UTK: ER65804/18
Page 42

INTRODUCTION
Page | 40
WAM and AM12 Accessories
Electrodes
Part Number
Description
9300-032-50
ECG MONITORING ELECTRODES CASE 300
9300-033-51
ELECTRODE RESTING TAB BOX/500
9300-033-52
ELECTRODE RESTING TAB CASE/5000
Acquisition Modules
Part Number
Description
9293-048-54
WIRED PATIENT CABLE (AM12)
30012-019-54
WIRELESS ACQUISITION MODULE (WAM)
30012-021-51
UTK (Wireless receiver / transceiver)
9293-065-50
WIRED PATIENT CABLE (AM12M) W/O LEAD WIRES
6400-015
Cable Extension USB Type A-TO-A 6FT
Manuals
Part Number
Description
9515-XXX-51-CD
PHYSICIAN'S GUIDE ADULT & PEDIATRIC UM ON CD
9515-217-50-CD
RSCRIBE USER MANUAL PDFS ON CD
9515-217-50-ENG
RSCRIBE USER MANUAL ENGLISH
9516-217-50-ENG
RSCRIBE SERVICE MANUAL
9515-166-50-CD
ELI LINK USER MANUALS ON CD
Contact your dealer or go to www.welchallyn.com for more information.
Part Number
Description
9293-046-07
COMBINER WAM LEADS 10 POS GRAY
9293-046-60
LEAD SET WAM 10 WIRE BANANA AHA GRAY
9293-046-61
LEAD SET WAM 10 WIRE BANANA IEC GRAY
9293-046-62
RPLCE LD SET WAM/AM12 LIMBS BANA AHA GRY
9293-046-63
RPLCE LD SET WAM/AM12 LIMBS BANA IEC GRY
9293-046-64
RPLCE LD SET WAM/AM12 V1-V3 BANA AHA GRY
9293-046-65
RPLCE LD SET WAM/AM12 C1-C3 BANA IEC GRY
9293-046-66
RPLCE LD SET WAM/AM12 V4-V6 BANA AHA GRY
9293-046-67
RPLCE LD SET WAM/AM12 C4-C6 BANA IEC GRY
9293-047-60
LEAD SET WAM 10 WIRE CLIPS AHA GRAY
9293-047-61
LEAD SET WAM 10 WIRE CLIPS IEC GRAY
9293-047-62
RPLCE LD SET WAM/AM12 LIMBS CLIP AHA GRY
9293-047-63
RPLCE LD SET WAM/AM12 LIMBS CLIP IEC GRY
9293-047-64
RPLCE LD SET WAM/AM12 V1-V3 CLIP AHA GRY
9293-047-65
RPLCE LD SET WAM/AM12 C1-C3 CLIP IEC GRY
9293-047-66
RPLCE LD SET WAM/AM12 V4-V6 CLIP AHA GRY
9293-047-67
RPLCE LD SET WAM/AM12 C4-C6 CLIP IEC GRY
Page 43

INTRODUCTION
Page | 41
RScribe Network Operation in a Distributed Configuration
The RScribe network capabilities leverage a common database across multiple networked RScribe workstations
where exams will be conducted and RScribe Review stations where acquired exams can be reviewed and edited.
A distributed configuration is comprised of a dedicated server and a number of networked client RScribe
workstations and RScribe Review Stations sharing the same database.
A distributed configuration supports efficient operation for a busy department to:
Create logins for all users at a single location who can log into any networked station.
Define system settings at a single location for all networked workstations and review stations.
Manually schedule exam orders, when no orders interface exists, that are available to all RScribe
workstations regardless of the lab location.
Access and update Patient Information, exam data, and final reports from multiple locations.
Start exams utilizing scheduled orders received from the institution information system with a single
DICOM or HL7 interface to the shared database. Refer to the ELI Link Administrator manual for network
interface configuration instructions.
Selectively search the database to review any completed exam’s full disclosure data. This includes the
ability to edit measurements, sign, print, and export the final report from multiple RScribe workstations and
review stations on your network, dependent on the user permissions.
Manage the stored data for all exams with ability to view audit trails, create groups, configure workflow,
troubleshoot issues, and archive/restore/delete exams at a single location according to user permissions.
Microsoft Updates
Welch Allyn recommends that all RScribe workstations and review stations be periodically updated with Microsoft
critical and security updates to protect from malware attacks and to fix critical Microsoft software issues. The
following guidelines apply for Microsoft updates:
Customer is responsible for applying Microsoft updates.
Configure Microsoft updates to be manually applied.
o Turn automatic Windows update off and run it periodically as a manual action.
Do not install Microsoft updates during active use of the product.
Run a functional test after any update which includes conducting a test exam as well as importing an order
and exporting results (if activated) before running patient exams.
Each RScribe product release is tested against the cumulative Microsoft updates at the time of product release.
There are no known Microsoft update conflicts with the RScribe application. Please contact Welch Allyn Technical
support if conflicts are identified.
Page 44

INTRODUCTION
Page | 42
Anti-Virus Software
Welch Allyn recommends the use of anti-virus (AV) software on computers hosting the RScribe application. The
following guidelines apply in the use of AV software:
Customer is responsible for installation and maintenance of AV software.
AV software updates (software and definition files) should not be applied during active use of the RScribe
application.
o AV patch updates and system scans should be scheduled for time periods when the system is not
actively in use or should be performed manually.
AV software must be configured to exclude files/folders as defined in Cautions in User Safety Information
and below:
o Welch Allyn recommends excluding the RScribe database folder (normally
C:\ProgramData\MiPgSqlData) from the folders to be scanned.
If a technical support issue is reported, you may be asked to remove the virus scanning software to allow
investigation of the issue.
Encrypt Protected Health Information (PHI) Stored in RScribe
The RScribe database may be configured for Windows Encrypted File System (EFS) for protection of patient data
security. EFS encrypts individual files with a key stored with the Windows user account. Only the Windows user
that encrypts or creates new files in an EFS-enabled folder can decrypt the files. Additional users can be granted
access to individual files by the original account that encrypted the files.
NOTE: The RScribe system database must be unencrypted prior to performance of any software upgrades.
Contact Welch Allyn technical support if your facility requires this security feature.
Page 45

Page | 43
USING RSCRIBE
A typical workflow on RScribe consists of the following actions:
Schedule an exam
An exam is scheduled for a patient; exam data such as referring physician and requested date and time are entered. If
the patient does not exist in the database, patient demographic data is entered. Orders may be managed through the
RScribe Modality Worklist (MWL) feature, or through an external scheduling system interface.
Start a resting exam
The patient is connected to the RScribe through the data acquisition module, data is collected and one or more 10
second ECGs are saved for analysis and further processing. An exam may fulfill an order or can be an ad-hoc exam,
in which case a patient must be selected from the database or a new patient created with demographic data entered.
RScribe can collect multiple ECGs in a single acquisition session that may last for up to one hour, dependent on
system settings. ECGs and a full disclosure rhythm page may be previewed and printed on the Windows default
printer during an acquisition session. The ECG records can be modified with appropriate user permissions.
Acquiring a STAT ECG exam
The STAT ECG icon can be selected when there is an immediate need to acquire an ECG without prior
demographic data entry. The patient is connected to the RScribe through the data acquisition module, data is
collected and one or more 10 second ECGs are saved for analysis and further processing. Patient Information can be
accessed after the ECG is acquired where the Last Name field has been automatically populated with STAT ECG.
These saved exams can be found through exam search to update patient information at a later time.
Reviewing and signing an exam and printing a report
In order to edit the measurements or select demographics of an exam and electronically sign it, you must have the
necessary permission to do so. The program will automatically start the Review mode after exiting the acquisition
session with the first ECG that was collected during the session. Other acquired ECGs are saved and can be found
through exam search.
Real-time Display
Real-time ECG may be displayed in one of two full-screen views. The standard (12x1) full-screen view displays
10 or more seconds of continuous waveform data for each of the 12 leads. The split-screen (6x2) view displays 5 or
more seconds of continuous waveform data for each of the 12 leads. The six (6) limb leads appear on the left and the
six (6) precordial leads appear on the right side of the screen.
To change the default display format for the real-time ECG view, see the Settings section in this manual.
NOTE: The amount of data displayed may vary and depends on display speed and display size.
Page 46

USING RSCRIBE
Page | 44
Recording an ECG
RScribe can acquire single or multiple ECGs in real time, retrospectively, or in a timed sequence.
Prepare the patient for best conductivity between the skin surface and the electrode. Place the electrodes on the
patient according to lead placement guidelines. Ensure that the proper lead wire is firmly and correctly attached to
each electrode.
Select an existing order from the MWL tab, search for the patient from the Patients tab, or manually enter patient
demographics.
The real-time ECG display can be exited with selection of the Done button to return to the Start a Resting
Exam display at any time. The user is prompted to select Yes or No when an ECG has not been acquired.
To acquire a real-time ECG:
Select the ECG button on the display to capture Best 10 or Last 10 12-lead ECG data.
o BEST 10 captures the best quality, 10-second ECG accumulated within the full disclosure
o LAST 10 captures the most recently acquired 10-second ECG
Or, select the ECG button on the WAM™ or the AM12™ that will capture either the BEST or
LAST 10-seconds of acquired ECG dependent on RScribe configurations.
Preview Acquisition Screen
The ECG preview screen appears with an ECG report exactly as it will save and print upon exiting this display.
Select the Save button to save the ECG as acquired, exit, and return to the Start a Resting
Exam display.
Select the Delete button to discard the ECG and return to the real-time ECG display to capture
another ECG.
Select the Review button to save the ECG as reviewed, exit, and return to the Start a Resting
Exam display. The user is prompted to enter the reviewer’s name prior to exit.
Select the Sign button to save the ECG as signed, exit, and return to the Start a Resting
Exam display. The user is prompted to enter the signer’s name prior to exit. When Legal Signature has
been defined in the workflow configuration settings, the signer is prompted to enter the user name and
password.
Select the Print ECG button to print the displayed ECG according to the Resting ECG settings.
Page 47

USING RSCRIBE
Page | 45
Timed ECG Capture
RScribe can automatically acquire ECGs at preset time intervals for future review and processing on the full
disclosure screen. Automatic acquisition may be as frequent as every 20 seconds or once per a 60-minute period
(dependent on the amount of full disclosure time set by the administrator).
To acquire timed ECGs:
Prep the patient and place the electrodes in the correct locations (ensuring lead wires are securely attached).
Select ECG Timed Capture from the settings icon in the
upper left corner of the real-time ECG display.
Enable Auto Capture Time by checkbox.
Enter the frequency in the Set Capture Time (mm:ss)
window
o 20 seconds up to 59-minutes and 59-seconds.
Select OK to begin automatic ECG collection or Cancel to
exit the window.
o Message appears prompting a manual ECG capture
Capture the first ECG to begin the timed ECG capture. The
time remaining to the next capture and the number of ECGs
captured is displayed in the lower right corner of the display.
ECGs are automatically captured according to the Full Disclosure duration defined by the administrator. ECG
capture automatically ends when the duration has been reached.
Automatic ECG capture can be manually ended with selection of the done button.
Captured ECGs are saved and can be reviewed and edited using the Exam Search feature.
ECG Capture from the Full Disclosure Data Window
The full disclosure data window is located at the bottom of the ECG display screen. ECG data is displayed using a
single lead or three leads according to the settings.
To acquire a retrospective ECG:
Use a left mouse click anywhere in the full disclosure ECG to highlight 10-seconds of data. Once clicked,
the Page Up , Page Down , Select , and Print Full Disclosure buttons
become active allowing navigation and ECG selection.
Position the 10-second box of highlighted ECG anywhere in the full disclosure ECG using left mouse
clicks and the Page Up/Down buttons.
Select the ECG button to the right of the full disclosure to capture the highlighted 10-second 12-
lead ECG.
Page 48

USING RSCRIBE
Page | 46
ECG Collection Using the Acquisition Module
ECG acquisition can be performed at the WAM or AM12 acquisition modules. Refer to the AM12 short-form
instruction card when using the AM12.
NOTE: The WAM must be synchronized to the UTK before RScribe operation. The Universal
Transmitter/receiver Key (UTK) is a bidirectional device that links the PC’s USB port to the WAM.
Select the ECG button on the WAM™ or the AM12™ to capture the last 10-seconds of acquired ECG.
Connecting the Acquisition Module
The AM12 connects to a USB port on the PC for signal acquisition. The RScribe will automatically detect the
AM12 once it’s connected to the USB port.
The WAM communicates via the UTK (Universal Transmitter/receiver Key) connected to an active USB port on the
PC. The WAM is synchronized with the UTK making them a matched pair. Using the same UTK and WAM that
were last paired maintains their synchronization.
Pairing WAM with RScribe
Start the RScribe application. Navigate to the real-time display and:
Select the settings icon in the upper right corner of the real-time display
Select WAM Pairing
Place the WAM (powered off) in close proximity to the UTK receiver connected to an RScribe USB port.
Select Start and then Yes
Power the WAM on.
A successfully paired message will display.
Select DONE.
NOTE: The wireless acquisition module (WAM) must be paired to a specific RScribe prior to signal
acquisition.
NOTE: If both AM12 and the UTK are connected simultaneously, RScribe will default to the AM12 over
the UTK with WAM for acquisition.
NOTE: Disconnecting the UTK and connecting the AM12 will automatically cause the RScribe to switch
to the AM12. It is not necessary to pair the same WAM with the same UTK to use it again.
Page 49

Page | 47
MWL/PATIENTS
The MWL/Patients icon allows you to schedule exams and enter patient demographics information. Select
this icon to open a window for scheduling resting ECG exams and to view the existing schedule.
When RScribe is linked to an external scheduling system, this information arrives from institution entered orders.
When the icon is selected, a split window appears with two selectable tabs (MWL and Patients) on the left and
Patient or Order Information fields on the right, dependent on the selected tab.
A Search field and button are present below the tab selections.
MWL
Text that is entered in the search field will be used to search through the Modality Worklist (MWL) to display orders
that start with matching text in the Last Name, First Name, or Patient ID. A blank search field will list all orders.
MWL columns include Scheduled Date/Time, Patient ID, Last Name, First Name, Date of Birth, and Group. The
list can be sorted by a click on the column headers. A second click on the same header will reverse the column
order.
NOTE: Selection of an unavailable order (e.g. in use at another workstation, deleted, or canceled) will
result in a refresh of the listed orders.
Edit Order
Selection of an entry in the list will display
the Order Information as read-only. Select
the Edit buttons to modify the order.
Select the Save Order button to save
changes or Cancel to cancel all changes.
NOTE: This function is not available
when an orders interface is enabled.
Page 50

MWL/PATIENTS
Page | 48
New Order
A New Order button allows a Patient ID
or name search of patient information in
the database allowing addition of a new
order in the MWL list. A blank search
field will list all patients in the database.
When the patient does not exist in the database, Cancel the Patient Information search and select the Patients tab
to enter a new patient. Instructions are on the following page.
The patient information populates the Order Information at the right of the display. Additional order information
can be entered and the order saved. The Cancel button will close the order without saving.
When entering an order, use the Group drop-down list to assign the order to a specific group that has been
configured in the system settings. This is not necessary when there is no more than one Group.
Select the calendar icon in the bottom right corner of the
Order Information section to open a calendar for
selection of the scheduled order date and time. Date and
time may also be entered by typing in the Requested
Date/Time field.
Delete an Existing Order
Select an existing patient order by highlighting the line and then
select Delete Order.
A warning message prompting delete confirmation will appear.
Select Yes to delete the order or No to cancel and return to the
MWL listing.
Exit MWL/Patients
Select the Exit button when finished to return to the main menu.
Page 51

MWL/PATIENTS
Page | 49
Patients
Text that is entered in the search field will be used to
search through the patient demographics in the
database to display any patients that start with
matching text in the Last Name, First Name, or Patient
ID.
Patients’ columns include Patient ID, Last Name, First
Name, and Date of Birth. The list can be sorted by
selecting the column headers. A second selection on
the same header will reverse the column order.
Edit Patient
Selection of an entry in the list will display the Patient Information as read-only. Select the Edit button to enable
and modify the patient demographics fields.
Select the Save Patient button when finished to save changes or the Cancel button to return to read-only
demographics without saving changes.
New Patient
A New Patient button clears any selected patient
information allowing addition of a new patient in the
list. The new patient information can be entered in the
demographic fields and the Save Patient button
selected to save it to the database. The Cancel button
will close the patient information without saving.
Delete Patient
Select the Delete button to remove patient demographics from the database.
NOTE: The Delete button is disabled when the patient demographics are associated with an existing order
or exam. All orders and exams for that patient must first be deleted before the patient demographics can
be deleted.
A warning message prompting delete confirmation will appear. Select
Yes to delete the patient demographics or No to cancel and return to the
Patients listing.
Exit MWL/Patient
Select the Exit button when finished to return to the main menu.
Page 52

Page | 50
RECORD AN ECG
Patient Preparation
Before attaching the electrodes, assure the patient fully understands the procedure and what to expect.
Privacy is very important in assuring the patient is relaxed.
Reassure the patient that the procedure is painless and that the electrodes on their skin are all that they
will feel.
Make sure the patient is lying down and is comfortable. If the table is narrow, tuck the patient’s hands
under his/her buttocks to ensure their muscles are relaxed.
Once all the electrodes are attached, ask the patient to lie still and to not talk. Explain this will assist you in
acquiring a good ECG.
Preparing Patient Skin
Thorough skin preparation is very important. There is natural resistance on the skin surface from various sources
such as hair, oil, and dry, dead skin. Skin preparation is intended to reduce resistance and maximize the quality of
the ECG signal.
To prepare the skin:
Clip hair from electrode sites if necessary.
Wash area with warm, soapy water or alcohol if dirty or oily.
Dry skin vigorously with a pad such as 2 x 2 or 4 x 4 gauze to remove residue from cleaning, dead skin
cells and oil, and to increase capillary blood flow.
NOTE: With elderly or frail patients take care to not abrade the skin causing discomfort or bruising.
Patient Hookup
Correct electrode placement is essential for acquiring a diagnostically valid ECG.
A low resistance highly conductive pathway from the skin surface to the electrocardiograph provides superior noisefree waveforms. Good quality silver-silver chloride (Ag/AgCl) electrodes within their expiration date should be
used whenever taking an ECG.
TIP: Electrodes should be stored in an air-tight container. Electrodes will dry out if not stored properly
causing reduced adhesion and conductivity, leading to poor trace quality.
To Attach the Electrodes
1. Expose the arms and legs of the patient to attach the limb leads.
2. Place the electrodes on flat, fleshy parts of the arms and legs.
3. If a limb site is not available, place the electrodes on a perfused area of the stump.
4. Attach the electrodes to the skin. A good test for firm electrode contact is to slightly tug on the electrode to
check adhesion. If the electrode moves freely, it needs to be changed. If the electrode does not move
easily, a good connection has been obtained.
Page 53

RECORD AN ECG
Page | 51
For accurate V-lead placement, it is important to locate the 4th intercostal space Because patients vary with respect
to body shape, it is difficult to palpate the 1st intercostal space with accuracy. Thus, locate the 2nd intercostal space
by first palpating the little bony prominence called the Angle of Lewis, where the body of the sternum joins the
manubrium. This rise in the sternum identifies where the second rib is attached, and the space just below it is the 2nd
intercostal space. Palpate and count down on the chest until you locate the 4th intercostal space.
Patient Hookup Summary Table
AAMI Lead
IEC
Lead
Electrode
Position
Red Red
On the 4th
intercostal space
at the right sternal
border.
Yellow
Yellow
On the 4th
intercostal space
at the left sternal
border.
Green
Green
Midway between
V2/C2 and V4/C4
electrodes.
Blue
Brown
On the 5th
intercostal space
at the left
midclavicular line.
Orange
Black
Midway between
V4/C4 and V6/C6
electrodes.
Violet
Violet
On the left
midaxillary line,
horizontal with
V4/C4 electrode.
Black
Yellow
On the deltoid,
forearm, or wrist.
White
Red
Red
Green
On the thigh or
ankle.
Green
Black
Page 54

RECORD AN ECG
Page | 52
Patient Demographic Entry
Patient demographic information can be entered before, during or after acquisition. The entered patient ID fields
will remain populated until you acquire the ECG; however, if you turn off the device before exiting the patient
information will be cleared.
In addition to the default patient ID format, RScribe also supports custom ID formats for each group through use of
ELI Link. Refer to the ELI Link Administrator Manual, Part number 9515-166-50-ENG, for instructions on Custom
ID.
STAT ECG
To begin STAT ECG acquisition without patient demographic entry, select the STAT ECG icon from the
main display to directly start continuous ECG display. Skip to ECG, Acquisition, and Storage on the following
pages. Patient demographics may be entered during ECG collection or after ending ECG acquisition by retrieval of
the STAT ECG from the database.
Start a Resting Exam
Select the Start a Resting Exam icon to open the MWL/Patients window.
When scheduled orders exist, the MWL tab is automatically selected.
When no scheduled orders exist, the Patients tab is automatically selected.
Scheduled Order(s)
1. When there is an existing order for the patient, highlight the patient in the MWL list.
The Exam Information section on the left side of the display is populated by the previously entered patient
demographics.
2. Enter any desired exam information on the left panel and select Start Exam.
NOTE: Selection of an unavailable order (e.g. in use at another workstation, deleted, or canceled) will
result in a refresh of the listed orders.
Page 55

RECORD AN ECG
Page | 53
No Scheduled Order(s)
When no scheduled orders exist, the Patient tab is automatically selected.
1. Search for existing patients in the database by entering a name or ID number, and then select the Search
button.
2. When the patient information is not found, enter any desired patient and exam information on the left panel.
NOTE: If the entered ID number already exists in the database, a warning will appear informing you to
click OK to continue or Cancel to correct the entered demographics.
Enter date of birth by typing MM/DD/YY or DD-MM-YY according to the computer regional settings, or by
clicking on the calendar icon. Select the decade and the year; use the left/right arrows to scroll the year, the
month, and the day to populate the field. Age will be automatically calculated.
RScribe will remember list items such as Indications, Medications, Procedure Type, and Referring Physician as
they are entered. The added items will be available for future selection. Enter text or choose items from the
drop-down menu and then click on the green checkmark to enter. Use the red X to delete the selected item.
When there are multiple entries, items can be moved up or down by using the green arrow keys.
Some fields are not available (grayed) when patient demographics are attached to existing exams in the database
or are ordered by an external system. The grayed fields are Last Name, First Name, DOB, Age, Gender, Race,
ID and Second ID.
Page 56

RECORD AN ECG
Page | 54
ECG Acquisition, Printing, and Storage
Once the patient is connected, RScribe continuously captures and displays ECG data. The patient should be in a
supine position and encouraged to relax to ensure that the ECG is free from artifact (noise) due to patient activity.
Display Overview
Menu Items
Patient
Demographics
12-lead Real-time
ECG View
Gain/Speed/Filter
Full Disclosure
ECG / Full
Disclosure Menu
Icons
Date/Time
Patient Heart
Rate
Patient
Information
ECG
Acquisition
Exit
Timed
Capture
Status
Menu Selections
Click on the settings button in the upper-right area of the display to open the ECG Timed Capture and
WAM Pairing menus.
o Select ECG Timed Capture to automatically acquire ECGs at preset time intervals.
Refer to page 39 for instructions
o Select WAM Pairing to pair the WAM acquisition module.
Refer to page 39 for instructions
Click the show/hide Full Disclosure ECG section in the lower-left area of the display as desired.
Date/Time
Current date/time according to the computer regional settings is displayed in the upper right-hand corner of the
display.
Real-Time Heart Rate
When a patient is connected to the RScribe, his/her heart rate is displayed in real time. The HR is the average
ventricular rate measured over the patient’s last five beats.
NOTE: If a lead fail occurs or swapped leads are suspected, a red message is visible next to the HR,
indicating the leads off or possibly misplaced, for both limb lead and chest lead fault conditions.
Page 57

RECORD AN ECG
Page | 55
Timed Capture Status
Values in the lower-right area of the ECG display indicate the time remaining until the next timed ECG capture and
the total number of 10-second 12-lead ECGs that are currently captured and saved.
Full Disclosure ECG
Single lead ECG or three (3) lead ECG (configurable) is accumulated and displayed along the bottom area of the
display. Twelve (12) leads of ECG are accumulated and stored for up to 60 minutes of full disclosure, which can be
reviewed or printed as a single lead or as acquired ECG.
ECG Display Menu Icons
Icon
Description
Patient Demographics allows editing of existing and entry of new demographics. Only
height, weight, admission ID, medications, notes, referring physician and location can
be edited.
ECG button permits the capture of an ECG at any time the patient is connected.
10 appears in the place of ECG when Best 10 capture mode is set up; selects the best
10 seconds of the full disclosure as the captured ECG.
Done ends and exits the ECG acquisition session.
Full Disclosure Menu Icons
Click within the full disclosure ECG to enable the menu icons for selection.
Icon
Description
Page Up advances the cursor back one page. Page size is
determined by the format, speed, and computer screen size.
Select allows for the selection of the data in the cursor to be
analyzed.
Prints a single lead rhythm page of the Full Disclosure.
Page Down advances the cursor forward one page. Page size is
determined by the format, speed, and computer screen size.
Page 58

RECORD AN ECG
Page | 56
Acquire ECGs
Examine the display for artifact or baseline drift. Re-prep and replace electrodes if necessary to obtain satisfactory
waveforms. (See Patient Preparation.)
Please refer to the following troubleshooting guide based on Einthoven’s Triangle:
Artifact
Check Electrode
Lead II and III artifact
Poor LL electrode or left leg tremor
Lead I and II artifact
Poor RA electrode or right arm tremor
Lead I and III artifact
Poor LA electrode or left arm tremor
V Leads
Re-prep site & replace electrode
If a lead fault occurs, square waves appear on the display for that lead and the lead(s) that are faulty will display in
the upper left corner of the screen one at a time. After the leads are reattached correctly at least 10 seconds must be
acquired before an ECG can be captured.
The program monitors the ECG waveform for unusual configurations that could be caused by misplaced (swapped)
electrode positions. If the program detects a high probability of electrode swap, it will display a message like "RA or
LA misplaced?" in the same message area as used for lead fault. Check the electrode connections for any
misplacement.
NOTE: Although the majority of lead wire swaps are correctly detected, some real ECG configurations
may give rise to an inappropriate "misplaced" message, and some real swaps may not be detected due to
patient specific ECG morphologies. The automatic detection helps to prevent lead wire swaps but do not
rely completely on the automatic detection.
Manual ECG Capture
Use the Capture ECG icon to capture the last 10 seconds of the real time ECG. The captured ECG will
appear on the screen in a format similar to a printout. An average beat can also be viewed if enabled.
The print ECG icon can be used to print the unconfirmed report; if set in the configuration, the ECG will
print automatically.
ECG acquisition can also be captured by pressing the ECG button on the WAM or AM12 acquisition
module.
Best 10 Seconds Selection
When the BEST 10 icon is selected, RScribe automatically selects the best quality10 seconds of acquired
ECG available from within the full disclosure ECG buffer.
ECG acquisition can also be captured by pressing the ECG button on the WAM or AM12 acquisition module
when Best 10 capture has been set up. However, this action will always capture the last 10-seconds of acquired
ECG.
Page 59

RECORD AN ECG
Page | 57
Capturing ECGs from Full Disclosure
Click anywhere in the full disclosure display at the bottom of the screen to capture an ECG retrospectively from the
buffer. A green rectangle will appear highlighting the selected 10-seconds of ECG data. You can navigate through
the window with the mouse, or use the page up/down buttons to the right. Use the ECG icon to capture the
12-lead ECG. The complete full disclosure data can be printed as a single lead by using the Print Full Disclosure
icon. Waveform data reviewed on the screen can be selected and printed as a single lead of up to 60
minutes of data, depending on the amount of ECG data that has been acquired.
NOTE: ECG size and gain will automatically adjust to allow all data to fit on one page.
NOTE: The full disclosure data cannot be accessed once the acquisition session has ended.
Timed ECG Recording
RScribe automatically acquires ECGs at preset time intervals for future review and processing on the full disclosure
screen. Automatic acquisition is based on the amount of full disclosure time set by the administrator. It may be set
as frequent as every 20 seconds or as infrequently as once per a 60-minute period.
The ECGs captured for the current patient are presented as white rectangles in the full disclosure window. As the
waveform data on the screen refreshes, additional ECGs can be acquired as necessary. Previously acquired data will
be retained in the buffer until the full disclosure buffer has been filled.
See the description of the Menu Item "ECG Timed Capture" on page 39 for instructions how to initiate and set up
timed capture of ECGs. To begin, manually capture an ECG to start timed collection.
NOTE: When the full disclosure buffer duration set by the administrator is reached, RScribe automatically
ends ECG capture and will display the last captured ECG.
Captured ECG Display and Icons
Once captured, the ECG is displayed with global measurements and the VERITAS automatic interpretation. Icon
button selections are located at the right of the captured ECG and actions are described below.
Icon
Description
ID allows editing of existing and entry of new patient information. Only height, weight,
admission ID, medications, notes, referring physician and location can be edited.
Sign the displayed ECG. Icon is only available for those logged in with signing
authority.
Mark the displayed ECG with a Reviewed status. Icon is only available for those
logged in with permission to Edit and Review exams. User is prompted to enter the
Reviewer’s name and select OK. Start a Resting Exam is then displayed.
Save the ECG. ECG is saved with an “Acquired” status. Start a Resting Exam is then
displayed.
Delete the ECG. User is prompted to select Yes or No and is then returned to the realtime ECG display.
Print ECG will send the displayed ECG to the default printer.
Page 60

RECORD AN ECG
Page | 58
Median Beats and Median Lead Zoom panels can be shown or hidden by toggling the small arrow buttons in the
upper-right corners.
The global measurement and interpretation panels can be shown or hidden by toggling the small arrow button in
the upper-left corner.
Measurement parameters can be changed with a double-click in the Median Lead Zoom area and by dragging the
cursors to the desired positions. Global measurements are updated upon selection of the OK button. Cancel will
undo any changes and revert back to the original locations and global values.
An undo icon in the bottom-right corner of the measurements area can be selected to revert back to the original
measurements when selected before saving the ECG.
NOTE: If no patient age is entered prior to acquiring an ECG, the interpretation algorithm assumes a
40-year old male. The statement “INTERPRETATION BASED ON A DEFAULT AGE OF 40 YEARS” will
be added to the Interpretation text.
NOTE: If a patient age of zero (0) is used the interpretation algorithm will assume a 6-month old infant.
The statement “INTERPRETATION BASED ON A DEFAULT AGE OF 6 MONTHS” will be added to the
interpretation text.
NOTE: Where global measurement values are not available (i.e., rate, interval, axis), text such as ‘- -‘or
‘*’ or similar will display/print for the unavailable value.
Page 61

RECORD AN ECG
Page | 59
Printing
If Auto-Print is enabled in the configuration, an ECG is printed following ECG capture, both for manual or timed
capture.
For manual printing, select the Print ECG button icon. The view on the display is what will print out.
To change the speed, gain, filter, or print format (regardless of the plot format configuration setting) of the acquired
ECG, use a right mouse click over the acquired ECG (see below).
The complete full disclosure data can be printed as a single lead by selecting the Print Full Disclosure
icon. Waveform data reviewed on the screen can be selected and printed as a single lead of up to 60 minutes of data,
depending on the amount of ECG data that has been acquired.
Storage
ECGs are automatically saved to the database upon acquisition. If the current user has permission to review, the
RScribe program will automatically restart in Review mode after ending the ECG acquisition session, with the first
ECG captured in the session selected. When multiple timed ECGs are captured, they can be edited using the exam
search functions.
Change Settings
Many settings can be changed by clicking the right mouse button on areas of the display. The context menus may be
different depending on the area selected. Some specific context menus are available for display speed, gain, filter
settings and lead layout in the area of the window where that parameter is displayed. The context menu is also
specific to the display area (e.g. the full disclosure window or the captured ECG window), but where appropriate,
the settings may apply to all windows; for example, if you change the gain through the menu in the full disclosure
window, the gain in the real time window is also changed.
Refer to the next section of this manual for a detailed description of the context menus allowing change.
Page 62

Page | 60
CONTEXT MENUS
Context Menu Settings
Many settings can be changed by clicking with the right mouse button on areas of the display. A so-called "context
menu" will be displayed as seen in the examples below. The context menus may be different depending on the area
selected. Some specific context menus are available for display speed, gain, filter settings and lead layout in the area
of the window where that parameter is displayed. The context menu is also specific to the display area (e.g. the full
disclosure window or the captured ECG window), but where appropriate, the settings may apply to all windows; for
example, if you change the gain through the menu in the full disclosure window, the gain in the real time window is
also changed. Some context menus activate specific tools, like measurement calipers.
NOTE: Changes are maintained ONLY for the current sessions. Settings will revert back to the default
settings with the next exam. Refer to the System Settings section in this manual to change the default
settings.
NOTE: Some of the described menus may not be present if they were locked by the administrator in the
RScribe configuration settings.
Context Menus in Captured ECG
Context Menus in Real-time ECG
Change Lead Format
Right mouse click while the cursor is over the captured ECG waveform
Select Waveforms
Select Lead Format
Select from: 3+1, 6, 3+3, 12, or 6+6
NOTE: In the real time display only 6+6 and 12 lead formats are available. It is recommended to choose
a format that allows at least 10 seconds of real time ECG on the screen during acquisition.
3 + 1 Lead Format – Select Lead
Right mouse click while the cursor is over the captured ECG waveform
Select Waveforms
Select Lead Format
Select: 3+1
Select from: I, II, III, aVR, aVL, aVF, V1, V2, V3, V4, V5, or V6
Page 63

CONTEXT MENUS
Page | 61
3 + 3 Lead Format – Select Leads
Right mouse click while the cursor is over the captured ECG waveform
Select Waveforms
Select Lead Format
Select: 3+3
Select from: I, II, III, aVR, aVL, aVF, V1, V2, V3, V4, V5, or V6
NOTE: 3+3 lead format requires a lead selection for each of the three leads presented.
Full Disclosure Change Lead Format
To change lead format in the full disclosure display:
Right mouse click while the cursor is over the ECG waveform in the Full Disclosure window
Select Waveforms
Select Lead Format
Select from: single lead by 3, single lead by 6, or 3 lead
NOTE: Single lead by 3 displays three lines of ECG data in the full disclosure buffer. Single lead by 6
displays six lines of ECG data in the full disclosure buffer. Three lead displays two groups of three leads in
the full disclosure buffer. The amount of data displayed is dependent on the size of the display and the ECG
sweep speed selected.
Full Disclosure Single-lead Format – Change Lead
To change the full disclosure lead to a single-lead format:
Right mouse click while the cursor is over the ECG waveform in the Full Disclosure window
Select Waveforms
Select Single Lead Format
Select from: I, II, III, aVR, aVL, aVF, V1, V2, V3, V4, V5, or V6
Full Disclosure Three-lead Format – Change Leads
To change the full disclosure lead to a 3-lead format:
Right mouse click while the cursor is over the ECG waveform in the Full Disclosure window
Select Three Lead Format
Select from: I, II, III, aVR, aVL, aVF, V1, V2, V3, V4, V5, or V6
NOTE: Three-lead format requires a lead selection for each of the three leads presented.
Full Disclosure Change Print Lead
To change the full disclosure print lead:
Right mouse click while the cursor is over the ECG waveform in the Full Disclosure window
Select Print Lead
Select from: I, II, III, aVR, aVL, aVF, V1, V2, V3, V4, V5, or V6
Change the ECG Presentation Gain
Right mouse click while the cursor is over the real-time or captured ECG waveform
Select Waveforms
Select Gain
Select from: 2.5 mm/mV, 5 mm/mV, 10 mm/mV, or 20 mm/mV
Gain displays and prints at the bottom of the ECG
NOTE: A shortcut to this menu is available when you right-click on the current gain display of the
window. Different gains are available in the median and full disclosure windows.
Page 64

CONTEXT MENUS
Page | 62
Change the ECG Presentation Speed
Right mouse click while the cursor is over the real-time or captured ECG waveform
Select Waveforms
Select Speed
Select from: 5 mm/s, 10 mm/s, 25mm/s, or 50 mm/s (real-time only)
Select from: 25mm/s or 50mm/s in the captured ECG waveform
Gain displays and prints at the bottom of the ECG
NOTE: A shortcut to this menu is available when you right-click on the current speed display of the
window. Different speeds are available in the median and full disclosure windows.
Change ECG Low Pass Filter
Right mouse click while the cursor is over the real-time or captured ECG waveform
Select Waveforms
Select Low Pass Filter
Select from: 0.05 – 40 Hz, 0.05 – 150 Hz, or 0.05 – 300 Hz
WARNING: When the 40 Hz filter is used, the frequency response requirement for diagnostic ECG
equipment cannot be met. The 40 Hz filter significantly reduces high-frequency components of the ECG
and pacemaker spike amplitudes, and is recommended only if high-frequency noise cannot be reduced by
proper procedures.
NOTE: A filter setting lower than 150 Hz will reduce the visibility of fast transients in the ECG like
pacemaker spikes or fast notches. For pediatric ECGs a 300 Hz setting is recommended. Filter settings
apply only to displayed and printed data. Data is stored in unfiltered format.
NOTE: The High Pass filter (or base line filter), indicated by the number "0.05" cannot be changed.
RScribe automatically implements a high performance base line filter that does not distort the ECG
waveform. High Pass filters that do distort the ECG waveform are not available.
Apply Anti-Aliasing to the ECG Display
Right mouse click while the cursor is over the real-time or captured ECG waveform
Select Waveforms
Select Anti-Aliasing
NOTE: Anti aliasing reduces slightly the "staircase" effect due to individual pixels in digital monitors, but
may put a strain on low performance computers.
Change AC Filter on the Real-time ECG
Right mouse click while the cursor is over the real time ECG waveform
Select Waveforms
Select AC Filter
Select from: None, 50 Hz, or 60 Hz
NOTE: RScribe removes 60 Hz or 50 Hz interference. The setting you select depends on the line
frequency in your country. For example, use the 60 Hz setting in the U.S. If the setting is correct but you
still see mains interference, check the electrode connections, mains interference sources like transformers
or motors close to the patient, and the connection to the safety ground of the computer. Try operating from
battery power if needed.
Page 65

CONTEXT MENUS
Page | 63
Change ECG Presentation To or From Cabrera Format
Right mouse click while the cursor is on the ECG waveform.
Select Waveforms
Select or unselect
Change Median Zoomed Lead in ECG Review
Mode
Right mouse click while the cursor is over the
Median Lead Zoom ECG
Select Lead
Select from: I, II, III, aVR, aVL, aVF, V1, V2,
V3, V4, V5, V6 , or All leads (all 12 leads
superimposed)
Switch Between Best Ten and Last 10 Seconds Capture in Real-Time ECG Mode
Right mouse click while the cursor is over the real-time ECG waveform
Select Capture
Select Capture Mode
Select from: Best 10 or Last 10
NOTE: Defines whether or not the RScribe will automatically capture the 10 seconds ECG with the lowest
noise level from the full disclosure buffer, or the last 10 seconds of data when the ECG button is selected.
Print Pace Spike Channel
Right mouse click while the cursor is over the
acquired ECG waveform
Select Pace Spike on or off
NOTE: When Pacer Spike is selected small tick
marks will appear at the bottom of the ECG
printout where each pacemaker spike was detected
by RScribe.
Display and Print Average RR Interval
Right mouse click while the cursor is over the acquired ECG waveform
Select Interpretation
Select Avg RR on or off
Display and Print QTcB (Bazett)
Right mouse click while the cursor is over the acquired ECG waveform
Select Interpretation
Select QTcB on or off
Page 66

CONTEXT MENUS
Page | 64
Display and Print QTcF (Fridericia)
Right mouse click while the cursor is over the acquired ECG waveform
Select Interpretation
Select QTcF on or off
NOTE: Welch Allyn VERITAS calculates by default the QTc with a linear correction method for average
RR-interval similar to the Framingham method. In addition it is possible to display and print the QTc
corrected with the Bazett or Fridericia correction methods.
Print Automatic Interpretation Text
Right mouse click while the cursor is over the acquired ECG waveform
Select Interpretation
Select Print Interpretation on or off
Display and Print Automatic Interpretation Reasons Text
Right mouse click while the cursor is over the real time ECG waveform
Select Capture
Select Interpretation
Select Reasons Text on or off
NOTE: Reasons statements indicate why a particular interpretive statement was printed. Reasons
statements print enclosed in [square brackets] within the interpretive text if the interpretation option is
turned on. Turning the reasons statement function on or off does not affect the measurements performed or
the interpretive statements selected by the analysis program.
For Example Anteroseptal Infarct [40+ ms Q WAVE IN V1-V4] where “Anteroseptal Infarct” is the
interpretive statement, and “40+ ms Q WAVE IN V1-V4” is the reason statement or explanation as to why
the interpretive statement was printed.
Display Calipers for on-screen measurement
Right mouse click while the cursor is over the acquired ECG waveform
Select Show Calipers on or off
A caliper tool is available in the context menus when
you right click anywhere in the main ECG window, and
select Calipers. Calipers for amplitude and interval
measurements will appear on the waveform.
Hover with the mouse over the caliper area. When you are close to the dotted line, the mouse cursor will change to a
cross and you can now drag the caliper to desired position without changing the distance. When you are close to the
solid line, the mouse cursor will change to a double arrow, and you can drag the single line to the desired position.
When you right click when the arrows or cross is present on the interval calipers, you can select March Out to
repeat the interval caliper over the duration of the recording. You can use any of the vertical solid line to expand or
shrink the calipers, and the horizontal dotted line to drag the whole series to a different position.
Page 67

Page | 65
EXAM SEARCH
Selecting ECG Reports to Review
The Exam Search icon is available for users that will edit, review, and sign exams. Click on the icon to open a window allowing you to view the exams according to their status and your role.
The Get Worklist button will filter the list of exams according to the User Preferences for the logged in user.
A search field is available for entry of a patient name or ID number. When you enter one or more alphanumeric
characters, all exams that start with those characters are displayed in a list when the Search button is clicked.
Listed exams can be sorted by clicking any of the column headers.
When a complete last name, first name, or patient ID is entered in the search field and the Search button is clicked,
all matching exams will appear in the list.
Highlight an exam in the list and then click the
Edit button to open the exam for review and editing of measurements and demographics, or
Report button to open the final report for review and printing, or
More button to display more advanced selections explained below.
Copy Offline button that allows an existing exam to be copied to an external drive using a browser for review
at another RScribe system.
Open Offline button that allows an RScribe system user to open an exam from another system by browsing to
the location of the copied exam.
Page 68

EXAM SEARCH
Page | 66
Transmit button allows the exam results to be sent to the ELI Link destination defined in the system
configuration settings. This selection is only enabled when the selected exam(s) has the associated export status
enabled in the Workflow Config settings.
Reconcile button is used to match an order to an exam that was performed before the order was available, or
to correct information after the exam has been completed with incorrect patient demographics.
Archive button is used to move the exam from the database to an external drive for long-term storage
purposes.
Delete button is used to permanently remove an exam or an order from the system database. The exam is not
recoverable after performing this action.
Button actions are dependent on user permissions. Unavailable buttons will appear grayed.
Advanced Search
For more sophisticated exam list filtering, click on the Advanced button. The identifier selections are relational to
the selected filter and are dependent on your system configuration.
The exam state(s) are selected by checkbox as identifiers. Click the Search button after your filter and identifiers
are selected. Click the Clear button to cancel and remove your entries from the search fields.
When finished, click the Done button to exit the advanced search selections and return to the main Exam Search
window.
Exam State Identifiers
Acquired
o Checked if equal to
Edited
o Checked if equal to
Reviewed
o Checked if equal to
Signed
o Checked if equal to
Exam Criteria Identifiers
Patient ID
o Equal To
o Start With
Last Name
o Equal To
o Start With
First Name
o Equal To
o Start With
Group
o Equal To
o Blank (All)
o Any defined Group this user can access
Date/Time
o Equal To
o Prior To
o Later Than
Page 69

EXAM SEARCH
Page | 67
Edit a Resting ECG Report
When a report is selected from the Exam Search list by a user with review and signing permissions, it is presented
on the screen similar to the one shown below. The Sign and Review button icons are not present for those without
appropriate permissions.
Presence of the Save and Review button icons is dependent on how the administrator has configured workflow in
system settings.
The Patient Information window can be opened and edited with selection of the ID icon button.
If the user agrees with the interpretation statements, the ECG can be saved, marked as reviewed, or signed. After
selection of any of these icon buttons, the user is returned to the Exam Review list.
Patient ID
Sign
Review
Save
Print ECG
Editing Measurements
There are two ways to edit the global measurement values:
1. Measurement Value Editing
o Left-click in the value measurement field and enter the
desired value.
o The values able to be edited are: Vent rate, QRS dur,
QT/QTc, and the P-R-T axes. The grayed-out boxes
cannot be edited here.
o The undo icon in the bottom-right corner of the
interpretation area can be selected to revert back to the
measurement values before any editing changes were
made, and when selected before saving the ECG.
2. Editing Interval measurements using the Median Beat Calipers
Page 70

EXAM SEARCH
Page | 68
o This method can be used for the PR-interval, QRS
duration, and QT duration editing
o Double-click in the Median Lead Zoom window.
Measurement calipers are now active in this window.
o Drag the calipers to the desired position. Involved and
related interval measurements will be automatically
recalculated.
o Select Cancel to leave the editing process without
saving.
o Select OK to complete the editing process
NOTE: Interval measurements can also be edited using the interval caliper tool. See next page for details.
Settings
Many settings can be changed using context menus. Right click the mouse on any part of the ECG tracing for the
following settings:
Change the waveform presentation
Print pacemaker spikes
Print interpretation
See the Context Menus section in this manual for a complete description of the context menus.
Measurement caliper tool
A caliper tool is available in the context menus when you right
click anywhere in the main ECG window, and select Show
Calipers.
Calipers for amplitude and duration measurements will appear on
the waveform.
Hover with the mouse over the caliper area. When you are close
to the dotted line, the mouse cursor will change to a cross and
you can now click and drag the caliper to a desired position
without changing the distance.
When you are close to the vertical line, the mouse cursor will
change to a double arrow, and you can then drag the vertical line
to a desired position.
When you right click when the arrows or cross is present on the interval calipers, a special context menu appears
that allows you to use the displayed caliper value to modify the ECG interval measurements. You can also select
March Out to repeat the interval caliper over the duration of the recording. You can use any of the vertical solid
lines to expand or shrink the marching calipers, and the horizontal dotted line to drag the whole series to a different
position.
Page 71

EXAM SEARCH
Page | 69
Editing Patient Information
Use the ID button icon at the right to edit patient and exam demographic information. Only height, weight,
admission ID, medications, notes, referring physician, location and acquisition date/time can be edited.
Printing the Report
Use the Print ECG button icon to the right to print the ECG in the currently displayed format on the default
Windows printer. Note that the state of the exam is not yet updated at this point, so the previous state of the ECG
(e.g. Unconfirmed report) will be printed.
Complete the Editing process
Select Save to complete the editing process and return to the Exam Review list.
o ECG is saved with an acquired status if not previously marked as reviewed or signed.
Select Review to mark the ECG status as Reviewed and return to the Exam Review list.
o User is prompted to enter the reviewer’s name.
Select Sign to mark the ECG status as Signed and return to the Exam Review list.
o User is prompted to enter signer’s name or signing authority depending on system configuration.
Report Print Preview
To open a preview of the ECG report that has been reviewed or signed, select the Report button icon in
Exam Search. A preview is generated and the first report page is displayed.
Page 72

EXAM SEARCH
Page | 70
Icon Tool Bar
Use the printer icon to open a Windows’ printer dialog and choose defined printers with properties, print range, and
number of copies. To print the report, select OK.
Use the magnifying glass icon to choose Auto to fit the window or a percentage size for display.
Use the page icons to select a single-page or two-page preview.
The number of report pages is shown as xx / xx (displayed page number per total pages). The red arrow keys allow
you to preview the next page or the previous page, as well as move to the last page or the first page.
Use the pink grid icon to toggle the ECG grid background on or off. An X appears when the background is off.
Sections
Use the checkboxes at the left of the display to choose sections for inclusion or exclusion in the final report. Select
the arrows in the bottom left corner of the display to refresh the displayed report after a change is made. The
"Resting" section will print the predefined 12-lead ECG report with demographic information, measurements,
interpretation and signature block.
The "Rhythm" section prints a 12-lead rhythm strip with summarized patient information and no measurements and
interpretation. This section is enabled in the configuration settings by the administrator and may not be present.
Exit the Print Preview
Click on the red X to close the report preview and return to the previous display.
Page 73

Page | 71
SYSTEM SETTINGS
Use the System Configuration icon on the main screen to enter the system configuration menus
The IT and Clinical Administrator can select the System Configuration icon to
enter the RScribe administrative functions. All other users can enter this menu to
access the Export Service Log task only.
A list of administrative task buttons is presented to:
Manage user accounts
Manage personnel lists
Manage Groups
Manage archived exams
View audit trail logs
Export service logs for troubleshooting purposes
Configure system-wide modality settings
Configure ELI Link for DICOM connectivity, XML, and PDF file
exchange
Configure workflow
Unlock exams
Configure patient demographics fields
Manage User Accounts and Personnel
User’s Database
The IT administrator will select Users Database
to create new or delete user accounts, reset user
passwords, assign roles (permissions) and groups
for each user, and assign personnel entries for that
user’s selection. When a single sign-on is used, no
user account and password creation is needed.
Personnel
Personnel is selected to add personnel that will
be available in the Patient Information, Summary,
and the Finalize Exam Update windows. Listed
personnel can be assigned to each user account and
will appear as selections for the logged-in user and
in the appropriate final report fields.
Page 74

SYSTEM SETTINGS
Page | 72
New User
Selection of the New button within the Users Database
window will open the New User dialog, similar to the
window to the right.
Tip: It is recommended to complete the
Personnel list before adding Users so they can
be selected as New Users are added.
The name entered in the Display Name field will appear
on the RScribe display when that user logs in.
The login password is entered and repeated.
Roles for this user, Personnel that will populate drop-
down lists for this user, and Groups that this user will
have access to are checked.
Tip: Refer to User Role Assignment Table.
Manage/Create Groups
Groups allow the IT administrator to group exams according to user access, reporting preferences (modality
settings) and file exchange preferences. Any user can be assigned to multiple groups. A group definition can be
copied and saved with a new name to create a second group, copying all settings and preferences of the existing
group.
Select the Groups button to make changes. Any created group can be copied, renamed and modified.
To create a new group, highlight the group you would like to copy, select New Group, and enter the new
Group Name. A new group will be created with the settings of the highlighted group.
Select the users under the Group User List that may have access to the highlighted group. The Select
All and Deselect All selection can be used to enable or disable all users.
Page 75

SYSTEM SETTINGS
Page | 73
If you want to rename a group without creating a new one, highlight the group, and enter a Group Name
Select Save Group to save your changes.
The Default group (first in the list) can only be renamed. An unlimited number of new groups can be created and
modified.
RScribe Modality Settings, CFD Configuration, and ELI Link configurations can be uniquely defined for each
individual group.
Groups, with exception of the Default group, can be deleted. All exams present in the database for the deleted group
will be automatically assigned to the default group.
Modality Settings
Modality Settings define all RScribe modality specific default values that do not change on a daily or patient-topatient basis. Most of these settings can be modified within the RScribe modality for a single exam, but most of
these default conditions will rarely need to change. The Modality settings may be "Locked" by the administrator,
meaning that the setting will not be available from within the modality. Use the "Lock" checkbox to the right of each
setting to exclude it from the settings available from within the modality.
Modality settings and file exchange settings are Group dependent. Ensure that the desired group is selected from the
drop-down list before proceeding.
Select the tab you wish to modify and click on Save Changes to apply or Discard Changes to cancel changes
before exiting.
Page 76

SYSTEM SETTINGS
Page | 74
Waveforms Tab
Waveforms
Gain
To change default ECG gain:
Position the left mouse key over the Gain
Select Gain
Select from: 2.5 mm/mV, 5 mm/mV, 10 mm/mV, or 20 mm/mV
Gain displays and prints at the bottom of the ECG
Anti-aliasing
To apply anti-aliasing to ECG view:
Select Anti-aliasing
Choices: On, Off
NOTE: Anti aliasing reduces slightly the "staircase" effect due to individual pixels in digital monitors, but
may put a strain on low performance computers.
Low Pass Filter
To change default ECG low pass filter:
Select Low Pass Filter
Select from: 0.05 – 40 Hz, 0.05 – 150 Hz, or 0.05 – 300 Hz
Page 77

SYSTEM SETTINGS
Page | 75
WARNING: When the 40 Hz filter is used, the frequency response requirement for diagnostic ECG
equipment cannot be met. The 40 Hz filter significantly reduces high-frequency components of the ECG
and pacemaker spike amplitudes, and is recommended only if high-frequency noise cannot be reduced by
proper procedures.
NOTE: A filter setting lower than 150 Hz will reduce the visibility of fast transients in the ECG like
pacemaker spikes or fast notches. For pediatric ECGs a 300 Hz setting is recommended. Filter settings
apply only to displayed and printed data. Data is stored in unfiltered format.
NOTE: The High Pass filter (or base line filter), indicated by the number "0.05" cannot be changed.
RScribe automatically implements a high-performance base line filter that does not distort the ECG
waveform. High Pass filters that do distort the ECG waveform are not available.
AC Filter
To change default ECG AC filter:
Select AC Filter
Select from: None, 50 Hz, or 60 Hz
NOTE: RScribe removes 60 Hz or 50 Hz interference. The setting you select depends on the line
frequency in your country. For example, use the 60 Hz setting in the U.S. If the setting is correct but you
still see mains interference, check the electrode connections, mains interference sources like transformers
or motors close to the patient, and the connection to the safety ground of the computer. Try operating from
battery power if needed.
Cabrera
To change default ECG to Cabrera:
Left mouse click on the Cabrera icon
Choices: On, Off
NOTE: Using the lock indicator to the right of this selection can be enabled to hide this choice from the
technician, permitting only unlocked choices.
Median Zoom
Lead
To change default median ECG lead format display:
Select Lead
Choices: I, II, III, aVR, aVL, aVF, V1, V2, V3, V4, V5, V6 , All leads (all 12 leads
superimposed)
Speed
To change default speed on the display:
Select Speed
Choices: 100 mm/s, 200 mm/s
Gain
To change default ECG gain:
Select Gain
Choices: 10, 20, 40, 80 mm/Mv
Page 78

SYSTEM SETTINGS
Page | 76
Acquire Tab
This Tab is for the default settings of the real time acquisition function of RScribe.
Main
Auto Print
Select Auto Print
Choices: On, Off
NOTE: Defines whether or not RScribe will automatically print an unconfirmed ECG after a timed or
manual capture. Manual printout is always possible.
Capture Mode
Select Capture Mode
Choices: Best 10 seconds, Last 10 seconds
NOTE: Defines whether or not the RScribe will automatically capture the 10-second ECG with the lowest
noise level from the full disclosure buffer, or the last 10 seconds of data when the ECG button is selected.
Auto Capture Time (mm:ss)
Set from: a minimum of 20 seconds up to 59-minutes and 59-seconds.
NOTE: Defines the time intervals in which the ECG will automatically be acquired once "Timed ECG
Capture" is selected.
Real Time
Speed
Select Speed
Choices: 5, 10, 25, 50 mm/sec
Lead Format
Select Lead
Choices: 12 by 1, 6 by 2
NOTE: In the real time display only 6+6 and 12 lead formats are available. It is recommended to choose
a format that allows at least 10 seconds of real time ECG on the screen during acquisition.
Page 79

SYSTEM SETTINGS
Page | 77
Full Disclosure Tab
This Tab is for the default settings of the full disclosure buffer at the bottom of the acquisition screen.
Speed
Select Speed
Choices: 5, 10, 25, 50 mm/s
Lead Format
Select Lead Format
Choices: single lead by 3, single lead by 6, or 3 lead
NOTE: Single lead by 3 displays three lines of ECG data in the full disclosure buffer. Single lead by 6
displays six lines of ECG data in the full disclosure buffer. Three lead displays two groups of three leads in
the full disclosure buffer. The amount of data displayed is dependent on the size of the display and the ECG
sweep speed selected.
Single Lead Format - Lead
Select Single Lead Format
Choices: I, II, III, aVR, aVL, aVF, V1, V2, V3, V4, V5, V6
Three Lead Format - Lead 1, 2 or 3
Select Three Lead Format
Choices: I, II, III, aVR, aVL, aVF, V1, V2, V3, V4, V5, V6
NOTE: The three-lead format requires a lead selection for each of the three leads presented.
Page 80

SYSTEM SETTINGS
Page | 78
Print Lead
Select Print Lead
Choices: I, II, III, aVR, aVL, aVF, V1, V2, V3, V4, V5, V6
NOTE: Use Print Lead to select the lead printed on full disclosure printouts.
Buffer Size
Select Buffer Size
Choices: 5, 10, 20, 30, 45, 60 minutes
NOTE: Use the Buffer Size to select the total amount of acquisition time permitted in the full disclosure
memory. A warning message will display when the selected time limit has been reached, and acquisition
terminated.
Page 81

SYSTEM SETTINGS
Page | 79
Resting ECG Tab
This Tab is for the default settings of the captured ECG waveform and printouts.
Speed
Select Speed
Choices: 25, 50 mm/sec
Lead Format
Select Lead Format
Choices: 3+1, 6, 3+3, 12, 6+6
3 + 1 Lead Format - Lead
Select 3+1 Lead Format
Choices: I, II, III, aVR, aVL, aVF, V1, V2, V3, V4, V5, V6
3 + 3 Lead Format - Lead
Select 3+3 Lead Format
Choices: I, II, III, aVR, aVL, aVF, V1, V2, V3, V4, V5, V6
NOTE: 3+3 lead format requires a lead selection for each of the three leads presented.
Pace Spike
Select Pace Spike
Choices: On, Off
NOTE: When Pace Spike is on, pacemaker spikes will be visible on the waveform display and at the
bottom of the page on captured ECG printouts.
Average RR
Page 82

SYSTEM SETTINGS
Page | 80
Select Avg. RR
Choices: On, Off
NOTE: Use this option to display an averaged RR value on the report.
QTcB (Bazett)
Select QTcB
Choices: On, Off
QTcF (Fridericia)
Select QTcF
Choices: On, Off
NOTE: Welch Allyn VERITAS calculates by default the QTc with a linear correction method for average
RR-interval similar to the Framingham method. In addition it is possible to display and print the QTc
corrected with the Bazett or Fridericia correction methods.
Print Interpretation
Select Print Interpretation
Choices: On, Off
Reasons Text
Select Reasons Text
Choices: On, Off
NOTE: Reasons statements indicate why a particular interpretive statement was printed. Reasons
statements print enclosed in [square brackets] within the interpretive text if the interpretation option is
turned on. Turning the reasons statement function on or off does not affect the measurements performed or
the interpretive statements selected by the analysis program.
For Example:
Anteroseptal Infarct [40+ ms Q WAVE IN V1-V4] where “Anteroseptal Infarct” is the interpretive
statement and “40+ ms Q WAVE IN V1-V4” is the reason statement or explanation as to why the
interpretive statement was included.
Page 83

SYSTEM SETTINGS
Page | 81
CFD Configuration
A long, custom, or short format for displayed items and report contents can be uniquely defined per Group. Select
the CFD Configuration button to display the Custom Format Definition Template drop-down list. Choose the
Long, Custom, or Short template for the selected group and then click the Save Changes button, or the Discard
Changes button to cancel any changes.
The Long format contains all available
demographics.
The Custom format has been created
through use of the ELI Link tool.
Refer to the ELI Link administrator
manual, part number 9515-166-50-
ENG, for information regarding
Custom IDs.
Note: Custom IDs are only available
when connected to ELI Link and when
an order is used to populate patient
demographics. If no order, the Short
format is defaulted.
The Short format excludes the patient
history and contact information in the
report summary.
Long CFD
Custom CFD
Short CFD
Page 84

SYSTEM SETTINGS
Page | 82
ELI Link Configuration
RScribe supports the ability to exchange information with DICOM systems, import orders from XML files, and
export PDF and XML results to an external system via ELI Link. Available connectivity options are dependent on
the RScribe system activated features. Refer to the ELI Link Administrator Manual, part number 9515-166-50-
ENG, for information regarding installation and configuration of the ELI Link gateway service.
When using ELI Link connectivity, check the box to enable communication and enter appropriate information into
the available fields.
The following table describes the available ELI Link configuration settings:
Item
Description
Host Name or IP
Entry field for the network name or IP address of the
networked ELI Link service
Port Number
Entry field for the TCP port number for network
communication with the ELI Link service
Site Number
Entry of a number will uniquely identify the RScribe that
is communicating with the ELI Link service
Encryption Key
Entry field for use of a secret string shared between the
ELI Link service and the RScribe
Enter your desired settings and then click the Save Changes button, or the Discard Changes button to cancel
any changes.
Page 85

SYSTEM SETTINGS
Page | 83
Note: If orders are used with RScribe in XML format and setup through ELI Link, XML order refresh must be
checked in ELI Link or orders will not appear in the worklist in RScribe.
Unlock Exams
RScribe internally tracks transitioning exams preventing the same exam to be processed by two or more users.
When a second user attempts to access an exam in use, a message displays with notification that the exam is not
currently available.
As a measure for recovering locked exams, administrative users can unlock an exam that resides on the same
workstation by selecting Unlock Exams. Highlight the listed exam(s) and click on Unlock.
Manage Archive Storage
The RScribe administrative user will manage storage system disks through selection of Storage System.
Add Archive Location
Select New Archive button to define a path
to the archive directory destination.
Any external disk (e.g. NAS, USB, etc.)
accessible from the RScribe central
database is a candidate for becoming an
archive volume.
The archive path should be defined as a
UNC path such as
\\ServerName\ShareName\Directory\
A Username, Password and Domain
may be entered as needed to add the
new storage disk to the Archive drive
listing.
Select Save Changes button to create the
archive location or Discard Changes
button to exit this window without saving
changes.
The Refresh Drive List button is available to update the list of
available drives.
An archive path may also be deleted by highlighting the desired label and selecting the Delete Archive button.
When selected, a prompt asking if you are sure you want to delete the selected archive is presented. Select Yes or
No. All archived ECGs will remain at the destination until they are manually deleted.
Page 86

SYSTEM SETTINGS
Page | 84
Recover Archived Exams
Administrative users can restore exams from the archive location to the RScribe database through selection of
Archive Recovery tab. Once selected, a window will open allowing a search of the Archive Name or the
Archive Label.
To search by Archive Name, a letter or number combination may be entered to show exams that contain the
characters. To search by Archive Label, the first letter of the label can be entered with the Start With description,
or the entire Archive Label can be entered with the Equal To description. Select the Search button when ready.
The Clear button can be selected to clear all search fields. Column headers can be selected to sort listed exams by
that item.
To restore exams, highlight the desired
exam(s) in the list and click on
Recover.
Multiple exams can be restored by
highlighting them followed by a single
Recover button click.
Page 87

SYSTEM SETTINGS
Page | 85
Audit Trail Logs
The RScribe administrative user will select Audit Trail to view the audit trail history. Selections for filter criteria
are available to sort the listing by date, user, workstation, operation, or target (e.g. User, Patient, Exam, Conclusion,
Locked Exams, User and System Settings). One or more filter criteria can be used to find audit trail information.
Results will display differences by comparing the XML statistics data before and after changes. A legend with
colored highlighting will point to added, removed, changed, and moved information.
All configuration information, user information, patient demographic information, exam demographic information,
textual conclusions, archive operations, and exam download requests are tracked by the audit trail with a date and
time.
Service Logs
All RScribe users have access to Export Service Logs. Selection of the button creates a Win-7 zipped file that
can be sent to the desktop containing a copy of the system logged events.
The file named EMSysLog.xml.gz can be e-mailed to a Welch Allyn service representative for troubleshooting
purposes.
Page 88

SYSTEM SETTINGS
Page | 86
Configure Workflow
The RScribe exam states are designed to follow typical user workflow. There are five possibilities with meanings
defined below each state:
1. ORDERED
The resting ECG exam is either scheduled by a user or an external scheduling system has sent an order.
2. ACQUIRED
The resting ECG exam is completed at the RScribe system and is ready for editing of measurements and select
demographics if needed.
3. EDITED
The resting ECG exam has been analyzed and saved with changes, ready for review by a physician.
4. REVIEWED
The resting ECG exam has been reviewed and confirmed to be accurate by an authorized user (e.g. physician,
fellow, clinician, etc.).
5. SIGNED
The exam is reviewed and electronically signed by an authorized user. No further workflow processing is
required.
Workflow Config
A Legal Signature can be enabled by selecting Yes or
disabled by selecting No. When legal signature is set to Yes,
the user is prompted to enter their login password and ID.
Administrative users can configure the workflow to include
all, or exclude some states through selection of Modality
Status radio buttons.
Select All to enable all five states.
Select No REVIEWED to move the state from EDITED
to SIGNED.
Select No EDITED/REVIEWED to move the state from
ACQUIRED to SIGNED.
Checkboxes under Export Status allow choices for Manual
or Automatic export of the results when the state moves to
Acquired, Edited, Reviewed or Signed. Any combination
may be selected.
A default Print Option with the number of automatic Copies from 1 to 9 can be defined to
Always print automatically when moving to the next state
Never print automatically
Automatically print only If Signed
Page 89

SYSTEM SETTINGS
Page | 87
No Legal Signature
When updating the exam to the signed state, the signature area will show the approver’s name with a label of
Approved by: in the final report.
About the Legal Signature
The legal signature requires the user credentials prior to updating a resting ECG exam when changing to a signed
state. When enabled, the user is prompted to authenticate with a user name and password when transitioning to the
signed state. Authentication can be entered when a different user is currently logged in. When the correct
credentials are not entered, the user will be notified with a message that the “Credentials supplied are not valid.”
When the signing physician has been set up as an Attending Physician under Personnel, the printed name will appear
in the RScribe final report on the signature line following the Electronically Signed by: field label.
User Preferences
Select the User Preferences icon to open the window.
Set selections define the default criteria for the Get
Worklist in the Search feature when the particular user is
logged into RScribe.
Set selections can be changed when the user selects the
Advanced search selections.
The user can also change the password in this window
when the system is not set up with a single sign-on.
All users have access to the User Preferences settings but may not have the Search feature available. Those users
will only enter this window to change their own password.
There are three possible choices for the Worklist exam states that can be enabled or disabled by checkboxes. The
choices are dependent on the workflow configuration modality status setting in that Edited or Review may not
appear as selections.
1. Acquired
2. Edited
3. Reviewed
There are three choices for the default time filter for worklists.
1. All
2. Today
3. Last week
The user’s custom lists can also be modified on this page. Some demographic data entry lists also accept free text
which will be automatically added to the list for future use. “My Custom Lists” allows deletion of any list items you
do not wish to use in the future.
The user can change his password on this page, only if “Single Sign On” is not used
When finished, select OK to save changes or Cancel to exit the window without saving changes.
RScribe will present the default settings on any of the workstations that the user logs into.
Page 90

SYSTEM SETTINGS
Page | 88
Report Configuration Tool
RScribe final reports can be configured with the practice name prior to using the system. The practice name is
printed at the bottom of each ECG report. In addition, the system can be set up to add or omit a 10 s 12-lead rhythm
strip to each ECG report.
The Report Configuration Tool is a separate program. Click on the Start menu from the RScribe workstation
desktop. Choose "All Programs", "Welch Allyn" followed by "Report Configuration Tool". This will open a dialog
window prompting a Group choice from a drop-down list. Each group that has been defined will have its own report
configuration. Select the group.
Choose the Resting report from the top left. Enter the practice name at the bottom white space. Select the Hide
checkbox if you do not want to print a rhythm strip with each ECG. You can use Report Preview to see a preview
of what will appear on each report.
NOTE: As an individual ECG report is reviewed, rhythm strips can be manually added if "Hide" has been
selected by default.
Select Next and Finish to save the configuration for the selected group. Select another group to configure or Exit
to leave the report configuration tool.
Page 91

SYSTEM SETTINGS
Page | 89
User Role Assignment Table
IT Admin
Clinical Admin
Schedule
Procedure
Patient
Hookup
Prepare Report
Main Screen
Schedule / Orders
No
Yes
Yes
No
No
Start a Resting Exam
No
No
No
Yes
No
Exam Search
No
Yes
No
No
Yes
User Preferences
Yes - No
Status Filter
Yes - No Status
Filter
Yes - No
Status Filter
Yes - Filter
Acquired only
Yes - Filter
Acquired and
Edited only
System Configuration
Yes - No
Modality
Settings, CFD
or Report
Settings
Yes - Audit Trail,
Service Logs,
Report Settings,
Modality
Settings and
CFD
Yes - Service
Logs only
Yes - Service
Logs only
Yes - Service Logs
only
Exam Search
Edit
No
No
No
No
Yes - Acquired and
Edited Exams only
Report
No
No
No
No
No
Copy Offline
No
Yes
No
No
No
Open Offline
No
No
No
No
Yes
Export
No
No
No
No
No
Reconcile
No
Yes (Signed
only)
No
No
No
Archive
No
Yes
No
No
No
Delete
No
Yes
No
No
No
Editing Permissions
Summary Tables
No
No
No
No
Yes
Conclusions Section
No
No
No
No
Diagnosis, Reason
For End and
Technician
Patient Data
No
No
No
Patient and
Contact
Fields - only
after
Acquisition
Admission ID,
Indications,
Referring
Physician,
Procedure type,
Location, Notes,
and Technician
Page Review
No
No
No
No
Yes -
View/Add/Edit
Events and Print
Update Exam State
No
No
No
Acquired only
Edited only
Review and
Edit Report
Sign Report
Edit
Conclusions
Export Report
View
Exams/Reports
Page 92

SYSTEM SETTINGS
Page | 90
Main Screen
Schedule / Orders
No
No
No
No
No
Start a Resting Exam
No
No
No
No
No
Exam Search
Yes
Yes
Yes
Yes
Yes
User Preferences
Yes
Yes
Yes - Filter
Acquired and
Edited only
Yes - No
Status Filter
Yes - No Status
Filter
System Configuration
Yes - Service
Logs only
Yes - Service
Logs only
Yes - Service
Logs only
Yes - Service
Logs only
Yes - Service
Logs only
Exam Search
Edit
Yes - Acquired,
Edited,
Reviewed
Exams only
Yes
Yes - Acquired
and Edited
Exams only
No
Yes
Report
No
No
No
No
Yes - Reviewed
and Signed
Exams only
Copy Offline
No
No
No
No
No
Open Offline
Yes
Yes
Yes
No
Yes
Export
No
No
No
Yes Reviewed and
Signed Exams
only
No
Reconcile
Yes (Not
Signed)
Yes (Not
Signed)
No
No
No
Archive
No
No
No
No
No
Delete
No
No
No
No
No
Editing Permissions
Summary Tables
No
No
No
No
No
Conclusions Section
Symptoms and
Conclusions
Symptoms
and
Conclusions
Symptoms and
Conclusions
No
No
Patient Data
No
No
No
No
No
Page Review
Yes - View and
Print only
View and
Print only
Yes - View and
Print only
No
Yes - View and
Print only
Update Exam State
Reviewed only
Signed only
Edited only
No
No - Screen is
not shown
 Loading...