

Page 1
\VK
Welch
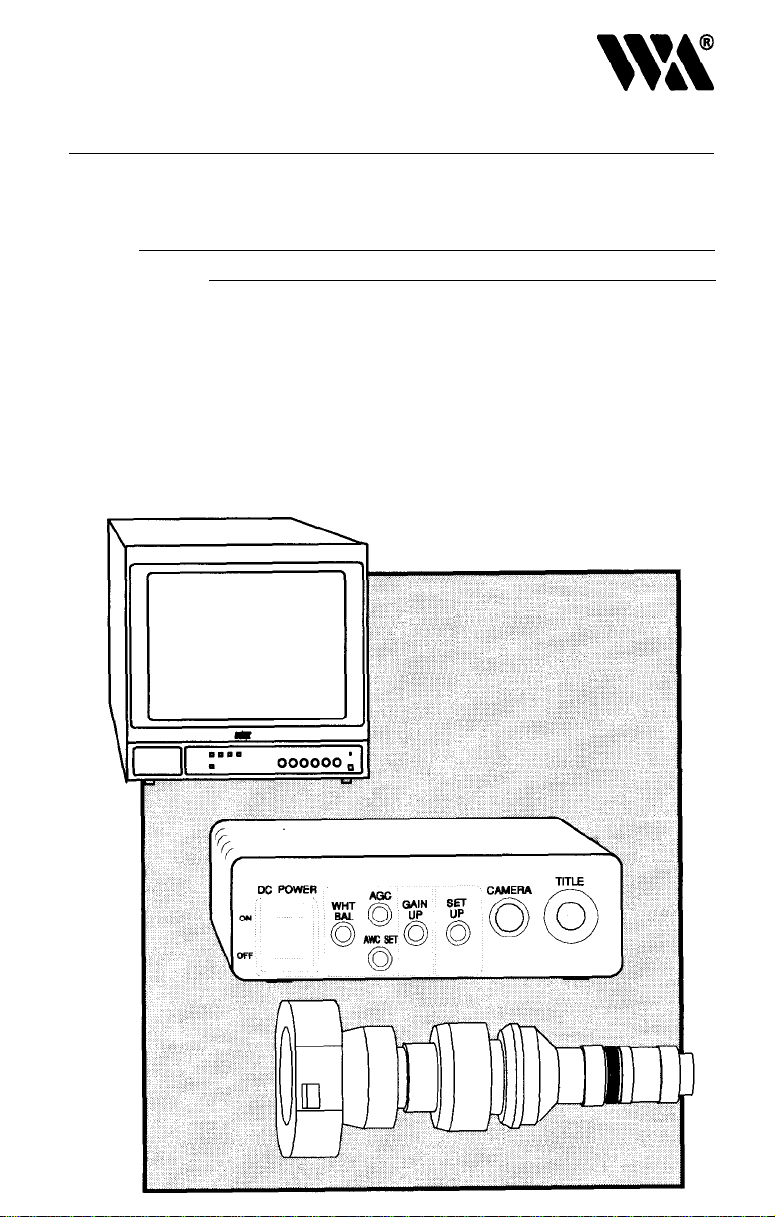
WELCH ALLYN PROXIMAL VIDEO CAMERA
FOR FLEXIBLE FIBER OPTIC ENDOSCOPES
FX-
100
Flexible Sigmoidoscope and
RL-100 Rhinolaryngoscope
Allyn
Part #651504-2
Operating
Instructions
Page 2

Welch Allyn
SPECIFICATIONS
For complete specifications please refer to of the
tions provided with the Camera and the Monitor
PRECAUTIONS
*Do not expose the camera or camera control unit to rain or
moisture, or try to operate it in wet areas. Do take immediate
action if ever the camera or camera control unit do become wet.
Turn power off, unplug and contact Welch Allyn Customer
Service
camera control unit and also create the danger of electrical shock.
*Never crush or pinch the camera cable. Do not bend the camera
cable into a curve with a radius smaller than 1 inch.
1-(800) 535-6663. Moisture can damage the camera and
operating
instruc-
*Never face the camera toward the sun, even when the camera is
off.
Use caution when operating the camera in the vicinity of spot
lights, other bright lights, or light reflecting objects.
*Caution: Connecting and disconnecting camera cable to/from the
camera control unit must be done with the Power switch in the
OFF position.
Page 3

OPERATING CONTROLS AND
FUNCTIONS
(Refer to Operating Instructions for more complete details.)
WHITE BALANCE CONTROL
SELECTION SWITCH
Prior to every procedure the camera, endoscope and light source
system should be white balanced to assure accurate tissue color.
To automatically adjust the white balance, point the distal tip of the
endoscope (with camera attached to the instrument eyepiece and
instrument coupled to the light box with lamp illuminated) at a
white object, such as a piece of paper or a white wall, while holding
the distal tip of the instrument one inch from the surface.
Follow the procedure in the camera’s operating instructions regarding Auto White Balance Control (AWC) and White Balance
Setting. Welch Allyn recommends that the camera operate in the
AWC mode.
CAMERA CABLE CONNECTOR
This connector is found on the front panel of the Camera
ControlUnit and is used for connection of the camera.
Warning: Connecting and disconnecting the
must be done after turning OFF the power ON/OFF switch.
camera
cable
Page 4
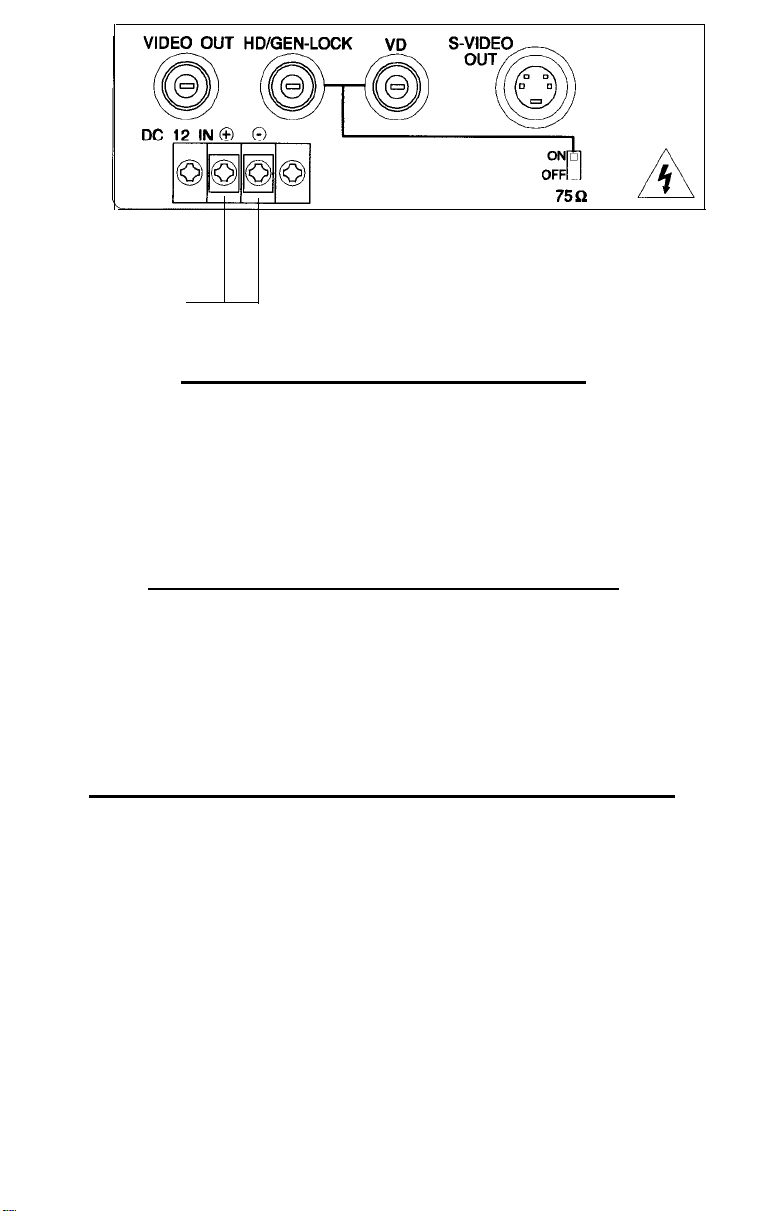
TRANSFORMER
CONNECTOR
BACK VIEW
VIDEO OUTPUT CONNECTOR
Connector(s) marked VIDEO OUT will provide a standard composite video signal. This output should be used when coupling the
camera control unit to a VTR to record a procedure. The connector type is BNC.
SUPER-VHS OUTPUT CONNECTOR
Connector marked S-VIDEO OUT will provide the luminance (Y)
and Chroma (C) for S-VHS VTR or Monitor. Resolution is higher
using this output. Thus, it is recommended that the live image be
viewed using S-VHS if possible.
TRANSFORMER CONNECTOR TERMINALS
Screw type connectors for 12 Volt DC transformer to power
camera control unit.
CAUTION: Install transformer connectors to Camera Control
Unit prior to plugging in the transformer. Failure to do this
can result in damage to the transformer. Connectors are
Make sure that the
labeled positive (+) and negative
(-)..
correct lead from the transformer is connected to the same
terminal before powering up the camera control unit.
Page 5

MONITOR
I
FRONT VIEW
VIDEO INPUT - LINES “A” AND “B”
Input lines “A” and “B” correspond to the composite (NTSC)
inputs on the back of the monitor.Depending upon which video
input “line” the VTR is coupled to on the back of the monitor, the
corresponding “line” button on the front of the monitor must be
depressed to view a recorded image. For example, if the coaxial
cable out of the VTR is coupled to the VIDEO IN connector under
LINE A, then the Line “A’ input button must be depressed to view
an image.
VIDEO INPUT - LINE
"C"
Y/C & VTR
This video input will display S-VHS video. In endoscopic applications it is this button that will be depressed to view a live image.
This is desirable due to the higher resolution that S-VHS video will
provide. If you have a VTR that is S-VHS compatible then this
button will always be depressed when viewing a live or recorded
image.
In this case the video connections will run from the camera
control unit to the VTR to the Monitor.
Page 6

BACK VIEW
VIDEO INPUT - LINES “A” AND “B”
BNC Type couplings (male) for connecting coaxial video cable for
input and output of composite (NTSC) video. These connectors
will be used for input out of a standard VTR for display of recorded
images.
VIDEO INPUT - LINE
4 pin mini DIN type coupling for connecting Y/C(S-VHS) video. This
connector is used to couple high resolution Y/C video directly from the
camera control unit to the monitor.
"C"
PREPARATION
ASSEMBLING CAMERA / C-MOUNT ADAPTOR
AND
EYEPIECE COUPLER
*Remove (unscrew) the front cap of the camera head and confirm
that the surface of the optical filter of the camera is clean.
surface of the optical filter is dirty or there is dust on it, clean with
the lens cleaning tissue paper provided.
If the
Page 7

COUPLING CAMERA / ADAPTOR /
EYEPIECE COUPLER
*Attach the endoscope eyepiece coupler to the C-mount adaptor
by rotating the adaptor clockwise.
U
:
9
33
*Rotate the focus lock ring on the camera
mount the coupler and C-mount adaptor to the camera by rotating
the assembly clockwise. Continue until no thread is exposed.
fully
clockwise.
Then
Page 8

COUPLING CAMERA / ADAPTOR / EYEPIECE
TO UNIT CONTROL
Locate the male end of the camera cable (with pins). Position the
raised alignment locator on the end of the camera cable with the
alignment groove located at
the control unit. Gently push connector into the camera cable
connector on the control unit until it snaps into place. Tighten the
retaining collar until snug. Couple the remaining end of the camera
cable to the camera by aligning the location groove in the cable
connector with the raised pin in the camera connector. Push
together, and tighten retaining collar securely.
1:00 on the camera cable connector on
CAMERA
I
Page 9

COUPLING THE CAMERA TO AN ENDOSCOPE
Grasp the two tabs on the outside ring of the eyepiece coupler with
your thumb and index finger and depress. This will retract the
eyepiece retainers on the coupling side of the eyepiece coupler.
Insert the endoscope eyepiece into the coupler as far as possible
and release the tabs. The camera/coupler should be rigidly mounted
to the eyepiece.
Page 10

CONNECTING THE CAMERA CONTROL UNIT
TO A MONITOR
Locate the S-VHS video cable. With the alignment groove of the
cable connector (identified with an arrow on the connector) positioned 90 degrees to the floor, push the connector into the receptacle on the back of the camera control unit marked S-VIDEO
OUT. Align the remaining end in the same manner and connect it
to the receptacle on back of the monitor marked Y/C
VIDEO. The control unit is now connected to the monitor. To
view an image on the monitor make sure that the INPUT Y/C VTR
button on the front control panel of the monitor is depressed.
INPUT
Page 11

CONNECTING THE CAMERA CONTROL UNIT
TO A VTR
COMPOSITE
VIDEO
(NTSC)
Connect one end of a coaxial cable with a BNC connector to the
VIDEO OUT receptacle on the back of the camera control unit.
Connect the other end of the cable to the VIDEO IN receptacle on
the back of the VTR.Connect another coaxial cable to the VIDEO
OUT receptacle on the back of the VTR. Connect the remaining
end of the second cable to the LINE “A”, VIDEO IN receptacle on
the back of the monitor.
To view a recorded image on the monitor
make sure that the INPUT "A" button on the front control panel of
the monitor is depressed.
Note: This method of connection will allow the user to record a
procedure and play it back on the monitor without changing
the connections. It is recommended that the “live” procedure
be viewed using the S-VHS video mode and that only video
tape be viewed using normal TV video.
CAMERA CONTROL BOX
r
MONITOR BACK
Page 12

Service
For service ship to:
!
A
Welch
Allyn
Skaneateles Falls, NY 13153-0220
Attention: Repair Department
Printed in USA
Part No. 651504-2
 Loading...