

Weinmann prisma20C, prisma25S-C, prisma20A, prisma25ST, prismaCR Instructions For Use Manual
...Page 1

prisma20C prisma25S-C
prisma20A prisma25ST
prismaCR prismaLAB
prisma25S prismaAQUA
prisma30ST prisma30ST-C
Sleep therapy devices
Instructions for use for devices of type WM 100 TD and type WM 100 TH
Page 2

Table of contents
Table of contents
1 Introduction 5
1.1 Intended use ................................................................................. 5
1.2 Function ........................................................................................ 6
1.3 User qualifications ......................................................................... 7
1.4 Indications .................................................................................... 7
1.5 Contraindications .......................................................................... 9
1.6 Side effects ................................................................................. 10
2 Safety 11
2.1 Safety information ....................................................................... 11
2.2 General information .................................................................... 14
2.3 Warnings in this document .......................................................... 15
3 Product description 16
3.1 Therapy device overview .............................................................. 16
3.2 Display ........................................................................................ 17
3.3 Components ............................................................................... 23
3.4 Accessories ................................................................................. 24
3.5 Labels and symbols ..................................................................... 25
4 Preparation 30
4.1 Setting up the therapy device ...................................................... 30
4.2 Connecting components .............................................................. 30
4.3 Connecting optional accessories .................................................. 34
5 Operation 43
5.1 Navigating the menu ................................................................... 43
5.2 Switching on the therapy device .................................................. 43
5.3 Switching off the therapy device .................................................. 46
5.4 Starting the therapy .................................................................... 46
5.5 Ending the therapy ...................................................................... 48
5.6 Performing a mask test ................................................................ 49
5.7 Switching softSTART on/off ......................................................... 50
5.8 Setting the respiratory air humidifier ............................................ 51
2 EN WM 100 TD
WM 67841c 03/2015
Page 3

Table of contents
5.9 Setting the alarm ......................................................................... 54
5.10 Viewing therapy data and device information ............................... 56
5.11 Using the SD card ........................................................................ 58
6 Settings in the menu 62
6.1 Setting comfort parameters ......................................................... 62
6.2 Setting accessories parameters .................................................... 63
6.3 Setting time parameters .............................................................. 64
6.4 Setting device parameters ............................................................ 65
7 Hygienic preparation 66
7.1 General information .................................................................... 66
7.2 Cleaning intervals ........................................................................ 66
7.3 Hygienic preparation of the therapy device ................................... 67
7.4 Hygienic preparation of the respiration hose ................................ 69
7.5 Hygienic preparation of the respiratory air humidifier ................... 70
8 Function check 76
8.1 Intervals ...................................................................................... 76
8.2 Checking the therapy device ........................................................ 76
8.3 Checking the respiratory air humidifier ......................................... 77
9 Alarms and error messages 78
9.1 Alarms ........................................................................................ 78
9.2 Faults in the therapy device ......................................................... 80
9.3 Faults in the respiratory air humidifier .......................................... 81
9.4 Display messages ........................................................................ 81
10 Maintenance 83
11 Storage and disposal 84
11.1 Storage ....................................................................................... 84
11.2 Disposal ...................................................................................... 84
12 Appendix 85
12.1 Technical data ............................................................................. 85
12.2 Pressure volume curve ................................................................. 93
12.3 Pneumatic system diagram .......................................................... 93
WM 67841c 03/2015
12.4 Separation distances ................................................................... 94
WM 100 TD EN 3
Page 4

Table of contents
12.5 Scope of supply ........................................................................... 94
12.6 Warranty ..................................................................................... 99
12.7 Declaration of conformity ............................................................ 99
4 EN WM 100 TD
WM 67841c 03/2015
Page 5

1 Introduction
1.1 Intended use
1.1.1 WM 100 TD therapy devices
The WM 100 TD devices are pressure-controlled, non-invasive,
non-life-sustaining therapy devices for the treatment of sleeprelated respiratory disorders (SRRDs) or intermittent treatment of
respiratory insufficiency by means of a mask.
The devices can be used on persons weighing above 30 kg. The
CPAP mode can be used on persons above the age of 3 years. The
device may only be used on the instruction of a physician.
The WM 100 TD devices are used in clinical facilities and in
domestic situations. In domestic situations, the devices are also
taken on trips.
1 Introduction
1.1.2 WM 100 TH respiratory air humidifiers
The integrable respiratory air humidifiers WM 100 TH are used to
enrich the air flow created by the therapy device WM 100 TD with
moisture. The respiratory air humidifier WM 100 TH warms and
humidifies the respiratory air and thus prevents drying out of the
mucosae in the respiratory tract.
The WM 100 TH prismaAQUA respiratory air humidifier described
in these instructions for use can be used with WM 100 TD therapy
devices.
The WM 100 TH devices are used in clinical facilities and in
domestic situations. In domestic situations, the devices are also
taken on trips.
WM 67841c 03/2015
WM 100 TD EN 5
Page 6

1 Introduction
1.2 Function
1.2.1 WM 100 TD therapy devices
The fan in the therapy device sucks ambient air in through a filter,
compresses it, and routes it to the device outlet.
From here, the air flows through the hose system and the mask to
the patient. The exhalation system in front of the mask or
optionally integrated in the mask prevents CO
air from collecting in the hose system.
The therapy device determines and analyzes the pressure and
breathing flow signal. This allows respiratory events to be
recognized.
The device can function with one pressure level (CPAP) or with two
or three pressure levels (BiLevel or inspiratory pressure, expiratory
pressure, and end-expiratory pressure). Depending on the version
employed, the pressure levels can be set automatically by the
device within preset limits, or they can be set manually. Depending
on the mode, the pressure can be continually applied at one level,
or triggered by the patient, or applied with time controls. Pressure
signals, breathing flow signals, and respiratory events can be saved
and/or emitted as an analog output on a PSG system.
-enriched exhaled
2
The therapy data are saved in the device and on an SD card for the
therapy control.
The device is operated via an On/Off button and a touchscreen.
The device can be remotely controlled using the prismaTS therapy
software.
In the case of a power failure, the settings are retained and the
therapy is continued once the power supply is restored.
WM 67841c 03/2015
6 EN WM 100 TD
Page 7

1 Introduction
1.2.2 WM 100 TH respiratory air humidifiers
The heatable respiratory air humidifier functions on the so-called
pass-over principle. The air coming from the therapy device is
routed across the surface of a preheated water reservoir. This
increases the relative humidity and the temperature of the air flow.
The humidifier level can be set individually using the buttons on the
therapy device.
The power of the element and consequently the temperature of
the water in the humidifier chamber is controlled electronically via
the therapy device.
The transparent window of the humidifier chamber makes it
possible to check the water level at any time.
1.3 User qualifications
The person operating the device is referred to in these instructions
for use as the "user". In contrast, a "patient" is the person
receiving the therapy. Always perform all the operating steps in
accordance with these instructions for use.
1.4 Indications
prisma20C
CPAP therapy device for the treatment of patients with obstructive
sleep apnea with a constant pressure requirement.
prisma20A
APAP therapy device for the treatment of patients with obstructive
sleep apnea with a variable pressure requirement. The therapy
pressure adjusts automatically to suit the patient's pressure
requirement.
WM 67841c 03/2015
WM 100 TD EN 7
Page 8

1 Introduction
prismaCR
Therapy device for the treatment of patients with periodic
breathing or Cheyne-Stokes respiration (e.g., in cases of heart
failure) as well as with central, mixed, or complex sleep apnea. The
therapy device adjusts the ventilation automatically and continually
to the changing requirements of the patient.
prisma25S
BiLevel therapy device for the treatment of patients with
obstructive, mixed, or complex sleep apnea and
• a high and/or fluctuating pressure requirement,
• a poor CPAP compliance.
The device has different pressure levels during inspiration and
expiration.
prisma25S-C
BiLevel therapy device for the treatment of patients with
obstructive, mixed, or complex sleep apnea and
• a high pressure requirement,
• a poor CPAP compliance.
The device has different pressure levels during inspiration and
expiration.
prisma25ST
BiLevel therapy device for the treatment of patients with
obstructive, mixed, or complex sleep apnea and
• a high and/or fluctuating pressure requirement,
• a poor CPAP compliance,
• central apneas,
• sleep-related or position-dependent hypoventilation (e.g.,
• respiratory insufficiency,
• coprevalent respiratory insufficiency (e.g., COPD/overlap).
8 EN WM 100 TD
OHS),
WM 67841c 03/2015
Page 9

1 Introduction
The device has different pressure levels during inspiration and
expiration and a backup frequency for the treatment of central
events.
prisma30ST, prisma30ST-C
BiLevel therapy device for the treatment of patients with
obstructive, mixed, or complex sleep apnea and/or
• chronically reduced respiratory drive (e.g., sleep-related or
position-dependent hypoventilation or chronically stable OHS),
• respiratory insufficiency, e.g., COPD.
prismaAQUA
Indications for the use of the respiratory air humidifier in
combination with the therapy device are dry upper airways and if
the respiratory air is felt to be too cold. prismaAQUA may only be
used in accordance with the recommendations of a physician.
1.5 Contraindications
The following contraindications are known – the physician in
charge is responsible for deciding whether to use the therapy
device in each individual case.
• Acute cardiac decompensation
• Severe arrhythmia
• Severe hypotension, particularly in combination with
intravascular volume depletion
• Severe epistaxis
• High risk of a barotrauma
• Decompensated pulmonary conditions
• Pneumothorax or pneumomediastinum
• Pneumocephalus
WM 67841c 03/2015
• Cranial trauma
WM 100 TD EN 9
Page 10

1 Introduction
• Status following brain surgery or surgical intervention on the
pituitary gland or the middle/inner ear
• Acute sinus infection (sinusitis), middle ear infection (otitis
media) or perforated eardrum
• Dehydration
• Do not use the respiratory air humidifier on patients who have
undergone an airway bypass procedure.
1.6 Side effects
The following undesirable side effects may occur when using the
therapy device for short or long periods of time:
• Pressure marks from the respiratory mask and the forehead
cushion on the face
• Flush of the facial skin
• Nasal congestion
• Dry nose
• Morning xerostomia (dry mouth)
• Sensation of pressure in the sinuses
• Irritated conjunctiva
• Gastrointestinal air insufflation ("bloating")
•Epistaxis
These side effects are general side effects associated with therapy
using a sleep therapy device and are not specially linked to the use
of WM 100 TD devices.
No side effects are known for the use of the respiratory air
humidifier.
10 EN WM 100 TD
WM 67841c 03/2015
Page 11

2 Safety
2.1 Safety information
2.1.1 Safe use of the therapy device, components,
2 Safety
Please read these instructions carefully. They form part of the
devices described, and must be available at all times.
Use the unit for the designated purpose only (see "Intended use").
For your own safety and that of your patients, and in accordance
with the requirements of Directive 93/42/EEC, please observe the
following safety instructions.
and accessories
Warning Risk of injury due to device or component malfunction!
A damaged device or damaged components may result in injury
to the patient, user or bystanders.
Only operate the device and components if they are externally
undamaged.
Only operate the device and components if the function check
has been successfully completed.
Only operate the device if the display is functional.
Risk of injury if the device is operated outside the prescribed
ambient conditions!
Use of the device outside the prescribed ambient conditions can
result in failure to comply with tolerances, device failures, and
injury to the patient.
Only operate the device within the prescribed ambient
conditions (see chapter "Technical data").
Risk of injury if disposable items are reused!
Disposable items are only intended to be used once. Reused
disposable items may be contaminated and/or not function
correctly and thus cause patient injury.
Do not reuse disposable items.
WM 67841c 03/2015
WM 100 TD EN 11
Page 12

2 Safety
Risk of infection when reusing therapy device!
When the therapy device is used by multiple patients, infections
may be passed on to the next patient.
Use a bacteria filter. When the device is used without a bacteria
filter: Have the device hygienically prepared by the
manufacturer, Weinmann, or an authorized dealer.
Treatment prevented due to increased resistance when
bacteria filters are used!
Misting or moistening can increase the resistance of the bacteria
filters, thereby modifying the output of the therapy pressure.
Check bacteria filters for increased resistance and blockages
regularly and remove them.
2.1.2 Power supply
Caution Risk of injury due to inaccessible power plug!
An obstructed power plug cannot be pulled out in an emergency
and can thus result in injury.
Keep the power plug and power supply accessible at all times.
Risk of injury and material damage as a result of insufficient
power supply!
Operation of the device outside the specified power supply range
can injure the user and damage the device.
Only operate the device with the supplied power supply unit at
voltages from 100 V to 240 V.
Use the DC adapter for operation at voltages from 12 V or 24 V.
2.1.3 Transport
Notice Water in the device can cause material damages!
If the device is tilted severely, the residual water from the
respiratory air humidifier can enter the device and damage it.
Do not transport or tilt the device when the respiratory air
Dirt in the device can cause material damage!
Dirt entering the device during transport can damage the device.
Only transport the device with the cover in position.
Transport the device in the corresponding transport bag.
12 EN WM 100 TD
humidifier is filled.
WM 67841c 03/2015
Page 13

2 Safety
2.1.4 Therapy
Warning The use of oxygen in combination with flammable substances
poses a fire hazard!
Oxygen in combination with flammable substances can result in
spontaneous explosions. In cases of insufficient ventilation,
oxygen in the surrounding area (e.g., clothes, hair, bedclothes) can
become enriched and cause fires and thus injuries to the patient,
user, and others in the immediate vicinity.
Do not smoke.
Do not use naked flames.
Ensure sufficient ventilation.
Use an oxygen safety valve.
Keep the device and screwed unions free from oil and grease.
Always replace splashguards immediately after use.
Risk of injury from burning oxygen!
Supplying oxygen without special safety equipment can cause
fires and injure people.
Always use an oxygen safety valve.
Observe the instructions for use for the oxygen safety valve and
the oxygen supply unit.
Set up oxygen sources more than 1 m from the device.
Caution Prevented therapy and material damage due to dirt in the
device or respiratory air humidifier!
Dirt entering the device can impair the success of the therapy and
damage the device.
Use the gray air filter.
If necessary, use the white pollen filter (optional accessory).
Risk of injury if the patient connection opening becomes hot
when uses a hose heating system!
In combination with the device, the hose heating system
generates a somewhat higher temperature at the patient
connection opening.
Observe the instructions for use for the hose heating system.
WM 67841c 03/2015
WM 100 TD EN 13
Page 14

2 Safety
2.2 General information
• Use of third-party products may lead to functional failures and
restricted fitness of purpose. Biocompatibility may also be
compromised. Please note that in these cases, any claim under
warranty and liability will be void if neither the accessories nor
original replacement parts recommended in the instructions
are used.
•
Repairs, servicing, and maintenance should only be carried out
by the manufacturer or by a technician expressly authorized by
the manufacturer.
• Only connect up the devices and modules permitted in
accordance with these instructions for use. The devices must
satisfy their respective product standard. Position non-medical
devices outside of the patient's immediate vicinity.
•
The operator is responsible for ensuring the compatibility of the
therapy device and all the connected components and
accessories prior to the application with the patient.
Only have modifications to the unit carried out by the
manufacturer, Weinmann, or by a technician expressly
authorized by Weinmann.
• Please observe the section on hygienic preparation in order to
avoid infection or bacterial contamination (see chapter
"Hygienic preparation").
• Also observe the respective instructions for use for the therapy
device, the components, and the accessories.
• Always carry out a function check before using the unit (see
chapter "Function check").
14 EN WM 100 TD
WM 67841c 03/2015
Page 15

2.3 Warnings in this document
Warnings are used to flag up safety-relevant information.
You will find a warning preceding any action that entails a hazard
for persons or equipment.
Warnings consist of
• the warning symbol (pictogram),
• a signal word designating the hazard level,
• information about the hazard
• instructions for avoiding the hazard.
The warnings appear in three hazard levels depending on the
degree of danger:
Danger!
Designates an extremely dangerous situation. Failure to observe
this warning will lead to serious, irreversible injury, or death.
2 Safety
Warning!
Designates an extremely dangerous situation. Failure to observe
this warning may lead to serious, irreversible, or fatal injury.
Caution!
Designates a dangerous situation. Failure to observe this warning
may lead to minor or moderately serious injury.
Notice!
Indicates a hazardous situation. Failure to observe this warning
may lead to damage to equipment.
Designates useful information relating to a particular action.
WM 67841c 03/2015
WM 100 TD EN 15
Page 16

3 Product description
1
2
3
4
5
6
7
8
9
10
12
13
11
3 Product description
3.1 Therapy device overview
3-1 Therapy device
No. Designation Description
1 Cover
Unlocking button therapy
2
device
Covers the humidifier connection when no respiratory air humidifier
is connected.
Makes it possible to remove the cover in order to connect the humidifier prismaAQUA.
Allows operation of the therapy device and the respiratory air humid-
3 Display
ifier.
Displays settings and current values.
4 System interface Connects the therapy device with modules.
5 Handle Allows lifting and transporting of the therapy device.
Filter compartment in suc-
6
tion area
Houses the air filter and, where applicable, the pollen filter. The respiratory air is sucked in here and the dust particles filtered out.
7 Voltage input Connects the therapy device to the power supply unit.
8 Mounting holes Accept a module and secure it to the therapy device.
9 SD card slot
For inserting an SD card. The symbol in the display indicates the communication between the SD card and the therapy device.
16 EN WM 100 TD
WM 67841c 03/2015
Page 17
No. Designation Description
Used for point-to-point connection with a PC on which prismaTS is
10 Micro USB port
11 On/off button
installed. Allows settings to be changed on the therapy device and
data to be exported.
Switches the therapy device on and off.
Switches the therapy device to standby mode.
Starts and stops the therapy.
3 Product description
12
13 Device output
Hose heating system connection
3.2 Display
Electrical power supply connection for a heatable hose.
Connection for the respiration hose, through which the patient is
supplied with respiratory air.
The information shown on the display depends on the current
status of the therapy device:
• Standby mode (no therapy in progress)
The therapy device operating hours since therapy began are
shown for the first 30 seconds. Then the device switches to the
start screen automatically.
The start screen shows the clock and the wake-up time if the
alarm clock is set. (see "3.2Display", page 17).
Settings can be performed on the therapy device
(see "6Settings in the menu", page 62).
WM 67841c 03/2015
• Therapy mode (therapy in progress)
There is a therapy in progress (see "3.2.2Display in Therapy
mode", page 19).
You can perform the mask test and start the softSTART sleep
aid (see "5 Operation", page 43).
• Energy-saving mode
The therapy device is supplied with a very low level of power;
nothing is shown on the display. You can return to the Standby
mode by pressing the on/off button .
WM 100 TD EN 17
Page 18

3 Product description
1
2
3
4
5
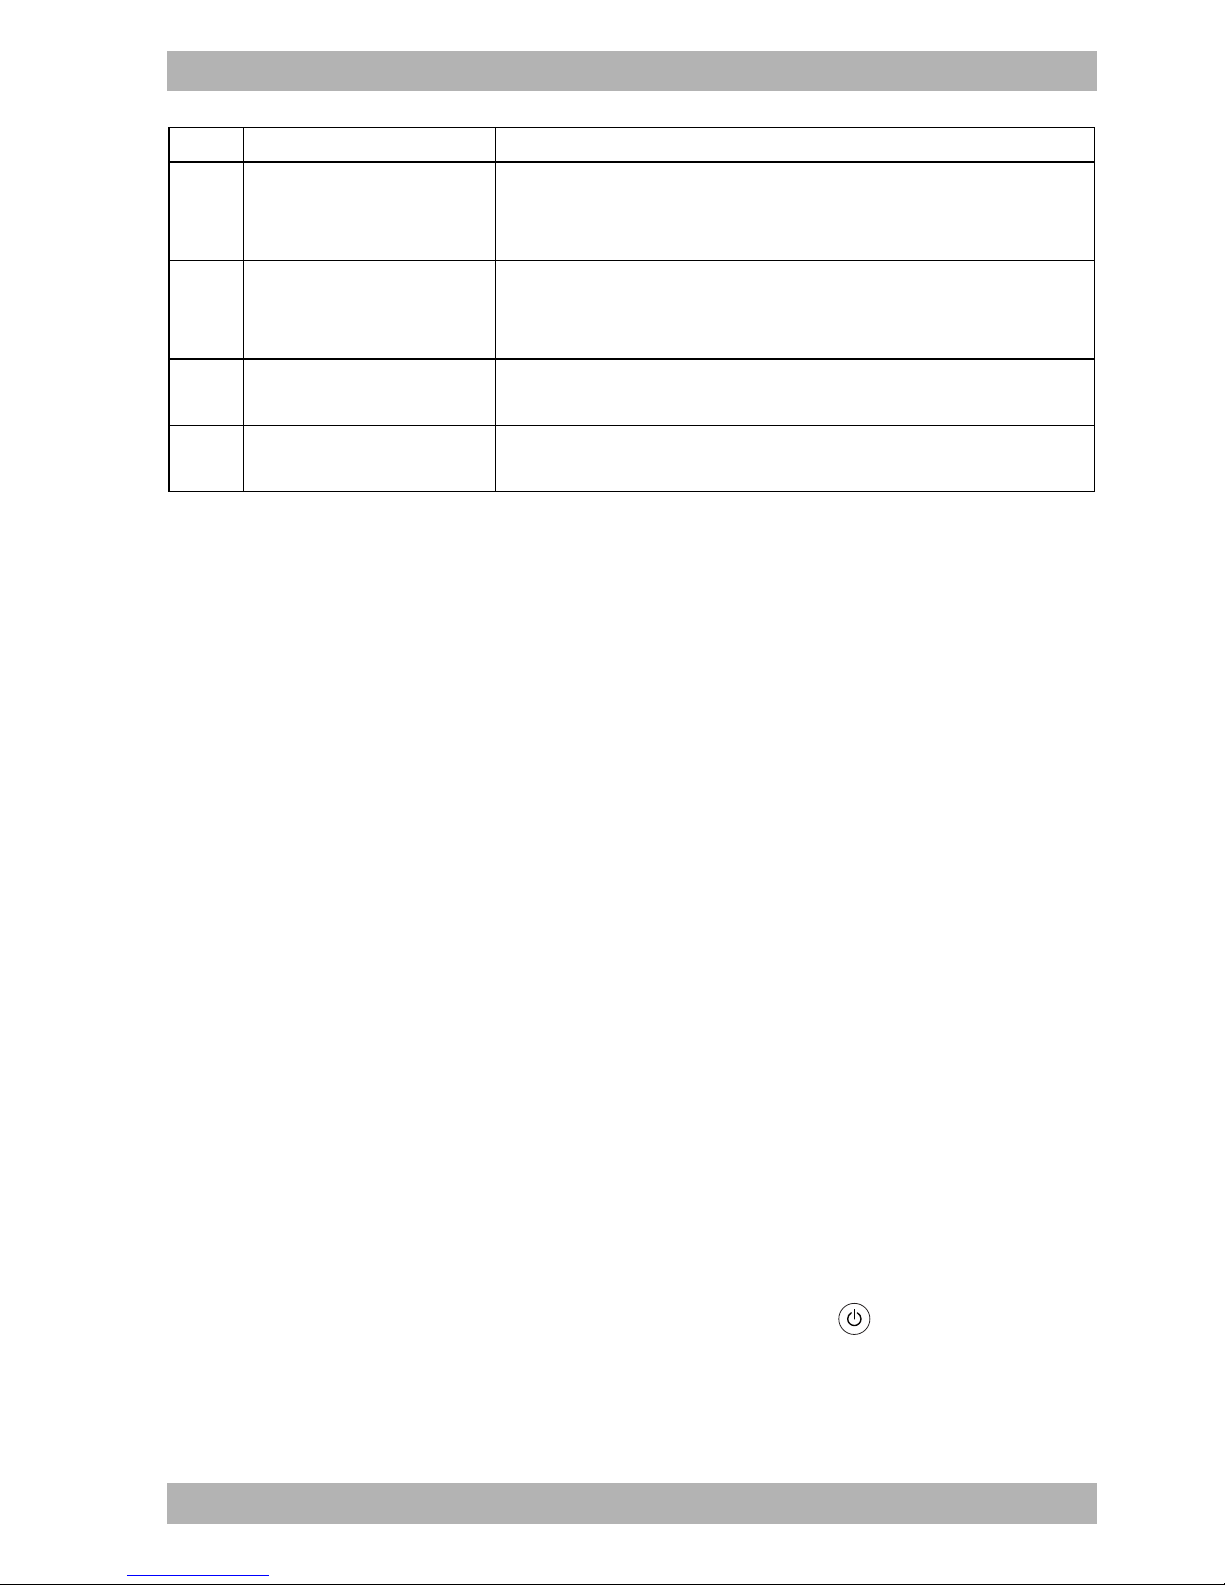
3.2.1 Display in Standby mode
(Start screen)
3-2 Start screen in Standby mode
No. Designation Description
1 Info menu button Provides access to the info menu.
2 Alarm with wake-up time
Alarm is set.
Displays the set wake-up time.
3 Menu button Provides access to the settings menus.
4 Dimmer button Makes the display dark.
5 Time Displays the current time.
18 EN WM 100 TD
WM 67841c 03/2015
Page 19
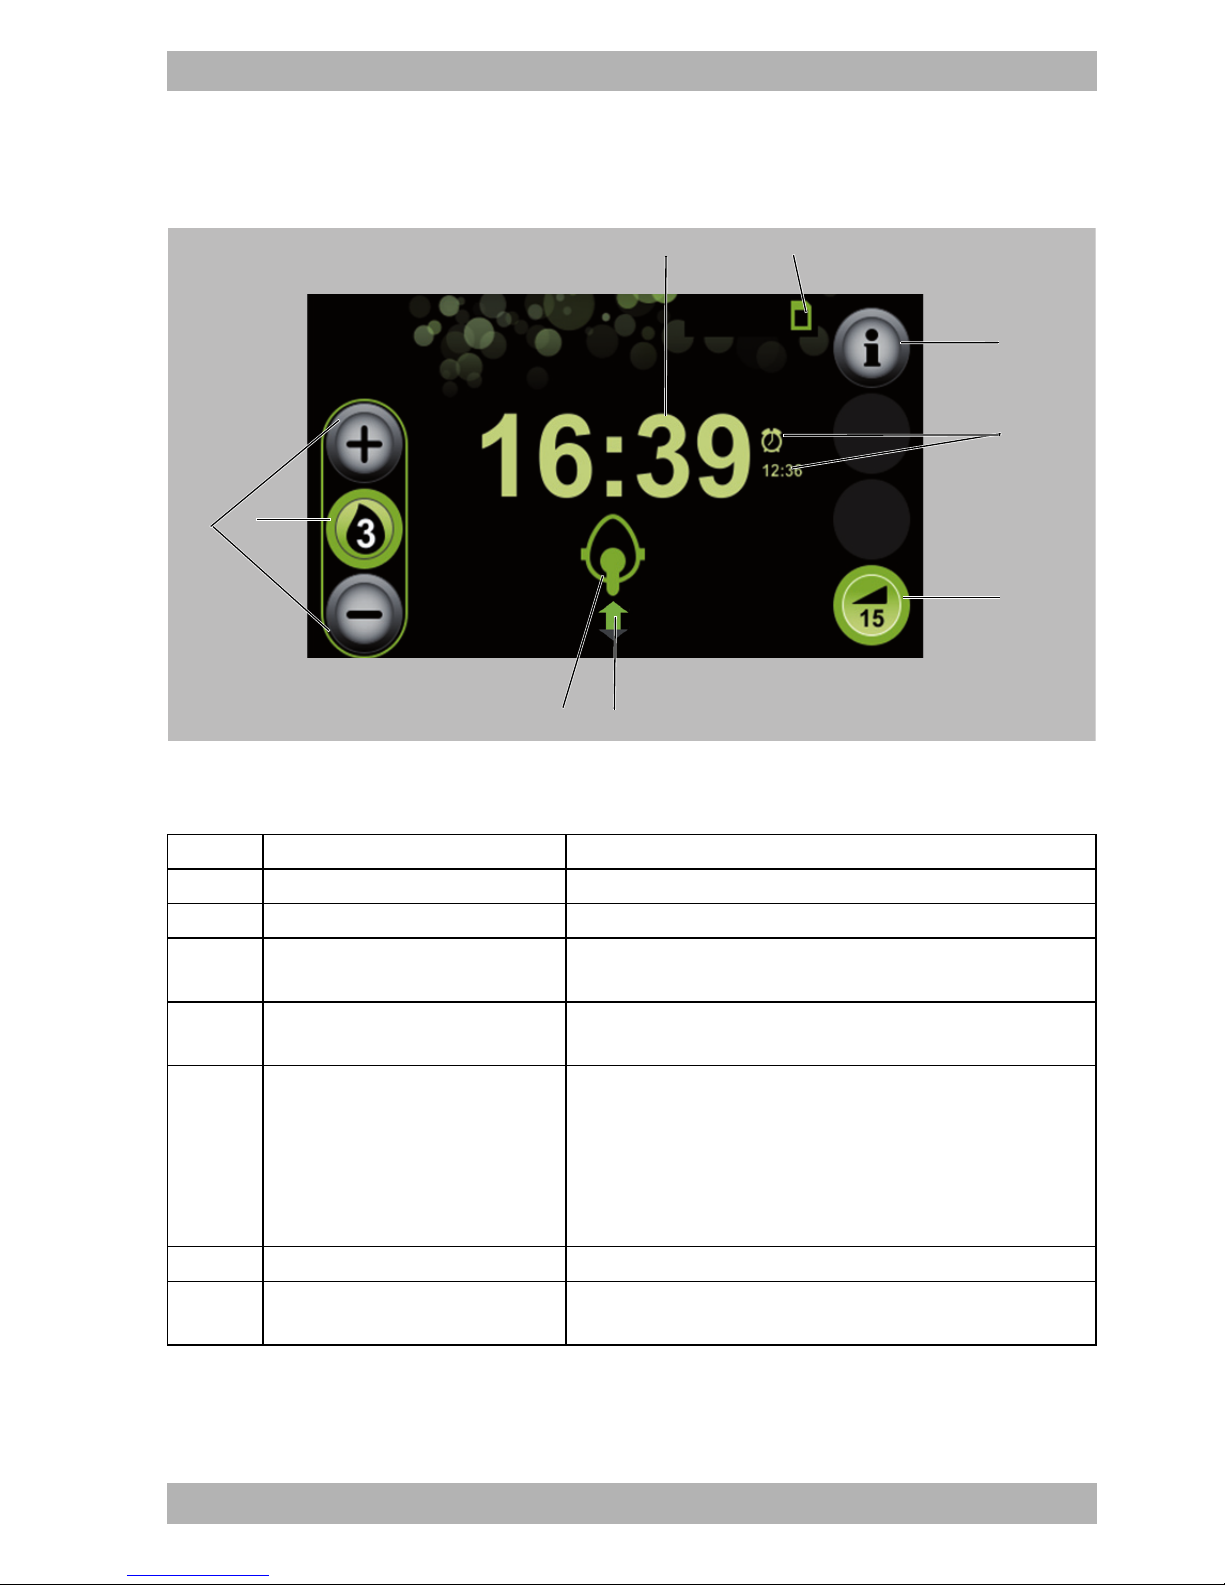
3.2.2 Display in Therapy mode
2
1
3
4
5
6
7
8
9
3 Product description
3-3 Start screen in Therapy mode
No. Designation Description
1 Time Displays the current time.
2 SD card symbol The SD card is inserted in the therapy device.
3 Info button
4 Alarm with wake-up time
Provides access to the info screen with detailed information
on the therapy currently in progress.
Alarm is set.
Displays the set wake-up time.
Switches the softSTART function on or off.
Displays the time remaining.
5 softSTART button
If the softSTART is switched off, the set softSTART period is
displayed.
If there is no softSTART button, the physician or authorized
dealer has disabled this function.
6 Respiration status symbol Displays the current respiration status.
7
Mask status symbol with leak
indicator
Displays how well the respiratory mask is positioned.
WM 67841c 03/2015
WM 100 TD EN 19
Page 20

3 Product description
No. Designation Description
Displays that the respiratory air humidifier is connected and
8
Humidifier button for respiratory
air humidifier prismaAQUA
switched on.
Shows the set humidifier level of the respiratory air
humidifier.
9
Function buttons for the
respiratory air humidifier
Allow increasing/decreasing of humidifier level.
3.2.3 Symbols on the display
Symbol Designation Description
Device status symbols (shown on the top line of the display)
Bacteria filter is connected and activated.
If this symbol is displayed even though you are not
Filter symbols
Maintenance symbol
using a bacteria filter, contact your authorized dealer.
Air filter replacement required. (Symbol only appears if
the authorized dealer has activated the reminder to
change the air filter).
Maintenance required (symbol only appears when
maintenance function is active).
USB symbol USB connection
CONNECT symbol prismaCONNECT module is connected
(Green symbol)
prisma2CLOUD module is connected
prisma2CLOUD symbol
(Gray symbol)
No connection to prisma2CLOUD module established.
(Green symbol)
prismaPSG module is connected
PSG symbol
No connection to prismaPSG module established
(Gray symbol)
WM 67841c 03/2015
20 EN WM 100 TD
Page 21

Symbol Designation Description
3 Product description
(Green symbol)
Network symbol
(Gray symbol)
SD card symbol
Symbols on the rest of the display
Respiratory air humidifier
symbol
Network connection available.
No network connection available.
SD card in SD card slot.
Symbol flashes: Data is being saved to the SD card or
read off the SD card.
Respiratory air humidifier is connected and switched
off.
Respiratory air humidifier is connected and switched
on.
The set humidifier level is displayed.
Respiratory air humidifier is connected and empty of
water.
Alarm symbol
Alarm is set.
If no alarm symbol is shown: the alarm is switched off.
Displays the respiration status:
• Arrow pointing upward: inhalation
• Arrow pointing downward: exhalation
Respiration status symbol
• Green arrow, spontaneous respiration
• Orange arrow, assisted breathing
Apnea
Mask position is good, no leaks.
Mask status symbol with
leak indicator symbol
Mask is not well positioned, considerable leaks, the
efficacy of the therapy is not guaranteed.
Hose diameter symbol Specifies the diameter of the hose in mm.
WM 67841c 03/2015
WM 100 TD EN 21
Page 22

3 Product description
Symbol Designation Description
Specifies the menu level that you are currently in:
Menu level symbol
The more green dots, the deeper you are in the menu
structure.
Alarm window
Alarm symbol Low-priority alarm triggered.
Alarm pause symbol Alarm paused for 2 minutes.
(Black symbol)
Mute symbol
(Orange symbol)
Indicates that the acoustic signal for an alarm can be
muted.
Acoustic signal for alarm is muted.
22 EN WM 100 TD
WM 67841c 03/2015
Page 23
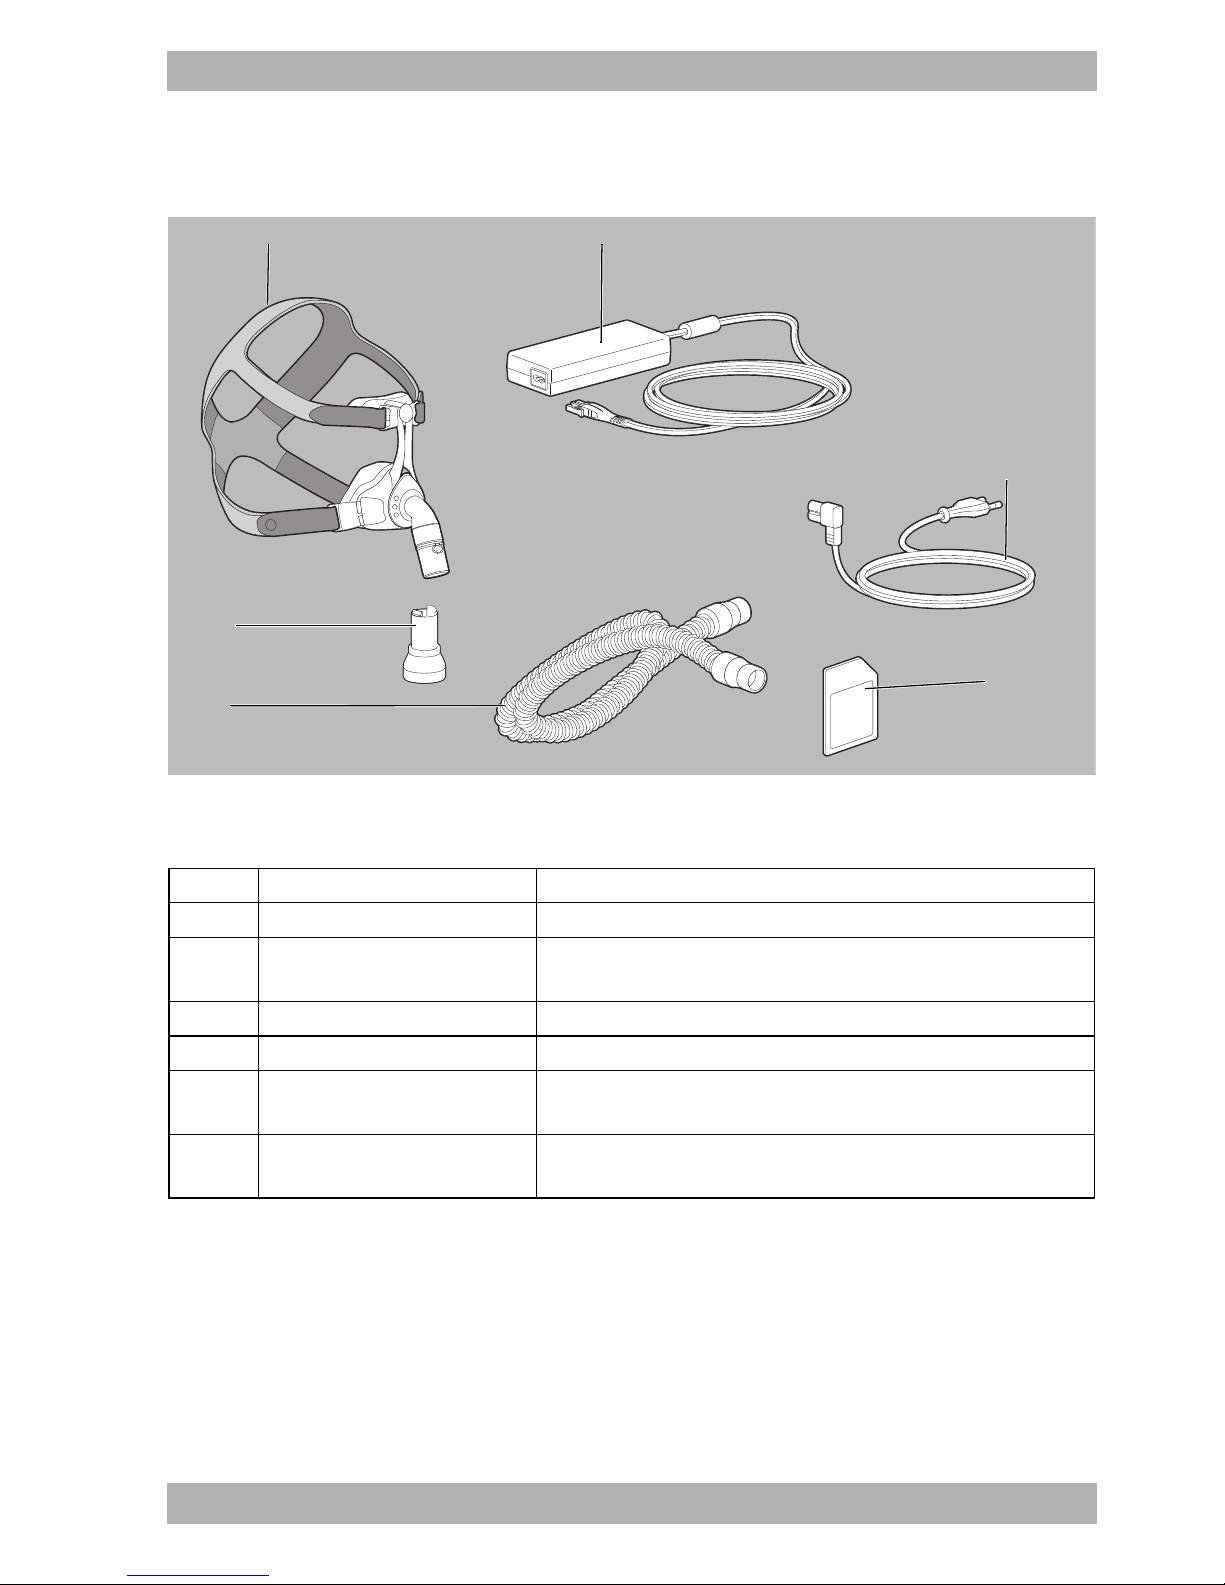
3.3 Components
1
2
3
4
5
6
3 Product description
3-4 Components
No. Designation Description
1 Respiratory mask Supplies the respiratory air to the patient.
2
Power supply unit with
connection cable
Supplies power to the device.
Connects the power supply unit to the therapy device.
3 Power supply cable Connects the power supply unit to the power socket.
4 SD card Records therapy data.
5
Respiration hose with
19-22 mm diameter
6 Exhalation system
Connects the therapy device to the respiratory mask.
If the mask does not feature an integrated expiratory system, the
exhaled air escapes here during the therapy.
WM 67841c 03/2015
WM 100 TD EN 23
Page 24

3 Product description
3
2
7
8
5
4
6
910
11
12
1
3.4 Accessories
3-5 Accessories
No. Designation Description
Respiration hose with 15 mm
1
diameter
Connects the therapy device to the respiratory mask.
Filters the suctioned respiratory air and prevents the ingress of fine
2 Pollen filter (white filter)
dust particles, pollen and fungal spores. Recommended for patients
with allergies.
3 Heatable hose Avoids condensation in the respiration hose.
4 Inverter Enables operation of the device via a DC power socket (12 V / 24 V).
Respiratory air humidifier prismaAQUA
5 Top of humidifier Seals the respiratory air humidifier.
6 Humidifier insert Prevents water from escaping.
7 Base of humidifier Holds the water for humidifying the respiratory air.
8 Lower recess For opening the respiratory air humidifier.
9 Input Connects the therapy device to the respiratory air humidifier.
WM 67841c 03/2015
24 EN WM 100 TD
Page 25

3 Product description
1
2
3
4
5
6
89
7
No. Designation Description
10 Output Connects the respiratory air humidifier to the device output.
11 Element Heats the water in the respiratory air humidifier.
12 Upper recess For lifting and transporting the respiratory air humidifier.
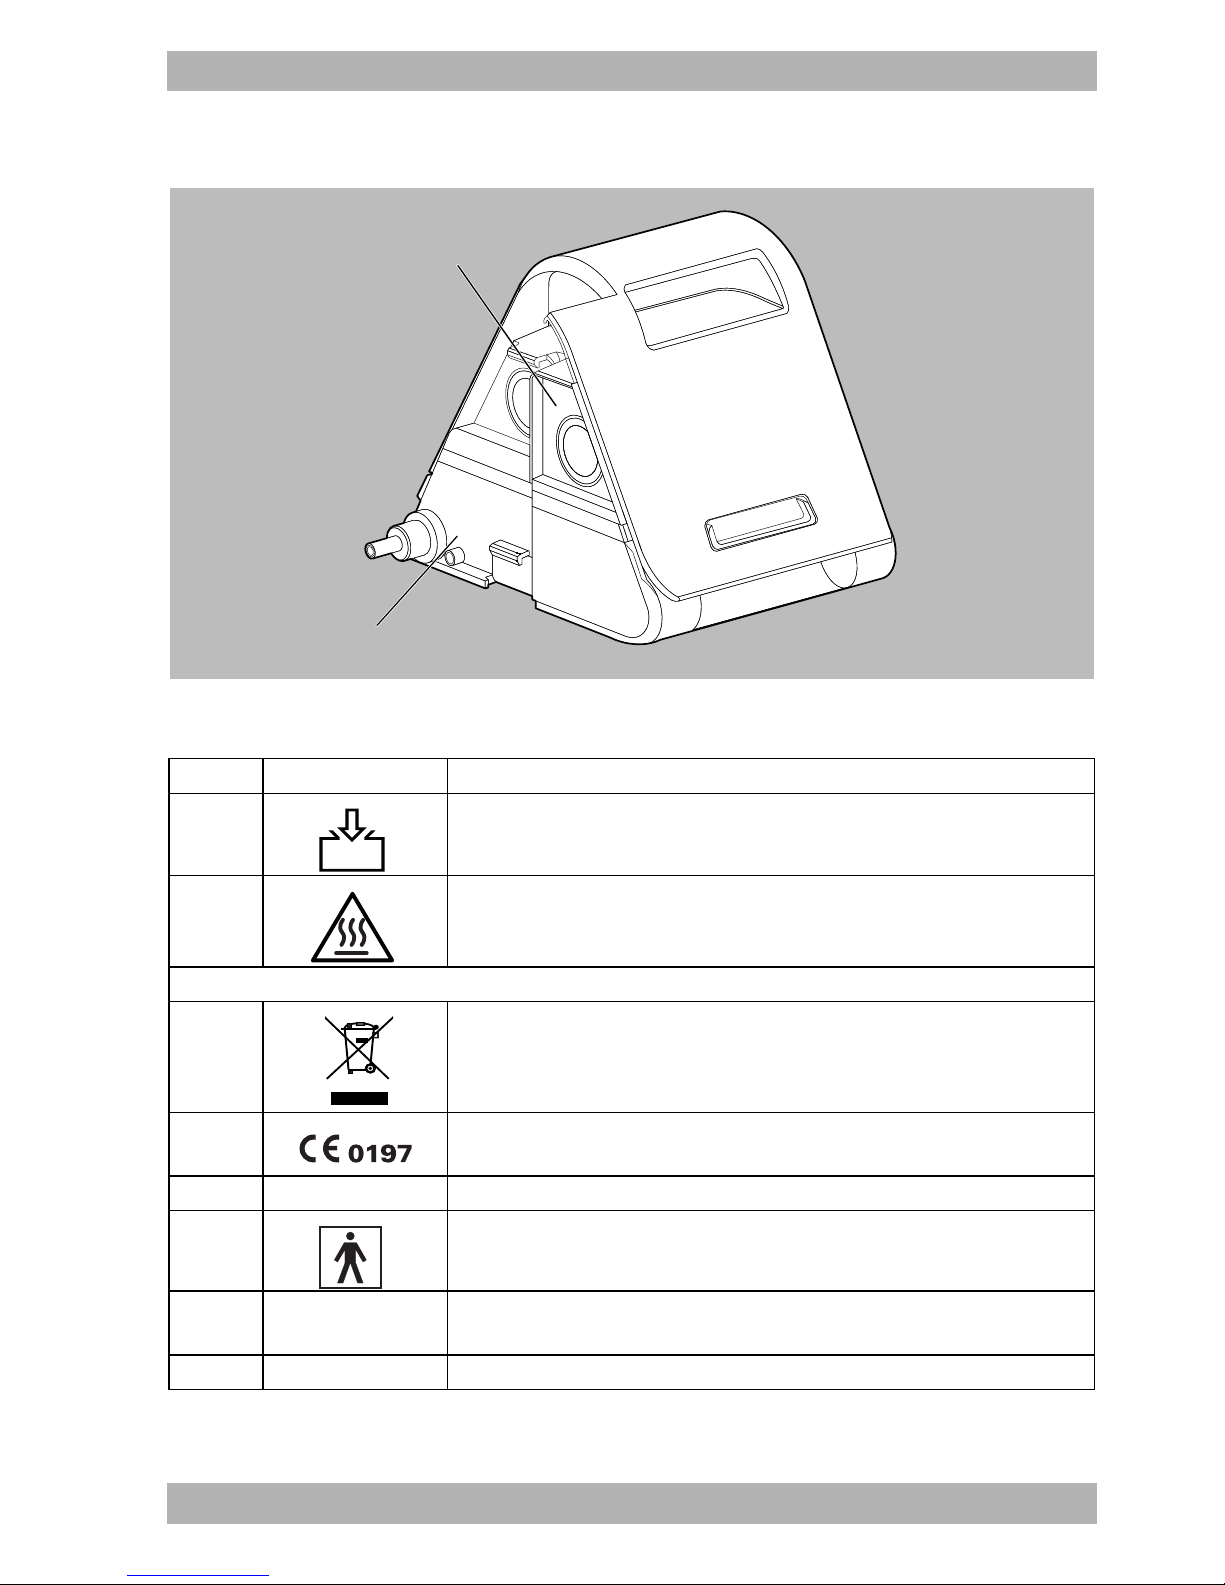
3.5 Labels and symbols
3.5.1 Labels on the therapy device
3-6 Labels on the therapy device
No. Symbol Description
Type plate on the right side of the therapy device
SN Serial number of the therapy device
1
Year of manufacture
Labels and symbols on the therapy device
2 , 8 Consult instructions for use
3 Device inlet: inlet for room air at ambient temperature
WM 67841c 03/2015
WM 100 TD EN 25
Page 26
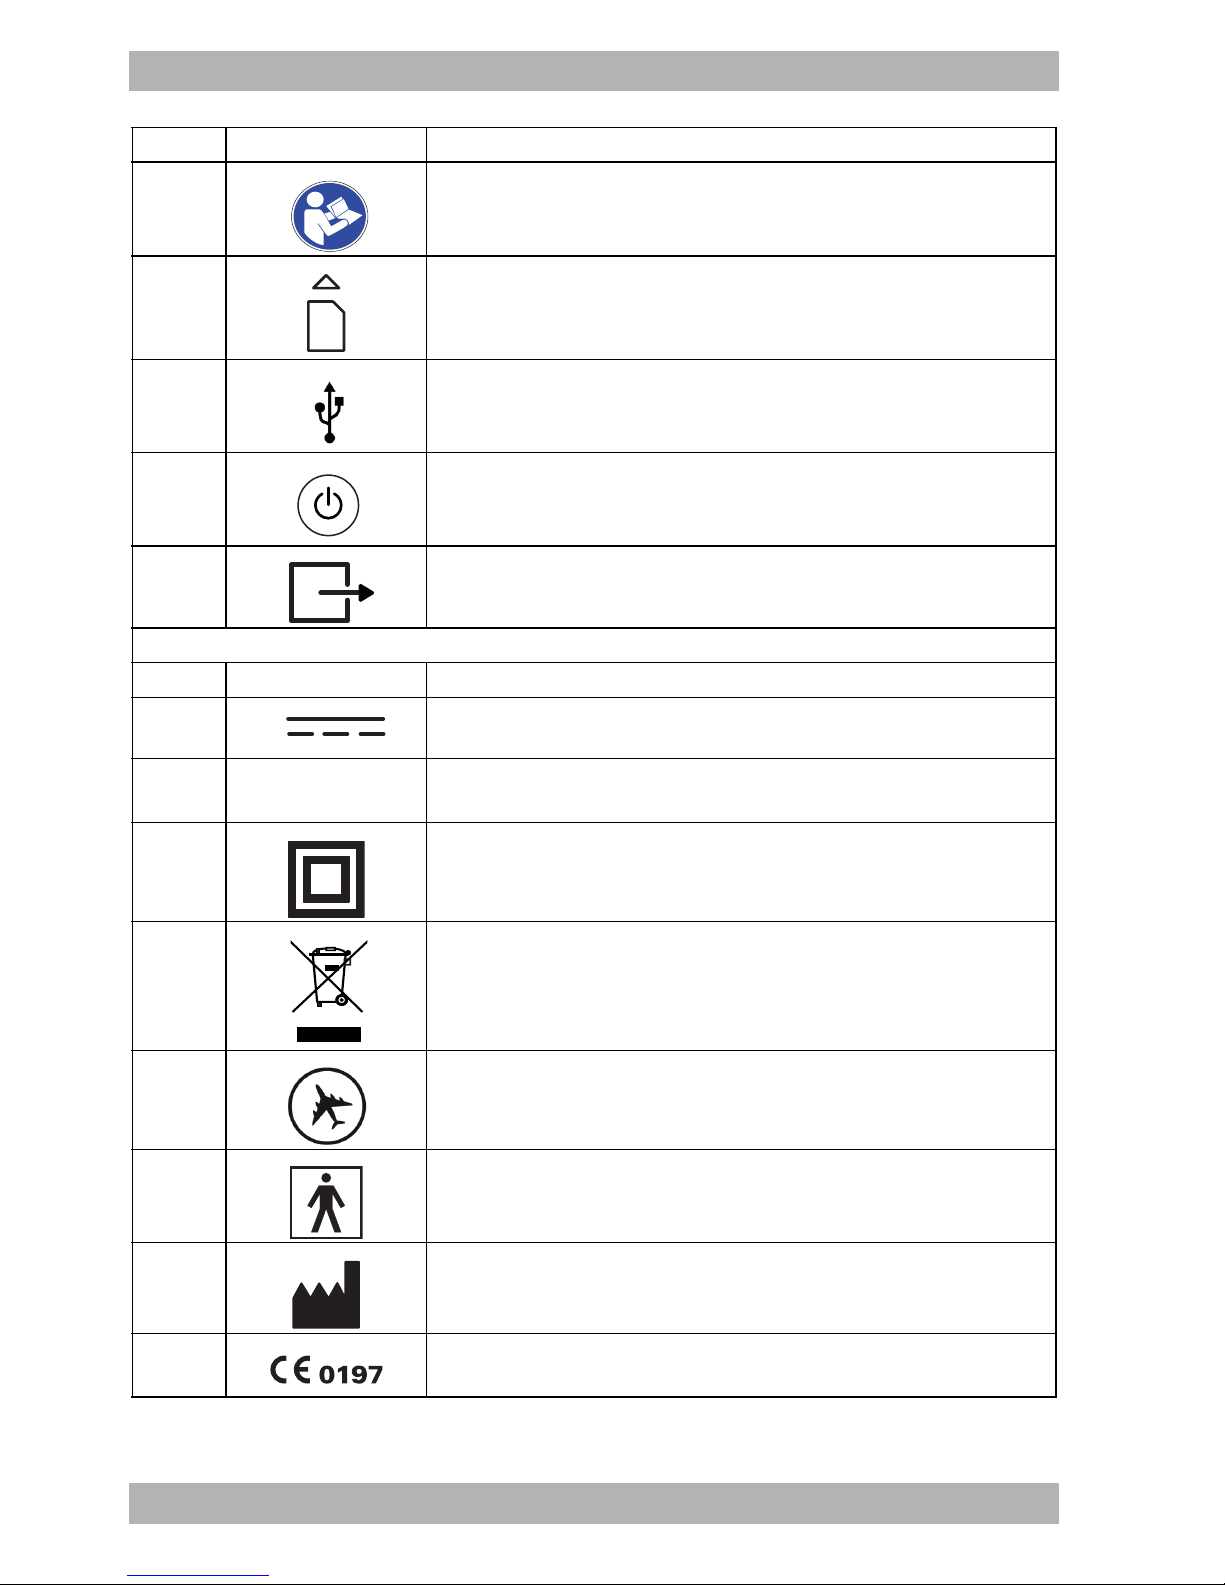
3 Product description
No. Symbol Description
4 Follow the instructions for use.
5 Slot for SD card
6 USB port
7 On/off: Indicates the on/off button
9
Device output: Outlet for room air at 4 hPa to 30 hPa (depending on type
of device)
Type plate on the underside of the therapy device
TYPE: WM 100 TD Type designation of the therapy device
37V
IP21
37 V DC
Degree of protection against solid foreign bodies. The device is protected
against dripping water.
Degree of protection against electric shock: Protection class II device
Do not dispose of device in household waste.
Suitable for use in airplanes. Complies with RTCA/DO-160G chapter 21,
Category M.
26 EN WM 100 TD
Type BF applied part
Manufacturer
CE mark (confirms that the product complies with the applicable
European directives)
WM 67841c 03/2015
Page 27
3 Product description
1
2
3.5.2 Labels on the respiratory air humidifier
r
3-7 Labels on the respiratory air humidifier
No. Symbol Description
1 Fill with water.
2 Respiratory air humidifier is heated. Do not touch the element.
Labels and symbols on the underside
Do not dispose of device in household waste.
CE mark (confirms that the product complies with the applicable European
directives).
32 V DC 32 V direct current
Type BF applied part
IP22
>PC< Material designation: Polycarbonate
WM 67841c 03/2015
IP protection class: Degree of protection against solid foreign bodies. The
device is protected against dripping water.
WM 100 TD EN 27
Page 28

3 Product description
No. Symbol Description
Date of manufacture (month/year)
Type: WM100TH Type designation: Device of type WM 100 TH
Consult instructions for use.
SN Serial Number
3.5.3 Labels on the type plate of the power supply
unit
Symbol Description
Input: 100-240 V,
50-400 Hz, 1.5 A
Output: 37 V
2.43 A
Input voltage: 100-240 V, 50-400 Hz, 1.5 A
Output voltage 37 V DC 2.43 A
GOST-R certification (confirms that the product complies with the applicable
Russian directives)
China RoHS label (confirms that the product does not emit toxic substances for
the number of years indicated)
PSE mark (confirms that the product complies with the applicable Japanese
directives)
Only intended for indoor use.
Degree of protection against electric shock: Protection class II device
Do not dispose of device in household waste.
CE mark (confirms that the product complies with the applicable European
directives)
28 EN WM 100 TD
WM 67841c 03/2015
Page 29

Symbol Description
25
%
%
3
1
3 Product description
IP21
IP protection class: Degree of protection against solid foreign bodies. The device
is protected against dripping water.
3.5.4 Labels on the therapy device packaging
Symbol Description
Permissible storage temperature: -25°C to +70°C
Permissible storage humidity: 15% to 93% relative humidity
3.5.5 Labels on the respiration hose packaging
Symbol Description
For use on one patient only!
WM 67841c 03/2015
WM 100 TD EN 29
Page 30

4 Preparation
4 Preparation
4.1 Setting up the therapy device
Material damage due to overheating!
Temperatures which are too high can cause the therapy device to
overheat and damage the device.
The therapy device and power supply unit must not be covered
with textiles (e.g., bedclothes).
Do not operate the therapy device close to heating systems.
Do not expose the therapy device to direct sunlight.
Do not operate the therapy device in the transport bag.
1. Place the therapy device on a flat surface (e.g., a bedside table).
2. Leave the suction area of the therapy device uncovered.
3. Keep the power plug and power socket accessible at all times.
4. Pull the protective foil off the device.
Result The therapy device is set up properly.
4.2 Connecting components
4.2.1 Connecting up the power supply
Risk of injury due to electric shock when connecting an
incorrect power supply unit to the line power!
The power supply unit contains a safety device to prevent electric
shock. The use of a non-original power supply unit may result in
injury to the user and the patient.
Only operate the device on line power using the power supply
unit recommended by Weinmann.
30 EN WM 100 TD
WM 67841c 03/2015
Page 31

4 Preparation
1. Connect the power supply cable with the power supply unit.
WM 67841c 03/2015
2. Insert the free connector of the power supply unit's connection
cable into the power supply port on the therapy device.
When doing so, pay attention to the alignment of the
connector.
If you want to operate the therapy device at 12 V or 24 V, connect
the optionally available inverter WM 24616 (12 V) or WM 24617
(24 V) to the device.
WM 100 TD EN 31
Page 32

4 Preparation
3. Plug the free end of the power supply cable in the power
socket.
The power supply unit adjusts to the line voltage (110 V or
240 V) automatically.
The LED on the power supply unit lights up green.
Result The power supply is connected.
The therapy device is switched on and in Standby mode.
If you want to disconnect the therapy device from the power
supply, press the clip on the connector and pull the connector out.
Do not pull on the power supply cable.
4.2.2 Connecting up the respiration hose
Risk of injury due to contaminated or infected patient hose
system!
A patient hose system contaminated or infected due to lack of or
incorrectly performed hygienic preparation procedures can pass
contamination or infection on to the next patient and cause
injuries.
Do not reprepare disposable hose systems.
Use a bacteria filter
Hygienically prepare reusable hose systems correctly (see "7.4
Hygienic preparation of the respiration hose", page69).
1. Connect the respiration hose to the device outlet.
32 EN WM 100 TD
WM 67841c 03/2015
Page 33

4 Preparation
Risk of asphyxia when using full face masks without
exhalation system!
When using full face masks without an integrated exhalation
system the CO
concentration can increase to critical values and
2
endanger the patient.
Use full face masks with an external exhalation system if there
is no exhalation system integrated.
Observe the instructions for use of the exhalation system.
2. If not integrated: Insert the external exhalation system between
the respiratory mask and the respiration hose (see instructions
for use of the respiratory mask and the exhalation system).
Risk of injury due to incorrectly positioned respiration hose!
An incorrectly positioned respiration hose can injure the patient.
Never place the respiration hose around the neck.
Do not use any small parts to fix the respiration hose in position
as they might be accidentally swallowed.
Do not squash the respiration hose.
3. Connect the mask with the respiration hose.
4. Check whether the hose diameter used is set in the therapy
device (see "6.2 Setting accessories parameters", page63).
5. Put on the respiratory mask (see instructions for use of the
respiratory mask).
6. Start the therapy (see "5.4 Starting the therapy", page46).
7. Perform a mask test to check the positioning of the mask (see
"5.6 Performing a mask test", page49).
Result The respiration hose is connected.
WM 67841c 03/2015
WM 100 TD EN 33
Page 34

4 Preparation
4.3 Connecting optional accessories
4.3.1 Connecting the oxygen safety valve
Risk of injury from burning oxygen!
Supplying oxygen without special safety equipment can cause
fires and injure people.
Always use an oxygen safety valve.
Observe the information on the safe handling of oxygen.
Observe the instructions for use for the oxygen safety valve and
the oxygen supply unit.
1. Insert the oxygen safety valve Respironics No. 302418 between
the respiration hose and the device outlet.
Result The oxygen safety valve is connected.
4.3.2 Connecting the respiratory air humidifier
Filling the respiratory air humidifier
Material damage due to overfilling!
Any escaping water can enter the device and damage it.
Remove the respiratory air humidifier from the device before
filling.
Only fill the respiratory air humidifier up to the max mark.
Requirement The respiratory air humidifier is removed from the therapy device
(see "4.3.3 Removing the respiratory air humidifier after use",
page38).
34 EN WM 100 TD
WM 67841c 03/2015
Page 35

4 Preparation
H2O
.
1. To open the respiratory air humidifier, grip the lower recess on
the rear of the housing and press the rear of the housing gently
with your thumb.
2. Remove the top of the humidifier.
3. If present: Pour out the water in the base of the humidifier.
4. Clean the respiratory air humidifier (see "7.4 Hygienic
preparation of the respiration hose", page69).
Material damage due to hot water and aromatic additives!
Hot water or aromatic additives (e.g., eucalyptus oil) can damage
the housing of the respiratory air humidifier and the element.
Do not fill with hot water.
Do not use any aromatic additives.
WM 67841c 03/2015
WM 100 TD EN 35
Page 36

4 Preparation
5. Fill the base of the humidifier with fresh, cold water up to the
mark (max. 400 ml).
Sterile or boiled water is only required in exceptional medical cases
when using this device at home. Do not use distilled water for
technical purposes, as it could contain microbiological pollution.
6. Place the top of the humidifier on the base of the humidifier
from the back and press it on gently until it clicks into place.
7. Check whether the humidifier is correctly sealed or whether
water can leak out. To do so, run your hand over the underside
of the device.
8. Fit the respiratory air humidifier to the therapy device
(see " Installing the respiratory air humidifier", page37).
Result The respiratory air humidifier is filled.
36 EN WM 100 TD
WM 67841c 03/2015
Page 37

4 Preparation
Installing the respiratory air humidifier
1. Press the unlocking button on the therapy device to remove the
side cover of the therapy device.
2. Fill the respiratory air humidifier with water (see " Filling the
respiratory air humidifier", page34).
3. Push the respiratory air humidifier into the therapy device from
the side on a flat surface until the unlocking button clicks into
place audibly.
Result The respiratory air humidifier is connected to the therapy device.
WM 67841c 03/2015
4. Pull the protective foil off the respiratory air humidifier.
WM 100 TD EN 37
Page 38

4 Preparation
Requirement The therapy device is switched off.
• When the therapy device is in Standby mode: The humidifier
button is shown in gray on the therapy device's display.
• When the therapy device is in Therapy mode: The humidifier
button is shown in green on the therapy device's display
with the currently set humidifier level.
4.3.3 Removing the respiratory air humidifier after
use
Risk of injury from hot element!
During and shortly after operation, the element of the respiratory
air humidifier is hot and touching it can cause burns.
Allow the element to cool down completely.
Avoid touching the element.
1. Press the unlocking button on the therapy device.
2. The respiratory air humidifier is removed from the side of the
therapy device.
38 EN WM 100 TD
WM 67841c 03/2015
Page 39

4 Preparation
Risk of infection due to germs in stagnant water!
Germs and bacteria can easily take hold and multiply in stagnant
water.
Remove the water from the respiratory air humidifier after
every use.
Clean the respiratory air humidifier regularly.
Only use the respiratory air humidifier with fresh water.
.
3. To open the respiratory air humidifier, grip the lower recess on
the rear of the housing and press the rear of the housing gently
with your thumb.
4. Remove the top of the humidifier.
5. Pour out any water remaining in the base of the humidifier.
6. Clean the respiratory air humidifier (see "7.5 Hygienic
preparation of the respiratory air humidifier", page70).
WM 67841c 03/2015
WM 100 TD EN 39
Page 40

4 Preparation
7. To use the therapy device without the respiratory air humidifier
in the future, insert the cover in the therapy device from the
side until the unlocking button clicks into place audibly.
Result The respiratory air humidifier is removed.
4.3.4 Alternative filling for nighttime: Topping up
water
If there is no more water left in the respiratory air humidifier, the
therapy device automatically switches the respiratory air humidifier
off. The humidifier button is orange .
To continue the therapy with the respiratory air humidifier as soon
as possible, you can top up the water.
.
Material damage due to overfilling!
Any escaping water can enter the device and damage it.
Remove the respiratory air humidifier from the device before
filling.
Only fill the respiratory air humidifier up to the max mark.
Requirement There is no more water in the respiratory air humidifier.
1. End the therapy (see "5.5 Ending the therapy", page48).
2. Press the unlocking button on the therapy device.
40 EN WM 100 TD
WM 67841c 03/2015
Page 41

4 Preparation
H2O
3. The respiratory air humidifier is removed from the side of the
therapy device.
Risk of injury from hot element!
During and shortly after operation, the element of the respiratory
air humidifier is hot and touching it can cause burns.
Allow the element to cool down completely.
Avoid touching the element.
WM 67841c 03/2015
4. Tilt the respiratory air humidifier carefully to the left and place
it on its side.
WM 100 TD EN 41
Page 42

4 Preparation
Material damage due to hot water and aromatic additives!
Hot water or aromatic additives (e.g., eucalyptus oil) can damage
the housing of the respiratory air humidifier and the element.
Do not fill with hot water.
Do not use any aromatic additives.
5. Fill fresh, cold water up to the marking on the underside (max.
400 ml) through the inlet.
Sterile or boiled water is only required in exceptional medical cases
when using this device at home. Do not use distilled water for
technical purposes, as it could contain microbiological pollution.
6. Set the respiratory air humidifier upright again carefully.
7. Install the respiratory air humidifier on the therapy device
(see " Installing the respiratory air humidifier", page37).
8. Start the therapy again (see "5.4 Starting the therapy",
page46).
Result The respiratory air humidifier is filled.
42 EN WM 100 TD
WM 67841c 03/2015
Page 43

5 Operation
5.1 Navigating the menu
You configure all the settings in the menu via the display. Press the
required field directly on the display.
Button Function
5 Operation
Go back a screen
Go forward a screen
Select values:
• If the parameter can have exactly 2 possible values
(e.g., on/off): press the button.
The value changes to the other one.
• If the parameter can have a range of different values,
press the button and select the value from the
overview.
Increase or decrease value
Confirm value
Reject value
Go back to start screen (Standby or Therapy mode)
5.2 Switching on the therapy device
5.2.1 Switching on the therapy device for the first
WM 67841c 03/2015
time
Before the first therapy is performed, the therapy device must be
configured. If your authorized dealer has not done so already,
configure the following settings.
WM 100 TD EN 43
Page 44

5 Operation
Material damage if power supply is interrupted during
configuration!
If the power supply is interrupted prematurely, the configuration
will not be performed correctly.
Leave the therapy device connected to the power supply
throughout the configuration.
Only disconnect the power supply once the Configuration
successful message has appeared.
1. Connect up the power supply (see "4.2.1 Connecting up the
power supply", page30).
2. Select your preferred language.
3. Select your time zone with the arrow keys and .
4. Set the time:
44 EN WM 100 TD
WM 67841c 03/2015
Page 45
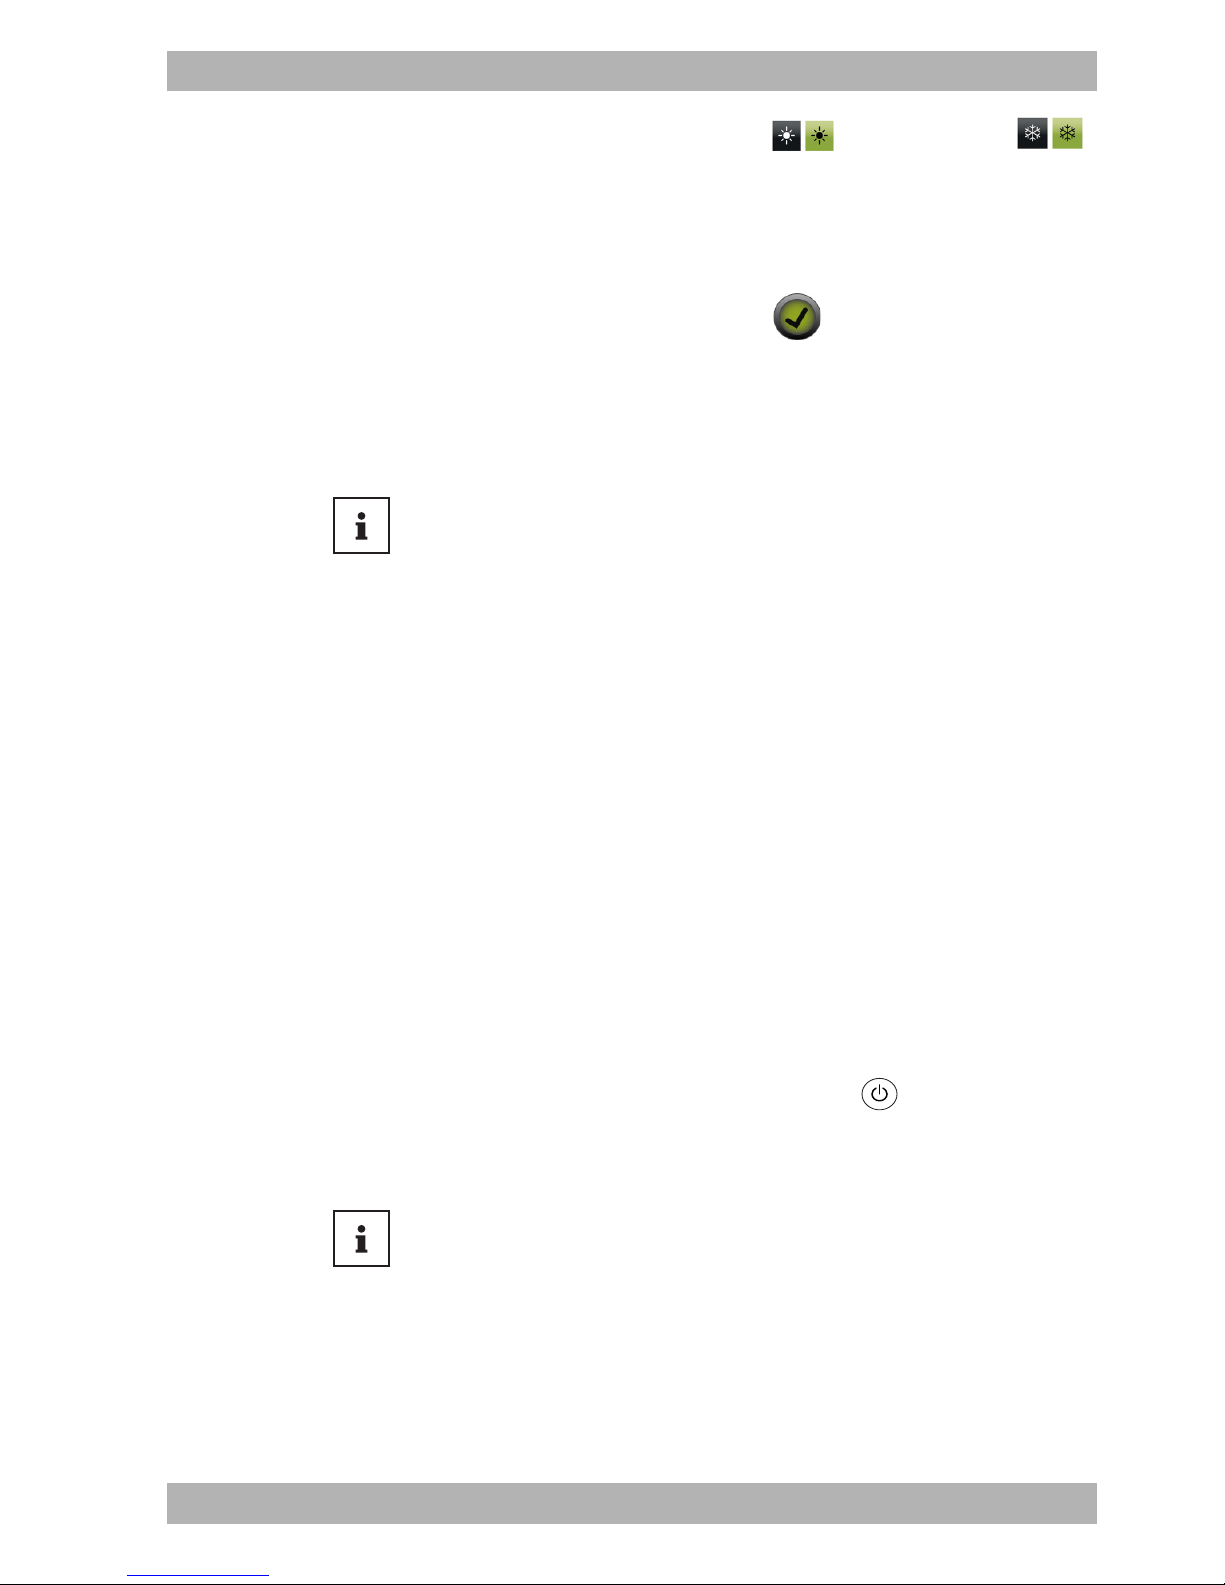
• Select daylight saving time or standard time .
Click on the symbol with the gray background to select it.
The background turns green when the setting is activated.
• Use the arrow keys on the right to set the minutes.
• Select the clock version: 24 h (0-24) or 12 h (0-12)
5. Confirm the set time with the button.
Result The therapy device is switched on and configured.
The set language and time settings are saved.
The therapy device is in the Standby mode (see "3.2.1 Display in
Standby mode (Start screen)", page18).
If you have received an SD card from your authorized dealer with
the configuration, please insert the SD card in the therapy device
(see "5.11.1 Inserting the SD card", page58).
The settings are then automatically transferred to the therapy
device.
5 Operation
5.2.2 Switching the therapy device on each time
The therapy device can assume 3 different modes:
• Standby mode (no therapy in progress)
• Therapy mode (therapy in progress)
• Energy saving mode (display is off to save energy during the
day)
1. To switch the therapy device to Standby mode, connect up
the power supply (see "4.2.1 Connecting up the power
supply", page30).
2. If the display remains off, the therapy device is in Energy
saving mode: Press the on/off button .
Result The therapy device is in the Standby mode (see "3.2.1 Display in
Standby mode (Start screen)", page18).
After being switched on, the device displays the patient-related
operating hours for 30 seconds.
WM 67841c 03/2015
WM 100 TD EN 45
Page 46
5 Operation
5.3 Switching off the therapy device
1. To save energy during the day, keep the on/off button
depressed for 3 seconds.
or
If the automatic energy saving function is activated: the
therapy device switches to the Energy saving mode
automatically 15 minutes after the user has performed the last
action.
Result The therapy device is in the Energy saving mode.
The automatic energy saving function can be activated in the
menu Main menu | Device | Energy saving (see "6.4 Setting device
parameters", page65).
The therapy device does not switch to the Energy saving mode
automatically if:
• there is a therapy in progress;
• there is a USB cable inserted;
• data are being exported;
• a message appears on the display.
5.4 Starting the therapy
1. Connect the components (see "6.1 Setting comfort
parameters", page62).
2. Connect the power supply (see "4.2.1 Connecting up the
power supply", page30).
3. If the display remains off, the therapy device is in Energy
saving mode: Press the on/off button .
The therapy device switches to the Standby mode.
4. Press the on/off button .
or
If the autoSTART-STOP function is activated: breathe into the
mask.
You can activate the autoSTART-STOP function in the menu Main
menu | Comfort | autoSTART-STOP (see "6.1 Setting comfort
parameters", page62).
WM 67841c 03/2015
46 EN WM 100 TD
Page 47

Result The therapy starts.
The start screen is shown in the Therapy mode.
If you want to view detailed information on your therapy: Press the
info button .
5 Operation
WM 67841c 03/2015
To allow you to sleep undisturbed, the display automatically turns
dark after 30 seconds. The therapy continues normally. As soon as
you press the display, the start screen is shown in the Therapy
mode again.
WM 100 TD EN 47
Page 48

5 Operation
5.5 Ending the therapy
1. Press the on/off button .
or
If the autoSTART-STOP function is activated: Remove the
respiratory mask.
The therapy is automatically ended after 5 seconds.
You can activate the autoSTART-STOP function in the menu
Main menu | Comfort | autoSTART-STOP (see "6.1 Setting comfort
parameters", page62).
Result The therapy is ended.
The therapy data for the last therapy session is shown briefly if the
physician or authorized dealer has enabled this function. In all
other cases, the usage time is displayed.
The more green checks are shown (max. 3), the better the result.
If you want to end the therapy prematurely during the night, you
can use the dimmer button on the start screen to turn the
display dark and sleep undisturbed.
The therapy device is still supplied with power and the alarm
function remains activated. As soon as you touch the display, the
start screen is shown in the Standby mode again.
48 EN WM 100 TD
WM 67841c 03/2015
Page 49

5 Operation
5.6 Performing a mask test
The therapy device is equipped with a mask test function. To
minimize the risk of leaks and test the correct positioning of the
mask even at higher pressures, you can perform a mask test before
starting the therapy.
Requirement • The mask test function has been enabled by the physician or
authorized dealer.
• The therapy device is in Therapy mode.
1. Press the button.
2. To start the mask test, press the mask test button.
The remaining time in seconds is shown.
3. Check the seal of the mask against what is shown on the
display:
Symbol Meaning
Mask position is good, no leaks
Mask is not well positioned, considerable leaks, the
efficacy of the therapy is not guaranteed
4. If necessary: Adjust the mask straps.
5. Wait until the therapy device automatically ends the mask test
after 30 seconds.
or
To end the mask test prematurely, press the mask test button .
Result The mask test is performed.
.
If you switch the softSTART on during the mask test, the mask test
is automatically switched off.
WM 67841c 03/2015
WM 100 TD EN 49
Page 50

5 Operation
Requirement • The softSTART function has been enabled by the physician or
5.7 Switching softSTART on/off
The softSTART function makes it easier to get used to the
ventilation pressure when falling asleep. You can set a pressure
different to the prescribed therapy pressure. When switched on,
the therapy device sets this softSTART pressure. The pressure then
increases slowly within the specified period or drops after the
specified period (maximum 45 minutes) to the therapy level.
This function is suitable for patients who find a high or low
pressure uncomfortable when awake and cannot fall asleep.
authorized dealer.
• A softSTART pressure is set (see "6.1 Setting comfort
parameters", page62).
1. Start the therapy (see "5.4 Starting the therapy", page46).
2. If softSTART was activated during the last therapy: softSTART
starts automatically when the therapy starts.
or
Press the softSTART button to switch softSTART on.
The remaining time in minutes is shown.
3. Press the softSTART button to switch softSTART off.
The set softSTART time in minutes is shown.
When running, a mask test will only interrupt softSTART and it will
be restarted after the mask test.
50 EN WM 100 TD
WM 67841c 03/2015
Page 51

5.8 Setting the respiratory air humidifier
5.8.1 Switching on the respiratory air humidifier
The respiratory air humidifier switches on automatically when you
start the therapy (see "5.4 Starting the therapy", page46).
You can also preheat the humidifier to ensure that the water in the
respiratory air humidifier has already reached the required
temperature by the start of the therapy. Please note that the
respiratory air humidifier will switch itself off again automatically
after 30 minutes of preheating.
Requirement • The therapy device is in Standby mode.
• The respiratory air humidifier is filled with water (see " Filling
the respiratory air humidifier", page34).
• The respiratory air humidifier is connected (see " Installing the
respiratory air humidifier", page37).
The humidifier button is gray .
5 Operation
Result The respiratory air humidifier is switched on.
WM 67841c 03/2015
1. Press the humidifier button .
The humidifier button is green and the humidifier level is shown .
WM 100 TD EN 51
Page 52

5 Operation
Requirement • The therapy device is in the Therapy mode.
5.8.2 Switching off the respiratory air humidifier
The respiratory air humidifier switches off automatically when you
end the therapy (see "5.5 Ending the therapy", page48).
You can also switch the respiratory air humidifier off during the
therapy.
• The respiratory air humidifier is connected to the therapy
device.
• The respiratory air humidifier is switched on.
The humidifier button is green .
1. Press the humidifier button .
Result The respiratory air humidifier is switched off.
The humidifier button is gray .
If there is no more water left in the respiratory air humidifier, the
respiratory air humidifier switches off automatically. The
humidifier button is orange (see "4.3.4 Alternative filling for
nighttime: Topping up water", page40).
52 EN WM 100 TD
WM 67841c 03/2015
Page 53

5 Operation
5.8.3 Setting the humidifier level
Requirement • The therapy device is in the Standby or Therapy mode.
• The respiratory air humidifier is filled with water (see " Filling
the respiratory air humidifier", page34).
• The respiratory air humidifier is connected to the therapy
device (see " Installing the respiratory air humidifier",
page37).
• The respiratory air humidifier is switched on (see "5.8.1
Switching on the respiratory air humidifier", page51).
The humidifier button is green and the humidifier level is
shown .
1. The and buttons can be used to increase or decrease
the humidifier level.
There are seven humidifier levels available (1-7). The level which is
suitable for you depends on the room temperature and the
humidity. The standard setting is level 4. If you wake up with dry
airways, the heating is set too low. If there is condensation in the
respiration hose in the morning, the heating is too high.
To reduce condensation in the respiration hose, we recommend
using a hose heating system.
Result The humidifier level is set.
WM 67841c 03/2015
WM 100 TD EN 53
Page 54

5 Operation
Requirement The therapy device is in Standby mode.
5.9 Setting the alarm
5.9.1 Setting the wake-up time and switching on the
alarm
1. Press the time display on the start screen.
or
Press the menu button .
Press the Time field.
2. Press the Wake-up time field.
3. To switch the alarm on, press the alarm button .
4. To set the wake-up time, use the left arrow keys to select the
5. Confirm the settings with the button.
6. To return to the start screen, press the Home button .
Result The wake-up time is set and the alarm is switched on.
54 EN WM 100 TD
hours and the right arrow keys to select the minutes.
WM 67841c 03/2015
Page 55

5.9.2 Switching off the alarm
Requirement The alarm is ringing.
1. To snooze the alarm for 5 minutes, press the Pause field.
2. To turn the alarm off for today, press the Off field.
The alarm will go off the following day again at the set wakeup time.
Result The alarm is switched off.
5.9.3 Deactivating the alarm
Requirement • The therapy device is in Standby mode.
• The alarm is switched on (see "5.9.1 Setting the wake-up time
and switching on the alarm", page54).
1. Press the time display on the start screen.
5 Operation
or
Press the menu button .
Press the Time field.
2. Press the Wake-up time field.
3. Press the alarm button .
4. Confirm the setting with the button.
5. To return to the start screen, press the Home button .
Result The alarm is deactivated.
If you want to be woken up again, you will need to switch it on
again (see "5.9.1 Setting the wake-up time and switching on the
alarm", page54).
WM 67841c 03/2015
WM 100 TD EN 55
Page 56

5 Operation
Requirement The therapy device is in Standby mode.
5.10 Viewing therapy data and device
information
In the info menu you can view information about the therapy
(usage time, mask fit, therapy quality) within a selectable period of
time and general information about the device and network.
If your device only displays the usage time and not the mask fit
and the therapy quality, your physician or authorized dealer will
need to enable this function.
1. Press the info button .
2. If necessary: To view therapy data from a night other than the
56 EN WM 100 TD
previous night, select the desired date in the list .
WM 67841c 03/2015
Page 57

5 Operation
3. If necessary: To view a longer period of time, navigate to the
second screen .
WM 67841c 03/2015
4. Select the required period.
5. To go back a screen, press the arrow key .
WM 100 TD EN 57
Page 58

5 Operation
6. If required, save all the data to the SD card (see " Saving the
therapy data manually", page60).
7. To view the device information, navigate to the next screen
using the arrow keys and .
8. To exit the info menu, press the Home button .
Result The therapy data and device information are called up.
5.11 Using the SD card
An SD card is not necessarily required for the operation of the
therapy device. The therapy data and settings are stored internally
in the device.
Loss of data due to incorrect SD card!
SD cards not purchased from Weinmann may have reduced
functionality or result in the loss of data.
Only use SD cards from brand manufacturers which comply
with the specifications (see "12.1 Technical data", page85).
Do not use the SD card for third-party files.
5.11.1 Inserting the SD card
Requirement The therapy device is in Standby mode.
1. Open the SD card slot cover.
58 EN WM 100 TD
WM 67841c 03/2015
Page 59

5 Operation
2. Slide the SD card into the SD card slot until it audibly clicks into
place.
When doing so, note: The beveled corner of the SD card must
be at the top and facing the device during insertion.
3. Close the SD card slot cover.
Result The SD card is inserted in the therapy device and ready for use.
After the device is switched on, the SD card symbol appears in
the status line of the display.
5.11.2 Saving therapy data to the SD card
Data loss in case of power loss!
Data may be lost if the therapy device is disconnected from the
power supply during the saving process.
Keep the therapy device connected to the power supply during
the saving process (SD card symbol flashes).
Autosave
The therapy device saves the therapy data automatically in the
following events:
• Each time you end a therapy.
WM 67841c 03/2015
• Each time you insert an SD card. Only insert SD cards when the
device is in Standby mode.
• When the therapy device is reconnected to the power supply
after a saving process is interrupted.
WM 100 TD EN 59
Page 60

5 Operation
Requirement • The SD card is inserted in the therapy device (see "5.11.1
Requirement • The therapy device is in the Standby mode.
Saving the therapy data manually
Inserting the SD card", page58).
• The info menu with the therapy data for the requested period
is open (see "5.10 Viewing therapy data and device
information", page56).
1. To save all the therapy data to the SD card, press the SD card
button .
2. Press the Save all data field and confirm with the OK field.
Result The SD card symbol flashes in the display and the data is written
onto the SD card.
5.11.3 Removing the SD card
• The SD card symbol is no longer flashing.
1. Open the SD card slot cover.
2. Briefly press in the SD card.
The SD card is ejected slightly.
3. Remove the SD card.
4. Close the cover of the SD card slot.
Result The SD card is removed.
60 EN WM 100 TD
WM 67841c 03/2015
Page 61

5.11.4 Sending the SD card
1. Remove the SD card (see "5.11.3 Removing the SD card",
page60).
2. Label the SD card with the name and date of birth in order to
avoid confusion when it reaches the physician or authorized
dealer.
The SD cards available from Weinmann have a field that you can
write in.
3. Insert the SD card in the protective wallet included in the scope
of supply.
4. Send the SD card to the physician or authorized dealer.
5.11.5 Setting the device with the SD card
You can set the device with the help of an SD card provided by
your physician or authorized dealer.
5 Operation
Requirement • The therapy device is in the Standby mode.
1. Insert the SD card with the saved device settings (see "5.11.1
Inserting the SD card", page58).
Result The message Configuration via SD card was successful appears
on the display. You can continue the therapy with the new
settings.
If the new settings for your device were not suitable or could not
be read, the message Configuration via SD card has failed
appears on the display. Contact your authorized dealer to obtain
new settings.
WM 67841c 03/2015
WM 100 TD EN 61
Page 62

6 Settings in the menu
6 Settings in the menu
You can configure settings for the comfort, accessories, and time
parameters in the settings menu when the therapy device is in
Standby mode.
6.1 Setting comfort parameters
Comfort parameters facilitate handling of the therapy device and
components for the patient and ensure a comfortable therapy.
Requirement The therapy device is in Standby mode.
1. Press the menu button .
2. Press the Comfort field.
3. Configure the desired settings and confirm.
Parameter Possible values Description
Here you can activate/deactivate the automatic on/off function
autoSTART-STOP.
If the automatic on/off function is activated, you can switch the
therapy device on with a breath.
If there is no pressure for 5 seconds (e.g., because the mask has
been removed), the therapy device switches itself off again
automatically.
Here you can set the pressure at which the mask test is
performed (see "5.6 Performing a mask test", page 49).
Leaks due to a poorly sitting mask often only occur at higher
pressures.
The softSTART function makes it easier to get used to the
ventilation pressure when falling asleep.
You can set the required softSTART pressure here.
If it is not possible to select this function, it must be enabled by
your physician or authorized dealer.
autoSTART-STOP
Mask test pressure
softSTART
pressure
On
Off
8hPa-20hPa
(depending on the
therapy pressure
currently set)
Intervals of 0.5 in
the range
prescribed by the
physician or
authorized dealer
(e.g., 4 hPa to
8hPa).
62 EN WM 100 TD
WM 67841c 03/2015
Page 63

Parameter Possible values Description
Intervals of 5
softSTART time
softPAP
minutes in the
range prescribed by
the physician or
authorized dealer
(e.g., 5 mins to
max. 45 mins).
Off
1
2
3
Here you can set the period of time during which the ventilation
pressure increases to the therapy pressure in the scope of the
softSTART.
If it is not possible to select this function, it must be enabled by
your physician or authorized dealer.
Settings 1 and 2 of the softPAP breathing relief function are
intended for patients who find exhaling against high pressure
uncomfortable. The breathing relief function reduces the
pressure early during the transition to expiration, allowing you
to breathe out more easily.
Setting 3 is suitable for patients who experience respiratory
distress with a low pressure setting. The pressure is raised
slightly during inspiration.
You can select the setting for the softPAP breathing relief here
or deactivate it if you do not wish to use the function anymore.
• Setting 1: Low breathing relief
• Setting 2: Normal breathing relief
• Setting 3: Breathing relief with inhalation assistance
This function is only available in CPAP and APAP mode. If it is
not possible to select this function in one of these modes, it
must be enabled by your physician or authorized dealer.
6 Settings in the menu
6.2 Setting accessories parameters
The accessories parameters are used to set the use of the
accessories.
Requirement The therapy device is in Standby mode.
1. Press the menu button .
2. Press the Accessories field.
3. Configure the required settings and confirm.
Parameter Possible values Description
Here you select the diameter of the hose type used. If it is not
possible to select this function, it must be enabled by your
physician or authorized dealer.
WM 67841c 03/2015
Tube type
15 mm
19-22 mm
WM 100 TD EN 63
Page 64

6 Settings in the menu
Parameter Possible values Description
Change
air filter
Changed
Cancel
Here you specify whether you have changed the air filter.
For this function, the authorized dealer must have activated the
air filter reminder.
6.3 Setting time parameters
In the time parameters you set the minutes of the current time, the
time zone, and the required wake-up time.
Requirement The therapy device is in Standby mode.
1. Press the menu button .
2. Press the Time field.
3. Configure the required settings and confirm.
Parameter Possible values Description
Here you can set the current time:
• Select daylight saving time or standard time.
The green background of the symbol shows that this setting
is active.
Time
• Use the arrow keys on the right to set the minutes.
• To set the hours: Select another time zone.
• Select the clock version:
24 hours (0-24)
12 hours (0-12)
You can reset the time to the end of the last therapy at most.
Time zone
Wake-up time
64 EN WM 100 TD
UTC -12 to
UTC +12
00:00 -12:00 /
23:59
Here you select the required time zone.
Here you set the time at which you want to be woken up (see
"5.9.1 Setting the wake-up time and switching on the alarm",
page 54).
WM 67841c 03/2015
Page 65

6.4 Setting device parameters
You can use the device parameters to set the brightness of the
display and the volume of the acoustic signals among other things
as you wish.
Requirement The therapy device is in Standby mode.
1. Press the menu button .
2. Press the Device field.
3. Configure the required settings and confirm.
Parameter Possible values Description
6 Settings in the menu
Display
brightness
Leakage
alert
Energy saving
Key tone volume
1
2
3
Off
On
Off
On
Off
1
2
3
Here you can set the brightness of the display.
• Level 1: Dark
• Level 2: Normal
• Level 3: Bright
Here you can set whether an alarm should be triggered in case
of a leak. This allows you to change the position of your mask
at night. By doing so you avoid side effects or a reduced therapy
quality due to severe leaks.
If it is not possible to select this function, it must be enabled by
your physician or authorized dealer.
Here you can activate or deactivate whether the therapy device
automatically switches to Energy saving mode 15 minutes
after the therapy has finished.
You save electricity if the therapy device is in Energy saving
mode during the day.
Here you can set the volume of the acoustic signal for every time
a key is pressed or switch the signal off.
• Level 1: Quiet
• Level 2: Normal
• Level 3: Loud
Alarm volume
Alarm clock
volume
WM 67841c 03/2015
1
2
3
Off
1
2
3
Here you can set the volume of the alarms.
• Level 1: Quiet
• Level 2: Normal
• Level 3: Loud
Here you can set the volume of the alarm.
• Level 1: Quiet
• Level 2: Normal
• Level 3: Loud
WM 100 TD EN 65
Page 66

7 Hygienic preparation
7 Hygienic preparation
7.1 General information
• This product may contain disposable items. Disposable
items are intended to be used only once. So use these
items only once and do not reprocess them. Reprocessing
disposable items may impair the functionality and safety of the
product and lead to unforeseeable reactions as a result of
aging, embrittlement, wear, thermal load, the effects of
chemical processes, etc.
• Wear suitable protective equipment for disinfection work.
• Please refer to the instructions for use supplied with the
disinfectant used.
• Also observe the respective instructions for use for the therapy
device, the components, and the accessories.
• The therapy device is suitable for subsequent use on further
patients following hygienic preparation by the authorized
dealer.
7.2 Cleaning intervals
Interval Action
Clean the therapy device (see "7.3 Hygienic preparation of the therapy device",
page 67)
Clean the respiration hose (see "7.4 Hygienic preparation of the respiration
Weekly
Monthly
Every 6 months Replace the air filter
hose", page 69)
Clean the respiratory air humidifier (see "7.5 Hygienic preparation of the
respiratory air humidifier", page 70)
In clinical areas: Disinfect the respiratory air humidifier
Clean the air filter (see "7.3.1 Cleaning the air filter (gray filter)", page 68)
If installed: Replace the (optional) pollen filter (see "7.3.2 Replacing the optional
pollen filter (white filter)", page 69)
66 EN WM 100 TD
WM 67841c 03/2015
Page 67

Interval Action
Annually Replace the respiration hose
As necessary
When changing patients
7.3 Hygienic preparation of the therapy
7 Hygienic preparation
Descale the respiratory air humidifier (see "7.5.1 Descaling the respiratory air
humidifier", page 74)
In clinical areas: Disinfect the respiration hose (see "7.4 Hygienic preparation of
the respiration hose", page 69)
For reasons of hygiene: Replace the housing components of the respiratory air
humidifier if they are in poor condition (e.g., if cracks appear).
If the therapy device or respiratory air humidifier has been used without a
bacteria filter: Have professional hygienic preparation performed before using
the device again. Send the therapy device to your authorized dealer.
device
Risk of injury from electric shock!
Any liquids entering the device can cause a short circuit, injure the
user, and damage the therapy device.
Disconnect the therapy device from the power supply before
starting the hygienic preparation.
Do not immerse the therapy device and the components in
liquids.
Do not pour liquids over the therapy device and the
components.
1. Switch off the therapy device (see "5.3 Switching off the
therapy device", page 46).
2. Disconnect the therapy device from the power supply.
3. If present: Remove the respiratory air humidifier (see "4.3.3
Removing the respiratory air humidifier after use", page 38).
4. Prepare the therapy device and the components hygienically in
accordance with the following table:
WM 67841c 03/2015
WM 100 TD EN 67
Page 68

7 Hygienic preparation
Part Cleaning Disinfection Sterilization
Wipe with a damp
Housing
cloth: use water or
mild soap
High-gloss
surfaces
on the housing
Power supply
unit
Power supply
cable
Wipe with a damp
cloth: use water or
mild soap; do not use
microfiber cloths
Wipe with a damp
cloth: use water or
mild soap
Wipe with a damp
cloth: use water or
mild soap
Wipe disinfection
(Recommendation:
®
terralin
protect or
perform advanced
Alcohol EP)
Not permitted
5. If present: Connect the respiratory air humidifier up to the
therapy device (see "4.3.2 Connecting the respiratory air
humidifier", page 34).
6. Reconnect to power supply.
7. Perform a function check (see "8 Function check", page 76).
Result The therapy device and the components are hygienically prepared.
7.3.1 Cleaning the air filter (gray filter)
1. Remove the air filter.
2. Clean the air filter under running water.
68 EN WM 100 TD
WM 67841c 03/2015
Page 69

7 Hygienic preparation
3. Leave the air filter to dry.
4. Replace the air filter in the holding bracket.
Result The air filter is clean.
7.3.2 Replacing the optional pollen filter (white
filter)
1. Remove the air filter.
2. Remove and dispose of the pollen filter.
3. Insert the new pollen filter in the holding bracket.
4. Replace the air filter in the holding bracket.
Result The pollen filter has been replaced.
7.4 Hygienic preparation of the
respiration hose
Damage to the device caused by ingress of liquids!
Ingress of liquids may damage the device.
Only use the respiration hose when it is completely dry.
1. Remove the respiration hose from the therapy device.
2. Carry out hygienic preparation of the respiration hose as
specified in the following table:
WM 67841c 03/2015
WM 100 TD EN 69
Page 70

7 Hygienic preparation
Part Cleaning Disinfection Sterilization
Respiration
hose
3. Rinse respiration hose off with clean water.
4. Shake respiration hose out thoroughly.
5. Hang up the respiration hose and leave it to drip dry.
6. Dry the respiration hose.
Result The respiration hose is hygienically prepared.
If you use a heatable respiration hose, please observe the
instructions for use for the respiration hose.
With warm water
and washing-up
liquid
Immersion
disinfection
(Recommendation:
gigasept FF
®
)
7.5 Hygienic preparation of the
respiratory air humidifier
Not permitted
Risk of injury from hot element!
During and shortly after operation, the element of the respiratory
air humidifier is hot and touching it can cause burns.
Allow the element to cool down completely.
Avoid touching the element.
Requirement The respiratory air humidifier is removed from the therapy device
(see "4.3.3 Removing the respiratory air humidifier after use",
page 38).
70 EN WM 100 TD
WM 67841c 03/2015
Page 71

7 Hygienic preparation
.
1. To open the respiratory air humidifier, grip the lower recess on
the rear of the housing and press the rear of the housing gently
with your thumb.
2. Remove the top of the humidifier.
3. Pour out any water remaining in the base of the humidifier.
4. Remove the humidifier insert from the top of the humidifier.
WM 67841c 03/2015
5. Carry out hygienic preparation of all parts of the respiratory air
humidifier as specified in the following table:
WM 100 TD EN 71
Page 72

7 Hygienic preparation
Part Cleaning Disinfection Sterilization
With warm water and washing-up liquid.
Base of the
humidifier
Recommendation: Clean the housing
components in the top rack of the
dishwasher every week (maximum 65°C).
If necessary: Descale (see "7.5.1 Descaling
Immersion disinfection
(Recommendation:
®
gigasept FF
) or boil out for
5minutes
the respiratory air humidifier", page 74)
Wipe-down disinfection
Top of the
humidifier
Wipe with a damp cloth: use water or mild
soap; do not use microfiber cloths
(Recommendation:
®
terralin
protect or perform
advanced Alcohol EP) or boil
out for 5 minutes
Not permitted
Humidifier
insert
With warm water and washing-up liquid.
Recommendation: Clean the humidifier
insert in the top rack of the dishwasher
every week (maximum 65°C).
Boil out for 5 minutes
If necessary: Descale (see "7.5.1 Descaling
the respiratory air humidifier", page 74)
Element
If necessary: Descale (see "7.5.1 Descaling
the respiratory air humidifier", page 74)
6. Rinse parts with clean water.
7. Dry the parts carefully with a soft cloth.
8. If necessary: fill the base of the humidifier with fresh water
(see " Filling the respiratory air humidifier", page 34).
9. Insert the humidifier insert into the top of the humidifier.
Immersion disinfection
(Recommendation:
®
gigasept FF
)
Spray disinfection
(Recommendation:
perform advanced)
or boil out for 5 minutes
72 EN WM 100 TD
WM 67841c 03/2015
Page 73

7 Hygienic preparation
10. Place the top of the humidifier on the base of the humidifier
from the back and press down gently until it clicks into place.
Result The respiratory air humidifier is hygienically prepared.
WM 67841c 03/2015
11. Ensure that the input and output of the humidifier insert fit
exactly in the openings on the top of the humidifier.
If necessary: Insert your fingers in the openings and make the
necessary adjustments.
12. Connect the respiratory air humidifier up to the therapy device
(see " Installing the respiratory air humidifier", page 37).
13. Perform a function check (see "8.3 Checking the respiratory air
humidifier", page 77).
WM 100 TD EN 73
Page 74

7 Hygienic preparation
7.5.1 Descaling the respiratory air humidifier
Requirement The respiratory air humidifier is removed from the therapy device
(see "4.3.3 Removing the respiratory air humidifier after use",
page 38).
1. To open the respiratory air humidifier, grip the lower recess on
the rear of the housing and press the rear of the housing gently
with your thumb.
2. Remove the top of the humidifier.
3. Remove the humidifier insert.
4. Pour 300 ml of pure household vinegar (5% solution without
additives) into the base of the humidifier.
5. Place the humidifier insert in a bowl with pure household
vinegar (5% solution without additives). The humidifier insert
must be completely covered with vinegar.
6. Allow the vinegar to work for 1 hour.
7. Rinse the base of the humidifier, the element, and the
humidifier insert off with clean water.
8. Dry the base of the humidifier, the element, and the humidifier
insert carefully.
Result The base of the humidifier, the element, and the humidifier insert
are descaled.
7.5.2 Replacing the seal on the element
Requirement • The respiratory air humidifier is removed from the therapy
device and emptied (see "4.3.3 Removing the respiratory air
humidifier after use", page 38).
• The element is cold.
74 EN WM 100 TD
WM 67841c 03/2015
Page 75

7 Hygienic preparation
1. Unscrew the element from the base of the humidifier.
2. Remove the sealing ring carefully with a screwdriver, without
damaging the groove.
3. Insert a new sealing ring in the groove on the element.
4. Screw the element back into the base of the humidifier.
5. Close the respiratory air humidifier.
Result The seal on the element has been replaced.
WM 67841c 03/2015
WM 100 TD EN 75
Page 76

8 Function check
8 Function check
8.1 Intervals
Carry out a function check at regular intervals:
• After each hygienic preparation
• After each repair
• At least every 6 months
8.2 Checking the therapy device
Requirement • The therapy device is disconnected from the patient.
• The therapy device is connected to the power supply.
• The therapy device is in Standby mode.
1. Check the therapy device for external damage.
If damaged: Do not use the therapy device.
2. Check the plug and cable for external damage.
If damaged: Contact the authorized dealer and have the parts
replaced.
3. Check that the components are connected to the therapy
device correctly in accordance with these instructions for use
(see "4.2 Connecting components", page 30).
4. Switch on the therapy device (see "5.2 Switching on the
therapy device", page 43).
5. If softSTART is activated: Press the softSTART button to
stop softSTART.
6. Close the opening on the respiratory mask (e.g., using the
elbow).
7. Press the info button .
8. Compare the pressure shown in the display with the prescribed
Result The function check is complete.
76 EN WM 100 TD
pressure.
If the pressure variance is > 1 hPa: Do not use the therapy
device and contact the authorized dealer.
WM 67841c 03/2015
Page 77

8 Function check
8.3 Checking the respiratory air
humidifier
Requirement • The therapy device is disconnected from the patient.
• The therapy device is connected to the power supply.
• The therapy device is in Standby mode.
1. Check the housing for cracks, damage, and severe soiling.
2. If there are cracks, damage, or soiling: Replace housing parts or
humidifier insert.
3. Fill the respiratory air humidifier up to the line with water (see
" Filling the respiratory air humidifier", page 34).
4. Check whether the respiratory air humidifier has any leaks.
5. If the respiratory air humidifier does have leaks: Replace the
damaged parts.
6. Pour out the water.
7. Fill the respiratory air humidifier with 200 ml of water.
8. Connect the respiratory air humidifier up to the therapy device
(see " Installing the respiratory air humidifier", page 37).
9. Switch on the respiratory air humidifier (see "5.8.1 Switching
on the respiratory air humidifier", page 51).
10. Set heating level 9 on the therapy device (see "5.8.3 Setting
the humidifier level", page 53).
11. Check whether the respiratory air humidifier is warming up.
If the respiratory air humidifier is not slightly warm after 10
minutes: Contact your authorized dealer.
12. If the respiratory air humidifier does not work properly or
shows signs of damage: Contact your authorized dealer.
Result The function check is complete.
WM 67841c 03/2015
WM 100 TD EN 77
Page 78

9 Alarms and error messages
9 Alarms and error messages
If you are not able to clear an error message with the aid of the
table below, you should have the device repaired by Weinmann or
your authorized dealer. To avoid serious damage, do not continue
using the device.
9.1 Alarms
Alarms can be categorized into three priority levels (low, medium,
high). This device only has low-priority alarms, which are indicated
by the symbol
9.1.1 Alarm messages
Alarm message Cause Remedy
Pressure build-up not possible!
Please connect the mask and
hose.
Severe leakage!
Please check the positioning of
the mask.
Apnea! Please check the
ventilation settings and the
course of the respiration hose.
Low tidal volume!
Please check the ventilation
settings and the course of the
respiration hose.
No respiration hose and/or mask
connected.
Mask has slipped or is not tight.
The respiratory volume output by
the device is lower than the
target value.
The respiratory volume output by
the device is lower than the
target value.
Connect the mask and respiration hose
correctly (see "4.2.2 Connecting up the
respiration hose", page 32).
Reposition mask. If the mask is faulty,
exchange it.
Check that the respiration hose is
neither blocked nor kinked. Reposition
the mask and breathe through it.
If the alarm continues to show: Have
the settings checked by the attending
physician.
Check that the respiration hose is
neither blocked nor kinked. Reposition
the mask and breathe through it.
If the alarm continues to show: Have
the settings checked by the attending
physician.
78 EN WM 100 TD
WM 67841c 03/2015
Page 79

9 Alarms and error messages
Alarm message Cause Remedy
Pressure build-up not possible!
Please connect the mask and
hose.
Low minute volume! Please
check the ventilation settings
and the course of the
respiration hose.
9.1.2 Muting the alarm
If an alarm sounds, you can mute the audible alarm for 2 minutes.
Requirement An alarm has been triggered.
1. Press the mute symbol .
Result The alarm is muted for 2 minutes. The symbol turns orange. After
2 minutes, the audible alarm sounds again.
.
No respiration hose and/or mask
connected.
The respiratory volume output by
the device is lower than the
target value.
Connect the mask and respiration hose
correctly (see "4.2.2 Connecting up the
respiration hose", page 32).
Check that the
respiration
hose is neither
blocked nor kinked. Reposition the mask
and breathe through it. If the alarm
continues to show: Have the settings
checked by the attending physician.
If your physician has activated this function, you can also
deactivate the Severe leakage alarm permanently (see "6.4
Setting device parameters", page 65).
9.1.3 Pausing the alarm
If an alarm sounds, you can pause the alarm for 2 minutes to
operate the device normally in the meantime.
Requirement The Apnea, Low minute volume, or Low tidal volume alarm
has been triggered.
1. Press the PAUSE field.
Result The alarm is paused for 2 minutes. The symbol appears in the
status line. After 2 minutes, the audible alarm sounds again.
.
If your physician has activated this function, you can also
deactivate the Severe leakage alarm permanently (see "6.3
Setting time parameters", page 64).
WM 67841c 03/2015
WM 100 TD EN 79
Page 80

9 Alarms and error messages
9.2 Faults in the therapy device
Fault Cause Remedy
Check that the power supply cable is
No running noise, no
information on the display.
It is not possible to start therapy
with a breath.
No power supply.
SD card defective.
The autoSTART-STOP function is
not active.
connected properly. Check the function
of the socket.
Remove the SD card (see 5.11.3, p. 60),
disconnect the device from the power
supply and switch it on again.
If the device can be switched on:
Replace SD card.
If the error persists: Contact your
authorized dealer.
Activate the autoSTART-STOP function
(see 6.1, p. 62).
The therapy device does not
switch off after approx. 5
seconds when the mask is
removed.
The softSTART cannot be
switched on.
The therapy device does not
reach the lower pressure limit.
The therapy does not start. The
display shows the message
Transferring...Please wait!
The autoSTART-STOP function
can be impaired by accessories
with a high level of resistance.
The softSTART function is locked.
Air filter is dirty.
Respiratory mask not tight.
The prisma2CLOUD module is
transferring data.
Contact your authorized dealer.
Ask the physician whether the function
can be enabled.
Clean the air filter. If necessary: Replace
filter (see "7 Hygienic preparation",
page 66).
Adjust the headband until the mask fits
tightly.
If necessary, replace the defective
mask.
Wait until the data transfer is complete
or disconnect the prisma2CLOUD
module from the therapy device and
contact the authorized dealer.
80 EN WM 100 TD
WM 67841c 03/2015
Page 81

9 Alarms and error messages
9.3 Faults in the respiratory air humidifier
Fault Cause Remedy
Set the humidifier level (see 5.8.3,
p.53).
Have therapy device repaired.
Insert the humidifier insert correctly
(see 7.5, p. 70).
Fill the respiratory air humidifier with
water (see , p. 34).
The respiratory air humidifier
is not heating up.
Respiratory air humidifier is
leaking.
Respiratory air humidifier
switches off.
Humidifier level switched off
The respiratory air humidifier is
defective
The seal on the element is defective. Replace the seal (see 7.5.2, p. 74).
The humidifier insert is not inserted
correctly.
The humidifier insert is defective. Replace the humidifier insert.
Cracks in the base of the humidifier Replace the base of the humidifier.
No water in the respiratory air
humidifier.
9.4 Display messages
If the message Error (xxx): Please follow the instructions in
the Instructions for use appears on the display, locate the
displayed error code in the table. Rectify the error as described.
Error code Cause Remedy
(108)
(204)
(205)
The therapy device does not
display the set time.
The respiratory air
humidifier is not working
correctly.
The power supply voltage is
not within the permitted
range.
Contact the authorized dealer and have the device repaired.
Remove the respiratory air humidifier from the therapy device
and connect it again (see 4.3.3, p. 38).
If the message is still shown, contact the authorized dealer
and have the device and the respiratory air humidifier
checked.
Check whether the correct power supply unit is connected
(WM 29657).
device and power supply unit checked and repaired.
Contact the authorized dealer and have the
WM 67841c 03/2015
WM 100 TD EN 81
Page 82

9 Alarms and error messages
Error code Cause Remedy
Remove and reconnect the prismaCONNECT module. If the
fault persists:
prismaCONNECT module replaced.
(206)
Error in the
prismaCONNECT module.
Ensure that the respiration hose and device output are not
blocked.
If the fault persists:
• Check whether there is water in the device. To do so,
remove the respiratory air humidifier and side part and
(702)
Device output is blocked. /
Water in therapy device.
tilt the device with the open side facing downward.
• If water comes out: Wait until all the water has escaped.
• Allow the device to dry until the message is no longer
displayed. In future, do not transport the device with
water in the respiratory air humidifier.
• If water collects in the respiration hose: Reduce the
humidifier level to avoid condensation.
Disconnect the therapy device from the power supply and
All other error
codes
Problems with the
electronics
reconnect it (see 4.2.1, p. 30).
If the message is still shown, contact the authorized dealer
and have the device and the respiratory air humidifier
checked.
Contact the authorized dealer and have the
82 EN WM 100 TD
WM 67841c 03/2015
Page 83

10 Maintenance
The therapy device is designed to have a useful service life of 6
years.
If the therapy device is used as intended in accordance with the
instructions for use, it does not require any maintenance within
this period.
If the therapy device is used beyond this period, we recommend
having it checked by an authorized dealer.
If the respiratory air humidifier is used as intended in accordance
with these instructions for use, it does not require any
maintenance.
If used and cleaned daily, the respiratory air humidifier can be used
for > 6 months.
10 Maintenance
If you identify faulty parts during the function check (see "8
Function check", page 76), contact your authorized dealer.
WM 67841c 03/2015
WM 100 TD EN 83
Page 84

11 Storage and disposal
11 Storage and disposal
11.1 Storage
11.1.1 General information
Store the device under the prescribed ambient conditions (see
"12.1 Technical data", page 85).
11.1.2 Storing the therapy device
1. Switch off the therapy device (see "5.3 Switching off the
therapy device", page 46).
2. Disconnect the therapy device from the power supply.
3. Clean the therapy device, components, and accessories (see "7
Hygienic preparation", page 66).
4. Store the therapy device, components, and accessories in a dry
place.
Result The therapy device, components, and accessories are stored in a
dry place.
11.2 Disposal
11.2.1 Electronic waste
Do not dispose of the product in the household waste. Consult an
authorized, certified electronic waste recycling company for proper
disposal. You can find out their address from your environmental
officer or from your local council.
The device packaging (cardboard box and inserts) can be disposed
of as waste paper.
84 EN WM 100 TD
WM 67841c 03/2015
Page 85

12 Appendix
12.1 Technical data
12.1.1 Technical data on therapy device
Specification Therapy device
Product class according to 93/42/EEC IIa
Dimensions W x H x D in cm 17 x 13.5 x 18
Weight 1.4 kg
Temperature range
- Operation
- Storage
Permissible humidity during operation and
storage
Air pressure range
Connection diameter of respiration hose in mm 19.5 (to fit standard cone)
Electrical power Max. 40 VA
System interface
Rel. humidity 15% to 93%, non-condensing
700 hPa to 1060 hPa, corresponds to a height of 3000 m
+5°C to +40°C
-25°C to +70°C
above sea level
12 V DC
Max. 10 VA
12 Appendix
Current consumption during operation (Therapy)
230 V
115 V
during standby mode (Standby)
230 V
115 V
Classification acc. to DIN EN 60601-1-11:
Protection class against elec. shock
Degree of protection against elec. shock
Protection against harmful ingress of water and
foreign bodies
Classification as per DIN EN 60601-1:
Operating mode
Applied part Respiratory mask
WM 67841c 03/2015
Continuous operation
0.11 A
0.22 A
0.036 A
0.019 A
Protection class II
Type BF
IP21
WM 100 TD EN 85
Page 86

12 Appendix
Specification Therapy device
Test parameters and limit values can be requested from the
Electromagnetic compatibility (EMC) as per DIN
EN 60601-1-2
Radio interference suppression
Radio interference immunity
manufacturer if required.
EN55011 B
IEC61000-4 Parts 2 to 6, Part 11, Part 8
IEC61000-3 Parts 2 and 3
Average sound pressure level in operation as
per ISO 80601-2-70
Average sound pressure level in operation as
per ISO 80601-2-70 with respiratory air
humidifier
Approx. 26.5 dB(A) at 10 hPa (corresponds to a sound
power level of 34.5 dB(A))
Approx. 27.5 dB(A) at 10 hPa (corresponds to a sound
power level of 35.5 dB(A))
Sound pressure level of alarm message At least 58 db(A)
All device types
Disconnection, severe leakage (optional)
Alarms (optional)
prisma30ST, prisma30ST-C, prismaLAB
Apnea, low minute volume, low tidal volume
Alarm output Optical and acoustic
CPAP operating pressure range 4 hPa to 20 hPa
AcSV pressure range 4 hPa to 30 hPa
BiLevel pressure range 4 hPa to 30 hPa
Pressure accuracy
P Lim
(maximum pressure in case of error) < 40 hPa
max
< 20 hPa: ± 0.6 hPa
≥ 20 hPa: ± 0.8 hPa
It is not possible to set a target volume for the AcSV mode.
Target volume in AcSV mode
The pressure control always stabilizes the volume at the
respective current level.
The automatic backup frequency is continuously adapted
Automatic backup frequency in AcSV and
autoS/T mode
between 10 bpm and 20 bpm, depending on the filtered
spontaneous rate and the relative respiratory minute
volume of the patient.
prisma25S-C
- Inspiratory positive airway pressure (IPAP)
- Expiratory positive airway pressure (EPAP)
- Relative inspiration duration Ti/Tset
- Trigger
- Pressure rise rate
- Available modes
4 hPa to 25 hPa
4 hPa to 25 hPa
20% to 67%
Auto, can be set to 3 levels
Can be set to 3 levels
CPAP, S
86 EN WM 100 TD
WM 67841c 03/2015
Page 87

Specification Therapy device
prisma25S
- Inspiratory positive airway pressure (IPAP)
- Expiratory positive airway pressure (EPAP)
- Relative inspiration duration Ti/Tset
- Trigger
Auto, can be set to 3 levels
- Pressure rise rate
- Available modes
prisma25ST
- Inspiratory positive airway pressure (IPAP)
- Expiratory positive airway pressure (EPAP)
- Relative inspiration duration Ti/Tset
- Trigger
Auto, can be set to 3 levels
- Pressure rise rate
- Backup frequency
- Available modes
CPAP, APAP, S, autoS, autoS/T, S/T, T
prisma30ST
- Inspiratory positive airway pressure (IPAP)
- Expiratory positive airway pressure (EPAP)
- Relative inspiration duration Ti/Tset
- Ti
- Trigger inspiration
- Trigger expiration
Auto, can be set to 3 levels
Auto, can be set to 3 levels
- Pressure rise rate
- Pressure drop rate
- Backup frequency
- Target volume
- Pressure adjustment
- Available modes
CPAP, APAP, autoS/T, S, S/T, T, aPCV
prisma30ST-C
- Inspiratory positive airway pressure (IPAP)
- Expiratory positive airway pressure (EPAP)
- Relative inspiration duration Ti/Tset
- Ti
- Trigger inspiration
- Trigger expiration
Auto, can be set to 3 levels
Auto, can be set to 3 levels
- Pressure rise rate
- Backup frequency
- Available modes
12 Appendix
4 hPa to 25 hPa
4 hPa to 25 hPa
20% to 67%
Can be set to 3 levels
CPAP, APAP, S, autoS
4 hPa to 25 hPa
4 hPa to 25 hPa
20% to 67%
Can be set to 3 levels
Auto, 0 bpm to 35 bpm
4 hPa to 30 hPa
4 hPa to 25 hPa
20% to 67%
500 ms to 4000 ms
Can be set to 4 levels
Can be set to 3 levels
Auto, 0 bpm to 35 bpm
300 ml to 2000 ml
Can be set to 3 levels
4 hPa to 30 hPa
4 hPa to 25 hPa
20% to 67%
500 ms to 4000 ms
Can be set to 4 levels
0 bpm to 35 bpm
CPAP, S, S/T, T, aPCV
WM 67841c 03/2015
WM 100 TD EN 87
Page 88

12 Appendix
Specification Therapy device
Peak flow as per ISO 80601-2-70
Pressure measured at the
patient connection opening
with a flow of 40 l/min
CPAP and APAP mode
Test pressures:
4hPa
8hPa
12 hPa
16 hPa
20 hPa
4.0 hPa
8.0 hPa
11.9 hPa
15.9 hPa
19.9 hPa
AcSV mode, BiLevel
Test pressures:
4hPa
10.5 hPa
17 hPa
23.5 hPa
25 hPa
30.0 hPa
4.0 hPa
10.4 hPa
17.0 hPa
23.5 hPa
25 hPa
30.0 hPa
Warming of respiratory air Max. +3°C
Stability of the dynamic pressure (short-term
accuracy) for 10 breaths/min as per ISO 175101:2007 when using the 19 mm hose.
7hPa
10 hPa
13.5 hPa
20 hPa
Average flow at the patient
connection opening
235 l/min
230 l/min
220 l/min
215 l/min
210 l/min
235 l/min
225 l/min
215 l/min
200 l/min
195 l/min
190 l/min
Δp<0.24 hPa
Δp<0.28 hPa
Δp<0.3 hPa
Δp<0.4 hPa
Stability of the dynamic pressure (short-term
accuracy) for 15 breaths/min as per ISO 175101:2007 when using the 19 mm hose.
7hPa
10 hPa
13.5 hPa
20 hPa
Stability of the dynamic pressure (short-term
accuracy) for 20 breaths/min as per ISO 175101:2007 when using the 19 mm hose.
7hPa
10 hPa
13.5 hPa
20 hPa
88 EN WM 100 TD
Δp<0.24 hPa
Δp<0.32 hPa
Δp<0.4 hPa
Δp<0.48 hPa
Δp<0.4 hPa
Δp<0.32 hPa
Δp<0.46 hPa
Δp<0.56 hPa
WM 67841c 03/2015
Page 89

Specification Therapy device
Stability of the dynamic pressure (short-term
accuracy) as per ISO 80601-2-70 in CPAP and
APAP mode
- when using the 19 mm hose
4hPa
8hPa
12 hPa
16 hPa
20 hPa
- when using the 15 mm hose, bacteria filter,
and oxygen safety valve
4hPa
8hPa
12 hPa
16 hPa
20 hPa
Stability of the dynamic pressure (short-term
accuracy) as per ISO 80601-2-70 in modes
with 2 pressure levels
At 10 bpm inspiratory
At 15 bpm inspiratory
At 20 bpm inspiratory
At 10 bpm expiratory
At 15 bpm expiratory
At 20 bpm expiratory
12 Appendix
Δp<0.68 hPa
Δp<0.58 hPa
Δp<0.52 hPa
Δp<0.44 hPa
Δp<0.64 hPa
Δp<1.06 hPa
Δp<1hPa
Δp<1.08 hPa
Δp<1.02 hPa
Δp<0.96 hPa
Δp=0.8hPa
Δp= 1.4hPa
Δp= 2.4hPa
Δp= 0.6hPa
Δp= 0.6hPa
Δp= 0.6hPa
Stability of the static pressure (long-term
accuracy) as per ISO 80601-2-70
- when using the 19 mm hose
Δp = 0.15 hPa
- when using the 15 mm hose, bacteria filter,
and oxygen safety valve
Δp = 0.19 hPa
Pressure drop via the oxygen valve
at 90 l/min
at 60 l/min
at 30 l/min
Recommended maximum additional oxygen
flow
Accuracy of volume measurement at 20°C ±20%
WM 67841c 03/2015
0.5 hPa
0.25 hPa
0hPa
15 l/min
WM 100 TD EN 89
Page 90

12 Appendix
Specification Therapy device
• Target volume that can be set:
In the "slow" level, the device checks after every
8 breaths if the target volume has been reached and
changes the pressure by 0.5 hPa. If the pressure
reaches a corridor around the target volume, the
device switches to exact regulation.
In the "medium" level, the device checks after every
5 breaths if the target volume has been reached and
changes the pressure by 1.0 hPa. If the pressure
reaches a corridor around the target volume, the
device switches to exact regulation.
In the "fast" level, the device checks after every breath
if the target volume has been reached and changes the
pressure by 1.5 hPa. If the pressure reaches a corridor
Filter and smoothing techniques
around the target volume, the device switches to exact
regulation.
•Alarms:
The "low minute volume" and "low tidal volume"
alarms are triggered if at least three of the last five
breaths were below the alarm limit. The alarms are
reset automatically as soon as the corresponding
alarm limit is exceeded again with at least three of the
five breaths.
If a target volume is activated, the "low tidal volume"
alarm is only triggered once IPAPmax or PDIFFmax has
also been attained.
The "Apnea" alarm is triggered if apnea is identified
which is longer than the set alarm limit. The alarm is
reset automatically as soon as the end of the apnea is
identified.
Pollen filter
up to 1 μm
up to 0.3 μm
Filter class E10
≥ 99.5%
≥ 85 %
Service life of pollen filter Approx. 250 hours
SD card
Memory sizes of 256 MB to 8 GB can be used, interface
compatible with SD physical layer version 2.0
90 EN WM 100 TD
WM 67841c 03/2015
Page 91

12 Appendix
Tolerances for measurements
Pressure: ± 0.75% of measurement or ± 0.1 hPa
Flow: ± 4 l/min
Temperature: ± 1.5°C
Sound pressure level and
sound power level
The right to make design modifications is reserved.
All flow and volume values are determined under STPD conditions.
All the parts of the therapy device are free from latex.
The WM 100 TD therapy devices use the following open source
software: FreeRTOS.org
This device’s software contains code which is subject to the GPL.
You will receive the source code and the GPL upon request.
± 2dB(A)
12.1.2 Technical data on power supply unit
Specification Power supply unit
Maximum output 90 W
Input voltage 100 V - 240 V
Frequency 50 Hz - 60 Hz
Input voltage for use in airplanes 115 V
Frequency for use in airplanes 400 Hz
12.1.3 Technical data on respiratory air humidifier
Specification prismaAQUA
Product class according to 93/42/EEC IIa
Dimensions W x H x D in cm 14 x 13.5 x 18
Weight (without water) 0.6 kg
Temperature range
Operation
Storage
Permissible humidity during operation and storage 15% to 93%, non-condensing
Air pressure range
Electrical power
WM 67841c 03/2015
700 hPa to 1060 hPa, corresponds to a height of
3000 m above sea level
Max. 30 VA (only in combination with the
permitted device)
+5°C to +37°C
-25°C to +70°C
WM 100 TD EN 91
Page 92

12 Appendix
Specification prismaAQUA
Classification acc. to DIN EN 60601-1-11:
Type of protection against elec. shock
Degree of protection against elec. shock
Protection against harmful ingress of water and foreign
Protection class II
Type BF
IP22
bodies
Classification as per DIN EN 60601-1:
Operating mode
Electromagnetic compatibility (EMC)
acc. to DIN EN 60601-1-2
Test parameters and limit values can be requested
from the manufacturer if required.
Continuous operation
EN 55011 B
Radio interference suppression
Radio interference immunity
IEC 61000-4 Parts 2 to 6, Part 11, Part 8
IEC 61000-3 Parts 2 and 3
Warming of respiratory air Max. +3°C
Respiratory air humidifier system output acc. to DIN EN
ISO 8185
Min. 19.89 mg H
O/l air
2
Maximum filling volume 400 ml
Pressure drop The pressure drop across the device combination
of WM 100 TD therapy device and WM 100 TH
respiratory air humidifier does not increase.
Maximum flow 248 l/min
Maximum permitted operating pressure 40 hPa
Gas leakage at max. operating pressure 0.0 l/min
92 EN WM 100 TD
WM 67841c 03/2015
Page 93

12.2 Pressure volume curve
Air filter
Inlet for
ambi ent ai r
Fan
Optional
humi difier
Pressure sensor
for patient
pres sure
Optional O
2
safety valve
Optional
bacteria filter
Res pirati on
hose ,
1.8m
Exhal atio n
system
Patient mask
Nasal or
full face mask
O2 pres sure
sour ce
Flow regulator
pV curve at AV=0.5 l and f=20/min
0.5
0.4
0.3
[l]
0.2
Volume
0.1
12 Appendix
0
0.00 5.00 10.00 15.00 20.00
Pressure [hPa]
12.3 Pneumatic system diagram
WM 67841c 03/2015
WM 100 TD EN 93
Page 94

12 Appendix
Recommended separation distances between portable and mobile RF
12.4 Separation distances
telecommunication devices (e.g., cell phones) and the device
Rated
maximum
output power
of the RF
device in W
0.01 0.04 0.12 0.12 0.23
0.1 0.11 0.38 0.38 0.73
1 0.35 1.20 1.20 2.30
10 1.10 3.80 3.80 7.27
100 3.50 12.00 12.00 23.00
Separation distance according to frequency of transmitter in m
150 kHz-80 MHz
outside the ISM
bands
150 kHz-80 MHz
in the ISM bands
80 MHz-800 MHz 800 MHz-2.5 GHz
12.5 Scope of supply
12.5.1 Standard scope of supply
The XXXX in the second part of the article number stands for the
accessory items, which are available in different versions (e.g.,
transport bag, respiration hose) and can be combined in different
ways. A current list of the products included in delivery can be
found on the Internet at www.weinmann.de or requested from
your authorized dealer. Not all device versions and delivery
contents are available in all countries.
prisma20C, complete WM 29630-XXXX
Part Article number
Basic device prisma20C, WM 100 TD WM 29935
Respiration hose WM 24445
Power supply unit WM 29657
Power supply cable WM 24133
Set, 2 air filters WM 29928
Transport bag WM 29659
SD card WM 29794
94 EN WM 100 TD
WM 67841c 03/2015
Page 95

12 Appendix
Part Article number
Protective wallet for SD card WM 29779
Instructions for use WM 67841
Patient compass WM 67871
prisma20A, complete WM 29600-XXXX
Part Article number
Basic device prisma20A, WM 100 TD WM 29605
Respiration hose WM 24445
Power supply unit WM 29657
Power supply cable WM 24133
Set, 2 air filters WM 29928
Transport bag WM 29659
SD card WM 29794
Protective wallet for SD card WM 29779
Instructions for use WM 67841
Patient compass WM 67871
prismaCR, complete WM 29960-XXXXX
Part Article number
Basic device prismaCR, WM 100 TD WM 29965
Respiration hose WM 24445
Power supply unit WM 29657
Power supply cable WM 24133
Set, 2 air filters WM 29928
Transport bag WM 29977
SD card WM 29794
Protective wallet for SD card WM 29779
Instructions for use WM 67841
Patient compass WM 67871
WM 67841c 03/2015
WM 100 TD EN 95
Page 96

12 Appendix
prisma25ST, complete WM 29920-XXXX
Part Article number
Basic device prisma25ST, WM 100 TD WM 29925
Respiration hose WM 24445
Power supply unit WM 29657
Power supply cable WM 24133
Set, 2 air filters WM 29928
Transport bag WM 29659
SD card WM 29794
Protective wallet for SD card WM 29779
Instructions for use WM 67841
Patient compass WM 67871
prisma25S, complete WM 29900-XXXX
Part Article number
Basic device prisma25S, WM 100 TD WM 29905
Respiration hose WM 24445
Power supply unit WM 29657
Power supply cable WM 24133
Set, 2 air filters WM 29928
Transport bag WM 29659
SD card WM 29794
Protective wallet for SD card WM 29779
Instructions for use WM 67841
Patient compass WM 67871
prisma25S-C, complete WM 29910-XXXX
Part Article number
Basic device prisma25S-C, WM 100 TD WM 29906
Respiration hose WM 24445
Power supply unit WM 29657
Power supply cable WM 24133
Set, 2 air filters WM 29928
96 EN WM 100 TD
WM 67841c 03/2015
Page 97

12 Appendix
Part Article number
Transport bag WM 29659
SD card WM 29794
Protective wallet for SD card WM 29779
Instructions for use WM 67841
Patient compass WM 67871
prisma30ST-C, complete WM 29940-XXXX
Part Article number
Basic device prisma30ST-C, WM 100 TD WM 29942
Respiration hose WM 24445
Power supply unit WM 29657
Power supply cable WM 24133
Set, 2 air filters WM 29928
Transport bag WM 29659
SD card WM 29794
Protective wallet for SD card WM 29779
Instructions for use WM 67841
Patient compass WM 67871
prisma30ST, complete WM 29930-XXXX
Part Article number
Basic device prisma30ST, WM 100 TD WM 29936
Respiration hose WM 24445
Power supply unit WM 29657
Power supply cable WM 24133
Set, 2 air filters WM 29928
Transport bag WM 29977
SD card WM 29794
WM 67841c 03/2015
Protective wallet for SD card WM 29779
Instructions for use WM 67841
Patient compass WM 67871
WM 100 TD EN 97
Page 98
12 Appendix
prismaLAB, complete WM 29980-XXXX
Part Article number
Basic device prismaLAB, WM 100 TD WM 29985
Respiration hose, autoclavable WM 24667
Power supply unit WM 29657
Power supply cable WM 24133
prismaCONNECT WM 29670
Set, 2 air filters WM 29928
Transport bag WM 29659
SD card WM 29794
Protective wallet for SD card WM 29779
Instructions for use WM 67841
Additional information for experts WM 67901
prismaAQUA WM 29680
12.5.2 Accessories
Accessories can be ordered separately, if required. A current list of
accessories is available on the Internet at www.weinmann.de or
from your authorized dealer.
12.5.3 Spare parts
Replacement parts can be ordered separately, if required. A current
list of accessories is available on the Internet at www.weinmann.de
or from your authorized dealer.
98 EN WM 100 TD
WM 67841c 03/2015
Page 99

12.6 Warranty
Starting from the date of purchase, Weinmann offers the customer
a limited manufacturer’s warranty on a new original Weinmann
product or replacement parts installed by Weinmann in accordance
with applicable warranty terms and conditions for the particular
product and the warranty periods listed below. The warranty
conditions can be downloaded from www.weinmann.de on the
Internet. We can also send you the warranty conditions on request.
In the event of a claim under warranty, please contact your
specialist dealer.
Product Period of guarantee
Weinmann devices, incl. accessories
(excluding: masks), for sleep diagnostics,
home ventilation, oxygen therapy, and
emergency medicine
12 Appendix
2years
Masks, incl. accessories, batteries (unless
otherwise stated in the technical
documentation), sensors, hose systems
Disposable products None
6months
12.7 Declaration of conformity
Weinmann Geräte für Medizin GmbH + Co. KG, Kronsaalsweg 40,
22525 Hamburg, Germany, the manufacturer of the therapy
devices described in these instructions for use, hereby declares that
the product complies with the relevant regulations of Directive 93/
42/EEC governing medical devices.
The complete text of the Declaration of Conformity is available
from the manufacturer, Weinmann (www.weinmann.de).
WM 67841c 03/2015
WM 100 TD EN 99
Page 100

WM 67841c 03/2015 EN
Weinmann
Geräte für Medizin GmbH + Co. KG
P.O.Box 540268 22502 Hamburg
Kronsaalsweg 40 22525 Hamburg
T: +49-(0)40-5 47 02-0
F: +49-(0)40-5 47 02-461
E: info@weinmann-medical.com
www.weinmann-medical.com
medical technology
made in germany
 Loading...