


VTech VT 9111, VT 9115 User Manual

VTECH
BASE UNIT
TELEPHONE LINE
CORD
HANDSET
AC ADAPTER
WALL MOUNT BRACKET
BATTERY PACK
USER’S MANUAL
VT 9111/VT 9115VT 9111/VT 9115
VT 9111/VT 9115
900MHz ANALOG CORDLESS TELEPHONE900MHz ANALOG CORDLESS TELEPHONE
900MHz ANALOG CORDLESS TELEPHONE
900MHz ANALOG CORDLESS TELEPHONE900MHz ANALOG CORDLESS TELEPHONE
INTRODUCTION
Parts Check List:
1. Handset
2. Base Unit
3. Telephone line cord
4. AC adapter
5. Battery Pack
6. Wall mounting bracket
BEFORE USING YOUR NEW PHONE, WE
STRONGLY RECOMMEND YOU READ THIS
Copyright 1998 for VTECH COMMUNICATIONS LTD.
IMPORTANT SAFETY INSTRUCTIONS
When using your telephone equipment, basic
safety precautions should always be followed
to reduce the risk of fire, electric shock and
injury to persons, including the following:
1. Read and understand all instructions.
2. Follow all warnings and instructions marked
on the product.
3. Unplug this product from the wall outlet
before cleaning. Do not use liquid cleaners
or aerosol cleaners. Use a damp cloth for
cleaning.
4. Do not use this product near water (for
example, near a bath tub, kitchen sink, or
swimming pool).
5. Do not place this product on an unstable
cart, stand, or table. The product may fall,
causing serious damage to the product.
6. Slots and openings in the cabinet and the
back or bottom are provided for ventilation.
To protect it from overheating, these
openings must not be blocked by placing
the product on the bed, sofa, rug, or other
similar surface. This product should never
be placed near or over a radiator or heat
register. This product should not be placed
in a built-in-installation where proper
ventilation is not provided.
7. This product should be operated only from
the type of power source indicated on the
marking label. If you are not sure of the type
of power supply to your home, consult your
dealer or local power company.
8. Do not allow anything to rest on the power
cord. Do not locate this product where the
cord will be abused by persons walking on
it.
9. Never push objects of any kind into this
product through cabinet slots as they may
touch dangerous voltage points or short out
parts that could result in a risk of fire or
electric shock. Never spill liquid of any kind
on the product.
IMPORTANT
MANUAL THOROUGHLY.
VTECH COMMUNICATIONS L TD.
Printed in China. ISSUE 0
91-5017-32-00
10.T o reduce the risk of electric shock, do not
disassemble this product. If service or
repair work is required, contact VTech
Customer Service at 1-800-595-9511.
Opening or removing cabinet parts other
than specified access doors may expose
you to dangerous voltages or other risks.
Incorrect reassembling can cause electric
shock when the appliance is subsequently
used.
11.Do not overload wall outlets and extension
cords as this can result in the risk of fire or
electric shock.
12.Unplug this product from the wall outlet:
a) When the power supply cord or plug
is damaged or frayed.
b) If liquid has been spilled into the
product.
c) If the product has been exposed to rain
or water.
d) If the product does not operate
normally by following the operating
instructions. Adjust only those controls
that are covered by the operating
instructions because improper
adjustment of other controls may result
in damage and will often require
extensive work to restore the product
to normal operation.
e) If the product has been dropped and
the cabinet has been damaged.
f) If the product exhibits a distinct change
in performance.
13. Avoid using a telephone (other than a
cordless type) during an electrical storm.
There may be a remote risk of electric
shock from lighting.
14. Do not use the telephone to report a gas
leak in the vicinity of the leak.
SAVE THESE INSTRUCTIONS
2
1
REPLACING THE HANDSET BATTERIES
1. Remove the battery case by pressing on
the ridged lines and sliding downward.
2. Discard the old battery pack. Don't put
the old battery pack in a trash compactor
or a fire - it could burst.
IMPORTANT:Do not dispose of this battery
3. Place the new battery pack in the battery
compartment. Make sure the metal
contacts on the underside of the battery
are aligned with charging contacts in
battery compartment.
4. Replace the battery cover by sliding it into
place.
5. The new battery pack must be charged
before using your telephone. Place the
handset in the cradle of the base unit to
allow it to charge for 24 hours. Maximum
battery life between charges is more than
7 hours of continuous talk time or 6 days
of standby.
in household garbage. For
information on recycling or
proper disposal, consult your
local solid waste collection or
disposal organization.
CAUTION: To reduce the Risk of Fire or
1. Use only VTECH battery.
2. Do not open or mutilate the battery.
3. Exercise care in handling batteries in
4. Do not dispose of the battery in a fire.
3
Injury to Persons, Read and
Follow these instructions:
Released electrolyte is corrosive and
may cause damage to the eyes or skin.
It may be toxic if swallowed.
order not to short the battery with
conducting materials such as rings,
bracelets, and keys. The battery or
conductor may overheat and cause
burns.
The cell may explode.
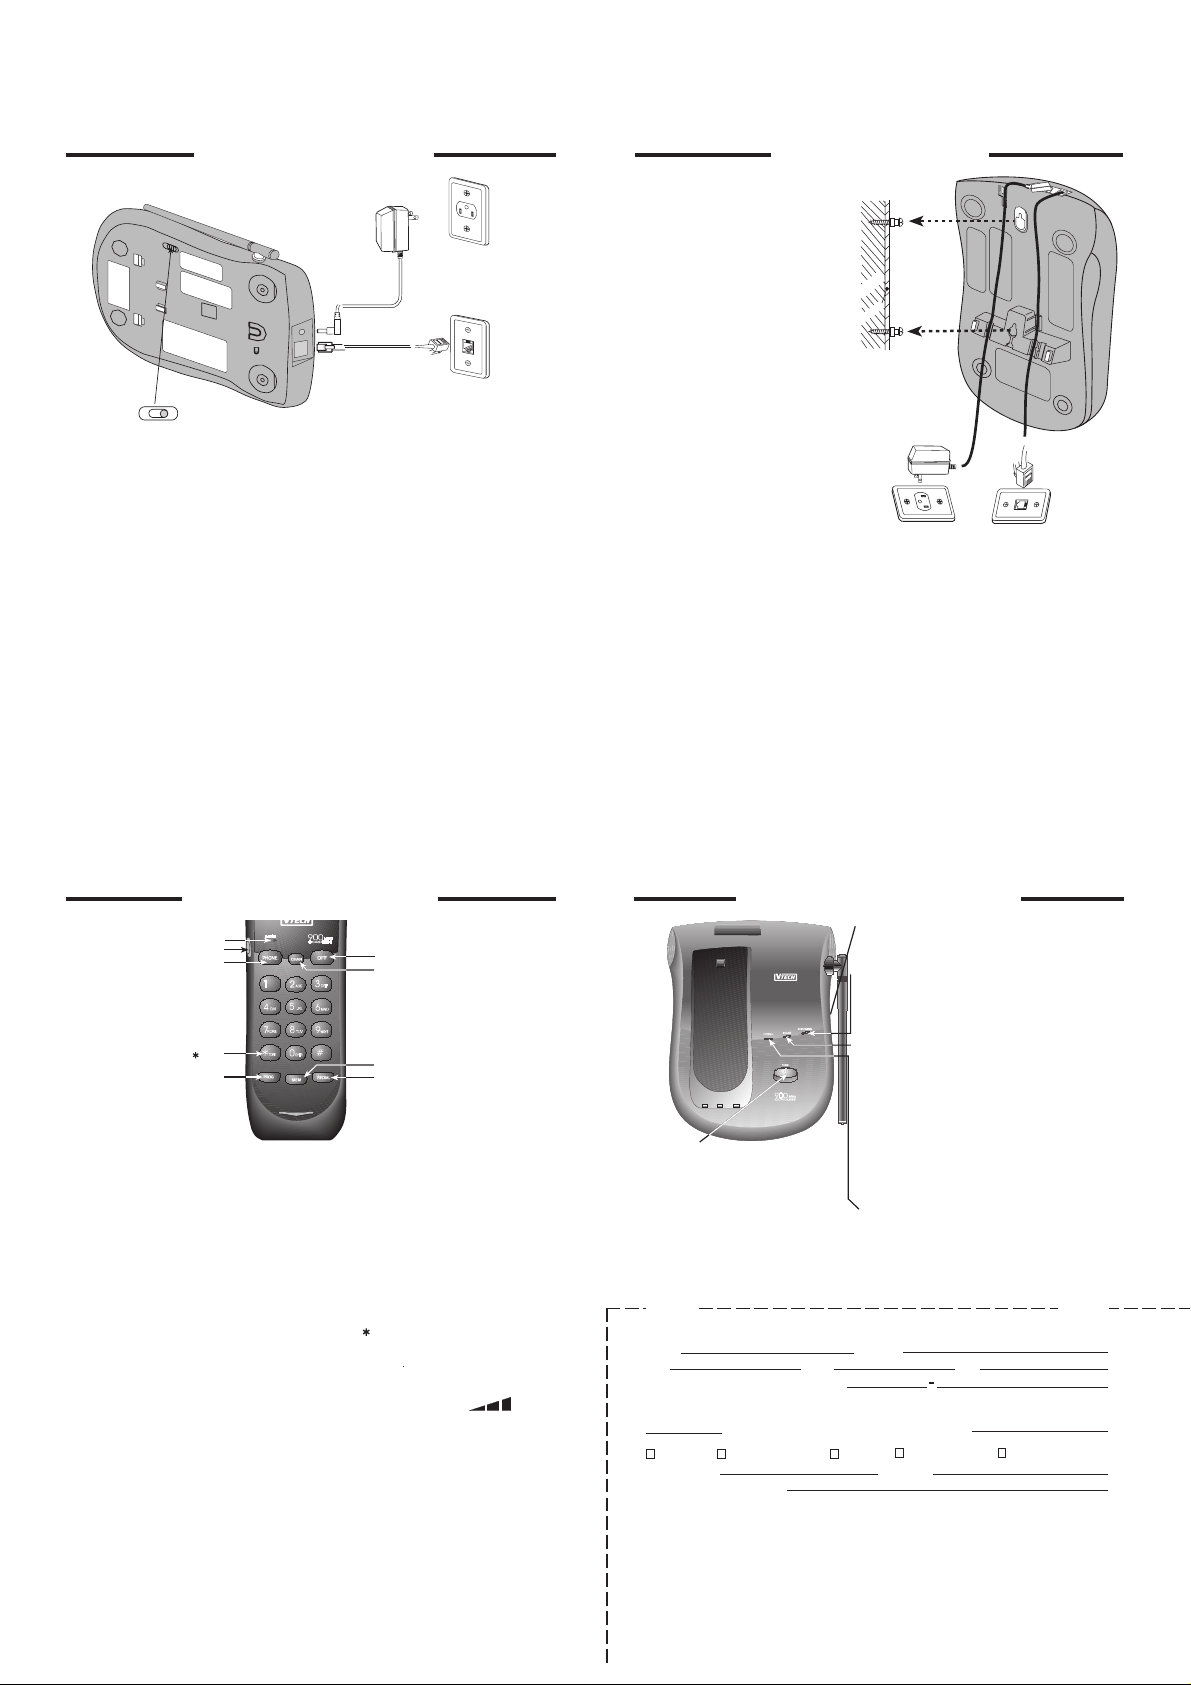
GETTING STARTED
wallboard
wooden
stud
TONE
PULSE
TONE
Setting Up Your
1. Choose an area near an electrical outlet
and a telephone wall jack.
2. Connect the telephone line cord. Insert
one end of the telephone line cord into
the jack at the rear of the base unit. Plug
the other end into a telephone wall jack.
Make sure the plugs snap securely into
place.
3. Plug the AC power adapter into an
electrical outlet and the DC connector to
the back of the base unit.
CAUTION:Use only the AC adapter shipped
with your VT 9111/VT 9115. This
is a Class 2 AC adapter,
specifically designed for use with
the VT 9111/VT 9115.
NOTE: Connect power to the base unit
before placing the handset in the
cradle.
4. Set the TONE/PULSE switch on the base
unit. If you have touch tone service on
your phone line, set the switch to TONE.
If you have rotary service, set the switch
to PULSE.
PULSE
VT 9111/VT 9115
AC ELECTRICAL
OUTLET
TELEPHONE
WALL JACK
5. CHARGE THE HANDSET BATTERIES
BEFORE USE. The batteries recharge
automatically whenever the handset is in
the base unit cradle. The batteries must
be charged for 24 hours before using
your phone for the first time.
6. CHECK FOR A DIAL TONE. After the
batteries are charged, pick up the
handset and press the PHONE key. The
IN USE indicator should light up, and you
should hear a dial tone. If not, see IN
CASE OF DIFFICULTY.
CAUTION:
1. Never install telephone wiring during a
lightning storm.
2. Never install telephone jacks in wet
locations unless the jack is specifically
designed for wet locations.
3. Never touch uninsulated telephone wires
or terminals unless the telephone line has
been disconnected at the network
interface.
4. Use caution when installing or modifying
telephone lines.
4
WALL MOUNTING
1.Choose a spot near an electrical outlet
and a telephone jack.Your phone
requires a modular telephone jack and
a standard electrical outlet (120V AC).
The power cord is six feet long; make
sure there is an electrical outlet within
reach of the base. The outlet should not
be controlled by a wall switch. If the
switch is ever turned off, the phone will
not operate.
2.Position the wall mount adapter on the
base. Line up the tabs on the wall mount
adapter with the holes on the bottom of
the base. Snap the wall mount adapter
firmly in place.
3.Mount the base on the wall. Position
the base so the mounting studs will fit
into the holes on the bottom of the base.
Position the power cord to extend down
the wall the phone is to be mounted on.
Slide the base down on the mounting
studs until it locks into place.
4.Connect the telephone cord. The
telephone line cord has a snap-in plug
at each end. Insert one of the plugs into
the jack on the bottom of the base. Insert
the other end of the plug into the wall
jack.
5.Connect the power cord. Plug the DC
connector into the DC jack at the rear of
the base unit. Plug the AC power adapter
into an electrical outlet.
6.Set the dial mode switch on the base
unit. If you have touch tone service on
your phone line, set the switch to TONE.
If you have rotary service, set the switch
to PULSE.
5
IN USE LED
VOLUME SWITCH
PHONE KEY
TONE/ KEY
PROG KEY
IN USE LED
* The IN USE LED lights when the phone
line is being used by the handset.
* It flashes in cadence with an incoming
ring.
* It flashes quickly during PROG mode.
PHONE KEY/ FLASH KEY
* Press the PHONE key to make a call.
* If you are currently on a call, pressing
PHONE flashes the line. This would be
used with a feature like call waiting to
answer your second call.
CHAN KEY
* Pressing the CHAN key when the
handset is in use will activate a channel
change to the next free channel.
* This is used if you are experiencing
noise or interface on the current channel.
OFF KEY
* Press the OFF key to exit all modes of
operation.
MEM KEY
* Press the MEM key to enter MEMORY
mode.
* The sequence for dialing out a speed
dial number in memory is: PHONE,
MEM, Number Button (0-9).
HANDSET FEATURES
OFF KEY
CHAN KEY
MEM KEY
REDIAL KEY
PROG KEY
* Press PROG key to enter PROGRAM
mode. See Programming Speed Dial
Numbers for more details.
REDIAL KEY
* When you hear the dial tone, pressing
the REDIAL key will dial out the last
number that was called on your phone.
* It can also be used to store the last
number dialed into the speed dial
memory. See Storing a Redial Number
into Speed Dial for details.
TONE/ KEY
* In PULSE dialing mode, this key is used
to switch to Temporary TONE dialing
mode.
VOLUME SWITCH
* 3 level of volume level( )
* Upper position of switch is high volume
level.
* Middle position is medium.
* Lower position is low.
BATTERY LOW WARNING BEEP
* The handset will make two beeps when
the handset battery is getting low and
needs to be recharged.
6
BASE UNIT FEATURES
TONE/PULSE SWITCH
* This switch will switch the phone between
TONE dialing and PULSE dialing.
CHARGING LED
* The CHARGE LED illuminates steadily when
the handset is in the base cradle to indicate
that the handset battery is being charged.
IN USE LED
* Immediately after placing the handset in the
base cradle, the IN USE LED flashes to indicate
that the initialization (assigning a new security
code and channel) is in progress
* The IN USE LED will stop flashing and go out
PAGE KEY
* Press the PAGE key to page the
handset.
* Press it a second time to cancel a
page.
* The base will ring the handset 4
times before ending the page
automatically.
* The handset can also cancel the
page by pressing the OFF key.
CUT
Name: Address:
City: State: Zip:
daytime phone Number: ( )
ORDER INFORMATION
For Model VT 9111/VT 9115
METHOD OF PAYMENT: DO NOT SEND CASH
CHECK MONEY ORDER VISA MASTERCARD AMERICAN EXPRESS
CREDIT CARD# EXP. DATE
CARD HOLDER’S SIGNATURE
REPLACEMENT BATTERY ORDER FORM
For VTECH 9111/9115 Cordless Telephone
(QTY.) Batteries @$19.95 each............................$
PLACE ORDER FORM AND PAYMENT IN ENVELOPE AND SEND TO:
BEAVERTON, OREGON 97008-7195 USA
YOU MAY ALSO ORDER BY PHONE. CALL 1-800-595-9511
when the initialization is complete.
* The IN USE LED illuminates whenever the
handset is being used.
* This LED also flashes with the cadence of the
incoming ring.
POWER LED
* The POWER LED illuminates when the base
power adapter is plugged in and power is
applied to the base unit.
7
VTECH COMMUNICATIONS
8770 SW NIMBUS AVENUE
CUT
 Loading...