

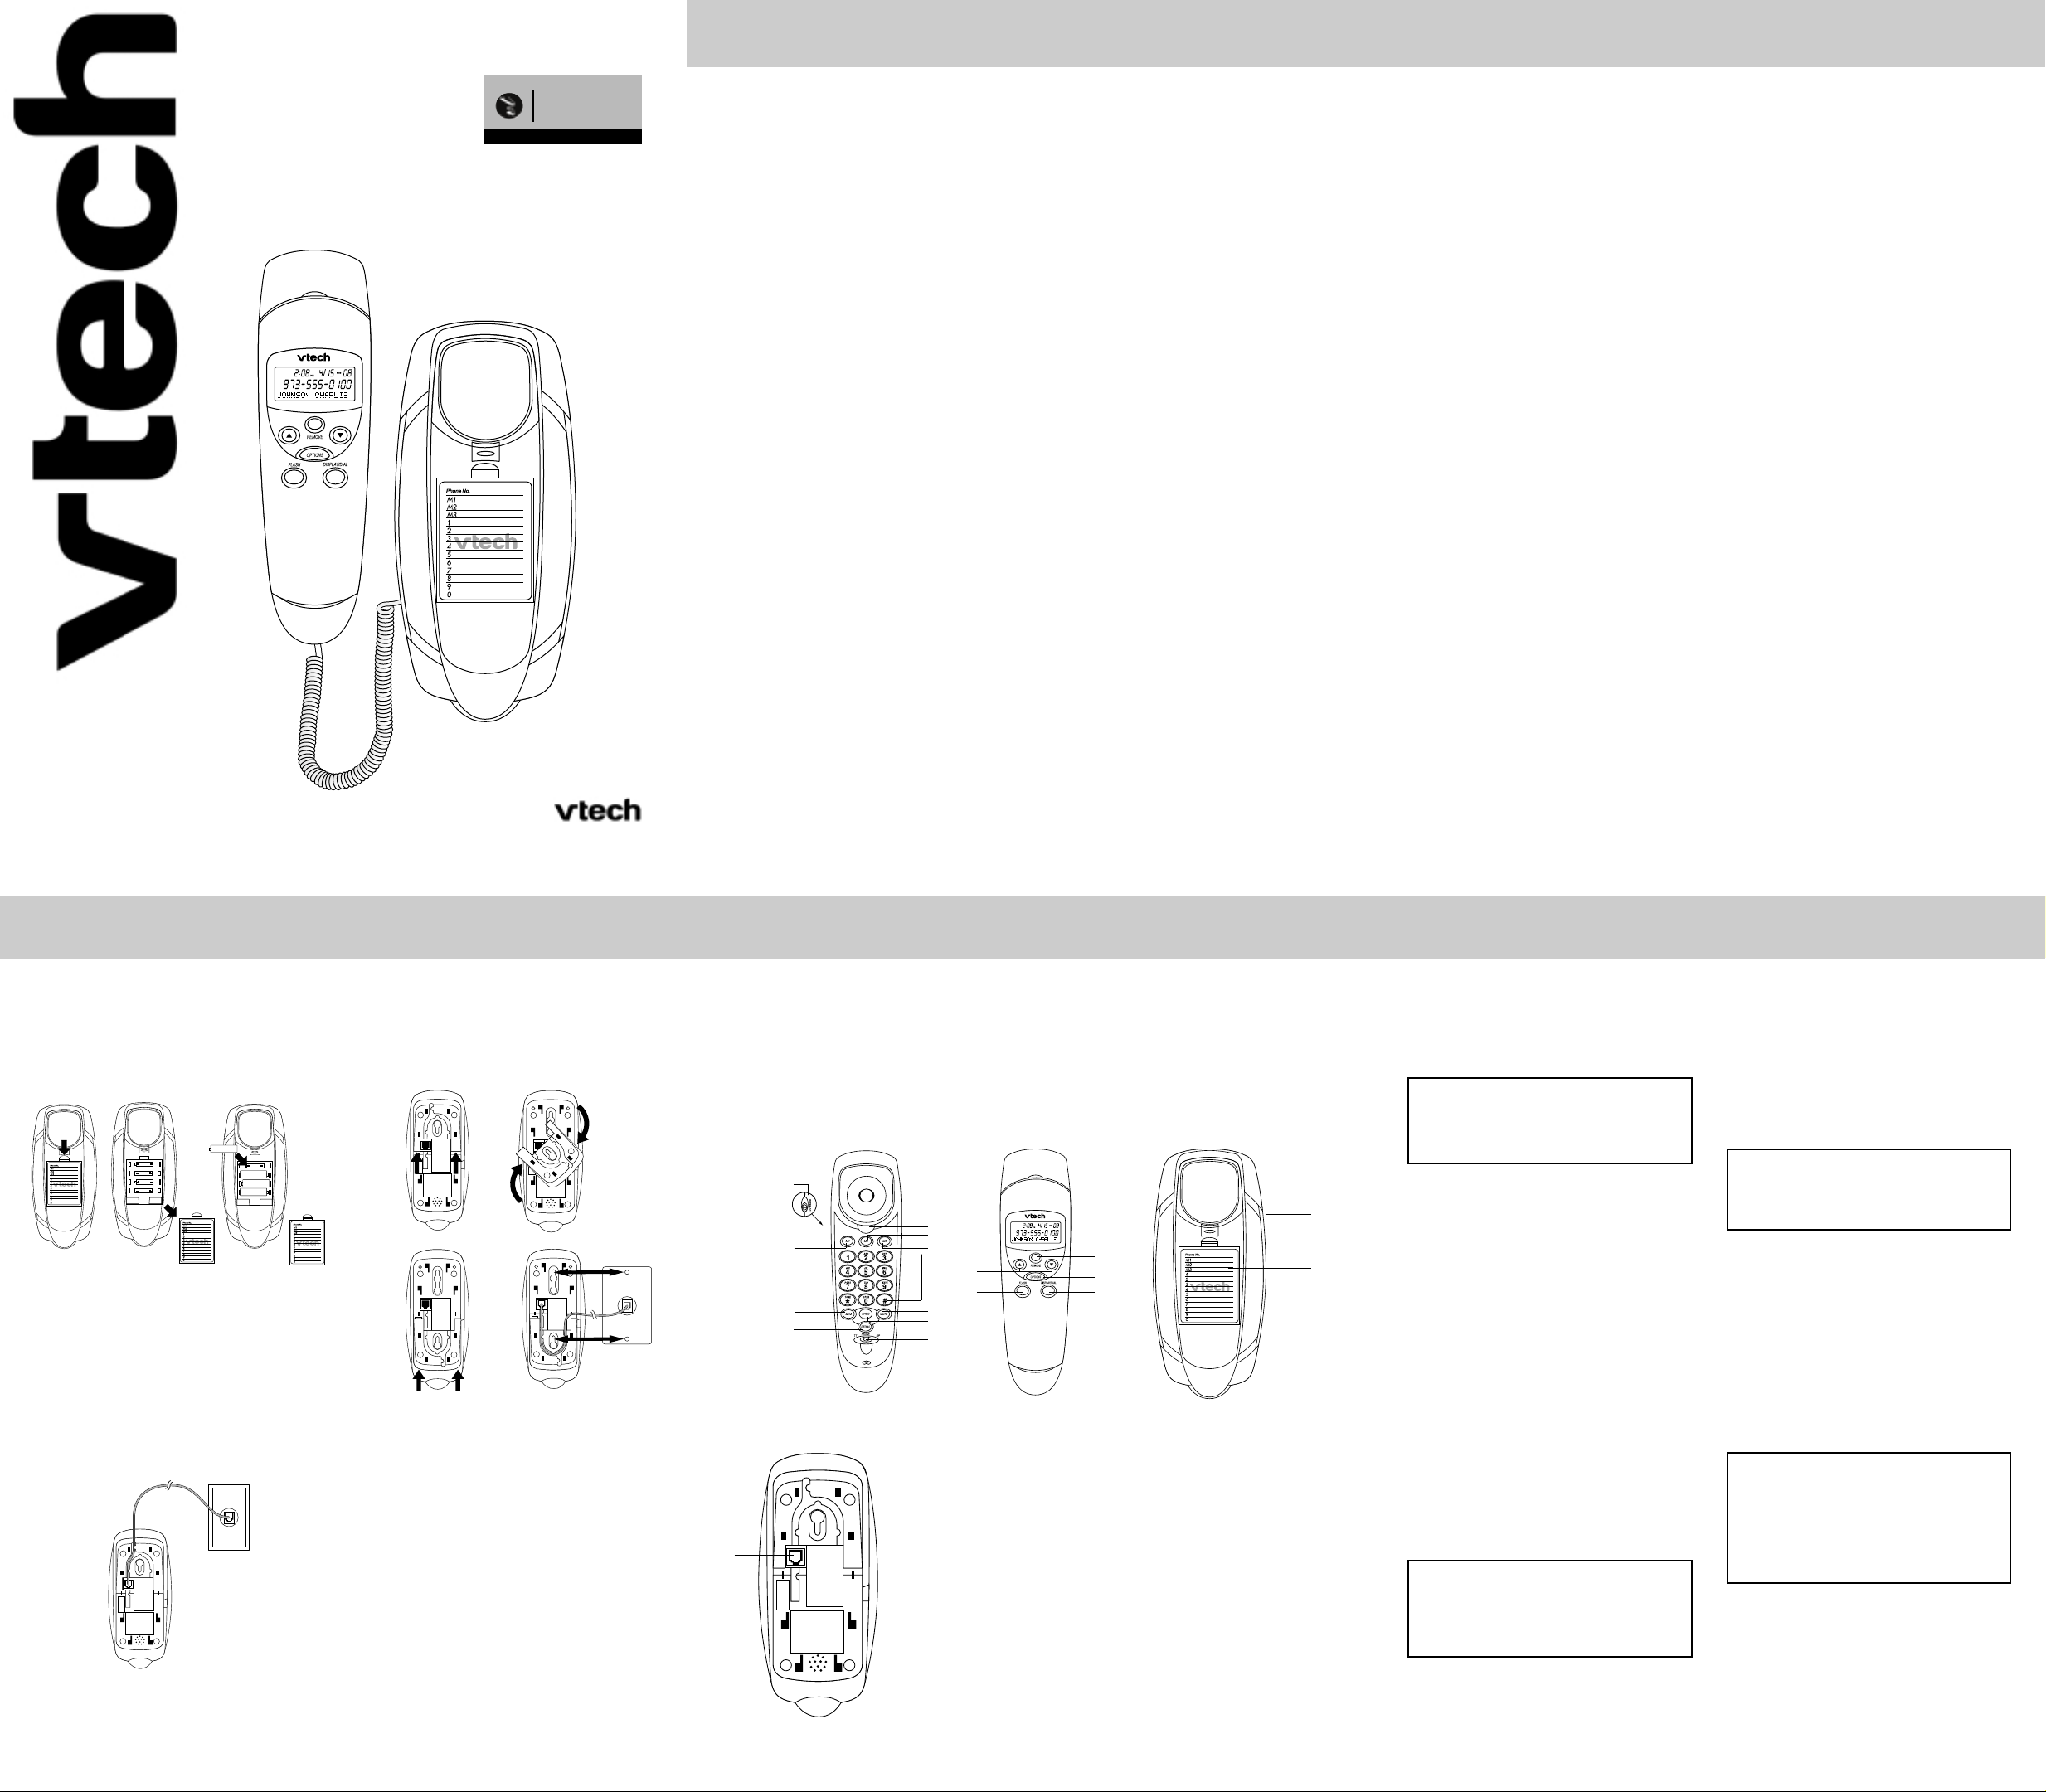
Installing the Batteries
1 Insert a flat blade screwdriver into the battery
door lock and open the battery cover located on
top of the base. Please note this construction is
for compliance with safety regulations. Install
the batteries according to the diagram.
IMPORT ANT: Be sure that the batteries are installed
correctly. Wrong polarity may damage the unit.
2 For better performance and longer operating
time, we recommend the use of alkaline
batteries.
a Do not mix old and new batteries.
b Do not mix alkaline, standard (carbon-zinc)
or rechargeable (nickel-cadmium)
batteries.
3 If the unit is not to be used for an extended
period of time, remove all the batteries.
Desktop
1 Unwrap the long telephone line cord.
2 Insert one plug into the LINE modular jack on
the bottom of the base.
VTECH TELECOMMUNICATIONS L TD
Printed in China Issue VT2 02/03
USER’S MANUAL
IMPORTANT SAFETY INSTRUCTIONS
CAUTION
When using your phone equipment, basic
precautions should always be followed to
reduce the risk of fire, electric shock and
injury to persons, including the following.
1 Read and understand all instructions.
2 Follow all warnings and instructions marked
on the product.
3 Unplug this product from the wall outlet before
cleaning. Do not use liquid cleaners or aerosol
cleaners. Use a damp cloth for cleaning.
4 Do not use this product near water (for
example, near a bath tub, kitchen sink, or
swimming pool).
5 Do not place this product on unstable stand or
table. The product may fall, causing damage
to the product.
6 Slots and openings in the cabinet and the back
or bottom are provided for ventilation. To
protect it from overheating, these openings
must not be blocked by placing the product on
a sofa, rug, or other similar surface. This
product should never be placed near or over a
radiator or heat register. This product should
not be placed in a built-in installation where
proper ventilation is not provided.
7 This product should be operated only from the
type of power source indicated on the marking
label. If you are not sure of the type of power
supply, consult your dealer or local power
company.
8 Do not allow anything to rest on the power
cord. Do not locate this product where the
cord will be abused by persons walking on it.
9 Never push objects of any kind into this
product through cabinet slots as they may
touch dangerous voltage points or short out
parts that could result in a risk of fire or electric
shock. Never spill liquid of any kind on the
product.
10 To reduce the risk of electric shock, do not
disassemble this product, but take it to a Vtech
authorized service facility. Opening or
removing cabinet parts other than specified
access doors may expose you to dangerous
voltages or other risks. Incorrect reassembling
can cause electric shock when the appliance
is subsequently used.
11 Do not overload wall outlets and extension
cords as this can result in the risk of the fire or
electric shock.
12 Unplug this product from the wall outlet and
refer servicing to a Vtech authorized service
facility under the following conditions:
A When the power supply cord or plug is
damaged or frayed.
B If liquid has been spilled into the product.
C If the product has been exposed to rain or
water.
D If the product does not operate normally by
following the operating instructions. Adjust
only those controls that are covered by the
operating instructions, because improper
adjustment of other controls may result in
damage and will often require extensive
work by a Vtech authorized technician to
restore the product to normal operation.
E If the product has been dropped and the
cabinet has been damaged.
F If the product exhibits a distinct change in
performance.
13 Avoid using a telephone (other than a cordless
type) during an electrical storm. There may be
a remote risk of electric shock from lightning.
14 Do not use the telephone to report a gas leak
in the vicinity of the leak.
VTECH TELECOMMUNICA TIONS L TD.
SERVICE DEPT.in the US
At 1-800-595-9511.
In Canada, call Vtech Electronics Ltd.
At 1-800-267-7377.
SA VE THESE INSTRUCTIONS
TO REDUCE THE RISK OF INJURY TO
PERSONS, READ AND FOLLOW THESE
INSTRUCTIONS.
1 Use only the type and size batteries designed
for this product. Do not dispose of the
batteries in a fire. The cell may explode.
Check with local codes for possible special
disposal instructions.
2 Do not open or mutilate the batteries.
Released electrolyte is corrosive and may
cause damage to the eyes or skin. It may be
toxic if swallowed.
3 Exercise care in handling batteries in order not
to short the battery with conducting mater ials
such as rings, bracelets and keys. The battery
or conductor may overheat and cause burns.
4 Do not attempt to recharge the batteries
provided with or identified for use with this
product. The batteries may leak corrosive
electrolyte or explode.
5 Do not attempt to recharge the batteries
provided with or identified for use with this
product by heating them. Sudden release of
the battery electrolyte may occur causing
burns or irritation to eyes or skin.
6 When replacing batteries, all batteries should
be replaced at the same time. Mixing fresh
and discharged batteries could increase cell
pressure and rupture the discharged batteries.
(Applies to products employing more than one
separately replaceable primary battery.)
7 When inserting batteries into this product, the
proper polarity or direction must be observed.
Reverse insertion or batteries can cause
charging, and that may result in leakage or
explosion. (Applies to product employing
more than one separately replaceable primary
battery.)
8 Remove the batteries from this product if the
product will not be used for along period of
time (several months or more) since during
this time the battery could leak in the product.
Discard "dead" batteries as soon as possible,
since "dead" batteries are more likely to leak in
a product.
9 Do not store this product, or the batteries
provided with or identified for use with this
product, in high-temperature areas. Batteries
that are stored in a freezer or refrigerator for
the purpose of extending shelf life should be
protected from condensation during storage
and defrosting. Batteries should be stabilized
at room temperature prior to use after cold
storage.
1 2
FEATURESINSTALLATION
TELEPHONE OPERATION
3 Insert the other modular plug into the
telephone wall jack.
4 Insert one modular plug of the coiled cord into
the handset jack, and the other plug into the
left side of the base.
Wall-mount
1 Unwrap the short telephone line cord.
2 Install the wall-mounting bracket on the bottom
of the base.
3 Insert one plug into the LINE modular jack on
the bottom of the base.
4 Insert the other modular plug into the
telephone wall jack.
5 Align the holes on the base with the mounting
studs on the wall plate and pull the base down
onto the studs.
6 Insert one modular plug of the coiled cord into
the handset jack, and the other plug into the
left side of the base.
Setting the Caller ID
Setting the Caller ID includes language selection,
contrast selection, area code pre-set (one home
area code and four local area codes) and time/date
setting in this order.
Select the Language
1 Press the OPTIONS button.
2 The display will show SET LANGUAGE.
Press UP or DOWN to see “ENGLISH,”
“FRANCAIS,” and “ESPANOL.”
3 Press the UP or DOWN button until your
desired language is displayed.
4 Press the OPTIONS button to confirm
selection and advance to next option in the
menu.
Select the Contrast Level
The contrast adjustment allows you to fine-tune the
display. The contrast has five levels of adjustment
(the default setting is 3).
1 Press the OPTIONS button twice.
2 Press UP or DOWN to adjust the contrast
level.
3 Press the OPTIONS button to confirm and
save.
Enter Your Area Code
1 Press the OPTIONS button three times.
Note: Only input area codes 2, 3 and
4 if there is more than one local area code
within the same area. Otherwise, press
the OPTIONS button to skip Area Codes 2, 3
and 4.
Note: If you do not press any b utton within 10
seconds, you unit will automatically terminate
the setting and revert to the standby mode with
the display showing the current time and date.
2 Press UP or DOWN to display the first digit of
your HOME AREA CODE (HAC), then press
DISPLAY DIAL to move to the next digit.
Press OPTIONS to save, and advance to the
next option in the menu.
3 Follow the directions in Step 2to input LOCAL
AREA CODES (LAC)1, 2, 3 and 4 if
necessary.
Setting Time and Date
4 Press the OPTIONS button eight times.
5 Press UP or DOWN to enter the hours setting.
Then press DISPLAY DIAL to set the hour.
(You might need to scroll through 12 hours to
set AM or PM.)
6 Press UP or DOWN to enter the minute
setting. Then press DISPLAY DIAL to set the
minute.
7 Follow the procedure in Steps 7 and 8 to set
the month and the date.
8 Press OPTIONS to save the settings, and exit
the OPTIONS MENU.
Note: On receiving a Caller ID call, the date
and time of your unit will be automatically
updated to synchronize with the date and time
registered by the Central Office. On
completion of setting, the unit will revert to the
standby mode, displaying the current time and
date and TOTAL: 0 and NEW: 0.
Note: The clock will automatically be set when
you receive a Caller ID call. However , you can
set the clock manually by following the steps
below.
43 5
1 Hook Switch
2 M1 Button (one - Touch Memory)
3 M2 Button (one - Touch Memory)
4 M3 Button (one - Touch Memory)
5 Dial Buttons
6 MUTE Button
7 FLASH Button
8 MEM Button
9 REDIAL Button
10 REMOVE Button
11 REVIEW Up & Down Buttons
12 OPTIONS Button
13 DISPLAY DIAL Button
14 TONE/PULSE Switch
15 PROG Button
16 Receiver VOLUME Switch
17 RINGER Switch
18 Battery Compartment with
removable memory card cover
19 LINE Modular Jack
19
1122
• 70 name-and-number Caller ID
• 3-language Operation
• Display number dialing capability
• 3 One-Touch Memory Locations
• 10 Two-touch Memory Locations
• Mute
• Redial
• Flash
• Handset Hi-Med-Low Switch
• Ringer Hi-Low-OFF Switch
• Hearing-aid Compatible
• Dial Mode Selectable
1
3
4
10
12
137
11
5
15
6
8
2
16
9
14
17
18

TELEPHONE OPERATIONTELEPHONE OPERATION
TELEPHONE OPERATION
Repeat Calls
When you receive calls repeatedly from the same
caller, the display will show REPEAT adjacent to
the call number of that call to indicate it is a repeat
call.
Reviewing Calls
1 The NEW CALL indicator will flash to indicate
new calls or calls that have not yet been
reviewed.
2 Press UP to review the next call.
3 Press DOWN to review the previous call.
4 After a new call is review ed, it will be deducted
from the total number of new calls displayed.
5 When the list of calls reaches the end, the
display will display END OF LISTand return to
show the current time and date in 10 seconds.
Deleting Calls
To delete an individual call:
1 Press the UP or DOWN button until the call to
be deleted is displayed.
2 Press the REMOVE button twice within 1.5
seconds.
3 The call is deleted and the total call count is
reduced by 1.
To delete all calls:
1 While the idle screen is displayed, press the
REMOVE key and hold it until the LCD
displays “REMOVEALL?”
2 Press the REMOVE key again to delete all
calls and the total call count returns to zero.
Dialing from Displayed Call
1 Press the UP or DOWN button until the
desired call is displayed.
2 Press the DISPLAY DIAL button, then lift the
handset. Your call will be dialed automatically.
Blocked or Unavailable Calls
1 If the caller’s telephone number is blocked
(that is, the caller wishes to keep his telephone
number private), the display will show
PRIVATE in place of the caller name.
2 If the call is international or from an area
where Caller ID service is not available, the
display will show UNKNOWN in place of the
caller’s name.
This telephone has 14 memory locations, including
Last Number Redial. Your phone can store three
phone numbers for one-touch dialing (for example,
for emergency or frequently called numbers). You
can additionally store up to 10 phone numbers for
two-touch dialing. Each phone number must be
stored in a specific memory location to enable your
phone to locate a number from the memory for
automatic dialing. The one-touch memory
locations are numbered M1, M2, and M3, while the
two-touch memory locations are accessed through
the MEM button and the dialing buttons (0-9).
Note: Each memory location can store up to
16 digits for the telephone number. If the
number to be stored exceeds 16 digits, you
should split storing of the numbers into two
separate locations. This normally occurs
when an access code is required. In this
case, you can store the access code in
another memory location.
Note: We recommend that you disconnect the
phone line when programming your telephone.
Note: We recommend that you disconnect the
phone line when programming your telephone.
Recalling a Number from the Two-Touch
Memory
1 Lift the handset.
2 Press the MEM button.
3 Press the dial button (0-9) where you stored
the number you want to call.
4 Your call will be dialed automatically.
Transferring a Caller ID Number into
Memory
1 Press the UP or DOWN button until the
desired call number is displayed.
2 Lift the handset, then press the PROG button.
The number will flash on the screen.
3 Press M1, M2 or M3 to store the number in a
one-touch location. The display shows the
location where the number has been stored
(01-03).
4 Press MEM and a dial button (0-9) to store the
number in a two-touch location. The display
shows the location where the number has
been stored (A0-A9).
7 8
WARRANTY STATEMENT & FCC REGULATIONSWARRANTY STATEMENT & FCC REGULATIONS
FCC REGULATIONS & TECHNICAL SPECIFICATIONS
and return shipping costs for the repair of Products
that are not covered by this limited warranty.
• What must you return with the Product to get
warranty service?
You must:
1 Return the entire or iginal package and contents
including the Product to the VTECH service
location along with a description of the
malfunction or difficulty;
2 Include "valid proof of purchase" (sales receipt)
identifying the Product purchased (Product
model) and the date of purchase or receipt; and
3 Provide your name, complete and correct
mailing address, and telephone number.
• IF YOU PURCHASED YOUR TELEPHONE IN
CANADA:
Please call: 1-800-267-7377
for return authorization
Ship to:
VTECH ELECTRONICS LTD.
200-7671 Alderbridge Way
Richmond, BC V6X 1Z9
Other Limitations
This warranty is the complete and exclusive
agreement between you and VTECH. It supersedes
all other written or oral communications related to this
Product. VTECH provides no other warranties for this
product. The warranty exclusively describes all of
VTECH’s responsibilities regarding the product.
There are no other express warranties. No one is
authorized to make modifications to this limited
warranty and you should not rely on any such
modification.
State Law Rights: This warranty gives you specific
legal rights, and you may also have other rights
which vary from state to state.
Limitations:
Implied warranties, including those of fitness for a
particular purpose and merchantability (an unwritten
warranty that the product is fit for ordinary use) are
limited to one year from date of purchase. Some
states do no allow limitations on how long an implied
warranty lasts, so the above limitation may not apply
to you.
In no event shall VTECH be liable for any indirect,
special, incidental, consequential, or similar damages
(including, but not limited to lost profits or revenue,
inability to use the product, or other associated
equipment, the cost of substitute equipment, and
claims by third parties) resulting from the use of this
product. Some states do not allow the exclusion or
limitation of incidental or consequential damages, so
the above limitation or exclusion ma y not apply to you.
Consumer Information:
This equipment complies with Part 68 of the FCC
rules and the requirements adopted by the ACTA.On
the bottom of this equipment is a label that contains,
among other information, a product identifier in the
format US:AAAEQ##TXXXX. If requested, this
number must be provided to the telephone company.
An applicable certification jacks Universal Service
Order Codes (USOC) for the equipment is provided
(i.e., RJ11C) in the packaging with each piece of
approved terminal equipment.
A plug and jack used to connect this equipment to the
premises wiring and telephone network must comply
with the applicable FCC Part 68 rules and
requirements adopted by the ACTA. A compliant
telephone cord and modular plug is provided with this
product. It is designed to be connected to a
compatible modular jack that is also compliant. See
installation instructions for details.
The REN is used to determine the number of devices
that may be connected to a telephone line.Excessive
RENs on a telephone line may result in the devices
not ringing in response to an incoming call. In most
but not all areas, the sum of RENs should not exceed
five (5.0).To be certain of the number of devices that
may be connected to a line, as determined by the
total RENs, contact the local telephone company.[For
products approved after July 23, 2001, the REN for
this product is part of the product identifier that has
the format US:AAAEQ##TXXXX. The digits
represented by ## are the REN without a decimal
point (e.g., 03 is a REN of 0.3). For earlier products,
the REN is separately shown on the label.]
If this equipment Model# VT_1122 causes harm to
the telephone network, the telephone company will
notify you in advance that temporary discontinuance
of service may be required. But if advance notice isn't
practical, the telephone company will notify the
customer as soon as possible. Also, you will be
advised of your right to file a complaint with the FCC
if you believe it is necessary.
The telephone company may make changes in its
facilities, equipment, operations or procedures that
could affect the operation of the equipment. If this
happens the telephone company will provide advance
notice in order for you to make necessary
modifications to maintain uninterrupted service.
Please follow instructions for repairing if any (e.g.
battery replacement section); otherwise do not
alternate or repair any parts of device except
specified.
Connection to party line service is subject to state
tariffs. Contact the state public utility commission,
public service commission or corporation commission
for information.
This equipment is hearing aid compatible.
NOTICE: If your home has specially wired alarm
equipment connected to the telephone line, ensure
the installation of this [equipment ID] does not disable
your alarm equipment. If you have questions about
what will disable alarm equipment, consult your
telephone company or a qualified installer.
NOTICE: According to telephone company reports,
AC electrical surges, typically resulting from lightning
strikes, are very destructive to telephone equipment
connected to AC power sources.To minimize damage
from these types of surges, a surge arrestor is
recommended.
Register your vtech product on line. You will be
notified of any product updates and special
offers. While you're there, visit our virtual store.
You can order battery packs and headsets, as
well as our exciting line of telephone products.
www.vtechphones.com
Please see the technical information for VT1122 as
below:
1 Size:
a. Handset:
207 (L) x 60 (W) X 57.5 (H) mm (Max)
b. Base:
208 (L) x 95.5 (W) x 67 (H) mm (Max)
2 Weight
a. Handset: 218 grams
b. Base: 240 grams
3 Power Requirement:
a. Battery: 4x(1.5V AA)
4 Memory:
a. Phone book (Directory):
• 3 one-touch memories and
10 two-touch memories
• 16 digits
b. CID:
• 70 CID Records
• 13 digits
10
TONE* Button
If you have Pulse (dial rotary) service, press this
button before entering codes you may need to
access remote answering systems, etc. Each
button pressed after * will be sent as tone signals.
The phone returns to Pulse dialing when you hang
up.
MUTE Button
1 Press and hold the MUTE button when you
don’t want the other party to hear the
conversation on your end.
2 Release the MUTE button to return to two-way
conversation.
Elapsed Call Time
During a call, the LCD panel will display the
elapsed time of the current conversation.
Receiving a Call
When you receive a call, your unit will display the
caller information sent by the telephone company
including:
• The caller’s name (if available)
• The caller’s telephone number (if available)
• The date and time of the call
• The Call Number to indicate the sequence of
the call
Caller ID
This telephone is compatible with "Caller ID"
service. Make sure that your telephone company
offers this service and you have subscribed to it in
order to use this service.
Note: When the memory is full and new calls
are received, previous messages will be
replaced by the new calls.
6
Limited Warranty
• What does this limited warranty cover?
The manufacturer of this VTECH product, VTECH
Communications, warrants to the holder of a valid
proof of purchase ("Consumer" or "You") that the
product and all accessories provided by VTECH in
the sales package ("Product") are free from material
defects in material and workmanship, pursuant to
the following terms and conditions, when installed
and used normally and in accordance with
operation instructions. This limited warranty
extends only to the Consumer for Products
purchased and used in the United States of
America.
• What will VTECH Communications do if the
Product is not free from material defects in
materials and workmanship during the limited
warranty period ("Materially Defective
Product")?
During the limited warranty period, VTECH’s
authorized service representative will repair or
replace, at VTECH’s option, without charge, a
Materially Defective Product. If we repair this
product, we may use new or refurbished
replacement parts. If we choose to replace this
product, we may replace it with a new or refurbished
product of the same or similar design. VTECH will
return repaired or replacement products to you in
working condition. VTECH will retain defective
parts, modules, or equipment. Repair or
replacement of Product, at VTECH’s option, is your
exclusive remedy. You should expect the repair or
replacement to take approximately 30 days.
• How long is the limited warranty period?
The limited warranty period for the product extends
for ONE (1) YEAR from the date of purchase.
If we repair or replace a Materially Defective
Product under the terms of this limited warranty , this
limited warranty also applies to repaired or
replacement Products for a period of either (a) 90
days from the date the repaired or replacement
Product is shipped to you or (b) the time remaining
on the original one-year limited warranty, whichever
is longer.
• What is not covered by this limited warranty?
This limited warranty does not cover:
1 Product that has been subjected to misuse,
accident, shipping or other physical damage,
improper installation, abnormal operation or
handling, neglect, inundation, fire, water , or other
liquid instruction; or
2 Product that has been damaged due to repair,
alteration, or modification by anyone other than
an authorized service representative of VTECH;
or
3 Product to the extent that the problem
experienced is caused by signal conditions,
network reliability or cable or antenna systems;
or
4 Product to the extent that the problem is caused
by use with non-VTECH electrical accessories;
or
5 Product whose warranty/quality stickers, Product
serial number plates or electronic serial numbers
have been removed, altered or rendered
illegible; or
6 Product purchased, used, serviced, or shipped
for repair from outside the United States, or used
for commercial or institutional purposes
(including but not limited to Products used for
rental purposes); or
7 Product returned without valid proof of purchase;
or
8 Charges for installation or setup, adjustment of
customer controls, and installation or repair of
systems outside the unit.
• How do you get warranty service?
To obtain warranty service in the United States of
America, call 1-800-595-9511 for instructions
regarding where to return the Product. Before
calling for service, please check the user’s manual.
A check of the Product controls and features may
save you a service call.
Except as provided by applicable law, you assume
the risk of loss or damage during transit and
transportation and are responsible for delivery or
handling charges incurred in the transport of
Product(s) to the service location. VTECH will
return repaired or replaced Product under this
limited warranty to you, transportation, delivery or
handling charged prepaid. VTECH assumes no risk
for damage or loss of the Product in transit.
If the Product failure is not covered by this limited
warranty , VTECH will notify you and will request that
you authorize the cost of repair prior to any further
repair activity. You must pay for the cost of repair
9 11
RINGER HI-LOW-OFF Switch
1 "HI" Position: Ringer sounds to alert you to
incoming calls.
2 "LOW" Position: Ringer sounds at a lower
level to minimize disturbance by incoming
calls.
3 "OFF" Position: This telephone does not ring
with incoming calls.
TONE/PULSE Switch
1 The DP (PULSE) position is used if your local
telephone system offers only Pulse (rotary
dial) service or if Tone service is available but
you do not subscribe to it.
2 The TT (TONE) position is used if you
subscribe to Tone Dialing (DTMF) service.
If you are not certain what type of service you
have, check with your local telephone company.
Dialing Buttons
To make a phone call, pick up the handset. When
you hear the dial tone, dial the phone number you
are calling using the buttons (1 to 9 and 0). The
number dialed will be shown in the LCD panel.
When your call is completed, hang up the handset.
REDIAL Button
The last number you have dialed (up to 32 digits)
remains in memory known as last number redial
memory. If you call a number and receive a busy
signal or no answer, hang up the handset. When
you are ready to try the same call again, pick up
the handset and tap the REDIAL button. Please
note that if you have made any other calls in the
meantime, only the last number you called will be
stored in the redial memory.
FLASH Button
For residential phone systems with "Call Waiting"
service, instead of pressing the hook switch to pick
up the other call, press the FLASH button. This will
automatically send the correct signal to the
telephone company to switch calls. The amount of
time you hold the FLASH button down is not
critical.
CALLER ID OPERATION
TELEPHONE MEMORY
OPERATION
Storing a Phone Number in the
One-Touch Memory Locations
1 Lift the handset.
2 Press the PROG button.
3 Dial the telephone number you want to store
(up to 16 digits).
4 Press the one-touch button (M1, M2, M3)
where you want to store the number.
5 Hang up the handset.
Storing a Phone Number in the T w o-Touch
Memory Location
1 Lift the handset
2 Press the PROG button.
3 Dial the telephone number you want to store
(up to 16 digits).
4 Press the MEM button.
5 Press the dial button (0 to 9) where you want
to store the telephone number.
6 Hang up the handset.
Replacing a Number Stored in Memory
Follow Steps 1-5 (one-touch) or 1-6 (two-touch) in
Storing a Phone Memory.
Deleting Numbers Stored in Memory
1 Press the PROG button.
2 Press the one-touch button you want to delete,
or press MEM and the dialing key of the
location you want to delete.
Recalling a Number from the One-Touch
Memory
1 Lift the handset.
2 Press the one-touch button (M1, M2, M3)
where the number you want to call is stored.
3 Your call will automatically be dialed.
Note: Numbers remain stored in memory as
long as the phone line is connected. If the
phone line is disconnected for more than 10
minutes, the numbers in memory may be lost.
 Loading...