

Page 1

TM
Digital camera User’s manual
Digitalkamera Bedienungsanleitung
Digitalkamera Brugermanual
Digitalkamera Bruksanvisning
Digitalkamera Brukermanual
Digitaalikamera Käyttäjän ohjekirja
GB
DE
DK
SE
NO
FI
Page 2

Dear Parent,
At VTech
®
we know how important the first day of school is for your
child. To help prepare pre-schoolers for this important event, VTech
®
has developed the Pre-school Learning™ series of interactive toys.
Pre-school Learning™ features fun characters and inviting school
themes that use technology to capture a child’s attention and teach
important pre-school skills such as creativity, matching and logic.
These vital skills are taught in a way that is both fun and highly
engaging to maintain a child’s interest. Children will also be introduced
to fun school subjects such as art class, music class and even recess!
With Pre-school Learning™, learning is fun from day one!
At VTech
®
we know that a child has the ability to do great things.
That’s why all of our electronic learning products are uniquely
designed to develop a child’s mind and allow them to exert the best of
their ability. We thank you for trusting VTech
®
with the important
job of helping your child learn and grow!
Sincerely,
Your Friends at VTech
®
To learn more about Pre-school Learning™ and other VTech®
toys, visit
www.vtechkids.com
GB
1
Page 3

2
INTRODUCTION
Thank you for purchasing the VTech® Kidizoom Camera™! Kidizoom Camera™ is a sleek and durable
digital camera for kids to take photos, edit photos, view photos, record digital video movies and play fun
games! Kidizoom Camera™ also connects to the TV to let the kids view their photos and movies or play
games on a TV screen. Kidizoom Camera™ has 16 MB of built-in memory and supports up to a 2 GB
Secure Digital (SD) memory card (not included) to save even more photos and movies! And it includes a
USB port and cable to connect the Kidizoom Camera™ to your home PC for viewing photos and movies,
editing photos, or photo printing.
FEATURES
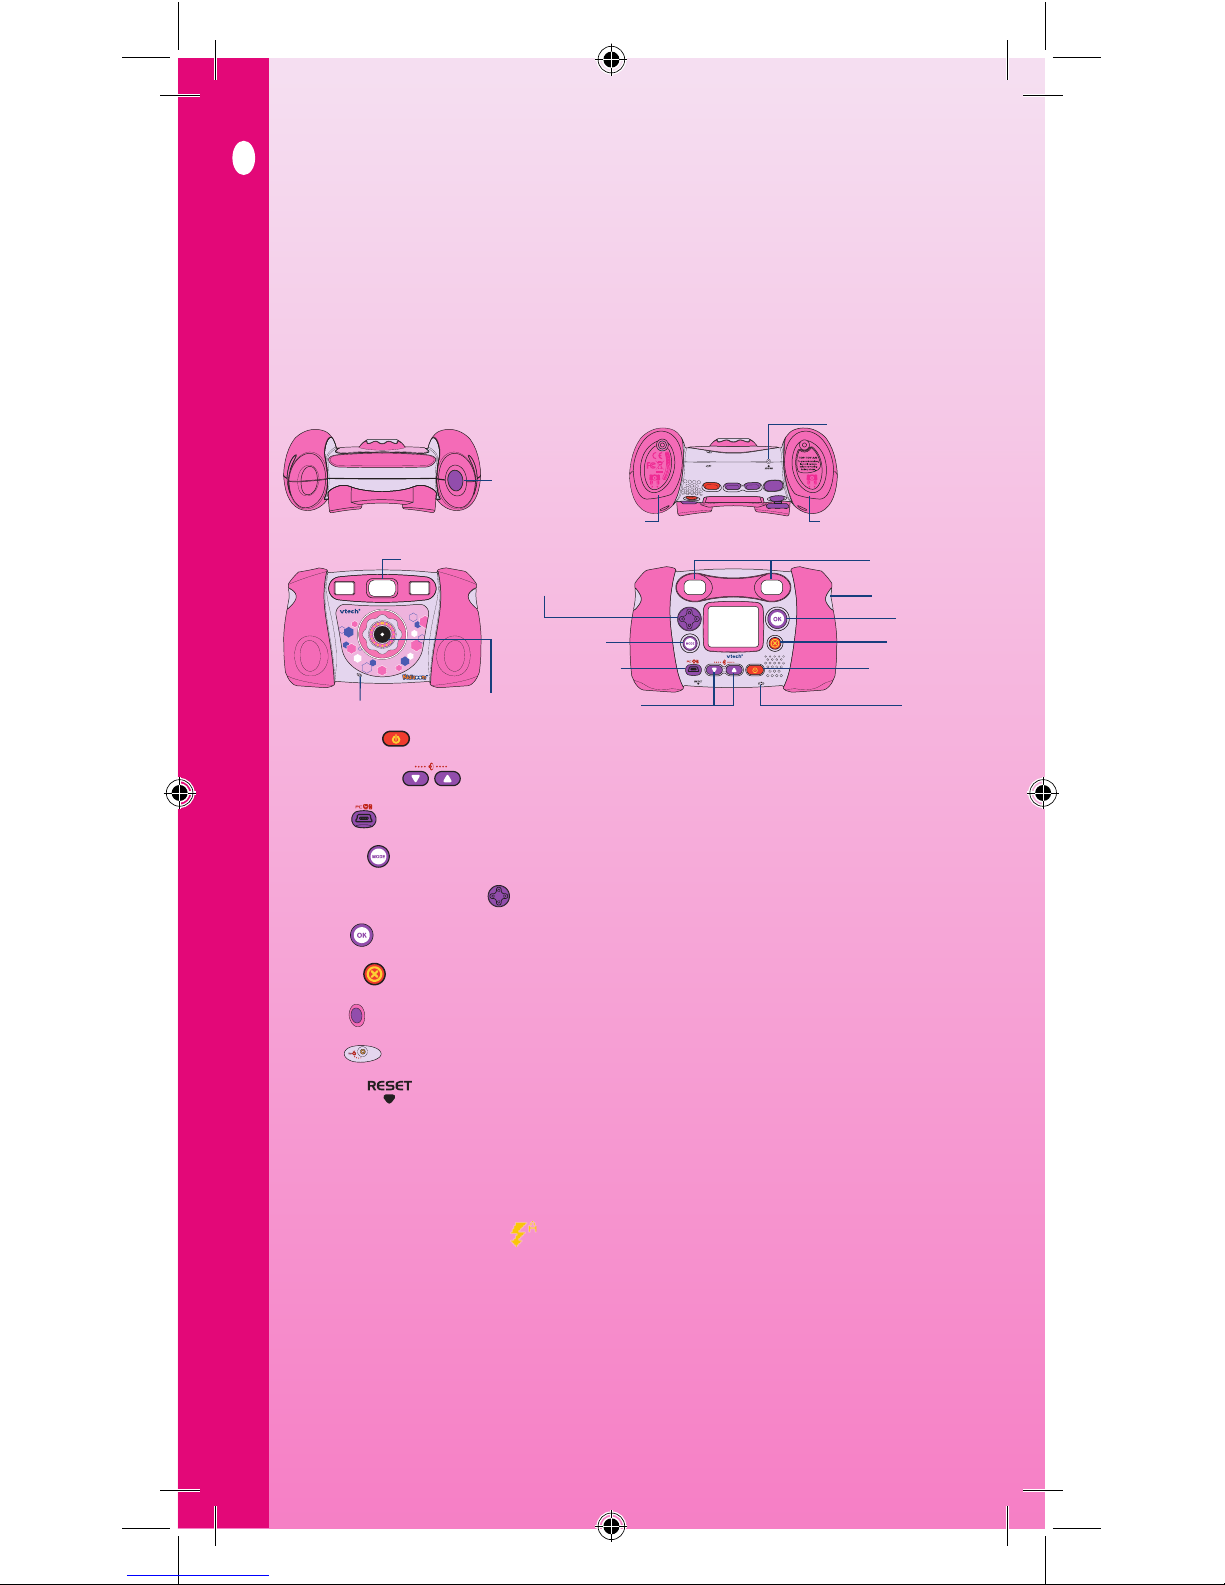
PRODUCT LAYOUT AND BUTTONS
ON/OFF Button
Press this button to turn the camera ON or OFF.
Volume Buttons
Press these buttons to adjust the volume.
USB Port
Plug the included USB cable into this USB port to connect to your PC.
Mode Button
Press this button to go to the main menu or to go back to the previous submenu.
4-Directional Cursor Button
Press this button to move the cursor and make selections.
OK Button
Press this button to conrm a choice or action.
Delete Button
Press this button to delete the selected le.
Shutter Button
Press this button to take a photo or start recording a movie.
A/V Port
Plug the included A/V cable into this A/V port to connect to your TV.
Reset Button
Press this button to reset the camera if it stops working properly.
Note: Pressing the Reset Button will erase all data in the Kidizoom Camera™ internal memory, but it will
not erase any data saved on an SD memory card (not included) if one is being used.
Flash
The auto exposure system of Kidizoom Camera™ will use the ash when it detects that it is necessary.
When the ash is ready to use, a lightning bolt icon
will show in the top left corner of the screen in
camera mode.
INCLUDED IN THIS PACKAGE
1 • VTech® Kidizoom Camera™
2 Interchangeable faceplates•
1 PC installation CD-ROM with additional features in the Photo Editor•
1 A/V cable•
1 USB cable•
1 User’s manual•
1 Wrist strap •
Warning: all packing materials such as tape, plastic sheets, wire ties and tags are not part of this toy,
and should be discarded for your child’s safety.
Introduction
GB
Lens
Microphone
Flash
Battery Cover (1)
Reset Button
Battery Cover (2)
4-Directional
Cursor Button
A/V Port for
TV Connection
Mode Button
USB Port for
PC Connection
Volume Buttons
OK Button
Delete Button
ON/OFF Button
Dual Viewnders
Microphone
Shutter Button
Page 4

PRODUCT SPECIFICATIONS
Display: 1.8” TFT colour LCD
Picture Resolution: Photo: 640 x 480 Movie: 160 x 120
Focus Range: 45 cm - ∞
Flash Range: 1 – 2 metres
Memory:
16 MB built-in memory (approximately 12 MB free memory for photo/movie storage).
Photos: Can store around 200 photos (photo size = 640 x 480 resolution in JPEG format).
Movies: Records up to 5 minutes of movies (movie size = 160 x 120 resolution in Motion JPEG format).
Kidizoom Camera™ supports up to a 2 GB Secure Digital (SD) memory card (not included) for
memory expansion.
Supported File Formats:
Photo: JPEG (up to 2 M pixels at 1632 x 1224 resolution)
Movie: Kidizoom Camera™ Motion JPEG
Supported Hardware:
A/V cable for TV connection (included)
USB cable for PC connection (included)
SD memory cards (not included) up to 2 GB
GETTING STARTED
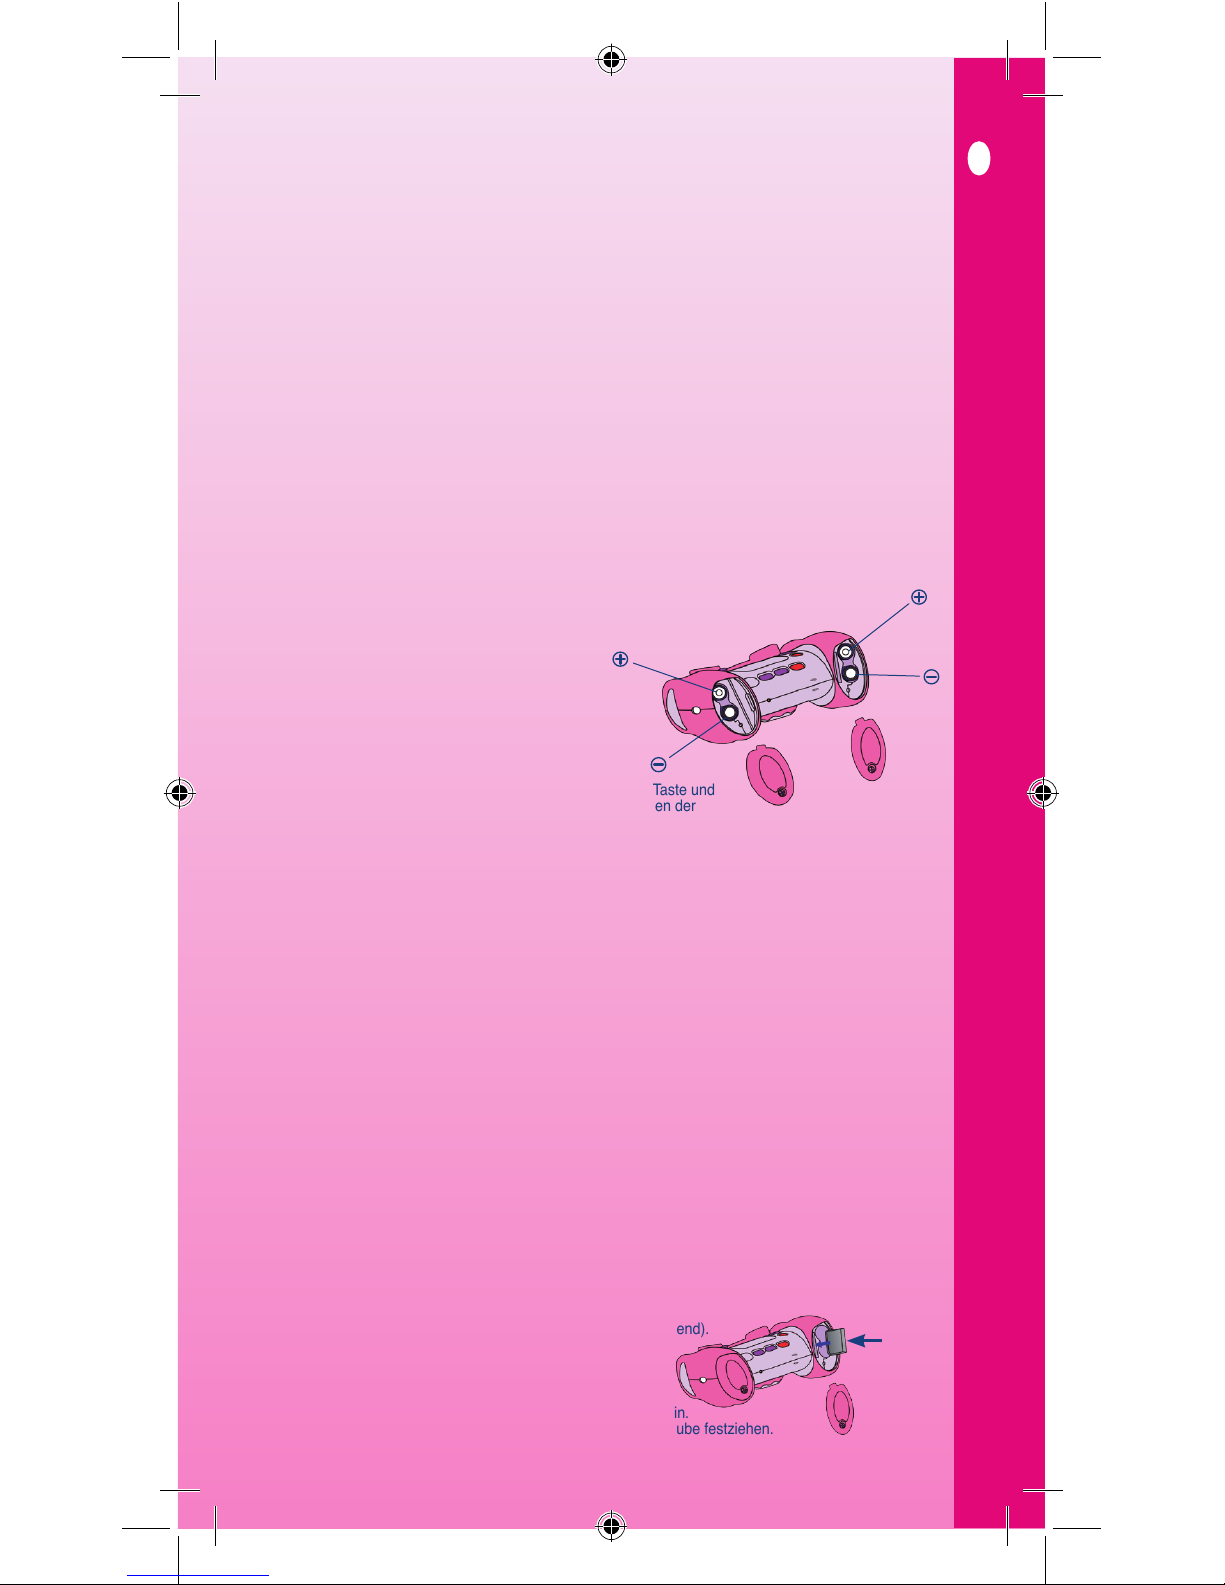
BATTERY INSTALLATION
Note: Adult assistance is required for battery installation. Use a screwdriver to install batteries.
Make sure the camera is turned • OFF.
Locate the battery covers on the bottom of the camera. Loosen the screws using the •
screwdriver and remove the battery covers.
Install 4 new C (LR6/AA) batteries (2 on each side) as illustrated below. •
(The use of new, alkaline batteries is
recommended for maximum performance.)
Replace the battery covers and tighten the •
screws. Do not over-tighten screws.
Note: If Kidizoom Camera™ is not working properly
after the batteries have been replaced, press the Reset
Button and then restart the camera. Pressing the Reset
Button will erase all data in the Kidizoom Camera™
internal memory, but it will not erase any data saved
on an SD memory card (not included) if one is being used.
Recommendation:
When the batteries in Kidizoom Camera™ run out
or are taken out for more than a
few minutes, the data in the internal memory may be lost. We recommend using an SD memory card
(not included) and setting it as the default for saving photos or movies taken by Kidizoom Camera™.
If an SD memory card (not included) is not used, remember to copy your photos and movies from the
camera’s internal memory to a PC before the
batteries run out or are taken out.
BATTERY NOTICE
Using new alkaline batteries for maximum performance is recommended.•
Install batteries correctly observing the polarity (+, -) signs to avoid leakage.•
Do not mix old and new batteries.•
Do not mix batteries of different types: alkaline, standard (carbon-zinc) or rechargeable •
(nickel-cadmium).
Remove the batteries from the equipment when the unit will not be used for an extended period of •
time. Please note: To prevent data loss, copy all photos and movies from Kidizoom Camera™ to a
PC before removing batteries.
Always remove exhausted batteries from the equipment.•
Do not dispose of batteries in re.•
Do not attempt to recharge ordinary batteries.•
The supply terminals are not to be short-circuited.•
Only batteries of the same and equivalent type as recommended are to be used. •
We do not recommend the use of rechargeable batteries.
SD MEMORY CARD INSERTION
Kidizoom Camera™ supports up to a 2 GB Secure Digital (SD) memory card
(not included) for memory expansion.
Make sure the camera is turned • OFF.
Open the battery cover on the right side •
(as you are facing the camera’s LCD screen).
Locate the SD card slot inside.•
Insert the SD card (not included) as illustrated below. •
Replace the battery cover and tighten the screw. •
Do not over-tighten the screw.
Introduction / Getting Started
3
GB
SD card
Page 5

CHANGING THE FACEPLATE
1. Gently lift up the lower part of faceplate and remove the faceplate
from the Kidizoom Camera™.
2. Insert the new faceplate by placing the hooks into the holes as
illustrated on the right.
3. Press the lower part of the faceplate against the camera to secure it in place.
TO BEGIN USING KIDIZOOM
CAMERA™
Press the ON/OFF Button • to turn on the camera. After turning on, Kidizoom Camera™ will go
directly into camera mode and you can start taking photos.
To switch to other activities, press the Mode Button •
to go to the Main Menu.
From the Main Menu, you can select the following activities: Camera, Movies,
Photo Workshop, Games and System Settings.
To increase or decrease the volume, press the up or down Volume •
Buttons
To connect to a TV or PC, follow the instructions in• Connecting to a TV or
Connecting to a PC below.
Press the ON/OFF Button again to turn the unit off.•
BATTERY STATUS
When the screen shows a Low Battery icon , we recommend to backup all data in the internal memory of Kidizoom Camera™ by uploading all data to a PC and then change batteries. When the unit shows
the No Batteries icon , the unit will not work properly. New batteries should be inserted before use.
Note: To avoid data lost in the internal memory of Kidizoom Camera™, backup the data or change the
batteries when it shows the Low Battery icon . When changing batteries, insert the new batteries
within a few minutes after taking out the old batteries. We recommend that you backup the data in the
internal memory of the Kidizoom Camera™ regularly to avoid data loss, and suggest that you use a SD
memory card (not included) for storage if possible.
AUTOMATIC SHUT-OFF
To preserve battery life, Kidizoom Camera™ will automatically turn off after 1 - 2 minutes without input.
The camera can be turned on again by pressing the ON/OFF Button.
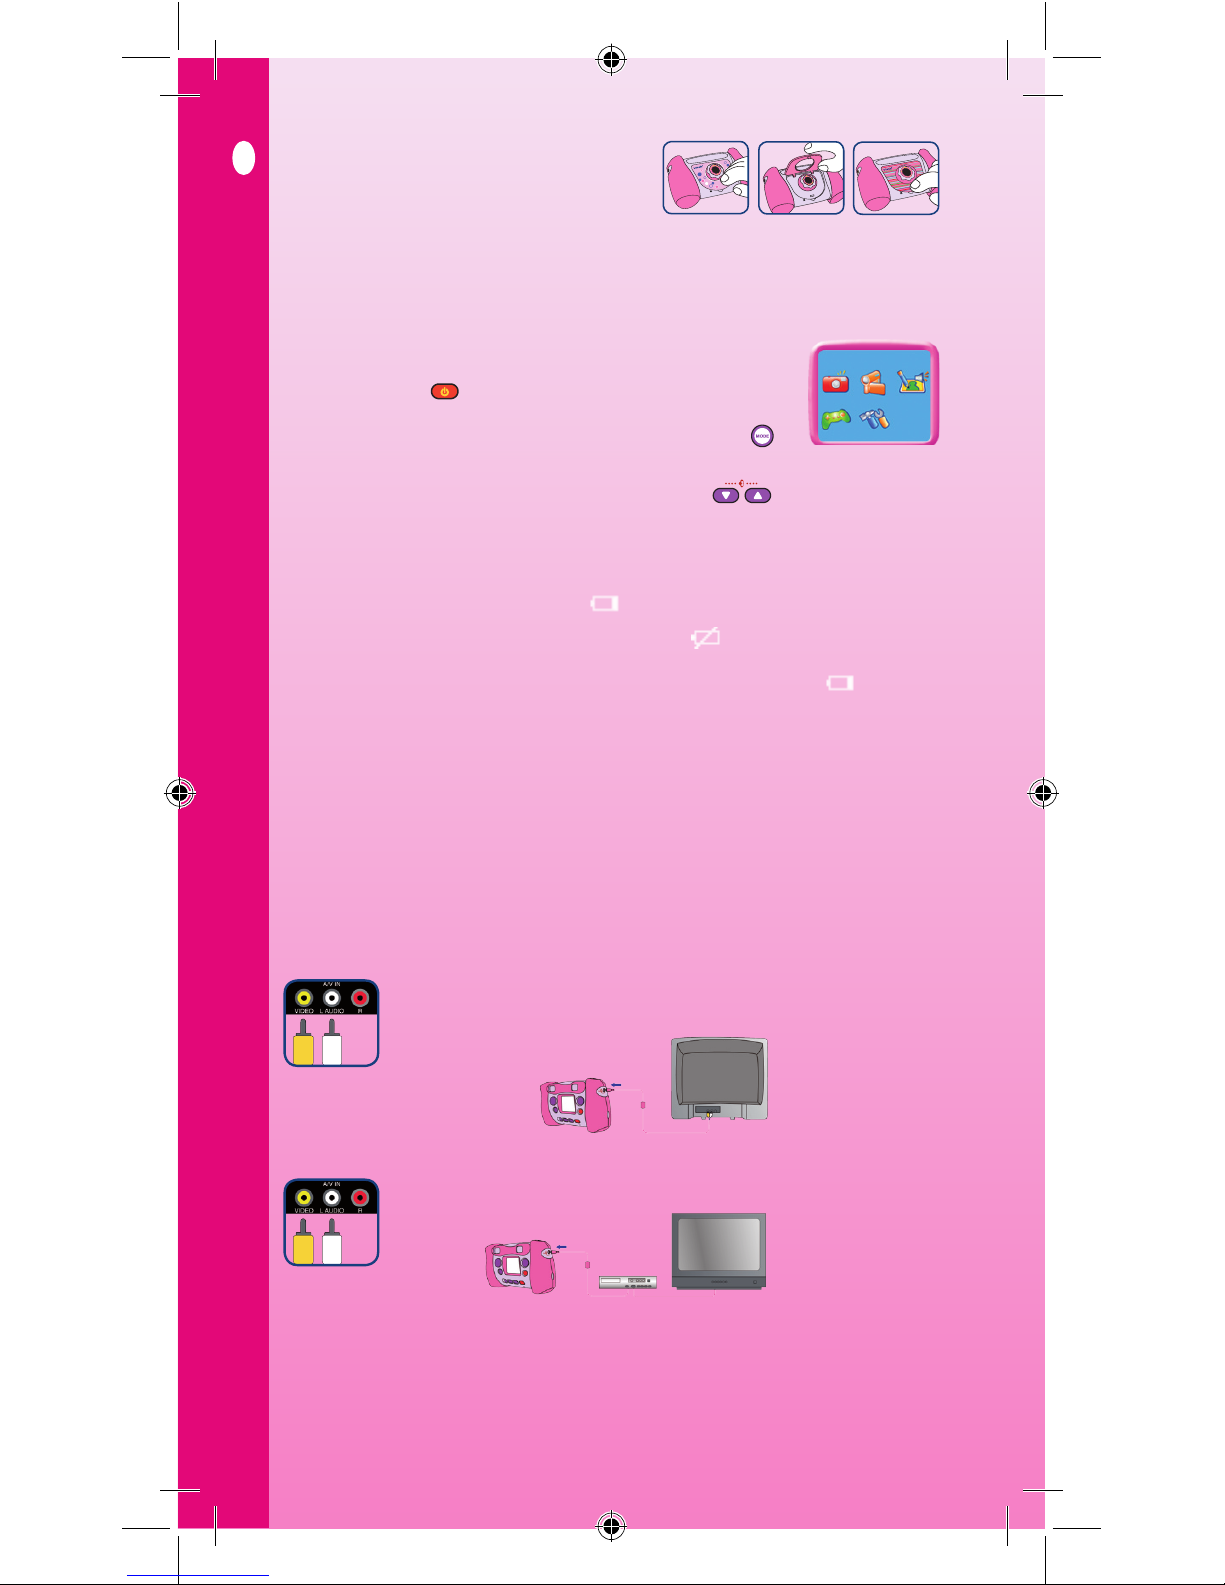
CONNECTING TO A TV
NOTE: Before you connect the Kidizoom Camera™ to a TV, make sure that the unit is working properly
by turning on the camera. Once you have turned the unit ON, the LCD will light up and go into camera
mode. If the LCD does not light up, check to see that the batteries are correctly installed.
Connect your Kidizoom Camera™ to a TV or monitor using
the included A/V cable. Insert the A/V cable into the A/V port on your Kidizoom
Camera™. Insert the colored plugs on the A/V cable into the matching color video and
audio input ports on your TV set.
CONNECTING TO A VCR
If there are no video IN or audio IN ports on your TV set, you can connect Kidizoom
Camera™ to a VCR.
Insert the A/V cable into the A/V port on your • Kidizoom Camera™.
Connect the yellow plug on the A/V cable to the yellow video input port on your VCR. •
Connect the white plug on the A/V cable to the white audio input port on your VCR. •
Note: If the A/V cable is plugged into Kidizoom Camera™ while a game is already in progress on the
LCD screen, the game will quit and exit to the main menu. Also, if the A/V cable is unplugged while a game
is in progress on the TV screen, the game will quit and exit to the main menu.
Changing the Faceplate / To Begin Using Kidizoom Camera™
GB
Main Menu
2
1
3
4
Page 6

To Begin Using Kidizoom Camera™ / Activities
CONNECTING TO A PC
You can connect Kidizoom Camera™ to a PC using the included USB cable. Once connected, you
may upload and download les to Kidizoom Camera™ by accessing your camera as a removable
storage device. When Kidizoom Camera™ is connected to the PC, a new drive called “VTech 773”
will appear on the PC. If there is also an SD memory card (not included) inserted into the camera when
it is connected, two new drives will appear. One will be the “VTech 773” drive and the other will be a
removable disk drive for the SD memory card.
Locate the USB port on the back of your camera and slide the door open.•
Insert the USB cable (smaller end) into the USB port on the camera.•
Insert the larger end of the USB cable into a USB port on the computer. •
A USB port is usually marked with this symbol
.
To avoid data corruption, before uploading data to the PC or downloading data to the camera make
sure that your Kidizoom Camera™ does not have low battery levels.
MINIMUM SYSTEM REQUIREMENTS FOR PC CONNECTION:
Windows 2000 SP3+/ XP
Note: Once the camera is connected to the PC, turn ON your Kidizoom Camera™ to enable
the connection between it and the PC. Do not disconnect the camera or computer while les
are uploading or downloading. After you have nished, turn OFF the camera to save power.
ACTIVITIES
1. CAMERA
In Camera mode, the user can either look through the viewnders or look at the LCD screen to see •
the photo subject.
While holding the camera steady, press the Shutter Button • on the top of the camera or press the
OK Button
on the back of the camera to take a picture.
When • Kidizoom Camera™ is rst turned ON, it will be in Autoash mode. To change your ash
settings, press the Delete Button to switch between three options: No Flash mode
,
Flash mode and Autoash mode .
Warning: Turn off the autoash when taking a close photo of a person’s face to avoid eye damage.
Note: If the batteries are too weak, the Autoash feature may not be available and it will show this
icon
.
Choose a photo frame or stamp graphic before taking a picture and adding it to the photo. •
To choose a frame or stamp, press the Left or Right arrows on the 4-Directional Cursor Button
to scroll through the options. Then take a photo as usual and your selected frame or stamp will be
included on the photo.
To view the photos you’ve taken, press the Up or Down arrows on the 4-Directional Cursor Button •
once to enter the Photo Album. Then press the Up or Down arrows again to view the previous
or next picture stored in the album.
While in the Photo Album, press the Delete Button • to delete the photo that is currently shown
on the LCD screen.
To exit the Photo Album and return to Camera mode, press the Shutter Button • once.
Photos taken by • Kidizoom Camera™ will be saved in the PHOTO folder in the internal memory or
on the SD memory card (not included) if one is inserted into the camera.
Note: If you want to view other photos (resolution not larger than 1632 x 1224) downloaded from the
PC onto your Kidizoom Camera™, make sure they have been downloaded to the root directory of the
Kidizoom Camera™ or the root directory of the SD card (not included), otherwise you may not be able
to view them.
2. MOVIES
In Movies mode, you can make digital video movies with Kidizoom Camera™. Press the • Shutter
Button
at the top of the camera or the OK Button on the back of the camera to start or to
stop movie recording.
To watch the movies you’ve taken, press the Up or Down arrows on the 4-Directional Cursor Button •
once to enter the Movie Album. Next, press the Up or Down arrows again to choose the movie
that you want to watch, and then press the OK Button
to start the movie.
While in the Movie Album, press the Delete Button •
to delete the movie that is currently shown
on the LCD screen.
To exit the Movie Album and return to Movies mode, press the Shutter Button • once.
Movies taken by • Kidizoom Camera™ will be saved in the MOVIE folder in the internal memory or
on the SD memory card (not included) if one has been inserted into the camera.
GB
5
Page 7

3. PHOTO WORKSHOP
In Photo Workshop, you can edit a photo or record voice and add it to a photo.
3.1) PHOTO EDITOR
In Photo Editor, the user can add photo frames, stamps, and cool distortion effects to a photo or animate
the photo. Press the Left or Right arrows on the 4-Directional Cursor Button
and press the OK button
to choose a picture. Press the Up or Down arrows to choose one of the below functions, then press the OK
Button
to begin.
A. Photo Frame Icon
: Choose this icon to select a photo frame to add to your photo. Press the Left
or Right arrows on the 4-Directional Cursor Button to choose a frame, and then press the OK
Button
to conrm your selection.
B. Stamp Icon
: Choose this icon to select a stamp to add to your photo. Press the Left or Right
arrows on the 4-Directional Cursor Button
to choose a stamp. Then press the up or down arrow
keys to enlarge or shrink the size of the stamp, and press the OK Button
to conrm your selection.
Then press the arrows on the 4-Directional Cursor Button to move the stamp to where you want to
apply it, and then press the OK Button to add the stamp to the photo.
C Distortion Icon
: Choose this icon to select a distortion effect to add to your photo. Press the Left
or Right arrows on the 4-Directional Cursor Button
to choose an effect, and then press the OK
Button
to conrm your selection. Press the arrows on the 4-Directional Cursor Button to move the
distortion effect to where you want to apply it, and then press the OK Button
to add it to the photo.
Note: Generating a distortion effect on your camera may take more than 1minute.
D. Animation Icon
: Choose this icon to select an animation effect to add to your photo. Press the
Left or Right arrows on the 4-Directional Cursor Button
to choose an animation effect, and then
press the OK Button
to conrm your selection and to view the animated picture. Please note that
the animation effects cannot be saved.
E. Undo Icon
: Choose this icon to undo the last editing operation.
F. Save As Icon
: Choose this icon to save the photo that you just edited.
Note: The process of saving an edited photo with a distortion effect may take more than 1 minute.
All edited photos will be saved at 640x480 resolution.
3.2) VOICE PHOTO
In Voice Photo, you can record up to 10 seconds of voice to add to a photo. To start, press the Left or
Right arrows on the 4-Directional Cursor Button
to select a photo. If a photo already has recorded
voice added, it will have a speaker
displayed on it. Press the Left and Right arrows again to select
between the Record, Play or Delete Voice icons.
A. Record icon
: Choose this icon to start recording your voice. Choose it again to
stop recording. You can record up to 10 seconds of voice for each photo.
B. Play icon
: Choose this icon to play or stop the recorded voice for a photo.
C. Delete Voice icon
: Choose this icon to delete the recorded voice of a photo.
Note: The recorded voice for Voice Photos can only be heard while the photo is saved in the Kidizoom
Camera™ internal memory or on an SD memory card (not included) if one is inserted. Voice Photos
cannot be transferred to and played on a PC.
4. GAMES
Three games are built into Kidizoom Camera™. Press the Left or Right arrows on the
4-Directional Cursor Button
to choose a game, and then press the OK Button to start
playing the selected game.
A. TIC TAC TOE
Play against the computer, take turns to place playing pieces on the 3x3 Tic Tac
Toe grid. You can press the arrows on the 4-Directional Cursor Button
to move your piece on the grid, and then press the OK Button
to place it.
The rst player to get 3 pieces in a row vertically, horizontally or diagonally wins
the game!
B. ROTATION PUZZLE
Challenge yourself by unscrambling this photo puzzle! First you will see the
complete picture, and then it will be broken into 4 or 9 square pieces. Each piece
will rotate randomly. To restore the picture, use the arrows on the 4-Directional
Cursor Button
to select a piece, and press the OK Button to rotate the
piece back to its original position. When all of the pieces have been restored and
form the complete picture, you win! You can also make your own puzzle by
pressing the shutter button to switch to the camera mode. Press the shutter
button again and the photo that has just been taken will become the puzzle.
Activities
6
GB
Page 8

C. MATCHING PAIRS
Test your memory with this matching game. There will be 3 or 4 pairs of
objects hiding behind the windows. You can open two windows at a time.
Press the arrows on the 4-Directional Cursor Button
to select a window,
and then press the OK Button
to open it. If the objects behind two open
windows do not match, the windows will close and you can try again.
When all the matching pairs are found, you win!
5. MEMORY MANAGER
You can see the memory status of the camera’s internal memory and SD
memory card (not included) if one is inserted into Kidizoom Camera™.
Press the Up and Down arrow keys on the 4-Directional Cursor Button
to
select either the internal memory in Kidizoom Camera™ or the SD memory
card Press the OK Button
, and it will show “Set Default” and “Format”
options for the selected memory. “Set Default” will set the selected memory as
the default memory for saving photos and movies taken by Kidizoom Camera™. The selected default
location will display this indicator
. “Format” will erase all data and format the selected memory.
6. CD-ROM
The included CD-ROM contains the VTech® Photo Editor program. If you choose to install this Photo
Editor on your PC, you can add additional fun photo frames and stamps to your photos, as well as
add distortion and animation effects. Please see the Read Me and Help sections of the VTech® Photo
Editor for more details and user instructions.
MINIMUM HARDWARE REQUIREMENTS OF CD-ROM
INSTALLATION
• Pentium III 1GHz or equivalent
• 1024 x 768 24-bit Graphics Card
• Windows 2000/XP Operating System
CARE & MAINTENANCE
1. Keep the camera clean by wiping it with a moist cloth.
2. Keep the camera out of direct sunlight and away from any direct heat source.
3. Remove the batteries when the camera is not in use for an extended period of time.
Please note: To prevent data loss, copy all photos and movies from Kidizoom Camera™ to a PC
before removing batteries.
4. Do not drop the camera on a hard surface and do not expose it to moisture or immerse it in water.
WARNING
A very small percentage of the public, due to an existing condition, may experience epileptic seizures
or momentary loss of consciousness when viewing certain types of ashing colours or patterns,
especially on television.
While Kidizoom Camera™ does not contribute to any additional risks; we do recommend that parents
supervise their children while they play video games. If your child experiences dizziness, altered vision,
disorientation, or convulsions, discontinue use immediately and consult your physician.
Please note that focusing on a television screen at close range and handling a Kidizoom Camera™
as a controller for a prolonged period of time may cause fatigue or discomfort. We recommend that
children take a 15 minute break for every hour of play.
Activities / Care & Maintenance
GB
7
CAUTION!
Batteries should be installed by an adult. Remember to position + and - correctly.
Do not mix old and new batteries or different types of batteries.
Do not attempt to recharge batteries which are not rechargeable.
Remove batteries if the product is not in use for some time.
Do not short-circuit the battery contacts.
Page 9

Troubleshooting
GB
TROUBLESHOOTING
Go through this section if you experience difculty in operating Kidizoom Camera™.
Problem Solution
Program stops working
1. Press the Reset Button with a paper clip. If this does
not solve the problem, please continue the following
steps.
2. Please make sure the camera is OFF.
3. Interrupt the power supply by removing the
batteries.
4. Let the camera sit for a few minutes without
batteries, then replace the batteries and press the
Reset Button again.
5. Turn the camera ON. The camera should now be
ready to use again.
6. If the camera still does not work, replace the
batteries with an entire set of new batteries.
Image taken is not clear
1. Check to see if the camera lens protection window
is clean.
Display on Kidizoom Camera™
LCD does not turn on
1. Make sure there are 4 C (LR6/AA) batteries in the
camera. Hold the ON/OFF button to turn it on.
2. Make sure the camera is not connected to a TV with
the A/V cable.
3. Make sure the camera is not in power saving mode.
Press the ON/OFF button to turn it on.
There is no picture on the TV
screen
1. Make sure that there are batteries in the camera
and that TV and VCR (if using) are plugged into
power outlets.
2. Make sure that the camera is turned ON and the TV
and VCR (if using) are turned ON.
3. Check the connections on the A/V cable between
the camera and the TV (or VCR, if using) and
review the appropriate connection procedure in this
manual.
4. Make sure that all cable plugs are securely inserted
into the appropriate ports.
5. Make sure that the TV is tuned to the appropriate
input channel.
No sound on TV
1. Check if the TV volume is turned off or is in “Mute”
mode.
2. Try to increase the volume by pressing the
“up” volume button.
3. Check the audio and video connections between
the camera and the TV or VCR (if using).
4. Make sure that the TV is tuned to the appropriate
input channel.
Picture is rolling or has bars or
lines on TV
1. Try to adjust the vertical or horizontal hold controls
(if available) on your TV.
8
Page 10
Cannot save les
1. Check the memory status of both the internal
Kidizoom Camera™ memory and the SD memory
card (not included) if one has been inserted into the
camera.
2. Check your memory default setting (see procedure
in the Memory Manager section). If it is set to
use an SD memory card (not included), check
to make sure that the SD memory card is not
write-protected.
The TV picture is black and white
1. Non-matching color system
Make sure that the TV is set to the correct TV
system (e.g. PAL, NTSC or AUTO).
2. Cable connection problem
Make sure that the video cable is rmly connected
to the video input of the TV.
There is a picture on the TV, but
no sound
1. TV setting
Raise the volume of the TV, and make sure it is not
set to “Mute.”
2. Cable connection problem
Make sure that the white and/or red plug is rmly
connected to the audio input of the TV.
When operating in environments that are subject to electrostatic discharge,
the camera may malfunction. If this occurs, reset the camera using the ON/OFF switch.
Troubleshooting
GB
9
Page 11

Liebe Eltern,
Wir bei VTech
®
wissen, wie wichtig der erste Schultag für Ihr
Kind ist. Um Vorschulkindern die Vorbereitung auf dieses wichtige
Ereignis zu erleichtern, hat VTech
®
das Pre-school Learning™
Sortiment mit interaktivem Spielzeug entwickelt.
Pre-school Learning™ bietet lustige Figuren und interessante
Schulthemen, die mittels Technologie die Aufmerksamkeit eines
Kindes gewinnen und ihm wichtige Vorschulfähigkeiten wie
Kreativität, vergleichendes Gedächtnis und Logik vermitteln.
Diese ungemein wichtigen Fähigkeiten werden in vergnüglicher
Weise und hoch motivierend gefördert, um das Interesse des Kindes
aufrecht zu erhalten. Die Kinder werden auch an Schulthemen wie
Kunst- und Musikunterricht und sogar die Pausen herangeführt!
Mit Pre-school Learning™ bedeutet Lernen Spaß vom ersten
Tag an!
Wir bei VTech
®
wissen, dass jedes Kind die Fähigkeit besitzt,
großartige Dinge zu tun. Darum sind all unsere elektronischen
Lernprodukte in einzigartiger Weise dafür konzipiert, den kindlichen
Verstand weiterzuentwickeln und den Kindern zu ermöglichen,
sich ganz nach ihren persönlichen Stärken zu entfalten. Wir danken
Ihnen für Ihr Vertrauen in VTech
®
bei der wichtigen Aufgabe, Ihrem
Kind beim Lernen und Heranwachsen zur Seite zu stehen!
Mit freundlichen Grüßen
Ihr VTech
®
Team
Um mehr über Pre-school Learning™ und anderes VTech
®
Spielzeug zu erfahren, besuchen Sie bitte
www.vtechkids.com
DE
10
Page 12
11
Einführung
DE
EINFÜHRUNG
Vielen Dank für den Kauf der VTech® Kidizoom Camera™!
Die Kidizoom Camera™ ist eine fröhlich gestaltete und robuste Digitalkamera, mit der Kinder Fotos
aufnehmen, bearbeiten und betrachten, digitale Videos drehen und lustige Spiele spielen können!
Die Kidizoom Camera™ lässt sich zum Betrachten von Fotos oder Videos und zum Spielen auch am
TV-Gerät anschließen. Die Kidizoom Camera™ verfügt über 16 MB internen Speicher und unterstützt
eine Secure Digital (SD) Speicherkarte mit bis zu 2 GB Kapazität (nicht beiliegend), auf der noch mehr
Fotos und Videos Platz nden! Mit ihrem USB-Port und Kabel lässt sich die Kidizoom Camera™ am
Heim-PC anschließen, um dort Fotos und Videos zu betrachten oder Bilder zu bearbeiten und
auszudrucken.
AUSSTATTUNG
GESTALTUNG UND BEDIENUNGSELEMENTE
Ein/Aus-Taste
Diese Taste drücken, um die Kamera ein- oder auszuschalten.
Lautstärketasten
Diese Tasten drücken, um die Lautstärke zu regeln.
USB-Port
Das beiliegende USB-Kabel in den USB-Port stecken, um die Kamera am PC anzuschließen.
Modustaste
Diese Taste drücken, um das Hauptmenü aufzurufen oder zurück zum letzten Untermenü zu gelangen.
Steuertaste (vier Richtungen)
Diese Taste drücken, um die Auswahlmarkierung zu bewegen und eine Auswahl zu treffen.
OK-Taste
Diese Taste drücken, um eine Auswahl oder Aktion zu bestätigen.
Löschtaste
Diese Taste drücken, um die ausgewählte Datei zu löschen.
Auslöser
Diese Taste drücken, um ein Foto zu machen oder eine Videoaufnahme zu starten.
A/V-Port
Das beiliegende A/V-Kabel in den A/V-Port stecken, um die Kamera am TV-Gerät anzuschließen.
Reset-Taste
Diese Taste drücken, um die Kamera in den Grundzustand zu versetzen, wenn sie einmal nicht korrekt
funktionieren sollte. Hinweis: Durch Drücken der Reset-Taste werden alle Daten im internen Speicher der
Kidizoom Camera™ gelöscht. Auf einer optionalen SD-Speicherkarte (nicht beiliegend) gesicherte Daten
bleiben jedoch erhalten.
Blitz
Die automatische Belichtungssteuerung der Kidizoom Camera™ schaltet bei Bedarf den
eingebauten Blitz zu. Sobald der Blitz einsatzbereit ist, erscheint im Kameramodus oben links
auf dem Display ein Blitzsymbol
LIEFERUMFANG
1 VTech® Kidizoom Camera™•
2 austauschbare Schmuckblenden•
1 CD-ROM zur Installation auf dem PC mit zusätzlichen Funktionen im Photo Editor•
1 A/V-Kabel•
1 USB-Kabel•
1 Bedienungsanleitung•
1 Handgelenktragriemen •
Warnung: Sämtliches Verpackungsmaterial wie Klebeband, Plastikfolien, Kabelbinder und Anhänger/
Etiketten, das nicht Teil dieses Spielzeugs ist, sollte zur Sicherheit Ihres Kindes sofort entsorgt
werden.
Auslöser
Objektiv
Mikrofon
Blitz
Steuertaste
(vier Richtungen)
A/V-Kabel für
TV-Anschluss
Modustaste
USB-Kabel für
PC-Anschluss
Lautstärketasten
OK-Taste
Löschtaste
Ein/Aus-Taste
Doppelsucher
Mikrofon
Batteriedeckel (1)
Reset-Taste
Batteriedeckel (2)
Page 13
DE
12
Einführung / Erste Schritte
PRODUKTSPEZIFIKATIONEN
Display: 1,8-Zoll TFT-Farb-LCD
Bildauösung: Foto: 640 x 480 Video: 160 x 120
Brennweitenbereich: 45 cm - ∞
Blitzreichweite: 1 – 2 Meter
Speicher:
16 MB interner Speicher (davon ca. 12 MB frei für Fotos oder Filme).
Fotos: Speichert ungefähr 200 Fotos (Auösung 640 x 480, Format JPEG)
Videos: Aufnahme von bis zu 5 Minuten Video (Auösung 160 x 120, Format Motion JPEG).
Die Kidizoom Camera™ unterstützt als Speichererweiterung eine Secure Digital (SD) Speicherkarte
mit bis zu 2 GB Kapazität (nicht beiliegend).
Unterstützte Dateiformate:
Foto: JPEG (bis zu 2 Megapixel bei 1632 x 1224 Auösung)
Video: Kidizoom Camera™ Motion JPEG
Unterstützte Hardware:
A/V-Kabel für TV-Anschluss (beiliegend)
USB-Kabel für PC-Anschluss (beiliegend)
SD-Speicherkarten bis 2 GB (nicht beiliegend)
ERSTE SCHRITTE
BATTERIEN EINLEGEN
Hinweis: Für das Einlegen der Batterie ist die Hilfe eines Erwachsenen erforderlich. Verwenden Sie für
das Einlegen der Batterien einen Schraubendreher.
Vergewissern Sie sich, dass die Kamera ausgeschaltet ist.•
Suchen Sie die Deckel der Batteriefächer unten an der Kamera. Lösen Sie die •
Schrauben mit dem Schraubendreher und nehmen
Sie die Deckel der Batteriefächer ab.
Legen Sie vier neue C (LR6/AA) Batterien •
(je zwei auf jeder Seite) wie unten gezeigt ein.
(Für optimale Leistung sollten frische
Alkaline-Batterien verwendet werden.)
Die Deckel der Batteriefächer wieder aufsetzen und die •
Schrauben festzie hen. Die Schrauben nicht überdrehen.
Hinweis: Wenn die Kidizoom Camera™ nach Einlegen
der Batterien nicht korrekt funktioniert, drücken Sie die Reset-Taste und
schalten die Kamera danach aus und wieder ein. Durch Drücken der
Reset-Taste werden alle Daten im internen Speicher der Kidizoom Camera™ gelöscht. Auf einer
optionalen SD-Speicherkarte (nicht beiliegend) gesicherte Daten bleiben jedoch erhalten.
Empfehlung:
Wenn die Batterien in der Kidizoom Camera™ erschöpft sind [icon] oder länger als einige Minuten
herausgenommen werden, gehen die Daten im internen Speicher verloren. Wir empfehlen eine
SD-Speicherkarte (nicht beiliegend) zu verwenden und die Grundeinstellungen so zu wählen, dass die
mit der Kidizoom Camera™ aufgenommenen Fotos und Videos auf der SD-Karte gespeichert werden.
Ohne SD-Speicherkarte (nicht beiliegend) müssen Sie daran denken, die Fotos und Videos aus dem
internen Speicher auf einen PC zu kopieren, ehe die Batterien erschöpft sind oder herausgenommen
werden.
HINWEIS ZU BATTERIEN
Für optimale Leistung wird die Verwendung neuer Alkaline-Batterien empfohlen.•
Die Batterien unter Beachtung der Polaritätszeichen (+ und -) einlegen, damit sie nicht auslaufen.•
Niemals gebrauchte und neue Batterien gleichzeitig einlegen.•
Niemals Batterien unterschiedlichen Typs gleichzeitig einlegen: Alkaline, normal (Kohle-Zink) oder •
wieder auadbar (Nickel-Cadmium).
Die Batterien herausnehmen, wenn das Gerät über längere Zeit hinweg nicht benutzt wird. Bitte •
beachten: Um Datenverluste zu vermeiden, vor dem Herausnehmen der Batterien alle Fotos und
Videos von der Kidizoom Camera™ auf einen PC kopieren.
Verbrauchte Batterien immer aus dem Gerät herausnehmen.•
Batterien niemals ins Feuer werfen.•
Niemals versuchen, normale Batterien wieder aufzuladen.•
Die Stromkontakte niemals kurzschließen.•
Nur Batterien des gleichen oder eines äquivalenten Typs wie empfohlen verwenden. •
Wir raten von der Verwendung wieder auadbarer Batterien ab.
SD-SPEICHERKARTE EINLEGEN
Die Kidizoom Camera™ unterstützt als Speichererweiterung eine Secure
Digital (SD) Speicherkarte mit bis zu 2 GB Kapazität (nicht beiliegend).
Vergewissern Sie sich, dass die Kamera ausgeschaltet ist.•
Öffnen Sie den Deckel des rechten Batteriefachs •
(bei Blick auf das LCD-Display der Kamera).
Suchen Sie den SD-Karteneinschub im Batteriefach.•
Legen Sie die SD-Karte (nicht beiliegend) wie unten gezeigt ein.•
Den Deckel des Batteriefachs wieder aufsetzen und die Schraube festziehen. •
Die Schraube nicht überdrehen.
SD card
Page 14
13
Schmuckblende austauschen / Inbetriebnahme der Kidizoom Camera™
DE
SCHMUCKBLENDE
AUSTAUSCHEN
1. Den unteren Rand der Schmuckblende vorsichtig anheben und die Schmuckblende von der
Kidizoom Camera™ abnehmen.
2. Die Haken der neuen Schmuckblende wie rechts gezeigt in die Öffnungen an der Kamera schieben.
3. Den unteren Teil der Schmuckblende gegen die Kamera drücken, bis sie einrastet.
INBETRIEBNAHME DER
KIDIZOOM CAMERA™
Die EIN/AUS-Taste • drücken, um die Kamera einzuschalten. Nach dem
Einschalten wechselt die Kidizoom Camera™ direkt in den Kameramodus
und ist bereit für die Aufnahme von Fotos.
Um auf andere Aktivitäten umzuschalten, drücken Sie die Modustaste •
zum Aufrufen des Hauptmenüs. Im Hauptmenü können Sie zwischen
folgenden Aktivitäten wählen: Kamera, Video, Bildbearbeitung, Spiele und Systemeinstellungen.
Zu Einstellung der Lautstärke drücken Sie die Lautstärketasten•
.
Für den Anschluss an ein TV-Gerät oder einen PC folgen Sie den Anleitungen unter Anschluss an •
ein TV-Gerät“ bzw. „Anschluss an einen PC“ weiter unten.
Die EIN/AUS-Taste erneut drücken, um die Kamera auszuschalten.•
BATTERIESTATUS
Wenn auf dem Display das Batteriewarnsymbol erscheint, sollten Sie alle Daten aus dem
internen Speicher der Kidizoom Camera™ auf einen PC hochladen und anschließend die Batterien
wechseln. Wenn auf dem Display das Symbol „Keine Batterien“ erscheint, funktioniert die Kamera nicht korrekt. Vor Verwendung der Kamera sollten dann neue Batterien eingelegt werden.
Hinweis: Um den Verlust von Daten im internen Speicher der Kidizoom Camera™ zu vermeiden,
sichern Sie die Daten oder wechseln Sie die Batterien, sobald das Batteriewarnsymbol erscheint.
Beim Batteriewechsel müssen Sie die neuen Batterien innerhalb weniger Minuten nach Herausnehmen
der alten Batterien einlegen. Um Datenverluste zu vermeiden, empfehlen wir, die Daten im internen
Speicher der Kidizoom Camera™ regelmäßig zu sichern und wenn möglich eine
SD-Speicherkarte (nicht beiliegend) für die Datenspeicherung zu verwenden.
AUTOMATISCHE ABSCHALTUNG
Um die Batterien zu schonen, schaltet sich die Kidizoom Camera™ automatisch ab, wenn 1 bis 2
Minuten lang keine Taste betätigt wurde. Durch Drücken der EIN/AUS-Taste kann die Kamera wieder
eingeschaltet werden.
ANSCHLUSS AN EIN TV-GERÄT
HINWEIS: Vergewissern Sie sich durch vorheriges Einschalten der Kamera, dass die Kidizoom
Camera™ korrekt funktioniert, ehe Sie die Kamera an ein TV-Gerät anschließen. Nach Einschalten
der Kamera leuchtet das Display der Kamera auf und sie wechselt in den Kameramodus. Wenn das
Display nicht aueuchtet, prüfen Sie, ob die Batterien korrekt eingelegt sind.
Schließen Sie die Kidizoom Camera™ mit dem beiliegenden A/V-Kabel an einem
TV-Gerät oder Monitor an. Stecken Sie das A/V-Kabel in den A/V-Port der Kidizoom
Camera™. Schieben Sie die farbigen Stecker am A/V-Kabel in die passenden farbigen
Video- und Audioanschlüsse des TV-Geräts.
ANSCHLUSS AN EINEN VIDEOREKORDER
Wenn am TV-Gerät keine Video- und Audioeingänge verfügbar sind,
können Sie die Kidizoom Camera™ auch an einen Videorekorder anschließen.
Stecken Sie das A/V-Kabel in den A/V-Port der Kidizoom Camera™.•
Verbinden Sie den gelben Stecker am A/V-Kabel mit dem gelb gekennzeichneten Videoeingang des •
Videorekorders.
Verbinden Sie den weißen Stecker am A/V-Kabel mit dem weiß gekennzeichneten Audioeingang •
des Videorekorders.
Hinweis: Wenn das A/V-Kabel an der Kidizoom Camera™ angeschlossen wird, während gerade ein
Spiel auf dem LCD-Display läuft, wird das Spiel beendet und das Hauptmenü erscheint. Wenn das
A/V-Kabel von der Kidizoom Camera™ getrennt wird, während gerade ein Spiel auf dem TV-Gerät
läuft, wird das Spiel beendet und auf dem Kameradisplay erscheint das Hauptmenü.
Hauptmenü
2
1
3
Page 15

DE
Inbetriebnahme der Kidizoom Camera™ / Aktivitäten
ANSCHLUSS AN EINEN PC
Sie können mit dem beiliegenden USB-Kabel die Kidizoom Camera™ an einem PC anschließen. So ist
es möglich, Dateien zwischen PC und Kidizoom Camera™ zu übertragen, die wie ein portables Speichermedium angesprochen wird. Wenn die Kidizoom Camera™ mit dem PC verbunden ist, erscheint am
PC ein neues Laufwerk mit der Bezeichnung „VTech 773“. Ist in der mit dem PC verbundenen Kamera
eine SD-Speicherkarte (nicht beiliegend) eingelegt, erscheinen am PC zwei neue Laufwerke. Eines trägt
die Bezeichnung „VTech 773“, die SD-Speicherkarte erscheint als mobiles Laufwerk.
Suchen Sie den USB-Port auf der Rückseite der Kamera und schieben Sie die Abdeckung auf.•
Stecken Sie den kleineren Stecker des USB-Kabels in den USB-Port der Kamera.•
Stecken Sie den größeren Stecker des USB-Kabels in den USB-Port des Computers. •
Ein USB-Port ist meist mit diesem Symbol
gekennzeichnet.
Um Beschädigungen der Daten zu vermeiden, sollten Sie sich vor dem Austausch von Daten zwischen
Kamera und PC vergewissern, dass die Batterien in der Kidizoom Camera™ noch hinreichend geladen
sind.
MINDESTSYSTEMANFORDERUNGEN FÜR PC-ANSCHLUSS:
Windows 2000 SP3+/ XP
Hinweis: Nachdem die Kamera am PC angeschlossen ist, schalten Sie die Kidizoom
Camera™ ein, um die Verbindung zwischen ihr und dem PC zu aktivieren. Trennen Sie die
Verbindung zwischen Kamera und Computer nicht, solange Daten übertragen
werden. Schalten Sie anschließend die Kamera wieder aus, um die Batterien zu schonen.
AKTIVITÄTEN
1. KAMERA
Im Kamera-Modus kann der Benutzer durch die Sucher oder auf das LCD-Display schauen, um das •
Bildmotiv zu sehen.
Um eine Aufnahme zu machen, die Kamera ruhig halten und den Auslöser • oben an der Kamera
oder die OK-Taste
an der Rück seite der Kamera drücken.
Nach dem ersten Einschalten ist bei der • Kidizoom Camera™ der automatische Blitz aktiviert.
Um die Blitzeinstellungen zu ändern, schalten Sie mit der Löschtaste zwischen drei Optionen um:
Kein Blitz
, Blitz und automatischer Blitz .
Warnung: Um Augenschäden zu vermeiden, sollte der automatische Blitz bei Nahaufnahmen von
Gesichtern ausgeschaltet sein.
Hinweis: Wenn die Batterien zu schwach sind, ist der automatische Blitz möglicherweise nicht mehr
verfügbar. Dann erscheint dieses Symbol
.
Wählen Sie vor der Aufnahme eines Fotos einen Rahmen oder eine Stem pelgrak, die eingefügt •
werden soll. Um einen Rahmen oder einen Stem pel auszuwählen, drücken Sie den Links- oder
Rechtspfeil der Steuertaste
und blättern durch die Optionen. Nehmen Sie dann das Foto ganz
normal auf. Der ausgewählte Rahmen oder Stempel wird dem Bild hinzugefügt.
Um die aufgenommenen Bilder anzusehen, drücken Sie einmal den Aufwärts- oder Abwärtspfeil der •
Steuertaste
. Damit öffnen Sie das Fotoalbum. Drücken Sie erneut den Aufwärts- bzw. Abwärtspfeil,
um das vorangehende bzw. nächste Bild zu sehen.
Weiterhin im Fotoalbum drücken Sie die Löschtaste •
, um das gerade auf dem LCD-Display
gezeigte Bild zu löschen.
Um das Fotoalbum zu verlassen und in den Kamera-Modus zurückzuke hren, drücken Sie einmal •
den Auslöser
.
Die mit der • Kidizoom Camera™ aufgenommenen Fotos werden im Ordner PHOTO des internen
Speichers oder auf der SD-Speicherkarte (nicht beiliegend) gespeichert, sofern eine SD-Karte
eingelegt ist.
Hinweis: Wenn Sie andere Bilder (Auösung maximal 1632 x 1224) betrachten wollen, die Sie vom PC
auf die Kidizoom Camera™ heruntergeladen haben, müssen diese Bilder im Stammverzeichnis der
Kidizoom Camera™ oder der SD-Karte (nicht beiliegend) stehen, sonst können sie nicht angezeigt
werden.
2. VIDEOS
Im Video-Modus können Sie mit der • Kidizoom Camera™ digitale Videos aufzeichnen. Um die
Filmaufnahme zu starten oder zu stoppen, drücken Sie den Auslöser oben an der Kamera oder
die OK-Taste
an der Rückseite der Kamera.
Um die aufgenommenen Videos anzusehen, drücken Sie einmal den Aufwärts- oder Abwärtspfeil der•
Steuertaste
. Damit öffnen Sie das Filmalbum. Drücken Sie erneut den Aufwärts- oder
Abwärtspfeil, um das gewünschte Video auszuwählen, und dann die OK-Taste
, um die Wieder
gabe zu starten.
Weiterhin im Filmalbum drücken Sie die Löschtaste • , um das gerade auf dem LCD-Display
gezeigte Video zu löschen.
Um das Filmalbum zu verlassen und in den Video-Modus zurückzukehren, drücken Sie einmal den •
Auslöser
.
Die mit der• Kidizoom Camera™ aufgenommenen Videos werden im Ordner MOVIE des internen
Speichers oder auf der SD-Speicherkarte (nicht beiliegend) gespeichert, sofern eine SD-Karte
eingelegt ist.
14
Page 16

15
Aktivitäten
DE
3. PHOTO WORKSHOP
In Photo Workshop können Sie ein Foto bearbeiten oder einen Sprachkommentar
aufzeichnen und einem Foto beifügen.
3.1) PHOTO EDITOR
In Photo Editor können Sie Fotorahmen, Stempel und einen interessanten Verfremdungseffekt auf ein Foto
anwenden oder das Foto animieren. Um ein Bild auszuwählen, drücken Sie den Links- oder Rechtspfeil
der Steuertaste
und dann OK. Drücken Sie den Aufwärts- oder Abwärtspfeil, um eine der unten
beschriebenen Funktionen auszuwählen, und dann die OK-Taste
, um zu beginnen.
A. Symbol Fotorahmen
: Wählen Sie dieses Symbol, um Ihrem Foto einen Rahmen zuzuweisen.
Um einen Rahmen auszuwählen, drücken Sie den Links- oder Rechtspfeil der Steuertaste
und
dann die OK-Taste
.
B. Symbol Stempel
: Wählen Sie dieses Symbol, um Ihrem Foto einen Stempel zuzuweisen.
Um einen Stempel auszuwählen, drücken Sie den Links- oder Rechtspfeil der Steuertaste .
Drücken Sie dann den Aufwärts- oder Abwärtspfeil, um den Stempel zu vergrößern oder zu
verkleinern. Drücken Sie die OK-Taste
, um die Auswahl zu bestätigen. Drücken Sie anschließend
die Pfeile der Steuertaste, um den Stempel an die gewünschte Einfügeposition zu bewegen.
Drücken Sie die OK-Taste, um den Stempel in das Foto einzufügen.
C. Symbol Verfremdung
: Wählen Sie dieses Symbol, um einen Verfremdungsef fekt auf Ihr Foto
anzuwenden. Um einen Effekt auszuwählen, drücken Sie den Links- oder Rechtspfeil der Steuertaste
und bestätigen mit der OK-Taste
Ihre Wahl. Drücken Sie anschließend die Pfeile der Steuertaste,
um den Verfremdungseffekt an die gewünschte Position zu bewegen. Drücken Sie dann die
OK-Taste
, um den Effekt auf das Foto anzuwenden.
Hinweis: Die Erzeugung eines Verfremdungseffekts kann mit der Kamera länger als eine Minute dauern.
D. Symbol Animation
: Wählen Sie dieses Symbol, um einen Animationseffekt auf Ihr Foto
anzuwenden. Um einen Animationseffekt auszuwählen, drücken Sie den Links- oder Rechtspfeil der
Steuertaste
. Drücken Sie dann die OK-Taste , um Ihre Wahl zu bestätigen und das animierte
Bild zu betrachten. Bitte beachten Sie, dass Animationseffekte nicht gespeichert werden können.
E. Symbol Rückgängig
: Wählen Sie dieses Symbol aus, um den letzten Bearbeitungsschritt
rückgängig zu machen.
F. Symbol Speichern unter
: Wählen Sie dieses Symbol aus, um das gerade bearbeitete Foto zu
speichern.
Hinweis: Das Speichern eines mit Verfremdungseffekt bearbeiteten Fotos kann über eine Minute dauern.
Alle bearbeiteten Fotos werden in der Auösung 640 x 480 gespeichert.
3.2) VOICE PHOTO
In Voice Photo können Sie einem Foto einen bis zu 10 Sekunden langen Sprachkommentar beifügen. Zu
Beginn drücken Sie den Links- oder Rechtspfeil der Steuertaste
, um ein Foto auszuwählen. Wenn es
bereits einen Sprachkommentar zum Foto gibt, erscheint darauf ein Lautsprechersymbol
. Drücken
Sie erneut den Links- oder Rechtspfeil, um zwischen den Symbolen Aufnahme, Wiedergabe und Löschen
zu wechseln.
A. Symbol Aufnahme
: Wählen Sie dieses Symbol, um die Sprachaufnahme zu starten. Wählen Sie
das Symbol erneut, um die Aufzeichnung zu beenden. Sie können zu jedem Foto bis zu 10 Sekunden
Sprachkommentar aufnehmen.
B. Symbol Wiedergabe
: Wählen Sie dieses Symbol, um den zu einem Foto aufgezeichneten
Sprachkommentar abzuspielen oder die Wiedergabe zu beenden.
C. Symbol Stimme löschen
: Wählen Sie dieses Symbol, um den Sprachkom mentar zu einem
Foto zu löschen.
Hinweis: Die Sprachaufzeichnung für Voice Photos ist nur zu hören, wenn das Foto im internen Speicher
der Kidizoom Camera™ oder auf einer eventuell vorhandenen SD-Speicherkarte (nicht beiliegend)
gespeichert ist. Voice Photos können nicht auf einen PC übertragen und dort abgespielt werden.
4. SPIELE
In der Kidizoom Camera™ sind drei Spiele integriert. Um ein Spiel auszuwählen, drücken Sie den Linksoder Rechtspfeil der Steuertaste
und dann die OK-Taste , um das ausgewählte Spiel zu starten.
A. TIC-TAC-TOE
Spielgegner ist der Computer der Kamera. Auf das 3x3 Tic-Tac-Toe-Gitter
müssen die Spieler abwechselnd ihre Steine ablegen. Mit den Pfeilen der
Steuertaste
können Sie den Spielstein auf das gewünschte Feld bewegen
und durch Drücken der OK-Taste
platzieren. Der Spieler, der als erster
drei seiner Steine in einer vertikalen, horizontalen oder diagonalen Reihe
ablegen kann, hat gewonnen!
Page 17

DE
16
Aktivitäten / Pflege und Wartung
B. ROTATIONSPUZZLE
Die Lösung dieses Fotopuzzles ist eine echte Herausforderung! Zuerst sehen
Sie das komplette Bild, dann zerfällt es in vier oder neun rechteckige Teile.
Jedes dieser Teile dreht sich ganz zufällig. Um das Bild wieder
zusammenzusetzen, wählen Sie mit den Pfeilen der Steuertaste
ein Teil aus
und drücken die OK-Taste
, um es in seine ursprüngliche Position zu drehen.
Wenn alle Teile wieder richtig herum stehen und ein vollständiges Bild formen,
ist das Spiel gewonnen! Sie können ein eigenes Puzzle erstellen, indem Sie
den Auslöser drücken, um in den Kameramodus zu wechseln. Drücken Sie den Auslöser erneut,
und das gerade aufgenommene Bild wird zum Puzzle.
C. MEMORY
Fordern Sie Ihr Gedächtnis mit diesem Memory-Spiel. Hinter den Fenstern
verbergen sich drei oder vier Paare von Objekten. Sie können immer zwei
Fenster gleichzeitig öffnen. Um ein Fenster auszuwählen, drücken Sie die Pfeile
der Steuertaste
und drücken dann die OK-Taste , um es zu öffnen.
Wenn die beiden Objekte in den offenen Fenstern nicht identisch sind, schließen
sich die Fenster und Sie können es erneut versuchen. Das Spiel ist gewonnen,
wenn alle passenden Paare gefunden sind!
5. SPEICHERMANAGER
Sie können den Status des internen Speichers der Kidizoom Camera™ und einer
eventuell vorhandenen SD-Karte (nicht beiliegend) abrufen. Drücken Sie den
Aufwärts- oder Abwärtspfeil der Steuertaste
, um den internen Speicher der
Kidizoom Camera™ oder die SD-Speicherkarte auszuwählen. Drücken Sie die
OK-Taste
. Die Optionen “Set Default” (als Standardspeicher festlegen) und
“Format” (Formatieren) für den ausgewählten Speicher erscheinen. „Set Default“ legt
den ausgewählten Speicher als Standardspeicher für Fotos und Videos fest, die mit
der Kidizoom Camera™ aufgenommen werden. Der so ausgewählte Speicher wird mit diesem Symbol
gekennzeichnet. „Format“ löscht alle Daten aus dem ausgewählten Speicher und formatiert ihn neu.
6. CD-ROM
Die beiliegende CD-ROM enthält das Programm VTech® Photo Editor. Wenn Sie Photo Editor auf Ihrem
PC installieren, haben Sie noch mehr Möglichkeiten, Fotos mit Rahmen und Stempeln zu versehen oder
Verfremdungs- und Animationseffekte darauf anzuwenden. Weitere Einzelheiten und die Anleitungen zur
Bedienung nden Sie in der Read-Me-Datei und der Hilfefunktion von VTech® Photo Editor.
HARDWARE-MINDESTANFORDERUNGEN FÜR DIE
INSTALLATION DER CD-ROM
• Pentium III 1 GHz oder gleichwertig
• 1024 x 768 24-Bit Grakkarte
• Windows 2000/XP Betriebssystem
PFLEGE UND WARTUNG
1. Zum Reinigen die Kamera mit einem feuchten Tuch abwischen.
2. Die Kamera keiner direkten Sonneneinstrahlung oder Hitzequelle aussetzen.
3. Batterien aus der Kamera herausnehmen, wenn sie für einen längeren Zeitraum nicht verwendet wird.
Bitte beachten: Um Datenverluste zu vermeiden, vor dem Herausnehmen der Batterien alle Fotos und
Videos von der Kidizoom Camera™ auf einen PC kopieren.
4. Die Kamera nicht auf einen harten Untergrund fallen lassen, keiner Feuchtigkeit aus setzen und nicht in
Wasser eintauchen.
WARNUNG
Bei einem sehr geringen Teil der Bevölkerung besteht aufgrund einer Veranlagung die Gefahr, epileptische
Anfälle zu erleiden oder das Bewusstsein zu verlieren, wenn sie bestimmte Arten blinkender Farben oder
Muster betrachten. Dies gilt insbesondere bei Fernsehgeräten.
Die Kidizoom Camera™ trägt hierzu keine zusätzlichen Risiken bei. Dennoch
empfehlen wir, dass Eltern ihre Kinder beim Spielen von Videospielen beaufsichtigen. Sollte Ihr Kind
Schwindelgefühle, Sehstörungen, Desorientierung oder Krämpfe erleiden, unterbinden Sie sofort die
Nutzung der Kamera und suchen Sie einen Arzt auf.
Bitte beachten Sie, dass der Blick auf einen Fernsehschirm aus geringer Entfernung und die Handhabung
der Kidizoom Camera™ als Steuerung über einen längeren Zeitraum hinweg zu Müdigkeit und
Unbehagen führen kann. Wir empfehlen, dass Kinder beim Spielen mit der Kamera für jede Stunde Spiel
eine fünfzehnminütige Pause einlegen.
BITTE BEACHTEN:
Das Einsetzen der Batterien darf nur von Erwachsenen ausgeführt werden.
Batterien gemäß den + und - Markierungen richtig einlegen.
Verwenden Sie nie alte und neue Batterien oder verschiedene Arten von Batterien gleichzeitig.
Nicht-auadbare Batterien dürfen nicht geladen werden.
Batterien aus dem Produkt herausnehmen, wenn dieses für einen längeren Zeitraum nicht verwendet wird.
Batterien nicht kurzschließen.
Page 18

17
Problemlösung
DE
PROBLEMLÖSUNG
Lesen Sie diesen Abschnitt, wenn Sie beim Betrieb der Kidizoom Camera™ auf Probleme stoßen.
Problem Lösung
Das Programm stellt seine
Funktion ein.
1. Drücken Sie mit einer Büroklammer die Reset-Taste.
Besteht die Störung weiter, fahren Sie mit den nachfolgen
den Schritten fort.
2. Vergewissern Sie sich, dass die Kamera ausgeschaltet ist.
3. Unterbrechen Sie durch Herausnehmen der Batterien die
Stromversorgung.
4. Lassen Sie die Kamera einige Minuten ohne Batterien
stehen. Legen Sie dann die Batterien wieder ein und
drücken Sie erneut die Reset-Taste.
5. Schalten Sie die Kamera EIN. Die Kamera sollte jetzt
wieder betriebsbereit sein.
6. Wenn die Kamera noch immer nicht funktioniert, ersetzen
Sie die Batterien durch einen kompletten Satz neuer
Batterien.
Das aufgenommene Bild ist
unscharf.
1. Prüfen Sie, ob das Schutzfenster vor dem Objektiv sauber
ist.
Das LCD-Display der Kidizoom
Camera™ schaltet sich nicht ein.
1. Vergewissern Sie sich, dass vier C (LR6/AA) Batterien in
der Kamera eingelegt sind. Halten Sie die EIN/AUS Taste gedrückt, um die Kamera einzuschalten.
2. Vergewissern Sie sich, dass die Kamera nicht über
A/V-Kabel mit einem TV-Gerät verbunden ist.
3. Vergewissern Sie sich, dass die Kamera sich nicht im
Energiesparmodus bendet. Drücken Sie die EIN/AUS-
Taste, um die Kamera einzuschalten.
Auf dem TV-Schirm erscheint
kein Bild.
1. Vergewissern Sie sich, dass Batterien in der Kamera
eingelegt sind und dass TV-Gerät und Videorekorder
(falls verwendet) an ihre Netzsteckdosen angeschlossen
sind.
2. Vergewissern Sie sich, dass die Kamera eingeschaltet ist
und dass TV-Gerät und Videorekorder (falls verwendet)
ebenfalls eingeschaltet sind.
3. Überprüfen Sie die Anschlüsse des A/V-Kabels zwischen
Kamera und TV-Gerät (oder Videoreko rder, falls
verwendet). Gehen Sie die Anschluss prozedur weiter
oben in diesem Handbuch nochmals durch.
4. Vergewissern Sie sich, dass alle Kabelstecker fest in den
richtigen Ports stecken.
5. Vergewissern Sie sich, dass das TV-Gerät auf den
richtigen Eingangskanal eingestellt ist.
Kein Ton am TV-Gerät. 1. Prüfen Sie, ob die Lautstärke des TV-Geräts
heruntergedreht oder die „Mute“ (Stummschalten)
Taste gedrückt wurde.
2. Versuchen Sie, die Lautstärke höher einzustellen.
3. Überprüfen Sie die Audio- und Videoanschlüsse
zwischen Kamera und TV-Gerät oder Videorekorder
(falls verwendet).
4. Vergewissern Sie sich, dass das TV-Gerät auf den
richtigen Eingangskanal eingestellt ist.
Das Bild läuft oder auf dem TVSchirm sind Balken oder Linien
zu sehen.
1. Justieren Sie den vertikalen oder horizontalen Bildlauf
ihres TV-Geräts (falls möglich).
Page 19

DE
18
Problemlösung
Speichern von Dateien nicht
möglich.
1. Prüfen Sie den Speicherstatus des internen Speichers der
Kidizoom Camera™ und der eventuell vorhandenen
SD-Speicherkarte (nicht beiliegend).
2. Prüfen Sie die Einstellung für den Standardspeicher
(siehe Anleitung im Abschnitt “Speichermanager”).
Wenn die SD-Speicherkarte (nicht beiliegend) als
Standardspeicher ausgewählt ist, vergewissern Sie sich,
dass die SD-Speicherkarte nicht schreibgeschützt ist.
Das TV-Bild ist schwarz-weiß. 1. Die Farbsysteme stimmen nicht überein. Vergewissern Sie
sich, dass das TV-Gerät auf das richtige System
(z. B. PAL, NTSC oder AUTO) eingestellt ist.
2. Problem mit einem Kabelanschluss. Vergewissern Sie
sich, dass das Videokabel fest mit dem Videoeingang des
TV-Geräts verbunden ist.
Auf dem TV-Gerät erscheint ein
Bild, es ist aber kein Ton zu hören.
1. Einstellung des TV-Geräts. Erhöhen Sie die Lautstärke am
TV-Gerät und vergewissern Sie sich, dass es nicht auf
“Mute“ (Stumm) geschaltet wurde.
2. Problem mit einem Kabelanschluss. Vergewissern Sie
sich, dass die weiße und/oder rote Buchse fest mit dem
Audio-Eingang des TV-Geräts verbunden ist.
In Umgebungen mit elektrostatischer Entladung kann es zu Betriebsstörungen der
Kamera kommen. Falls dies vorkommt, die Kamera mit dem Ein-/Ausschalter neu starten.
Page 20

19
Kære forældre,
Hos VTech
®
ved vi hvor vigtig den første skoledag er for dit barn.
For at hjælpe børnehaveklassebørn i den vigtige situation har VTech
®
udviklet en serie interaktivt legetøj kaldet Pre-school Learning™
til børn i førskolealderen.
Pre-school Learning™ er sjovt legetøj med skoletemaer der bruger
teknologi til at fastholde barnets opmærksomhed, og som lærer barnet
vigtige førskolefærdigheder såsom at være kreativ, kunne sammenholde
ting og tænke logisk. Barnet lærer disse vigtige egenskaber på en sjov
og engagerende måde der fastholder barnets interesse. Barnet bliver
også introduceret til sjove skoleemner som billedkunst, musik og selv
frikvarter! Med Pre-school Learning™ er det sjovt at lære lige fra
allerførste dag!
Hos VTech
®
ved vi at børn er i stand til at gøre fantastiske ting. Derfor
er alle vores elektroniske produkter designet til at udvikle børns sind
og vise hvad de kan. Tak fordi I stoler på at VTech
®
kan hjælpe jeres
barn med at vokse og lære!
Venlig hilsen
Jeres venner hos VTech
®
Få mere at vide om Pre-school Learning™ og andet VTech®legetøj på
www.vtechkids.com
DK
Page 21

DK
Introduktion
20
INDLEDNING
Tak fordi du har købt VTech® Kidizoom Camera™!
Kidizoom Camera™ er et holdbart digitalkamera med et enkelt design. Barnet kan tage billeder, redigere
billeder, se billeder, optage digitalvideo og spille sjove spil! Kidizoom Camera™ kan også sluttes til tv’et
så barnet kan se sine billeder og lm eller spille spil på tv-skærmen. Kidizoom Camera™ har en
indbygget hukommelse på 16 MB og støtter et sikkert digitalt (SD) hukommelseskort på op til 2 GB
(medfølger ikke) så endnu ere billeder og lm kan gemmes på kameraet! Det er udstyret med USB-port
og -kabel så kameraet kan sluttes til computeren så du kan se billeder og lm, redigere eller printe billeder.
FUNKTIONER
PRODUKTET OG DETS KNAPPER
Tænd/sluk
Tryk på denne knap for at tænde og slukke for kameraet.
Lydstyrke
Tryk på disse knapper for at indstille lydstyrken.
USB-port
Sæt det medfølgende USB-stik i USB-porten for at slutte kameraet til computeren.
Indstillinger
Tryk på denne knap for at gå til hovedmenuen eller tilbage til den foregående undermenu.
Joystick med 4 retninger
Tryk på denne knap for at ytte cursoren og vælge.
OK
Tryk på denne knap for at bekræfte et valg eller en handling.
Slet
Tryk på denne knap for at slette den valgte l.
Udløser
Tryk på denne knap for at tage et billede eller begynde at optage en lm.
AV-port
Sæt det medfølgende AV-stik i AV-porten for at slutte kameraet til tv’et.
Nulstil
Tryk på denne knap for at nulstille kameraet hvis det ikke fungerer korrekt.
Bemærk: Hvis du trykker på nulstillingsknappen, slettes alle data i kameraets interne hukommelse,
men ikke data på SD-hukommelseskortet (medfølger ikke) hvis det er i brug.
Blitz
Kidizoom Camera™ bruger automatisk blitzen hvis det vurderer at det er nødvendigt. Når blitzen er klar,
fremkommer der er et lynsymbol
øverst til venstre på skærmen i kameraindstillingen.
MEDFØLGER
1 • VTech® Kidizoom Camera™
2 udskiftelige kameraforsider •
cd-rom til computerinstallation med ekstra billedredigeringsfunktioner •
1 AV-kabel •
1 USB-kabel •
brugermanual •
håndledsrem •
Advarsel: Al emballage såsom tape, plastik, ståltråd og mærker er ikke en del af legetøjet og bør
smides væk af hensyn til dit barns sikkerhed.
Udløser
Linse
Mikrofon
Blitz
Joystick med
4 retninger
AV-port til
tv-tilslutning
Indstillinger
USB-port til
computertilslutning
Lydstyrke
OK
Slet
Tænd/sluk
Todelt søger
Mikrofon
Batteridæksel (1)
Nulstil
Batteridæksel (2)
Page 22

21
DK
Introduktion / Sådan kommer du i gang
PRODUKTSPECIFIKATIONER
Skærm: 1,8” TFT LCD med farver
Billedopløsning: Billede: 640 x 480 Film: 160 x 120
Fokusrækkevidde: 45 cm - ∞
Blitzrækkevidde: 1-2 meter
Hukommelse:
16 MB indbygget hukommelse (ca. 12 MB fri hukommelse til opbevaring af billeder/lm). Billeder: Kan
gemme omkring 200 billeder (billedstørrelse = opløsning på 640 x 480 i JPEG-format).
Film: Kan optage op til 5 minutters lm (lmstørrelse = opløsning på 160 x 120 i motion JPEG-format).
Kidizoom Camera™ understøtter et sikkert digitalt (SD) hukommelseskort på op til 2 GB (medfølger
ikke) til at udvide hukommelsen.
Understøttede lformater:
Billede: JPEG (op til 2 millioner pixel i 1632 x 1224-opløsning)
Film: Kidizoom Camera™ Motion JPEG
Understøttet hardware:
AV-kabel til tv-tilslutning (medfølger).
USB-kabel til computertilslutning (medfølger).
SD-hukommelseskort (medfølger ikke) op til 2 GB.
SÅDAN KOMMER DU I GANG
ISÆTNING AF BATTERI
Bemærk: En voksen bør hjælpe med at sætte batterierne i. Brug en skruetrækker til at sætte dem i.
Sørg for at kameraet er slukket.•
Find batterirummet i bunden af kameraet. Skru skruerne løs med en skruetrækker og •
fjern batteridækslerne.
Sæt 4 nye C-batterier (LR6/AA) i – 2 i hver side – som vist nedenfor. •
(Vi anbefaler at bruge nye, alkaliske batterier
så produktet fungerer bedst muligt.)
Sæt batteridækslerne på igen, og stram skruerne godt. •
Dog ikke for meget.
Bemærk: Hvis Kidizoom Camera™ ikke virker korrekt efter
at batterierne er blevet udskiftet, så tryk på nulstillingsknappen
og tænd det igen. Hvis du trykker på nulstillingsknappen,
slettes alle data i kameraets interne hukommelse, men ikke
data på SD-hukommelseskortet (medfølger ikke) hvis det er i brug.
Anbefaling:
Når batterierne i Kidizoom Camera™ løber tør for strøm eller de er ude af kameraet i mere end et par
minutter, kan dataene i den interne hukommelse gå tabt. Vi anbefaler at bruge et SD-hukommelseskort
(medfølger ikke) og indstille kameraet til som standard at gemme billeder eller lm på det. Hvis SD-hukommelseskortet (medfølger ikke) ikke bruges, så husk at kopiere billeder og lm fra kameraets interne
hukommelse over på en computer før batterierne løber tør for strøm eller bliver taget ud.
BATTERIINFO
Kameraet fungerer bedst med nye, alkaliske batterier.•
Husk at vende batterierne rigtigt (+ -) så de ikke lækker.•
Bland ikke nye og gamle batterier.•
Bland ikke batterier af forskellig type: alkaliske, standard (brunstensbatterier) eller •
genopladelige batterier (nikkel-kadmium).
Fjern batterierne fra produktet når det ikke skal bruges i længere tid. Bemærk: For at •
undgå at data går tabt, anbefales det at kopiere billeder og lm fra Kidizoom Camera™
over på en computer før batterierne tages ud.
Tag altid batterier der er løbet tør for strøm, ud af produktet.•
Smid ikke batterier ind i åben ild.•
Prøv ikke på at oplade ikke-genopladelige batterier.•
Undgå at kortslutte batteriernes poler.•
Brug kun ens batterier af den type som anbefales. •
Vi fraråder at bruge genopladelige batterier.
SÅDAN SÆTTER DU SD-HUKOMMELSESKORTET I
Kidizoom Camera™ understøtter et sikkert digitalt (SD) hukommelseskort på op til 2 GB
(medfølger ikke) til at udvide hukommelsen.
Sørg for at kameraet er slukket.•
Åbn batteridækslet på højre side (når du holder kameraet sådan at du kan se •
skærmen).
Find SD-kortindgangen indeni.•
Sæt SD-kortet (medfølger ikke) i som vist nedenfor.•
Sæt batteridækslet på igen, og stram skruerne godt. •
Stram ikke skruerne for meget.
SD-kort
Page 23

DK
Sådan skifter du forside på kameraet / Sådan bruger du Kidizoom Camera™
22
SÅDAN SKIFTER DU
FORSIDE PÅ KAMERAET
1. Løft forsigtigt den nederste del af forsiden og fjern den fra kameraet.
2. Sæt en ny forside på ved at sætte krogene i hullerne som vist til højre.
3. Tryk den nederste del af forsiden mod kameraet indtil den sidder godt fast.
SÅDAN BRUGER DU KIDIZOOM
CAMERA™
Tryk på kameraets tænd/sluk-knap • . Når du har tændt, går kameraet
direkte over i kameraindstilling, og du kan begynde at tage billeder.
Hvis du vil over i andre indstillinger, så tryk på indstillingsknappen•
for
at komme til hovedmenuen. I hovedmenuen har du følgende
muligheder: kamera, lm, fotoværksted, spil og systemindstillinger.
Skru op og ned ved at bruge lydstyrkeknapperne•
.
Ved tilslutning til tv eller computer se vejledningen under “Sådan slutter du til tv’er” • eller “Sådan
slutter du til computeren” nedenfor.
Tryk igen på tænd/sluk-knappen for at slukke kameraet. •
BATTERISTATUS
Når skærmen viser at der er lavt batteriniveau , anbefales det at tage backup af alle data i den
interne hukommelse på Kidizoom Camera™ ved at lægge dem over på en computer og derefter
udskifte batterierne. Når kameraet viser at der ikke er mere strøm på batterierne , kan det ikke
fungere korrekt. Sæt derfor nye batterier i før du bruger kameraet.
Bemærk: For at undgå at miste data som er lagret i den interne hukommelse på kameraet anbefales
det at tage backup af dataene eller udskifte batterierne når der er lavt batterieniveau . Når du
skifter batterier, så sæt de nye batterier i inden for få minutter efter at du tog de gamle batterier ud.
Vi anbefaler at du regelmæssigt tager backup af dataene i kameraets interne hukommelse så du undgår
at miste dem, og at du bruger et SD-hukommelseskort (medfølger ikke) til lagring hvis det er muligt.
AUTOMATISK SLUKKEFUNKTION
For at spare på batterierne slukker Kidizoom Camera™ automatisk efter 1-2 minutter hvor det ikke er i
brug. Kameraet kan tændes igen på tænd/sluk-knappen.
TILSLUTNING TIL TV
BEMÆRK: Før du slutter Kidizoom Camera™ til tv’et skal du kontrollere at det
fungerer rigtigt ved at tænde det. Når du har tændt kameraet, tænder kameraets skærm og det går
over i kameraindstilling. Hvis kameraets skærm ikke tænder, så tjek at
batterierne er sat rigtigt i.
Slut kameraet til tv’et med det medfølgende AV-kabel. Sæt AV-kablet i AV-stikket på
Kidizoom Camera™. Sæt de farvede stik på AV-kablet ind i de tilsvarende indgange
for video og audio på tv’et.
TILSLUTNING TIL VIDEO/DVDAFSPILLER
Hvis der ikke er video- eller audioindgang på tv’et, kan du slutte Kidizoom Camera™
til en video/dvd-afspiller.
Sæt AV-kablet i AV-stikket på Kidizoom Camera™.•
Sæt det gule stik på AV-kablet i den gule videoindgang på video/dvd-afspilleren.•
Sæt det hvide stik på AV-kablet i den hvide audioindgang på video/dvd-afspilleren. •
Bemærk: Hvis AV-kablet sættes i kameraet mens et spil er i gang på kameraets skærm, slutter spillet
og du kommer tilbage til hovedmenuen. Hvis AV-kablet tages ud af kameraet mens et spil er i gang på
tv-skærmen, slutter spillet og du kommer tilbage til hovedmenuen.
Hovedmenu
2
1
3
Page 24

Sådan bruger du Kidizoom Camera™ / Aktiviteter
DK
TILSLUTNING TIL COMPUTER
Du kan slutte Kidizoom Camera™ til en computer med det medfølgende USB-kabel. Når det
er tilsluttet, kan du lægge ler fra kameraet over på computeren eller omvendt ved at gå ind i
kameraet som i et eksternt drev. Når Kidizoom Camera™ er tilsluttet computeren, dukker der et
nyt drev ved navn “VTech 773” op på computeren. Hvis et SD-hukommelseskort (medfølger ikke)
er sat i kameraet når det tilsluttes computeren, vil der fremkomme i alt to nye drev. Det ene
drev hedder “VTech 773”, og det andet vil være et eksternt drev til SD-hukommelseskortet.
Find USB-porten bag på dit kamera og åbn lågen.•
Sæt USB-kablets lille ende i USB-porten på kameraet.•
Sæt dernæst USB-kablets store ende i USB-porten på computeren. En USB-port er •
som regel markeret med
.
For at undgå at data går tabt eller bliver ødelagt bør du tjekke batteriniveauet på kameraet inden du
lægger data ind på computeren fra kameraet eller omvendt.
MINIMUMKRAV TIL PC:
Windows 2000 SP3+/ XP
Bemærk: Når kameraet er tilsluttet computeren, skal du tænde det før computeren kan komme i
kontakt med det. Fjern ikke kameraet og lad være med at slukke det når det er i gang med at
uploade eller downloade billeder. Når du er færdig, bør du slukke kameraet for at spare batteri.
AKTIVITETER
1. KAMERA
I kameraindstillingen kan du udvælge et motiv ved enten at kigge i søgeren eller ved at se på •
skærmen.
Hold kameraet stille mens du trykker på udløseren • oven på kameraet eller på OK bag på
kameraet for at tage et billede.
Når Kidizoom Camera™ er tændt, er den automatiske blitz slået til. Du kan ændre på •
blitzindstillingerne ved med sletknappen at vælge mellem tre indstillinger: Ingen blitz , Blitz
eller Autoblitz .
Advarsel: Slå blitzen fra når du tager et billede tæt på en persons ansigt, så øjenskader undgås..
Bemærk: Hvis batterierne er ved at løbe tør for strøm, kan autoblitzen måske ikke bruges, og
vises.
Du kan vælge en billedramme eller et stempel til dit billede før du tager billedet. Vælg en ramme ved •
at trykke joysticket
mod højre eller venstre for at bladre mellem mulighederne. Tag så et billede
på normal vis, og den ramme du har valgt, vil blive føjet til billedet.
Se de billeder du har taget, ved at trykke op eller ned på joysticket•
inde i fotoalbummet.
Tryk så op eller ned igen for at se billedet lige før eller lige efter det billede du står på.
I fotoalbummet kan du trykke på slet •
for at slette det billede du ser på skærmen netop nu.
Gå ud af fotoalbummet og tilbage til kameraindstillingen ved at trykke på udløseren•
en gang.
Billeder som du tager med Kidizoom Camera™, bliver gemt i PHOTO-mappen i den interne •
hukommelse eller på SD-hukommelseskortet (medfølger ikke) hvis du har sat sådan et i.
Bemærk: Hvis du vil se andre billeder (hvis opløsning ikke er større end 1632 x 1224) som du har lagt
ind på kameraet fra computeren, så sørg for at de er lagt ind i kameraets eller SD-hukommelseskortets
rodbibliotek (dvs. ikke i en undermappe). Ellers er det ikke sikkert du kan se dem.
2. FILM
I lmindstillingen kan du lave digitale videolm med Kidizoom Camera™. Tryk på udløseren • oven
på kameraet eller på OK
bag på kameraet for at begynde eller stoppe lmoptagelsen.
Se de lm du har taget, ved at trykke op eller ned på joysticket•
inde i lmalbummet. Tryk derefter
op eller ned igen for at vælge den lm du vil se, og tryk OK
for at begynde afspilningen.
I lmalbummet kan du trykke på slet •
for at slette den lm du ser på skærmen netop nu.
Gå ud af lmalbummet og tilbage til lmindstillingen ved at trykke på udløseren•
en gang.
Film som du tager med • Kidizoom Camera™, bliver gemt i MOVIE-mappen i den interne
hukommelse eller på SD-hukommelseskortet (medfølger ikke) hvis du har sat sådan et i.
23
Page 25

Aktiviteter
3. BILLEDVÆRKSTED
I billedværkstedet kan du redigere billeder eller indtale nogle ord som du kan føje til billedet.
3.1) BILLEDREDIGERING
I Billedredigeringen kan du føje billedramme, stempel og seje forvrængningseffekter til billedet eller
animere billeder. Tryk joysticket til højre eller venstre , og tryk på OK for at vælge et billede.
Tryk op eller ned for at vælge en af funktionerne, og tryk så OK for at starte.
A. Billedramme
: Vælg dette symbol for at vælge en ramme til dit billede. Tryk joysticket mod
højre eller venstre for at vælge ramme, og tryk så på OK for at bekræfte.
B. Stempel
: Vælg dette symbol for at vælge et stempel til dit billede. Tryk joysticket til højre eller
venstre for at vælge et stempel. Tryk så op eller ned for at forstørre eller formindske stemplet,
og tryk på OK for at bekræfte. Flyt nu stemplet rundt ved hjælp af joysticket, og tryk på OK når
du har fundet ud af hvor det skal være.
C. Forvrængning
: Vælg dette symbol for at vælge en forvrængningseffekt til dit billede.
Tryk joysticket mod højre eller venstre for at vælge forvrængning, og tryk så på OK for at
bekræfte. Flyt nu effekten rundt ved hjælp af joysticket, og tryk på OK når du har fundet ud af
hvor det skal være.
Bemærk: At lave en forvrængningseffekt på dit kamera kan godt tage mere end 1 minut.
D. Animation
: Vælg dette symbol for at vælge en animationseffekt til dit billede.
Tryk joysticket mod højre eller venstre for at vælge animation, og tryk så på OK for at
bekræfte og se det animerede billede. Vær opmærksom på at animationseffekten ikke kan
gemmes.
E. Fortryd
: Vælg dette symbol for at fortryde den sidste handling.
F. Gem som
: Vælg dette symbol for at gemme det billede du lige har behandlet.
Bemærk: Det kan godt tage mere end 1 minut at gemme et billede som er behandlet med en
forvrængningseffekt. Alle behandlede billeder bliver gemt med opløsningen 640 x 480.
3.2) STEMME
Her (Voice Photo) kan du optage op til 10 sekunders lyd som du vil føje til dit billede.
Tryk joysticket til højre eller venstre for at vælge et billede. Hvis der allerede er optaget stemme
til dette billede, vil der være en lille mikrofon
på det. Tryk joysticket til højre eller venstre for at
vælge optag (record), afspil (play) eller slet (delete).
A. Optag
: Tryk på optag (record) for at optage din stemme. Tryk på knappen igen for at stoppe
optagelsen. Du kan optage op til 10 sekunder til hvert billede.
B. Afspil
: Vælg afspil (record) for at afspille eller stoppe stemmeoptagelsen.
C. Slet stemme
: Vælg slet stemme (delete voice) for at slette stemmeoptagelsen fra billedet.
Bemærk: Stemmeoptagelsen kan kun høres når billedet er gemt i kameraets interne hukommelse eller
på et indsat SD-hukommelseskort (medfølger ikke). Stemmeoptagelser til billeder kan ikke overføres til
computeren og afspilles der.
4. SPIL
Der er 3 indbyggede spil i Kidizoom Camera™. Tryk joysticket mod højre eller venstre for at vælge
et spil, og tryk så på OK for at begynde at spille.
A. KRYDSOGBOLLE
Spil mod computeren og sæt på skift brikker på spillepladen. Brug joysticket
til at ytte din brik rundt på pladen, og tryk på OK når du har fundet ud af
hvor den skal være. Den spiller der først får 3 af sine brikker på række
– lodret eller vandret – vinder!
DK
24
Page 26

25
DK
Aktiviteter / Vedligeholdelse
B. ROTATIONSPUSLESPIL
Prøv at give dig selv den udfordring at lægge et rodet fotopuslespil!
Først ser du billedet i sin helhed, og så bliver det brudt op i 4 eller 9
rkantede stykker. Hver brik vender tilfældigt. Saml puslespillet til et helt
billede igen ved med joysticket
at vælge en brik og trykke på OK for
at få den til at vende rigtigt. Når alle brikkerne er blevet lagt rigtigt, har du
vundet! Du kan også lave dit eget puslespil ved at trykke på udløserknappen
for at komme over i kameraindstillingen. Tryk på udløseren igen, og så bliver
det billede du lige har taget, forvandlet til et puslespil.
C. HUKOMMELSESSPIL
Test din hukommelse. Der er 3 eller 4 par ting der gemmer sig bag lågerne.
Du kan åbne to låger ad gangen. Tryk joysticket mod højre eller venstre
for at vælge låge, og tryk så på OK for at åbne den. Hvis de to ting
bag lågerne ikke passer sammen, lukker de, og du må prøve igen. Når du
har fundet alle par, har du vundet!
5. HUKOMMELSESINDSTILLINGER
Du kan se status for kameraets interne hukommelse og for SD-kortet (medfølger
ikke) hvis sådan et er sat i Kidizoom Camera™. Brug joysticket
til at vælge
enten kameraets interne hukommelse eller SD-kortet. Tryk på OK
og der
står nu “Set default” (vælg som standard) og “Format” (formater) ud for den
valgte hukommelse. “Set default” vælger den valgte hukommelse som standard
til at gemme billeder og lm taget med Kidizoom Camera™. Den valgte
standardplacering viser dette symbol
. “Format” sletter alle data og
formaterer den valgte hukommelse.
6. CD-ROM
Den medfølgende cd-rom indeholder VTech® Billedredigeringsprogram. Hvis du vælger at installere
billedredigeringsprogrammet på din computer, kan du føje endnu ere billedrammer og stempler til dine
billeder såvel som forvrængnings- og animationseffekter. Se ere detaljer og brugervejledning i Read
Me- og Help-lerne i VTech® Billedredigering.
MINIMUMKRAV TIL HARDWARE VED
CD-ROM-INSTALLATION
• Pentium III 1 GHz eller tilsvarende
• 1024 x 768 24-bit grakkort
• Windows 2000/XP styresystem
VEDLIGEHOLDELSE
1. Kameraet kan tørres af med en fugtig klud.
2. Udsæt ikke kameraet for direkte sollys eller direkte varme.
3. Tag batterierne ud hvis kameraet ikke skal bruges i en længere periode.
Bemærk: For at undgå at data går tabt, anbefales det at kopiere billeder og lm fra
Kidizoom Camera™ over på en computer før batterierne tages ud.
4. Tab ikke kameraet ned på en hård overade og udsæt det ikke for fugt eller vand.
ADVARSEL
En meget lille procentdel af befolkningen kan, på grund af en eksisterende lidelse, opleve epileptiske
anfald eller miste bevidstheden når de ser bestemte blinkende farver eller mønstre – især på tv.
Selv om Kidizoom Camera™ ikke øger risikoen, anbefaler vi at forældre holder øje med deres børn
når de spiller videospil. Hvis dit barn oplever svimmelhed, ændret syn, desorientering eller kramper, så
afbryd spillet omgående og søg læge.
Bemærk at det kan medføre træthed og ubehag at fokusere på et tv på nært hold og bruge et joystick i
længere perioder. Vi anbefaler at børn holder pause i 15 minutter for hver time de spiller.
BEMÆRK!
Isætning af batterier bør foretages af en voksen. Husk at vende + og - korrekt.
Bland aldrig gamle og nye batterier eller forskellige batterityper.
Forsøg aldrig at genoplade ikke-genopladelige batterier.
Tag batterierne ud hvis varen ikke anvendes i en længere periode.
Kortslut ikke batterikontakterne.
Page 27

DK
Problemløsning
PROBLEMLØSNING
Gennemgå disse punkter hvis du oplever problemer med Kidizoom Camera™.
Problem Løsning
Programmet holder op med at
fungere.
1. Tryk på nulstillingsknappen med en papirclips.
Hvis det ikke løser problemet, så gør følgende.
2. Sørg for at kameraet er slukket.
3. Afbryd strømmen ved at fjerne batterierne.
4. Lad kameraet stå uden batterier nogle minutter,
og sæt så batterierne i igen og tryk på
nulstillingsknappen.
5. Tænd kameraet. Det burde nu være klar til brug igen.
6. Hvis kameraet stadig ikke virker, så udskift alle
batterierne med nogle helt nye.
Billedet er uskarpt eller uklart. 1. Tjek om beskyttelseslinsen på kameraet er ren.
Skærmen på kameraet tænder
ikke.
1. Kontroller at der sidder 4 C-batterier (LR6/AA) i
kameraet. Hold tænd/sluk-knappen inde for at tænde
det.
2. Tjek at kameraet ikke er tilsluttet tv’et med et AV-kabel.
3. Tjek at kameraet ikke står på strømspare-funktion.
Tryk på tænd/sluk-knappen for at tænde det.
Der er ikke noget billede på
tv-skærmen.
1. Tjek at der er batterier i kameraet, og at tv’et eller
video/dvdafspilleren (hvis de er i brug) er tilsluttet et
strømstik.
2. Tjek at kameraet er tændt, og at tv’et og video/
dvdafspilleren (hvis de er i brug) er tændt.
3. Tjek AV-kablet mellem kamera og tv
(eller video/dvdafspiller), og sammenhold forbindelsen
med proceduren i denne vejledning.
4. Tjek at alle kablerne er sat korrekt i de rigtige stik.
5. Tjek at tv’et står på den rigtige kanal.
Ingen lyd på tv’et. 1. Tjek om der er slukket for lyden på tv’et.
2. Prøv at skrue op for lyden.
3. Tjek lyd- og billedforbindelserne mellem kamera
og tv (eller video/dvdafspiller).
4. Tjek at tv’et står på den rigtige kanal.
Tv-billedet ruller eller har bjælker
eller linier på.
1. Prøv at justere tv-billedet vandret eller lodret
(hvis du har mulighed for det).
Kan ikke gemme ler. 1. Tjek hukommelsesstatus på både kameraets interne
hukommelse og SD-kortet (medfølger ikke)
hvis der er sat et sådant i kameraet.
2. Tjek standardhukommelsesindstillingerne
(se hvordan under “Hukommelsesindstillinger”).
Hvis den er sat til at bruge et SD-kort (medfølger ikke)
som standard, så tjek at SD-kortet ikke er
skrivebeskyttet.
Tv’et viser kun sort og hvid. 1. Farvesystemet er ikke kompatibelt. Sørg for at dit
tv er indstillet til det rigtige farvesystem
(PAL, NTSC eller Auto)
2. Der er problemer med kablet. Sørg for at
videokablet er sat rigtigt i videostikket i tv’et.
Der er billede på tv’et,
men ingen lyd.
1. Tv’ets indstilling. Skru op for lyden på tv’et, og sørg
for at tv’et ikke står på lydløs (mute).
2. Der er problemer med kablet. Tjek at det hvide
og/eller røde stik er sat rigtigt i audiostikket på tv’et.
I tilfælde af statisk elektricitet kan det ske at kameraet ikke fungerer som det skal. Hvis det sker,
så nulstil kameraet med tænd/sluk-knappen.
26
Page 28

Kära förälder,
Här på VTech
®
vet vi hur viktig den första skoldagen är för ditt
barn. För att hjälpa förskolebarn att förbereda sig för denna stora
händelse, har VTech
®
utvecklat en serie interaktiva leksaker i serien
Pre-school Learning™.
Leksaker i Pre-school Learning™-serien har roliga karaktärer och
skolorienterade uppgifter som utnyttjar teknik för att fånga barnens
fantasi och lära ut viktiga färdigheter som kreativitet, matchning
och logik. Dessa viktiga färdigheter lärs ut på ett både roligt och
engagerande sätt som fångar barnens intresse. Barnen får även en
introduktion till kreativa skolämnen som teckning, musik och till
och med rast! Med Pre-school Learning™, är skolan rolig redan
från dag ett!
På VTech
®
är vi medvetna om barnens enorma potential. Därför
är våra elektroniska produkter utformade för att utveckla barnens
mentala färdigheter och slipa på sina kunskaper. Vi tackar dig för
visat förtroende för VTech
®
och den viktiga uppgiften att hjälpa dina
barn växa och utvecklas!
Med vänlig hälsning,
Dina vänner på VTech
®
Mer information om Pre-school Learning™ och andra VTech®leksaker finns på
www.vtechkids.com
SE
27
Page 29

SE
28
INTRODUKTION
Tack för ditt köp av VTech® Kidizoom Camera™! Kidizoom Camera™ är en smidig och tålig digitalkamera för barn, som inte bara tar bilder, utan även redigerar och visar bilder, spelar in video och används för
att spela spel! Kidizoom Camera™ kan också anslutas till TV:n där barnen kan visa upp bilder och lmer
eller spela spel. Kidizoom Camera™ har 16 MB inbyggt minne och kan utökas med ett 2 GB SD-minne
(ingår ej) så att er bilder och lmer kan lagras! Kameran har också en USB-utgång och kabel för
anslutning till en PC för visning av bilder och lmer, bildredigering och utskrift.
FUNKTIONER
KAMERADELAR OCH KNAPPAR
PÅ/AV-knapp
Tryck på den här knappen för att slå PÅ eller stänga AV kameran.
Volymknappar
Tryck på dessa knappar för justera ljudvolymen.
USB-port
Anslut den medföljande USB-kabeln till denna port och sedan till PC:n.
Lägesknapp
Tryck på den här knappen för att gå till huvudmenyn eller återvända till föregående undermeny.
Pilratt
Tryck på den här knappen för att ytta markören och göra olika val.
OK-knapp
Tryck på den här knappen för bekräfta val eller åtgärder.
Ta bort-knapp
Tryck på den här knappen för att ta bort en markerad l.
Slutarknapp
Tryck på den här knappen för att ta ett foto eller börja spela in en lm.
A/V-port
Anslut den medföljande A/V-kabeln till denna port och sedan till TV:n.
Återställningsknapp
Tryck på den här knappen för att nollställa kameran om den slutar att fungera som den ska.
Obs: När du trycker på återställningsknappen raderas alla data på internminnet i Kidizoom Camera™,
men bilder och annan information som nns sparade på ett SD-minneskort (ingår ej) raderas inte.
Blixt
Kidizoom Camera™ har en automatisk exponeringsfunktion som aktiverar blixten när den behövs.
När blixten är klar att användas visas en blixtsymbol
överst till vänster på displayen när kameran är i
fotoläge.
DETTA INGÅR
1 • VTech® Kidizoom Camera™
2 utbytbara linsskivor•
1 CD-ROM med programvara till PC (Photo Editor)•
1 A/V-kabel•
1 USB-kabel•
1 Bruksanvisning•
1 handrem •
Varning: alla emballagedelar som t.ex. tejp, omslagsplast, ståltråd och etiketter bör kasseras snarast
för barnets säkerhet.
Introduktion
Lins
Mikrofon
Blixt
Slutarknapp
Pilratt
A/V-port för
anslutning till TV
Lägesknapp
USB-port för
anslutning till PC
Volymknappar
OK-knapp
Ta bort-knapp
På/av-knapp
Dubbla sökare
Mikrofon
Batterilucka (1)
Återställningsknapp
Batterilucka (2)
Page 30

29
SE
PRODUKTSPECIFIKATIONER
Display: 1,8-tums TFT färg-LCD
Bildupplösning: Foto: 640 x 480 Film: 160 x 120
Fokuseringsområde: 45 cm - ∞
Blixtgräns: 1 till 2 meter
Minne:
16 MB inbyggt minne (cirka 12 MB minne ledigt för lagring av foto/lm).
Foton: Du kan lagra upp till 200 foton (fotomått = 640 x 480 pixlar i JPEG-format).
Filmer: Du kan spela in upp till 5 minuter lm (lformat = 160 x 120 pixlar i Motion JPEG-format).
Kidizoom Camera™ stödjer SD-minneskort på upp till 2 GB (ingår ej).
Filformat som stöds:
Foto: JPEG (upp till 2 megapixlar i formatet 1632 x 1224)
Film: Kidizoom Camera™ Motion JPEG
Maskinvara som stöds:
A/V-kabel för anslutning till TV (medföljer).
USB-kabel för anslutning till PC (medföljer).
SD-minneskort (ingår ej) på upp till 2 GB
SÅ HÄR KOMMER DU IGÅNG
SÄTTA IN BATTERIER
Obs: Isättning av batterier ska göras i vuxet sällskap. Använd en skruvmejsel för isättning av batterier.
Se till att kameran är avstängd.•
Leta upp batteriluckan på kamerans undersida. Lossa skruvarna med skruvmejseln och ta loss •
batteriluckorna.
Sätt i 4 nya C-batterier (LR6/AA) (2 på vardera sidan enligt bilden nedan. •
(Nya alkaliska batterier rekommenderas för bästa prestanda.)
Sätt tillbaka batteriluckorna och dra åt skruvarna. •
Dra inte åt skruvarna för hårt.
Obs: Om Kidizoom Camera™ inte fungerar som den
ska eller inte kan slås på, ska du trycka på
återställningsknappen och sedan prova att starta
kameran. När du trycker på återställningsknappen
raderas alla data på internminnet i Kidizoom Camera™,
men bilder och annan information som nns sparade
på ett SD-minneskort (ingår ej) raderas inte.
Rekommendation:
När batterierna i Kidizoom Camera™ är urladdade
eller tas ut i mer än några minuter kan
informationen på internminnet försvinna. Vi rekommenderar att du använder ett SD-minneskort
(ingår ej) och anger det som standardminne för lagring av bilder och lmer som skapas med Kidizoom
Camera™. Om du inte har ett SD-minneskort (ingår ej) bör du komma ihåg att säkerhetskopiera bilder
och lmer från kameran till en PC innan batterierna laddar ur helt eller tas ut.
PÅPEKANDEN OM BATTERIER
Nya alkaliska batterier rekommenderas för bästa prestanda.•
Installera batterierna med polerna (+, -) åt rätt håll för att undvika batteriläckage.•
Blanda aldrig nya och gamla batterier.•
Blanda aldrig batterier av olika typer: alkaliska, standard (kol-zink) eller laddningsbara •
(nickel-kadmium).
Ta ut batterierna från apparaten när den inte ska användas under en längre tid. •
Observera: Kom ihåg att säkerhetskopiera bilder och lmer från kameran till en PC innan du tar ut
batterierna.
Ta alltid ut förbrukade batterier ur apparaten.•
Bränn inte kasserade batterier.•
Försök inte att ladda vanliga batterier.•
Batteripolerna får inte kortslutas.•
Använd endast batterier av samma eller jämförbar sort som de som rekommenderas. •
Vi rekommenderar inte användning av laddningsbara batterier.
SÄTTA IN SD-MINNESKORT
Kidizoom Camera™ stödjer SD-minneskort på upp till 2 GB (ingår ej).
Se till att kameran är avstängd.•
Öppna batteriluckan på höger sida (sett från kamerans LCD-skärm).•
Hitta SD-kortplatsen inuti.•
Sätt i SD-minneskortet (ingår ej) enligt bilden nedan.•
Sätt tillbaka batteriluckan och dra åt skruven. •
Dra inte åt skruven för hårt.
Introduktion / Komma igång
SD-kort
Page 31

SE
30
Så här byter du linsskiva / Börja använda Kidizoom Camera™
BYTA LINSSKIVA
1. Vik försiktigt upp den nedre delen av skivan och lyft loss den från
Kidizoom Camera™.
2. Sätt fast den nya skivan genom att haka i den enligt bilden till höger.
3. Tryck fast den nedre delen av skivan mot kameran så att den sitter fast.
BÖRJA ANVÄNDA KIDIZOOM
CAMERA™
Tryck på knappen PÅ/AV • för att starta kameran. Kidizoom Camera™ är direkt i kameraläge och
du kan börja ta foton.
Tryck på lägesknappen • för att gå till huvudmenyn och välja andra aktiviteter.
I huvudmenyn kan du välja följande aktiviteter: Kamera, lm, bildredigering,
spel och systeminställningar.
Höj eller sänk volymen genom att trycka på volymknapparna • .
Anslut kameran till en TV eller PC genom att följa instruktionerna i ”Ansluta till en •
TV” eller ”Ansluta till en PC”.
Tryck på PÅ/AV-knappen för att stänga av kameran.•
BATTERISTATUS
När skärmen indikerar svagt batteri , rekommenderar vi att du säkerhetskopierar innehållet från
internminnet på Kidizoom Camera™ till en PC och sedan byter batterier.
När skärmen visar att batterierna slut kommer kameran inte att fungera. Nya batterier måste i så fall
sättas i innan kameran används.
Obs: Säkerhetskopiera internminnet eller byt batterier på Kidizoom Camera™ när skärmen visar svagt
batteri . När du byter batterier ska du sätta i de nya batterierna inom ett par minuter.
Vi rekommenderar att du säkerhetskopierar internminnet på Kidizoom Camera™ regelbundet för att
undvika dataförlust, samt att du även använder ett SD-minneskort (ingår ej).
AUTOMATISK AVSTÄNGNING
För att spara batterier stängs Kidizoom Camera™ automatiskt av efter 1–2 minuters inaktivitet. Kameran
kan sättas på igen genom att trycka på PÅ/AV-knappen.
ANSLUTA TILL EN TV
Obs! Innan du ansluter Kidizoom Camera™ till en TV, bör du slå på kameran för att kontrollera att den
fungerar. När kameran är PÅ, lyser LCD-skärmen och går direkt i kameraläge. Om LCD-displayen inte
lyser, bör du kontrollera att batterierna är korrekt isatta.
Ansluta din Kidizoom Camera™ till en TV eller monitor med medföljande A/V-kabel.
Sätt i A/V-kabeln i A/V-porten på Kidizoom Camera™. Sätt i de färgade kontakterna på
A/V-kabeln i motsvarande färgade ingångar på TV:n.
ANSLUTA TILL EN VIDEO
Om TV:n saknar ingångar för video och ljud kan du ansluta Kidizoom Camera™ till en
videobandspelare.
Anslut A/V-kabeln till A/V-porten på • Kidizoom Camera™.
Anslut den gula kontakten från A/V-kabeln till den gula videoingången på din videobandspelare.•
Anslut den vita kontakten på A/V-kabeln till den vita ljudingången på din videobandspelare. •
Obs: Om A/V-kabeln ansluts till Kidizoom Camera™ medan ett spel är igång på LCD-displayen,
kommer spelet att avslutas och återgå till huvudmenyn. Om A/V-kabeln kopplas loss från
Kidizoom Camera™ medan ett spel är igång på TV:n, kommer spelet att avslutas och återgå till
huvudmenyn.
Huvudmeny
2
1
3
Page 32

Börja använda Kidizoom Camera™ / Aktiviteter
ANSLUTA TILL EN PC
Du kan ansluta Kidizoom Camera™ till en PC med den medföljande USB-kabeln. När anslutningen är
klar kan du överföra ler till och från Kidizoom Camera™ precis som på en vanlig lagringsenhet.
När Kidizoom Camera™ är ansluten till PC:n visas den nya enheten som ”VTech 773”. Om det även
nns ett SD-minneskort i kameran (ingår ej) när den ansluts, kommer två nya lagringsenheter att visas.
En kommer att heta ”VTech 773” och den andra kommer att motsvara namnet på SD-minneskortet.
Öppna skjutluckan till USB-porten på baksidan av kameran.•
Anslut USB-kabeln (den mindre kontakten) till kamerans USB-port.•
Anslut den stora USB-kontakten till datorns USB-port. USB-portar är oftast märkta med denna •
symbol
.
Kontrollera att Kidizoom Camera™ inte har svaga batterier innan du ansluter den till en PC för att
förhindra att bilder eventuellt skadas.
MINIMUM SYSTEMKRAV FÖR ANSLUTNING TILL PC:
Windows 2000 SP3+/ XP
Obs: När Kidizoom Camera™ väl är ansluten till PC:n ska du trycka på knappen PÅ för att
aktivera anslutningen. Koppla inte ifrån kameran eller datorn medan ler överförs. Stäng AV
kameran när överföringen är klar för att spara batterier.
AKTIVITETER
1. KAMERA
I kameraläge kan användare titta genom sökarna eller använda LCD-displayen för att se vad som •
ska fotograferas.
Håll kameran stilla och tryck på slutarknappen • ovanpå kameran, eller använd OK-knappen
på kamerans baksida för att ta ett foto.
När Kidizoom Camera™ först slås PÅ är den i autoblixtläge. Ändra blixtinställningar genom att •
trycka på ta bort-knappen för att välja mellan tre alternativ: Ingen blixt
, blixt och
autoblixt
.
Varning: Stäng AV autoblixt när du tar foton nära en persons ansikte för att undvika ögonskador.
Obs: Om batterierna är för svaga nns inte autoblixtfunktionen tillgänglig. Då visas denna symbol
.
Välj en fotoram eller stämpel som du vill lägga till i bilden innan du tar fotot. Välj en ram eller •
stämpel genom att trycka på höger- eller vänsterpilen
för att bläddra genom alternativen.
Ta sedan ett foto som vanligt. Ramen eller stämpeln kommer att synas i fotot.
Visa de foton som du tagit genom att klicka på uppåt- eller nedåtpilen på pilratten•
för att
öppna ditt fotoalbum. Tryck sedan på uppåt- eller nedåtpilarna igen för att bläddra till nästa eller
föregående bild i albumet.
När fotoalbumet är öppet kan du trycka på ta bort-knappen •
för att ta bort fotot som visas på
LCD-displayen.
Stäng fotoalbumet och återvänd till kameraläge genom att trycka en gång på slutarknappen • .
Foton tagna med • Kidizoom Camera™ lagras i mappen PHOTO i det interna minnet eller SD-min
neskortet (ingår ej) om ett sådant nns installerat i kameran.
Obs: Om du vill visa andra foton (ej större än 1632 x 1224 pixlar) som överförts från PC:n till kameran
ska dessa lagras i rotkatalogen på Kidizoom Camera™ eller SD-minneskortet (ingår ej). Annars kan
bilderna inte visas.
2. FILMER
I lmläge kan du skapa digitala lmer med Kidizoom Camera™. Tryck på slutarknappen • ovanpå
kameran, eller använd OK-knappen
på kamerans baksida för att börja eller sluta lma.
Visa lmerna som du har lmat genom att trycka en gång på uppåt- eller nedåtpilen på pilratten•
för att öppna ditt lmalbum. Tryck sedan på uppåt- eller nedåtpilen för att välja lmen som du vill
titta på. Tryck sedan OK-knappen
för att spela upp lmen.
När lmalbumet är öppet kan du trycka på ta bort-knappen • för att ta bort lmen som visas på
LCD-displayen.
Avsluta lmalbumet och återvänd till lmläge genom att trycka en gång på slutarknappen • .
Filmer som spelats in med Kidizoom Camera™ lagras i mappen MOVIE i det interna minnet eller •
SD-minneskortet (ingår ej) om en ett sådant nns installerat i kameran.
SE
31
Page 33

3. BILDREDIGERING
I läge bildredigering kan du redigera bilder eller spela in din röst och lägga till inspelningen i fotot.
3.1) BILDREDIGERING
I bildredigering kan du lägga till fotoramar, stämplar och roliga förvrängnings- och animeringseffekter i
foton. Tryck på höger- eller vänsterpilen på pilratten
för att bläddra till önskad bild och tryck på OKknappen. Tryck sedan på uppåt- eller nedåtpilen för att välja önskad funktion (se nedan). Tryck sedan på
OK-knappen
för att börja.
A. Fotoram
: Välj den den här symbolen för att lägga till en fotoram runt fotot. Tryck på höger- eller
vänsterpilen på pilratten
för att välja önskad fotoram och tryck på OK-knappen för att bekräfta.
B. Stämpel
: Välj den den här symbolen för att lägga till en stämpel i fotot. Tryck på höger- eller
vänsterpilen på pilratten
för att bläddra till önskad stämpel. Tryck sedan på uppåt- eller
nedåtpilarna för att förstora eller förminska stämpeln och tryck sedan på OK-knappen
för att
bekräfta ditt val. Använd sedan pilknapparna på pilratten för att placera stämpeln där du vill ha den och
tryck sedan på OK-knappen för att lägga till stämpeln.
C Förvrängning
: Välj den den här symbolen för att skapa en förvrängning av fotot. Tryck på
höger- eller vänsterpilen på pilratten
för att välja önskad effekt och tryck sedan på OK-knappen
för att bekräfta. Använd sedan pilknapparna på pilratten för att placera effekten där du vill ha den
och tryck sedan på OK-knappen
för att lägga till effekten.
Obs: Det kan dröja över en minut för att skapa en förvrängning med kameran.
D. Animering
: Välj den här symbolen för att skapa en animeringseffekt i fotot. Tryck på höger- eller
vänsterpilen på pilratten
för att välja önskad animeringseffekt och tryck sedan på OK-knappen
för att bekräfta. Observera att animeringseffekter inte kan sparas.
E. Ångra
: Välj den här symbolen för att ångra den senaste redigeringen.
F. Spara som
: Välj den här symbolen för att spara fotot som du precis har redigerat.
Obs: Det kan dröja över en minut för att spara ett foto med en förvrängningseffekt. Alla redigerade foton
sparas i upplösningen 640 x 480 pixlar.
3.2) RÖSTFOTO
Med röstfoto kan du spela in din röst i upp till 10 sekunder och lägga till inspelningen i fotot. Börja med att
trycka på höger- eller vänsterpilen på pilratten
för att välja ett foto. Om fotot redan innehåller en
röstinspelning visas en högtalare
på bilden. Använd höger- och vänsterknapparna för att växla
mellan inspelning, uppspelning eller borttagning.
A. Inspelning
: Välj den här symbolen för att börja inspelning av din röst. Tryck en gång till för att
stoppa inspelningen. Du kan spela in din röst i upp till 10 sekunder i varje foto.
B. Spela upp
: Välj den här symbolen för att spela upp eller stoppa uppspelning av ljudet i fotot.
C. Ta bort röst
: Välj den här symbolen radera röstinspelningen från fotot.
Obs: Röstinspelningar kan bara spelas upp om fotot har sparats på internminnet i Kidizoom Camera™
eller på ett SD-minneskort (ingår ej) som nns installerat. Röstfoton kan inte överföras och spelas upp på
en PC.
4. SPEL
Kidizoom Camera™ har tre inbyggda spel. Tryck på höger- eller vänsterpilen på pilratten för
att välja önskat spel och tryck på OK-knappen
för att börja spela det valda spelet.
A. LUFFARSCHACK
Spela mot datorn och turas om med att spela på spelbrädet på 3x3 spelrutor.
Tryck på pilknapparna på pilratten
för att placera pjäsen på spelfältet och
tryck på OK-knappen
för att lägga ut den. Den första spelaren som lägger
ut tre pjäser i en linje, lodrätt, vågrått eller diagonalt vinner!
B. ROTATIONSPUSSEL
Utmana dig själv genom att lösa fotopusslet! Först kommer du att få se hela bilden
och sedan delas den upp i 4 eller 9 kvadrater. Varje del kommer att rotera slumpmäs-
sigt. Återställ bilden genom att använda pilarna på pilratten
för att markera en bit
och tryck på OK-knappen
för rotera tillbaka biten till dess ursprungliga läge.
När alla bilder är återställda och hela bilden visas har du vunnit! Du kan också skapa
ett eget pussel genom att trycka på slutarknappen för att växla kameran till
kameraläge. Tryck igen på slutarknappen. Då används fotot som du just tagit som pusselbild.
Aktiviteter
32
SE
Page 34

C. MATCHANDE PAR
Testa ditt minne med det här matchningsspelet. Det nns 3 eller 4 par med
föremål som gömmer sig bakom fönstren. Du kan öppna två fönster åt
gången. Tryck på pilarna på pilratten
för att välja ett fönster och tryck
på OK-knappen
för att öppna det. Om föremålen i de två öppna fönstren
inte stämmer överens kommer fönstren att stängas och du får prova något
annat fönster. När du har hittat alla matchande par har du vunnit!
5. MINNESHANTERING
Du kan visa minnesstatus på kamerans internminne och SD-minneskort
(ingår ej) om ett sådant installerat i Kidizoom Camera™. Tryck på uppåt- och
nedåtpilarna på pilratten
för att välja antingen internminnet eller SD-
minneskortet. Tryck på OK-knappen
. Då visas alternativen ”Set Default”
(ange som standard) och ”Format” (formatera) för det valda minnet. ”Set Default”
kommer att ställa in valt minne som standardminne för sparade foton och lmer
som tas med Kidizoom Camera™. Denna symbol
visas vid det minne som är satt som standard.
”Format” kommer att radera innehållet och formatera det valda minnet.
6. CD-ROM
Den medföljande CD-skivan innehåller bildredigeringsprogrammet VTech® Photo Editor. Installera
det här programmet på din PC för att lägga till ytterligare fotoramar och stämplar på dina foton, samt
förvrängnings- och animeringseffekter. Se avsnitten Read Me och hjälp i VTech® Photo Editor för mer
information och brukanvisningar.
MASKINVARUKRAV FÖR INSTALLATION AV CD-ROM
• Pentium III 1 GHz eller motsvarande
• 1024 x 768 24-bitars grakkort
• Operativsystem: Windows 2000/XP
SKÖTSEL OCH UNDERHÅLL
1. Håll kameran ren genom att torka av den med en fuktig trasa.
2. Förvara inte kameran i direkt solljus eller i närheten av värmekällor.
3. Ta ur batterierna om kameran inte ska användas under en längre tid. Observera: Kom ihåg att
säkerhetskopiera bilder och lmer till en PC innan du tar ut batterierna.
4. Tappa inte kameran på hårt underlag och exponera den inte för fukt, och doppa den inte heller i
vatten.
VARNING
Mycket få människor kan, på grund av ett redan existerande tillstånd, få epileptiska anfall eller tillfällig
medvetslöshet när de ser vissa typer av blinkande färger eller mönster, i synnerhet på TV.
Medan Kidizoom Camera™ inte bidrar till ökade risker, rekommenderar vi vuxen övervakning av barn
medan de spelar TV-spel. Om ditt barn upplever yrsel, förändrad syn, förvirring eller kramper, måste
användningen genast avbrytas och läkare kontaktas.
Notera att om man koncentrerar sig på en TV-skärm på nära håll och samtidigt använder Kidizoom
Camera™ som spelkontroller under en längre stund, kan det orsaka trötthet eller obehag.
Vi rekommenderar att barn tar en 15-minuters paus för varje timme de spelar.
Aktiviteter / Skötsel och underhåll
SE
33
VARNING!
Batterier bör sättas i av en vuxen. Kom ihåg att vända + och - åt rätt håll.
Blanda inte gamla och nya batterier eller batterier av olika typ.
Försök inte att ladda batterier som inte är laddningsbara.
Ta ur batterierna om produkten inte används under en längre tid.
Kortslut inte batterikontakterna.
Page 35

SE
Felsökning
FELSÖKNING
Läs igenom det här avsnittet om du får problem med att använda Kidizoom Camera™.
Problem Lösning
Programmet slutar fungera. 1. Tryck in återställningsknappen med ett gem. Om detta
inte löser problemet ska du går vidare till nästa
felsökningssteg.
2. Se till att kameran är avstängd.
3. Stäng av strömmen genom att ta ur batterierna.
4. Låt kameran stå i några minuter utan batterier, sätt
sedan i batterierna på nytt och tryck in
återställningsknappen.
5. Slå på kameran. Kameran bör nu kunna användas igen.
6. Om kameran fortfarande inte fungerar ska du sätta i nya
batterier.
Fotot är suddigt. 1. Kontrollera att kameralinsfönstret är rent.
Displayen på Kidizoom Camera™
visar ingen bild.
1. Kontrollera att kameran har 4 st. C-batterier (LR6/AA).
Tryck på PÅ/AV-knappen för att starta kameran.
2. Kontrollera att kameran är inte är ansluten till TV:n med
A/V-kabeln.
3. Kontrollera att kameran inte är i energisparläge.
Tryck på PÅ/AV-knappen för att slå på kameran.
Det nns ingen bild på TV:n.. 1. Se till att kameran har batterier och att TV:n eller videon
är ansluten till vägguttaget.
2. Se till att kameran är PÅ och att TV:n eller videon är PÅ.
3. Kontrollera anslutningen av A/V-kabeln mellan kameran
och TV:n (eller videon) och läs anslutningsanvisningen i
motsvarande avsnitt i denna bruksanvisning.
4. Se till att alla kabelkontakter är ordentligt anslutna till rätt
ingångar.
5. Se till att TV:n är inställd på rätt kanal.
Inget ljud på TV:n. 1. Kontrollera att ljudet på TV:n är påslaget och inte i
ljudlöst läge (mute).
2. Höj volymen med motsvarande reglage på TV:n.
3. Kontrollera ljud- och videoanslutningarna mellan
kameran och TV:n (eller videon).
4. Se till att TV:n är inställd på rätt kanal.
Bilden rullar eller TV-bilden har
streck eller linjer .
1. Justera lodrät och vågrät bildjustering på TV:n
(om sådana reglage nns).
Det går inte att spara ler. 1. Kontrollera status på kamerans internminne och
SD-minneskort (ingår ej) om ett sådant nns installerat.
2. Kontrollera valet av standardminne (se anvisningen i
avsnittet ”Minneshantering”). Om ett SD-minneskort
(ingår ej) är angivet som standardminne ska du
kontrollera att minnet inte är skrivskyddat.
TV-bilden är svartvit. 1. Färgsystemet är inte kompatibelt. Se till att TV:n
är inställd på rätt TV-system (t.ex. PAL, NTSC
eller AUTO).
2. Problem med kabelanslutningen. Se till att videokabeln
är ordentligt ansluten till videoingången på TV:n.
Det nns bild, men inget ljud
på TV:n.
1. TV-inställning. Höj volymen på TV:n och se till att den
inte är inställd på ljudlöst (mute).
2. Problem med kabelanslutningen. Se till att den vita
och/eller röda kontakten är ordentligt ansluten till
ljudingången på TV:n.
Kameran kan sluta att fungera om den får en elektrostatisk stöt. Om detta inträffar kan du starta om
kameran med PÅ-/AV-knappen.
34
Page 36

Kjære foreldre
Hos VTech
®
vet vi hvor viktig første skoledag er for barnet ditt. For
å hjelpe førskolebarn med å forberede seg til den viktige dagen, har
VTech
®
utviklet Pre-school Learning™ -serien med interaktive
leker.
Pre-school Learning™ inneholder morsomme figurer og spennende
skoletemaer som benytter teknologi for å fange barnets oppmerksomhet
og lære dem viktige ferdigheter, som kreativitet, matching og
logikk. Disse ferdighetene læres på en måte som er både morsom og
engasjerende, slik at barnet ikke mister interessen. Barna vil også
lære om morsomme og interessante skoletemaer som kunst, musikk
– og friminutt! Med Pre-school Learning™ blir læring morsomt
fra første stund!
Hos VTech
®
vet vi at barna har i seg evnen til å utføre store ting.
Det er derfor våre elektroniske læringsprodukter er spesiallaget for
barnesinn og gir dem mulighet for å bruke sine evner på beste måte.
Takk for at du bruker VTech
®
i den viktige jobben det er å hjelpe barnet
med å lære og vokse.
Vennlig hilsen
Dine venner hos VTech
®
For å lære mer om Pre-school Learning™ og andre VTech®-leker,
kan du besøke
www.vtechkids.com
NO
35
Page 37

INTRODUKSJON
Takk for kjøpet av VTech® Kidizoom Camera™!
Kidizoom Camera™ er et stilig og slitesterkt digitalkamera for barn. Du kan ta bilder, redigere bilder, se
bilder, ta opp digitale videolmer og spille morsomme spill! Kidizoom Camera™ kan også kobles til TV,
slik at barna kan se sine bilder og lmer, eller spille spill på TV-skjermen. Kidizoom Camera™ har 16 MB
innebygd minne og støtter opp til 2 GB Secure Digital (SD) minnebrikker (ikke inkludert), slik at du kan
lagre enda ere bilder og lmer! Og det har en USB-port og -kabel for tilkobling av Kidizoom Camera™ til
datamaskinen, for visning av bilder og lm samt redigering og utskrift av bilder.
FUNKSJONER
PRODUKTLAYOUT OG KNAPPER
På/av-knapp
Trykk på denne knappen for å slå kameraet på og av.
Volum-knapp
Trykk på disse knappene for justere volum.
USB-Port
Sett den inkluderte USB-kabelen inn i USB-porten for å koble kameraet til datamaskinen.
Modus-knapp
Trykk denne knappen for å gå til hovedmenyen eller tilbake til forrige undermeny.
Retningstasten
Trykk denne knappen for å bevege markøren og markere.
OK-knapp
Trykk denne knappen for å bekrefte et valg eller en handling.
Slette-knapp
Trykk denne knappen for å slette valgte l.
Utløser-knapp
Trykk denne knappen for å ta et bilde eller starte et lmopptak.
A/V-port
Sett den inkluderte A/V-kabelen inn i A/V-porten for å koble den til TV.
Tilbakestillingsknapp
Trykk denne knappen for å tilbakestille kameraet hvis det ikke fungerer som det skal.
Merk: Trykker du tilbakestillingsknappen, vil dette slette alle data i Kidizoom Camera™ sitt minne, men vil
ikke slette data som er lagret på en SD-minnebrikke (ikke inkludert), hvis en slik er i bruk.
Blits
Autoeksponeringssystemet til Kidizoom Camera™ vil bruke blits når dette er nødvendig. Når blitsen er
klar til bruk, vil et lyn-symbol
lyse øverst i venstre hjørnet på displayet i kamera-modus.
INNHOLDET I DENNE PAKKEN
1 • VTech® Kidizoom Camera™
2 utbyttbare frontdeksler•
1 installasjons-CD med ekstrafunksjoner til bilderedigeringsprogrammet•
1 A/V-kabel•
1 USB-kabel•
Brukermanual•
1 håndleddsreim •
Advarsel: Alt emballasjemateriale, som tape, plastmerker, tråder og etiketter er ikke en del av denne
leken og bør kastes for barnets sikkerhet.
Introduksjon
36
NO
Utløser
Linse
Mikrofon
Blits
Retningstasten
A/V-port for
TV-tilkobling
Modus-knapp
USB-port for tilkobling
til datamaskinen
Volum-knapper
OK-knapp
Slette-knapp
På/av-knapp
Todelte søkere
Mikrofon
Batterideksel (1)
Tilbakestillingsknapp
Batterideksel (2)
Page 38

PRODUKTSPESIFIKASJONER
Display: 1,8” TFT farge-LCD
Bildeoppløsning: Bilde: 640 x 480 Film: 160 x 120
Fokusområde: 45 cm - ∞
Blits-område: 1–2 meter
Minne:
16 MB innebygd minne (ca. 12 MB ledig minne for bilde/lm).
Bilder: Kan lagre ca. 200 bilder (bildestørrelse = 640 x 480, oppløsning i jpeg-format).
Filmer: Tar opp opptil fem minutter med lm (lmstørrelse = 160 x 120, oppløsning i Motion JPEG-
format).
Kidizoom Camera™ støtter opptil 2 GB Secure Digital (SD) minnebrikker (ikke inkludert) for større
minne.
Støtter lformatene:
Bilde: JPEG (opp til 2 MB piksler med 1632 x 1224 oppløsning)
Film: Kidizoom Camera™ Motion JPEG
Maskinvare som støttes:
A/V-kabel for TV-tilkobling (inkludert)
USB-kabel for tilkobling til datamaskinen (inkludert)
SD-minnebrikker (ikke inkludert) opptil 2 GB
SLIK KOMMER DU I GANG
INNSETTING AV BATTERIER
Merk: Batterier må settes i av en voksen. Bruk en skrutrekker for å installere batterier.
Sørg for at kameraet er slått av.•
Lokaliser batterirommet på undersiden av kameraet. Løsne skruene ved hjelp av •
skrutrekkeren og fjern batteridekslet.
Installer 4 nye C-batterier (LR6/AA) – to på •
hver side – som vist nedenfor. (Bruk nye
alkaliske batterier for optimal ytelse.)
Sett på batteridekslet og skru fast skruene. •
Ikke skru til for hardt.
Merk: Hvis Kidizoom Camera™ ikke fungerer som
det skal etter at batteriene er satt i, kan du trykke
tilbakestillingsknappen og starte kameraet på nytt.
Trykker du tilbakestillingsknappen, vil dette slette
alle data i Kidizoom Camera™ sitt minne, men vil ikke slette data
som er lagret på en SD-minnebrikke (ikke inkludert), hvis en slik er i bruk.
Anbefalinger:
Når batteriene i Kidizoom Camera™ er tom
for energi eller er tatt ut i mer enn et par minutter,
kan det være at dataene i det interne minnet slettes. Vi anbefaler derfor bruk av en SD-minnebrikke
(ikke inkludert) og å velge den som standard for lagring av bilder eller lm som er tatt med Kidizoom
Camera™. Hvis en SD-minnebrikke (ikke inkludert) ikke brukes, må du huske å kopiere bildene og
lmene som ligger i kameraets internminne over til en datamaskin før du skifter batteri eller før batteriene går tom for energi.
BATTERIER
Det anbefales at du bruker nye alkaliske batterier for beste ytelse.•
Installer batteriene korrekt vei (+, -) for å unngå lekkasje.•
Ikke bland gamle og nye batterier.•
Ikke bland forskjellige typer batterier: alkalisk, standard (karbon-sink) eller oppladbare •
(nikkel-kadmium).
Fjern batteriene fra batterirommet når enheten ikke skal brukes over lengre tid. Vær oppmerksom •
på: For å unngå tap av data, bør alle bilder og lmer fra Kidizoom Camera™ kopieres over på en
datamaskin før batteriene fjernes.
Fjern alltid ate batterier fra enheten.•
Batterier må ikke brennes.•
Ikke forsøk å lade opp standardbatterier.•
Unngå å kortslutte polene på laderen.•
Kun batterier av samme eller tilsvarende type anbefales brukt. •
Vi anbefaler ikke bruk av oppladbare batterier.
SETT INN SD-MINNEBRIKKE
Kidizoom Camera™ støtter opp til 2 GB Secure Digital (SD) minnebrikker (ikke inkludert) for større
minne.
Sørg for at kameraet er slått av.•
Åpne batteridekslet på høyre side (når du har •
LC-displayet fremfor deg).
Finn inngangen til SD-minnebrikken inni batterirommet.•
Sett inn SD-minnebrikken (ikke inkludert) som •
vist nedenfor.
Sett på batteridekslet og skru fast skruen. •
Ikke stram skruen for mye.
Introduksjon og hvordan du kommer i gang
37
NO
SD card
Page 39

SKIFTE AV FRONTDEKSLET
1. Løft forsiktig opp nedre del av frontdekslet og fjern det fra
Kidizoom Camera™.
2. Sett inn det andre frontdekslet ved å plassere hektene inn i åpningene
som vist på bildet til høyre.
3. Trykk nedre del av frontdekslet mot kameraet slik at det festes ordentlig.
BRUK AV KIDIZOOM CAMERA™
Trykk på på/av-knappen • for å slå på kameraet. Etter at du har slått det på,
vil Kidizoom Camera™ automatisk gå i kamera-modus, og du kan begynne å ta bilder.
Når du vil skifte til andre aktiviteter trykker du på modus-knappen•
for å gå
til hovedmenyen. Fra hovedmenyen kan du velge blant følgende aktiviteter:
kamera, lmer, fotoverksted, spill og systeminnstillinger.
For å øke eller redusere volumet trykker du opp eller ned på volumknappene •
.
For å koble til en TV eller datamaskin, følg veiledningen i avsnittene •
“Kobling til TV” eller “Kobling til datamaskin” nedenfor.
Trykk på på/av-knappen igjen for å slå av enheten.•
BATTERISTATUS
Når displayet viser “svakt batteri”-ikon , anbefaler vi at alle data i det interne minnet i Kidizoom
Camera™ sikkerhetskopieres ved at de lastes opp på en datamaskin. Deretter skiftes batteriene ut.
Når enheten viser “ingen batterier”-ikon
vil ikke enheten fungere ordentlig. Nye batterier bør settes
inn før bruk.
Merk: For å unngå tap av data som ligger i det interne minnet i Kidizoom Camera™, bør dataene sikker-
hetskopieres eller batteriene skiftes når du ser “svakt batteri”-ikonet
. Ved skifte av batterier setter du
inn nye batterier innen et par minutter etter at du har tatt ut de gamle batteriene.
Vi anbefaler at du jevnlig sikkerhetskopierer dataene som ligger i det interne minnet til
Kidizoom Camera™ for å unngå tap av data, og vi anbefaler dessuten bruk av en SD-minnebrikke
(ikke inkludert) som lagringsenhet, hvis mulig.
AUTOMATISK STENGNING
For å spare batteriet vil Kidizoom Camera™ automatisk slås av etter 1–2 minutter uten input. Kameraet
kan slås på igjen ved å trykke på på/av-knappen.
SLIK KOBLES KONSOLLEN TIL EN TV
MERK: Før du kobler Kidizoom Camera™ til en TV, må du sørge for at enheten fungerer ordentlig ved å
slå på kameraet. Når du har slått på kameraet, vil LC-displayet lyse opp og gå inn i kamera-modus.
Hvis LC-displayet ikke lyser opp, må du kontrollere om batteriene er satt i korrekt.
Koble Kidizoom Camera™ til en TV eller skjerm ved hjelp av A/V-kabelen (inkludert).
Sett inn A/V-kabelen i A/V-inngangen i Kidizoom Camera™. Sett de fargede kontaktene
på A/V-kabelen inn i matchende farger for video- og lyd-inngangene på TV-en.
KOBLING TIL EN VIDEOSPILLER
Hvis det ikke er videoinngang eller lydinngang på TV-en, kan du koble Kidizoom
Camera™ til videospilleren.
Sett inn A/V-kabelen i A/V-inngangen i • Kidizoom Camera™.
Koble den gule kontakten på A/V-kabelen til den gule videoinngangen på videospilleren.•
Koble den hvite kontakten på A/V-kabelen til den hvite lydinngangen på videospilleren. •
Merk: Hvis A/V-kabelen er satt i Kidizoom Camera™ mens et spill allerede er i gang på LC-displayet, vil
spillet avbrytes, og displayet vil vise hovedmenyen. Og hvis A/V-kabelen er tatt ut mens et spill allerede er i
gang på TV-en, vil spillet på samme måte avbrytes, og displayet vil vise hovedmenyen.
Skifte av frontdekslet / Bruk av Kidizoom Camera™
38
NO
Hovedmeny
2
1
3
Page 40

Bruk av Kidizoom Camera™ / Aktiviteter
SLIK KOBLES KAMERAET TIL
DATAMASKINEN
Du kan koble Kidizoom Camera™ til en datamaskin ved hjelp av en USB-kabel. Når Kidizoom
Camera™ er koblet til datamaskinen, kan du laste opp og ned ler som om det var en vanlig ekstern
lagringsenhet. Når Kidizoom Camera™ er koblet til en datamaskin, vil en ny stasjon som heter “VTech
773” vise stasjonsmappen på datamaskinen. Hvis det også er en SD-minnebrikke (ikke inkludert) i
kameraet når det er koblet til datamaskinen, vil det stå to nye stasjoner i stasjonsmappen. Den ene vil
hete “VTech 773” som nevnt ovenfor, og den andre vil være for minnebrikken.
Finn USB-inngangen på baksiden av kameraet og skyv lokket av.•
Sett i USB-kabelen (den minste enden) i USB-inngangen på kameraet.•
Sett i den største enden av USB-kabelen i USB-inngangen på datamaskinen. En USB-inngang er •
normalt merket med dette symbolet
.
For å unngå datafeil bør du kontrollere om batteriet i Kidizoom Camera™ er svakt, før du foretar
opplasting av data til datamaskinen eller laster ned data til kameraet.
MINIMUM SYSTEMKRAV FOR TILKOBLING TIL DATAMASKIN:
Windows 2000 SP3+/ XP
Merk: Når kameraet er koblet til datamaskinen, slår du på Kidizoom Camera™ for at det
skal bli kontakt mellom kamera og datamaskin. Ikke koble fra kamera eller datamaskin når
lene lastes opp eller ned. Når du er ferdig, slår du av kameraet for å spare energi.
AKTIVITETER
1. KAMERA
I kamera-modus kan brukeren enten se gjennom søkeren eller på LC-displayet for å se det som •
skal tas bilde av.
Hold kameraet stødig og trykk på utløser-knappen • øverst på kameraet eller trykk OK-knappen
på baksiden av kameraet for å ta bildet.
Når • Kidizoom Camera™ først er slått på, vil det være i autoblits-modus. For å endre
blitsinnstillingen trykker du sletteknappen for å skifte mellom tre alternativer: ingen blits-modus
, blits-modus og autoblits-modus .
Advarsel: Slå av autoblits-modus når du tar et nærbilde av en persons ansikt, for å unngå skader på
personens øyne.
Merk: Hvis batteriene er for svake, kan det være at autoblits-funksjonen ikke er tilgjengelig, og da vil
dette ikonet vise
.
Velg en bilderamme eller grakk som skal legges til bildet før du tar bildet. Velg en ramme eller •
grakk ved å trykke venstre eller høyre pil på retningstasten
for å bla gjennom utvalget.
Når du tar et bilde, vil den valgte rammen eller grakken være en del av motivet.
Se bildene som du har tatt ved å trykke oppover eller nedover på retningstasten •
én gang for
å velge fotoalbum. Trykk deretter opp eller ned en gang til med piltasten for å se det forrige eller
neste bildet som er lagret i fotoalbumet.
Mens du er i fotoalbumet, kan du trykke på sletteknappen •
hvis du ønsker å slette bildet som
vises i LC-displayet.
Gå ut av fotoalbumet og returner til kamera-modus ved å trykke på utløser-knappen • én gang.
Bilder som tas med • Kidizoom Camera™ vil lagres i PHOTO-mappen i det interne minnet eller på
en SD-minnebrikke (ikke inkludert), hvis en minnebrikke er satt inn i kameraet.
Merk: Hvis du vil se andre bilder (men ikke høyere oppløsning enn 1632 x 1224) som er lastet ned
fra datamaskinen til Kidizoom Camera™, må du huske å laste dem ned til rotkatalogen til Kidizoom
Camera™ eller til rotkatalogen til SD-minnebrikken (ikke inkludert), ellers kan det hende du ikke får
frem bildene i displayet.
2. FILMER
I lm-modus kan du lage digitale videolmer med Kidizoom Camera™. Trykk på utløser-knappen •
øverst på kameraet eller OK-knappen
bak på kameraet for å starte eller stoppe lmopptak.
Se lmopptakene ved å trykke oppover eller nedover på retningstasten •
én gang for å velge
lmalbum. Deretter trykker du opp eller ned med retningstasten for å velge lmen du vil se.
Trykk OK-knappen
for å starte lmen.
Mens du er i lmalbumet, kan du trykke på sletteknappen •
hvis du ønsker å slette lmen som
vises i LC-displayet.
Gå ut av lmalbumet og returner til lm-modus ved å trykke på utløser-knappen •
én gang.
Filmer som tas med • Kidizoom Camera™ vil lagres i MOVIE-mappen i det interne minnet eller på
en SD-minnebrikke (ikke inkludert), hvis en minnebrikke er satt inn i kameraet.
NO
39
Page 41

3. FOTOVERKSTED
I fotoverkstedet kan du redigere et bilde eller spille inn lyd og legge den til et bilde.
3.1) BILDEREDIGERINGSVERKTØYET
I bilderedigeringsverktøyet kan brukeren legge til bilderammer, grakk og morsomme fordreiningseffekter til bildet, og du kan animere bilder. Trykk retningstasten til venstre eller høyre
og trykk deretter
OK-knappen for å velge et bilde. Trykk retningstasten opp eller ned igjen for å velge en av funksjonene
nedenfor, og trykk deretter OK-knappen
for å begynne.
A. Bilderamme-ikon
: Velg dette ikonet for å velge en bilderamme som du legger på bildet. Trykk
retningstasten til venstre eller høyre
for å velge en ramme, og trykk deretter OK-knappen for å
bekrefte valget.
B. Grakk-ikon
: Velg dette ikonet for å velge en grakk som du legger på bildet. Trykk retningstasten
til venstre eller høyre
og trykk deretter OK-knappen for å velge en grakk. Trykk deretter
retningstasten opp eller ned for å forstørre eller krympe grakkens størrelse, og trykk deretter
OK-knappen
for å bekrefte valget. Deretter bruker du retningstasten for å plassere grakken der
hvor du vil ha den, og trykker så OK-knappen for å legge grakken til bildet.
C Fordreinings-ikon
: Velg dette ikonet for å velge en fordreiningseffekt som du legger på bildet.
Trykk retningstasten til venstre eller høyre
for å velge en effekt, og trykk deretter OK-knappen
for å bekrefte valget. Deretter bruker du retningstasten for å plassere fordreiningen der hvor du vil ha
den, og trykker så OK-knappen
for å legge den til bildet.
Merk: Å generere en fordreiningseffekt på bildet, kan ta mer enn 1 minutt.
D. Animasjons-ikon
: Velg dette ikonet for å velge en animasjon som du legger på bildet.
Trykk retningstasten til venstre eller høyre
for å velge en animasjonseffekt, og trykk deretter
OK-knappen
for å bekrefte valget og se det animerte bildet. Vær oppmerksom på at
animasjonseffekter ikke kan lagres.
E. Angre-ikon
: Velg dette ikonet for å angre den siste redigeringen.
F. Lagre som-ikon
: Velg dette ikonet for å lagre bildet som du har redigert.
Merk: Prosessen som lagrer et redigert bilde som inneholder en fordreiningseffekt, kan ta mer enn 1
minutt. Alle redigerte bilder vil lagres med en oppløsning på 640 x 480.
3.2) STEMMEBILDE
I stemmebilde kan du gjøre 10 sekunder med stemmeopptak som du kan legge til et bilde.
Trykk retningstasten til venstre eller høyre
for å velge et bilde. Hvis et bilde allerede har et
stemmeopptak, vil det ha et høyttaler-ikon
ved siden av seg. Trykk retningstasten til venstre eller
høyre igjen for å velge ikon for opptak, avspilling eller sletting av stemme.
A. Opptaks-ikon
: Velg dette ikonet for å begynne stemmeopptak. Velg ikonet én gang til for å stoppe
opptaket. Du kan ta opp 10 sekunder for hvert bilde.
B. Avspillings-ikon
: Velg dette ikonet hvis du vil spille av eller stoppe innspilt stemme.
C. Slett stemme-ikon
: Velg dette ikonet for å slette innspilt stemme til et bilde.
Merk: Innspilt stemme for stemmebilder kan bare høres når bildet er lagret i det interne minnet i Kidizoom
Camera™ eller på en SD-minnebrikke (ikke inkludert), hvis en slik er satt i. Stemmefoto kan ikke overføres
eller spilles av på en datamaskin.
4. SPILL
Tre spill er innebygd i Kidizoom Camera™. Trykk retningstasten til venstre eller høyre for å
velge et spill, og trykk deretter OK-knappen
for å begynne å spille det valgte spillet.
A. TRIPP TRAPP TRESKO
Spill mot datamaskinen, bytt på å plassere spillbrikkene på 3 x 3 rutet brett.
Du kan trykke retningene på retningstasten
for å ytte brikken og deretter
trykke på OK-knappen
for å plassere den. Første spiller som får tre brikker
på rad vertikalt, horisontalt eller diagonalt, vinner spillet!
B. ROTERENDE PUSLESPILL
Utfordre deg selv ved å ordne opp i dette bildepuslespillet! Først ser du et helt
bilde, og deretter deles det opp i 4 eller 9 kvadratiske deler. Hver del vil rotere
tilfeldig. For å ordne bildet skal du bruke retningstasten
for å velge en del
og deretter trykke på OK-knappen
for å dreie den tilbake til sin riktige plass.
Når alle delene er tilbake på rett plass og bildet er helt, har du vunnet! Du kan
også lage ditt eget puslespill ved å trykke på lukkerknappen for å skifte til
kameramodus. Trykk på lukkerknappen en gang til og bildet som nettopp er tatt
vil bli puslespillet.
Aktiviteter
40
NO
Page 42

C. PAR SOM PASSER
Test hukommelsen din. Det vil være 3 eller 4 par med ting som gjemmes bak
vinduene. Du kan åpne to vinduer av gangen. Trykk retningstasten
for
å velge et vindu, og trykk deretter OK-knappen
for å åpne det.
Hvis tingene bak de to åpne vinduene ikke passer sammen, vil vinduene
lukkes igjen, og du må forsøke igjen. Når du har funnet alle par som passer,
har du vunnet!
5. MINNEKONTROLL
Du kan se minnestatus for kameraets interne minne og for en SD-minnebrikke
(ikke inkludert), hvis en slik sitter i kameraet. Trykk retningstasten
for å velge
enten internt minne i Kidizoom Camera™ eller SD-minnebrikke.
Trykk OK-knappen
og den vil vise alternativene “Set Default” (sett standard)
og “Format” for det valgte minnet. “Set Default” vil velge minnet som standard
minne ved lagring av bilder og lmer som er tatt med Kidizoom Camera™.
Den valgte standardplasseringen vil vise denne indikatoren
. “Format” vil slette alle data og
formatere det valgte minnet.
6. CD-ROM
Den inkluderte CD-ROM-en inneholder VTech® Photo Editor-program. Hvis du installerer dette
fotoredigeringsprogrammet på en datamaskin, kan du få ere morsomme bilderammer og grakk å
velge mellom, og dessuten ere fordreiningseffekter og animasjonseffekter. Se Les meg- og Hjelp-
avsnittene for VTech® fotoredigeringsprogrammet for mer informasjon og brukerveiledning.
MINIMUMSKRAV FOR MASKINVARE VED
INSTALLERING AV CD-ROM
• Pentium III 1 GHz eller tilsvarende
• 1024 x 768 24-bit grakkort
• Windows 2000/XP operativsystem
VEDLIKEHOLD
1. Rengjør kameraet jevnlig ved å tørke det av med en fuktig klut.
2. Ikke la kameraet ligge i direkte sollys eller i nærheten av varmekilder.
3. Ta ut batteriene hvis kameraet ikke er i bruk over en lengre periode. Vær oppmerksom på: For å
unngå tap av data bør alle bilder og lmer fra Kidizoom Camera™ kopieres over på en datamaskin
før batteriene fjernes.
4. Unngå å la kameraet falle på harde overater. Det må heller ikke utsettes for fukt eller senkes ned i
vann.
ADVARSEL
En veldig liten del av befolkningen kan, på grunn av en eksisterende lidelse, få epileptiske anfall eller
miste bevisstheten hvis de ser bestemte former for blinkende lys eller mønstre, spesielt på TV.
Selv om Kidizoom Camera™ ikke øker risikoen, anbefaler vi at foreldre holder øye med barna når
de spiller TV-spill. Hvis barnet opplever svimmelhet, synsforstyrrelser, forvirring eller anfall, så avbryt
spillet umiddelbart og kontakt lege.
Legg merke til at det å fokusere på en TV-skjerm på nært hold og å betjene et Kidizoom Camera™
som en joystick i en lengre periode kan medføre tretthet og ubehag. Vi anbefaler at barnet tar en 15
minutters pause for hver time det spiller.
Aktiviteter / Vedlikehold
NO
41
FORSIKTIG!
Batterier bør settes i av en voksen. Husk å sette + og - riktig vei.
Ikke bland gamle og nye batterier eller forskjellige batterityper.
Ikke forsøk å lade batterier som ikke er oppladbare.
Ta ut batteriene hvis varen ikke er i bruk over en lengre periode.
Batterikontaktene må ikke kortsluttes.
Page 43

NO
Problemløsning
PROBLEMLØSNING
Les dette avsnittet hvis du opplever problemer med Kidizoom Camera™.
Problem Løsning
Programmet fungerer ikke. 1. Trykk på tilbakestillingsknappen med en binders.
Hvis dette ikke løser problemet, følg trinnene nedenfor.
2. Sørg for at kameraet er slått av.
3. Avbryt strømmen ved å fjerne batteriene.
4. La kameraet være i et par minutter uten batterier,
deretter setter du batteriene tilbake på plass og trykker
på tilbakestillingsknappen en gang til.
5. Slå på kameraet. Kameraet burde nå være klart til å
brukes igjen.
6. Hvis kameraet ennå ikke fungerer, skifter du batteriene
med helt nye batterier.
Bildet er ikke skarpt. 1. Kontroller om kameralinsebeskyttelsesvinduet er rent.
Displayet på Kidizoom Camera™
er ikke slått på.
1. Sørg for at det sitter 4 C-batterier (LR6/AA) i kameraet.
Hold nede på/av-knappen for å slå den på.
2. Sørg for at kameraet ikke er koblet til TV-en med en
A/V-kabel.
3. Sørg for at kameraet ikke er i hvilemodus.
Trykk på/av-knappen for å slå det på.
Det er ikke noe bilde på
TV-skjermen.
1. Sørg for at det er batterier i kameraet og at eventuell TV
og videospiller er koblet til strømnettet.
2. Sørg for at kameraet er slått på og at eventuell TV og
videospiller er slått på.
3. Kontroller A/V-kabelens forbindelse mellom kamera og
TV (eller videospiller), og utfør på nytt korrekt tilkobling
som vist i denne manualen.
4. Sørg for at kabelpluggene er satt ordentlig inn i de
korrekte inngangene.
5. Sørg for at TV-en er innstilt på riktig inngangskanal.
Ingen lyd på TV-en. 1. Kontroller at TV-volum er slått av eller er i
lydløs-modus (“Mute”).
2. Forsøk å øke volumet ved å trykke på
oppvolum-knappen.
3. Kontroller lyd- og bildeforbindelsene mellom kamera og
TV eller video.
4. Se til at TV-en er innstilt på riktig inngangskanal.
Bildet ruller eller imrer på TV-en. 1. Forsøk å justere de vertikale eller horisontale
hold-kontroller (hvis tilgjengelig) på TV.
Kan ikke lagre ler. 1. Kontroller minnestatus for både det interne minnet på
Kidizoom Camera™ og minnet på SD-minnebrikken
(ikke inkludert), hvis en slik er satt i.
2. Kontroller innstillingen for standardlagring (se avsnittet
“Minnekontroll” ovenfor). Hvis den er innstilt til å bruke
en SD-minnebrikke (ikke inkludert), må du sørge for at
minnebrikken ikke er skrivebeskyttet.
Bildet på TV-en er svart/hvitt. 1. Fargesystemet er ikke kompatibelt. Se til at TV-en er
innstilt på riktig TV-system
(f.eks. PAL, NTSC eller AUTO).
2. Problemer med kabeltilkoblingen. Sørg for at
bildekabelen er ordentlig koblet til bildeinngangen i TV-en.
Det er bilde, men ingen lyd på
TV-en.
1. TV-instillingen. Skru opp volumet på TV-en og kontroller
at den ikke er innstilt på lydløst (“Mute”).
2. Problemer med kabeltilkoblingen. Sørg for at den hvite
og/eller røde pluggen er ordentlig koblet til lydinngangen
på TV-en.
Når du er i nærheten av gjenstander som har statisk elektrisitet, kan det hende at kameraet ikke virker
som det skal. Hvis dette skjer, tilbakestilles kameraet ved hjelp av av/på-knappen.
42
Page 44

Hyvät vanhemmat,
Me VTech
®
:n väki tiedämme, kuinka tärkeä ensimmäinen koulupäivä
on lapsellenne. Auttaakseen esikouluikäisiä valmistautumaan tähän
tärkeään tapahtumaan VTech
®
on kehittänyt erityisen esikoululaisille
tarkoitetun, interaktiivisen lelusarjan nimeltään Pre-school
Learning™.
Pre-school Learning™ käsittää hauskoja hahmoja ja kiinnostavia
opetusteemoja, jotka tekniikkaa apuna käyttäen vangitsevat lapsen
huomion samalla opettaen tärkeitä esikoulussa tarvittavia taitoja,
kuten luovuutta, yhdistelykykyä ja loogista ajattelua. Näitä
tärkeitä taitoja opetetaan tavalla, joka on samalla kertaa sekä hauska
että mukaansatempaava. Lapset tutustuvat myös hauskoihin
kouluaineisiin, kuten kuvaamataitoon, musiikkiin ja jopa välituntiin!
Pre-school Learning™ tekee oppimisesta hauskaa heti alusta
alkaen!
Me VTech
®
:n väki tiedämme, että lapsella on kyky upeisiin
suorituksiin. Tästä syystä kaikki elektroniset oppimistuotteemme
on suunniteltu ainutlaatuisella tavalla siten, että ne antavat lapselle
mahdollisuuden kehittää ajatteluaan ja käyttää koko suorituskykyään.
Kiitämme luottamuksesta VTech
®
:iin. Olemme mukana auttamassa
lastanne oppimaan ja kasvamaan!
Parhain terveisin,
VTech
®
:n väki
Lisätietoa Pre-school Learning™- ja muista VTech
®
-leluista löydät
osoitteesta
www.vtechkids.com
FI
43
Page 45

JOHDANTO
Kiitos, että olet valinnut VTech® Kidizoom Cameran™!
Kidizoom Cameran™ on linjakas ja kestävä digitaalikamera lasten käyttöön: valokuvaamiseen, kuvien
muokkaamiseen, digitaalisten videoelokuvien tekemiseen ja hauskojen pelien pelaamiseen!
Kidizoom Cameran™ voi yhdistää TV-vastaanottimeen, jolloin lapset voivat katsella valokuviaan ja
elokuviaan kuvaruudulta. Kidizoom Cameran™ on 16 Mt:n sisäänrakennettu muisti, ja se tukee jopa
2 Gt:n kapasiteetilla varustettua Secure Digital (SD)-muistikorttia (ei sisälly pakkaukseen), jolloin
laitteeseen voi tallentaa enemmän kuvia ja elokuvia! Ja laitteeseen kuuluu myös USB-portti ja -kaapeli,
jotta Kidizoom Cameran™ voidaan yhdistää tietokoneeseen valokuvien ja elokuvien katselemista,
sekä kuvien muokkaamista ja tulostusta varten.
TOIMINNOT
TUOTTEEN KAAVAKUVA JA NÄPPÄIMET
PÄÄLLE/POIS PÄÄLTÄ -painike
Painamalla tätä painiketta voit kytkeä kameraan virran tai katkaista virran.
Äänenvoimakkuuden säätönäppäimet
Voit lisätä äänenvoimakkuutta painamalla näitä painikkeita.
USB-portti
Kytkemällä pakkaukseen kuuluvan USB-kaapelin tähän USB-porttiin voit yhdistää kameran tietokoneeseen.
Tilavalikon näppäin
Painamalla tätä näppäintä voit siirtyä päävalikkoon tai palata edelliseen alavalikkoon.
4-suuntainen kohdistinnäppäin
Painamalla tätä näppäintä voit siirtää kohdistinta ja tehdä valintoja.
OK-näppäin
Painamalla tätä näppäintä voit vahvistaa valinnan tai toiminnon.
Poistonäppäin
Painamalla tätä näppäintä voit poistaa valitsemasi tiedoston.
Laukaisinnäppäin
Painamalla tätä näppäintä voit ottaa valokuvan tai kuvata videokuvaa.
AV-portti
Kytkemalla pakkaukseen kuuluvan AV-kaapelin tähän AV-porttiin voit yhdistää kameran televisioon.
Nollauspainike
Painamalla tätä näppäintä voit palauttaa kameran toiminnot alkutilaan, jos kamera lakkaa toimimasta
kunnolla.
Huomaa: Painaessasi nollauspainiketta kaikki tallennukset pyyhkiytyvät pois Kidizoom Cameran™
sisäisestä muistista, mutta SD-muistikorttiin (ei sisälly pakkaukseen) tallennetut tiedostot säilyvät.
Salama
Kidizoom Camera™ automaattivalotus käyttää salamaa tarpeen vaatiessa. Salaman ollessa käyttövalmis
salamakuvake tulee kameran näytön vasempaan yläkulmaan
.
TÄHÄN PAKKAUKSEEN KUULUU
1 • VTech® Kidizoom Camera™
2 vaihdettavaa päällyskuorta•
1 tietokoneasennukseen tarkoitettu CD-ROM, jossa on lisätoiminnot kuvien muokkausta varten•
1 AV-kaapeli•
1 USB-kaapeli•
1 ohjekirja käyttäjälle•
1 rannehihna •
Varoitus: Mitkään pakkauksen materiaaleista, esim. teippi, muovikelmut, rautalangat tai tarrat,
eivät ole tämän leikkikalun osia. Ne on hävitettävä lapsen turvallisuuden takia.
Esittely
44
FI
Laukaisupainike
Linssi
Mikrofoni
Salama
4-suuntainen
kohdistinnäppäin
AV-kaapeli
TV-liitäntää varten.
Tilavalikko
USB-kaapeli
tietokoneliitäntää
varten.
Äänenvoimakkuuden
säätö
OK-näppäin
Poistonäppäin
Päälle/pois päältä
-painike
Kaksoisetsin
Mikrofoni
Paristotilan kansi (1)
Nollauspainike
Paristotilan kansi (2)
Page 46

TEKNISET TIEDOT
Näyttö: 1,8 tuuman TFT väri-LCD
Kuvan erottelukyky: Valokuva: 640 x 480 Videokuva: 160 x 120
Tarkennusetäisyys: 45 cm - ∞
Salaman ulottuvuus: 1 – 2 metriä
Muisti:
Sisäänrakennettu 16 Mt:n muisti (suunnilleen 12 Mt vapaata muistitilaa valokuvien ja videoelokuvien
tallennukseen).
Valokuvat: Muistiin mahtuu noin 200 valokuvaa (kuvakoko 640 x 480, JPEG-muoto).
Videokuva: Nauhoittaa jopa 5 minuuttia (koko = 160 x 120, Motion JPEG -muoto).
Kidizoom Camera™ on yhteensopiva enintään 2 Gt:n Secure Digital (SD) -muistikorttien kanssa
(ei sisälly pakkaukseen) muistin laajentamiseksi.
Yhteensopivat tiedostomuodot:
Valokuva: JPEG (2 megapikseliin asti erottelukyvyllä 1632 x 1224)
Videoelokuva: Kidizoom Camera™ Motion JPEG
Laitteistoyhteensopivuus:
AV-kaapeli TV-liitäntää varten.(sisältyy pakkaukseen)
USB-kaapeli tietokoneliitäntää varten (sisältyy pakkaukseen)
SD-muistikortti (ei sisälly pakkaukseen) 2 Gt:uun asti
KÄYTTÖÖNOTTO
PARISTOJEN ASENTAMINEN
Huomaa: Aikuisen apua tarvitaan paristojen asentamisessa. Käytä apuna ruuviavainta paristojen
asennuksessa.
Varmista, että kameran virta on kytketty pois päältä.•
Paristotilojen kannet ovat kameran pohjassa. Ota ruuvit irti •
ruuviavaimella ja irrota paristokotelojen kannet.
Aseta paikoilleen 4 uutta C (LR6/AA) •
paristoa (2 kummallekin puolelle) alla olevan
kuvan esittämällä tavalla. (Uusien alkaliparistojen
käyttöä suositellaan parhaan mahdollisen tehon
saavuttamiseksi.)
Aseta paristokotelon kansi takaisin paikoilleen ja •
kiristä ruuvit. Älä kiristä ruuveja liikaa.
Huomaa: Jos Kidizoom Camera™ ei toimi kunnolla
paristojen vaihdon jälkeen, paina nollauspainiketta ja käynnistä
kameran toiminnot uudelleen. Painaessasi nollauspainiketta kaikki
tallennukset pyyhkiytyvät pois Kidizoom Cameran™ sisäisestä muistista, mutta SD-muistikorttiin
(ei sisälly pakkaukseen) tallennetut tiedostot säilyvät.
Suositus:
Kun Kidizoom Cameran™ paristot ovat tyhjenneet
tai olleet poistettuina yli 5 minuuttia, laitteen
sisäisen muistin tiedot voivat kadota. Suosittelemme SD-muistikortin (ei sisälly pakkaukseen) käyttöä
Kidizoom Cameran™ otettujen kuvien ja videoelokuvien tallentamiseksi. Jos SD-kortti (ei sisälly
pakkaukseen) ei ole käytössä, muista kopioida valokuvat ja videoelokuvan kameran sisäisestä
muistista tietokoneeseen ennen paristojen tyhjenemistä tai poistamista.
TIETOJA PARISTOISTA
Alkaliparistojen käyttöä suositellaan parhaan mahdollisen suorituskyvyn saavuttamiseksi.•
Asenna paristot kunnolla paikoilleen napaisuuden suhteen (+ ja -) oikein päin vuotojen •
välttämiseksi.
Älä käytä sekaisin vanhoja ja uusia paristoja.•
Älä yhdistä erityyppisiä paristoja: alkali, standardi (hiili-sinkki) tai ladattavia (nikkeli-kadmium).•
Poista paristot laitteesta, jos et käytä sitä pitkään aikaan. Ota huomioon seuraavat seikat: •
Kopioi kaikki valokuvat ja elokuvat Kidizoom Camerasta™ tietokoneeseen ennen paristojen
irrottamista, jotta tiedot eivät katoa.
Poista aina loppuun käytetyt paristot laitteesta.•
Älä hävitä paristoja polttamalla.•
Älä yritä ladata tavallisia paristoja. •
Älä oikosulje liitäntöjä.•
Ainoastaan samanlaisten tai vastaavan tyyppisten paristojen käyttö on suositeltavaa. •
Emme suosittele ladattavien paristojen käyttämistä.
TILA SD-MUISTIKORTILLE
Kidizoom Camera™ on yhteensopiva enintään 2 Gt:n Secure Digital (SD)-muistikortin kanssa
(ei sisälly pakkaukseen), jolla laitteen muistia voi laajentaa.
Varmista, että kameran virta on kytketty pois päältä.•
Avaa kameran oikealla sivulla (LCD-näytöstä päin •
katsottuna) oleva paristotila.
SD-kortin aukko on sen sisällä.•
Aseta SD-kortti (ei sisälly pakkaukseen) paikoilleen •
alla olevassa kuvassa esitetyllä tavalla.
Aseta paristokotelon kansi takaisin paikoilleen ja kiristä •
ruuvit. Älä kiristä ruuveja liikaa.
Esittely / Käyttöohjeet ja alkuvalmistelut
45
FI
SD card
Page 47

PÄÄLLYSKUOREN
VAIHTAMINEN
1. Nosta varovasti päällyskuoren alaosaa ja irrota se Kidizoom Camerasta™.
2. Aseta uusi kuori paikoilleen laittamalla koukut reikiin oikealla puolella näkyvässä
kuvassa esitettävällä tavalla.
3. Paina kuoren alaosaa kameraa vasten varmistaaksesi, että se on oikein paikoillaan.
NÄIN RYHDYT KÄYTTÄMÄÄN
KIDIZOOM CAMERAA™
Käynnistä kamera painamalla virtapainiketta (ON/OFF) • . Käynnistämisen
jälkeen Kidizoom Camera™ siirtyy välittömästi kuvaustilaan ja voit aloittaa
kuvien ottamisen.
Voit siirtyä muihin toimintoihin painamalla tilavalikkonäppäintä • .
Siirryt päävalikkoon. Voit valita päävalikosta seuraavat toiminnot: valokuva,
videoelokuva, muokkaus, pelit ja järjestelmäasetukset.
Voit lisätä tai vähentää äänenvoimakkuutta painamalla äänenvoimakkuusnäp •
päimiä
.
Kun yhdistät laitteen televisioon tai tietokoneeseen, noudata televisioonkytkemis- tai tie •
tokoneeseenkytkemisohjeita.
Voit katkaista virran painamalla virtapainiketta.•
PARISTOJEN TOIMINTATASO
Kun näyttöön tulee heikon paristotehon kuvake , suosittelemme kaikkien Kidizoom Cameran™
sisäiseen muistien tallennettujen tietojen siirtämistä ensin tietokoneeseen ja paristojen vaihtamista tämän
jälkeen. Kun näyttöön tulee Ei paristoja -kuvake , laite ei toimi kunnolla. Uudet paristot tulee vaihtaa
ennen kameran käyttämistä.
Huomaa: Voit välttää tietojen katoamisen Kidizoom Cameran™ sisäisestä muistista varmuuskopioimalla
ne tai vaihtamalla paristot, kun paristojen heikosta toimintatasosta kertova kuvake tulee näkyviin.
Kun vaihdat paristoja, laita uudet paristot paikoilleen muutaman minuutin kuluessa vanhojen paristojen
poistosta. Suosittelemme, että tallennat Kidizoom Cameran™ sisäisessä muistissa olevat tiedostot
säännöllisin väliajoin, jotta et menetä niitä. Suosittelemme SD-muistikortin (ei sisälly pakkaukseen)
käyttämistä tähän tarkoitukseen.
AUTOMAATTINEN VIRRANKATKAISU
Paristojen käyttöiän pidentämiseksi Kidizoom Camera™ sammuu automaattisesti, kun se on ollut
käyttämättä 1-2 minuuttia. Kameran virta saadaan päälle uudelleen painamalla virtapainiketta (ON/OFF).
TELEVISIOON KYTKEMINEN
HUOMAA: Ennen kuin yhdistät Kidizoom Camera™ televisioon, kytke kameraan virta sen
varmistamiseksi, että laite toimii kunnolla. Kun olet käynnistänyt kameran, LCD-näytön valo syttyy ja laite
siirtyy kameratilaan. Jos LCD-näyttö ei syty, tarkista, ovatko paristot kunnolla paikoillaan.
Yhdistä Kidizoom Camera™ televisioon tai näyttöön käyttämällä pakkauksessa olevaa
AV-kaapelia. Kytke AV-kaapeli Kidizoom Camera™ AV-porttiin. Työnnä AV-kaapelin
värilliset AV-liittimet televisiovastaanottimen vastaavan värisiin video- ja ääniliitäntöihin.
VIDEOLAITTEESEEN KYTKEMINEN
Jos televisiossasi ei ole tuloliitäntöjä videokuvalle tai äänelle, voit kytkeä Kidizoom
Cameran™ videolaitteeseen.
Kytke AV-kaapeli • Kidizoom Cameran™ AV-porttiin.
Liitä A/V-kaapelin keltainen pää videonauhurin keltaiseen videoliitäntään.•
Liitä A/V-kaapelin valkoinen pää videonauhurin valkoiseen ääniliitäntään. •
Huomaa: Jos A/V-kaapeli kytketään Kidizoom Cameran™, kun LCD-näytössä on meneillään peli, peli
loppuu ja näyttöön tulee päävalikko. Jos A/V-kaapeli irrotetaan Kidizoom Camerasta™, kun TV-näytössä
on meneillään peli, peli loppuu ja näyttöön tulee päävalikko.
Päällyskuoren vaihtaminen / Kidizoom Cameran™ käyttöönotto
46
FI
Päävalikko
2
1
3
Page 48

Kidizoom Cameran™ käyttöönotto / Toiminnot
TIETOKONEESEEN KYTKEMINEN
Voit kytkeä Kidizoom Cameran™ tietokoneeseen pakkauksessa olevalla USB-kaapelilla. Kun kamera
on kytketty, voit ladata tiedostoja kamerasta tai käyttää kameraa irrotettavana muistilaitteena ja ladata
siihen tiedostoja. Kun Kidizoom Cameran™ on kytkettynä tietokoneeseen, tietokoneen näytössä
näkyy VTech 773-asema. Kun tietokoneeseen kytkettäessä kamerassa on myös muistikortti (ei sisälly
pakkaukseen), tietokoneen näyttöön tulee kaksi uutta asemaa. Toinen on VTech 773 -asema ja toinen
on siirrettävä muisti eli muistikortti.
Paikanna kameran takaa USB-portti ja liu’uta sen kansi auki.•
Yhdistä USB-kaapelin pieni pää kameran USB-porttiin.•
Yhdistä USB-kaapelin suuri pää tietokoneen USB-porttiin. USB-portti merkitään tavallisesti •
symbolilla
.
Jotta tiedostot eivät vahingoittuisi, varmista ennen tiedostojen lataamista tietokoneeseen tai kameraan,
että Kidizoom Cameran™ paristot ovat täynnä.
JÄRJESTELMÄN VÄHIMMÄISVAATIMUKSET TIETOKONELIITÄNTÄÄ VARTEN
Windows 2000 SP3+/ XP
Huomaa: Kun olet kytkenyt Kidizoom Cameran™ tietokoneeseen, kamera on laitettava päälle,
jotta yhteys tietokoneeseen voi muodostua. Kamerasta tai tietokoneesta ei saa katkaista virtaa,
kun tiedostoja ollaan lataamassa. Kytke lopuksi kamera pois päältä, jotta säästät virtaa.
TOIMINNOT
1. KAMERA
Kameratilassa voit katsoa kuvattavia kohteita joko kaksoisetsimen läpi tai suoraan LCD-näytöltä. •
Pidä kameraa tukevasti: Ota kuva painamalla kameran päällä olevaa laukaisupainiketta•
tai
kameran takana olevaa OK-näppäintä
.
Kun • Kidizoom Camera™ käynnistetään, käytössä on automaattinen salamavalotila. Voit vaihtaa
salama-asetuksia painamalla poistopainiketta, jolloin voit valita kolmesta vaihtoehdosta: Ei salamaa
, Salama ja Automaattisalama .
Varoitus: Poista automaattisalama käytöstä, kun otat lähikuvaa henkilön kasvoista, jotta kirkas valo ei
vahingoita silmiä.
Huomaa: Kun paristot ovat heikot, automaattisalama ei välttämättä toimi. Silloin näyttöön tulee
merkki
.
Valitse valokuvakehys tai leima ennen valokuvan ottamista. Tehoste lisätään kuvaan jälkikäteen. •
Valitse kehys tai leima selaamalla vaihtoehtoja nelisuuntaisen kohdistinpainikkeen
vasemmalla tai oikealla nuolella. Ota sitten valokuva tavalliseen tapaan. Valitsemasi kehys tai leima
liitetään ottamaasi valokuvaan.
Kun haluat katsella ottamiasi kuvia, voit siirtyä valokuva-albumiin painamalla nelisuuntaisen •
kohdistinpainikkeen
ylä- tai alanuolta. Näet albumin edellisen tai seuraavan kuvan painamalla
ylä- tai alanuolta uudelleen.
Kun selaat valokuva-albumia, voit poistaa LCD-näytössä parhaillaan näkyvän kuvan painamalla •
poistonäppäintä
.
Voit poistua valokuva-albumista kameratilaan painamalla laukaisinnäppäintä•
kerran.
Kidizoom Cameralla™• otetut kuvat tallentuvat sisäisen muistin PHOTO (VALOKUVAT) -kansioon
tai SD-muistikorttiin (ei sisälly pakkaukseen), jos kamerassa on muistikortti.
Huomaa: Jos haluat katsella tietokoneesta Kidizoom Cameralla™ ladattuja kuvia (erottelukyky alle
1632 x 1224), varmista, että ne on ladattu kameran päähakemistoon tai SD-muistikortin (ei sisälly
pakkaukseen) päähakemistoon. Muussa tapauksessa kuvia ei ehkä voi katsella.
2. VIDEOELOKUVAT
Kidizoom Cameran™ elokuvatilassa voit kuvata digitaalisia videoelokuvia. Aloita kuvaaminen •
painamalla kameran päällä olevaa laukaisinnäppäintä tai kameran takana olevaa OK-näp
päintä
.
Kun haluat katsoa kuvaamiasi elokuvia, paina nelisuuntaisen kohdistinpainikkeen•
ylä- tai
alanuolipainiketta kerran, jolloin pääset videoalbumiin. Valitse sitten haluamasi elokuva painamalla
ylä- tai alanuolinäppäintä. Voit käynnistää elokuvan painamalla OK-näppäintä
.
Kun selaat videoalbumia, voit poistaa LCD-näytössä parhaillaan näkyvän elokuvan painamalla •
poistonäppäintä
.
Voit poistua elokuva-albumista elokuvatilaan painamalla laukaisinnäppäintä•
kerran.
Kidizoom Cameralla™• kuvatut elokuvat tallentuvat sisäisen muistin VIDEO-kansioon tai
SD-muistikorttiin (ei sisälly pakkaukseen), jos kamerassa on muistikortti.
FI
47
Page 49

3. VALOKUVAPAJA
Valokuvapajassa voit muokata valokuviasi tai lisätä kuviin nauhoittamiasi ääniä.
3.1) PHOTO EDITOR -MUOKKAUSTYÖKALU
Photo Editor -muokkaustyökalun avulla käyttäjä voi animoida valokuvia tai lisätä kuviin kehyksiä, leimoja
ja hienoja vääristymätehosteita. Paina nelisuuntaisen kohdistinpainikkeen
vasenta tai oikeaa nuolta
ja valitse haluamasi kuva painamalla OK-näppäintä. Voit valita seuraavat toiminnot painamalla ylä- tai
alanuolinäppäintä. Paina sitten OK-näppäintä
.
A. Valokuvakehys-kuvake
: Valitsemalla tämän kuvakkeen voit valita valokuvaasi kehyksen.
Valitse kehys painamalla nelisuuntaisen kohdistinpainikkeen
vasenta tai oikeaa nuolta.
Vahvista valinta painamalla OK-näppäintä
.
B. Leima-kuvake
: Valitsemalla tämän kuvakkeen voit valita valokuvaasi leiman. Valitse leima pain
amalla nelisuuntaisen kohdistinpainikkeen
vasenta tai oikeaa nuolta. Voit suurentaa tai pienentää
leimaa painamalla ylä- tai alanuolinäppäintä. Vahvista valinnat painamalla OK-näppäintä
.
Voit siirtää leiman haluamaasi kohtaan nelisuuntaisen kohdistinpainikkeen nuolinäppäimillä.
Paina lopuksi OK-näppäintä.
C Vääristymä-kuvake
: Valitsemalla tämän kuvakkeen voit lisätä kuvaan vääristymätehosteen.
Valitse tehoste painamalla nelisuuntaisen kohdistinpainikkeen
vasenta tai oikeaa nuolta.
Vahvista valinta painamalla OK-näppäintä
. Siirrä vääristymätehoste haluamaasi kohtaan
nelisuuntaisen kohdistinpainikkeen nuolinäppäimillä. Paina lopuksi OK-näppäintä
.
Huomaa: Vääristymätehosteen muodostuminen voi kestää yli minuutin.
D. Animaatio-kuvake
: Valitsemalla tämän kuvakkeen voit lisätä valokuvaasi animaation.
Valitse animaatio painamalla nelisuuntaisen kohdistinpainikkeen
vasenta tai oikeaa nuolta.
Vahvista valinta ja katso animoitu kuva painamalla OK-näppäintä
. Huomaa, että
animaatiotehosteita ei voi tallentaa.
E. Kumoa-kuvake
: Voit kumota viimeksi suoritetun toiminnon valitsemalla tämän kuvakkeen.
F. Tallenna nimellä -kuvake
: Voit tallentaa juuri muokkaamasi kuvan valitsemalla tämän kuvakkeen.
Huomaa: Vääristymätehostetun kuvan tallennus voi kestää yli minuutin. Kaikkien muokattujen kuvien
tarkkuudeksi tulee 640 x 480.
3.2) ÄÄNIKUVA-KUVAKE
Äänikuva-toiminnolla voit tallentaa enimmillään kymmenen sekunnin pituisen äänileikkeen ja lisätä sen
kuvaan. Valitse ensin haluamasi kuva painamalla nelisuuntaisen kohdistinpainikkeen
nuolta
vasemmalle tai oikealle. Jos kuvaan on jo lisätty ääntä, sen päällä näkyy kaiutin-kuvake
.
Valitse nuolinäppäimillä Äänitä, Toista tai Poista ääni -kuvake.
A. Äänitä-kuvake
: Voit aloittaa äänittämisen valitsemalla tämän kuvakkeen. Kun haluat lopettaa
äänittämisen, valitse kuvake uudelleen. Voit tallentaa kuvaan enimmillään kymmenen sekuntia ääntä.
B. Toista-kuvake
: Voit käynnistää tai pysäyttää kuvaan tallennetun äänen toiston valitsemalla
tämän kuvakkeen.
C. Poista ääni -kuvake
: Voit poistaa kuvaan tallennetun äänen valitsemalla tämän kuvakkeen.
Huomaa: Äänikuviin tallennettua ääntä voi kuunnella vain, jos kuva on tallennettu Kidizoom Cameran™
sisäiseen muistiin tai kameraan asetettuun SD-muistikorttiin (ei sisälly pakkaukseen). Äänikuvia ei voi
siirtää tietokoneeseen eikä toistaa tietokoneessa.
4. PELIT
Kidizoom Camerassa™ on kolme valmiiksi asennettua peliä. Valitse haluamasi peli nelisuuntaisen
kohdistinpainikkeen
nuolilla. Aloita pelaaminen painamalla OK-näppäintä .
A. RISTINOLLA
Voit pelata ristinollaa tietokonetta vastaan. Pelissä sijoitellaan vuorotellen
merkkejä ristinollan 3x3-ruudukkoon. Voit liikutella merkkejä nelisuuntaisen
kohdistinpainikkeen
nuolilla ja sijoittaa niitä ruudukkoon OK-näppäimellä
. Voittaja on se, joka saa ensimmäisenäkolmen merkin rivin vaakasuoraan,
pystysuoraan tai vinottain.
B. KÄÄNTELYPALAPELI
Haasta itsesi ja ratkaise valokuvapalapeli! Näkyvissä on ensin kokonainen kuva.
Sitten kuva jaetaan neljäksi tai yhdeksäksi nelikulmaiseksi palaseksi. Jokainen
pala pyörii satunnaiseen suuntaan. Tavoitteena on koota kuva ennalleen.
Valitse haluamasi pala nelisuuntaisen kohdistinpainikkeen
nuolinäppäimillä.
Käännä sitten pala alkuperäiseen asentoonsa painamalla OK-näppäintä .
Peli on suoritettu, kun kaikki osat ovat alkuperäisillä paikoillaan ja
muodostavat alkuperäisen kuvan. Voit myös rakentaa oman palapelisi.
Siirry ensin kameratilaan painamalla suljinpainiketta. Paina sitten suljinpainiketta uudelleen,
jolloin juuri otetusta kuvasta tulee oman palapelisi kuva.
Toiminnot
48
FI
Page 50

C. MUISTIPELI
Testaa muistisi tällä hauskalla pelillä. Pelissä on ikkunoita, joiden taakse on
piiloutunut kolme tai neljä erilaista paria. Yhdellä vuorolla voit avata kaksi
ikkunaa. Valitse haluamasi ikkuna nelisuuntaisen kohdistinpainikkeen
nuolilla ja avaa se painamalla OK-näppäimellä
. Jos avaamiesi
ikkunoiden takaa ei löydy paria, ikkunat sulkeutuvat ja voit yrittää uudelleen.
Olet voittaja, kun kaikki parit ovat löytyneet.
5. MUISTINHALLINTA
Muistinhallinnan avulla voit tarkistaa kameran sisäisen muistin ja kameraan
mahdollisesti liitetyn SD-muistikortin (ei sisälly pakkaukseen) muistin tilanteen.
Valitse ensin haluamasi muisti nelisuuntaisen kohdistinpainikkeen
ylä- tai
alanuolinäppäimillä. Kun painat OK-näppäintä
, saat näkyviin muistin
toiminnot “Set Default” (Aseta oletus) ja ”Format” (Alusta). Aseta oletus -toiminnolla asetetaan valittu muisti kameralla otettavien kuvien ja videoelokuvien
oletusmuistiksi. Tämä kuvake
ilmaisee oletusarvoisen tallennussijainnin. Alusta-toiminnolla voit
pyyhkiä valitun muistin tyhjäksi ja alustaa sen.
6. CD-ROM
Tuotteen mukana toimitettavalla CD-ROM-levyllä on VTech® Photo Editor -ohjelma. Voit asentaa
ohjelman tietokoneeseesi, jolloin voit lisätä kuviisi hauskoja kehyksiä ja leimoja sekä vääristymä- ja
animaatiotehosteita. Lisätietoja ja ohjeita VTech® Photo Editorin käytöstä on ohjelman Read Me
(Lue minut) tiedostossa ja ohjeessa.
CD-ROM-ASENNUKSEN LAITEVAATIMUKSET
• 1 GHz:n Pentium III -prosessori tai vastaava
• 24-bittinen näytönohjain, jonka tarkkuus on 1024 x 768
• Windows 2000/XP -käyttöjärjestelmä
HUOLTO JA KUNNOSSAPITO
1. Pidä kamera puhtaana. Käytä puhdistukseen kosteaa liinaa.
2. Älä altista kameraa suoralle auringonvalolle äläkä vie sitä lämmönlähteiden lähelle.
3. Irrota paristot, jos laite tulee olemaan pitkään käyttämättä. Huomaa: Voit välttää tietojen katoamisen
kopioimalla kaikki valokuvat ja elokuvat Kidizoom Camerasta™ tietokoneeseen ennen paristojen
irrottamista.
4. Älä pudota kameraa kovalle pinnalle äläkä altista sitä kosteudelle tai upota sitä veteen.
VAROITUS
Hyvin pieni osa ihmisistä voi olemassa olevan sairautensa takia saada epileptisen kohtauksen tai
menettää hetkellisesti tajuntansa, kun he näkevät tietyn tyyppisiä vilkkuvia värejä tai kuvioita etenkin
televisiossa.
Vaikka Kidizoom Camerasta™ ei lisää tällaisten kohtausten riskiä, suosittelemme vanhempien
valvovan lapsiaan näiden pelatessa tietokonepelejä. Jos lasta alkaa huimata tai hänen näkökykynsä
heikkenee, hän menettää suuntavaistonsa tai saa kouristuskohtauksen, lopeta pelaaminen välittömästi
ja ota yhteys lääkäriin.
Pitkäaikainen television katseleminen lähietäisyydeltä ja Kidizoom Camerasta™ käyttäminen
ohjaimena voi aiheuttaa väsymystä tai huonovointisuutta. Suosittelemme, että lapset pitävät kerran
tunnissa 15 minuutin tauon pelaamisesta.
Toiminnot / Huolto ja kunnossapito
FI
49
HUOMIO!
Paristojen asentaminen on aikuisten tehtävä. Muista asettaa + ja - oikein päin.
Älä sekoita vanhoja ja uusia tai erimerkkisiä paristoja keskenään.
Älä yritä ladata ei-ladattavia paristoja.
Poista paristot, jos tuotetta ei käytetä pitkään aikaan.
Paristoja ei saa oikosulkea.
Page 51

FI
Vianmääritys
VIANMÄÄRITYS
Lue tämä osio, jos Kidizoom Cameran™ käyttämisessä ilmenee ongelmia.
Ongelma Ratkaisu
Ohjelma lakkaa toimimasta. 1. Paina nollauspainiketta paperiliittimellä. Mikäli ongelma
ei ratkennut, seuraa tätä ohjetta.
2. Varmista, että kamerasta on katkaistu virta.
3. Keskeytä virransyöttö poistamalla kamerasta paristot.
4. Anna kameran olla ilman paristoja muutaman minuutin
ajan. Laita sitten paristot takaisin ja paina
nollauspainiketta uudelleen.
5. Kytke kameraan virta. Kameran pitäisi nyt olla
käyttökunnossa.
6. Jos kamera ei edelleenkään toimi, vaihda siihen uudet
paristot.
Otettu kuva on epäselvä. 1. Varmista, ettei kameran objektiivinsuojuksessa ole likaa.
Kameran LCD-näyttö ei käynnisty. 1. Varmista, että kamerassa on neljä C (LR6/AA) -paristoa.
Käynnistä kamera pitämällä ON/OFF-painiketta pohjassa.
2. Varmista, että kamera ei ole kytketty televisioon
A/V-kaapelilla.
3. Varmista, että kamera ei ole virransäästötilassa.
Käynnistä kamera painamalla ON/OFF-painiketta.
Televisioruutuun ei tule kuvaa. 1. Varmista, että kamerassa on paristot ja että televisio ja
videonauhuri (jos käytössä) on kytketty pistorasiaan.
2. Varmista, että sekä kamerassa että televisiossa ja
videonauhurissa (jos käytössä) on virta päällä.
3. Tarkista kameran ja television (tai videoiden, jos niitä
käytetään) väliset A/V-kaapelikytkennät ja käy läpi tämän
käyttöoppaan kyseistä kytkentää koskevat ohjeet.
4. Varmista, että kaikki johdot on kiinnitetty tukevasti oikeisiin
pistokkeisiin.
5. Varmista, että televisio on säädetty oikealle kanavalle.
Televisiosta ei kuulu ääntä. 1. Tarkista, onko television äänenvoimakkuus säädetty
hiljaiselle ja onko televisio mykistetty.
2. Yritä lisätä äänenvoimakkuutta painamalla
äänenvoimakkuuden säätöpainiketta.
3. Tarkista kameran ja television tai videonauhurin
(jos käytössä) väliset ääni- ja videoliitännät.
4. Varmista, että televisio on säädetty oikealle kanavalle.
Kuva pyörii tai siinä on raitoja
ja viivoja.
1. Yritä säätää televisiokuvan vaaka- ja pystyasetuksia
(jos mahdollista).
Tiedostoja ei voi tallentaa. 1. Tarkista sekä Kidizoom Cameran™ sisäisen muistin
että kameraan mahdollisesti kytketyn SD-muistikortin
(ei sisälly pakkaukseen) tila.
2. Tarkista muistin oletusasetukset (katso ohje tämän
oppaan Muistinhallinta-osiosta). Mikäli kamera on asetettu
käyttämään SD-muistikorttia (ei sisälly pakkaukseen),
varmista, ettei SD-muistikorttia ole kirjoitussuojattu.
Television kuva on
mustavalkoinen.
1. Värijärjestelmät ovat yhteensopimattomat. Varmista,
että televisiosta on valittu oikea järjestelmä (esim. PAL,
NTSC tai AUTO).
2. Johdon kytkennässä voi olla ongelma. Varmista, että
videokaapeli on kiinnitetty tiukasti television
videokytkentään.
Television ruudussa näkyy kuva,
mutta äänet eivät kuulu.
1. Television asetukset. Lisää television
äänenvoimakkuutta ja varmista, ettei sitä ole mykistetty.
2. Johdon kytkennässä voi olla ongelma. Varmista, että
valkoinen ja/tai punainen pistoke on kytketty tiukasti
television ääniliitäntään.
Kameran toiminta saattaa häiriintyä paikoissa, joissa on sähköstaattinen varaus. Jos näin tapahtuu,
voit palauttaa kameran toiminnot alkutilaan sulkemalla ja käynnistämällä se uudestaan.
50
Page 52

62335 052166 © 2007 TOP-TOY A/S. All rights reserved.
 Loading...