

KIDILOOK
TM
2008
91-002348-000

INTRODUCTION
Thank you for purchasing the VTech® Kidilook™!
Kidilook™ is a digital photo frame that allows kids to view and
share their favorite pictures. With Kidilook™, you can store and
view up to 100 photos, create your own picture stories with a digital
ash card feature, and even switch to a digital clock display.
With the use of a simple PC application, you can quickly download
photos and picture stories to share with friends and family on your
Kidilook™. Also, with the easy one-click download feature, you
can even download photos from a Kidizoom Camera™ directly to
your Kidilook™ through PC.
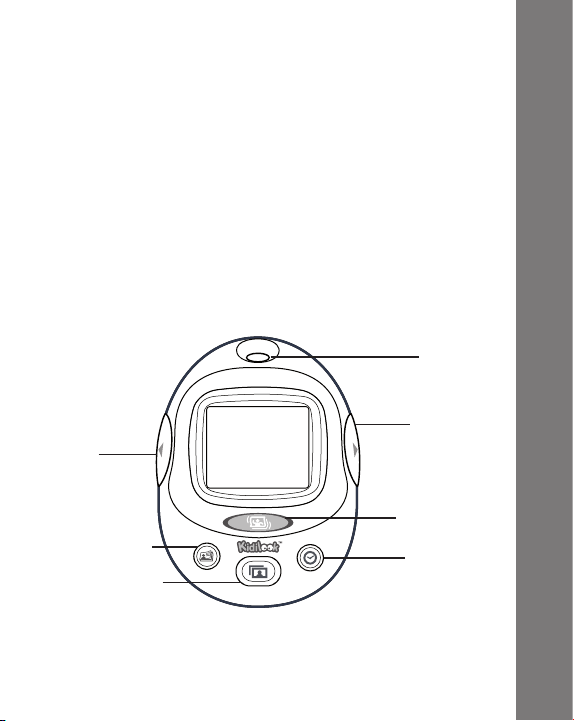
PRODUCT FEATURES
Hole for
hand strap
Right arrow
Left arrow
Button
Photo Story Button
Photo Album Button
Button
Shufe Button
Clock Button
Introduction & Product Features
3
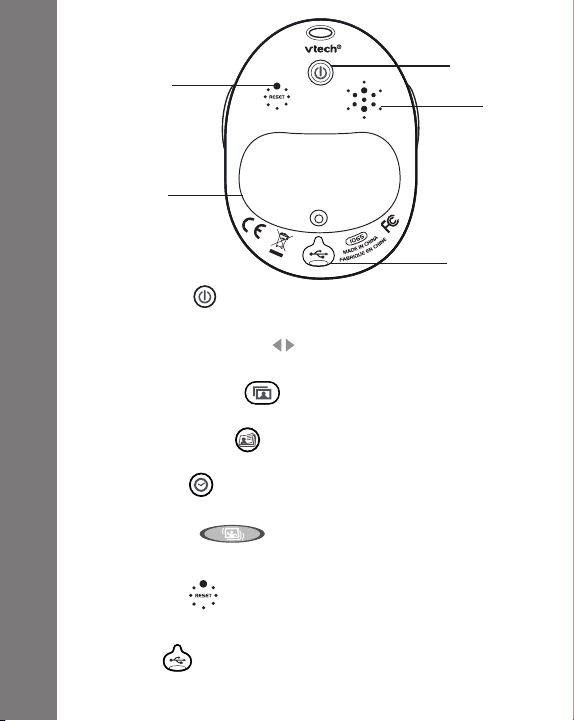
Reset Button
Battery door
Power Button
Press this button to turn the Kidilook™ ON or OFF.
Left /Right arrow Button
Press direction buttons to view previous/next photo.
Photo Album Button
Press this button to view the photos.
Photo Story Button
Product Features
Press this button to view your stories created on the PC.
Clock Button
Press this button to show the time.
Shufe Button
Hold this button and shake the unit to see a special effect in some
modes.
Reset Button
Press this button with an object tip to reset the unit if it stops
working properly.
USB Jack
4
Plug the included USB cable into this USB port to connect to your
PC.
Power Button
Speaker
USB Jack with
cover door
INCLUDED IN THIS PACKAGE
• 1 VTech® Kidilook
• 1 PC installation CD-ROM
• 1 USB cable
• 1 User’s Manual
• 1 wrist strap
WARNING:
All packing materials such as tape, plastic sheets, wire ties and
tags are not part of this toy, and should be discarded for your
child’s safety.
™
PRODUCT SPECIFICATION
Display: 1.8” color LCD
Memory: Stores around 100 photos in the Kidilook™.
Photo Format Supported: JPEG, BMP
Hardware Supported: USB Connection to PC
GETTING STARTED
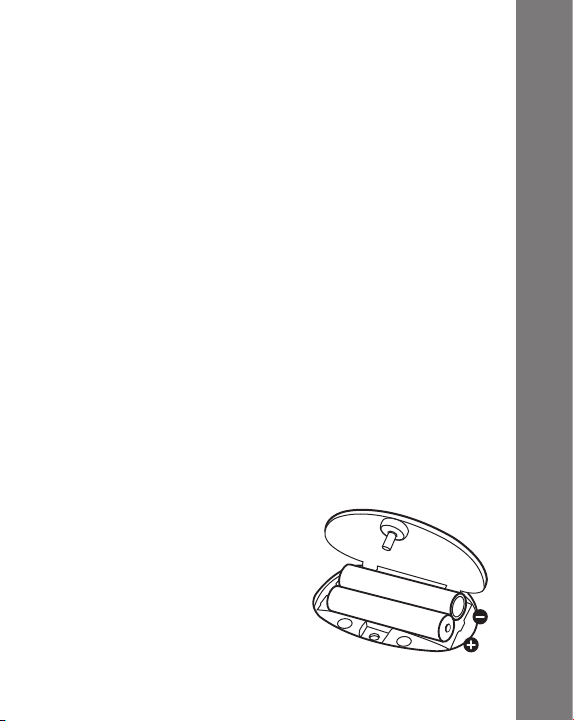
BATTERY INSTALLATION
Note: Adult assembly is required for battery installation. Tools
required for battery installation: screwdriver (not included).
• Make sure the Kidilook™ is turned OFF.
• Locate the battery cover on the
back of the Kidilook™. Loosen the
screws using a screwdriver and
remove the battery cover.
• Install 2 new “AAA” batteries
as illustrated on the right. (The
use of new, alkaline batteries
is recommended for maximum
performance.)
• Replace the battery cover and tighten the screws. Do not overtighten screws.
Included In This Package
5

• Please note: If Kidilook™ is not working properly after the
batteries have been installed, press the Reset Button and then
restart the Kidilook™.
BATTERY NOTICE
• Install batteries correctly observing the polarity (+, -) signs to
avoid leakage.
• Do not mix old and new batteries.
• Do not mix batteries of different types: alkaline, standard
(carbon-zinc) or rechargeable (nickel-cadmium).
• Remove the batteries from the equipment when the unit will
not be used for an extended period of time.
• Always remove exhausted batteries from the equipment.
• Do not dispose of batteries in re.
• Do not attempt to recharge ordinary batteries.
• The supply terminals are not to be short-circuited.
• Only batteries of the same and equivalent type as recommended
are to be used.
Note: Remove battery from the toy if the low voltage detected or
Battery Notice
the toy can’t be turned on.
HAND STRAP ATTACHMENT
INSTRUCTIONS
1. Locate the thread loop on
the end of the strap. Insert
it into the groove behind
the bar and then push it
through.
2. Feed the end of the strap up through the
loop and pull it all the way through.
6
3. Make sure the loop is securely tightened
around the bar.
INSTALLATION OF KIDILOOK™ PHOTO
MANAGER
Insert the CD-ROM that comes with the Kidilook™. It should
be able to run installation automatically. If it doesn’t run setup
automatically, open the CD-ROM disk and click Setup.exe to run
the installation.
TO BEGIN USING KIDILOOK™
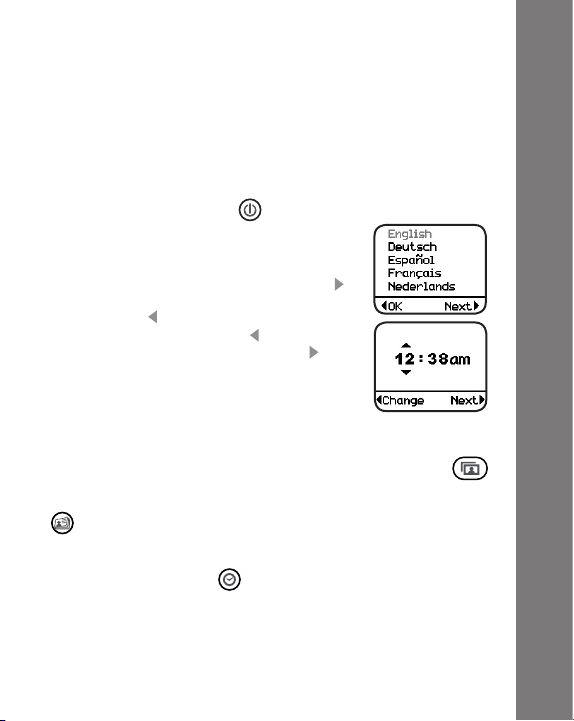
• Press the ON/OFF Button to turn on the Kidilook™.
• If it is the rst time turning on the Kidilook™,
it will prompt you to choose the language
and then set the correct time. To select the
language, press the Right arrow button to
show the next selection, and press the Left
arrow button to conrm. To set the time,
press the Left arrow button to change the
time. Press the Right arrow button to go
to the next item. When nished, press the
photo album button to start viewing photos.
• After the initial setup, each time you turn on
the Kidilook™ it will go directly into Photo Album mode for
photo viewing.
• If it is in the other modes, press the Photo Album button
to switch back to the Photo Album mode.
• To switch to Photo Story mode, press the Photo Story button
and use the arrows to scroll through the story. (Photo story
needs to be created and downloaded from the PC application
Kidilook™ Photo Manager)
• Press the Clock Button to show the time.
• To change settings on the Kidilook™, press and hold the Left
arrow and Right arrow buttons at the same time for 2 seconds
to enter the setup mode. For detailed setup instructions, please
refer to the setup section shown in the manual.
• Press the On/Off Button again for 2 seconds to turn the unit
off.
™
To Begin Using Kidlook
7

AUTOMATIC SHUT-OFF
To preserve battery life, the VTech® Kidilook™ will automatically
turn off after several minutes without input. Turn the unit on again
by pressing the On/Off Button. The auto shut off timer can be
changed in the setup mode.
CONNECTING TO A PC
Connect Kidilook™ to a PC with the USB cable, and then you
can start downloading photos and creating photo stories with the
included PC software, the Kidilook™ Photo Manager.
™
1. Locate the USB port on the back of your Kidilook™ and slide
the door open.
2. Insert the USB cable (smaller end) into the USB port on the
Kidilook™.
3. Insert the larger end of the USB cable into a USB port on the
computer. A USB port is usually marked with this symbol .
MINIMUM SYSTEM/ HARDWARE REQUIREMENTS FOR PC
CONNECTION & CD ROM INSTALLATION:
• Pentium 4/ Celeron1GHz or equivalent
• Windows® 2000 SP3+/ XP / Vista
• 1024 x 768 24-bit Graphics Card
To Begin Using Kidlook
Note: Once the Kidilook™ is connected to the PC, it will turn on
automatically. Do not disconnect the Kidilook™ or the computer
8
while photos are being downloaded to the Kidilook™.

Microsoft® Windows® is a registered trademark of Microsoft
Corporation in the United States and other countries. Intel®,
Pentium® are trademarks of Intel Corporation in the United States
and other countries. All other trademarks are the property of their
respective owners.
ACTIVITIES
1. Photo Album
Press the Photo Album button to enter the Photo Album,
and it will automatically show all photos.
Slide Show
Photos will display automatically as a slide show. The delay time
between photos can be set in the setup mode. Press the Left or
the Right arrow buttons to view the previous or next photo at any
time.
Manual Mode
If the delay time is set to 0 sec, it will be in a manual mode and will
not automatically move to the next photo. User has to press the
Left or Right button to show the previous or next photo.
Shufe Photos
Hold the Shufe button and shake the Kidilook™ for 1-2 seconds
to change from a sequence mode to a random photo mode .
Hold the Shufe button and shake the Kidilook™ again to switch
back to showing the photos in their original sequence.
Photo Index
While in Photo Album mode, press the Photo Album button
again to show the current photo index or random icon . Press
the same button again to hide this information.
Please refer to the Setup section below on how to change
settings.
Note: Please refer to the PC application’s help on how to download
the photos to Kidilook™.
Activities
9

Activities
10
2. Photo Story
Press the Photo Story button to see your Photo Story. Press the
Left or the Right arrow buttons to view the previous or next frame
of a story. Hold the Shufe button and shake it at the same time in
order to see a fun photo shaking effect.
Note: Please refer to the PC application’s help on how to create
Photo Stories and download them to the Kidilook™.
3. Clock
Press the Clock button to show the current time. Hold the Shufe
button and shake it at the same time for a surprise. To set the
time, please refer to the Setup section below.
4. Setup
Hold both the Left and Right arrow buttons for 2 seconds, and it
will enter the Setup Mode.
Sound Setting
To turn the sound on or off, press the left arrow
button to change the setting. Press the right
arrow button to go to the next item in the list.
Auto Off Setting
Set the time for automatic powering off of the unit. Press the Left
arrow button to change the time off setting. Press the Right arrow
button to go to the next item.
Delay Setting
To set the time interval for the photo slide show, press the Left
arrow button to change the time interval. Choose ‘0 sec’ for
manual mode, and it will turn off the slide show function. Press
the Right arrow button to go to the next item.
Clock Setting
Press the Left arrow button to go to the clock
setup screen.
Press the Right arrow button to select Hour,
Minute and am/pm. Press the Left arrow button
to change the setting.

Press the Shufe Button or other mode buttons to exit the clock
setup.
Language Setting
Press the Right arrow button to select a
language from the list. Press the Left arrow
button to conrm the selection.
5. Bonus Alphabet Activity
To demonstrate how the Kidilook™ can be used in creative ways
that are both educational and fun, we’ve included a special set of
letter pictures on your CD-ROM. These pictures will be installed in
a folder titled “ABC Food Fun” on your PC. Download them onto
your Kidilook™ to help your children learn their ABC’s and some
fun food vocabulary too!
CARE & MAINTENANCE
1. Keep the unit clean by wiping it with a slightly damp cloth.
2. Keep the unit out of direct sunlight and away from any direct
heat source.
3. Remove the batteries when the unit is not in use for an
extended period of time.
4. Do not drop the unit on hard surface and do not expose the
unit to moisture of water.
Care & Maintenance
11

TROUBLESHOOTING
If you nd the program stops working. Please try the following:
1. Press Reset with a pin. If this does not solve the problem,
please continue the following steps.
2. Please make sure the unit is OFF.
3. Interrupt the power supply by removing the batteries.
4. Let the unit stand for a few minutes, then replace the
batteries.
5. Turn the unit ON. The unit should now be ready to play again.
6. If the unit still does not work, replace with an entire set of new
batteries.
TECHNICAL SUPPORT
If you have a problem that cannot be solved by using this manual,
we encourage you to visit us online or contact our Customer
Services Department with any problems and/or suggestions that
you might have. A support representative will be happy to assist
you.
Before requesting support, please be ready to provide or include
the information below:
• The name of your product or model number (the model number
Troubleshooting
is typically located on the back or bottom of your product).
• The specic problem you are experiencing.
• The actions you took right before the problem occurred.
Internet: www.vtechkids.com
Phone: 1-800-521-2010 in the U.S. or 1-877-352-8697 in
Canada.
12

DISCLAIMER AND LIMITATION OF
LIABILITY
VTech® Electronics North America, L.L.C. and its suppliers assume
no responsibility for any damage or loss resulting from the use of
this handbook. VTech® Electronics North America, L.L.C. and its
suppliers assume no responsibility for any loss or claims by third
parties that may arise through the use of this product. VTech
Electronics North America, L.L.C. and its suppliers assume no
responsibility for any damage or loss caused by deletion of data
as a result of malfunction, dead battery, or repairs.
Company: VTech® Electronics North America, L.L.C.
Address: 1155 West Dundee Road, Suite 130, Arlington Heights,
IL, 60004 USA
Phone: 1-800-521-2010 in the U.S., or 1-877-352-8697 in Canada.
IMPORTANT NOTE:
Creating and developing VTech® products is accompanied by a
responsibility that we at VTech® take very seriously. We make
every effort to ensure the accuracy of the information which
forms the value of our products. However, errors sometimes
can occur. It is important for you to know that we stand behind
our products and encourage you to call our Consumer Services
Department at 1-800-521-2010 in the U.S., or 1-877-352-8697
in Canada with any problems and/or suggestions that you might
have. A service representative will be happy to help you.
®
Disclaimer And Limitation Of Liability
13

Note:
This equipment has been tested and found to comply with the limits
for a Class B digital device, pursuant to Part 15 of the FCC Rules.
These limits are designed to provide reasonable protection against
harmful interference in a residential installation. This equipment
generates, uses and can radiate radio frequency energy and, if
not installed and used in accordance with the instructions, may
cause harmful interference to radio communications. However,
there is no guarantee that interference will not occur in a particular
installation. If this equipment does cause harmful interference to
radio or television reception, which can be determined by turning
the equipment off and on, the user is encouraged to try to correct
the interference by one or more of the following measures:
• Reorient or relocate the receiving antenna.
• Increase the separation between the equipment and receiver.
• Connect the equipment into an outlet on a circuit different from
that to which the receiver is connected.
• Consult the dealer or an experienced radio/TV technician for
help.
Caution: Changes or modications not expressly approved by the
party responsible for compliance could void the user’s authority to
operate the equipment.
THIS DEVICE COMPLIES WITH PART 15 OF THE FCC RULES.
OPERATION IS SUBJECT TO THE FOLLOWING TWO CONDITIONS:
(1) THIS DEVICE MAY NOT CAUSE HARMFUL INTERFERENCE, AND
(2) THIS DEVICE MUST ACCEPT ANY INTERFERENCE RECEIVED,
INCLUDING INTERFERENCE THAT MAY CAUSE UNDESIRED
OPERATION.
Disclaimer And Limitation Of Liability
THIS CLASS B DIGITAL APPARATUS COMPLIES WITH CANADIAN
ICES-003.
CET APPAREIL NUMÉRIQUE DE LA CLASSE B EST CONFORME À
LA NORME NMB-003 DU CANADA.
14
 Loading...