

Page 1

QUICK GUIDE
Page 2

VÄLKOMMEN!
This Quick Guide describes a selection of the features and functions in your Volvo. More detailed information is available in the vehicle's
center display, in an app and on the Internet.
THE CENTER DISPLAY
The owner's manual is available in the center display's Top view.
MOBILE APP
The owner's manual is available as an app (Volvo Manual), which also
contains instructional videos for certain functions.
VOLVO'S SUPPORT SITE
Go to Volvo Cars' support site (support.volvocars.com) for manuals and
instructional videos. Additional information about your vehicle and owning
a Volvo is also available on the support site.
PRINTED INFORMATION
The glove compartment contains a printed supplement to the owner’s
manual containing information about fuses and specifications as well as a
summary of other important and practical information. A complete printed
version of the owner's information (or a new owner's manual supplement)
can be ordered through a Volvo retailer.
Page 3

CONTENT
01. GETTING TO KNOW YOUR VOLVO
This section provides overviews of your Volvo's interior, exterior and the center display.
02. INTERIOR AND CONNECTIONS
This section provides information about features and functions in the passenger compartment.
03. CENTER DISPLAY VIEWS
This section contains information about the center display's main views, which control many vehicle functions.
04. SMART DRIVING
This section describes several driver support functions and offers tips on how to drive more economically.
05. VOICE CONTROL
This section provides a list of commands/phrases that you can use with the voice control function.
06. SUPPLEMENTARY TEXTS
The owner's manual and other owner-related manuals contain safety instructions and all warning, caution and note
texts, which must be read. Certain functions may not be available in all markets or on all models.
In the Quick Guide, options are marked with an asterisk*.
Page 4
01
Page 5

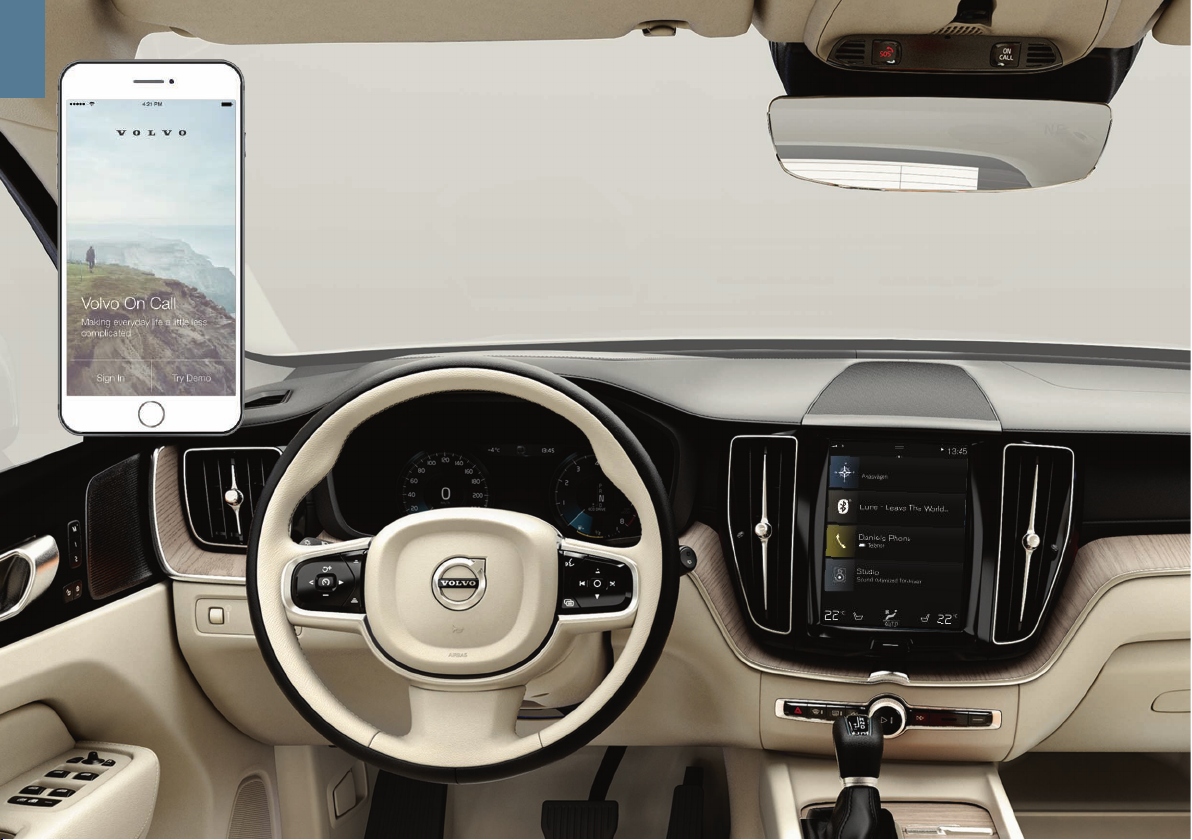
GETTING STARTED
The following concepts, functions, and tips are intended to help you
familiarize yourself with your Volvo as quickly as possible.
Volvo ID
A personal Volvo ID can be created and used to access a number of
on-line services1. These services include Volvo On Call, map services
and the opportunity to book service and repairs. A Volvo ID can be created using the Volvo On Call app or can be done directly in your vehicle.
Sensus
Sensus is your vehicle's intelligent interface and includes all of its solutions relating to entertainment, connecting to the Internet, navigation
and the user interface between the driver and the vehicle. Sensus
makes communication between you, the vehicle and the digital world
around you possible.
Volvo On Call
Volvo On Call is an integrated assistance system with an app that enables you to control some of your vehicle's functions remotely. The
Volvo On Call app enables you to e.g., lock or unlock the vehicle, see
where the vehicle is parked, log trip-related information, etc. Download
the app to get started.
Volvo On Call also gives you access to emergency roadside assistance
and security services by pressing the ON CALL and SOS buttons on
the ceiling console.
Driver profiles
Many of the vehicle's settings can be adapted to the driver's personal
preferences and saved in one or more driver profiles. Each of the
remote keys used with the vehicle can be linked to a driver profile. See
the section "Top view" in this Quick Guide for additional information.
1
These services vary and may be subject to change. Consult your Volvo retailer.
01
Page 6
01
Page 7

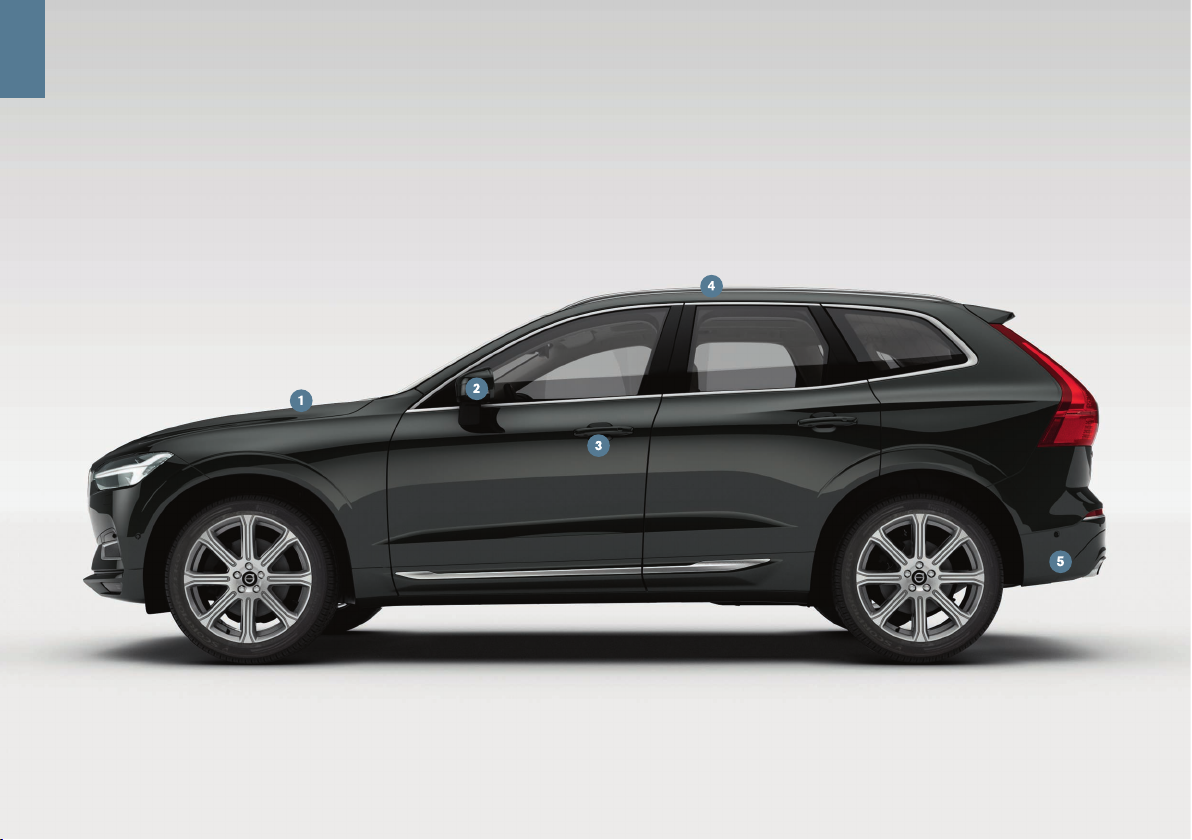
EXTERIOR OVERVIEW
Checking the engine oil level and tire pressure is done from
the Car status app in the center display's App view. You can also
view any status-related messages and book service and repairs
here.
The door mirrors can be angled down automatically* when reverse
gear is selected to give the driver a view of the curb, etc. The mirrors can fold in/out automatically* when the vehicle is locked/
unlocked.
Keyless locking/unlocking* makes it possible to lock/unlock the
vehicle simply by having a remote key in your possession. The
remote key must be within approximately 3 feet (1 meter) of the
vehicle.
To unlock the vehicle, grasp one of the door handles or press the
rubberized button under the tailgate's handle. To lock the vehicle,
press one of the indentations on the outside of a door handle.
Avoid pressing the inside and outside of a door handle at the same
time.
The laminated panoramic roof includes an openable glass section and a sun shade that can be operated using the control in the
front ceiling console when the ignition is in at least mode I. Open
the roof to the tilt position for ventilation by pressing up the control
and close it by pulling down the control. To open the roof completely, pull the control rearward twice. Close it by pulling down the
control twice.
The power tailgate can be opened using the control on the tailgate or by moving your foot slowly under the left side of the rear
bumper*. Close and lock the tailgate by pressing the button
on the lower edge of the tailgate or by moving your foot under the
rear bumper.
The tailgate's opening height can be programmed, for example, if
the tailgate has to be opened in a garage with a low ceiling. To set
the height, open the tailgate manually to the desired position and
press
for at least 3 seconds to store this position.
01
Page 8
01
Page 9

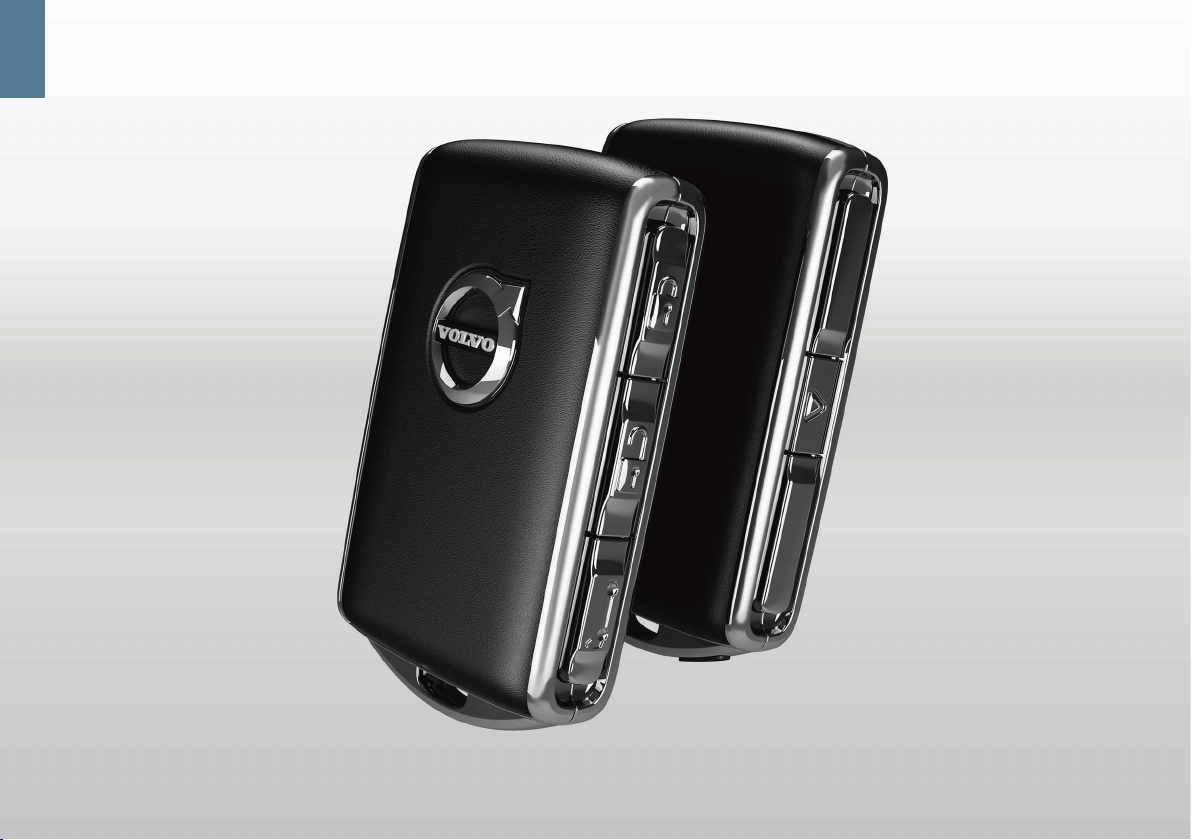
LOCKING AND UNLOCKING THE VEHICLE
Remote key
Press to lock the doors/tailgate and arm the alarm.
Press to unlock the doors/tailgate and disarm the alarm.
Press briefly to unlock the tailgate only (and disarm the alarm for
the tailgate). On vehicles equipped with the power tailgate*, press
and hold to open/close the tailgate.
Press to trigger the panic alarm to attract attention during emergency situations. To activate, press and hold this button for at least
3 seconds or press it twice within 3 seconds to activate the turn
signals and horn. To deactivate, wait approximately 5 seconds and
press the button again (the panic alarm will also deactivate automatically after several minutes).
Private (valet) locking
The private locking function locks the tailgate, which can be
useful when the vehicle is e.g., brought to a workshop for
service. The glove compartment can be locked manually with
the key provided.
– In the center display's Function view, tap
Private locking to activate/
deactivate the function.
A pop-up window will appear showing the function's status. A 4-digit
code has to be selected each time the function is activated and an
extra security code has to be selected the first time this function is
used.
01
Page 10
01
Page 11

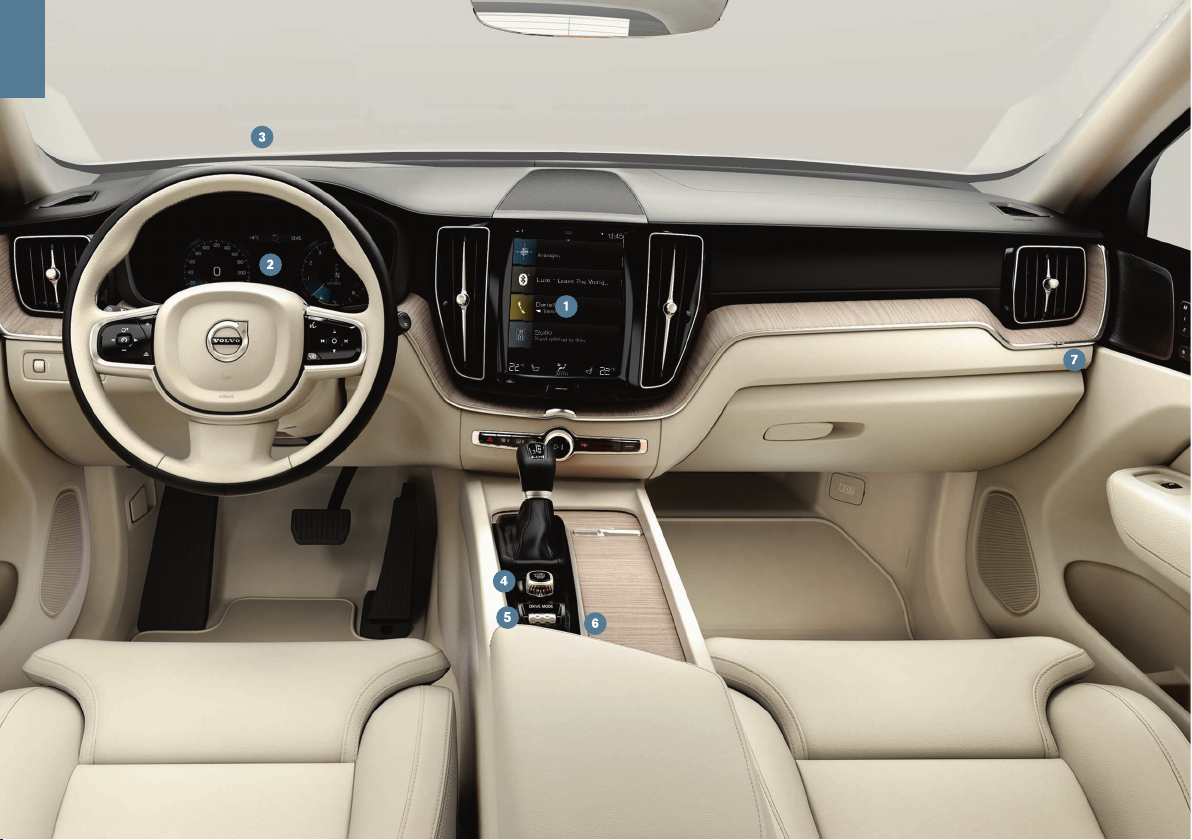
INTERIOR OVERVIEW
The center display is used to control many of the vehicle's main
functions, such as the climate system, driver support systems and
apps.
The instrument panel displays most of the information related to
driving such as speed, rpm, navigation and active driver support
functions. You can decide what is displayed here via
Settings
My Car Displays in the center display's Top view.
The head-up display* supplements the instrument panel by pro-
jecting certain information on the lower section of the windshield. It
can be activated in the center display's Function view.
Start/stop the engine with the start knob in the tunnel console,
between the front seats. Select gears P or N. Turn the knob clockwise and release it to activate ignition mode I or depress the brake
pedal and turn the knob and release it to start the engine. Switch
off the ignition by turning the knob clockwise and releasing it.
Drive modes* are selected using the control in the tunnel console,
between the front seats. Press the control and roll it to select drive
mode Comfort, Off Road, Eco, Dynamic or Individual in the center
display. Confirm your choice by pressing the control. Drive mode
Individual enables you to tailor a drive mode's characteristics and
is activated in the center display's Top view under
Settings My
Car
Individual Drive Mode
Activate the parking brake by pulling up the control in the tunnel console. A symbol will appear in the instrument panel. Release
the parking brake manually by pressing the brake pedal and press-
ing down the control. The auto-hold brake function (
) keeps the
vehicle stationary when it is stopped e.g., at a traffic light even if the
brake pedal is not depressed.
Keep in mind that the parking brake's auto-hold function has to be
deactivated in automatic car washes where the vehicle rolls. This is
done in the center display's Top view by tapping
Settings My
Car
and deselecting Parking Brake and Suspension. Select gear
N and turn the start knob clockwise as far as possible and hold it in
this position for at least 4 seconds.
Disabling the front passenger's side airbag: models in the United States and Canada are equipped with an automatic occupant
weight sensor that monitors the weight of the person sitting in the
front passenger's seat and activates/deactivates the front passenger's side airbag accordingly. Please consult your on-board
owner's manual or the printed owner's manual supplement
for important safety-related information about this function.
Storage compartments
There are a number of storage compartments in passenger compartment. There are also storage compartments under the outboard rear
seating positions for stowing e.g., a tablet device.
01
Page 12
01
Page 13

CENTER DISPLAY
Many of the vehicle's settings and functions are controlled from the
center display, which has 3 main views: Home view, Function view
(from Home view, swipe the screen from left to right) and App view
(from Home view, swipe the screen from right to left). The center display also has a Top view, which is accessed by swiping from the top of
the screen downward.
Change the instrument panel's/center display's appearance by
selecting a theme. From Top view, select
Settings My Car
Displays. From here, you can also select a dark or light background for
the screen.
Go back in a menu by pressing the Home button under the screen.
Press and hold this button to return to Home view.
To clean the center display, press and hold the Home button below
the screen. After cleaning the screen, reactivate it by pressing the
Home button briefly.
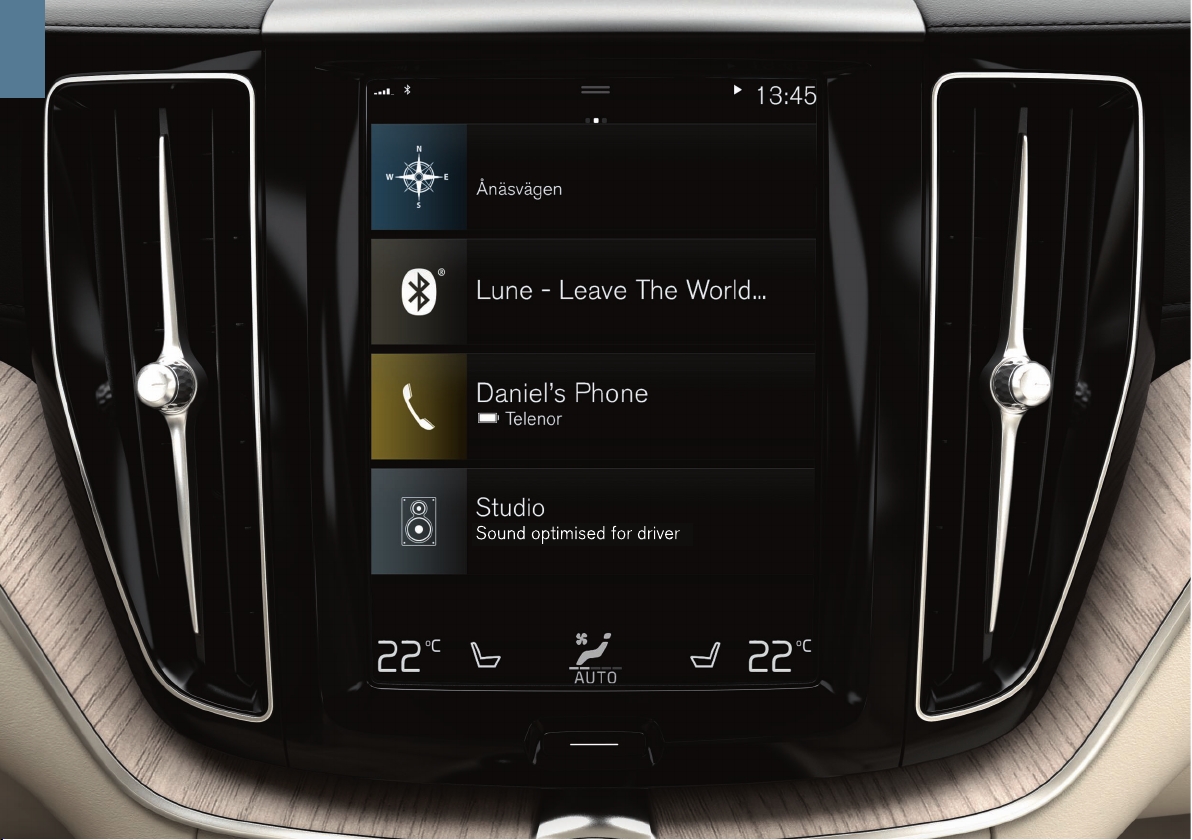
The status bar at the top of the screen shows the status of current
vehicle activities and functions. Network and connection information is
shown to the left. Brief media-related information and the clock are
shown to the right.
The climate bar at the bottom of the screen is where temperature,
seat comfort functions and blower levels are set by tapping the respective icons.
01
Page 14

POWER FRONT SEATS
Use the controls on the outboard side of a front seat to adjust the
seat's position, lumbar support*, etc. One of the controls is shaped like
a seat and is used to make basic seat adjustments. The other control
(multifunction) is used to adjust lumbar support, use the massage function*, etc.
The seat-shaped control
Adjust the height of the seat cushion or move the entire seat using the
lower section of the control. Adjust backrest tilt with the rear section of
the control.
The multifunction control*
Settings for the massage function*, side bolsters*, lumbar support*, and
extending the seat cushion* are made using the multifunction control.
1. Turn the multifunction control to open the seat settings window in
the center display.
2. Select the desired function in the center display by turning the control.
3. Change the desired settings by pressing the upper/lower/front/rear
sections of the control. Some of the settings can also be made by
tapping the respective buttons in the center display.
Storing seat settings
1.
Adjust the seat, door mirrors and head-up display* to the desired
positions and press the M button on the door. The indicator light in
the button will illuminate.
2.
Press and hold button 1 or 2 within three seconds to store the new
settings in the selected button. When the settings have been stored,
an audible signal will sound and the indicator light in the M button
will go out.
To move the seat to the position stored in one of the memory buttons:
With the driver's door open: press one of the memory buttons and
release it.
With the driver's door closed: press and hold one of the memory but-
tons until the seat reaches the stored position.
02
Page 15

FOLDING THE REAR SEAT BACKRESTS
It may be necessary to adjust the front seat backrests and/or move
these seats forward in order to fold down the rear seat backrests completely.
The backrests can be folded down manually by pulling up the handles
on the upper edge of the outboard seats and folding the backrests
down. On models equipped with the electric fold-down function*, the
buttons used are located at the rear of the vehicle in the tailgate opening.
Folding down the backrests electrically
To fold down a rear seat backrest, the vehicle must be stationary and
the tailgate must be open.
1. If necessary, press down the center head restraint manually.
2.
Press one of the buttons (marked L and R) for the left or right section of the backrest on the right side of the tailgate opening.
3. The backrest will fold down automatically to the horizontal position.
The outboard head restraint will fold down automatically.
Returning a backrest to the upright position
The backrests always have to be returned to the upright position manually.
1. Fold the backrest up and press it into place until it locks in position.
2. Manually return the outboard head restraint(s) to the upright position.
3. If necessary, adjust the height of the center head restraint.
02
Page 16

STEERING WHEEL
The steering wheel's height and reach can be adjusted. Push the lever
under the steering wheel downward/forward to release the steering
wheel. Adjust the steering wheel to a suitable position and pull back the
lever to lock the steering wheel in position.
Left-side steering wheel keypad
Driver support functions are selected in the instrument panel using the
and arrows on the left-side keypad. When a symbol is WHITE,
the function is active. A GRAY symbol indicates that the function is in
standby mode or has been cancelled.
Symbols in the instrument panel:
Speed limiter*: helps the driver to avoid exceeding a set maximum
speed.
Cruise control: helps maintain a set speed.
Adaptive cruise control*: helps maintain a set speed and/or a set
time interval to a vehicle ahead.
Pilot Assist*: helps keep the vehicle in a traffic lane by providing
steering assistance and by maintaining a set speed and/or a set
time interval to a vehicle ahead.
Press
to start or cancel a function.
Press briefly / to increase or reduce a stored speed in +/– 5
mph (+/– 5 km/h) increments. Press and hold to change the speed
+/– 1 mph (+/– 1 km/h) at a time.
When using Adaptive Cruise Control or Pilot Assist, press / to
reduce/increase the time interval to the vehicle ahead.
Pressing
also resumes the speed set for the selected function.
02
Page 17

Right-side steering wheel keypad
The right-side keypad controls the instrument panel.
Open/close the app menu. From here, you can control the trip
computer, media player, a connected cell phone and the naviga-
tion system.
Press the left/right arrows to scroll among the available apps.
Select/deselect or confirm a choice, e.g., select the trip computer's menu or erase a message from the instrument panel.
Scroll among a selected app's functions by pressing the up/down
arrows.
If no other function is active, raise/lower media volume by pressing
and .
Voice control is activated by pressing the button to give voice commands for e.g., media, navigation or climate systems. For example,
say ”Play the Rolling Stones", ”Raise temperature", or ”Cancel”.
See the section "Voice commands" in this Quick Guide for additional
information.
Trip computer
The trip computer calculates e.g., mileage, fuel consumption and average speed. You can choose the type of trip computer information that
will be displayed in the instrument panel. The trip computer calculates
the distance that can be driven on the amount of fuel remaining in the
tank. Use the buttons on the right-side steering wheel keypad to display the various alternatives. When ”---” is displayed in the instrument
panel, there is very little driving distance remaining.
02
Page 18

LEFT-SIDE STEERING WHEEL LEVER
The vehicle's exterior lights are controlled using the left-side steering
wheel lever and the lighting ring on this lever.
With the lighting ring in the AUTO position, the vehicle will automatically monitor ambient lighting conditions and e.g., switch between daylight running lights and low beam headlights or switch on the low beam
headlights when driving through a tunnel. Turn the lighting ring to the
position to switch on the Active High Beam function. Manually activate the high beams by moving the lever forward or switch back to low
beams by moving the lever rearward.
Active Bending Lights* are designed to help light up a curve accord-
ing to movements of the steering wheel. This function is activated automatically when the engine is started and the low beam headlights are
on, and can be deactivated in the center display's Function view.
Home safe lighting switches on the headlights, parking lights and
door handle lights* to illuminate the area in front of the vehicle in dark
conditions. To activate this function, switch off the ignition and push the
lever toward the dashboard as far as possible and release it. After a
period of time, the lights will switch off automatically.
Resetting the trip odometer
Reset all information in the manual trip odometer (TM) by pressing and
holding the RESET button. Press the button briefly to only reset the
mileage. The automatic trip odometer (TA) resets automatically if the
ignition is switched off for more than 4 hours.
02
Page 19

RIGHT-SIDE STEERING WHEEL LEVER
The right-side steering wheel lever is used to control the vehicle's wipers/washers and the rain sensor*.
–
Move the lever down and release it for a single sweep.
–
Move the lever upward in steps for interval/normal speed/high speed
wipers.
–
Turn the thumb wheel on the lever to adjust interval wiping speed.
–
Pull the lever toward the steering wheel to start the windshield and
headlight* washers or press it forward to start the tailgate window
washer.
Press this button to activate the rain sensor*, which monitors the
amount of water on the windshield and starts the wipers automatically when needed. Turn the thumb wheel on the lever to adjust
the rain sensor's sensitivity.
Press for tailgate interval wiper.
Press for tailgate continuous wiper.
The windshield wiper blades must be in the vertical (service)
position for replacement, removing snow, etc. This is activated
from the center display's Function view.
02
Page 20

02
Page 21

PASSENGER COMPARTMENT CLIMATE
Climate system settings
Climate system functions for the front and rear sections of the passenger compartment are controlled from the center display, using buttons
on the center console and the climate panel on the rear side of the tunnel console*. Some functions can be controlled using voice commands.
The icon for opening Climate view is at the center of the climate bar at the bottom of the screen. When the text Clean
Zone is BLUE, this indicates that the conditions for good air
quality in the passenger compartment have been met.
–
Tap AUTO in Climate view to activate/deactivate fully automatic control of certain climate system functions and the temperature. Press
briefly to reset to previously used auto climate settings. Press and
hold for standard settings (72 °F/22 °C and blower level 3 in the
front seats, level 2 in the rear seats). The blower speed can also be
set to five different automatic levels in AUTO mode as well as to Off
and Max.
–
Tap any of the icons in the climate bar at the bottom of the center
display to set the temperature, seat heating* and blower speed.
To synchronize the temperature for all of the vehicle’s zones with the
driver side’s temperature, tap the driver side’s temperature icon and
then tap
Synchronize temperature .
Interior Air Quality System (IAQS)*
IAQS is part of the Clean Zone Interior Package* and is a fully automatic system that filters passenger compartment air to help remove
gases, particles and other contaminants. The function is activated in the
center display's Top view under
Settings Climate Air Quality
Sensor.
02
Page 22

CONNECTIONS
The vehicle's various types of connections can be used to play or voicecontrol media, send or receive text messages, make or receive phone
calls, connect to the Internet, etc., from an external device such as a
smartphone. In order to connect your devices to the vehicle, the ignition
must be in at least mode I.
Connect using the vehicle's modem
2
The easiest and most efficient way to connect the vehicle to the Internet is to use its own modem. This provides the fastest type of connection, is activated automatically each time the engine is started and does
not require the use of a smartphone.
1. Place a SIM card in the holder near the floor on the front passeng-
er's side of the vehicle.
2.
Tap
Settings Communication Vehicle Modem Internet in
the center display’s Top view.
3. Activate by tapping the
Vehicle modem Internet box.
When the modem is used to make the connection, the Volvo On Call
services will use this connection.
Wi-Fi tethering (hotspot)
When the vehicle is connected to the Internet via the modem, tethering
(sharing a Wi-Fi hotspot with other devices) can be activated in
Settings in the center display's Top view. Tap Communication
Vehicle Wi-Fi Hotspot.
Bluetooth
Bluetooth can be used to make a cordless connection between the
vehicle and an external device to e.g., handle phone calls and text mes-
02
Page 23

sages, stream media and connect the vehicle to the Internet. Two
Bluetooth-enabled devices can be connected at the same time but one
of them can only be used to stream media. The two most recently connected phones will connect automatically when the ignition is switched
on (if the phones' Bluetooth function is activated). Up to 20 previously
paired Bluetooth devices are saved in a list to make it possible to connect them.
1. Activate Bluetooth in your phone. Also activate tethering/personal
hotspot if you would like to connect to the Internet.
2. Open the
Phone sub-view in the center display and tap Add phone
or if a phone is already connected, tap Change to connect a different
one.
3. Select the phone to be connected and follow the instructions on the
center display and in the phone. For certain phones, the text message function must be activated. Go to www.volvocars.com for a list
of compatible phones or contact your Volvo retailer.
Wi-Fi
Wi-Fi connections can be used to connect the vehicle to the Internet at
greater speeds than are possible using Bluetooth to listen to web radio
and music services via apps in the vehicle, download software, etc. A
Wi-Fi connection from a smartphone acts as a hotspot for the vehicle
and any external devices that may be in the vehicle.
1. Activate the smartphone's tethering/personal hotspot function.
2. Tap
Settings in the center display's Top view.
3.
Select
Communication Wi-Fi and activate the function by tap-
ping the Wi-Fi box.
Please note that in certain phones, tethering is closed after contact
with the vehicle has been broken, which means that the phone's tethering function will have to be reactivated before it can be used again.
USB
These sockets can be used to connect external devices to e.g., play
media. The USB sockets can also be used for Apple CarPlay/Android
Auto. An external device is also recharged while it is connected to the
vehicle.
USB socket (in the tunnel console armrest's storage compartment)
Electrical sockets
The following 12-volt sockets are available in your vehicle:
12-volt socket.
12-volt socket and 120-volt socket*. There is also a 12-volt socket
in the cargo compartment*.
2
When connecting using the vehicle's modem, Volvo On Call services will use this connection.
02
Page 24

USING CONNECTED DEVICES
When an external device such as a cell phone or media player is connected to the vehicle, you can e.g., handle phone calls and listen to
media through the vehicle's infotainment system.
Handling calls
You can make and receive calls in the vehicle from a Bluetooth-connected cell phone.
For information about cell phones that are compatible with the vehicle,
go to support.volvocars.com.
Making a call using the center display
1. Open the Phone sub-view in the center display's Home view. Select
to make a call using the list of recent calls, your list of contacts or
enter a phone number using the keyboard.
2.
Tap
Call or .
Making a call using the right-side steering wheel keypad
1.
Tap
and go to Phone by tapping or .
2.
Scroll in the list of calls using
and select using .
Voice control
Calls can also be handled using voice control. Tap the voice control
button (
) on the right-side steering wheel keypad. See also the sec-
tion "Voice control" in this Quick Guide for additional information.
Playing media
In order to listen to audio content from an external device, connect it to
the vehicle using the connection of your choice.
Bluetooth-connected devices
1. Start playback in the connected device.
2. Open the Bluetooth app in the center display's App
view. Playback through the infotainment system will
begin.
02
Page 25

USB-connected device
1. With the device connected to a USB port, start the USB
app in the center display's App view.
2. Select a song, etc., and playback will begin.
Mp3 player or an iPod
1. Start playback in the connected device.
2. Open the iPod or USB app in the center display's App
view. When using an iPod, select the iPod app regardless of how the iPod is connected to the vehicle. Playback through the infotainment system will begin.
Apple CarPlay and Android Auto
Apple CarPlay and Android Auto make it possible to use certain apps in
your cell phone via the vehicle to e.g., play music or listen to podcasts.
These features can be controlled from the vehicle's center display or
your cell phone.
In an iPhone, voice control with Siri has to be activated before using
Apple CarPlay.
1. Connect the phone to a USB socket. If the vehicle is
equipped with two USB sockets, use the one with the
white frame.
2. Tap the
Apple CarPlay/Android Auto icon in the center
display's App view to activate.
Activate voice control for Apple CarPlay or Android Auto by pressing
and holding the
button on the right-side steering wheel keypad.
Pressing this button briefly will activate the vehicle's own voice control
system.
Bluetooth is deactivated when Apple CarPlay is activated. Use Wi-Fi or
the vehicle's integrated modem if you would like to connect to the
Internet.
02
Page 26

03
Page 27

HOME VIEW
The center display starts up in Home view, which has sub-views for
Navigation, Media, Phone and recently used vehicle functions.
Navigation*: tap to go to the Sensus Navigation system.
Set a destination by entering text: Tap to display a screen
where text can be entered.
Set a destination on the map: Tap to maximize the map and
press a point on the map to set it as a destination.
Deleting a destination: Tap to open the itinerary. Tap the recycling bin to delete an intermediate destination (waypoint) in the itinerary or tap Clear itinerary to delete the entire itinerary.
Map updates: Tap
Download Center in the center display's App
view.
Maps shows any available updates. Tap Maps Install to
update the maps or to install a selected map (certain markets only).
Maps can also be downloaded from support.volvocars.com to a
USB flash drive and then copied to the vehicle.
Media: this shows e.g., your music on an external device or if you
have selected FM radio in App view. Tap the sub-view to access
settings. From here, you can see your music libraries, web-based
radio stations, etc.
Phone: This provides access to phone functions. Tap the sub-view
to expand it to e.g., make a call from the list of recent calls or from
your list of contacts, or to enter a phone number using the keypad.
When you have selected or entered a number, tap
Call or .
Recently used vehicle function: This displays a recently used
function that is not displayed in one of the other sub-views, such as
Car status or Driver performance. A recently used function can
also be reached by tapping its sub-view.
03
Page 28

03
Page 29

FUNCTION VIEW AND APP VIEW
Function view
In Home view, sweep the screen from left to right to access Function
view. From here, you can activate/deactivate various vehicle functions
such as the
Head-up display*, Park Assist* and Start/Stop*. Activate/
deactivate a function by tapping its symbol. Some functions open in
their own windows.
Go back in the menu structure by pressing the Home button beneath
the center display.
App view
In Home view, sweep the screen from right to left to access App view.
This displays the factory-installed apps as well as apps that you may
have chosen to download and install.
Download, update or uninstall apps by tapping
Download
Center in App view. In order to do this, the vehicle must be
connected to the Internet.
Downloading: Tap New apps and select an app. Tap Install to download the app.
Updating: Tap
Install all to update all of the apps. Tap Application
updates to display a list of available updates. Select the desired app
and tap Install.
Uninstall: Tap
Application updates and select an app. Tap Uninstall
to remove it.
Searching for and updating system software
–
Tap System updates to display a list of available updates.
–
Tap Install all to update all software or Install to update specific
software. If you prefer not to see the list, tap Install all near the
System updates button.
Moving an icon: apps and buttons in App and Function views can be
moved to customize these views.
1. Press and hold an icon.
2. Drag it to the desired position and release it.
03
Page 30

03
Page 31

TOP VIEW
Tap (or pull down) the tab at the top of the screen to open Top view.
This provides access to
Settings, Owner's manual, Profile and the
vehicle’s stored messages.
Personal settings
Many personal settings, such as changing the center display's appearance and the information that is shown there, mirrors, the driver's seat,
navigation, etc., can be changed under
Settings.
Driver profiles
Each remote key used with the vehicle can be linked to a
driver profile containing the settings of your choice3. The
Guest driver profile cannot be linked to a specific remote key.
The vehicle settings applied are the ones stored in the driver
profile linked to the remote key used to unlock the vehicle. You can
change driver profiles by selecting
Profile in the center display's Top
view.
Driver profiles can be linked to the remote keys used with the vehicle
under
Settings System Driver Profiles. Select one of the driver
profiles. Home view will again be displayed. Pull down Top view again,
repeat this procedure and select Edit for the selected profile followed
by Connect key.
The Individual drive mode*
To adapt the
Comfort, Eco or Dynamic drive modes to your personal
preferences: go to
Settings My Car Individual Drive Mode.
After changing the settings of your choice, select
Individual using the
DRIVE MODE control in the tunnel console.
System volumes
The volume level of certain system sounds such as the on-screen keyboard or the center display touchscreen can be adjusted or muted
under
Settings Sound System Volumes.
3
See your owner's manual for a list of personal/global settings.
03
Page 32

04
Page 33

DRIVER SUPPORT
A number of standard and optional driver support functions are available in your vehicle to help make driving safer and are designed to help
avoid accidents or mitigate their effects. These functions are activated
in the center display's Function view.
City Safety™
City Safety™ is a support system designed to help alert the driver to
pedestrians, cyclists, large animals and vehicles that may appear suddenly in front of your vehicle by providing visual and audible alerts. City
Safety™ activates automatically each time the engine is started.
Cross Traffic Alert (CTA)*
CTA alerts the driver to crossing traffic behind your vehicle
when backing up or if reverse gear is selected.
Blind Spot Information (BLIS)*
BLIS informs the driver of vehicles in the door mirrors’ blind
angles or of rapidly approaching vehicles in the driving lanes
adjacent to your vehicle.
Lane Keeping Aid
If your vehicle is about to inadvertently cross a driving lane’s
side marker lines, Lane Keeping Aid is designed to actively
guide the vehicle back into the lane. You will also be alerted by
an audible signal or vibrations in the steering wheel.
Lane Keeping Aid settings can be made in the center display's Top
view under
Settings. Select My Car IntelliSafe Lane Keeping
Aid Mode. The Run-off Mitigation function* can also provide additional
support if the vehicle is about to go off the road. If this system is triggered, brake and steering support can be provided automatically.
Pilot Assist*
Pilot Assist is a feature that helps keep the vehicle in its current traffic
lane and maintain a set time interval to the vehicle ahead.
Pilot Assist is activated/deactivated using the buttons on the left-side
steering wheel keypad. In order to provide steering assistance, the driver's hands must be on the steering wheel and the traffic lane's side
marker lines must be clearly visible.
When steering assistance is being actively provided, the steering wheel
symbol in the instrument panel will be GREEN.
04
Page 34

04
Page 35

PARKING ASSISTANCE SYSTEMS
Park Assist Pilot (PAP)*
PAP assists in parking or leaving a parking space by e.g., scanning a
potential parking space and thereafter controlling the steering wheel to
guide the vehicle into the space. The driver’s task is to check the area
around the vehicle, follow the instructions in the center display, select
the appropriate gear, control the vehicle’s speed, apply the brakes and
stop the vehicle.
Parking with Park Assist Pilot
1. Tap Park In in the center display's Function view. The
vehicle’s speed may not exceed 20 mph (30 km/h) during parallel parking or 12 mph (20 km/h) during perpendicular parking. The distance between the vehicle and
the parking space must be approximately 3 ft (1 m).
2. Stop the vehicle when prompted by a graphic and text in
the center display when a suitable parking space has
been detected. A pop-up window will appear.
3. Follow the instructions on the center display and be prepared to stop the vehicle when prompted to do so.
Leaving a parking space
This function can only be used when the vehicle has been parallel
parked.
1. Tap Park out in the center display's Function view.
2. Follow the instructions provided.
Park Assist Camera (PAC)*
This camera helps the driver see what is around the vehicle
and to indicate potential obstructions using a camera image
and graphics in the center display. The camera view and guiding lines can be selected in the center display. The camera
starts automatically when reverse gear is selected.
The camera can also be started manually:
–
Tap the Camera icon in the center display's Function view to activate/deactivate the camera.
04
Page 36

04
Page 37

ECONOMICAL DRIVING PLEASURE
Planning your trips and driving economically can help reduce fuel consumption, emissions, operating expenses and environmental impact.
Plan your drives by always:
•
Planning your route to avoid unnecessary stops and frequent
changes in speed, which are factors that contribute to increased fuel
consumption
Drive economically by:
•
Activating the Eco drive mode to help adapt the vehicle for more
energy-efficient driving
•
Not idling the engine unnecessarily. Use the Stop/Start function
whenever possible
•
Maintaining an even speed and planning ahead to help minimize
braking
•
Maintaining the recommended tire inflation pressure and checking it
regularly
•
Not driving with open windows
04
Page 38

VOICE COMMANDS
The voice control system makes it possible to control e.g., the media
player, a Bluetooth-connected cell phone, climate system functions and
the navigation system using voice commands. Activate a voice command dialog by pressing the voice control button on the right-side
steering wheel keypad.
The following commands are available (the exact list of available commands may vary slightly from market to market):
•
Repeat
•
Cancel
•
Help
Cell phone voice commands
•
Call [contact]
•
Call [phone number]
•
Recent calls
•
Read message
•
Message to [contact]
Radio and media voice commands
•
Media
•
Play [artist]
•
Play [song title]
•
Play [song title] from [album]
•
Play [radio station]
•
Tune to [frequency]
•
Tune to [frequency] [waveband]
•
Radio
•
Radio FM
•
Radio AM
•
SiriusXM*
•
CD*
•
USB
•
iPod
•
Bluetooth
•
Similar music
Climate system voice commands
•
Climate
•
Set temperature to X degrees
•
Raise temperature/Lower temperature
•
Sync temperature
•
Air on feet/Air on body
•
Air on feet off/Air on body off
05
Page 39

•
Set fan to max/Turn off fan
•
Raise fan speed/Lower fan speed
•
Turn on auto
•
Air condition on/Air condition off
•
Recirculation on/Recirculation off
•
Turn on defroster /Turn off defroster
•
Turn on max defroster/Turn off max defroster
•
Turn on electric defroster/Turn off electric defroster*
•
Turn on rear defroster/Turn off rear defroster
•
Turn steering wheel heat on/Turn steering wheel heat off*
•
Raise steering wheel heat/Lower steering wheel heat*
•
Turn on seat heat/Turn off seat heat*
•
Raise seat heat/Lower seat heat*
•
Turn on seat ventilation/Turn off seat ventilation*
•
Raise seat ventilation/Lower seat ventilation*
Navigation voice commands*
•
Navigation
•
Take me home
•
Go to [city]
•
Go to [address]
•
Add intersection
•
Go to [zip code]
•
Go to [contact]
•
Search [POI category]
•
Search [POI category] [city]
•
Search [POI name]
•
Change country/Change state
•
Show favorites
•
Clear itinerary
•
Repeat voice guidance
•
Turn off voice guidance
•
Turn on voice guidance
05
Page 40

SUPPLEMENTARY
TEXTS
The owner's manual and other owner-related manuals contain safety instructions and all warning,
caution and note texts, which must be read. Certain
functions may not be available in all markets or on
all models.
WARNING
GETTING STARTED
•
Volvo On Call only functions in areas where
there is cell phone reception. Just as with a cell
phone, atmospheric disturbances or areas with
few cell phone transmitting masts may make it
difficult or impossible to make a connection. In
addition to the owner’s manual, refer also to your
Volvo On Call service agreement for information
about warnings/cautions/notes.
•
Sensus Navigation: Focus your attention on the
road and concentrate primarily on driving. As the
driver, you are responsible for adhering to road
and traffic regulations and for operating the vehicle in a safe manner. Road and weather conditions may make some of the routes suggested by
the system less viable.
EXTERIOR OVERVIEW
•
Pay attention to the risk of injury when using the
power tailgate. Before opening/closing: Make
sure that no one is in the path of the tailgate as
an injury could occur and that the tailgate is not
obstructed in any way while it is in motion.
INTERIOR OVERVIEW
Volvo recommends that ALL occupants (adults and
children) shorter than 4 feet 7 inches (140 cm) be
seated in the rear seat of any vehicle with a front
passenger side airbag and be properly restrained
according to their height and weight.
Occupant Weight Sensor
•
No objects that add to the total weight on the
seat should be placed on the front passenger's
seat. If a child is seated in the front passenger's
seat with any additional weight, this extra weight
could cause the occupant weight sensor to enable the airbag, which might cause it to deploy in
the event of a collision, thereby injuring the child.
•
The seat belt should never be wrapped around an
object on the front passenger's seat. This could
interfere with the occupant weight sensor's function.
•
The front passenger's seat belt should never be
used in a way that exerts more pressure on the
passenger than normal. This could increase the
pressure exerted on the occupant weight sensor
by a child, and could result in the airbag being
enabled, which might cause it to deploy in the
event of a collision, thereby injuring the child.
•
The full weight of the front seat passenger
should always be on the seat cushion. The passenger should never lift him/herself off the seat
cushion using the armrest in the door or the center console, by pressing the feet on the floor, by
sitting on the edge of the seat cushion, or by
pressing against the backrest in a way that
reduces pressure on the seat cushion. This could
cause the occupant weight sensor to disable the
front, passenger's side airbag.
INTERIOR OVERVIEW
When leaving the vehicle, ensure that the ignition is
in mode 0. Never leave a remote key in the vehicle.
Always apply the parking brake when parking on
hills or uneven surfaces.
POWER FRONT SEATS
Do not adjust the seat while driving. The seat
should be adjusted so that the brake pedal can be
depressed fully. In addition, position the seat as far
rearward as comfort and control allow.
FOLDING THE REAR SEAT BACKRESTS
When a backrest is returned to the upright position,
check that it is properly locked in place by pushing
and pulling it. Also, if the outboard head restraints
are in the upright position, be sure they are securely
locked in place.
STEERING WHEEL
The driver is always responsible for operating the
vehicle in a safe manner in accordance with current
traffic regulations.
DRIVER SUPPORT
The driver support functions available in your vehicle are designed to be supplemental aids to the
driver and all have certain limitations. They can
never replace the driver’s attention and judgement
with respect to traffic, road and/or weather conditions or his/her responsibility for operating the vehicle in a safe manner in accordance with traffic regulations and speed limits. The driver always has the
primary responsibility for applying the brakes and
steering the vehicle.
Before operating your vehicle, read the detailed
information in your owner's manual about the driver
support functions in your vehicle.
PARKING ASSISTANCE SYSTEMS
•
Park Assist Pilot does not function in all situations and is only intended to assist the driver during parallel or perpendicular parking. As the
driver, you have full responsibility for parking the
vehicle in a safe manner.
•
Park Assist Camera is designed to be a supplementary aid when parking the vehicle. It is not,
however, intended to replace the driver’s attention and judgment. The camera has blind spots
where it cannot detect objects or people behind
the vehicle. Pay particular attention to people or
animals that are close to the vehicle. Objects
seen on the screen may be closer than they
appear to be.
VOICE COMMANDS
The driver is always responsible for operating the
vehicle in a safe manner in accordance with current
traffic regulations.
CAUTION
EXTERIOR OVERVIEW
If the power tailgate* has been opened and closed
continuously too long, the automatic function will be
deactivated to avoid overloading the electrical system. The automatic function can be used again
after approximately 2 minutes. Foot operation* may
not be possible or function normally if the rear
bumper is obstructed by snow, ice, dirt, etc.
INTERIOR OVERVIEW
OFF ROAD drive mode may not be used if the vehicle is towing a trailer without an electrical connection. This could result in damage to the pneumatic
suspension system's bellows.
INTERIOR OVERVIEW
The head-up display's* projection unit is located in
the dashboard. Avoid scratching or placing objects
on the unit's glass surface.
FOLDING THE REAR SEAT BACKRESTS
To help avoid damage to the seat upholstery, before
a rear seat backrest is folded down, remove any
objects from the seat and ensure that the seat belts
are not buckled.
The center armrest* must be folded up before the
backrest is folded down.
RIGHT-SIDE STEERING WHEEL LEVER
•
Be sure the wiper blades are not frozen in position before attempting to move them to the service position.
•
If the wiper arms have been folded out from the
windshield while in the service position, fold them
back against the windshield before returning the
wipers to the normal position to help avoid
scratching the paint on the hood.
CONNECTIONS
•
Max. current provided is 10 A (120 W) per
socket.
•
The max. current provided by the 120-volt socket
is 150W.
NOTE
EXTERIOR OVERVIEW
Metallic objects or electromagnetic fields may interfere with the remote key's function. Avoid placing
the remote key within 4-6 in. (10-15 cm) of a metallic object, cell phone, tablet, etc.
INTERIOR OVERVIEW
•
The Off Road drive mode is not intended for normal street driving.
•
After a cold start, idle speed may be noticeably
higher than normal for a short period. This is
done to help bring components in the emission
06
Page 41

control system to their normal operating temperature as quickly as possible, which enables
them to control emissions and help reduce the
vehicle's impact on the environment.
•
If City Safety™ or Forward Collision Warning* is
activated, the information in the head-up display
will be replaced by a graphic relating to the
respective systems. This graphic will illuminate
even if the head-up display is turned off.
•
The driver's ability to see information in the headup display may be impeded by the use of polarizing sunglasses, not sitting in the center of the
driver's seat, objects on the head-up display's
projector glass on the dashboard or certain ambient lighting conditions. Certain types of vision
problems may also result in headaches or eye
strain.
CENTER DISPLAY
•
The microfiber cloth used should be free of sand,
dirt or anything abrasive that might scratch the
screen. Do not use rough cloths, paper towels or
tissues that could scratch the screen. When
cleaning the center display, apply only light pressure on the screen. Pressing too hard could
cause damage.
•
Do not spray any liquid or corrosive chemicals
directly on the screen. Do not use window cleaning liquid, cleaning agents (particularly ones containing abrasives), sprays, solvents, alcohol or
ammonia to clean the screen.
STEERING WHEEL
The accuracy of the "distance to empty" figure may
vary if your driving style changes.
PASSENGER COMPARTMENT CLIMATE
•
Seat ventilation* cannot be started if the temperature in the passenger compartment is too
low.
•
Heating or cooling cannot be speeded up by
selecting a higher/lower temperature than the
one actually required.
•
The vehicle's doors, windows and laminated panoramic roof* should be closed during preconditioning.
USING CONNECTED DEVICES
Please be aware that Volvo has no control over the
content of the Apple CarPlay/Android Auto apps.
PARKING ASSISTANCE SYSTEMS
Keep the Park Assist Camera’s lens free of dirt, ice
and snow. This is particularly important in poor
ambient lighting conditions.
06
Page 42

TP 23951 (English - USA & Canada), AT 1717, MY18, Copyright © 2000-2017 Volvo Car Corporation
 Loading...