


English
Operator’s Manual
Countertop Convection Oven
Item |
Model |
Description |
Shelves |
Watts |
Amps |
Voltage |
Plug |
|
|
|
(Included) |
|
|
|
|
40703 |
COA7002 |
Half-size |
3 |
1,500 |
12.5 |
120 |
5-15P |
40701 |
COA8004 |
Half-size |
4 |
2,520 |
11 |
230 |
6-15P |
40702 |
COA8005 |
Full-size |
4 |
5,600 |
25.5 |
230 |
6-50P |
Thank you for purchasing this Vollrath Counter Top Cooking Equipment. Before operating the equipment, read and familiarize yourself with the following operating and safety instructions. SAVE THESE INSTRUCTIONS FOR FUTURE REFERENCE. Save the original box and packaging. Use this packaging to ship the equipment if repairs are needed.
Item No. 2350085-1 en Rev 02/14

 Countertop Cooking Equipment
Safety Precautions
To ensure safe operation, read the following statements and understand their meaning. Please read carefully.
 WARNING
Warning is used to indicate the presence of a hazard that can cause severe personal injury, death, or substantial property damage if the warning is ignored.
 CAUTION
Caution is used to indicate the presence of a hazard that will or can cause minor personal injury or property damage if the caution is ignored.
NOTE
Note is used to notify people of installation, operation, or maintenance information that is important but not hazard-related.
 WARNING
Fire Hazard.
Have this equipment installed by a qualified installer in accordance with all Federal, State and Local Codes. Failure to install this equipment properly can result in injury or death.
 WARNING
Fire Hazard.
This unit is designed to be used with legs. Do not use without legs installed. Use of this equipment without legs can cause the unit to over heat and cause a fire.
 WARNING
Fire Hazard and Burn Hazard.
Injuries or death can occur if this equipment is not used properly. To reduce risk of injury or death:
•Unit should only be used in a flat, level position.
•Let hot unit cool before cleaning or moving.
•Do not spray controls or outside of unit with liquids or cleaning agents.
•Do not operate unattended.
ForYour Safety!
These precautions should be followed at all times. Failure to follow these precautions could result in injury to yourself and others.
To reduce risk of injury or damage to the equipment:
Do not set items on door, use the door as a shelf or lean on door.
Use only grounded electrical outlets matching the nameplate rated voltage.
Do not use an extension cord with this equipment. Do not plug this equipment into a power strip or multi-outlet power cord.
Unplug equipment, turn off and let it cool before cleaning or moving.
Keep equipment and power cord away from open flames, electric burners or excessive heat.
Do not operate equipment in public areas and/or around children.The equipment may be hot, even though the pilot light(s) is not on.
Do not operate if equipment has been damaged or is malfunctioning in any way.
Do not clean the equipment with steel wool.
Function and Purpose
This unit is intended to be used for cooking fresh or frozen foods in a commercial foodservice operations only. It is not intended for household, industrial or laboratory use.
Before using this equipment it must be cleaned and dried thoroughly. Clean all surfaces before use. Failure to clean surfaces before using the unit could cause food contamination.
This equipment is a medium duty appliance capable of a wide variety of bake applications. The temperature is thermostatically controlled. The temperature range is 150°F - 570°F (65°C - 299°C).
Unpacking the Equipment and Initial Setup
When no longer needed, dispose of all packaging and materials in an environmentally responsible manner.
1.Remove all packing material and tape, as well as any protective plastic from the equipment.
2.Clean any glue residue left over from the plastic or tape.
NOTE:
There must be a minimum of 12” (30.4 cm) between the equipment and any surrounding walls. The surrounding walls must be made of noncombustible materials. The equipment must be installed in accordance with local fire and building regulations.
3.Place the equipment in the desired position and height.
4.Model 40702 Only. This model is equipped with a water spray feature. To utilize the water spray feature the unit should be connected to a potable water supply with a pressure between 3 and 30 PSI. The 4” legs must be installed to comply with NSF.
5.Plug the equipment into a properly grounded electrical supply matching the nameplate rating. Damage to the equipment can occur if incorrect power is supplied to equipment.
Controls
A |
B |
C |
|
|
|
l |
l |
l |
|
|
|
|
|
|
5 |
l |
l |
l |
|
|
|
|
|
|
l |
l |
l |
l |
l |
l |
|
|
|
|
|
50 |
|
l |
|
|
|
|
|
50 |
|
l |
|
|
|
|
l |
0 |
|
40 |
|
|
|
|||||
|
|
|
|
50 |
|
|
|
|
|
|
|
50 |
|
|
|
|
|
3 |
|
|
50 l |
|
|||||||
|
|
|
|
|
0 |
4l |
|
|
|
|
|
|
|
0 |
4l |
|
|
l |
0 |
|
|
|
|
||||||
|
|
|
|
|
|
5 |
|
|
°F |
|
|
|
|
|
|
5 |
|
|
l 0 |
2 |
|
|
|
|
|
l |
|||
|
|
|
|
|
|
0l |
|
|
|
|
|
|
0l |
|
|
|
|
|
|
6 |
|
||||||||
|
|
|
|
|
|
|
4 |
|
|
|
|
|
|
|
|
4 |
|
|
|
|
|
|
0l |
||||||
|
|
|
|
|
|
|
|
l |
|
|
|
|
|
|
|
|
|
l |
l |
1 |
|
|
|
|
|
|
|
|
|
|
|
|
|
|
|
|
0 |
l0 |
|
|
|
|
|
|
|
0 |
0 |
|
|
|
|
|
|
|
7l |
||||
|
|
|
|
|
|
|
0l |
|
|
|
|
|
|
|
0l |
l |
|
|
|
|
|
|
|
0 |
|||||
|
|
|
|
|
|
|
3l |
|
|
|
|
|
|
|
|
3l |
|
|
|
|
|
|
|
|
|
8 |
l |
||
|
|
|
|
|
|
|
5 |
|
|
|
|
|
|
|
|
5 |
|
|
|
|
|
|
|
|
|
l |
|||
|
|
|
|
|
|
|
0 |
l |
|
|
|
|
|
|
|
|
0 |
l |
|
|
|
|
|
|
|
|
|
0 |
|
0 |
|
|
|
|
|
0 |
|
0 |
|
|
|
|
|
|
0 |
|
|
N |
|
|
|
|
|
09 |
|
l |
|||
0 |
|
|
|
|
|
l |
|
0 |
|
|
|
|
|
|
l |
|
|
|
O |
|
|
|
|
|
|||||
l1 |
0 |
|
|
20 |
|
l1 |
0 |
|
|
|
20 |
|
|
l |
|
|
|
|
|
l |
|
||||||||
l l |
51 |
002 |
0 l |
|
|
|
l l |
51 |
002 |
0 l |
|
|
|
|
|
|
|
021 |
|
001 l |
|
|
|||||||
|
|
l |
l |
l |
|
|
|
|
|
|
l |
|
l |
l |
|
|
|
|
|
|
|
|
l |
|
l |
l |
|
|
|
D |
D |
D |
Figure 1. 40703 and 40701 Controls.
A |
C |
|
|
|
5 |
l |
l |
l |
|
|
|
|
|
|
l |
l |
l |
l |
l |
l |
|
|
|
|
|
50 |
|
|
|
|
|
|
l |
0 |
|
40 |
5 |
l |
|
||||
|
|
|
|
|
500 l |
|
|
|
l |
|
3 |
|
|
|
|
|||||
|
|
|
|
|
|
4l |
|
|
0 |
|
|
|
0 |
l |
||||||
|
|
|
|
|
|
|
5 |
|
|
|
l 0 |
2 |
|
|
|
|
|
|||
|
|
|
|
|
|
|
0l |
|
|
|
|
|
|
6 |
|
|||||
|
|
|
|
|
|
|
|
4l |
|
|
|
|
|
|
|
0l |
||||
|
|
|
|
|
|
|
|
0 |
|
l 1 |
|
|
|
|
|
|
|
|
l |
|
l0 |
|
|
|
|
|
|
|
0 |
l |
l0 |
|
|
|
|
|
|
|
7 |
||
|
|
|
|
|
|
|
3 |
|
|
|
|
|
|
|
0 |
|||||
|
|
|
|
|
|
|
|
|
|
|
|
|
|
|
|
|
|
l |
||
|
|
|
|
|
|
|
|
5l |
|
|
|
|
|
|
|
|
8 |
|
||
|
|
|
|
|
|
|
|
0 |
|
|
|
|
|
|
|
|
|
|
l |
|
0 |
|
|
|
|
|
|
00 |
|
l |
|
N |
|
|
|
|
|
9 |
|
l |
|
0 |
|
|
|
|
|
2 |
l |
|
|
|
O |
|
|
|
|
|
||||
l1 |
0 |
|
|
|
l |
|
|
l |
|
|
|
|
|
0 |
l |
|
||||
l l |
51 |
002 |
0 l |
|
|
|
|
|
|
|
021 |
|
001 l |
|
|
|||||
|
|
l |
|
l |
l |
|
|
|
|
|
|
|
|
l |
|
l |
l |
|
|
|
D |
D |
E |
|
|
Figure 2. 40702 Controls.
2Operator’s Manual
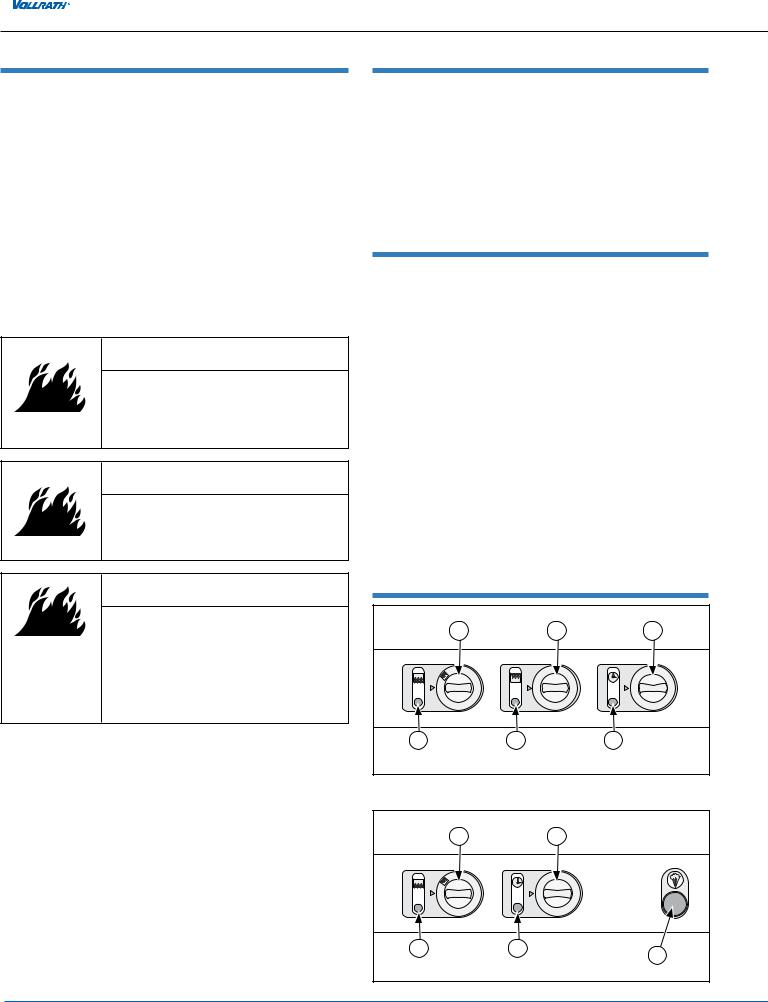
ABAKE CONTROL 
 . Used to set or adjust the temperature of the oven. The numbers on the dial correspond with the oven temperature. The “0” position is off. The timer needs to be “ON” for the heating elements to function.
BBROWN CONTROL 


 (40701 and 40702 Only). Used to set or adjust the temperature of the upper element. The numbers on the dial correspond with the oven temperature. The bake control must be set in the “BROWN” position and the timer in the “ON” position for the upper element to heat. The fan does not operate when the brown function is operating.
C TIMER  . Timer can be set for 1 - 120 minutes, or it can set to constant “ON” position. The timer must be operating in order for “Bake” to function. The timer has no bell or buzzer.
DPILOT LIGHTS. This light indicates that the oven is heating and the timer is activated. Once the set temperature has been reached the light will go out. Equipment will continue to maintain heat and temperature as the light cycles on and off. This light is not a power “ON” indicator. The timer pilot light will illuminate when the timer is operating.
E MIST CONTROLBUTTON (40702 Only).Apush button located
on the front panel of the oven. Sprays a small amount of water to enter
the baking chamber.
Operation
 WARNING
Burn Hazard.
Do not touch hot food, liquid or heating surfaces while equipment is heating or operating.
Hot surfaces and food can burn skin. Allow the hot surfaces to cool before handling. Do not drop or spill water onto the cooking surface as it can spray or splatter.
Before initial use burn-in procedure:
1.Plug the equipment into a properly grounded electrical supply matching the nameplate rating. Damage to the equipment can occur if incorrect power is supplied to equipment.
2.Close the door and turn the bake control  (A) to 525°F (274°C). set
the timer  (C) for 30 minutes. During this burn-in you may notice a slight odor, this is normal. See Figures 1 and 2.
All Models: Baking Function - Used to bake or cook food product.
1.Place the wire shelves or pans in the desired positions inside the unit. Allow a space of at least 2” (5 cm) between wire shelves or pans.
2.Set the bake control (A) the desired temperature.
3. |
Set the timer control |
(C) to the desired time. The fan and oven light |
|
will operate continuously. The heating elements will cycle on and off to |
|
|
maintain a consistent temperature. |
|
4. |
Place food product into the unit and monitor. |
|
Countertop Cooking Equipment
Models 40701 and 40703 Only: Browning Function - Used to brown a food product has been fully cooked.
1.Place the shelves in the desired positions inside the unit.Assure the food product is not too close or touching the inside top or heating element.
B |
A |
D |
E |
|
|
|
|
l |
l |
l |
l |
l |
|
|
|
|
|
|
|
|
l |
l |
l |
|
|
|
|
|
|
|
l |
l |
l |
l |
l |
|
|
|
l |
|
00 |
45 |
|
l |
|
|
|
|
|
5 |
0 |
50 |
l |
|
|
|
|
|
l |
|
0 |
|
40 |
|
l |
|
|
|||
|
0 |
|
|
|
40 l |
|
|
|
|
|
|
0 |
|
|
|
|
|
l |
0 |
|
|
|
50 l |
|
|||||||
5 |
|
|
|
|
0 |
|
|
F |
|
|
|
|
|
4l |
|
|
|
|
|
|
|
6l |
|||||||||
5 |
|
|
|
|
|
|
3l |
|
|
|
|
|
|
5 |
|
|
l |
|
2 |
|
|
|
|
||||||||
|
|
|
|
|
|
|
|
0 |
° |
|
|
|
|
|
|
0l |
0 |
|
|
|
|
|
|
0 |
l |
||||||
|
|
|
|
|
|
|
5 |
|
|
|
|
|
|
|
|
|
|
|
|
|
|
||||||||||
|
|
|
|
|
|
|
|
|
l |
|
|
|
|
|
|
|
4l |
l |
|
|
|
|
|
|
|
|
|
||||
|
|
|
|
|
|
|
|
|
3 |
|
|
|
|
|
|
|
|
0 |
l |
1 |
|
|
|
|
|
|
|
|
l |
||
|
|
|
|
|
|
|
|
|
0l |
l0 |
|
|
|
|
|
|
|
0 |
|
l |
0 |
|
|
|
|
|
|
|
0 |
||
|
|
|
|
|
|
|
|
|
0 |
|
|
|
|
|
|
|
|
3 |
|
|
|
|
|
|
|
|
|
|
8 |
l |
|
|
|
|
|
|
|
|
|
|
2 l |
|
|
|
|
|
|
|
|
5l |
|
|
|
|
|
|
|
|
|
l |
|||
|
|
|
|
|
|
|
|
0 |
5 |
|
|
|
|
|
|
|
|
0 |
|
|
|
|
|
|
|
|
|
|
|
0 |
|
0 |
|
|
|
|
|
|
2 |
l |
0 |
|
|
|
|
|
|
0 3 |
|
l |
|
|
N |
|
|
|
|
|
9 |
|
l |
||
|
|
|
|
|
|
0 |
|
l |
l1 |
|
|
|
|
|
2 |
0 |
l |
|
|
|
l |
|
|
|
|
|
0 |
l |
|
||
|
|
|
|
|
0 |
l |
|
|
0 |
|
|
|
l |
|
|
|
|
|
|
|
|
|
|
|
|||||||
|
|
001 |
051l |
|
|
|
l l |
51 |
002 |
0 l |
|
|
|
|
|
|
|
|
021 |
|
001 l |
|
|
||||||||
|
|
l |
l |
l |
|
|
|
|
|
|
|
l |
|
l |
l |
|
|
|
|
|
|
|
|
|
l |
|
l |
l |
|
|
|
C |
Figure 3. 40703 and 40701 Controls set for the Browning Function.
NOTE:
The fans do not operate in the browning mode. It is recommended that the door be opened slightly during browning.
2. Switch the bake control 
 knob (A) to the brown function icon


 (B) to the indicator (C). See Figure 3.
3. |
Set the brown control |
|
knob (D) to the desired temperature. The |
|
|||
|
timer control (E) does not need to be used for the browning function to |
||
|
operate. |
|
|
4. |
Place food product into the unit and monitor. |
||
Models 40702 Only: Humidity Function - Used to provide a heavier crust on bread and rolls.
The humidity function works best if activated at the beginning of the baking cycle after the oven has reached the cooking temperature and the food product has just been placed into the oven.
1. Press the mist control |
button (E) to activate a spray of water into |
the cooking chamber. See Figure 2. Do not press the button longer than 2-second pulses.
Cleaning
To maintain the appearance and increase the service life, clean your equipment daily.
 WARNING
Electrical Shock Hazard.
Keep water and other liquids from entering the inside of the equipment. Liquid inside the equipment could cause an electrical shock.
Do not spray water or cleaning products. Liquid could contact the electrical components and cause a short circuit or an electrical shock. Do not use equipment if power cord is damaged or has been modified
1.Turn off and unplug the equipment.
2.Allow the equipment to cool completely before cleaning.
NOTE:
Do not immerse the cord, plug or equipment in water or any other liquid.
3.Using a damp cloth, sponge dipped in soapy water to clean the outside of the equipment.
4.Do not use caustic or abrasive cleaners on this unit.
English
Operator’s Manual 3


 Countertop Cooking Equipment
The oven door may be removed for cleaning.
To remove and install the oven door:
1.Allow the equipment to cool completely before removing the door.
2.Open the door (B). See Figure 4.
3.Note the down or back position of hinge locks (E). Check that both sides are in this position.
C |
|
|
D |
E |
|
A |
B |
Figure 4. Oven Door and Hinge Lock (down or back position). |
|
4.Place the hinge lock (E) over the hinge arm (D) as shown. Repeat on both sides. See Figure 5.
C |
|
|
D |
E |
|
A |
B |
Figure 5. Oven Door and Hinge Lock (up or locked position). |
|
Troubleshooting
5.Tilt the oven door (B) up slightly and lift the oven door out.
6.Door (B) may be cleaned.
7.Using a damp cloth, sponge dipped in soapy water to clean the door
(B).
8.Use towels to completely dry the door (B) or allow it to air dry completely.
C |
D |
B |
E |
A |
Figure 6. Oven Door removal and Installation. |
9.Carefully set the oven door (B) into the oven (A). Place the arm (D) so that it sets under pin (C). See Figure 6.
10.Rotate the hinge lock (E) off the hinge arm (D) as shown. Repeat on both sides. See Figure 4.
11.Carefully open and close the door to verify that it is operating correctly. If not repeat steps 4 and 5.
Maintenance
Replacement of the oven light.
1.Turn off and unplug the equipment.
2.Allow the equipment to cool completely before cleaning.
3.Unscrew the light cover.
4.Remove and discard the old light.
5.Install a new light. The new light must be rated for the high temperature and must match the nameplate voltage.
40703, Mini Prima Pro, 120 Volt - 15 watts
40701, Prima Pro, 220 Volt - 25 watts
40702, Proton, 220 Volt - 25 watts
6. Install the light cover.
Problem |
It might be caused by |
Course of Action |
|
Pilot Light does not come on when the temperature |
The equipment is not plugged in. |
Plug equipment in. |
|
Pilot Light malfunction. |
Replace Pilot Light. |
||
control is turned up. |
|
|
|
Thermostat Control malfunction. |
Replace Thermostat Control. |
||
|
|||
|
|
|
|
The light comes on, equipment does not heat. |
Heating Element malfunction. |
Replace Heating Element. |
|
|
|
|
|
Brown function does not work. |
Bake Control not set to brown setting. |
Set Bake Control to brown setting. |
|
|
|
|
|
Mist function does not operate. |
Blocked or no water supply. |
Turn water supply on or clean blockage. |
|
|
|
|
4Operator’s Manual

Countertop Cooking Equipment
Service and Repair
The only user serviceable part for this appliance is the light bulb. To avoid serious injury or damage, never attempt to repair the equipment or replace a damaged power cord yourself. Do not send equipment directly to the Vollrath Company. Please contact the qualified professional repair service listed below.
Vollrath Technical Service • 1-800-628-0832
ELECTRICALDRAWING - Convection Oven ~ 40703
120V
L |
N |
GND |
|
P3 |
P1 |
|
P2 |
|
|
|
|
S |
5 |
2 |
1 |
3 |
4 |
M1
T
L
H1
B1 |
B2 |
E1 |
H2 |
E2 |
H3 |
WIRING DIAGRAM
Convection Oven, Mini Prima Pro, 120v
Item Code: 40703
Model Code: COA7002
LEGEND DESCRIPTION
SSTAGE SWITCH
LINTERIOR LIGHT-120V
M1 |
FAN - MINI PRIMA 120V |
B1 |
BAKE THERMOSTAT |
H2 |
BAKE PILOT LIGHT |
E1 |
BAKE ELEMENT 1400W / 120V |
B2 |
GRILL THERMOSTAT |
H1 |
TIMER PILOT LIGHT |
E2 |
GRILL ELEMENT 1400W / 120V |
TTIMER
H3 |
GRILL PILOT LIGHT |
English
Operator’s Manual 5
 Loading...