


Volkswagen Touareg Media Mode 2013 Owner's Manual
Media mode: Introduction
Introduction
In this section you’ll find information about:
Data media and file requireme nts
Inserting or removing data media
Loading external DVD changer
Open MEDIA main menu
Changing the media source
Track or chapter selection in audio and video menu
“Media sources” are audio and video sources cont ai ning audio and video files on various different
data media (such as CD, DVD, memory CARd, external MP3 player). These files can be played back
using the corresponding players or inputs of the Infotainment System (internal CD/DVD player,
memory CARd slot, etc.).
Copyright
Audio and video files stored on data media are normally subje ct to national and international copyright
laws. Observe legal regulations!
More information:
Safety information for Infotainment System
Basic information on use
MEDIA-IN multimedia jack
WARNING
.
Opening a CD or DVD player's housing can lead to inj ur i es fro m invisible laser radiation.
Have CD or DVD players repaired only by a qualifi e d workshop.
WARNING
.
Driving on today's roads demands the full attenti o n of the driver at all times. Driver
distraction causes acciden ts, collisions and serious personal injur y!
Never let yourself be distracted when setting, adjusting, or using the Infotainment System,
when using your cell phone, or when operating the cell phone controls.
Always drive attentively and responsibly. Use the Infotainment system, your cell phone,
and the cell phone controls only if road, traffic, and weather conditions p er m it and you will
not be distracted from your driving.
If you cannot use the Infotainment System, your cell pho ne, or the cell ph on e con trols
safely while driving, wait until l ater or find a safe spot where you can pull off the road and
park the vehicle.
Always set sound volume levels so that you can clearly hear horns, sirens, and other
warning sounds outside the vehicle.
NOTICE
.
When inserting and removing CDs and DVDs, always hold them at right angles to the front
of the unit. Inserting or removing them at an angle to the DVD drive may lead to scratching.
Inserting a second CD or DVD while a CD or DVD is inserted or is being ejec te d c an destroy
the DVD drive. Always wait until the data medi a is completely ejected.
NOTICE
.
Any foreign objects attached to a data medium and non -r ound data media can damage the DVD
drive.
Only clean 12-cm standard CDs or DVDs should be used!
– Do not attach stickers or other items to the data medium. Stickers may peel off and damage the
drive.
– Do not insert 8-cm single CDs or non-round CDs (shaped CDs) or DVDs.
– Do not insert DVD-Plus, Dual Discs and Flip Discs, as these are thicker th an standard CDs.
CDs can also be played in a DVD drive if they meet the requirem e nts .
.
Uneven road surfaces and strong vibrations may cause CDs and DVDs being played in the
.
DVD drive to jump.
If the temperature inside a DVD drive is too high, loading and playback of CDs an d DV Ds is
.
disabled.
Data media and file requirements
Please first read and heed the WARNINGS note the introductory information and heed
the WARNINGS
Factory-fitted CD and DVD drives conform to safety class 1 according to DIN IEC 76 (CO)
6/ VDE 0837.
Only use 12-cm standard CDs or DVDs and memory CARds with the dimensions
32 mm x 24 mm x 2.1 mm or 1.4 mm.

Data media Conditions for playback
Audio files Video files
Audio CDs (up to 80 min).
i
Standard video DVD and DVD-
i
compatible DVD audio.
CD-ROM-, CD-R-, CD-RW audio
i
data CD up to max. 700 MB
(Megabyte) in the data system ISO
9660 Level 1 and 2, Joliet or UDF
1.02, 1.5, 2.01, 2.5
DVD+/-R/RW up to 4.7 GB and
i
dual layer DVDs up to 8.5 GB in the
Joliet file system (single-session
only); UDF.
SDHC memory CARds up
Þ
to 32 GB.
SD- and MMC memory
Þ
CARds in the data system FAT12,
FAT16, FAT32 or VFAT up to
max. 2 GB (Gigabyte) and SDHC
memory CARds up to max. 32 GB.
– Digital audio specification
.
!
– Bit rates from 160 kbit/s
(recommended) up to
320 kbit/s and 48 kHz
sampling frequency.
– Format: MPEG layers 1, 2,
and 3 (.MP3).
– Format:
Windows M ed ia
.
Audio 8 and 9 (.wma, .asf).
– Format: MPEG layers 2
– Bit rates up to 2000 kbit/s.
– Maximum resolution
720 x 576 pixel.
– Format: MPEG layers 1 and 2 (.mpg, .mpeg).
– Format: ISO-MPEG4; DivX 3,
4 and 5 Xvid (.avi).
– Format: ISO-MPEG4 H.264
(.mp4, .m4v, .mov).
– Format: Windows Media
Video 9 (.wmv, .asf).
and 4 (.m4a, .m4b, .mp4,
.aac).
– Playlists supported in formats M3U, PLS and WPL (not
supported by the media center (HDD)).
– Limit of 4 partitions.
– On DVD limit of 1000 files per medium and directory.
– On memory CARds limit of 4000 files and limit of 1000 files
per directory.
– Limit of 3000 files in the media center (HDD).
Requirements for using external data media via the MEDIA-IN multimedia jack .
Restrictions and notes
Windows Media Audio 9 Voice, Lossless and Professional as well as DRM-protected files are not
supported. Other data media with copy protection and multi-session CDs and DVDs can somet i mes
not be played back or only with limitations.
Dirt, high temperatures and mechanical damage can render a data medium unusable. Please observe
data medium manufacturer information.
Quality differences between data media of different manufacturers can cause problems during
playback.
The data medium configuration or the devices or pro grams use d fo r recording can cause individual
tracks or data medium to be unreadable. Information ca n be found on the Internet on the best ways to
create audio files, video files and data media (compression rate, ID3 tag etc.).
Due to the larger quantity of data, it takes longer to read a data medium containing compressed audio
files (such as MP3, WMA) than a “normal” audio CD. Complex directory structures can also the delay
the reading process. If possible, only use data media with readable audio and video files.
Play lists only define a certain playback sequence. Play lists do not save any files. Play lists cannot
be played if the files on the data medium are not saved in the location to which the play list is referring
(relative data path). Play lists cannot be copied to the media center (HDD).
NOTICE
.
Do not use memory CARd adapters.
No liability can be accepted for damaged or lost files on the data me dia.
.
Inserting or removing data media
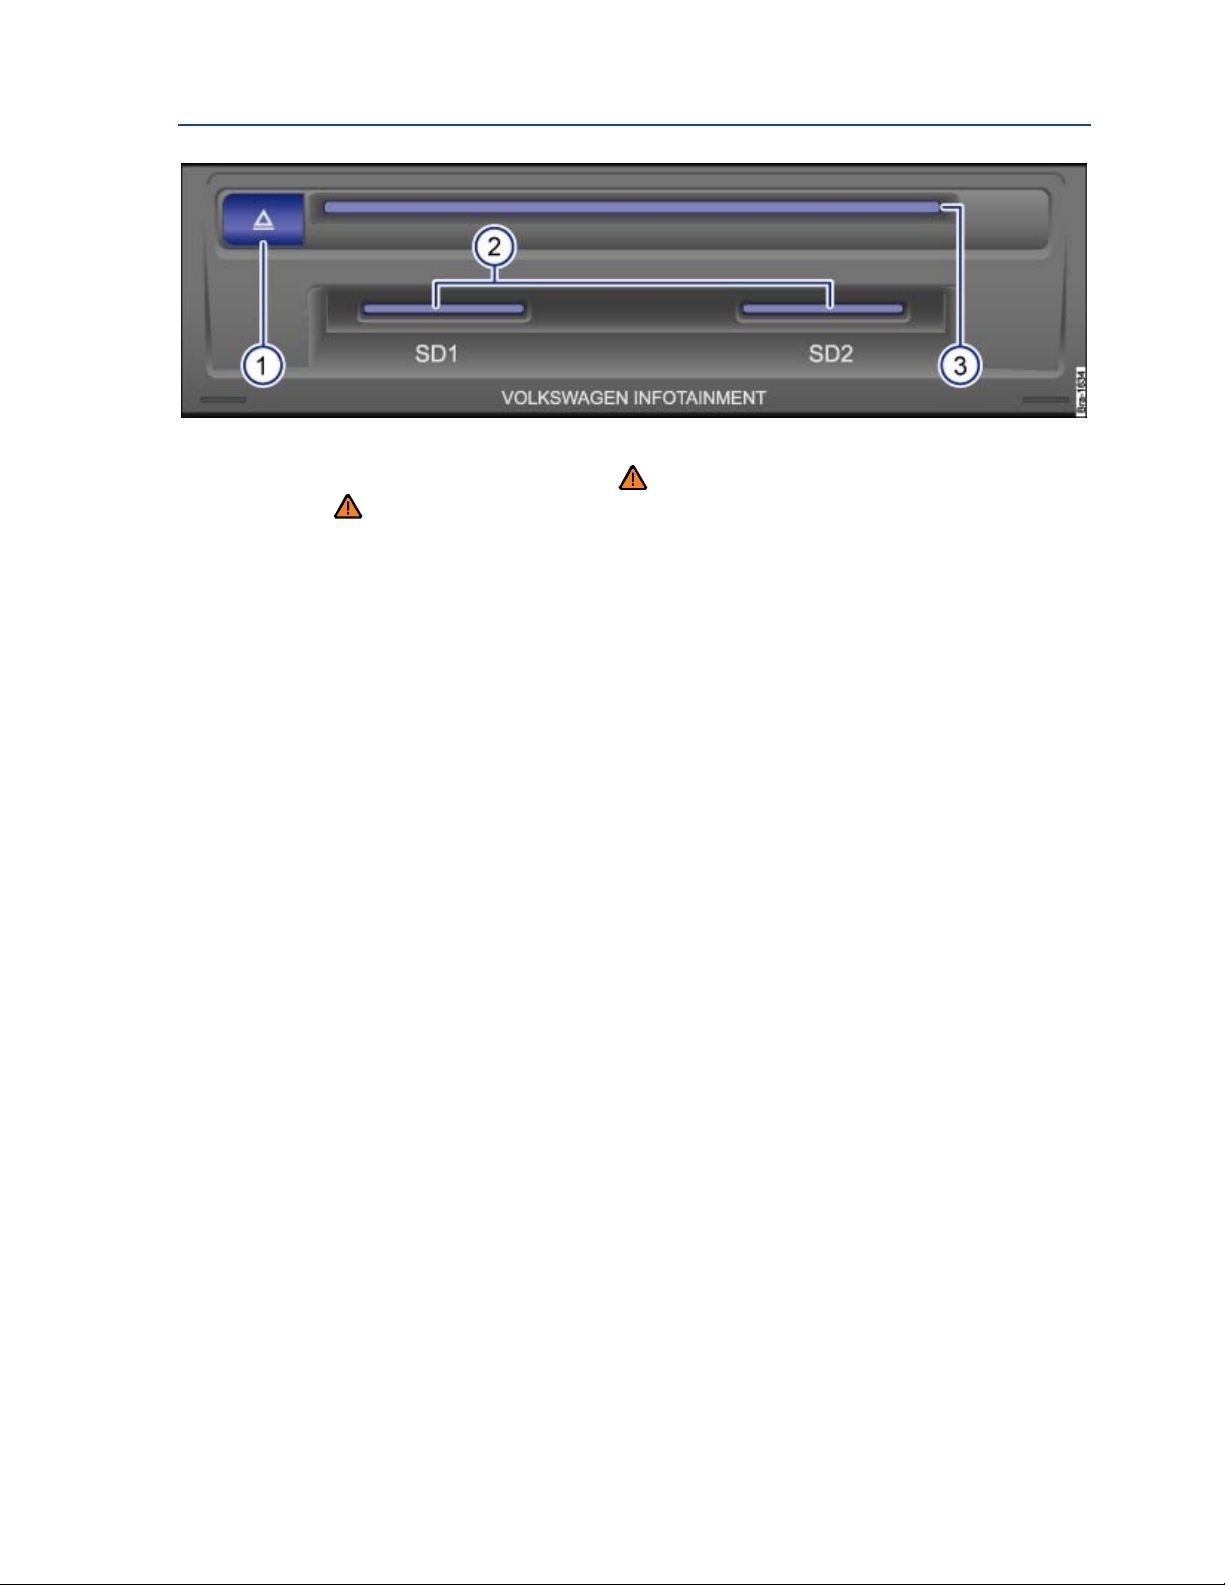
Fig. 143 Data media slots in glove compartment.
Please first read and heed the WARNINGS note the introductory information and heed
the WARNINGS
The driver should not operate the unit while driving. Insert or change data media before starting your
journey.
Various data media (CDs, DVDs and memory CARds) can be inserted or connected (USB storage
media or MP3 players via the MEDIA-IN multimedia jack). Data media can contain both audio and
video files.
Compressed and supported audio files and some video files can be saved on the Media center
(HDD)
The slots for a CD or DVD and 2 memory CARds are located in glove compartment ⇒ fig. 143.
Inserting or ejecting CDs or DVDs
Hold the CD or DVD with the printed side facing up.
Push the CD or DVD into the DVD slot (3) to the point where it is drawn in automatically. Do not
push it in any further.
Press the unit button
Once in the eject position, the CD or DVD must be removed within about 10 seconds otherwise it will
be drawn back in.
In addition, an external DVD changer is located in the luggage comp artment behind the right-hand
side trim
(1) to move the CD or DVD into the eject position.
Inserting or removing memory CARds
If a memory CARd cannot be inserted, check the insert position and memory CARd.
Insert a compatible memory CARd into one of the memory CARd slots (2) with the cutoff corner
first and facing right until the CARd clicks into place.
To remove, briefly press the inserted memory CARd. The memory CARd “pops” into the eject
position and can be removed.
No files can be copied onto the memory CARd in the unit.
Data media or files cannot be re ad
A message will be shown if a data medium cannot be read. The data medium needs to be remov ed
manually.
Only supported files can be displayed and played via the Audio menu. Othe r files are ig n ored.
When you browse a media source, folders containing non-supported files are also displayed, but they
appear empty once opened.
Navigation data (VCARds etc.) can only be read via t he Directory menu
WARNING
.
Inserting data media when the vehicle is moving can distract you from the road and lead to
accidents. Always keep the storage compartment closed when the vehicle is moving.
NOTICE
.
The memory CARd slot's locking mechanism and the memory CARd can be damaged by
incorrect insertion of a memory CARd or by inserting a incompatible memory CARd!
When inserting a CARd, make sure it is correctly positioned.
Excessive pressure can destroy the loc ki ng mechanism in the memory CARd slot.
Only use suitable memory CARds .
If you insert a number of different CDs and DVDs and receive the message Drive error
.
every time, contact a qualified workshop.
Loading external D VD changer
Please first read and heed the WARNINGS note the introductory information and heed
the WARNINGS
The DVD changer is located on the right of the luggage compartment behind a cover
Six 12-cm standard CDs and DVDs can be inserted into the DVD changer. You do not have to load all
the slots in the DVD changer.
CDs and DVDs in the CD changer can be selected and controlled via the Infotainment System
Only video files in the formats ISO-MPEG4 (.asf) and Di vX 3, 4 and 5 (.avi, .divx) can be played in the
DVD changer.
DTS audio format and the playlist format “.wpl” are not supported.
Loading DVD changer
Press the LOAD.button. The number button of the next free DVD slot starts to flash.
To manually select another DVD slot press one of the number buttons
1 to 6
When the LEDs in the DVD slot flash green, push the CD or DVD into the DVD slot with t he
unprinted side facing the number buttons until it is automatically drawn in.
For quick loading press and hold the
LOAD
button for longer than 3 seconds. The free slots i n the DVD
.
changer will be prepared for loading one after the other.
Ejecting a CD or DVD
Press the .button. The number buttons of the occupied DVD slots start to flash.
Select the required DVD slot by pressing one of the number butt o ns
1 to 6
The data medium is moved to the eject position.
When the LEDs in the CD slot flash green, the data medium can be removed.
A CD or DVD will be drawn back in if it is not removed from the eject position within 30 seconds.
To eject all data media from the DVD changer, press and hold the
button for longer than 3 seconds.
.
The data media will be ejected one after the other.

NOTICE
.
Only insert or remove CDs or DVDs if the LEDs on the DVD slot are flashing green.
NOTICE
.
Before closing the side compartment in the luggage com part m en t, che ck w h ether th e CD or
DVD has been drawn in or removed completely. The DV D changer or the data medium might
otherwise be damaged.
Playlists in the format cann ot be played in the external DVD changer.
.
Open MEDIA main menu
Fig. 144 MEDIA main menu: Audio menu.
Fig. 145 MEDIA main menu: Video DVD menu.
Please first read and heed the WARNINGS note the introductory information and heed
the WARNINGS
Audio, video and media sources
“Audio sources” are sources which tran sm it audio signals; “video sources” transmit both audio and
video signals. “Media sources” are all audio and video sources which can be selected.
In the MEDIA main menu different media sources can be select e d and played back.
When the system is switched over to play a standard video DVD, the MEDIA main menu is opened
automatically as a Video DVD menu
Other video sources (such as AVI films) are played back like audio files only via the Audio menu .
Starting media mode
Press the MEDIA Infotainment button ⇒ fig. 123.
Playback of the last media source played is continued if the data medium is still available in the
Infotainment System.
Depending on the selected media source, t he MEDIA main menu is op e ne d as an Audio men u or
Video menu ⇒ fig. 145.
If no media source is available, the MEDIA main menu cannot be opened.
Changing the media source
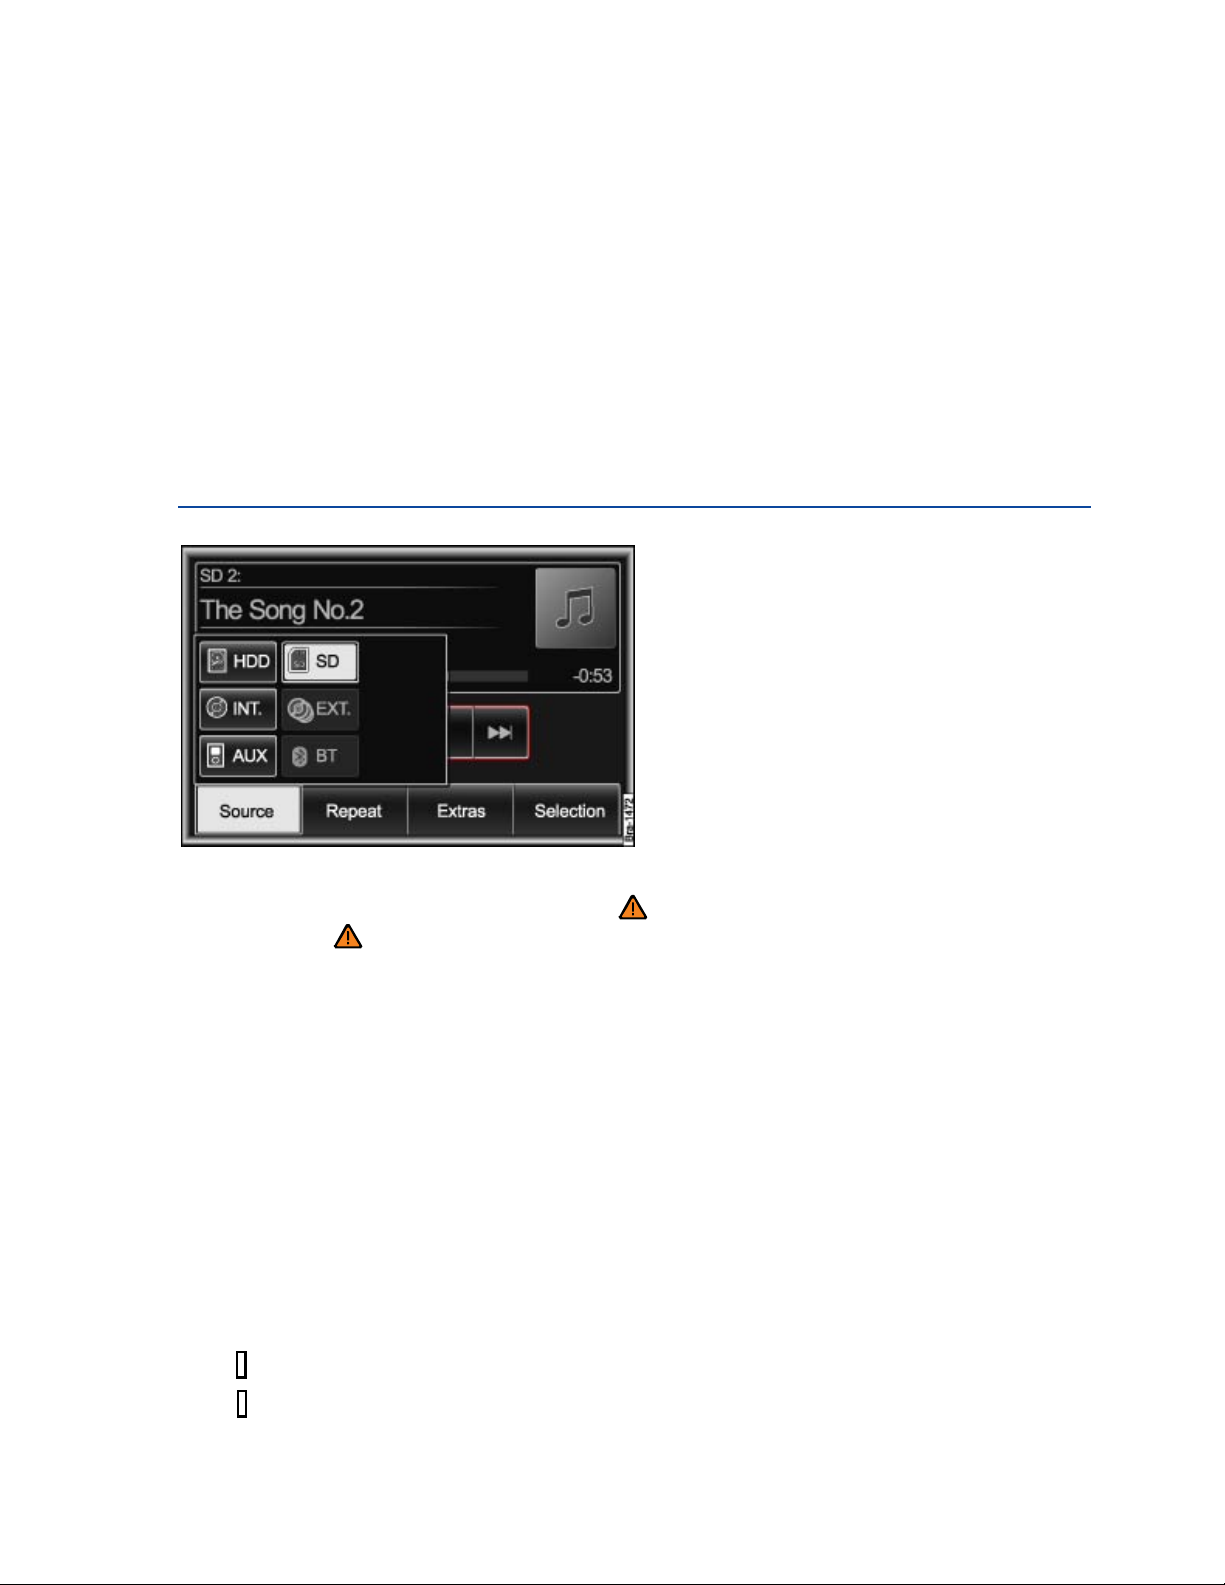
Fig. 146 MEDIA main menu with display of currently playing and available media sources.
Please first read and heed the WARNINGS note the introductory information and heed
the WARNINGS
In the MEDIA main menu, press the
Source function key ⇒ fig. 146.
Press one of the active function keys in the pop-up window to swi tch t o playback of this media
source.
The media source currently being played is highlighted. Any m edia source that can currently not be
selected is shown as inactive .
If a previously played media source is selected again, the pla ybac k c ontinues at the last played
position.
When video sources are played back, the f u nction keys are hidden after a w h ile.
Briefly press the screen or
MEDIA Infotainment button to display the function keys.
Optionally selectable media sources in the Audio menu
HDD: Media center (internal hard drive)
SD: Memory CARd
INT. .: Internal DVD drive
EXT. .: External DVD changer
/ AUX: External audio source to AUX-IN or external data medium to m ult imedia jack MEDIA-IN
BT: Bluetooth audio transmission
WARNING
.
The volume may suddenly get louder when you switch media sou r c e or conne ct a n ew audio
source.
Always lower the base volume before switching media source or connecting a new audio
source.
NOTICE
.
Excessively loud or distorted playback can damage the vehicle speakers.
Track or chapter selection in audio and video menu
Please first read and heed the WARNINGS note the introductory information and heed
the WARNINGS
The tracks or chapters of the media source being played can be switched through one after the other
with the arrow buttons on the screen (observe playin g or de r of audio f ile s and fold er s).
It is also possible to select tracks using the
It is not possible to use the arrow key to switch to playback from a play list. Playback from play list
must be started manually via the menu for track selecti on.
or £ buttons on the multi-function steerin g wh eel.
Controlling playback via the MEDIA main menu
Response Effect
Briefly press the button once. Switch tracks or chapters at the start of the current
track or chapter.
Briefly press the button twice. Switch tracks or chapters at the start of the previous
track or chapter.
Briefly press the button once. Switch to next track or chapter.
Press and hold. Fast search backward.
Press and hold. Fast search forward.
Briefly press the button once. Playback stops. The button changes to £
OR: Briefly press the button £ once. Playback is resumed. The button £ changes to
 Loading...