

Volkswagen LT Instruction Manual
Instruction
Manual
Volkswagen
LT
www.WestfaliaLT.info - a useful website for owners and enthusiasts of VW Westfalia LT Campervans
- - ank you for the confidence you have placed in us through the purchase of your new
:*« =.'. 5ie~ LT.
_ is a reliable, versatile vehicle.
e -oroven technical design, very careful selection
;e—
manufacturing techniques and the conscien-
e-/one concerned the Volkswagen LTalso
posses; typical for Volkswagen such as, economy, quality,
.e
retention.
s'.vagen
Dealers are convinced about the quality of
you 1 years warranty against defects -
with
no
: zer" technology the Volkswagen LT only needs very
• ; - 5" ze. Normally, an Inspection Service only is required
T;E5
- g for you to know
that
one of the largest and most
• :
:t~
rations in the world is available to look after your
::
r"
_~ in Europe alone there is a network of, more than
; =;e^ Dealershipsofwhichalargenumberhavespecial-
e::- —z servicing LT vehicles. Furthermore, there are special
:
T'Z-
ZS in some export countries. All these Dealerships
r::_t~
cally and professionally in accordance
with
factory
The Volkswagen Dealers in most countries offer you, in addition,
further
warranty cover and a number of other services, such as for
example:
• 1 years warranty on
work
done in the Dealerships
• 1 years warranty on all Genuine parts, Genuine accessories and
Volkswagen
accessories
• The quick, reasonably priced Express service for small repairs
• The Volkswagen accessory service
Tested,
factory approved accessories and correct
fitting
- please
read notes on page 82.
Volkswagen
Dealers
will
inform
you of the details of the above-
mentioned services and of any possible deviations in various coun-
tries.
Please
refer also to the notes in the Service Schedule.
We
wish you pleasant and safe motoring at all times.
YourVOLKSWAGEN
AG
1
www.WestfaliaLT.info - a useful website for owners and enthusiasts of VW Westfalia LT Campervans
VEHICLE LITERATURE
Notes
on the
layout
of
this
manual:
It describes the largest possible range of
equipment envisaged at the time of
going to press. Some of the equipment
may be available later on or not at all or
will not be offered in certain Export markets.
Items of equipment marked
with
a * are
only standard on certain model versions
or are only available as optional extras on
certain models.
All blocks of
text
which
have
this
col-
our backing and the
title
"Atten-
tion"
refer
to
potential
accident
or
injury
risks.
Texts
following
this
symbol
and
printed
in
italics
are
important
notes
on
environmental
protection.
In the vehicle wallet you will find, in addition
to this
Instruction
manual,
a Service
Schedule and a List of Addresses.
Also
depending on vehicle model and equipment there can be various Supplements
(e.g.
car radio leaflet, "Florida" Camper, LT
4x4).
If one of these publications appears to be
missing
or you have the impression
that
the
information on some equipment or model
version
is not complete, please contact your
Volkswagen
Dealer. He will be pleased to
help you.
You
can naturally also get in touch direct
with
our Service Department or
with
the Importer in your country. The telephone numbers
and addresses are to be found in the
appropriate list.
The
instruction
manual
should
be read carefully as soon as possible
so
that
you get to know your vehicle quickly.
Your
special attention is drawn to the chapter "Driving tips" in this instruction manual.
There
you will see how you can drive
safely,
economically and
environment
con-
sciously.
For
safety
reasons please
note
also the
information
on Accessories, modifica-
tions
and the
renewal
of
parts
on
page
82.
The
other chapters are of course also impor-
tant
because the correct operation of the ve-
hicle
series - in addition to regular care and
maintenance - to maintain the value of the
vehicle
and is, in many
cases,
also one of
the stipulations for upholding warranty
claims.
At the end of this manual we have made a
list of the checks which you should carry out
regularly to keep your vehicle roadworthy at
all
times.
The Service Schedule
contains
- identification data for your car
- the Service intervals
- the Service operations
- important details about Warranty
Service
work which has been carried out is
also
confirmed in the Service
Schedule.
This
can
be important when a claim is made
under Warranty. You should always present
the Service Schedule when taking the
vehicle
to a Volkswagen Dealership.
The List of Addresses
contains
- addresses and telephone numbers of
Volkswagen
Dealers in Europe and over-
seas;
- important information on the emergency
services.
One
final request:
When
you sell your vehicle please give the
complete Vehicle Wallet to the new owner
because
the vehicle literature belongs to
the vehicle.
www.WestfaliaLT.info - a useful website for owners and enthusiasts of VW Westfalia LT Campervans
INDEX
INSTRUMENT PANEL
_ayout 4
.'.arning lamps 6
OPERATION
leys,
doors 7,8
.Vindows, mirrors 10,11
Seat belts 12
Safety for children 15
Head restraints, seats 16, 17
_oad compartment/loading area, canopy 20
Dropsides, roof rack 21
3edals,
brakes 22
Manual gearbox, power take-off ... 23, 24
gnition switch 25
Starting/stopping engine 26, 27
Warning lamps 28
Instruments 30
Switches 33
Turn signals, windscreen wiper.... 35, 36
Heating,
ventilation . , 37
Auxiliary heater 39
Interior lights 41
Ashtray, shelves 41
Cigarette lighter, socket 41
DRIVING TIPS
Running in and afterwards 42
Driving safely 43
Driving economically and
environment consciously 44
Driving with trailer 46
OPERATING INSTRUCTIONS
Refueling,
fuel 49, 50
Care of vehicle, maintenance 52, 57
Engine bonnet, engine
compartment 58, 59
Engine oil, gearbox oil 60,64
Fuel filter, water separator 65
Air cleaner 66
Additional lubricating points 67
Power assisted steering 68
Cooling system 69
Brake fluid 71
Battery 72
Windscreen wash/wipe system ... 74, 75
Wheels 76
Arduous operating conditions 80
Winter operation 81
Accessories, modifications,
renewal of parts 82
Mobile telephone, two-way radio 82
DO-IT-YOURSELF
First aid kit, warning triangle 83
Vehicle tools, chocks 83
Jack, spare wheel 84,85
Changing wheels 86
Fuses 89
Changing bulbs 91
Adjusting/masking headlights 94
Installing a radio 95
Emergency starting 96
Tow starting/towing 97
Lifting vehicle 99
TECHNICAL DESCRIPTION
Engine 102
Emission control system, activated
charcoal filter 103, 104
Power transfer 105
Steering,
axles 105
Brakes, body 105
TECHNICAL DATA
Engine data 106
Performance 107
Fuel consumption 111
Spark plugs, vee belts 115
Capacities 115
Wheels, tyre pressures 116
Weights, trailer loads 119,124
Dimensions 125
Vehicle identification data •.... 129
SPECIAL INFORMATION
Axle springing LT 28-35 131
Welding operations, bolted-on
load platform 132
Adjusting brake pressure regulator . . . 132
ALPHABETICAL INDEX 136
CHECKS WHEN FILLING TANK 140
www.WestfaliaLT.info - a useful website for owners and enthusiasts of VW Westfalia LT Campervans

INSTRUMENT
PANEL
www.WestfaliaLT.info - a useful website for owners and enthusiasts of VW Westfalia LT Campervans
INSTRUMENT
PANEL
Page
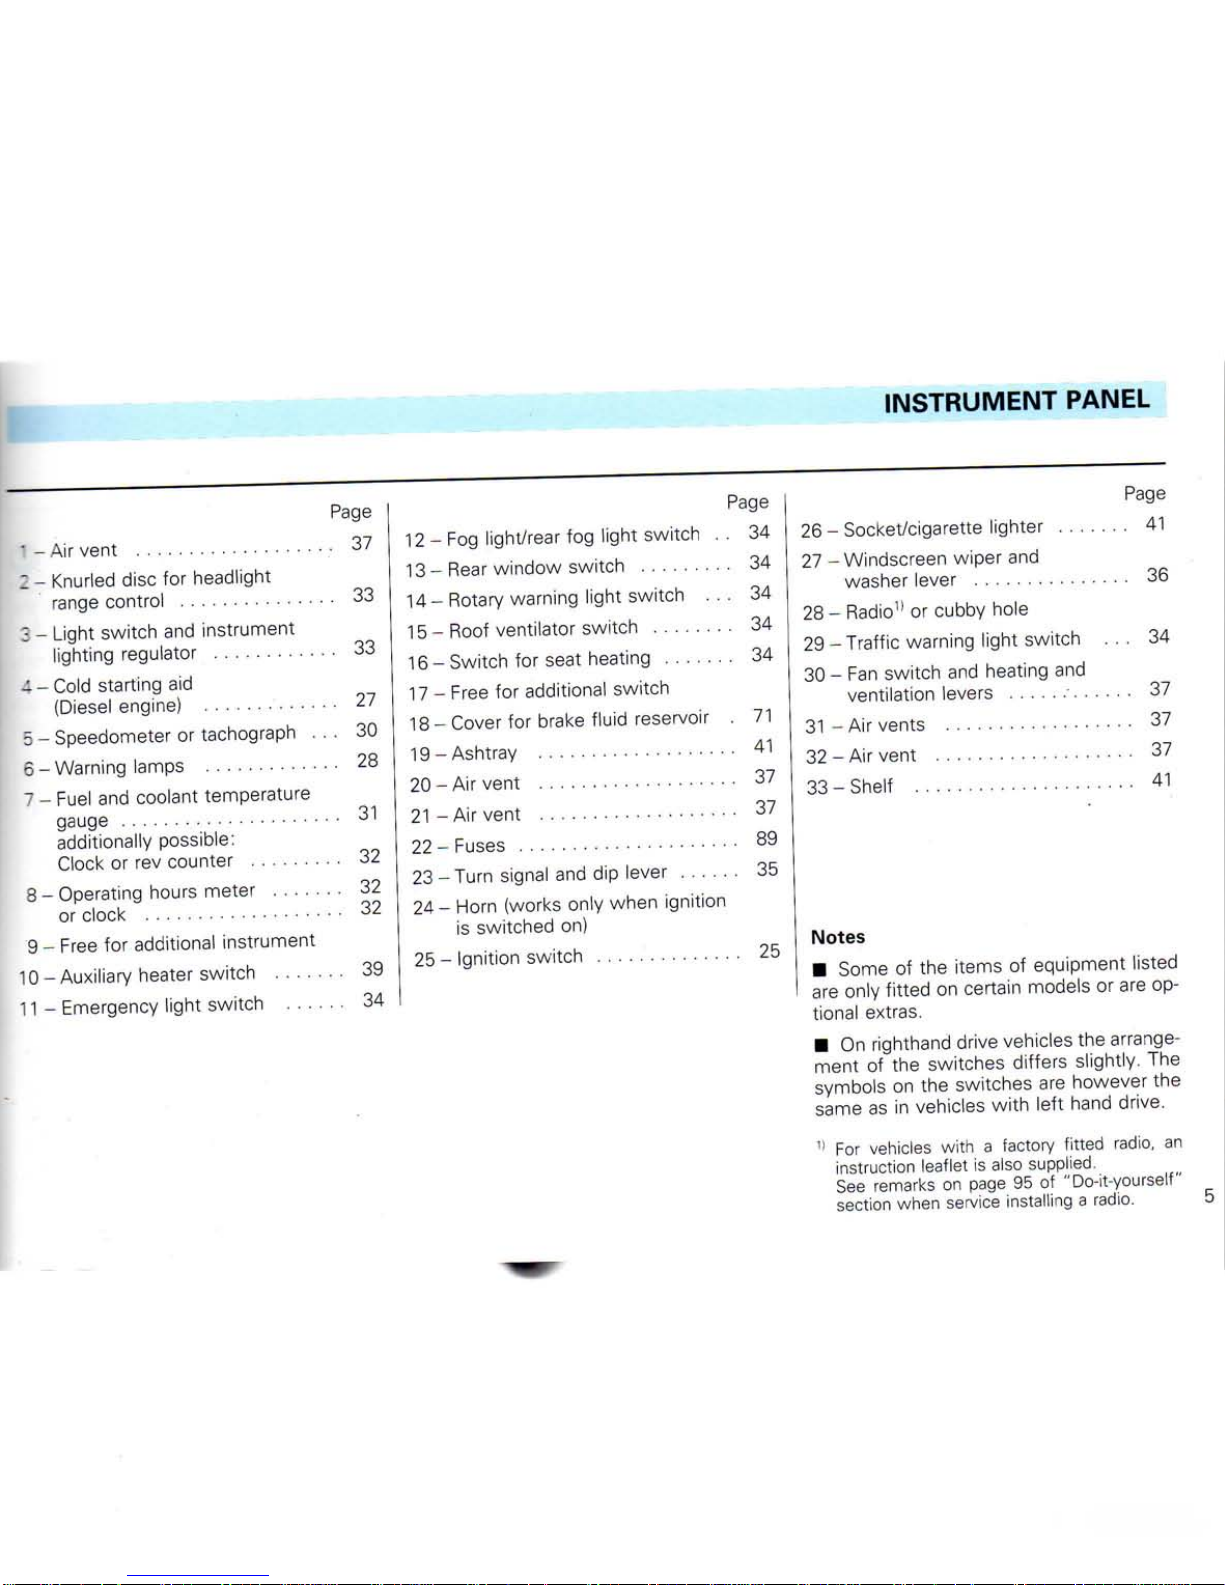
' - Air vent 37
I - Knurled disc for headlight
range control 33
: - Light switch and instrument
lighting regulator 33
I -
Cold
starting aid
(Diesel
engine) 27
5
- Speedometer or tachograph ... 30
5
- Warning lamps 28
7 -
Fuel
and coolant temperature
gauge
31
additionally possible:
Clock
or rev counter 32
3
- Operating hours meter 32
or clock 32
9 - Free for additional instrument
10-Auxiliary heater switch 39
11 - Emergency
light
switch 34
Page
12 - Fog light/rear fog
light
switch . . 34
13 - Rear
window switch 34
14 - Rotary warning
light
switch ... 34
15
- Roof ventilator switch 34
16 - Switch for seat heating 34
17 - Free for additional switch
18 -
Cover
for brake
fluid
reservoir 71
19-
Ashtray 41
20-
Air vent 37
21-
Air vent 37
22-
Fuses
89
23
- Turn signal and dip lever 35
24 - Horn (works only when ignition
is
switched on)
25 - Ignition
switch 25
Page
26 - Socket/cigarette lighter 41
27 - Windscreen wiper and
washer
lever 36
28 -
Radio11
or cubby hole
29-Traffic warning
light
switch ... 34
30 - Fan switch and heating and
ventilation levers 37
31 - Air vents 37
32-
Air vent 37
33-
Shelf 41
Notes
• Some of the items of equipment listed
are only
fitted
on certain models or are op-
tional extras.
• On righthand drive vehicles the arrangement of the switches differs slightly. The
symbols
on the switches are however the
same
as in vehicles
with
left
hand drive.
11 For vehicles
with
a factory
fitted
radio, an
instruction leaflet is also supplied.
See
remarks on page 95 of "Do-it-yourself"
section
when service installing a radio.
www.WestfaliaLT.info - a useful website for owners and enthusiasts of VW Westfalia LT Campervans
INSTRUMENT
PANEL
WARNING
LAMPS
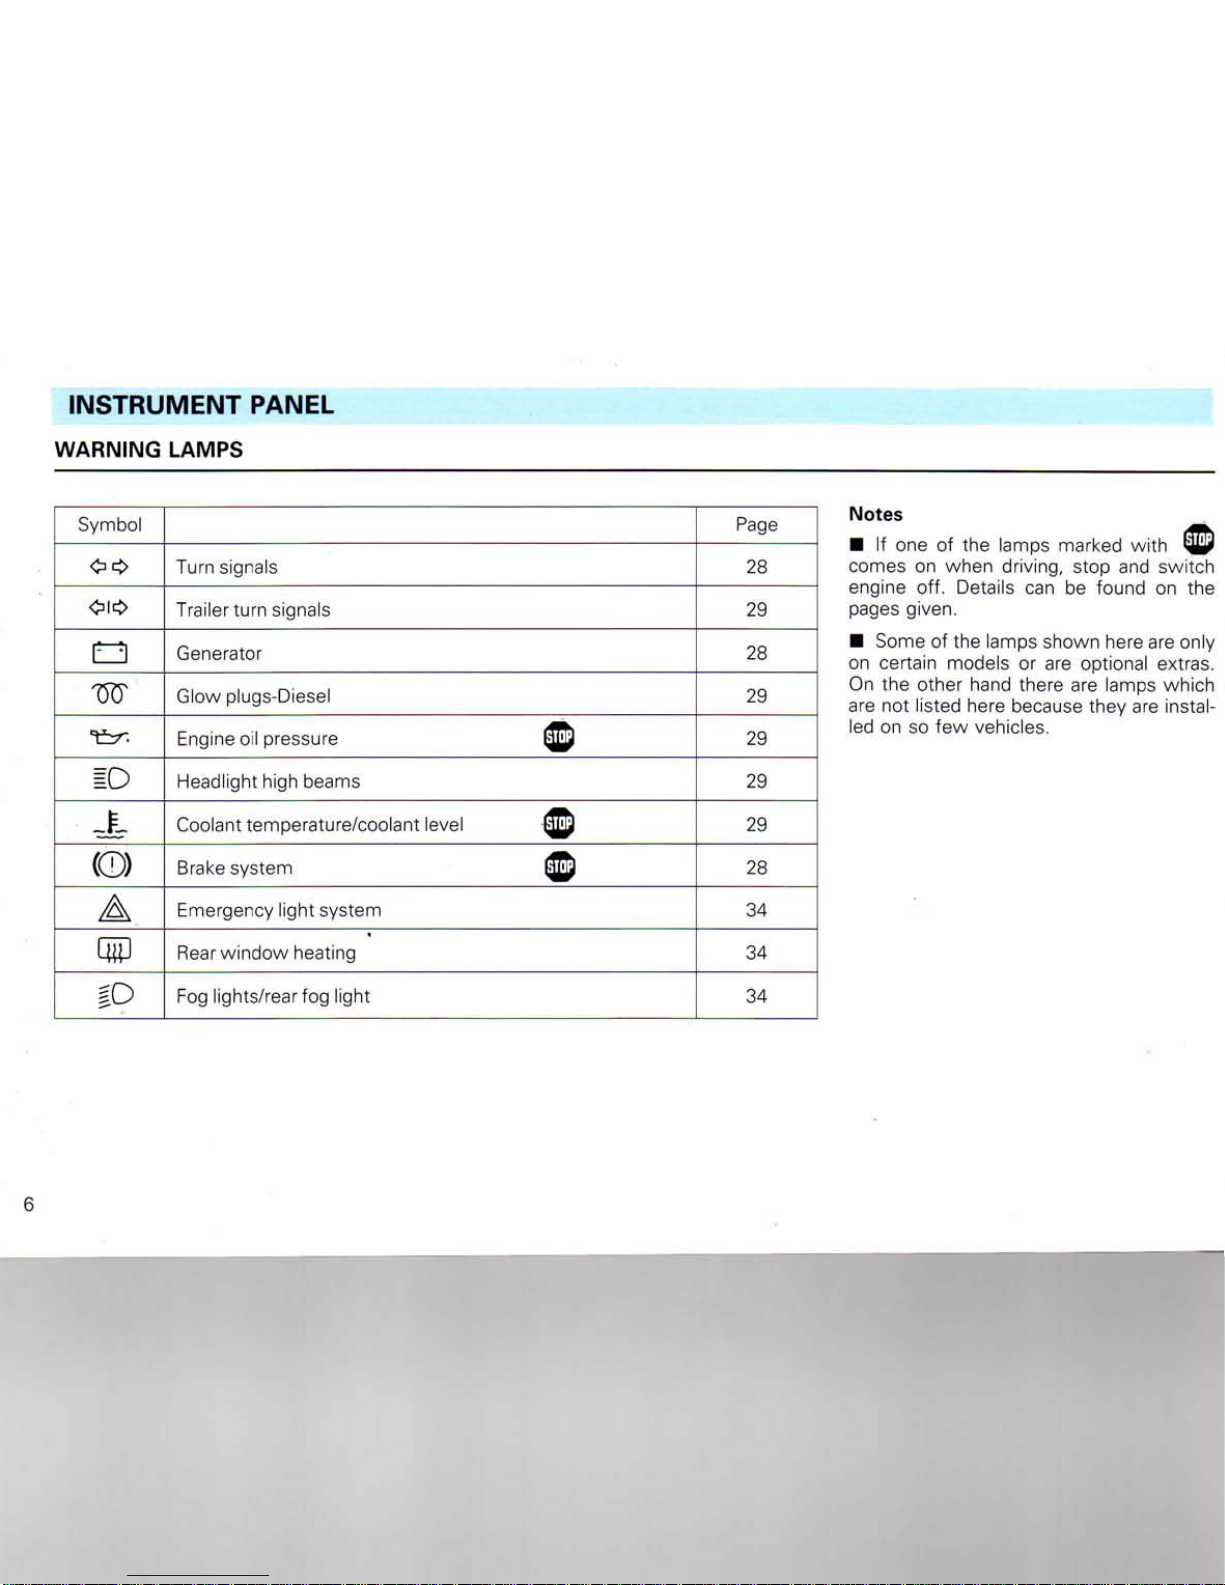
Symbol Page
Turn
signals
28
Trailer turn signals
29
Generator
28
m
Glow plugs-Diesel
29
Engine
oil
pressure
Ij^jl
29
Headlight
high
beams
29
J?
Coolant temperature/coolant level
29
(CD)
Brake
system
Em
28
A_
Emergency light system
34
m
Rear
window
heating
34
to
Fog
lights/rear
fog
light
34
Notes
•
If one of the
lamps marked
with
comes
on
when driving, stop
and
switch
engine
off.
Details
can be
found
on the
pages given.
•
Some
of the
lamps shown here
are
only
on certain models
or are
optional extras.
On
the
other hand there
are
lamps which
are
not
listed here because
they
are
instal-
led
on so few
vehicles.
6
www.WestfaliaLT.info - a useful website for owners and enthusiasts of VW Westfalia LT Campervans

OPERATION
Up
to six keys can be supplied
with
the
vehicle:
• two keys A
• two keys B *
• two keys C *
This
key
fits
all locks except:
• the lockable glove box
• sliding door and wing door
with
safety
locks
Attention
When
leaving
the
vehicle
unattended
-
even
only
for a few
moments - always
take
the key
with
you.
Key B
This
key is for the lockable glove box *.
Key C
This
key
fits
the safety locks in sliding door
and
wing door. It can only be withdrawn
when the doors are locked.
Tag D
The
number for key A is stamped on this
plastic
tag.
The
numbers for keys B and C are stamped
on the individual keys.
With the aid of the number a replacement
key
can be ordered from a Volkswagen
Dealership.
The
tag should be kept separately and
safely
(in your wallet for example) so
that
no unauthorised person can order a key.
In addition to the plastic tag there may also
be
a metal tag on which there is a part of
the vehicle identification number. This tag
is
no longer required after vehicle has been
delivered.
|B25-450
www.WestfaliaLT.info - a useful website for owners and enthusiasts of VW Westfalia LT Campervans
OPERATION
DOORS
Cab doors
From
outside
both cab doors can only be
locked
with
the key A. When unlocking the
locking knobs go up, when locking they go
down.
Both doors can be locked
without
using the
key. To do this press down the locking
knob
with
the door open and operate the
trigger in the outside door handle as the
door is
closed.
If the door
closes
on its own after the locking knob has been depressed, the knob
springs up automatically so
that
you are not
locked
out
with
key inside the vehicle.
The rear door on the Double Cab pick-up is
locked
from outside in the same way as
the
front
doors.
From
inside
the door can be locked by
pressing
down the locking knobs or by
pressing
down the inner lock lever (Double
Cab).
As
long as the knobs are pressed down the
doors cannot be opened from inside or outside.
Attention
Locking the doors can
prevent
them
from
opening
in an
unusual
accident
situation.
Locked doors also
prevent
anyone
from
entering
without
permission -
e.g. at
traffic
lights.
However
they
8
make
it
difficult
for
anyone
to get
into
the
vehicle
in an
emergency.
Sliding door *
From
outside
the sliding door can be
locked
and unlocked
with
the key A or C.
When fully open the door is held by a hook.
To
close sliding door from outside -
Press
the door handle down to release the hook
and slide the door
firmly
forwards.
Note
If door does not close the
first
time,
move
handle
to
stop
in
opening
direction
before
trying
to close it
again.
Otherwise
the door
will
be
difficult
to
close and the lock
mechanism
may be
damaged.
From
inside
the sliding door is locked by
pushing down the locking knob near the
door inner handle.
As
long as the knob is in the lower position
the door cannot be opened from inside or
outside.
When the vehicle is moving, the door
must
always
be
properly
closed but
when carrying passengers the locking knob
should be
left
in the upper position so
that
the door can be opened from outside in an
emergency.
Wing
door *
Low doors in Van and Combi
with
nor-
mal or
high
roof
The wing door can be locked and unlocked
with
the key A or C.
To
open
from
outside
-
Open
right
hand half
with
handle, release
left
hand half
with
handle in end of door
and open it.
To
close - slam
left
hand half to. This en-
gages
lock to
first
catch. When the
right
hand*half is
closed,
the door is locked fully.
www.WestfaliaLT.info - a useful website for owners and enthusiasts of VW Westfalia LT Campervans

OPERATION
To lock from outside without key - With
the right hand half open, push inner lever
up and press trigger in outside handle
when closing door.
To open from inside - Press locking
lever down and pull.
Locking right door wing after closing it Press locking lever up.
The wing door must also always be
properly closed when vehicle is moving.
High doors in Van and Combi with high
roof
The rear door can only be locked from outside with the key A or C.
To open from outside - swing handle on
right hand half right down and open door.
Release left hand half by pulling handle in
end of door and open door.
To close - close left hand half and swing
handle forward to secure it. Slam right
hand half to so that it engages in the lock
and swing handle up fully to secure it.
From inside
To lock - swing handle up to position 1
In this position the door can
be opened from outside, provided that the outer door
han-
dle has not been locked.
To unlock- swing handle down to
posi-
tion 2
To open - swing handle down to
posi-
tion 3
Further instructions are on the next page.
9
www.WestfaliaLT.info - a useful website for owners and enthusiasts of VW Westfalia LT Campervans
OPERATION
WINDOWS
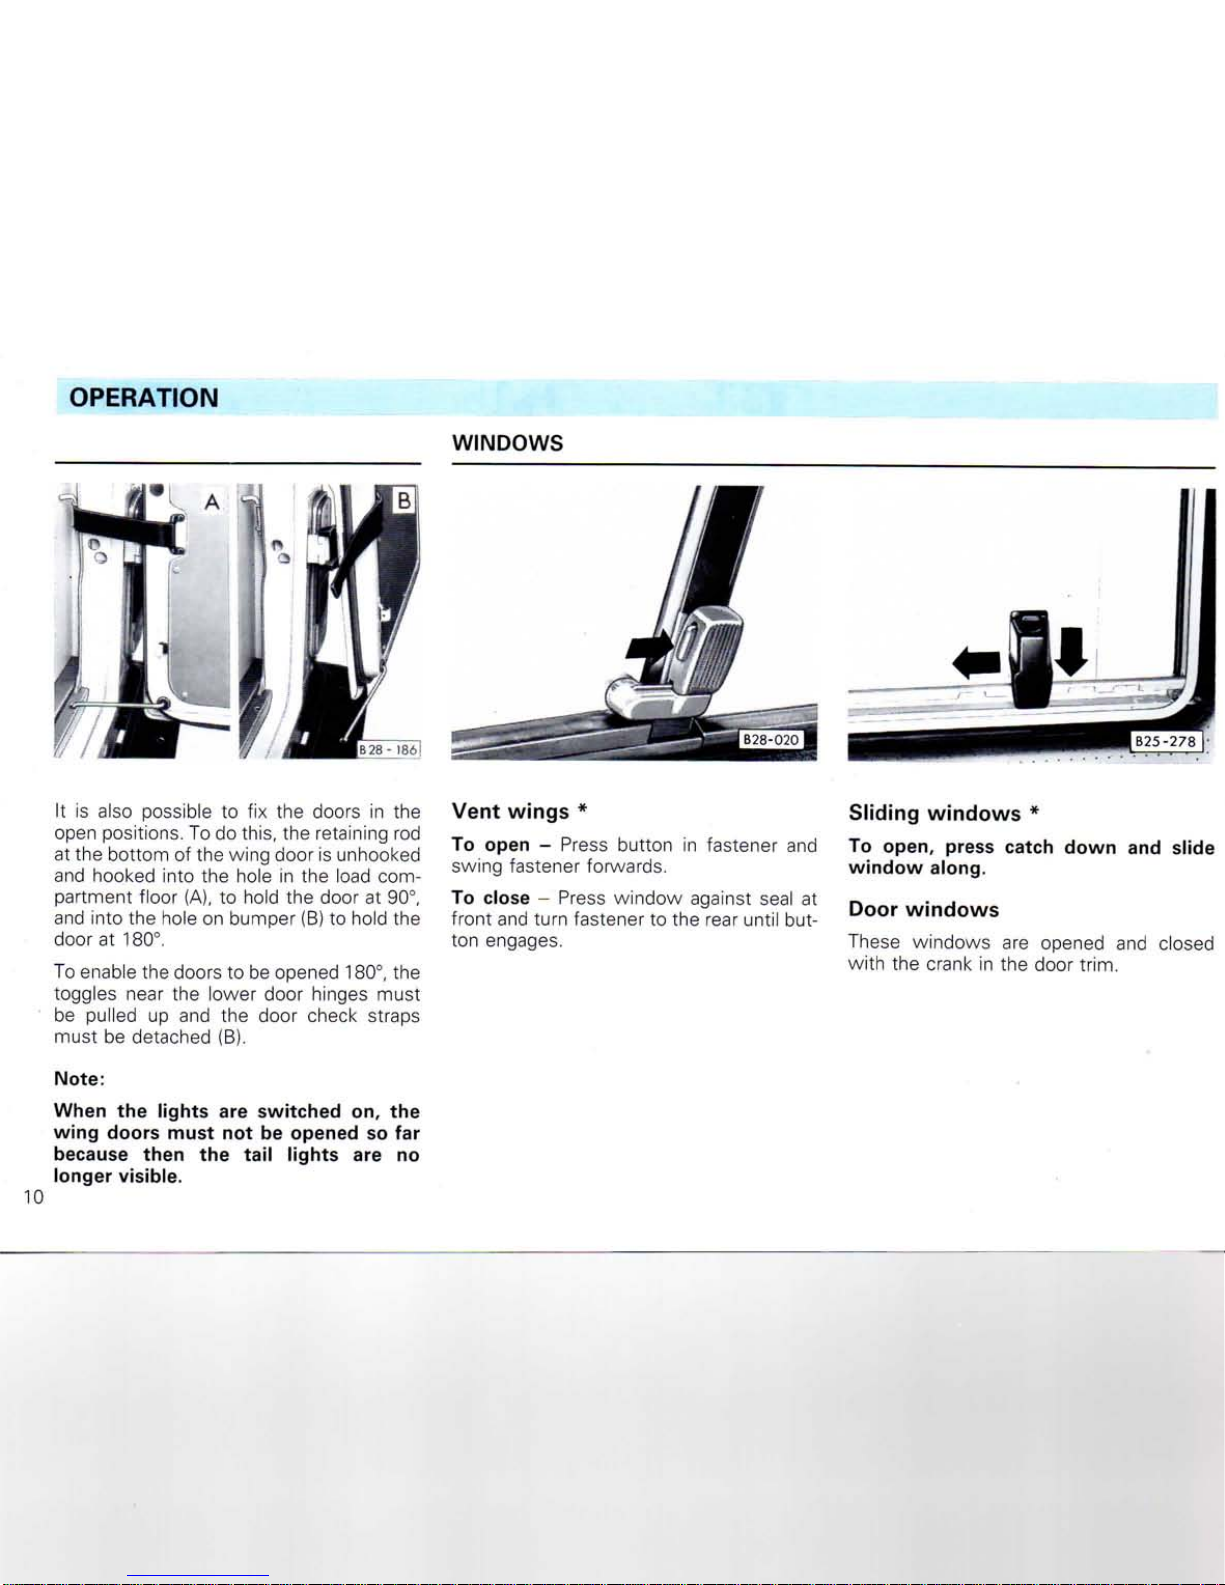
It is also possible to fix the doors in the
open positions. To do this, the retaining rod
at the bottom of the wing door is unhooked
and hooked into the hole in the load com-
partment floor (A), to hold the door at 90°,
and into the hole on bumper (B) to hold the
door at 180°.
To enable the doors to be opened 180°, the
toggles near the lower door hinges must
be pulled up and the door check straps
must be detached (B).
Note:
When the lights are switched on, the
wing doors must not be opened so far
because then the tail lights are no
longer visible.
Vent wings *
To open - Press button in fastener and
swing fastener forwards.
To close - Press window against seal at
front and turn fastener to the rear until button engages.
Sliding windows *
To open, press catch down and slide
window along.
Door windows
These windows are opened and closed
with the crank in the door
trim.
www.WestfaliaLT.info - a useful website for owners and enthusiasts of VW Westfalia LT Campervans
MIRRORS
OPERATION
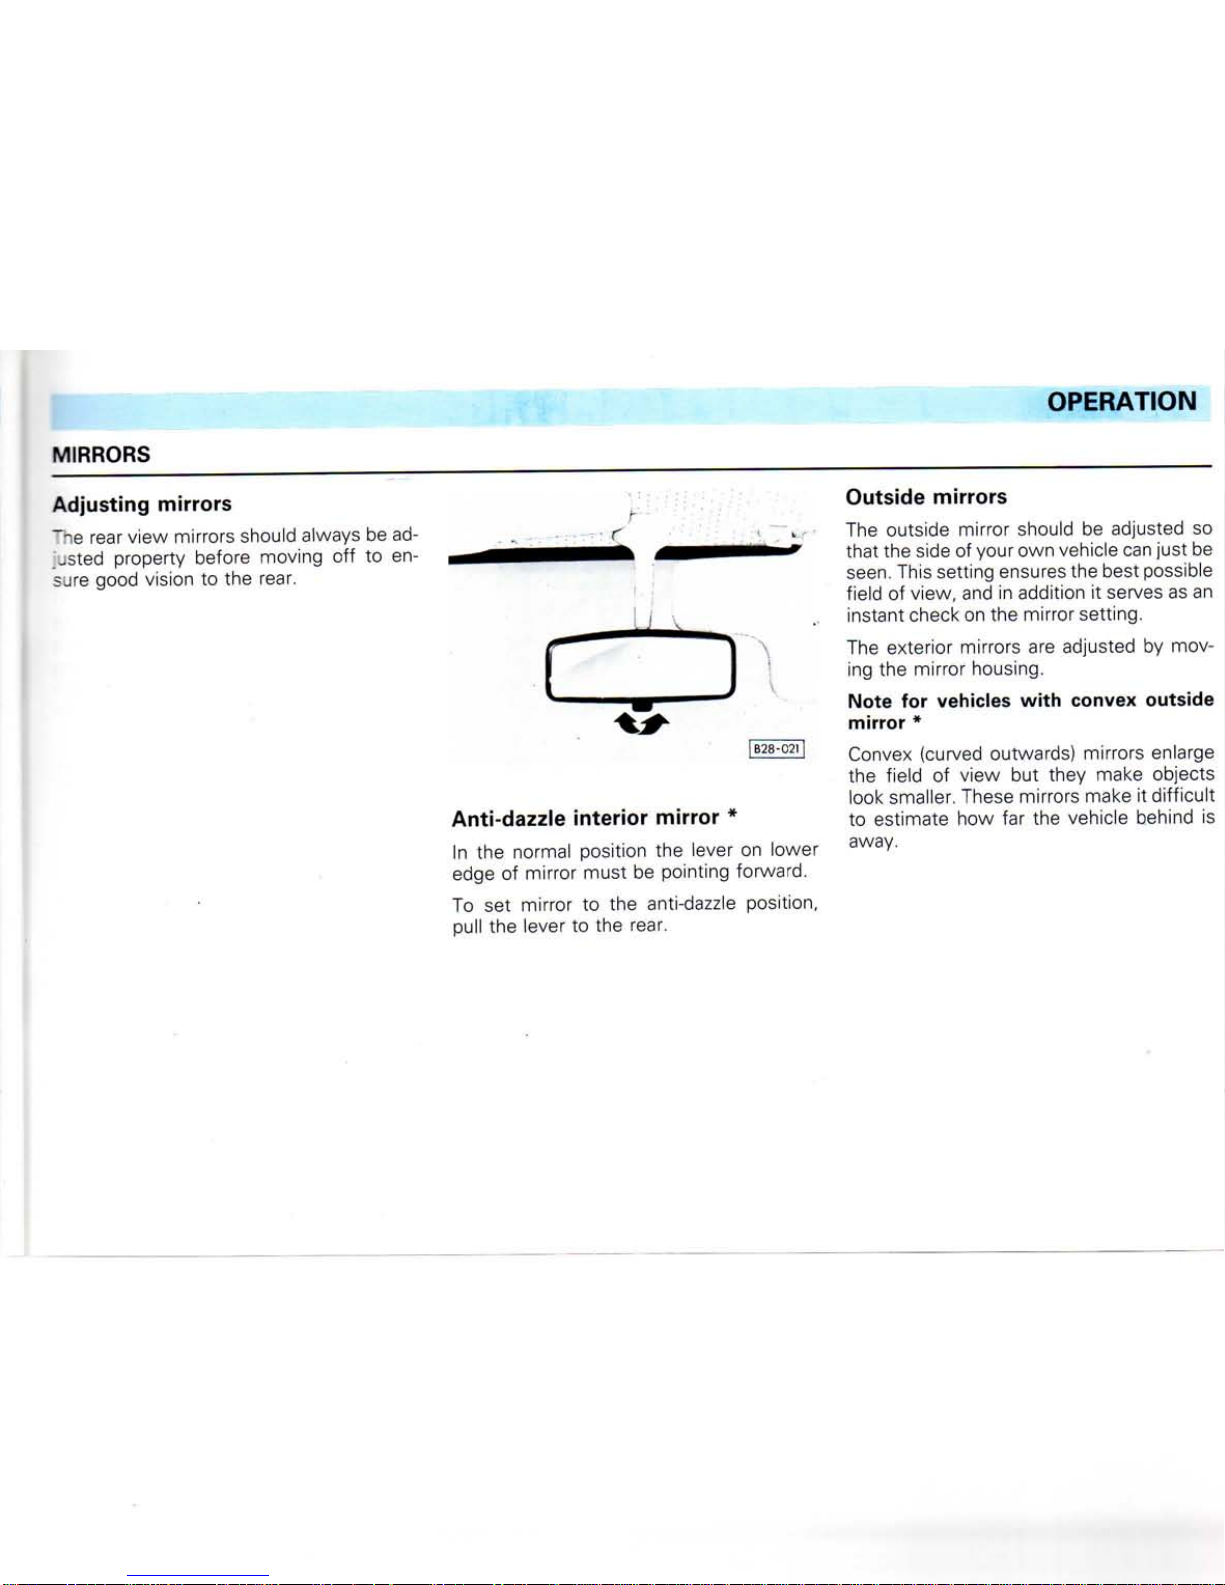
Adjusting mirrors
""he rear view mirrors should always be adjusted property before moving off to en-
sure good vision to the rear.
•• •
C
|B28-021 |
Anti-dazzle interior mirror *
In the normal position the lever on lower
edge of mirror must be pointing forward.
To set mirror to the anti-dazzle position,
pull the lever to the rear.
Outside mirrors
The outside mirror should be adjusted so
that the side of your own vehicle can just be
seen.
This setting ensures the best possible
field of view, and in addition it serves as an
instant check on the mirror setting.
The exterior mirrors are adjusted by mov-
ing the mirror housing.
Note for vehicles with convex outside
mirror *
Convex (curved outwards) mirrors enlarge
the field of view but they make objects
look smaller. These mirrors make it difficult
to estimate how far the vehicle behind is
away.
www.WestfaliaLT.info - a useful website for owners and enthusiasts of VW Westfalia LT Campervans
OPERATION
SEAT
BELTS
It has been proven
that
seat belts give good
protection in accidents. In most countries
therefore the wearing of seat belts is required by law.
Attention
The
belts
should be put on
before
every
journey - even
in
town
traffic.
This
applies
also to the
rear
seats.
Even
pregnant
women
should
always
wear a seat
belt.
The
routing
of the
belt
is of
major
im-
portance
to the
protective
effect
of the
belt.
How the
belt
should be
worn
is de-
scribed on the
following
pages.
How
children can be carried safely in the
vehicle
is explained on page 15.
General
notes
• The
belt
must
not be
twisted.
• Two persons
(including
children)
must
never
be secured
with
one belt, It is particularly dangerous to put the belt round a
child sitting on a person's lap.
• The belt should not be worn over hard or
breakable
articles (glasses, ball pens, key
rings,
pipes, etc.) because this can cause
injury to the body.
•
Loose,
bulky clothing (e.g. overcoats
over
jackets) affects the fit and function of
the belts.
• The belt must not be jammed anywhere
or rub on any sharp edges.
• The lock tongue may only be inserted
into the lock part belonging to the appropriate seat, otherwise the protective effect
is
impaired.
• The slot for the belt tongue must not be
blocked
with
paper or anything similar,
otherwise the tongue cannot engage
properly.
• The belts must be kept clean otherwise
the retractors may not work properly (see
also
"Care
of car" section).
• Seat belts which have become dam-
aged
or have been stressed in an accident
and
stretched must be renewed - prefera-
bly by a Volkswagen Dealership. The an-
chorages
should be
checked.
• Belts can be service installed for all
seating
positions on vehicles not
fitted
with
belts at the factory. The installation of belts
should
be done by a Volkswagen Dealer-
ship
because these workshops have the in-
formation required to do the job properly.
• In some export countries seat belts
could
be used on which the functions differ
from those mentioned on the following
pages.
Note
On
the Van there are no belt anchorage
points in the load compartment.
12
www.WestfaliaLT.info - a useful website for owners and enthusiasts of VW Westfalia LT Campervans
OPERATION
Three-point
inertia
reel
belts
*
•he inertia reel belt gives complete free-
ZZT)
of movement when .pulled slowly.
Sadden
braking however will cause the belt
ID lock.
Jhe
retractor mechanism will also lock the
belt when accelerating, driving down steep
5radients or cornering hard.
The backrests of the
front
seats
must
not be inclined too far to the
rear,
other-
wise
the
belts
are no
longer
effective.
The lap
part
of
belt
must
always
fit
tightly.
Pull
belt
tight
if necessary.
Particularly
in the case of
pregnant
women
the lap
part
of the
belt
should
be as low across the pelvis as possible
to
ensure
that
no pressure is
exerted
on
the abdomen.
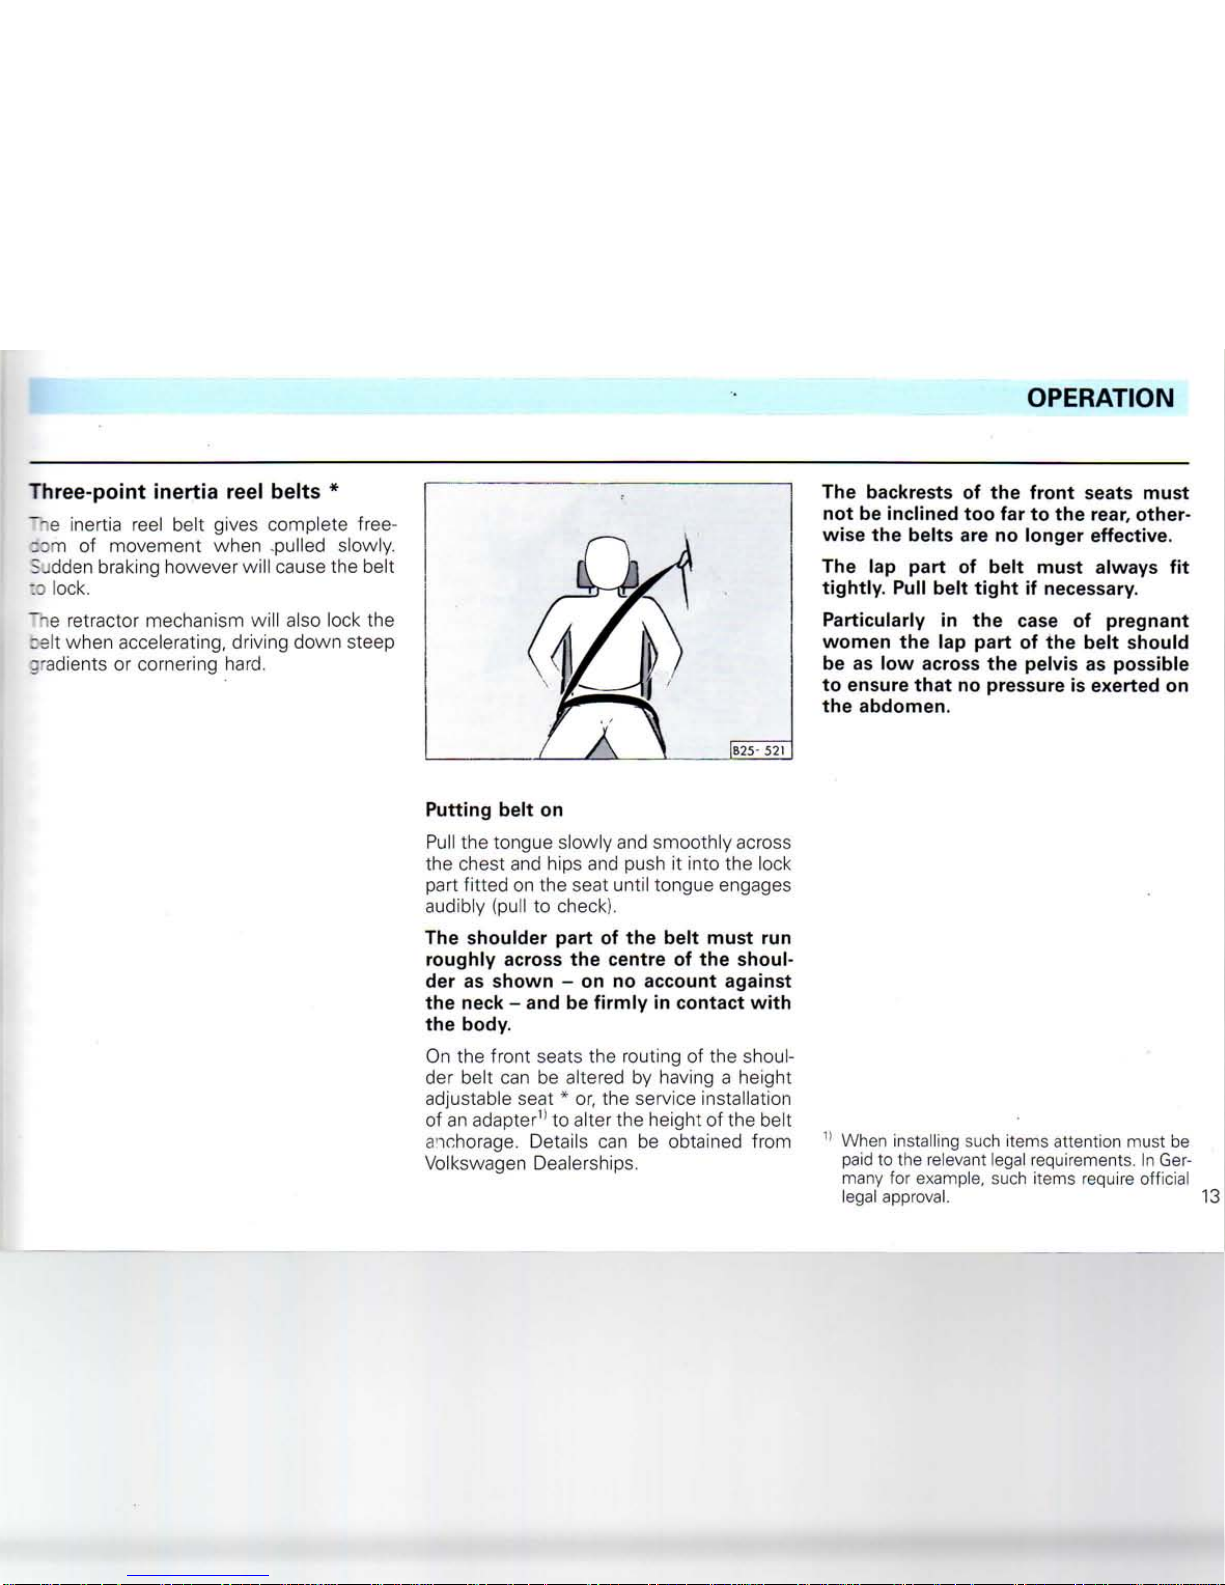
Putting
belt
on
Pull
the tongue slowly and smoothly across
the chest and hips and push it into the lock
part
fitted
on the seat until tongue engages
audibly (pull to check).
The shoulder
part
of the
belt
must
run
roughly
across the
centre
of the shoul-
der as
shown
- on no account
against
the
neck
- and be
firmly
in
contact
with
the body.
On
the
front
seats the routing of the shoul-
der
belt can be altered by having a height
adjustable seat * or, the service installation
of an adapter1' to alter the height of the belt
anchorage.
Details can be obtained from
Volkswagen
Dealerships.
When
installing such items attention must be
paid to the relevant legal requirements. In
Germany for example, such items require official
legal
approval. 13
www.WestfaliaLT.info - a useful website for owners and enthusiasts of VW Westfalia LT Campervans
OPERATION
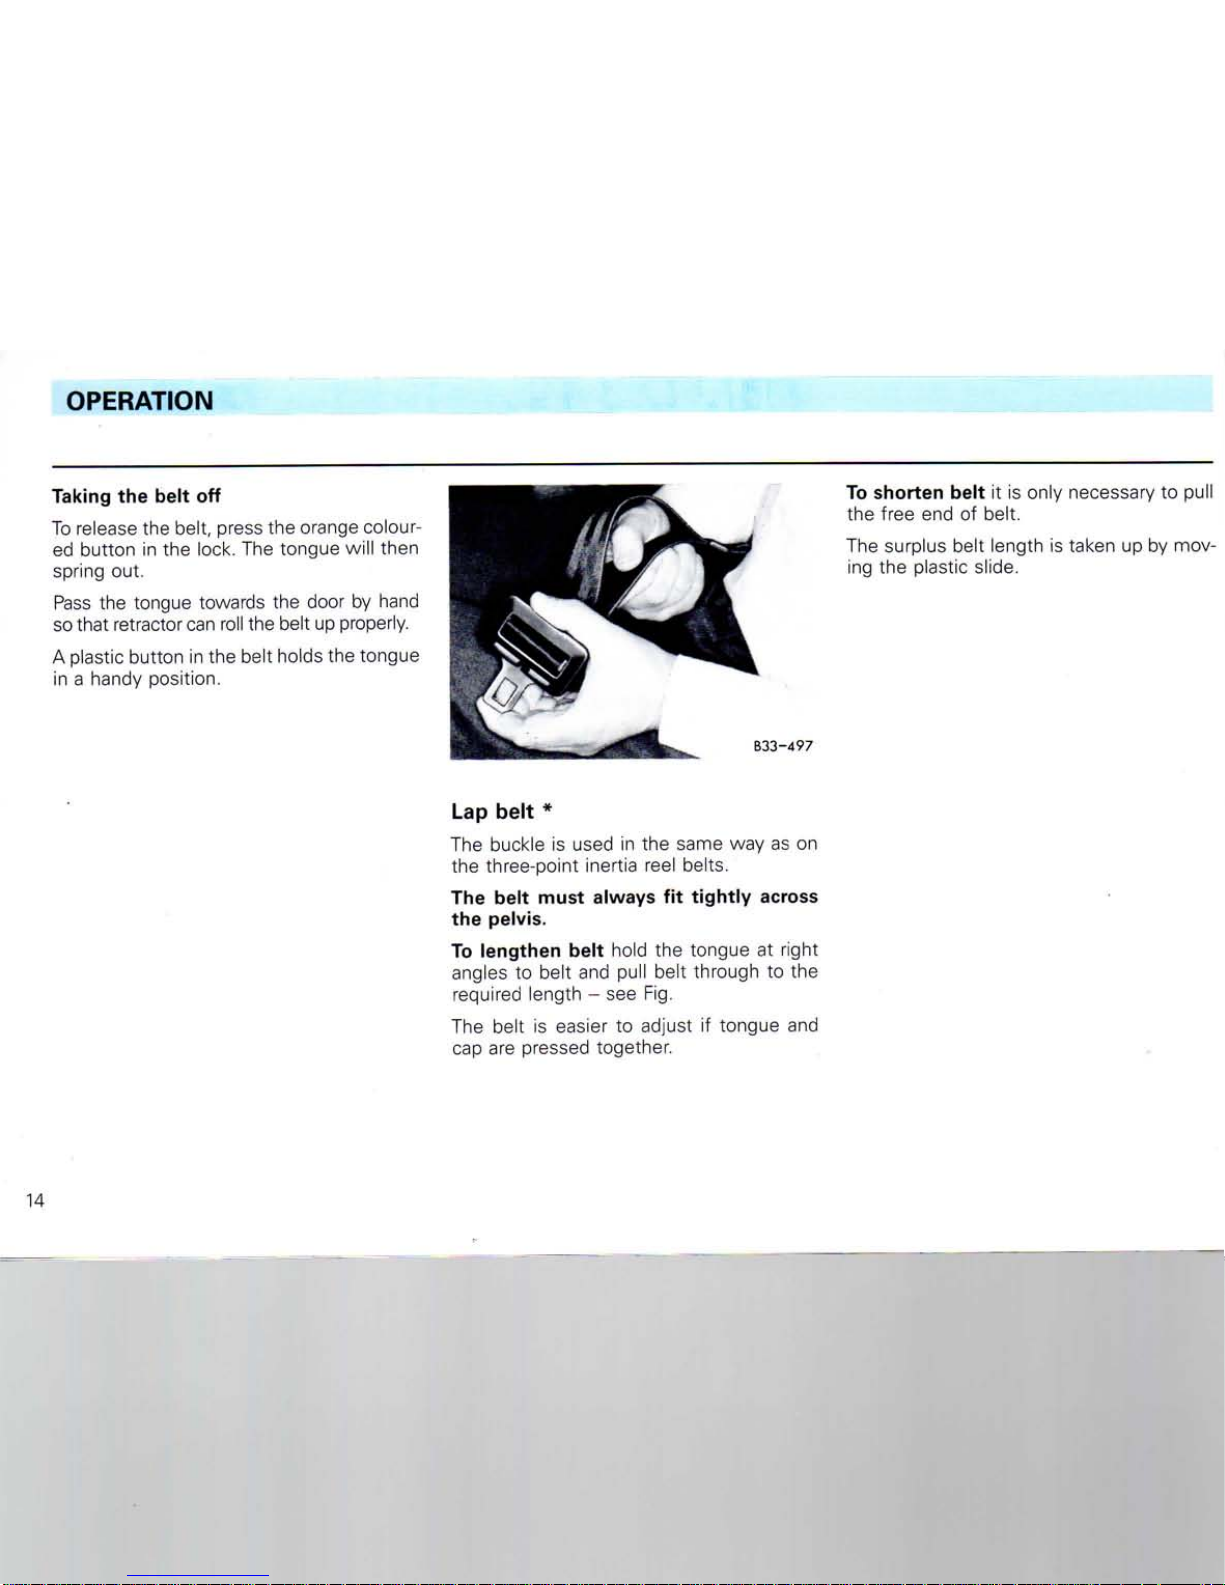
Taking the belt off
To release the belt, press the orange colour-
ed button
in
the lock.
The
tongue will then
spring out.
Pass
the
tongue towards
the
door
by
hand
so that retractor can
roll
the belt up properly.
A plastic button in the belt holds the tongue
in a handy position.
To shorten belt it is
only necessary to pull
the free end
of
belt.
The surplus belt length
is
taken up
by
mov-
ing
the
plastic slide.
Lap belt *
The buckle
is
used
in the
same
way as on
the three-point inertia reel belts.
The belt must always fit tightly across
the pelvis.
To lengthen belt
hold
the
tongue
at
right
angles
to
belt and pull belt through
to the
required
length
- see Fig.
The belt
is
easier
to
adjust
if
tongue
and
cap are pressed together.
www.WestfaliaLT.info - a useful website for owners and enthusiasts of VW Westfalia LT Campervans

OPERATION
SAFETY
FOR
CHILDREN
Children
under
12
years
of age should
-Drmally
travel
on the
rear
seat11.
De-
rending
upon
their
ages,
height
and
.••eight,
they
must
be
protected
with
either
a child
restaint
system
or the
seat
belts
provided.
- :hild may also occupy the
front
passenger
seal
if the restraint system used has been
5 • oressly approved for this purpose by the
manufacturer. One should bear in mind howe.e^
that
occupants are generally safer on
"5 rear seat.
On
no
account
should
babies
or
small
children
travel
on an
adult's
lap.
• Babies up to about 9 month old/10 kg are
rest protected, in an accident,
with
a safety
seat
or a special safety carrier.
• Experience has shown
that
babies and
small
children up to about 3 years/18 kg are
best protected in child seats or safety car-
liers where they can lie or sit facing the rear
of the vehicle.
• Children up to about 7 years of age/25
<g, depending on their height, are safest
.'.'hen secured in a child seat or by a safety
seat
cushion.
Observe
any statutory regulations to the
con-
trary.
• Children over about 7 years of age may
use
the three point belts or the two point
belts provided. It is important to ensure
that
the diagonal part of the belt
fits
over the
centre of the shoulder - and does not
make
contact
with
the
neck.
The lap part
of the belt must pass across the pelvis and
not
over
the child's stomach.
If this cannot be guaranteed, a safety cushion should be used to raise the seating
position.
When using the belt the section "Seat
belts" should also be noted.
Note the following points when purchasing,
installing and using a child restraint system:
• For safety reasons always use a restraint
system which conforms to the international
safety standard ECE R 44. Restraint
sys-
tems
that
can be connected to the seat
belts provided in the car are recommended.
If the existing belts are too short, one can
use
adapter belts which are available from
Volkswagen
Dealerships.
• Only use child seats or safety carriers of
the type which have a large,
flat
area in
con-
tact
with
the car's seat upholstery. Child
seats
which have feet or tubular frames and
no
flat
base can easily penetrate
into
the
car's
upholstery, and are therefore not so
safe.
• We recommend
that
child restraint
sys-
tems from the Genuine Accessory
Programme at Volkswagen Dealerships are
used.
Under the name "Bobsy" restraint
systems
for all age groups are available
there2'. These systems
fulfil
all the require-
ments mentioned and were furthermore de-
veloped and tested by us for use in Volkswagen vehicles.
• Special care must be taken if child restraint systems are used which are secured
at the same point as the belts provided in
the vehicle. One must ensure
that
the secur-
ing bolts are screwed fully
into
the threaded
holes
and tightened to a torque of 30 Nm.
Furthermore, one should ensure
that
the
belt itself cannot become damaged by
sharp edged buckles etc.
• For the
installation
and use,
attention
must
be
paid
to the
legal
regulations
and
the
instructions
of the
restraint
system
manufacturer.
Not in all export markets.
15
www.WestfaliaLT.info - a useful website for owners and enthusiasts of VW Westfalia LT Campervans
OPERATION
HEAD RESTRAINTS *
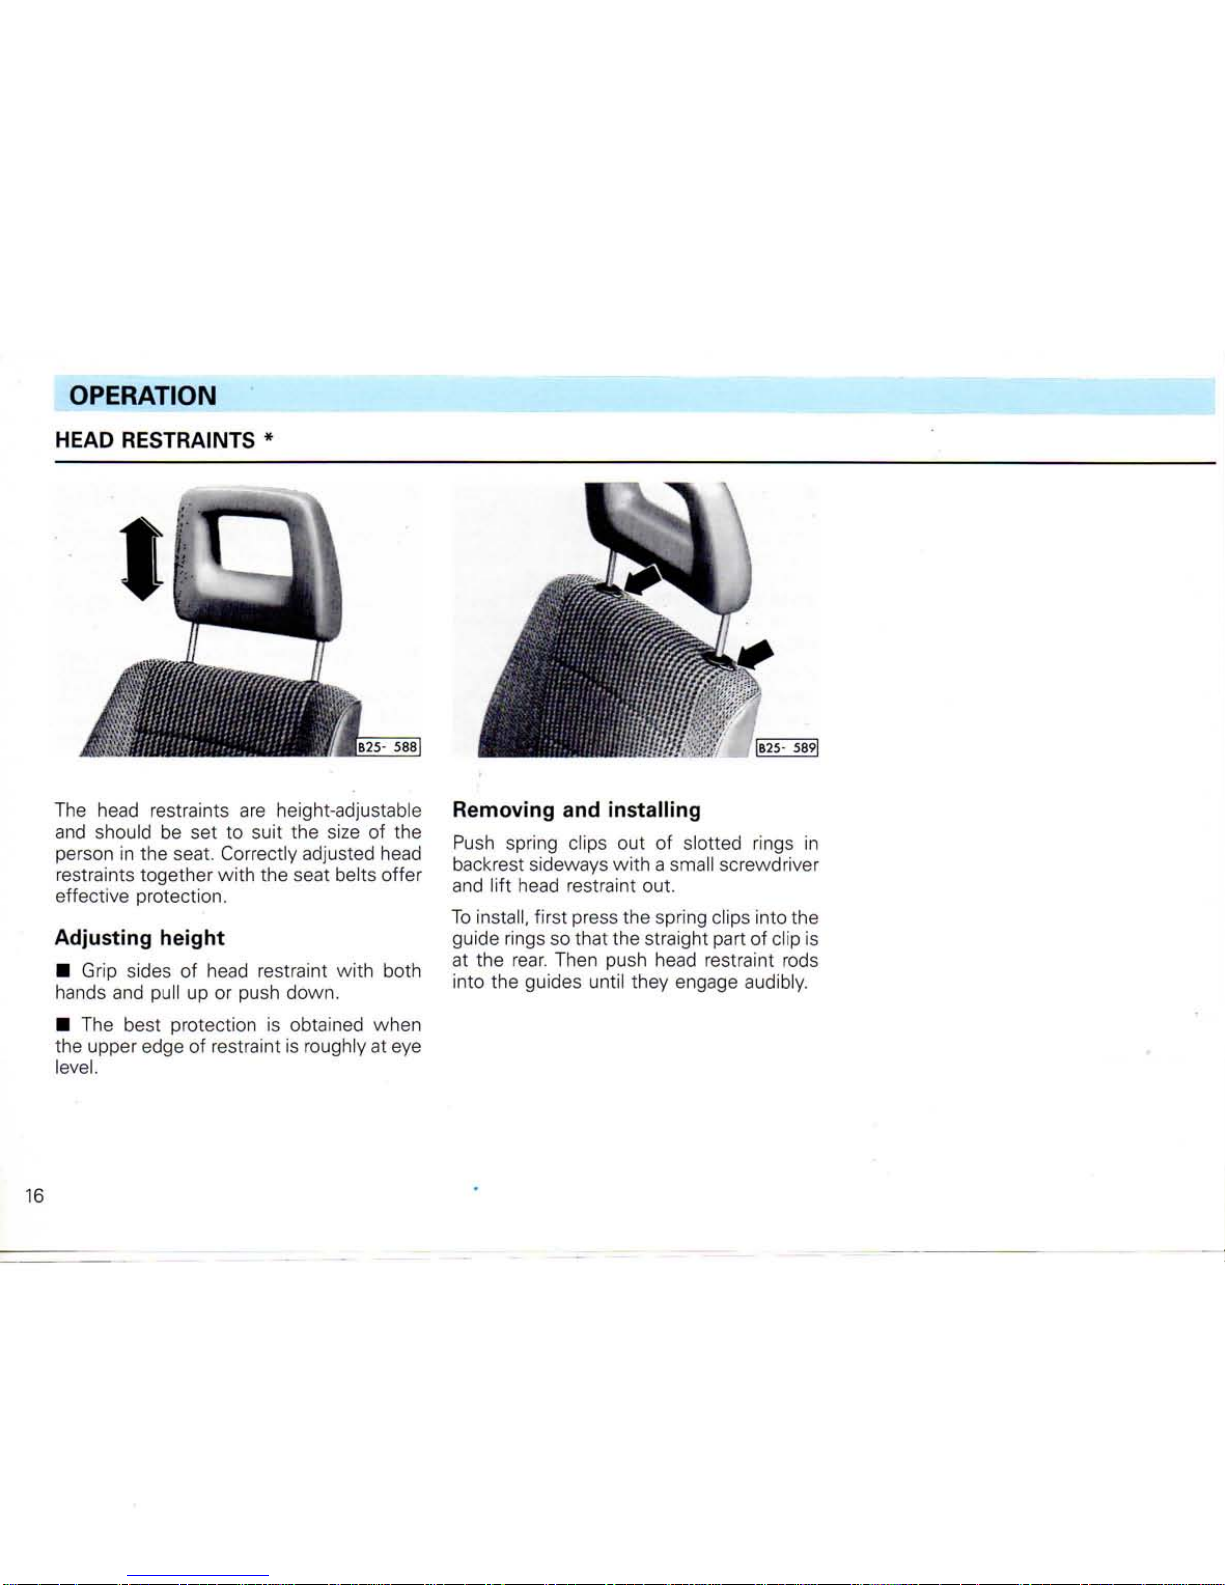
The
head restraints are height-adjustable
and
should be set to suit the
size
of the
person
in the seat. Correctly adjusted head
restraints together
with
the seat belts offer
effective protection.
Adjusting
height
• Grip sides of head restraint
with
both
hands
and pull up or push down.
• The best protection is obtained when
the upper edge of restraint is roughly at eye
level.
Removing and
installing
Push
spring clips out of slotted rings in
backrest
sideways
with
a small screwdriver
and
lift
head restraint out.
To
install,
first
press the spring clips into the
guide rings so
that
the straight part of clip is
at the rear. Then push head restraint rods
into the guides until they engage audibly.
www.WestfaliaLT.info - a useful website for owners and enthusiasts of VW Westfalia LT Campervans
OPERATION
SEATS
::-ect adjustment
of the
seats
is im-
- "^a;ning
the
controls safely and quickly
-
-e
axed low-fatigue body position
- —aximum protection
from
the
seat belts
~-e
--ont
seats should
be
adjusted before
:_~
-g on the
seat belt.
Do not
place
any
=n z es under the seats because this can
in-
:e~5'e
with
the
seat adjustment.
liter
every fore
and aft or
height adjust-
-e~.
of the
seat check,
by
jerking
with
the
that
the
retainers
are
properly
en-
Attention
•
For safety reasons the driver's seat
must
only be moved backwards or for-
wards when the vehicle is stationary.
•
Do not lower the backrest too far
when on the move because the seat
befts are then no longer fully effective.
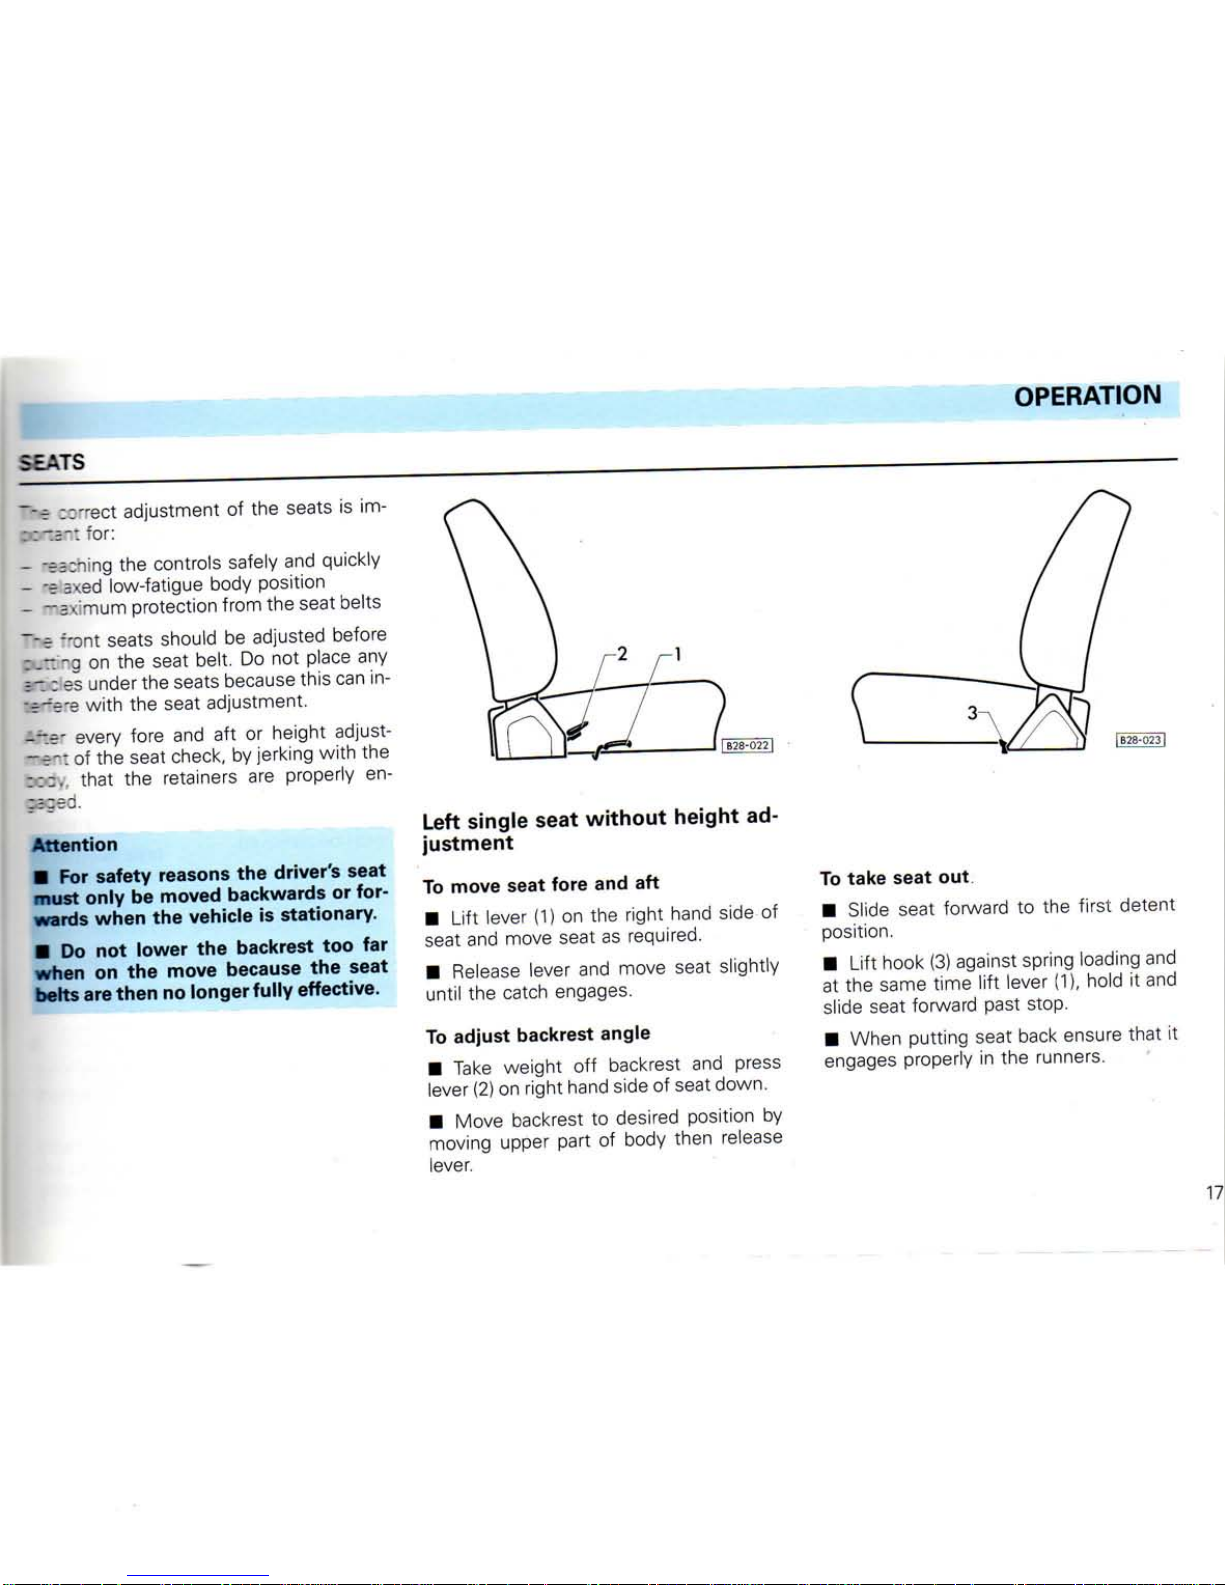
Left
single
seat
without
height
ad-
justment
To
move seat fore and aft
•
Lift
lever
(1) on the
right
hand side
of
seat and move seat
as
required.
•
Release
lever
and
move seat slightly
until
the
catch engages.
To
adjust backrest angle
• Take weight
off
backrest
and
press
lever (2)
on
right
hand side
of
seat down.
• Move backrest
to
desired position
by
moving upper
part
of
body then release
lever.
To
take
seat out
• Slide seat forward
to the
first
detent
position.
•
Lift
hook
(3)
against spring loading and
at
the
same
time
lift
lever
(1),
hold
it and
slide seat forward past stop.
• When
putting
seat back ensure
that
it
engages
properly
in the
runners.
www.WestfaliaLT.info - a useful website for owners and enthusiasts of VW Westfalia LT Campervans

OPERATION
Single
seat
with
height
adjustment
*
To
adjust seat angle
•
Lift
front
or rear lever on outer side of
seat
and adjust angle of seat by moving
body weight.
•
Release
the lever and let it engage in
nearest slot.
To
adjust
seat
height
Lift
front
and rear levers alternately and
raise
or lower seat by moving body weight
to
front
or rear.
To
move seat fore and aft, to adjust backrest angle and remove seat see previous
page.
Seat
with
height
and
weight
adjust-
ment
*
Adjusting seat angle and seat height is
done as described under "Single seat
with
height adjustment". The
front
and rear le-
vers are marked
with
A and B in the above
illustration.
Adjusting
backrest
angle
• Take weight off backrest and
lift
lever C
on outer side of seat.
• Adjust backrest to desired position by
moving upper part of body and release
lever.
To
move
seat
fore
and aft
• Move lever D on outer side of seat and
adjust seat.
•
Release
lever and move seat slightly
until
catch engages.
To
adjust
seat
to
driver's
weight
To
ensure
that
the seat springing is
comfortable regardless of the driver's weight
the knob E must be turned to the appro-
priate weight on the
scale.
To
take
seat
out
To
take seat out the bolts in the runners
must be removed.
Attention
• For
safety
reasons the
height
* of
the
driver's
seat
must
only
be
adjusted
when
the
vehicle
is
stationary.
•
When
service
installing
seat
belts
for the
seat
with
height
and
weight
ad-
justment
*,
only
inertia
reel
belts
may
be used.
www.WestfaliaLT.info - a useful website for owners and enthusiasts of VW Westfalia LT Campervans
OPERATION
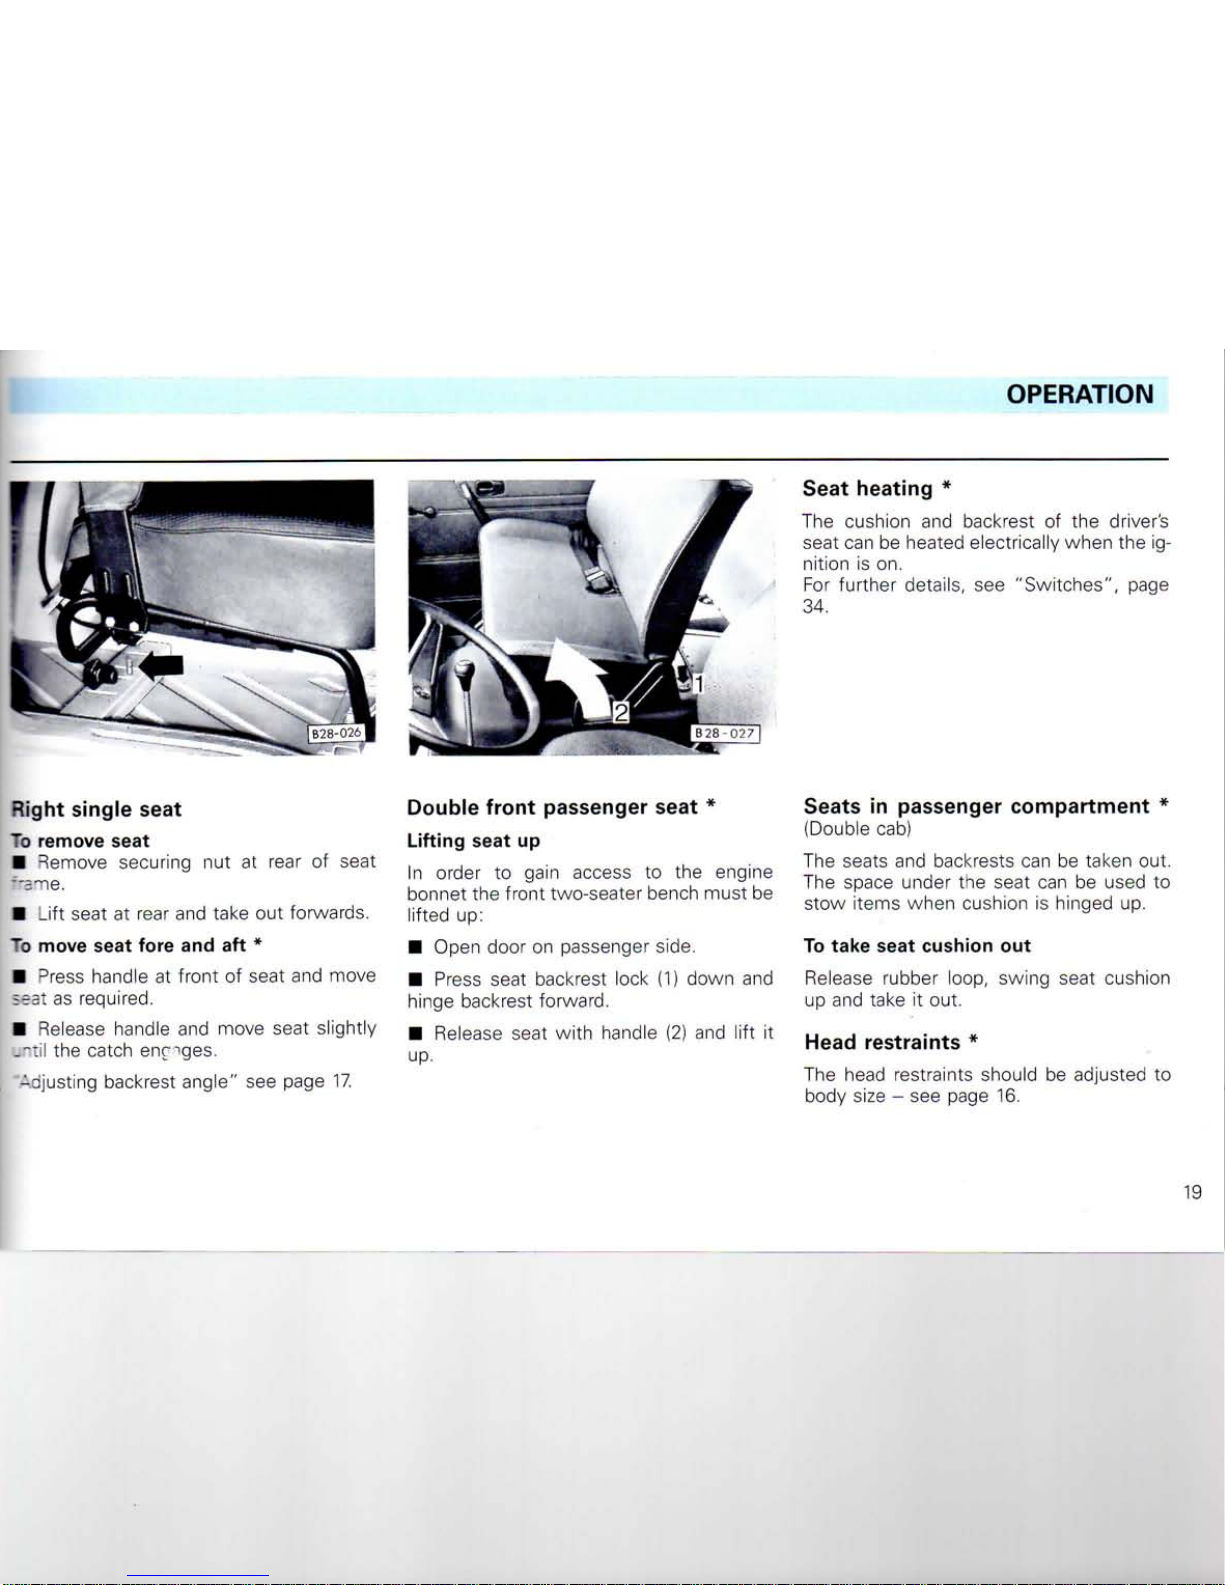
Right
single
seat
To
remove
seat
• Remove securing nut at rear of seat
:"5Tie.
•
Lift
seat at rear and take out forwards.
To
move
seat
fore
and aft *
• 3ress handle at
front
of seat and move
seat
as required.
•
Release
handle and move seat slightly
--.til
the catch engages.
Adjusting backrest angle" see page 17.
Double
front
passenger
seat
*
Lifting
seat
up
In order to gain
access
to the engine
bonnet the
front
two-seater bench must be
lifted
up:
• Open door on passenger side.
•
Press
seat backrest lock (1) down and
hinge backrest forward.
•
Release
seat
with
handle (2) and
lift
it
up.
Seat
heating
*
The cushion and backrest of the driver's
seat
can be heated electrically when the ignition is on.
For
further
details, see "Switches", page
34.
Seats
in passenger
compartment
*
(Double cab)
The seats and backrests can be taken out.
The space under the seat can be used to
stow items when cushion is hinged up.
To
take
seat
cushion out
Release
rubber loop, swing seat cushion
up and take it out.
Head
restraints
*
The head restraints should be adjusted to
body
size
- see page 16.
19
www.WestfaliaLT.info - a useful website for owners and enthusiasts of VW Westfalia LT Campervans
OPERATION
LOAD COMPARTMENT/LOAD SURFACE
CANOPY *
Notes
on
loading
the
vehicle
In the interests of good handling ensure
that
the load (load, persons and luggage) is distri-
buted evenly.
Heavy
items should be placed as near as
possible
to the rear axle or better still be-
tween the
axles.
The permissible axle loads
and GWV must on no account be exceeded
-see
pages 119-123.
To ensure satisfactory steerability the mini-
mum
front
axle weight is:
LT28-40:
1000 kg
•LT45
- 55: 25% of appropriate
total
ve-
hicle weight.
Attention
•
Note
that
when
carrying
heavy
loads
the
handling
changes
due to the
altera-
tion
of the
centre
of
gravity.
Driving
style
and speed
must
be
altered
to
suit.
• The
load
must
be
stowed
so
that
no
articles
can fly
forward
when
brakes
are
applied
suddenly.
Note
Vehicles
with
a bolted-on load
platform
must not be driven when
platform
has been
taken off.
When this cannot be avoided, see the notes
on page 132.
Please
ensure
that
the canopy is secured
properly at the
front
behind the cab.
Pass
the rod through the seam at the
bot-
tom of the canopy and
bolt
it to the head
board at each end.
www.WestfaliaLT.info - a useful website for owners and enthusiasts of VW Westfalia LT Campervans
:?SIDES
ROOF
RACK
OPERATION
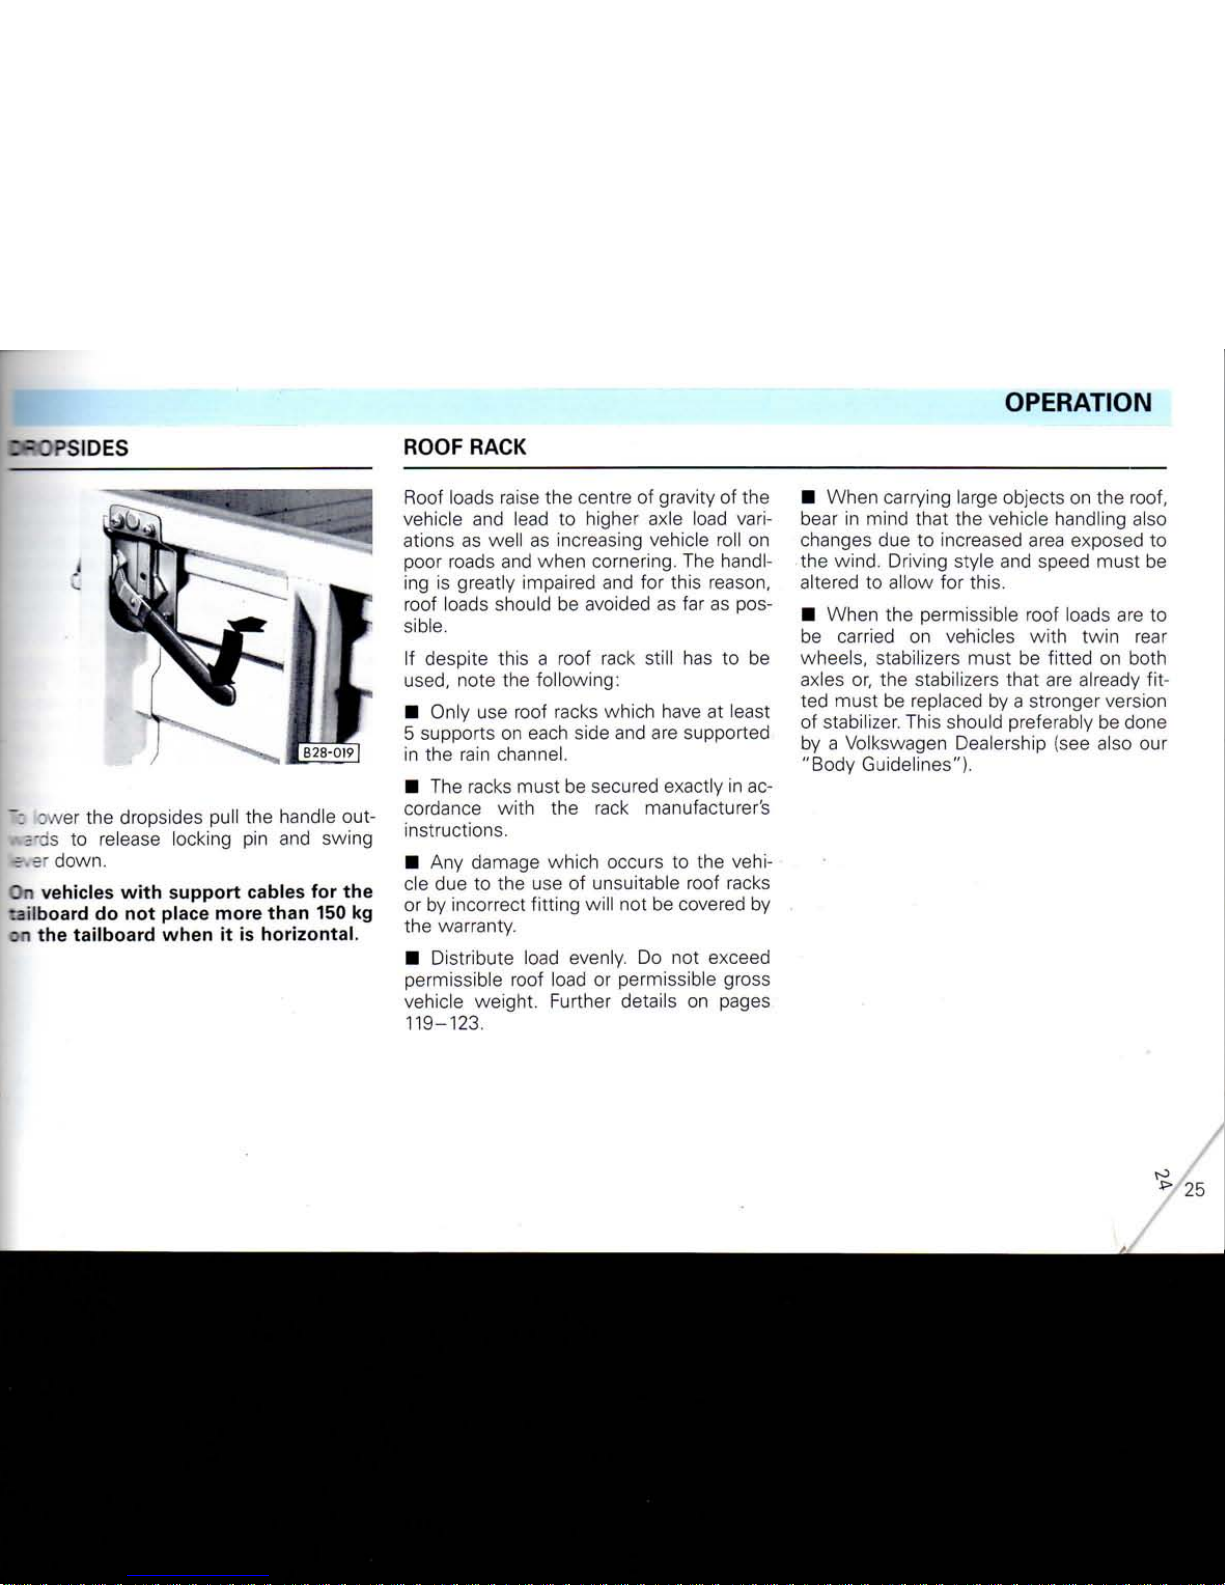
~:
Dwer
the
dropsides
pull the
handle
out-
a'ds to
release
locking
pin and
swing
r
~-
down.
vehicles
with
support
cables
for the
tailboard
do not
place
more
than
150 kg
Mi the
tailboard
when
it is
horizontal.
Roof
loads raise the centre of
gravity
of the
vehicle and lead to higher axle load variations as well as increasing vehicle
roll
on
poor roads and when cornering. The handling is greatly impaired and for
this
reason,
roof
loads should be avoided as far as pos-
sible.
If despite
this a roof
rack
still
has to be
used,
note
the following:
•
Only use
roof
racks which have at least
5
supports on each side and are supported
in the rain channel.
•
The racks must be secured exactly in ac-
cordance
with
the rack manufacturer's
instructions.
•
Any damage which occurs to the vehi-
cle due to the use of unsuitable
roof
racks
or by incorrect
fitting
will
not be covered by
the
warranty.
•
Distribute load evenly. Do not exceed
permissible
roof
load or permissible gross
vehicle
weight.
Further details on pages
119-123.
•
When carrying large objects on the
roof,
bear in mind
that
the vehicle handling also
changes due to increased area exposed to
the wind. Driving style and speed must be
altered to allow for this.
•
When the permissible
roof
loads are to
be carried on vehicles
with
twin
rear
wheels, stabilizers must be
fitted
on
both
axles
or, the stabilizers
that
are already
fitted must be replaced by a stronger version
of stabilizer. This should preferably be done
by a Volkswagen Dealership (see also our
"Body
Guidelines").
/
www.WestfaliaLT.info - a useful website for owners and enthusiasts of VW Westfalia LT Campervans
OPERATION
PEDALS
BRAKES
The movement of the. pedals must not be
restricted. For this reason, do not put articles
in the footwell which could roll or slide
underneath the pedals.
Around the pedal area there should also be
no
foot
mats or other additional floor cover-
ing materials:
• In the
case
of defects on the brake
system, a greater pedal travel may be necessary.
• It should always be possible to depress
the clutch and accelerator pedals fully.
• All pedals must be able to return, unhin-
dered,
to their rest positions.
For
these reasons therefore, the only
foot
mats which may be
used,
are those which
leave
the pedal area completely free, and
which are prevented from slipping.
The following points are important for the
satisfactory operation of the brakes.
• New brake linings must also be run in
and do not have the optimum friction properties during the
first
200 km. The slightly
reduced braking effect can be compen-
sated for by slightly more pressure on the
brake pedal. This also applies when new
linings have been fitted.
• If the brake pedal travel increases
sud-
denly, it may be
that
one of the two brake
circuits has failed. You can still drive on to
the next Volkswagen Dealership but be pre-
pared to use more pressure on the pedal
and allow for longer braking distances on
the way.
• The brake fluid level must be checked
regularly - see page 71.
A
low brake fluid level will be indicated by
the brake warning lamp * lighting up (see
page 28 also).
• Brake lining wear depends to a large ex-
tent
on the operating conditions and style
of driving. On vehicles which are used
mainly in town
traffic
and stop/start conditions or are driven hard it may be necessary
to have the thickness of the brake linings
checked
in a V.A.G Dealership in between
the intervals given in the Service Schedule.
• When driving downhill change down in
good time to make use of the braking effect of engine. This relieves strain on the
brake system. When brakes are applied do
not keep them on continuously, apply and
release
alternately.
• In certain operating conditions, such as
for example, after driving through water,
after heavy rain or after washing the vehicle,
the braking effect may be retarded by
wet, or in winter iced up brake discs and
pads.
The brakes must be dried
first
by ap-
plying the footbrake.
The
full
braking force may also be retarded
when vehicle has been driven for some
time on heavily salted roads
without
using
the brakes, because the layer of salt on
discs
and pads has to be removed
first.
Brake
servo
Attention
The servo is
operated
by
vacuum
which
is
only
created
when
engine
is
running.
For
this
reason
the
vehicle
should not
be
allowed
to
roll
with
the
engine
switched
off.
22
www.WestfaliaLT.info - a useful website for owners and enthusiasts of VW Westfalia LT Campervans
MANUAL GEARBOX
OPERATION
•-en the
brake
servo
is not
working
7:
.=
jse, for
example,
the
vehicle
is
- g
towed,
or
because a defect
has
::: J
rred
on the
brake
servo, the
brake
: e;el
must
be pressed
considerably
-3'der
to
compensate
for the
absence
: •
servo
assistance.
- z ndbrake
~~e nandbrake is located next to the driv-
er's
seat.
~: Eoply the handbrake, pull lever up
firmly.
".' ' ily roads the 1st gear should also be
r":5ged.
The handbrake should always be
-:: ed so
firmly
that
it is not possible to
:~ .3 off accidentally
with
handbrake
: gntly on.
"en handbrake is applied
with
the igni-
on,
the brake warning lamp * comes
m 'elease handbrake, pull lever up slightly,
:~ess
locking knob in and push lever
right
cown.
3^
^ 4^
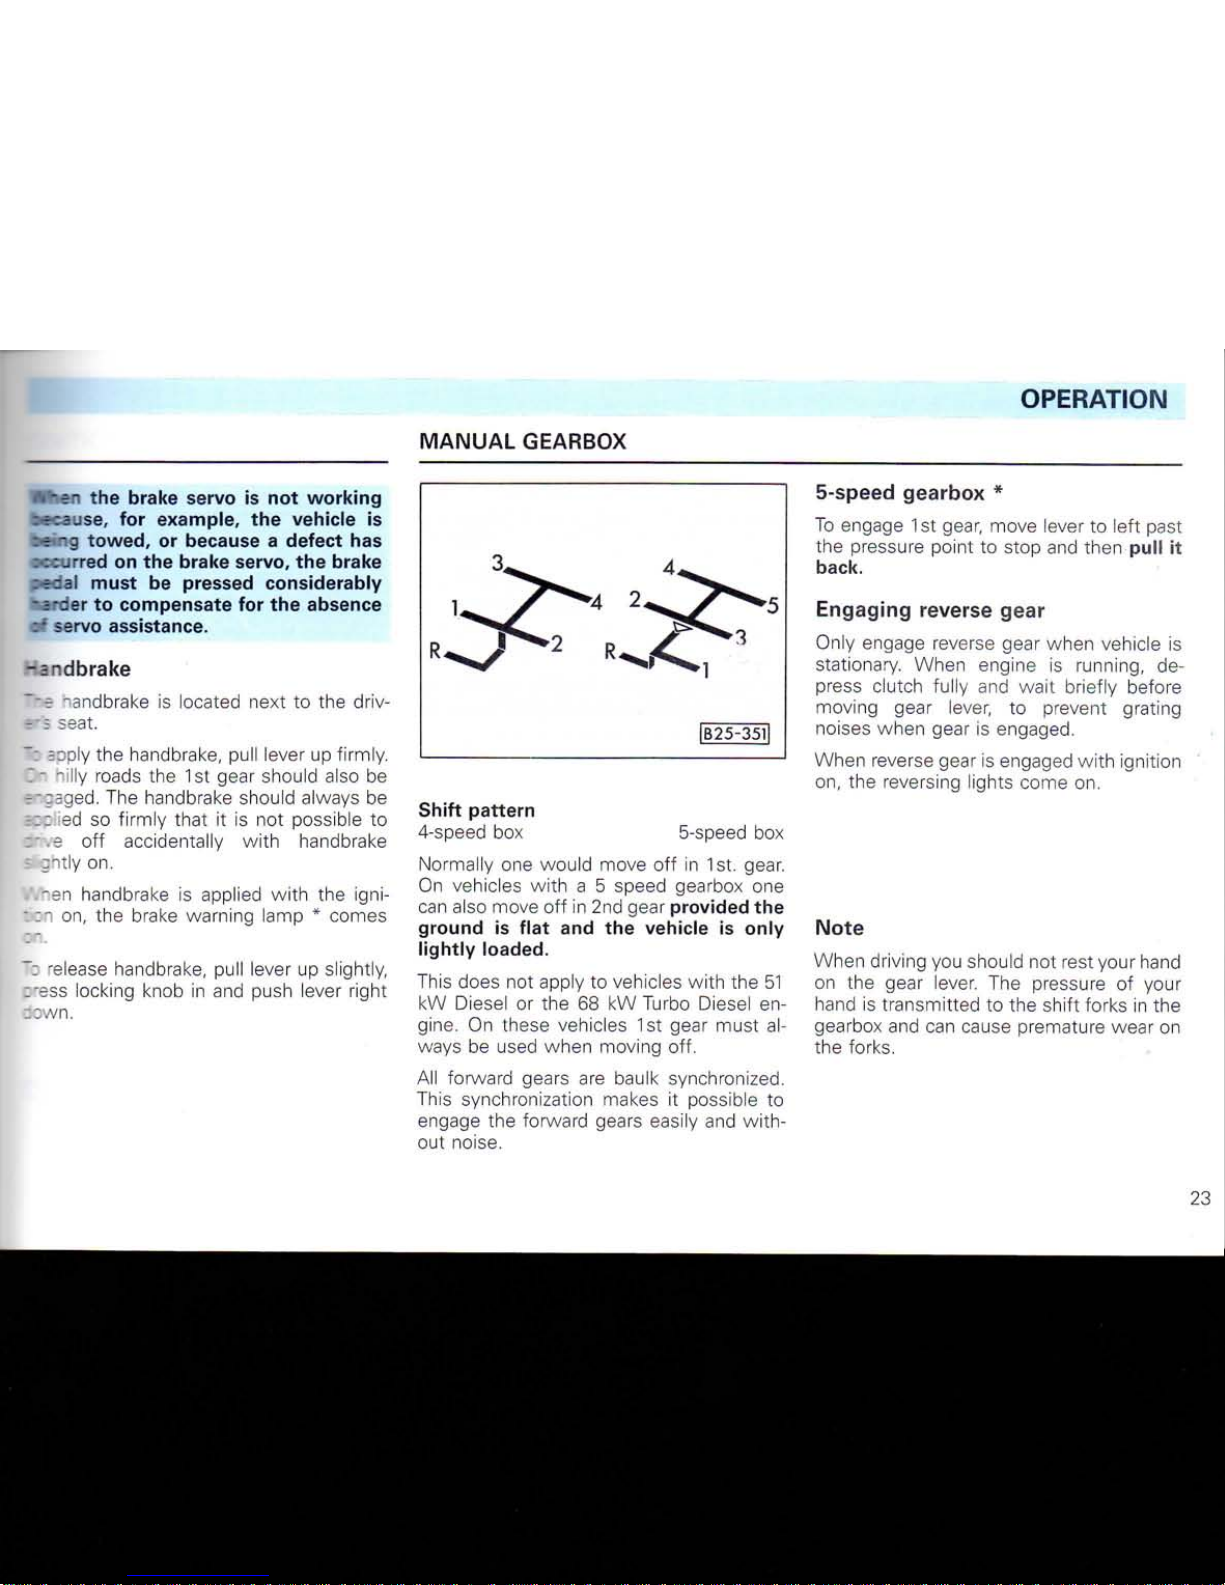
|B25-35l|
Shift
pattern
4-speed
box 5-speed box
Normally one would move off in 1st. gear.
On
vehicles
with
a 5 speed gearbox one
can
also move off in 2nd gear
provided
the
ground
is
flat
and the
vehicle
is
only
lightly
loaded.
This does not apply to vehicles
with
the 51
kW
Diese!
or the 68 kW Turbo Diesel engine. On these vehicles 1st gear must always be used when moving off.
All
forward gears are baulk synchronized.
This synchronization makes it possible to
engage the forward gears easily and without noise.
5-speed
gearbox
*
To engage 1st gear, move lever to
left
past
the pressure
point
to stop and then
pull
it
back.
Engaging
reverse
gear
Oniy engage reverse gear when vehicle is
stationary. When engine is running, depress
clutch
fully
and
wait
briefly before
moving gear lever, to prevent grating
noises
when gear is engaged.
When reverse gear is engaged
with
ignition
on,
the reversing lights come on.
Note
When driving you should not rest your hand
on the gear lever. The pressure of your
hand is transmitted to the
shift
forks in the
gearbox and can cause premature wear on
the forks.
23
www.WestfaliaLT.info - a useful website for owners and enthusiasts of VW Westfalia LT Campervans
OPERATION
POWER TAKE-OFF ON GEARBOX *
The PTO can be used to drive auxiliary units
from the gearbox.
Note operating instructions from the
equipment manufacturer.
Depending on the conditions, the running
time or the power transmitted must be restricted.
The lever for the PTO is behind the gear
lever.
The speed of the PTO flange can be regu-
lated with a hand throttle (on panel near
clutch pedal).
Slow (idle) - Lever vertical
Fast - Lever to rear
The PTO must only be engaged and dis-
engaged with vehicle stationary. Depress clutch first and wait about 6 seconds.
The PTO can be used when vehicle is mov-
ing but then the gears in the gearbox must
not be shifted, to avoid excessive strain on
the synchromesh units.
To engage PTO - Depress clutch, move
lever forward
To disengage - Depress clutch, move
lever back
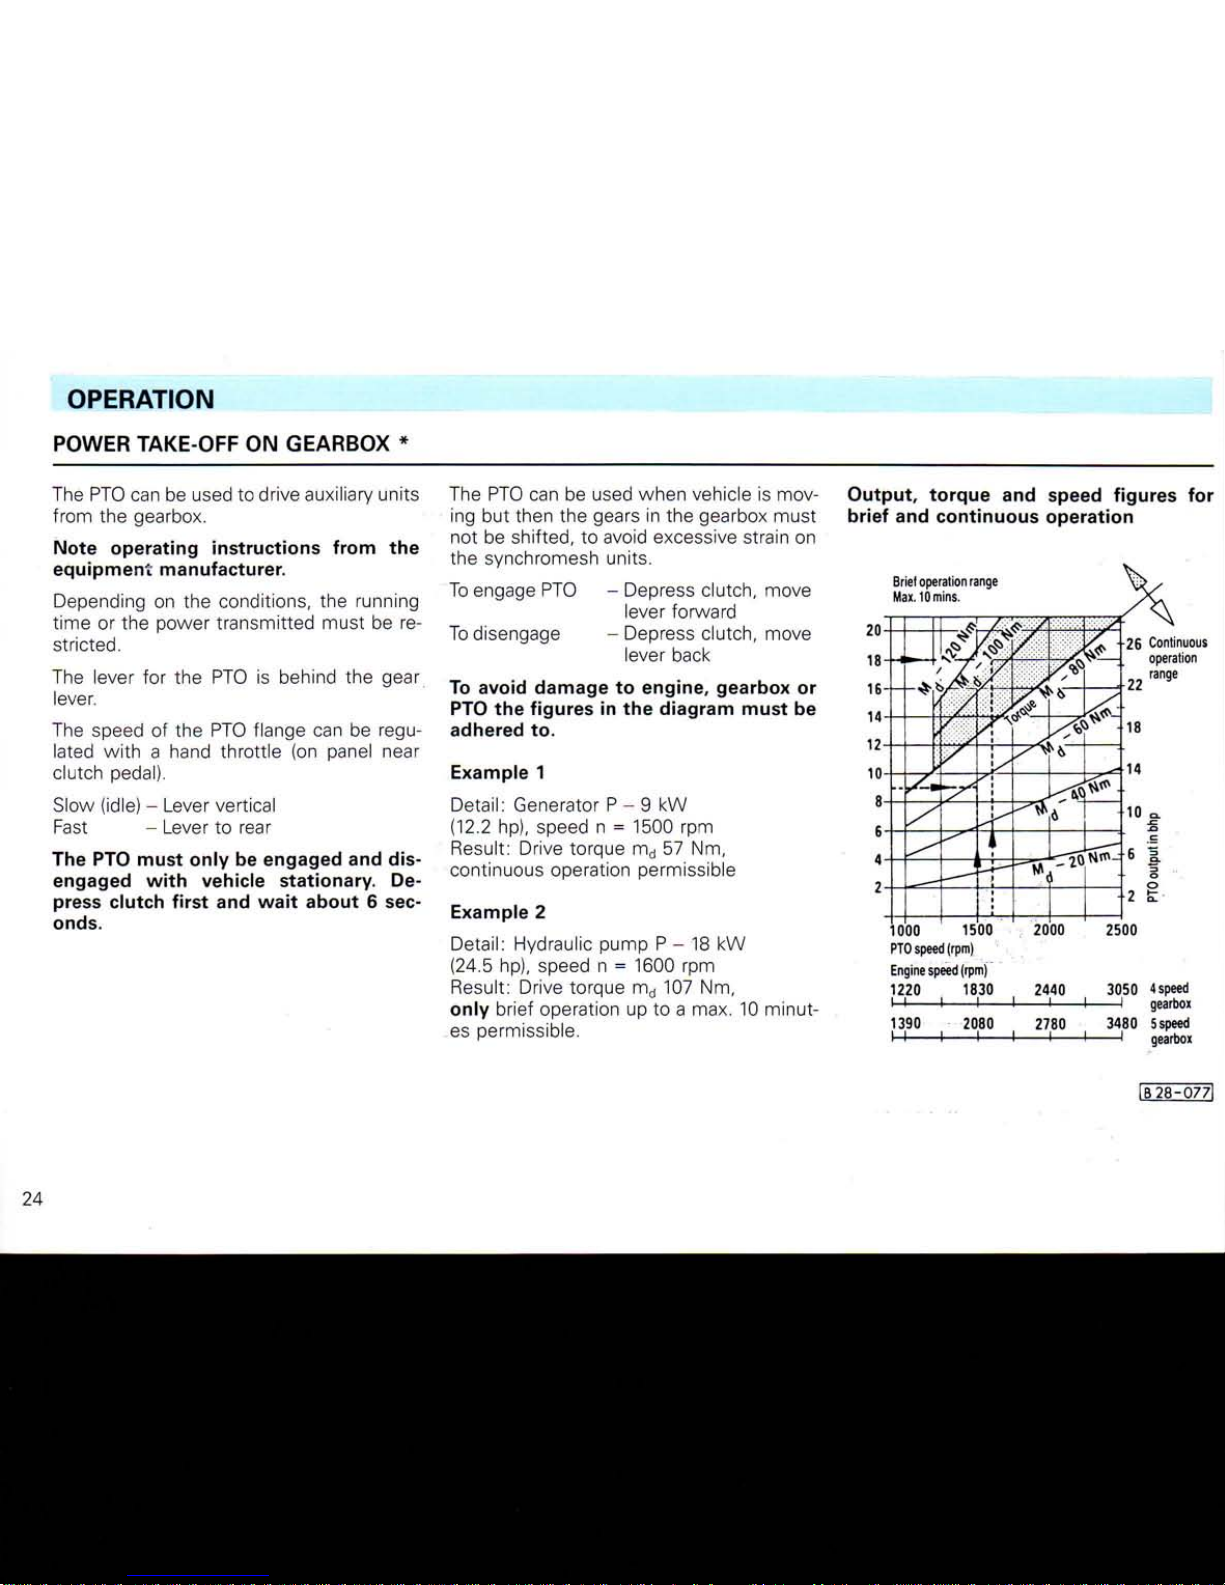
To avoid damage to engine, gearbox or
PTO the figures in the diagram must be
adhered to.
Example 1
Detail:
Generator P - 9 kW
(12.2 hp), speed n = 1500 rpm
Result: Drive torque md 57 Nm,
continuous operation permissible
Example 2
Detail:
Hydraulic pump P - 18 kW
(24.5 hp), speed n = 1600 rpm
Result: Drive torque md 107 Nm,
only brief operation up to a max. 10 minutes permissible.
Output, torque and speed figures for
brief and continuous operation
Brief operation range
Max. 10mins.
26 Continuous
operation
range
1000 1500 ; 2000
PTO speed (rpm)
Engine speed (rpm)
1220 1830 2440
-4-
1—4-
-4- -4-
2500
3050 4speed
—I gearbox
1390
-4-
2080
2780
3480 5 speed
—1 gearbox
IB 28-0771
24
www.WestfaliaLT.info - a useful website for owners and enthusiasts of VW Westfalia LT Campervans

OPERATION
3*JITION
SWITCH
Petrol engines
1 -
Ignition
off - Steering can be lock-
ed
*.
2 -
Ignition
on
3 - Starting engine
Diesel engines
1 - Fuel supply cut off - Steering can
be locked *.
2- Glow and drive position
While
the
glow
plugs
are
on,
no
other
heavy current consumers should
be
switched
on -
avoids draining battery
unnecessarily.
3 - Starting engine
All
vehicles:
Position 1:
To lock
the
steering
wheel,
withdraw
key
and turn wheel until you hear the pin
* en-
gage.
Attention
Do not withdraw the key from the lock
until the vehicle is stationary. The
steering lock could otherwise engage
unintentionally.
Position 2:
If the key is
difficult
to
turn
in the
lock
or
cannot
be
turned
to
this position
at
all,
the
steering wheel must
be
rocked
to
and
fro
slightly
to
release
the
locking
pin *.
Position 3:
In
this position
the
headlights
and
other
heavy current consumers are switched
off.
Before
the
starter
can be
operated
again
the key must be turned
back
to position
1.
The non-repeat lock
in the
ignition switch
prevents
the
starter from being operated
when engine
is
running
as
this could dam-
age
the
starter.
25
www.WestfaliaLT.info - a useful website for owners and enthusiasts of VW Westfalia LT Campervans
OPERATION
STARTING THE ENGINE
General
notes
Attention
•
When
running
the
engine
in a con-
fined
space
there
is a
danger
of poi-
soning.
• Before starting the engine, check
that
the gear lever is in neutral and apply the
handbrake firmly.
• Depress the clutch pedal when starting,
so
that
the starter only has to
turn
the en-
gine.
• As soon as the engine starts, release
the ignition key, so
that
the starter can dis-
engage.
• After starting a cold engine it may sound
noisy
for a few moments because the oil
pressure
has to build up in the hydraulic
tappets *
first.
This is normal and no cause
for alarm.
Do not
warm
engine
up by
running
it
with
vehicle
stationary.
Drive
off
straight
away.
• Do not overrev or use
full
throttle
until
the engine has reached the normal operating temperature.
• The
engine
must
not be
started
when
catalytic
converter
* is at
operating
tem-
perature,
by
towing
the
vehicle
a long
distance,
otherwise
unburnt
fuel
can
enter
the
catalytic
converter
and be
burned
there.
This can cause
overheat-
ing of the
catalytic
converter.
Fuel
injection
engine
This
engine is
fitted
with
a fuel injection
system
which automatically supplies the
correct fuel/air mixture for all operating
conditions. The starting procedure described
here is applicable regardless of ambient or
engine temperature.
• Do not depress the
accelerator
pedal
before operating the starter, or during the
staring process.
If the engine does not start at once, stop
using
the starter after 10 seconds, wait
about half a minute and then try again.
If the engine still does not start, the fuse
for the electrical fuel pump may have
blown - see pages 89 and 90.
• When the engine is very hot, it may be
necessary
to open the
throttle
slightly once
the engine has started.
Carburetor
engine
Starting
a cold
engine
The
carburetor is
fitted
with
an automatic
choke
which is actuated the
first
time the
accelerator
pedal is depressed, when en-
gine is cold.
• Depress accelerator pedal slowly once
(twice when it is freezing) and then release
it.
• If the engine does not start at once,
stop using the starter after 10 seconds,
wait about half a minute and then try again.
• The increase in the idling speed which
takes
place as engine starts to warm up
can
be reduced by tapping the accelerator
pedal.
Starting a warm
or hot
engine
• Depress pedal slowly
while
operating
starter and hold it in the
full
throttle
position
- do not pump the pedal!
In unfavourable circumstances, starting
may take up to 9 seconds.
•
Release
the pedal as soon as the engine
starts.
www.WestfaliaLT.info - a useful website for owners and enthusiasts of VW Westfalia LT Campervans
OPERATION
STOPPING ENGINE
T esel engines
1 r.v plug system
engine is
fitted
with
glow plugs. The
zr~e :he plugs are on is indicated by a lamp
;h is controlled by the coolant tempera-
•-••5
- see
page
29.
Cold
starting
aid
~: "acilitate starting from
cold,
there is a
:: ; starting device in the injection pump.
~- 5 cold starting aid is actuated when the
-:; on the
left
of the dash under the light
switch is pulled out
fully.
Starting
a cold
engine
• At ambient temperatures down to - 15°
C,
pull the cold start knob out fully before
::erating the starter.
-: ower temperatures, the knob should
be
pulled out
until
engine
is
firing
evenly
- the engine will then start more
Bodily.
• Turn ignition key to position 2 (see page
lz the glow plug lamp comes on. It goes
: „t when the ignition temperature is reachec
(see page 29).
To avoid
draining
battery
unnecessarily,
do not
switch
any
other
heavy
current
consumers on
while
glow
plugs are on.
• As soon as lamp goes out, start engine.
Do
not depress accelerator when operating
the starter.
If engine only fires irregularly, continue to
operate starter a few seconds longer (30
seconds
at maximum) until engine runs
under its own power.
If engine does not start, switch glow plugs
on again and try starting it again as describ-
ed.
If the engine still does not start, the fuses
for the glow plug system may have blown see
page 90.
•
Push
the knob of cold starting aid in fully
as
soon as engine has reached normal
operating temperature.
Starting a warm
engine
The
glow plug warning lamp does not
come
on - the engine can be started
straight away. Do not pull cold starting aid
knob and do not depress accelerator pedal.
• Applicable to all engines:
When
vehicle
has
been
driven
hard
for a
while
do not
switch
engine
off as soon
as you stop. Let it
idle
for
about
2 min-
utes
to cool it
down
slightly.
• Applicable to
carburetor
engine:
When
the
engine
is hot the
carburetor
fan may
continue
to run for a
while
after
engine
has
been
switched
off or it may
switch
on suddenly -
even
when
igni-
tion
is off.
• Applicable to vehicles
with
catalytic
converter
*:
The
ignition
must
not be
switched
off as
long as the
vehicle
is
rolling
with a gear
engaged,
otherwise,
unburnt
fuel
can
enter
the
catalytic
converter
and be
burned
there.
This can cause
overheat-
ing of the
catalytic
converter.
www.WestfaliaLT.info - a useful website for owners and enthusiasts of VW Westfalia LT Campervans
OPERATION
WARNING
LAMPS
page
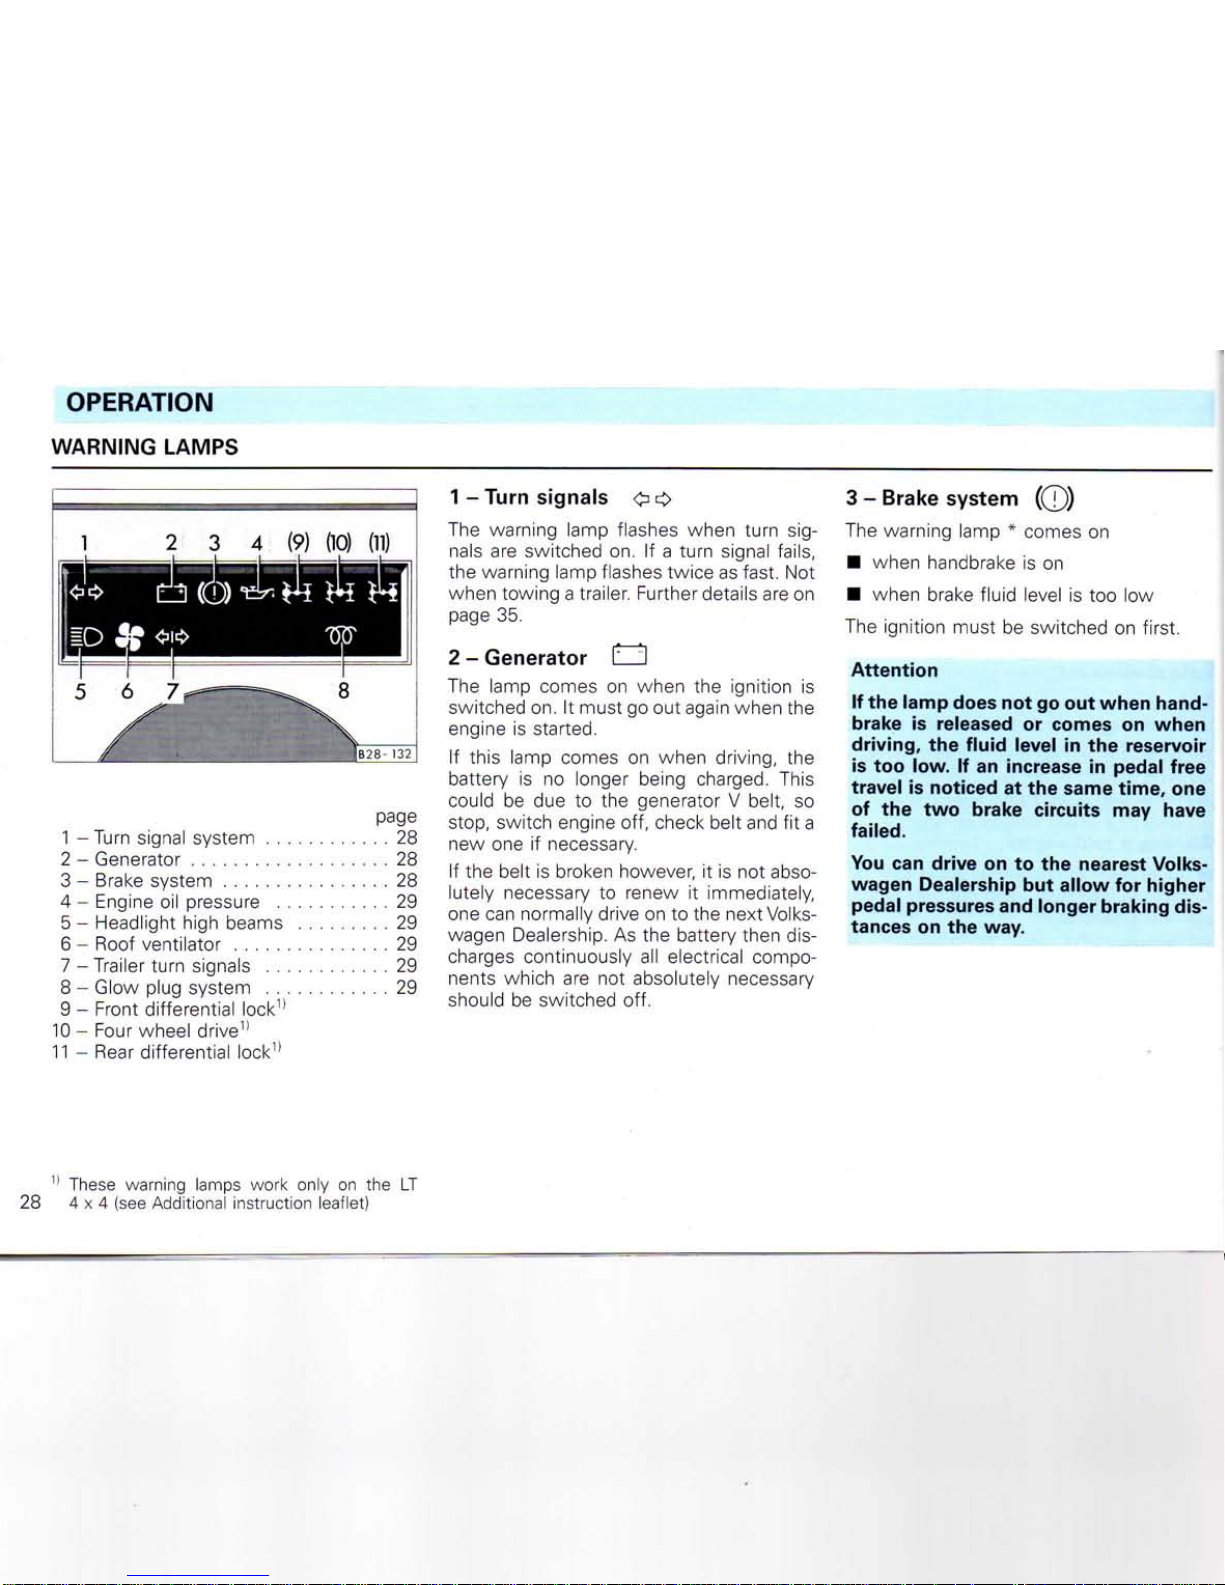
1 -
Turn signal system
28
2 - Generator
28
3 - Brake system
28
4 - Engine
oil
pressure
29
5 - Headlight high beams
29
6 - Roof ventilator
29
7 - Trailer
turn
signals
29
8 - Glow plug system
29
9 - Front differential lock1'
10 - Four wheel drive11
11 - Rear
differential lock1'
1 -
Turn
signals
<?
c>
The
warning lamp flashes when
turn
sig-
nals
are
switched
on. If a
turn
signal fails,
the warning lamp flashes twice as fast.
Not
when towing a trailer. Further details are
on
page
35.
2 - Generator
I I
The
lamp comes
on
when
the
ignition
is
switched on.
It
must
go out
again when
the
engine
is
started.
If
this lamp comes
on
when driving,
the
battery
is no
longer being charged. This
could
be due to the
generator V belt,
so
stop,
switch engine
off,
check belt and
fit a
new one
if
necessary.
If the
belt
is
broken however,
it is not
abso-
lutely necessary
to
renew
it
immediately,
one
can normally drive
on to the
next
Volks-
wagen Dealership.
As the
battery then dis-
charges
continuously
all
electrical compo-
nents which
are not
absolutely necessary
should
be
switched
off.
3 - Brake
system
(©)
The
warning lamp * comes
on
• when handbrake
is on
• when brake fluid level
is too low
The
ignition must
be
switched
on
first.
Attention
If the lamp does not go out when hand-
brake is released or comes on when
driving,
the fluid level in the reservoir
is
too low. If an increase in pedal
free
travel
is noticed at the same time, one
of
the two brake circuits may have
failed.
You
can drive on to the nearest
Volkswagen Dealership but allow for higher
pedal
pressures
and longer braking
dis-
tances
on the way.
11 These warning lamps work only
on the LT
28
4 x 4
(see Additional instruction leaflet)
www.WestfaliaLT.info - a useful website for owners and enthusiasts of VW Westfalia LT Campervans
OPERATION
•i - Engine oil pressure tt^
.varning lamp flashes when ignition is
j.'.
:ched on. The lamp must go out when
-_: "8 has started.
- :-e lamp does not go out, or flashes, or
::~es
on when driving, a buzzer also
=c~ds at engine speeds above 2000 rpm
- stop,
switch
engine
off, check oil level
r"
add oil if necessary - see page 62.
" :_5 lamp flashes although the oil level is
" "der, do not
drive
on. Do not even run
"e
engine at idling speed - call in expert
iss
stance.
\;.tes
~ne oil pressure
warning
lamp
is not an
:il
level
indicator.
The oil
level
should
therefore
be checked at
regular
inter-
nals,
preferably
every
time
the
fuel
tank
is
filled.
I _e to the way it is wired the brake warn-
•g amp * also comes on when the oil pres-
ide warning lamp lights up.
5 -
High
beams
ID
~~e warning lamp comes on when high
:eams
are on or headlight flasher is
used.
6 - Roof
ventilator
J£
see
page 34
7 -
Trailer
turn
signals
<^ic>
The
warning lamp * flashes when
turn
sig-
nals
are switched on when towing a trailer.
If a
turn
signal fails on trailer or vehicle, the
warning lamp does not flash.
Further details on page 46.
8-Glow
plugs '(ftp
(Diesel
engines only)
When
engine is cold the warning lamp
comes
on when key is turned to Drive po-
sition (ignition on).
If the warning lamp flashes or does not
come
on, there may be a defect in the glow
plug system - call in expert assistance.
When
the lamp goes out, start engine im-
mediately - see page 27.
When
engine is
warm
the glow plug lamp
does
not come on - the engine can be
started straight away.
In large round instrument on
right:
t - Coolant
temperature/
Coolant
level
The
lamp in the coolant temperature gauge
(see
page 31) flashes for a few seconds as
a
functional check when ignition is switch-
ed
on. If the lamp does not go out afterwards or flashes when driving, either the
coolant the temperature is too high or the
coolant level is too low.
Stop,
switch
engine
off and check level.
Add
coolant if necessary.
Attention
• Be
careful
when
opening the cool-
ant expansion
tank.
When
the
engine
is hot the cooling sys-
tem is
under
pressure -
Danger
of
scalding! Let
engine
cool
down
there-
fore
before
unscrewing
the cap.
For
further details see page 70.
If the lamp does not go out although the
coolant level is correct, do not
drive
on -
call
in expert assistance.
29
www.WestfaliaLT.info - a useful website for owners and enthusiasts of VW Westfalia LT Campervans
 Loading...