

Page 1
www.westfaliaLT.info - a useful site for enthusiasts and owners of VW Westfalia LT campers
Translated into English by www.westfaliaLT.info – a useful website for VW Westfalia LT Camper enthusiasts.
Page 2

Contents
www.westfaliaLT.info - a useful site for enthusiasts and owners of VW Westfalia LT campers
1. Operation
1.1. Heating / Clock Timer
1.2. LPG Equipment
1.3. Gas Cooker
1.4. Water Supply / Warm Water Boiler
1.5. Display Unit
1.6. Fridge
1.7. Electrics / Battery Charger / Safety Cut Out / Wiring
Diagram
1.8. Opening Window
1.9. Seat Group
1.10. Furniture Locks
1.11. Information for Use in Winter
2. Care And Maintenance
2.1. Fridge
2.2. Heating
2.3. Gas Cooker
2.4. Windows
2.5. Furniture
2.6. Upholstery / Curtains / Carpet
2.7. Shower unit
2.8. Exterior Decals
2.9. Joints & Hinges
2.10. Second Battery (Leisure Battery)
2.11. Gas Tank
3. Troubleshooting
3.1. Water pump
3.2. Battery Charger
3.3. Warm Water Boiler
3.4. Fri dge
3.5. Heating
3.6. Fuses
4. General Instructions
4.1. Papers
4.2. Vehicle Preparation
4.3. Equipment
4.4. Loading & Tyre Pressure
4.5. Before a Journey
4.6. Staying in the city with the camper van
4.7. Behaviour in a thunderstorm
5. Appendix
5.1. Installation Position of the Speakers
Translated into English by www.westfaliaLT.info – a useful website for VW Westfalia LT Camper enthusiasts.
Page 3

Introduction
www.westfaliaLT.info - a useful site for enthusiasts and owners of VW Westfalia LT campers
These instructions contain important information about the
internal features of your automobile. You should read prior to use,
so that you understand the equipment and can use it properly.
Knowledgeable use and care for the upkeep of the van is also
usually a pre-requisite for insurance claims. Further information
about insurance is available from your dealer.
The V.A.G Partners for VW Automobiles are available for the
service of your Westfalia Camper Van. They can provide
Westfalia replacement parts and repairs.
Please see your dealer for a detailed service, if required.
V.A.G firms are familiar with the Westfalia insurance terms
Equipment in the Westfalia Camper Van such as heating, fridge,
and gas cooker are looked after by authorised service departments
of the equipment manufacturers, in terms of repairs.
You can find further service points in your Westfalia pack. Further
information eg: about service levels abroad, can be requested from
the central customer service department of the Westfalia-Works
KG, 4840 Rheda -Wiedenbruck, Telephone 05242 / 152 19
Translated into English by www.westfaliaLT.info – a useful website for VW Westfalia LT Camper enthusiasts.
Page 4

1. Operation
www.westfaliaLT.info - a useful site for enthusiasts and owners of VW Westfalia LT campers
1.1. Heating / Timer
Heater
Your vehicle is equipped with a fuel heater, Eberspächer type B2L
or D2L. The heater works independently from the engine, but is
operated from the fuel tank. The fuel consumption in continuous
operation is about 0.3 l / h. In normal operation the fuel
consumption is lower. The on, off and temperature switch for the
heating are on the control panel.
When the heating is on the inlet and outlet vents must be kept
open and clear. The fan can also be used without heating to
circulate air throughout the vehicle and draw fresh air in.
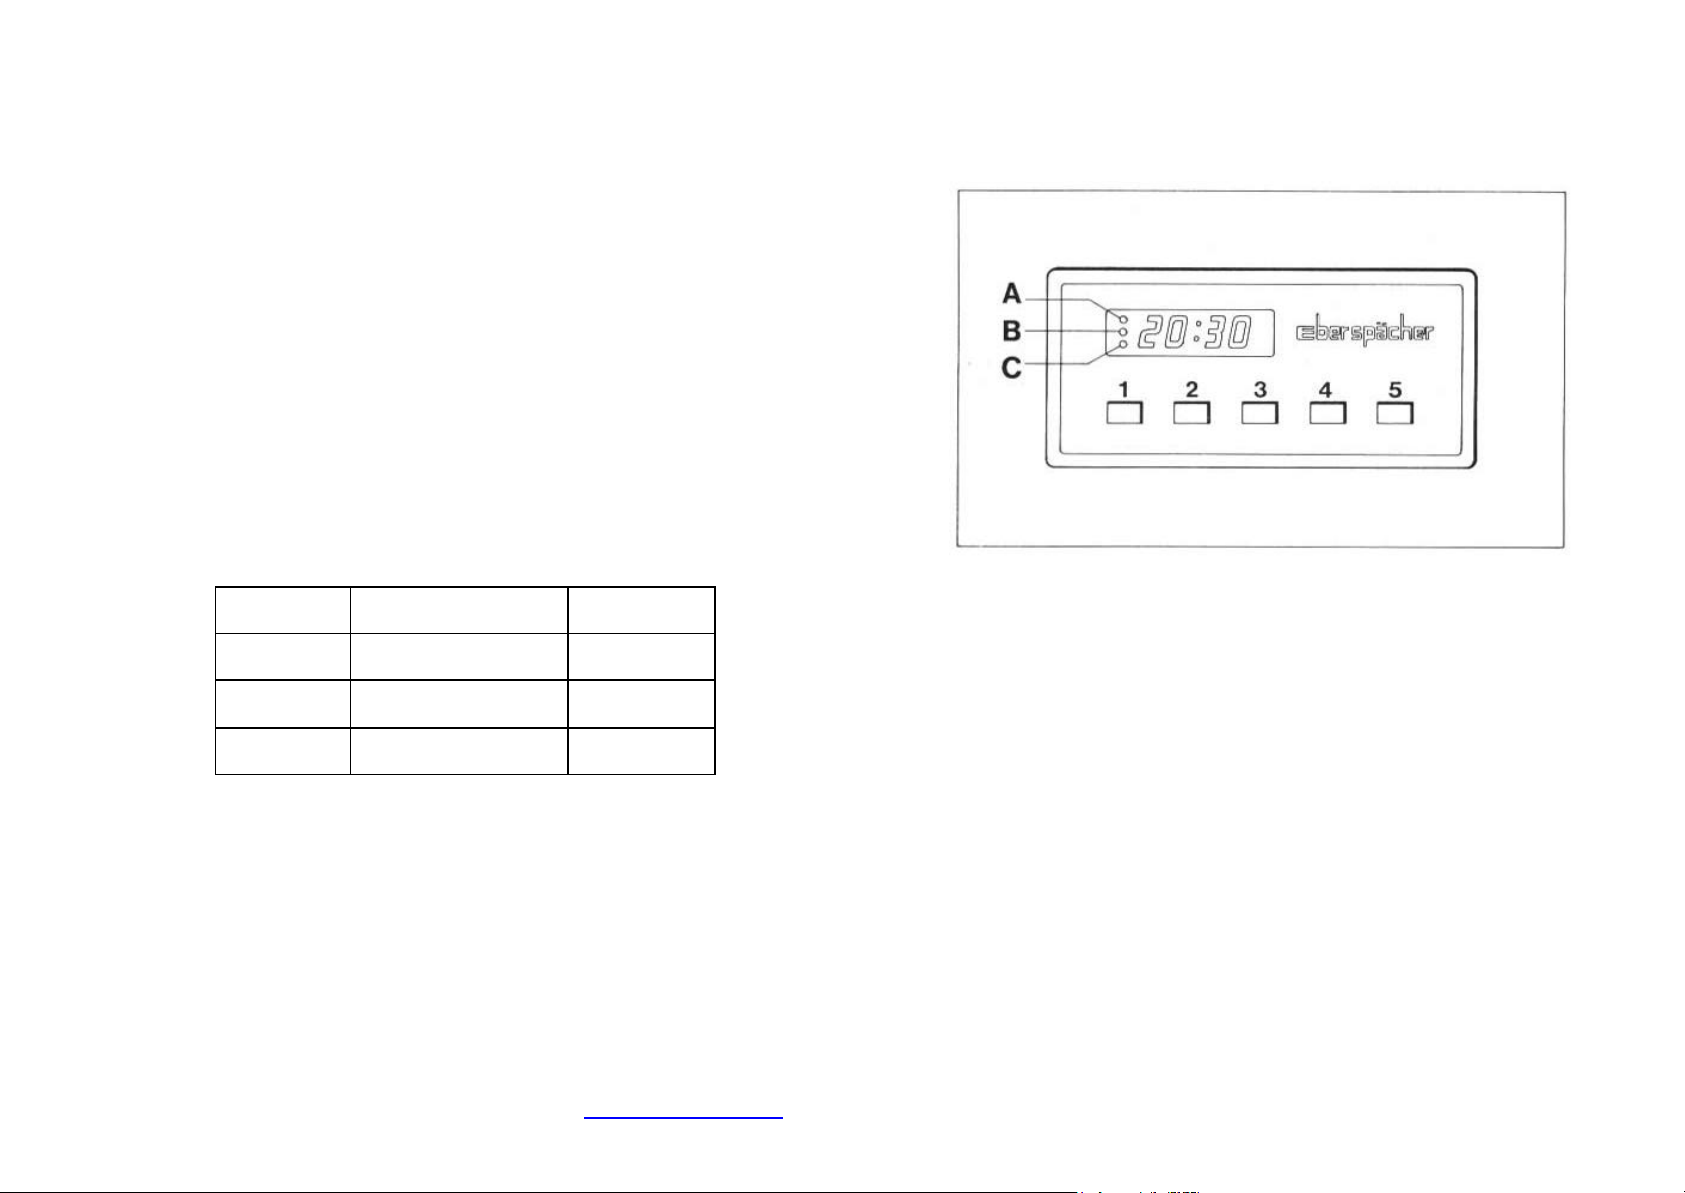
A = Dial (Temperature Control)
B = Red Control Light (Fault due to overheating)
C = Green ‘On’ Light
D = Switch – Heat / Air Conditioning – On/Off
Ventilation (with fresh air supply) :
To Switch On
Press switch (D) to the left. The green light (C) will turn on and
the fan will begin to work.
To Switch Off:
Turn switch (D) to the middle setting. The green light (C) will turn
off.
Heating (with fresh air supply):
To Switch On
- Turn dial (A) to Number 7
- Press Switch (D) to the right
- The green control light (C) will come on and the heating
As soon as the temperature reaches the desired level, turn the dial
(A) back until the green light (C) goes darker. Doing this will set
the desired temperature. The space between each number on the
dial (A) corresponds to about 5° Celsius.
To Switch Off:
Turn switch (D) to the middle setting. The green light (C) will turn
off. The fan will continue running until the heater has cooled
down, and will then switch off automatically.
Normal Operation of the B2L (petrol)
The fuel pump is switched off. The heater operates without heat
but at full fan speed for about 3 minutes, then with a reduced fan
speed until the fan goes off and a new cycle begins. Once the
will start
Translated into English by www.westfaliaLT.info – a useful website for VW Westfalia LT Camper enthusiasts.
Page 5
room temperature drops below the temperature set at the control
www.westfaliaLT.info - a useful site for enthusiasts and owners of VW Westfalia LT campers
panel, the thermostat switches on the fuel supply and the heater is
restarted. A built in heating coil switch ensures the coil remains
switched off in normal operation if the ignition sparks are sufficient
to form a flame.
Normal Operation of the D2L (Diesel)
The fuel quantity is reduced to approx 25%. This means that the
heating capacity also drops to approx 25% (600 watts). Once the
temperature drops below the room temperature set at the
thermostat, the thermostat switches the fuel quantity and thus the
heat capacity back up to 100%.
Warning !
You can avoid the fumes from the exhaust of the heating entering
the vehicle by closing the window on the left side of the vehicle.
Technical
Data
Rated
voltage
Max fuel
consumption
Power
consumption
Petrol (B2L) Diesel (D2L)
12v 12v
Approx. 0.32 l/h Approx. 0.27
l/h
Approx. 15W Approx. 15W
Clock Timer – Optional Equipment
It is not ne cessary to switch on the ignition before using the clock.
The display constantly shows the time.
To Set the Time
- Press button 1 and either button 4 or 5 at the same time
To Switch on Heating: (possible to be independent from the
previous choice)
- Press button 3, the possible heating time will appear in the
display in minutes
- Set the temperature with the thermostat on the control
panel.
To switch on the heating for long term use:
- Press buttons 1 & 3 at the same time
- The display will show 00
Translated into English by www.westfaliaLT.info – a useful website for VW Westfalia LT Camper enthusiasts.
Page 6

www.westfaliaLT.info - a useful site for enthusiasts and owners of VW Westfalia LT campers
To Switch off Heating:
- Press button 3
- The fan will continue to run until the unit has cooled, and
then will switch off automatically
The display allows you to choose 3 different times for the heating
to come on. After pressing button 2 once, twice or three times,
memories A, B, or C will be displayed.
You will reach the neutral position by pressing button 2 again. The
time will show and the memory will be saved.
Setting Pre-Set Times:
- Press button 2
- Memory lights up (either A, B, or C will light up)
- By pressing button 4 & 5, the desired pre-set time will be
saved in the memory of A, B or C.
To Erase Pre-Set Times:
(Heating switches on at a pre-set time)
- Press button 2.
- Memory lights up (A, B, or C)
- Pre-Set time appears on the display
- After 20 seconds, the actual time appears on the display.
1.2 LPG Equipment
LPG Equipment Description
The gas installation is built according to safety guidelines DVGW
G 607. The certificate issued by the factory is located in the
vehicle.
Every two years the gas system must have a repeat of the leak
and combustion test in accordance with paragraph 6.1 of the
technical rules for "gas appliances and fire places" within vehicles.
A leak test is also required in the case of repair of the gas pipeline
system. Only DVFG recognized technical experts may carry out
this test. There are about 1,000 test centres in the Federal
Republic of Germany. You can find test centres in your area by
contacting the Association for LPG DVFG - 6242 in Kronberg /
Taunus, Minnholz 2, phone 06173/4077. You will also receive
relevant information from the company Westfalia Phone (05 242)
15/219. All gas appliances have built-in safety ignition,. That is if
the flame goes out the gas supply is cut by the automatic safety
mechanism. It is not allowed to make changes to the gas
installation and gas appliances.
Gas Tank with Filling Stop Valve
The LPG tank can be found on the right side of the vehicle, under
the body of the vehicle, and can be identified by its red colour.
Only fill the tank with DIN 51621 propane fuel from licensed
petrol stations at home and abroad.
Your vehicle documents include a list of filling stations. Please
note in the directory are hints for travelling abroad. The necessary
adapter (extra piece) for filling the gas tank abroad is available
from your dealer as an accessory (Westfalia Order No. 523 266).
So you always have an updated list of filling stations in Europe we
recommend you request when needed the latest gas filling station
directory from ADAC Headquart ers, Munich 70, Baumgartner Str
53,
Translated into English by www.westfaliaLT.info – a useful website for VW Westfalia LT Camper enthusiasts.
Page 7

An examination of the gas tank must be conducted every 10
www.westfaliaLT.info - a useful site for enthusiasts and owners of VW Westfalia LT campers
years. The certificate accompanying a vehicle for the initial testing
of the gas tank should be kept safe. At eventual resale of the
vehicle please hand over the certificate with the operating
instructions to the buyer
This amount corresponds to 80% on the display.
Determination of how much gas is in the tank
Using the figure on the display you can determine how many
kg and litres are in the tank.
A = Regulator C = Main Valve E = Level Indicator
B = Ice – Ex D= Safety Relief Valve F = Fill Up Point
To Fill the Tank
- Open up the fill up point (F)
- Put in LPG nozzle and fill up tank
There is an automatic filling stop valve that will prevent any more
LPG going into the tank, once it is 80 % full.
The tank’s level indicator display (E), which is behind the
lockable cover shows values in percentages.
Determining the amount of LPG in the tank
With the diagram below, you can determine the volume of
LPG in kilograms and litres from the displayed percentage,
The maximum capacity is 9 kg = 18 litres of LPG.
Gas Consumption
Refrigerator Gas 5-15g per hour
Cooker approximately 150 g / hour
Warm Water Boiler during the heating phase 120g / hour
Regulator with 3 Way Valve
Translated into English by www.westfaliaLT.info – a useful website for VW Westfalia LT Camper enthusiasts.
Page 8

The pressure regulator reduces the container pressure to 50 Mbar which is
www.westfaliaLT.info - a useful site for enthusiasts and owners of VW Westfalia LT campers
the pressure needed for the attached equipment.
A gas bottle or an external gas source can be joined on to the quick release
connector (A). Before you do this, you should take off the protective cover
(B).
The leak testing of the LPG system can be carried out via the quick release
connector (A), but this should be observed using setting 3.
Settings For The Valves C & D
Setting 1:
Delivers LPG from the LPG tank to the equipment which uses LPG in the
vehicle.
Setting 2:
Delivers LPG from the LPG tank to the equipment which use gas outside
of the vehicle - at the same time delivers gas where needed inside the
vehicle.
Setting 3:
Emergency lead for an external LPG tank / gas bottle.
Test connection for leak testing.
Setting 4:
No LPG delivery
Warning !
- The position of the quick release connector (A) must not be
changed
- Note the position of the valves C & D
Ice -Ex De-Icer
The Ice-ex De-Icer protects the LPG flow pipe from freezing. At external
temperatures of +5° Celsius or less, you should switch on the Ice-Ex DeIcer, from the display unit, about 15 minutes before using equipment that
uses LPG. The green control light will be illuminated. At temperatures
over +5° Celsius switch the Eis -Ex off.
The Eis -Ex has a power consumption of 4 Watts.
Gas Valves
Translated into English by www.westfaliaLT.info – a useful website for VW Westfalia LT Camper enthusiasts.
Page 9
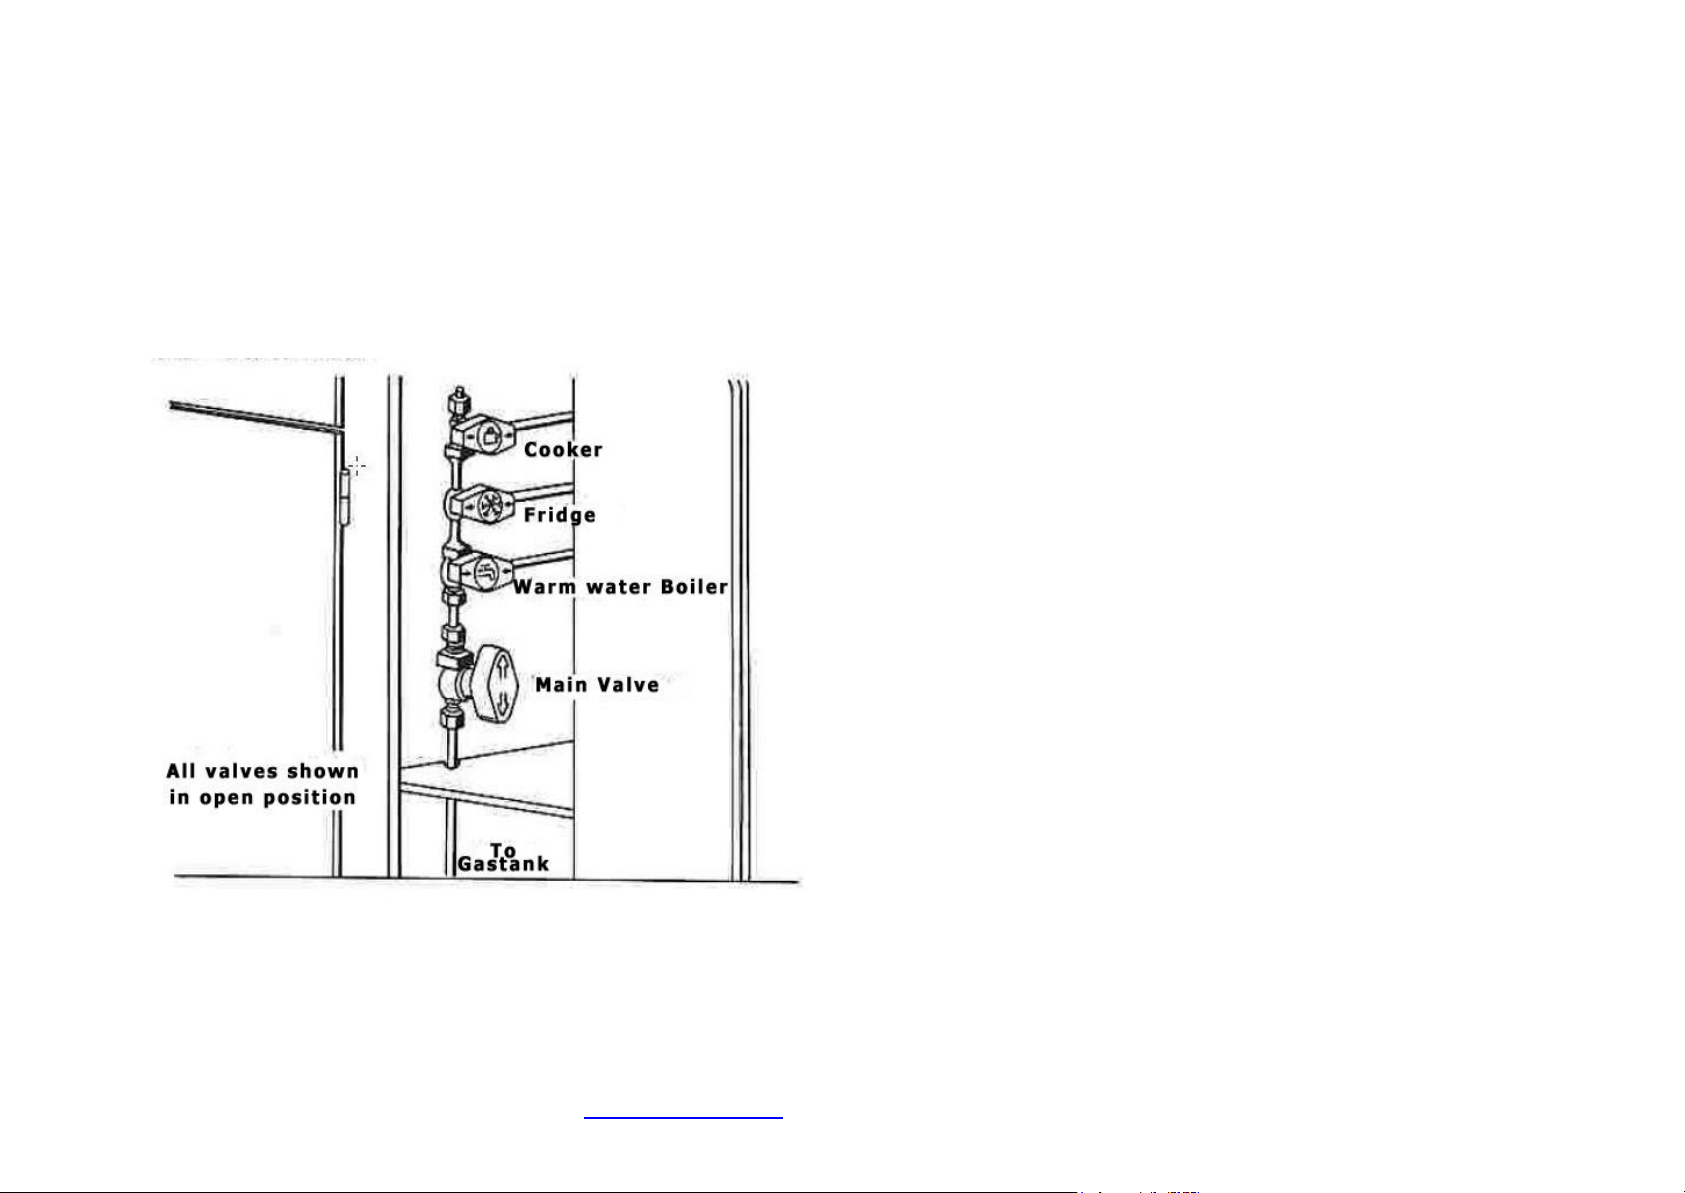
The equipment that uses LPG is ready for use when the main valve, which
www.westfaliaLT.info - a useful site for enthusiasts and owners of VW Westfalia LT campers
is attached to the LPG tank, the main valve in the kitchen cupboard, and
the valve which connects to the warm water boiler, fridge or cooker are all
open.
Close the main valve (yello w knob in the kitchen cupboard) first if there is
a problem with the LPG system. Next, close the main valve (C) adjoining
the LPG tank.
.
1.3 Gas Cooker
To Switch On:
Open the valves in the cupboard, press the cooker knob in, and turn to the
left. Light the gas with a match or lighter, continue to press in the cooker
knob for about 10 seconds (to ensure it remains lit). If the flame goes out
when you let go of the knob, repeat the process above for lighting, and
hold in the knob for a little longer.
To Turn Off:
Turn the cooker knob to 0, and close the valve in the kitchen cupboard.
Warning ! When using the cooker, do not close the air vents (roof vent,
windows etc ). Do not use open stove burners to provide heat.
1.4 Water Supply Equipment
In the rear seat bank there is a 90 litre (approx) freshwater tank. The filler
is located at the rear on the vehicle side and has a lockable filler cap. The
drain valve on the freshwater tank should be closed. In the water tank there
is an electric pump. By turning on the tap in either the kitchen or shower
room the water pump is switched on. The used water is collected in a 70
litre approx. waste water tank mounted under the vehicle. At high
temperatures and low water levels residues may form in the fresh water
tank and lines. It is therefore advisable to change the water more
frequently or to add commercial chemicals for filtration and sterilisation.
When vehicle is not being used for longer periods the entire water system
should be emptied.
Translated into English by www.westfaliaLT.info – a useful website for VW Westfalia LT Camper enthusiasts.
Page 10
1.4.1 Warm Water Boiler
www.westfaliaLT.info - a useful site for enthusiasts and owners of VW Westfalia LT campers
The warm water heater is installed in the roof and is powered by gas
(propane / butane). The water temperature is controlled and regulated by
an electronic ignition.
To avoid damage to the hot water heater only operate in the filled state.
After emptying the hot water system check that the safety valve has been
closed (the red lever switch (A) should not be in high position.)
1) To fill boiler, turn on a warm water tap. The pump switches on
and water comes from the tap. Turn off the warm water tap when
there are no more air bubbles in the water.
2) Open the valves (valve on gas tank, main valve in gas supply and
the quick closing valve for the hot water boiler).
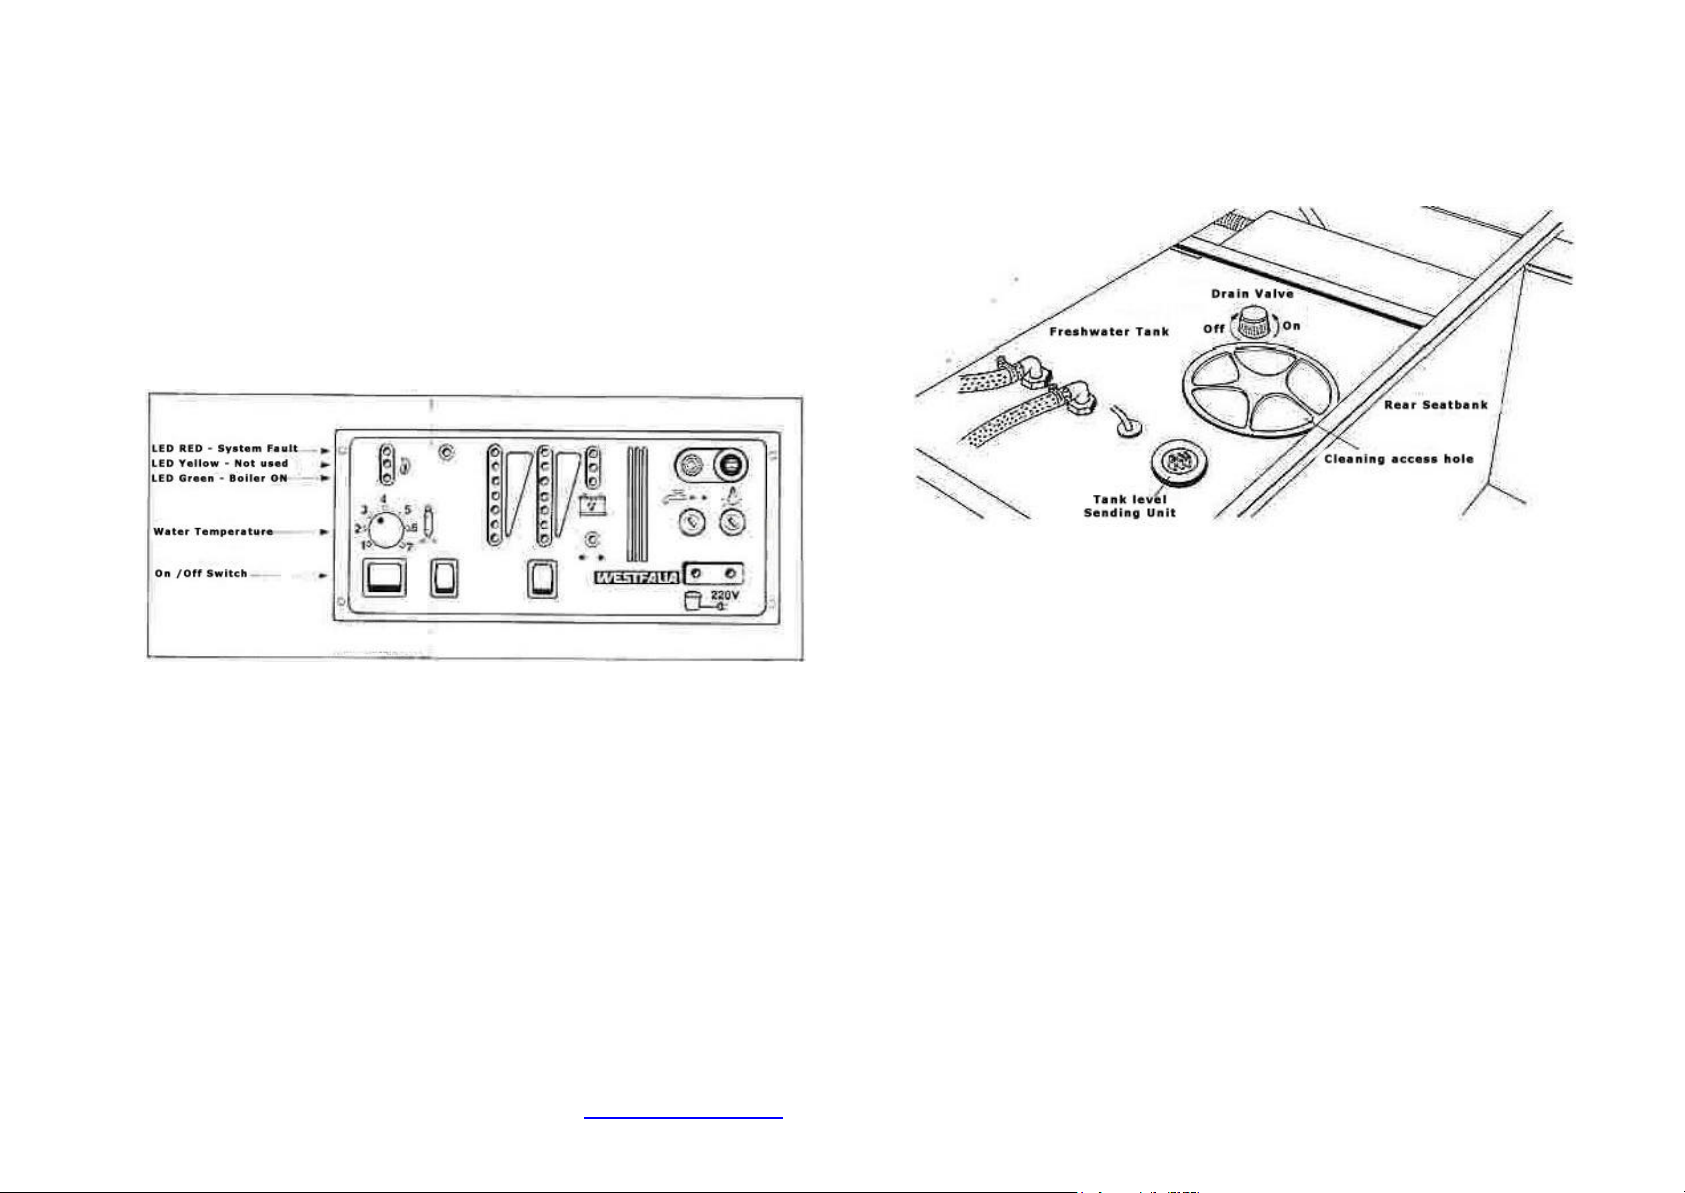
3) Switch on via the switch on the display panel and the green LED
should come on. The yellow LED is not used and does not light.
4) With the rotary knob you can set the water temperature between
30 -75° Celsius. The electronics will switch the burner on and off
as required.
Attention! The manufacturer is not liable for frost damage. Please
note the information for winter use (section 1.11).
Warm Water Boiler / Emptying
1) Remove the 10 amp fuse (under the tap symbol) from the display
panel.
2) Turn on the mixer tap and open the drain plug on the sink in the
shower room.
3) Open the emptying access valves on both fresh and waste water
tanks.
4) Open the safety valve (A) by raising the red lever that is located
inside the rear bench seat. The water drains through the bottom
outlet.
When you drain the water system observe any environmental
laws. On the campsite observe the rules and regulations.
Translated into English by www.westfaliaLT.info – a useful website for VW Westfalia LT Camper enthusiasts.
Page 11
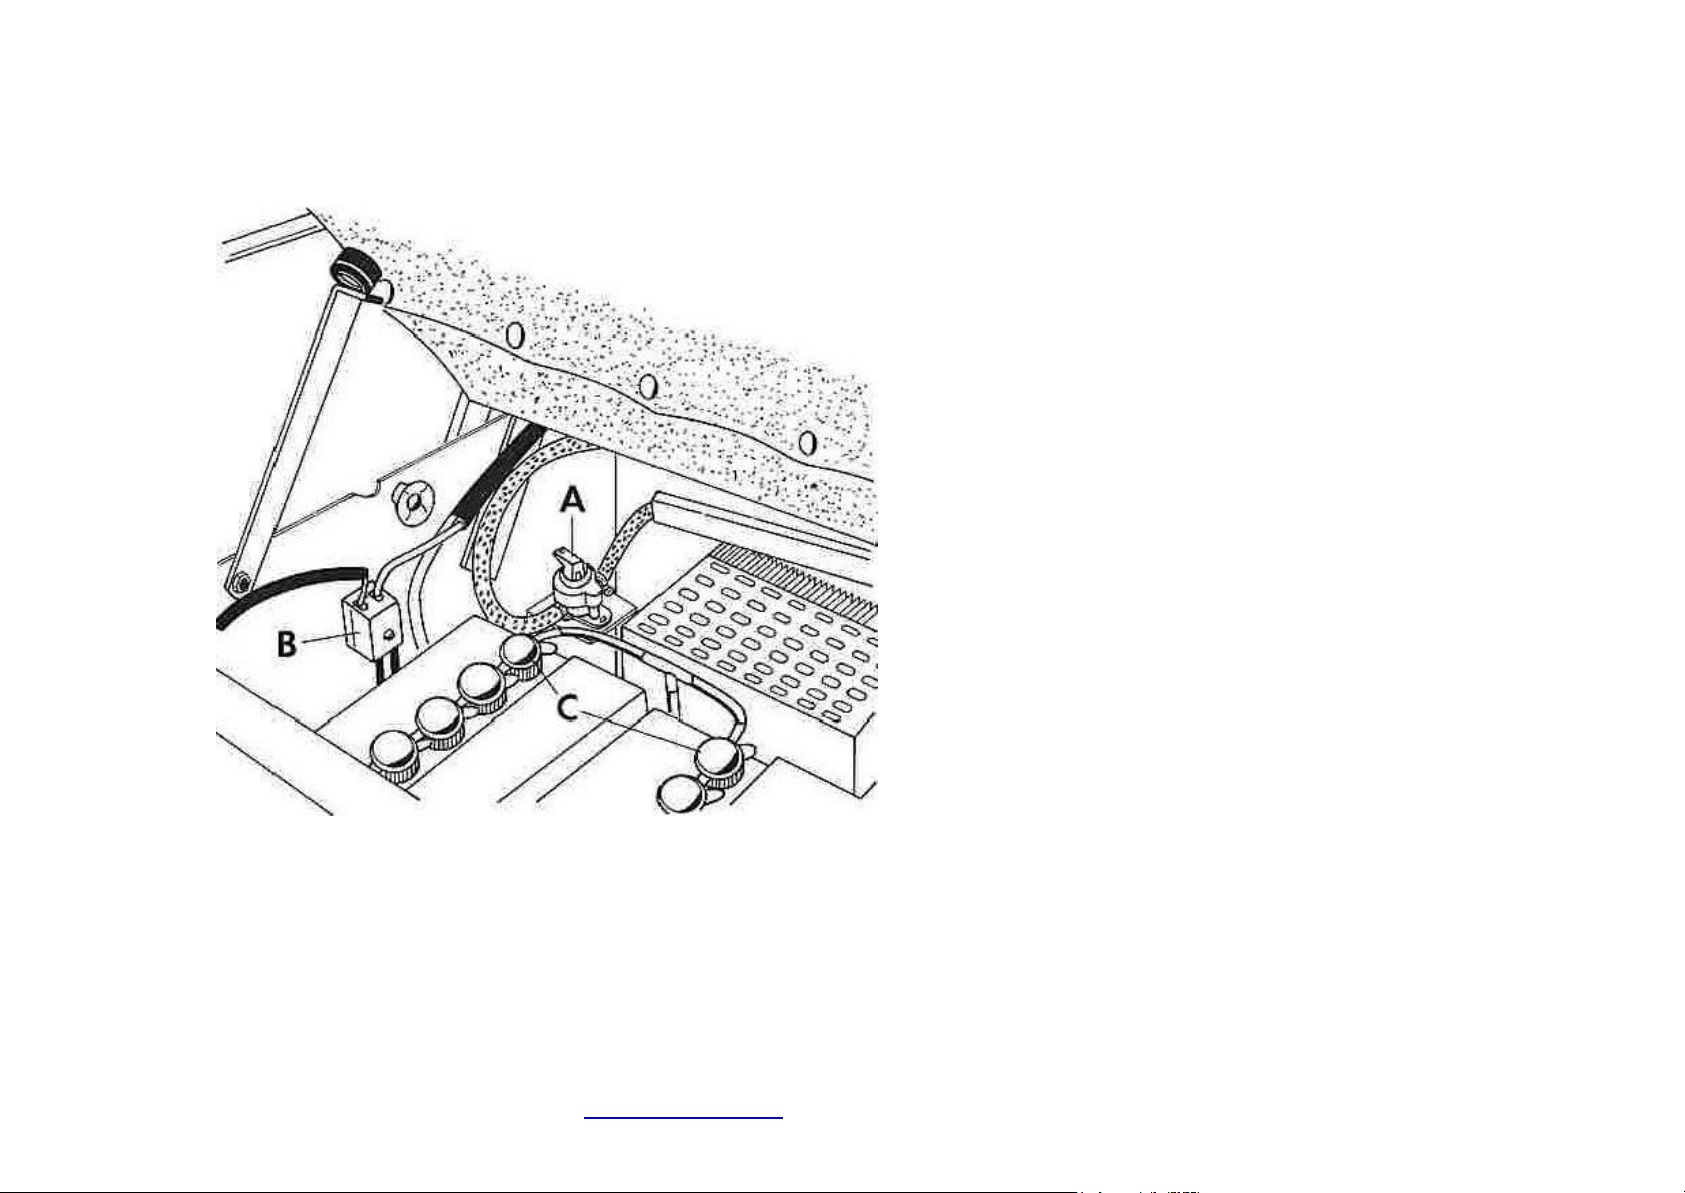
www.westfaliaLT.info - a useful site for enthusiasts and owners of VW Westfalia LT campers
A = Safety Valve
B = Fuse box
C = Gas venting stopper
Technical Specification
Water Capacity: 10 litres
Gas Consumption: 120 g/h
Max Water Temperature 75° C
Heating up time 15- 75° C: approx 12 minutes
Voltage rating: 12 V
Current consumption:
(during the heating phase): 90 mA
Current consumption:
(on standby phase): 36 mA
Safety valve: 2 bar (pressure)
1.5 Display Unit
In the kitchen area there is a display indicator and control panel
for:
(a) Warm water boiler.
(b) Switch and LED (Lights) for the Ex-Ice De-Icer
(c) Display lights indicating water level in the fresh water tank
(d) Display lights indicating water level in the waste water tank
(e) Display lights showing second (leisure) battery charge level
(f) Display lights indicating when fridge is working from gas
(g) 12 Volt socket with thermal fuse.
(h) Fuses for water pump, fridge, boiler and lighting.
(i) Shaver socket supplied by an inverter 220 Volt max 15 Watt.
Translated into English by www.westfaliaLT.info – a useful website for VW Westfalia LT Camper enthusiasts.
Page 12
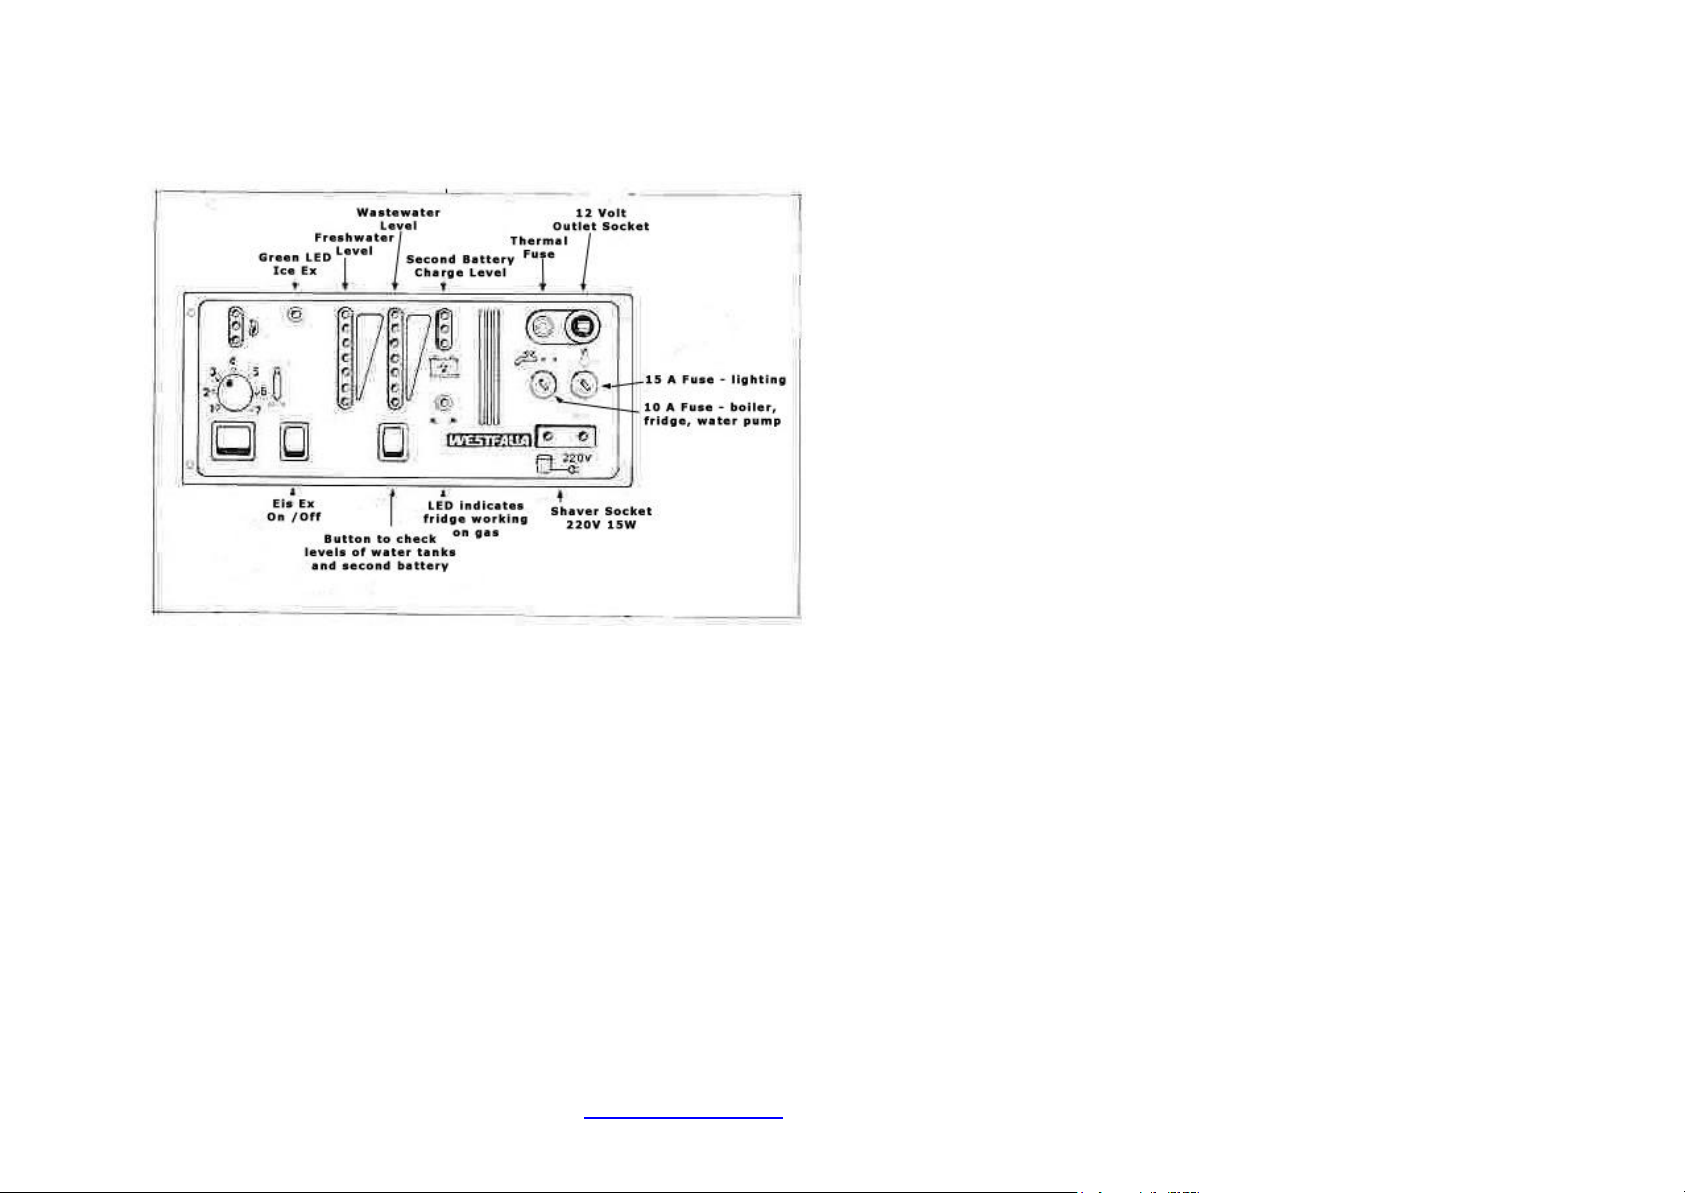
The level of the water tanks and charge level of second battery can be seen
www.westfaliaLT.info - a useful site for enthusiasts and owners of VW Westfalia LT campers
by pressing the button. The LEDs light for approx 45 secs and then
automatically switch off. Using the 7 LEDs on each water tank the water
levels can be read. The distance from LED to LED for the waste water
tank is 10 litres. If the yellow or red LEDs are lit for the freshwater tank
there is between 30 and 10 litres in the tank. The charge level of the
second battery can be seen on the 3 LEDs.
Green – Battery voltage over 12.5 Volts
Yellow – Battery voltage less than 12.5 Volts
Red – Battery voltage less than 11.5 Volts
1.6 Fridge
The ventilation openings for the fridge on the kitchen cupboard
must be kept clear.
Before using the fridge for the first time, the inside of the fridge
should be cleaned with lukewarm water and a mild cleaning fluid .
Your refrigerator is equipped with a newly developed absorption
cooling unit, which ensures it functions eve n if the vehicle is
driving uphill or downhill (up to 15%)
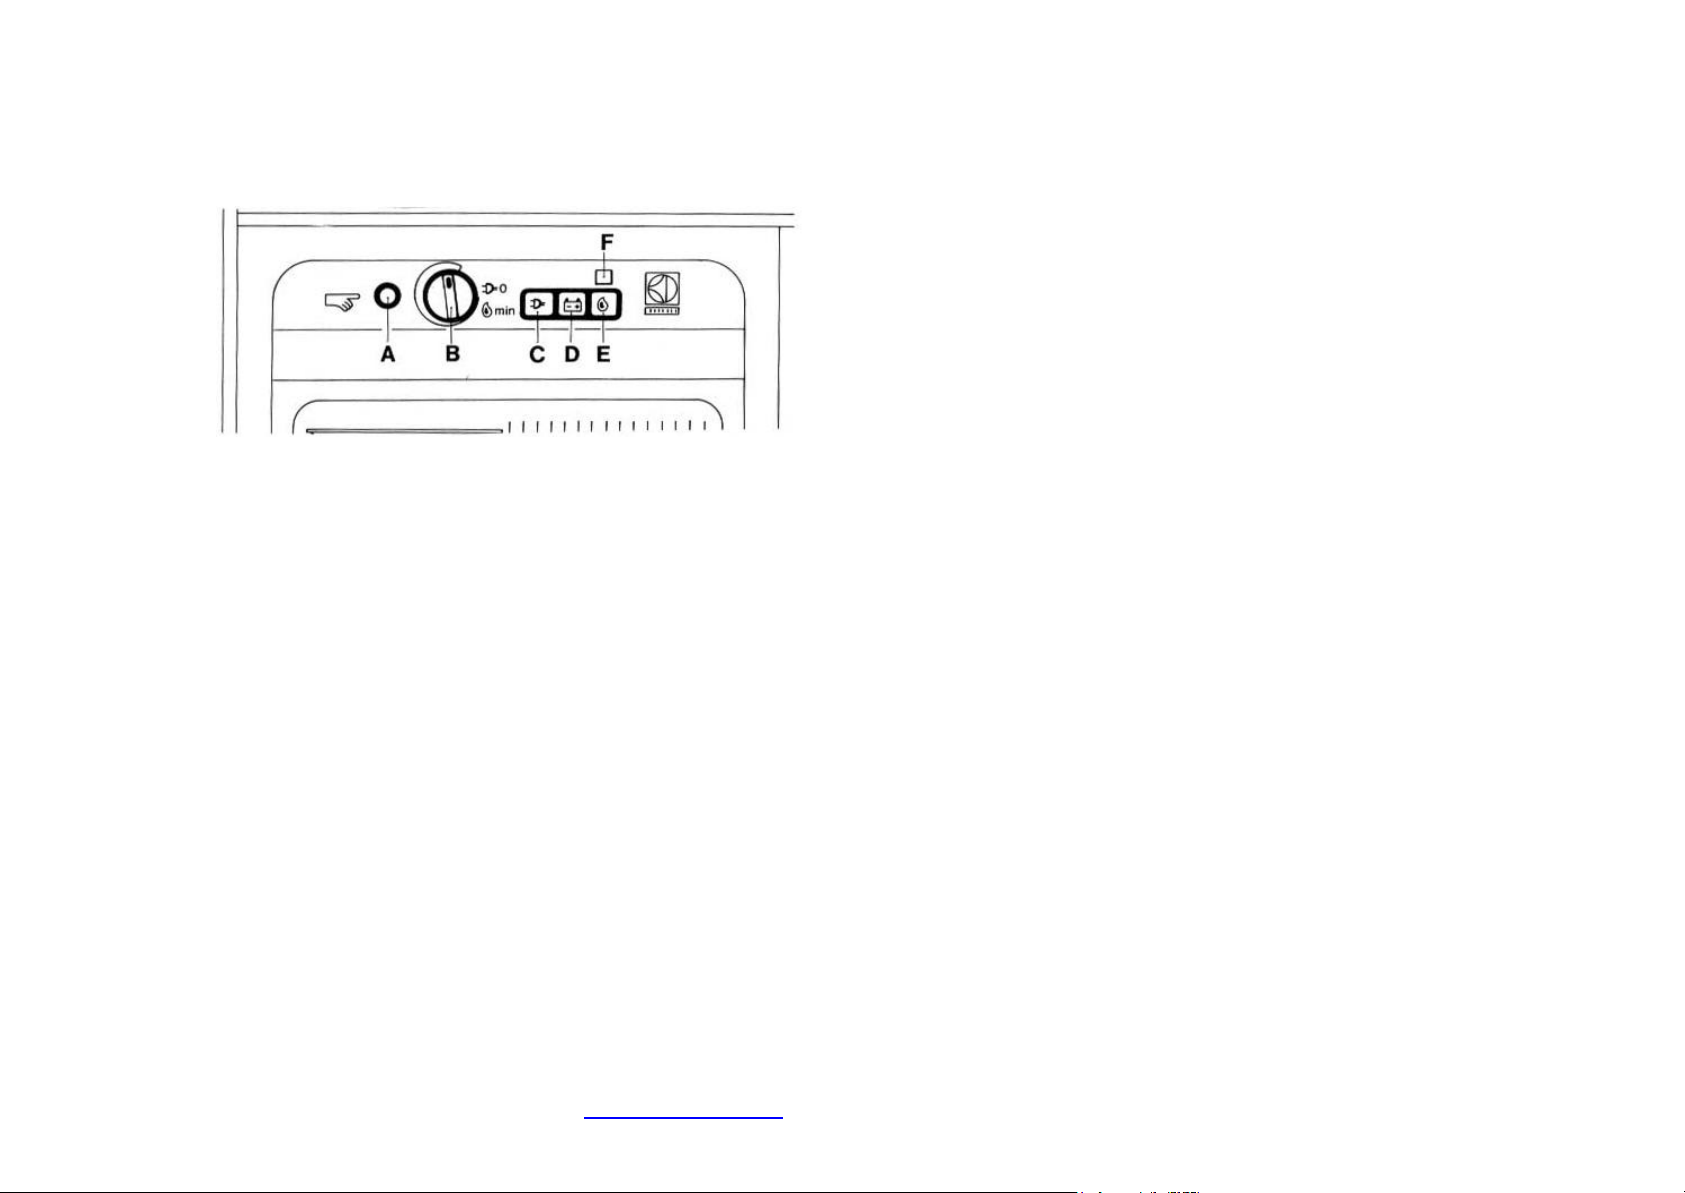
Explanation of the controls
A – button to operate the ignition control
B – dial for the combined electric / gas thermostat.
The combined electric / gas thermostat can be used with the LPG
or the mains electricity. The thermostat is not set up for use with
12v battery power. If the dial for the thermostat is turned fully to
the left – past the point where you can feel some resistance – the
mains use is switched off. This same dial position needs to be in
the minimum setting for use with LPG (LPG use will only be
switched off by switching the LPG connection to the fridge)
C to E – Buttons to switch the voltage on / off
C – Button for mains use
D – Button for 12V use
E – Button for LPG use
F – red signal light
Translated into English by www.westfaliaLT.info – a useful website for VW Westfalia LT Camper enthusiasts.
Page 13
www.westfaliaLT.info - a useful site for enthusiasts and owners of VW Westfalia LT campers
Bringing into operation (220v)
Check if the voltage of the house or campsite mains connection is
within the required voltage. This can be found inside the fridge at
the top left. (The safety circuit breaker must be switched on)
1. Press in Button (C)
2. Turn the combined electric / gas thermostat dial (B) clockwise
to the max setting.
3. When not in use, switch off button (C) by using button (D) or
(E).
Bringing into operation (12V)
When using 12V, your fridge is protected by the general electrical
circuitry of your vehicle. To prevent your vehicle’s battery from
draining, a measure has been built into the 12V circuitry to ensure
that the fridge can only be used when the vehicle’s engine is
running.
When the fridge is running on 12V it cannot be controlled by the
thermostat.
1) Press in button (D) before driving off.
2) When not in use, switch off button (D) by using buttons (C) or
(E).
Bringing into operation (LPG)
The fridge is designed for use with Propane or Butane gas only.
Natural gas or city gas must not be used.
1. Open the valves (main valve of the gas tank, and quick release
valve in the kitchen cupboard)
2. Turn the thermostat knob (B) clockwise to the max setting.
3. Press in button (E). Straight after pressing the button, the
electronic gas ignition will switch on, the red signal light (F) will
light up.
4. Press button (A) in and keep it pressed in. After 20-30 seconds,
the burner will automatically ignite. As soon as the flame lights,
the ignition will stop, and the red signal light (F) will go out. Keep
the button (A) pressed in for another 15-20 seconds, then the
thermo-electric ignition from the LPG tank will stay open.
You can see the progress of the ignition steps by flashing light (F).
The use of the burner flame is shown by control light (G) (see
below) as long as switch (A) on the cooker display is switched on.
Should there be a cause (other than the LPG tank being empty) for
the gas flame to go out, it will ignite again automatically. If it does
not ignite due to a defect, the protection mechanisms will activate
and will automatically shut off the LPG supply .
5. When not in use or if the fridge has a problem using gas, stop
the gas supply to the fridge & switch off button (E) by using
button (C) or (D).
Translated into English by www.westfaliaLT.info – a useful website for VW Westfalia LT Camper enthusiasts.
Page 14

Regulating the temperature of the fridge
www.westfaliaLT.info - a useful site for enthusiasts and owners of VW Westfalia LT campers
You can regulate the temperature of the fridge by using the
combined electric / gas thermostat. After sufficient cooling in the
max position, you can turn the temperature knob (B) anticlockwise
to your desired temperature.
Important Notice !
Always watch out that the fridge is never connected to 2 power
sources (i.e.: gas & electricity) at the same time. It would then not
work, and will possibly suffer damage. Such damage would not be
covered by the warranty.
The cove r for the fridge vent must be in place when using a car
wash.
Technical data
Gas operation:
Power consumption gas: 15 g / hour
Supply pressure: Cat I3 LPG 50 mbar
Electric operation:
220V 50Hz 85 Watt thermostatically controllable
12V 85 Watt not controllable
Contents: 41 litre gross
Refrigerant: NH3 absorber
1.7 Electrics
The vehicle is equipped with a combined 12 / 220 Volt power
supply.
The 12V appliances (lighting, water pump, heating, control of the
water boiler and 12 V operation of fridge ) are supplied by the
second (leisure) battery.
An external socket when connected supplies 220 volt via the
battery charger.
A safety circuit breaker is installed for the 220 Volt supply
inside.
Two batteries: 2x12 Volt 80 Amp/Hour are installed inside the
rear seat bench.
Attention! These batteries are not to be used as starter
batteries.
1.7.1 Battery Charger
The battery charger operates automatically. As soon as you have
attached the 220V current to the vehicles external socket, the
charger is ready for use and if required charges the second
batteries. The batteries are charged up to the intended battery
voltage. Once the batteries have reached this voltage the charger
switches off automatically. The two batteries are equipped with
encapsulated gas vent stoppers. It is not necessary or
recommended to remove the stoppers during charging. During
charging the battery charger gets warm. For this reason do not
store items near the charger. Whilst driving all batteries are
charged by the alternator.
1.7.2 Safety Circuit Breaker
The safety circuit breaker acts as a line and personal protection
cut out.
Automatic safety circuit breaker:
Line Protection 10 Amp
Operator Protection 6 -10 mA with max 30 ms cut out time
Translated into English by www.westfaliaLT.info – a useful website for VW Westfalia LT Camper enthusiasts.
Page 15
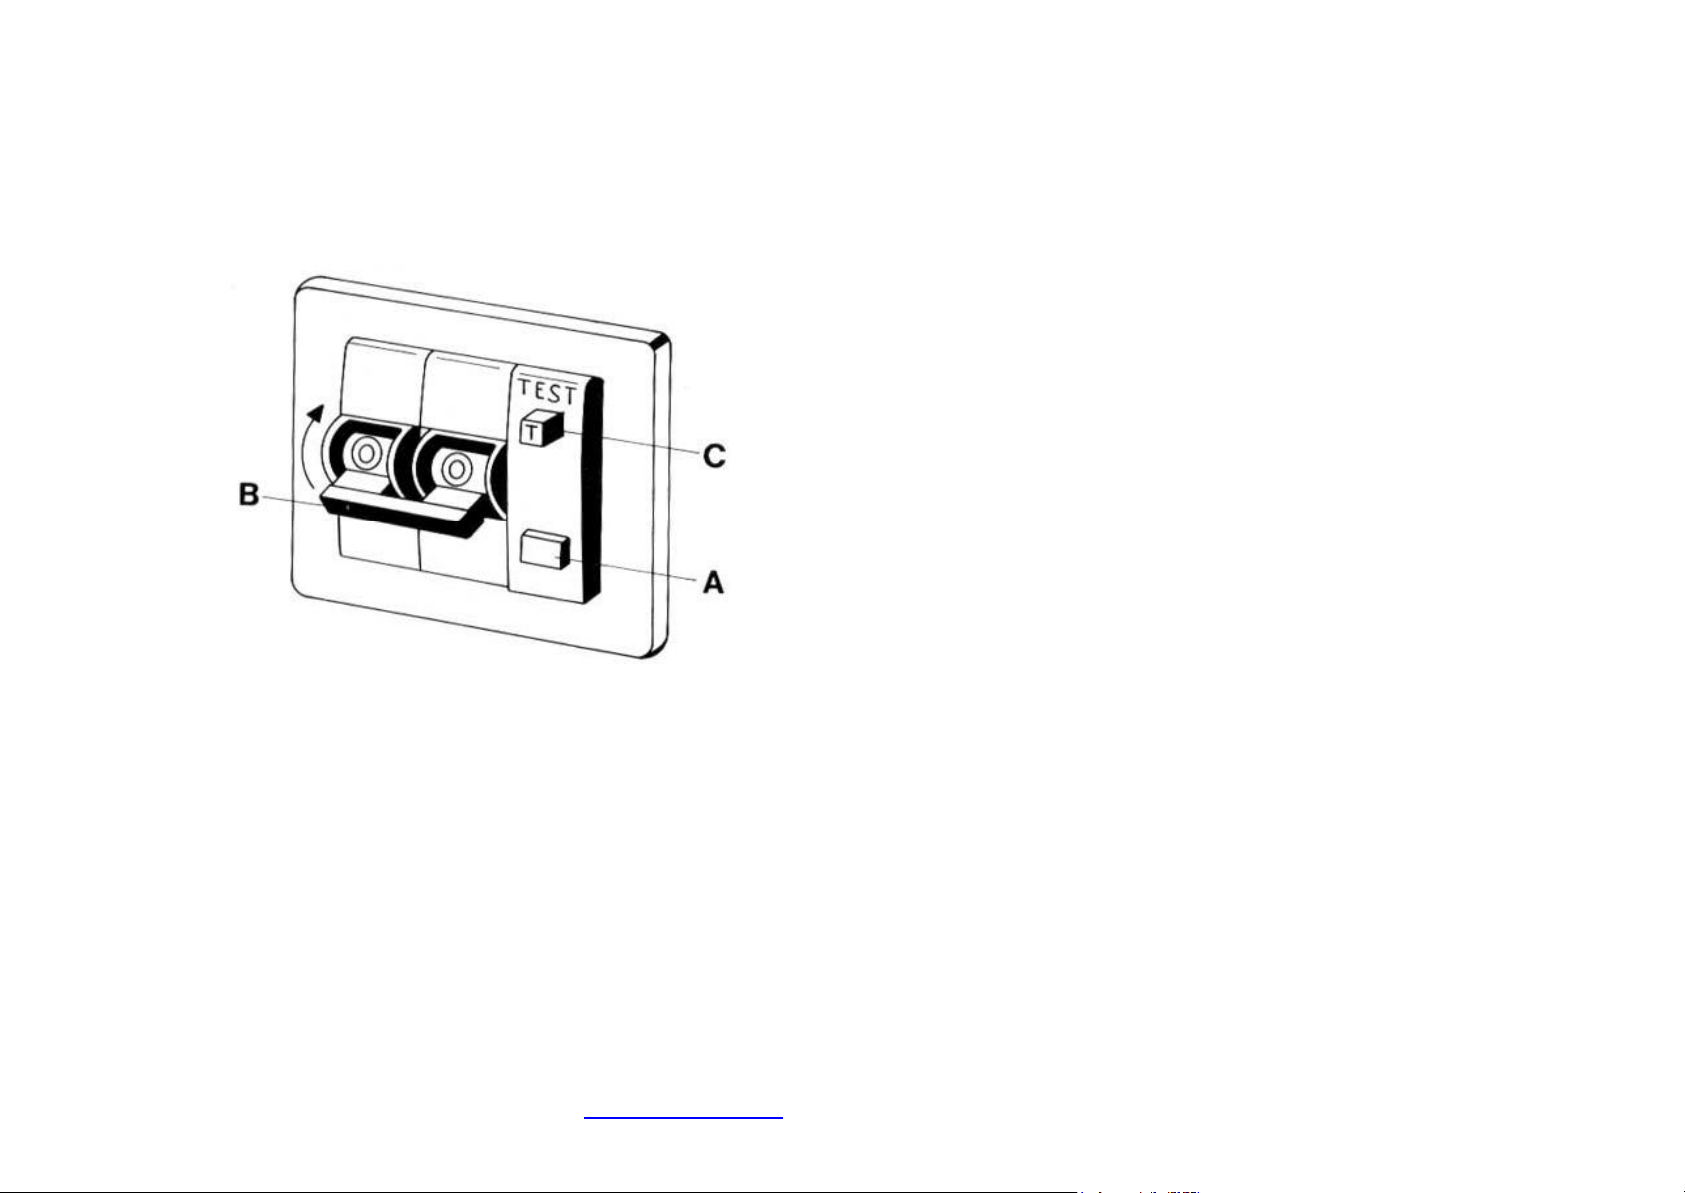
The disconnection takes place two-pole.
www.westfaliaLT.info - a useful site for enthusiasts and owners of VW Westfalia LT campers
Secondary (leisure) battery: 12 V 63 Ah under the driver seat
To Use: Press in the blue button (A) until it clicks in, then bring
the black switch (B) to the position (1) (i.e.: push up)
To Test Its Use: To test its use, 220V mains power must be
connected to the vehicle. Press in the white test button (C), the
blue button (A) should then pop out and the black switch (B) will
go to the ‘O’ position. The safety circuit breaker is located above
the rear door next to the display unit.
Important Notice ! When the circuit breaker is not switched on,
the 220V appliances (i.e. fridge, battery charger, and outlet socket
above the kitchen cupboard) will not work.
Important Notice !
12V Battery Use: Please note that the battery capacity is limited
when left for a while without recharging. For example, at least 12-
12.5V is required for using the additional heater. The voltage of a
fully charged second battery should be 13.5 – 13.8 Volts.
Use with 220V: Attach the vehicle to the mains via the outside
plug. The outlet socket above the kitchen cupboard, battery
charger and the fridge are fed from the safety circuit breaker.
1.8 Opening Window
It is possible to open the left hand side window and the rear
window.
Side Window
The side window can be opened in several fixed positions. To
close the window, open it wide and then close properly.
Rear Window
The rear window can be opened and adjusted in infinitely variable
positions.
Translated into English by www.westfaliaLT.info – a useful website for VW Westfalia LT Camper enthusiasts.
Page 16
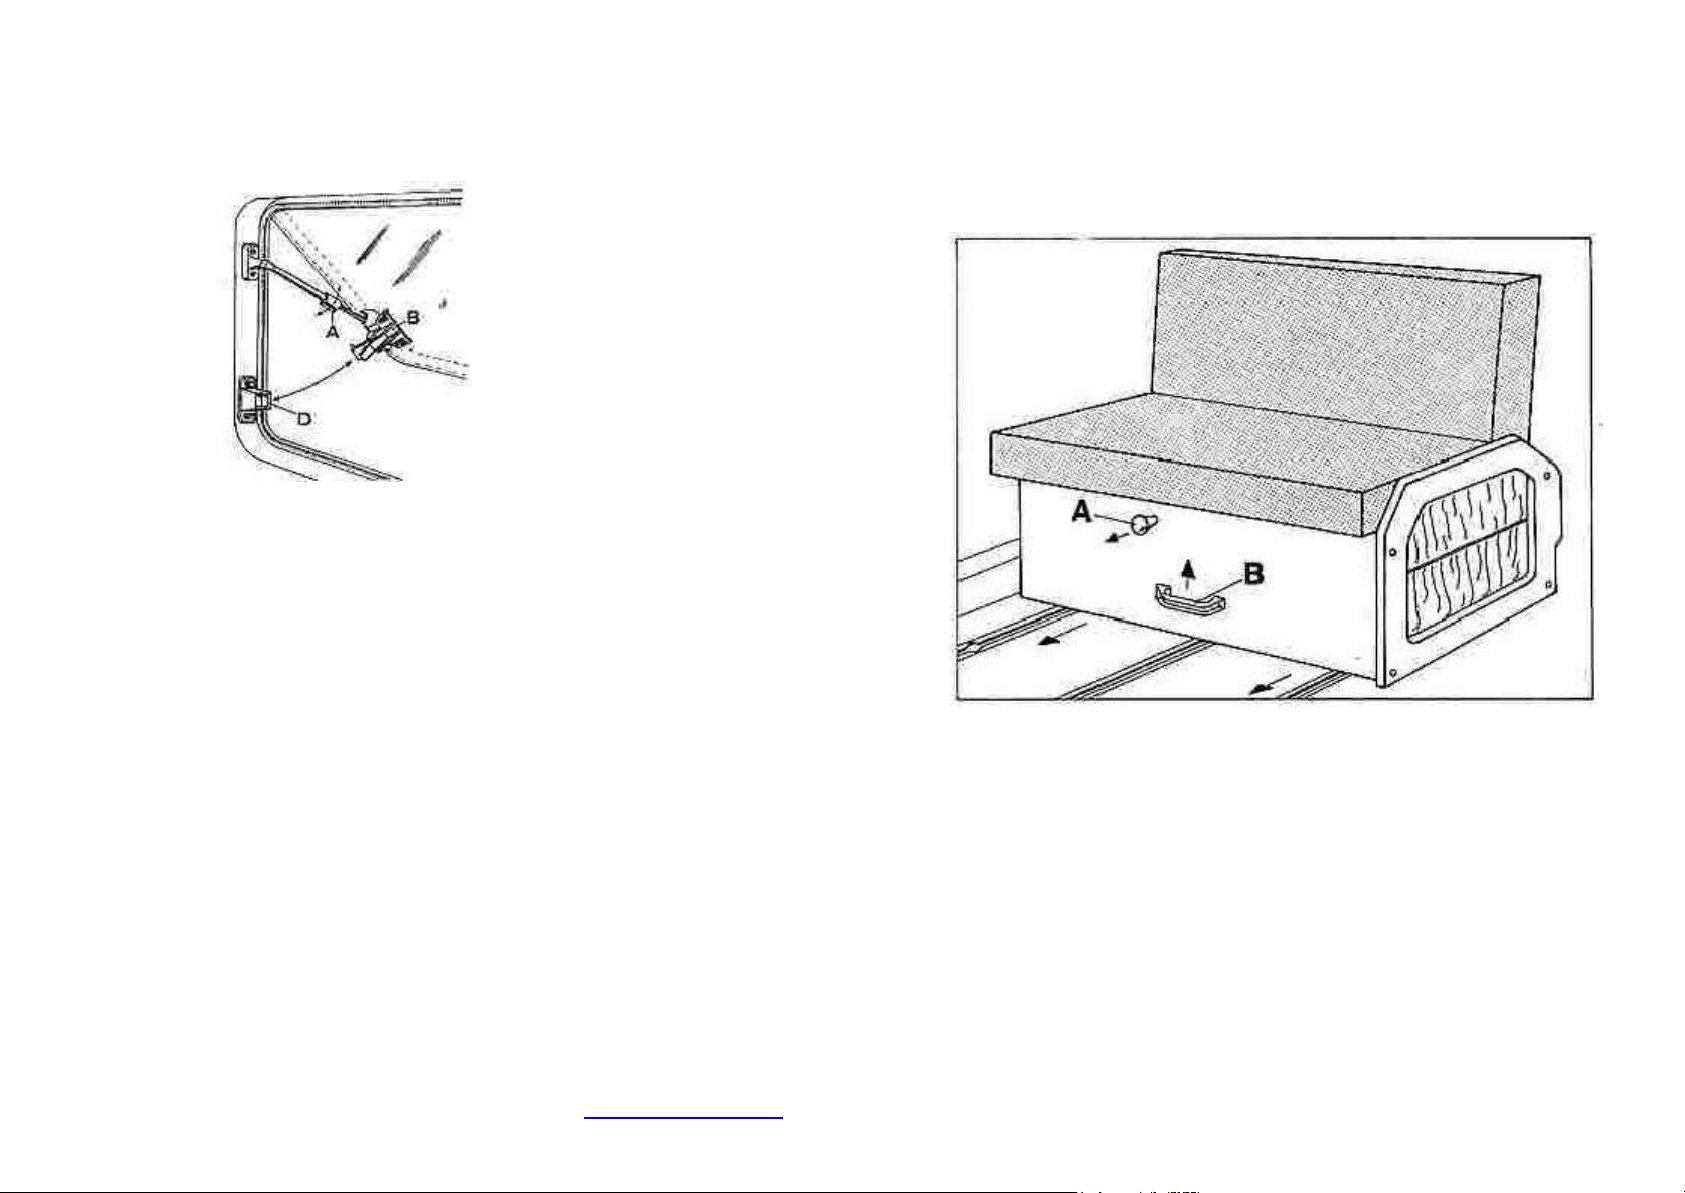
travel (living position). When driving the seat bank must be in the
www.westfaliaLT.info - a useful site for enthusiasts and owners of VW Westfalia LT campers
driving position.
To Open
- Lift the lever (B) and adjust window to desired position.
- Turn the locking mechanism (A) to secure
To Close
- Levers (B) of the 2 locks need to be open
- Locking mechanism (A) on the side supports need to be
loosened, by turning either to the left or right
- Close the window
- Press the levers (B) in, so the clip (C) lies behind the latch
(D)
Warning ! The window should not be open when driving.
1.9 Seating
Warning ! Please do not adjust the seating arrangement (Bed,
living or driving position) whilst the roller blinds for the opening
window are in the lowered position.
The front seat bank can be used in two positions: Facing the
direction of travel (driving position) and against the direction of
Changing from driving position to living position:
Pull the lever on the seat box front. Lift the seat cushion up and
pull forward whilst pushing the seat back cushion down into the
opposite position. Use the handle (B) and slide the seat bank
forward until it locks into position automatically.
Changing fro m living position to driving position:
Use the handle (B) and pull the seat bench until it locks into the
rear latch. Pull handle (A) and lift the seat cushion whilst at the
same time pushing the seat back until it swings round into the
opposite position.
Translated into English by www.westfaliaLT.info – a useful website for VW Westfalia LT Camper enthusiasts.
Page 17

www.westfaliaLT.info - a useful site for enthusiasts and owners of VW Westfalia LT campers
Changing the sliding seat bench into a bed:
With the seat in the living position use the lever to release the seat
cushion and pull forward. The seat back now moves automatically
to the horizontal position.
Changing the sliding seat bench from the bed into a seat in the
driving position:
Lift the horizontal cushion until the seat fittings lock in place then
press the seat cushion down and seat back will automatically go
into the right position.
Changing the rear seat bench into the bed:
Unlock the seat cushion, lift it and pull it forward. The seat back
goes automatically into the bed position and the seat cushion is
lowered.
Changing back the rear seat bench into the sitting position:
Lift the seat cushion and swing 90 to the rear until the seat fittings
lock in place. Fold down the high cushion and the seat cushion
must lock in place on the seat front panel.
Double bed in the high top
The front bed part is fixed. To construct the bed, open the flap
(right and left) and withdraw the extension evenly. Ins ert the
cushions.
Note: In the absence of child safety net (optional extra), small
children should sleep in the lower beds.
Attention: Whilst driving no one should be transported in the
upper bed.
1.10 Furniture Locks
Doors, flaps and drawers are fitted with safety handles so
they don’t open whilst driving.
To open pull the handle.
1.11 Information for the Winter
Before taking a winter vacation some things that you should pay
attention to:
During snowfall don’t let snow build up around the roof vents.
Vents should not be covered by snow. Above all the flue in the
roof area near the hot water boiler and the exhaust pipe of the
heater should be kept free of snow. To prevent freezing of waste
water in waste water tank then a sufficient quantity of salt should
be added (up to -10° C) and ensure timely emptying.
The formation of condensation can largely be avoided by
appropriate use of heating and ventilation.
To ensure proper function of gas appliances (fridge, gas cooker,
hot water equipment) we recommend that at temperatures of +5°
C and below the Eis-ex is switched on.
The vehicle should be parked safely so it doesn’t slide in a thaw.
The hand brake should not be applied.
When the heater and hot water unit are switched on the vehicle is
suitable for use in temperatures of -10° C. Even if there is a short
drop in temperature to -15° C (eg: at night) harm to the water
supply system should not be feared. The rubber seals for the
opening windows and doors should occasionally be rubbed with
talcum powder.
When not used in winter if there is danger of frost then empty
the entire water and waste disposal system.
In order to achieve complete emptying, one should proceed as
described and additionally remove the hand shower hose through
the opening in the washbasin and lay it on the shower cabinet
floor.
Translated into English by www.westfaliaLT.info – a useful website for VW Westfalia LT Camper enthusiasts.
Page 18

www.westfaliaLT.info - a useful site for enthusiasts and owners of VW Westfalia LT campers
2.0 Care and Maintenance of Equipment
2.1 Refrigerator
2.1.1 Defrosting of the appliance
The ice on the evaporator should be no more than 3 - 4mm thick,
so that the cooling capacity is not diminished.
To defrost power is interrupted when operating using gas by
shutting off the gas supply or when operating in electric mode by
the switch. The defrost water runs into the drip tray, which can be
pulled forward and emptied. Do not use a heater to speed up the
defrost as this could damage components. The door of your
refrigerator has a PVC edging to ensure a proper seal. Clean this
PVC edging only with clear water and never with chemical
additives.
2.1.2 Measures when fridge is not going to be used for a long
period.
If your fridge is going to be out of service for a long time switch off
the power supply and empty contents. After the defrosting of the
refrigerator it should be carefully cleaned and dried.
2.2 Heating
The outer casing of the auxiliary heater is factory equipped with
surface protection. However, whilst driving damage to the
protective layer can not be excluded, it is recommended that the
housing is checked at certain intervals (twice per year), and
repaired if necessary.
To do this you can use normal corrosion inhibitors.
In summer you should run the heating once a month for about 10
minutes.
The life of the glow plug (D2L) and spark plug (B2L) is limited.
Before camping in winter check the condition of the glow plug (or
spark plug).
After 10 years the heat exchanger of the heater must be changed
for an original equipment part by either the manufacturer or an
authorised repair shop.
2.3 Gas Cooker
To clean the stove top and the gas burner the stove grate needs
to be removed. Enamelled surfaces should not be cleaned with
abrasives.
When cleaning the gas stove, make sure that the thermocouple
that sticks up near the gas burner is not bent. A bent or broken
thermocouple prevents any further use of the burner, as the flame
goes out, despite prolonged actuation of the safety pilot time and
again. The thermocouple needs to be replaced by an expert if this
happens.
If the flame pattern overtime becomes uneven, this is a sign of
poor combustion. Regular cleaning of the burner cover is
advisable. The burner covers are removable by twisting them a
quarter turn, so that the slots can be cleaned with ordinary water
or a brush.
2.4 Windows
The cleaning of the acrylic double windows should be washed with
plenty of water with added soap or detergent. A 10% addition of
detergent will prevent the build up of static electricity and hence
dust.
You should only use very soft cloth or natural chamois to rub the
plastic windows. Light scratches can be polished with brass polish
or liquid Stahlfix. A subsequent treatment with silver polish is
recommended.
The double glass should not be treated with de-icing spray or ice
scraper.
The supports for the opening windows should at regular intervals
be cleaned and lightly oiled.
Translated into English by www.westfaliaLT.info – a useful website for VW Westfalia LT Camper enthusiasts.
Page 19

2.5 Furniture
www.westfaliaLT.info - a useful site for enthusiasts and owners of VW Westfalia LT campers
All visible parts of furniture are plastic coated. Maintain furniture and
fittings with the same furniture preservative products that you use in your
home.
2.6 Upholstery, Curtains and Carpet
The cushions are composed of polyether foam. The upholstery and
curtains should be chemically cleaned, if necessary . The carpet is fully
synthetic and should be cleaned using commercially made shampoos.
2.7 Shower Room
The shower cell is made from fibreglass with a gel coat finish. The good
surface gloss will only last if the surface is properly treated. To clean use
only soap or mild detergent solution.
The washbasin and shelves are made from plastic which should not
come into contact with solvents such as nail polish remover as the
will damage the surface.
2.8 Outer Decals
The application is car wash safe and should be treated the same way as
the exterior paintwork of the vehicle. The decals must not be cleaned with
high pressure jet wash systems.
The decals should not be treated with tar remover, if necessary, use
purified gasoline.
2.9 Joints and Hinges
The guide rails of the sliding seat should be lightly oiled periodically at the
joints or even better, sprayed with a non-greasy spray.
The telescopic strut of the roof vent should also from time to time, be oiled
so that it moves easily.
2.10 Second Battery (Leisure Battery)
The second batteries are located inside the rear seat bank.
Proper function of the electrical system, especially the additional heating
depends very much on the charge level of the second batteries .
If the acid level is too low pull out the plug of the gas venting stopper,
disconnect battery, remove cell plug and top up with distilled water to the
max level.
How often you should check the battery acid level will depend on the
operating conditions of the vehicle and the season.
When detached the second battery terminals should be insulated. They
must not come into contact with vehicle earth.
Well before the start of a journey the battery should be sufficiently charged
using the built in battery charger.
2.11 Gas tank
We recommend to treat the gas tank with under body protection. The red
marking strip must however remain recognizable, or it must later be
renewed. In addition, clean the valve regularly. The hinges and lock on the
gas tank cover must be cleaned and oiled occasionally so that it cont inues
to function properly.
3. Troubleshooting
Tools
The tool kit is placed at the factory in the passenger seat. The jack is
inside the rear seat bench above the freshwater tank.
3.1 Water pump does not work
a) Check the second battery is charged by pressing the button on the
display unit, where appropriate, recharge battery.
b) Check 10 amp fuse for the water pump in the display unit.
c) If temp is below 0°C check if ice has formed in the water supply system.
Translated into English by www.westfaliaLT.info – a useful website for VW Westfalia LT Camper enthusiasts.
Page 20

3.2 Battery charger does not work
www.westfaliaLT.info - a useful site for enthusiasts and owners of VW Westfalia LT campers
a) Check if 220 v is applied to the vehicle.
b) Check whether the safety circuit breaker is on (near to the display panel
above the rear door).
3.3 Hot water heater does not work, the control lights
are not lit.
a) Check 10 amp fuse for the water supply in the display unit.
b) Check 16 amp fuse for the central electrics.
3.3.1 Hot water heater does not work, the red control indicates a fault.
a) When not working, try 2 or 3 times to start.
b) Check the tank has gas in it.
c) Check that the valve on the gas tank, main gas valve in the supply and
the quick release valve for the water boiler are all open.
d) Check that the flue is not being blocked. To avoid this, remove any
luggage on the roof rack in the area of the flue.
e) Check if the Eis-ex is switched on (may be required at temperatures of
+5° C and below)
If the function of the hot water heater can not be restored, we recommend
you contact the customer service department of the equipment
manufacturer. A customer services directory is included with the
equipment.
3.4 Fridge does not cool
3.4.1 12 v operation
a) check 10 amp fuse for the fridge in the display unit.
3.4.2 220 v operation
a) Check the safety circuit breaker is switched on.
b) Check the 220 volt plug for the fridge (at the rear side) is inserted in the
socket.
3.4.3 Gas operation
a) Check that valve is open on the gas tank, main valve in the supply and
the quick release valve for the fridge.
b) Check whether ice-ex is switched on (required at temperatures of + 5°C
and below).
If the function of the fridge can not be restored, we recommend you
contact the customer service department of the equipment manufacturer.
A customer services directory is included with the equipment.
3.5 Heater
3.5.1 Heating does not start, no fan noise
a) Check that second battery (leisure battery) is fully charged.
b) Check 25 Amp fuse for the additional heating.
c) Check motor current fuse in the heating control unit.
WARNING! As a replacement, use only T 1.25 A fuse. The use of other
backups in case of failure can cause damage to the control unit.
3.5.2 After it is s witched on the fan runs only for around 3 minutes.
The heater does not ignite and is automatically switched off.
a) Check that second battery (leisure battery) is fully charged (start vehicle
engine and with the engine running and start heating).
b) Turn the heater off and on again (no more than twice). If heater still
does not ignite it needs to be repaired in a workshop.
3.5.3 Heating is switched off due to overheating.
Red light (B) flashes on the panel.
a) Check that the wire mesh in the air intake (behind the drivers seat) is
sufficiently clear and provides an unobstructed air intake.
3.5.4 After it is s witched on the fan runs only for around 20 seconds
and is automatically switched off.
a) Check that second battery (leisure battery) is fully charged (start vehicle
engine and with the engine running and start heating).
If the function of the heating can not be restored, we recommend you
contact the customer service department of the equipment manufacturer.
A customer services directory is included with the equipment.
Translated into English by www.westfaliaLT.info – a useful website for VW Westfalia LT Camper enthusiasts.
Page 21

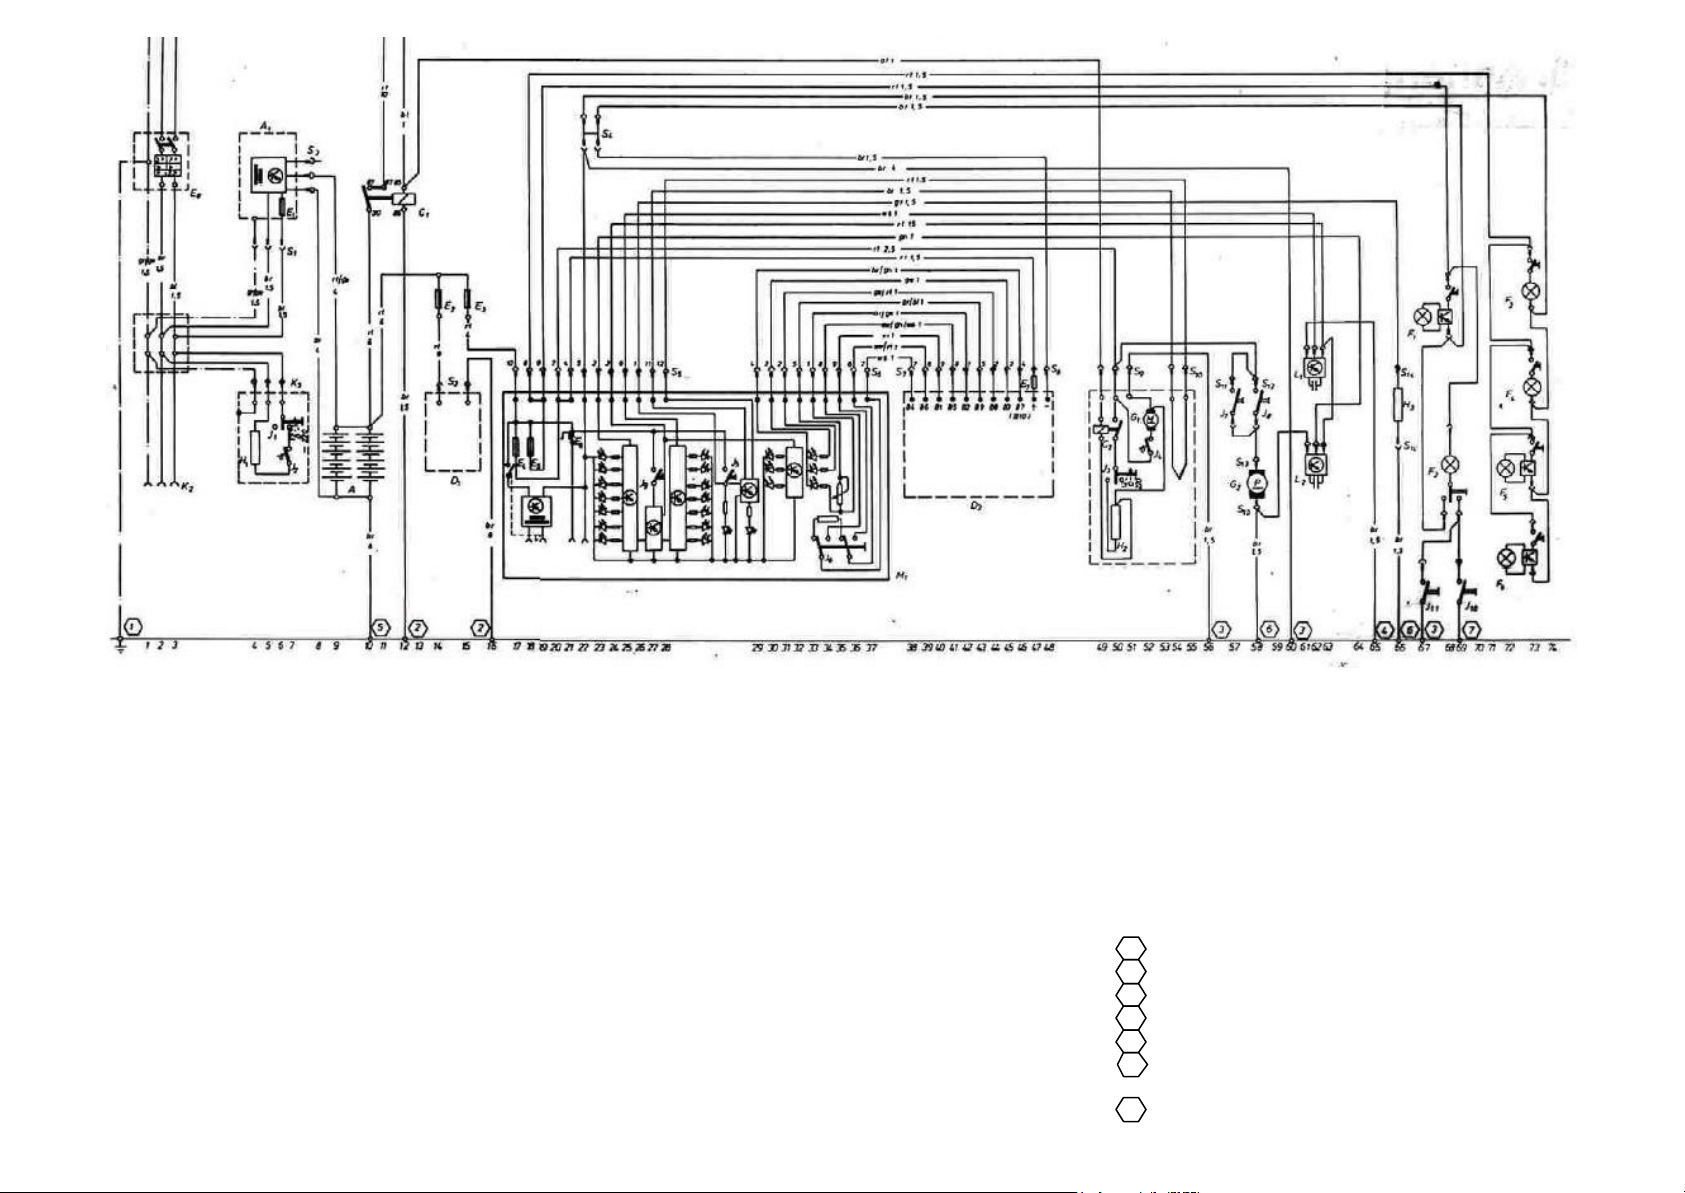
3.6 Fuses (see also circuit diagram)
www.westfaliaLT.info - a useful site for enthusiasts and owners of VW Westfalia LT campers
E1 4 Amp fuse in the battery charger. The battery charger is located inside
the rear bench seat next to the second batteries .
E2 25 Amp fuse for additional heating is located in the fuse box inside the
rear bench seat .
E3 16 Amp fuse for the central electrics is located in the fuse box inside
the rear bench seat.
E4 10 Amp fuse for the fridge, water pump and boiler is located in the
display unit.
E5 10 Amp fuse for the lighting is located in the display unit.
E6 Over current trip (thermal fuse) is located in the display unit.
E7 Fuse T1 Amp (Boiler) is located on the control panel in the boiler.
The motor current protection (fuse T1.25 Amp) of the heater blower is
located in the control unit of the heating. The control box is mounted near
the starter battery (seat box under the drivers seat).
4.0 General Reference
Before starting a journey in the camper, we recommend using the
following travel preparation check-list.
4.1 Papers
Identity card or passport Street maps
Vaccination certificates Travel Guide
Driver's licence (International?) Vehicle Registration
Carnet or Triptik Vehicle Operating Instructions
Insurance Green Card Service Stations Directory
International Medical Card List of LPG Filling Stations
Necessary papers for the dog Camping Guide
4.2 Vehicle Preparation
Carry out inspection
Tool kit
Check the second battery charge level
Check gas level
Fill up water Fuel jerry can
First-aid kit Warning triangle
Equipment
Tableware, Cutlery Bed linen
Cookware Clothing
Can and bottle openers Toiletries
Water canister with filler pipe for tank
220 Volt connection cable Footwear
12 Volt cable light Rain gear
Underwear Flashlight
Possibly Radio + TV Sports equipment
Reading matter Matches
Awning Chemical toilet
4.4 Loading and Tyre Pressure
The correct loading of the vehicle with laundry, luggage, food, etc.
is important for a good ride. It is preferable to put the main weight
in the lower storage areas and lighter items in the upper storage
areas.
Ensure that the load on the roof rack does not block the flue of the
hot water boiler or it will not function properly.
The maximum load of the roof rack is 50 kg.
Tyre pressure
As the campervan has been designed to carry a particular load
including camping equipment , you can drive safely using the
details supplied by VW. Note the specifications for motorway
driving at higher speeds.
Roof Structure
If you wish to carry a surfboard or ski holder you should any use
brackets that use the roof seams for support.
Note that in order for the vehicle to drive properly any load should
be uniformly distributed.
Translated into English by www.westfaliaLT.info – a useful website for VW Westfalia LT Camper enthusiasts.
Page 22

4.5 Before a Journey
www.westfaliaLT.info - a useful site for enthusiasts and owners of VW Westfalia LT campers
Make sure windows and roof vents are closed to prevent drafts
and damage.
Approach to filling stations
Take care that gasoline or diesel heater, warm water equipment,
and the gas supply to the refrigerator must be turned off.
4.6 Travel Tips
Staying with the camper in the city?
Of course you can take a motor home in any camping site, for
many, however, this would avoid the charm of this special
companion. Some would prefer to stay in the centre, which eg for
some countries is permitted.
Here are some tips for those who want to take their camper in the
city and possibly even stay there. They will have the ideal starting
point to visit museums, to attend theatre events or to allow, for
example, a gourmet tour.
Many cities have a fair or festival place where twice a year they
have shows . Also, for two weeks one of the clubs or a big top
circus tent is set up. The remaining time the ground is free, and
often sanitary facilities can also be found.
Another way to stay in cities is at sports stadiums. You will find
ample parking and in most cases, park -like facilities.
Drawback: if at the weekend there is a football game then there
will be a crowd for a few hours. From experience evenings and at
night is quieter.
Even in smaller cities in the last years, spacious indoor swimming
pools emerged with appropriate parking areas. The indoor pools
usually close about 21.00 hours and in the morning will open at
10:00 hours again. Only in rare cases, does the car park operate
in the morning so this is an appropriate parking space for one
night, and they are often in places with low traffic noise.
If you would like stay in the city and don’t mind some road noise
then it would be best to stay at a guarded parking lot. Most places
will be supervised until 21.00 hours or a maximum of 22.00 hours.
You have a campsite in a central location with security. When you
pay for the last hour, and in the morning from 9.00 to 11.00 hours,
you may pay 2:50 to 3:00 DM overnight fee. Maybe you should
think of paying a tip for the security.
Guest houses in the suburbs often have large parking lots,
especially those with so called beer gardens. Here it is sufficient in
many cases to eat in the restaurant or have a drink with the family
and you may get permission to stay over night on the parking lot.
Advantage: man can jump from his evening drink straight into his
motor home bed. Disadvantage: Often the last customer leaves
after midnight.
4.7 Behaviour in a thunderstorm
The Westfalia camper is as secure in a thunderstorm as a normal
car. The sheet metal reinforcements interact with the vehicle body
as a light ning conductor (Faraday cage).
We recommend:
Disconnect 220 V power supply from outside socket
Retract car radio antenna
5.0 Appendix
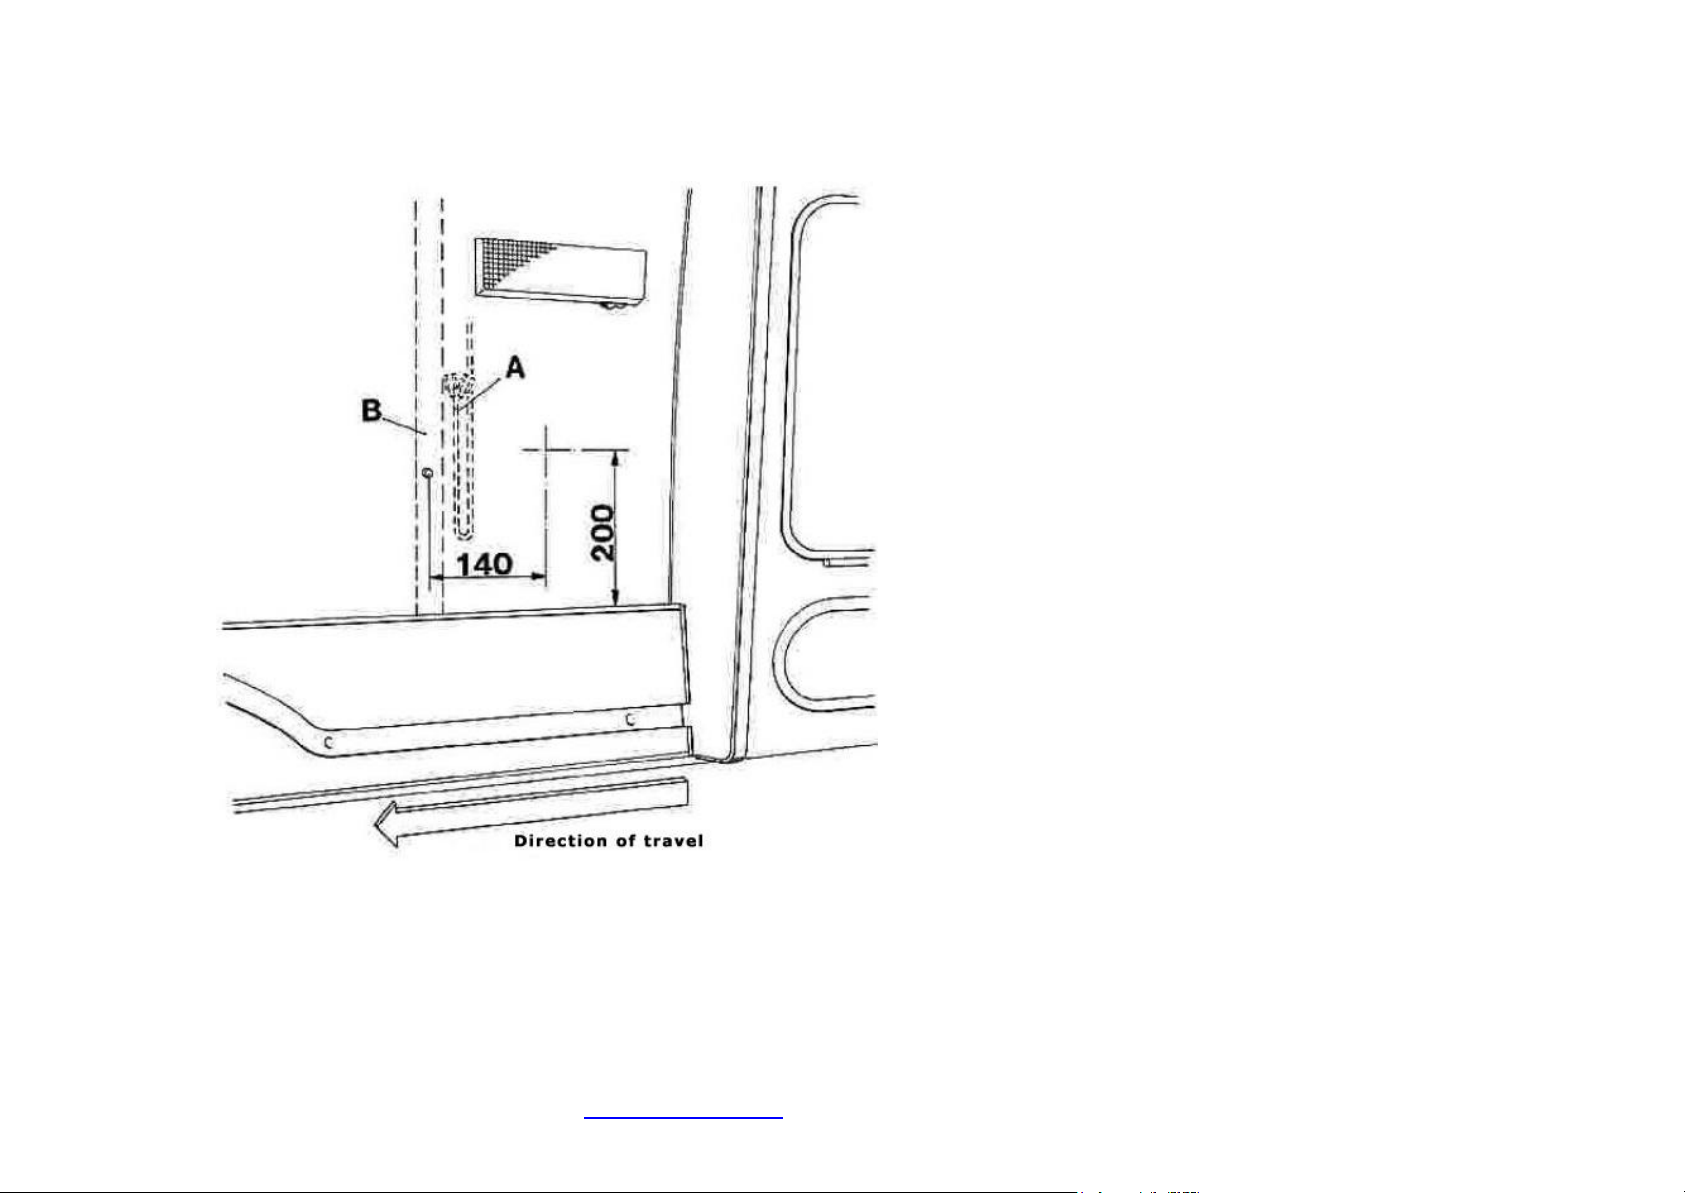
5.1 Installation Position of the Speakers
Position of the speaker cable
The speaker cables (A) are always located next to the roof brace
(B).
The dimensions (140 and 200) show the centre point of the
speaker.
The end of the speaker cables (rolled up together) are right and
left under the instrument panel. When using built in speakers note
the max mounting depth of 40mm.
Translated into English by www.westfaliaLT.info – a useful website for VW Westfalia LT Camper enthusiasts.
Page 23
The factory is working constantly in the development of all types
www.westfaliaLT.info - a useful site for enthusiasts and owners of VW Westfalia LT campers
and models. Please be aware we reserve the right to change our
supply range, its equipment and technology. From the information,
pictures and descriptions in this manual, therefore no claims can
be derived.
Translated into English by www.westfaliaLT.info – a useful website for VW Westfalia LT Camper enthusiasts.
Page 24
7
6
4 2
www.westfaliaLT.info - a useful site for enthusiasts and owners of VW Westfalia LT campers
Description Circuit
A Second battery 2 x 12V 80 Ah 9,10
A1 Battery charger 5,6
B Starter Battery drivers seat box 11
B1 Connection KI.61 under instrument
panel
C1 Starter battery isolating relay; driver’s
seat box
C2 Isolating relay; 12V fridge 49, 50
D1 Auxiliary heating (B2L/D2L) 14, 15
D2 Warm water boiler 38 - 48
E1 4A fuse (battery charger) 6
E2 25A fuse (auxiliary heating) 14
E3 16A fuse (central electrics) 15
E4 10A fuse (fridge, water pump, boiler) 17
E5 10A fuse (lighting) 18
E6 Over current trip (thermal fuse) 21
E7 1A fuse (boiler) 47
E8 Circuit breaker 10mA,L-automat 10A,
2 Pole
F1 Transistor light (kitchen area right) 67, 68
F2 Inner light (roof top right) 68, 69
F3 Inner light (shower)
F4 Inner light (roof top left) 73
F5 Transistor light (seat group) 72, 73
12
10, 11, 12
1, 2, 3
73
F6 Transistor light (seat group) 72, 73
G1 Fridge fan 52
G2 Water pump 58
H1 220V fridge heating element 4
H2 12V fridge heating element 50
H3 G as regulator heating element (Eis-
ex?)
J1 220V fridge switch 6, 7
J2 220V fridge thermostat 7
J3 12V fridge switch 50
J4 Thermo switch 52
J5 Switch heating element gas regulator
J6 Switch warm water boiler
J7 Switch water pump (shower) 57
J8 Switch water pump (kitchen) 58
J9 Button control display panel
J10 Door contact (sliding door) 69
J11 Door contact (rear door) 67
K1 220V external socket 1, 2, 3
K2 220V internal socket 1, 2, 3
K3 220V internal socket for fridge 4, 5, 6
L1 Tank water level sensor; waste water
tank
L2 Tank water level sensor; fresh water
tank
M1 Central electric control display unit 17 - 37
66
61, 62. 63
61, 62. 63
S1 3 pin connector; battery charger
S2 3 pin connector; battery charger
S3 2 pin connector; auxiliary heating
S4 4 way connector, central electric
S5 12 pin connector, central electric
S6 9 pin connector, central electric
S7 9 pin connector, boiler
S8 2 pin connector, boiler
S9 3 pin connector; fridge
S10 2 way connector; fridge
S11 2 way connector, shower tap
S
2 way connector, kitchen tap
12,
S13 2 pin connector, water pump
S14, 2 pin connector gas regulator (eis-ex?)
External socket earth point
Battery box drivers seat earth point
Column rear right earth point
Longitudinal beam earth point
Floor rear seat bank earth point
Wheel arch rear right earth point
Column –C-, right earth point
Page 25
www.westfaliaLT.info - a useful site for enthusiasts and owners of VW Westfalia LT campers
 Loading...