

Page 1
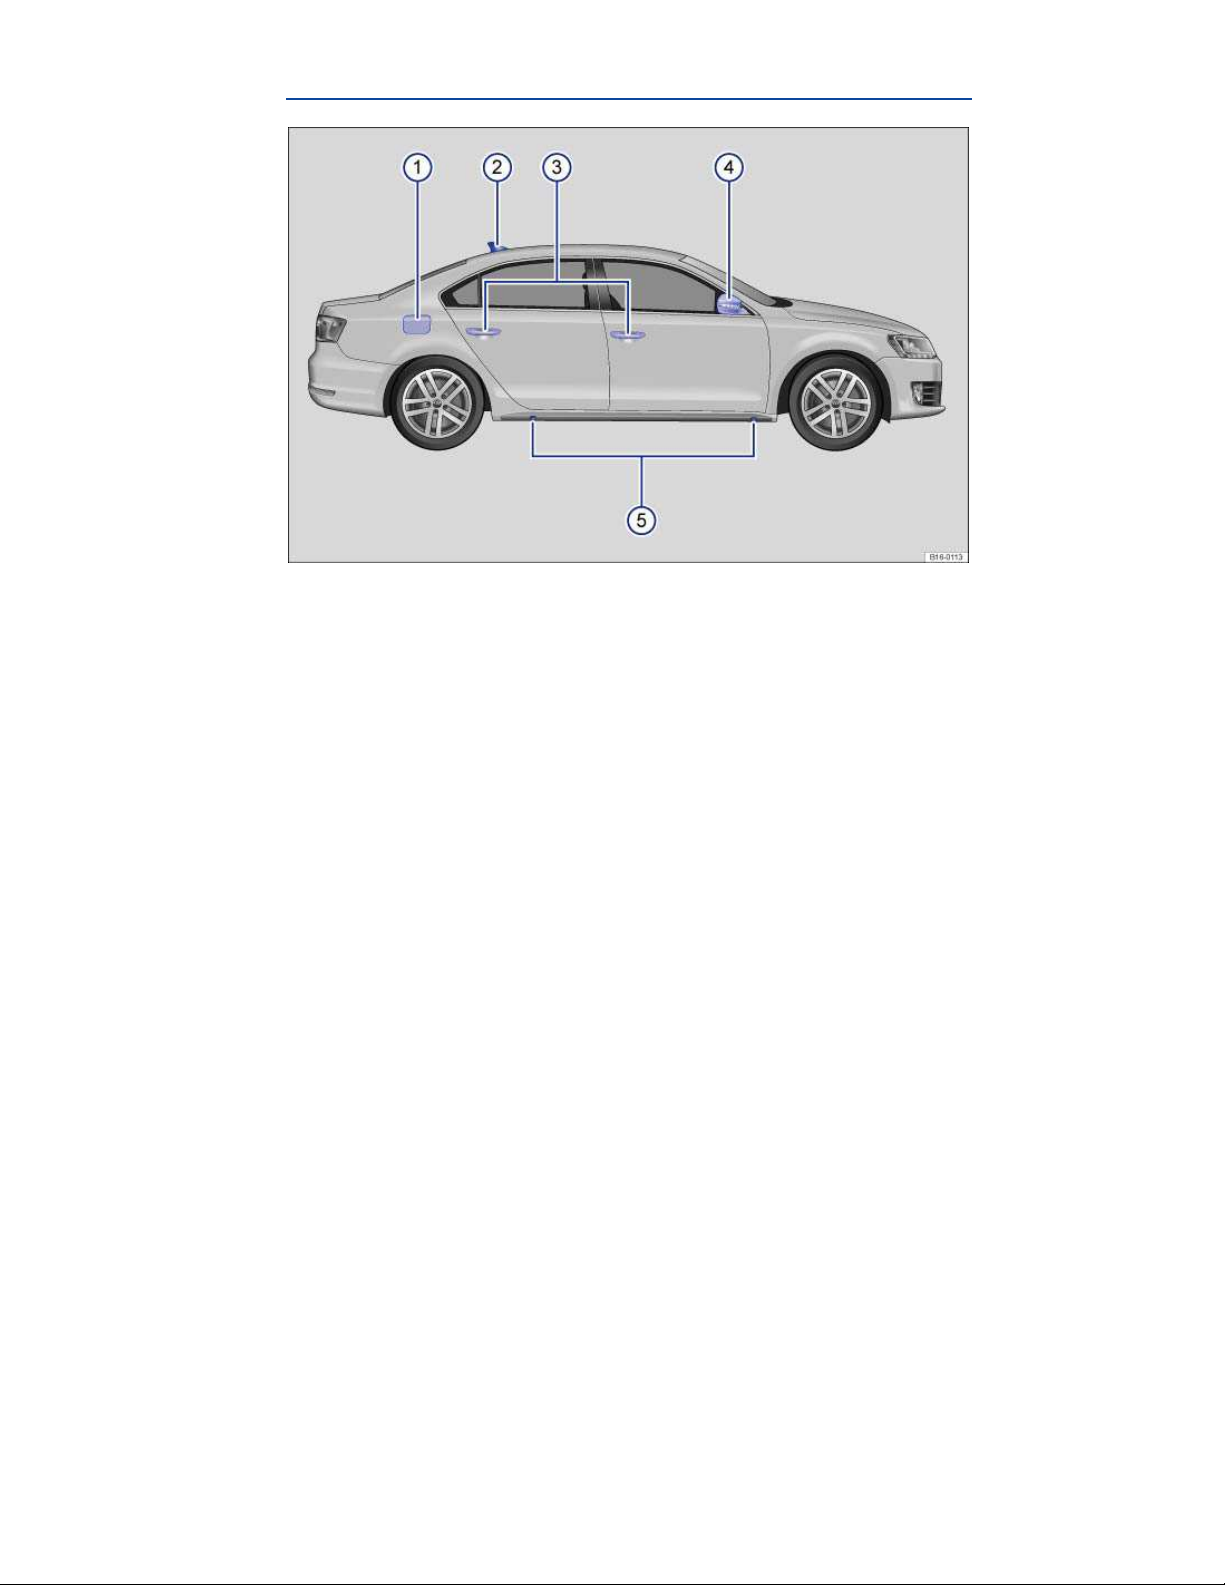
Side view
Fig. 1 Vehicle side overview.
Key to fig. 1:
(1) Fuel filler flap
(2) Roof antenna
(3) Outside door handles
(4) Outside mirror
– Additional turn signal light
(5) Lift points for the jack
Page 2
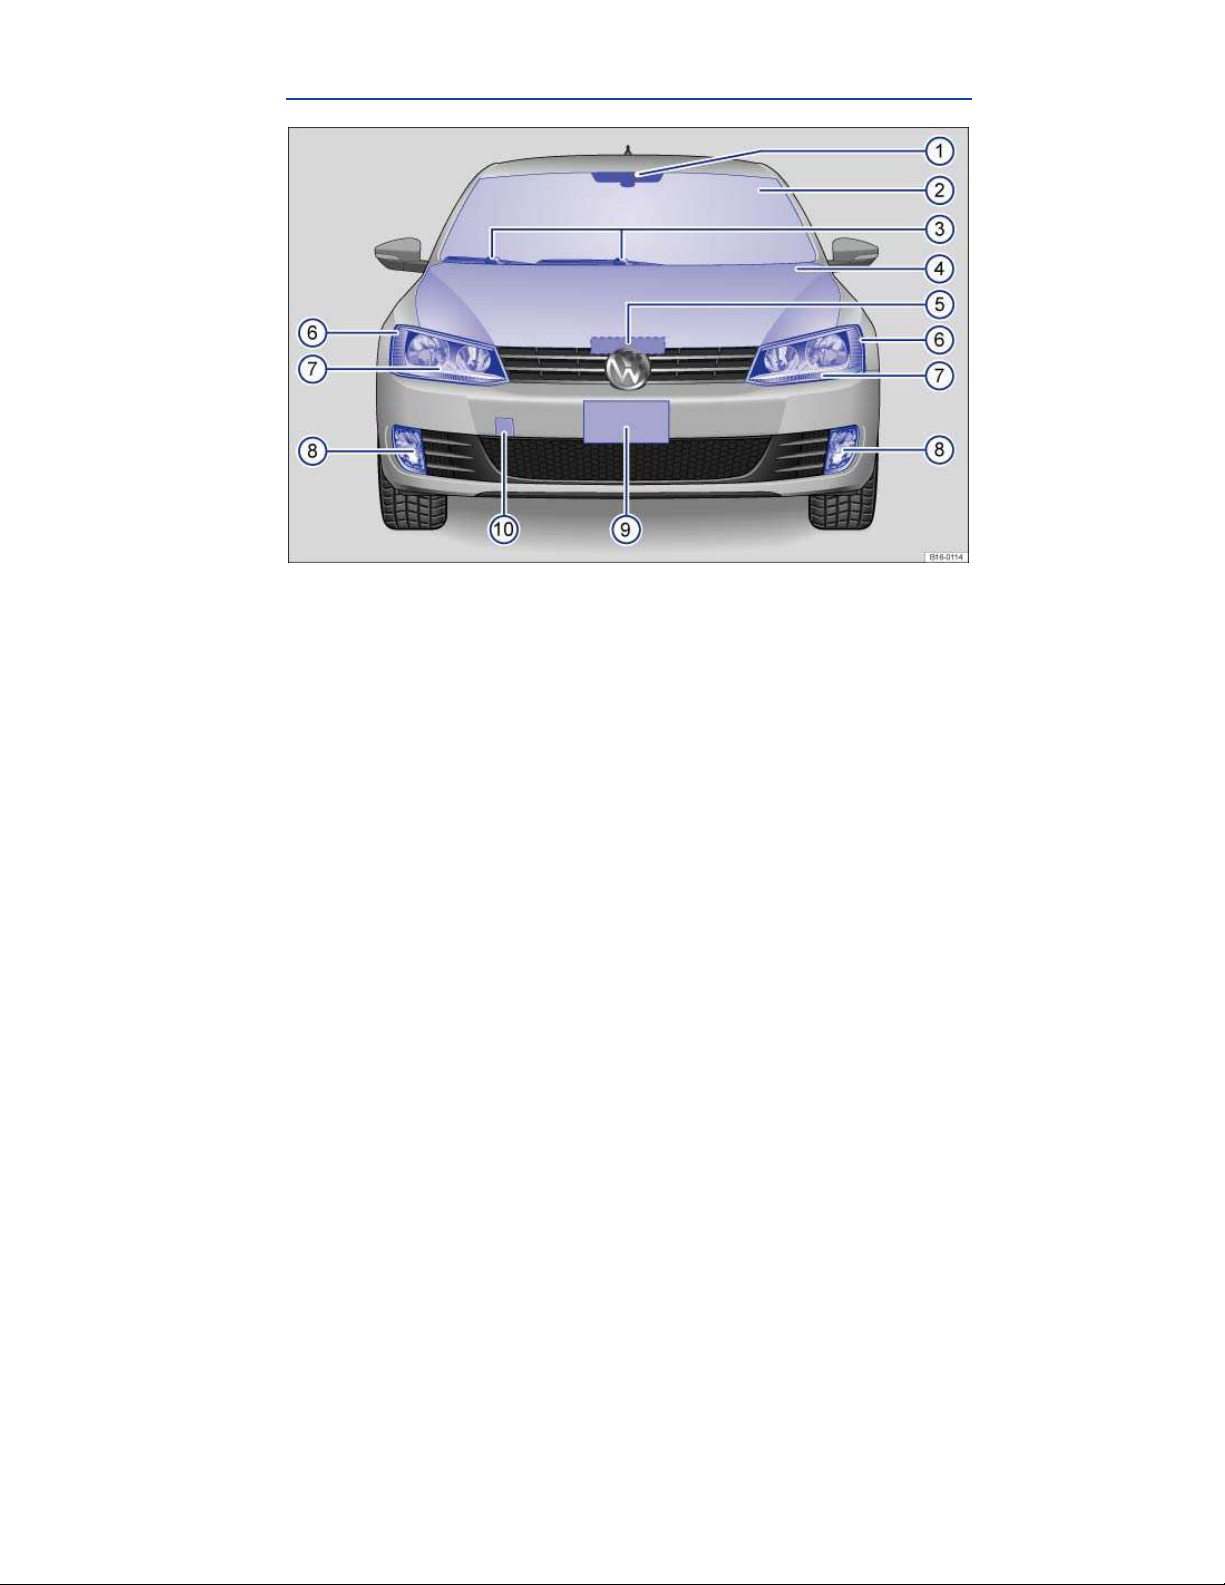
Front view
Fig. 2 Vehicle front overview.
Key to fig. 2:
(1) Inside mirror
(2) Front windshield
(3) Windshield wipers
(4) Engine hood
(5) Engine hood release
(6) Side marker lights
(7) Headlights
(8) Fog lights
(9) Front license plate bracket
(10) Threaded hole for the front towing eye (behind cover)
Page 3
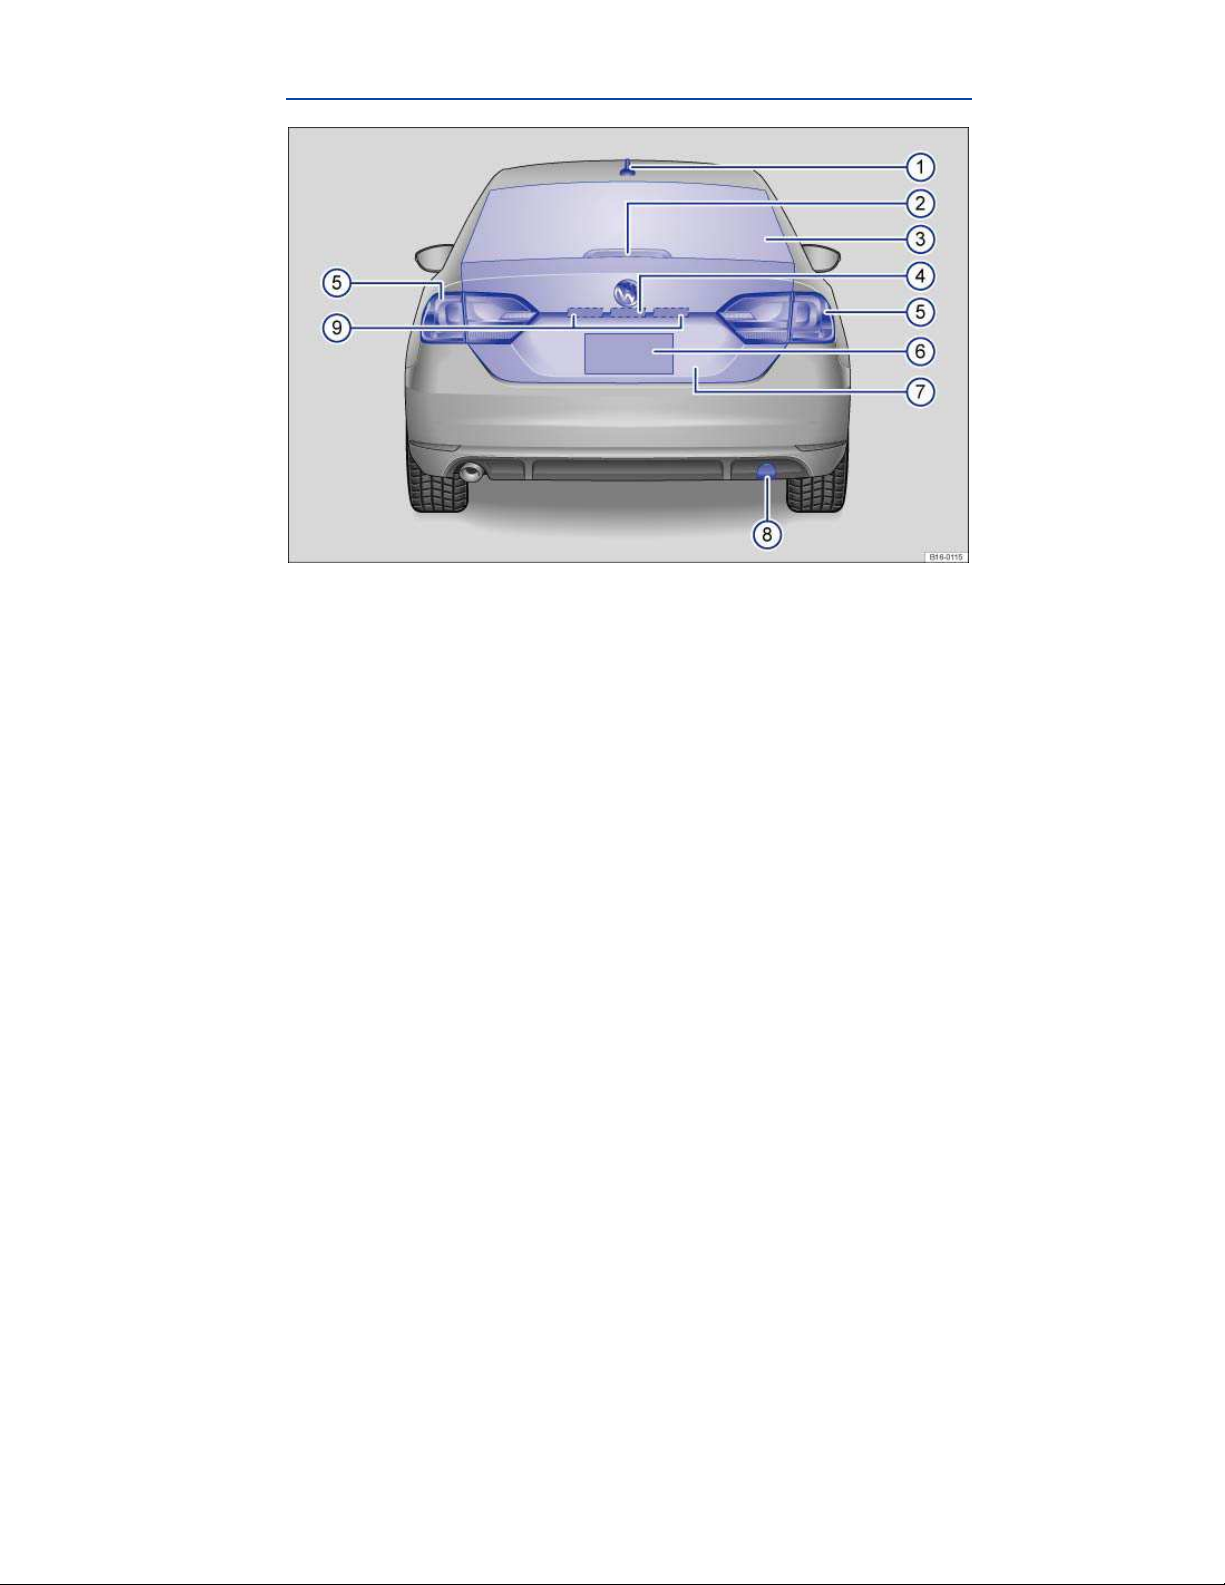
Rear view
Fig. 3 Vehicle rear overview.
Key to fig. 3:
(1) Roof antenna
(2) High-mounted brake light
(3) Rear window
– Rear window defroster
(4) Luggage compartment release
(5) Taillights
(6) Rear license plate bracket
(7) Luggage compartment lid
(8) Threaded hole for the rear towing eye (behind cover)
(9) License plate lights
Page 4
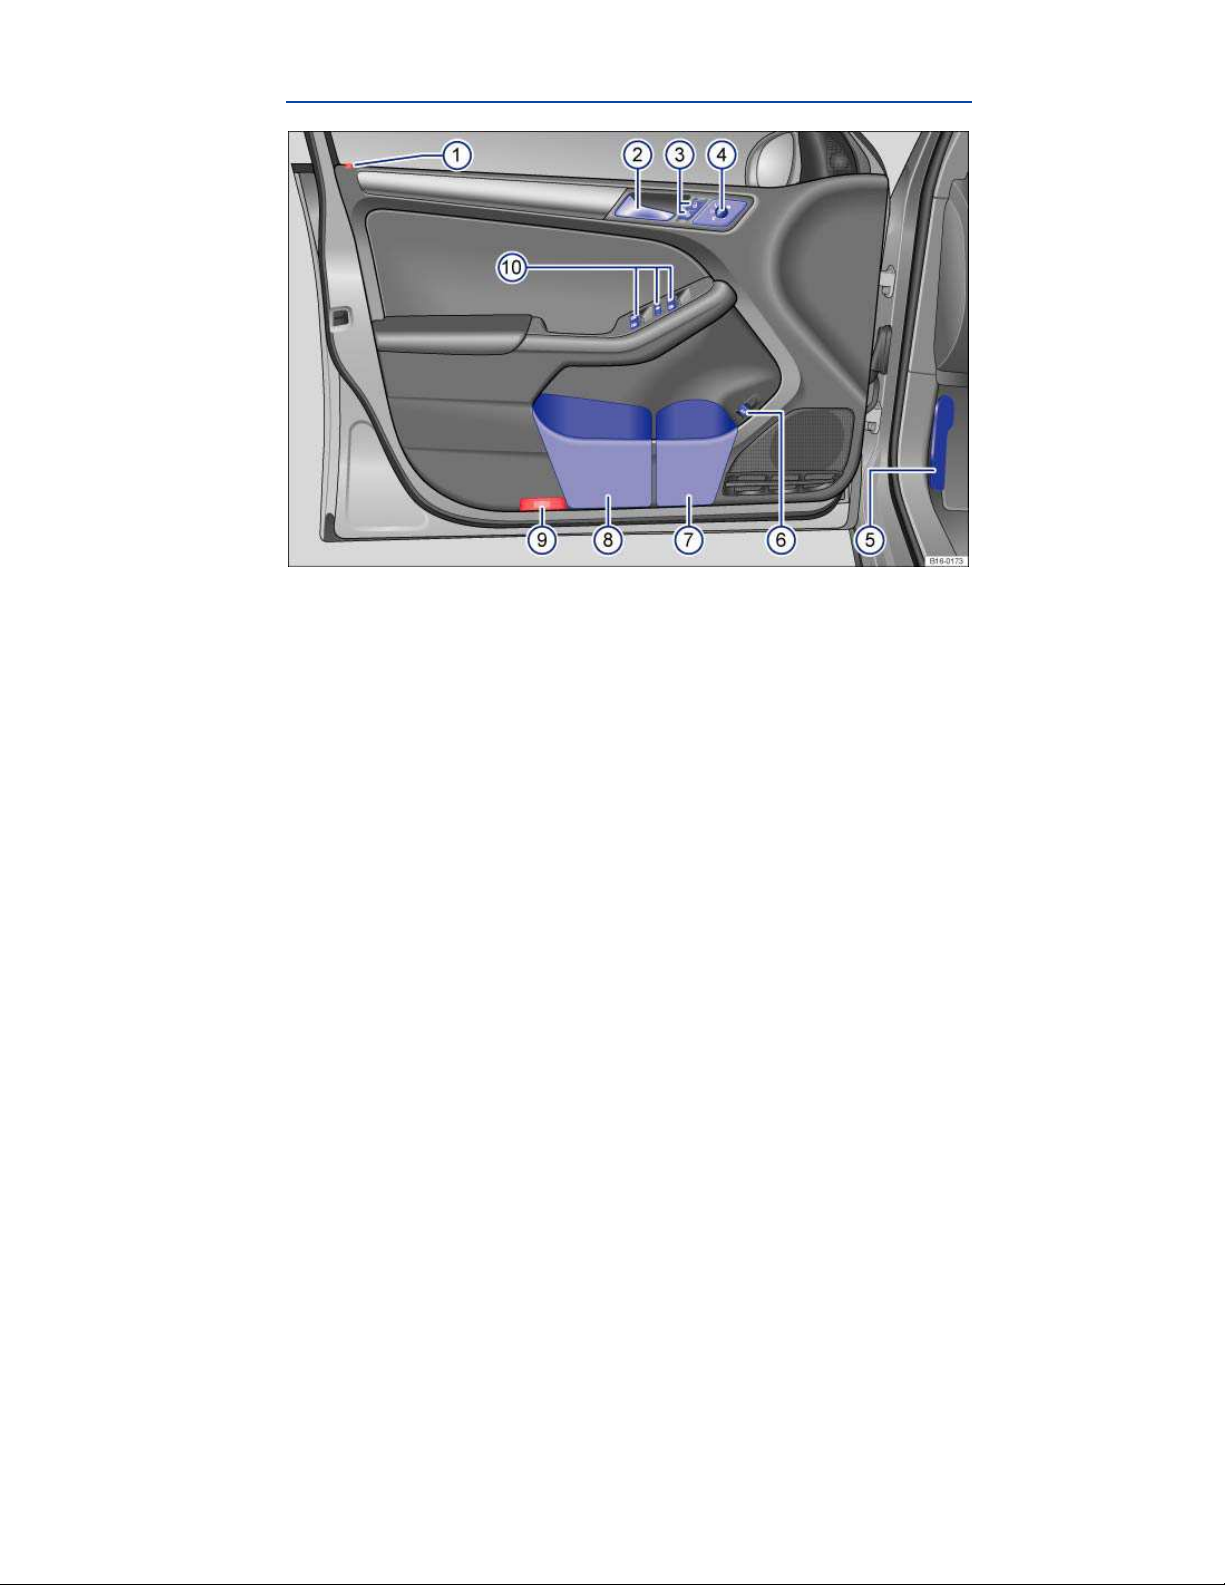
Driver door overview
Fig. 4 Overview of controls in the driver door.
Key to fig. 4:
(1) Indicator light for anti-theft alarm system (if equipped)
(2) Door handle
(3) Power locking button for locking and unlocking the vehicle –
(4) Switch for adjusting the outside mirror (equipment varies)
– Adjusting outside mirrors – –
– Outside mirror heating
(5) Lever for releasing the engine hood
(6) Luggage compartment release
(7) Bottle holder
(8) Storage compartment
(9) Reflector
(10) Buttons for operating the power windows
– Power windows
– Safety switch for rear power windows
Page 5
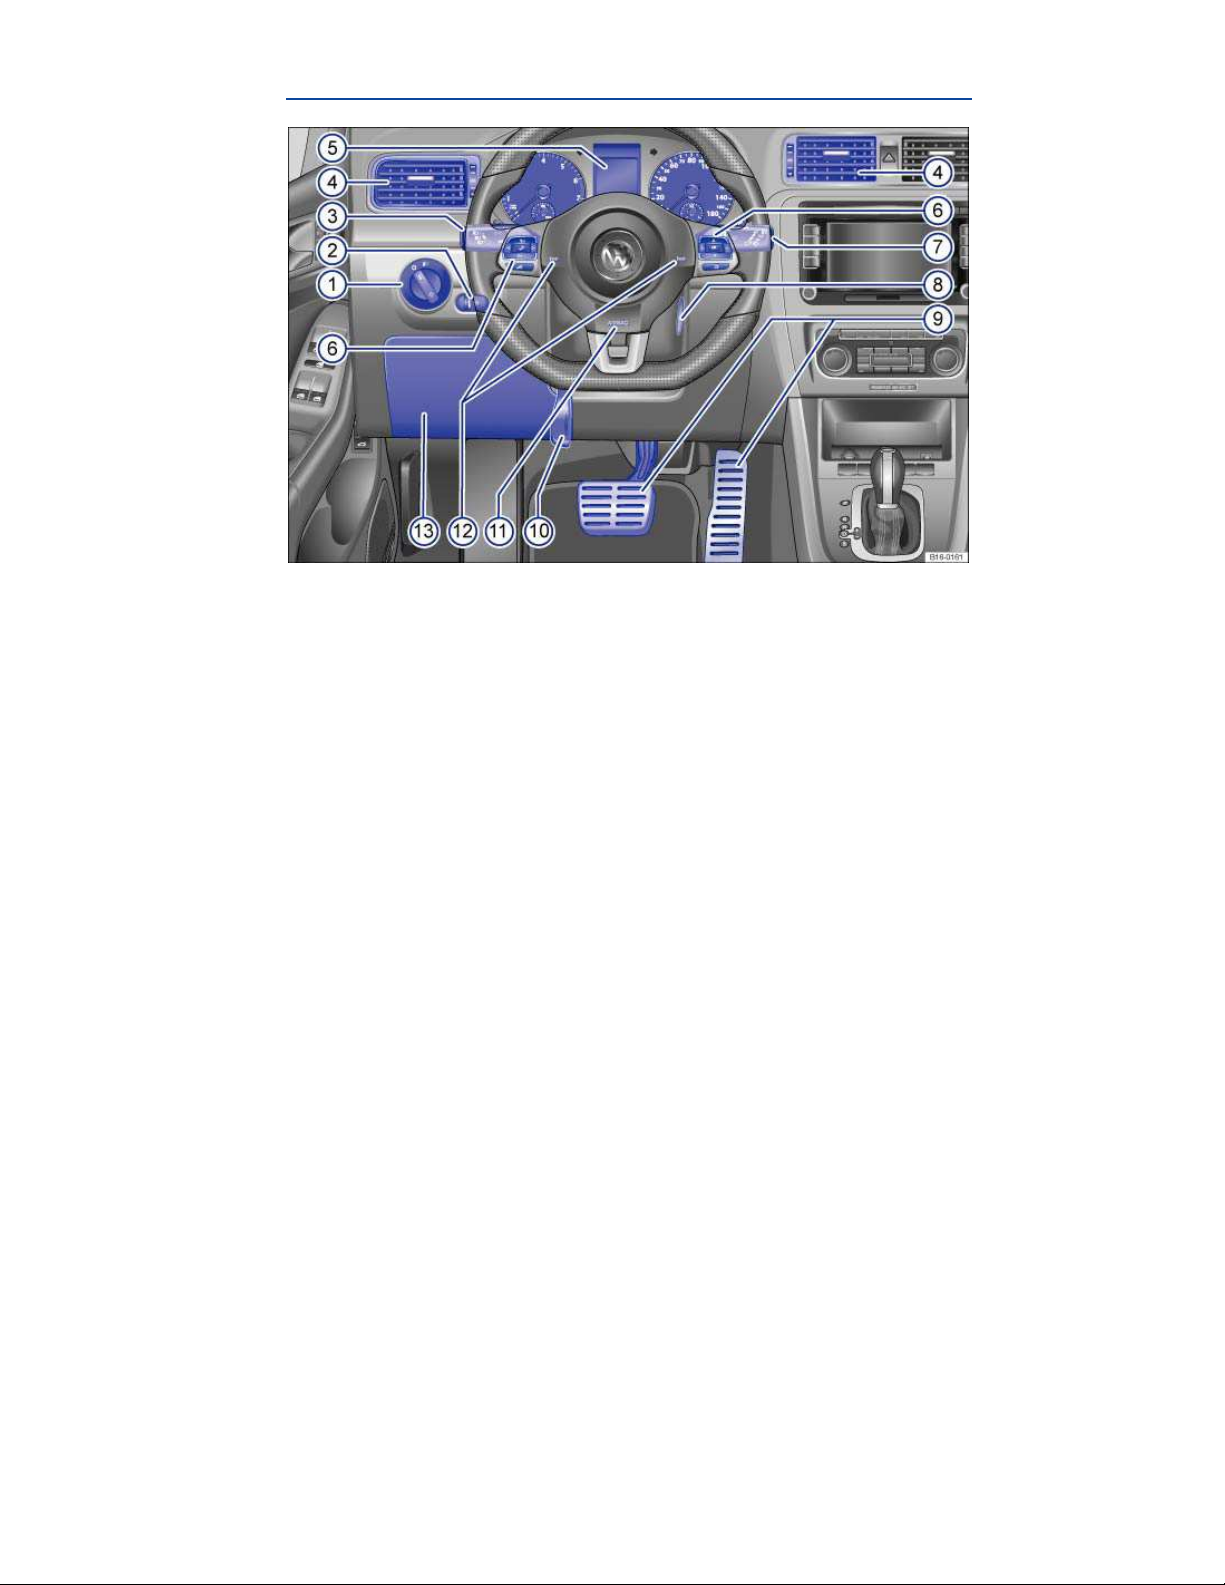
Driver side overview
Fig. 5 Driver side overview.
Key to ⇒ fig. 5:
(1) Headlight switch
– Off position
– Low beams
– Fog lights
(2) Dimmer control for the instrument and switch illumination
(3) Lever for
– High beams
– Headlight flasher
– Turn signals .
– Cruise Control System (CCS) – – – –
(4) Air vents – –
(5) Instrument cluster:
– Instruments
– Display
– Warning and indicator lights
(6) Multi-function steering wheel controls
– Volume setting for radio programs, navigation system notifications, or telephone calls –
– Mute switching for radio or activation of voice control
– Display telephone main menu or accept telephone calls
– Audio, navigation
– Control switches for the Volkswagen Information System # ∃, ,
(7) Windshield wiper and washer lever
Page 6

– Windshield wiper –
– Intermittent operation for windshield wipers
– Windshield wiper
– “One-tap wiping” x
– Windshield wiper
– Automatic wipe/wash for windshield
– Lever with buttons for the Volkswagen information system ,
(8) Ignition switch (vehicles without Keyless Access) or location for the emergency start feature for
the Keyless Access locking and starting system
(9) Pedals
(10) Lever for adjustable steering wheel
(11) Driver front airbag
(12) Horn (only works when the ignition is switched on)
(13) Fuse box cover
OF F
Page 7
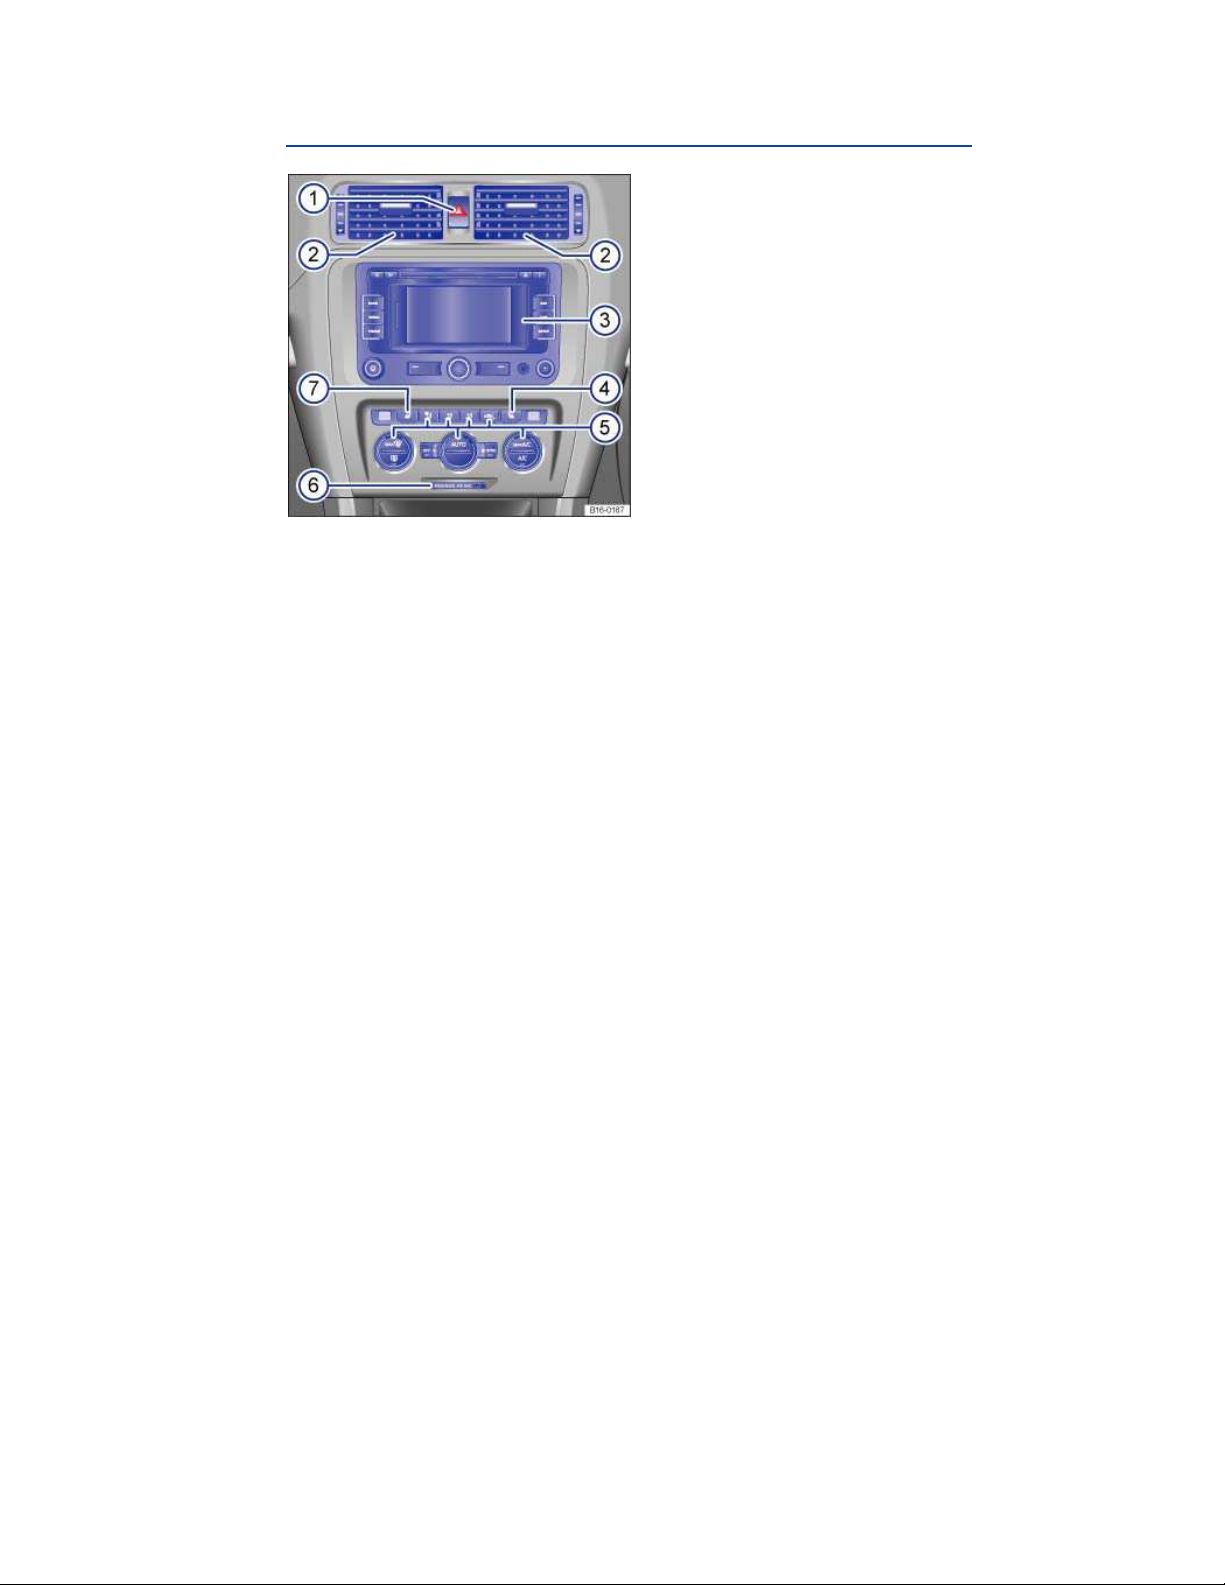
Center console overview
Upper center console
Fig. 6 Overview of the upper center console.
Key to fig. 6:
(1) Switch for emergency flashers
(2) Air vents – –
(3) Radio or Radio & Navigation system (factory-installed) ⇒ Booklet
⇒ Booklet
(4) Controls for:
– Manual AC
– Climatronic
(5) Passenger seat heating button
(6) PASSENGER AIR BAG light (front airbag for front seat passenger)
(7) Driver seat heating button
Navigation system
Radio
or
Page 8
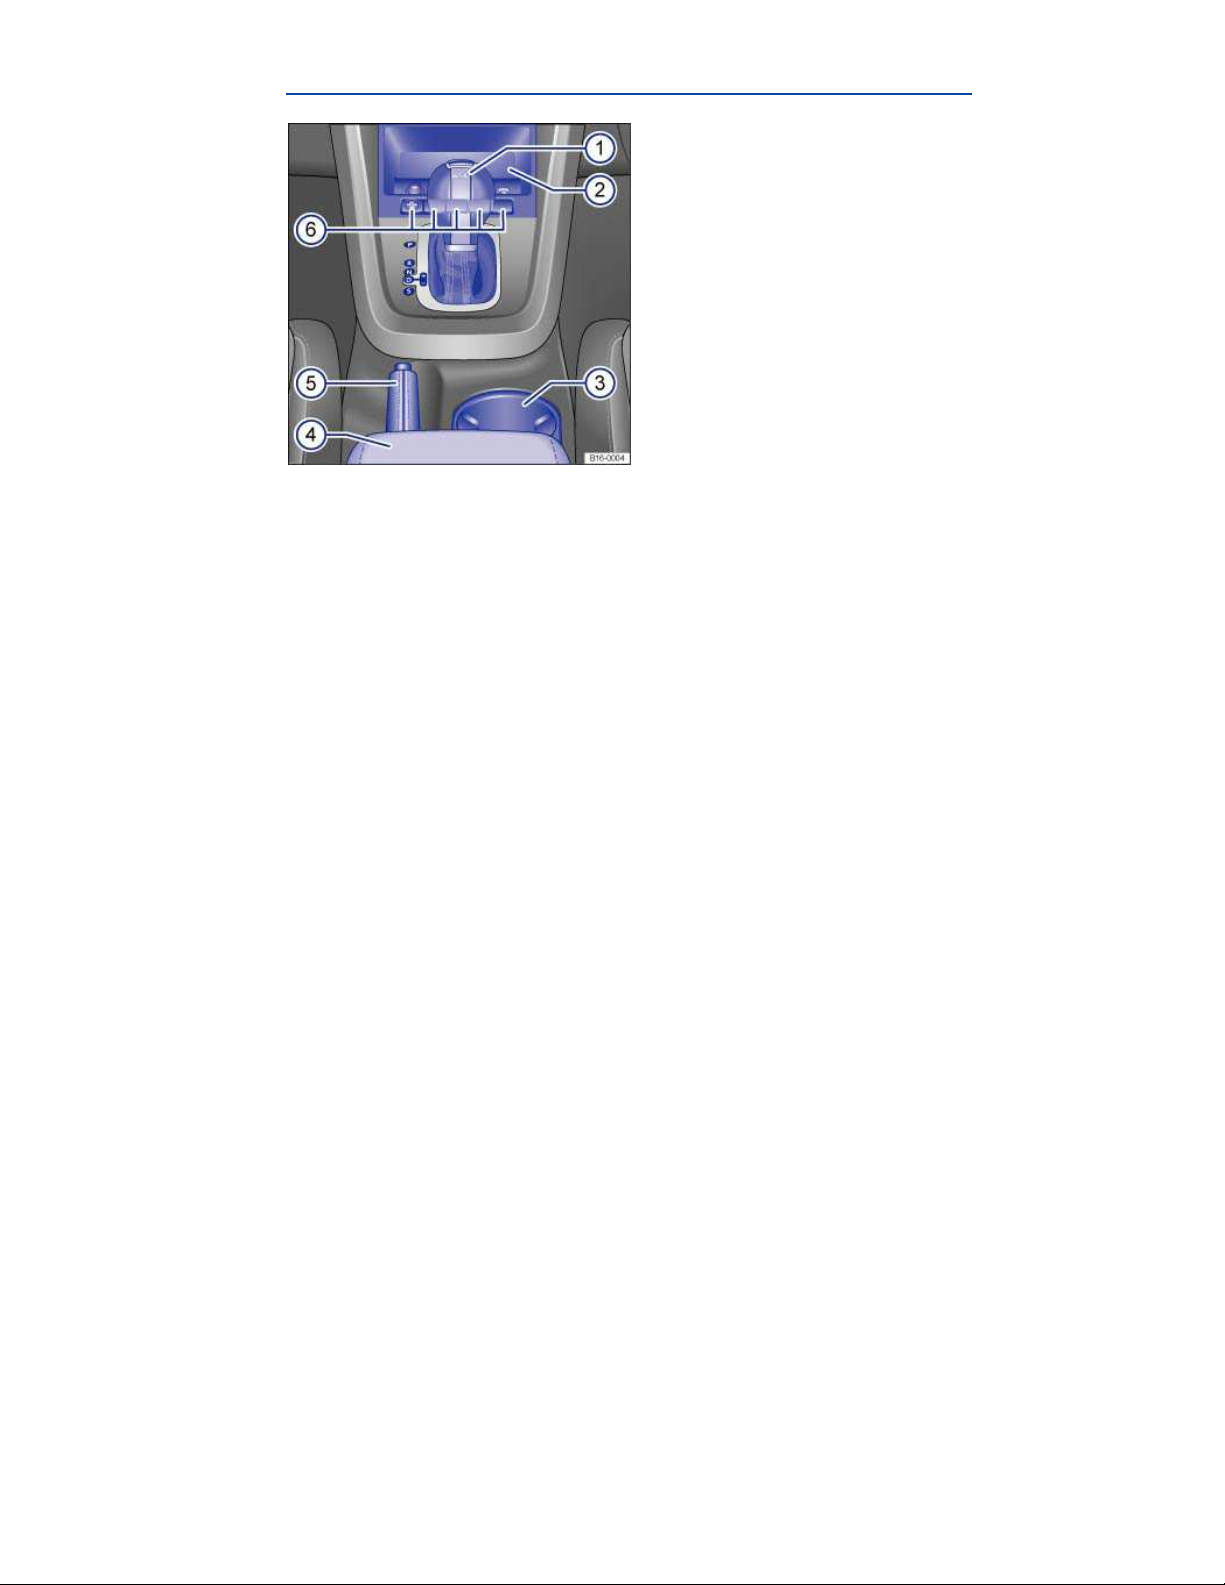
Lower center console
Fig. 7 Overview of the lower center console.
Key to fig. 7:
(1) Lever for:
– Manual transmission
– Automatic transmission
(2) Storage compartment
– with 12 Volt socket
Radio
– with AUX-IN socket ⇒ Booklet
– Card holder
(3) Storage compartment with cup holder in the center console
(4) Center armrest with storage compartment
(5) Parking brake lever
(6) Buttons for:
– Starter button for the Keyless Access locking and starting system
– ASR off button
or ⇒ Booklet
Navigation system
Page 9
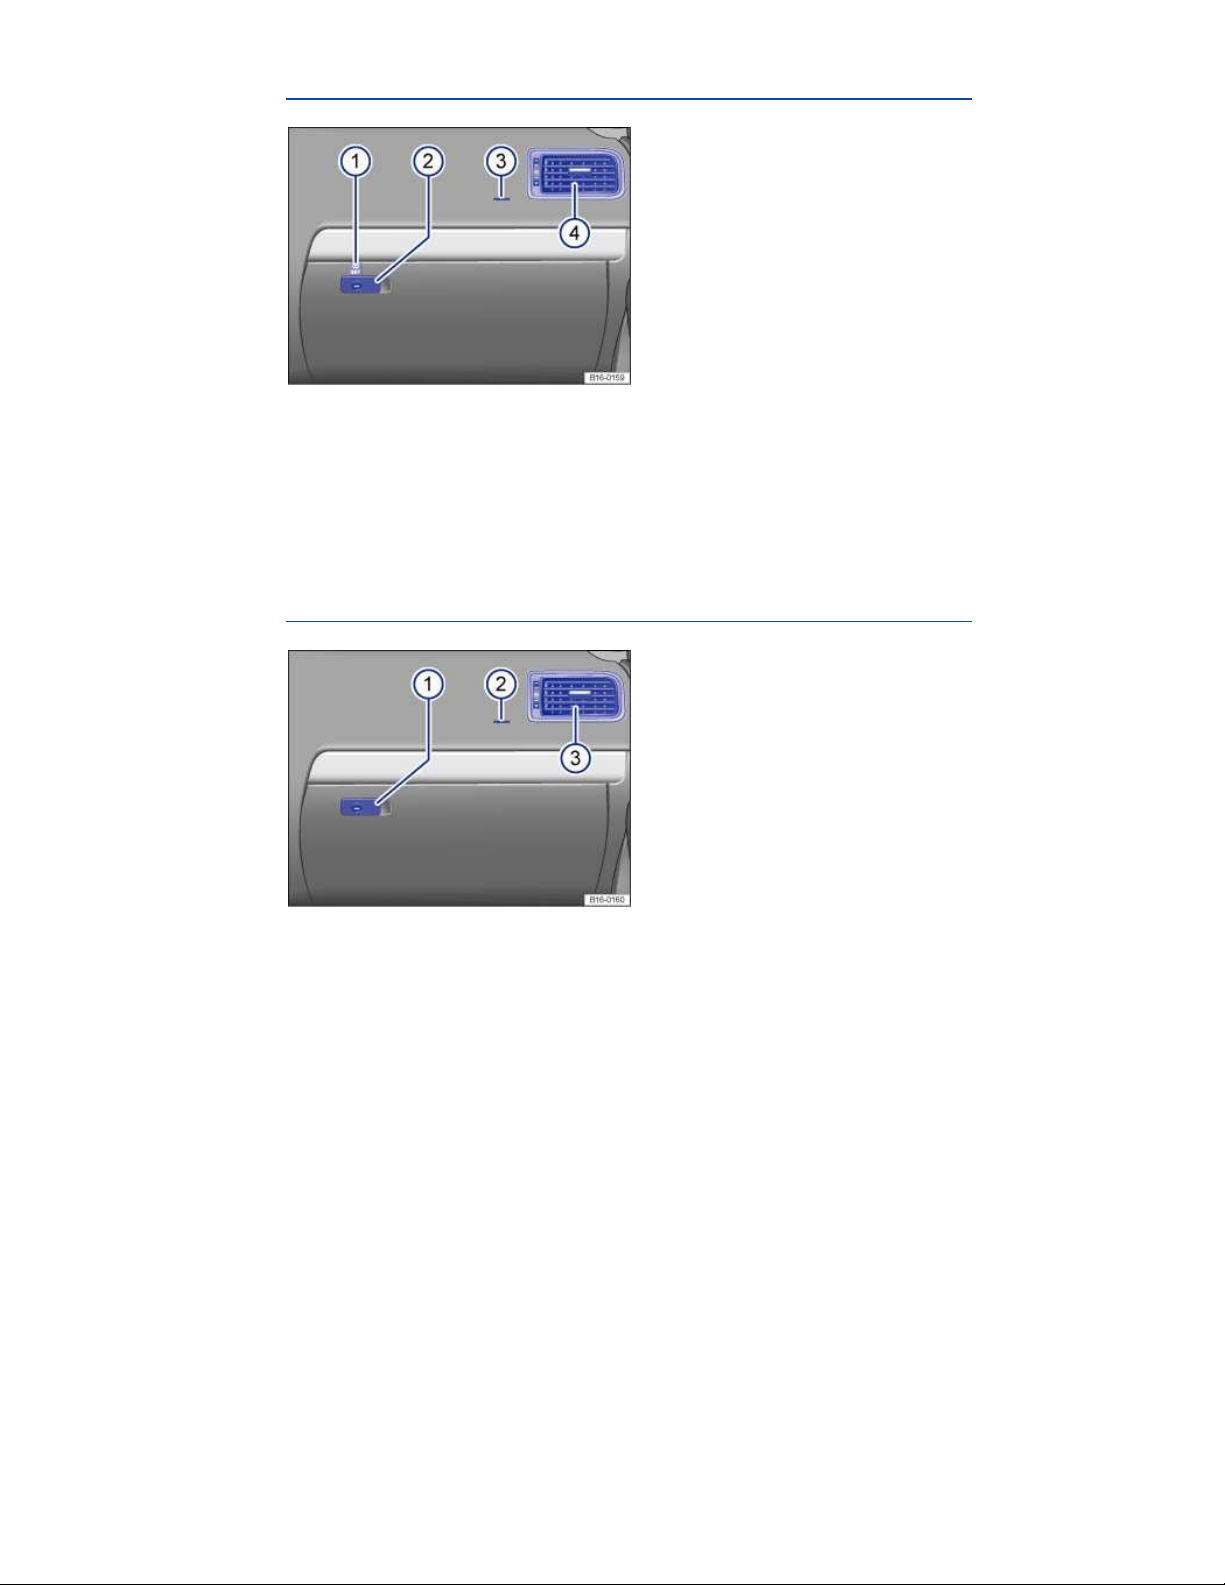
Front passenger side overview
Fig. 8 Overview of the front passenger side.
Key to fig. 8:
(1) Inside the glove compartment: SET button for Tire Pressure Monitoring System
(2) Opening handle for the glove compartment
(3) Passenger front airbag location in the instrument panel (approximate)
(4) Air vent – –
Applicable only in Canada
Front passenger side overview
Fig. 9 Overview of the front passenger side.
Key to ⇒ fig. 9:
(1) Opening handle for the glove compartment
(2) Passenger front airbag location in the instrument panel (approximate)
(3) Air vent – –
Page 10

Applicable only in the United States
Symbols on the roof console
Symbol Meaning
Interior and reading lights
Power sunroof
Applicable only in Canada
Three-button module ⇒ Booklet
Symbols on the roof console
Symbol Meaning
Interior and reading lights
Power sunroof
Mobile Phone Package
.
Page 11
Instrument cluster
Introduction
In this section you’ll find information about:
Instrument overview
Instrument overview
Displays
Compass
Service reminder display
More information
Warning and indicator lights
Volkswagen Information System
Display of the selected gears (automatic transmission)
Service reminder information ⇒ Booklet
WARNING
Driving on today's roads demands the full attention of the driver at all times. Driver distraction causes accidents, collisions and serious personal injury!
Never use the buttons in the instrument cluster while driving.
Applicable only in the United States
Instrument overview
Warranty and Maintenance
.
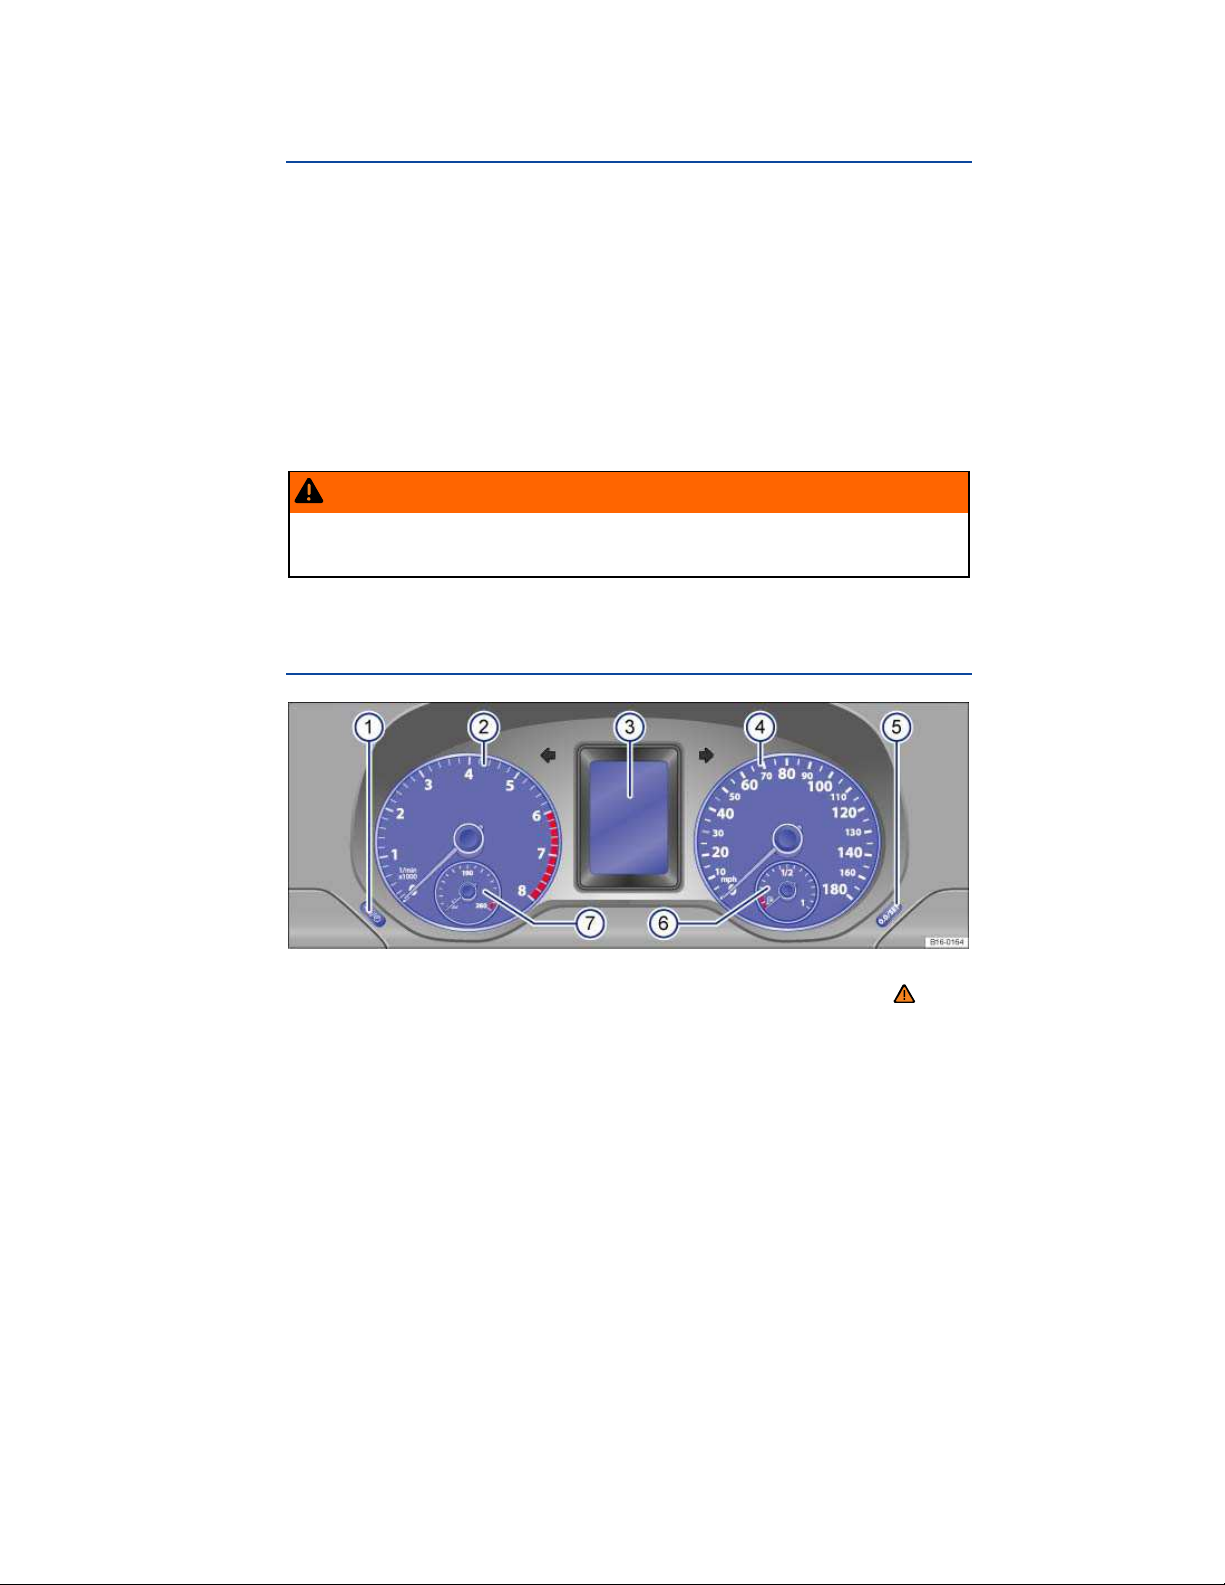
Fig. 10 Instrument cluster in the instrument panel.
Please first read and note the introductory information and heed the WARNINGS
Page 12
Instrument explanations ⇒ fig. 10:
(1) Button for setting the instrument cluster clock1.
– With the ignition on, push the button to highlight the hour or the minutes in the clock
display.
– To advance the clock, push the button
– Push the button again or wait about 10 seconds to finish setting the clock.
(2) Tachometer (in thousands of revolutions per minute when the engine is running).
The red zone at the end of the scale indicates maximum permissible engine rpm (revolutions
per minute) for all gears after the break-in period. Before reaching the red zone, select the next
higher gear or selector level position D, or ease your foot off the accelerator ⇒
(3) Displays
(4) Speedometer.
(5) Reset button for the trip odometer display (trip).
– Push the button for about 1 second to reset to zero.
(6) Fuel gauge
(7) Engine coolant temperature display
(5). Press and hold the button to fast forward.
.
NOTICE
To help prevent engine damage, always avoid high engine speeds, full throttle acceleration
and heavy engine loads when the engine is cold.
To help prevent engine damage, the tachometer needle should only enter the red zone
(warning zone) briefly.
Upshifting early into the next higher gear saves fuel and reduces engine noise.
Applicable only in Canada
Instrument overview
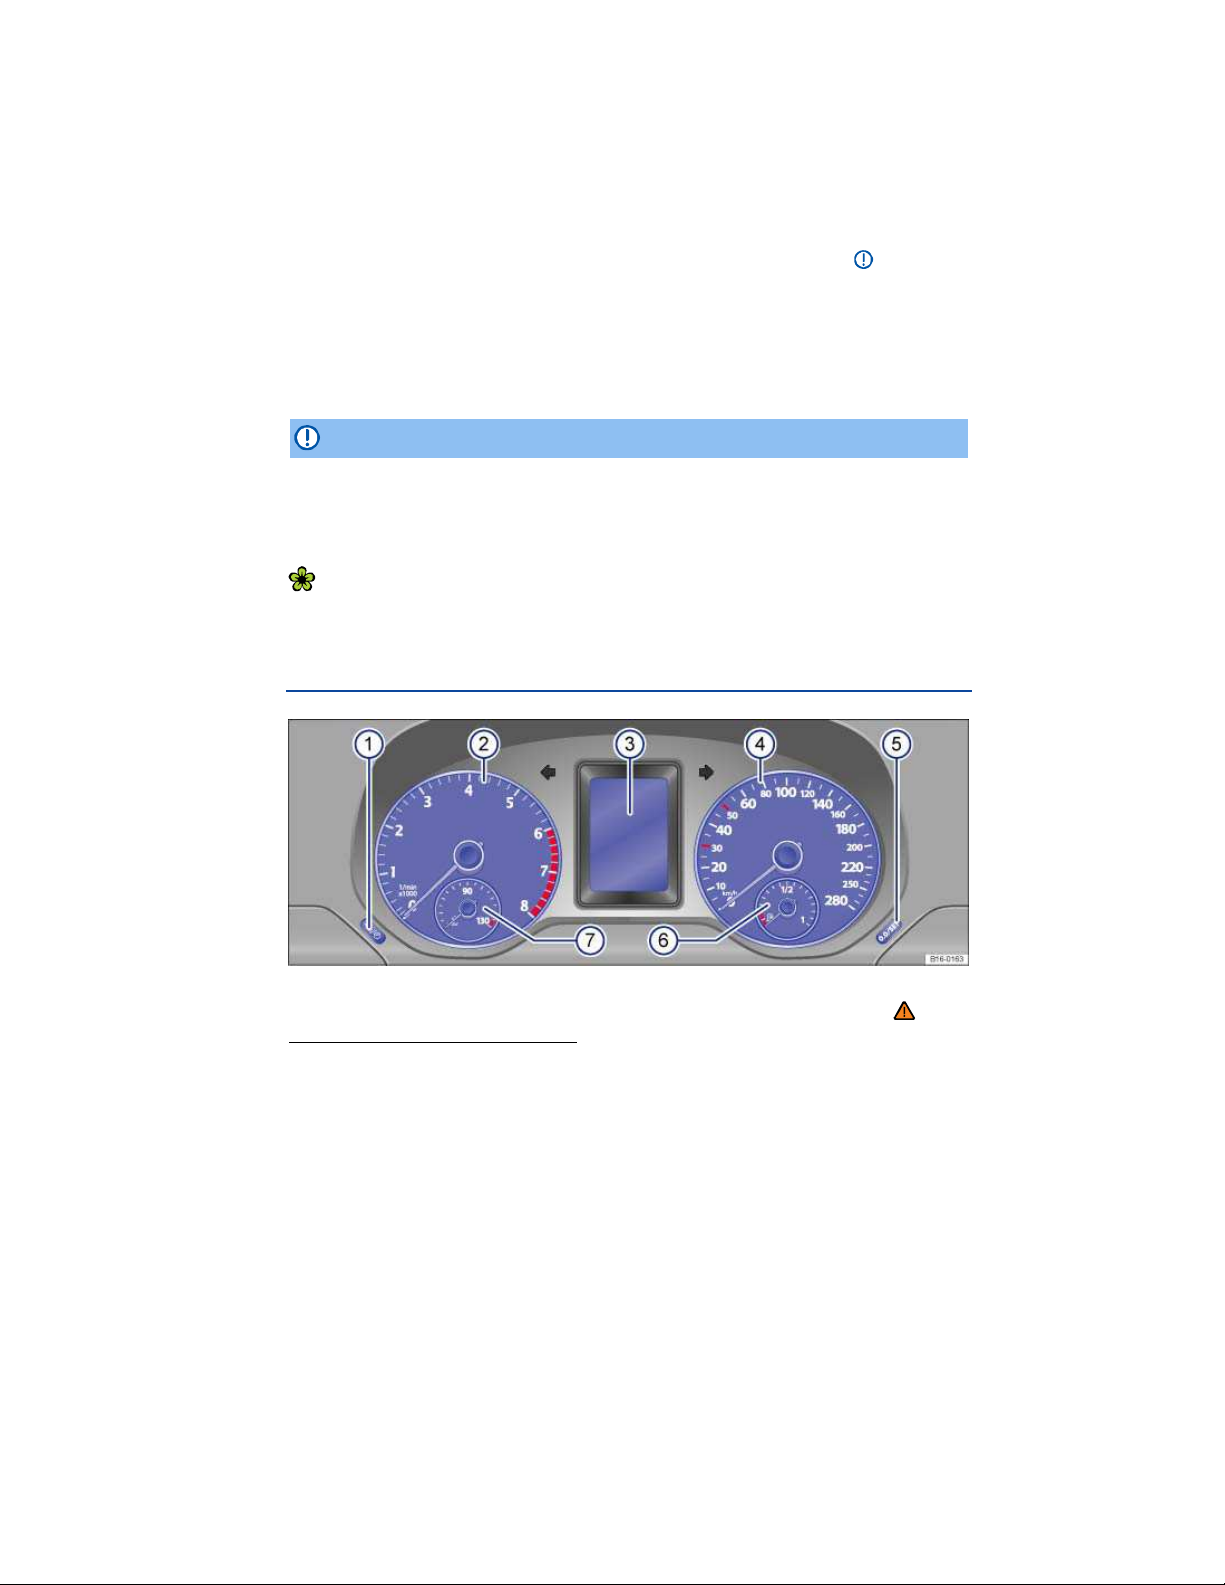
Fig. 11 Instrument cluster in the instrument panel.
Please first read and note the introductory information and heed the WARNINGS
1
On appropriately equipped vehicles, the clock can also be set via the
Settings menu in the instrument cluster display ⇒ page 2.
Page 13
Instrument explanations ⇒ fig. 11:
(1) Button for setting the instrument cluster clock2.
– With the ignition on, push the button to highlight the hour or the minutes in the clock
display.
– To advance the clock, push the button
– Push the button again or wait about 10 seconds to finish setting the clock.
(2) Tachometer (in thousands of revolutions per minute when the engine is running).
The red zone at the end of the scale indicates maximum permissible engine rpm (revolutions
per minute) for all gears after the break-in period. Before reaching the red zone, select the next
higher gear or selector level position D, or ease your foot off the accelerator ⇒
(3) Displays 20.
(4) Speedometer.
(5) Reset button for the trip odometer display (trip).
– Push the button for about 1 second to reset to zero.
(6) Fuel gauge 220.
(7) Engine coolant temperature display
(5). Press and hold the button to fast forward.
.
NOTICE
To help prevent engine damage, always avoid high engine speeds, full throttle acceleration
and heavy engine loads when the engine is cold.
To help prevent engine damage, the tachometer needle should only enter the red zone
(warning zone) briefly.
Upshifting early into the next higher gear saves fuel and reduces engine noise.
Displays
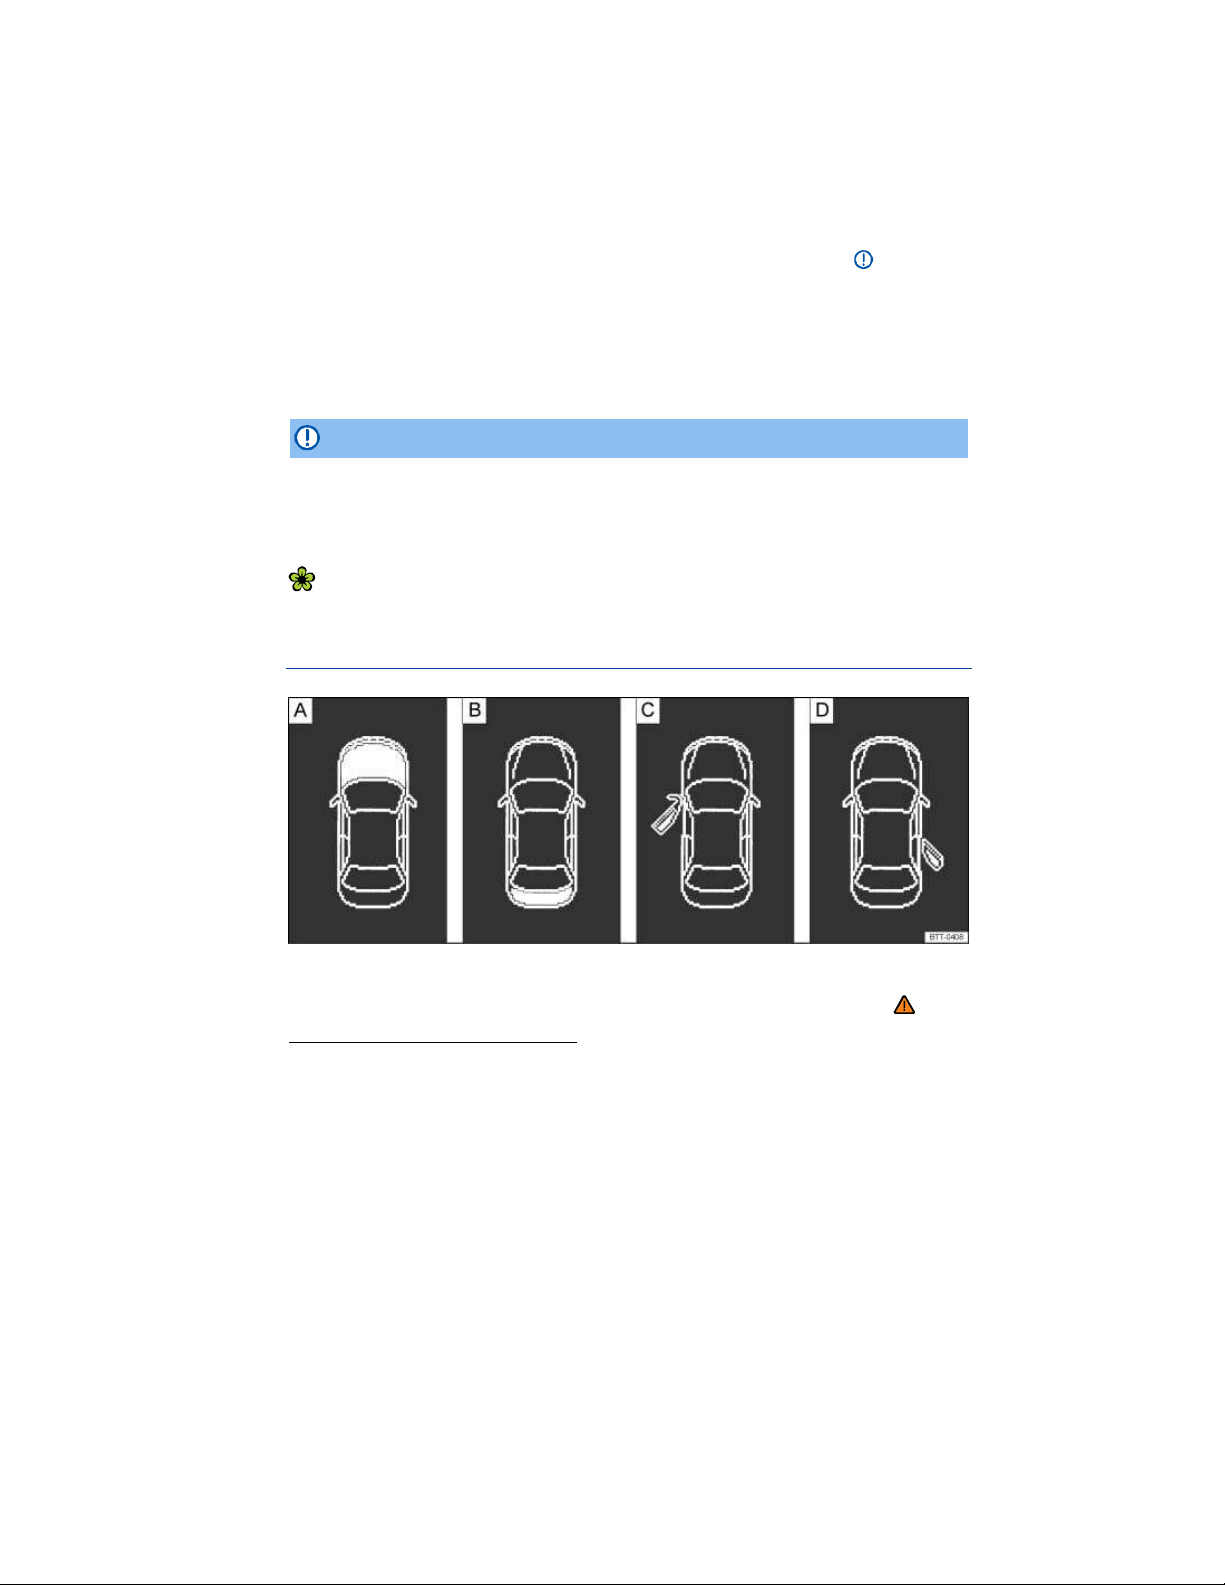
Fig. 12 In the instrument cluster display: A: Open engine hood, B: Open luggage compartment lid, C: Open
front driver side door, D: Open rear passenger side door.
Please first read and note the introductory information and heed the WARNINGS
2
On appropriately equipped vehicles, the clock can also be set via the
Settings menu in the instrument cluster display ⇒ page 2.
Page 14
Depending on the vehicle model, different information may be shown in the instrument cluster display
⇒
fig. 10 (3), ⇒ fig. 11 (3).
Warning and information texts
Odometer displays
Time
Outside temperature
Compass display
Open door, engine hood, or luggage compartment lid ⇒
Selector lever position
Gear recommendation (manual transmission)
Multi-Function Indicator (MFI) and menus for different settings
Service reminder display
Alternative speed display (Settings menu)
fig. 12.
Compass
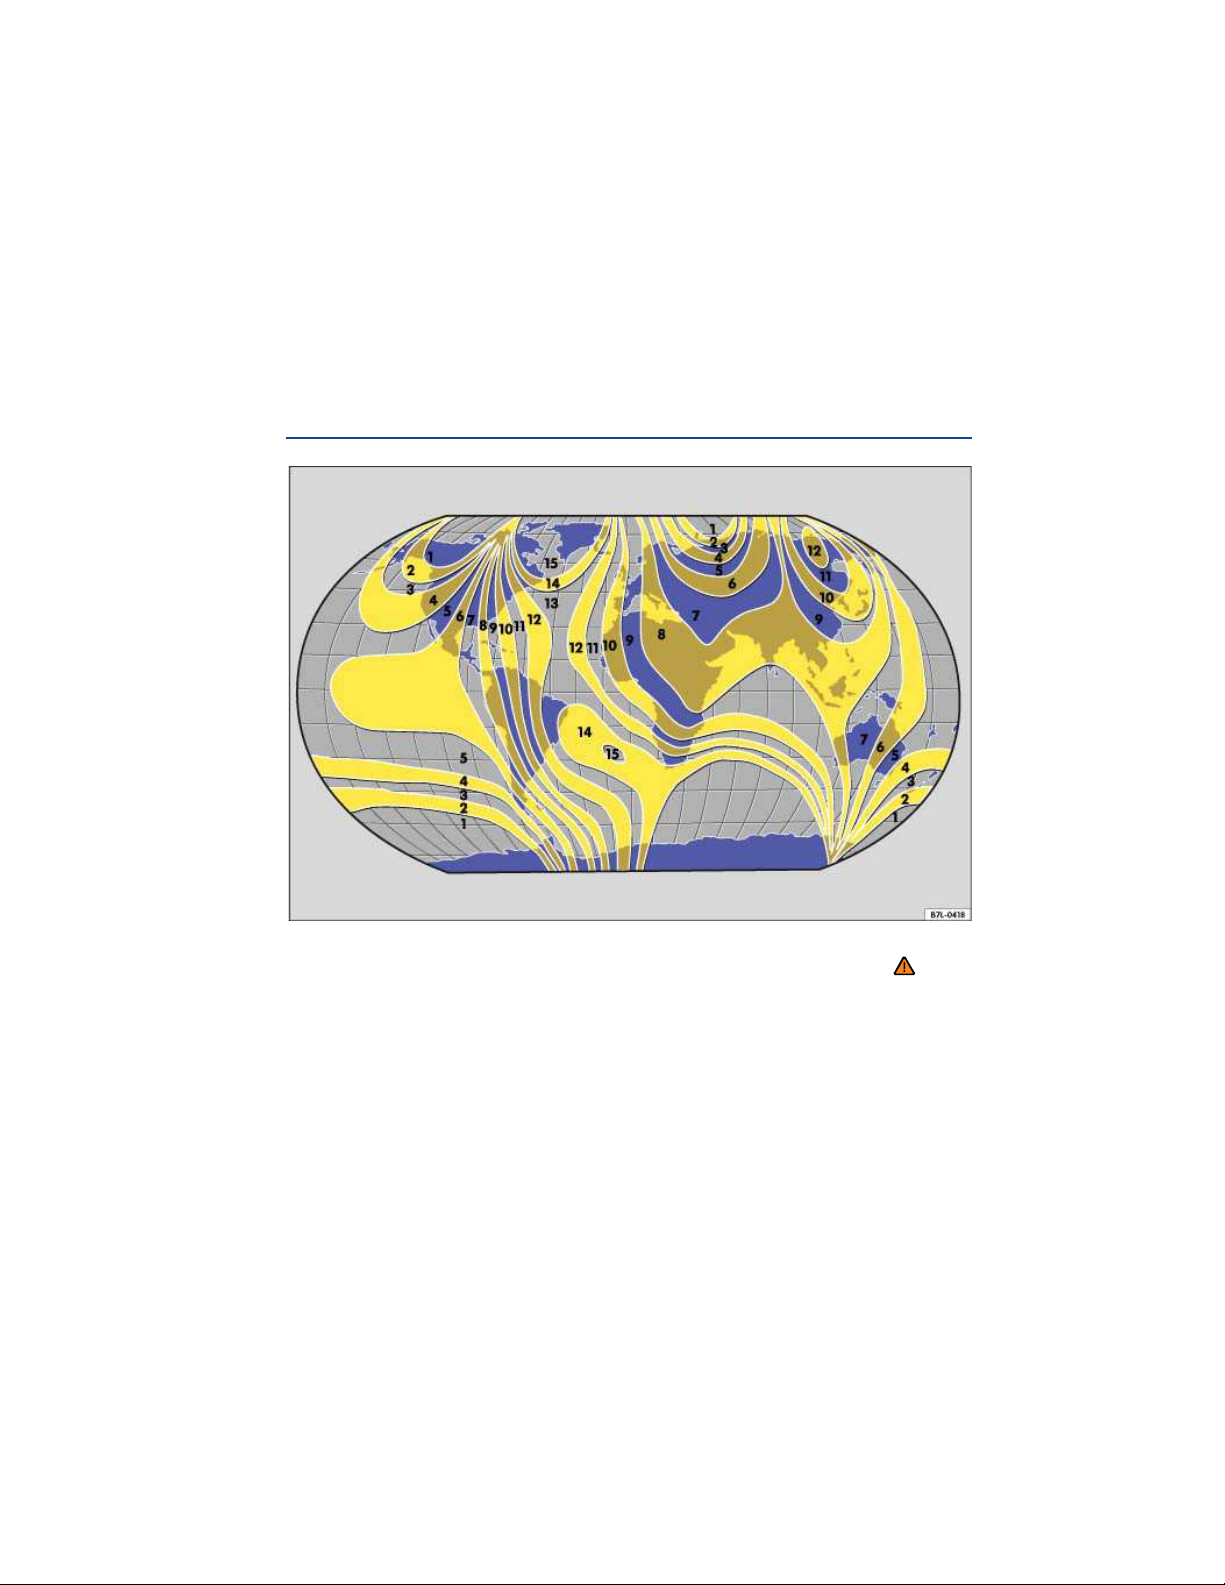
Fig. 13 Compass zones.
Please first read and note the introductory information and heed the WARNINGS
The compass does not need to be calibrated in vehicles with a factory-installed navigation system.
There is no Compass menu item in this case.
On vehicles without a factory-installed navigation system, the compass is calibrated automatically. If
electrical or metallic accessories are added to the vehicle, the compass must be recalibrated.
Page 15

Adjusting the compass zone
Switch on the ignition.
Select the Settings menu followed by the Compass and Zone menu items.
Select the compass zone according to the current location ⇒
Adjust and confirm compass zone (1‐15) by using the arrow buttons.
fig. 13.
Calibrating the compass
In order to calibrate the compass, you need a valid compass zone for the location and enough room to
drive in a circle.
Switch on the ignition.
Select the Settings menu followed by the Compass and Calibrate menu items.
Confirm the Pleasedriveafullcircletocalibrate message by pressing the OK button
on the multi-function steering wheel, and then drive in a complete circle at about 6 mph (10 km/h).
During calibration, CAL is shown in the instrument cluster display. The calibration is complete when the
compass direction is displayed.
Service reminder display
Please first read and note the introductory information and heed the WARNINGS
The service appointment reminder is shown in the instrument cluster display ⇒ fig. 10 (3), ⇒ fig. 11 (3).
For information on maintenance intervals, please see the ⇒ Booklet
For vehicles with time- or distance driven-dependent service, only fixed service intervals are displayed.
Service reminder
If service is due in the near future, a service reminder is displayed when the ignition is switched on.
The message Servicein‐‐‐mior‐‐‐days (Servicein‐‐‐kmor‐‐‐days) is shown in
the instrument cluster display.
Service event
When service is due, a warning chime sounds when the ignition is switched on, and a flashing
wrench symbol d is displayed for several seconds. The message Servicenow is shown in the instrument cluster display.
Viewing service message
The current service message can be accessed when the ignition is switched on, the engine is
switched off, and the vehicle is stopped:
Select the Settings menu.
In the Service submenu, select the Info menu item.
Servicesince‐‐‐mior‐‐‐days (Servicesince‐‐‐kmor‐‐‐days) is shown in the
instrument cluster display when service is overdue.
Resetting the service reminder display
If the service was not performed by an authorized Volkswagen dealer or an authorized Volkswagen
Service Facility, the service reminder can be reset as follows:
Select the Settings menu.
Warranty and Maintenance
.
Page 16

In the Service submenu, select the Reset menu item.
O
Confirm request with the
button on the multi-function steering wheel.
K
Do not reset the service reminder between service intervals; otherwise, incorrect information will
be displayed.
The service reminder disappears after a few seconds when the engine is running or after the OK
button on the multi-function steering wheel has been pushed.
Page 17
Volkswagen Information System
Introduction
In this section you’ll find information about:
Menu structure – overview
Using the instrument cluster menus
Main menu
MFI menu (Multi-Function Indicator)
Settings menu
Convenience submenu
Lights&Vision submenu
When the ignition is switched on, you can display different types of information in the instrument
cluster and control certain vehicle features.
The control buttons are on the right side of the multi-function steering wheel.
The number of menus in the instrument cluster display depends on the electronics and equipment on
the vehicle.
An authorized Volkswagen dealer or an authorized Volkswagen Service Facility may be able to add or
modify functions depending on your vehicle's equipment.
Some menu items can only be accessed when the vehicle is not moving.
As long as a priority 1 warning message is displayed, no menus can be accessed. In order to display
menus, acknowledge the warning by pressing the OK button on the multi-function steering wheel
⇒ fig. 14.
More information:
Outside mirrors
Driver assistance systems
Radio or Navigation system ⇒ Booklet
Mobile phone package ⇒ Booklet
Radio
or ⇒ Booklet
Mobile Phone Package
Navigation system
WARNING
Driving on today's roads demands the full attention of the driver at all times. Driver distraction causes accidents, collisions and serious personal injury!
Never access menus when the vehicle is moving.
Emergency starting and starting the engine with a very weak vehicle battery or after the vehicle
battery has been replaced may change or delete system settings (including time, date, personal convenience settings, and programming). Check the settings and correct as necessary once the vehicle
battery has built up a sufficient charge.
Menu structure – overview
Please first read and note the introductory information and heed the WARNINGS
Page 18

The instrument cluster display is divided into 3 parts. The time (digital clock) is displayed in the top
part. The bottom part contains the odometer and the trip odometer (“trip”). You can select the following
displays for the middle part:
Multi-Function Indicator (MFI)
▪ Travel time
▪ Consumption --.- mpg (l/100 km) (current fuel consumption)
▪ Av. consumption --.- mpg (l/100 km) (average fuel consumption)
▪ Range
▪ Route
▪ Average speed --- mph (km/h)
▪ xx mph (km/h) (digital speed display)
▪ Speed warning --- mph (km/h)
Audio
⇒ Booklet
Navigation
Phone
⇒ Booklet
Assistants (if equipped)
▪ AFS
Vehicle status
Settings
▪ Language
▪ MFI data
– Travel time
– Curr. consum. (current fuel consumption)
– Av. consum. (average fuel consumption)
– Route
– Av. speed
– Digit. speed (digital speed display)
– Speed warn. (speed warning)
– Back
▪ Compass (vehicles without navigation system)
▪ Convenience
– ATA confirm
– Central locking
Auto unlock
Unlock doors
Back
– Window op. (window operation)
Off
All
Driver
Back
– Mirror adjust
Individually
Both mirrors
– Factory setting
– Back
Radio
or ⇒ Booklet
⇒ Booklet
Navigation system
Mobile Phone Package
Navigation system
Page 19
▪ Lights & Vision
– Conv. turn sig. (convenience turn signal)
– Factory setting
– Back
▪ Time
– Hours
– Minutes
– 24 hr. mode
– Daylight save
– Back
▪ Snow tires (winter tires)
– On
– + 5 mph (10 km/h)
– - 5 mph (10 km/h)
– Back
▪ Units
– Temperature
– Consump./dist.
– Back
▪ Alt. speed dis. (alternative speed display On / Off)
▪ Service
– Info
– Reset
– Back
▪ Factory setting
Using the instrument cluster menus
Fig. 14 Right side of the multi-function steering wheel: Controls for menus in the instrument cluster.
Please first read and note the introductory information and heed the WARNINGS
The instrument cluster menus are controlled with buttons on the right side of the steering wheel
⇒
fig. 14.
Accessing the instrument cluster menus
Switch on the ignition. You will see the vehicle icon or a message in the instrument cluster display.
Page 20
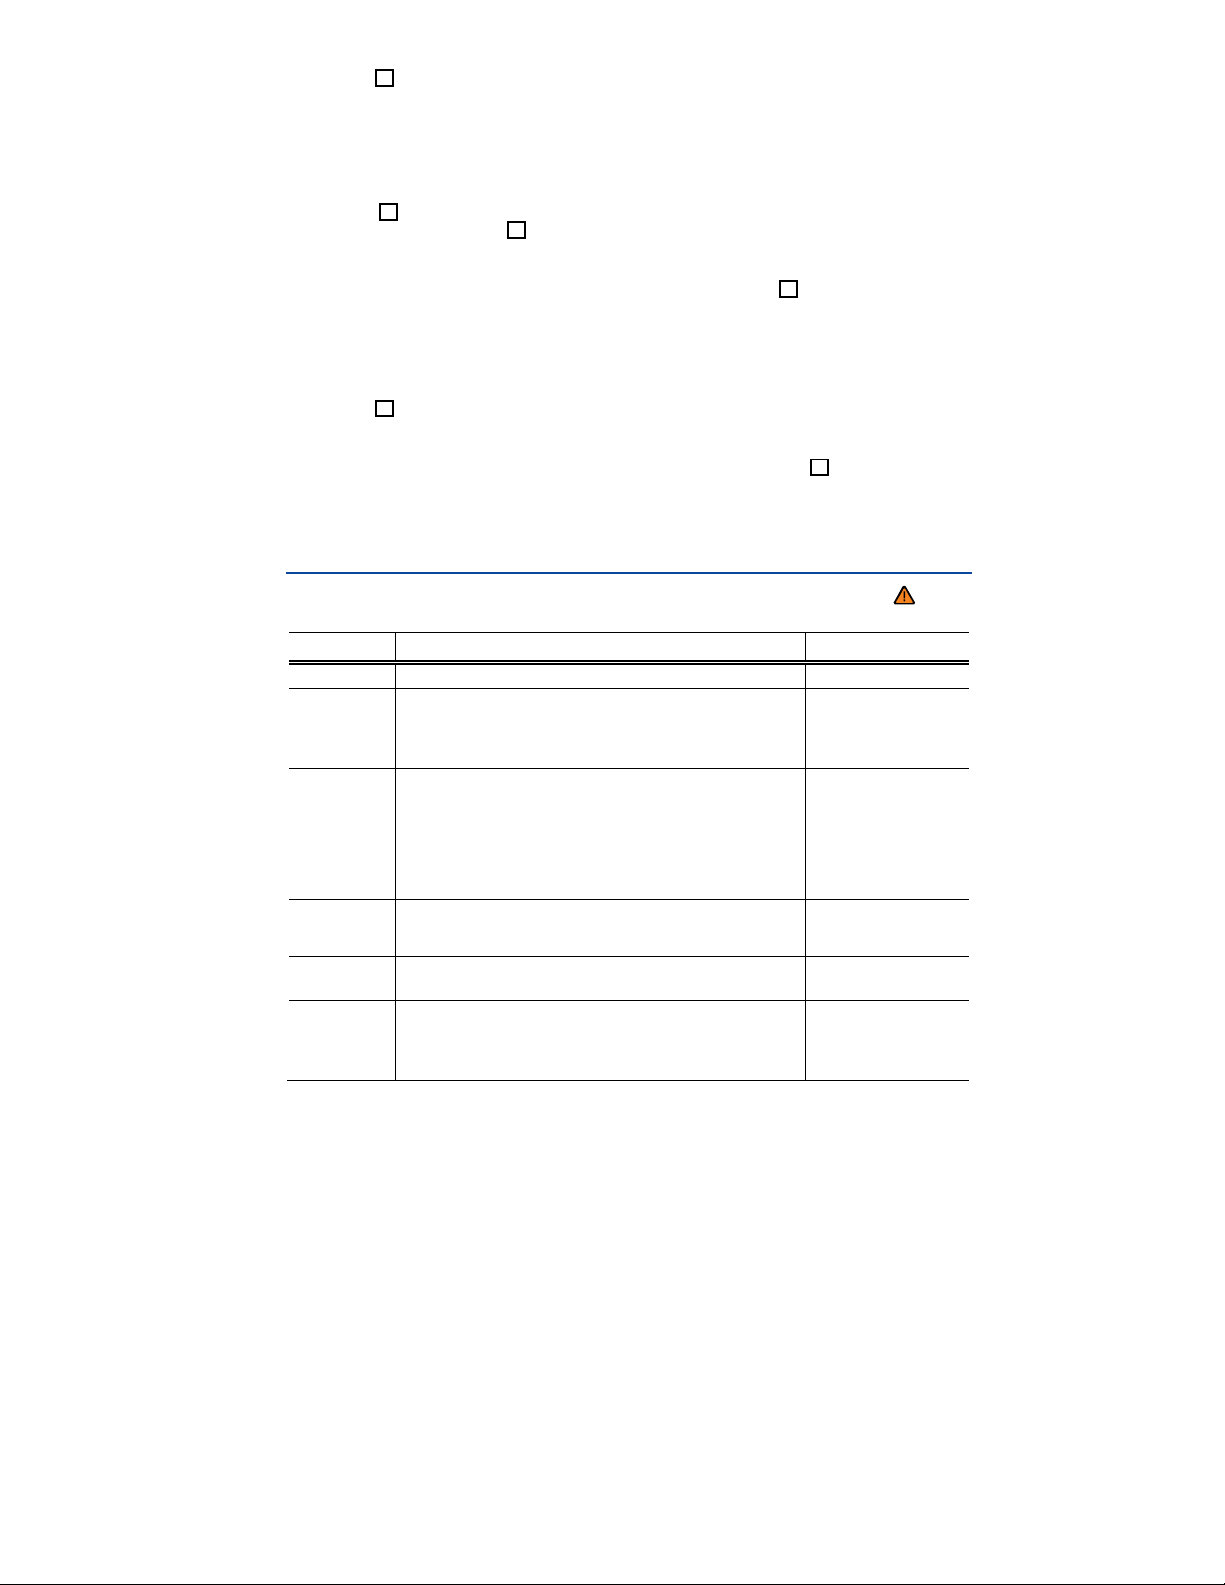
Push the OK button () on the right side of the multi-function steering wheel until a main menu
appears in the instrument cluster display. For a list of main menus,
Push buttons # or ∃ to move to another main menu, and push the arrow up and down buttons
and to navigate inside the current main menu. For example, in the Settings main menu, press the
arrow down button to navigate to the MFIdata submenu.
Displaying a submenu
Press the OK button to display submenu items. For instance, after scrolling to MFIdata in the
Settings main menu, press the OK button to display items available under the MFIdata submenu.
Selecting a setting
Some menus are used to select settings for certain features. Push the OK button () to select a
setting.
Use the arrow up and down buttons and on the multi-function steering wheel to navigate
through the available options.
The selected menu item is located between the 2 horizontal lines. There is also a triangle (Å) on
the right.
Push the OK button to select the setting.
Returning to the main menu
Via menu: Use the arrow down button to select Back and then press the OK button .
For operation with multi-function steering wheel: Press
Main menu
Please first read and note the introductory information and heed the WARNINGS
Main menus Function See
MFI
Audio
Navigation
Phone
Assistants
Vehicle
status
Multi-Function Indicator (MFI) information.
Station indicator in radio mode.
Track display in CD mode.
Track display in media mode.
Information displays on the navigation system (if applicable):
When destination guidance is active, turn arrows and proximity bars are shown. The illustration is similar to the symbol display in the navigation system.
If destination guidance is inactive, driving direction (compass function) and the current street name are displayed.
Information and settings of the mobile phone package.
Turn the Adaptive Front Lighting System (AFS) on and off
(if equipped).
Current warning and information messages.
This menu item is only displayed when warning or information messages are available. The number of available
messages is shown in the display. Example: 1/1 or 2/2.
⇒ Booklet
⇒ Booklet
⇒ Booklet
⇒ Booklet
Radio
Navigation
system
Navigation
system
Mobile
Phone Package
or
Page 21
Main menus Function See
y
Settings
Includes the Convenience and Lights & Vision submenus,
as well as many settings such as time, speed warning for
winter tires, language, and units.
MFI menu (Multi-Function Indicator)
Please first read and note the introductory information and heed the WARNINGS
The MFI display has 2 automatic memories: 1 – single trip memory and 2 – total trip memory. The
number of the trip memory is shown at the upper right of the display.
The trip memories are in addition to the trip odometer, which is displayed in the bottom part of the
instrument cluster and controlled using the button on the right of the instrument panel ⇒
(5), ⇒ fig. 11 (5).
To display the distance driven on trips 1 and 2, select the Route item in the MFI menu. Press the OK
button ⇒ fig. 14 to toggle between Route 1 and Route 2 (trip 1 and trip 2). Push and hold the OK button
to manually reset a trip memory to zero.
The memory accumulates and stores information about distance driven
and fuel used from the time the ignition was switched on until the time it
1
Single trip memory
2
Total trip memory
was switched off.
If the ignition stays off for 2 hours or more, stored information is automatically deleted. If the trip is continued within 2 hours after the ignition
was switched off, the new values are added.
The memory displays and stores the accumulated driving and fuel consumption data of any number of single trips up to a total driving time of
99 hours and 59 minutes, and up to a total distance of 9,999 miles
(9,999 km). If one of the maximum values is exceeded, then the memory
is automatically cleared and starts again from 0.
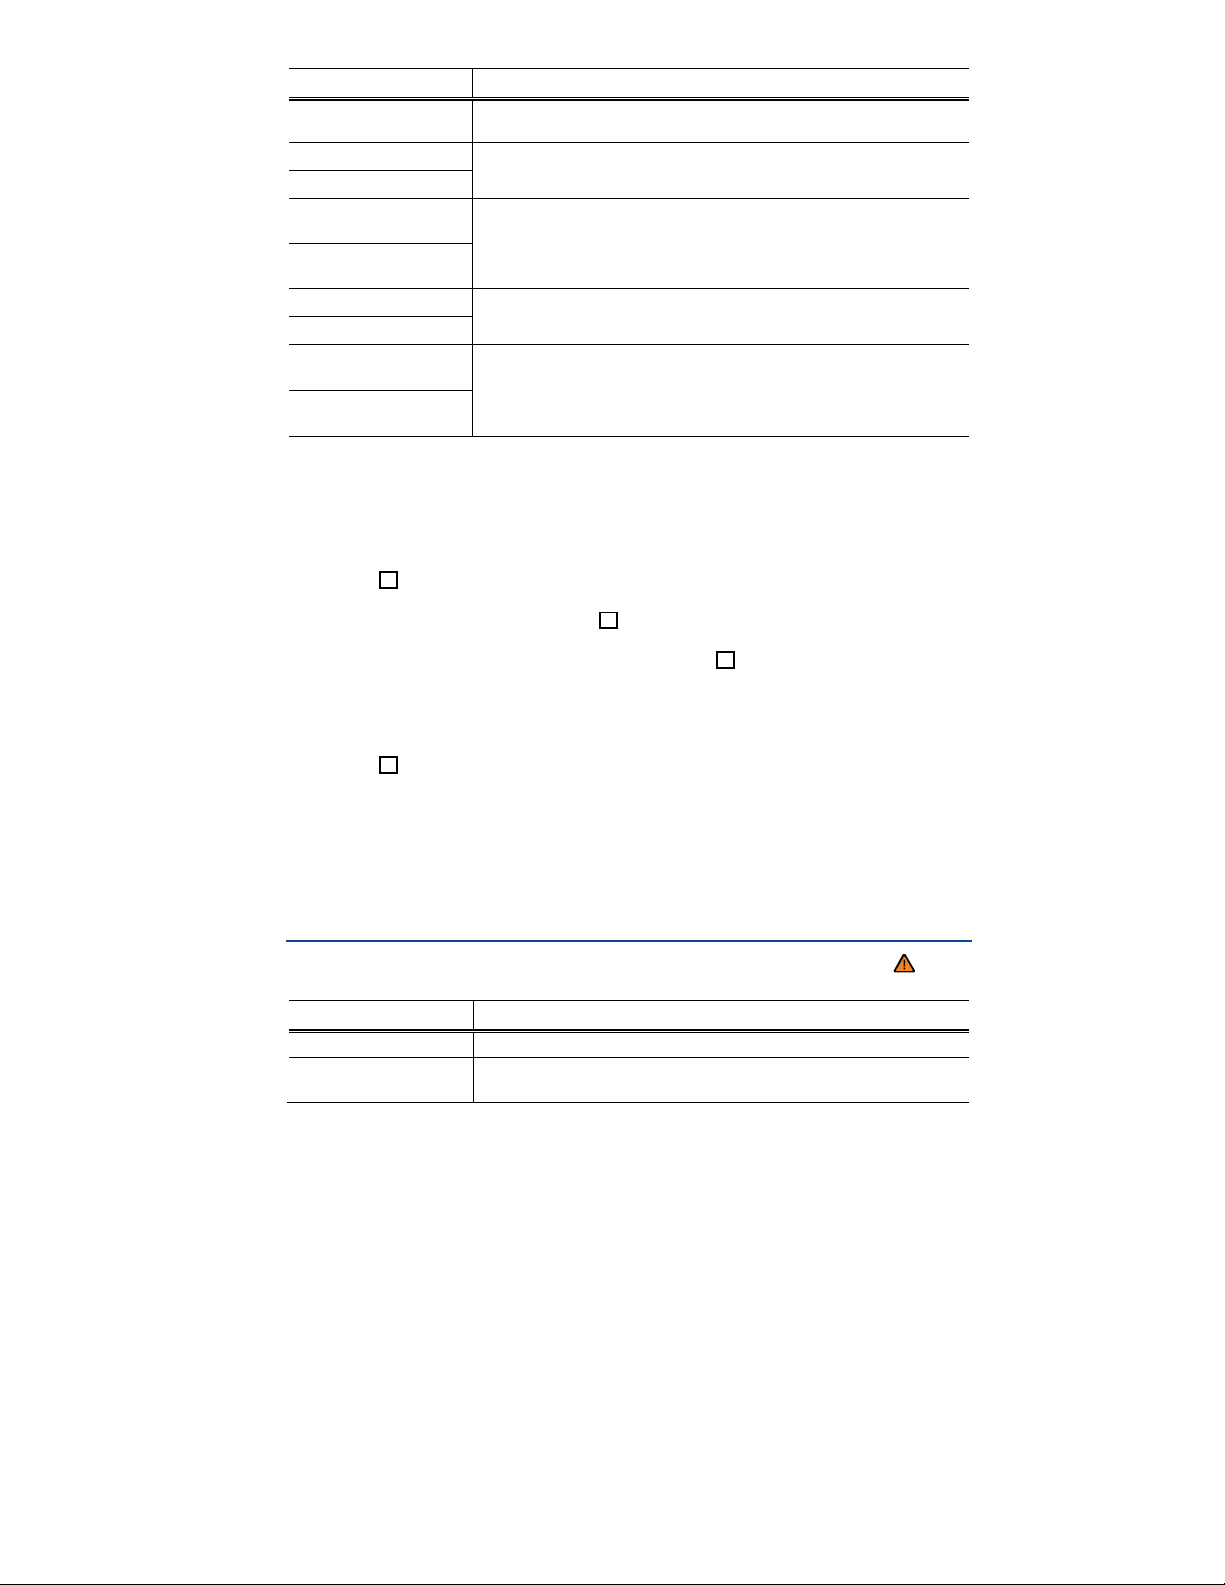
Possible MFI menu displays
The following displays can be accessed in the MFI menu if enabled under Settings > MFIdata.
Displays that are not enabled will not appear.
Function
Displa
Traveltime
Consumption
‐‐.‐mpg
Consumption
‐‐.‐l/100km
Av.consumption
‐‐.‐mpg
Av.consumption
‐‐.‐l/100km
‐‐mi
Range
I
Driving time in hours (h) and minutes (min) corresponding to trip memories 1 and 2 (toggle).
Current fuel consumption in miles per gallon (l/100 km) while driving.
When units are set to miles, dashes appear instead of a number when
the engine is running and the vehicle is standing still.
When units are set to kilometers, the display shows liters consumed per
hour when the engine is running and the vehicle is standing still.
Average fuel consumption in miles per gallon (l/100 km) on trips per trip
memories 1 and 2 (toggle) is displayed once the vehicle has been driven
about 330 feet (100 m). Until then, dashes appear instead of a number.
The value displayed is updated every 5 seconds.
Estimated distance in miles (km) that the vehicle can go with the fuel left
fig. 10
Page 22
Display Function
‐‐km
Range
I
Route‐‐mi
Route‐‐km
Averagespeed
‐‐mph
Averagespeed
‐‐km/h
‐‐mph
‐‐km/h
Speedwarning
‐‐‐mph
Speedwarning
‐‐‐km/h
in the tank the way you are currently driving. Takes account of the current fuel consumption, among other things.
Distance driven in miles (km) per trip memories 1 and 2 (toggle).
Average speed on trips per trip memories 1 and 2 (toggle). Displayed
once the vehicle has been driven about 300 feet (100 m). Until then,
dashes may appear instead of a number. The value displayed is updated
every 5 seconds.
Digital display of current vehicle speed.
When the set speed (from 20–155 mph or 30–250 km/h) is exceeded, an
acoustic warning sounds and a visual message may also appear in the
instrument cluster display.
Switching between the displays
Use the arrow up and down buttons and on the multi-function steering wheel.
Storing speed for the speed warning
Select the Speedwarning‐‐mph or Speedwarning‐‐km/h display.
Press the OK button to save the current speed and to activate the warning.
If the speed is not right, press buttons or on the multi-function steering wheel to set a different
speed within about 5 seconds. Then press the OK button a second time or just wait a few seconds.
The speed is saved and the warning is activated.
To deactivate, toggle to ‐‐‐mph or ‐‐‐km/h and press the OK button. The set speed is deleted.
Manually erasing trip memory 1 or 2
Navigate to MFI > Route.
Select the memory to be erased.
Press the OK button for about 2 seconds.
Enabling and disabling displays
Use the Settings menu, submenu MFIdata to enable displays you want to be available under the
MFI menu in the instrument cluster display. The units in which data is displayed can also be changed
29.
Settings menu
Please first read and note the introductory information and heed the WARNINGS
Settings menu
Language
MFIdata
Function
Set the language for messages in the display and navigation system.
Select the features you want to have displayed in the MFI menu in the
instrument cluster display
Page 23

Settings menu
Compass
Convenience
Lights&Vision
Time
Snowtires
Units
Alt.speeddis.
Service
Factorysetting
Function
Calibrating the compass on vehicles without a factory-installed navigation system. To calibrate, follow the instructions in the instrument cluster
display
Convenience function settings
Vehicle lighting settings
Set hours and minutes for the instrument cluster clock and the Radio &
Navigation System clock. The time can be displayed in 12 or 24 hour
format, and can also be set to daylight savings time.
Set up a visual and acoustic speed warning. Use the feature only when
winter tires are installed that have a speed rating less than top vehicle
speed.
Set the units in which temperature, fuel consumption, and distances
should be displayed (for example, whether to show distance driven in
miles or kilometers).
Activate/deactivate alternative speed display (mph or km/h).
Display service messages or reset service reminder display.
Reset the functions in the Settings menu back to the factory settings.
Convenience submenu
Please first read and note the introductory information and heed the WARNINGS
Convenience
menu
ATAconfirm
Centrallocking
Function
The horn beeps once when the vehicle is locked with the remote control vehicle
key if ATAconfirm is checked.
You can enable or disable Auto unlock. If Auto unlock is
enabled (box checked), it is triggered on vehicles without
Keyless Access by taking the key out of the ignition.
Autounlock
On Keyless Access vehicles, Auto unlock is triggered by
opening the driver door. Auto unlock works only if the
vehicle has been automatically locked after reaching a
speed of 10 mph (15 km/h). It unlocks the doors that would
be unlocked if you pushed the unlock button on the remote
control vehicle key once.
Page 24

Convenience
menu
Windowop.
Mirroradjust
Factorysetting
Back
Function
Unlockdoors
Off
All
Driver
Back
Individually
Bothmirrors
Back
Resets the features in the Convenience submenu back to the factory settings.
The display returns to the Settings menu.
Doors are unlocked as follows depending on the option
selected:
– Alldoors: Pushing the unlock button on the remote
control vehicle key unlocks all doors and the luggage
compartment lid.
– Singledoor: Pushing the unlock button on the remote
control vehicle key unlocks only the driver door. To unlock
all doors and the luggage compartment, push the unlock
button on the key a second time within about 5 seconds.
On vehicles with Keyless Access, touching the sensor
surface of the door handle on the side where the valid
vehicle key is located unlocks the respective door
– Veh.side: Pushing the unlock button on the remote
control vehicle key unlocks the doors on the driver side of
the vehicle.
On vehicles with Keyless Access, touching the sensor
surface of a door handle on the side where the valid vehicle key is located unlocks the doors on that side of the
vehicle.
Manual unlocking/locking: No windows open or close when
the key is held in the unlocking or locking position.
Keyless Access: No windows close when the locking
sensor on the door handle is pressed and held (convenience closing)
Manual unlocking/locking: All windows open or close when
the key is held in the unlocking or locking position.
Keyless Access: All windows close when the locking
sensor on the door handle is pressed and held.
Manual unlocking: The driver window opens when the key
is held in the unlocking position.
Manual locking: All windows close when the key is held in
the locking position.
Keyless Access: All windows close when the locking
sensor on the door handle is pressed and held.
The display switches back to the Convenience menu.
Both outside mirrors are adjusted separately.
The front passenger outside mirror is adjusted at the same
time as the driver outside mirror.
The display switches back to the Convenience menu.
Lights&Vision submenu
Please first read and note the introductory information and heed the WARNINGS
Page 25

Lights&Vision menu
Conv.turnsig.
Factorysetting
Back
Function
Enable/disable lane change flash (convenience turn signal). When the
feature is enabled, the turn signal flashes at least 3 times when the turn
signal is tapped
Resets the functions in the Lights&Vision submenu back to the
factory settings.
The display returns to the Settings menu.
Page 26
Driving checklists and warnings
Introduction
In this section you’ll find information about:
Getting ready and driving safely
Driving in other countries
Driving through water on road
More information:
Sitting properly and safely
Transporting
Starting, shifting, parking
Saving fuel and helping the environment
Consumer information
WARNING
Driving under the influence of alcohol, illegal drugs, narcotics and some medications may
cause collisions and other accidents, severe personal injuries and even death.
Alcohol, illegal drugs, narcotics and some medications may severely affect perception,
reaction times and safe driving, which may result in the loss of vehicle control.
Getting ready and driving safely
Please first read and note the introductory information and heed the WARNINGS
Checklist
Observe the following points before and during every drive for your own safety, the safety of all pas-
sengers and others ⇒ :
Check proper function of lights and turn signals.
Check tire pressure and fuel level
Make sure that all windows are clean.
Store items and all luggage safely in the storage compartments, in the luggage compartment and,
if necessary, on the roof
Always make sure that nothing keeps the pedals from moving freely.
Make sure that children are properly secured by a restraint system appropriate for their size and
weight
Properly adjust front seats, all head restraints and mirrors to the correct height
Wear shoes that give your feet a good grip, and that give you a feel for the pedals.
Make sure that the floormat on the driver side is properly fastened and cannot interfere with the
pedals.
Assume a proper seating position before the vehicle starts to move and keep this position while
driving. Make sure that all passengers do the same
Page 27
Properly fasten your safety belt before driving the vehicle and wear your safety belt properly at all
times while driving. Make sure that all passengers do the same
Only transport as many passengers as there are seats and safety belts available.
Never drive if your driving ability has been impaired, for example by medication, alcohol or illegal
drugs.
Never let passengers or phone calls distract you while driving, and never take your attention off the
road while using vehicle software or adjusting vehicle equipment or accessories.
Always adapt your speed and driving style to visibility, weather, road, and traffic conditions.
Always obey traffic laws and speed limits.
On long trips make frequent rest stops – at least once every 2 hours.
Secure animals in the vehicle with a system that corresponds to weight and size.
WARNING
Alwa ys observe traffic rules and posted speed limits and use common sense. Your good
judgment can mean the difference between arriving safely at your destination and being seriously injured in a crash or other kind of accident.
Regular service and maintenance of your vehicle is important both for operational and driving
safety and to help prolong your vehicle's service life. Always follow the scheduled maintenance inter-
vals in the ⇒ Booklet
frequent stop-and-go driving, driving in very dusty areas, trailer towing, and other factors may make it
necessary to have the vehicle serviced more frequently. Ask an authorized Volkswagen dealer or an
authorized Volkswagen Service Facility for more information.
Warranty and Maintenance
, especially for changing the brake fluid. Hard use,
Driving in other countries
Please first read and note the introductory information and heed the WARNINGS
Checklist
Some countries have special safety standards and emissions requirements that your vehicle may not
meet. Before taking your vehicle to another country, Volkswagen therefore recommends that you ask
your authorized Volkswagen dealer or authorized Volkswagen Service Facility about the following
issues with regard to the country to which you would like to travel:
Should the vehicle be technically prepared for the trip abroad, such as masking or adjusting head-
lights?
Are maintenance, repair facilities, necessary tools and testing equipment as well as spare parts
readily available for your vehicle?
Are there authorized Volkswagen dealers and authorized Volkswagen Service Facilities in the
countries where you will be driving?
For gasoline engines: Is unleaded fuel with the right octane rating readily available?
Are engine oil (⇒ page 234) and other operating fluids that meet Volkswagen quality and perfor-
mance requirements available where you will be driving? For more information, please see
⇒ Booklet
Does the factory-installed navigation system work in the countries where you will be driving, and is
navigation data available?
Are special or heavy-duty tires necessary for the kind of driving expected?
Warranty and Maintenance
.
Page 28
NOTICE
Volkswagen is not responsible for mechanical damage that may result from substandard fuel
or service or the unavailability of Genuine Volkswagen parts.
Driving through water on roads
Please first read and note the introductory information and heed the WARNINGS
Note the following to help prevent vehicle damage when driving through water, for example on flooded
roads:
Check the depth of the water before driving through it. The water must not be any higher than
the bottom of the vehicle body ⇒ .
Do not drive faster than walking speed.
Never stop the vehicle, and do not drive in reverse or switch the engine off when driving through
water.
Oncoming vehicles may create waves that raise the water level and make it too deep for your
vehicle to drive through safely.
WARNING
After driving through water, mud, sludge, etc., the brakes react slower and need longer stopping distances.
Always dry the brakes and clean off any ice coatings with a few careful applications of the
brake. Make sure not to endanger other motorists or cyclists or disobey legal requirements.
Avoid abrupt or sudden braking maneuvers immediately after driving through water.
NOTICE
Vehicle components such as the engine, transmission, suspension or electrical system may
be severely damaged by driving through water.
Never drive through salt water. Salt causes vehicle corrosion. Thoroughly rinse with fresh
water all vehicle parts that were exposed to salt water.
Page 29
Technical data
Introduction
In this section you’ll find information about:
Important vehicle labels
Engine data
Dimensions
Your vehicle's engine type is shown on the vehicle identification label.
The specifications in this Manual refer to the base model. The stated values may vary, depending
upon different equipment or models, as well as with respect to special vehicles and vehicles exported
to different countries.
More information:
Transporting
Saving fuel and helping the environment
Fuel
Engine oil
Engine coolant
Tires and wheels
Consumer information
WARNING
Disregarding or exceeding stated values for weights, loads, dimensions and maximum speed
may result in accidents and serious personal injuries.
Important vehicle labels
Fig. 15 Vehicle identification label: shown in the example with engine identification code CBFA 3.
Page 30

Fig. 16 Vehicle identification number (VIN).
Please first read and note the introductory information and heed the WARNINGS
Vehicle identification number
The vehicle identification number is on a plate on top of the instrument panel on the driver side, and is
visible from the outside through the windshield ⇒
of the windshield. The vehicle identification number is also stamped into the top of the right drip channel in the engine compartment. The drip channel is between the spring strut tower and the right fender.
Open the engine hood to read the vehicle identification number ß
fig. 16. The view window is on the side at the bottom
Vehicle identification label
The vehicle identification label ⇒
compartment and contains the following information:
(1) Vehicle identification number (VIN)
(2) Vehicle type, engine output, transmission
(3) Engine and transmission classification code, paint number, interior. In the example, the engine
classification code is “CBFA” .
(4) Optional equipment, part numbers
fig. 15 is affixed to the area of the spare wheel well in the luggage
Other important vehicle labels
Other important vehicle labels are discussed elsewhere in this Manual:
Safety Compliance Certification Label, affixed to the driver door jamb (Consumer information).
Radiator fan and high voltage warning sticker in the engine compartment next to the engine
hood release (see, Consumer information).
Tire inflation pressure label on the driver door jamb ( Tires and wheels).
Engine data
Please first read and note the introductory information and heed the WARNINGS
Gasoline engines
Page 31
Maximum power output
(SAE net)
200 hp at 5100 – 6000 rpm
(147 kW at 5100 – 6000 rpm)
Injection
technology
TSI®
Engine
ID code
CBFA,
CCTA
2.0T
Maximum torque No. of
207 lb-ft at 1700 –
5000 rpm
(280 Nm at 1700 -
5000 rpm)
cylinders
Displacement
4 cylinders
121 CID
1984 ccm
Dimensions
Please first read and note the introductory information and heed the WARNINGS
Length 182.2–186.8 in. (4628–4744 mm)
Width about 70.0 in. (1778 mm)
Height (unloaded) 56.6–57.9 in. (1438–1473 mm)
Wheelbase 104.4 in. (2651 mm)
Minimum turning circle diameter (wall to wall)3 about 36.4 ft (about 11.1 m)
Track3, front 60.1–60.7 in. (1527–1541 mm)
Track3, rear 59.9–60.6 in. (1523–1538 mm)
Ground clearance (unloaded) about 3.7–5.5 in. (about 94–139 mm)4
NOTICE
Please be careful when parking your vehicle in areas with parking barriers or curbs. These
vary in height and could damage your bumper and related parts if the front of your vehicle hits
a barrier or curb that is too high while you are getting into or out of a parking spot.
Always be careful when you enter a driveway or drive up or down steep ramps or over
curbs or other obstacles. Parts of the vehicle close to the ground may be damaged (such as
bumper covers, spoilers, and parts of the engine, suspension, and exhaust systems).
3
Slight differences to these figures are possible, depending on wheel and
tire size fitted and the level selected.
4
Varies depending on your vehicle's equipment (engine, tires, wheels, tire
inflation pressure, driving situation and other factors).
Page 32

Vehicle key set
Introduction
In this section you’ll find information about:
Remote control vehicle keys
Indicator light in the remote control vehicle key
Replacing the remote control vehicle key battery
Synchronizing the remote control vehicle key
More information:
Volkswagen Information System
Power locking and closing system
Starting and stopping the engine
Consumer information
Emergency closing and opening
WARNING
Improper use of vehicle keys can result in serious personal injury.
Always take the key with you when you leave the vehicle. It can be used to start the engine
and operate vehicle systems such as the power windows, leading to serious personal injury.
Children or other unauthorized persons could also lock the doors and the luggage compartment.
Never leave children, disabled persons, or anyone who cannot help themselves in the
vehicle. The doors can be locked with the remote control vehicle key. This could leave people
trapped in the vehicle in an emergency. Depending on the time of year, people trapped in the
vehicle can be exposed to very high or very low temperatures.
A closed vehicle can become very hot or very cold, depending on the season. Particularly
in the summer, heat build-up in the passenger and luggage compartment of a parked vehicle
can result in temperatures in the vehicle that are much higher than the outside temperatures.
Temperatures can quickly reach levels that can cause unconsciousness and death, particularly to small children.
Never remove the key from the ignition switch while the vehicle is moving or rolling to a
stop. The steering wheel will lock and you will not be able to steer or control the vehicle.
Page 33
Remote control vehicle keys
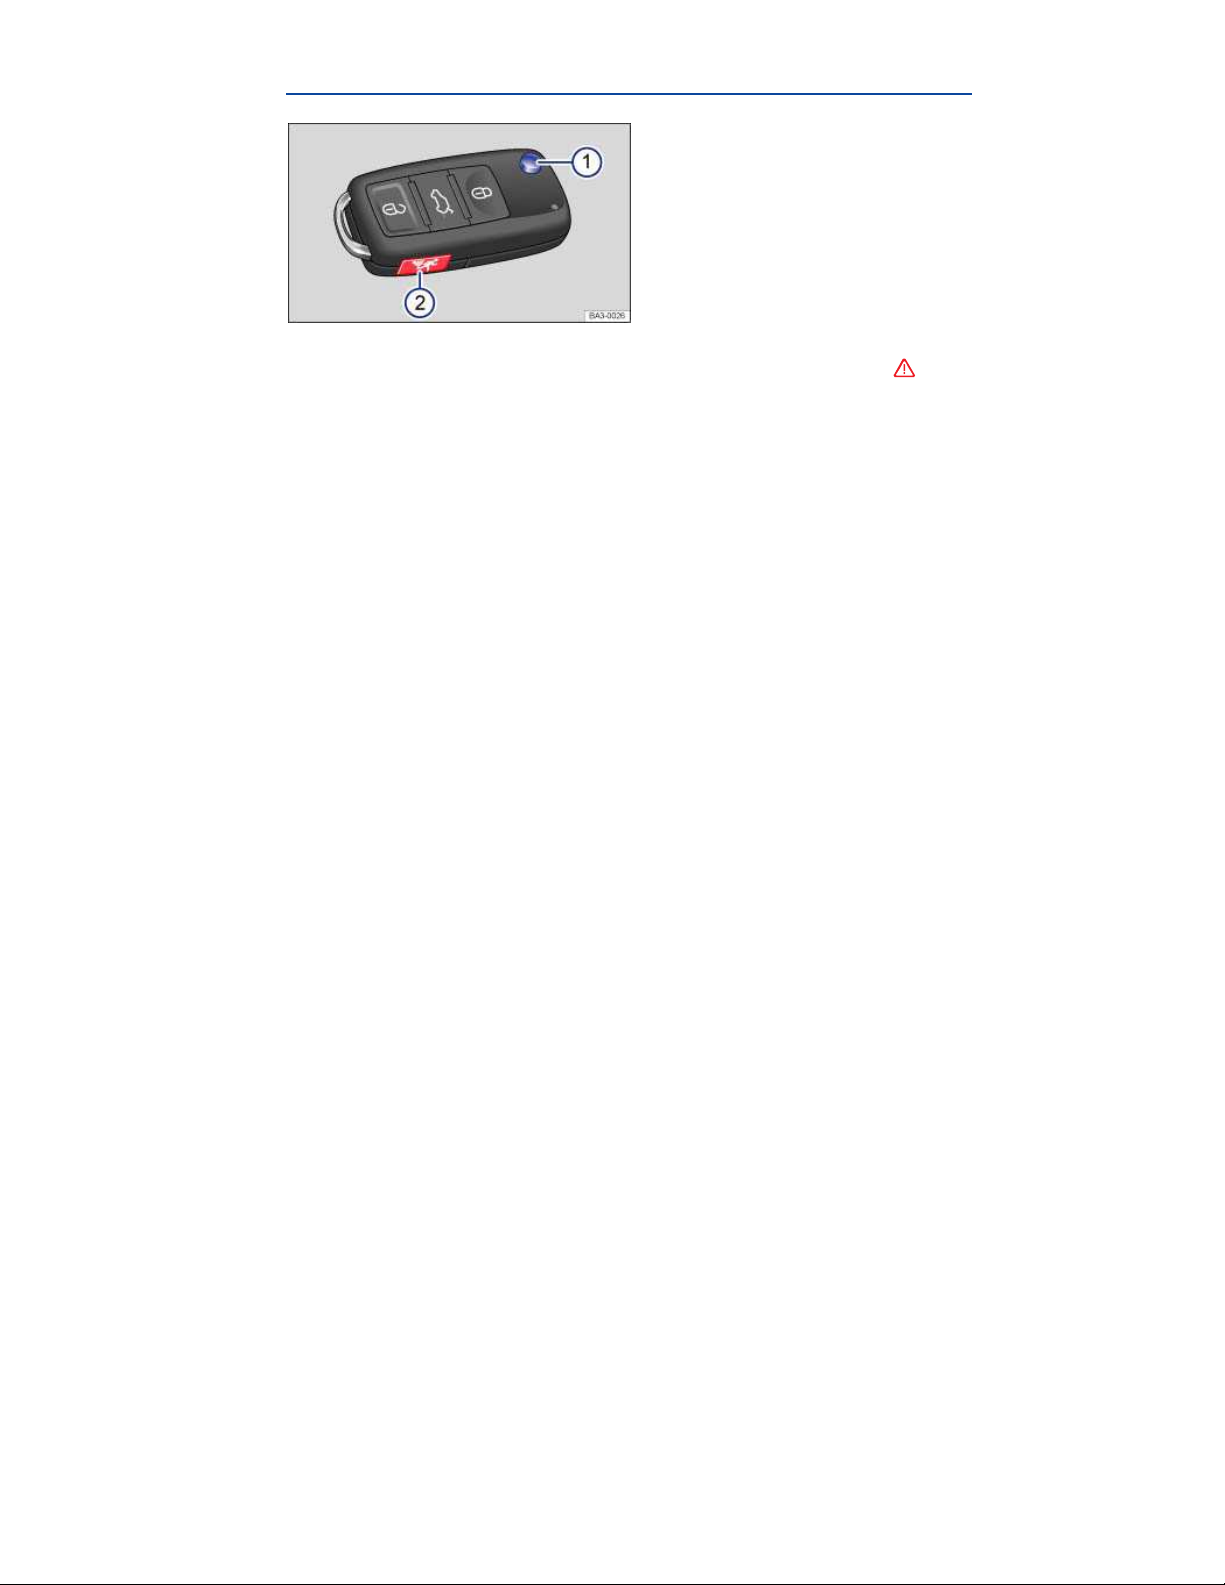
Fig. 17 Remote control vehicle key with panic button.
Please first read and note the introductory information and heed the WARNINGS
Remote control vehicle key
The remote control vehicle key can unlock and lock the vehicle from a distance
The remote transmitter and battery are inside the remote control vehicle key. The receiver is inside the
passenger compartment. The operating range of the remote control vehicle key for a fresh battery is
several yards (meters) around the vehicle.
If the remote control vehicle key will not lock or unlock your vehicle, you probably need to replace the
battery in the remote control vehicle key, Replacing the remote control vehicle key battery. If this is not
the problem, the key should be resynchronized by an authorized Volkswagen dealer, an authorized
Volkswagen Service Facility, or another qualified workshop. See also, Synchronizing the remote
control vehicle key.
Folding the key bit in or out
Pressing button ⇒
To fold the key bit in press button
Panic button
Press the panic button (2) only in emergencies! After pushing the panic button, the horn will sound and
the turn signals will flash. Press the panic button again to switch off the panic feature.
Replacement vehicle keys
The vehicle identification number is required to get a replacement key or an additional remote control
vehicle key.
Up to 8 vehicle keys, each of which must be properly cut, coded, programmed, and synchronized, can
be used with your vehicle.
Each new vehicle key contains a microchip and must be coded with the data from the vehicle's electronic immobilizer. A vehicle key will not work if it does not contain a microchip or contains a chip that
is not coded, even if the key bit was cut correctly.
You can obtain additional or duplicate remote control vehicle keys from authorized Volkswagen dealers, authorized Volkswagen Service Facilities, and from certain independent repair facilities and locksmiths which are qualified to make remote control vehicle keys.
Each vehicle key must be programmed by an authorized Volkswagen dealer or an authorized
Volkswagen Service Facility in order for it to work with your vehicle.
To find the nearest qualified independent repair facility, locksmith, or Volkswagen dealer which can cut
and code replacement vehicle keys, call the VW Customer Care Hotline at 1-800-822-8987 or visit
http://www.vw.com and search for “replacement keys.”
fig. 17 (1) releases the key bit and folds it out.
(1) while pressing the key bit back until it clicks.
Page 34
Canadian customers can contact an authorized Volkswagen dealer or Volkswagen Service Facility or
call the Volkswagen Canada Customer CARE Center at 1-800-822-8987.
NOTICE
The remote control vehicle keys contain electrical components. Protect them from damage,
moisture and rough handling.
Do not press the buttons on the remote control vehicle key unless you actually want to use the
function in question. Since terrain and conditions vary, pressing a button on the remote control vehicle
key when it is not necessary may unlock the vehicle or set off the panic alarm, even if you think you
are out of range.
Remote control vehicle key functions can be temporarily disrupted by interference from transmitters near the vehicle that use the same frequency range (such as radio equipment or cellular phones).
Things between the remote control vehicle key and vehicle, bad weather, as well as a weak
battery can reduce the operating range.
If the remote control vehicle key buttons or the power locking buttons are pushed repeatedly in
quick succession, the power locking system is switched off for a brief period to help keep it from being
overloaded. The vehicle is then unlocked for about 30 seconds. Unless a door or the luggage compartment lid is opened in this span of time, the vehicle is automatically locked afterwards.
Indicator light in the remote control vehicle key
Fig. 18 Indicator light in the remote control vehicle key.
Please first read and note the introductory information and heed the WARNINGS
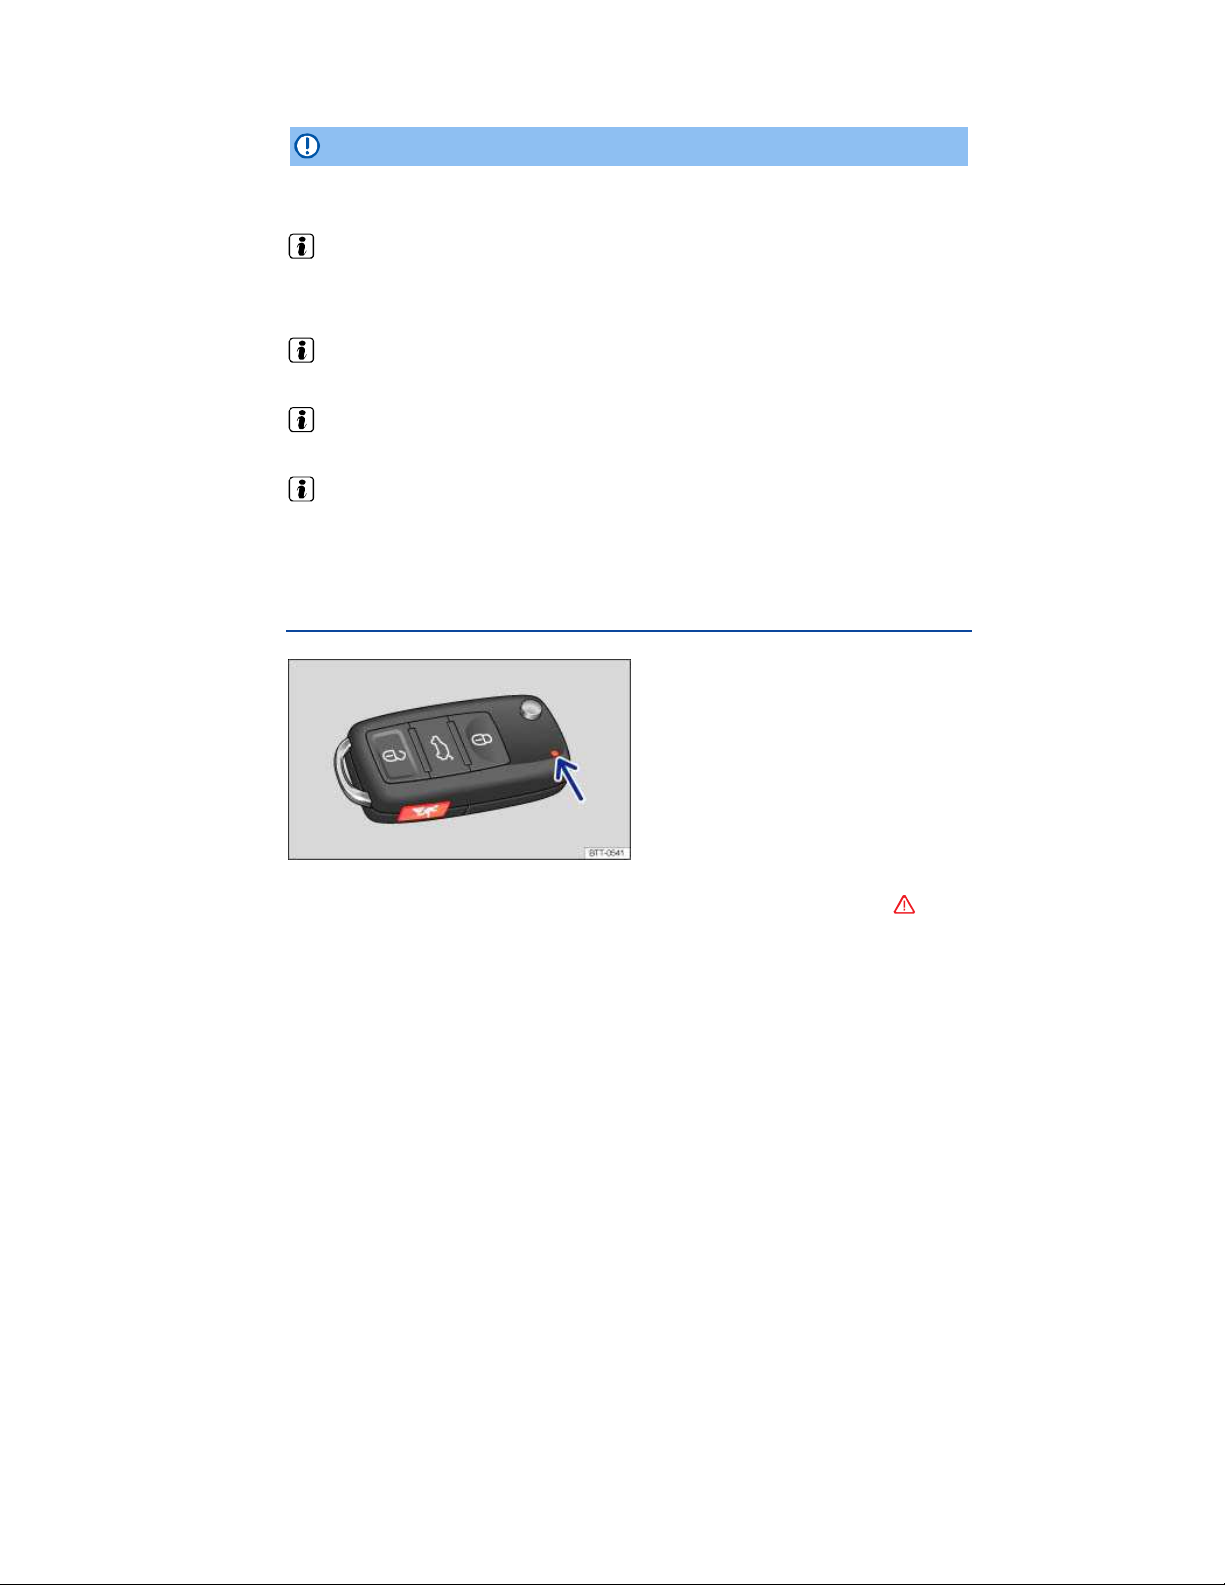
If a button in the remote control vehicle key is pressed briefly, the indicator light ⇒ fig. 18 (arrow) will
flash once briefly. If you push and hold a button, it flashes repeatedly.
If the indicator light in the remote control vehicle key does not come on when the button is pressed,
the battery inside the key must be replaced
A Declaration of Compliance with United States FCC and Industry Canada regulations is found in the
Consumer information section of this Manual
Page 35
Replacing the remote control vehicle key battery
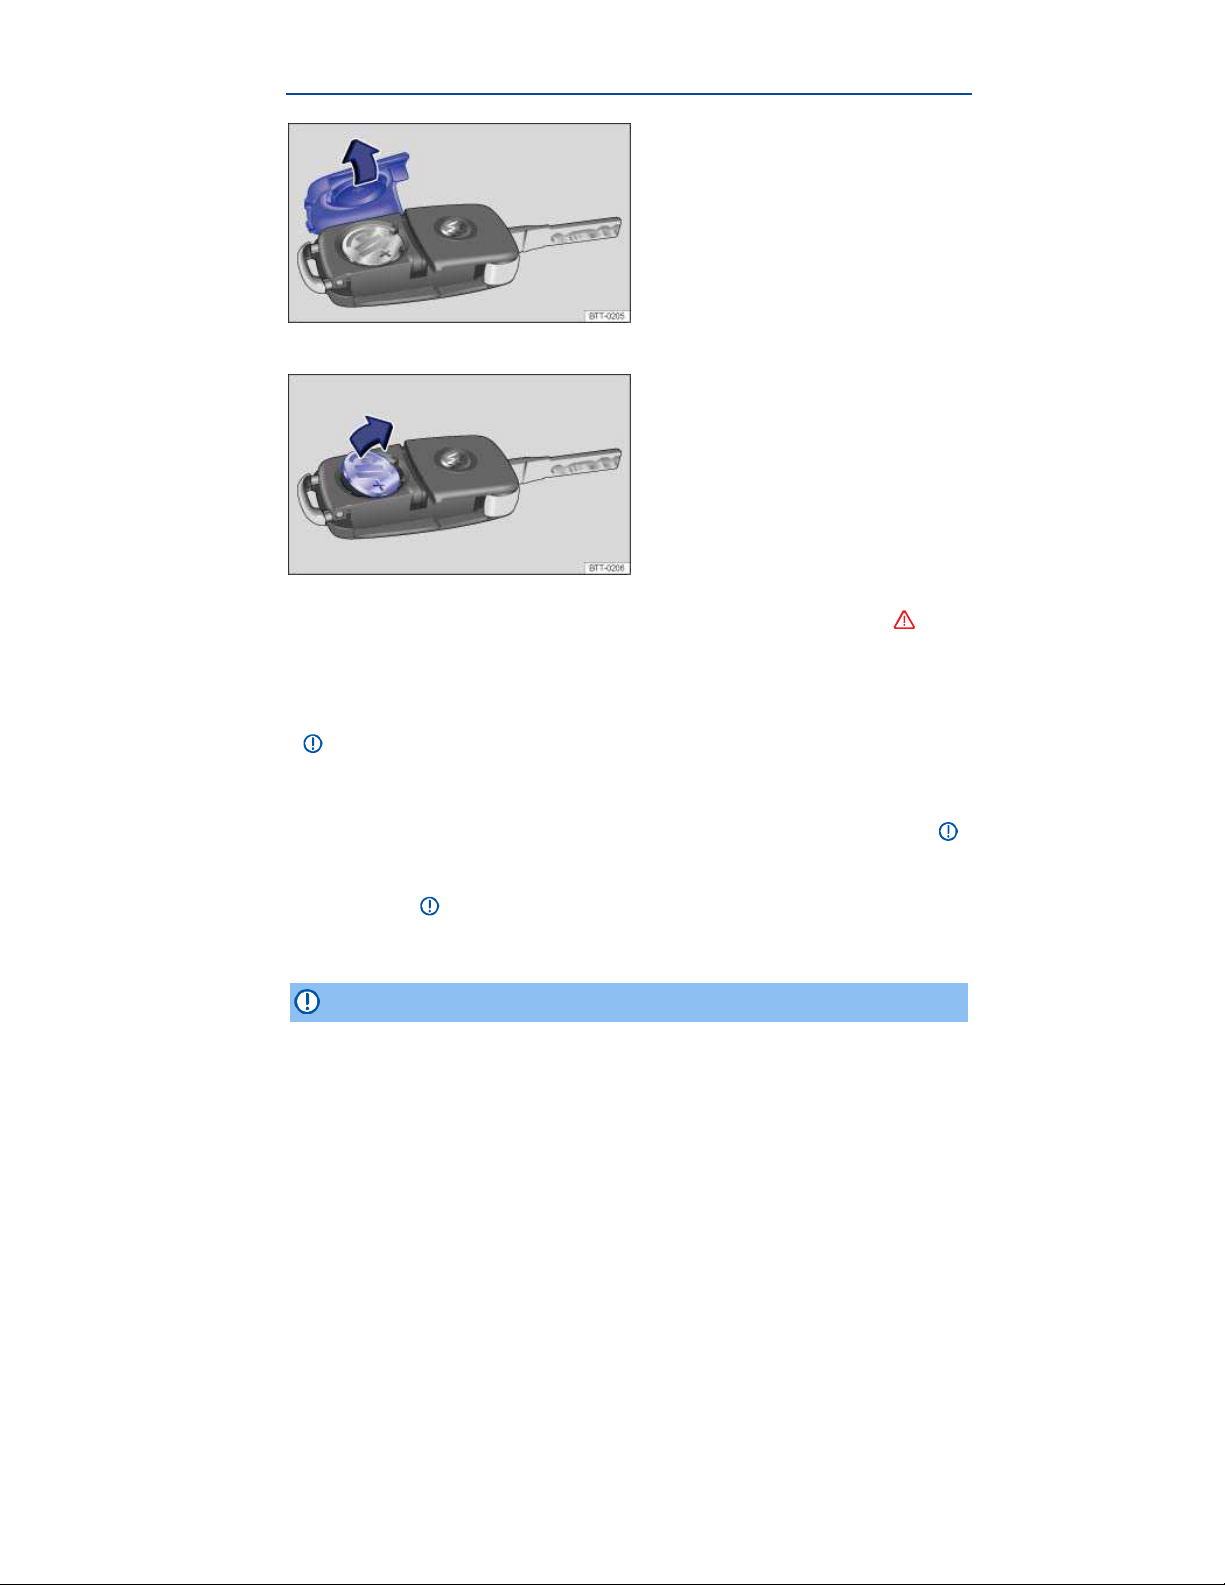
Fig. 19 Remote control vehicle key: Open battery compartment cover.
Fig. 20 Remote control vehicle key: Remove old battery.
Please first read and note the introductory information and heed the WARNINGS
Volkswagen recommends having the battery in the remote control vehicle key changed by an authorized Volkswagen dealer or authorized Volkswagen Service Facility.
The battery is on the back of the remote control vehicle key under a cover ⇒
When changing the battery, pay attention to the correct polarity and use the same type of battery
⇒ .
Replacing the battery
Unfold the key bit on the remote control vehicle key
Remove the cover on the back of the remote control vehicle key in the direction of the arrow ⇒
Use a thin object to pry the battery out of the battery compartment ⇒
Position the new battery in as shown and press it into the battery compartment (opposite to direc-
tion of the arrow) ⇒
Position the cover as shown and press it down (opposite to direction of the arrow) until you hear it
click into place.
.
fig. 19.
fig. 20.
.
NOTICE
Changing the battery improperly can damage the remote control vehicle key.
Using the wrong battery can damage the remote control vehicle key. Replace a dead battery
with a new one that has the same voltage, size, and specifications.
Page 36

Make sure the plus and minus poles of the battery are correctly positioned.
Dispose of old batteries in an environmentally responsible manner and keep them out of the
reach of children.
Batteries of the type used in your remote control vehicle key may contain Perchlorate Material.
Special handling may apply – see http://www.dtsc.ca.gov/hazardouswaste/perchlorate. Obey all legal
requirements regarding handling and disposal of these batteries. Authorized Volkswagen dealers and
authorized Volkswagen Service Facilities are familiar with the requirements, and we recommend that
you have them perform this service for you.
Synchronizing the remote control vehicle key
Please first read and note the introductory information and heed the WARNINGS
If the button is pressed often while outside the operating range, it is possible that the vehicle cannot
be locked or unlocked anymore with the remote control vehicle key. Synchronize the vehicle key as
follows:
Unfold the key bit on the remote control vehicle key
Remove the cap from the door handle on the driver door
Press the button on the remote control vehicle key. Stand immediately next to vehicle while
doing so.
Manually unlock the vehicle using the key bit within 1 minute. The synchronization is complete.
Reinstall the cap.
Page 37
Doors
Introduction
In this section you’ll find information about:
Warning light
Child safety lock
More information:
Exterior views
Vehicle key set
Power locking and closing system
Power windows
Emergency closing and opening
WARNING
A door that is not closed properly may open suddenly when the vehicle is moving and cause
severe injuries.
Stop immediately and close the door.
Make sure that the door is safely and completely latched when closed. The closed door
must be flush with the surrounding auto body parts.
Open or close doors only if no one is in the way.
WARNING
A door kept open with the door stop may close in strong winds or on inclines and cause injuries.
Always hold doors by the door handle while opening and closing.
Child safety lock
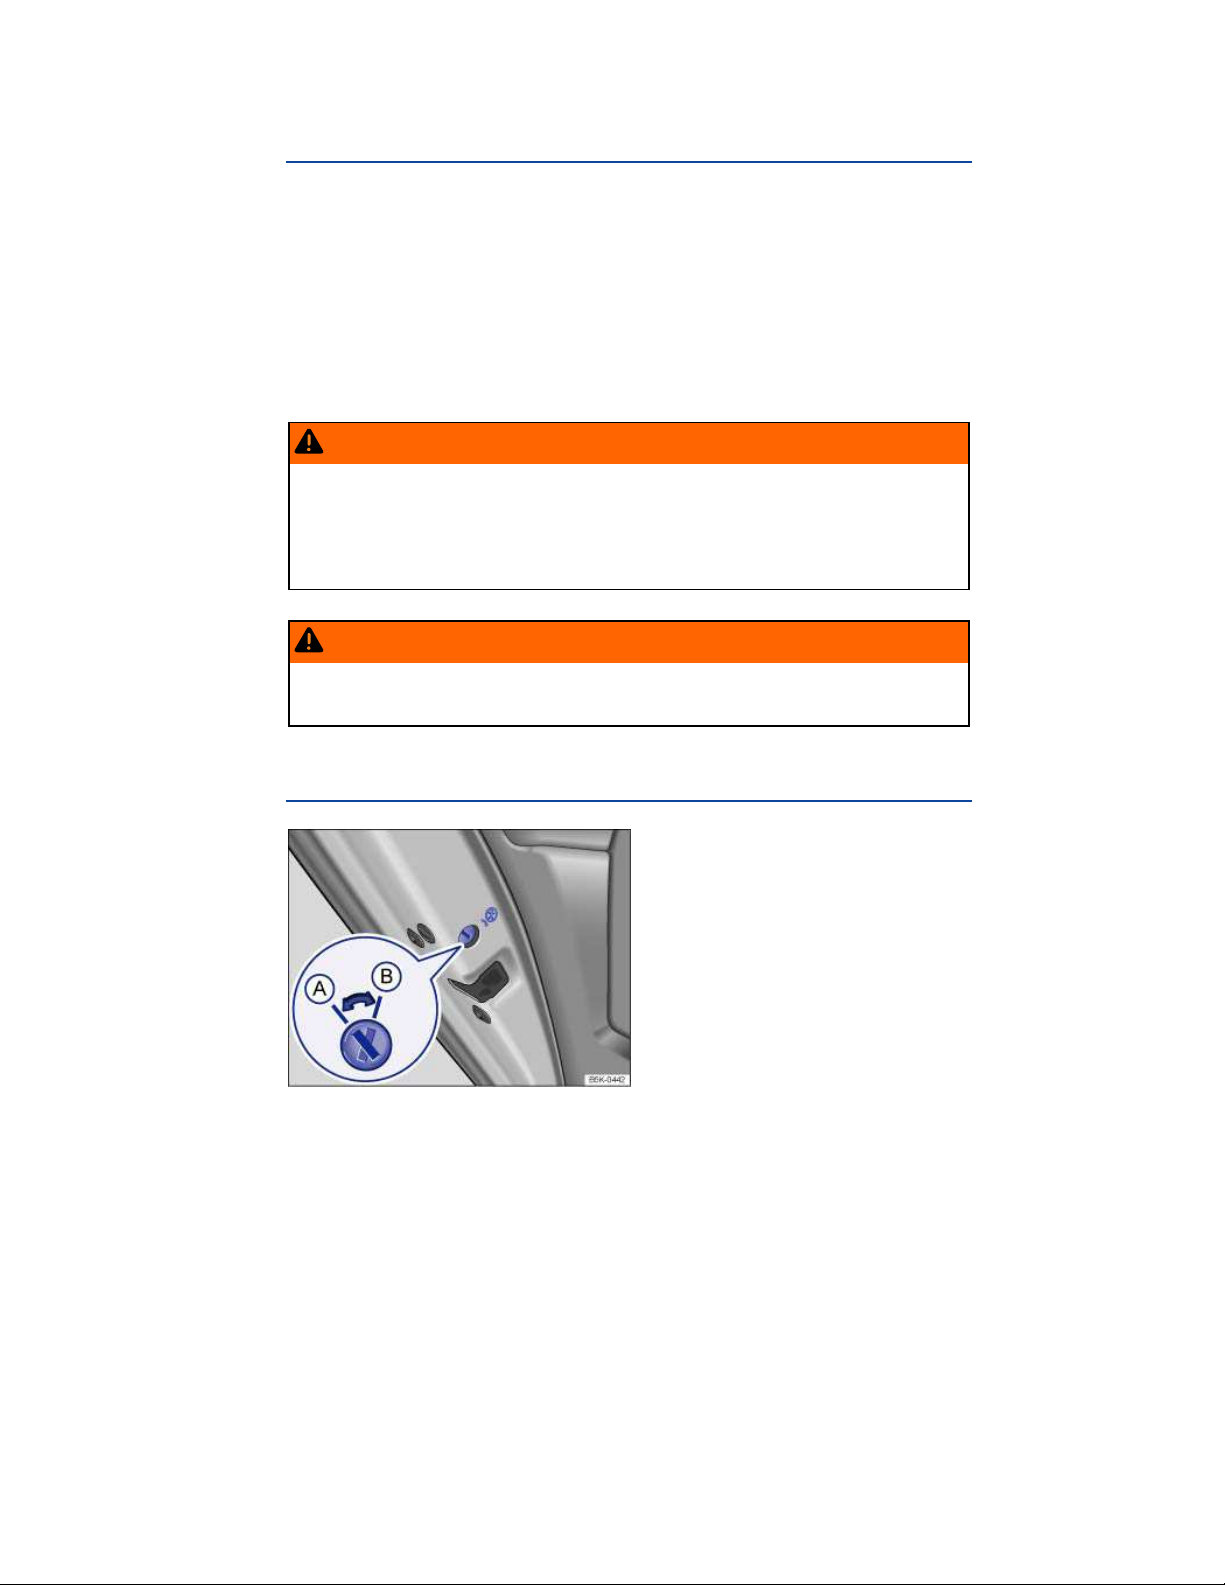
Fig. 26 In the left rear door: Child safety lock A deactivated, B activated.
Page 38
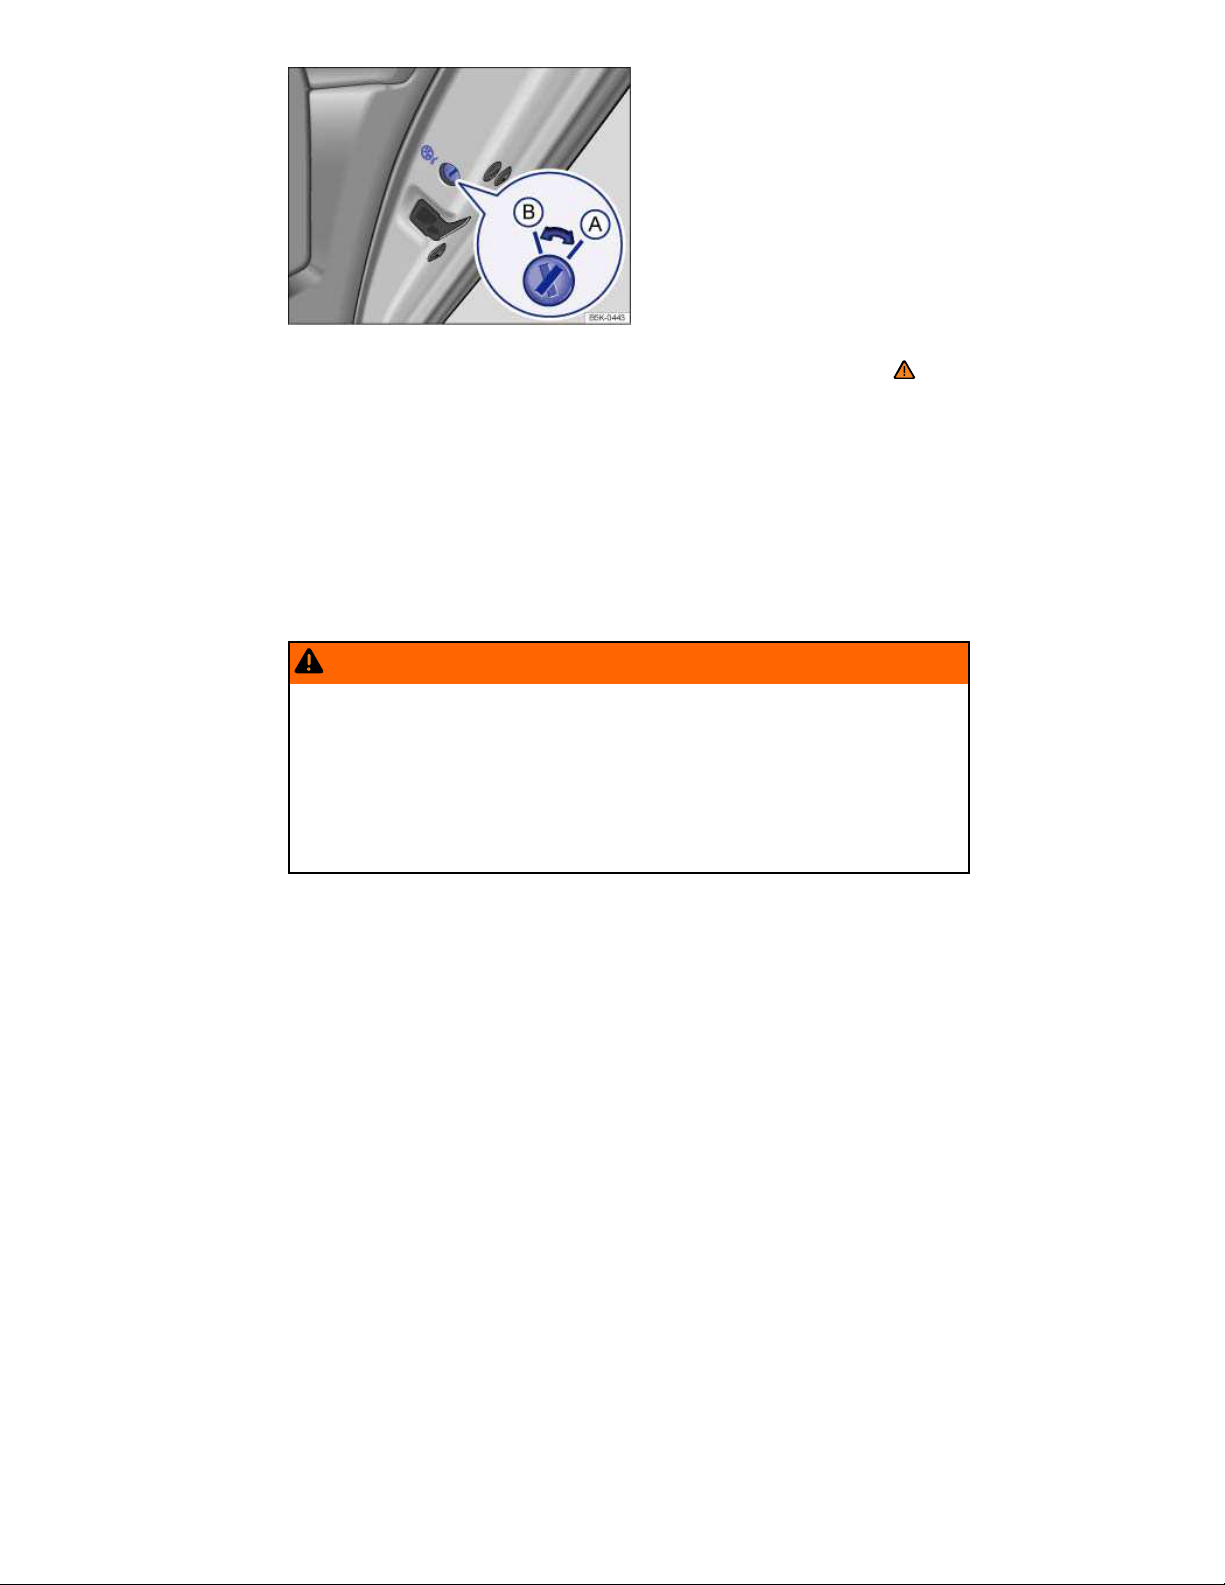
Fig. 27 In the right rear door: Child safety lock A deactivated, B activated.
Please first read and note the introductory information and heed the WARNINGS
The child safety lock keeps the rear doors from being opened from the inside, so that children cannot
open them accidentally. When the child safety lock is engaged, the rear doors can only be opened
from the outside.
Engaging or disengaging child safety lock
Unlock the vehicle and open the respective rear door.
Unfold the key bit from the remote control vehicle key.
Using the key bit, move the slot into the desired position.
Slot position ⇒
(A) Child safety lock disengaged.
(B) Child safety lock engaged.
fig. 26 or ⇒ fig. 27:
WARNING
When the child safety lock is engaged, that rear door cannot be opened from the inside.
Never leave children, disabled persons, or anyone who cannot help themselves, in the
vehicle when locking the doors. This could result in people being locked in the vehicle. This
could result in people being trapped in the vehicle in an emergency. Depending on the time of
year, people trapped in the vehicle can be exposed to very high or very low temperatures.
A closed vehicle can become very hot or very cold, depending on the season. Particularly
in the summer, heat build-up in the passenger and luggage compartment of a parked vehicle
can result in temperatures in the vehicle that are much higher than the outside temperatures.
Temperatures can quickly reach levels that can cause unconsciousness and death, particularly to small children.
Page 39

Luggage compartment lid
Introduction
In this section you’ll find information about:
Warning light
Opening the luggage compartment lid
Closing the luggage compartment lid
More information:
Exterior views
Power locking system
Transporting
Emergency closing and opening
WARNING
Accidents and severe personal injuries can result if you unlock, open, or close the luggage
compartment lid when someone is in the way.
Only open or close the luggage compartment lid if no one is in the way.
After closing the luggage compartment lid, always make sure that it is properly closed and
locked so that it cannot open suddenly when the vehicle is moving. The closed luggage compartment lid must be flush with the surrounding auto body parts.
Always keep the luggage compartment lid closed while driving to help keep poisonous
exhaust gas from being drawn into the vehicle.
Never open the luggage compartment lid when a luggage rack is installed and loaded. If,
for example, there are bicycles on a carrier on the luggage compartment lid, it is possible that
the lid will not be able to open automatically. An open luggage compartment lid may fall on
its own because of the additional weight. If necessary, prop open luggage compartment lid.
Remove the weight from the luggage rack first.
Close and lock the luggage compartment lid and all doors when the vehicle is not in use.
First, make sure that no one is left inside the vehicle.
Never leave your vehicle unattended or let children play around your vehicle, especially
when the luggage compartment lid is open. A child could crawl into the vehicle and pull the
luggage compartment lid shut, becoming trapped and unable to get out. A closed vehicle can
become very hot or very cold, depending on the season. Particularly in the summer, heat
build-up in the passenger and luggage compartment of a parked vehicle can result in temperatures in the vehicle that are much higher than the outside temperatures. Temperatures can
quickly reach levels that can cause unconsciousness and death, particularly to small children.
Never leave children or anyone who cannot help themselves behind in the vehicle. They
may lock the vehicle with the vehicle key or the power locking button and lock themselves in.
NOTICE
Before opening or closing the luggage compartment lid, make sure there is enough room to do
so, for example when the vehicle has a trailer or is in a garage.
Page 40
Warning light
Please first read and note the introductory information and heed the WARNINGS
Lights up Possible cause Proper response
OR
icon ap-
pears in the
display
When the ignition is switched on, several warning and indicator lights come on briefly for a function
check. They go out after a few seconds.
If the luggage compartment lid is not closed properly, the red ² warning light comes on in the instrument cluster or the vehicle icon appears in the instrument cluster display showing an open luggage
compartment lid.
Depending on your vehicle's equipment and options, the red warning light or icon may still be displayed even after the ignition is switched off as long as the key has not been taken out of the ignition.
The icon in the instrument cluster display goes out about 15 seconds after the vehicle has been
locked.
Luggage compartment lid open or
improperly closed.
WARNING
If the luggage compartment lid is not closed properly, it may open suddenly when the vehicle
is moving and cause severe injuries.
Stop immediately and close the luggage compartment lid.
Always make sure the luggage compartment lid is securely latched after you close it.
Stop!
Open the luggage compartment lid and then
close it again.
Opening the luggage compartment lid
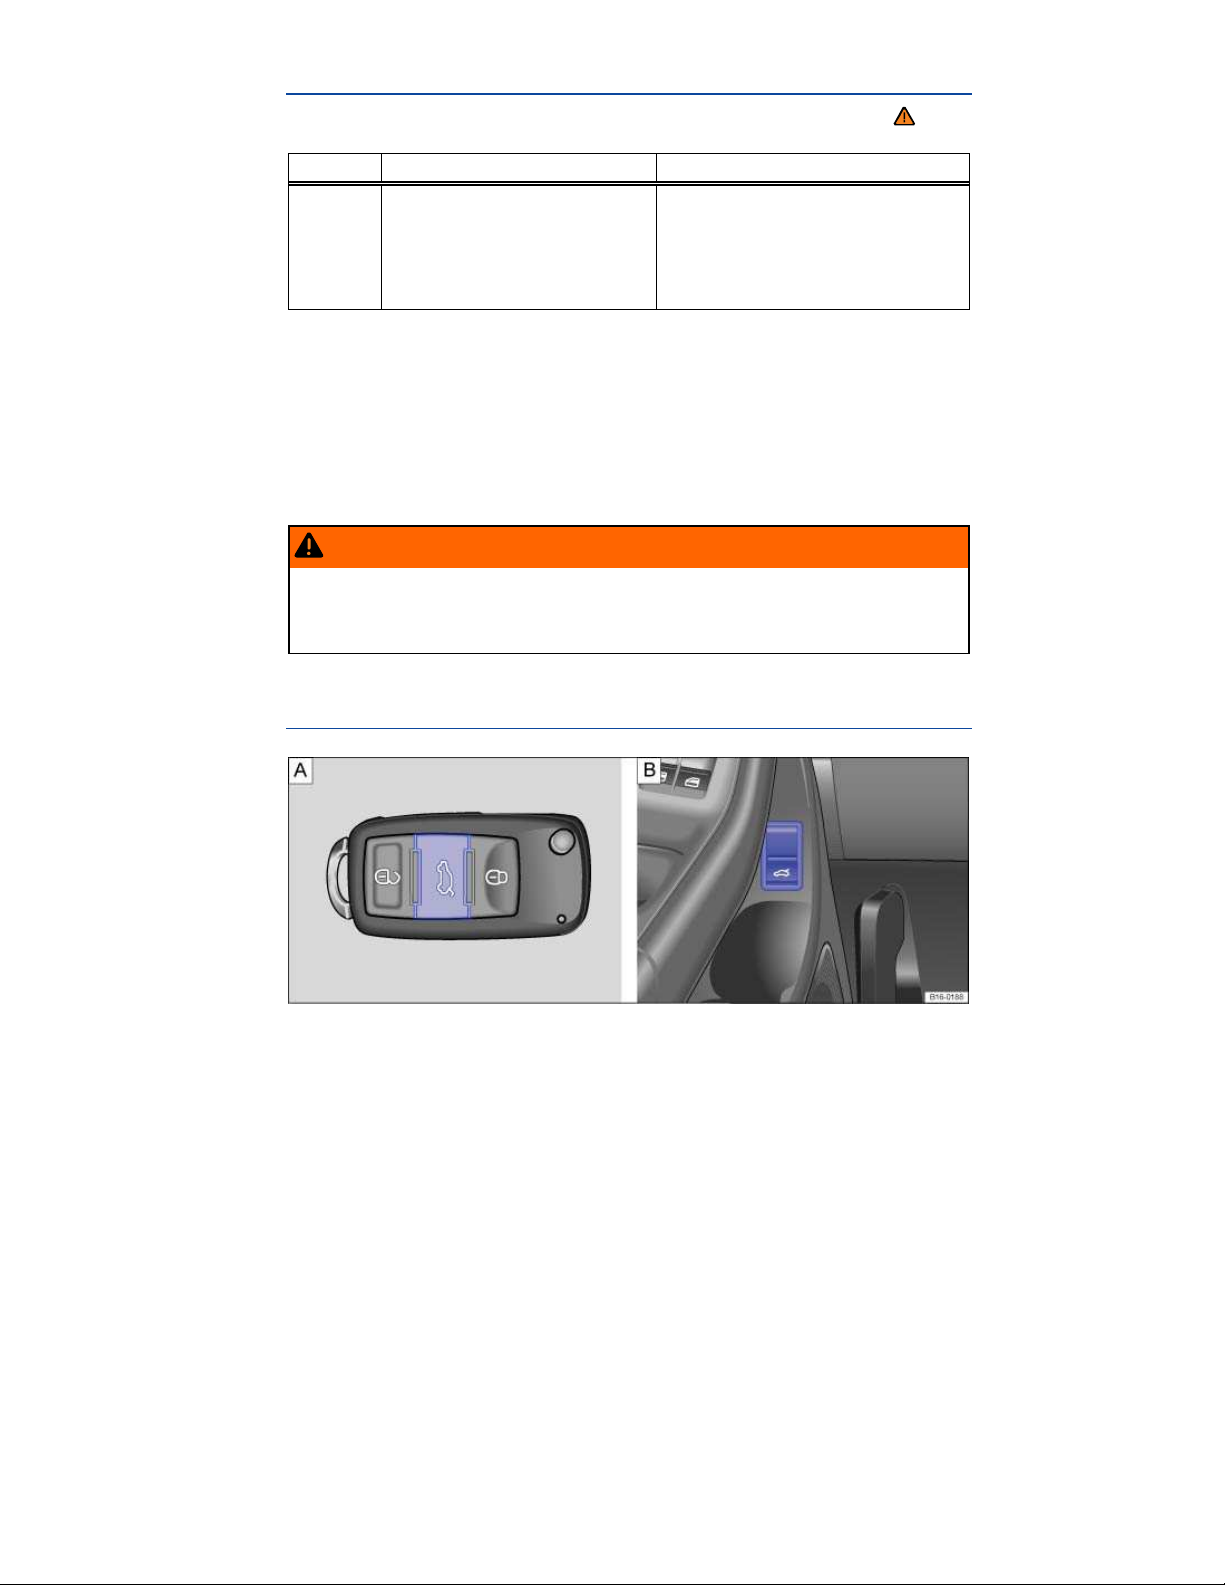
Fig. 28 A: Button to unlock and open the luggage compartment lid in the remote control vehicle key. B: Button
to unlock and open the luggage compartment lid in the driver door.
Page 41
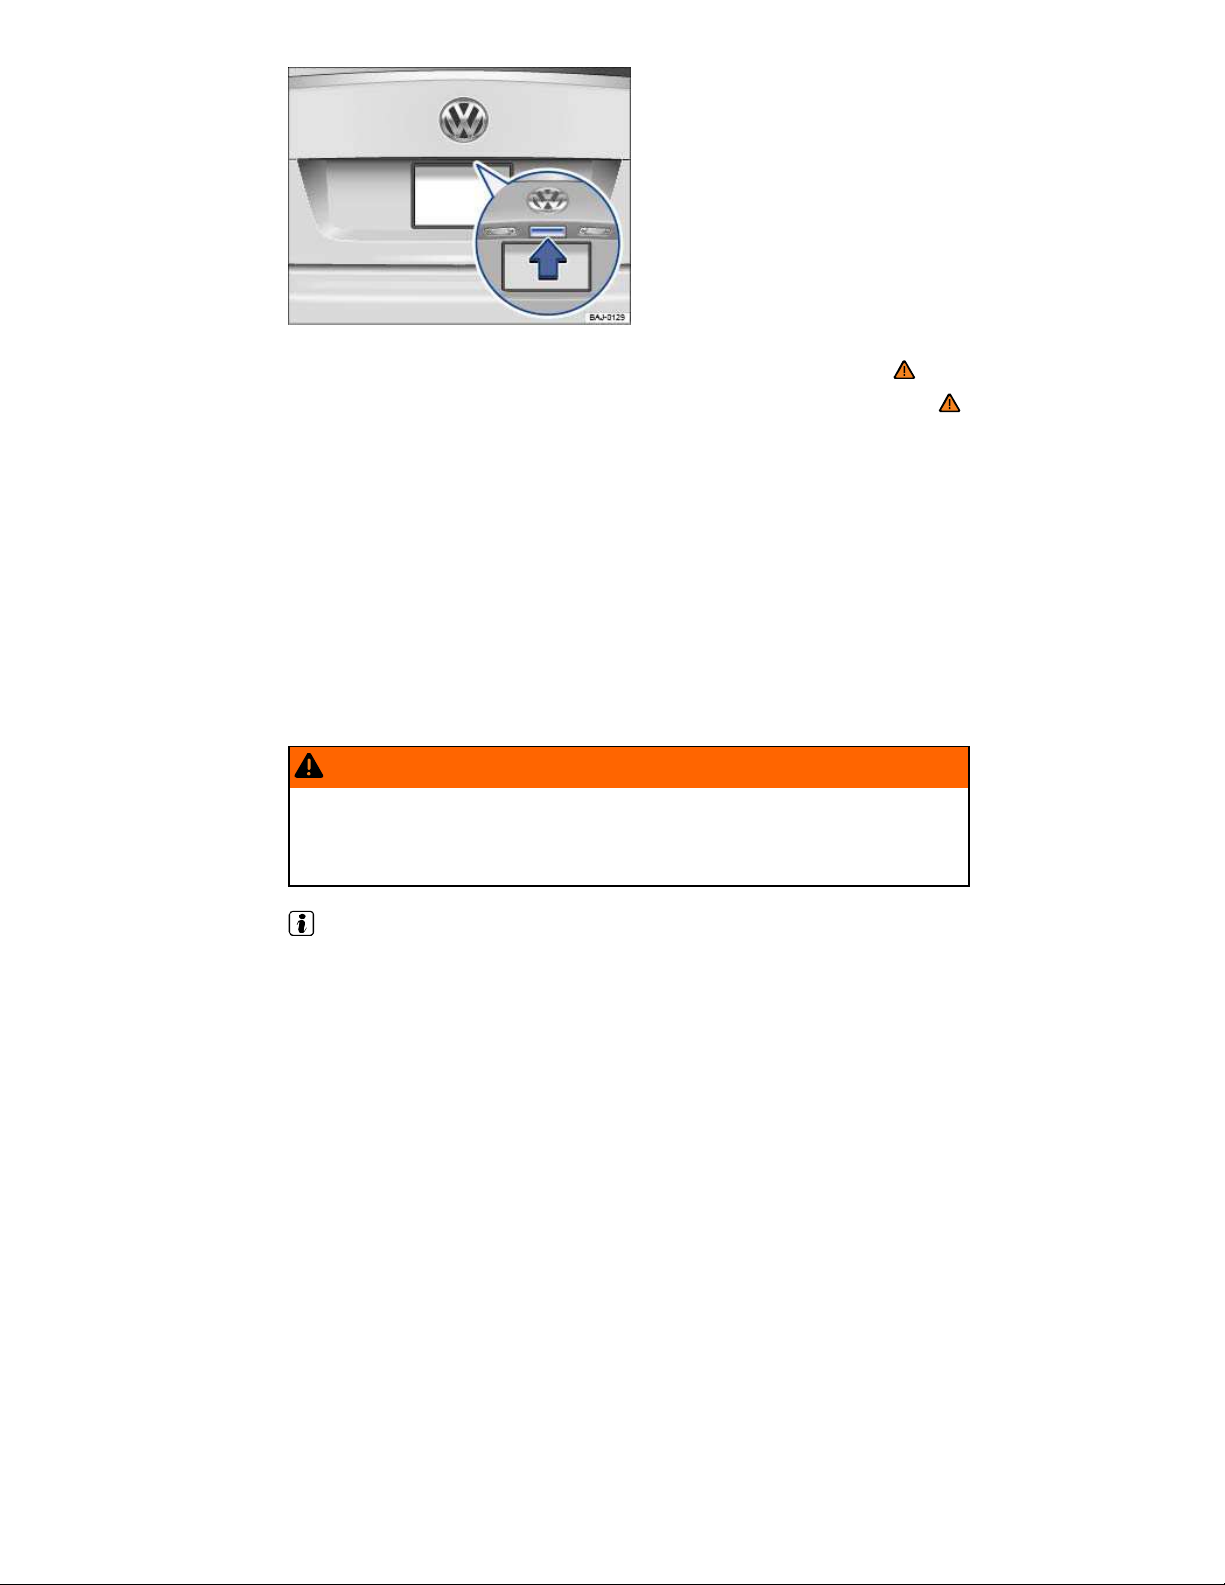
Fig. 29 Opening luggage compartment lid from the outside.
Please first read and note the introductory information and heed the WARNINGS
Always remove any item(s) being transported on the luggage compartment lid before opening it ⇒
Unlocking with the vehicle key
Briefly press the button on the remote control vehicle key ⇒
compartment lid.
Press and hold the button on the remote control vehicle key to unlatch and automatically open
the luggage compartment lid.
fig. 28 A to unlock the luggage
Unlocking and opening with the unlock switch on the driver door
Pull up the switch on the driver door B until the luggage compartment lid opens automatically.
The switch in the driver door also works when the ignition is switched off.
Opening with the button on the luggage compartment lid
Unlock the vehicle or the luggage compartment lid, or open a door.
Lift the luggage compartment lid slightly at the button ⇒ fig. 29 (arrow). The luggage compartment
lid opens automatically.
WARNING
Improper or unsupervised unlocking or opening of the luggage compartment lid can cause
severe injuries. Never open the luggage compartment lid when someone is in the way.
If a bicycle or luggage rack is installed on the luggage compartment lid, it may be hard to
see that the luggage compartment lid is unlatched. An unlatched luggage compartment lid
may open suddenly when the vehicle is moving.
.
At temperatures below +32 °F (0 °C), the luggage compartment lid may not open automatically
after you unlock it. It will be necessary to lift it by hand.
Page 42
Closing the luggage compartment lid
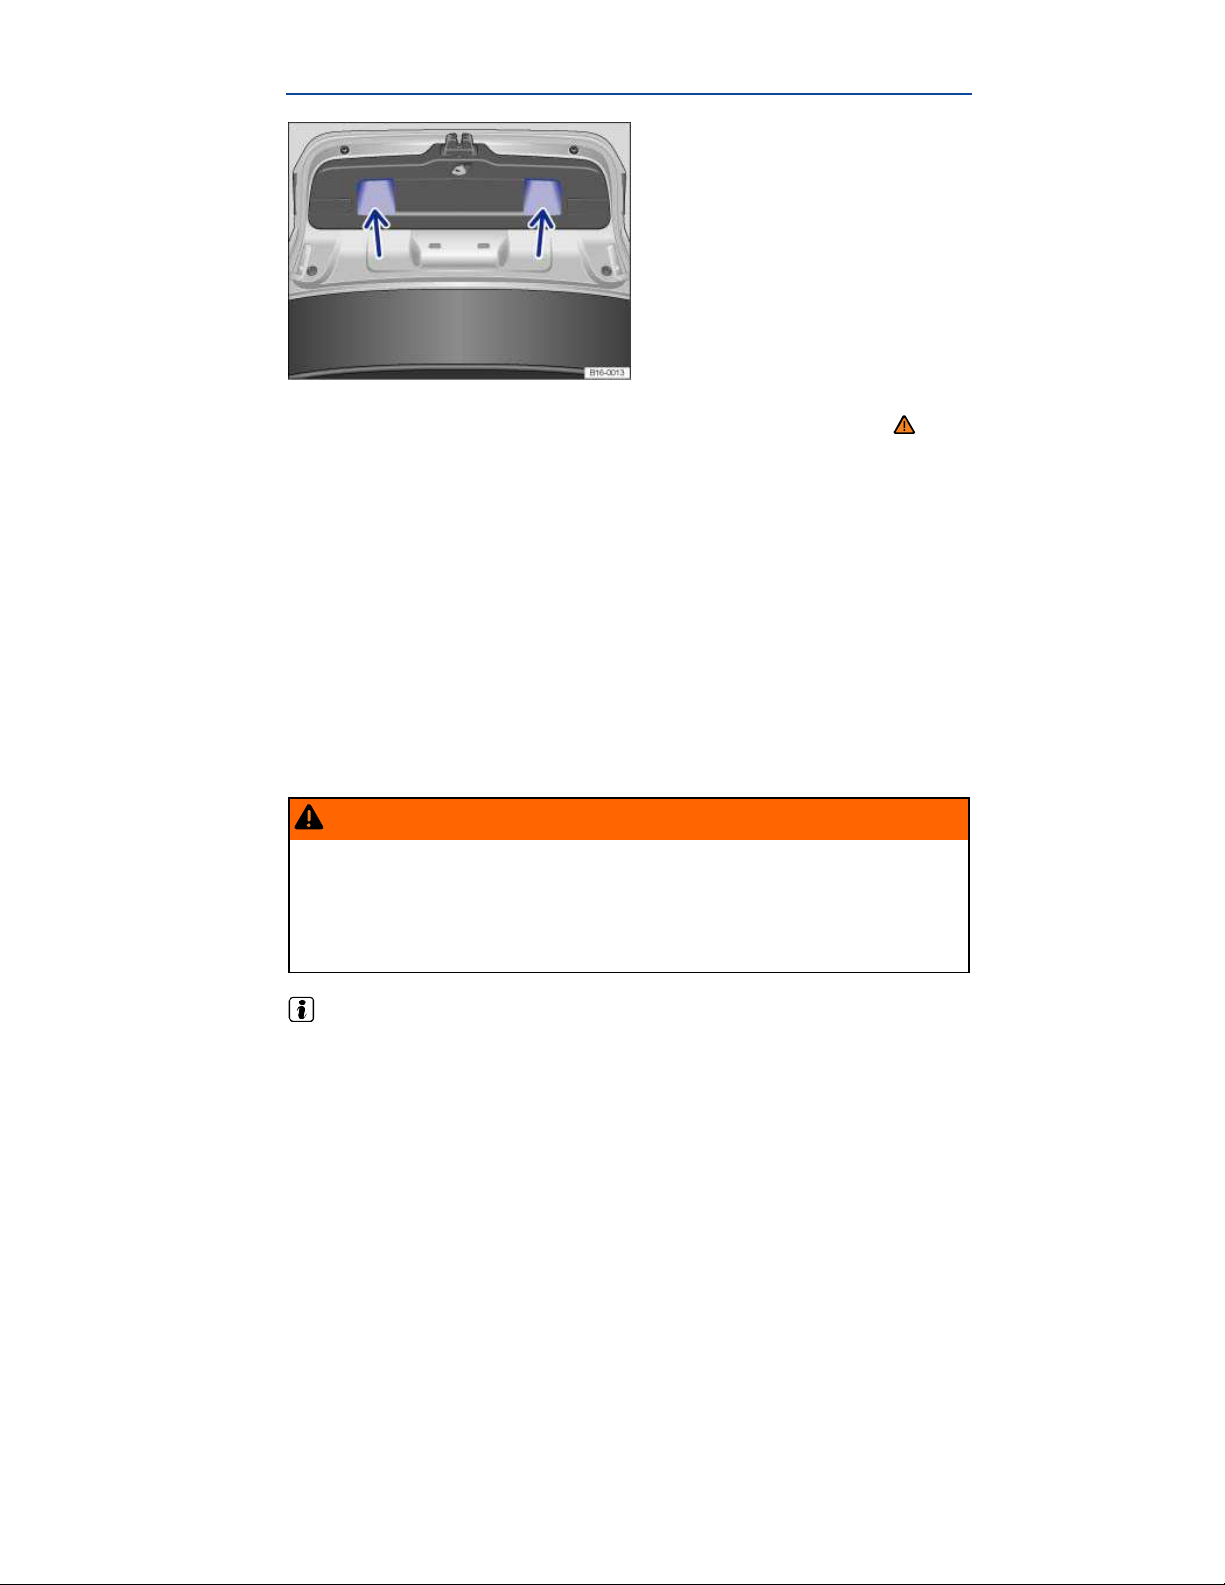
Fig. 30 Opened luggage compartment lid: Recessed grips for closing.
Please first read and note the introductory information and heed the WARNINGS .
Closing the luggage compartment lid
Grasp one of the recessed grips in the trim of the luggage compartment lid ⇒
Pull the luggage compartment lid down and close it securely so that the latch engages.
Check the luggage compartment lid to make sure it is securely latched.
Locking the luggage compartment lid
If you unlock the vehicle with the vehicle key, but do not open either a door or the luggage compartment lid in about the next 30 seconds, the vehicle is automatically locked again. This feature helps
prevent you from leaving the vehicle unlocked unintentionally.
It is only possible to lock the luggage compartment lid when it is securely closed and latched.
The power locking system also locks the luggage compartment lid.
If the luggage compartment lid of a locked vehicle is unlocked with the button ⇒
remote control vehicle key, it will lock again right after it is closed.
A closed but unlocked luggage compartment lid automatically locks at speeds above about 5 mph
(10 km/h).
fig. 30 (arrows).
fig. 28 A on the
WARNING
Improper or unsupervised closing of the luggage compartment lid can cause severe injuries.
Never close the lid when someone is in the way.
Never leave your vehicle unattended or let children play around your vehicle, especially
with the luggage compartment lid left open. A child could crawl into the vehicle and pull the
luggage compartment lid shut, becoming trapped and unable to get out. A closed vehicle can
become very hot or very cold depending on the season. Temperatures can quickly reach
levels that can cause unconsciousness or death, particularly to small children.
Make sure that the remote control vehicle key is not in the luggage compartment before closing
the luggage compartment lid.
Page 43
Power windows
Introduction
In this section you’ll find information about:
Opening and closing power windows
Power windows – features
Power window pinch protection
More information:
Volkswagen Information System
Power locking and closing system
WARNING
Improper use of power windows can result in serious personal injury.
Never let anyone get in the way of a power window when closing it.
When locking the vehicle from the outside, make sure that no one, especially children,
remains in the vehicle. The windows will not open in case of an emergency.
Always take the key with you when you leave the vehicle. You can still use the power windows for several minutes after the ignition is switched off as long as the driver or front passenger door has not been opened.
Always use the safety switch when children are in the back seat to disable the rear power
windows and keep them from being opened and closed.
NOTICE
If you leave the windows open, rain or other precipitation may enter the vehicle from outside
and can damage the vehicle interior.
Opening and closing power windows
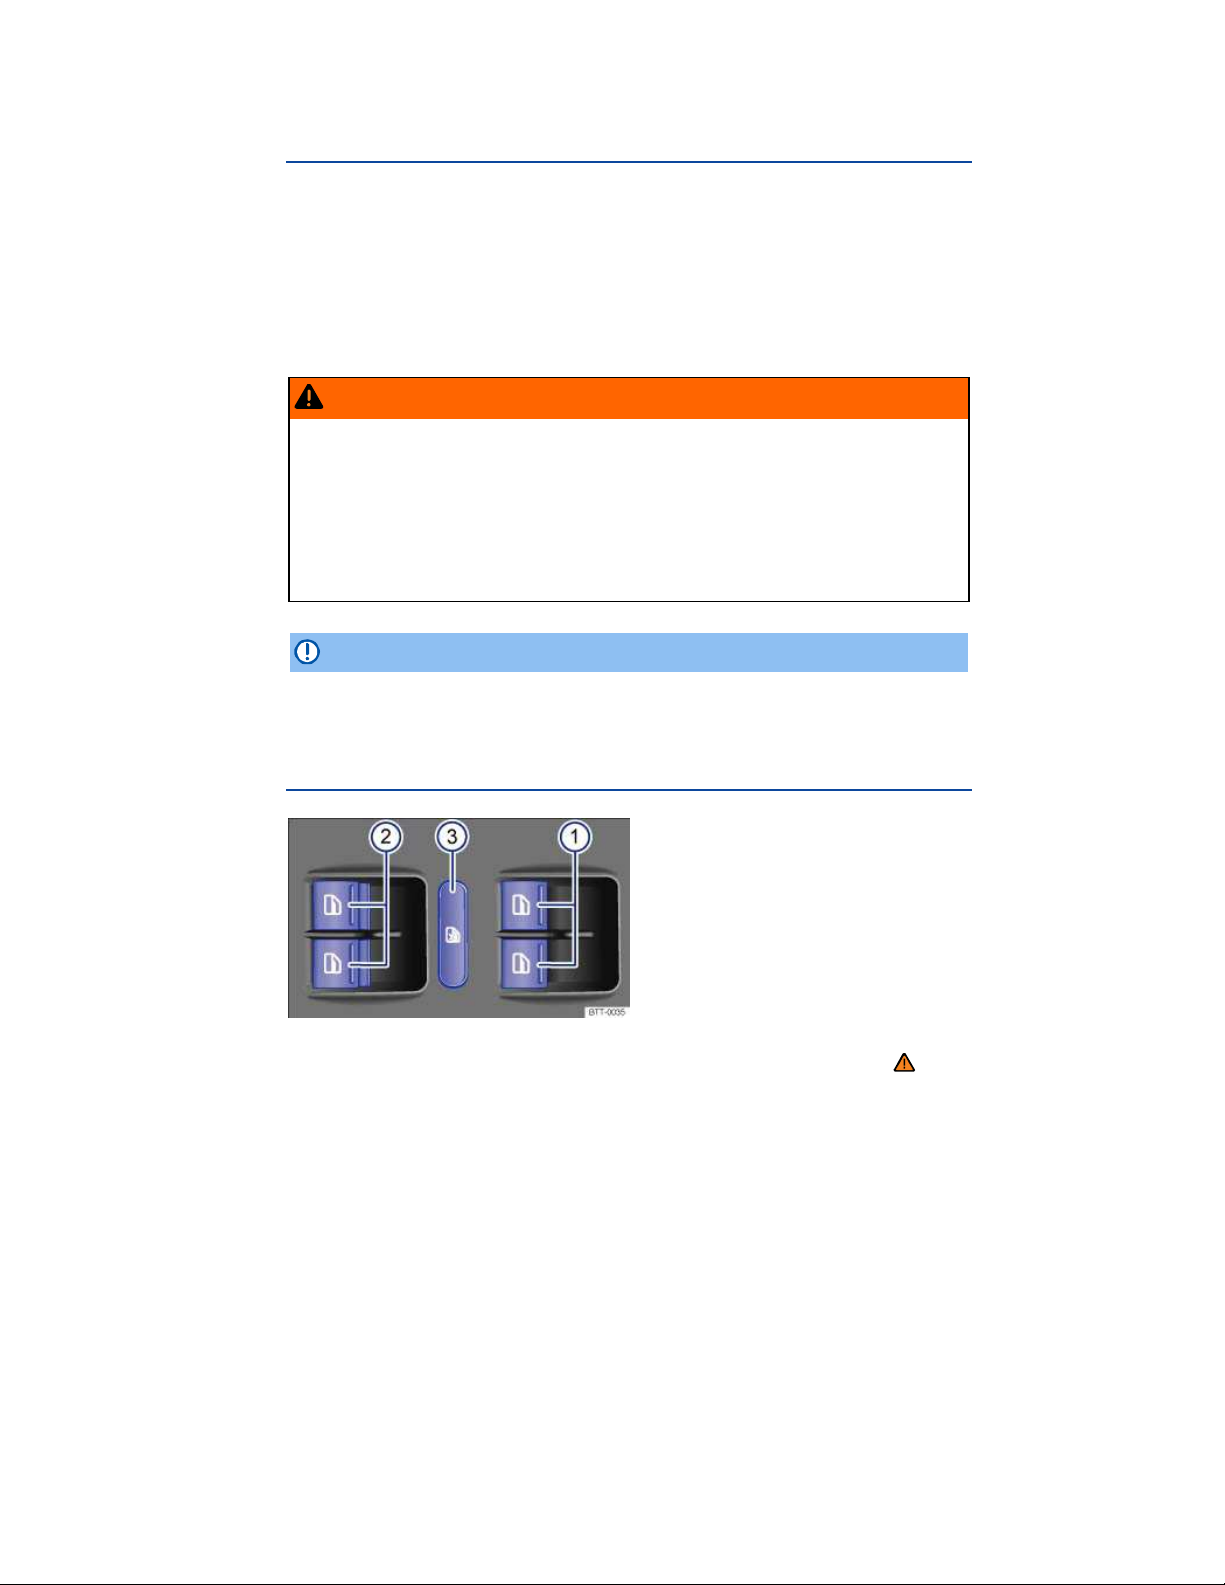
Fig. 31 In the driver door: Switches for front and rear power windows.
Please first read and note the introductory information and heed the WARNINGS
Page 44

Switches in the driver door
Key to ⇒
(1) For the windows in the front doors.
(2) For the windows in the rear doors.
(3) Safety switch.
fig. 31:
Opening or closing windows
Function Action
Opening: Press the switch.
Closing: Pull the switch.
Stopping automatic
movement:
You can still use the power windows for several minutes after the ignition is switched off as long as the
driver or front passenger door has not been opened. When the vehicle key has been removed from
the ignition and the driver door has been opened, the power windows cannot be opened or closed.
A separate button for controlling the window is located in the front passenger door.
Press/pull the switch again.
The safety switch
in the rear doors. The yellow indicator light in the
switch comes on.
(3) deactivates the power windows
Power windows – features
Please first read and note the introductory information and heed the WARNINGS
One-touch opening and closing
The one-touch feature automatically opens/closes a power window all the way. The window switch
does not have to be held down/up.
For one-touch opening: Press the switch for the window down briefly as far as it goes.
For one-touch closing: Pull the switch for the window up briefly as far as it goes.
Stopping automatic movement: Pull/press the switch again.
Reactivating the one-touch feature
If the vehicle battery is disconnected or dead and the windows are not completely closed, the onetouch feature will not work and must be reactivated:
Switch on the ignition.
Close all windows and doors.
Pull up the switch for the respective window and hold it for at least 2 seconds in this position.
Release the switch, pull up and hold again. The one-touch feature is now reactivated.
The one-touch feature can be reactivated for one or more windows at the same time.
Convenience closing
The convenience closing feature lets you close the windows and the power sunroof from outside the
vehicle as follows:
Page 45

Manual locking: lock the vehicle with the vehicle key bit in the driver door and keep the key turned
in the locking position to close all windows and the power sunroof
Vehicles with Keyless Access: hold your finger on the lock sensor surface on the outside of the
door handle for a few seconds until the windows and power sunroof close
Convenience closing first closes the windows and then the power sunroof.
WARNING
Improper use of power windows can result in serious personal injury.
Never let anyone get in the way of a power window when closing it.
When locking the vehicle from the outside, make sure that no one, especially children,
remains in the vehicle. The windows will not open in case of an emergency.
Always take the key with you when you leave the vehicle. You can still use the power windows for several minutes after the ignition is switched off as long as the driver or front passenger door has not been opened.
Always use the safety switch when children are in the back seat to disable the rear power
windows and keep them from being opened and closed.
If the power windows malfunction, the one-touch feature, as well as pinch protection may not
work properly. See an authorized Volkswagen dealer or authorized Volkswagen Service Facility right
away.
If convenience closing of the power windows from the outside requires removing the cover cap of
the lock cylinder on the driver door, the cover cap must be reinstalled after the vehicle is locked 284.
Page 46
Power sunroof
Introduction
In this section you’ll find information about:
Opening and closing the power sunroof
Power sunroof – convenience closing feature
Pinch protection for the power sunroof
Initializing the power sunroof
More information:
Volkswagen Information System
Power locking and closing system
Emergency closing and opening
WARNING
Improper use of the power sunroof can result in serious personal injury.
Always make sure that no one is in the way of the power sunroof when it is closing.
Always take the key with you when you leave the vehicle.
Never leave children or disabled persons in the vehicle – particularly if they have access
to the vehicle key. Unsupervised use of the remote control vehicle key makes it possible to
lock the vehicle, start the engine, turn on the ignition and operate the sunroof.
You can still open or close the power sunroof for several minutes after you switch off the
ignition, as long as the driver or front passenger door has not been opened.
NOTICE
To help prevent damage, remove ice and snow from the sunroof before opening or tilting it
in winter weather.
Always close the sunroof before leaving the vehicle or if it begins raining. If the sunroof is
open or tilted, rain could enter the vehicle interior and cause extensive damage to the electrical
system. This could result in further vehicle damage.
Remove leaves and other objects from the sunroof guiderails regularly either by hand or using a
vacuum cleaner.
If the power sunroof malfunctions, pinch protection may not function properly. See an authorized
Volkswagen dealer or an authorized Volkswagen Service Facility.
Page 47
Opening and closing the power sunroof
A
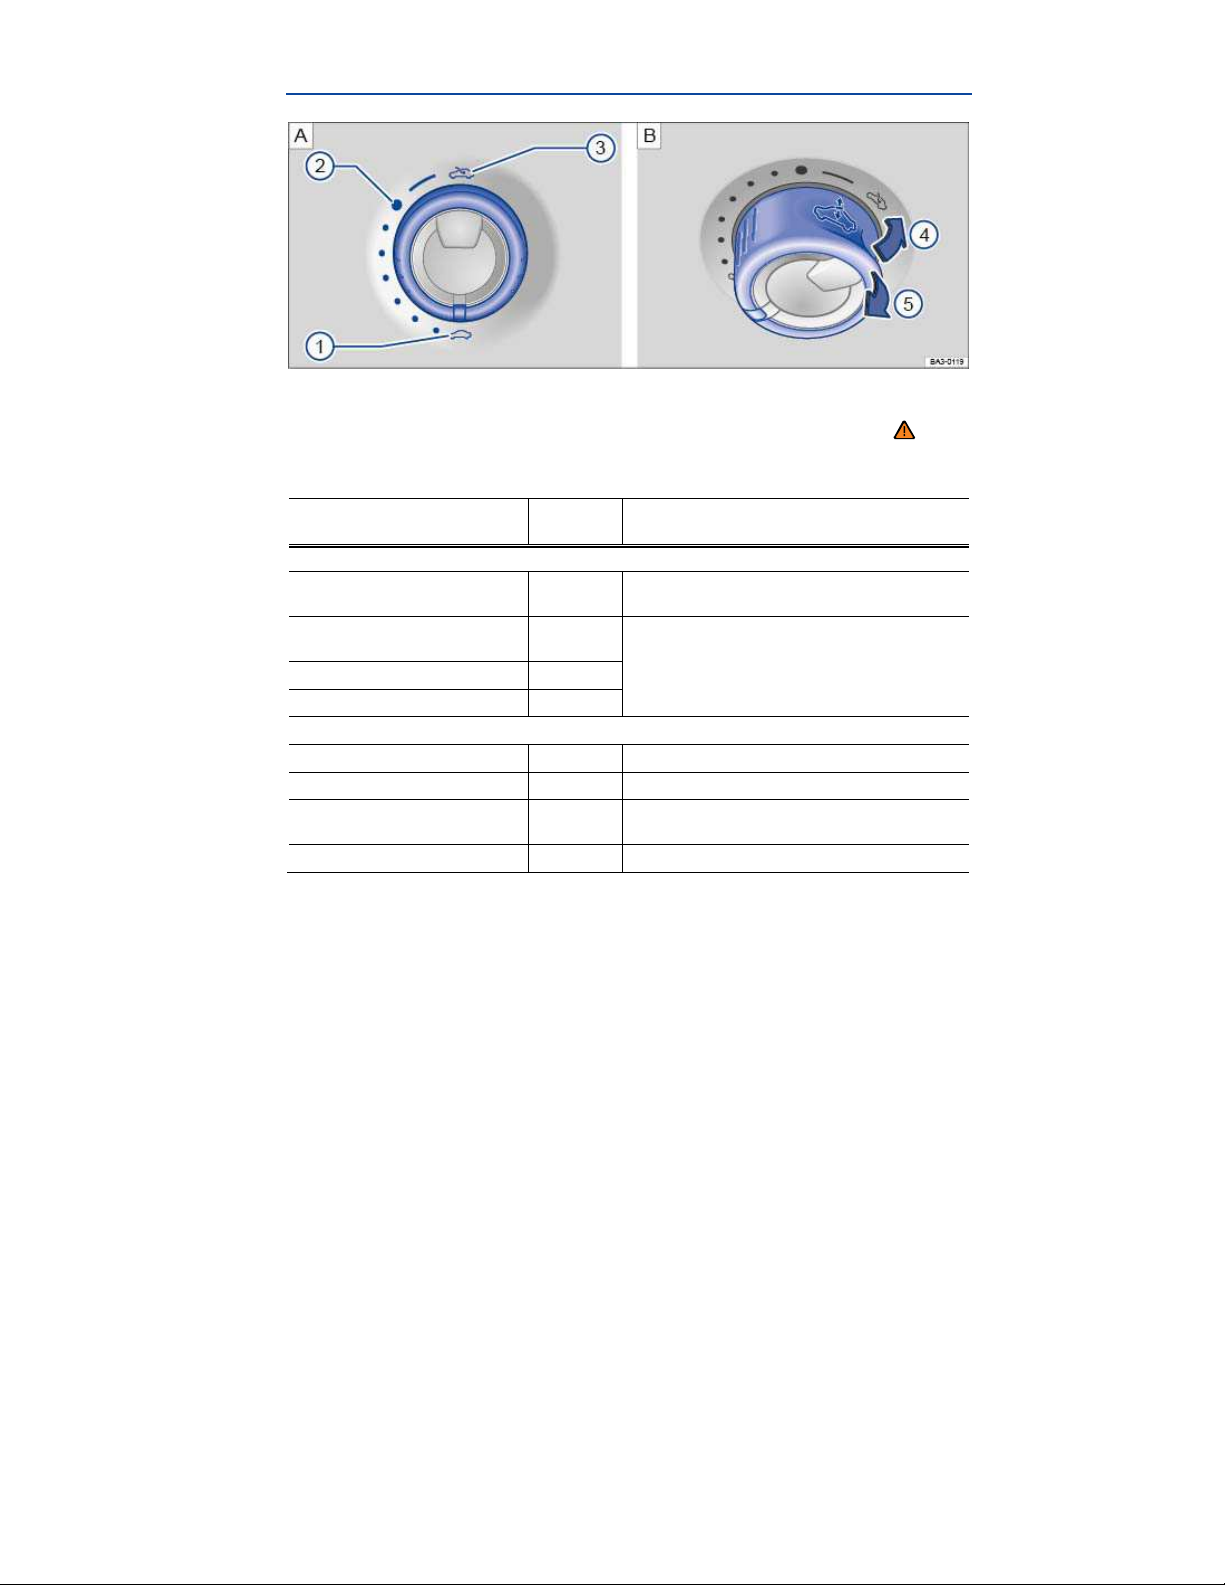
Fig. 32 In the headliner: Rotary switch for the power sunroof. (A) Turn the rotary switch to slide the sunroof
open or closed. (B) Press or pull the switch to tilt open or to close.
Please first read and note the introductory information and heed the WARNINGS
The rotary switch must be turned to its home position ⇒ fig. 32 (1) in order to tilt the power sunroof.
Function
To open sliding sunroof fully: (3)
To move the sliding sunroof to the
comfort position:
To set an intermediate position: (1) to (2)
To close the sliding sunroof fully: (1)
To tilt open the tilting roof fully: (4) Push the rear part of the switch briefly (arrow).
To stop the one-touch feature: (4) or (5) Push or pull the switch again briefly.
To set an intermediate position: (4) to (5)
To close fully: (5) Pull the rear part of the switch briefly (arrow).
You must switch on the ignition to operate the power sunroof. After switching off the ignition, you can
still open or close the power sunroof for several minutes as long as the driver or front passenger door
has not been opened.
Sliding headliner
The sliding headliner opens with the power sunroof and can be closed manually when the sunroof is
closed.
Switch
position
(2)
B
Action
Turn the switch past position
until the glass roof moves to the desired position.
Turn the switch to the desired position.
Pull or push the rear part of the switch briefly until
the desired position is reached.
(2) and hold it there
Page 48
Power sunroof – convenience closing feature
Please first read and note the introductory information and heed the WARNINGS
Convenience closing
The convenience closing feature lets you close the power sunroof as follows:
Remove the cover cap from the concealed lock cylinder on the driver door
Turn the vehicle key bit in the lock of the driver door to the closing position and hold it there. The
power sunroof closes. Release the vehicle key to stop the process.
Vehicles with Keyless Access: hold your finger on the lock sensor surface on the outside of the
door handle for a few seconds until the windows and power sunroof close
Convenience closing first closes the windows and then the power sunroof.
Convenience closing of the power sunroof from the outside leaves the rotary switch in the last
selected position. The switch must be newly positioned when starting to drive again.
If convenience closing of the power sunroof requires removing the cover cap of the lock cylinder
on the driver door, the cover cap must be reinstalled after the vehicle is locked
Initializing the power sunroof
Fig. 33 In the headliner: Sunroof rotary switch.
Please first read and note the introductory information and heed the WARNINGS
Initializing the sunroof
If the vehicle battery has been disconnected or is dead, the sunroof must be initialized.
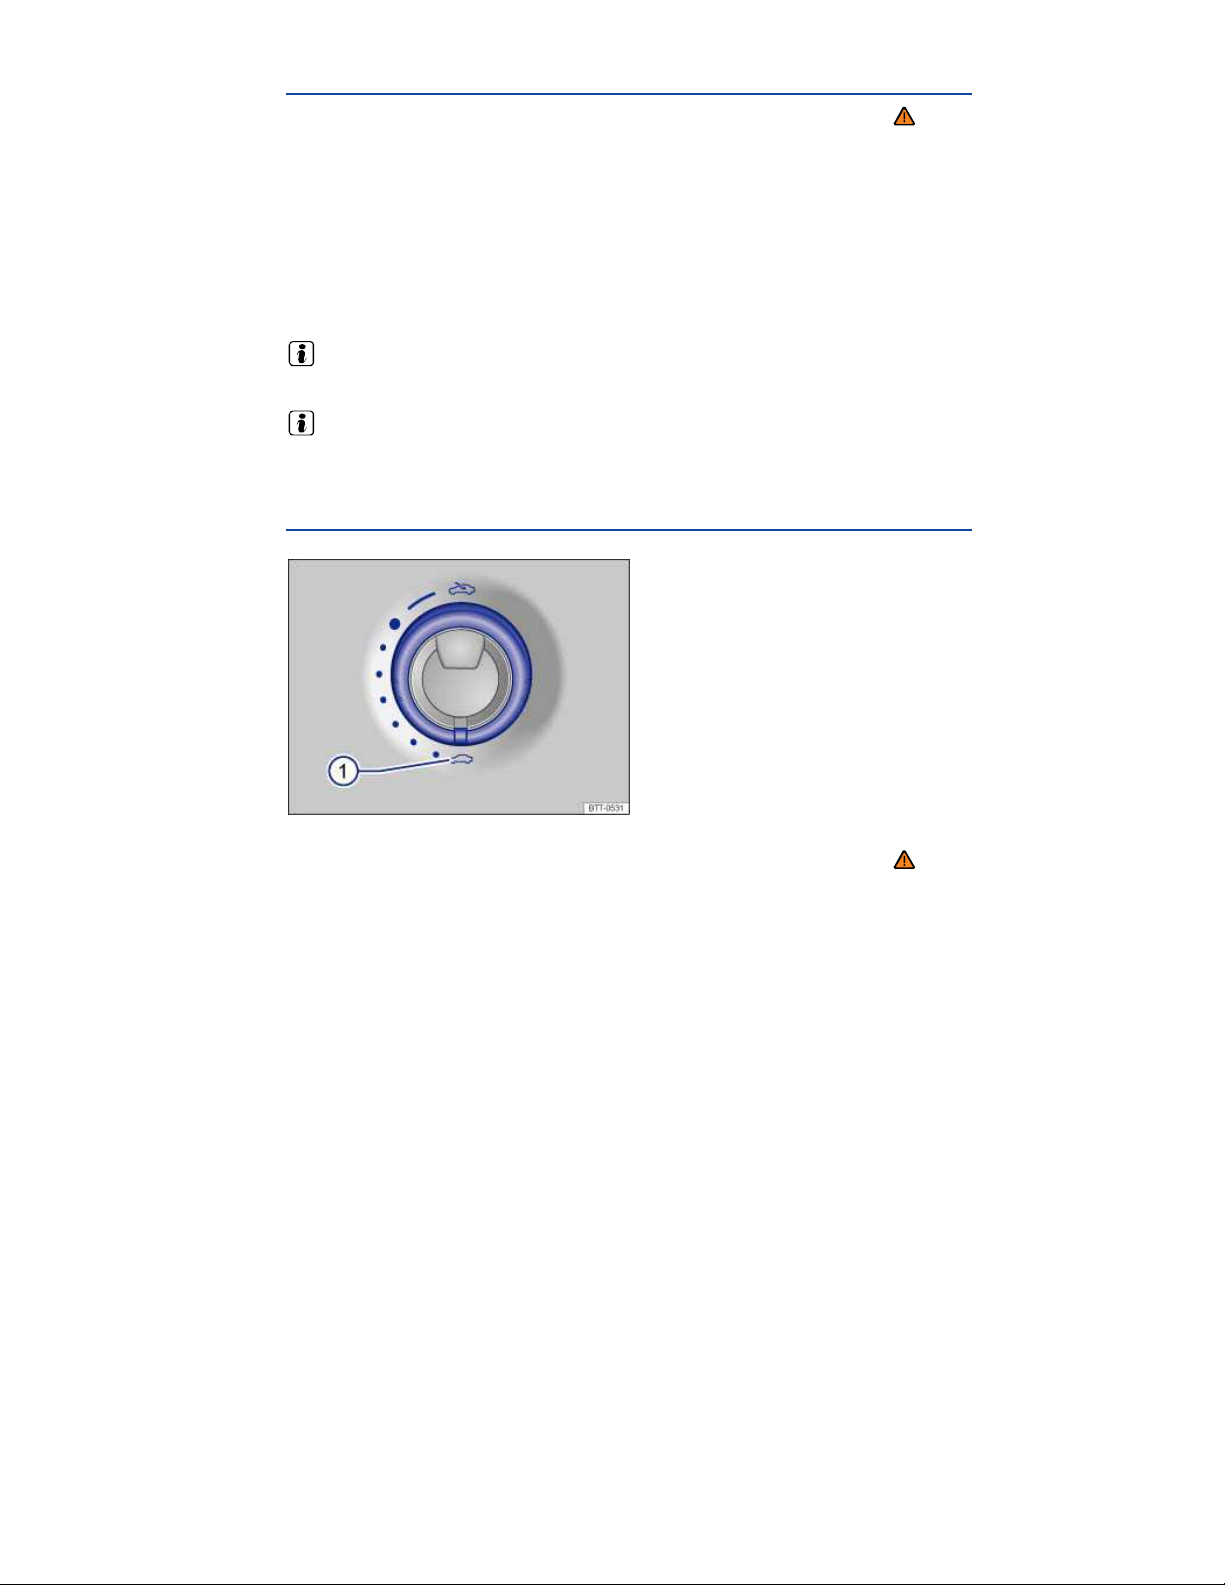
The switch must be rotated to the “Closed” position ⇒
Pull the switch at the rear until the sunroof is fully closed.
The sunroof will now close without pinch protection!
Release the switch.
Pull and hold the switch at the rear. The sunroof will open and close on its own.
When the sunroof is closed once again, release the switch.
fig. 33 (1).
Page 49
If the sunroof still will not close, contact an authorized Volkswagen dealer or an authorized
Volkswagen Service Facility.
WARNING
Careless or unsupervised use of the sunroof can cause serious injuries.
Always make sure that no one is in the way of the power sunroof when it is closing.
Always take all vehicle keys with you when leaving the vehicle.
Never leave children or persons requiring assistance unattended in the vehicle, especially
if they have access to the vehicle key. Unsupervised use of the remote control vehicle key
can lock the vehicle, start the engine, switch on the ignition and operate the sunroof.
The sunroof can still be opened or closed for a short period after the ignition has been
switched off, as long as the driver or passenger door is not opened.
WARNING
Closing the sunroof without pinch protection can cause severe injuries.
Always be careful when closing the sunroof.
Always make sure that no one is in the way when overriding pinch protection to close the
sunroof.
Pinch protection does not prevent fingers or other body parts from being pressed against
the roof frame, thereby causing injury.
If the power sunroof malfunctions, pinch protection may not function properly. See an authorized
Volkswagen dealer or an authorized Volkswagen Service Facility for assistance.
Page 50
Seat functions
Introduction
In this section you’ll find information about:
Seat heating
Seat heating
More information:
Adjusting the seating position
Safety belts
Airbag system
Child safety and child restraints
Outside mirrors
WARNING
Improper use of seat adjustment controls can cause severe personal injuries.
Always sit properly at all times before starting to drive and while the vehicle is moving.
Make sure all passengers, especially children, are properly seated whenever the vehicle is
moving.
Keep hands, fingers, feet and other body parts away from moving parts and adjustment
areas of the seats.
Applicable only in the United States
Seat heating
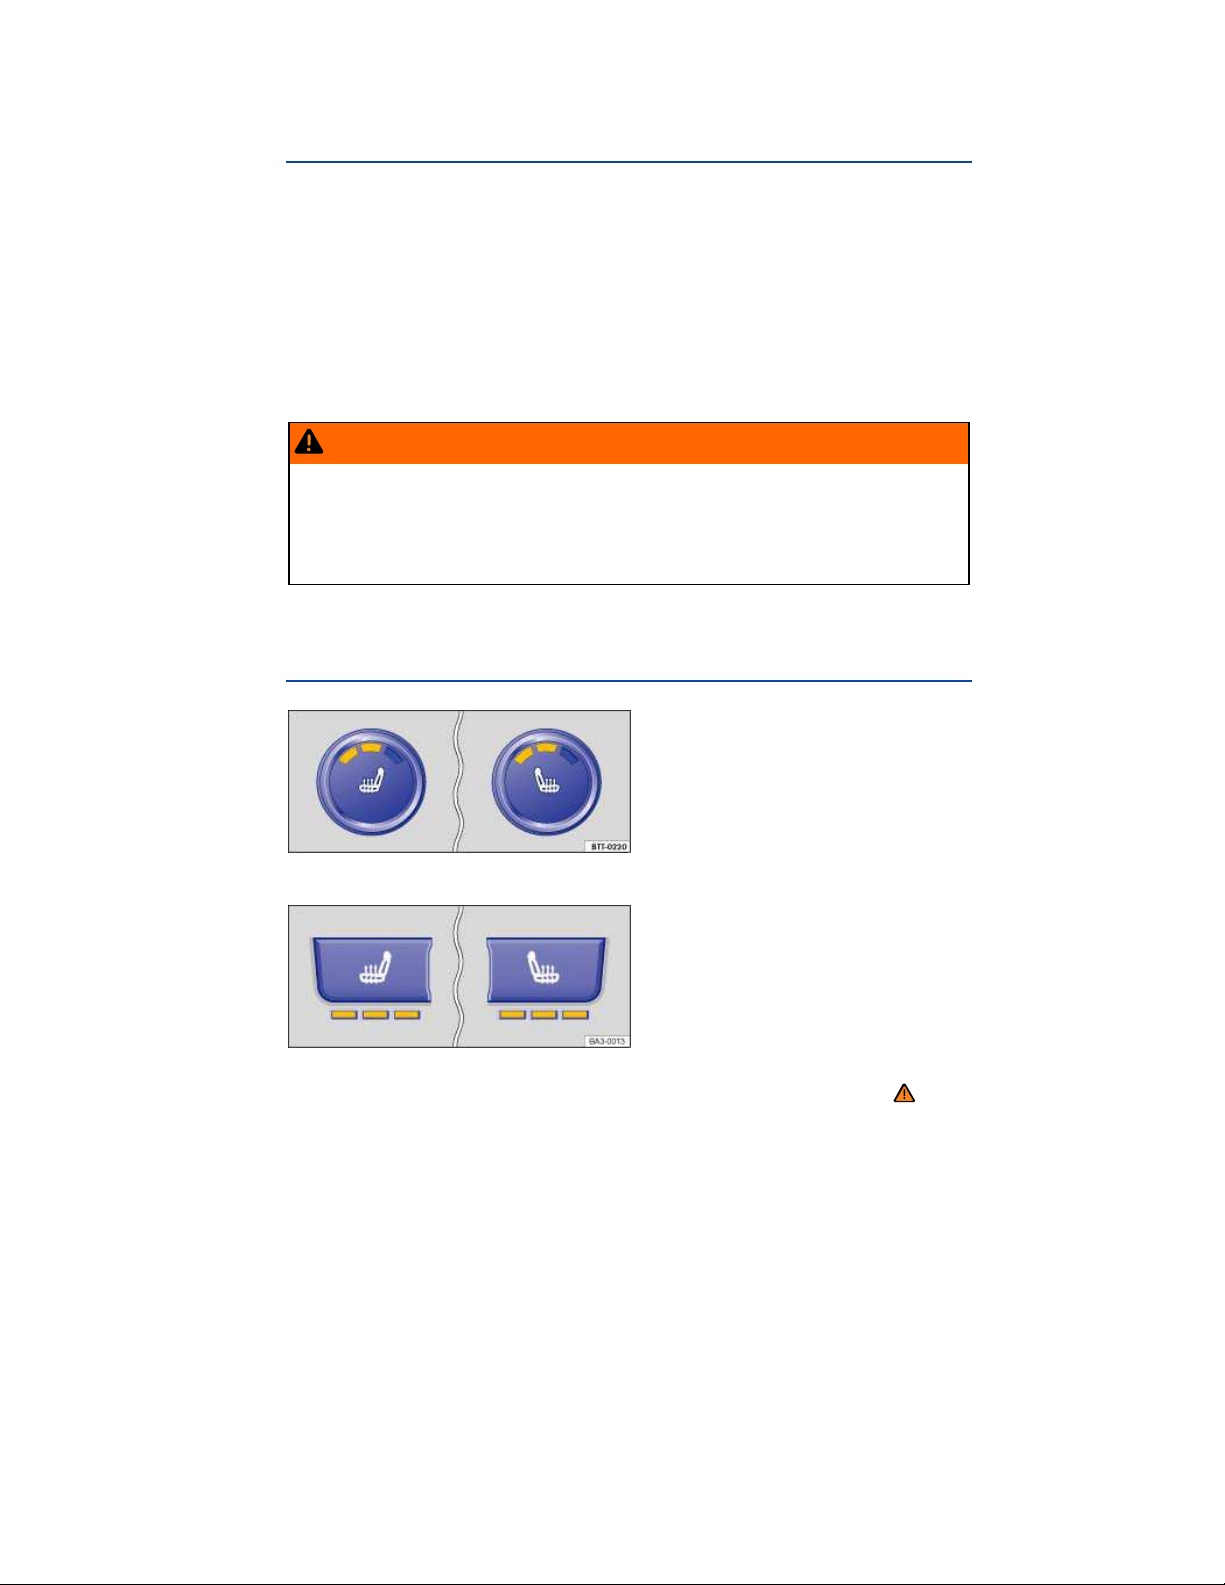
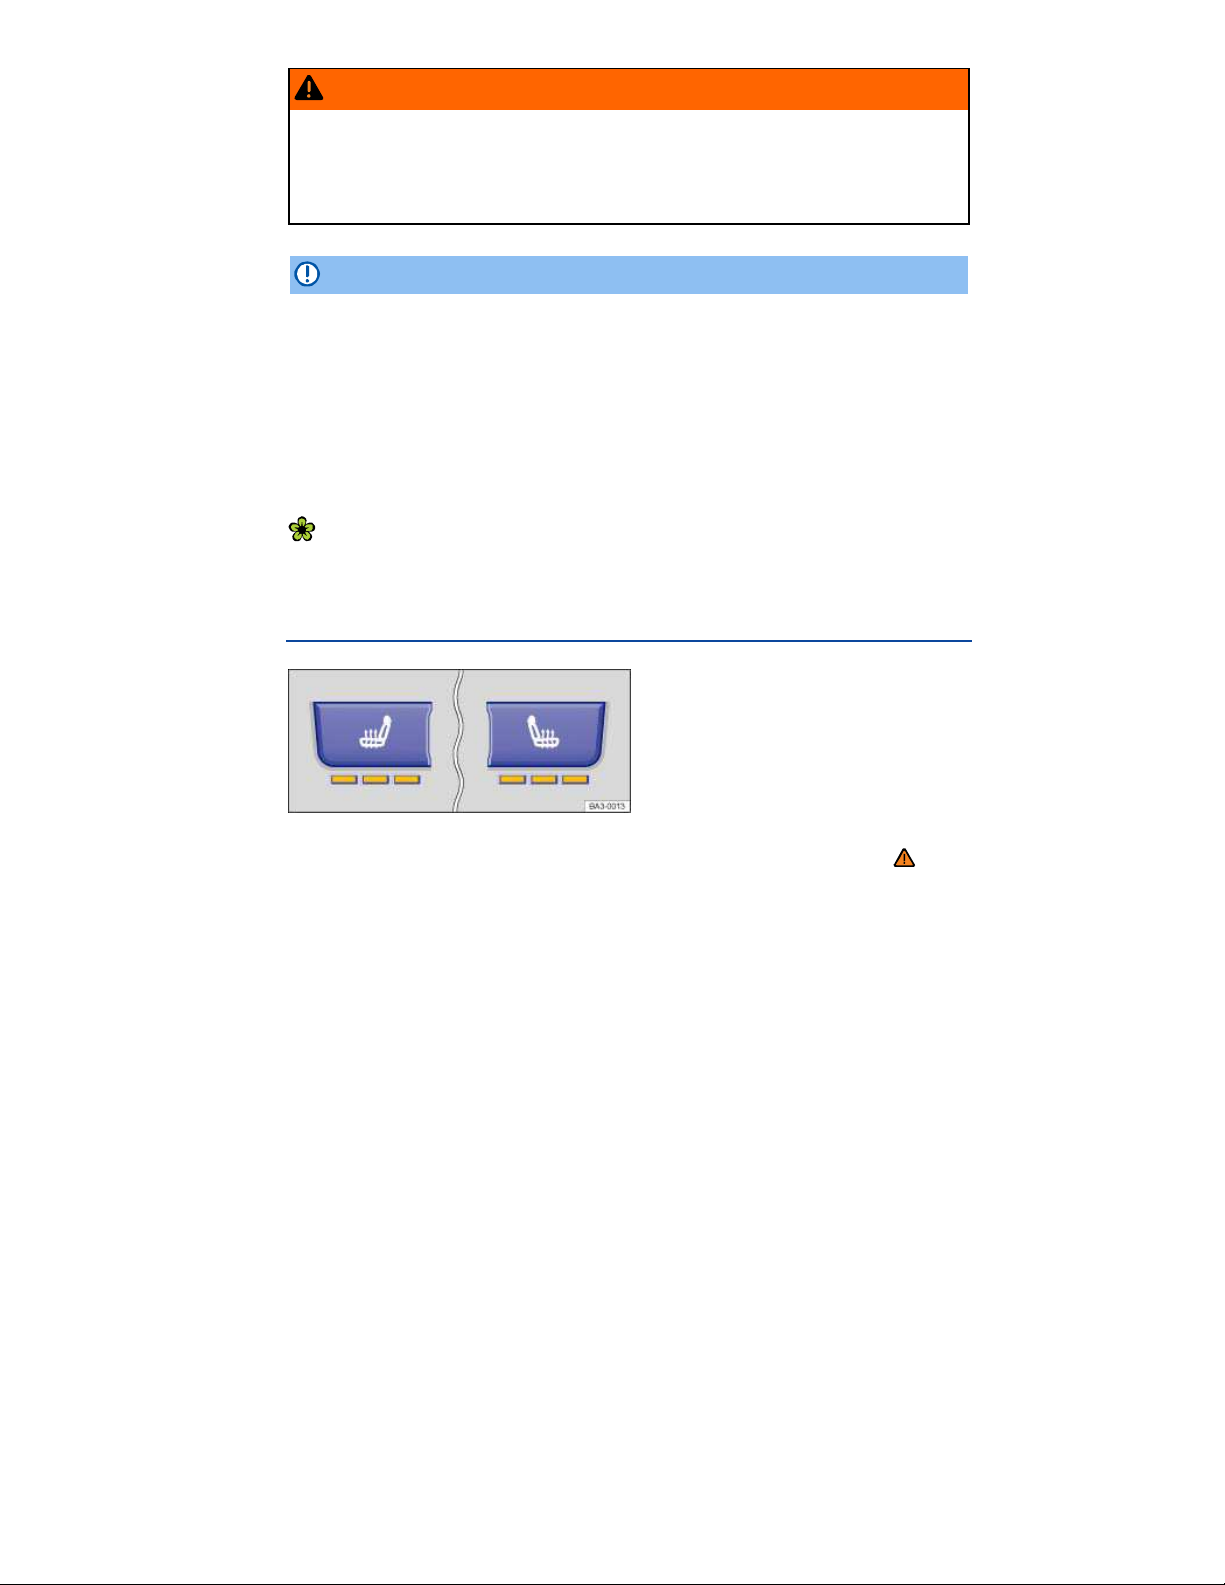
Fig. 44 In the center console: Seat heating buttons for the front seats (Manual AC).
Fig. 45 In the center console: Seat heating buttons for the front seats (Climatronic).
Please first read and note the introductory information and heed the WARNINGS
Page 51
When the ignition is switched on, the front seats can be electrically heated by heating elements that
warm the seat backrest and cushion.
Do not use the seat heating if any of the following conditions apply:
If the seat is not being used.
If there is a child restraint installed on the front passenger seat.
If there is a blanket or seat cover on the front passenger seat.
If the seat is damp or wet.
If the outside temperature or the temperature inside the passenger compartment is 77 °F (25 °C) or
more.
Function
Switch on: Press the or button. Seat heating is switched on
Adjust the heating
level:
Switch off: Press the or button repeatedly until all indicator
Action for seat heating ⇒ fig. 44 or ⇒ fig. 45
to maximum.
Press the or button repeatedly until the desired
heating level is set.
lights in the button are off.
Special seat heating features
On the driver and the passenger side, the seat heating will resume at the setting that was set when the
ignition was switched off. However, this feature only works if the key is not taken out of the ignition
switch, or, for vehicles with Keyless Access, the driver door is not opened or the vehicle is not locked.
People suffering from a low level of perceived pain or a lowered awareness of pain as from
medication, paralysis, or chronic illness (e.g. diabetes) should NEVER use the seat heating feature
!
⇒
The use of seat heating by persons with these conditions could result in burns to the back, buttocks,
and legs that may take a long time to heal and may never heal completely. If you have any of these
conditions, you should take regular breaks and get out of the vehicle, particularly on long trips. Consult
your doctor for advice regarding your specific condition.
WARNING
Certain medical conditions, such as paralysis and diabetes, and certain medications can
increase the risk of serious burns when the seat heating feature is switched on.
Vehicle occupants who have a low level of perceived pain or a lowered awareness of pain
can receive serious burns to the back, buttocks, and legs that take a long time to heal or may
never heal completely.
Never use the seat heating feature if you or your passengers are at risk of being burned
because of a medical condition. Take regular breaks and get out of the vehicle, particularly
on long trips. Consult your doctor for advice regarding your specific condition.
Never let exposed skin remain in contact with the seat upholstery when the seat heating is
being used.
Page 52
WARNING
A wet seat can cause the seat heating to malfunction and increase the risk of serious burns.
Always make sure the seats are dry before using the seat heating.
Never sit on the seat with wet clothes.
Never put damp or wet things including clothes on the seat.
Never spill liquids on the seats.
NOTICE
To help prevent damage to electrical and other parts in the seat, do not kneel on the front
seats or apply concentrated pressure to a small area of the seat or backrest.
Liquids, sharp objects and things that do not let the heat in the seat escape into the air,
including, for example, a child restraint, a blanket, or seat covers on the seat can damage seat
heating.
If you smell an odor, immediately shut off seat heating and have it checked by an authorized
Volkswagen dealer or authorized Volkswagen Service Facility.
Never install leather upholstery on a vehicle with seat heating that originally had cloth
upholstery. The seat heating elements for seats with cloth seats will overheat if the cloth
upholstery is replaced with leather upholstery.
Switch off seat heating when it is not needed to help reduce unnecessary fuel consumption.
Applicable only in Canada
Seat heating
Fig. 46 In the center console: Seat heating buttons for the front seats.
Please first read and note the introductory information and heed the WARNINGS
When the ignition is switched on, the front seats can be electrically heated by heating elements that
warm the seat backrest and cushion.
Do not use the seat heating if any of the following conditions apply:
If the seat is not being used.
If there is a child restraint installed on the front passenger seat.
If there is a blanket or seat cover on the front passenger seat.
If the seat is damp or wet.
If the outside temperature or the temperature inside the passenger compartment is 77 °F (25 °C) or
more.
Page 53
Function
Switch on: Press the or button. Seat heating is switched on
Adjust the heating
level:
Switch off: Press the or button repeatedly until all
Action for seat heating
to maximum.
Press the or button repeatedly until the desired
heating level is set.
indicator lights in the button are off.
⇒ fig. 46
Special seat heating features
On the driver and the passenger side, the seat heating will resume at the setting that was set when the
ignition was switched off. However, this feature only works if the key is not taken out of the ignition
switch, or, for vehicles with Keyless Access, the driver door is not opened or the vehicle is not locked.
People suffering from a low level of perceived pain or a lowered awareness of pain as from
medication, paralysis, or chronic illness (e.g. diabetes) should NEVER use the seat heating feature
⇒
!
The use of seat heating by persons with these conditions could result in burns to the back, buttocks,
and legs that may take a long time to heal and may never heal completely. If you have any of these
conditions, you should take regular breaks and get out of the vehicle, particularly on long trips. Consult
your doctor for advice regarding your specific condition.
WARNING
Certain medical conditions, such as paralysis and diabetes, and certain medications can
increase the risk of serious burns when the seat heating feature is switched on.
Vehicle occupants who have a low level of perceived pain or a lowered awareness of pain
can receive serious burns to the back, buttocks, and legs that take a long time to heal or may
never heal completely.
Never use the seat heating feature if you or your passengers are at risk of being burned
because of a medical condition. Take regular breaks and get out of the vehicle, particularly
on long trips. Consult your doctor for advice regarding your specific condition.
Never let exposed skin remain in contact with the seat upholstery when the seat heating is
being used.
WARNING
A wet seat can cause the seat heating to malfunction and increase the risk of serious burns.
Always make sure the seats are dry before using the seat heating.
Never sit on the seat with wet clothes.
Never put damp or wet things including clothes on the seat.
Never spill liquids on the seats.
NOTICE
To help prevent damage to electrical and other parts in the seat, do not kneel on the front
seats or apply concentrated pressure to a small area of the seat or backrest.
Liquids, sharp objects and things that do not let the heat in the seat escape into the air,
including, for example, a child restraint, a blanket, or seat covers on the seat can damage seat
heating.
Page 54

If you smell an odor, immediately shut off seat heating and have it checked by an authorized
Volkswagen dealer or authorized Volkswagen Service Facility.
Never install leather upholstery on a vehicle with seat heating that originally had cloth
upholstery. The seat heating elements for seats with cloth seats will overheat if the cloth
upholstery is replaced with leather upholstery.
Switch off seat heating when it is not needed to help reduce unnecessary fuel consumption.
Page 55

Safety belts
Introduction
In this section you’ll find information about:
Warning light
Frontal collisions and laws of physics
What happens to passengers not wearing a safety belt
Safety belts protect
Using safety belts
Fastening and unfastening safety belts
Safety belt position
Safety belt height adjusters
Safety belt extender
Safety belt retractor, pretensioner, load limiter
Service and disposal of belt pretensioners
Properly worn safety belts are the single most effective means of reducing the risk of serious injury
and death in a collision or other accident.
Damage to safety belts reduces their overall effectiveness and increases the risk of serious personal
injury and death whenever the vehicle is being used.
Check the condition of all safety belts regularly.
If a safety belt shows damage to webbing, bindings, retractors or buckles, have the safety belt
replaced by an authorized Volkswagen dealer or an authorized Volkswagen Service Facility ⇒
More information:
Adjusting the seating position
Airbag system
Child safety and child restraints
Parts, accessories, repairs and modifications
.
Page 56

WARNING
Not wearing a safety belt or wearing an improperly positioned safety belt increases the risk of
severe personal injury or death. Safety belts offer optimum protection only when they are
used properly.
Properly worn safety belts are the single most effective means of reducing the risk of
serious injury and death in a collision or other accident. For this reason, always wear your
safety belt properly and make sure all passengers wear their safety belts properly as well
whenever the vehicle is moving.
The driver must always make sure that every person in the vehicle is properly seated on a
seat of his or her own, properly fastens the safety belts belonging to that seat before the
vehicle starts to move, and keeps the belts properly fastened while riding in the vehicle. This
applies even when just driving around town. Therefore, always wear your safety belts and
make sure that everybody in your vehicle is properly restrained.
Always secure children in the vehicle with a restraint system appropriate for their age,
weight and height
Always fasten safety belts correctly before driving off and make sure that all passengers
are properly restrained.
Never attach the safety belt to the buckle of another seat. Attaching the safety belt to the
wrong buckle will reduce safety belt effectiveness and can cause serious personal injury.
Never let any objects or liquids get into the safety belt latch and prevent it from working
properly.
Never remove a safety belt while the vehicle is moving. Doing so will increase your risk of
being injured or killed.
Never strap more than one person, including small children, into any single safety belt.
Never let children or babies ride sitting on your lap, and never place a safety belt over a
child sitting on your lap.
Never wear belts over rigid or breakable objects in or on your clothing, such as
eyeglasses, pens, keys, etc., as these may cause injury.
Several layers of heavy clothing (such as a coat worn over top of a sports jacket) may
interfere with proper positioning of the safety belt and reduce the overall effectiveness of the
system.
Never use comfort clips or devices that create slack in the shoulder belt. However, special
clips may be required for the correct use of some child restraint systems.
Safety belts offer optimum protection only when the seat backrest is upright and belts are
correctly positioned on the body.
Page 57
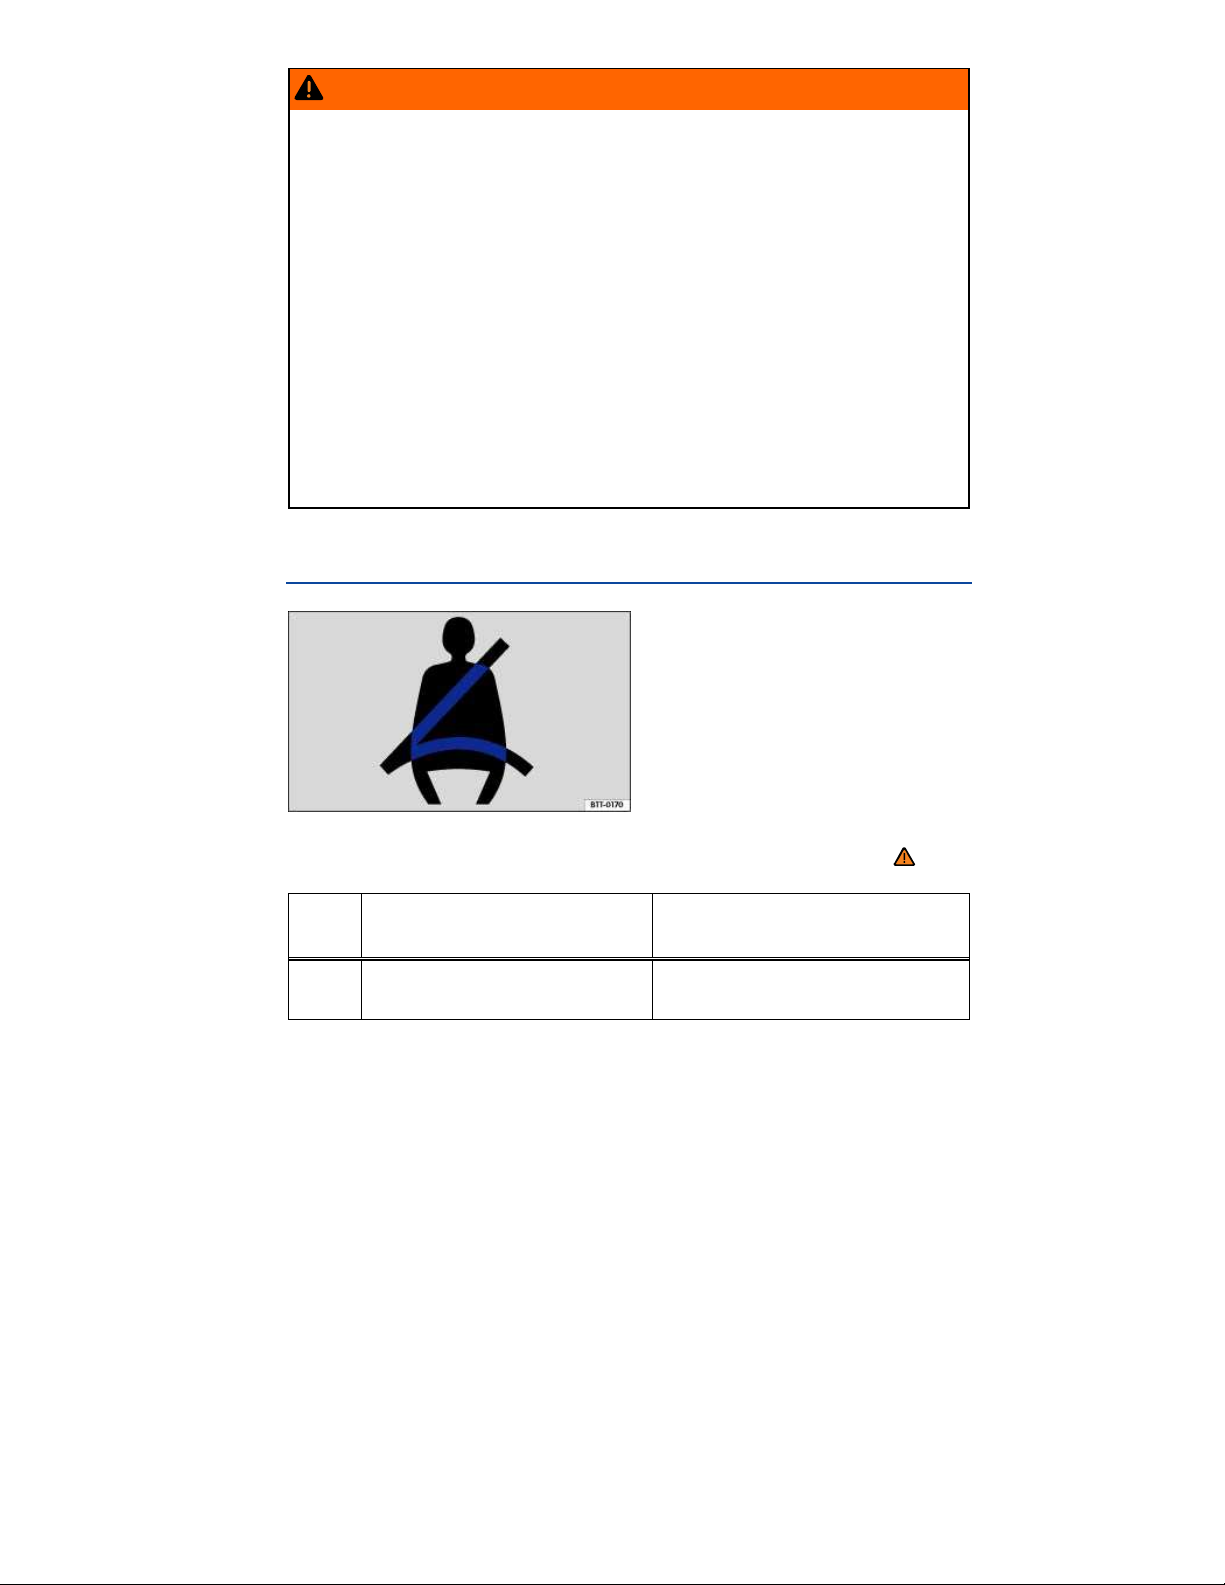
WARNING
Damage to safety belts reduces their overall effectiveness and increases the risk of serious
personal injury and death whenever the vehicle is being used.
Never let safety belts become damaged by being caught in the door or seat hardware.
Torn or frayed safety belts can tear, and damaged safety belt hardware can break in an
accident.
Inspect belts regularly for damage. If webbing, bindings, buckles, or retractors are
damaged, have the belts replaced immediately with the correct replacement belts approved
by Volkswagen for your vehicle, model, and model year.
Safety belts that were subject to stress in an accident and stretched must be replaced with
a correct, new safety belt, preferably by an authorized Volkswagen dealer or authorized
Volkswagen Service Facility.
Replacement after a crash may be necessary even if a safety belt shows no visible
damage. Anchorages that have been loaded must also be inspected.
Damaged safety belts must be replaced; they cannot be repaired.
Never try to repair a damaged safety belt yourself. Never remove or modify the safety belts
in any way.
Have safety belts, bindings, retractors and buckles replaced by an authorized Volkswagen
dealer or authorized Volkswagen Service Facility.
Always keep the belts clean. Dirty belts may not work correctly and can impair the
function of the inertia reel.
Warning light
Fig. 47 Warning light in the instrument cluster.
Please first read and note the introductory information and heed the WARNINGS
Lights
up or
flashes
When the ignition is switched on, several warning and indicator lights come on briefly for a function
check. They go out after a few seconds.
A warning chime also sounds.
Possible cause Proper response
Driver and front passenger have not
fastened their safety belts, if front
passenger seat is occupied.
Fasten safety belts.
Page 58
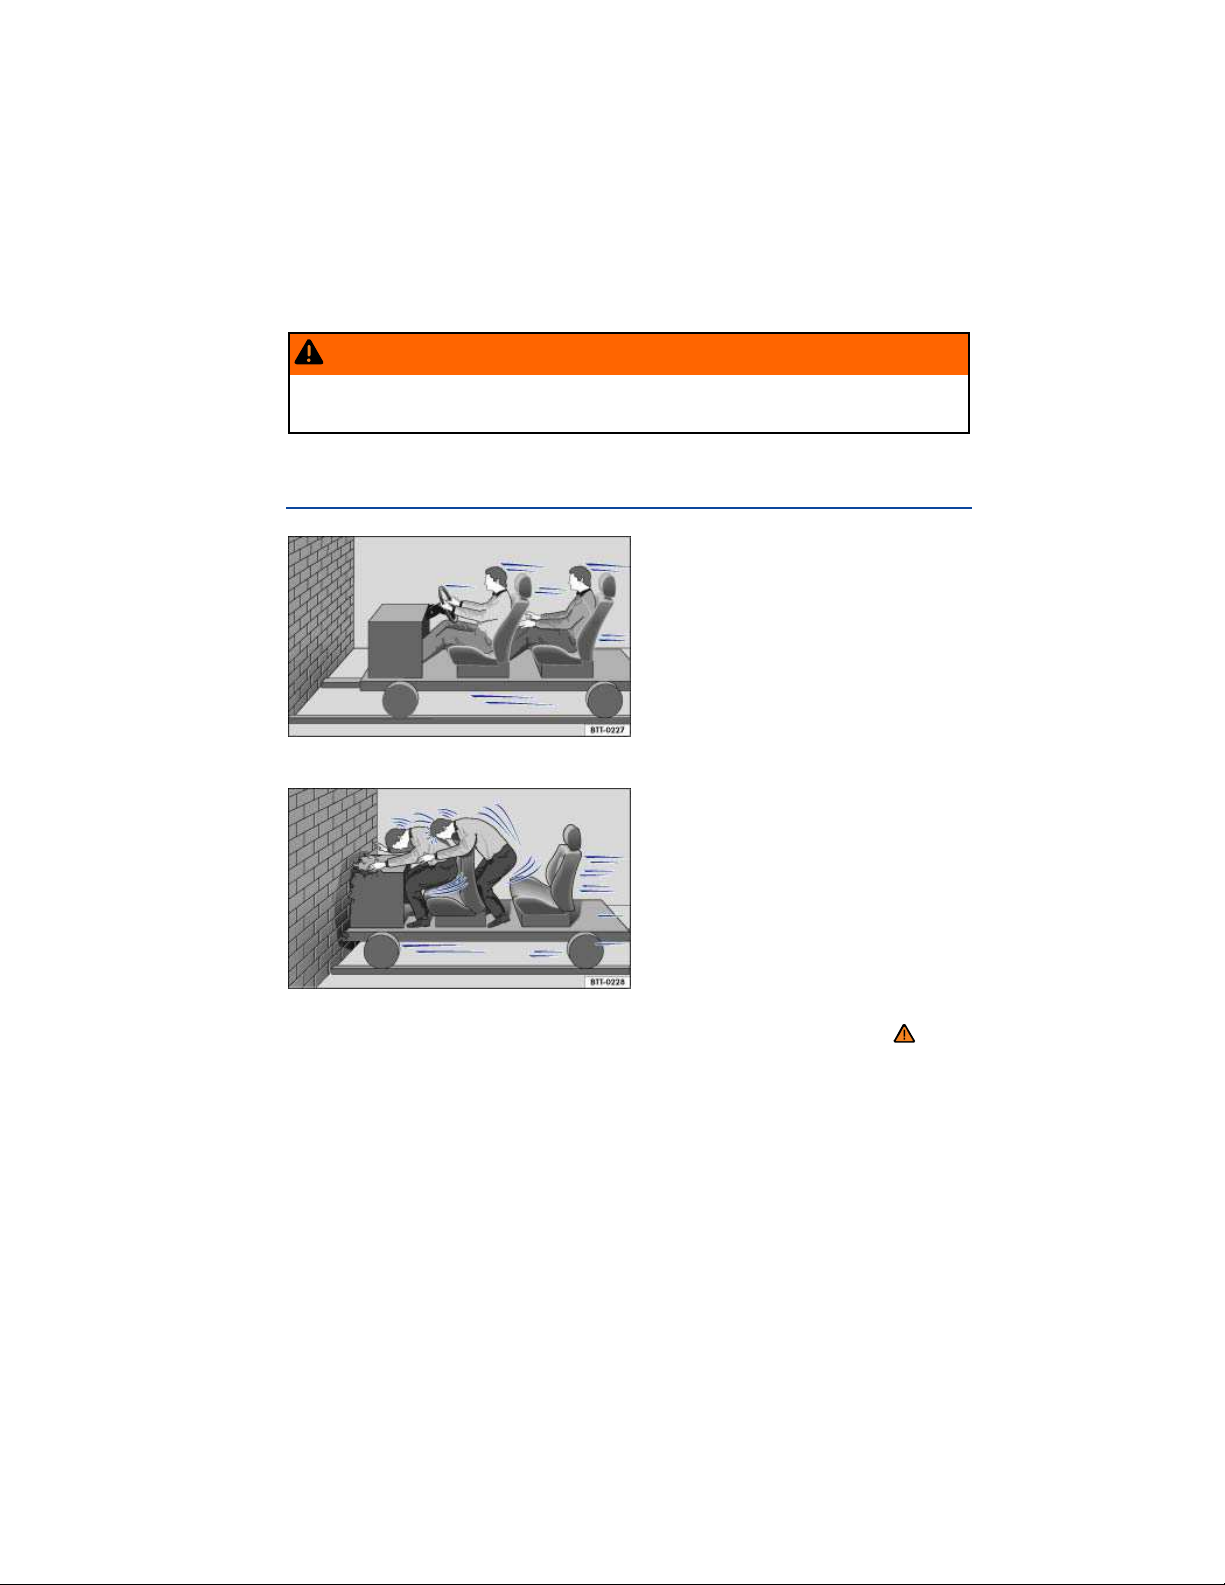
The safety belt warning light ª comes on for 6 seconds when the ignition is switched on. A warning
chime also sounds for up to 6 seconds if the driver's safety belt is not buckled. The chime stops
sooner if the driver buckles his or her safety belt. The warning light and the chime go out when both
driver and front passenger have bucked their safety belts.
If the driver and front seat passenger do not both fasten their safety belts within about 24 seconds
after the chime stops and the vehicle is moving at a speed of more than about 15 mph (25 km/h), the
chime will again sound for about 6 seconds, then go off for about 24 seconds, then sound again for
about another 6 seconds. The same thing happens if one of the safety belts is fastened and then
unfastened while the vehicle is moving. The safety belt warning light ª also flashes. The warning
chime continues to sound at 24 second intervals for up to 2 minutes. No chime sounds at speeds of
less than about 5 mph (8 km/h).
If the ignition is switched on, the safety belt warning light ª stays on until the driver and front
passenger have both buckled their safety belts.
WARNING
Not wearing a safety belt or wearing an improperly positioned safety belt increases the risk of
severe personal injury or death. Safety belts offer optimum protection only when used
correctly.
Frontal collisions and laws of physics
Fig. 48 A vehicle with passengers not wearing safety belts approaches a wall.
Fig. 49 A vehicle with passengers not wearing safety belts hits a wall.
Please first read and note the introductory information and heed the WARNINGS
Page 59
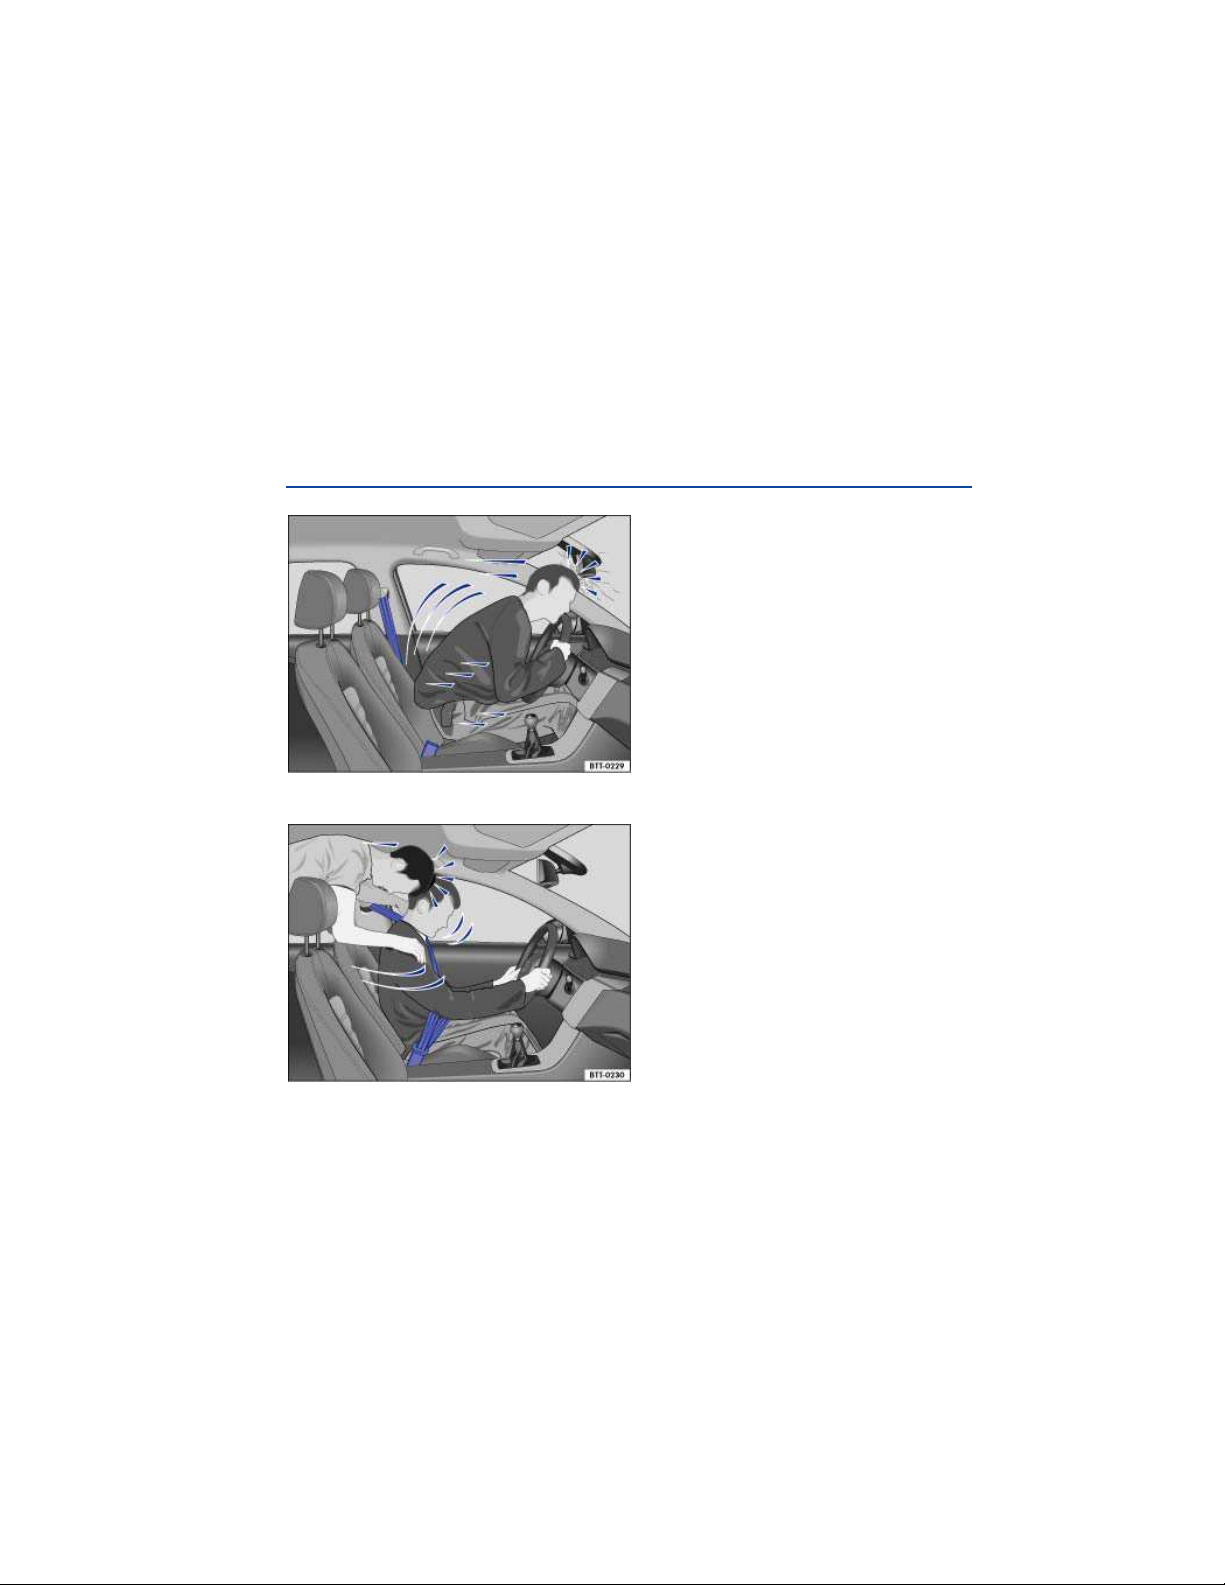
The physical principles of a frontal collision are simple. Both the moving vehicle and the passenger
possess energy ⇒
“kinetic energy.”
The higher the speed of the vehicle and the greater the vehicle's weight, the more energy has to be
“absorbed” in a crash.
Vehicle speed is the most significant factor. If your speed doubles (for example, from 15 mph to
30 mph – 25 km/h to 50 km/h), the energy increases 4 times!
Because the occupants of the vehicle in the above example are not using safety belts, they are not
“attached” to the vehicle. In a frontal collision, they will keep moving at the same speed the vehicle
was moving just before the crash, until something stops them - here, the inside of the passenger
compartment. Because the occupants of the vehicle in the example are not wearing safety belts, their
entire kinetic energy will be absorbed by impact with the wall ⇒
The same principles apply to people in a vehicle that is in a frontal collision on the highway. Even at
city speeds of 20–30 mph (30–50 km/h), the forces acting on the body can reach one ton (2,000 lbs or
1,000 kg) or more. At greater speeds, these forces are even higher.
Of course, the laws of physics don't apply just to frontal collisions; they determine what happens in all
kinds of accidents and collisions.
fig. 48, which varies with vehicle speed and body weight. Engineers call this energy
fig. 49.
What happens to passengers not wearing a safety belt
Fig. 50 The unbelted driver is thrown forward.
Fig. 51 Unbelted passengers in the rear seats are thrown forward on top of the belted driver.
Page 60
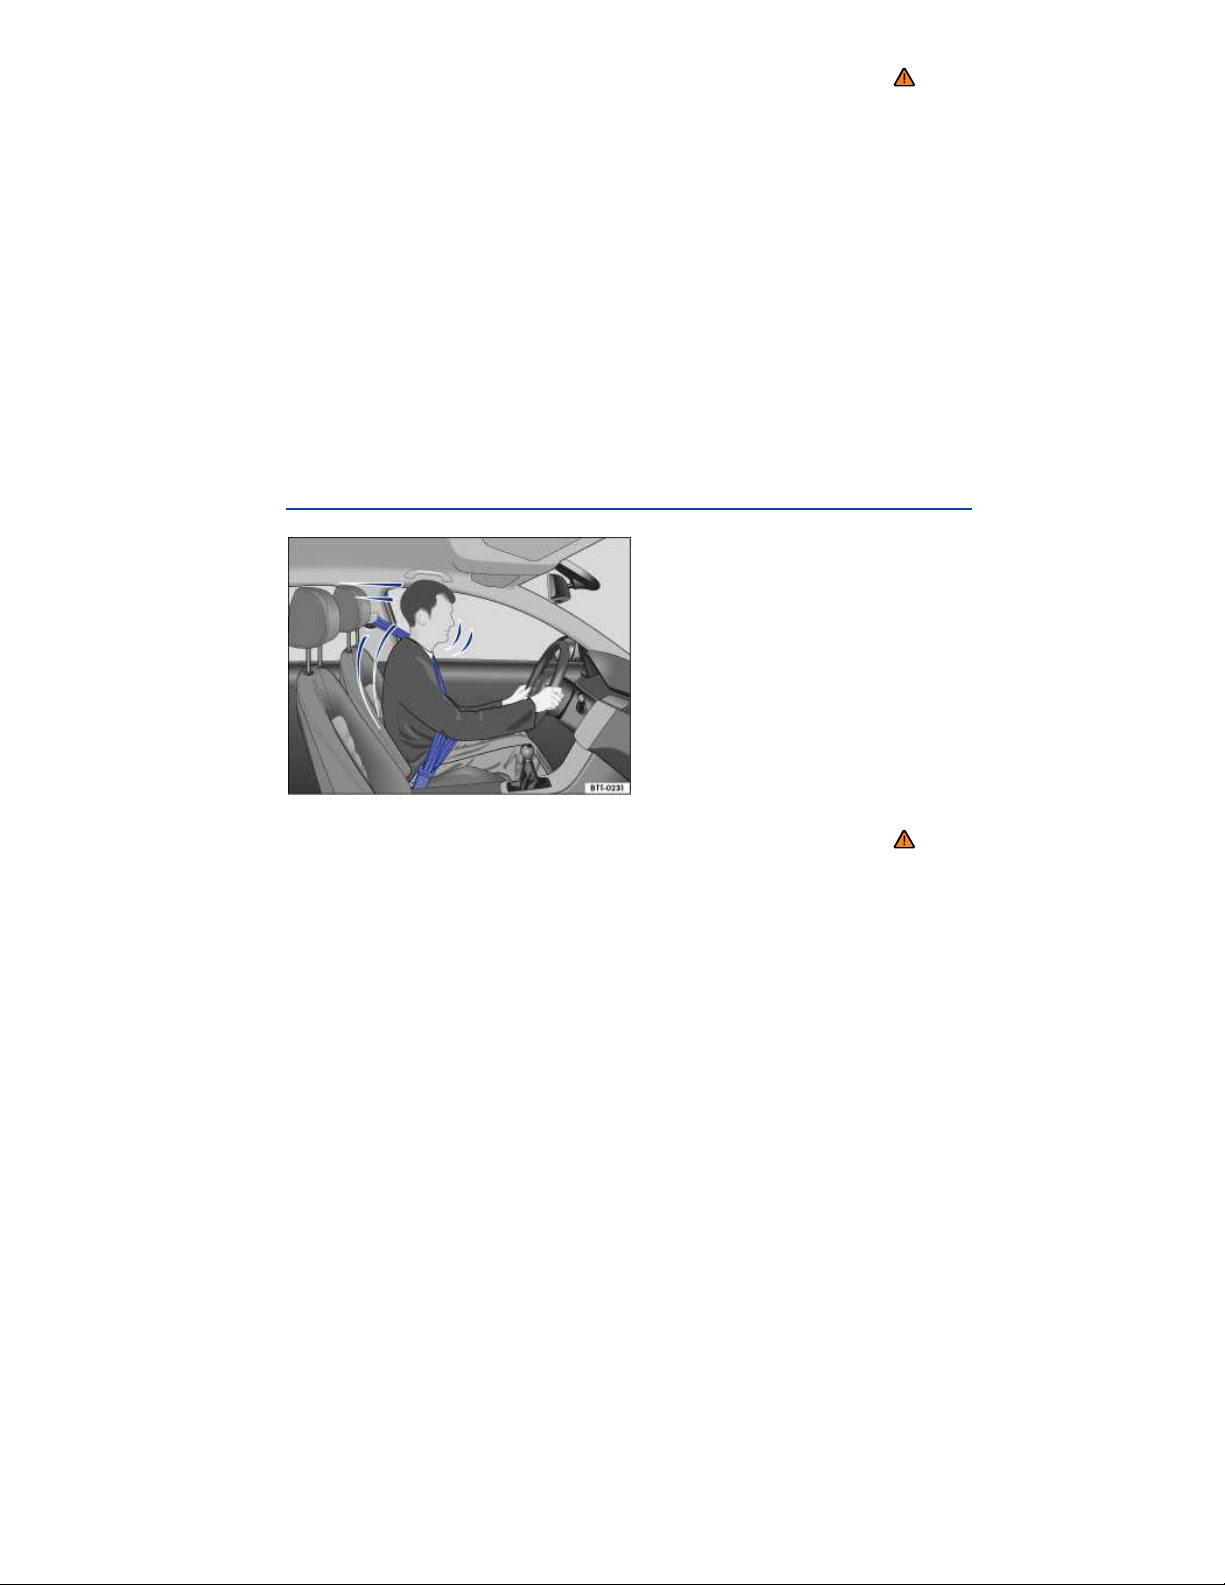
Please first read and note the introductory information and heed the WARNINGS
Many people believe that it is possible to resist the forces of an impact by holding tight or bracing
themselves. That is simply not true!
Even at low collision speeds, the forces acting on the body are too much for the body to be held in the
seat with the arms and hands. In a frontal collision, unrestrained occupants will slam violently into the
steering wheel, instrument panel, windshield or anything else in the way ⇒
Never rely on airbags alone for protection. Even when they deploy, airbags provide only additional
protection. Airbags are not supposed to deploy in all kinds of accidents. Even if your vehicle is
equipped with airbags, all vehicle occupants, including the driver, must wear safety belts correctly in
order to minimize the risk of severe injury or death in a crash, regardless of whether a seating position
has an airbag or not.
An airbag will deploy only once. Safety belts are always there to offer protection in those accidents in
which airbags are not supposed to deploy or when they have already deployed. Unbelted occupants
can also be thrown out of the vehicle, causing even more severe injuries or death.
It is also important for occupants in the rear seats to wear their safety belts properly since they can be
thrown violently forward through the vehicle in the event of an accident. Unbelted passengers in the
rear seats endanger not only themselves but also the driver and other passengers in the vehicle
fig. 51.
⇒
fig. 50.
Safety belts protect
Fig. 52 Belted driver secured by the correctly worn safety belt in the event of a sudden braking maneuver.
Please first read and note the introductory information and heed the WARNINGS
Used properly, safety belts can make a big difference. Safety belts help to keep passengers in their
seats, gradually reduce energy levels applied to the body in a collision, and help prevent the
uncontrolled movement that can cause serious injuries. In addition, safety belts reduce the danger of
being thrown out of the vehicle ⇒
Safety belts attach passengers to the car and give them the benefit of being slowed down more gently
or “softly” through the “give” in the safety belts, crumple zones, and other safety features (such as
airbags) engineered into today's vehicles. The front crumple zones and other passive safety features
(such as the airbag system) are also designed to absorb kinetic energy. By “absorbing” the kinetic
energy over a longer period of time, the forces on the body become more “tolerable” and less likely to
cause injury.
Although these examples are based on a frontal collision, safety belts can also substantially reduce
the risk of injury in other kinds of crashes. So, whether you're on a long trip or “just going to the corner
store,” always buckle up and make sure that others do, too.
fig. 52.
Page 61

Accident statistics show that vehicle occupants properly wearing safety belts have a lower risk of being
injured and a much better chance of surviving a collision. Properly using safety belts also greatly
increases the ability of the supplemental airbags to do their job in a collision. For this reason, wearing
a safety belt is required by law in most countries including the United States and Canada.
Although your Volkswagen is equipped with airbags, you still have to wear the safety belts provided.
Front airbags, for example, are activated only in some frontal collisions. The front airbags are not
activated in all frontal collisions, in side and rear collisions, in rollovers, or in cases when the
conditions for deployment stored in the electronic control unit are not met. The same goes for the other
airbag systems on your Volkswagen.
So always wear your safety belt and make sure that everybody in your vehicle is properly restrained!
Using safety belts
Please first read and note the introductory information and heed the WARNINGS
Checklist
Using safety belts ⇒
Damage to safety belts reduces their overall effectiveness and increases the risk of serious
personal injury and death whenever the vehicle is being used.
Check the condition of all safety belts regularly.
Keep safety belts clean.
Keep objects and liquids away from safety belt webbing, the safety belt buckle tongue, and the
safety belt buckle latch and opening.
Do not pinch or damage the safety belt or buckle tongue (for instance, when closing a door).
Never modify, disassemble or try to repair safety belts and safety belt anchorages.
Always fasten your safety belt properly before driving and keep it fastened whenever the vehicle is
moving.
Twisted safety belt
If it is difficult to pull the safety belt out of the belt guide, the belt may be twisted inside the side trim
because the belt retracted too quickly when it was taken off.
Hold the safety belt tongue, slowly and carefully pull safety belt all the way out.
Untwist the safety belt and slowly return the belt by hand.
If you cannot untwist the safety belt, wear it anyway. Make sure that the safety belt is twisted in a spot
where it does not come in direct contact with your body. Have the safety belt untwisted immediately by
an authorized Volkswagen dealer or authorized Volkswagen Service Facility.
Lockable safety belt
The retractors for the rear seat safety belts and the front passenger safety belt have a switchable
locking feature for child restraints in addition to the emergency locking feature. Whenever a child
restraint is installed with a safety belt, the safety belt must be locked so that the safety belt webbing
cannot unreel. The switchable locking feature lets you lock the belt so that a child restraint can be
properly installed and, for example, so that it can't tip to the side when the vehicle goes around a
corner
To see whether a safety belt is lockable, pull the safety belt all the way out of the safety belt retractor.
You should then hear a “clicking” sound as the belt winds back into the retractor reel. Test the
switchable locking feature by pulling on the belt. When the switchable locking feature is active, you
should no longer be able to pull the belt out of the retractor.
The locking feature must be deactivated when a vehicle occupant uses the safety belt.
Page 62
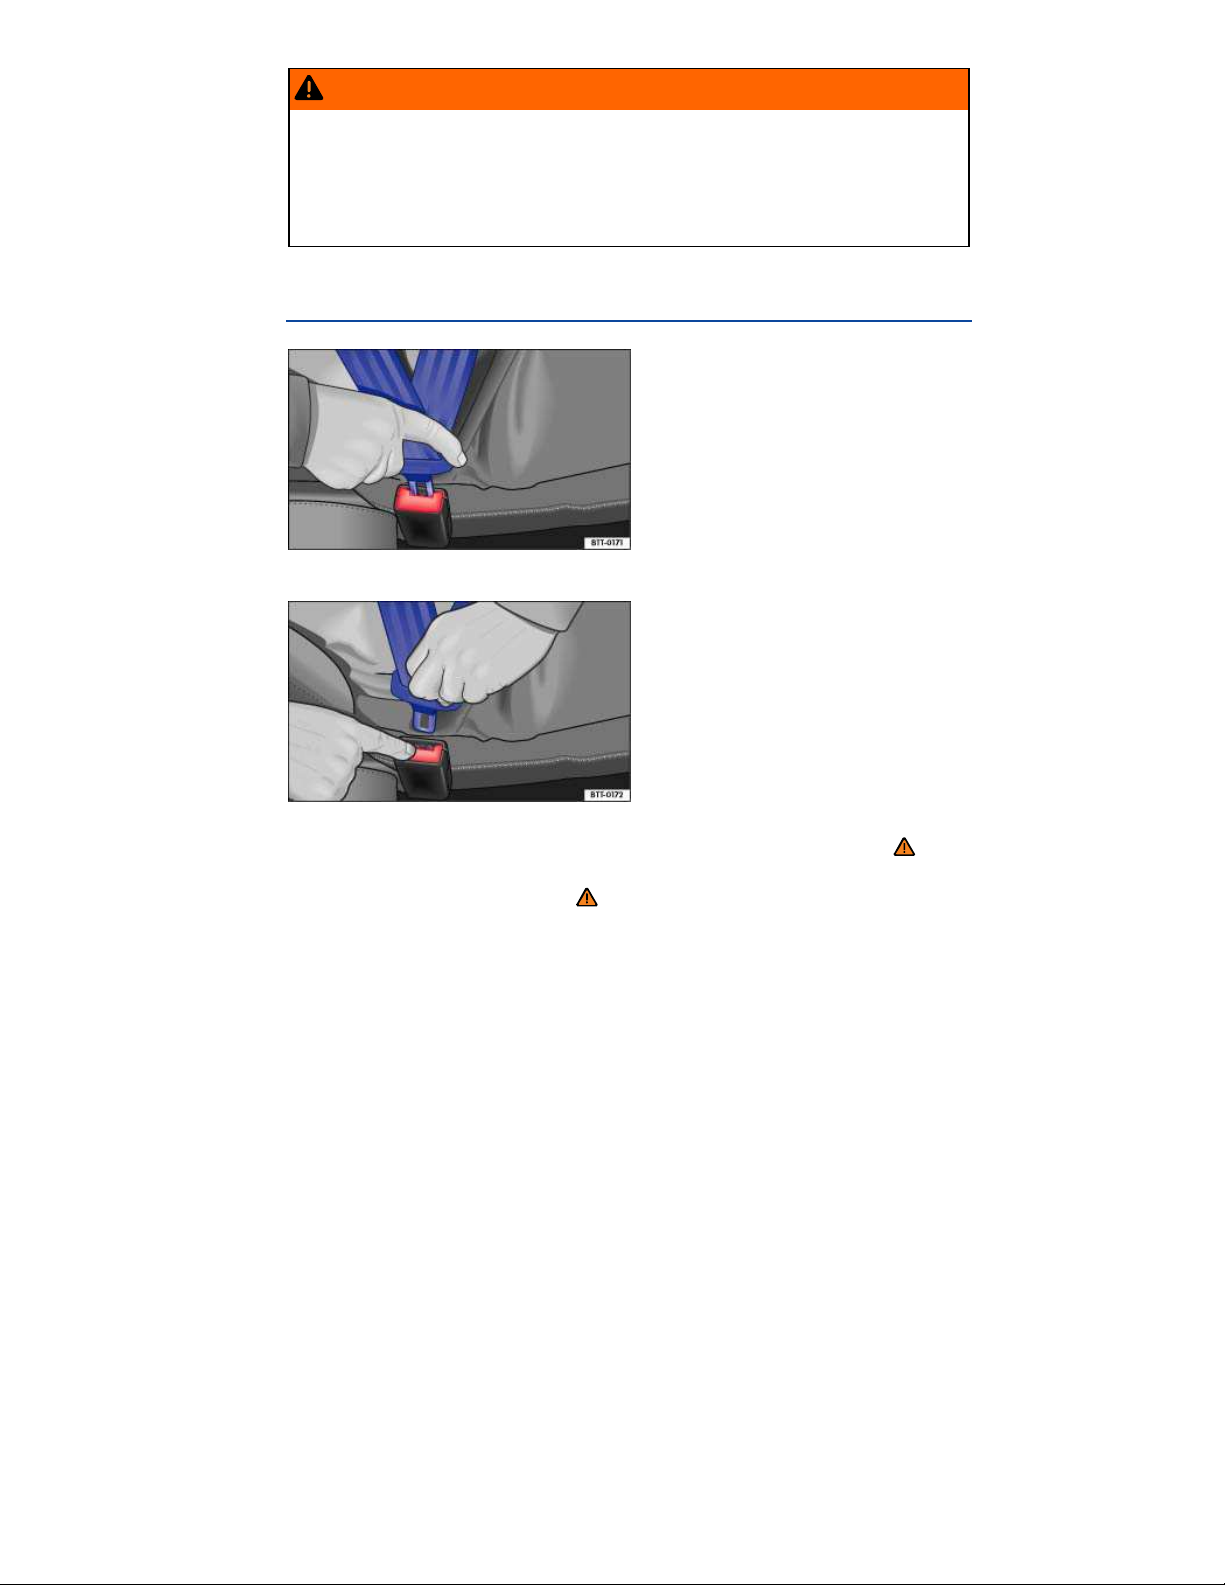
WARNING
Improper use and care of safety belts increases the risk of severe personal injury or death.
Regularly check safety belts and related parts for damage.
Damaged safety belts must be replaced; they cannot be repaired.
Always keep safety belts clean.
Never catch, damage or chafe safety belt webbing on sharp edges.
Always keep objects and liquids away from the belt buckle and buckle opening.
Fastening and unfastening safety belts
Fig. 53 Inserting the buckle tongue into the belt buckle.
Fig. 54 Releasing the buckle tongue from the belt buckle.
Please first read and note the introductory information and heed the WARNINGS
Properly worn safety belts help to hold occupants in their seats and provide optimum protection during
braking or in a collision or other accident ⇒
The switchable locking feature makes a “clicking” sound when the safety belt is winding back onto the
safety belt retractor wheel after being pulled all the way out. Whenever a child restraint is installed with
a safety belt, the safety belt must be locked so that the safety belt webbing cannot unreel 98, Child
safety and child restraints. If active, deactivate the locking feature before using the safety belt to
restrain a person without a child restraint system.
.
Fastening safety belts
Always buckle your safety belt before driving.
Adjust the front seat and head restraint correctly
Page 63
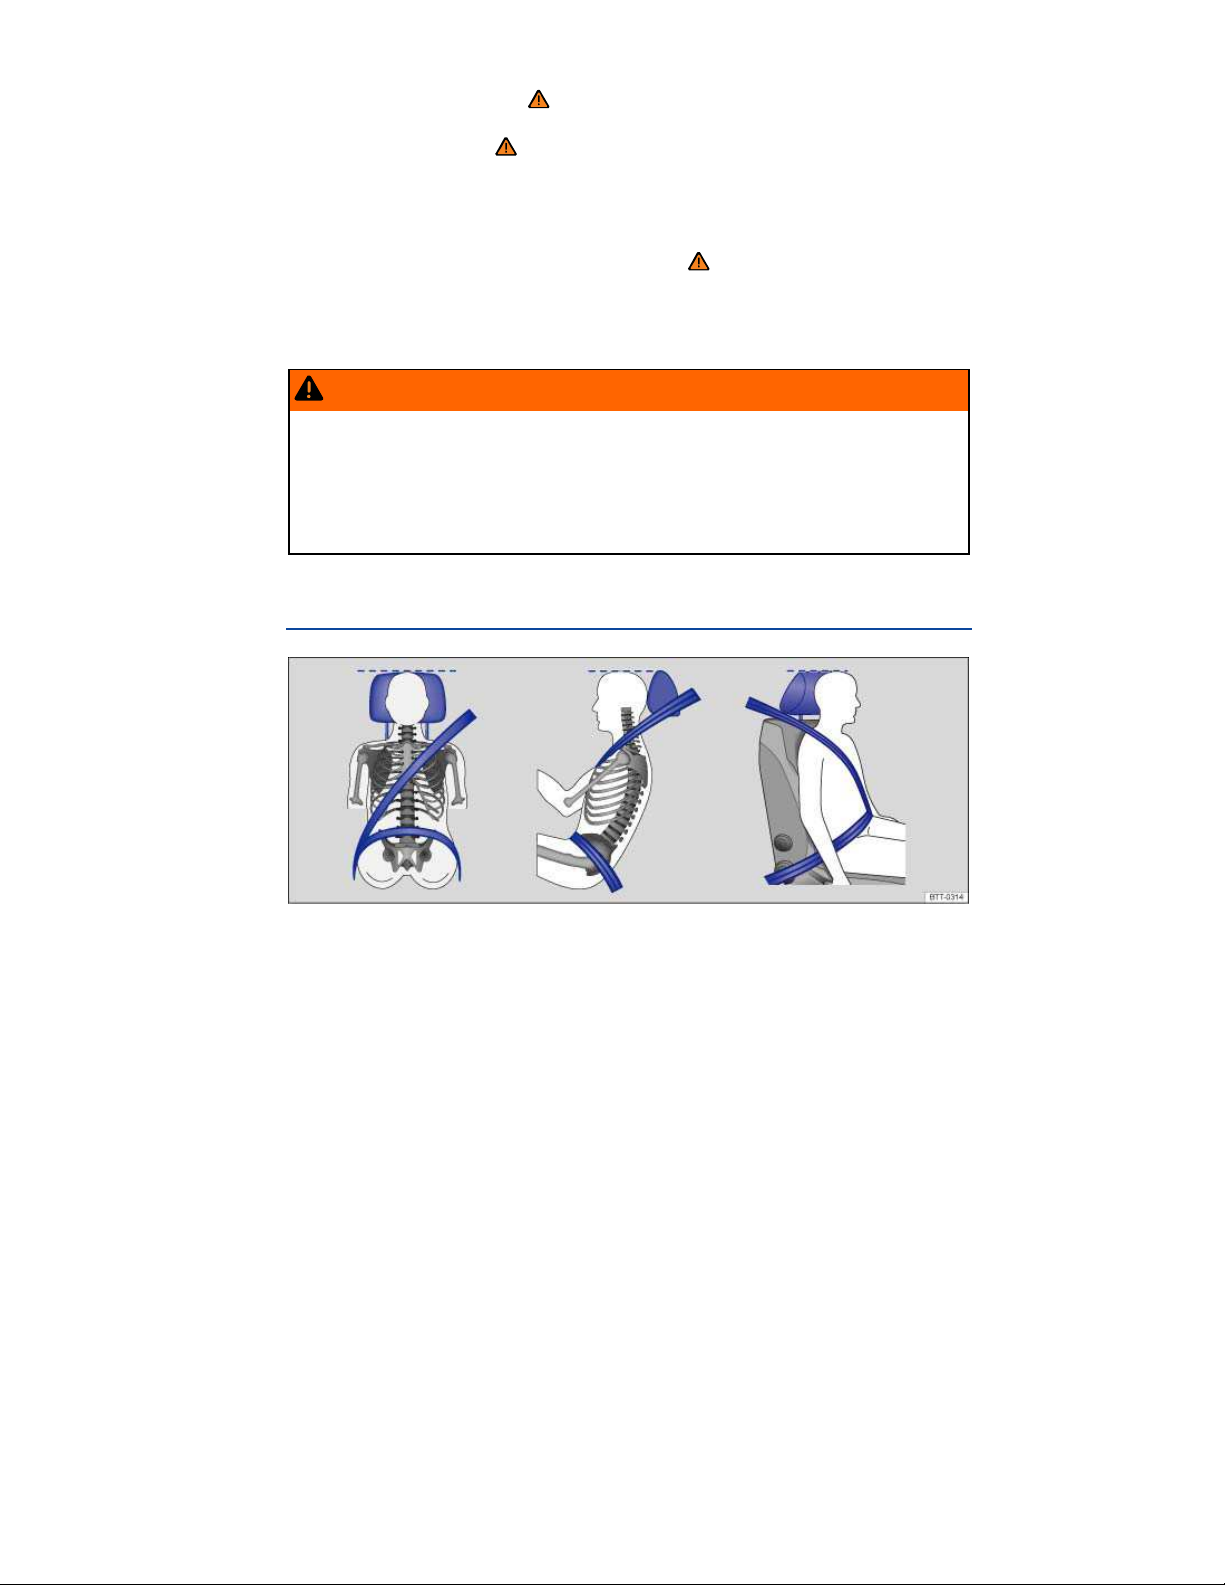
Make sure the seat backrest of the rear seat bench is in an upright position and securely latched in
place before using the safety belt ⇒ .
Hold the safety belt by the tongue and pull it slowly and evenly across the chest and pelvis. Do not
twist the safety belt webbing ⇒
Insert the tongue into the correct buckle for your seat until you hear it latch securely ⇒
Pull on the safety belt to make sure that it is securely latched in the buckle.
.
fig. 53.
Unfastening safety belts
Unfasten safety belts only when the vehicle is not moving ⇒
Press the red button on the buckle ⇒
Let the belt wind up on the retractor as you guide the belt tongue to its stowed position to help
prevent the safety belt from twisting and to help avoid damage to the interior trim.
fig. 54. The buckle tongue is ejected.
.
WARNING
Improperly positioned safety belts can cause serious personal injury or death in an accident.
Safety belts offer optimum protection only when the seat backrest is upright and belts are
correctly positioned on the body.
A person who is not properly restrained can be seriously injured by the safety belt itself if
it slips from the stronger parts of the body into sensitive areas like the abdomen.
Unfastening safety belts while the vehicle is in motion can cause severe personal injury or
death in the event of an accident or braking maneuver!
Safety belt position
Fig. 55 Proper safety belt positioning and head restraint adjustment.
Page 64
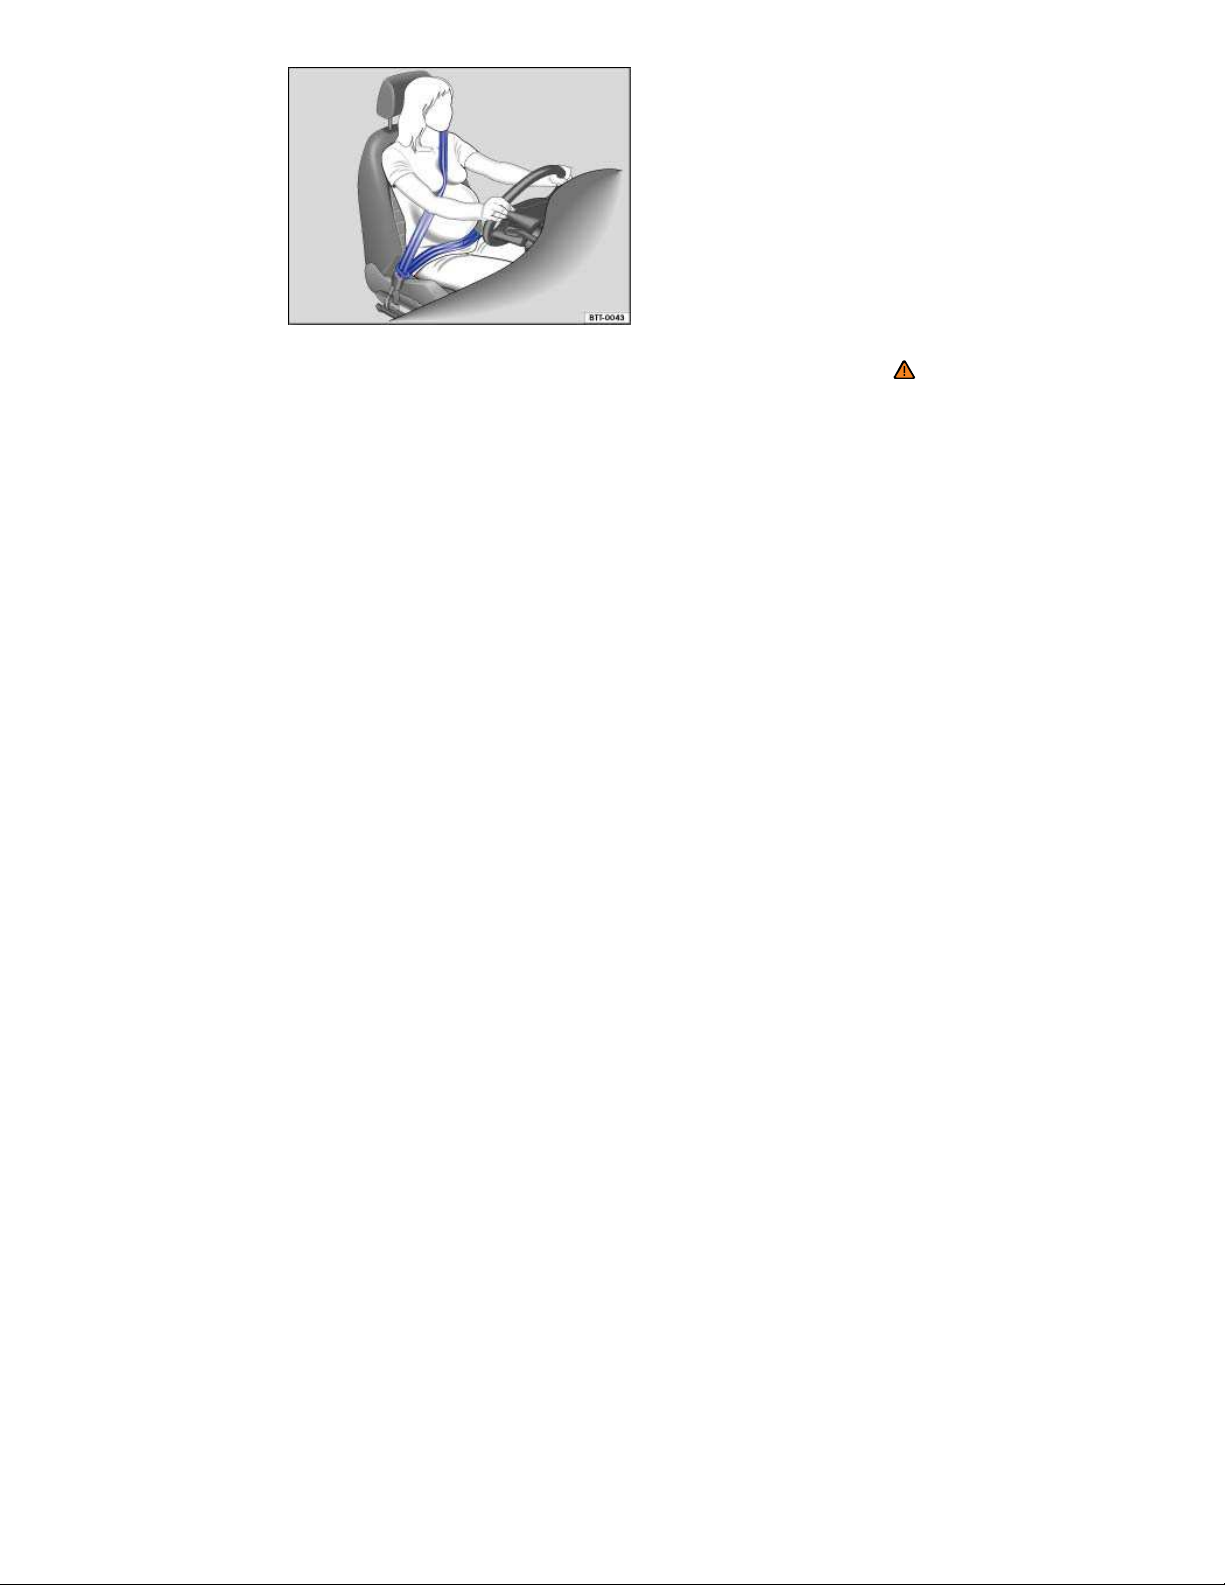
Fig. 56 Proper safety belt positioning for expectant mothers.
Please first read and note the introductory information and heed the WARNINGS
Wearing safety belts improperly can cause serious injury or death. Safety belts can only work when
they are correctly positioned on the body. A properly worn safety belt also helps to position the
occupant so that an airbag can provide maximum protection when deployed. Therefore, always fasten
your safety belt and make sure that it is properly positioned over your body.
Improper seating positions reduce the effectiveness of safety belts and even increase the risk of injury
or death by moving the safety belt to critical areas of the body. Improper seating positions also
increase the risk of severe injury or death when an airbag deploys and strikes an occupant who is not
seated properly, Adjusting the seating position.
Proper safety belt position
The shoulder portion of the safety belt must always run over the center of the shoulder and never
over the throat, over the arm, under the arm or behind the back.
The lap portion of the safety belt must always run as low as possible over the pelvis and never
over the abdomen.
Always wear the safety belt flat and snug against the body. Pull on the safety belt to tighten if
necessary.
Expectant mothers must always wear the lap portion of the safety belt as low as possible across the
pelvis and below the rounding of the abdomen – throughout the pregnancy. The safety belt must lie
flat against the body to avoid pressure against the abdomen ⇒
fig. 56.
Adjusting safety belt height
The safety belt position can be adjusted using the following features:
Safety belt height adjusters for the front seats.
Front seats with height adjustment.
Page 65
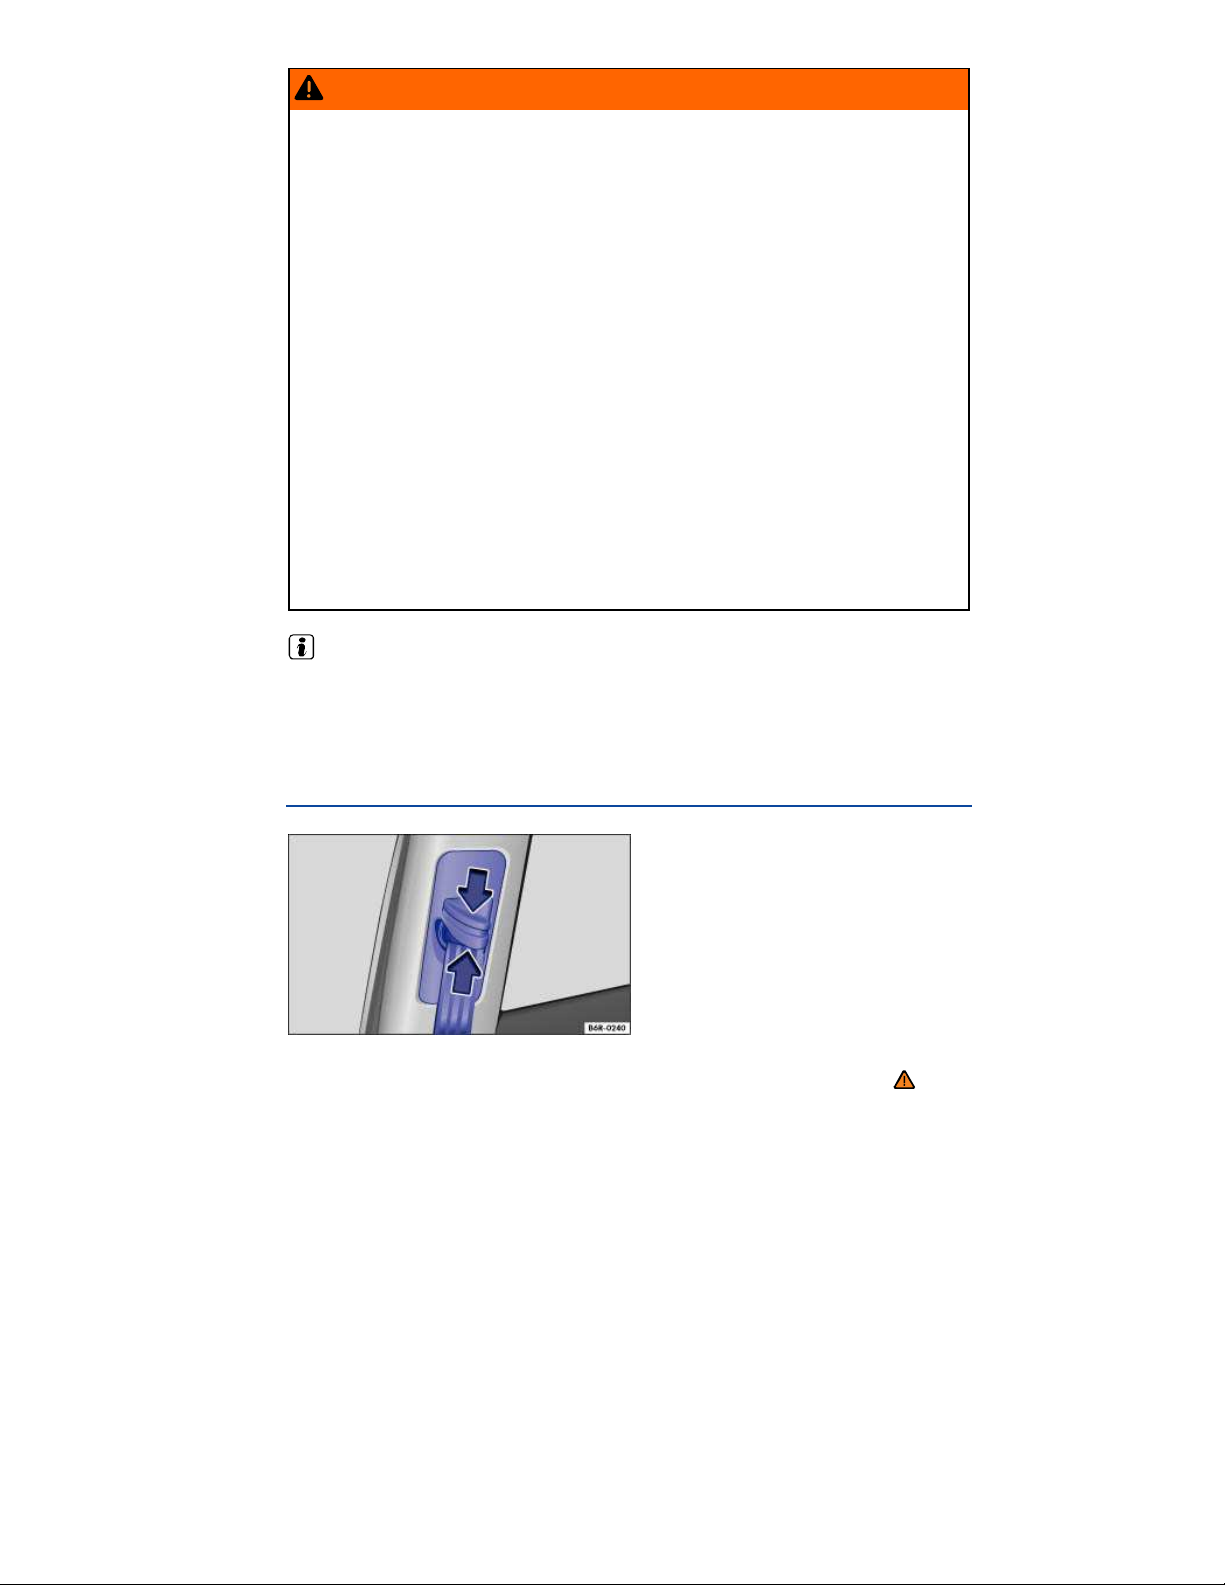
WARNING
Improperly positioned safety belts can cause serious personal injury in an accident or a
sudden braking maneuver.
Always make sure that all vehicle occupants are correctly restrained and stay in a correct
seating position whenever the vehicle is being used.
Safety belts offer optimum protection only when the seat backrest is upright and belts are
correctly positioned on the body.
A loose-fitting safety belt can cause serious injuries by shifting its position on your body
from the strong bones to more vulnerable soft tissue and cause serious injury.
The shoulder belt portion of the safety belt must be positioned over the middle of the
occupant's shoulder and never across the neck or throat.
The safety belt must lie flat and snug on the occupant's upper body.
Never wear the shoulder part of the safety belt under your arm or otherwise out of
position.
The lap portion of the safety belt must be positioned as low as possible across the pelvis
and never over the abdomen. Make sure the belt lies flat and snug against the pelvis. Pull on
the safety belt to tighten if necessary.
Expectant mothers must always wear the lap portion of the safety belt as low as possible
across the pelvis and below the rounding of the abdomen.
Do not twist the belt when attaching it. If you cannot untwist a twisted safety belt, wear it
anyway, but make sure the twisted part is not in contact with your body. Have the problem
corrected right away by an authorized Volkswagen dealer or authorized Volkswagen Service
Facility.
Never hold the safety belt away from your body with your hand.
Never wear belts over rigid or breakable objects, such as eyeglasses, pens or keys.
Never modify the position of the belt using comfort clips, loops or similar devices.
If you have a physical impairment or condition that prevents you from sitting properly on the seat
with the safety belt properly fastened, special modifications to your vehicle may be necessary. Contact
your authorized Volkswagen dealer or authorized Volkswagen Service Facility or call the Volkswagen
Customer CARE Center at 1-800-822-8987 for information about possible modifications to your
vehicle.
Safety belt height adjusters
Fig. 57 Next to the front seats: Safety belt height adjuster.
Please first read and note the introductory information and heed the WARNINGS
Page 66
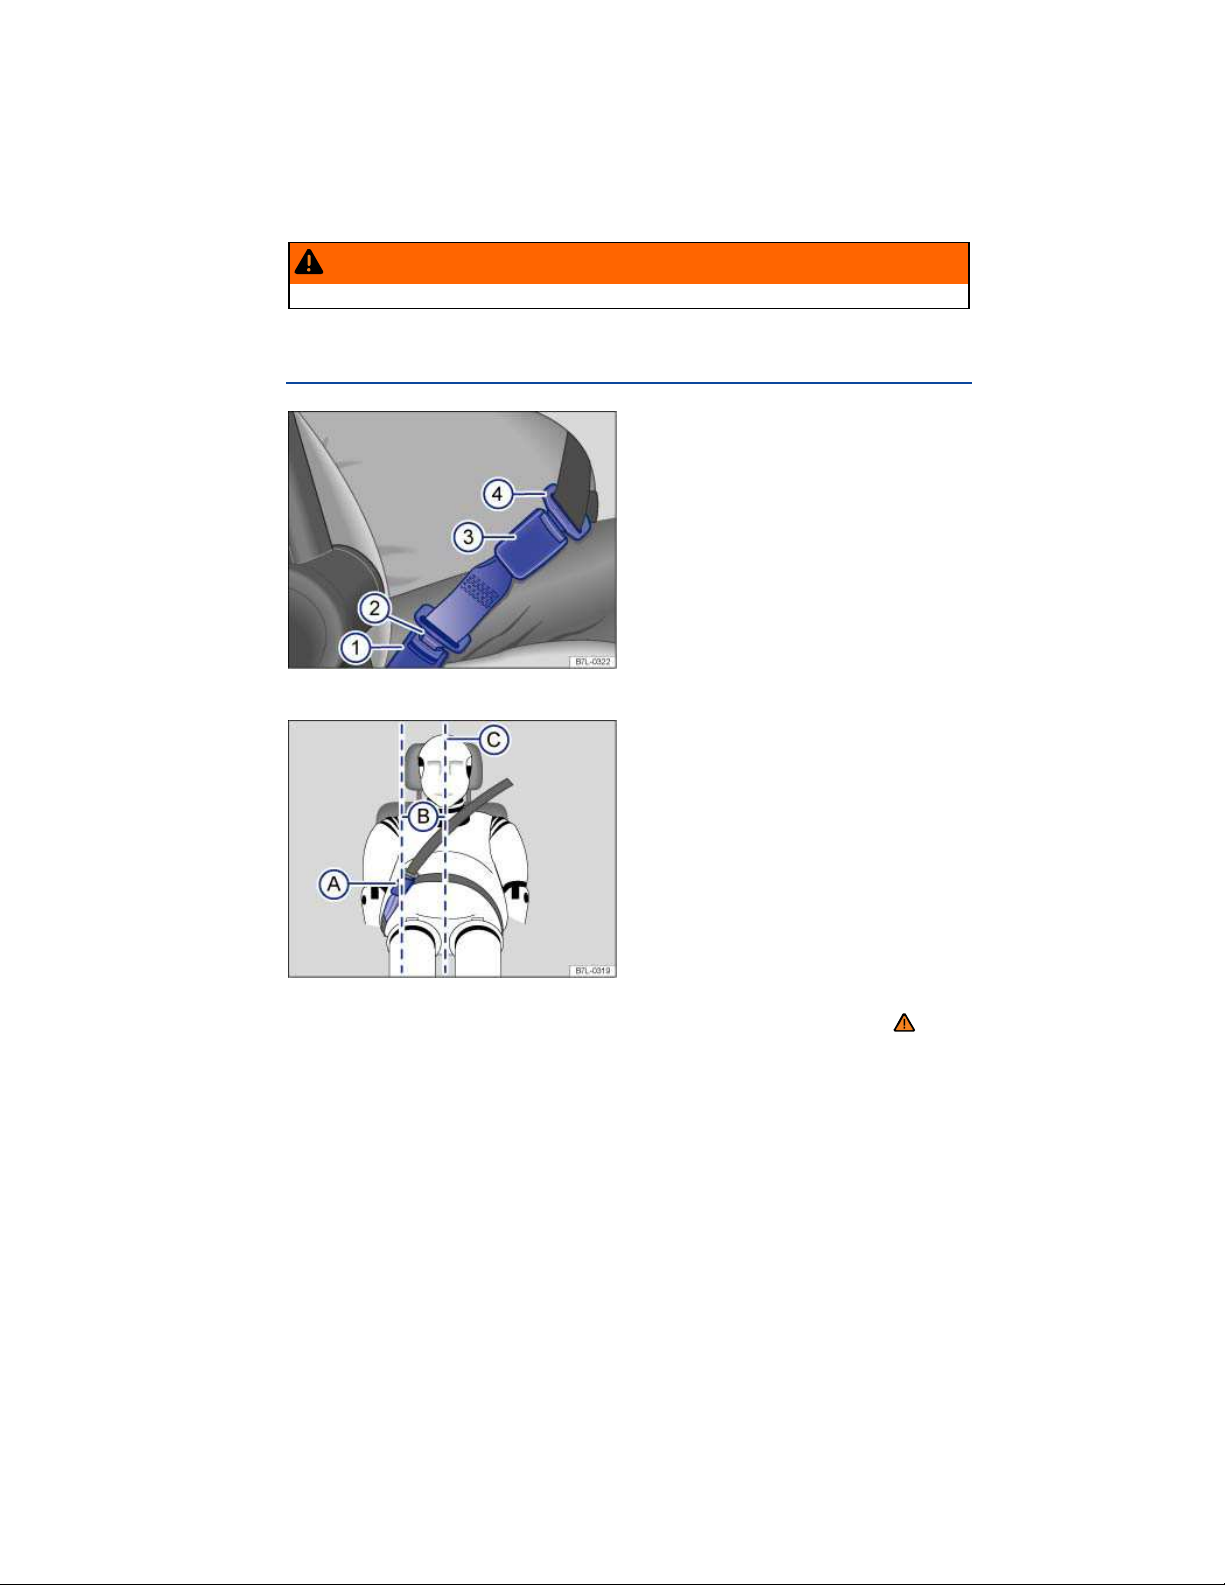
Safety belt height adjusters for the front seats can be used to adjust the height of the shoulder portion
of the safety belt so that it is positioned correctly:
Pinch the safety belt attachment together as indicated by the arrows and hold ⇒
Slide the belt and upper attachment up or down until the safety belt is positioned over the center of
the shoulder, Safety belt position.
Release the safety belt attachment.
Pull on the safety belt to make sure that the upper attachment is securely locked in place.
fig. 57.
WARNING
Never adjust the height of the safety belt while driving.
Safety belt extender
Fig. 58 A safety belt extender properly attached to the factory-installed safety belt.
Fig. 59 Positioning of the safety belt extender.
Please first read and note the introductory information and heed the WARNINGS
If a safety belt is too short to correctly fit you or one of your passengers, even when the safety belt is
pulled out all the way, you can use a safety belt extender.
Page 67

Never use the safety belt extender for any other purpose – including the attachment of a child
restraint.
The extender adds about 8 inches (20 cm) to the safety belt. Always remove the safety belt extender
when it is not needed and stow it safely. Contact an authorized Volkswagen dealer or authorized
Volkswagen Service Facility if you believe you may need an extender.
Key to
fig. 58:
(1) Vehicle safety belt buckle.
(2) Buckle tongue on the safety belt extender.
(3) Safety belt buckle on the safety belt extender.
(4) Safety belt buckle tongue on the factory-installed safety belt.
Key to
fig. 59:
(A) Safety belt buckle on the safety belt extender.
(B) Distance between the safety belt buckle on the safety belt extender and the centerline of the
person using the safety belt extender. The distance must be more than 6 inches (15 cm)!
(C) Centerline of the person using the safety belt extender.
Using a safety belt extender
Adjust both the seat and the head restraint properly , Adjusting the seating position.
Insert the buckle tongue on the safety belt extender ⇒
seat where the safety belt extender is being used
Fastening or unfastening the vehicle safety belt
Pull the belt to make sure that the tongues are securely locked in the buckles.
Make sure that the safety belt is positioned properly
fig. 58 (2) into the vehicle belt buckle for the
(1).
Properly using safety belt extenders:
Use a safety belt extender only when the factory installed safety belt is too short when worn
properly by a person in proper seating position.
Only use 1 safety belt extender per seat and vehicle safety belt.
Always remove the safety belt extender when it is not needed.
Never leave a safety belt extender attached to the vehicle safety belt buckle when the extender is
not needed and being used with the safety belt. Otherwise, the airbag control module will receive an
incorrect signal from the safety belt buckle and this will prevent the airbag from working properly for a
person who is not using the safety belt. Leaving the extender attached to the safety belt buckle when
the front seat is occupied and the safety belt is not being used will signal the airbag control unit during
a collision that the front passenger seat is occupied and that the safety belt is being used. The
electronic control unit for the airbag system will then receive incorrect information that will cause the
safety belt pretensioner to deploy unnecessarily and the front passenger airbag to deploy later in
collisions that would normally trigger the front airbag earlier in the collision to help protect an
unrestrained front seat occupant. The airbag will not be able to provide enough protection for an
occupant not wearing a safety belt.
Only use the safety belt extender approved by Volkswagen for your vehicle.
Page 68

WARNING
Improper use or positioning of a safety belt extender increases the risk of serious personal
injury and death.
A driver or passenger who is not properly restrained can be seriously injured by striking
the interior of the passenger compartment or by the safety belt itself, which can be displaced
from stronger parts of the body into sensitive areas like the abdomen.
Safety belt extenders offer optimum protection only when they are properly used.
Only use the extender when the belt is not long enough to be worn low and snug and the
person is in the correct seating position. Remove and stow extender safely when not needed.
Always make sure the safety belt tongue of the safety belt extender is securely inserted
into the buckle for the seating position that belongs to the seat where the safety belt extender
is being used. Attaching the safety belt to the wrong buckle will reduce safety belt
effectiveness and can cause serious personal injury.
Never use the safety belt extender if you can properly attach the safety belt without it.
Using a safety belt extender when not needed can increase the risk of injury, especially in a
collision.
Never use a safety belt extender if the distance (B) between the front edge of the safety
belt extender buckle (A) and the centerline of the person using the safety belt extender
⇒ fig. 59 (C) is less than 6 inches (15 cm).
Never leave a safety belt extender attached to the vehicle safety belt buckle when the
extender is not needed and being used with the safety belt. Otherwise, the airbag control
module will receive an incorrect signal from the safety belt buckle and this will prevent the
airbag from working properly for a person who is not using the safety belt.
Never use more than 1 extender with a safety belt. Using more than 1 extender can change
the way the safety belt passes over the body and can cause serious injury.
Never use the safety belt extender to secure a child restraint.
Never use a safety belt extender on your Volkswagen that you got from another
automobile manufacturer or from an automotive parts store.
Never use the safety belt extender you got for your vehicle for any other vehicle,
regardless of make, model, or model year.
NOTICE
Leaving the extender attached to the safety belt buckle when the front seat is occupied and the
safety belt is not being used will signal to the airbag control unit that the front passenger seat is
occupied and that the safety belt is being used. The electronic control unit for the airbag system will
then receive incorrect information that will
– cause the safety belt pretensioner to deploy unnecessarily in collisions.
– cause the front passenger airbag to deploy later in collisions in which the front airbag
would otherwise be triggered earlier to help protect an unrestrained front seat passenger.
A pretensioner that has deployed cannot be repaired. The entire safety belt must be
replaced.
NOTICE
If the safety belt extender is left attached to the safety belt buckle, the safety belt warning
system will sense that the safety belt for that seat is being used. The warning light will not
come on and the warning chime will not sound even though the seat is occupied and the safety
belt is not being used.
Page 69

Safety belt retractor, pretensioner, load limiter
Please first read and note the introductory information and heed the WARNINGS .
The safety belts in the vehicle are part of the vehicle's safety concept and consist of the following
important features:
Automatic safety belt retractors
Every safety belt is equipped with an automatic belt retractor on the shoulder belt. As long as the
safety belt is pulled out slowly, the shoulder belt will extend to let you move freely under normal driving
conditions. The automatic safety belt retractor locks the belt when the belt is pulled out fast, during
hard braking and in a collision. The belt may also lock when you drive up or down a steep hill or
through a sharp curve.
Safety belt pretensioner
The safety belt retractors for the driver and front seat passenger have a pretensioner that helps take
the slack out of the safety belt and tighten it when the pretensioner is activated.
The pretensioners are activated by the electronic control unit for the airbag system in front, side, and
rear collisions. By tightening the safety belt, the pretensioner helps to reduce the occupant's forward
movement. The belt pretensioner works together with the airbag system; its function is monitored by
the airbag system indicator light. The belt pretensioner will not deploy in a rollover if the side airbags
are not activated.
A fine dust may be released upon activation. This is normal and is not caused by a fire in the vehicle.
Safety belt load limiter
The front safety belts also have load limiters to help reduce the forces applied to the body in a crash.
Heed all safety regulations if the vehicle or individual components of the system have to be
scrapped. Your authorized Volkswagen dealer and authorized Volkswagen Service Facility are familiar
with these regulations
Service and disposal of belt pretensioners
Please first read and note the introductory information and heed the WARNINGS
The pretensioners are part of the safety belts installed at the front seats in your vehicle. Installing,
removing, servicing, or repairing of safety belt pretensioners can damage the safety belt system and
prevent it from working correctly in a collision. The pretensioners themselves may then also not work
in the event of an accident, or not work properly.
There are some important things you have to know to make sure that the effectiveness of the system
will not be impaired and that discarded components do not cause injury or pollute the environment.
Undeployed safety belt pretensioners and airbag modules contain explosive materials that can cause
serious injuries to the general public and to people who work at dealerships and workshops, scrap
yards, and recycling facilities. For this reason, the systems must be properly handled when they or the
vehicles they are installed in are scrapped.
Undeployed safety belt pretensioners and airbag modules can also pollute the environment. Never
abandon vehicles or vehicle parts. If your vehicle must be scrapped, please make sure that it is done
safely, responsibly, and in compliance with all applicable environmental regulations. Take it to a
licensed facility that has the knowledge and experience to properly dispose of the vehicle and its
safety belt system. Your authorized Volkswagen dealer and authorized Volkswagen Service Facility
are familiar with these regulations.
Page 70

WARNING
Improper handling, care, servicing, and repair procedures can increase the risk of personal
injury and death by preventing a belt pretensioner from activating when needed or by
causing it to activate unexpectedly.
The pretensioner can be activated only once. If a pretensioner has been activated, the
safety belt must be replaced.
Safety belt systems including the pretensioners cannot be repaired. Special procedures
are required to remove, install, and dispose of this system.
Never repair, adjust, or change pretensioners or any other part of the safety belt system
yourself. We strongly recommend that you have any w ork on the safety belt system
performed by an authorized Volkswagen dealer or authorized Volkswagen Service Facility.
They have the necessary technical information, training, and special equipment
WARNING
Undeployed safety belt pretensioners and airbag modules contain explosive materials that
can cause serious personal injuries if they are not properly handled when they or the
vehicles they are installed in are scrapped.
Never abandon vehicles or vehicle parts.
Always scrap vehicles and vehicle parts, especially those containing undeployed airbag
modules and undeployed safety belt pretensioners, at a licensed facility that has the
knowledge and experience to properly dispose of the vehicle and its safety belt and airbag
systems.
Undeployed airbag modules and safety belt pretensioners are classified as Perchlorate
Material. Special handling may apply – see http://www.dtsc.ca.gov/hazardouswaste/perchlorate. Obey
all applicable legal requirements regarding handling and disposal of the vehicle or parts of its restraint
system, including airbag modules and safety belts with pretensioners. Authorized Volkswagen dealers
and authorized Volkswagen Service Facilities are familiar with the requirements, and we recommend
that you have them perform this service for you.
Page 71
Lights
Introduction
In this section you’ll find information about:
Indicator lights
Turn signal lever and high beam switch
Switching lights on and off
Lights and vision features
Lights and vision features
Instrument panel lighting and headlight range adjustment
Interior and reading lights
Always obey local vehicle lighting laws.
The driver is always responsible for the correct headlight settings.
More information:
Exterior views
Volkswagen Information System
Changing a light bulb
WARNING
Crashes and other accidents can happen when you cannot see the road ahead and when you
cannot be seen by other motorists.
Always switch on the low beam headlights at dusk or when it is dark and whenever the
weather is bad or visibility is poor.
WARNING
Headlights that are aimed too high and improper use of the headlight flasher or high beams
can blind and distract other drivers. This can lead to a crash and serious personal injuries.
Always make sure that headlights are properly adjusted.
Never use the headlight flasher or high beams when they can blind or distract other
drivers.
Indicator lights
Please first read and note the introductory information and heed the WARNINGS
Lights
Possible cause Proper response
up
One or more driving lights not working or
Adaptive Front Lighting System (AFS)
malfunction.
Replace burned out bulb 302, or
If all light bulbs are OK, see an authorized
Volkswagen dealer or authorized
Volkswagen Service Facility.
Page 72
Lights
When the ignition is switched on, several warning and indicator lights come on briefly for a function
check. They go out after a few seconds.
Possible cause Proper response
up
Fog lights switched on (indicator light on
the headlight switch or the instrument
cluster).
Left or right turn signal.
The indicator light blinks twice as fast if a
turn signal is not working on the vehicle or
the trailer.
Daytime running lights (DRL) on.
High beams switched on or headlight
flashers in use.
Check the turn signals on the vehicle and
the trailer.
WARNING
Failure to heed warning lights and instrument cluster text messages can cause the vehicle to
break down in traffic and result in a collision and serious personal injury.
Never ignore warning lights or text WARNINGS.
Always stop the vehicle as soon as it is safe to do so.
Whenever stalled or stopped for repair, move the vehicle a safe distance off the road, stop
the engine, turn on the emergency flashers, and use other warning devices to warn
approaching traffic.
Never park the vehicle in areas where the hot catalytic converter and exhaust system can
come into contact with dry grass, brush, spilled fuel, oil, or other material that can catch fire.
A broken down vehicle presents a high accident risk for itself and others. Switch on
emergency flashers and set up a warning triangle to warn oncoming traffic.
NOTICE
Failure to heed warning lights or text WARNINGS can result in vehicle damage.
High Intensity Discharge (HID) headlights provide bright, uniform lighting to help you see and be
seen. The light comes from an electric arc between two electrodes in the gas-filled bulb. Over time, the
electrodes can wear down and the gap between them will get wider. The HID lamp’s control unit then
increases the voltage to keep the arc’s brightness constant. However, the commonly called “Xenon”
bulbs will also ultimately burn out. Before they burn out, HID lamps can flicker. A message will then
appear in the MFI. This is your reminder to see an authorized Volkswagen dealer or an authorized
Volkswagen Service facility to check the headlights.
Page 73
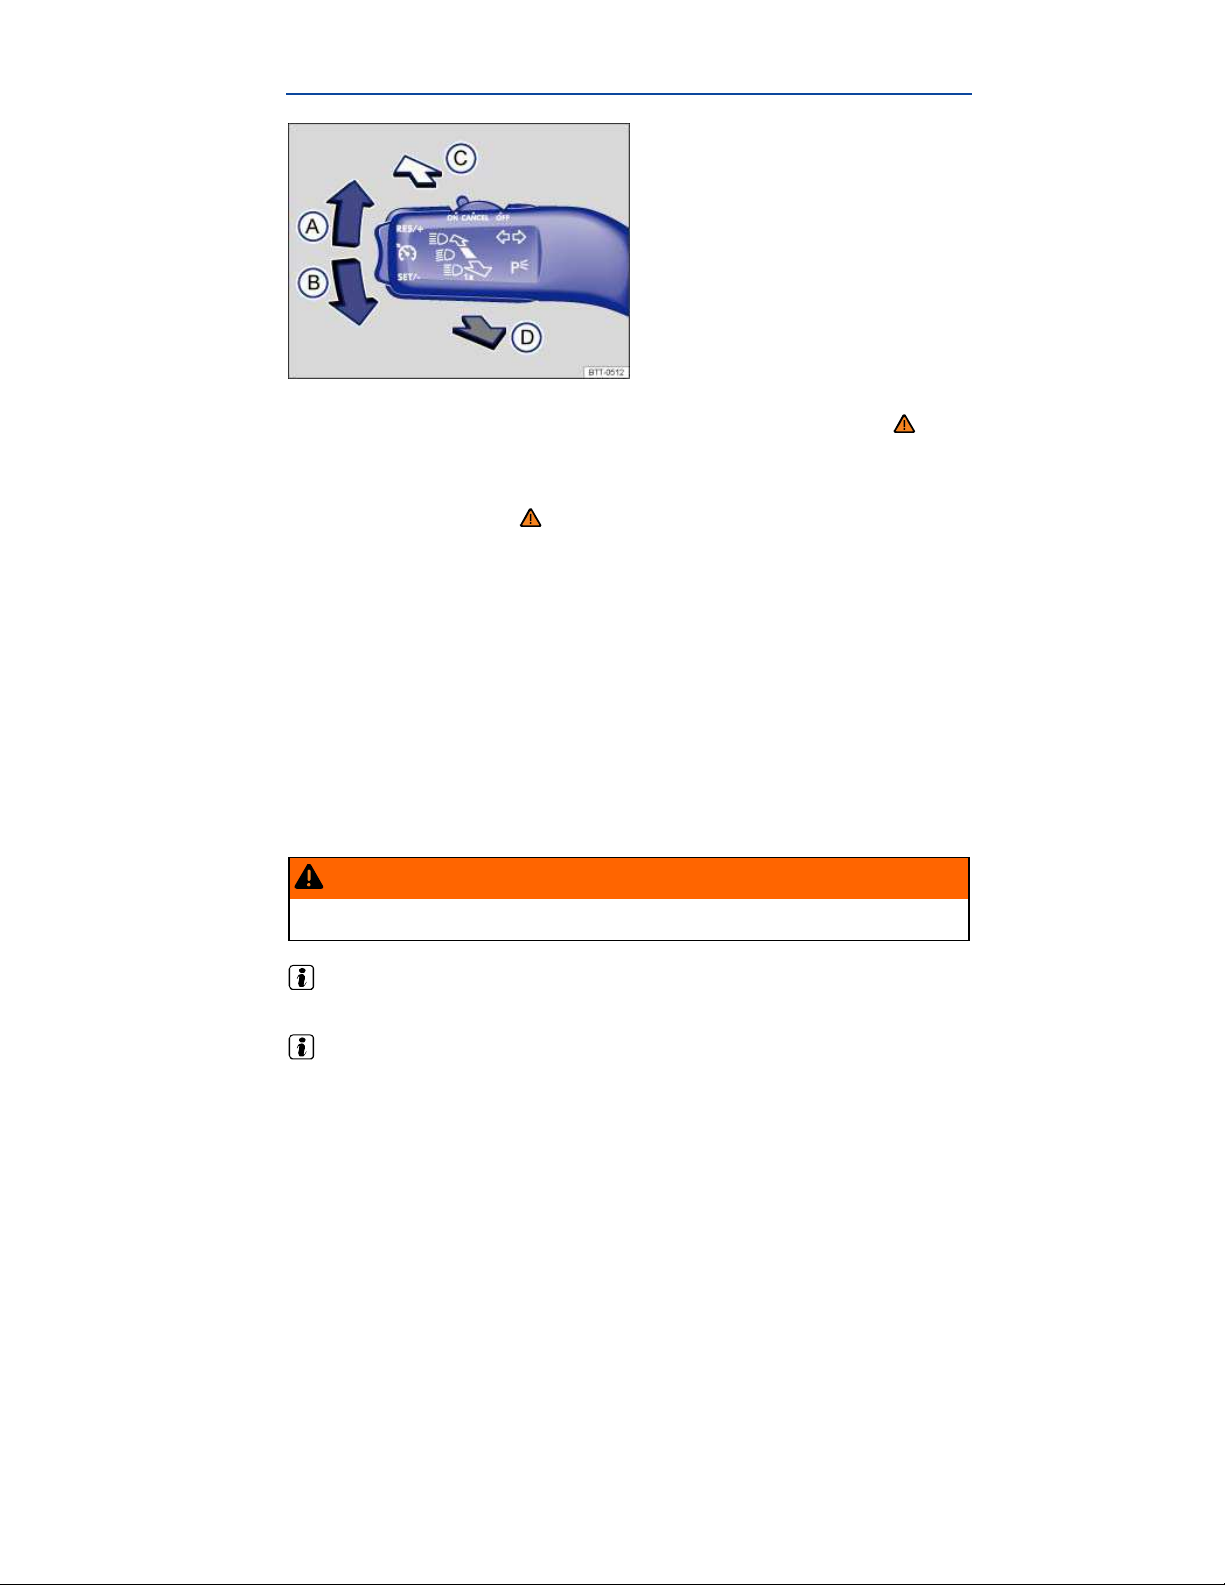
Turn signal lever and high beam switch
Fig. 73 Turn signal lever and high beam switch.
Please first read and note the introductory information and heed the WARNINGS
Move the lever to the desired position.
(A) Right turn signal.
(B) Left turn signal.
(C) Switching high beams on ⇒ . An indicator light $ comes on in the instrument cluster when
the high beams are switched on.
(D) Switching the high beams off and operating the headlight flasher. The headlight flasher turns on
the high beams as long as the lever is pulled and manually held in the pulled position. The
indicator light $ lights up. When released, the lever moves back to the home position and turns
off the high beams. The indicator light $ goes out.
Move the lever back to the home position to turn the selected feature off.
Lane change signaling feature (convenience turn signal)
To use the lane change signaling feature, move the lever up or down slightly, just to the point of
resistance and then release it. If you have lane change flash (Conv.turnsig.) switched on, the turn
signals and the turn signal indicator flash 3 times. If it is switched off, they flash as long as you hold
the lever up or down, and go out when you release the lever.
Lane change flash is switched on and off in the Lights&Vision menu in the instrument cluster
display 23. If your vehicle is not equipped with the Lights&Vision menu, the lane change flash
feature can be deactivated by an authorized Volkswagen dealer or authorized Volkswagen Service
Facility.
WARNING
Improper use of high beams can distract and blind others, causing accidents and serious
injuries.
The turn signal light works only when the ignition is switched on. The emergency flasher works
even when the ignition is switched off
The indicator light flashes twice as fast if a turn signal bulb is burned out.
Page 74
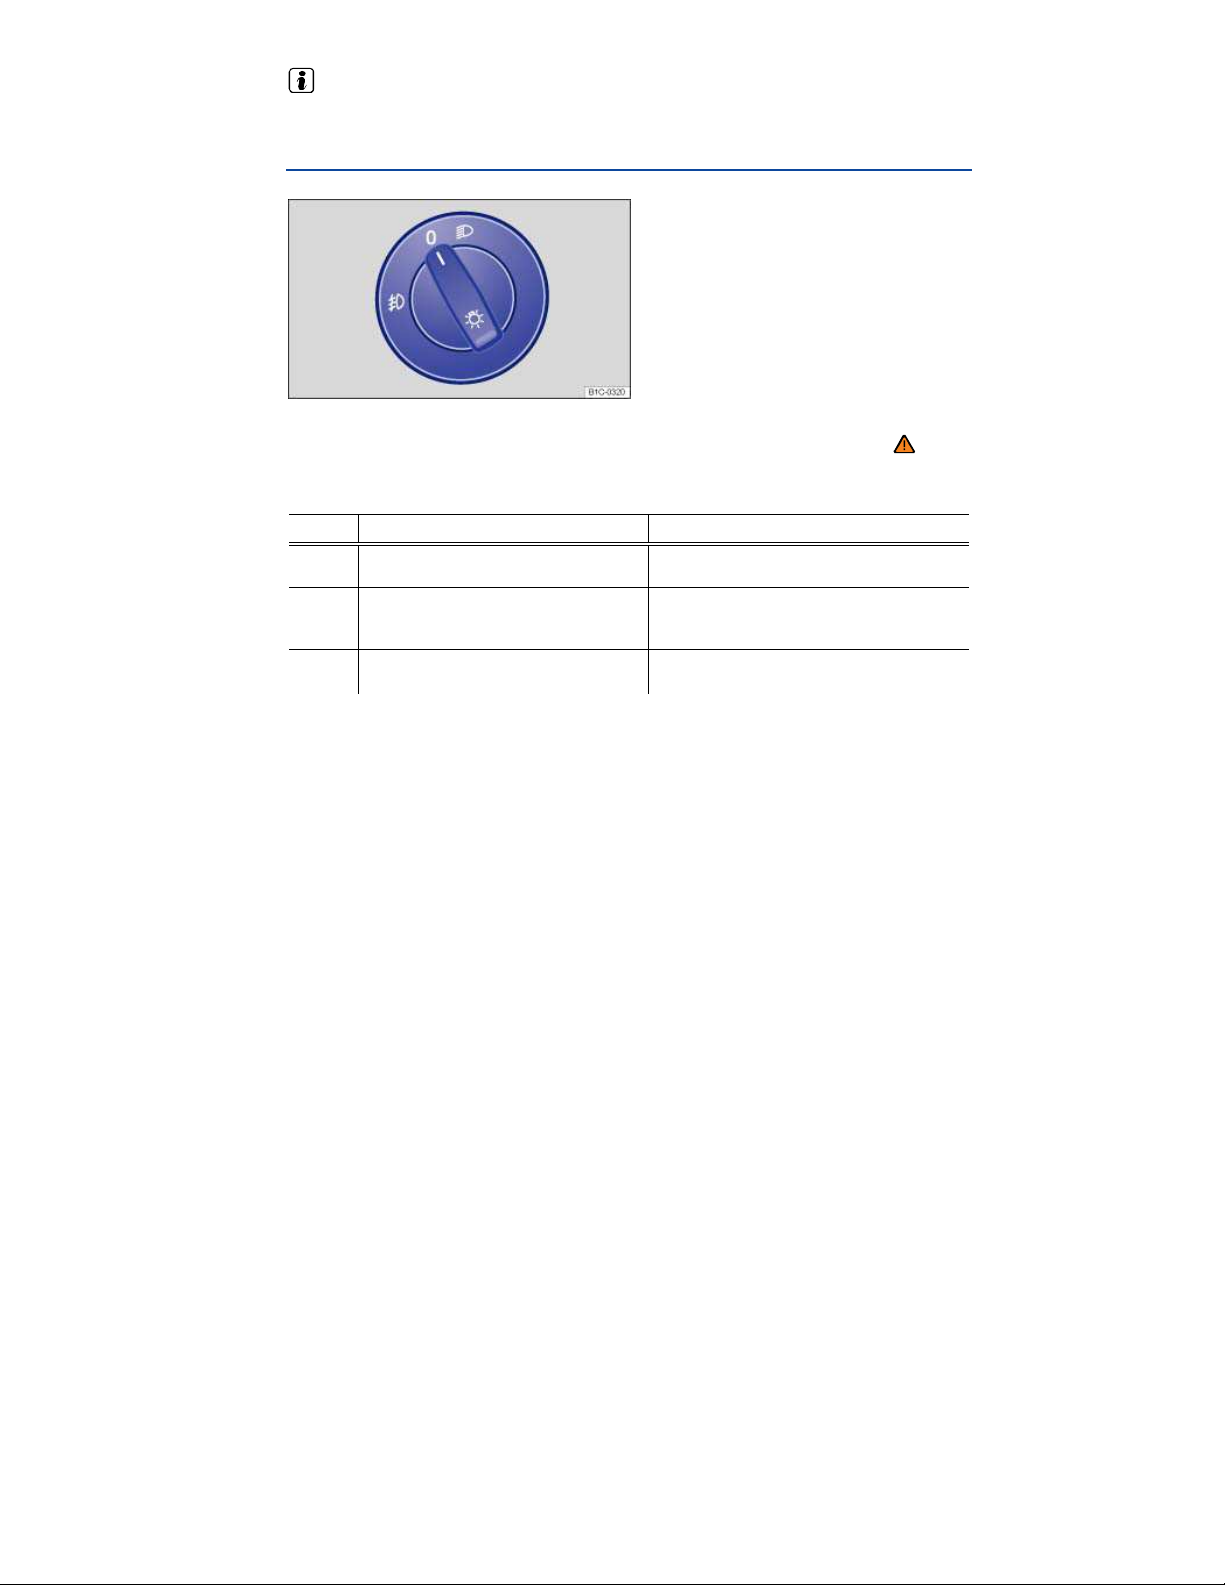
High beams can only be switched on when the low beams are on.
f
Switching lights on and off
Fig. 74 Headlight switch next to the steering wheel.
Please first read and note the introductory information and heed the WARNINGS
Adjust the light switch to the desired position
Symbol When the ignition is switched of
Fog lights and low beams switched off. Headlights off, daytime running lights (DRL)
Low beams switched off. The DRL may
stay on. The length of time they stay on
depends on the vehicle battery charge.
Fog lights switched off. The DRL may
Fog lights
The indicator light in the headlight switch or the instrument cluster shows that the fog lights are
switched on.
To switch on the fog lights : first turn the light switch to position ,then pull the light switch out to
the first detent.
To switch off the fog lights, push the switch back in from the first detent. To then turn off the
headlights, turn the switch to position .
Acoustic warning when lights are not switched off
In the following situation, a warning chime will sound if you take the key out of the ignition and open
the driver door. This is to remind you that lights are still on.
Light switch in position
stay on for some time.
⇒ fig. 74:
When the ignition is switched on
on.
Low beams switched on.
Headlights and fog lights switched on.
Page 75
WARNING
A
Daytime running lights are not bright enough to let you see ahead or be seen by others when
it is dark.
Always switch on the low-beam headlights at dusk or when it is dark and whenever the
weather is bad or visibility is poor.
Never use the daytime running lights to see where you are going. They are not bright
enough and will not let you see far enough ahead for safety, especially at dusk or when it is
dark. Always switch on the low-beam headlights at dusk or when it is dark.
The taillights do not come on with the daytime running lights. Unless the taillights are on,
a vehicle cannot be seen by others in bad weather, at dusk, or when it is dark.
In cool or humid weather, the insides of the headlights, the rear lights, and turn signals can
temporarily fog up. This is normal and does not affect the service life of the vehicle's lighting system.
Applicable only in the United States
Lights and vision features
Please first read and note the introductory information and heed the WARNINGS
Daytime running lights (DRL)
Separate lamps are installed in the headlights or in the front bumper for the daytime running lights
(DRL).
When the daytime running lights are switched on, only these separate lamps come on ⇒
The daytime running lights are switched on whenever the ignition is switched on and the light switch is
in position . The indicator light or may come on in the instrument cluster to indicate that the
feature is active
Daytime running lights (DRL) parking feature
Some models are equipped with a daytime running lights (DRL) parking feature that switches the
daytime running lights off when the vehicle is parked and the ignition is switched on.
Function
Switching the DRL off: – Switch the ignition on.
Switching the DRL back on: – Release the parking brake.
ction
– Turn the light switch to the O position.
– Set the parking brake.
Static cornering lights
Your vehicle may have fog lights under the front bumper, which on some models are also static
cornering lights. On some models the static cornering lights may be integrated in the headlights. At
speeds below about 25 mph (40 km/h), the light on one side of the vehicle will come on automatically
when you turn a corner. If you turn to the right, the right fog light comes on; turn left and the left fog
light comes on. The light dims and goes out when the steering wheel is straightened out again.
When you move the selector lever to Reverse (R), the static cornering lights on both sides of the
vehicle may come on so that you can see the area around the vehicle better when backing up.
.
Page 76
The static cornering lights work only when the headlights are on. The static cornering lights do not
come on when the headlight switch is in the O position or when the fog lights themselves have been
switched on
Adaptive Front Lighting System (AFS)
The Adaptive Front Lighting System works only with the low beams switched on and only at speeds
above about 6 mph (10 km/h). The swivel-mounted lamps automatically improve road illumination
during cornering.
On vehicles equipped with the Adaptive Front Lighting System, the feature is switched on and off via
the Assistants menu in the instrument cluster display
WARNING
Crashes and other accidents can happen when you cannot see the road ahead and when you
cannot be seen by other motorists.
Never use daytime running lights (DRL) to see where you are going. DRL are not bright
enough to light up the roadway and be seen by other motorists. You will not be able to see far
enough ahead for safety, especially at dusk or when it is dark. Always switch on the lowbeam headlights at dusk or when it is dark.
The taillights do not come on when the daytime running lights are switched on. A vehicle
without taillights on cannot be seen by others in bad weather, at dusk, or when it is dark.
In cool or humid weather, the insides of the headlights, the rear lights, and turn signals can
temporarily fog up. This is normal and does not affect the service life of the vehicle's lighting system.
Applicable only in Canada
Lights and vision features
Please first read and note the introductory information and heed the WARNINGS
Daytime running lights (DRL)
Separate lamps are installed in the headlights or in the front bumper for the daytime running lights
(DRL).
When the daytime running lights are switched on, only these separate lamps come on ⇒
The daytime running lights are switched on whenever the ignition is switched on and the light switch is
in position . The indicator light or may come on in the instrument cluster to indicate that the
feature is active
.
Static cornering lights
Your vehicle may have fog lights under the front bumper, which on some models are also static
cornering lights. On some models the static cornering lights may be integrated in the headlights. At
speeds below about 25 mph (40 km/h), the light on one side of the vehicle will come on automatically
when you turn a corner. If you turn to the right, the right fog light comes on; turn left and the left fog
light comes on. The light dims and goes out when the steering wheel is straightened out again.
When you move the selector lever to Reverse (R), the static cornering lights on both sides of the
vehicle may come on so that you can see the area around the vehicle better when backing up.
The static cornering lights work only when the headlights are on. The static cornering lights do not
come on when the headlight switch is in the
switched on 102.
position or when the fog lights themselves have been
O
Page 77
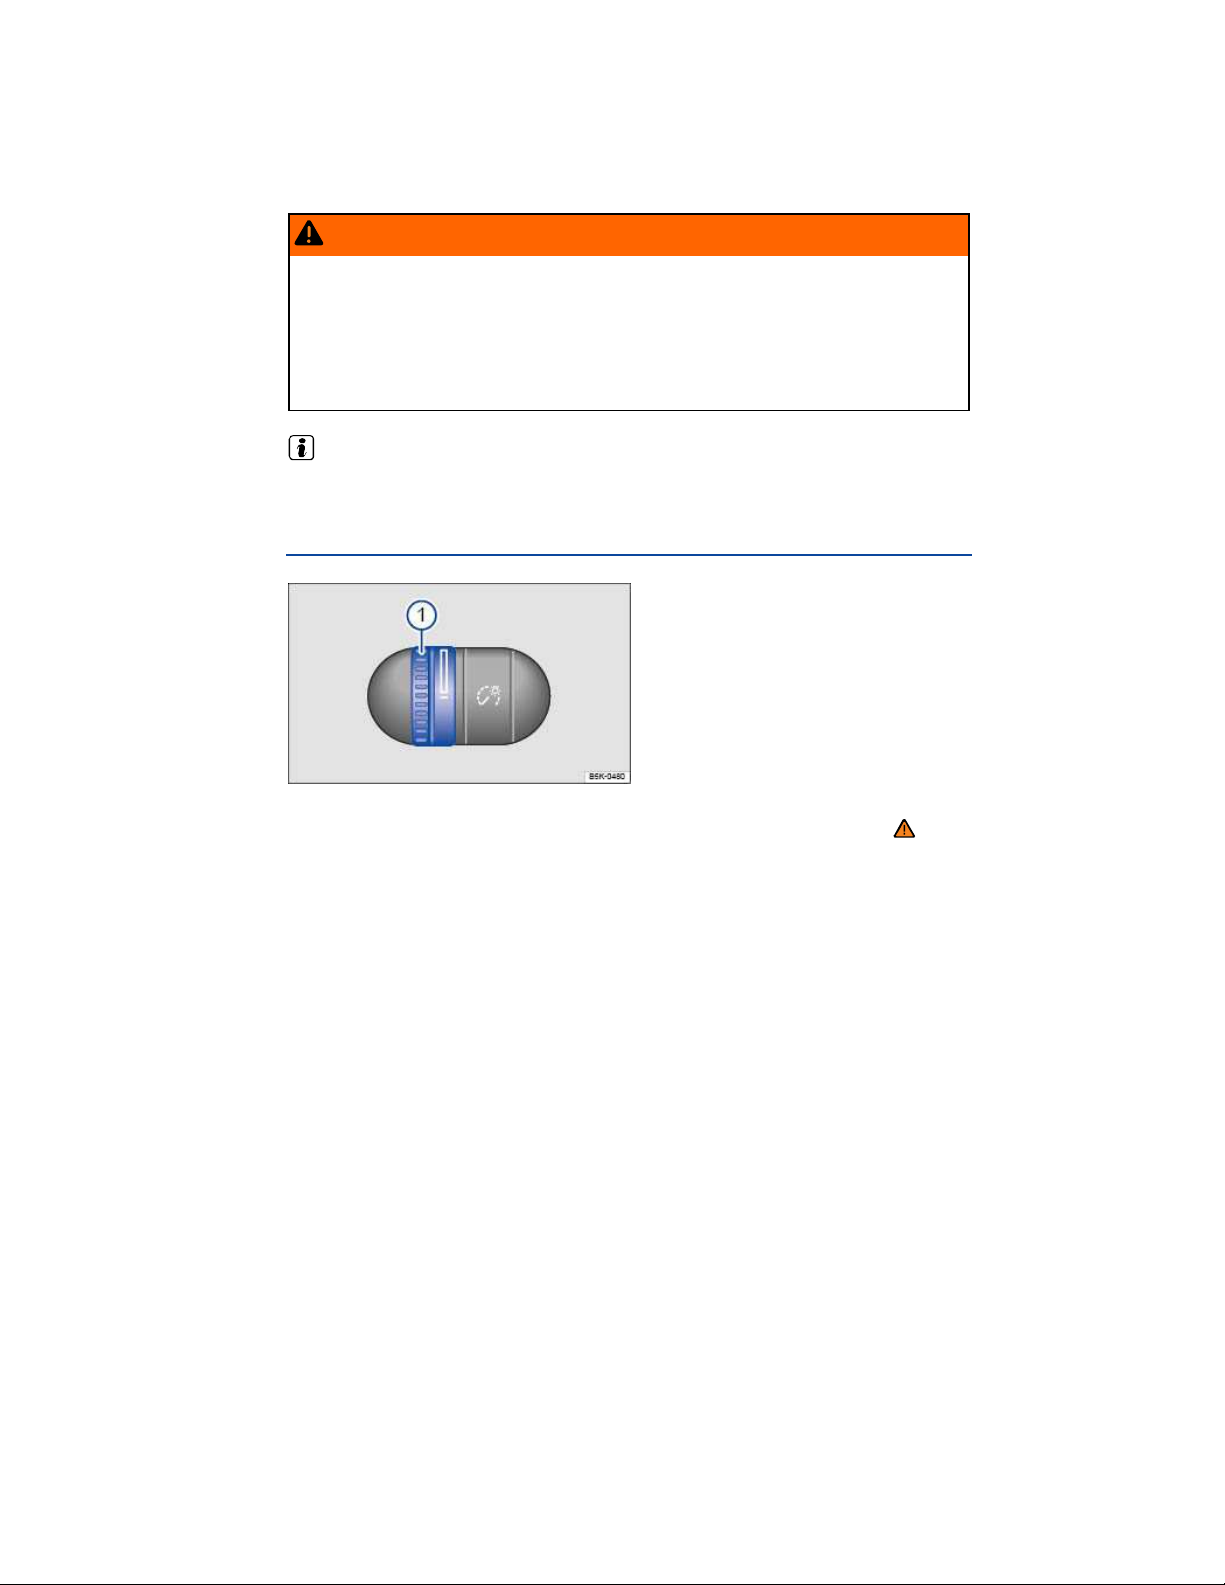
Adaptive Front Lighting System (AFS)
The Adaptive Front Lighting System works only with the low beams switched on and only at speeds
above about 6 mph (10 km/h). The swivel-mounted lamps automatically improve road illumination
during cornering.
On vehicles equipped with the Adaptive Front Lighting System, the feature is switched on and off via
the Assistants menu in the instrument cluster display
WARNING
Crashes and other accidents can happen when you cannot see the road ahead and when you
cannot be seen by other motorists.
Never use daytime running lights (DRL) to see where you are going. DRL are not bright
enough to light up the roadway and be seen by other motorists. You will not be able to see far
enough ahead for safety, especially at dusk or when it is dark. Always switch on the lowbeam headlights at dusk or when it is dark.
The taillights do not come on when the daytime running lights are switched on. A vehicle
without taillights on cannot be seen by others in bad weather, at dusk, or when it is dark.
In cool or humid weather, the insides of the headlights, the rear lights, and turn signals can
temporarily fog up. This is normal and does not affect the service life of the vehicle's lighting system.
Instrument panel lighting and headlight range adjustment
Fig. 75 To the left of the steering wheel: Thumbwheel to adjust instrument panel lighting 1.
Please first read and note the introductory information and heed the WARNINGS
Instrument panel lighting
When the lights are on, the brightness of the instrument panel lighting is adjusted by turning the
thumbwheel ⇒
fig. 75 (1).
Instrument cluster brightness
When the lights are on, the brightness of the instrument cluster lighting is adjusted by turning the
thumbwheel
In some vehicles with daytime running lights (DRL), the instrument cluster lighting switches on
automatically when it is dark outside or when driving through tunnels, for example. You will need to
switch the headlights on manually when this happens, so that the vehicle's taillights will turn on 103,
104.
(1).
Page 78
Dynamic headlight range adjustment
In some vehicles with HID (Xenon) headlights, the headlight range is automatically adjusted to the
vehicle loading condition once the low beams are switched on ⇒ .
WARNING
Headlights that are aimed too high because of the way the vehicle is loaded can blind and
distract other drivers. This can lead to a crash and serious personal injuries.
Always make sure the headlights are adjusted to loading conditions so that they do not
blind others.
WARNING
If dynamic headlight range adjustment does not work properly or at all, the headlights could
blind and distract other drivers. This can lead to a crash and serious personal injuries.
Have headlight range adjustment checked immediately by an authorized Volkswagen
dealer or an authorized Volkswagen Service Facility.
Interior and reading lights
Please first read and note the introductory information and heed the WARNINGS
Button Function
Interior lights off.
Interior lights on.
Door contact switch - center position.
Interior lights go on automatically when the vehicle is unlocked, a door is opened, or
the vehicle key is removed from the ignition.
The lights go out about 20 seconds after you close the doors. They also go out when
you lock the vehicle or switch on the ignition.
Reading light on or off.
Glove and luggage compartment lights
The glove and luggage compartments may have lights that come on automatically when they are
opened and go off when they are closed.
Background lighting
When the ignition and headlights are switched on, the background lighting in the roof console lights
up.
There may also be footwell lighting.
Page 79

The interior and reading lights go out when you lock the vehicle or a few minutes after you
remove the vehicle key from the ignition. This helps to prevent unnecessary drain on the vehicle
battery.
Page 80
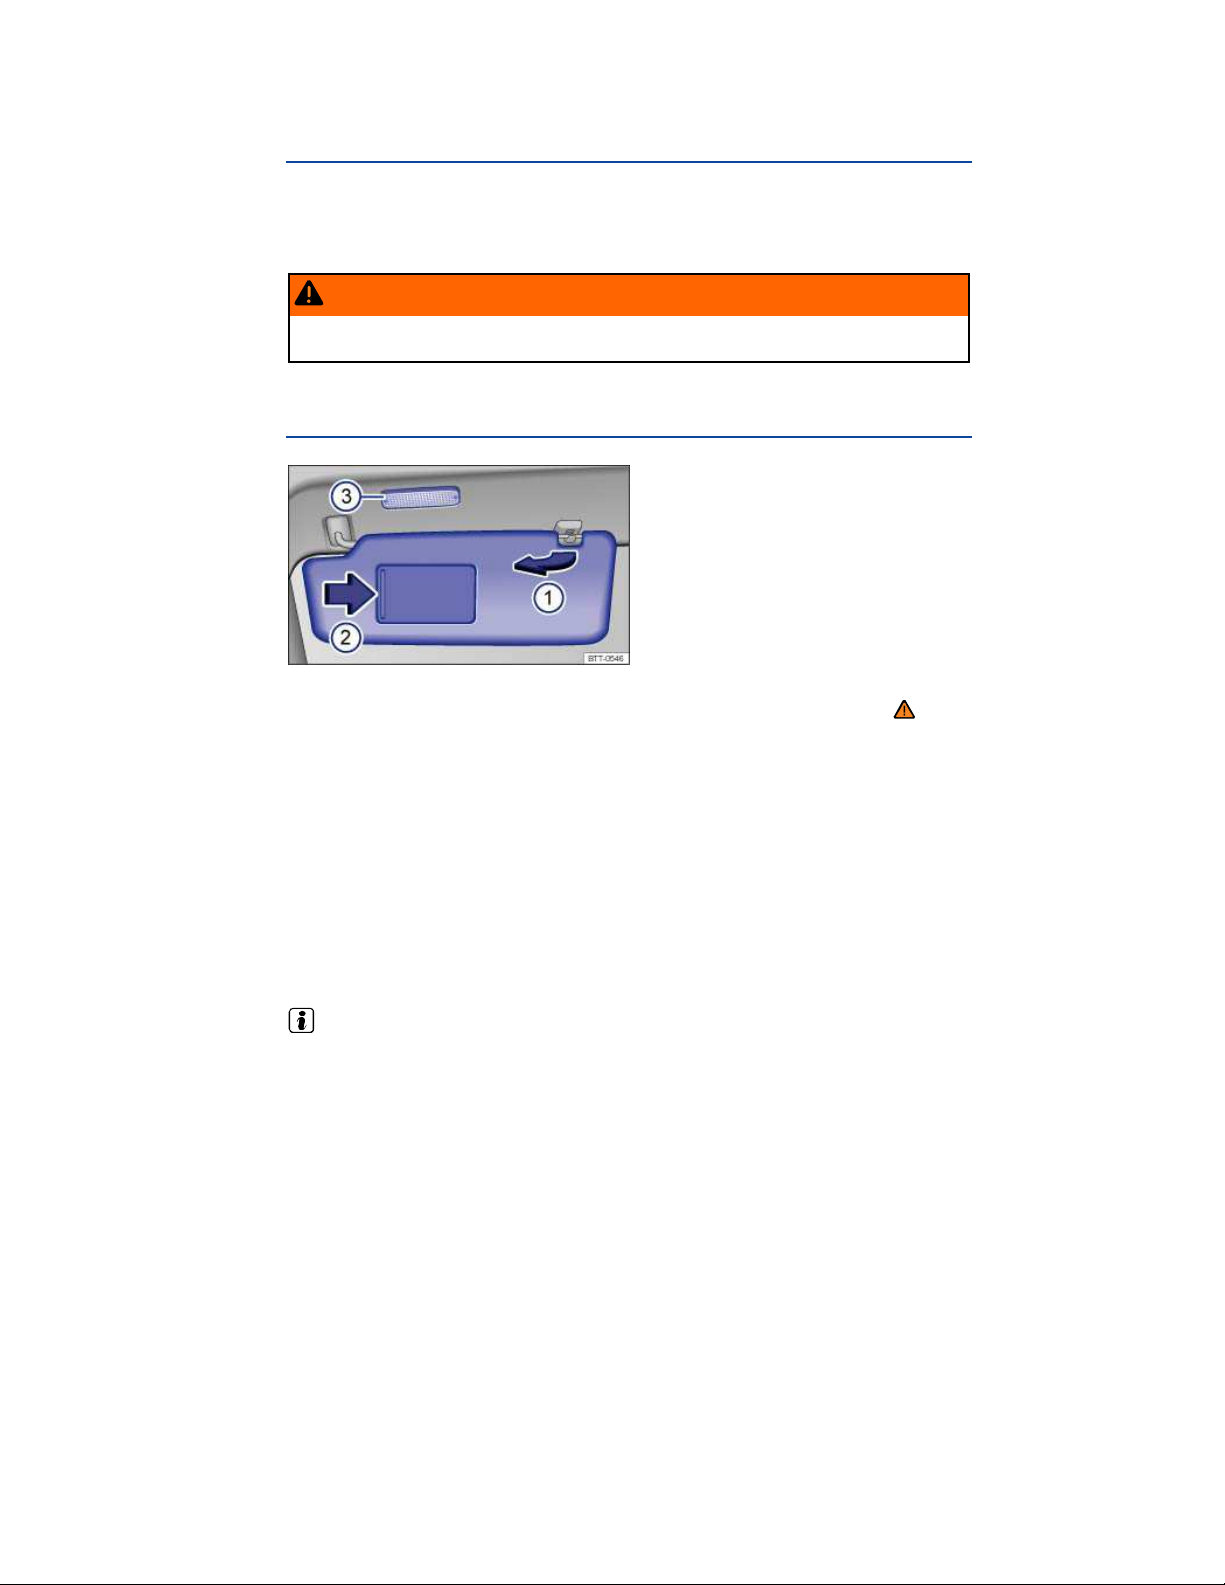
Sun protection
Introduction
In this section you’ll find information about:
Sun visors
Windshield made of heat-insulating glass
WARNING
Sun visors can reduce visibility.
Always stow sun visors when not needed to block sun glare.
Sun visors
Fig. 76 Sun visor.
Please first read and note the introductory information and heed the WARNINGS
Sun visor adjustment:
Flip the sun visor down toward the windshield.
Lift it out of the retaining clip ⇒ fig. 76 (1) and swivel it over toward the door.
Additional sun visor positions:
On some vehicles, you can slide the sun visor towards the rear of the vehicle after swiveling it over
to the door.
Vanity mirror and lighting
A vanity mirror is behind a cover in the sun visor. A light
open.
The light goes out when you shut the cover or if you flip the sun visor up again.
(3) may come on when you slide the cover (2)
The vanity mirror light and the interior light above the sun visor go out after several minutes. This
helps to prevent unnecessary drain on the vehicle battery.
Page 81

Windshield made of heat-insulating glass
Fig. 77 Heat-reflective windshield with communications window (blue shaded area).
Please first read and note the introductory information and heed the WARNINGS
Windshields made of insulating glass have a transparent metallic infrared-reflecting coating. There is
an uncoated area (communications window) just above the inside rearview mirror ⇒
serves as a communications window for transmitting signals to and from electronic components and
accessories.
The uncoated area must not be blocked on the inside or outside or covered with stickers because this
can cause the electronic components to malfunction.
fig. 77. This
Page 82
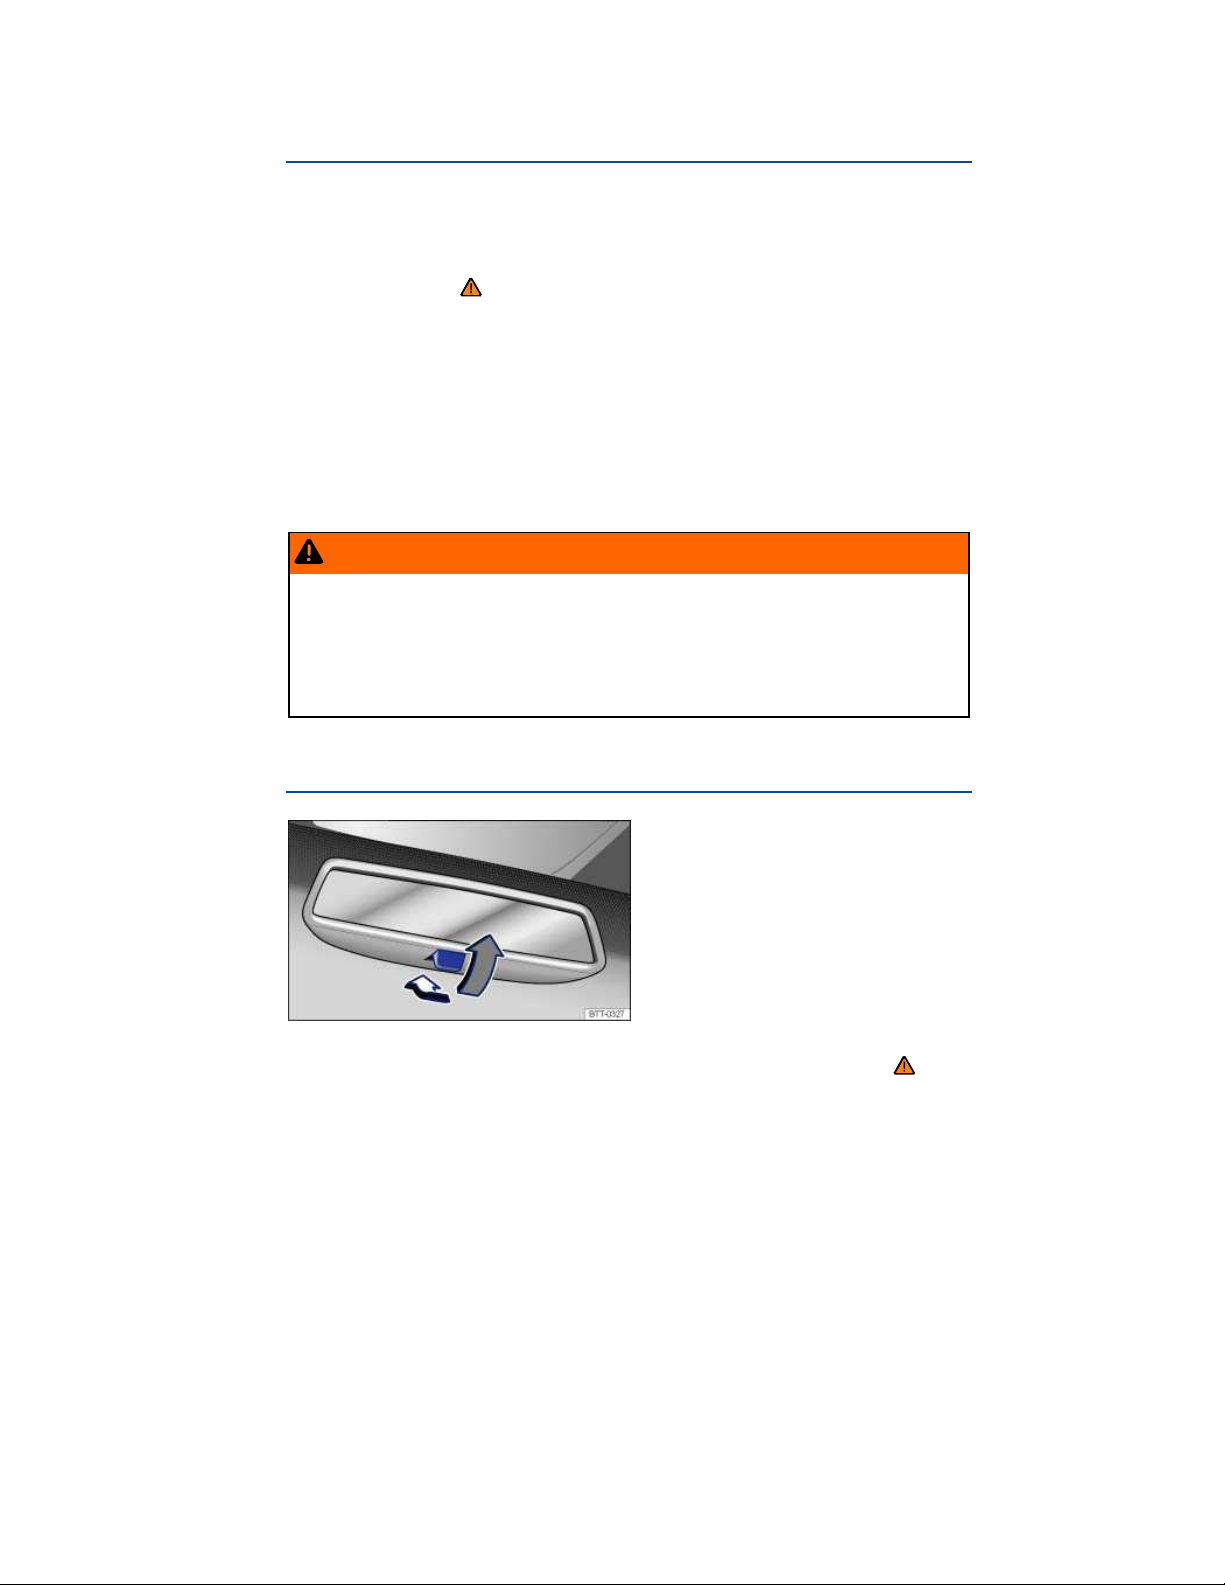
Mirrors
Introduction
In this section you’ll find information about:
Inside mirror
Outside mirrors
For your driving safety, it is important that you properly adjust the outside mirrors and the inside mirror
before you start driving ⇒
The outside mirrors and the inside mirror help you see and adapt your driving to traffic behind you.
Remember that the inside and outside rearview mirrors will not show everything behind you. There
can be blind spots. Blind spots can be significantly larger if the mirrors are not properly adjusted.
More information:
Exterior views
Volkswagen Information System
Adjusting the seating position
Shifting gears
Braking, stopping and parking
WARNING
Adjusting mirrors when the vehicle is moving can cause driver distraction, accidents, and
serious personal injury.
Always adjust the rearview mirrors when the vehicle is not moving.
Always be aware of what is happening around the vehicle when changing lanes, passing,
turning, or parking. Another vehicle, pedestrian, or object could be in your blind spot.
Always make sure mirrors are properly adjusted and the view to the rear is not reduced by
moisture, ice, snow, or other things.
.
Inside mirror
Fig. 81 Manually adjustable inside mirror.
Please first read and note the introductory information and heed the WARNINGS
Adjust the inside mirror to make sure that there is good visibility through the rear window.
Page 83
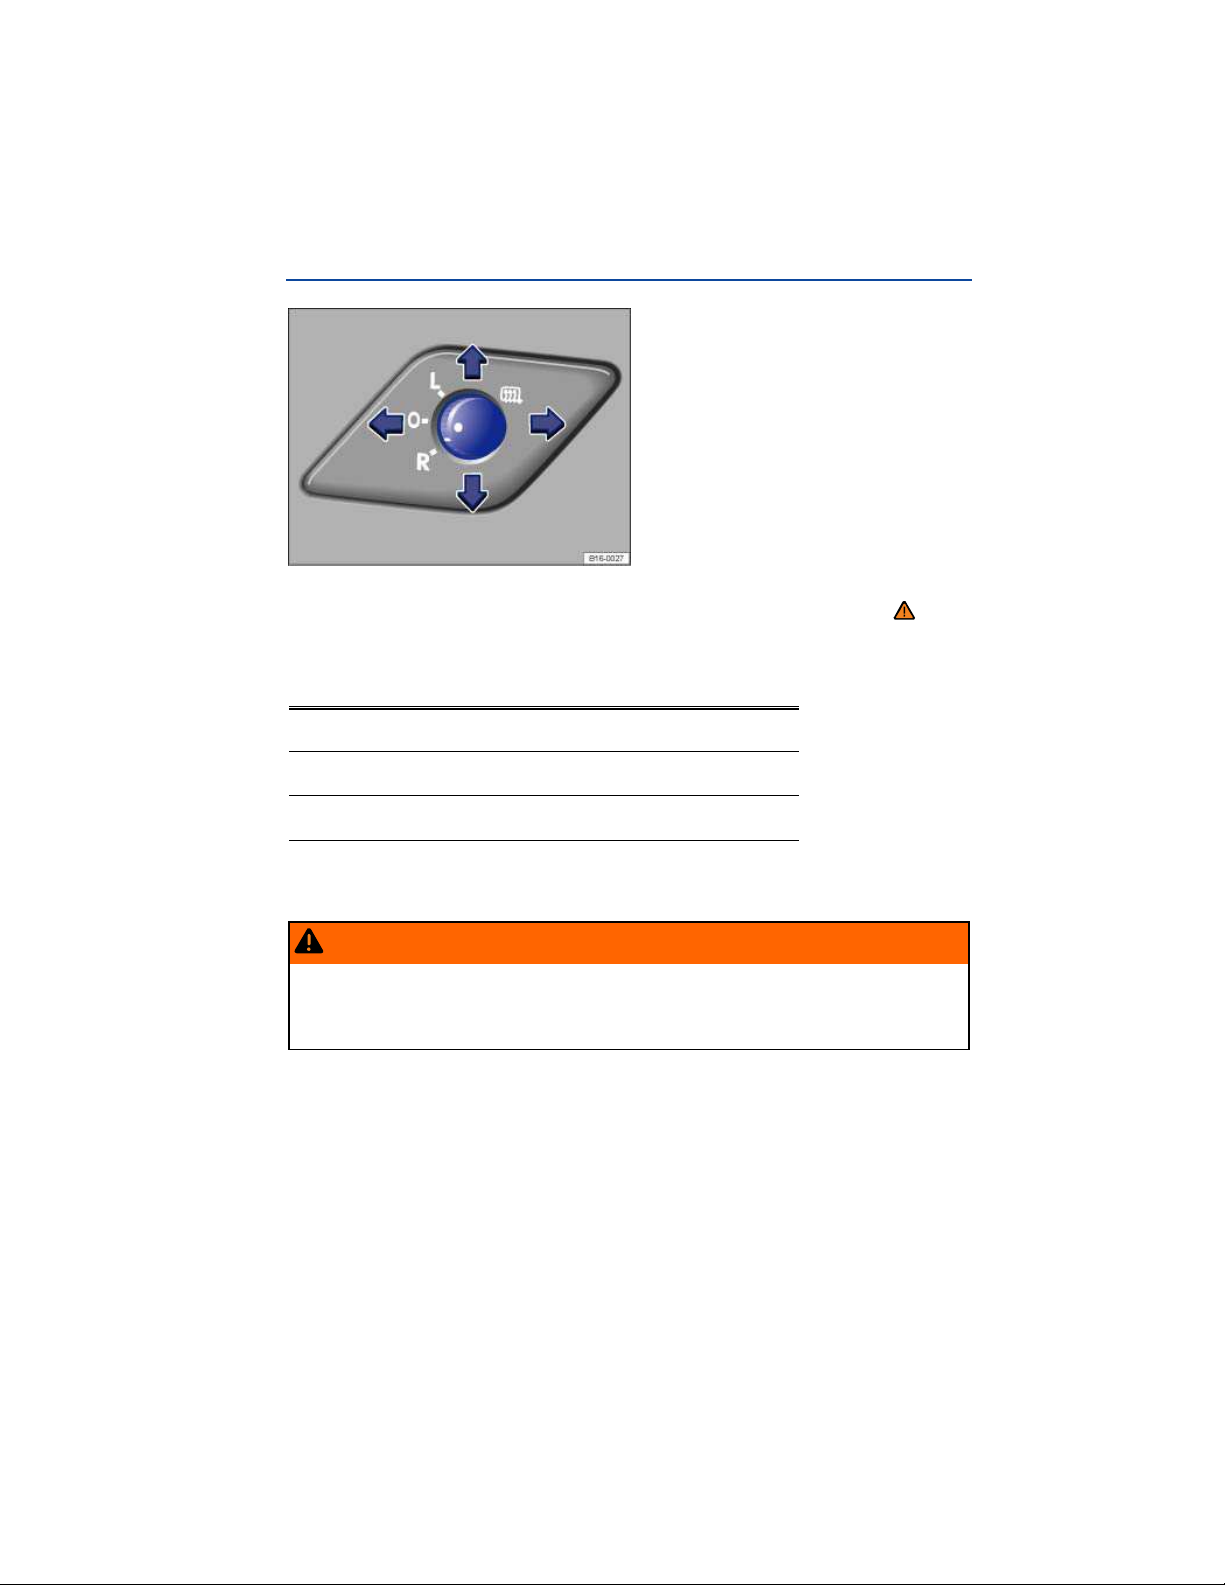
For example, visibility through the rear window could be impaired if there is a sunshade on the rear
window or clothing on the luggage compartment cover, or if the rear window is covered with ice, snow,
or dirt.
Manually adjustable inside mirror
Home position: Lever on the bottom edge of the mirror points forward.
To adjust to non-glare visibility, move the lever so that it points backward ⇒
fig. 81.
Outside mirrors
Fig. 82 In the driver door: Adjusting knob for the outside mirrors.
Please first read and note the introductory information and heed the WARNINGS
Turn the rotary knob ⇒
Turn the rotary knob to the desired position:
Switch on outside mirror heating. Heats only at outside air
temperatures below +68 °F (+20 °C).
Adjust the left outside mirror by pressing the knob to left/right
L
and up/down.
Adjust the right outside mirror by pressing the knob to left/right
R
and up/down.
Neutral position. Outside mirror folded out, no heating or
adjustment possible.
fig. 82 to adjust the outside mirrors.
WARNING
Improper use of the folding outside mirrors can cause personal injury.
Always make sure that nobody is in the way when folding the mirrors in or out.
Make sure that you do not get your finger caught between the mirror and the mirror base
when moving the mirrors.
Page 84

WARNING
Incorrectly estimating distances with the right outside mirror can cause collisions and
serious injury.
The right outside mirror has a convex (curved) surface. This widens your field of vision.
But vehicles or other objects seen in a convex mirror will look smaller and farther away than
they really are.
If you use the right outside mirror to judge distances from vehicles behind you when
changing lanes, you could estimate incorrectly and cause a crash and serious injuries.
Whenever possible, use the inside mirror to more accurately judge distance and size of
vehicles or other objects seen in the convex mirror.
Always make sure you have a clear view to the rear of the vehicle.
NOTICE
Alwa ys fold in the outside mirrors when taking the vehicle through an automatic car wash.
To reduce fuel consumption, use outside mirror heating only when needed.
When first switched on, outside mirror heating works with maximum heat for about 2 minutes.
If power mirror adjustment does not work, the outside mirrors can be adjusted by hand by
pressing on the edges of the mirror surface.
Page 85

Driving tips
Introduction
In this section you’ll find information about:
Stowing luggage
Driving with an open luggage compartment lid
Driving a loaded vehicle
Weights and axle weights
Always stow heavy objects in the luggage compartment and make sure that the rear seat backrests
are securely latched. Always use the tie-downs in the luggage compartment and secure the objects
with suitable straps. Never overload the vehicle. Remember that the vehicle load, as well as how it is
distributed, can affect vehicle handling and braking ⇒
More information:
Luggage compartment lid
Folding the passenger seat backrest forward
Lights
Luggage compartment
Roof rack
Trailer towing
Tires and wheels
WARNING
Unsecured or incorrectly stowed items can fly through the vehicle, causing serious personal
injury during hard braking or sharp steering or in an accident. Loose items can also be struck
and thrown through the passenger compartment by the front airbags if they inflate. To help
reduce the risk of serious personal injury:
Always stow all objects securely in the vehicle.
Always keep storage compartments closed while driving.
Do not stow hard, heavy, or sharp objects in open bins in the vehicle or on top of the
instrument panel.
Remove hard, heavy, and sharp objects from clothing and bags in the vehicle interior and
stow securely. Always put heavy items in the luggage compartment.
Always secure objects in the passenger compartment properly with suitable straps so that
they cannot move into the deployment area of a side or front airbag during braking, in a
sudden maneuver, or in a collision.
Always make sure that there is nothing on the front passenger seat when the backrest is
folded forward.
Passengers must never ride in an incorrect seating position because objects are being
transported in the vehicle.
Never let anybody sit in a seat that is blocked by objects being carried in the vehicle.
.
Page 86
WARNING
Heavy loads will influence the way your vehicle handles and increase stopping distances.
Heavy loads that are not properly stowed or secured can cause loss of control and serious
injury.
Secure the load properly to keep it from shifting.
Always remember when transporting heavy objects that a change in the center of gravity
also changes the way your vehicle handles:
– Always distribute the load as evenly as possible.
– Secure heavy objects properly as far forward in the luggage compartment as possible.
– Always tie down heavy items securely with suitable straps using the tie-downs in the
luggage compartment.
Securely latch the rear seat backrest in the upright position.
Never exceed the Gross Axle Weight Rating or the Gross Vehicle Weight Rating on the
safety compliance sticker on the left door jamb. Exceeding permissible weight can cause the
vehicle to skid and handle differently.
Always adapt your speed and driving to the heavier load and the weight distribution in the
vehicle. Take road, weather, traffic, and visibility conditions into account as well.
Always accelerate gently and avoid sudden braking and driving maneuvers.
Always brake earlier than you would if you were not driving a loaded vehicle.
Stowing luggage
Please first read and note the introductory information and heed the WARNINGS
Always stow all luggage securely in the vehicle
Distribute the load in the vehicle, on the roof, and in the trailer as evenly as possible.
Put heavy objects as far forward as possible in the luggage compartment and securely latch the
rear seat backrest in the upright position.
Secure luggage in the luggage compartment to the tie-downs with suitable straps
Have the headlight range adjusted, if necessary
Check the pressure in all 4 tires when the tires are still cold. Never reduce air pressure in warm
tires to match cold tire inflation pressure. Heed the information on the tire pressure label .
Pay especially close attention to your vehicle's Tire Pressure Monitoring System when driving with
a heavy load
NOTICE
The defroster heating wires or antenna in the rear window can be damaged by objects that rub
against them.
Please review the information on loading a trailer and a roof rack
Driving with an open luggage compartment lid
Please first read and note the introductory information and heed the WARNINGS
Page 87
Driving with an open luggage compartment lid can lead to serious personal injury. If you have to drive
with an open luggage compartment lid, make sure that all objects and the lid itself are properly
secured and take appropriate measures to keep toxic exhaust fumes from entering the vehicle.
WARNING
Driving with an unlatched or open luggage compartment lid can lead to serious personal
injury.
Never transport objects larger than those that fit completely in the luggage compartment,
because the luggage compartment lid cannot be fully closed properly.
After closing the lid, always pull up on it to make sure that it is properly closed and cannot
open suddenly when the vehicle is moving.
Always stow all objects securely in the luggage compartment. Loose objects can fall out
of the luggage compartment and injure others on the road behind you.
Drive carefully; anticipate what other drivers will do.
Avoid abrupt or sudden acceleration, steering, or braking, because the unlatched luggage
compartment lid can move suddenly.
Always mark objects sticking out from the luggage compartment clearly for others to see.
Obey all applicable legal requirements.
Never use the luggage compartment lid to “clamp” or “hold” objects that stick out of the
luggage compartment.
Always remove any luggage rack or other rack mounted on the luggage compartment lid
(along with any luggage on the rack) before driving with an open luggage compartment lid.
WARNING
Driving with an open luggage compartment lid can cause poisonous carbon monoxide in the
engine exhaust to get into the passenger compartment.
Carbon monoxide causes drowsiness, inattentiveness, poisoning, and loss of
consciousness. It can lead to accidents and severe personal injuries.
Always keep the luggage compartment lid closed while driving to help keep poisonous
exhaust fumes from being drawn into the vehicle.
Never transport objects that are too large to fit completely into the luggage area, because
then the luggage compartment lid cannot be fully closed.
If you absolutely must drive with an open luggage compartment lid, do the following to
reduce the risk of carbon monoxide poisoning:
– Close all windows and the power sunroof.
– Switch off the climate control system's air recirculation feature.
– Open all air vents in the instrument panel.
– Set the fresh air fan to the highest speed.
NOTICE
The open luggage compartment lid changes the vehicle height.
Driving a loaded vehicle
Please first read and note the introductory information and heed the WARNINGS
Page 88

For good handling when driving a loaded vehicle, please observe the following:
Securely stow all luggage
Drive especially carefully and accelerate gently.
Avoid sudden braking and driving maneuvers.
Brake earlier than you would if you were not driving a loaded vehicle.
If applicable, observe information about driving with a trailer
If applicable, observe information about driving with a roof rack
WARNING
Heavy loads can change the way your vehicle handles and increase stopping distances.
Heavy loads that are not properly stowed or secured can shift suddenly, causing loss of
control and serious injury.
Secure the load properly to keep it from shifting.
Always remember when transporting heavy objects that they change the vehicle's center
of gravity and also the way it handles.
– Always distribute the load as evenly as possible.
– Secure heavy objects as far forward in the luggage compartment as possible.
– Use your vehicle's luggage compartment tie-downs with suitable straps.
Always tie down heavy items securely with suitable straps.
Securely latch the rear seat backrest in the upright position.
Never exceed the Gross Axle Weight Rating or the Gross Vehicle Weight Rating on the
safety compliance sticker on the left door jamb. Exceeding permissible weight can cause the
vehicle to skid and handle differently.
Always adapt speed and driving to the heavier load and the weight distribution in the
vehicle. Take road, weather, traffic, and visibility conditions into account as well.
Always accelerate gently and avoid sudden braking and driving maneuvers.
Always brake earlier than you would if you were not driving a loaded vehicle.
Weights and axle weights
Please first read and note the introductory information and heed the WARNINGS
The actual gross weight of any vehicle depends on the engine, basic equipment, any factory-installed
optional equipment for the given model, and any accessories that have been installed. The Gross
Vehicle Weight Rating (GVWR) and the Gross front and Rear Axle Weight Ratings (GAWR) for a
given vehicle are printed on the vehicle's Safety Compliance Certification Label on the driver door
jamb.
The Gross Vehicle Weight Rating includes the weight of the vehicle itself with all of its factoryinstalled equipment, plus a full tank of gasoline, the engine oil and coolant, all vehicle occupants
(150 lbs/68 kg per seating position) and cargo.
The Gross Axle Weight Ratings specify the maximum allowable load for each axle.
The cargo payload may not be increased by using a roof rack without commensurately reducing the
weight from vehicle occupants ⇒ . Determining the Gross Vehicle Weight Rating , Tires and
wheels.
Vehicle payload consists of the combined weight of the following:
Passengers.
Total luggage and other cargo.
Page 89

Luggage compartment
Introduction
In this section you’ll find information about:
Folding the rear seat backrest forward and back into place
Luggage compartment pass-through
Tie-downs
Always stow heavy objects in the luggage compartment and make sure that the rear seat backrests
are securely latched in their upright position. Always secure objects to the tie-downs with suitable
straps. Never overload the vehicle. Remember that the vehicle load, as well as how it is distributed,
can affect vehicle handling and braking ⇒
More information:
Safety belts
Airbag system
Lights
Transporting
Trailer towing
Tires and wheels
WARNING
An open or unlocked luggage compartment poses special risks for children.
Close and lock the luggage compartment lid and all doors when the vehicle is not in use.
First, make certain that no one is left inside.
Never leave your vehicle unattended or let children play around the vehicle, especially
with the luggage compartment lid left open. A child could crawl into the vehicle and pull the
lid shut, becoming trapped and unable to get out. This could cause severe or fatal injuries.
A closed vehicle can become very hot or very cold, depending on the season.
Temperatures can quickly reach levels that can cause unconsciousness or death, particularly
to small children.
Never let children play in or around the vehicle.
Never let anyone ride in the luggage compartment.
.
Page 90
WARNING
Unsecured or incorrectly stowed items can fly through the vehicle, causing serious personal
injury during hard braking or sharp steering or in an accident. Loose items can also be struck
and thrown through the passenger compartment by the front airbags if they inflate. To help
reduce the risk of serious personal injury:
Always stow all objects securely in the vehicle. Always put luggage and heavy items in the
luggage compartment.
Always secure objects in the passenger compartment properly with suitable straps so that
they cannot move into the deployment zone of a side or front airbag during sudden braking,
in a sudden maneuver, or in a collision.
Always keep storage compartments closed while driving.
Never stow hard, heavy, or sharp objects in the vehicle's open storage compartments, on
the shelf behind the rear seat bench, or on the top of the instrument panel.
Always remove hard, heavy, or sharp objects from clothing and bags in the vehicle
interior and stow them securely in the luggage compartment.
WARNING
Transporting heavy objects causes the handling characteristics of the vehicle to change and
increases braking distances. Heavy loads which are not properly stowed or secured in the
vehicle can lead to a loss of vehicle control and cause serious personal injury.
Transporting heavy items causes the handling characteristics of the vehicle to change by
shifting the vehicle's center of gravity.
Always distribute luggage evenly and as low as possible within the vehicle. The vehicle
capacity weight figures apply when the load is distributed evenly in the vehicle (passengers
and luggage).
Always stow luggage and heavy items in the luggage compartment as far forward of the
rear axle as possible and secure them with appropriate straps to the tie-downs provided.
Never exceed the vehicle's Gross Vehicle Weight Rating or Gross Axle Weight Ratings,
which are printed on the Safety Compliance Certification Label located on the door jamb of
the driver door. Exceeding the permissible weight can cause the vehicle to skid and behave
differently.
Always adapt your speed and driving style to accommodate your payload and its weight
distribution within your vehicle.
Be especially cautious and gentle when stepping on the accelerator pedal and avoid
sudden braking and other maneuvers.
Brake earlier than you would if you were not driving a loaded vehicle.
NOTICE
The defroster heating wires or antenna in the rear window can be damaged by objects that rub
against them.
The ventilation slots between the rear window and the shelf behind the rear seat backrest must
not be blocked so that stale air can escape from the vehicle.
Page 91
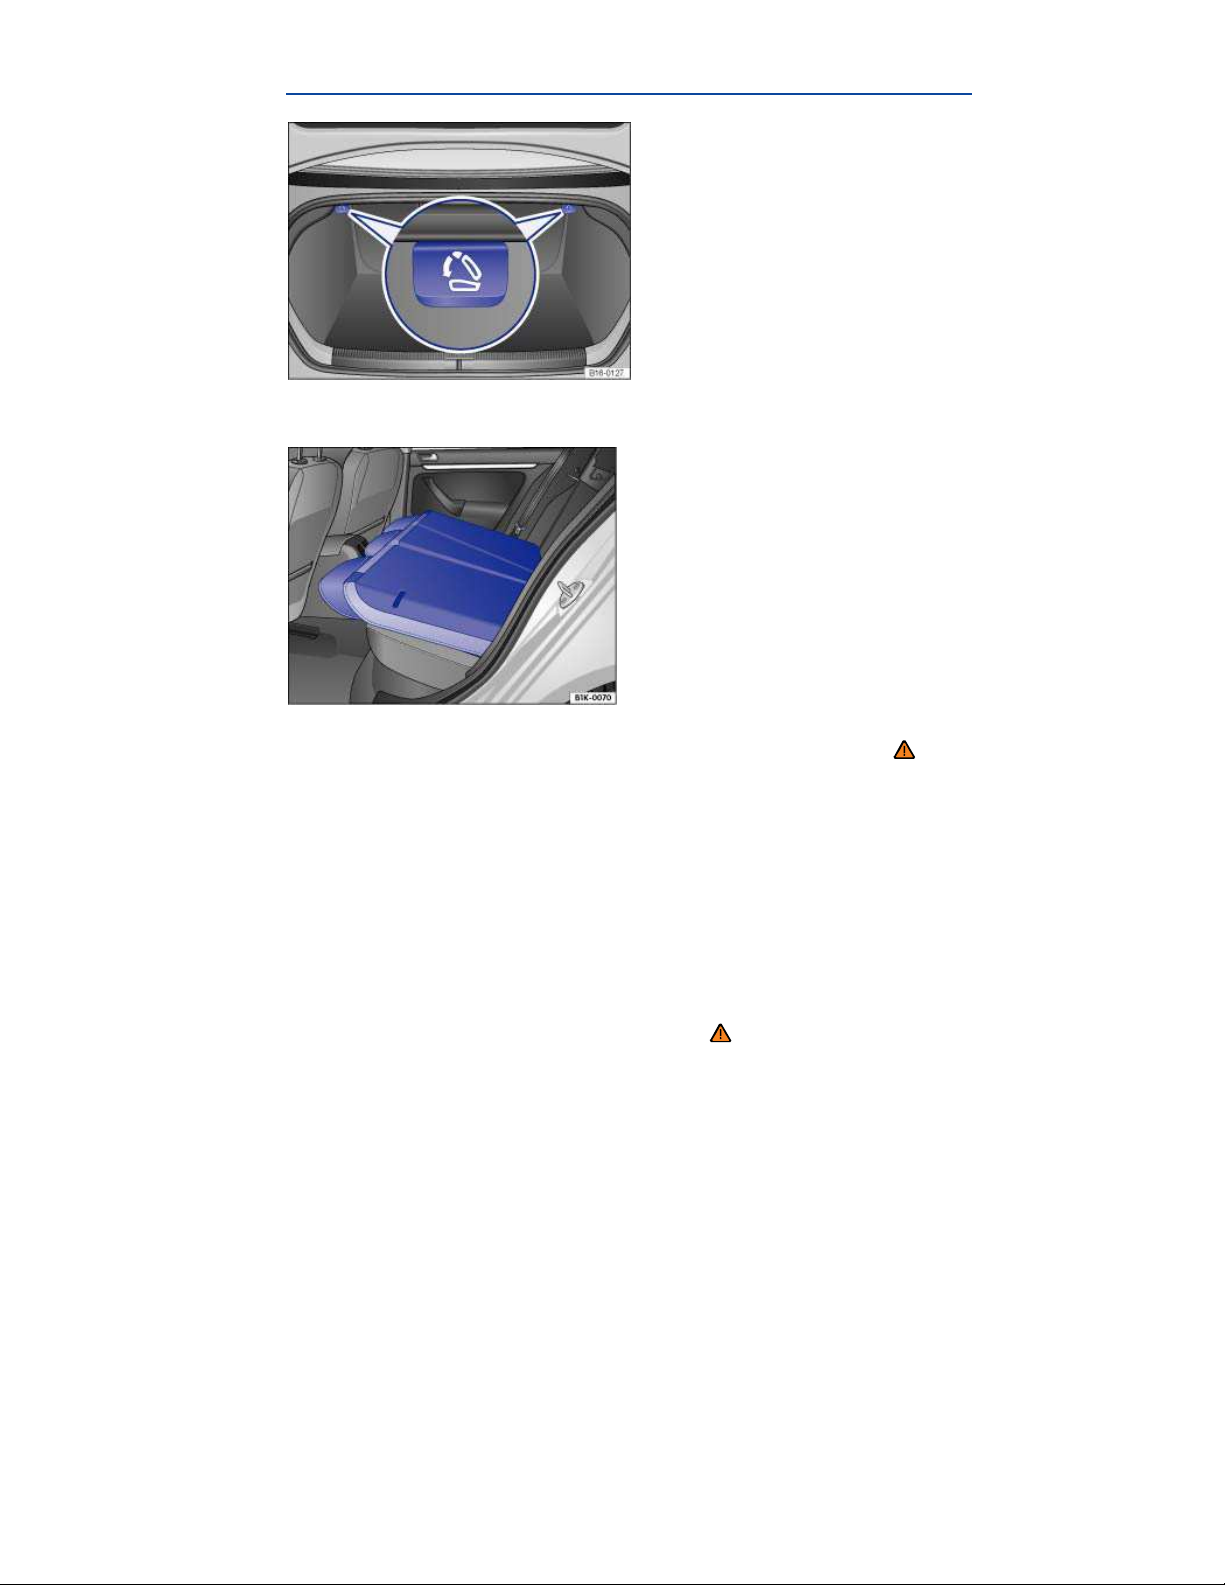
Folding the rear seat backrest forward and back into place
Fig. 83 On the left side of the luggage compartment: Release lever for the left-side rear seat backrest. The
release lever for the right-side rear seat backrest is on the right side of the luggage compartment.
Fig. 84 Rear seat bench: Seat backrest folded down.
Please first read and note the introductory information and heed the WARNINGS
The rear seat backrest is divided into 2 sections. Each section of the rear seat backrest can be folded
down individually to increase luggage space.
Folding the rear seat backrest forward
Push the head restraint all the way down
Open the luggage compartment lid
Pull the release lever for the folded rear seat backrest ⇒ fig. 83 .
Close the luggage compartment lid if open
The rear seat backrest is released and can be folded forward.
If the rear backrest is folded down, no one, including children, may ride on the rear seat.
Folding the rear seat backrest back into place
Fold the rear seat backrest back until it engages securely ⇒ .
The rear seat backrest must be securely latched into place for the safety belts on the rear seats to
provide optimal protection.
Page 92
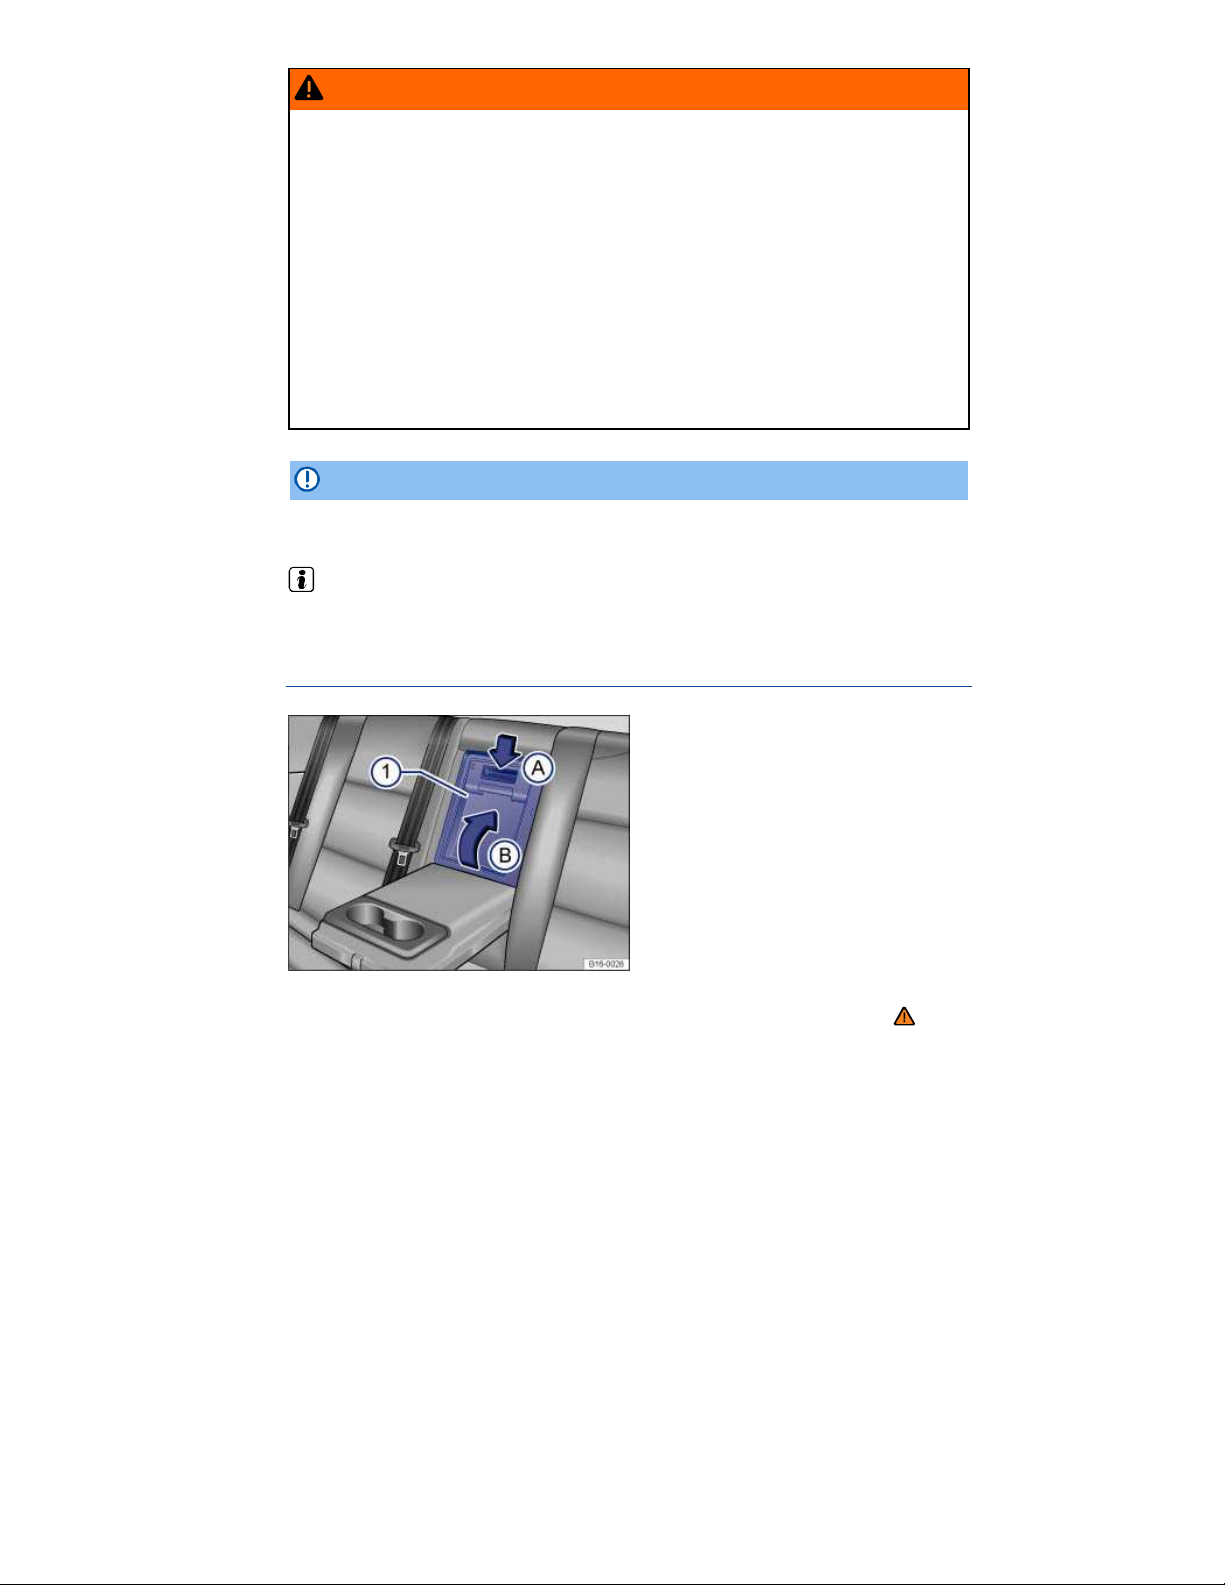
WARNING
Improper folding and improper latching of the rear seat backrest can cause serious personal
injury.
Always make sure there are no people or animals in the area around the rear seat backrest
when folding it forward.
Never fold the rear seat backrest forward or back while the vehicle is moving.
When folding the rear seat backrest back up, make sure that the safety belt does not get
caught or damaged.
Keep hands, fingers, feet and other body parts out of the way when folding the rear seat
backrest forward or back.
Each rear seat backrest must be securely latched in the upright position so that the safety
belts on the rear seats can provide protection. This is particularly the case for the middle seat
on the rear seat bench.
If a seat is used with an unsecured backrest, the passenger will move forward together
with the rear seat backrest during sudden braking, driving maneuvers, or in a collision.
No one, including children, may ride on the rear seats if the rear seat backrest is folded
down or not correctly latched.
NOTICE
Before folding the rear seat backrest forward, adjust the front seats so that the rear seat's head
restraint or backrest cushion will not touch the front seats.
There is a separate release lever in the luggage compartment for each rear seat backrest
section.
Luggage compartment pass-through
Fig. 85 In the rear backrest: Opening luggage compartment pass-through.
Please first read and note the introductory information and heed the WARNINGS
There may be a pass-through for transporting things like skis in the rear seat backrest behind the
center armrest.
To help prevent soiling the vehicle interior, cover dirty items before sliding them into the pass-through.
Page 93
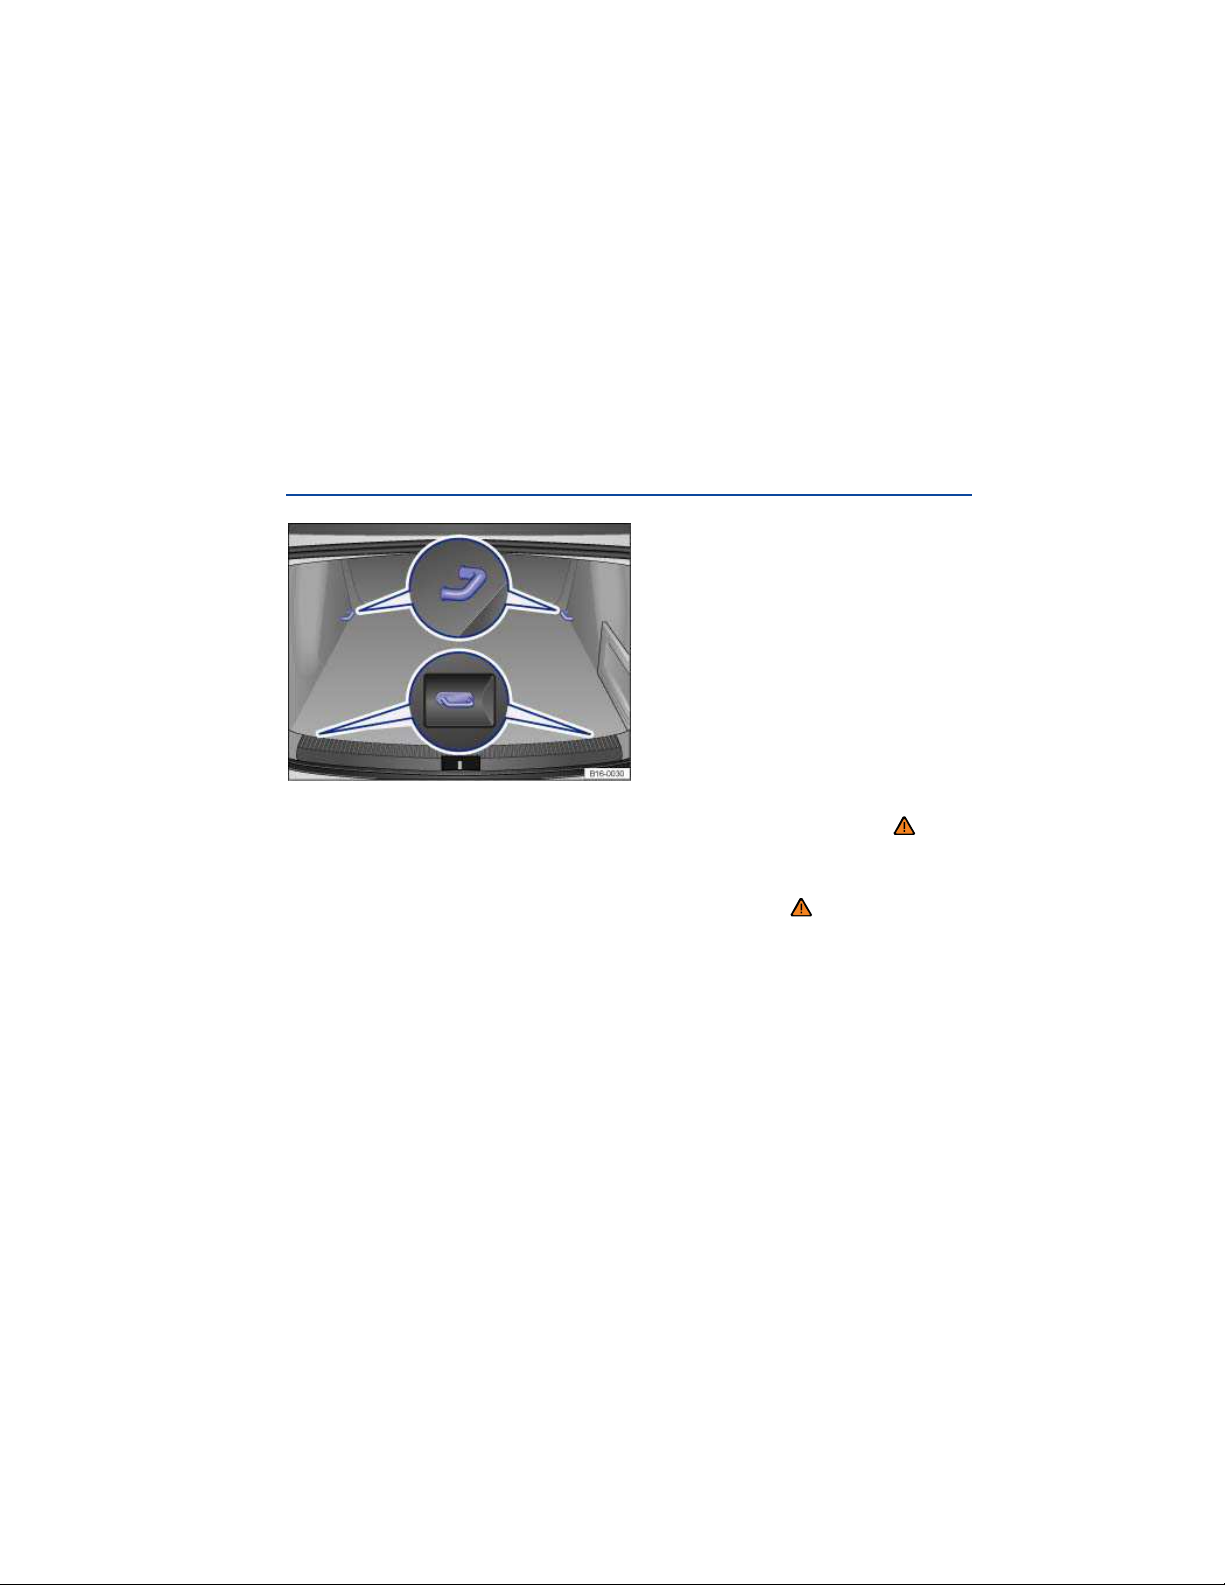
If the center armrest is folded down, no one can sit on the middle seat of the rear bench.
Opening the pass-through
Fold down the rear center armrest
Push down the release button ⇒
luggage compartment
Take the cover out of its bracket and bring it forward into the passenger compartment.
Stow the cover securely in the luggage compartment.
Slide long objects from the luggage compartment through the pass-through.
Secure objects with the safety belt.
Close the luggage compartment lid.
(B).
fig. 85 (A) and fold the pass-through cover (1) down into the
Closing the pass-through
Working from the vehicle passenger compartment, guide the pass-through cover (1) into the
luggage compartment and push the release button to engage it in its bracket.
Pull the cover shut until it locks into place. Make sure it is securely locked into place.
If necessary, fold the center armrest up.
Tie-downs
Fig. 86 In the luggage compartment: Tie-downs.
Please first read and note the introductory information and heed the WARNINGS
There are tie-downs in the front and rear of the luggage compartment, which you can use to secure
luggage or other items ⇒
Elastic straps can snap back toward you if they are not properly attached ⇒ .
If you use elastic straps to secure items in the luggage compartment, be sure to fist securely attach
them to the tie-downs just behind the rear seat backrest first and then to the tie-downs at the loading
edge of the luggage compartment.
Remove the hooks from the tie-downs in the reverse order described above, first from the tie-downs at
the loading edge and then from the tie-downs behind the rear seat backrest so that if the hooks come
loose suddenly, they will move away from you.
fig. 86 (arrows).
Page 94

WARNING
Unsuitable, worn, or damaged tie-down straps (elastic or non-elastic) can snap or come loose
during braking or other maneuvers or in a collision. Objects secured with these straps can
then come loose and fly through the passenger compartment, causing severe personal
injuries or death.
To help prevent baggage or other items from coming loose and flying around, always use
suitable undamaged tie-down straps.
Securely fasten the tie-down straps to the tie-downs.
Loose or improperly secured objects in the luggage compartment can slide about
suddenly and change the vehicle's handling.
Secure even small and light objects. Loose objects in the luggage or passenger
compartment can fly about during sudden braking maneuvers or in the event of an accident
and injure occupants.
Never exceed the maximum allowable load on the tie-downs when securing objects.
Never secure a child seat to the tie-downs.
WARNING
Elastic straps have to be stretched when being attached to the tie-downs in the luggage
compartment. Hooks on these straps can cause serious personal injury if not handled
properly and attached securely.
Always protect eyes and face from injury from the hooks when attaching them to the tiedowns in the luggage compartment.
Always hold the hooks on elastic straps firmly when attaching to the vehicle and do not let
them snap back and hit you.
First attach the hooks on the straps to the tie-downs at the rear seat backrest in the
luggage compartment and then to the tie-downs near the loading edge of the luggage
compartment. This way, if one of the hooks on the elastic straps snaps back, it will move
away from you, decreasing the risk of personal injury.
The maximum load for the tie-downs is about 785 lbs. (356 kg).
For suitable straps and luggage stowage systems, please see an authorized Volkswagen dealer
or authorized Volkswagen Service Facility.
Page 95
Roof rack
Introduction
In this section you’ll find information about:
Attaching the roof rack base carrier and roof rack
Securing a load on the roof rack
The roof of your vehicle has been designed to optimize aerodynamics and does not have traditional
rain gutters that are used to attach many kinds of roof racks.
Since the rain gutters are molded into the roof to provide efficient aerodynamics, only Volkswagenapproved base carrier mounts and roof racks can be used.
When should the roof rack be removed?
When it is no longer needed.
Before driving through an automatic car wash.
When the vehicle would otherwise be too high for minimum clearance to enter, for example, a
garage.
More information:
Lights
Transporting
Saving fuel and helping the environment
Tires and wheels
Parts, accessories, repairs and modifications
WARNING
Transporting heavy or bulky loads on the roof rack will change the way the vehicle handles
by shifting the vehicle's center of gravity and increasing the wind drag.
Always secure the load properly w ith suitable and undamaged straps so that the load will
not shift.
Cargo that is large, heavy, bulky, long or flat will have a negative effect on the vehicle's
aerodynamics, center of gravity and overall handling.
Always avoid sudden maneuvers and hard braking.
Always adapt your speed and driving to the heavier load and the weight distribution in the
vehicle. Take road, weather, traffic, and visibility conditions into account as well.
NOTICE
Always remove the roof rack before driving through an automatic car wash.
Your vehicle is higher when the roof rack is installed, especially when it is loaded. Compare
the vehicle height with existing clearance heights, such as underpasses and garage doors.
Always make sure that the roof rack system and anything being carried on it does not
interfere with the roof antenna, the power sunroof or the luggage compartment lid.
Make sure that the luggage compartment lid does not touch items on the roof rack when
opened.
Page 96
If a roof rack is installed, fuel consumption increases due to increased air resistance.
Securing a load on the roof rack
Please first read and note the introductory information and heed the WARNINGS
It is not possible to secure a load unless the roof rack system has been properly installed ⇒
Maximum permissible roof load
The maximum permissible roof load is 165 lbs. (75 kg). The roof load is the combined weight of the
roof rack and the items being carried on the roof ⇒ .
Be sure you know the weight of the roof rack and the items you want to transport on the roof. Weigh
them if necessary. Never carry a total of more than the maximum permissible roof load.
When using a roof rack with a lower load limit, do not load the rack to the maximum weight mentioned
above. In this case, you may only load the roof rack to the weight limit specified in the system's
installation instructions.
Distributing the load
Distribute the load evenly and secure it properly ⇒
.
Checking the mountings
After the base carrier and rook rack have been installed, check all bolts and fasteners after driving a
short time and at regular intervals thereafter.
WARNING
If the maximum permissible roof load is exceeded, accidents and substantial vehicle damage
may occur.
Never exceed the specified roof load, the maximum Gross Axle Weight Rating, or the
Gross Vehicle Weight Rating.
Do not exceed the loading capacity of the roof rack, even if the permissible roof load is
not fully utilized.
Always make sure that loads are evenly distributed and that heavier items are, as far as
possible, toward the front.
.
WARNING
Loose or improperly secured items can fall off the roof rack and cause accidents and injuries.
Always use suitable, undamaged tie-down ropes and ratchet straps.
Secure the load properly.
Page 97

Trailer towing
Introduction
In this section you’ll find information about:
Technical requirement
Hitching up and connecting a trailer
Loading the trailer
Driving with a trailer
Ball mount
Retrofitting a trailer hitch
Maximum permissible trailer weight
Obey country-specific requirements about trailer towing and trailer hitches.
Volkswagen does not recommend installing a trailer hitch on your vehicle. Your Volkswagen was
mainly designed for carrying passengers. If you plan to tow a trailer, please remember your vehicle will
be performing a job for which it was not primarily intended. The additional load will affect durability,
handling, fuel economy, and performance, and may require the vehicle to be serviced more often.
Trailer towing not only places more stress on the vehicle, it calls for more concentration from the
driver. Always follow the operating and driving instructions given, and use common sense.
Under winter conditions, install winter tires on the vehicle and the trailer.
Tongue weight
The maximum permissible trailer tongue weight exerted on the ball mount must not exceed 165 lbs
(75 kg).
More information:
Power locking and closing system
Anti-theft alarm system
Lights and vision
Braking, stopping, and parking
Saving fuel and helping the environment
Starting assistance systems
Tires and wheels
Parts, accessories, repairs and modifications
WARNING
Riding in a trailer is dangerous and may be illegal.
Page 98

WARNING
Improper use of the trailer hitch can cause accidents and injuries. An improperly installed,
incorrect, or damaged trailer hitch can cause the trailer to separate from the towing vehicle
and cause serious personal injuries.
Only use an undamaged, properly mounted trailer hitch.
Never repair or modify the trailer hitch.
To reduce the risk of injury in rear-end collisions, and the risk to pedestrians and cyclists
when the vehicle is parked, always remove the ball mount when you are not towing a trailer.
Never install a “weight distributing” or “load equalizing” trailer hitch on your vehicle. The
vehicle was not designed for these kinds of trailer hitches. The trailer hitch attachment can
fail, causing the trailer to tear loose from the vehicle.
WARNING
Improper trailer towing can cause loss of vehicle control and serious personal injury.
Driving with a trailer and carrying heavy or large things can change the way the vehicle
handles, increase the distance it needs to stop safely, and cause accidents.
Always secure the load properly w ith suitable and undamaged straps so that the load will
not shift.
Always adapt your speed and driving to the heavier load and the weight distribution in the
vehicle. Take road, weather, traffic, and visibility conditions into account as well.
Reduce your speed even more than you otherwise would when going downhill and under
unfavorable load, weather, or wind conditions.
Trailers with a high center of gravity tip more easily than trailers with a low center of
gravity.
Always avoid sudden maneuvers and hard braking.
Be especially careful when passing other vehicles.
Reduce speed immediately if the trailer shows the slightest sign of swaying.
Never try to stop the swaying by accelerating.
Always obey speed limits. In some areas, the speed limits for vehicles towing trailers are
lower than for vehicles without trailers. Never drive faster than 50 mph (80 km/h; under
exceptional circumstances 60 mph - 100 km/h) when towing a trailer. This applies even if the
local speed limit is higher.
If you are driving a new vehicle or a vehicle with a new or rebuilt engine, do not tow a trailer
during the break-in period, about 600 miles (1000 km)
If you tow a trailer, your vehicle may need maintenance more often because of the extra load it
has to move.
When you are not towing, remove the trailer hitch ball. This helps keep the trailer hitch from
causing damage to your vehicle and to others if your vehicle is hit from behind.
Some models need a trailer hitch to tow or tow-start other vehicles. You may want to always
carry the ball mount in the vehicle after it has been removed. Be sure to stow it securely.
Page 99

Technical requirements
Please first read and note the introductory information and heed the WARNINGS
Use only a weight-carrying trailer hitch designed and approved for the gross weight of the trailer you
want to tow. The trailer hitch must be suitable for your vehicle and trailer and must be securely bolted
to the appropriate place on the vehicle chassis. Use only a trailer hitch with a removable ball mount.
Always check with the trailer hitch manufacturer to make sure that you are using the correct trailer
hitch and carefully follow the hitch manufacturer's instructions. Never install a “weight-distributing” or
“load-equalizing” trailer hitch on your vehicle. The vehicle is not designed for this kind of trailer hitch
.
⇒
Do not use a bumper-mounted trailer hitch
Never install a trailer hitch on the bumper or on the bumper attachments. The trailer hitch must not
interfere with the impact-absorbing bumper system. Do not make any changes to the vehicle exhaust
and brake systems. From time to time, check that all trailer hitch mounting bolts are securely fastened.
When you are not towing, remove the trailer hitch. This helps keep the trailer hitch from causing
damage if your vehicle is hit from behind.
Engine cooling system
Towing a trailer makes the engine and its cooling system work harder. It is important that the engine
cooling system is up to the job. Make sure that the cooling system has enough coolant.
Trailer brakes
If your trailer has its own brakes, make sure it meets all regulations. The trailer brake system must
never be directly connected to the vehicle's brake system.
Safety chains
Always use safety chains between your vehicle and the trailer
Trailer taillights
Trailer lights must meet all regulations
Never connect the trailer lights directly to the electrical system of your vehicle.
Outside mirrors
If you cannot see the traffic behind you using the regular outside mirrors, then you must install
extended mirrors. Extended mirrors may also be required by law in some countries/states/provinces.
Always adjust the outside mirrors before driving. It's vital that you always have a clear view to the rear
of the vehicle.
Maximum power consumption for the trailer
Do not exceed the power ratings listed in the chart below.
Electrical load Maximum power
Brake lights total 108 watts
Turn signals per side 54 watts
Side marker lights total 100 watts
Taillights total 54 watts
Page 100
WARNING
An improperly installed or incorrect trailer hitch can cause a trailer to separate from the
tow vehicle and cause serious personal injuries.
If you don't have to tow a trailer any more, remove the entire trailer hitch. Always seal all
bolt holes to prevent water and deadly exhaust fumes from getting into the vehicle.
NOTICE
If the trailer lights are not connected properly, the vehicle's electronics may be damaged.
If the trailer uses too much electricity, the vehicle's electronics may be damaged.
Never connect the electrical system for the trailer directly to the electrical connections for
the rear lights or to any other unsuitable power sources. Use only a suitable connector to
provide power to the trailer.
If you tow a trailer frequently, Volkswagen recommends having the vehicle serviced between the
regular maintenance and inspection intervals because of the extra load it has to pull.
Hitching up and connecting a trailer
Please first read and note the introductory information and heed the WARNINGS
Safety chains
Always make sure that the safety chains are properly attached to the towing vehicle. Leave enough
slack in the chains so that you can go around corners without stretching the chains. The safety chains
must not drag on the ground, however.
Trailer taillights
Make sure that the trailer lights work properly and meet legal requirements. Do not exceed the
maximum power consumption for the trailer
WARNING
Improper connections to the vehicle electrical system can cause malfunctions that affect the
entire vehicle electrical system, which can lead to accidents and serious personal injury.
Have any work on the electrical system done by an authorized Volkswagen dealer or
authorized Volkswagen Service Facility.
Never connect the electrical system for the trailer directly to the electrical connections for
the rear lights or to any other unsuitable power sources. Use only a suitable connector to
provide power to the trailer.
NOTICE
Never attach a trailer to the vehicle or leave it attached to the vehicle when the trailer is
supported by a trailer jack or blocks. Various things (such as a change in trailer or vehicle load
or a flat tire) can lower or raise the vehicle. This subjects the trailer hitch and the trailer to
strong forces that can damage the vehicle or the trailer.
 Loading...