


ViviCam 8400 Digital Camera
Owner’s Manual
© 2009 Sakar International, Inc. All rights reserved.
Windows and the Windows logo are registered trademarks of Microsoft Corporation. All other trademarks are the property of their respective companies.
Table of Contents |
|
Introduction .......................................................................................................................... |
2 |
Key Features ....................................................................................................................... |
2 |
What your digital video camera includes .............................................................................. |
3 |
Computer System Requirements for Windows XP ............................................................... |
3 |
Computer System Requirement for Windows Vista .............................................................. |
4 |
Computer System Requirements for Macintosh ................................................................... |
4 |
A Quick Look at your Digital Video Camera.......................................................................... |
5 |
Preparing Your Camera for Use ........................................................................................... |
6 |
Inserting an SD Memory Card............................................................................................ |
10 |
DV Function Control........................................................................................................... |
12 |
Taking Still Photos ............................................................................................................. |
13 |
Camera Mode Functions.................................................................................................... |
16 |
Capturing Videos ............................................................................................................... |
22 |
Video Mode Functions ....................................................................................................... |
25 |
Playback Mode .................................................................................................................. |
28 |
Playback Mode Functions .................................................................................................. |
30 |
Setup Mode ....................................................................................................................... |
37 |
Install the Vivitar Experience Image Manager Software...................................................... |
44 |
Connect your camera to the computer ............................................................................... |
47 |
Get photos and videos from your camera to your computer ............................................... |
47 |
Get started! ........................................................................................................................ |
49 |
Transfer media from my camera to my computer manually (Using Windows)..................... |
49 |
Transfer media from my camera to my computer manually (Using Macintosh) ................... |
50 |
Connect your Digital Camera to a TV ................................................................................. |
50 |
Using your device as a PC Camera (on Windows only)...................................................... |
51 |
Camera Maintenance......................................................................................................... |
52 |
Sakar Warranty Card ......................................................................................................... |
55 |
Technical Specifications..................................................................................................... |
56 |
FAQ – Frequently Asked Questions ................................................................................... |
57 |
Trouble Shooting................................................................................................................ |
58 |
1

Introduction
Thank you for purchasing the ViviCam 8400 Digital Water Resistant Camera. With your camera you can take individual photos and shoot video clips. In addition, to expand the memory capacity of your camera a SD compatible memory card of up to 8GB needs to be inserted.
The camera is water resistant to a depth of 30 feet / 10 meters.
Key Features
4 modes - Camera, Video, Playback and Set Up.
Digital Video resolutions – 640x480 (VGA), 320x240 (QVGA).
5 digital camera resolutions8M, 5M, 3M, 2M and 0.3M
2.4" TFT LCD
8 X Digital Zoom
Limited Internal Flash memory
Supports external SD memory card up to 8GB
Takes digital photos and videos
Vivitar Experience Image Manager software for uploading and managing photos and videos to or from the most popular photo sharing and social network websites.
2

What your digital video camera includes
Digital Camera
USB / AV cable
Vivitar Experience Image Manager software Installation CD
Quick Start Guide
Wrist strap
Computer System Requirements for Windows XP
To be able to download photos and videos to your PC, you will need the following minimum configuration:
Pentium 4 processor or above with Windows XP service pack 2
512 MB RAM, with 100MB of free disk space
1024 x 768 Recommended screen resolution
16-bit color or higher display adaptor
CD-ROM Drive
QuickTime 6 or higher
Microsoft Internet Explorer 7 or higher
Windows Media Player 10 or higher
Internet connection required
3

Computer System Requirement for Windows Vista
To be able to download photos and videos to your PC your will need the following minimum configuration:
Windows Vista
800MHz processor and 512 MB of system memory
20GB hard drive with at least 15GB of available space
Support for Super VGA graphics
Available USB Interface
CD-ROM drive
QuickTime 6 or higher
Microsoft Internet Explorer 7 or higher
Internet connection required
Computer System Requirements for Macintosh
Macintosh with Intel processor running Mac OS X v10.4.6 or later
256 MB RAM, 100 MB free disk space
Display: 1024 x 768 or higher-resolution monitor
QuickTime 6 or higher
Internet connection required
4

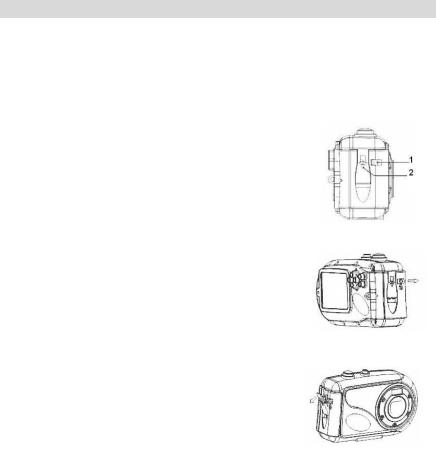
A Quick Look at your Digital Video Camera
1:Shutter button
2:Power button
3:Flash strobe
4:Lens
5:Up/Zoom in button 
6:Right/Flash button 
7:OK/Menu button
8:Playback button 
9:Lock device
10:Trip socket
11:Power/charging LED
12:LCD screen
13:Left/Mode button 
14:Down/Zoom out button 
15 Battery compartment
16:Memory card
slot
17:Battery cover
18:USB jack
Preparing Your Camera for Use
Battery Installation
Your camera requires 2 “AA” batteries (not included). It is recommended that alkaline batteries be used.
Important: Before installing the batteries make sure you are not near water and that your hands are dry.
1.Turn the camera around so that the battery cover on the side is facing you.
2.Push the small lock button at the top of the battery cover (1) to the right to the unlock position.
3.The battery cover lever (2) will spring down.
If the lever (2) does not spring down, then gently pull down the lever to release the battery door
6
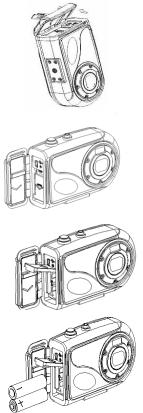
4.Gently open the battery cover door from right to left.
5.In order to open the battery compartment, locate the OPEN arrow pointing down on the battery compartment door and press down in the direction of the arrow.
6.The battery compartment door will spring up and open.
7.Insert the batteries in accordance with the polarity + /- indicated on the inside of the battery compartment.
7
8.Return and close the battery compartment cover pressing gently in a downwards and then an upwards direction.
9.Now close the battery door from left to right making sure the top lock is still in the unlock position.
10.Press and hold the battery door down as shown in diagram (a). Gently lift the lever (2) upwards until you hear it click and lock into place as in diagram (b). Now push the middle section of the battery door to the left as indicated in diagram (c).
8
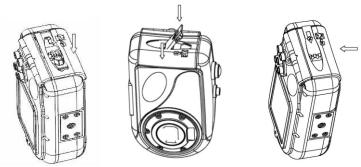
a. |
b. |
c. |
Important: It is important that the battery cover be sealed properly before using the camera underwater.
Note:
As this is a special underwater camera, all the buttons can rotate.
We strongly recommend downloading your photos and videos regularly to your computer.
Remove the batteries from the camera when not in use for an extended period.
Do not mix alkaline and non Alkaline batteries.
There are a few features that will not work if the battery power level is low.
When the battery power is low the battery icon turns red and the camera will automatically turn off a few seconds later.
9
For instructions on how to set the date and time that will appear on your photos, set the language that you want your camera`s menu to appear with or other setup options please refer to the Setup section later on in this manual.
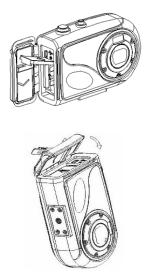
Inserting an SD Memory Card
Your Digital Camcorder has a limited built-in flash memory. In order to extend this capacity to capture more photo and video files you can also insert an SD Memory card (up to 8GB) into the SD slot found in the battery compartment of the camera.
Memory cards are not included and need to be purchased separately.
1.Make sure the camera is turned off before inserting the SD Card.
2.Open the battery cover as well as the battery compartment as explained in steps 1 to 6 of the Battery Installation section above.
3.Locate the SD card slot on the left of the battery compartment.
4.Insert the SD memory card correctly in the direction shown.
5.Press the memory card until you hear a “Click” sound.
10
6.Close the battery compartment and cover an explained in steps 8 to 10 of the Battery Installation section above.
Important: It is important that the battery cover be sealed properly before using the camera underwater.
Note: After you insert an SD memory card, the SD card icon will appear on the bottom left side of the LCD, indicating that your SD memory card has been installed successfully. The media you capture will now be stored on the card and not in internal memory.
This product supports SD cards of up to 8GB.
Before using the SD card with the camera you should format the card in the camera.
Formatting will delete all data on the SD Memory Card including protected data.
Do not remove the SD memory Card during formatting as this may damage the card and render it unusable.
Be sure to format the card with the camera.
Format the memory card
It is important to format the memory card the first time you use this digital camera. All data sitting on the card will be deleted including protected files. Be sure to download important files to your computer before formatting.
1.Press the Power button to turn on the camera.
2.Press the OK/Menu button to enter the IMAGE mode menu.
3.Press the Right button to select the SETUP mode menu.
4.Press the Down/Zoom Out button to select and highlight the Format option.
5.Press the Right button to open the Format submenu.
6.Press the Up/Zoom In or Down/Zoom Out button to select either “YES” to format the card or “No” to exit without formatting and then press the OK/Menu button.
11

7.Press the OK/Menu button to revert back to Camera mode.
DV Function Control
The Power button is situated on the top of the camera.
Power on
Press the Power button to turn on your camera.
The LCD monitor will light up indicating that your camera is ready for use.
Power off
Press the Power button to turn your camera off.
If the camera is not in use or in an operational mode for 60 seconds it will switch off automatically.
When there is insufficient battery power, a  icon will appear on the LCD screen. The camera will automatically power off a few moments later.
Note: To save battery power, the LCD monitor will automatically turn off if the camera is inactive for 30 seconds. Press any button other than the power button to turn it on again.
12

MODE selection
Press the MODE (left) button to select the camera`s mode – Camera Capture or Video. By default the Camera mode appears when powering on the camera.
Press the MODE button to switch to the Video mode and again to revert back to the Camera mode.
Display |
|
Title |
|
|
Description |
|
|
|
Camera Capture |
|
|
For taking still photos. |
|
|
|
mode |
|
|
|
|
|
|
|
|
|
|
|
|
|
Video mode |
|
|
For recording movie clips. |
|
|
|
|
|
|
|
|
Taking Still Photos
After you power on your camera, the default mode is Camera Capture.
The camera  icon will now appear on the top left corner of the LCD screen.
Important: The camera`s internal memory is limited to 64MB.
Insert a compatible SD card of up to 8GB to expand the memory and take many more images.
1.Use the image that appears in the LCD to compose your shot.
2.If need be use the Zoom In / Zoom Out button to focus in on the scene or object you wish to capture.
3.Hold the camera steady and press the Shutter button on the top of the camera.
13
4.The camera will beep and the picture taken is now saved to the memory.
5.The number of photos that can be taken for each resolution and per the memory card inserted appears on the top left of the LCD screen.
6.After the shot is taken the number on the left tells you the number of the photo taken and the number on the right indicated the number of shots left to take at this resolution.
7.When the camera`s internal memory is full, “Memory Full” will appear on the LCD screen when you attempt to press the Shutter button to take a photo. Either download the photos to your computer using the Vivitar Experience Image Manager software as described below in the section “Transfer photos and videos to your computer” or insert an SD card to continue taking more photos and videos.
8.The number of photos that can be captured not only depends on the SD card’s capacity but also on the resolution selected. Better quality photos are taken at higher resolutions but these will also take up more memory on the card.
9.The screen will power off automatically if the camera is not active for 30 seconds. Press any key to restart the screen.
10.Do not take the memory card or battery out when camera is saving the image, otherwise the image won't be saved completely.
Preview and Delete images taken
Press the Playback  function button to enter the preview mode to view all the images captured with the camera.
1. The last image captured will appear first on the LCD.
14

2. Press the Right (Flash)/Left (MODE) buttons to toggle through the images.
For more information on how to use the Playback mode to view and delete images see the Playback mode section of this manual.
Flash
The flash feature only operates in Camera mode.
1.Press the Right (Flash) button to activate the flash.
2.The corresponding flash icon will appear on the left side of the LCD.
Auto: Automatically turn on/off according to the light
Flash on: Force on the flash
Flash off: Force off the flash
3.If the flash is on, when the image is captured and the flash activated the screen will remain blank while the flash recharges. The next image can only be taken once the flash has recharged.
4.Using the Flash in bright light environments will cause the image to come out with the incorrect exposure.
Note: The flash will not work while in Burst Snapshot mode or if the battery power level is low.
15
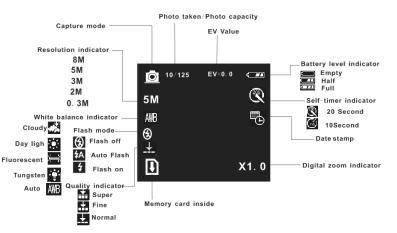
Digital Zoom
You may zoom in or out of the object by using the 8X digital zoom feature.
1.Press the Zoom In  function button to zoom into your object.
2.Press the Zoom Out  function button to zoom out of your object.
3.The Zoom digits icon appears on the bottom right corner of the LCD.
4.The image on the LCD is affect immediately when the zoom option is pressed.
5.Press the Shutter button to capture the image.
Note: The digital zoom may affect the quality of the image as the higher the zoom multiple the lower the image quality will be.
You can also zoom in or out of the Photos and Video in Playback mode.
Camera Mode Functions

In Camera mode, press the OK/Menu button on the top right of the camera. The LCD will display 2 mode tabs – IMAGE and SETUP.
By default the IMAGE tab will open with the menu options for that tab appearing:
Resolution, Quality, White Balance, Color Effect, Exposure, Date Stamp, Self Timer, and Burst Snapshot
Resolution
1.Press the Down button to select the Resolution mode.
2.Press the Right button for the 5 Resolution options submenu to appear:
8M, 5M, 3M, 2M or 0.3M.
3.Press the Up/Down button to highlight and select the Resolution option you desire.
4.Press the OK/Menu button to confirm and save your choice.
5.Press the OK/Menu button to exit.
17
 Loading...