


DVR 786 HD
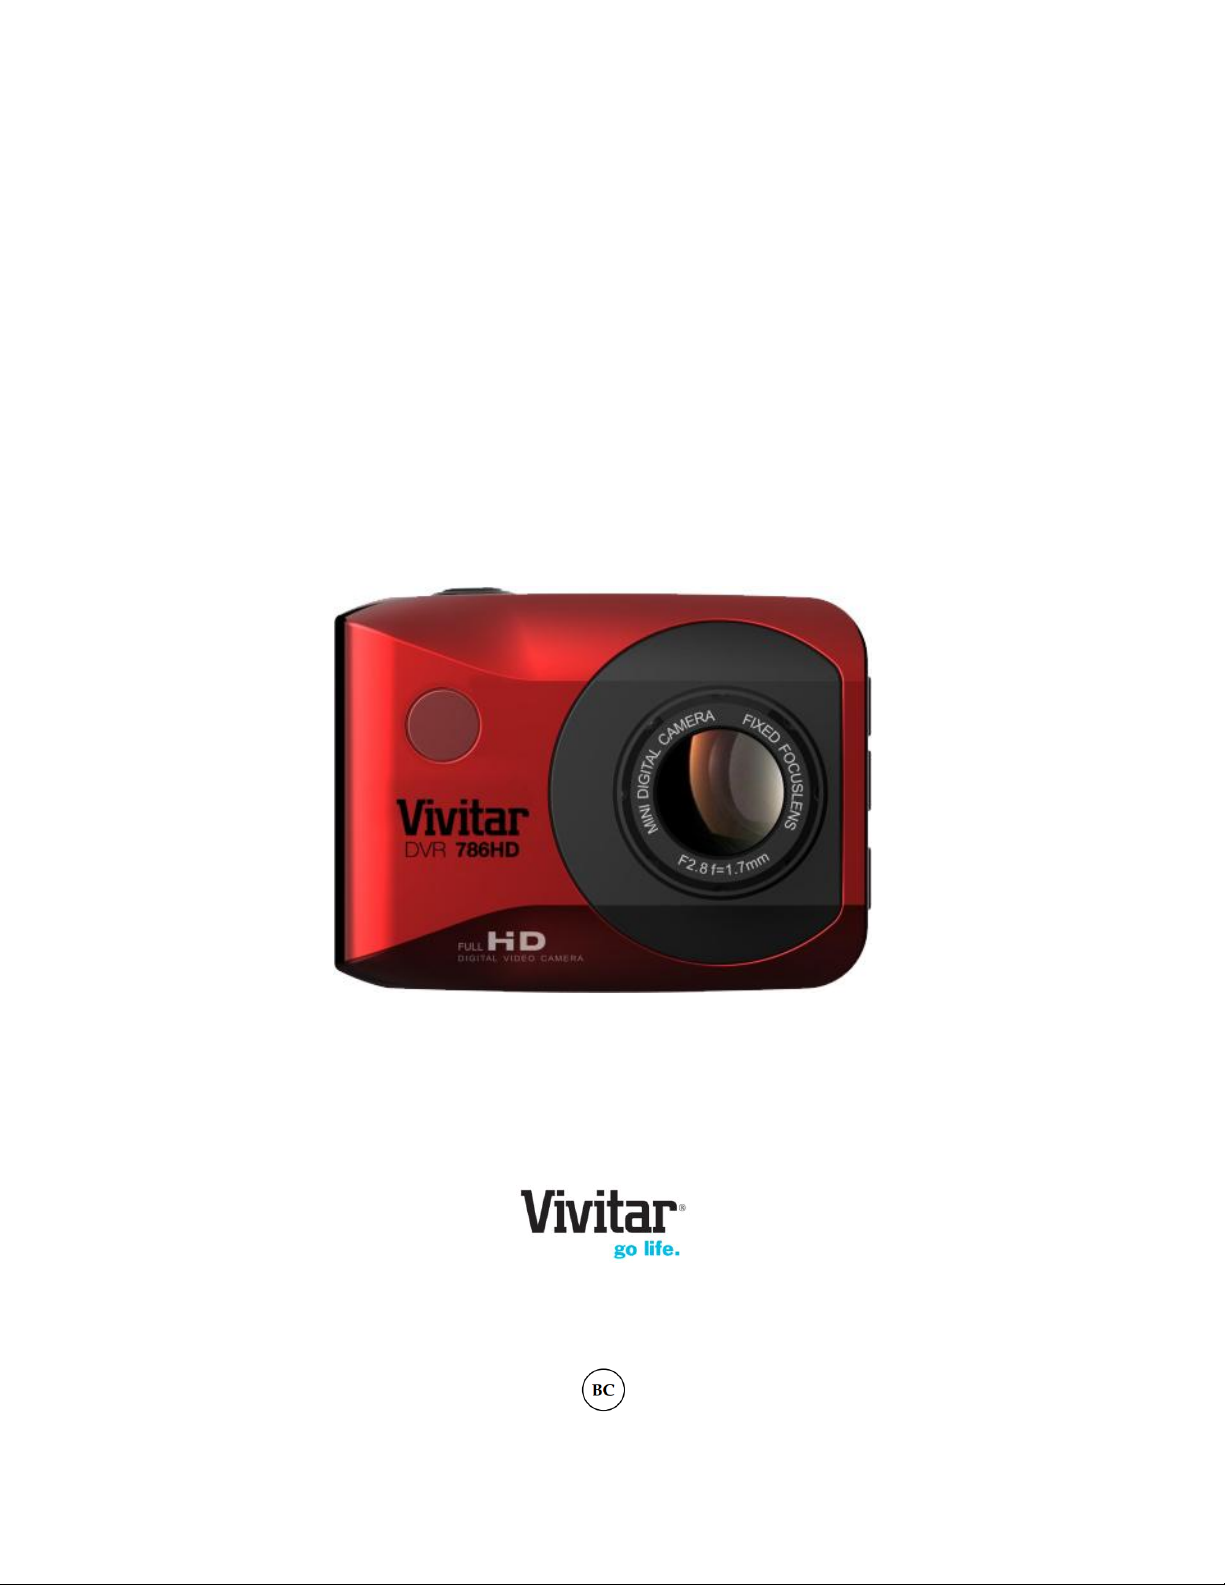
DVR 786HD
Full HD Action Camcorder
User Manual
© 2009-2014 Sakar International, Inc. All rights reserved.
Windows and the Windows logo are registered trademarks of Microsoft Corporation.
All other trademarks are the property of their respective companies.

1
CONTENTS
Introduction .................................................................................................................................. 2
What’s Included ............................................................................................................................ 3
Parts of the Camcorder ................................................................................................................ 4
Initial Camcorder Setup ................................................................................................................ 5
Remote Control .......................................................................................................................... 10
Main Camcorder Modes .............................................................................................................. 11
Camcorder Technical Specifications ........................................................................................... 12
Camcorder Mounts and Accessories .......................................................................................... 13
Powering On Your Camcorder .................................................................................................... 16
Changing Camcorder Mode ....................................................................................................... 17
Navigating the Menus ................................................................................................................. 18
Video Capture Mode .................................................................................................................. 19
Photo Capture Mode .................................................................................................................. 23
Playback Mode ........................................................................................................................... 27
Menu Options ............................................................................................................................. 31
Computer System Requirements ............................................................................................... 45
Installing the Software ................................................................................................................ 46
Connecting the Camcorder to the Computer .............................................................................. 47
Getting Photos and Videos from the Camcorder to the Computer ............................................. 48
Getting Started! .......................................................................................................................... 49
Transferring Images Manually from the Camcorder to the Computer ......................................... 49
Camcorder Maintenance ............................................................................................................ 51
Sakar Warranty Card .................................................................................................................. 53
Technical Support ....................................................................................................................... 54
Troubleshooting .......................................................................................................................... 54

2
Introduction
Thank you for purchasing this digital HD Action Camcorder. Everything you need to take quality
digital videos and photos is included with your camcorder.
Vivitar makes capturing those special moments as easy as possible.
Please read this manual carefully first in order to get the most out of your digital camcorder.
NOTE:
Your digital action camcorder supports a Micro SD Memory Card (up to 32GB, Class 4 or
higher).
In order to use your digital action camcorder normally, please insert the Micro SD Memory
card before use.
Micro SD Memory cards are not included and need to be purchased separately.
This camera is a plug and play device. You can download the pictures and videos without
the software by directly accessing the memory card from your computer. We would
however recommend that you install the ‘Vivitar Experience Image Manager’ Software to
enjoy the full Vivitar experience.
3
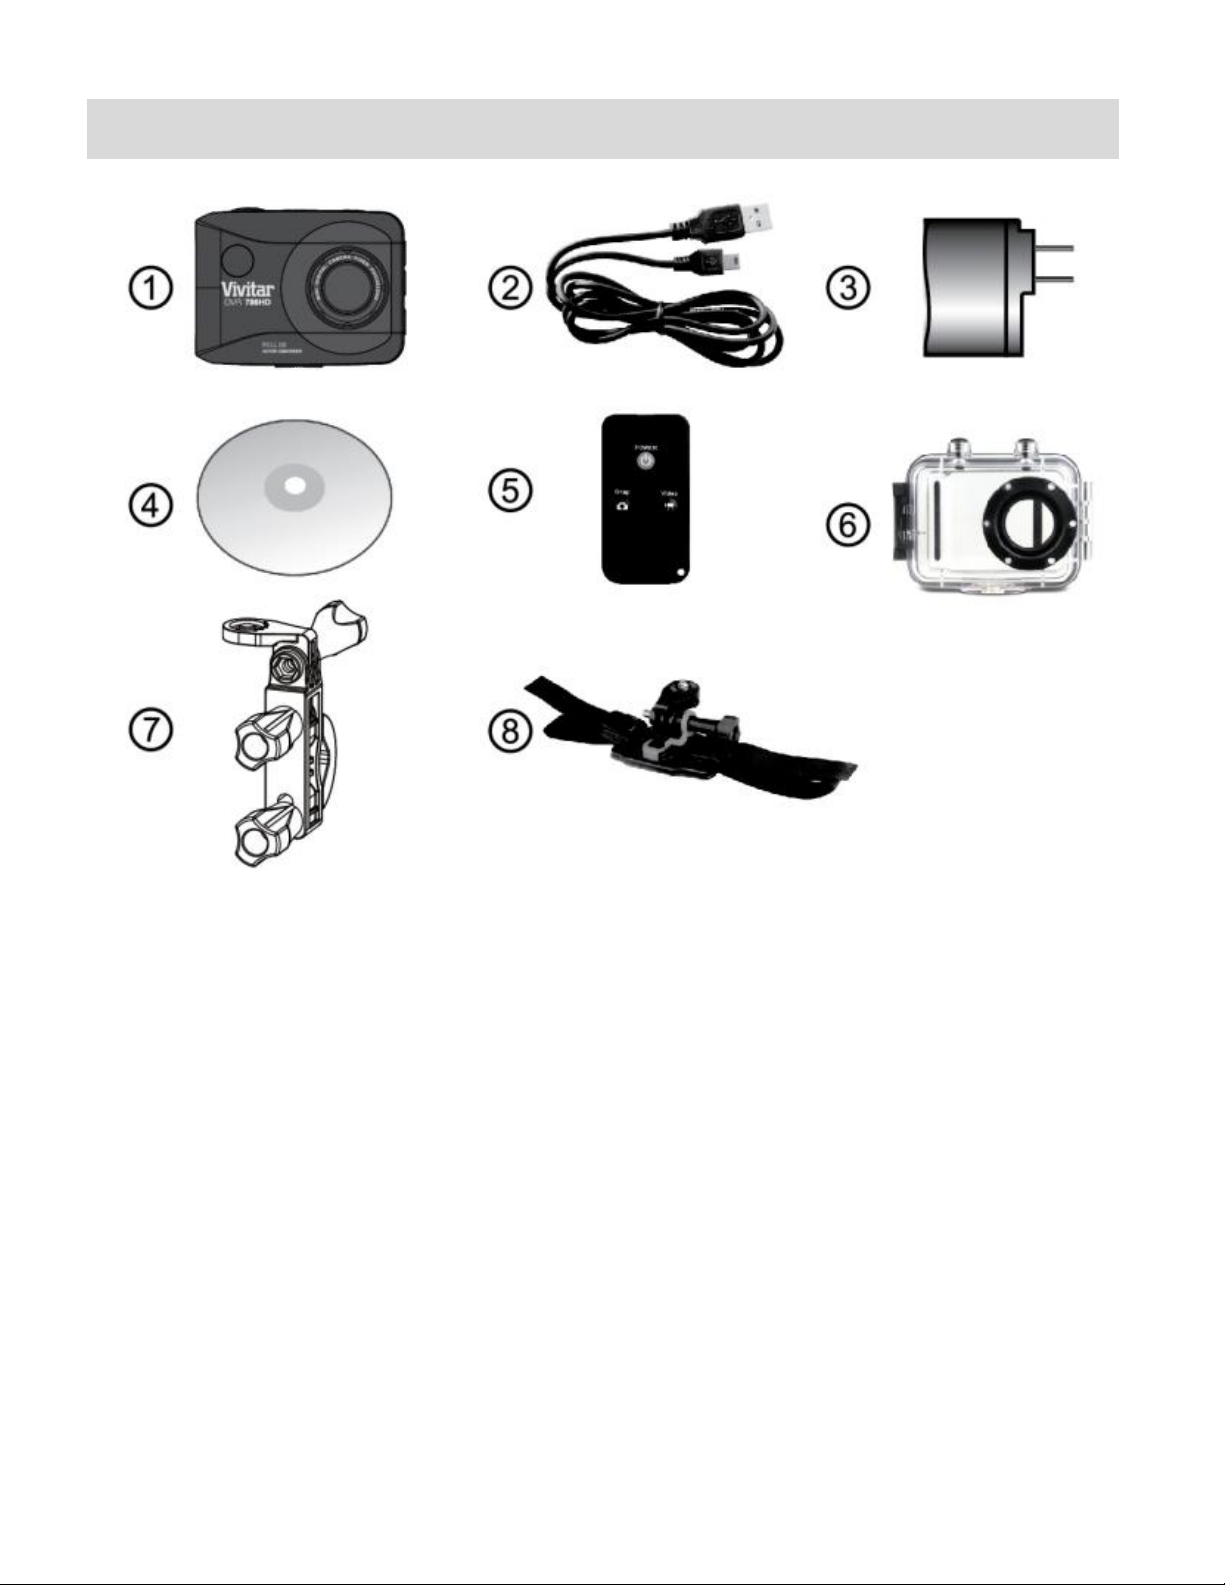
What’s Included
1. Action Camcorder
6. Waterproof Casing
2. USB Cable
7. Bicycle Mount
3. AC Adapter
8. Helmet Mount & Band
4. Vivitar Experience Installation CD
5. Remote Control
NOTE:
Camera shield and Built-in Lithium Battery included (not shown).
Micro SD Card not included.
4
Parts of the Camcorder
1.
Shutter / OK button
9. Down / Zoom Out Button
2.
Microphone
10. Menu / Back Button
3.
Power / Mode Button
11. Infrared Signal Reception Light
4.
Tripod Mount
12. Lens
5.
Reset Button
13. LCD Screen
6.
Micro SD Memory Card Slot
14. LED Charge Light Indicator
7.
USB Interface
15. LED Busy Light Indicator
8.
UP / Zoom In Button

5
Initial Camcorder Setup
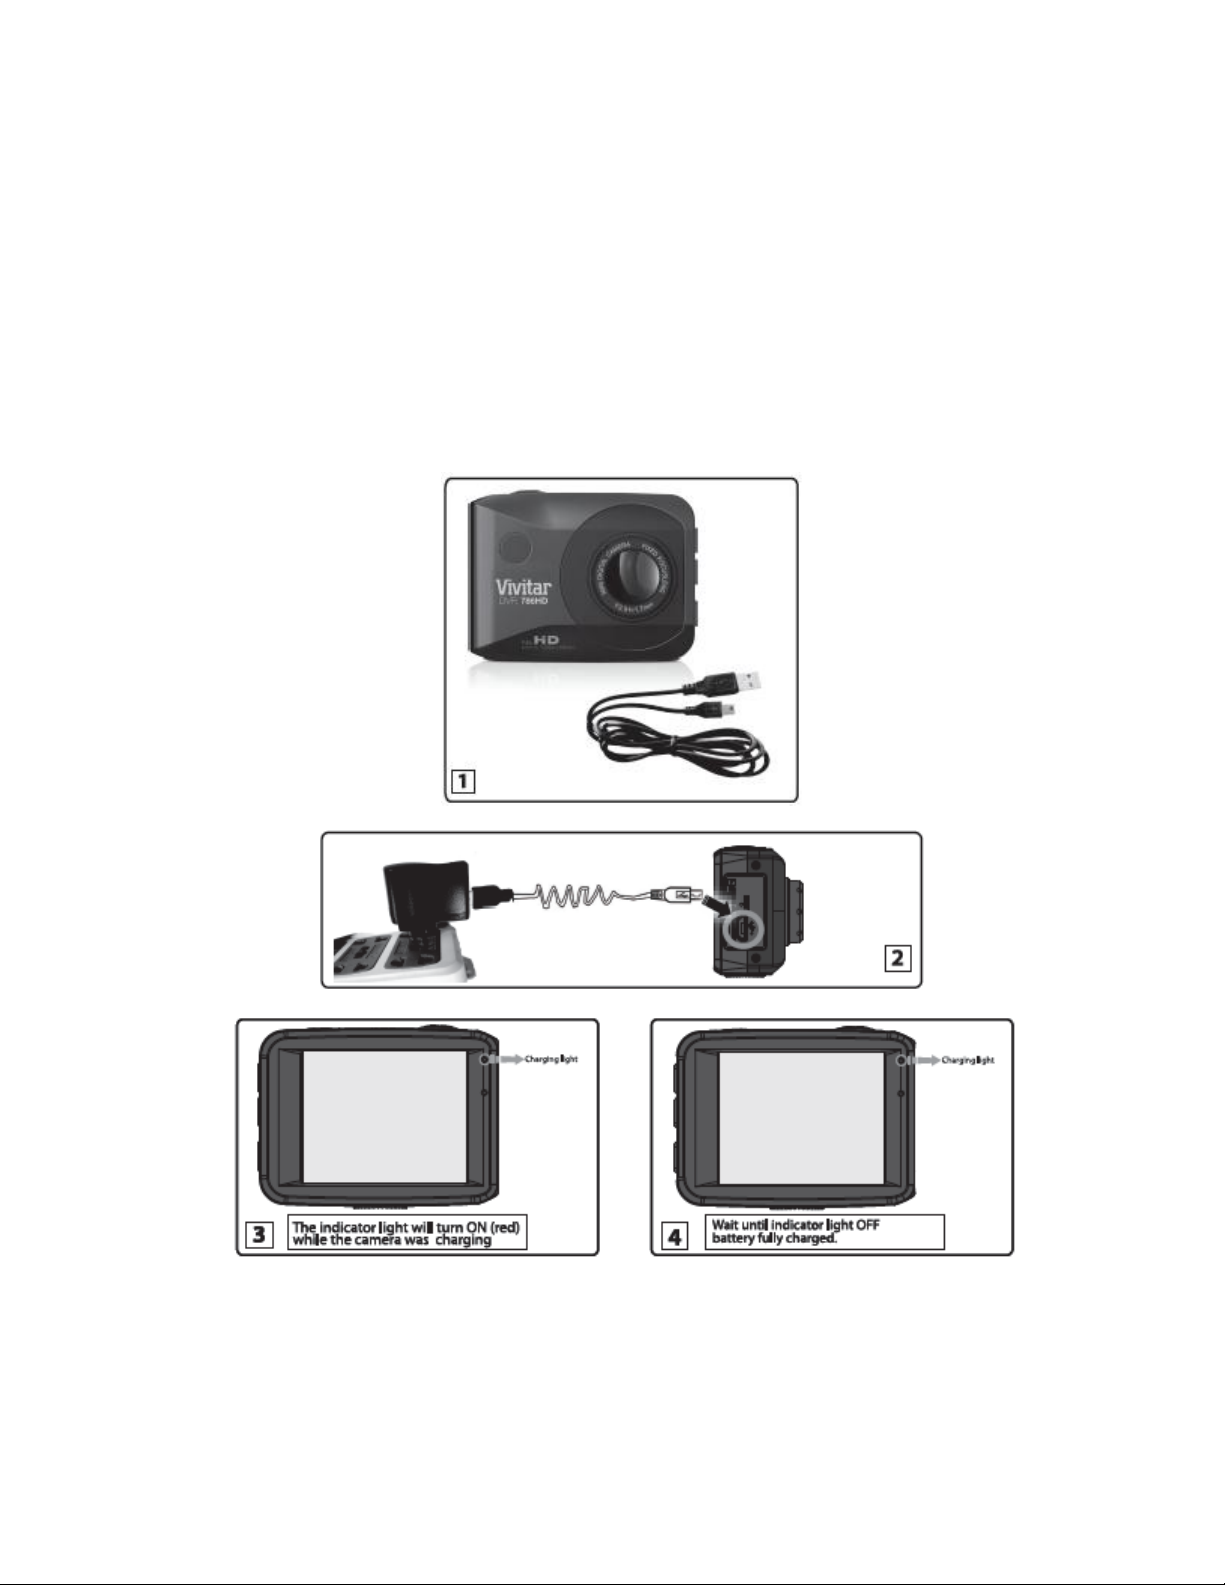
CHARGING THE BATTERY
To charge the battery, follow either one of the charging methods below:
CHARGING VIA THE COMPUTER
1. Power off the camera.
2. Use the supplied USB cable to connect the smaller end of the USB cable into the USB
slot on the camcorder. Connect the other end to the USB interface of your computer.
See images below: 1 and 2.
3. The LED charge light turns on while charging is in progress. The charge light turns off
when the battery is fully charged. See images below: 3 and 4.
6
CHARGING VIA THE AC ADAPTER
1. Power off the camera.
2. Use the supplied USB cable to connect the smaller end of the USB cable into the USB
slot on the camcorder. Connect the other end to the cable to the AC Adapter and then
plug the AC Adapter into a power socket. See images below: 1 and 2.
3. The charge light will turn off when the battery is fully charged.
See images below: 3 and 4.
7
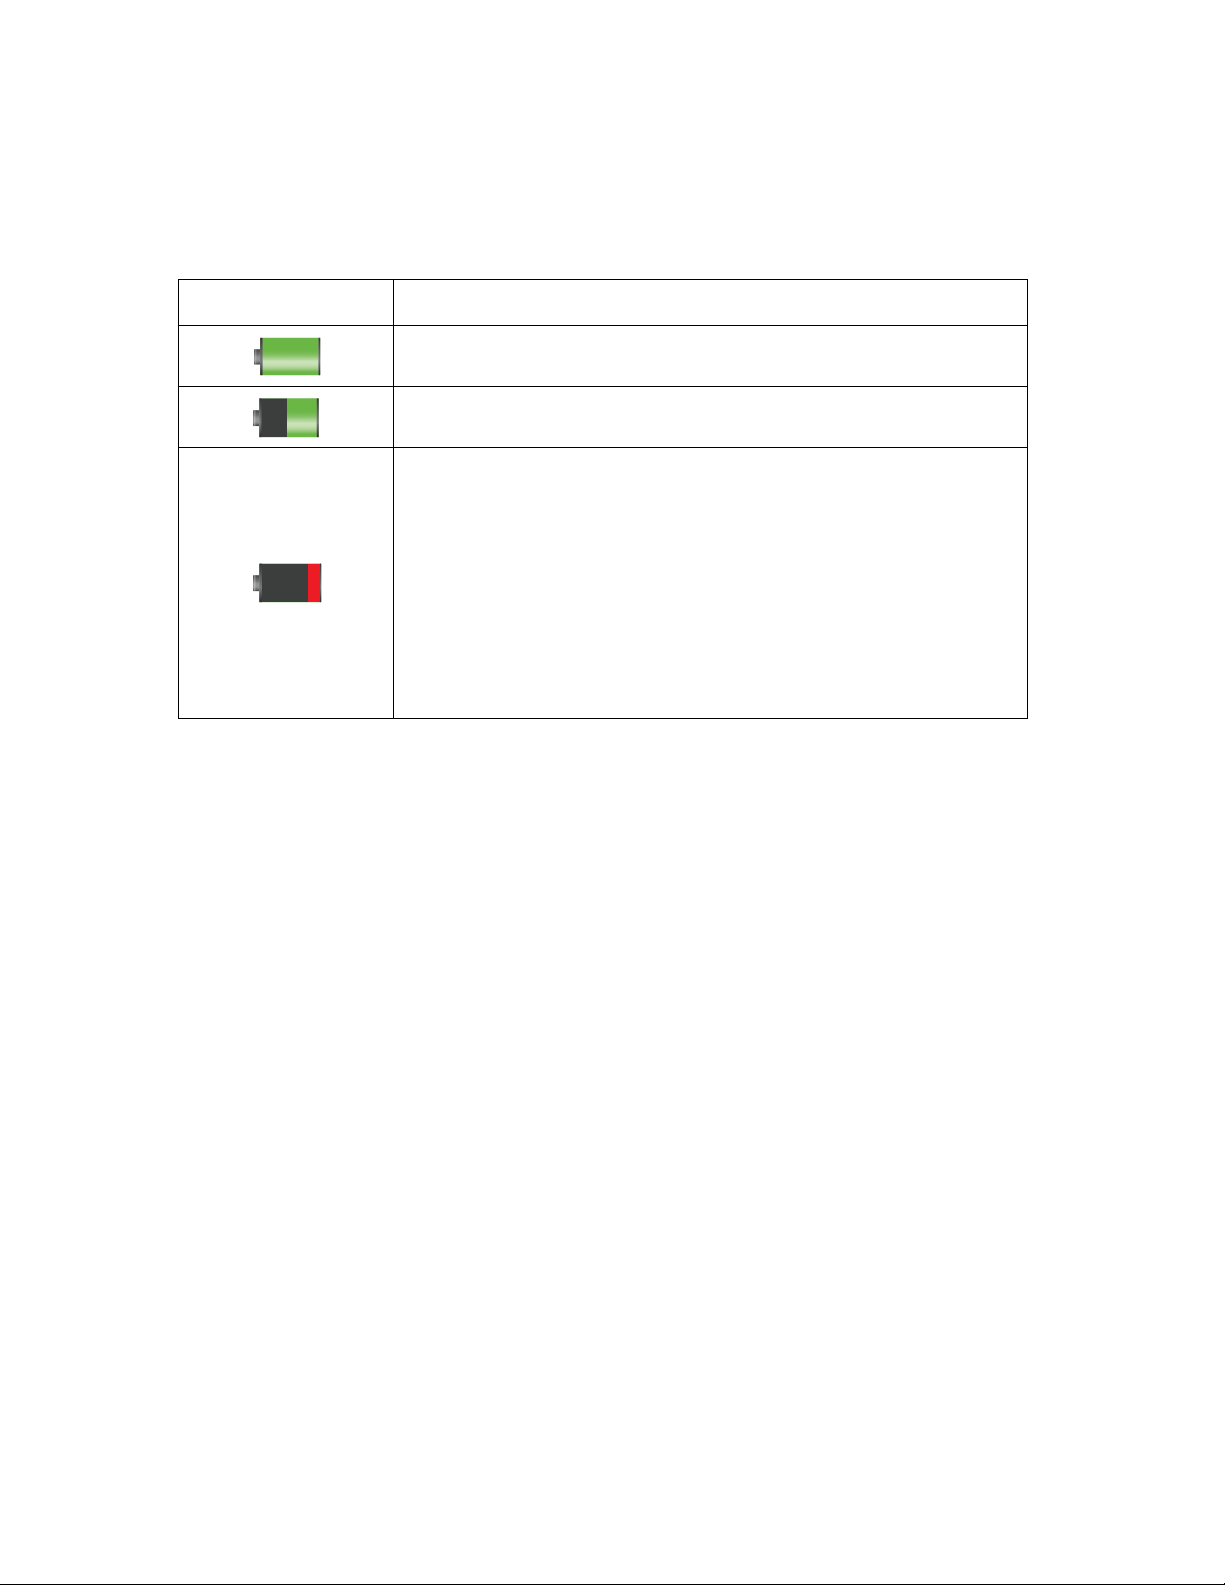
BATTERY INDICATOR
Battery Indicator
Description
The battery level is full.
The battery level is half.
The battery level is low, indicating to prepare for
recharging the built-in lithium battery.
Once ‘Low Battery’ appears on the LCD, this indicates
that the battery level is completely exhausted and the
camcorder automatically turns off after a few seconds.
Please fully recharge the battery.
The following icons appear on the camera and indicate the status of the camera’s battery power
level:
8
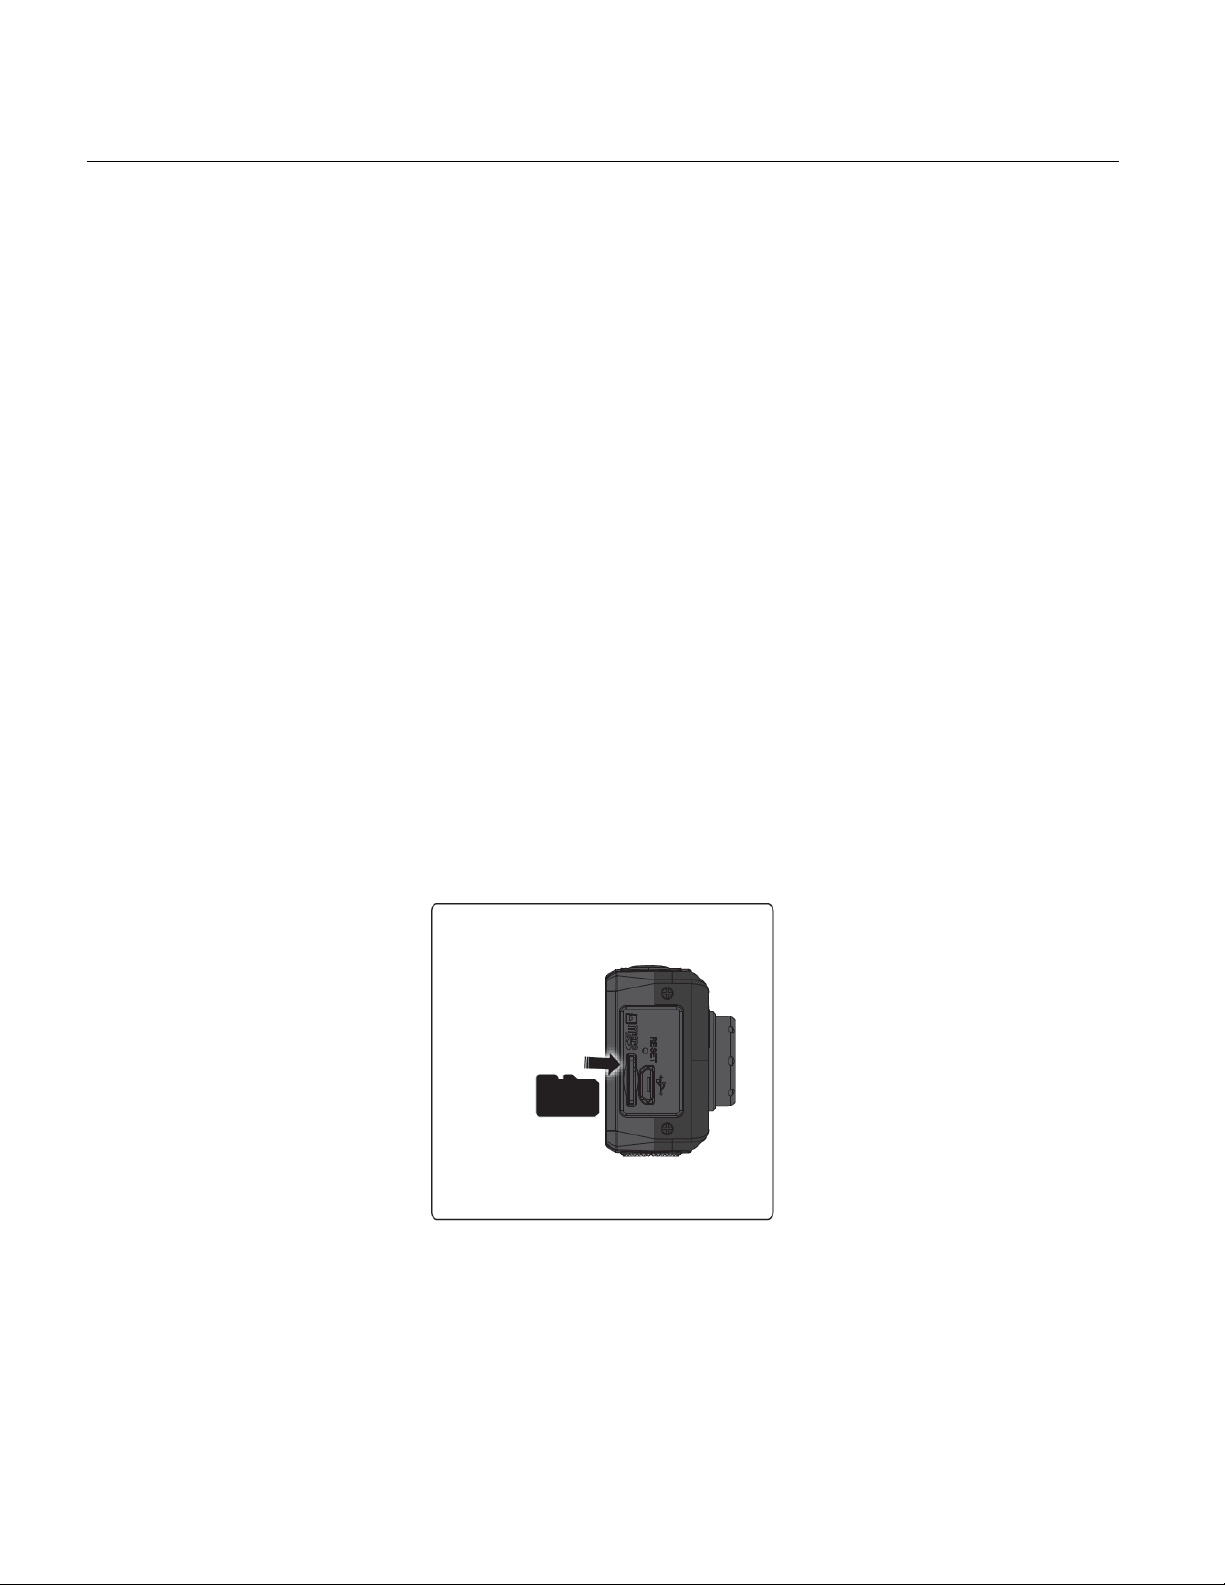
INSTALLING THE MICRO SD MEMORY CARD
Make sure a Micro SD Memory card Class 4 or higher (up to 32 GB) has been properly inserted
into your camcorder. Micro SD Memory card not included.
To properly insert the Micro SD Memory Card:
1. Power off the camcorder.
2. Insert the Micro SD Card into the Micro SD Card slot in the direction as shown on the
camcorder (see SD icon by the Micro SD card slot).
3. Gently press the Micro SD Card until you hear a slight clicking sound. This indicates the
memory card has been inserted correctly.
4. To remove the card, gently press on the edge of the card to release it and pull the card
out.
5. If the card is inserted or removed while the camcorder's power is on, it may damage the
card and/or any recorded data. Always confirm that the power is off before inserting the
card into the camcorder.
NOTE: Make sure there is room on the Micro SD Memory Card to capture images. If the
memory card is full, additional images cannot be captured and saved to the card.

9
TURNING ON AND USING THE CAMERA
/ Switching Modes
Press the POWER button, located on top of the camcorder, to turn on the camcorder.
NOTE: If the camcorder becomes unresponsive, insert a thin pin into the RESET
hole and gently push the pin until you hear a slight ‘click’ sound. The camcorder will
then reset.
10
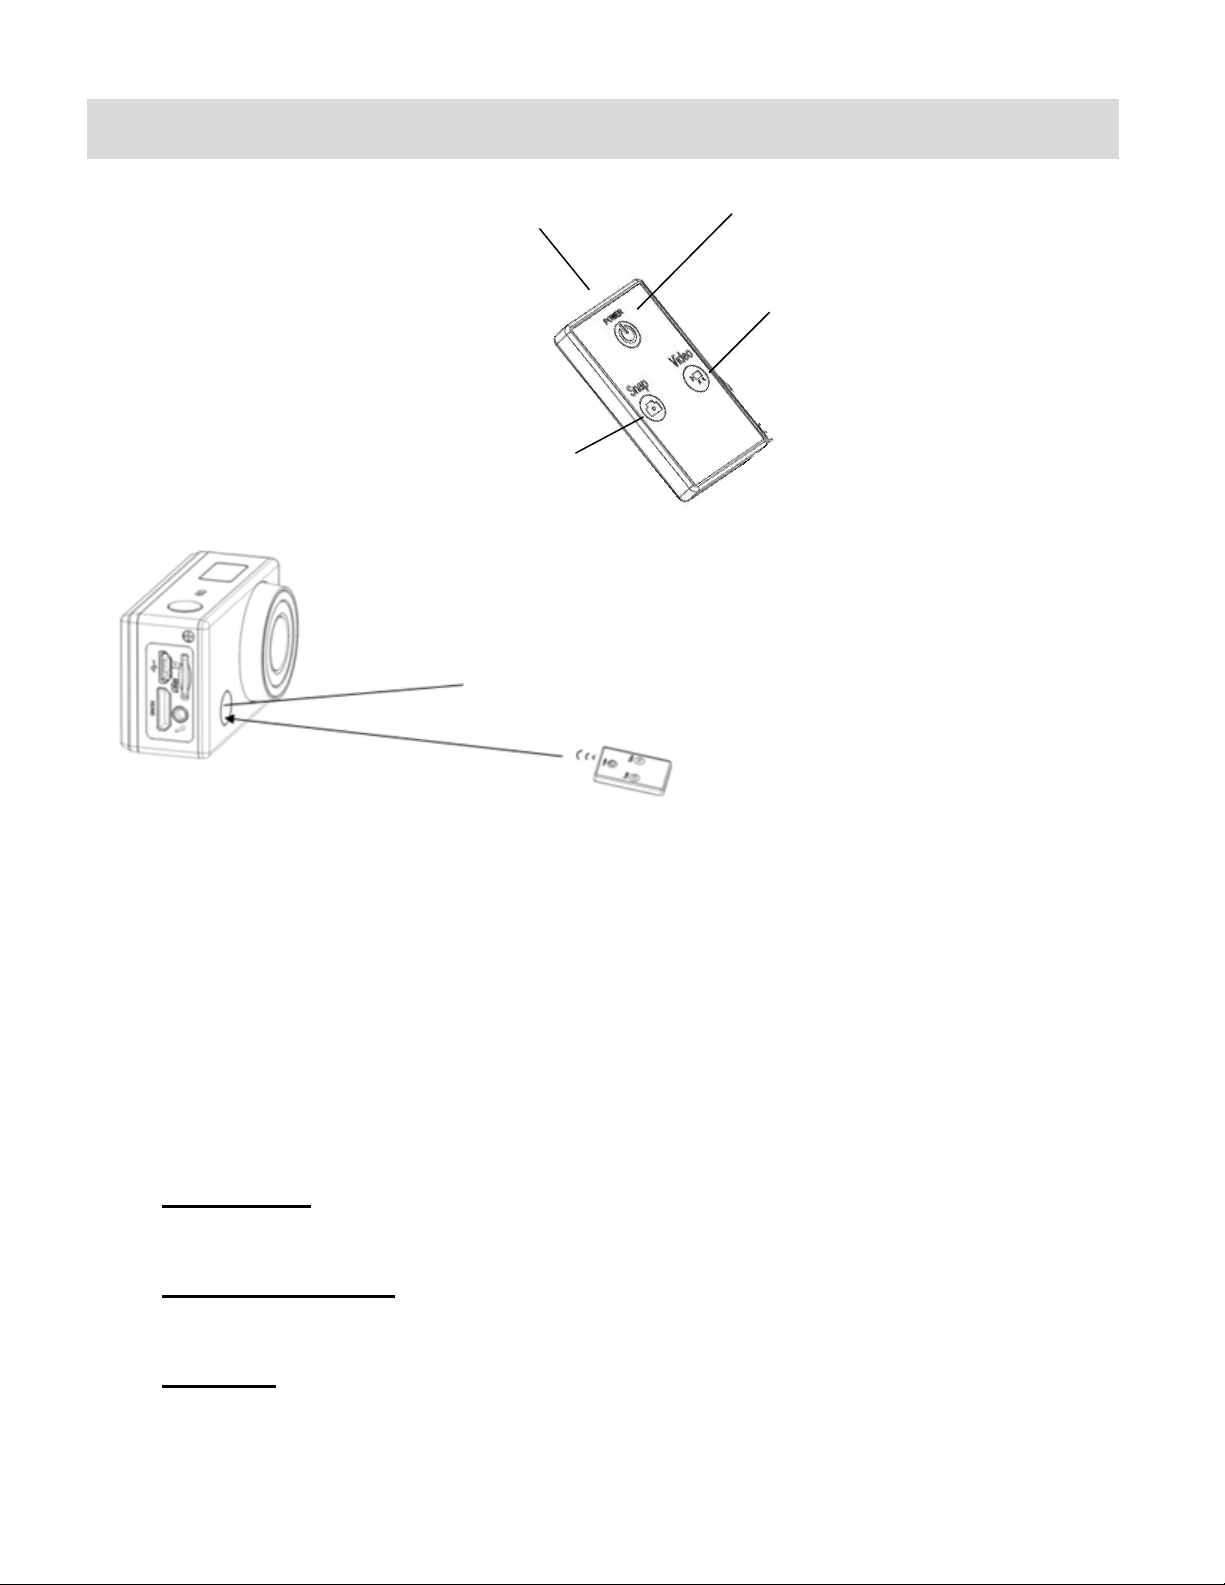
Remote Control
Signal emission port
Power off button
Video button
Photo button
Infrared signal reception light
You can use the remote control to record videos, take photos and shut down the Mini Action
Camcorder. When using the remote control, aim the signal emission to the port to the infrared
signal reception light of the camcorder, and then press the Video button, Photo (Snap) button or
POWER OFF button.
Remote Control Buttons:
- Video Button: Press the Video Button to start recording your video. Press the Video
Button again to stop recording the video.
- Photo (Snap) Button: Press the Photo (Snap) Button to automatically open the Photo
Capture Mode and take a Photo.
- Power Off: Press the Power Off Button to turn off your camcorder. To power on again,
press the Power button on the camcorder.

11
Main Camcorder Modes
VIDEO CAPTURE MODE
Use this mode to capture videos with your digital camcorder.
Slide the MODE Switch to the Video Capture icon to open the Video Capture Mode.
To take a video, aim your camcorder as desired and press the Shutter button to start
recording. A blinking, red record indicator appears on the LCD screen while the recording
is in progress. To stop the recording, press the Shutter button again. The video is
automatically saved to your camcorder’s memory card.
PHOTO CAPTURE MODE
Use this mode to capture pictures with your camcorder.
Slide the MODE Switch to the Photo Capture icon to open the Photo Capture Mode.
To take a picture, aim your camcorder as desired and press the Shutter button.
The picture is automatically saved to your camcorder’s memory card.
PLAYBACK MODE (PHOTOS & VIDEOS)
Use this mode to view and manage the photos and videos on your camcorder.
Slide the MODE Switch to the Playback icon to open the Playback mode for photos and
videos. You can scroll through the photos and videos that you’ve previously taken to view
or delete them as desired.

12
Camcorder Technical Specifications
Image Sensor
CMOS Sensor
Video Resolution
FHD (1920x1080P@30fps), HD720P (1280X720@60fps),
HD720P (1280X720@30fps)
Photo Resolution
12M (4000x3000), 8M (3264x2488),
5M (2592x1944), 1M (1280x960)
File Format
AVI/MOV (Video), JPEG (Photo)
External Memory
Micro SD Memory card, Class 4 or higher, up to 32GB
LCD Display
2.0”TFT
Zoom
4X Digital Zoom
Focus Range
2.8M
White Balance
Auto, Daily, Cloudy, Fluorescent H, Tungsten
Light Exposure (Photo)
+2, +1, Auto, -1, -2
Metering
Center, Multi, Spot
Auto Power Off
Off, 1 min., 3 min., 5 min.
Languages
English, French, Spanish, Italian, Portuguese, Polish,
Russian, Greek
Interface
Micro USB
System Requirements
MICROSOFT® Windows XP (SP3), Vista (SP1) or 7
MACINTOSH OSX v10.5.x and above
Battery
Built-in 700mAH Lithium Battery
13
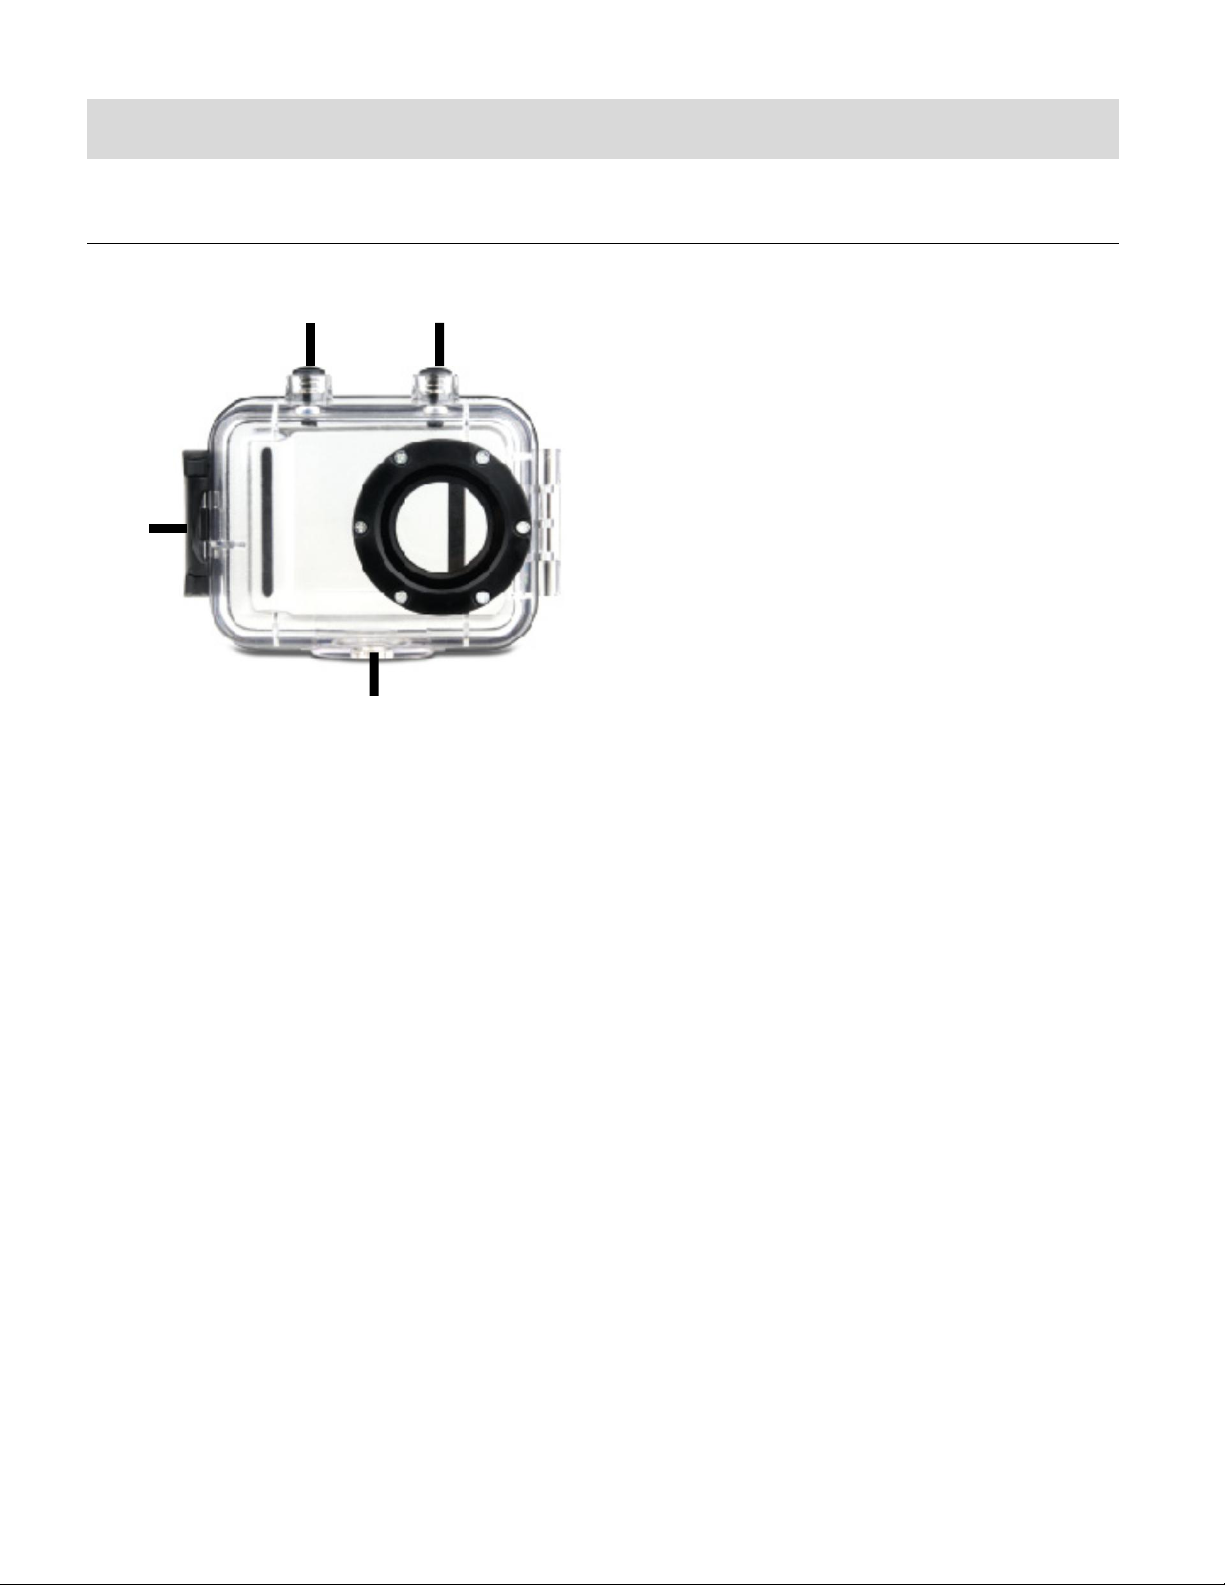
Camcorder Mounts and Accessories
1
2 3 4
WATERPROOF CASE
1. Clamp
2. Shutter Release
3. Power/Mode Button
4. Tripod Mount
Your action camcorder comes with a waterproof casing for underwater action and added
durability. To assemble your camera to the case, follow the instructions below:
1. To open the case: Insert a finger at the half circle of the latch by prying the latch up - away
from the case.
2. Insert the camera lens forward into the case.
3. Before sealing the waterproof case, make sure the camera housing’s rubber seal clean.
Close the door and secure the latch.
4. While the camcorder is in the waterproof casing, press the POWER/MODE button to select
Video Capture Mode, Photo Capture Mode or Playback Mode. Press the Shutter button
for recording your videos and capturing your photos.

14
NOTE:
A single hair or grain of sand can cause a leak. You can test by closing the case without
inserting the camera. Submerse the case completely in water for about a minute. Remove
the case from the water, dry off its exterior with a towel, and then open the case. If the
entire interior is dry, the case is safe for use under water.
Before opening the waterproof casing and putting the device in, carefully check whether
the waterproof ring of the casing is flat and smooth.
After placing the device into the waterproof casing and closing the cover, carefully check
whether the waterproof ring is deformed due to pressure.
After every use in salt water you will need to rinse the outside of the housing with non-salt
water and dry. Not doing this can eventually cause corrosion of the hinge pin and salt
buildup in the seal, which can cause failure.
To clean the seal, rinse in fresh water and shake dry (drying with a cloth may cause lint to
compromise the seal). Re-install the seal into the grooves of the housing.
15
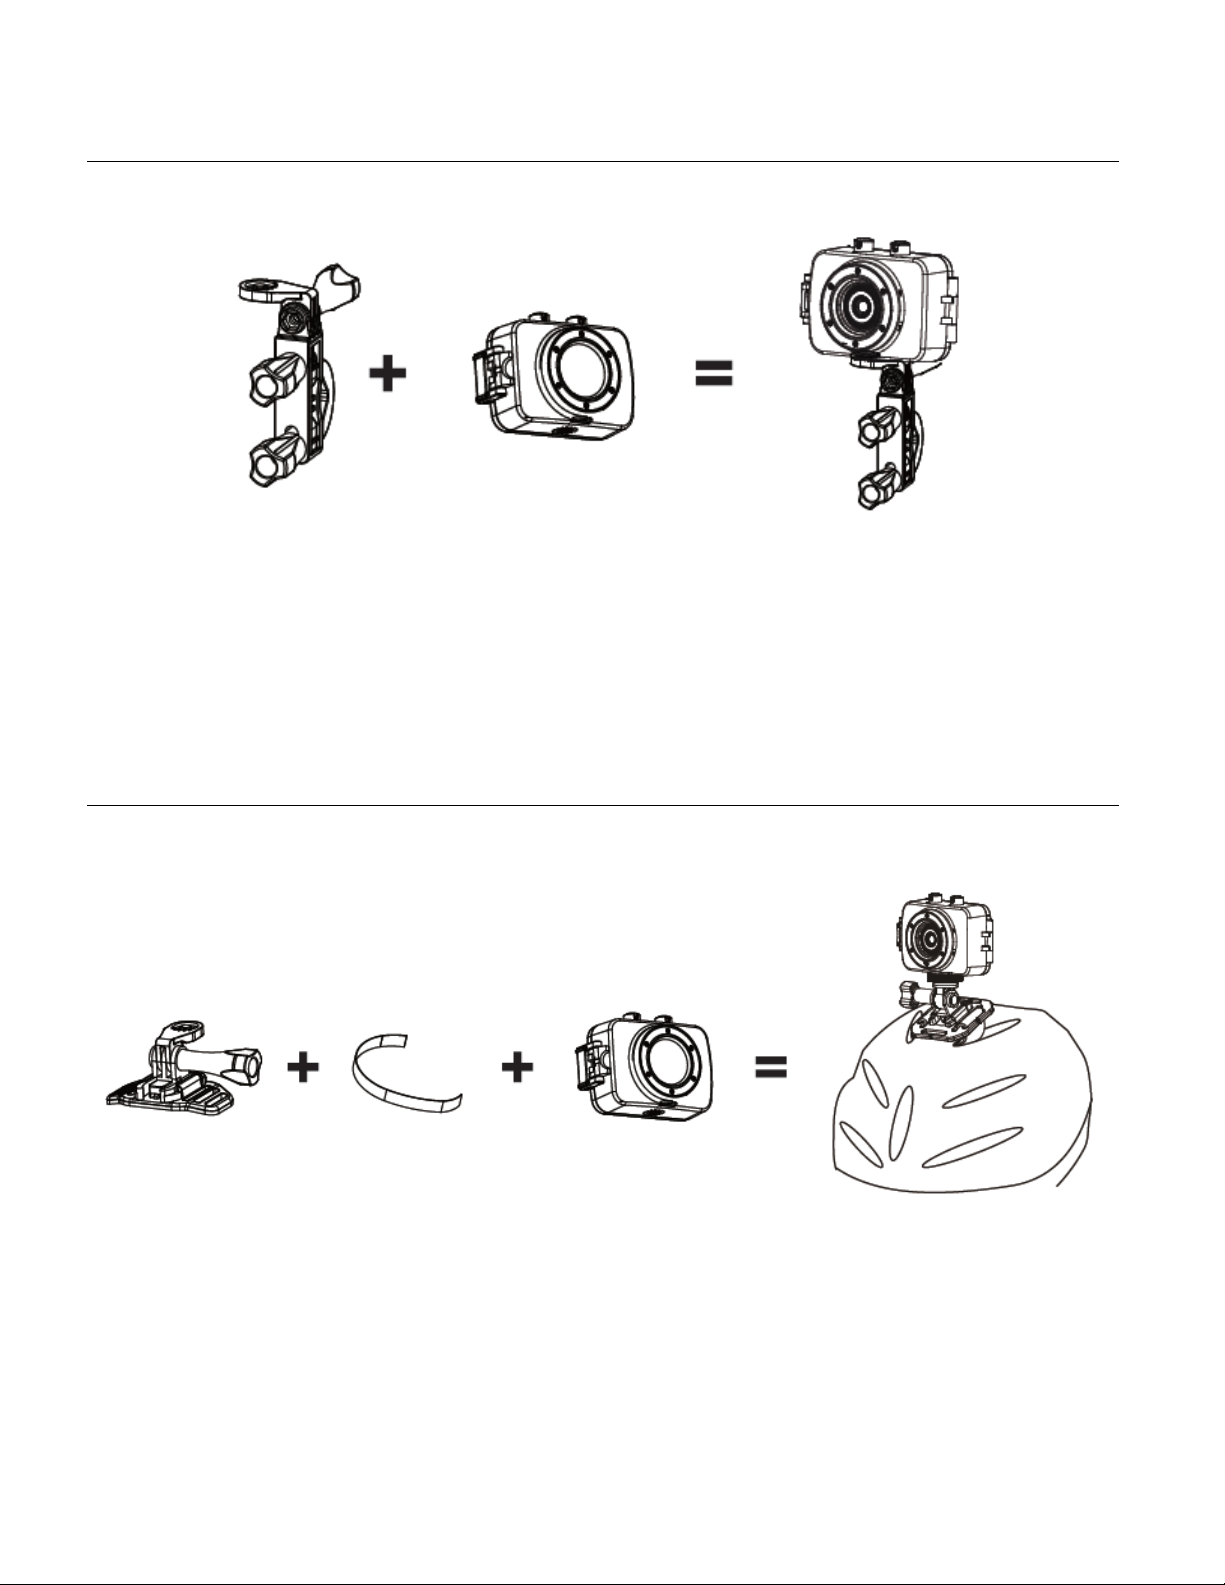
INSTALLING THE BICYCLE MOUNT: HANDLEBAR CLAMP
INSTALLING THE HELMET MOUNTING SYSTEM

16
Powering On Your Camcorder
TURNING POWER ON AND OFF
1. Press and hold the POWER button for about 3 seconds to turn on the camcorder.
The LCD screen briefly displays the ‘Vivitar’ screen and opens the default Video Capture
Mode. A beep can be heard from the camcorder’s buzzer.
2. Press and hold the POWER button again for about 3 seconds to turn the power off.
The LCD screen briefly displays ‘Goodbye’ screen and then powers off. A beep can
also be heard from the buzzer as the camcorder is being powered off.
AUTO POWER OFF – POWER SAVING FEATURE:
Your digital camcorder includes an Auto Power Off power feature that automatically turns off your
camcorder after a specified time that your camcorder is left idle. The specified time can be set
using the ‘Power Save’ menu option. Once the camcorder is automatically powered off, you can
long press the POWER button to power on the camcorder.
 Loading...