


DVR 410
Digital Video Camera
User’s Manual
© 2009 Sakar International, Inc. All rights reserved.
Windows and the Windows logo are registered trademarks of Microsoft Corporation. All other trademarks are the property of their respective companies.
Table of Contents |
|
Introduction ............................................................................................................................................ |
2 |
Key Features.......................................................................................................................................... |
2 |
Camera Maintenance and Care.............................................................................................................. |
3 |
What your Camera Includes ................................................................................................................... |
3 |
Computer System Requirement for Windows XP ................................................................................... |
4 |
Computer System Requirement for Windows Vista ................................................................................ |
4 |
Computer System Requirements for Macintosh...................................................................................... |
5 |
A Quick Look at Your Digital Video Camera ............................................................................................ |
5 |
Prepare Your Digital Video Camera for Use............................................................................................ |
7 |
Insert SD/MMC Memory Card ................................................................................................................ |
8 |
Starting Your Digital Video Camera......................................................................................................... |
9 |
Video Mode .......................................................................................................................................... |
11 |
Camera Mode ...................................................................................................................................... |
14 |
Playback Mode..................................................................................................................................... |
18 |
TV out function ..................................................................................................................................... |
20 |
Install the Vivitar Experience Image Manager Software ........................................................................ |
22 |
Connect your Camera to the Computer ................................................................................................ |
23 |
Get photos and videos from your camera to your computer.................................................................. |
23 |
Get started! .......................................................................................................................................... |
25 |
Transfer media from my camera to my computer manually (Using Windows) ....................................... |
26 |
Transfer media from my camera to my computer manually (Using Macintosh) ..................................... |
26 |
Sakar Warranty Card............................................................................................................................ |
27 |
Technical Support................................................................................................................................. |
28 |
Technical Specifications ....................................................................................................................... |
29 |
Troubleshooting.................................................................................................................................... |
30 |
1

Introduction
Thank you for purchasing the DVR 410 Digital Video Camera. With this camera you can shoot quality Videos (AVI) and Photos (JPG).
This camera requires an SD card (up to 16GB) for normal use. You will not be able to capture videos and photos without the SD card inserted.
Please read this manual carefully before using.
Key Features
Digital Video resolution - 640x480pixels (VGA), 320x240pixels (QVGA).
Digital Photo resolution - 1280 x 1024 pixels (1.3M), 640x480pixels (VGA)
1.8‟‟ LCD screen
4 X Digital Zoom
Built-in microphone and speaker
NTSC TV out function
SD memory card up to 16GB is needed in order to capture videos and photos
Vivitar Experience Image Manager software for uploading and managing photos and videos to or from the most popular photo sharing and social network websites
2

Camera Maintenance and Care
Do not wrap the camera in cloth or other materials when operating the camera. Doing so will raise the internal temperature and cause overheating hazards.
Do not attempt to disassemble or alter any part of the equipment not expressly described in this manual.
Avoid using and storing your camera in extremely hot and cold places, as well as humid and dusty environments.
Protect the equipment from strong shocks and impacts.
Be careful to prevent metal objects or others from contact with any plug/slot of the device.
Do not try to use the camera during driving.
When not using the camera for extended periods of time, remove the batteries from the camera.
What your Camera Includes
Digital Video Camera
TV cable
Strap
Built-in USB connector
Vivitar Experience Image Manager software Installation CD
User`s Manual
3

Computer System Requirement for Windows XP
To be able to download photos and videos to your PC, you will need the following minimum configuration:
Pentium 4 processor or above with Windows XP service pack 2
512 MB RAM, with 100MB of free disk space
1024 x 768 Recommended screen resolution
16-bit color or higher display adaptor
CD-ROM Drive
QuickTime 6 or higher
Microsoft Internet Explorer 7 or higher
Windows Media Player 10 or higher
Internet connection
Computer System Requirement for Windows Vista
To be able to download photos and videos to your PC you will need the following minimum configuration:
Windows Vista
800MHz processor and 512 MB of system memory
20GB hard drive with at least 15GB of available space
Support for Super VGA graphics
Available USB Interface
CD-ROM drive
QuickTime 6 or higher
Microsoft Internet Explorer 7 or higher
Internet connection
4

Computer System Requirements for Macintosh
Macintosh with Intel processor running Mac OS X v10.4.6 or later
256 MB RAM, 100 MB free disk space
Display: 1024 x 768 or higher-resolution monitor
QuickTime 6 or higher
Internet connection
A Quick Look at Your Digital Video Camera
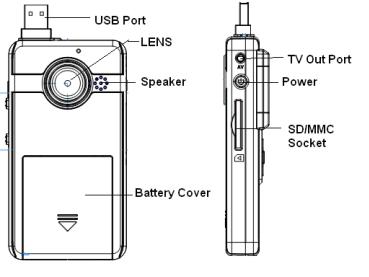
6
Prepare Your Digital Video Camera for Use
Battery Installation
Your Digital Video Camera requires 3 AAA batteries (alkaline batteries are recommended).
Insert the batteries into your Digital Video Camera as directed below:
1.Slide the battery cover on the front of the camera in a downward direction to open the cover.
2.Insert the batteries with the correct polarity (positive pole/negative pole) as appears in the battery compartment.
3.Replace and slide the battery cover up to
Note:
1.Do not mix old and new batteries.
2.Do not mix alkaline, standard (carbon-zinc), or rechargeable (nickel-cadmium metal hydride) batteries.
3.If the camera locks or freezes and does not respond to any button, remove and reinstall the batteries.
7
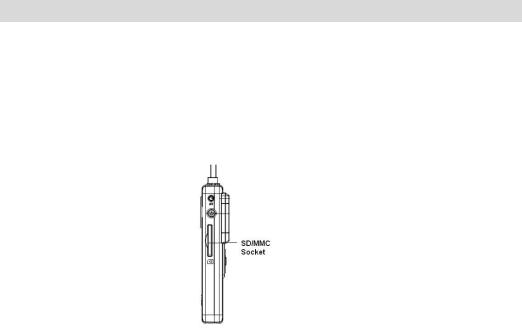
Insert SD/MMC Memory Card
Important: A compatible SD/MMC memory card up to 16GB needs to be inserted into the SD card slot on the side of the camera in order to capture videos and photos. After you insert the memory card, all the videos and photos you shoot will automatically be stored on the memory card.
(SD cards are not included and need to be purchased separately).
Note: Power off the camera before inserting or removing the memory card.
Please follow these steps to insert the memory card:
1.Locate the memory card slot on the side of your Digital Video Camera.
2.Insert the memory card correctly as directed on the side of the camera at the opening of the slot.
3.Press the memory card until you hear a “Click” sound. The memory card when properly inserted will be flush with the surface of your camera.
Note: After you insert the memory card, the card icon will appear on the LCD, indicating that your memory card has been installed successfully, and the videos and photos you shoot will be stored on the card.
8

Starting Your Digital Video Camera
Power on
Press the Power button on the side of the camera to power on the camera.
The LCD will light up and the Video mode will appear by default indicating that you camera is ready to use to capture videos.
If you have not inserted a compatible SD memory card, a “NO CARD” message will appear in the center of the
LCD screen. Please insert an SD card in order to continue using the camera.
Power off
Press the Power button to power off your camera.
Auto Power off
Your camera will automatically power off if idle for 60 seconds or if there is insufficient battery power.
Change Camera Mode
Press the Mode button to change between the 3 camera options - Video, Camera and Playback. The icon of the selected mode will appear on the LCD.
9
 Loading...